The first question is ‘why would you want to make nipples out of titanium?’ I guess the answer ‘ because its there’ isn’t really adequate! I like it for several reasons – T5 is very tough and doesn’t deform when hammered by the cock, it is completely corrosion resistant as isn’t marked by the cap composition or black powder residues and it doesn’t get ‘gas cut’ by escaping gas past the thread – plus it looks distinctive and I find it as easy or easier to use than a steel of adequate carbon content. I’ve made lots for myself – almost all my shooting guns have titanium nipples, and I’ve made a number for clients and friends and haven’t had any negative comments.. As with steel nipples, I always wrap the thread with PTFE pipe tape before inserting the nipple.
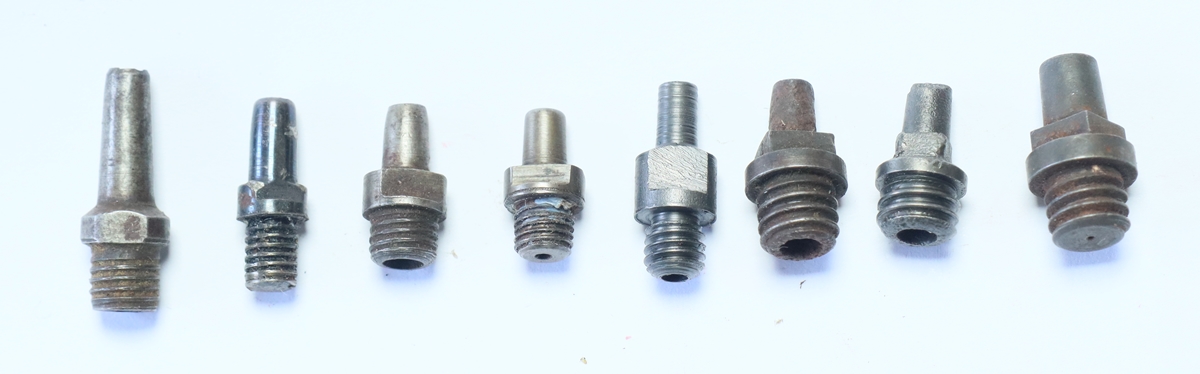
The one on the left is made from silver steel – its a bit of a mess, the rest are titanium – much easier to make!
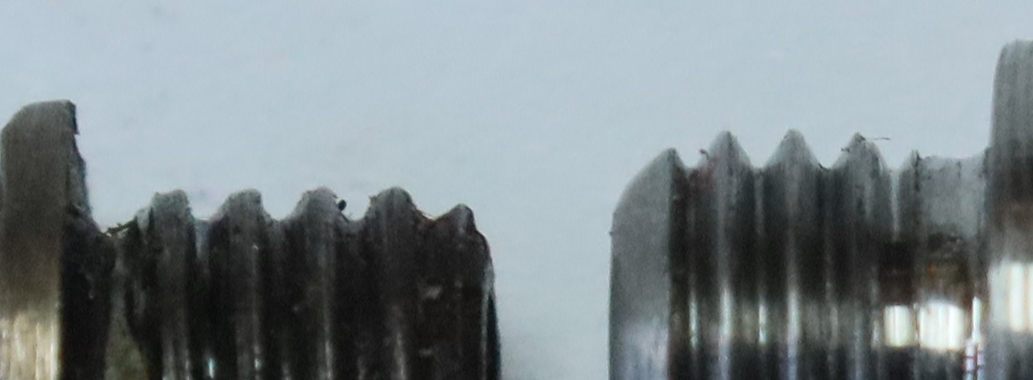
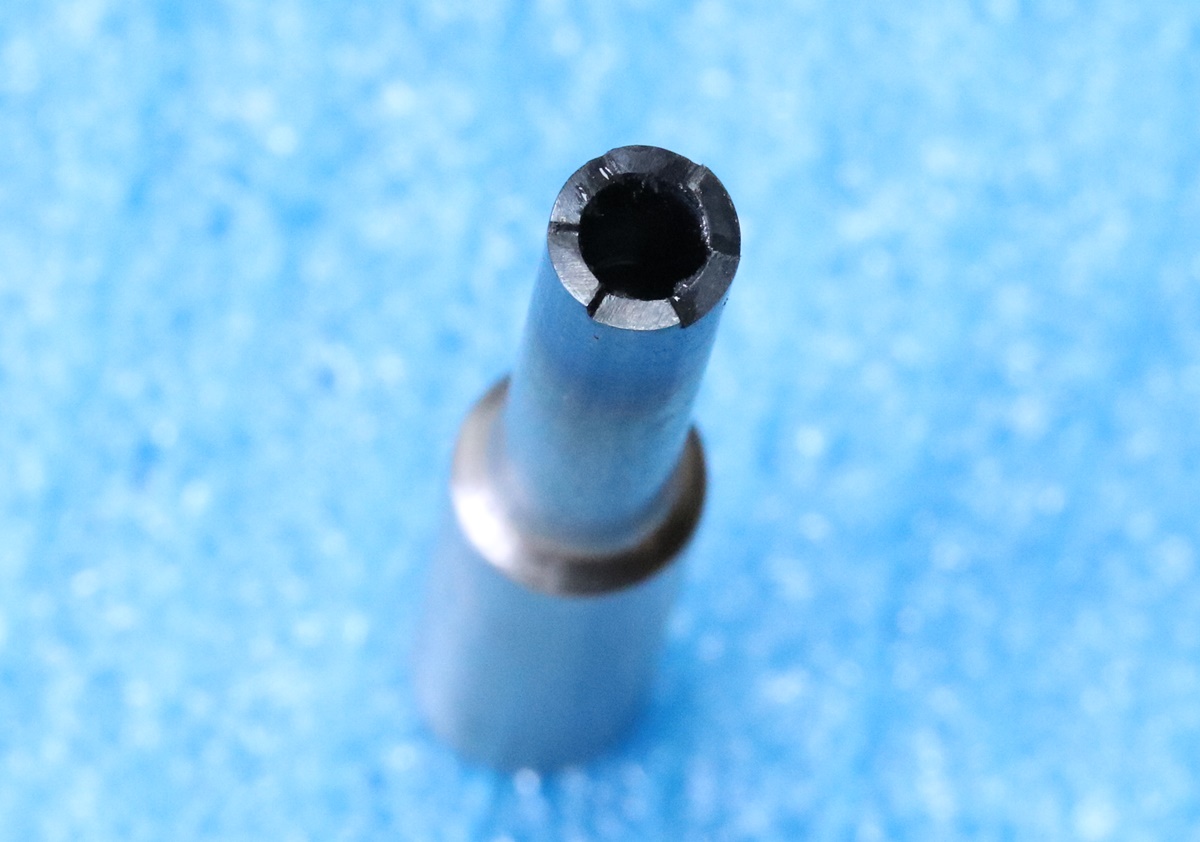
Most original gun threads are like the one on the left – the right hand one is a 1/4 x U.N.F. 28 t.p.i. thread in titanium.
All nipples are not born equal! Most don’t follow the current trend for small holes at the bottom – old caps were more powerful so it was probably less important.
WARNING:- I do NOT recommend that you make nipples for a gun that is going to be shot unless you are a competent engineer and understand the risk attached to a nipple blowing out – a detached nipple is effectively a bullet out of YOUR end of the gun! Always proof test any gun/nipple combination remotely.
Caution:- Titanium burns and can be ignited during fierce cutting – only special extinguishers will put it out. Swarf is usually continuous and sharp and very strong. Stop the lathe often to remove swarf (use a paper towel to avoid cuts if necessary) and put in a metal bin. If you start a titanium fire and don’t have a special extinguisher use sand.
Advice:- When cutting do not stop the feed with the tool in contact with the work – retract it before you stop the feed – or you will leave a mark and likely work harden the titanium. The same goes for drilling. If you use coolant, flood the work to carry away heat, otherwise I use oil to drill small holes – any smoke acts as a warning.
I was looking on the web at comments on turning and milling T5 titanium and I realised that in my ignorance I had got on much better than the comments would suggest! The only thing I knew before I started was that titanium swarf burns with intense heat and is difficult to extinguish – impossible with water. I know that because we had a fire in swarf on a lathe in a workshop I was responsible for many years ago. We called the Fire Brigade who unreeled their hoses until we told them titanium and water didn’t mix – in the end they took a bucket into the grounds and dug up some sand. Titanium T5 bar ( the titanium alloy of choice) can be found on ebay as reasonable prices for offcuts from production runs in 10 and 12 mm diameters. The problems with machining T5 titanium are several – its very elastic (Young’s Modulus low) so will deform out of the way of the tool, it work hardens dramatically so if the tool stops cutting and rubs it may not start cutting again easily, and the low thermal conductivity and heat capacity means that very little heat is carried away with the swarf but remains with the tool. I have made many nipples of T5 and I guess that I have learned how to do it by trial and error. I can turn it with cheap replaceable carbide tipped tools to get a slightly ribbed finish on the boss of the nipple, or with a sharp HSS tool to get a fine finish, but its difficult to take off very small cuts because the elasticity tends to deform the metal out of the way. I haven’t had too much difficulty drilling 1 and 2 mm holes up to 12 mm or so deep – if you stop the drill it does work harden but you can break through – it pays to use sharp/new drills – I found that Tracy tools sold Imperial 40 thou drills for £1 each whereas the equivalent metric 1 mm drills cost £3.00 – no contest so I got 5. I break less drills than when I try to make nipples out of silver steel. I am fairly careful to splash oil around when drilling and to clear swarf often – pull the drill out and don’t let it idle in the hole or it will work harden. You need a smooth control on the tailstock thread so you can feel progress when using the 1 mm drill – I can tell even on my big lathe how it is going, and feel the breakthrough of the 2 mm drill into the 1 mm hole.
The most difficult part is putting an external thread on the nipple – you need a sharp HSS die and you cannot have several goes at getting the diameter down – you have to know what gap to set in the die with the wedge screw and go for it – unless you need to remove a significant go in your second try you’ll just end up swaging/work hardening the thread. It is a pain to try cutting a thread with a blunt die – I used one for some time and couldn’t understand why it was as much effort to back off the die as to ‘cut’ it onto the work! It is a good idea to turn up a dummy and cut the thread, then part it off and try it in the breech before going through the whole process so you know how much to open the die. I have opened dies up so far they break in attempts to get a better fitting thread – I have also run a TIG welder up the outside of the die by a hole to weaken it so it opens easier. You will find that a standard die doesn’t cut up to the shoulder of the nipple so you can’t screw it in completely – you need to grind up a small tool (or use a parting tool) to undercut the thread at the top slightly. You can also grind out surplus taper on the face of the die to let it cut a bit nearer the shoulder, but you will almost certainly still have to undercut with a tool. Make sure that you get the thread length right by checking the depth of the hole in the breech and any nipple you removed from the gun – if you make the thread too long it will be the devil’s own job to shorten it once the nipple is finished, and if you make it too short you will be loosing security in the thread – try to get the bottom edge shaped to match the bottom of the hole if you can. Having got the initial turning and threading done the nipple is screwed into a bit of tapped bar in the chuck and the nipple end turned using the top slide set to a taper of a couple of degrees – using the top slide complicates the use of the Digital ReadOut so you have to remember not to touch the leadscrew wheel – I can’t lock the saddle on my lathe unfortunately. If you are making a slightly oversize nipple it’s a problem tapping the hole in your jig bar – you can sometimes do it by rotating the tap around the diameter at the same time as turning it. Getting the actual nipple to be a good fit in the cap is tricky because you can’t proceed in very small steps, and files are not that effective. The nominal nipple diameter at the top for a 1075 cap is, I think, 4.20 m.m. Having got the nipple blank turned I put in the flats with a file while its in the tapped bar in a vice because its too difficult to hold the nipple firmly enough for them to be milled – a file works (slowly!) although it doesn’t quite look as professional as it should. We, the Anglian Muzzle Loaders, reckon that the most reliable configuration for a nipple is with a 1 m.m. to 1.2 m.m. (40 to 50 thou) hole in the bottom extending 4 or 5 mm up the threaded part put in before bothering to cut the thread in case the drill breaks off in the blank, and a 2 to 2.2 m.m ( 80 or 90 thou) hole down from the top as you shape the actual nipple end. If you use the tailstock wheel to advance the drill you can feel when it breaks through into the 1 m.m. hole and can then put the 1 m.m drill through to clear out the hole. Most nipples in English percussion sporting guns and pistols correspond to 1/4 BSF thread with 26 threads per inch, although the diameter is often worn somewhat oversize. The thread profile used in guns is generally quite different from modern threadforms – it has a much lower angle, probably 45 to 50 degrees as opposed to 60 degrees for the BSF and a much more rounded top and bottom to the thread – this means that the thread depth as a fraction of the overall diameter is less, and may mean that modern male threads cut a bit small for the equivalent old hole.. Be aware that the 1/4 UNF is the only UNF thread that DOES NOT correspond in pitch to the equivalent BSF diameter – 1/4 UNF is 28 t.p.i. The Smiths patent nipples I am copying use an oversize 1/4 by 28 t.p.i (UNF) which is a first for me. If you have a breech with a very loose nipple you can recut the thread with a tap of a slightly bigger diameter but you really must keep to the same t.p.i. Fortunately 9/32 BSF has the same pitch as the 1/4 BSF (26 t.p.i) so can be used for recutting those threads and making new nipples. If tapping out the breech for a bigger thread you will almost certainly need to grind the end of a tap almost flat to cut down to the bottom of the hole – it may need two taps, a plug to start and a ground off plug to finish.
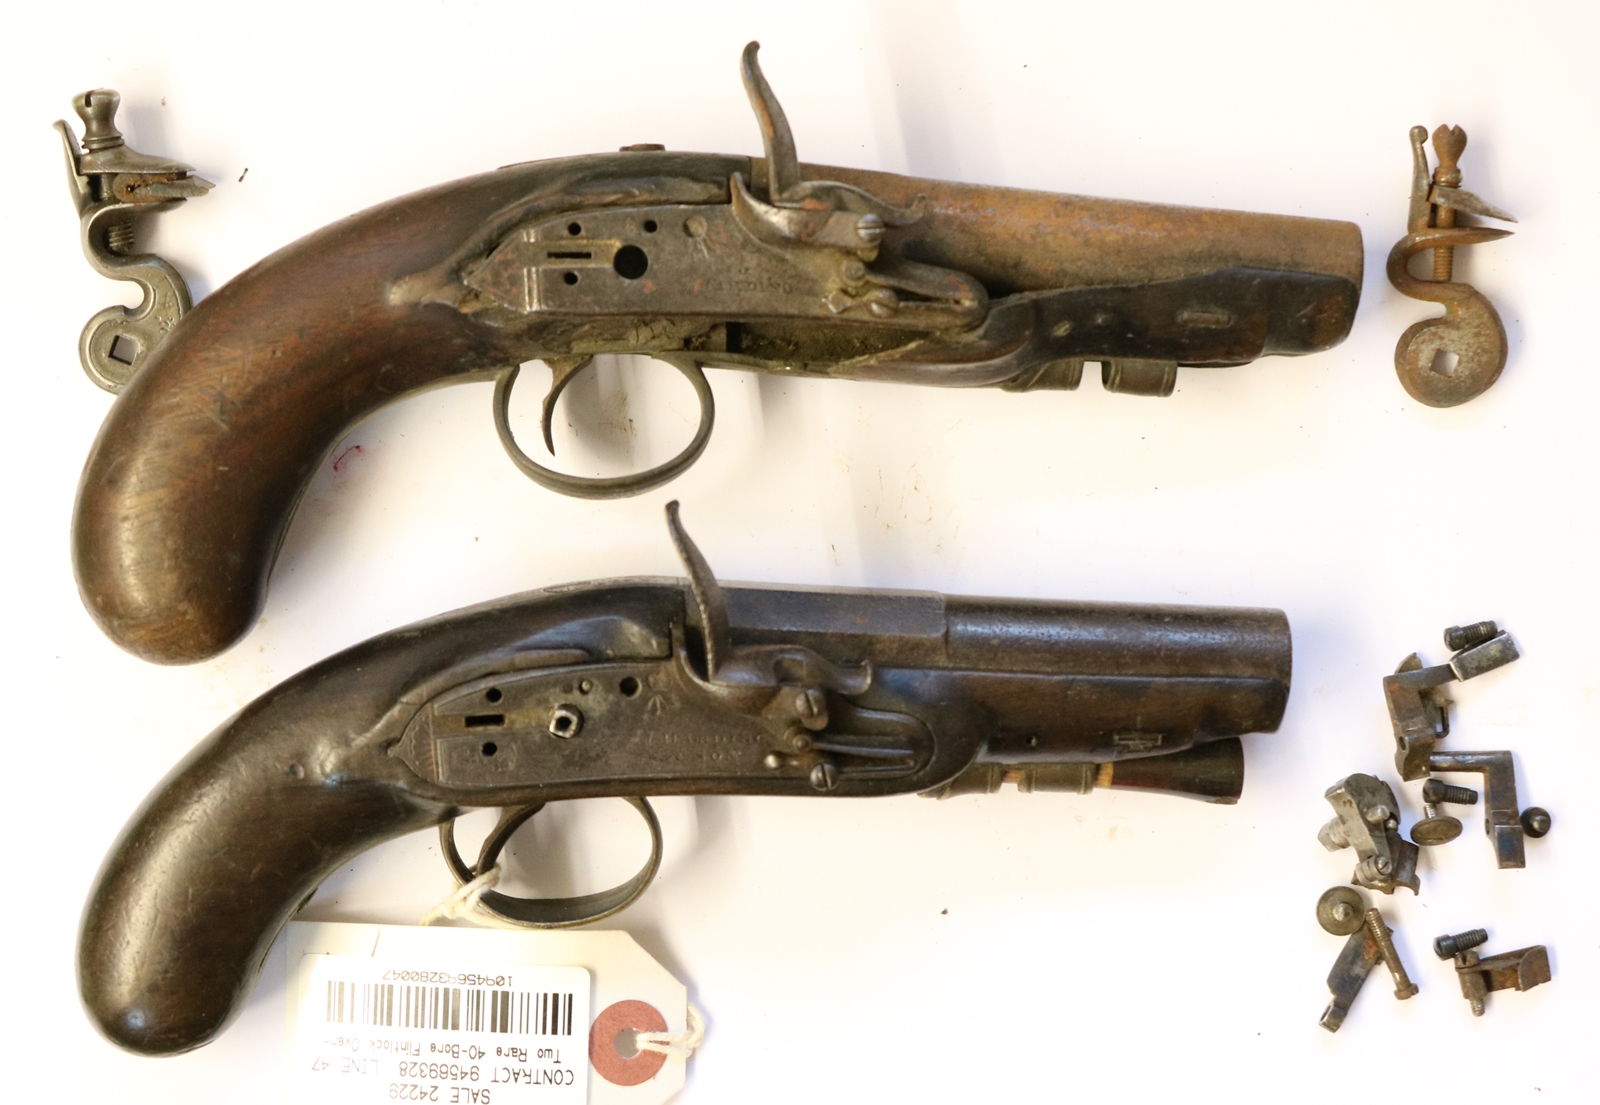
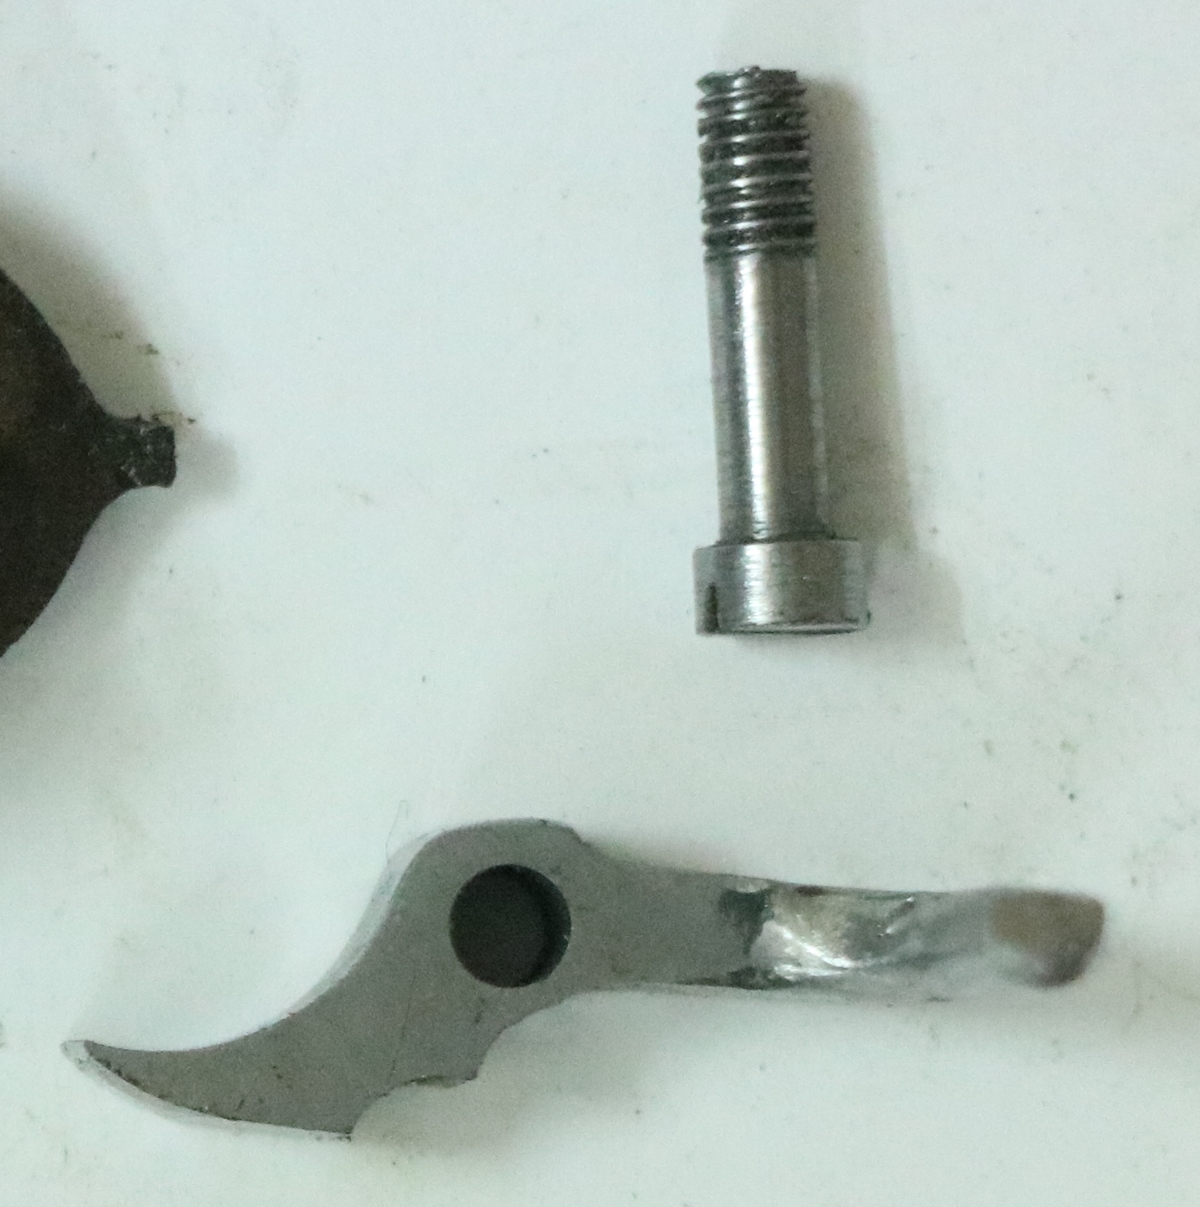
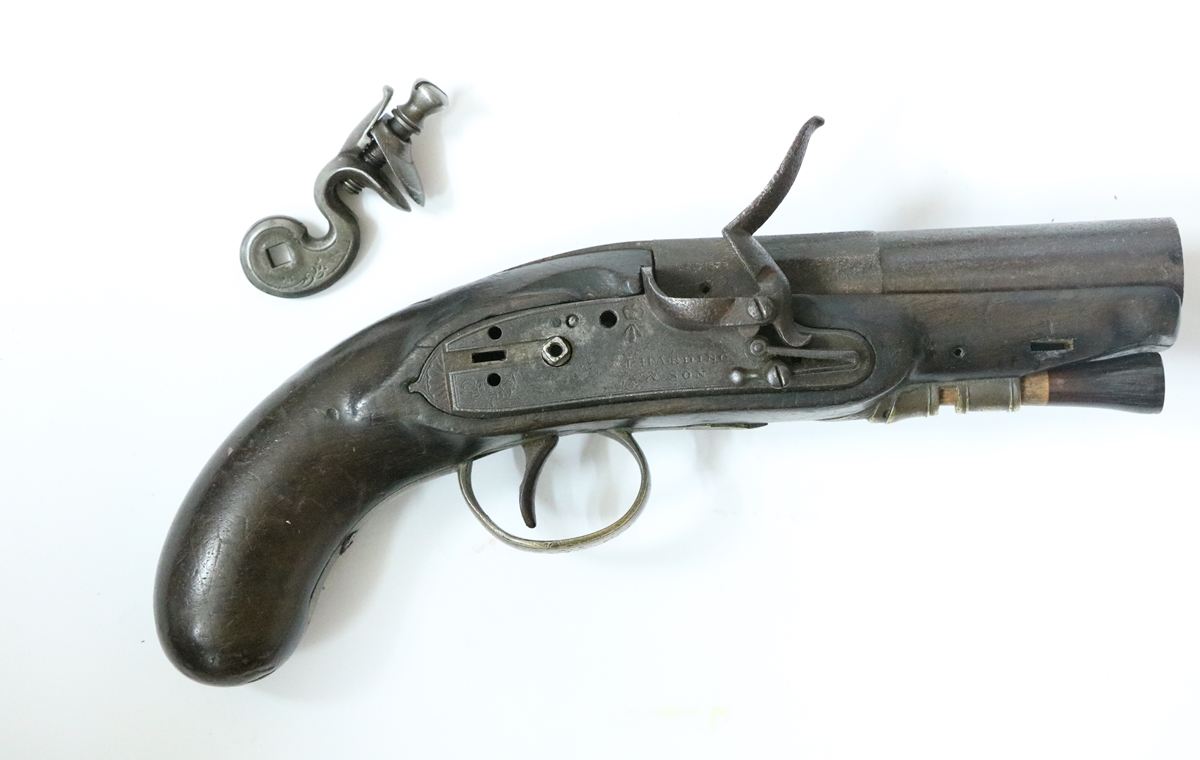
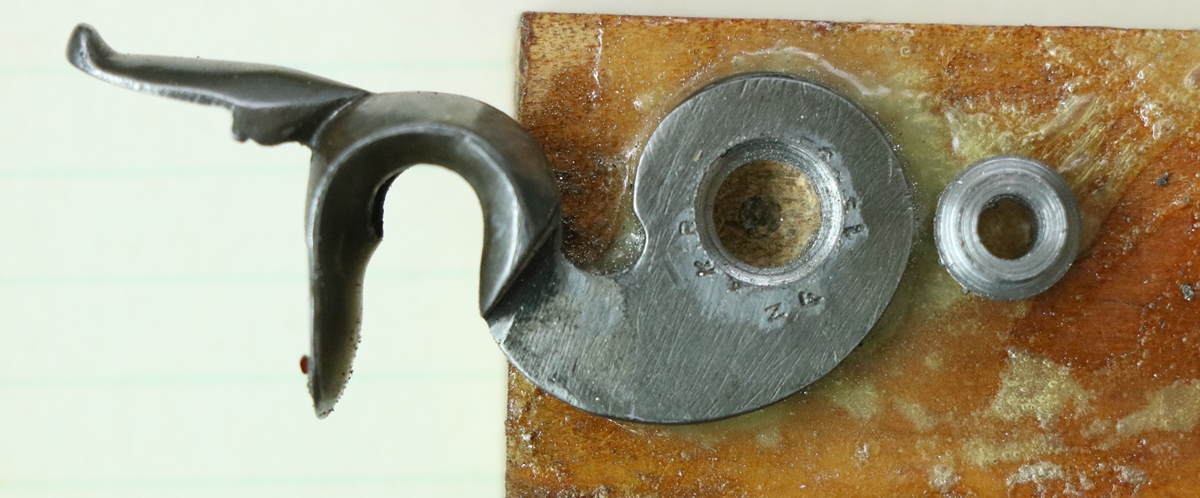
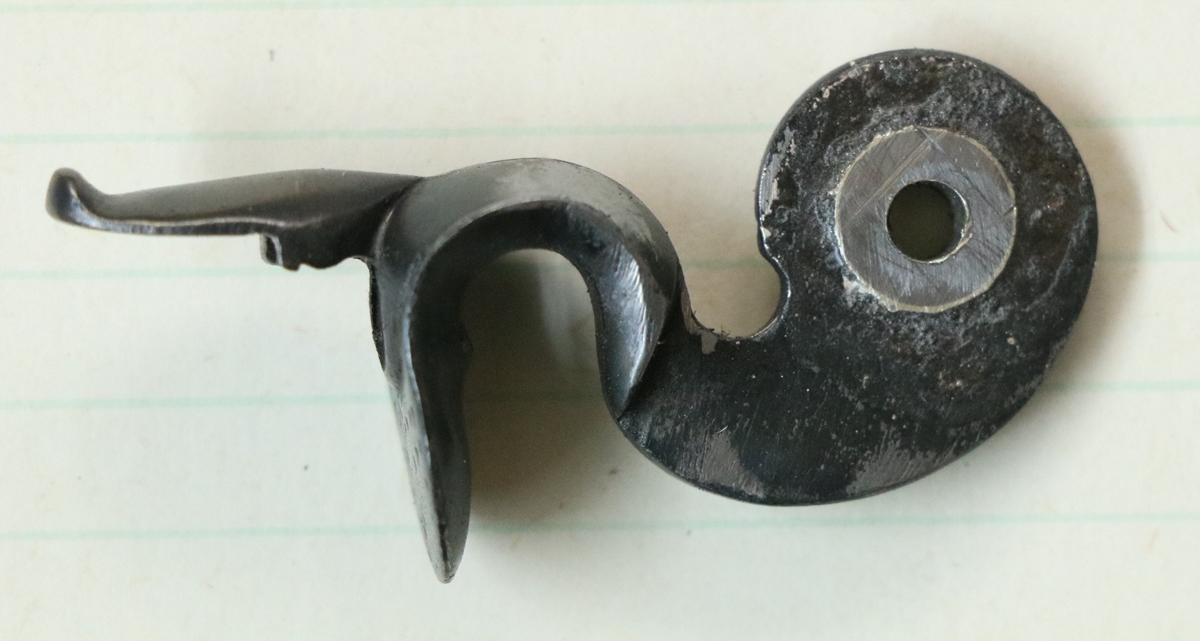
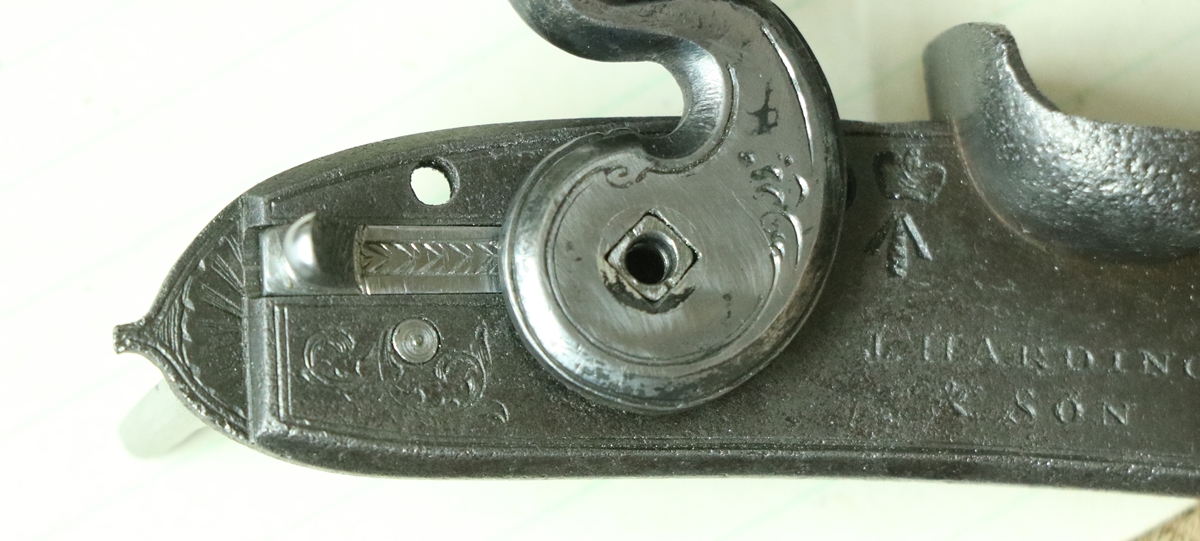
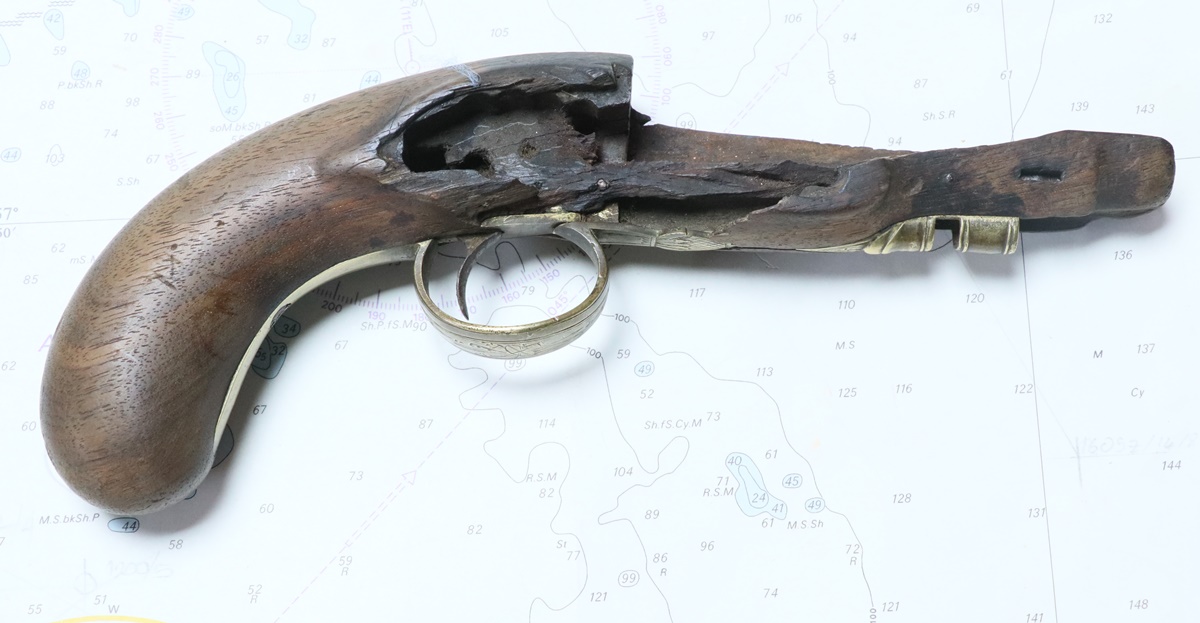
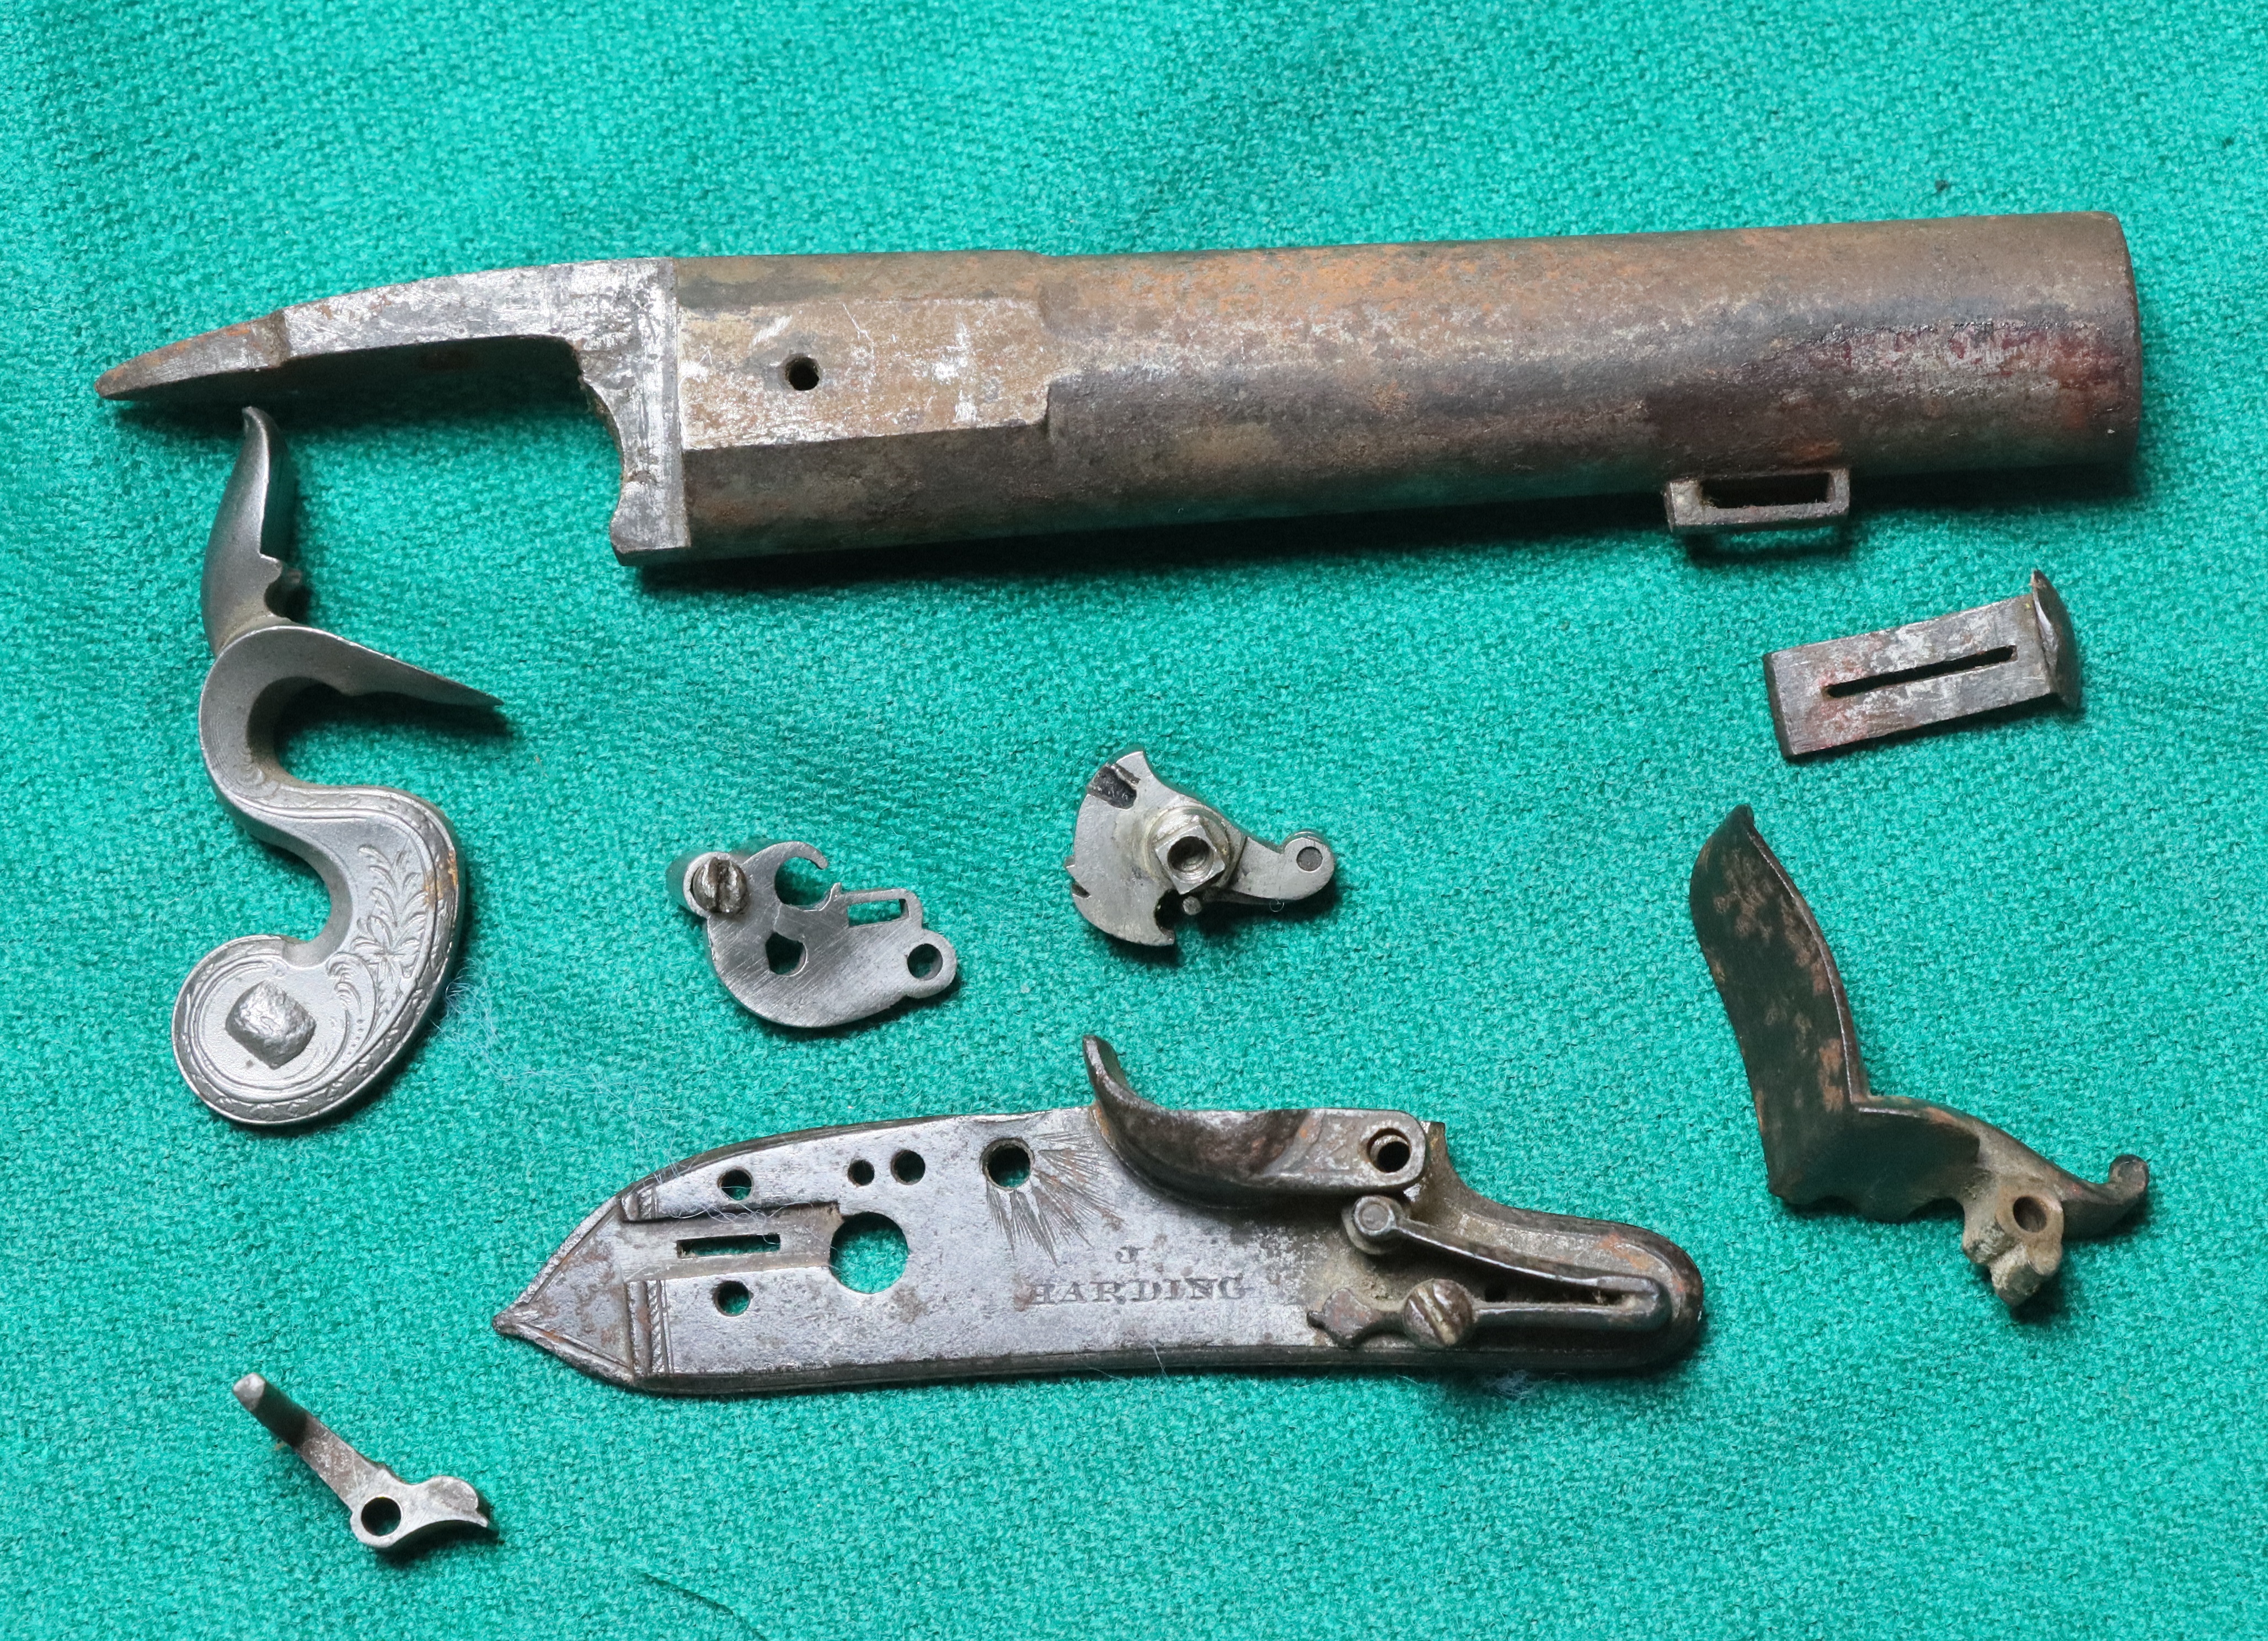
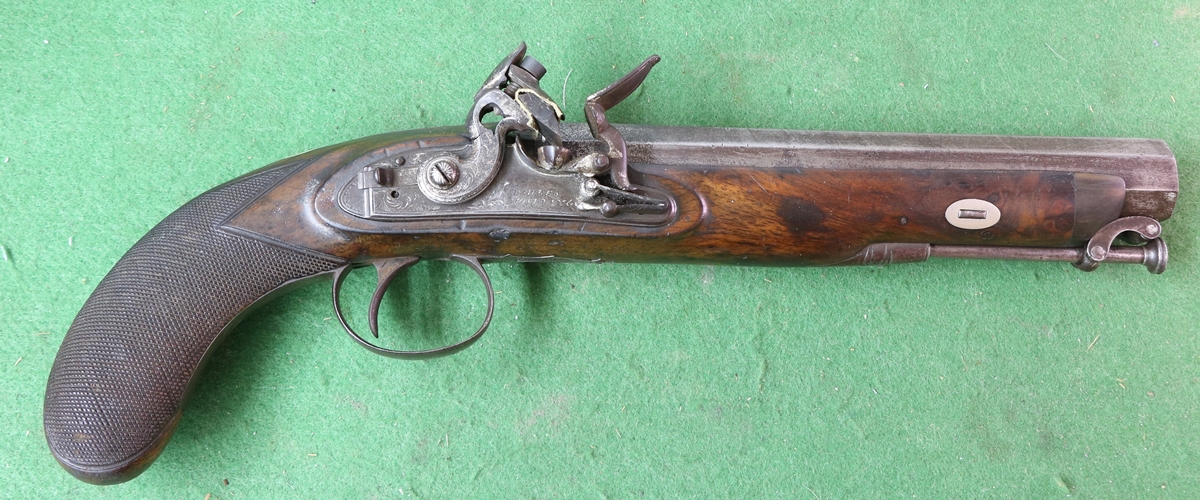
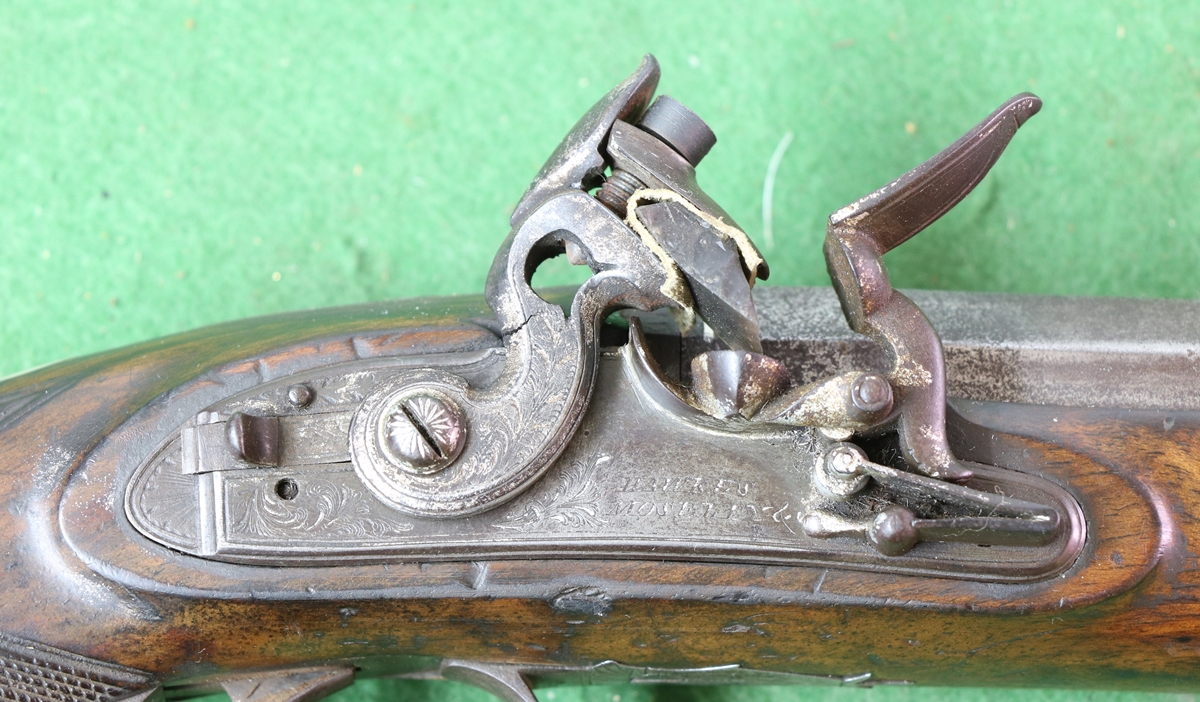
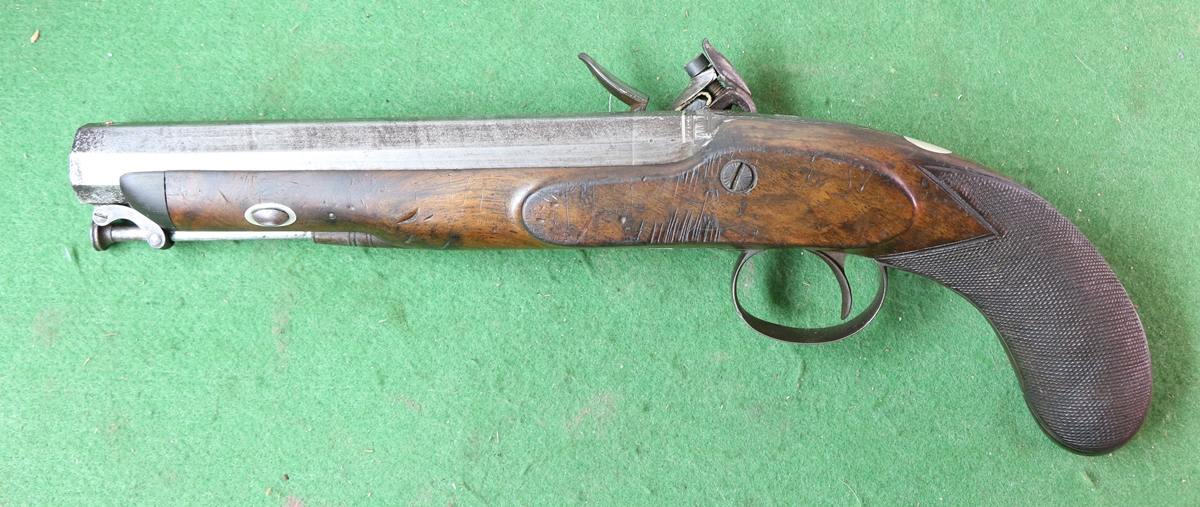
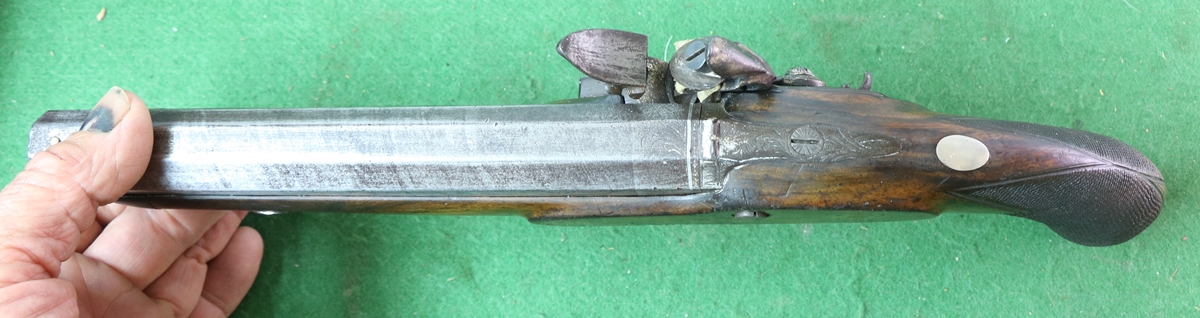
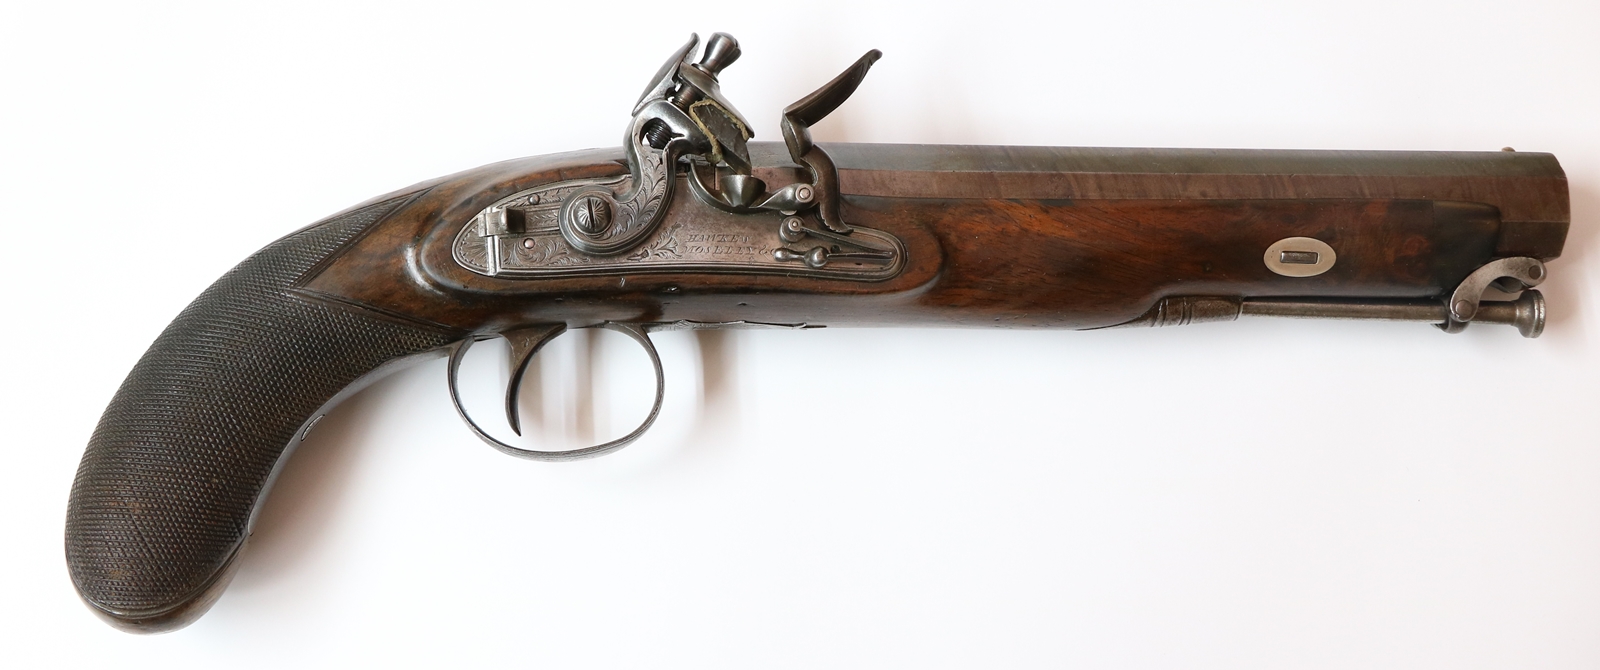
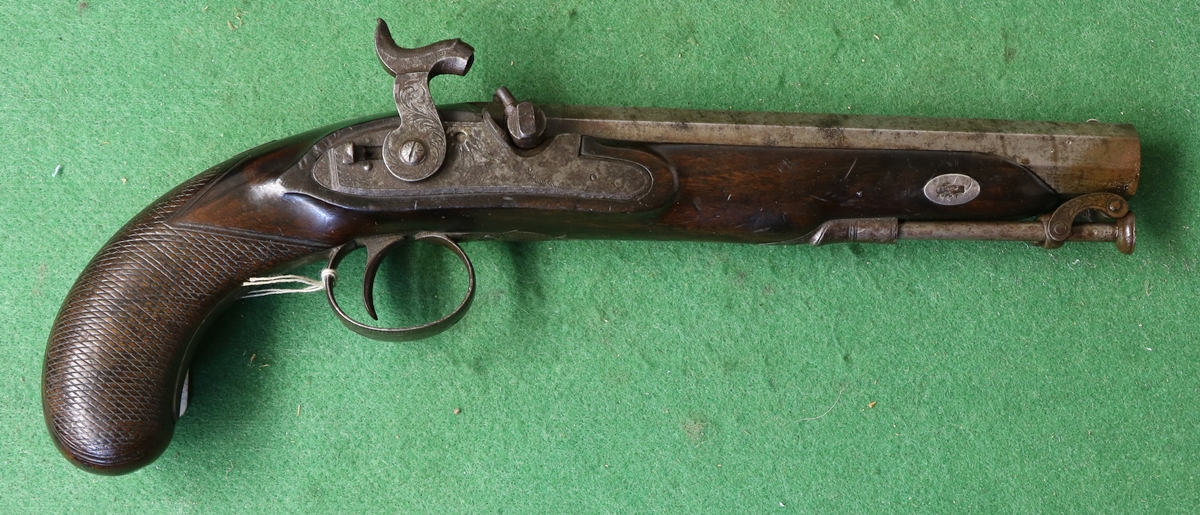
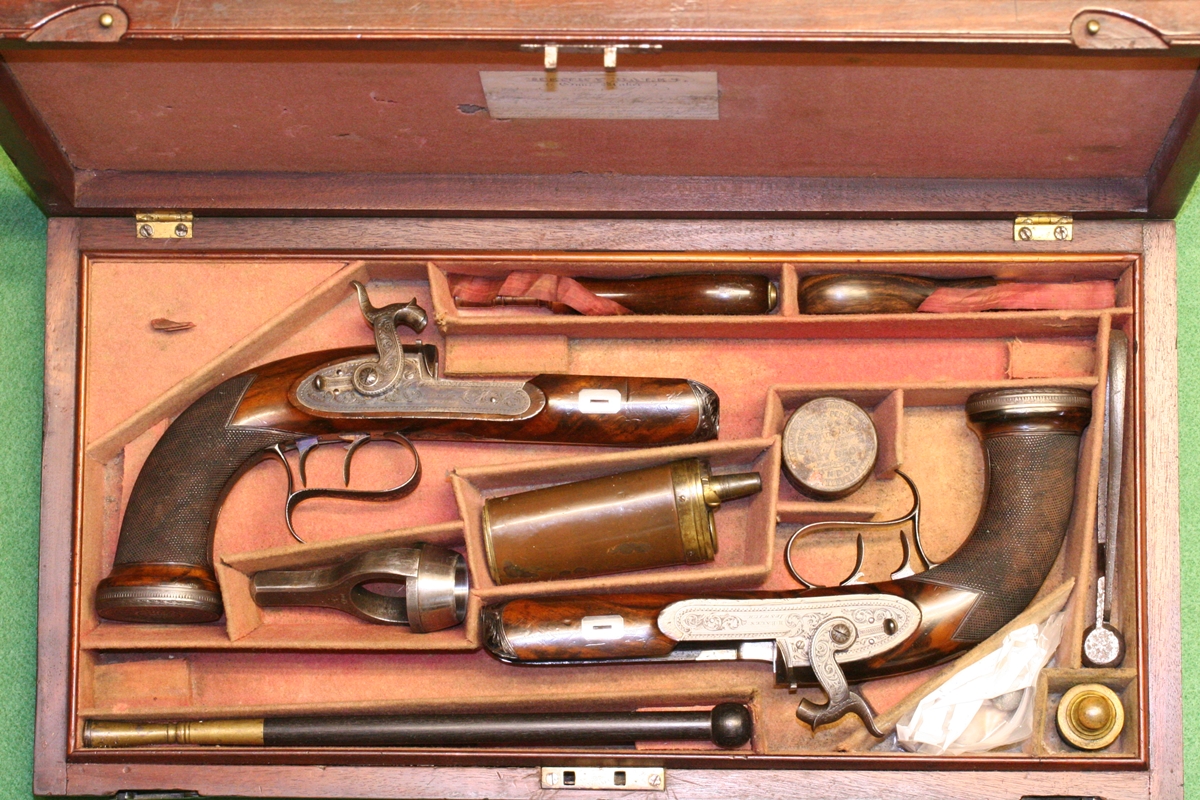
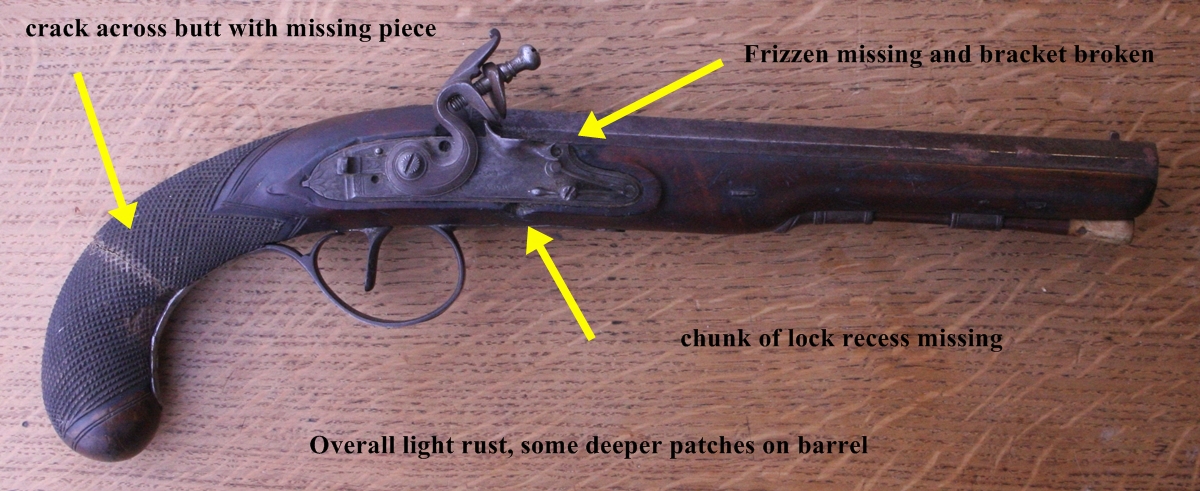
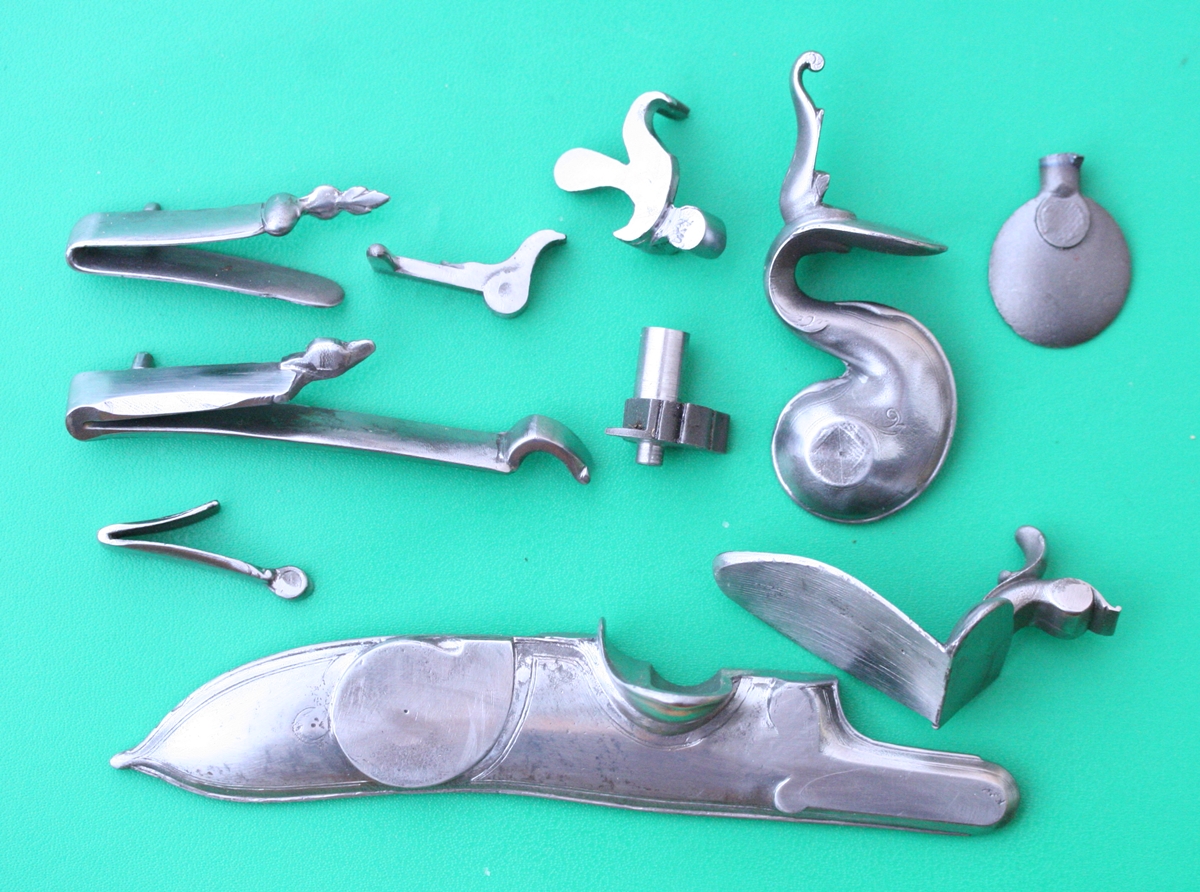
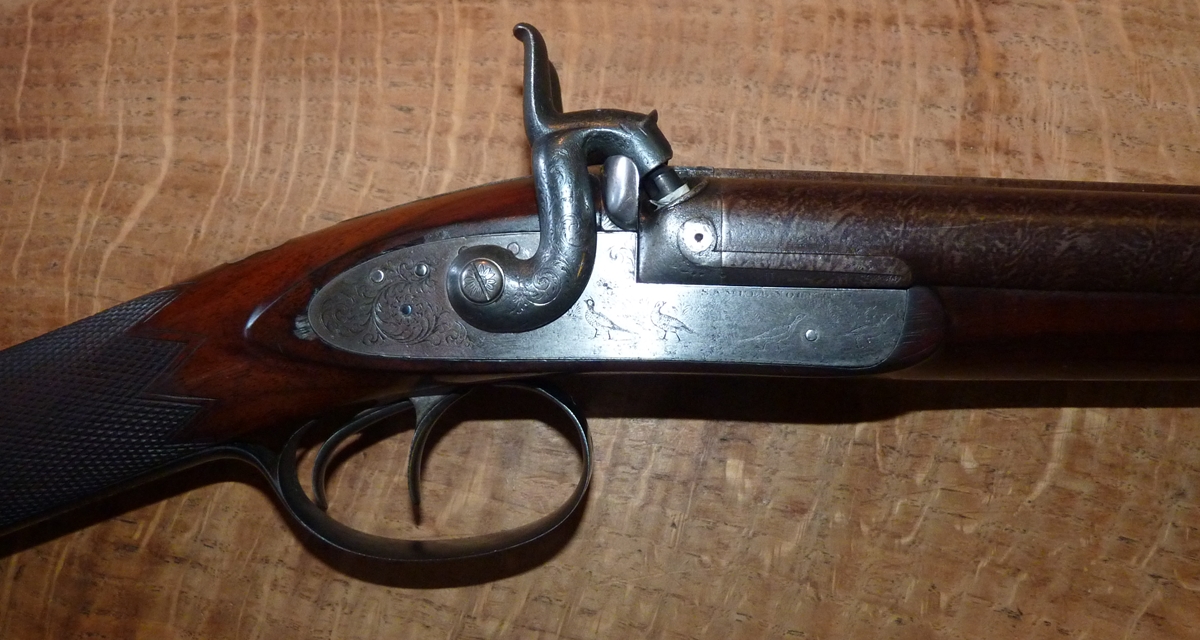
I bought a pile of bits at a Bonham’s Auction for a pretty exorbitant price and they sat in the tin box they came in for a year or so. One stock, barrel and lock plate were fine – fortunately the one with the Post Office stamps as that is a very rare pistol. J Harding was the official contractor to the Post Office and made many brass barrelled blunderbusses and brass barreled coach pistols for the mail coaches, plus it would seem, a very (?) few pocket pistols for Postmen on foot. There were bits for two pistols, they were not identical- the Post Office stamped one was by J Harding and Son and the other was just Harding, both of Borough in London. The names indicate that the Post Office pistol was post 1834, the other earlier. The differences between the two are subtle – slightly different butt shape and barrel shape, and slightly different lock size and action parts. Anyway when I came to sort out the pile of bits it was clear that only some were related, but I got enough parts to make most of the Post Office one – minus the sear , mainspring and sliding safety parts – there was one small part of the wood missing at the muzzle but apart from making a few new parts it is original, althought the cock is an old (1969) replacement and I had to re-adjust the square fit. The second pistol stock was a complete wreck and almost looked beyond repair, but in fact only needed three bits of wood let in and it is as good as new – in fact its difficult to distinguish it from the other. I had to find a cock, make a tumbler and sear etc and sliding safety, plus top jaw and cock and side screw. But now its finished what you see is largely original! Here are the before and after photos!
The positive is that they have the original barrels, lockplates, frizzens & frizzen springs, brass furniture and the overall woodwork – just a few minor details missing!
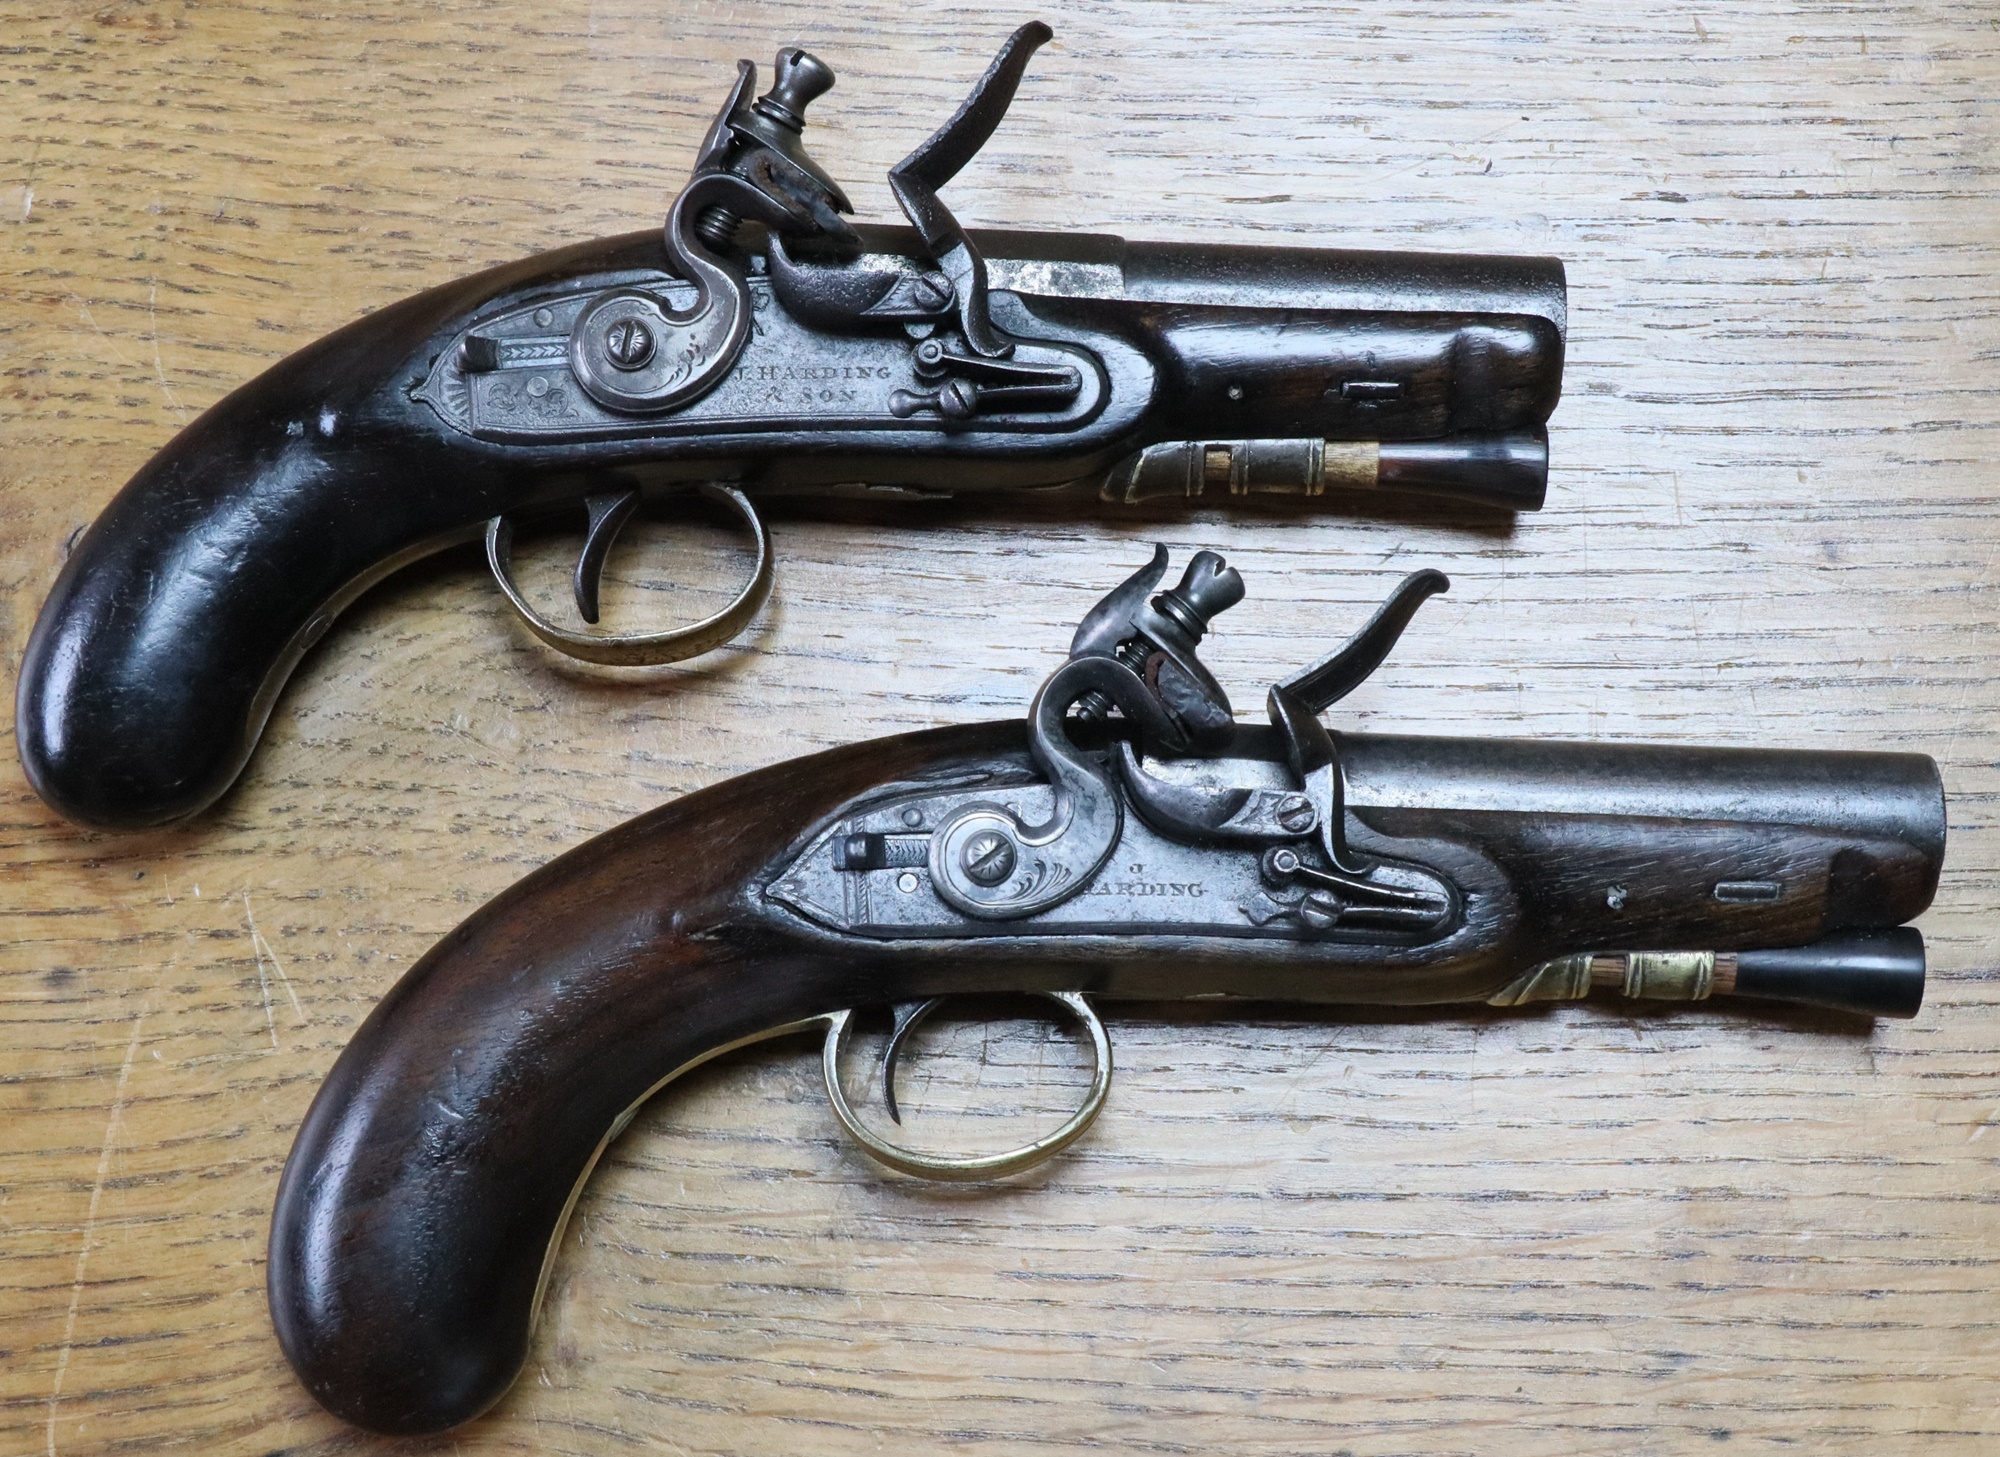
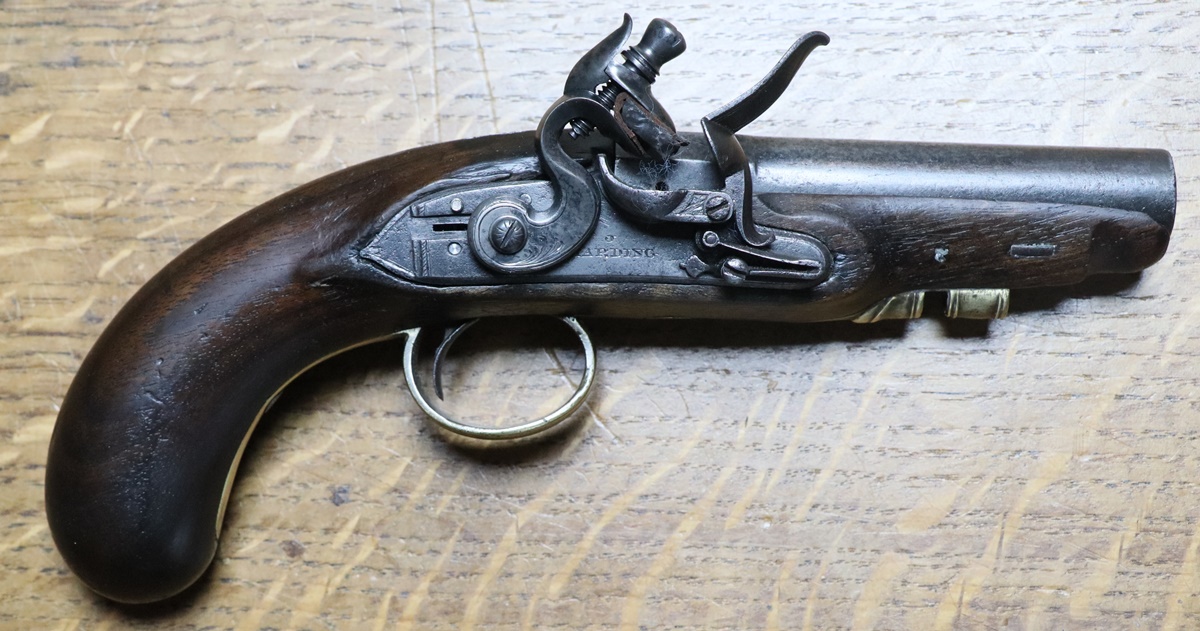
What you see in the end is almost entirely original except the cocks and slide safety catches and one (?) ramrod. The top cock is a 1969 replacement (it was dated on the back) and the bottom is my replacement – not identical but pretty similar. The top pistol is stamped for the Post Office.
The following bits are extracted from the Diary posts for 2018/19
This starts with the Post Office pistol – my ref 146A
26th December Pheww…… Christmas is passed, now just 2 big parties to organise and run in the next week – but at least we had today to relax! We even managed to go to the cinema and see ‘Mortal Engines’ which seemed rather like the last Star Wars film I saw, lots of shootups and clever cgi. Anyway I did manage to get more done on the sear for the Harding pistol – it just needs to be finally adjusted after the mainspring and cock have been sorted. I rather like fiddly machining, although I’m prone to being a bit careless at the last moment and taking off too much metal somewhere. I just about got the sear OK, – the arm that intersects the trigger plate was welded to the sear itself rather than machined as one piece to save more machine ops, and I left the joint as a fillet.
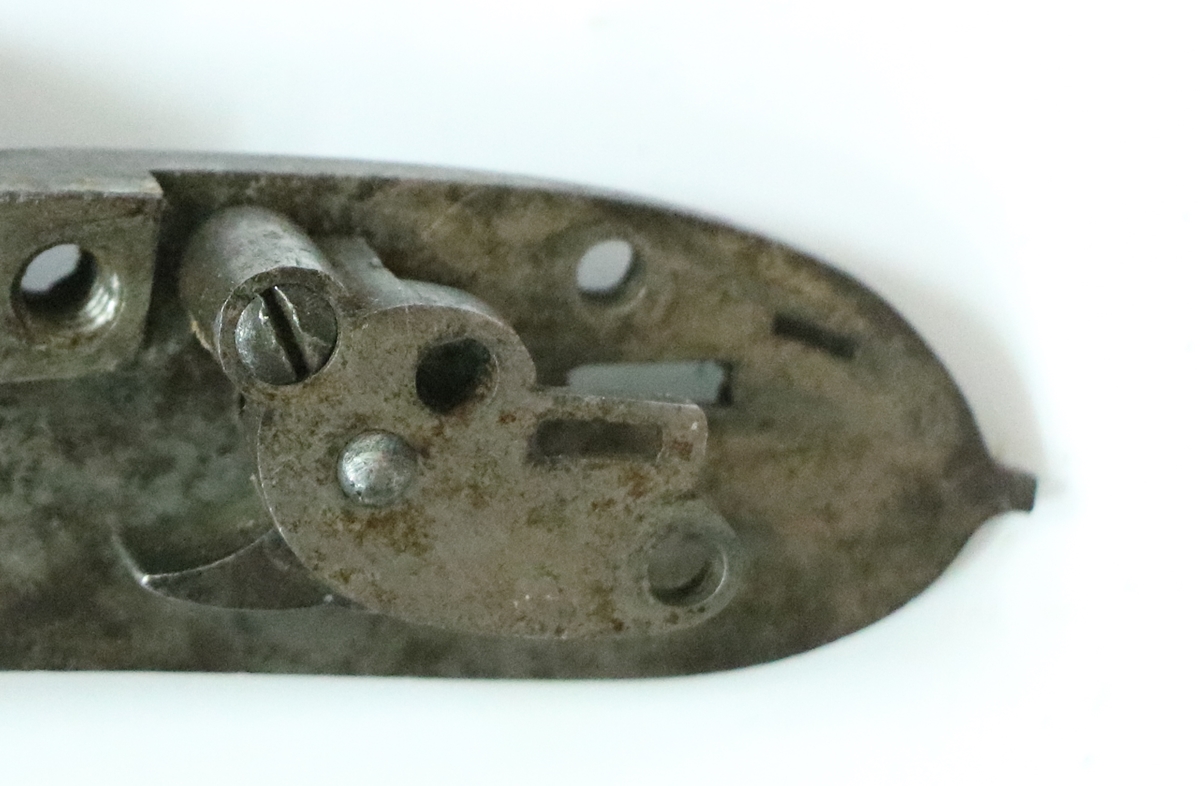
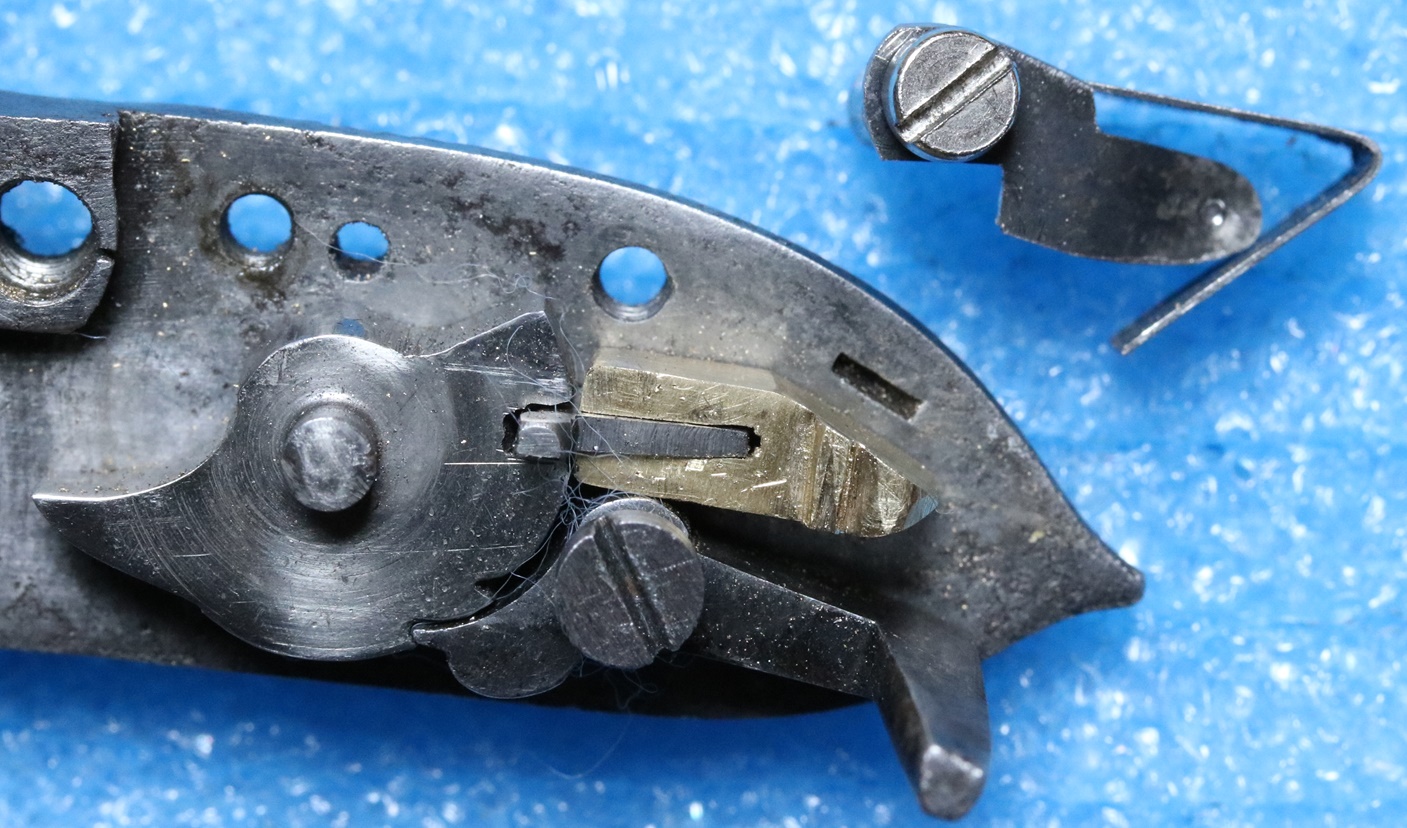
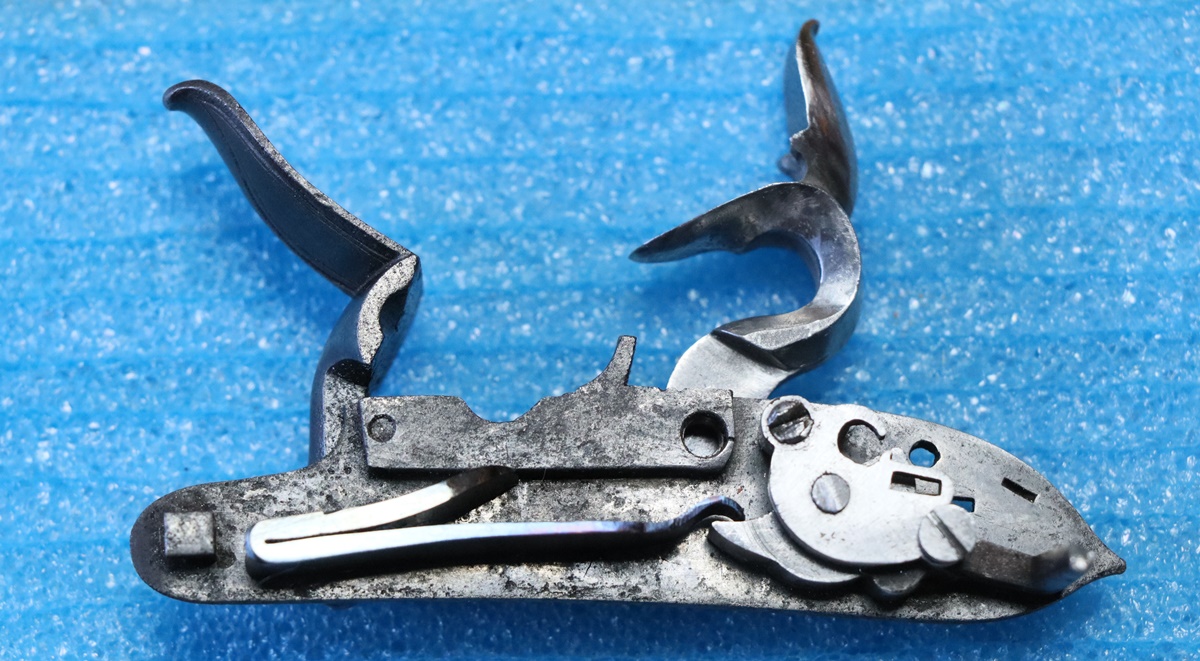
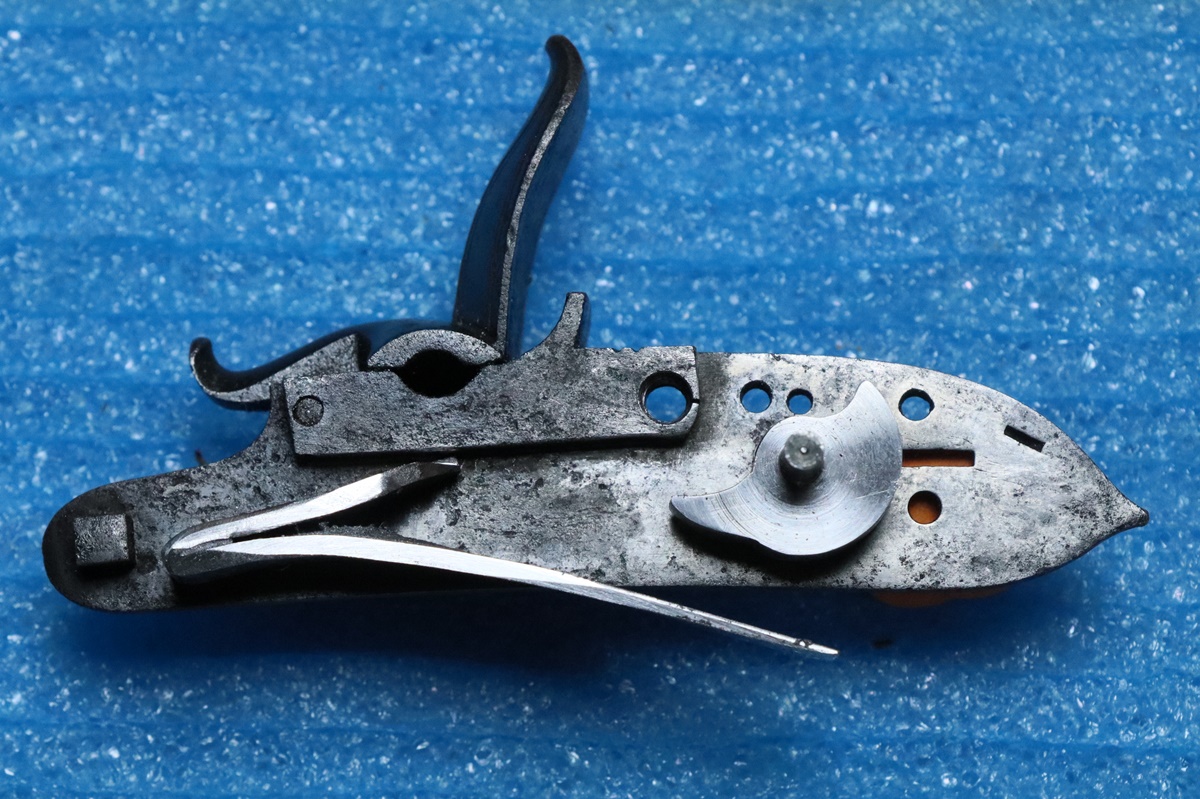
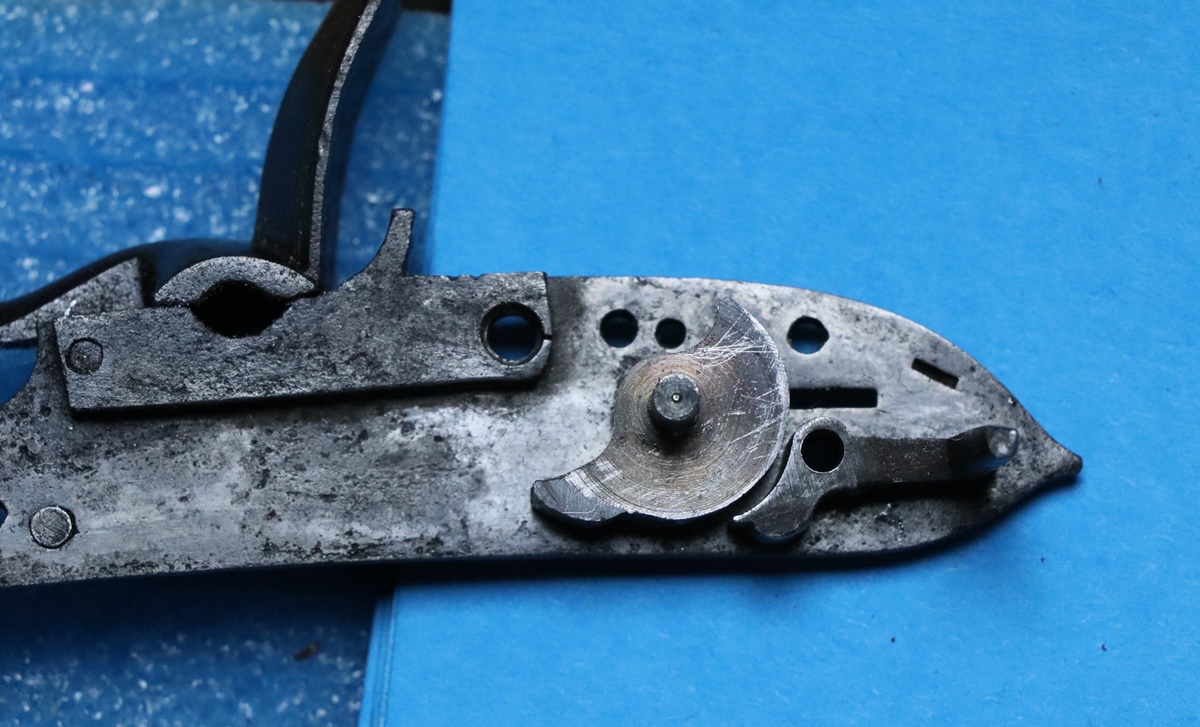
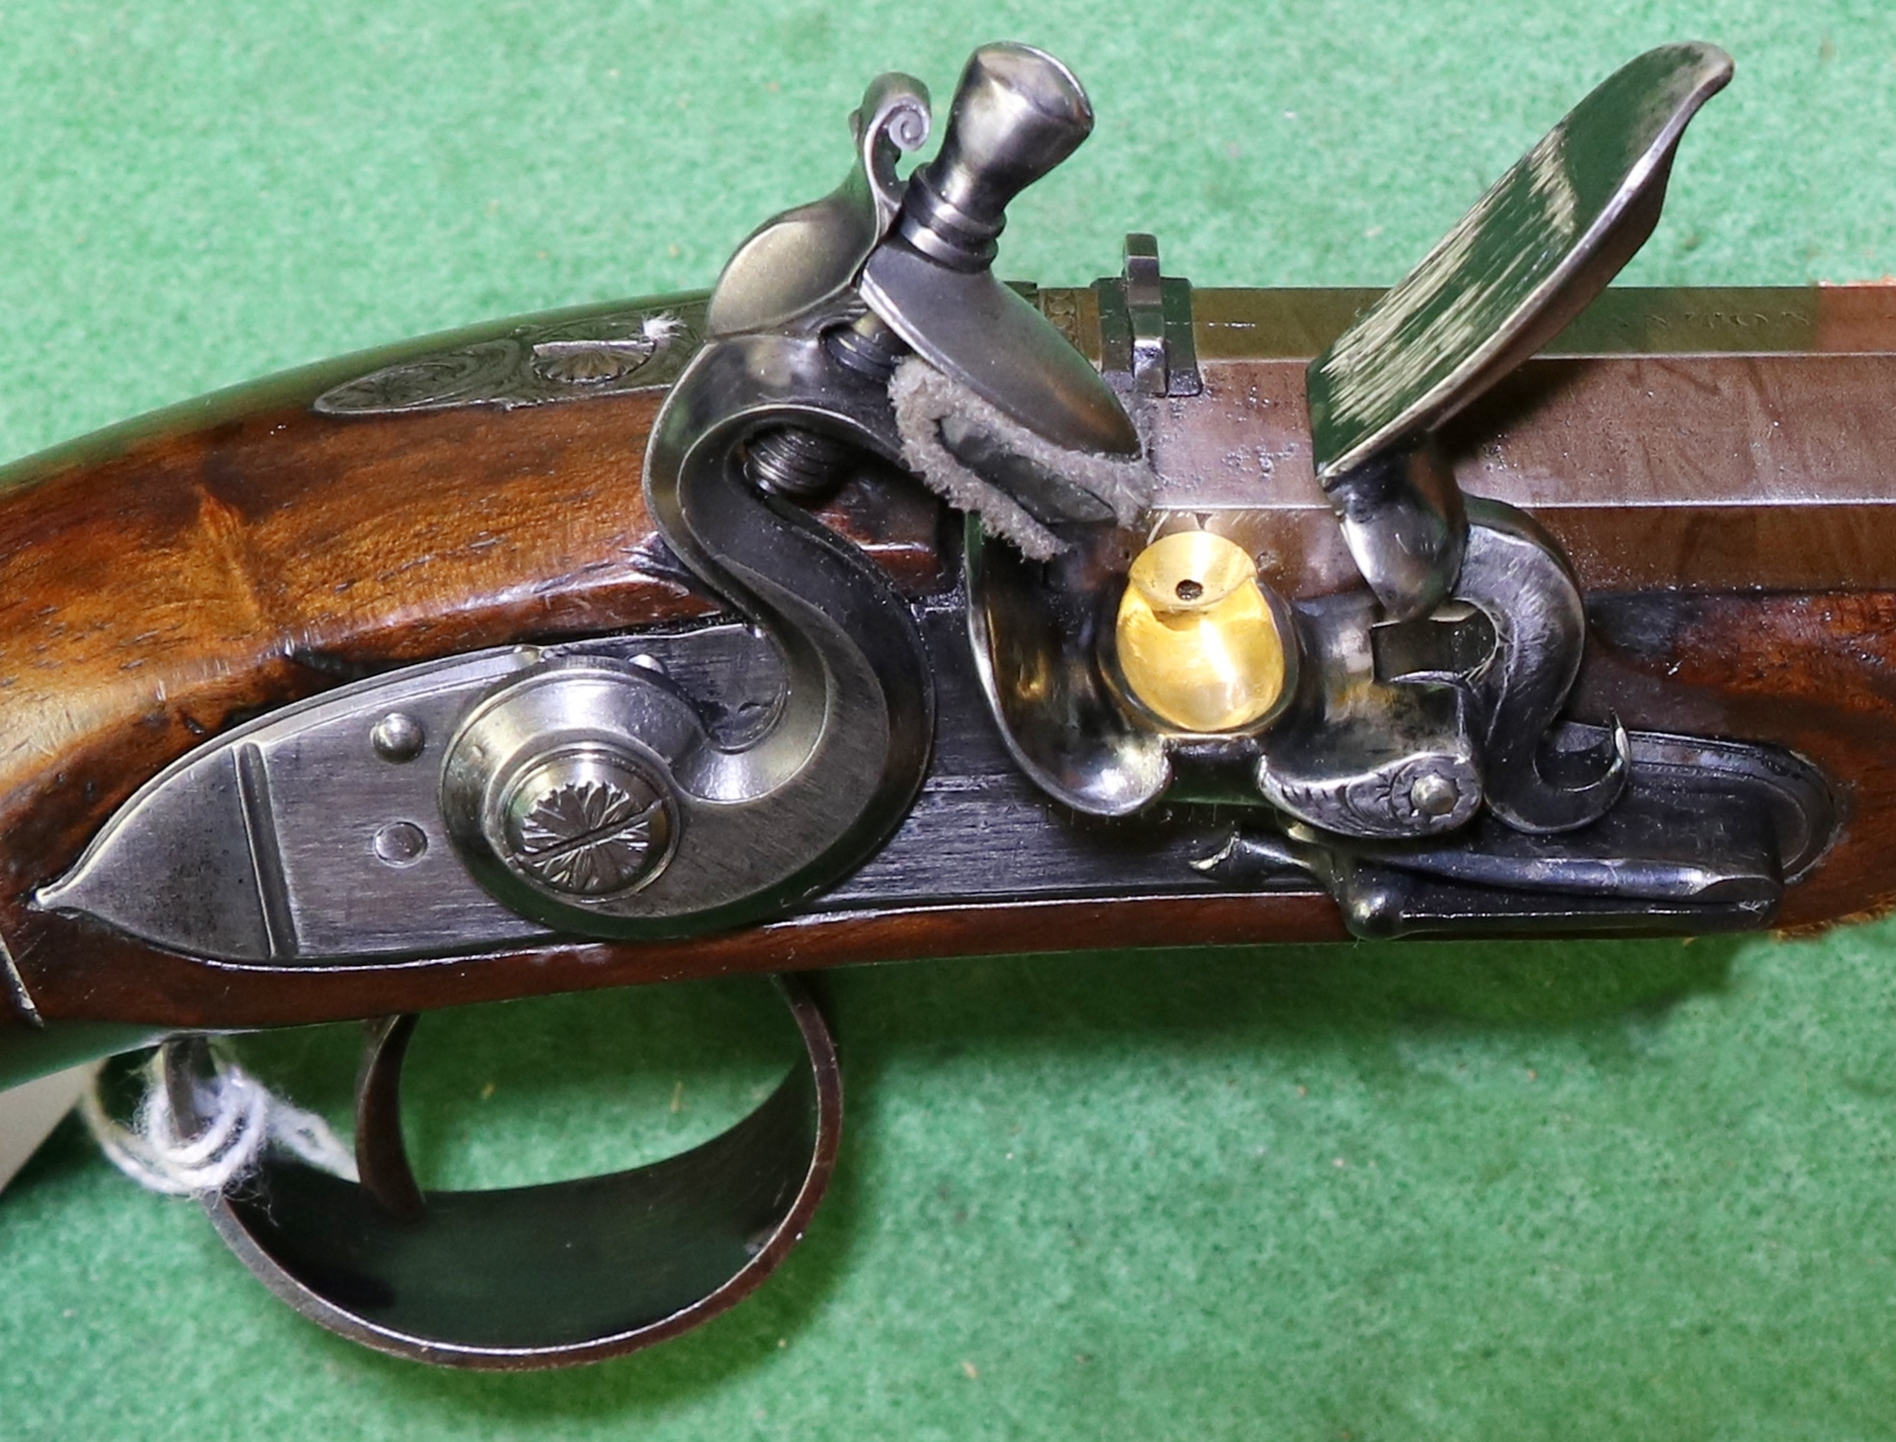
There is a bit of a puzzle with the works of this pistol that I can’t get my head round at the moment – the bridle appears to fit perfectly on the lock plate – the 2 screws, tumbler and the peg are in perfect alignment, and the tumbler seems right. The puzzle is that the lock plate has a slot for a sliding safety catch and the tumbler has a slot into which a catch would fit at half cock – all as it should be to work with a small part moving inside the V of the sear spring, with a cover spring with a pip to hold the catch in either position. All as I would expect – But the puzzle is that there is a slot in the bridle that doesn’t quite align with the slot for the catch in the lockplate, and a additional hole in the bridle that doesn’t coincide with a hole in the lockplate, and anyway is half obstructed by the tumbler when its on full cock – so what are the slot and the hole in the bridle for – they would appear to get in the way of the sliding safety and tumbler ? Any ideas or photos would be appreciated;-
25th December 00:12 hrs Happy Christmas, and thanks to all the followers of this blog who have contacted me over the past year – have a good day, and may Father Christmas bring you something special, or, more likely if you are like me, you’ll have to buy it yourself if its in the gun line!
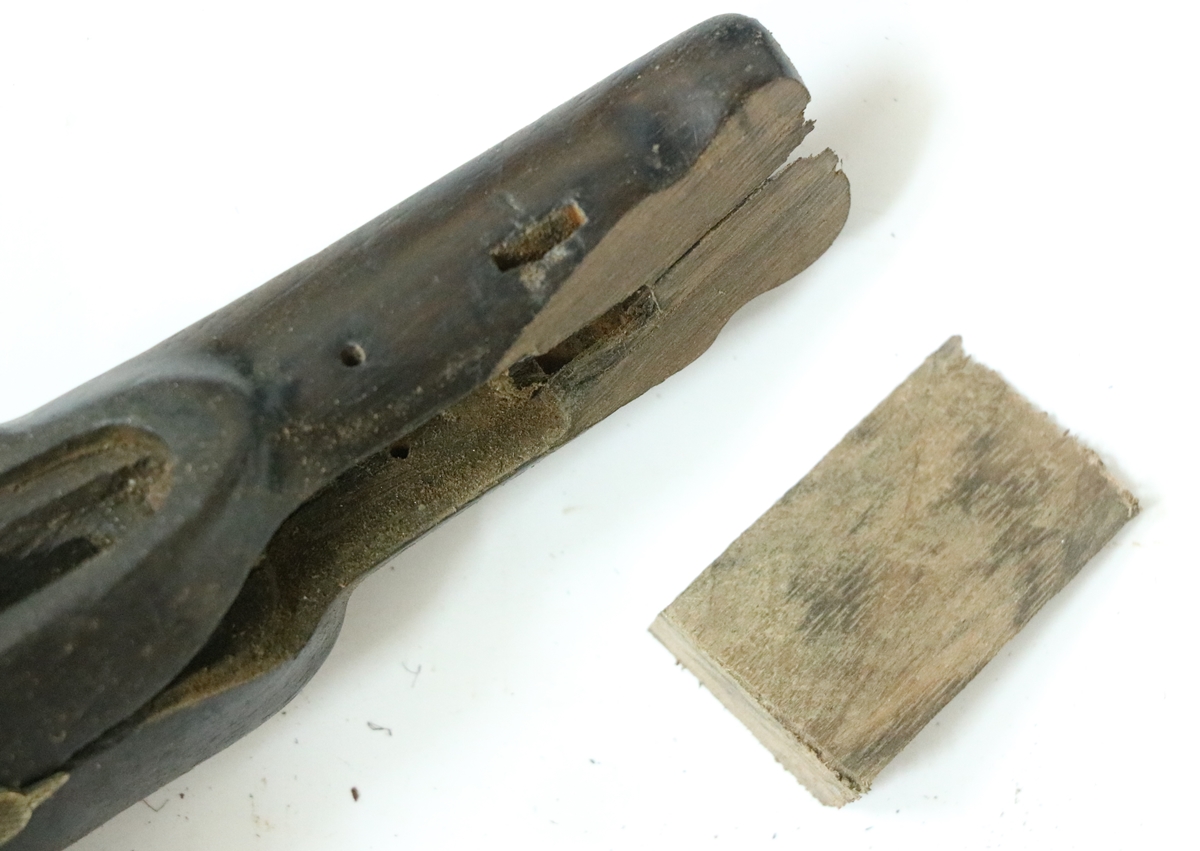
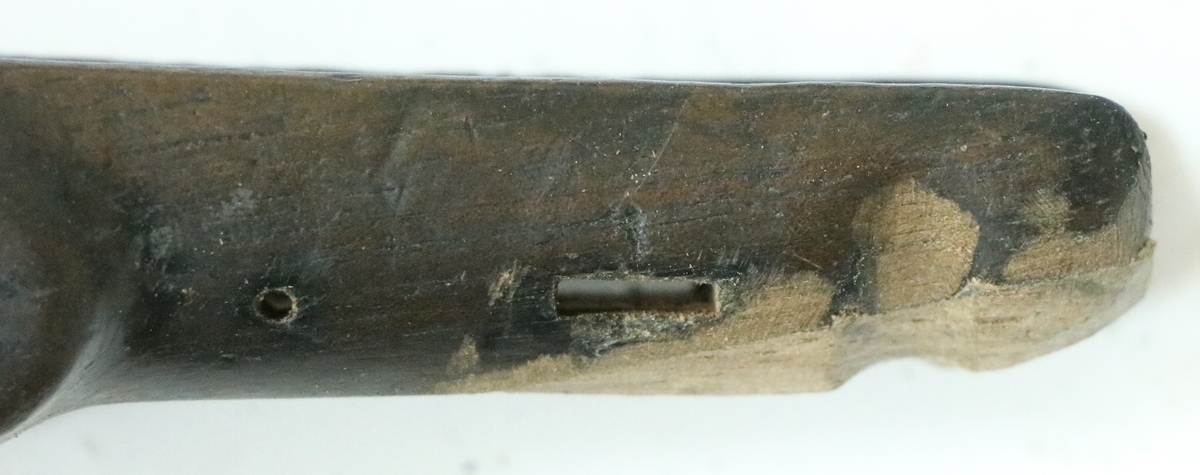
23th December – I couldn’t keep away from the workshop and came across the little pair of rubbish pistols I had bought at too high a price, and thought they deserved a bit of attention as at least one is restoreable. The first problem was fixing the stock – the muzzle end was cut away so I needed to splice on a bit of matching wood, glue up a crack down the middle ( partly covered by the patch wood) and then patch a couple of small holes with instant glue and sawdust, then steam a few dents out and colour up the patch. That is all going well so the next problem is the cock, which isn’t the original one – its a casting and is stamped on the back with initials and the date 1969. – it had never been fitted to this pistol as the square is completely out of alignment with the tumbler. I cleaned up the cock and recut the engraving and filed it up a bit to make it look a bit less like a casting – the next job is to fill up the hole in the cock and weld it all up ready for a new square to be cut. I’ll fill up the hole with a square plug of steel with a pilot hole drilled in the middle, and weld round it. I’ll need to get a sear that fits and make or find a mainspring, plus all the bits of the safety catch that locks the tumbler in half cock position.
De-rusted and ready for restoration.
The wood of the patch is a little light but it will colour down OK
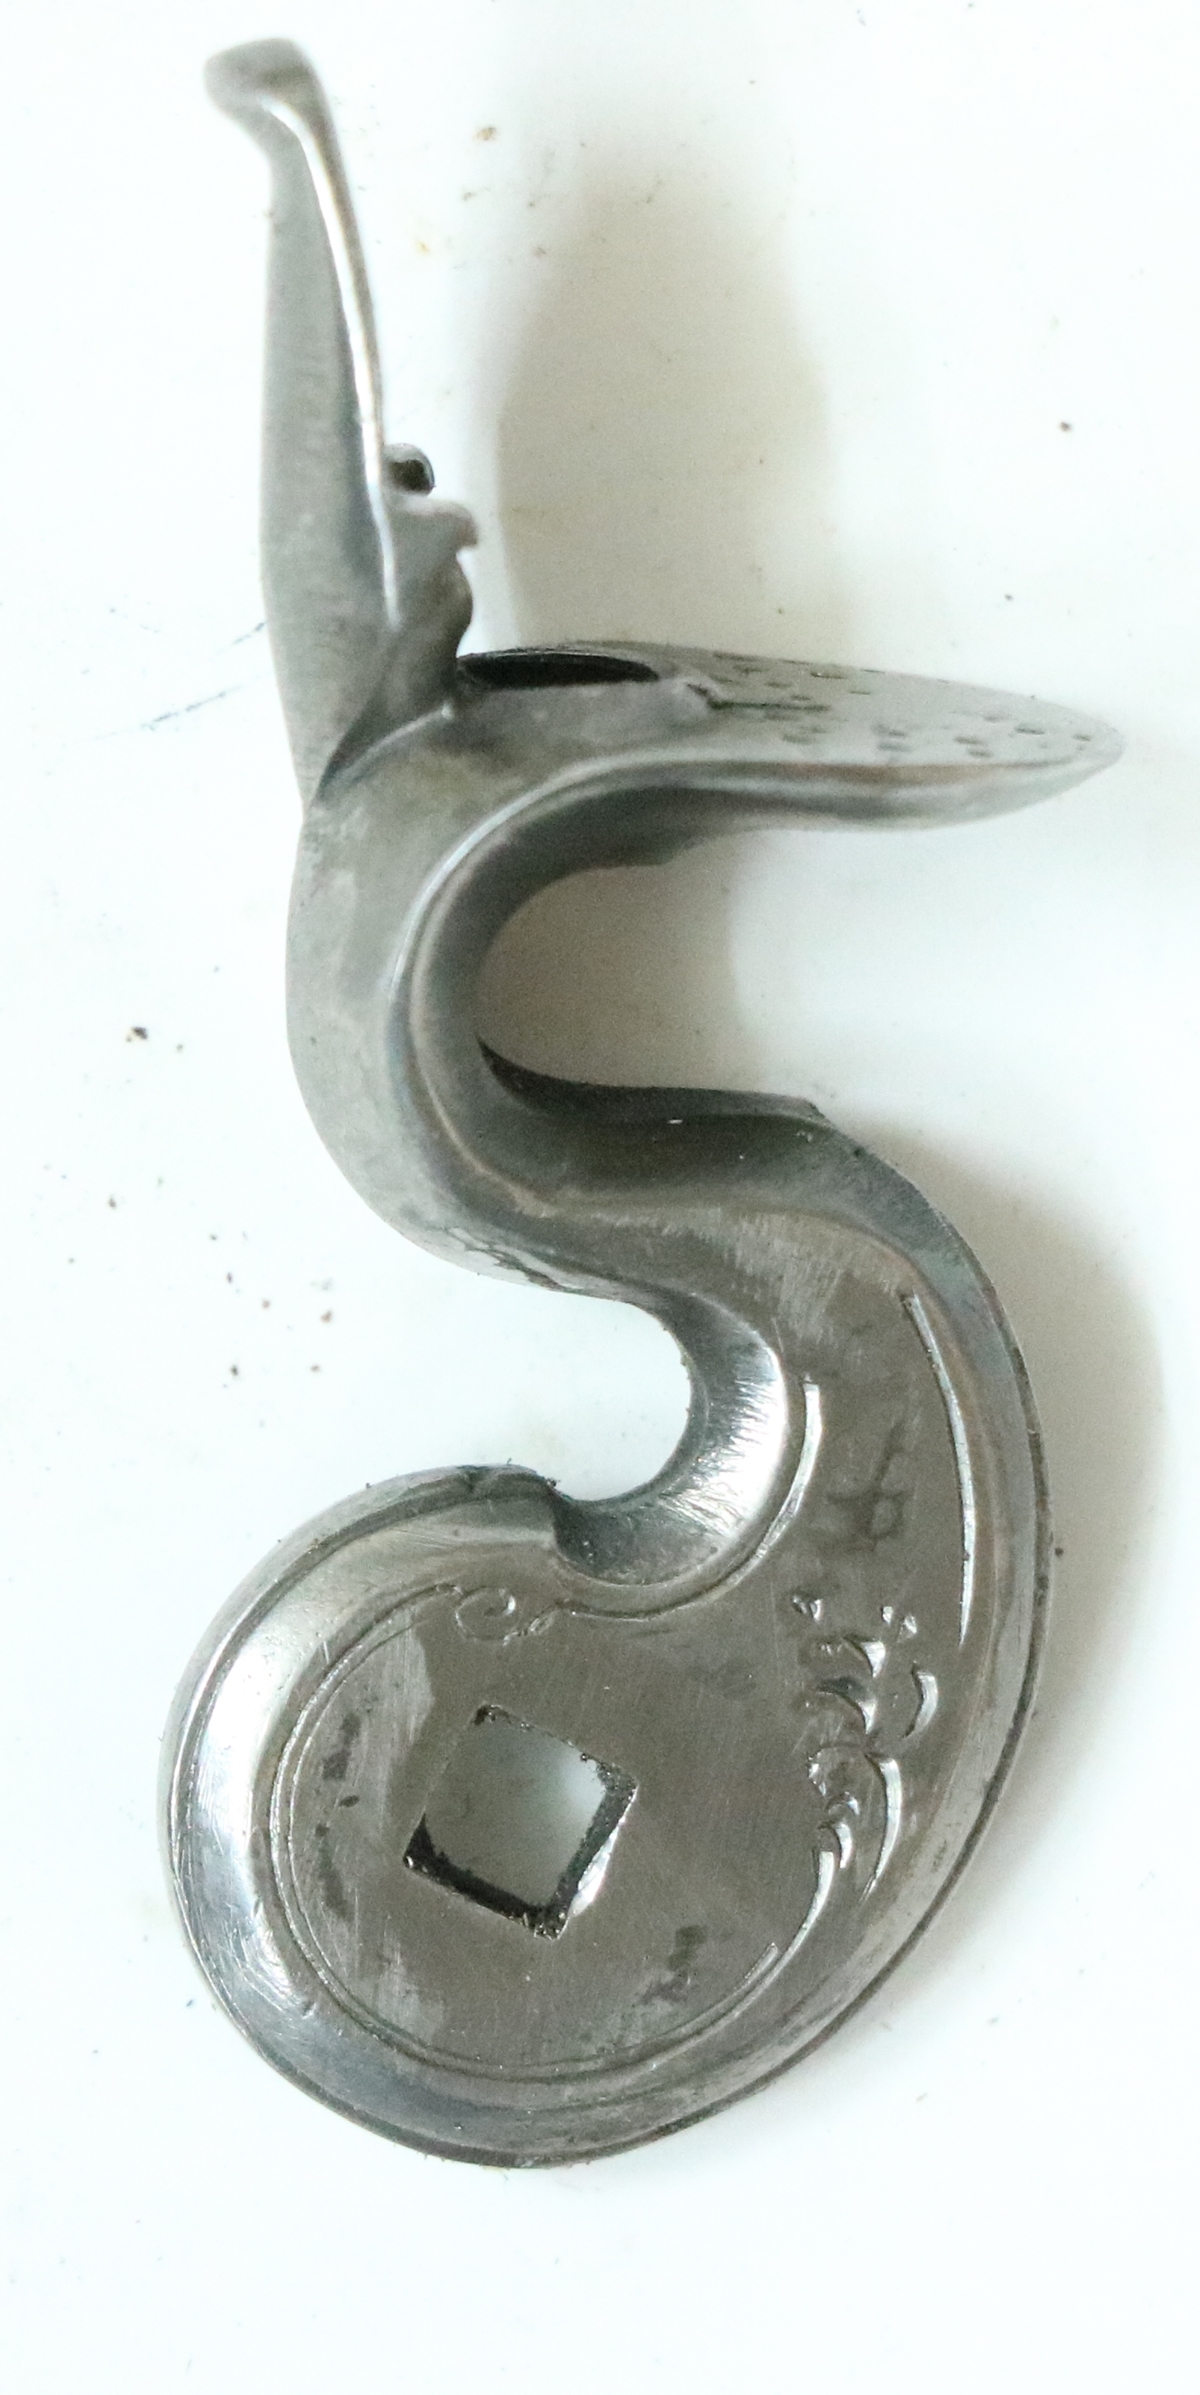
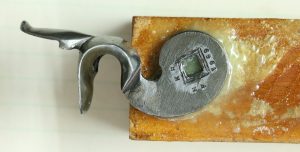
24th January – Switched back to my little Harding Post Office pistol. I needed to remake the square in the cock as the cock was from another pistol. As mentioned I decided to bore out the tumbler hole in the cock and silver solder in a disk and put the square hole in that. The cock was Araldited to a scrap of wood and centered under the mill/drill and a 6 mm end mill put through – the square on the tumbler is a 5 mm diagonal, approx 4 mm square. I then dropped an 8 mm end mill into the back of the cock 1.5 mm deep, and turned up a disk to fit the two milled holes with about 0.2 mm proud on the back surface and a 3.5 mm hole in the centre to start the square from. I had intended to put the square in the disk before fixing it in the cock, but there is no way to hold it so I silver soldered it in place with ‘easy’ silver solder paste that melts at 650C (dull red heat). I then filed up the square hole very carefully to fit and , I thought, in the right orientation – but it turned out to be about 10 degrees from where I wanted it, so I just heated the cock up to dull red and turned the insert with the end of a screwdriver to the correct angle. That all went well so I worked on the sear to get it all aligned as I hadn’t done the final shaping until the cock was on. I am not sure that all the parts I had were from the same pistol, and the shape of the full cock bent was a bit too ‘re-entrant’ for the motion of the sear and you couldn’t fire the lock – so the bent had to be opened out a bit. All done so I tweaked the mainspring and hardened it and tempered it to blue – and then broke it while clamping it to put it in place! It was my fault as I couldn’t find a small mainspring clamp and used a mole grip too near the ‘elbow’ and overstressed it – another job to do, although I might just try welding it.
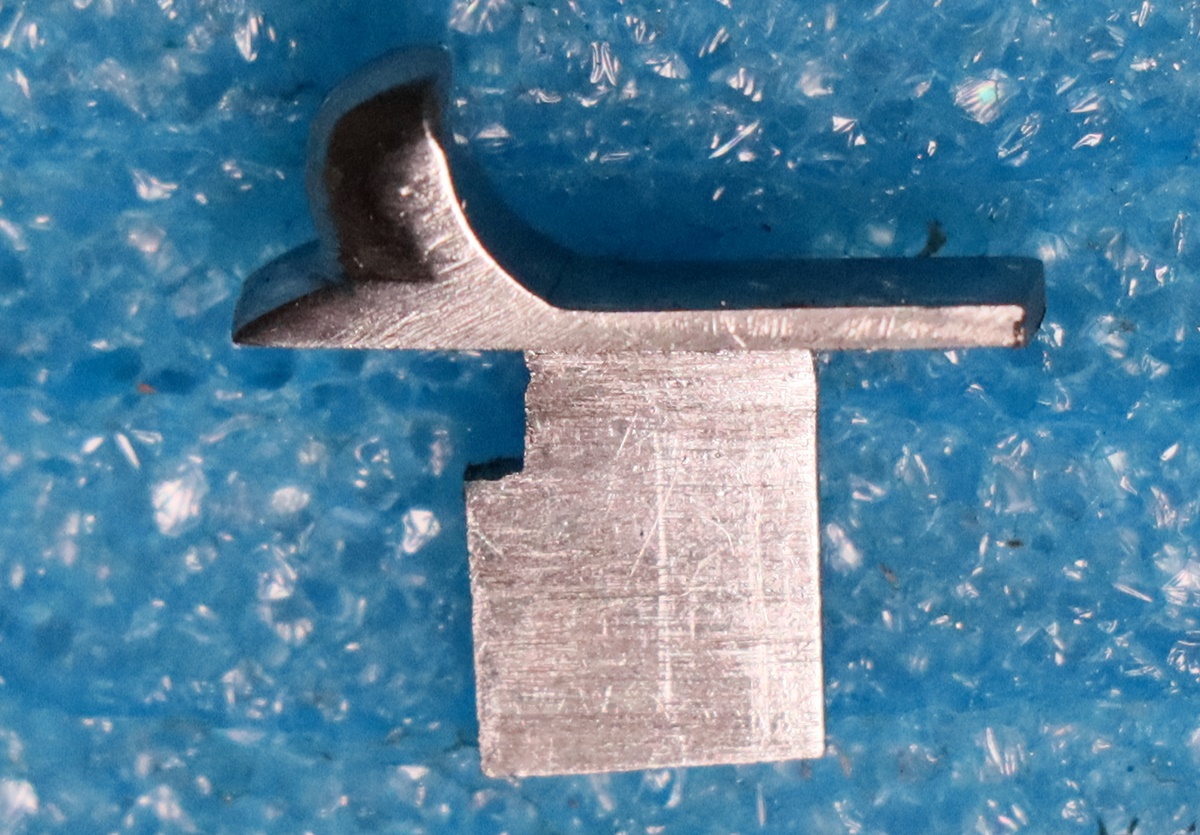
The cock is actually stopped by the step hitting the edge of the lock as it should be, but the ‘chin’ of the jaw is a bit close – the cock needs slightly reshaping, although I’ll have to be careful not to loose the square insert if I heat it to red heat…..
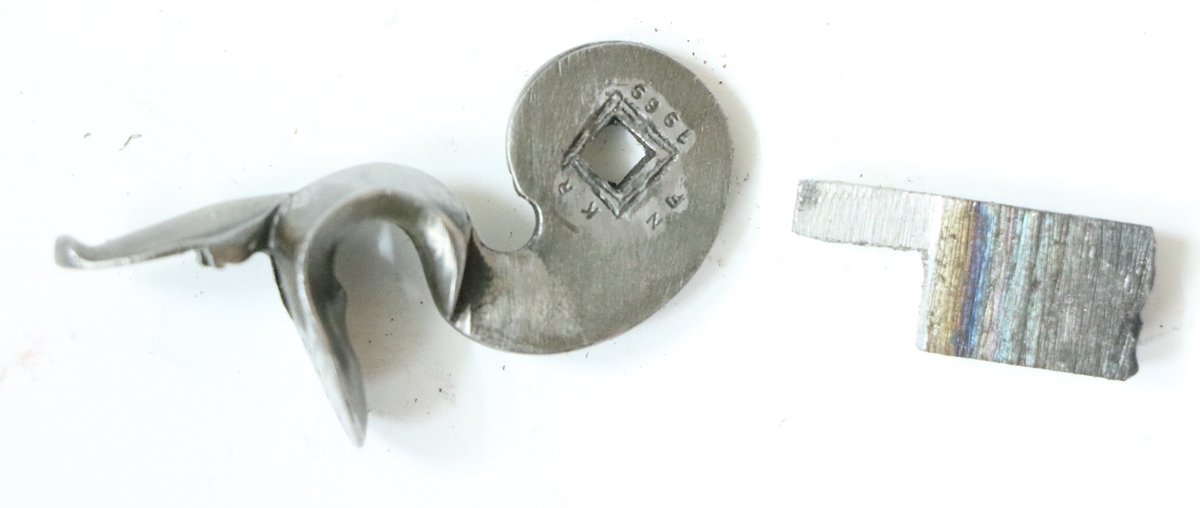
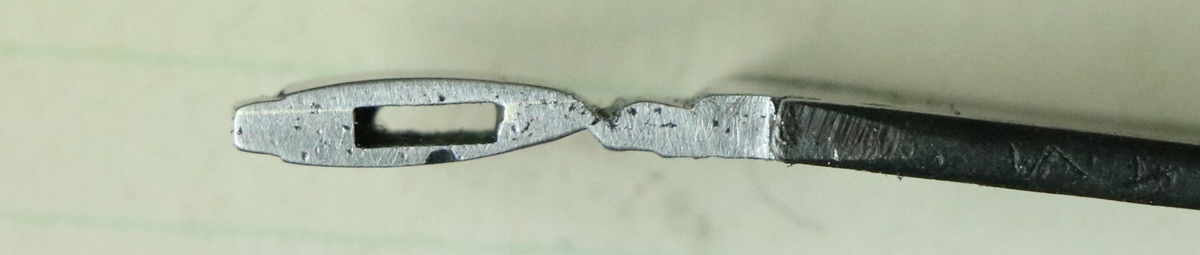
Yesterday I started on the safety catch slider for the Post Office pistol – I took a chunk of 8 mm EN8 and cut out a tab of about the right size on one end so I could work on it and have a decent bit to hold in a vice. I milled the rough blank – slightly oversize and still attached to the chunk – and filed it to fit, only separating it from at the last minute to shape the knob. It looks fine, or will do when I’ve engraved the slider – now to do the internals.
4th Feb Update – did a bit of work on the Harding Post Office pistol safety catch today (workshop was up around 25C!) – I couldn’t see a good way of making a 1.5mm wide slot through the inside bolt for the tongue of the external slider – my mill is nowhere near good enough to use such a small cutter, so I decided to mill a groove in a strip of metal and silver solder another piece over the top to complete the slot – worked a treat… And it all fitted together after a bit of filing – you can’t see the silver solder line. As before I left the part attached to the strip of metal until the last minute as its much easier to handle that way.
Strip with milled groove and piece silver soldered on top.
Shaped bolt still attached.
The bolt fits neatly over the tab on the slider – it will need pinning.
Safety slider is now engraved.
4th February – It continues cold, although I did get the indoor workshop up to 25 degrees C yesterday by burning wood at a rate of knots for 6 hours. I need to do a bit of TIG welding but by Argon has run out – annoying because it has leaked out of the cylinder – I’ve not used much in two years but its empty so I’ll have to change it. I couldn’t do that with the loan car as it wouldn’t fit in. but I’ll take it on Tuesday. I got some parts from Fred in the US to engrave for a gun he is making, so I’ll have to do a bit of design work. I have the Post Office pistol to finish making the safety catch parts for, and the Venables barrel to re-do, plus a bit of silver soldering for Dick on a flintcock to fix a disk for a remade square. I have converted Dick to using Bev’s method of re-doing the squares in cocks by milling out a hole and silver soldering in a disk. My method is to mill a stepped hole so there is some depth location when it comes to the soldering, but Dick has done a plain hole – We shall see if that works as well. The advantage of the stepped hole is that you can have a smaller ring of silver solder on the cock face so it doesn’t show round the cock screw but get an increased area for the solder as you can make the back mill of greater diameter. Anyway we shall see which is best….
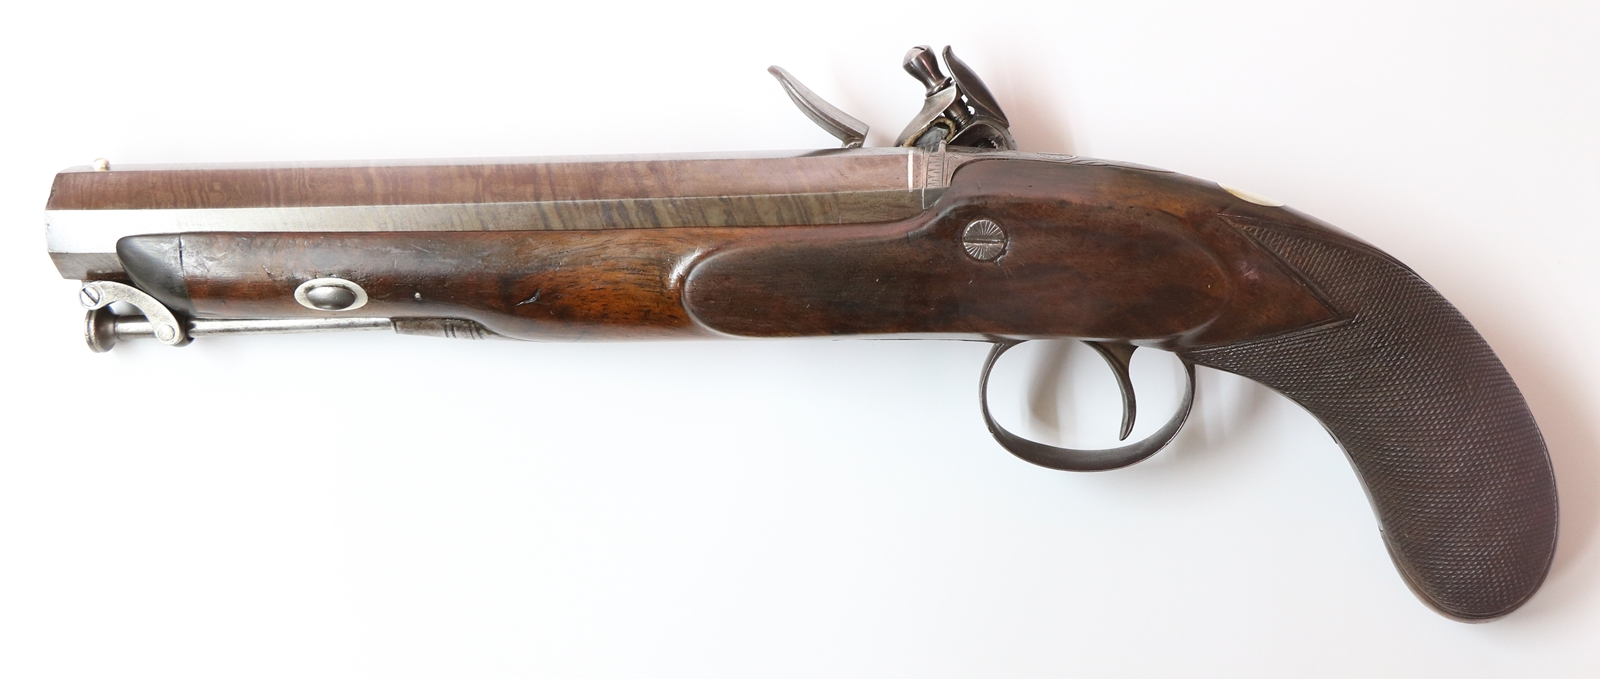
The following is for 146B – the non PO J Harding pistol
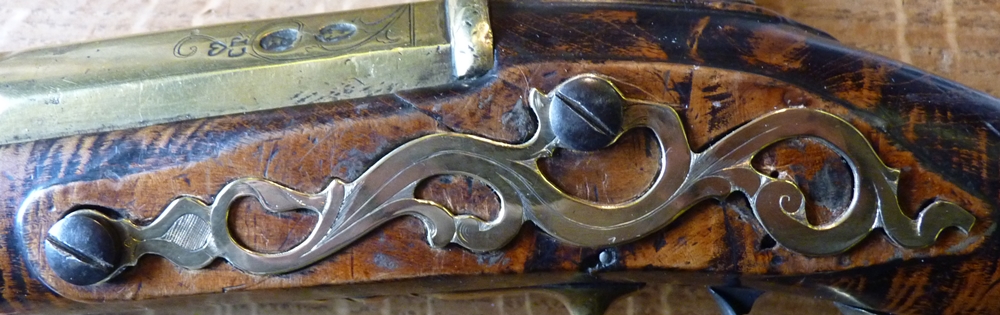
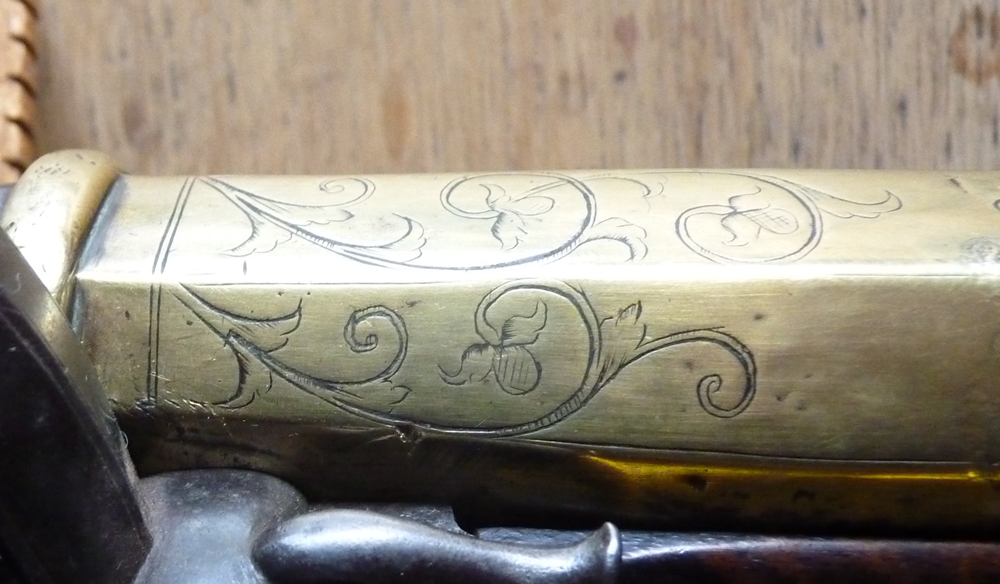
Pistol has very nice brass furniture
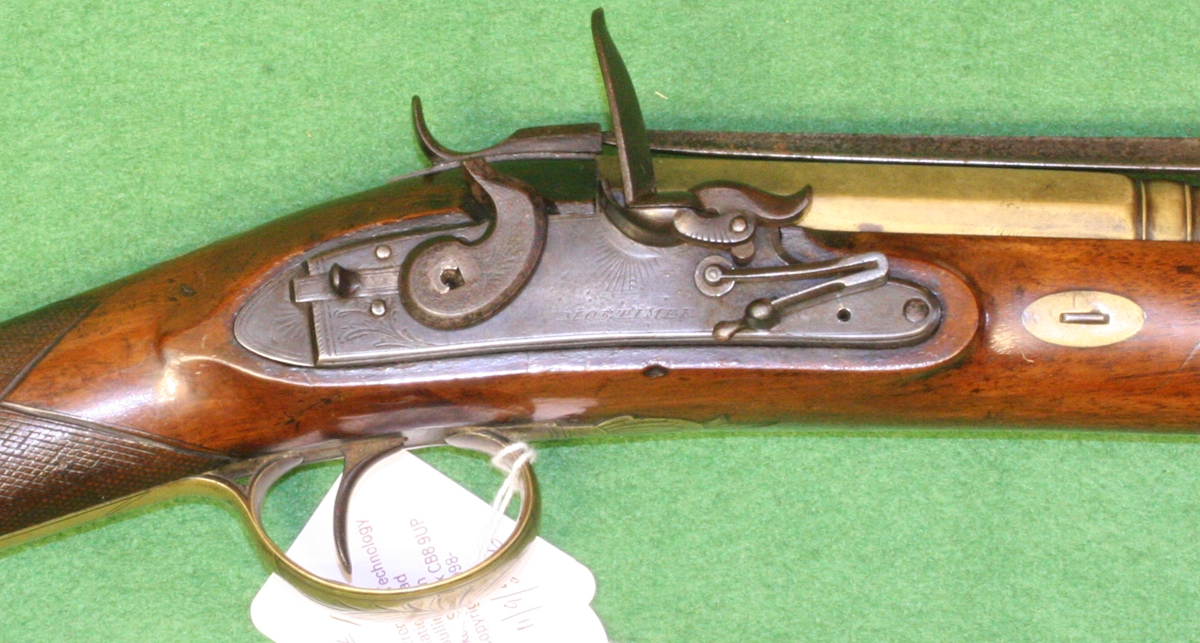
The barrel, lockplate, frizzen and frizzen spring and barrel bolt are all original – I’m not sure about the bridle or tumbler but I think the are original – the tumbler is wrong.
I did some more on the little pistol woodwork. It was fairly riddles with cracks as well as having chunks of wood missing, – the first job is to find all the cracks and see which move if you gently flex the wood. If they are wide or full of muck they need clearing out with the back of a modelling knife blade – these I fill with liquid epoxy, mixing in a bit of walnut dust to fill the surface. As you put the epoxy in, flex the wood to open the joint more and suck the glue in. You may need to clamp or bind the wood to close up cracks while the epoxy sets – I find self amlgamating tape is ideal for quick elastic binding of parts while glue sets – a couple of turns and it will stick to itself and hold things in place. For small cracks I use an instant isocyanate glue and again work the joint to get the glue in – I keep a spray can of activator handy to start the polymerisation. I also put walnut dust in the top of these cracks and drop a little instant glue on it and set it with the activator. I’ve done all that for the Harding pistol and the next step is to work out how to do the replacements and what needs milling out, and find a bit of matching walnut from my offcut box, or go over to Dick’s as he has a much bigger box of offcuts.
7th July – I started to strip the little Harding pistol so that I could sort the woodwork, but the woodscrew holding the tail of the triggerguard proved to be a major problem – first, the slot had got worn into a ramp and wouldn’t shift even with heat, then it turned out to be dead hard and I couldn’t drill it with any of my drills. I ended up grinding off the head and digging out bits of it with the GRS graver – that released the guard. That left the stub of the screw very firmly embedded – I tried cutting a slot in it with a small disk but the screw broke when I put a screwdriver on it! Only solution was to core out the remains of the screw so I made a corer from 8 mm silver steel with a 4 mm hole in the centre and a 5.5 mm outside diameter and filed up some teeth and hardened it – at least that got it out and I could glue in a wooden plug for the next screw! A lot of work to get one screw out – lucky I enjoy making tools! I derusted the lock and the barrel, which is in good condition – I lightly recut the barrel engraving. I will have to make a new tumbler as the one with the pistol is completely wrong, but I might get away with the existing bridle – I think it might have been the right one, but it had been broken and rewelded with the parts not quite aligned – I will make the tumbler and see if the sear is right before I decide whether to make a new bridle or fudge that one.
Corer for removing headless screw.
A bit of pitting but not too bad!
I more or less finished the woodwork for the second Harding pistol, at least in so far as anything is ever finished in this game! I’ve given it an initial coat of stain to darken it down and match the wood repairs in – a coat of Van Dyke solution first, that didn’t do much, then a coat of Jacobean Oak stain. The problem with stains that are supposed to be black is that there is no effective black stain – so they mostly contain black solids, which in this case I had to rub off, which leaves a decent dark brown colour that matches the original colour pretty well. The various joints are still visible but not too bad – I’ll work on them a bit as I apply finish – probable a couple of coats of sanding sealer, then alkonet root coloured oil finish to give a deep rich colour and finish off with a very hard wax finish. Any recalcitrant joints will probably get blended in with a black Sharpie pen and smeared with a finger! – it works a treat. One trick that does help if you want to disappear a joint is to take a very sharp modelling knife and create some ‘grain’ across the joint matching that around it – do this early on in the process so they get treated the same as real grain! Oh dear, maybe I shouldn’t reveal trade secrets here but anything that is continuous across the joint hides it from attention! On this pistol the main joint runs with the grain, so that technique is of marginal benefit!
10th July – I seem to have got landed with compiling a document for the school governors – I am thinking of enrolling for ‘Say No‘ lessons! It rather got in the way of my gun activities. I finished the blank for the tumbler for the Harding pistol and unglued it (heat) and then glued it onto a piece of scrap plate to put it centered on the turntable in my miller so I could reduce the diameter over most of the circumference – I did get some way, but the strain was too much for the glue, so I’ll have to finish it by hand. I’m made some progress on with the woodwork – I now have sundry bits of wood stuck onto the pistol and tonight I managed to inlet the barrel – I think its now just a matter of filing/sanding everything to shape and inletting the lock. I put some oxalic aid on the existing wood which got rid of most of the black stains – I should have done it before selecting the wood for the repairs as its now a bit darker than the original – but the other little Harding pistol is almost black so I can colour this one down – it will help to hide the repairs too. In the course of sanding down blocks of wood for the repairs I managed to sand the end of my thumb on the 12 inch disk sander – painfull still!
Tumbler blank on a scrap plate – the glue failed!
Clingfilm on a dowel to locate the repair in place – self amalgamating tape as an elastic binder. see earlier photo for the ‘before’ state.
9th July – several jobs on the go, which is handy when there is adhesive setting time involved. I started the new tumbler for the little pistol – I turned the axle that bears in the lockplate plus a bit for the square and tapped it No 4 UNC, and faced a 22mm diameter disk to make the actual tumbler out of, I then parted off the disk and axle, leaving a bit for the bearing in the bridle, faced off the bar left in the lathe and drilled a hole that is a good fit on the lock axle and Araldited the proto tumbler to the bar so I could finish the other side of the tumbler – its still in the lathe hardening off. I milled some of the broken wood from the pistol lock area and glued in a piece of walnut – there is still quite a lot of wood to be fitted in, but its starting to look less bad. I also decided to make another batch of de-cappers in case I get orders from the Holt’s shoot participants – I know Martin is keen for everyone to have one on safety grounds. And I got the new screen for my PC so that had to be set up…….
8th July – I got a request for a couple of my personalised decappers – I had run out of my original supply of metal and bought some 15m.m wide strip but it is a bit wide to fit round the nipples of some guns, so I picked up a length of scrap 1/2 x 1/8 from my old lab and made two decappers – when I came to engrave the names etc on them it was a bit of a revelation – they cut like butter, and it made me realise how horrible most of the metal I engrave is! I guess the scrap was mild steel but it didn’t have the cold rolled crust that most mild steel strip has. Anyway a pleasure to work with. I did some more on teh little pistol woodwork. It was fairly riddles with cracks as well as having chunks of wood missing, – the first job is to find all the cracks and see which move if you gently flex the wood. If they are wide or full of muck they need clearing out with the back of a modelling knife blade – these I fill with liquid epoxy, mixing in a bit of walnut dust to fill the surface. As you put the epoxy in, flex the wood to open the joint more and suck the glue in. You may need to clamp or bind the wood to close up cracks while the epoxy sets – I find self amlgamating tape is ideal for quick elastic binding of parts while glue sets – a couple of turns and it will stick to itself and hold things in place. For small cracks I use an instant isocyanate glue and again work the joint to get the glue in – I keep a spray can of activator handy to start the polymerisation. I also put walnut dust in the top of these cracks and drop a little instant glue on it and set it with the activator. I’ve done all that for the Harding pistol and the next step is to work out how to do the replacements and what needs milling out, and find a bit of matching walnut from my offcut box, or go over to Dick’s as he has a much bigger box of offcuts.
7th July – I started to strip the little Harding pistol so that I could sort the woodwork, but the woodscrew holding the tail of the triggerguard proved to be a major problem – first, the slot had got worn into a ramp and wouldn’t shift even with heat, then it turned out to be dead hard and I couldn’t drill it with any of my drills. I ended up grinding off the head and digging out bits of it with the GRS graver – that released the guard. That left the stub of the screw very firmly embedded – I tried cutting a slot in it with a small disk but the screw broke when I put a screwdriver on it! Only solution was to core out the remains of the screw so I made a corer from 8 mm silver steel with a 4 mm hole in the centre and a 5.5 mm outside diameter and filed up some teeth and hardened it – at least that got it out and I could glue in a wooden plug for the next screw! A lot of work to get one screw out – lucky I enjoy making tools! I derusted the lock and the barrel, which is in good condition – I lightly recut the barrel engraving. I will have to make a new tumbler as the one with the pistol is completely wrong, but I might get away with the existing bridle – I think it might have been the right one, but it had been broken and rewelded with the parts not quite aligned – I will make the tumbler and see if the sear is right before I decide whether to make a new bridle or fudge that one.
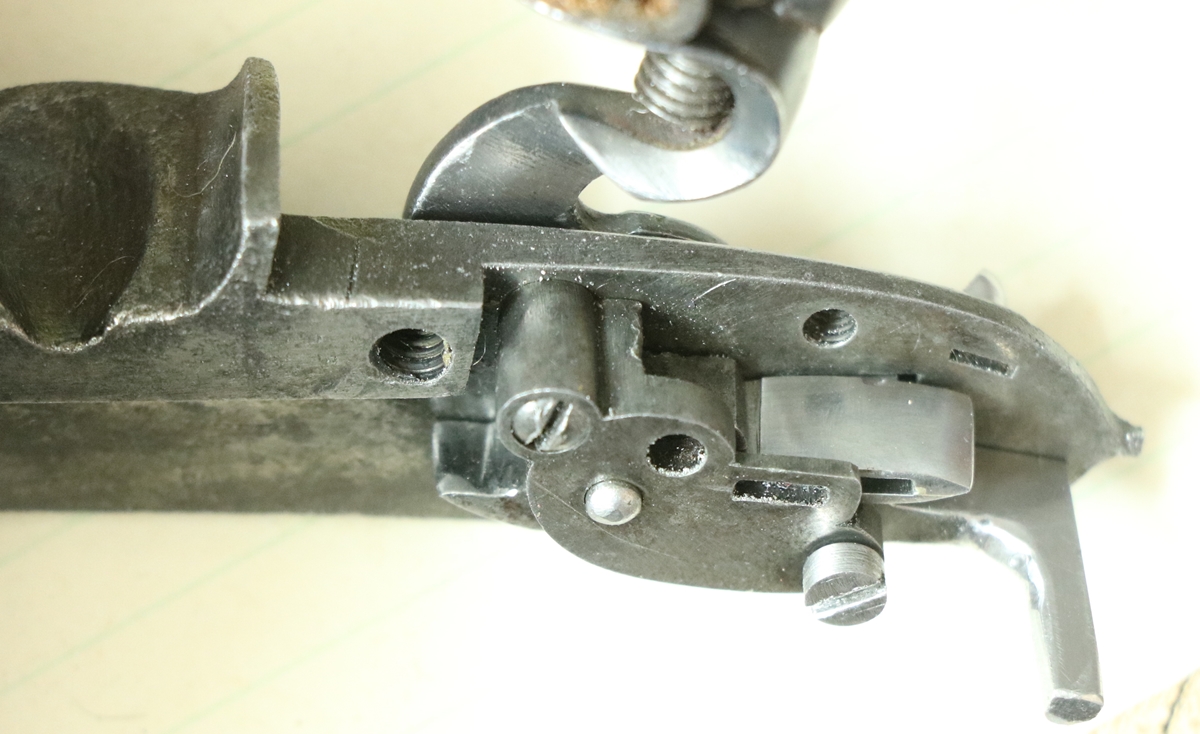
27th July – bit cooler and wetter today! Had a visit from a regular client to collect some pistols – I swapped some work for a little 1860s pistol case and a cased double pinfire 12 by Geo Sturman that need a little tidying – the barrel needs striking up and rebrowning – I need to have another go at browning as I am keen to improve my technique – basically slow it all down… I did a bit more fiddly work on the sliding safety of the second Harding pistol – this one turns out to be a bit different in its internals from the first, which was conventional. here there wasn’t a lot of space so I modified the mechanism so that the slider itself actually bolted the tumbler, the slider being retained by a small brass ‘bolt’ that had the ramp on its tail that engaged with a pip on a small spring retained by the sear spring screw. I found that this time the bridle had a slot that aligned with the slider, so I left a pip on the slider to engage in the slot – actually that’s not true – I’d already filed off the slider when I realised that the slot lined up, so I had to weld a tiny blob in the right place…..
Slider and its brass retainer – ramp on the tail, plus sear and slider springs – slider spring has dimple to engage ramp. ( bridle removed) All very fiddly as its a very small pistol.
25th July Predictably the pool got a lot of use today from friends and neighbours -seemed to be full of children all day! I sheltered from the heat in my ‘machine shop’ which keeps a reasonable temperature, so I was able to finish a couple of jobs on the Harding – I glued up a piece of dowel with a turned end into a horn blank – Araldite went off rapidly in the heat, and turned it all down together – looks fine and fits perfectly. I also turned up a side screw – I was going to cut off the thread portion and weld on a new head but found that an M3.5 thread would just do, so made a new screw – I had a very cheap non adjustable die for M 3.5 which worked well enough. I filed up the slider for the safety catch from the blank I machined yesterday – it must be one of the fiddliest jobs – especially for such a small pistol – anyway its almost done. Not quite sure how to do the mechanism inside – there is precious little room for the bolt to intersect the tumbler so I might just make a slot in the tumbler to take the blade of the slider, then make a dummy bolt to stop the slider falling out…. I’ll see what is possible. I gather we have a small group for the ‘Have a go’ tomorrow, and I’ll take a breech loader for some lazy shooting afterwards – not sure which – I’m not sure the Beretta I bought fits terribly well, so I might take something else.
24th July – rather warm today – when I got in my car to go to Dick’s it said 38 degrees (C) – that went down to 33 when I was moving! By 4 oclock I was ready for a swim in the giant bag of water – I reckon I’m up to 700m a session and am aiming for I km – that’s a lot of turning as its only 10m long- I think I’m going to have to make something to keep track of how many lengths I swim!. A good day on the tinkering front – I machined blanks for the top jaw and slide safety, and turned a top jaw screw and a better cock screw, and filed up the top jaw and gave them a once over with Blackley’s case hardening powder to colour them down a bit – they actually look quite good now. I ‘spiked up’ the bottom of the top jaw with a 45 degree graver without the heels, mounted in a metal rod and tapped with a small hammer – it throws up really vicious little hooks that are just like the originals must have been – its always a give away that a cock has been replaced by a casting as very few people bother to file off the cast ‘teeth’ and replace them with nice sharp ones. It only takes a few minutes! Anyway the little pistol is beginning to look really good – the photo has a nasty bit of flint I broke off a larger on as I don’t have any micro flints in stock – it does actually spark up although probably not reliable enough to set off priming consistently – anyway better than a repro Scottish Pistol I was looking at with Dick that would not spark except very occasionally one feeble little spark. I didn’t have any perfect flints with me – most had been used but you can usually persuade a few sparks out of the lock if you tap a new edge on the flint. It was sold as a working repro with proof marks so presumably was intended to shoot but I think its going to need some work on the frizzen, either some heat treatment or facing with a bit of old saw blade or whatever – I’ve never had any problems using Blackley’s frizzen casting – they spark OK – and I’ve never worn a frizzen to the point when it needed refacing. I don’t shoot flintlock that much – I have enough of a job hitting things with a percussion! Having said that I’m doing another corporate ‘have a go with a muzzle loader day’ on Friday for Cambridge Gun Club and I have to take both a flintlock and a percussion.
Slide safety and ramrod to do and it can join its ‘almost’ pair, the P.O. pistol
23rd July – I went into ‘my’ school for the ‘Leaver’s Assembly’ to say goodbye to the year 6 pupils who are moving on to secondary school – a few tears amonst them, but they will do well – their teachers have been so caring. More tinkering with the Harding – I used a chunk of thick tubing as a heat reservoir to temper the spring and it worked just fine with the radiant thermometer and got a good uniform blue towards the bright end of he spectrum – the spring fits, so I adjusted the full cock bent on the tumbler – very carefully in stages as I didn’t want to loose any more cock swing than necessary. Once that was done I case hardened the tumbler – it was made out of mild steel – and made a ‘cut price’ sear spring from a bit of spring steel sheet – works fine but looks a bit naff! might have to revisit. Anyway so far so good, the lock fits, the spring, trigger and sear work fine – I’ve filed up the cock to a slightly better shape and put a bit of engraving on it – I now need to tap the hole for the cock screw that holds the top jaw, and make a top jaw, plus the safety slider and internal bits – I realise that I case hardened the tumbler and haven’t put in the notch for the safety bolt, but I’m sure I can file through the case. I reckon the restoration of this pistol has already cost far more than it could possibly be worth and it isn’t finished yet – a true labour of love – but at least it all goes on the blog!
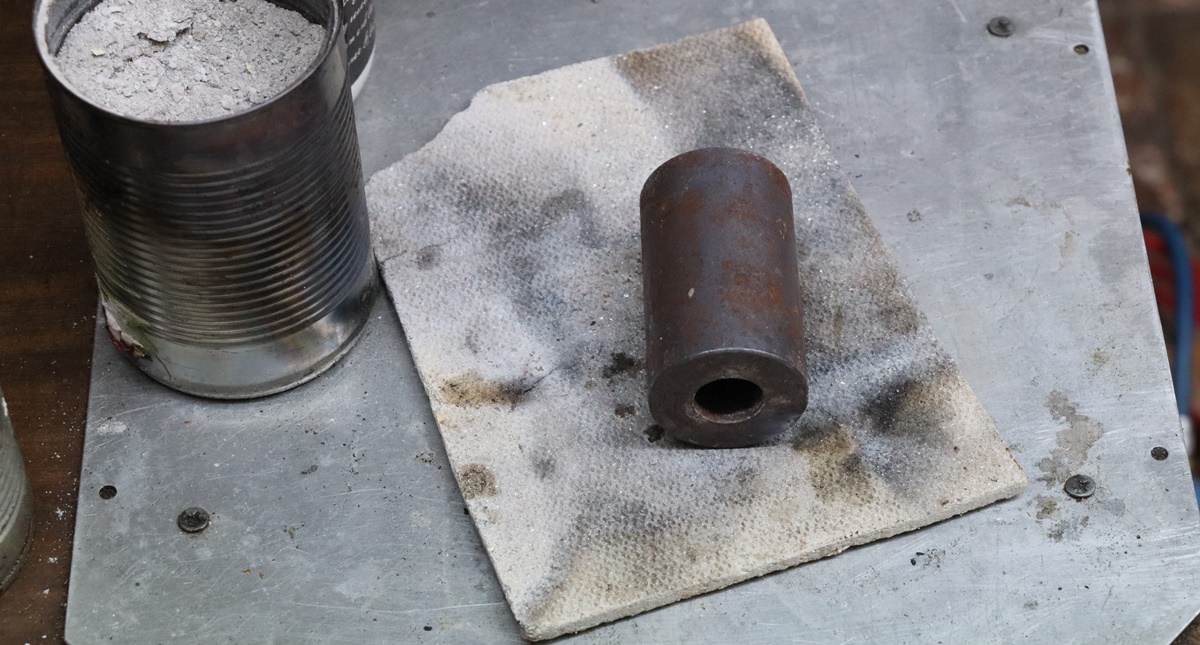
Thick tube as heat sink for tempering springs etc. Bean can holds wood ash insulation so parts cool slowly to avoid hardening them.
22nd July – Went into Cambridge to do some work on the Bullard Archive but ended up towing a giant skip with my Landcruiser and sorting some junk. I made one of the springs for the Harding pistols. This one looks a bit more convincing than the last one. I’ve hardened it with an oil quenching and its now glass hard so I’m being very careful not to break it – I suspect dropping it on a hard surface might even do it. Now I have to decide how to temper it, since I screwed up on that stage last time. I normally find a spot on the hotplate of the AGA which is the right temperature, using a remote temp probe and pop it on there with a couple of layers of aluminium foil over it and shut the lid down for ten minutes, but the AGA is out for the summer. The traditional method is to put the spring in a pool of oil in a tobacco tin (now a historic item!) and burn it off, after which the spring will have got to the right temper as if by magic. There is always a discussion about what oil to use – used engine oil is often quoted, but whether its the engine oil or the used bit that’s critical isn’t revealed. I think I’ll probably heat a thick walled tube in my furnace to 300C, check it with the radiant thermometer and then pop the spring in and leave it to cool down. – a lot more trouble than the burning oil, but at least measurable! As I wrote yesterday, the spring feels different now its fully hard, even when its just resting in my hand – mysterious or imaginary?
I can never decide if the two arms should touch along the joint – I think most original springs don’t so I’ve left this one slightly open – you can get a piece of thin card in the joint. I think this spring is a better shape than the last one. We shall see!
21st July – What a lovely day sailing in the dinghy on the Orwell! Yesterday I made a couple of blanks for new springs – This time I did the thicknessing of the blank on my medium soft grindwheel (after flattening it with a diamond tool) rather than the linisher and it worked much better. I had a look at the broken spring – it was fairly clear that I hadn’t tempered it sufficiently as I could barely mark it with a file – a spring properly tempered should just be fileable. Thinking about hardening, I sometimes think when I handle the occasional metal component that I can tell if they are soft or fully hard just by the feel of them – and not by trying to flex them either. It sounds pretty improbably, but I guess the elastic properties are quite different and maybe this affects the internal damping of vibrations so they do feel different? Or maybe its just a vivid imagination…….
19th July – Tragedy – my new spring broke when I tried to put it in the pistol! I had hardened it and tried to temper it in my furnace, the AGA being out for the summer, but its not good at controlling temperatures as low as 300 C and I don’t think it was taken to spring temper. Anyway it seemed a bit strong, and pinged when I compressed it – I think maybe it should have been thinned a bit more, and I need to be more careful to compress it at the ends to allow more of the spring to flex. Anyway its busted, so I can have the excitement of making another one – I’ll probably make two whle I’m about it as the other little pistol has a fudged spring…. Oh well, I’m going sailing on Sunday and will be busy tomorrow so it will just have to wait – at least I should be much quicker this time.
18th July – yet more tinkering with the little pistol! I worked on the tumbler and spring to get the combination working – its an iterative process – check, file, check as you converge on what looks like a satisfactory arrangement. I filed a square on the tumbler shaft and drilled and filed a matching hole in the cock so that I could see how that fitted at the same time. It all went together quite well as far as I can test at the moment. I found a sear that will probably do although I might have to bend the arm a bit as it threatens to foul the edge of the lock pocket – so now I’ll need to file the bents in the tumbler for half and full cock – the half cock is more difficult as it has to resist firing by letting the sear nose enter a slot. I’ll have to make a cock screw to keep the cock in place – although its not loose it still comes off, and also a screw for the sear pivot. The cock screw is 5 UNC ( I made the tumbler) but the sear pivot seems to accept an M2.5 thread, and I don’t have a die for that one – for the moment I can use an existing screw. That just leaves making hardening and tempering the spring and any other bits, and making the sliding safety catch and spring, oh and the sear spring…. not much to do then!
The shape of the end of the spring, the ‘spur of the tumbler and the orientation of the cock on its square all have to be right – its a slow job if you haven’t done it very often.
17th July Bit more tinkering with the little pistol – I made a new mainspring and also made a video of the operation – difficult to concentrate on two things at once – tryiing to bend the spring into a ‘hairpin’ while juggling an oxy/gas torch and talking to the camera is fun. I can’t put it down without turning it off, by which time the spring is cold. I got it in the end though. Anyway it is almost there – just got to alter the bend a little to make it more even and slightly less open, and shape the end that bears on teh tumbler. Very satisfying making springs! Much more so than struggleing with editing documents in Word – I’ll have grey hair if I have to do it much more – making springs etc is a doddle compared to struggling with Bill Gates’s constructions. I think I got the bridle to fit as well, so progress!
The bend has a face with a slight angle so it looks dark – its fine!
16th July I did some work on a gun case – I bought a set of ‘furniture pens and crayons’ from Amazon for a few pounds – they are meant for touching in scratches on furniture but they might be useful on guns and cases – I’ve aleady deployed the mahogany one – it helps but I really need darker shades. In my ‘spare’ time I’m still tinkering with the little Harding pistol. I put the proto tumbler in the miller and got a bit more metal off it, and have now filed it to an approximate shape. I found a sear that looks as if it will fit so I’ll have to sort out the bridle and fixing screws – I think I can use the bridle out of the box of bits if I weld up the hole for the tumbler extension shaft and re-drill it in the right place. Then its just a case of making the mainspring, the sear spring, and the sliding safety catch, bolt and spring – nothing really!!!!!
Part way there with the tumbler. not sure about the sear?
15th July – Looking through my Manton book yesterday I realised that whoever botched the single NOCK barrel to have a recessed breach didn’t need to recess the side opposite the lock – Joseph never did on single guns….
I bought back a pair of continental locks sans frizzens to see if we could find replacements for the owner – and indeed we found a pair of matching frizzens with pan lids exactly the right size – the tails need extending to reach the pivot position but that can be done…. a result.
My ‘office’ table is now covered with nautical charts as we begin to plan our summer trip to the NW of Scotland – we have a new charter yacht from Skye and will head out to the Outer Hebrides – we are a bit light on crew this year, so a bit more work for me, although the boat has in-mast reefing on the mainsail so not so much deck work needed – its 43 ft long so it will be interesting to see how we get on with just 3 of us. It’s the coming alongside in marinas that’s tricky, although we don’t do that very often. The last few years we’ve had the same boat so I knew how it handled under power – its going astern that is always tricky – most boats just won’t steer until they are moving so you never know quite how they will set off backwards so there will be a learning curve with this one.
The table is also covered with the bits of a pistol case that I am remaking – fortunately was just held together with animal glue – or indeed no glue at all! Anyway its all in pieces now.
I’ve had a couple of conversations with experts on gun browning in the last few days – one, supposed to be the best in England says it can take up to a month to get a good browning on some barrels, and he stops if the weather gets too hot. The other friend says he reckons up to 16 days and thinks that if you brown them faster than one rusting a day the browning wears off very quickly – so maybe I need to slow down as I had been aiming to get at least two brownings a day……..
14th July – Holts shoot at Cambridge Gun Club. Not my best day – but I did manage to hit one of every different clay except one – at least that shows something! Derek brought the owner of the Joseph Manton 22 bore featured in the posts and the gun for Nick Holt to have a look at – I was able to assist him in unravelling the gun as I’d done a blog on it. He was shown another gun that was a bit of a mystery – a very late Jo Manton flint lock on a single barreled gun signed H Nock on the barrel – its difficult to appraise a gun without my list of dates and references etc, but the gun had the patent Jo Manton recessed breech C1810(?), while the barrel and trigger guard looked older. My suspicions were confirmed when I noticed that the breech blocks had been machined down from a normal width to the recessed width to take the late lock, and not particularly carefully. The lock fitted quite well. Nothing on the bottom of the barrel made a lot of sense – no HN maker’s stamp as I would expect, or a number (Henry Nock was amonst the first to number his guns around 1790). In the absence of any further info I thought it was maybe a Nock gun of maybe 1790ish with the ‘wrong’ lock. Possibly a spuriously engraved NOCK? The left side of the breech plug had also been recessed – I didn’t see if the stock had had a bit glued on to fill the gap where the barrel was milled away. If not I’d have to suspect that it had been restocked – the lock was very well inletted so a possibility. I’m afraid the jury is out on that one! I was hoping for a valuation on the Post Office pistol – I know what its worth as a little pistol but not what the rarity value of the P.O. connection is – but it wasn’t fair to expect Nick to guess that. I actually found a reference to one similar being sold at Bonhams in 2015 for $2800 – so obviously some rarity value there….
13th July – bit more tinkering with the pistol below – I had to make a replacement screw ( I had to grind it out) for the tang of the trigger guard – I don’t like just using a woodscrew as the heads are never right and in this case they don’t work well into the endgrain of the plug I had to glue in, so I turned up a countersunk screw with a No 5 UNC thread and an extra false head. I slotted the false head and screwed it in, then marked the fore and aft line, cut off the false head, put in the aligned slot and filed it to conform to the curved shape, then engraved a few lines on it and used Blackley’s case hardening powder to colour it down (and incidentally harden it). Jobs left include all the works of the lock, some reshaping of the cock casting I have, to reduce the prominent breast it has and scale down the spur, and make a ramrod. Tomorrow is the Holts Shoot at the Cambridge Gun Club – I am, of course, going and will hope to exceed my 50% target – I didn’t quite make it at the Helice shoot – I was on target but missed all of the last 4 ‘easy’ birds! I’ve finished a batch of de-cappers to take to CGC – they make good engraving practice so I did a little stand of arms, and a stand of music and a sunburst and a scroll plus some borders. Quite interestingly (at least for me!), the strip I was using that I said was as soft as butter turned out to be pretty tough down the other end – just goes to show what cold rolling does to the grain structure near the surface.
I made a small furnace for heat treating steel, although it should also be hot enough to cast aluminium and brass. The basic design is from a YouTube video by a schoolboy, and is the neatest small design I have seen on the web, although the basic principle could easily be modified to give different configurations – in particular it would be easy to make a front access furnace, or one that would take a longer part using the more of same bricks and elements etc. with a different configuration and a modified steel cage round it. Having used the furnaces a few times I think I skimped by only having half thickness bricks on the base as it gets pretty hot underneath – although as its standing on legs above a piece of stone it doesn’t really matter. The basic parts of the furnaces were sourced from Ebay and I spent around £80 or 90 making it, but I did have quite a bit of old junk lying about that got incorporated, including the metal for making the framework, the wiring bits for the circuit and the old plastic box and aluminium panels.
Dragoons were essentially cavalry of medium or heavy weight, as distinct from light cavalry. The army had both Dragoon and Cavalry regiments in the 18/19th centuries.
This is a pretty standard Heavy Dragoon pistol of 1795 pattern with rounded lock and iron ramrod. All parts are original – all the ironwork bits are marked with the assembly mark X\III – even the screws. Proof marks are missing from the barrel, although there is a ghost mark in teh right place. The marks that would have been impressed on the wood are missing, although there are pits where they might have been.
This is a pretty straight pistol, all original with a poorly repaired muzzle end to the stock, and the bents on the tumbler and the end of the sear all worn so that it can be fired on half cock but won’t hold on full cock. There are numerous small dents in the woodwork from a hard life, and the frizzen has been refaced, also suggesting a hard life. The barrel has been struck off at some point and lost all but a trace of its marks, but isn’t rusted on the outside and will clean up perfectly. Here are a couple of views before starting work;-
The Andrews is a fairly typical travelling or possibly officer’s pistol of the turn of the 18th century. Judging by pictures on the internet there were basically two common patterns of Andrews pistols of this type – the earlier with a rounded back to the lock and a semi rainproof pan and serpentine cock in the English style, and the later with a square back to the lock and a full rainproof pan and french style cock with a cutout. This one is probably the earlier type based on the shape of the lock and so would not have had a full rainproof pan and french cock.
I have Gold plated the pans of flintlocks using the brush plating system sold by SPA Plating (www.goldn.co.uk) with great success. Steel makes a perfectly good substrate on which to plate gold directly without a barrier layer, the only caveat is that rust must be avoided by keeping surfaces very lightly protected by oil or a coating like Metalguard. Spa plating used to have a very good handbook on plating but I couldn’t find it on the latest website, and the new instructions are less clear so I will put the .pdf at the end of this blog. I have told them that the new website isn’t as informative!
Here are my hints for plating gold onto steel parts using the SPA plating brush method;-
When it comes to finishing stocks for antique guns I like to use the traditional materials – partly for authenticity and because they are pleasant to work with, although undoubtedly not as durable as a thick coat of polyurethane varnish! Guns were finished using one of two methods, oil finishes or spirit varnishes. Oil finishes basically use mixtures of oils (usually boiled linseed oil) and waxes ( beeswax and other hard natural waxes) and harden by the oxidation of the oils by oxygen in the air, which takes place fairly slowly – driers, typically based on manganese compounds, are used in low concentrations to speed up the oxidation. The alternative traditional finish was spirit varnish, using a solvent – typically alcohol, in which a naturally occurring material that is transparent and hard is dissolved – typically shellac (secreted by an insect) or occasionally copal varnish (from the resin of a tree), or other resinous material – alcohol and Shellac are the ingredients of traditional French Polish and were very widely used before modern synthetic materials displaced them. Spirit varnish hardens by evaporation of the spirit to leave a thin coating of the varnish – the alcohol evaporates rapidly so the varnish hardens quite quickly and far fewer coats are needed compared to oil finishes, but its more difficult to get an even finish. Shellac varnish itself has a brown tint, and so does darken the wood slightly – the better the quality of the shellac the lighter the colour. It is also possible to use both materials on the same job.
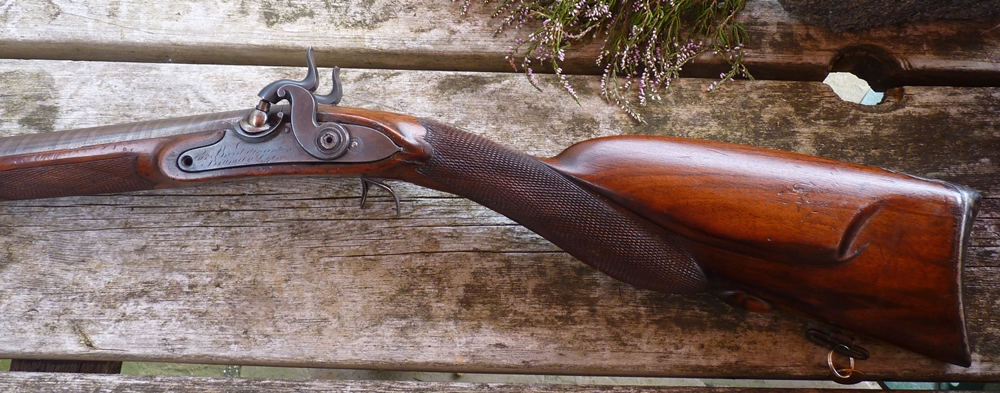
I bought a Samuel Nock Heavy Rifle of about 16 bore for restoration, I think it was made as a big game rifle, although it has been used recently as a target rifle. 12 lbs is a not unusual weight for a dangerous game rifle and the bore is appropriate, but larger than was popular as a target rifle.
Since I was playing with my new setup for photographing long guns I thought I’d post some pictures of my favourite gun ( my Westley Richards 12 1871 patent breechloader excepted!) , and one of my earlier restoration before I started this blog. It was a German (?) Jeager rifle I purchased from Holts for not much money( if I remember correctly- it now seems unlikely!) as a drum percussion conversion minus its trigger guard, sideplate and butt plate and in a rather sad state, but I was attracted by the inlaid brass figures and date on the stock. I kept the percussion lock intact and made a completely new lock with a casting for the detachable pan and a flintcock, frizzen and frizzen spring casting. The trigger guard was fabricated from strip metal and old bits, and the butt plate was modeled in lead and a silicone mould made and then cast in brass – all the casing done by Kevin Blackley. The side plate was filed from brass sheet, and new screws made. I’m very fond of the finished gun – its very simple and utilitarian, except for the delightfully naive inlay work. I’d like to imagine that this gun was one of the forerunners of the American Longrifle! ;-
I made contact at the Fenland Country Fair with the lucky owner of this Mortimer brass barrelled blunderbuss who wanted it put to rights. He brought it to Sandringham Game Fair, and its a beauty! Well worth doing – the cost of repairs will very easily be covered by the increase in value, although that isn’t the client’s priority – I’m always careful to discuss this aspect with clients because its important that we understand the context of the repair. By any standards this is going to be a real beauty when done!
Here is another job that I have taken on – this cased double pistol is immaculate – it looks untouched by human hand – except the barrel engraving that looks as if the barrels have been refinished with a little too much vigour. So I have to work some magic on them….
I’ve been asked to recut the engraving on the barrels of a very fine pair of Westley Richards target pistols that have lost legibility on the barrel engraving.
Looking at the lettering under a microscope it is clear that the lettering is not showing clearly for two main reasons, and I’m not sure which is the most important;-
I found this old pocket pistol in my collection of miscellaneous bits and pieces, and somehow found myself starting to spruce it up, without having ever thought it was a job worth doing – but I’ve started so I’ll (probably) finish , at least some time….Continue reading »
I thought it was time to discuss the issues around restoration and repair, and perhaps offer some simple advice to beginners who find themselves in possession of an antique gun, or more subtle questions posed by collectors who want to enhance their guns, or put right old damage or botched repairs. It is very presumptive of me to offer this advice, but I get a steady stream of questions from people who visit this site – occasionally after they have already made ‘unfortunate’ decisions and done potentially devastating damage to their guns….
I suppose one way to approach the subject is to offer some ‘rules of thumb’ about particular issues – so here goes….Continue reading »
The PARR pistol from Holts Sealed Bid sale was labelled as a 25 bore duelling pistol – used in the broad sense I guess it might have been but I think the description is overworked! Anyway, the hammer price was £320 so by the time I had paid the dreaded buyer’s premium (30%!) and postage it was around £440, which doesn’t leave much of a margin for work, but its a useful exercise and I wanted a start-to-finish job to document as most jobs get some way along before I remember to photograph them. Here is the original set of photos with some annotations ( I apologise for the photo quality – I didn’t use my decent camera) ;-
The lock lock I’m making up here is a from a set of castings from Jim Kibler in the US, I think he charged $125 for the kit which has all the cast parts but no screws – good value for a nice kit. I built up the lock without any particular destination in mind, but later I made a pistol in the style of a sea service pistol and fitted the lock to that – see INERT PISTOL post .
Here is the kit – I have cleaned up most parts and turned the tumbler down – only the top jaw is untouched.
RestorationComments Off on French Percussion restoration
Aug172015
I have been playing with this for a while, but posting it has had to wait until I got back from sailing in the Hebrides, so here it is;-
I bought this from Holts way back as I thought it would be a bit different – I thought that it was probably a conversion from flint, but it is possible that it was made like that originally – it had had some later work done anyway – I’m not that familiar with French guns that I can be certain. On examination the ‘barrel’ holding the left nipple didn’t match the one holding the right nipple, and was not fit to be fired – you can see above that I have made and fitted a replacement – fortunately a 3/8th Whitworth thread fitted the existing hole. Also the left lock didn’t work as the bents on the tumbler were badly rounded and didn’t hold the sear, and the cock was not correctly aligned with them so that it tried to cock and half cock in the wrong positions – plus the hexagonal hole in the left cock was pretty loose on the tumbler. Maybe a replacement tumbler?
RestorationComments Off on Samual Nock 16 bore lock problem & Anglian Muzzle Loaders’ shoot
May172015
Today was the monthly shoot at Cambridge Gun Club – Martin Crix had been over the day before to set things up and had done a fantastic job in selecting targets – although the wind was different on the day and CGC had changed a couple of the traps. It was the most enjoyable shoot I’ve had there for a while, and not just because I hit a few more clays than usual! Competition was very close and scores were mostly within a fairly narrow range – a credit to Martin’s planning. I’ve been using a number of different guns lately, which I decided was a bad idea, so I went back to my 16 bore Samuel Nock percussion double – I bought this gun some time ago at Holts and did some cosmetic work on it, and had to sort out the cocks – I replaced them with a pair of John Manton cocks that fitted perfectly.
I’ve just engraved the brass sideplate of a hefty early blunderbuss with rather nice stripy wood that my friend Dick was restoring for a client. The barrel has a classic ‘strawberry leaf’ motif on the breech, and the new sideplate needed to have a bit of life put into it. The original would probably been cast and quite 3D but the replacement is rather thin so I tried to get some 3D effect with the simple engraving – it remined me that I hate engraving brass more than anything else – I resorted to my Gravemaster in the end. The Gravemaster relies on resonance to work, so it depends on tuning the pressure and frequency (see below) so I can’t always get it to cut consistently, sometimes its too fierce and sometimes it hardly cuts at all – it is a frustrating tool, but it does have its uses and presumably I’ll get used to its foibles and learn to control it one day. (Added later…. I have sorted the Gravemaster now I hope, but uncovered a mystery – the pressure regulator on the compressor was blowing off above the set pressure and loosing air, so the compressor tended to run continuously which it wasn’t rated to do. I concluded that there was some kind of leak in the regulator and bought a new one. The new one worked as I thought it should and now acts as a pre-regulator that stabilises the Gravemaster and it seems to be fine. When I stripped the old regulator it seemed that it was meant to blow off and not regulate – more of a safety valve than a regulator – a mystery….
I didn’t do a particularly good job of getting rid of the Brasso!
For more photo examples see Engraved Screw Heads – Gallery post on this site.
For a list of dimensions of most modern thread sizes click here;- Useful thread Data
Gun screws are one of the most common things that get lost, broken or mangled on old guns and so are often remade. On an old gun a replaced screw that hasn’t been engraved stands out a mile, yet they are one of the easiest things to engrave, as we shall see…
I’ve been a bit lax in keeping my Blog up to date recently, so here is an update:
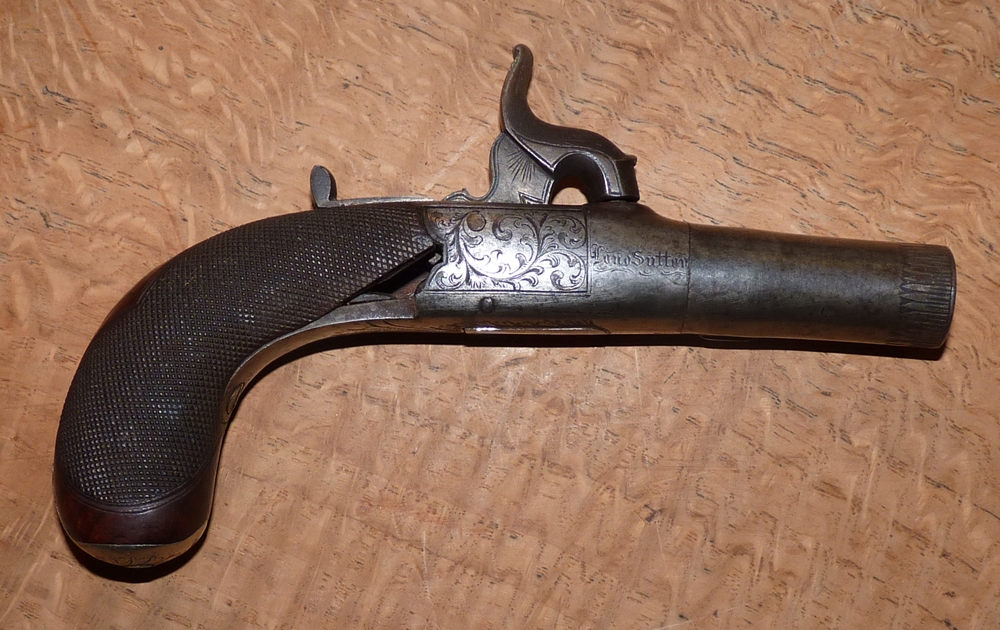
Turn-off Pocket Pistol by Abbey of Long Sutton
I bought a pair of percussion turnoff pistols at the Birmingham Arms Fair because they looked pretty and in need of a bit of TLC, I also got a box that fitted them as pairs were sometimes boxed. When I got home I found I had a barrel key that fitted, but couldn’t unscrew the barrels easily so sprayed Plus-Gas around and left it for a day or so. Still couldn’t get them off so thought I’d better apply some heat, but in an uncharacteristically sensible moment I thought to check that they were not loaded. One was – I could see the lead ball. The Plus Gas prevented the powder from going off, so I drilled out the ball and poured out the damp powder which fizzed when lit – so the gun had been loaded since it was last used – probably in the mid 1800s – some 160 years ago!
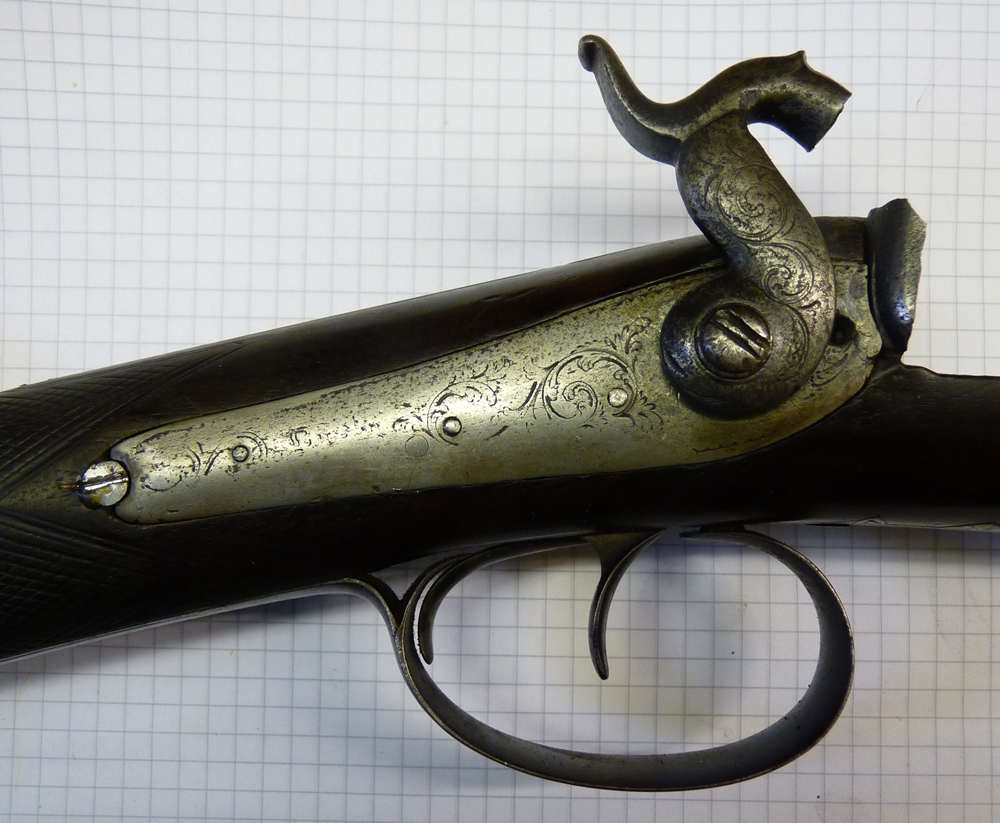
Bev Keeble, one of the Lakenheath Muzzle Loading members and a mean shot with a muzzle loader, had a 18 bore double percussion gun that had the RH back action lock replaced by a gash lock that had had most of its engraving filed off and was a bit of a mess.
RestorationComments Off on Flintlock Pocket Pistol by Henry Nock
Nov282014
Cased pistol in good condition with flask, bullet mould, turnscrew and barrel key. Pistol, flask and bullet mould and key ( slightly the too small) are contemporary, the rest are recent.
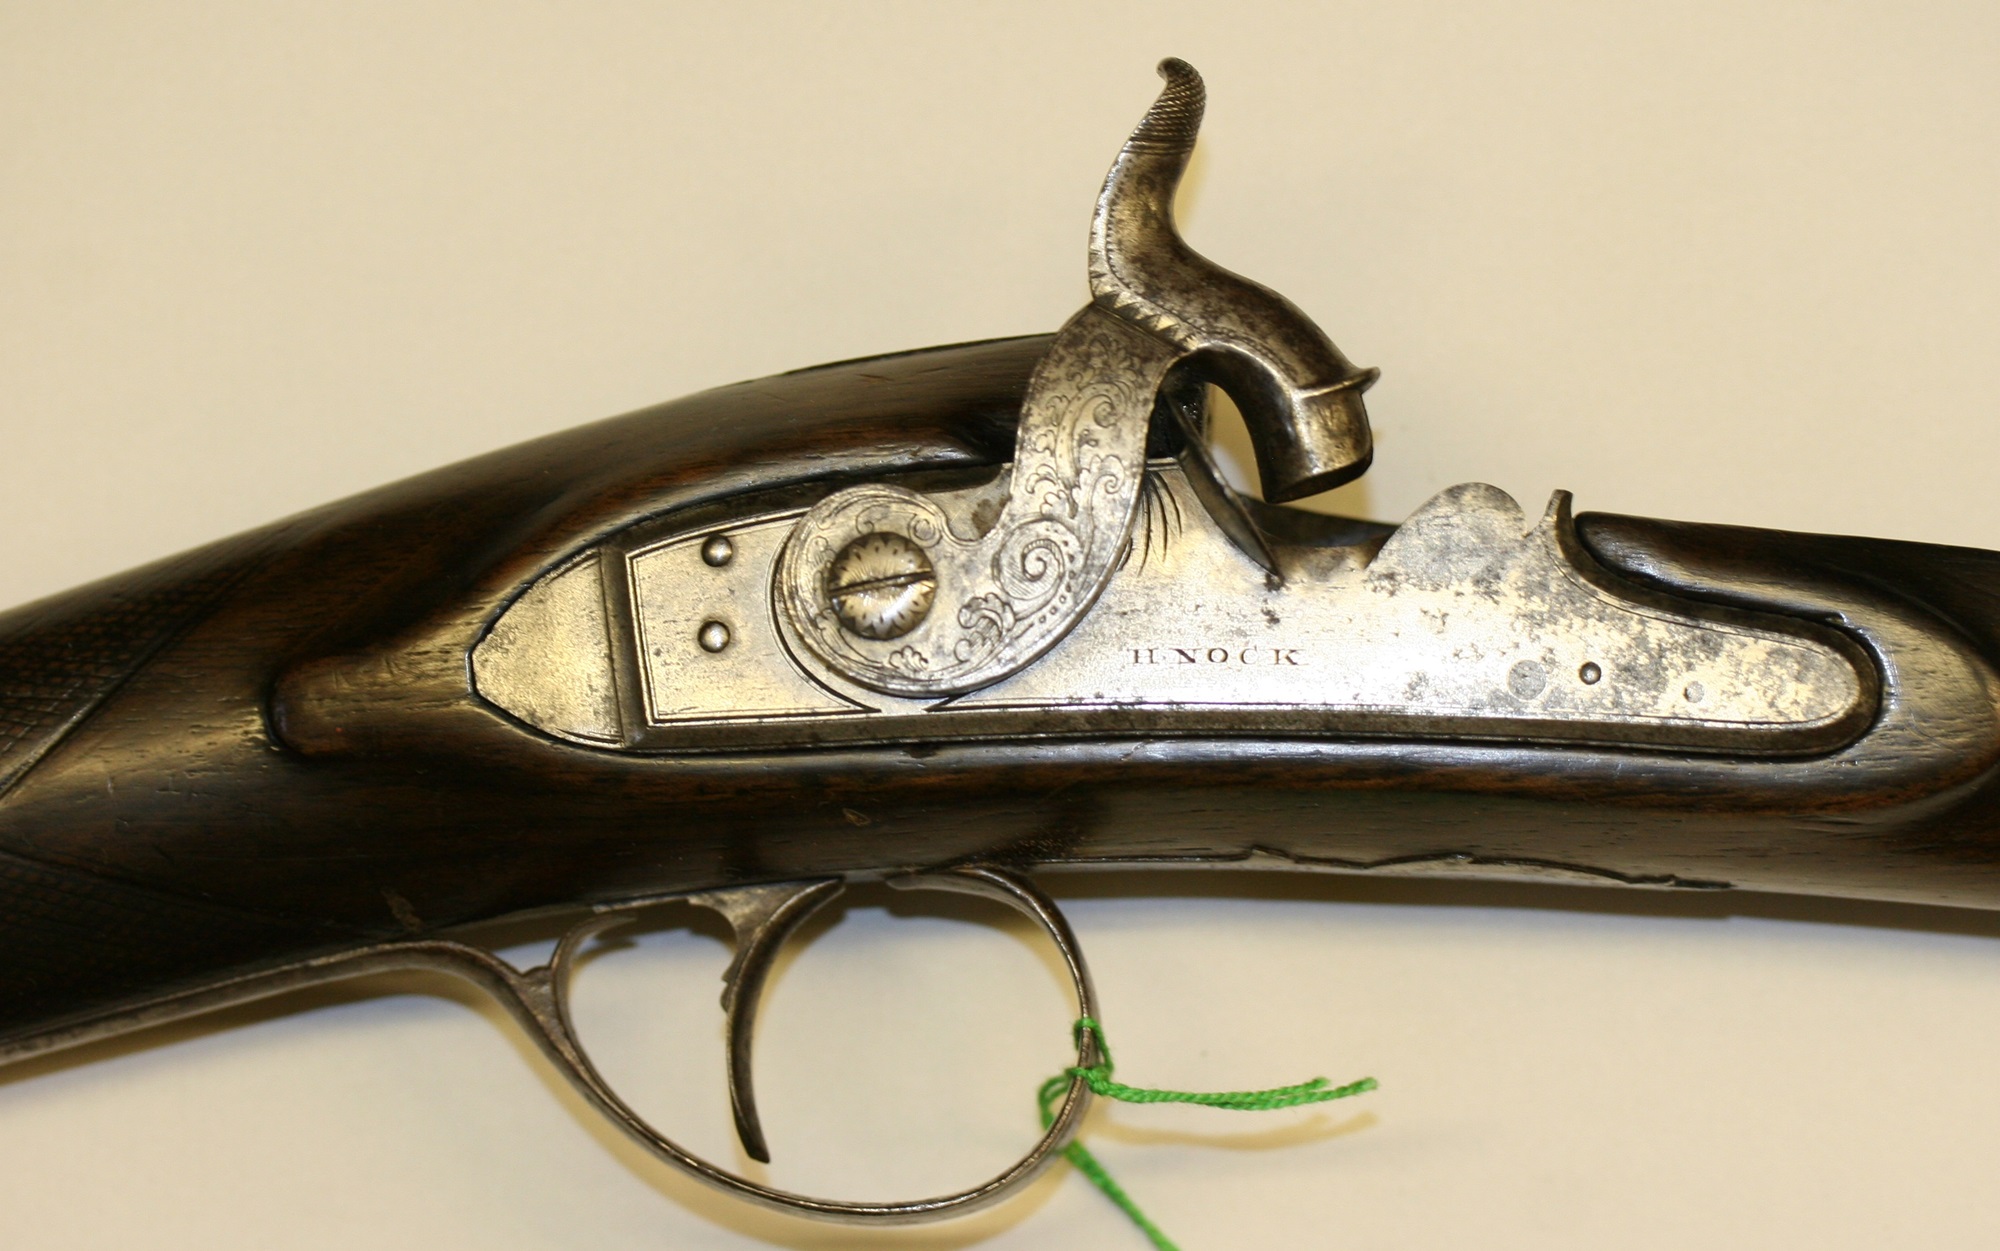
The pistol has a new butt fitted (original retained) and the under tang of the frame has been repaired. It has Birmingham proof marks probably from the official proof house that opened in 1813. Henry Nock died in 1804, but his name probably helped sell these utilitarian pistols – they were made in large numbers in the late 18th and early 19th century, and were a cheap and effective personal protection weapon against footpads etc. They were normally sold in a bag with the necessary key for unscrewing the barrel, and a small leather wallet containing a turnscrew for the cock screw and a couple of spare flints, plus the necessary bullet mould.
People think that because these pistols have the name of a famous maker on them, they were made by that maker – its probable that he never even took them out of the bag they came in, or possibly he got the youngest apprentice to unpack the boxes of a dozen when they came in from Birmingham and put them in bags.
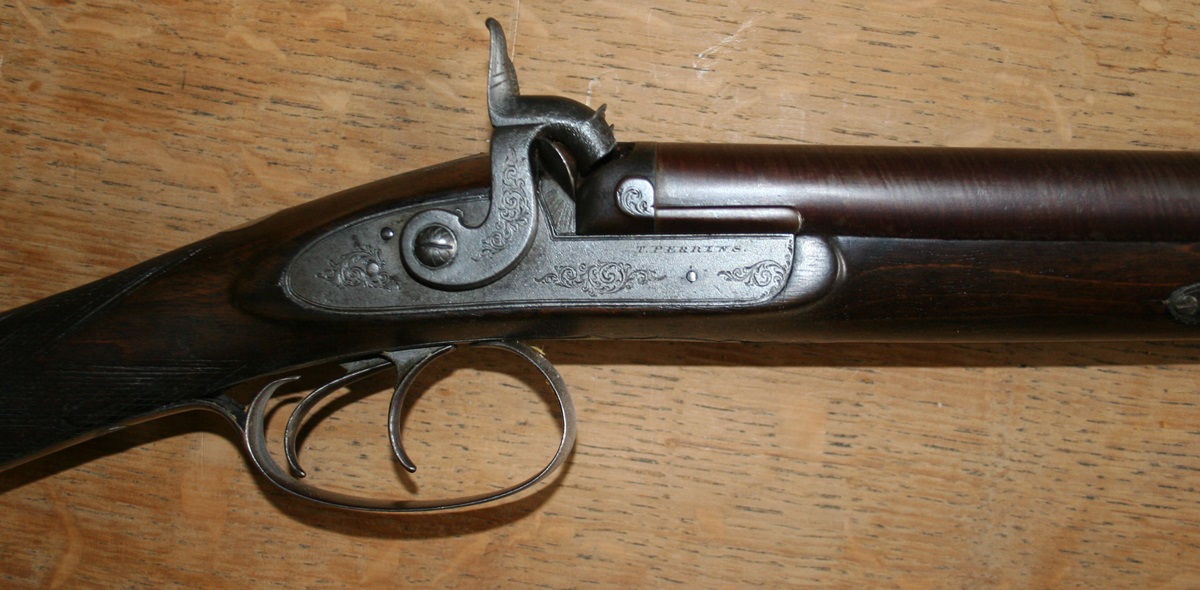
An interesting gun, signed T Perrins on the locks, and faintly but clearly T Perrins Worcester on the barrel rib, it has 27 1/4 inch plain twist barrels with London proof marks and stamped LG (?) underneath. The engraving is fairly simple and a little unusual in that it has matching scrolls on all the furniture. It has a 13 1/2 inch pull, and is clearly intended as a ladies or youth’s gun. I would rate this as a fairly basic, but sound class of gun, I’m not sure where it was made, the proof marks suggest it was not Birmingham made, but I haven’t any lead on the barrel maker. As is known to Perrins followers, T.Perrins is normally associated with Windsor, Thomas was not previously known to have traded in Worcester as far as I know.
I bought this Henry Nock single barrel half stocked 16 bore gun from Holts to restore to shootable condition. The barrel is by Nock and is stamped H N Patent for his patent breeching. The gun was made as a flintlock, fairly late in the flintlock era, and converted to percussion using a threaded barrel and nipple in place of the touch-hole. Because the nipple barrel was threaded into the barrel, it will be possible to replace it with a plug for a touch-hole, and make a new flint-lock, thus making a gun that can be swopped between flint and percussion as the mood takes, and not destroying anything of the original! First I’ll restore it as it is, so that I can see how I like shooting it – I find some of the early guns are too high in the comb for me to shoot happily, and often I don’t find out until I try them at clays.
As purchased – the lock outside was good, and the barrel had been rebrowned, but the furniture was poor.
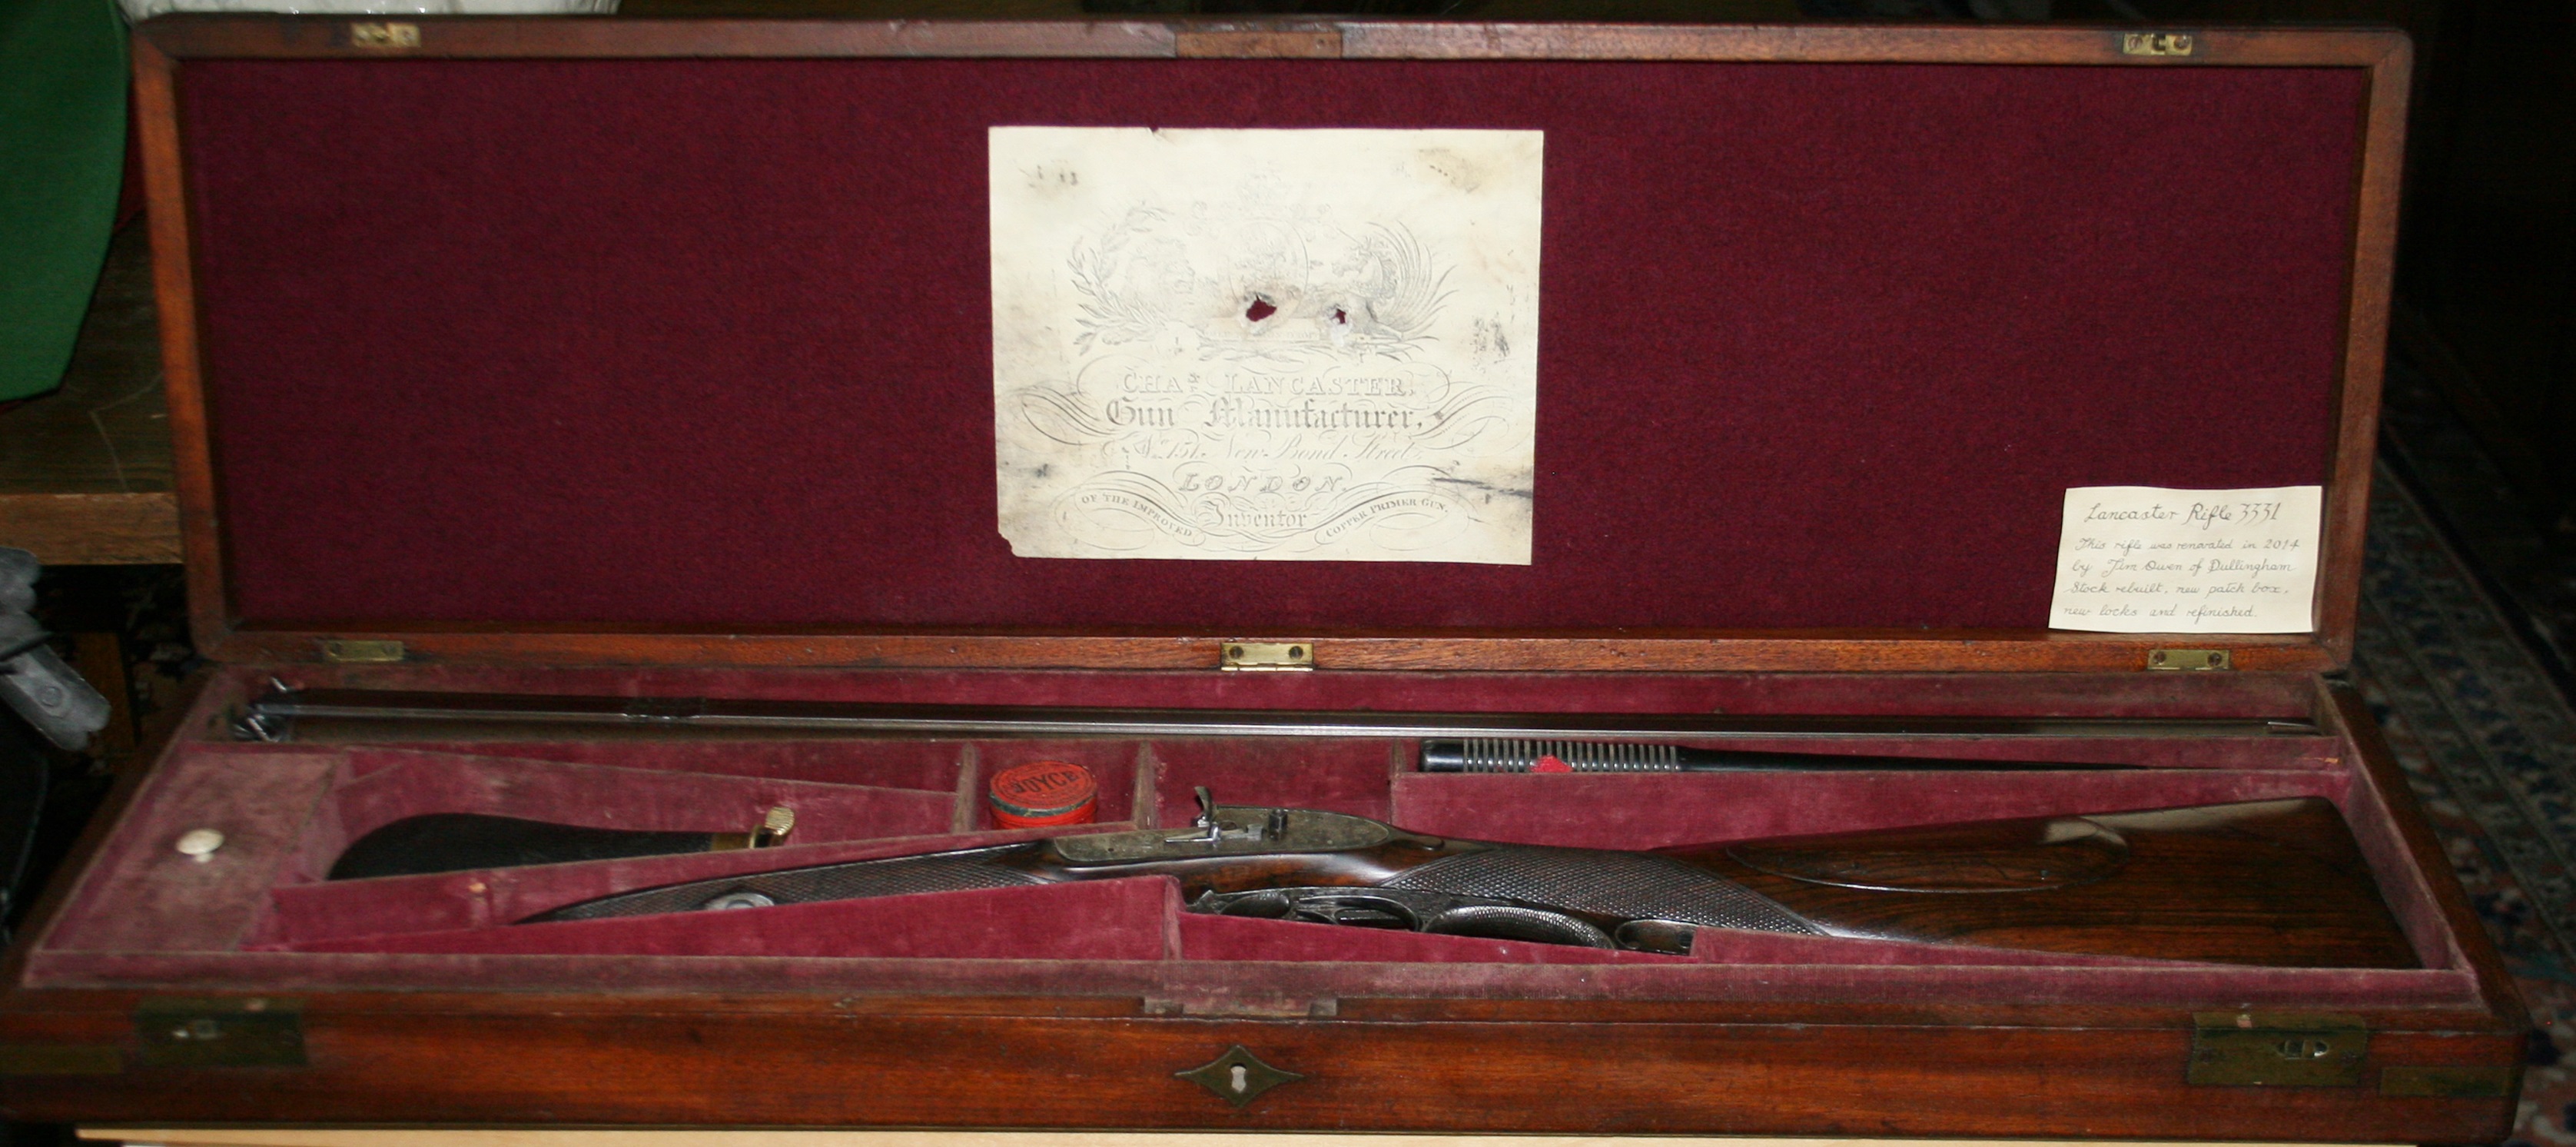
Charles Lancaster patented the oval bore rifling, although he wasn’t actually the inventor. I purchased a cased Lancaster double rifle in excellent condition (serial No. 3076 for 185X) and then acquired a complete wreck of a very similar gun. The stock had been burnt, the locks very crudely replaced with rebounding Stanton locks from a breech loader extended to fit the opening, and a major crack running right through the action area. I didn’t take photos of the ‘before’ state, but the work involved splicing a new heel on the butt – which my friend Dick did for me as my woodwork was not so hot ( its better now) and some additional woodwork that I did manage, including replacing almost all of the wood between the two locks. I made a pair of new lockplates, fitted with the modified Stanton insides, and made new main springs. I engraved the lock plates as an exact copy of the locks on my ‘good’ Lancaster. The good Lancaster had a circular patch box but there wasn’t one on the wreck, but there was a nasty burn mark on the stock where a patch box would fit, so I made one – but rectangular to cover the entire burn mark and engraved it to match the good one – keeping the circular reference of the original. I’m not sure I engraved the lion deeply enough, but otherwise I’m pretty happy with it – it shuts with a suitable snap. Stock is finished with dozens of coats of ‘Slacum’ – a mixture of boiled Linseed oil, beeswax and terbine driers, put on and then rubbed off as it goes through the jelly stage. I had a reasonably suitable case that fitted well, which I modified inside, and made a set of tools with ebony handles. I haven’t attempted to pass this rebuild off as original – the locks and patch box are engraved with my name and the year to avoid confusing future collectors and the case carries a ‘confession’ notice!
These pictures are what I have to hand – I’ll try to take some better ones sometime! Click on the pictures to enlarge to full screen.
RestorationComments Off on Jover restoration project
May202014
William Jover made some very fine guns, first as a partner in Nock, Jover and Green at 83 Long Acre from 1775 -, then as Jover and Bolton, then as Jover and finally as Jover and Son from 1784. He didn’t have the same high output as the Mantons or Nock, but was in the same league in terms of quality.
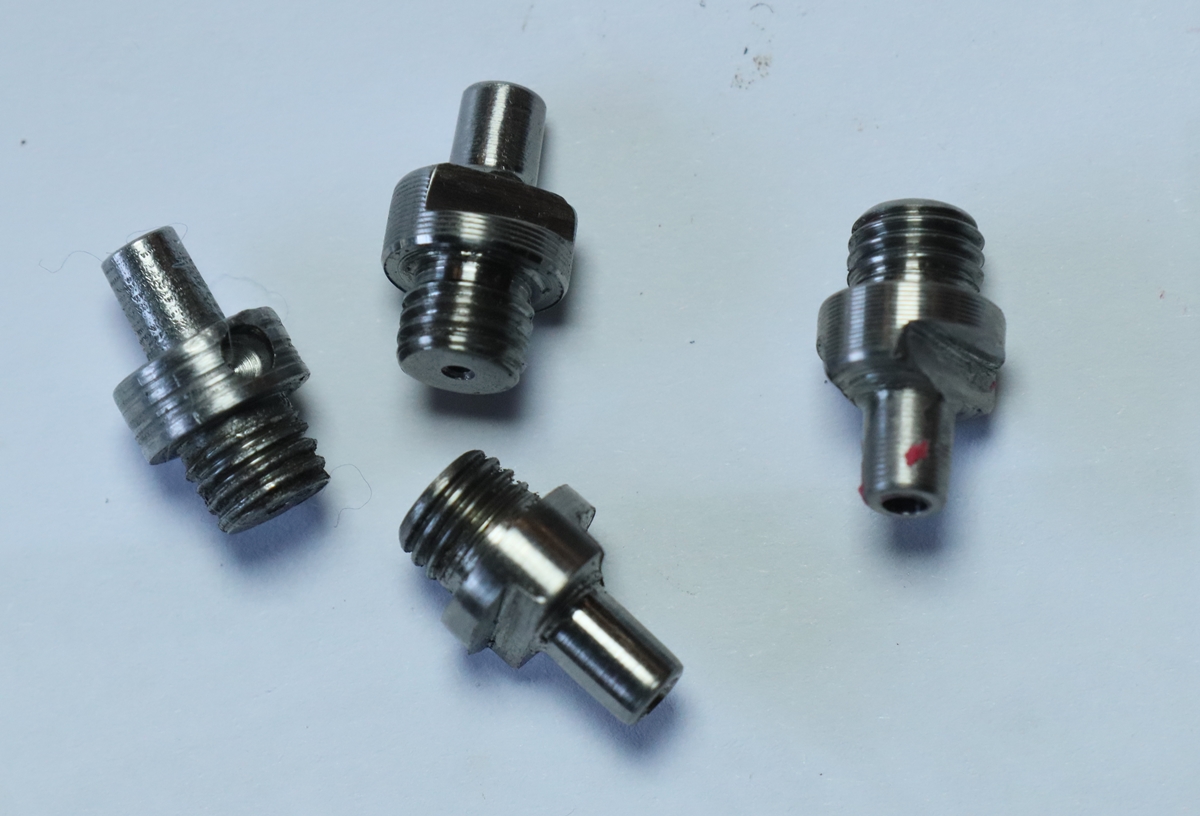 The one on the left is made from silver steel – its a bit of a mess, the rest are titanium – much easier to make!