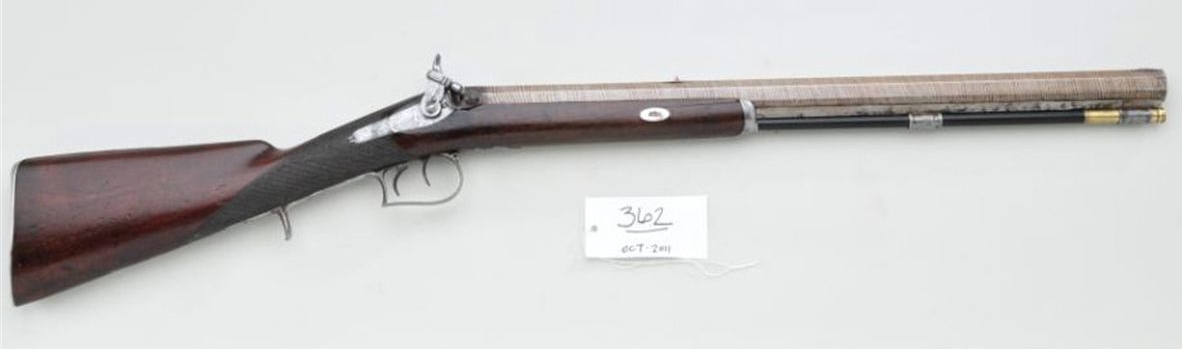
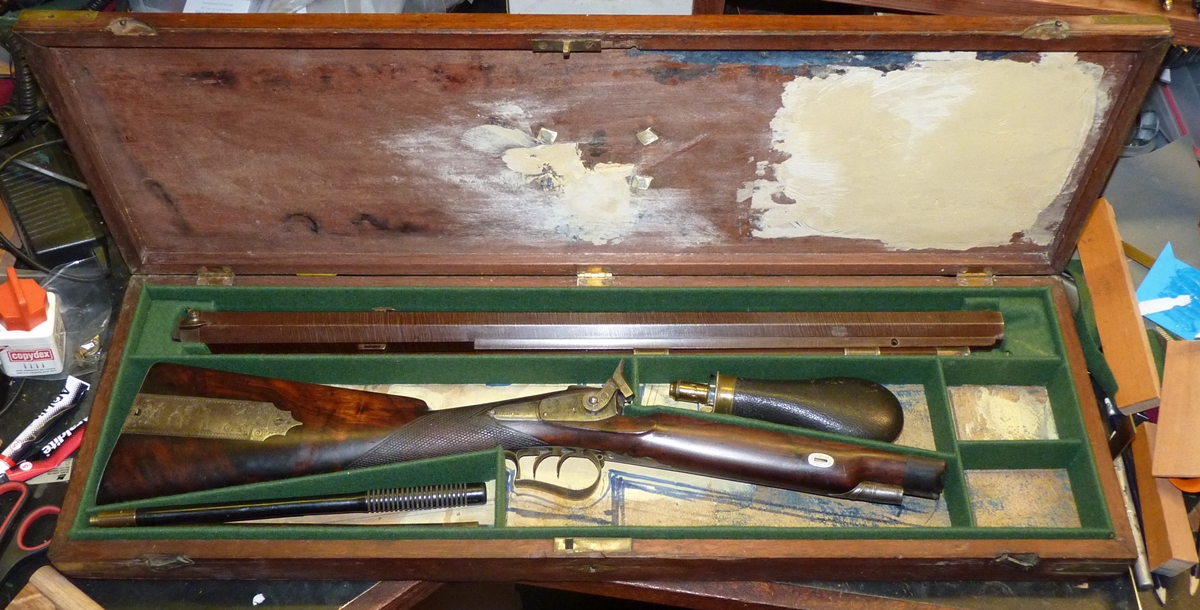
I bought a Samuel Nock Heavy Rifle of about 16 bore for restoration, I think it was made as a big game rifle, although it has been used recently as a target rifle. 12 lbs is a not unusual weight for a dangerous game rifle and the bore is appropriate, but larger than was popular as a target rifle.

Here are its specifications;-
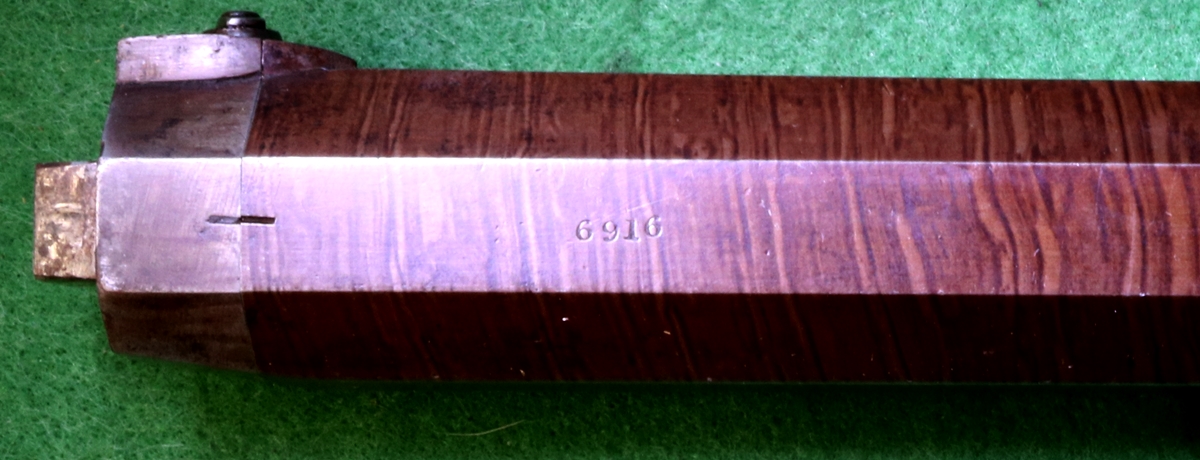
L.O.A. 44 inches, , overall weight 12 lbs, Serial Number 6916 under barrel. No proof marks found – probable date around 1826 – 1830 on basis of serial number??.
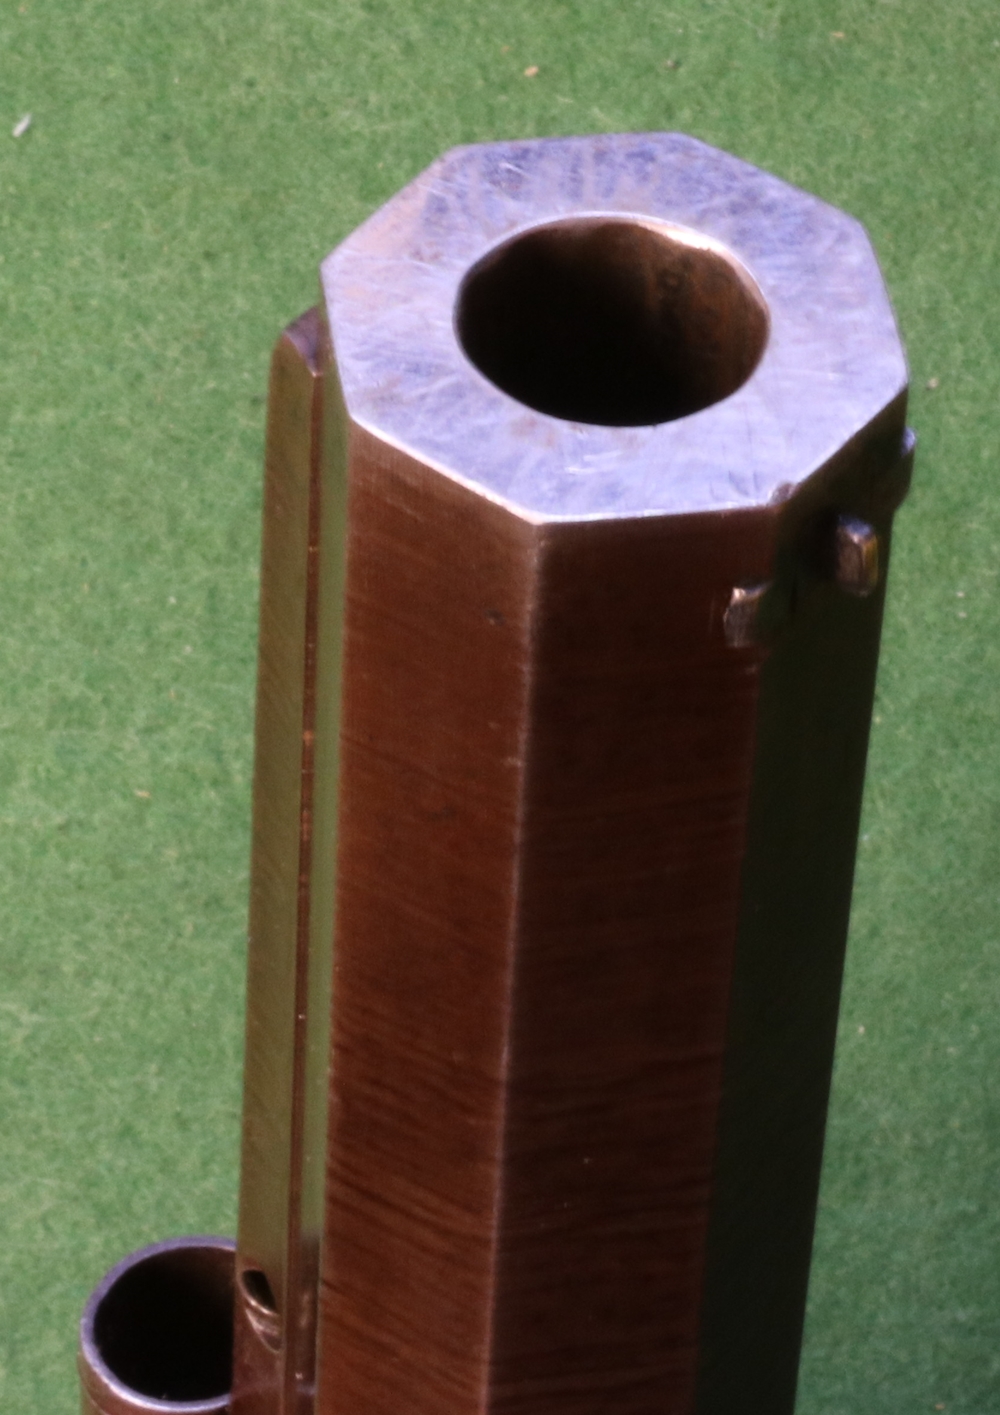
Barrel 28 inches, weight 9 lbs. bore approx 16, Cal approx 0.66 in, rifling 8 wide rounded grooves with narrow lands. Octagonal untapered. Low foresight and rear sight with 4 folding leaves, range unmarked. There are no peg holes in the muzzle face for a starter.
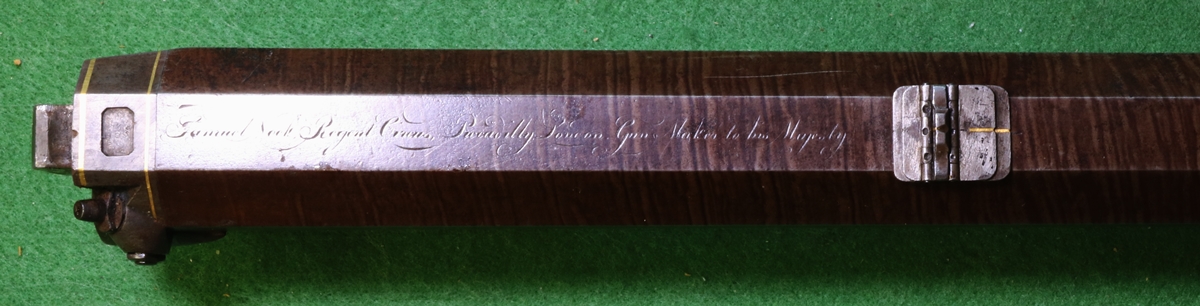
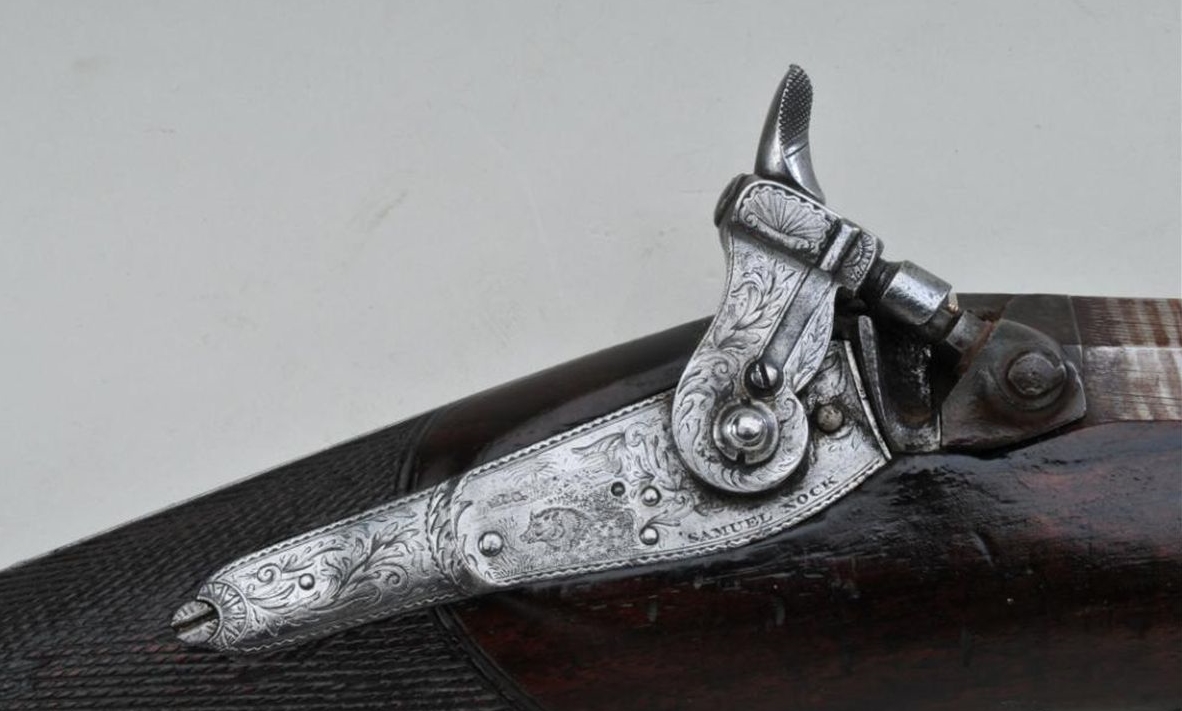
Barrel engraving; Samuel Nock Regent Circus Piccadilly London Gunmaker to his Majesty, Gold Poinson, underside number only – 6916
Percussion back action lock with set trigger cocked by second trigger, fitted with fly to tumbler. (sear pivot not original) numbered 6916 to match barrel.
Holes for sling loop in under rib and trigger guard, Patch pocket in stock.
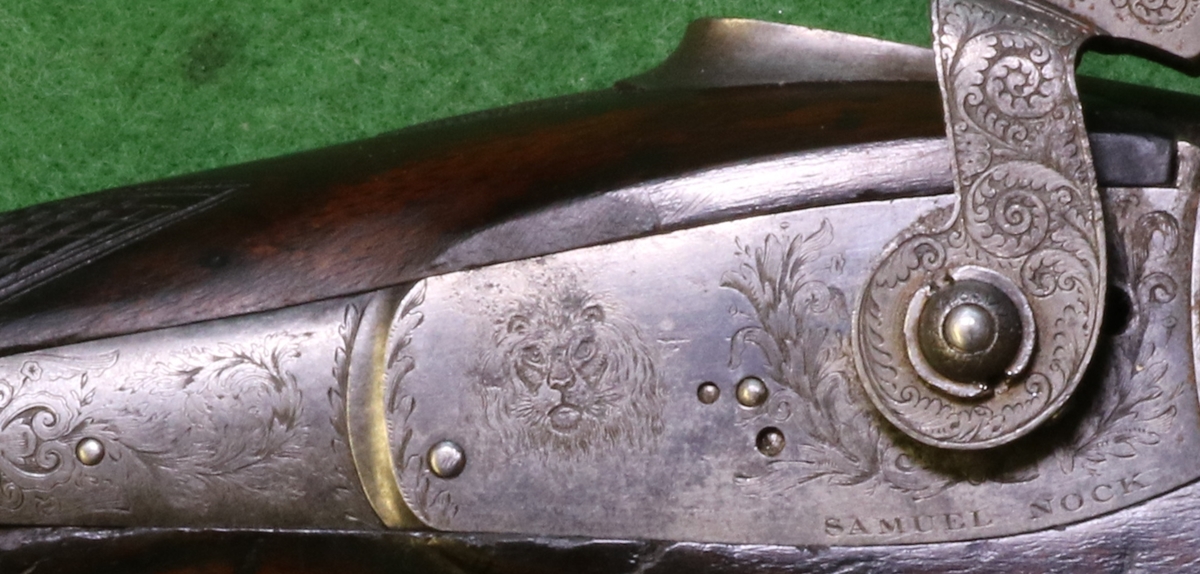
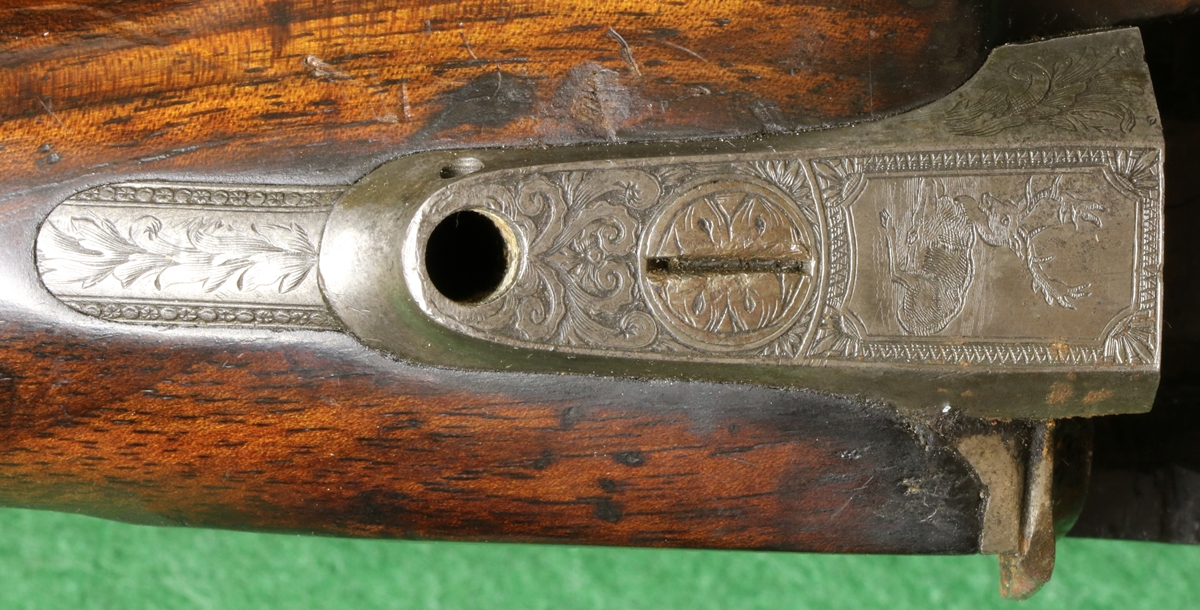
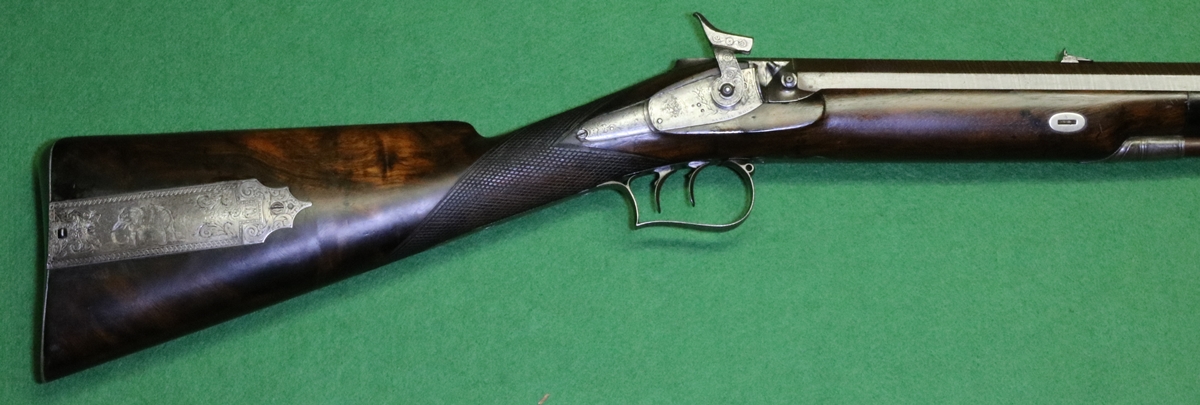
Engraving ;- Tiger ( ?lion) on Lock, elephant on patch Pocket, deer on butt tang and false breech, Jaguar on trigger guard.
Hole in extended false breech platform for post, with locking side screw.
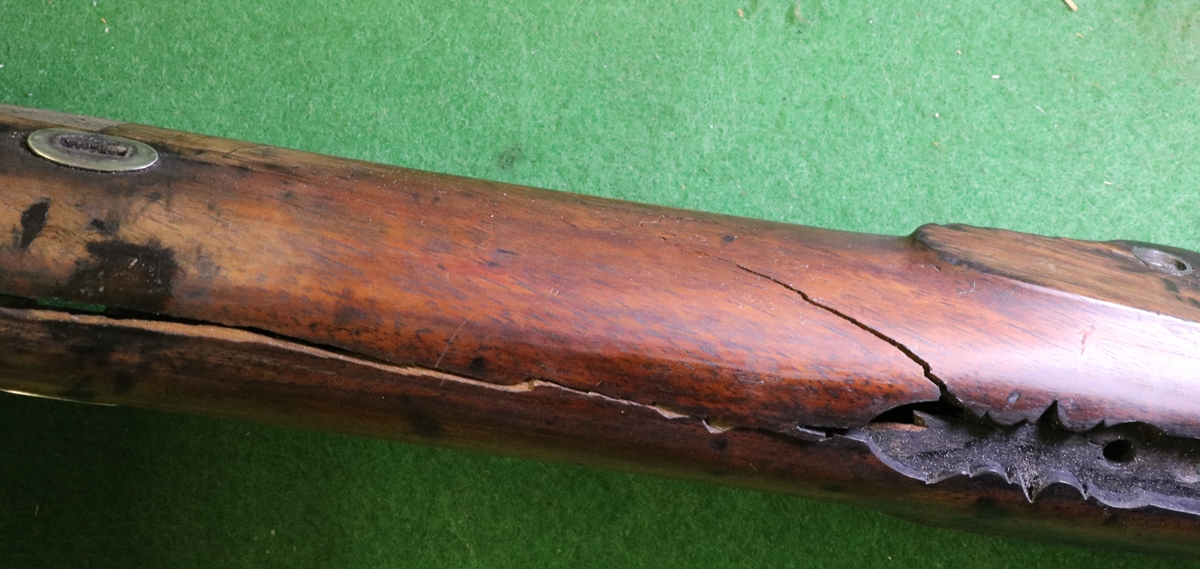
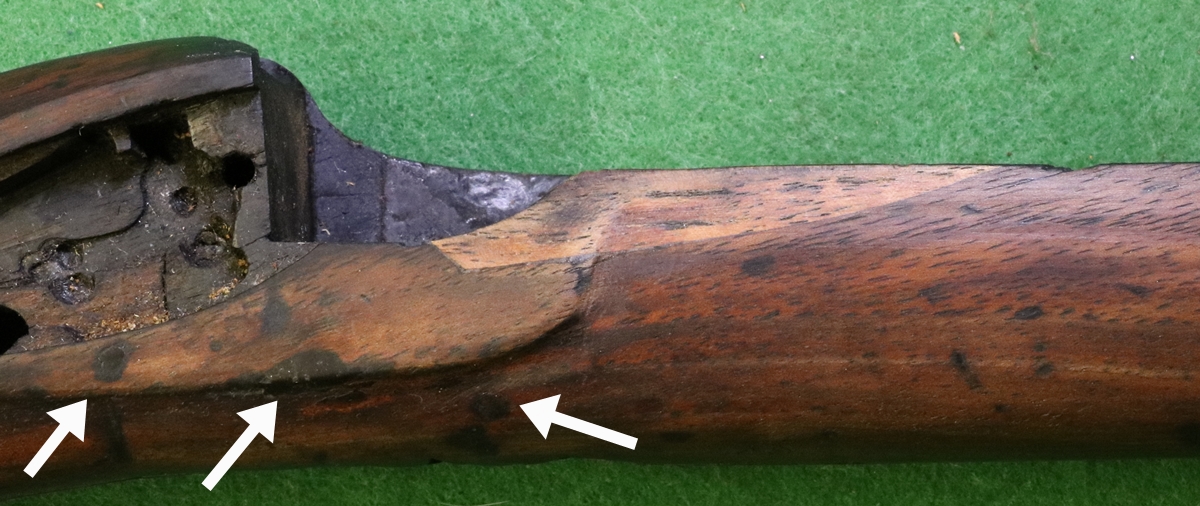
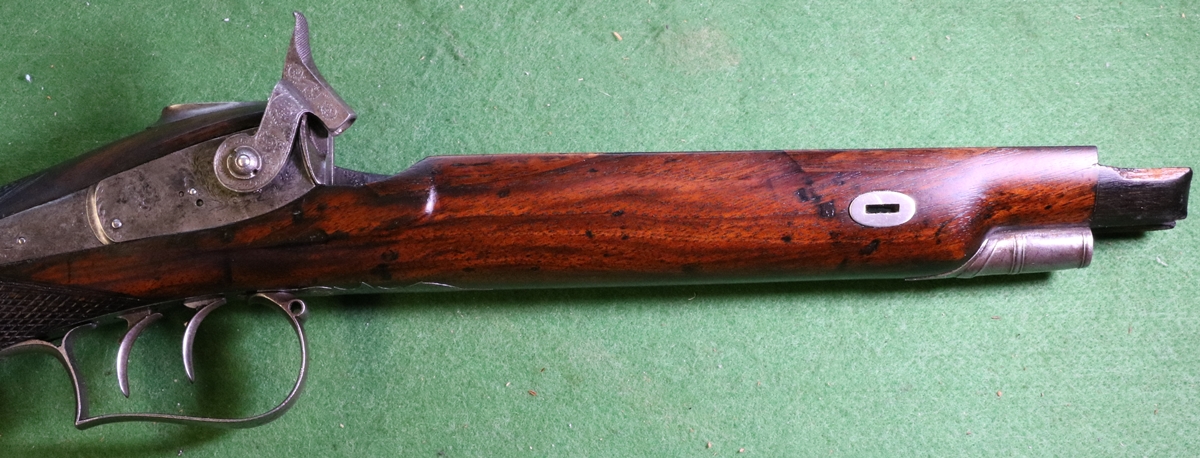
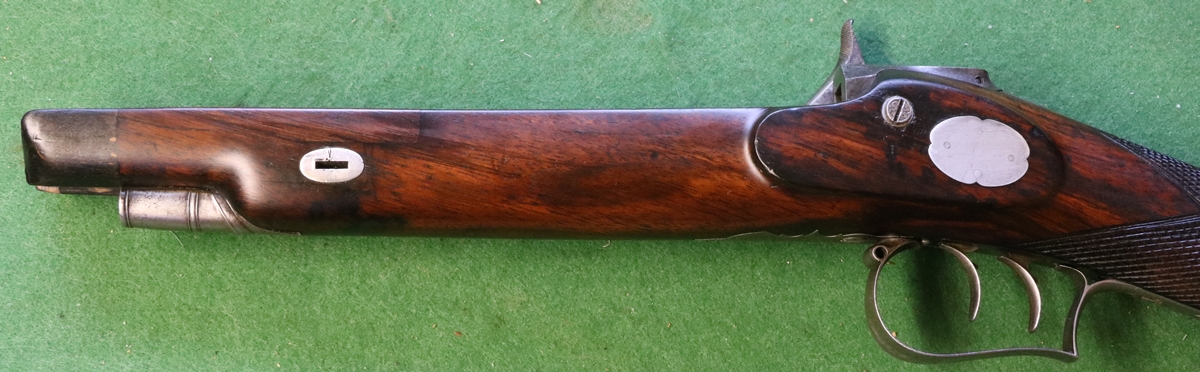
This rifle is in very sound mechanical shape, the only minor thing I have found so far is that the sear pivot has been replaced with one that is a bit too small diameter, and its displaced slightly. Otherwise its lock and furniture look pretty original. The main area of concern is the stock, which has a lot of defects, some from an earlier phase when chunks of the wood along the barrel sides were replaced and disguised with patches of black stain, and some evidently more recent ones related to major cracking down the middle of teh foreend and back into the stock, possibly into the wrist area? These look as if they are the result of either dropping the gun or possibly overloading it or firing it in a clamp without enough freedom to recoil. I believe propping a gun against a vehicle tyre as a buffer can result in some spectacular stock damage as the shock wave rebounds into the gun. Anyway the arrows highlight areas of damage.

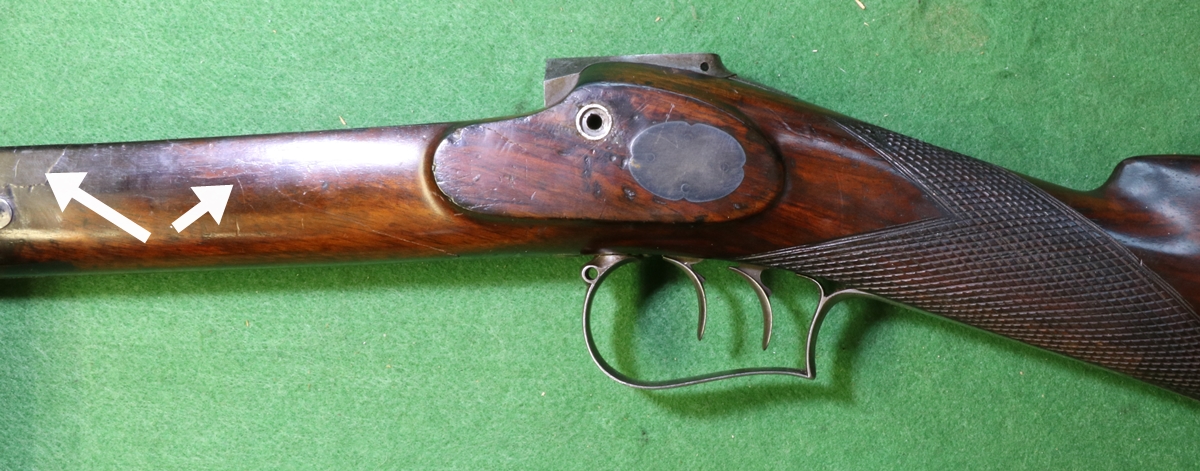
Very decent quality of animal engraving for the period- almost modern in its modelling!
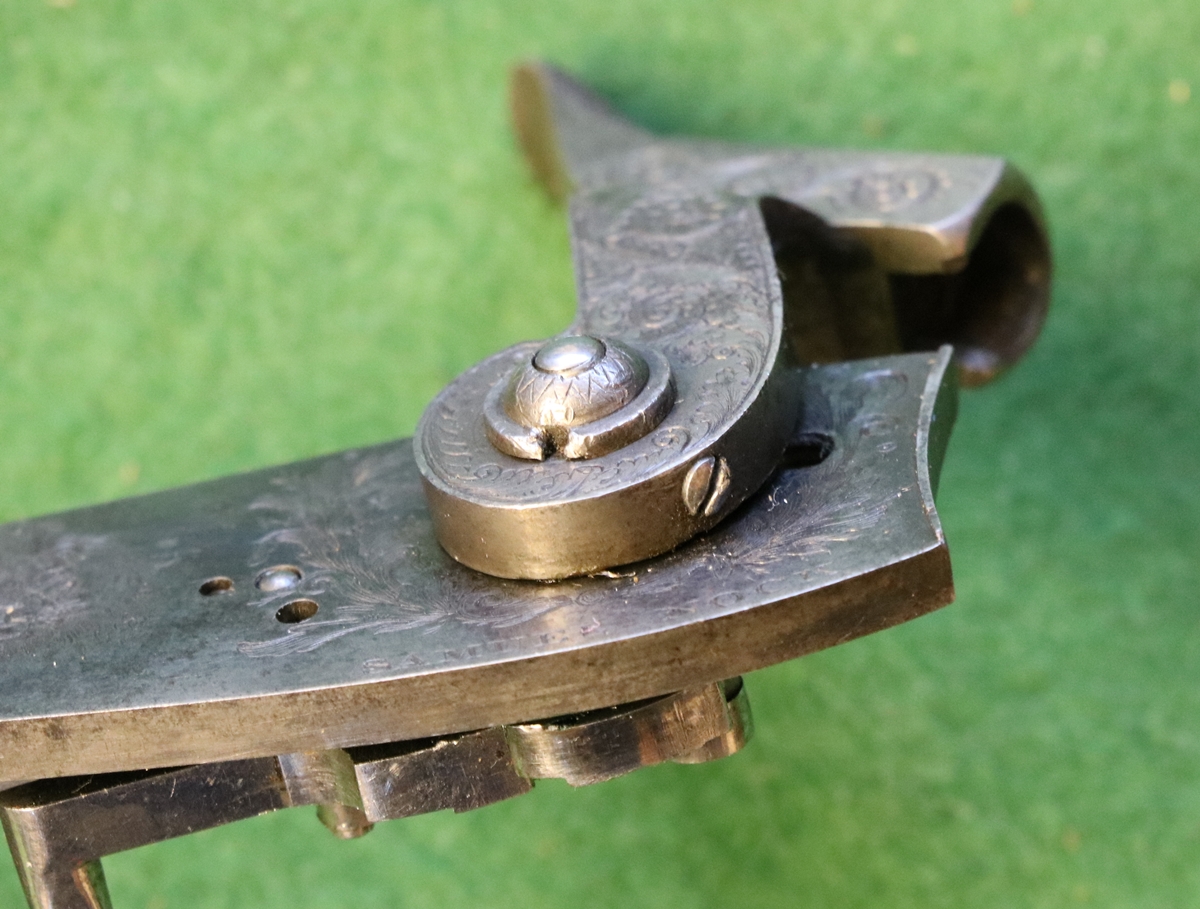
What is this grub screw doing – I’ve never seen one here before
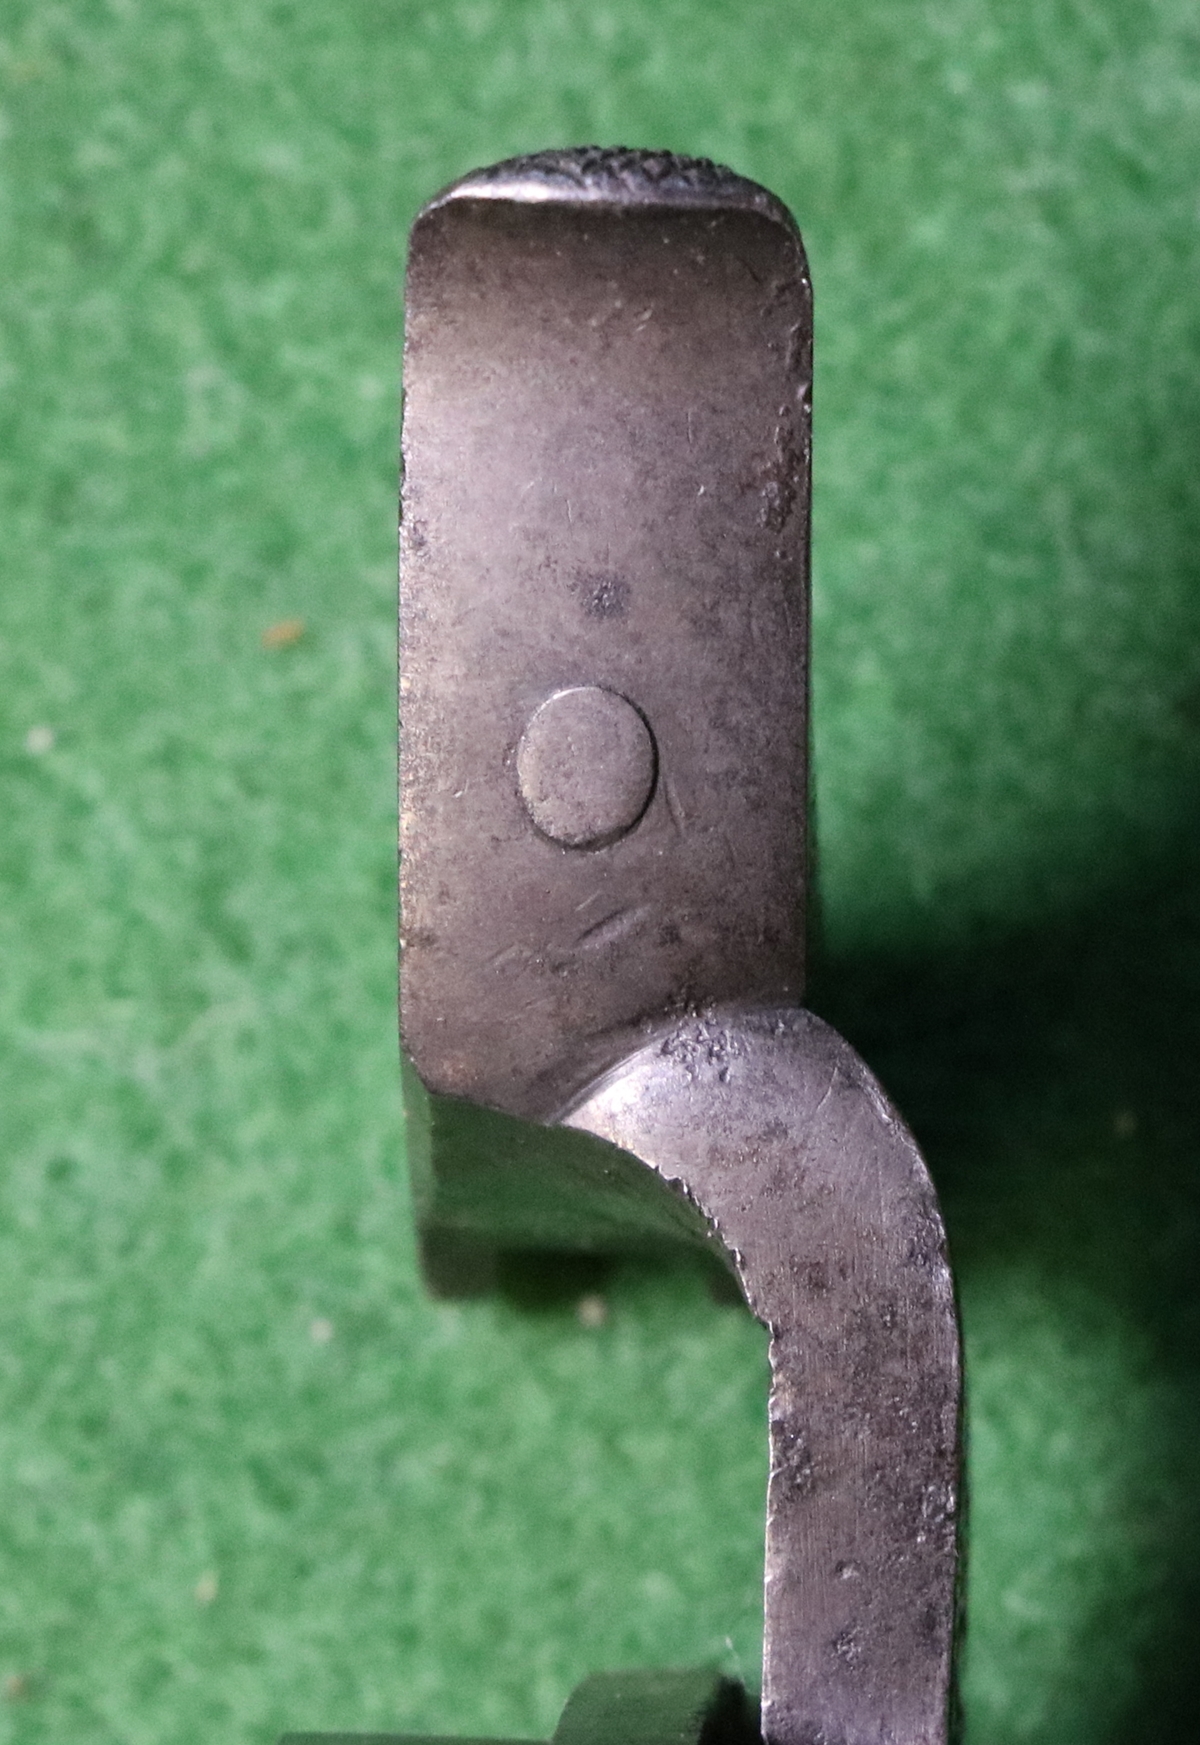
and what is this plug on the back of the cock doing? Might it be left over from a detachable part or a conversion of a pellet lock? (see below)
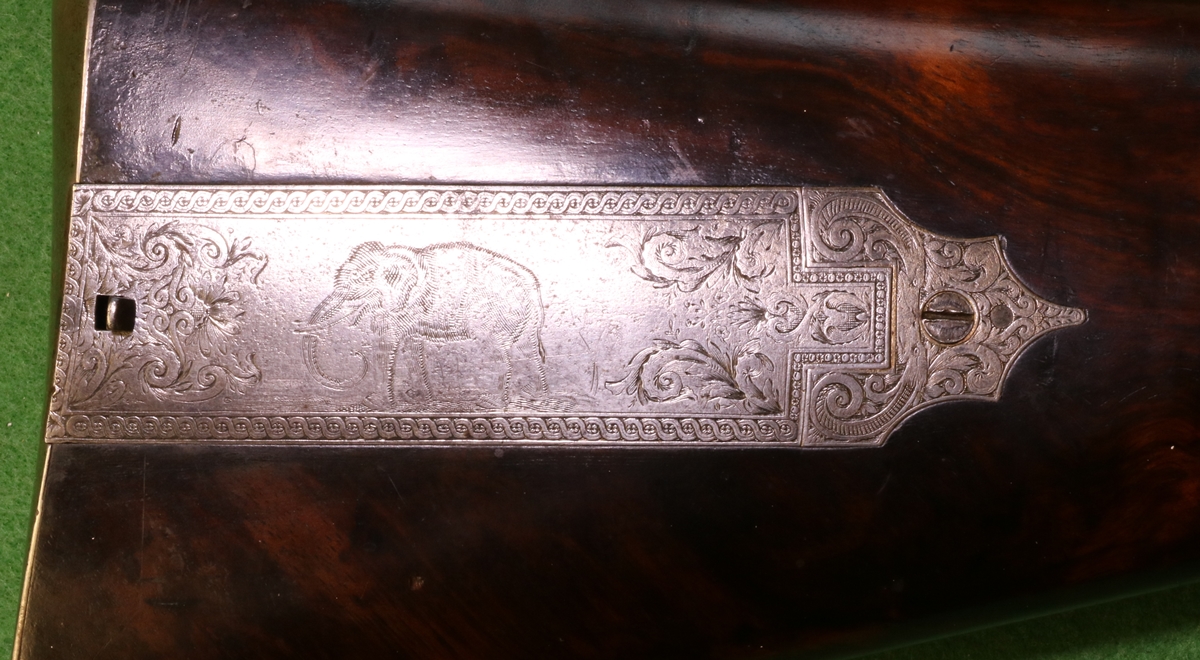
Not sure I’d give as many marks for the elephant though! I might suspect a different hand at work – its similar but distinctly different in style.
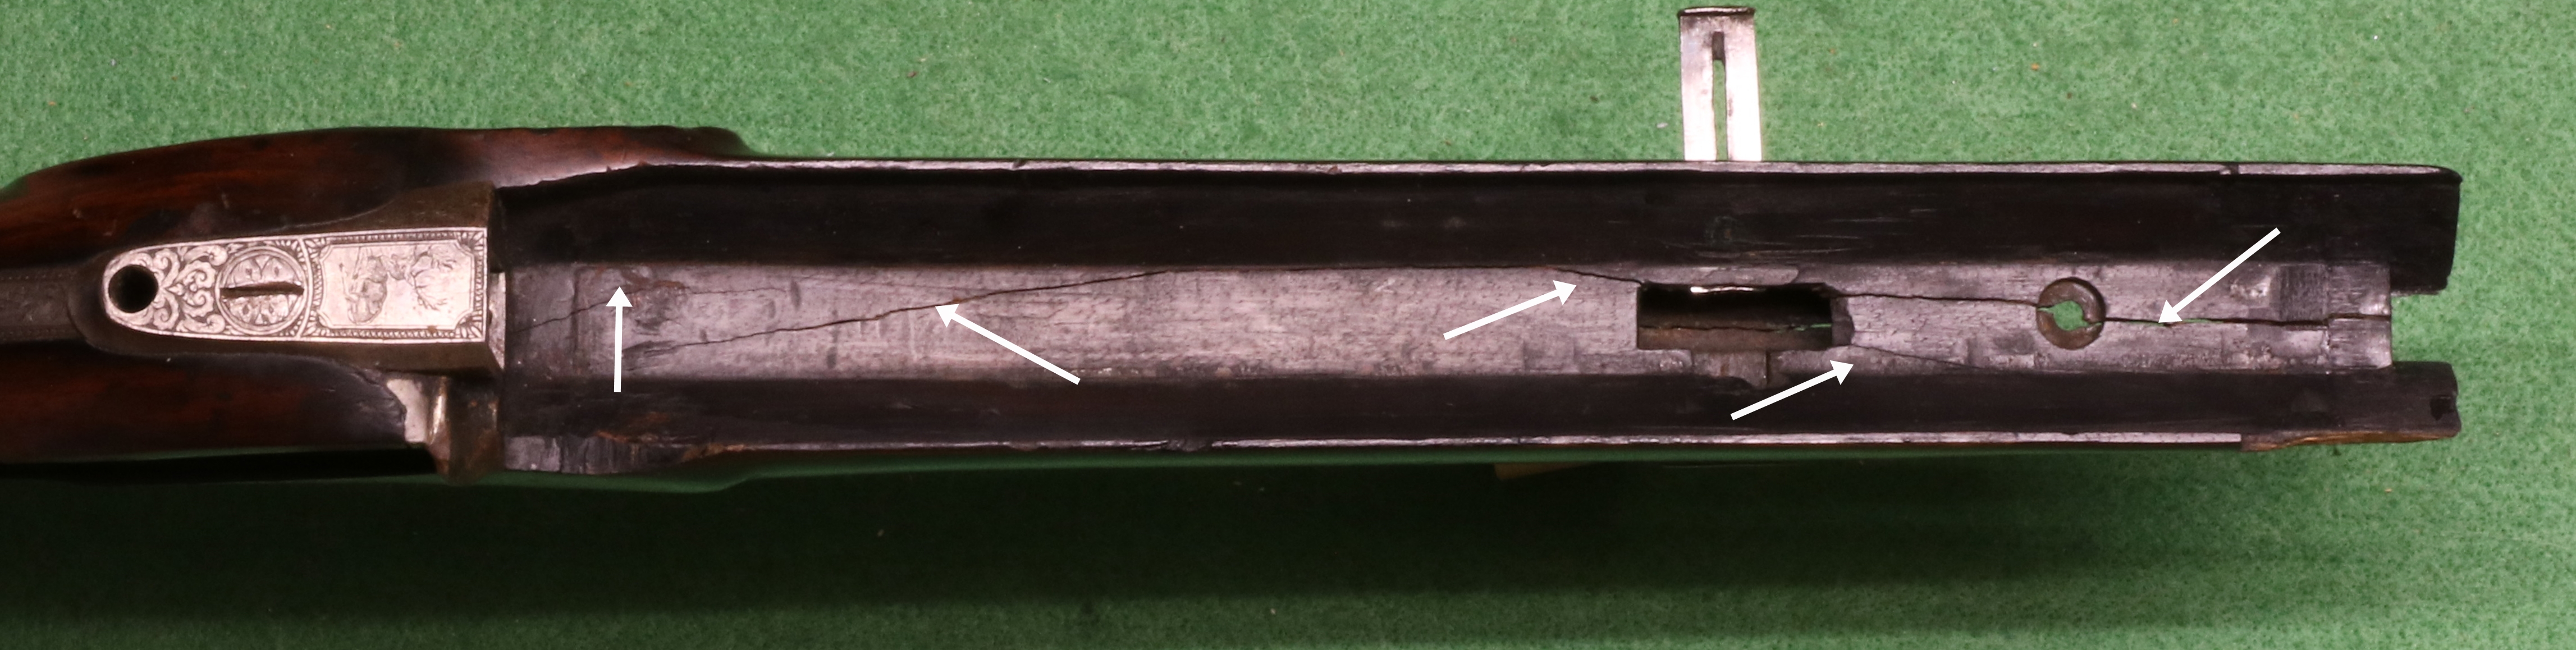
The fore-end is split completely down the middle, with some secondary splitting
The Forensics
When I get a new gun for restoration, I always begin by having a very detailed look at what I’ve got, mostly under the microscope at x4 or x10 magnification, so lets see what this Nock has to say;
I’ve covered the obvious repairs to the stock, but careful examination reveals many minor holes and dings and a few cracks that have been repaired. The securing nail at the butt end of the lock is screwed into a block of wood that has been epoxy glued into a slot cut in the end of the lock pocket – obviously the nail lost its grip in the wood – its not a very neat repair, and in doing it some of the edge of the lock pocket was damaged. The lock pocket isn’t very close fitting now. There are a couple of splits around the area of the barrel breech that have been glued up, apparently satisfactorily. The fore-end has a number of repairs to the edge of the barrel groove that seem to have been glued in with epoxy but are still visible – the levels don’t all blend, so perhaps the joints are moving? The bolt escutcheons stand proud of the wood, showing that the wood has been refinished by the removal of a significant amount of wood in this area, but the butt cap and patch pocket fit flush indicating that refinishing there was light or negligible. The fore-end cap should probably have been horn, but is now wood stained black – it is an addition and looks like a later replacement – part of it is broken off. The finish on the fore-end seems to be a varnish, possibly sprayed on, but this doesn’t extend to the stock area. repaired areas of the fore-end have been ?sprayed? black to hide the repairs, but the wood underneath doesn’t appear to be stained, fortunately! I need to check the type of finishes used using spirit and paint stripper before deciding on what action to take. The wrist has been chequered in a modern style and rather poorly – obviously a recent, amateur job that will need some attention. The chequering hasn’t been varnished or oiled.
The lock is very well engraved although very slightly worn and has the same serial number inside as the barrel number so is undoubtedly original its only fault is the replaced sear pivot that is a bit too small in diameter and not positioned quite correctly. The percussion cock has only a very light indent where it hits the cap on the nipple indicating that it hasn’t fired many caps off, and hence hasn’t been much used. It is possible that it isn’t the original as it hits the nipple somewhat off centre, and the engraving differs a bit in style for the lock, although this is not unusual in original guns. The flash guard and nipple area of the breech don’t show any spark erosion – consistent with little use. Its even possible that the nipple is the original. I think on reflection that the creature on the lock is a lion, not a tiger, although its difficult to be sure – it may be that the engraver hadn’t seen either! Having seen a picture of a pellet lock pistol by Samuel Nock I’m sure he had that engraved by Gumbrell as its identical to many of Joseph Manton’s tubelocks of the same era – so it is quite possible that Gumbrell did the rather good engraving on the lock – but there is no way of knowing – it certainly wasn’t out of the workshop of William Palmer.
The rest of the furniture is in reasonable condition, but has been polished and lost some of the engraving crispness – the engraving is all consistent in subject matter and related in style, although quite possibly different parts were engraved by different people, as was apparently common in the larger engraving enterprises.
The barrel bore appears in excellent condition consistent with little use. It is almost certain that the barrel has been rebrowned at some point, although as thee are minor pits and blemishes under the browning, but very little has been taken off the barrel when it was struck for re-browning, to judge from the extensive script engraving. The lettering is all visible, including many very fine flourishes at the beginnings and ends of the script capital letters although there is some slight rounding of the edges of the letters and consolidated rust and oil in the recesses of the letters as is usual even in guns of very good condition. The ramrod is of heavy gauge and has a brass rammer end, but the fitting from the other end ( presumably a capped screw extractor) is missing and the rod is an inch and a half too short. It could be original or a replacement.
The rear sights have a fixed blade and 4 flaps – the sight has a very small V notch, almost invisible, with a gold inlay running up to it. There is a hole that would take a peep sight on the false breech, but the peephole would have to be very low on the false breech – only about 1/8th inch above teh false breech mounting – difficult to see how windage adjustment would be possible.
OVERALL ANALYSIS
It all looks ‘of a piece’ and there is nothing that suggests any parts are not original and were not the product of Mr Nock’s workshop, with the possible exception of the cock, although if its not original it’s very appropriate. Nothing apart from the stock has been messed about, and that is overall intact. The serial number is consistent with a manufacturing date of late 1820s to early 1830s (according to data I have seen) and it is therefore a fairly early percussion rifle – caps came into use after 1823.
What is it? Stylistically it looks a bit Germanic – the cock and trigger guard and patch pocket point in that direction, and large bore hunting rifles were much more of a feature of the German firearms market than the British market, where the shotgun was more common – however it has Nocks name on it and he was a London maker and it does have a more English feel to it than straight German rifles! It is interesting because it has no proof marks on the barrel, nor any maker’s marks. Since a London maker would have had to have his guns proofed by the Gunmaker’s Company before selling them in the Britain, on pain of a fine and seizure, it suggests that the gun was sold abroad, implying that someone ordered it and had it sent directly overseas ato a country that didn’t have statutary proof requirements – possibly India or Africa? I need to look at what game hunting was done at that period.
What are the contrary indications to this analysis? I’m pretty confident about the integrity of the rifle and its maker – all the bits look as if they belong and have a consistent level of wear – wear is the most important indicator! I am not sure about the dating of it – in the absence of the serial number and the data I have that I can’t verify I would have put this gun 10 or 20 years later, bringing it into an era where big game hunting in Africa and India was more popular and where back action locks were more common. I need to check some serial numbers for Samuel Nock!
I think that these big bore hunting rifles were popular at one point – the 16 bore and 12 lb weight are quite usual – I need to research what loads would have been used.
Another Example of a Samuel Nock Rifle
Stop press: I came across another almost identical Samuel Nock gun, only with a 24 inch barrel, on an American Auction of 2011 – you can see the similarity;-
Its so similar to mine that I did wonder if mine was a conversion from pellet lock – there is a plugged hole on the back of the cock, although no provision for the spring clip – but the resemblence is striking, down to the engraving lettering etc. Unfortunately they dont give the serial number (if it had one), or the price it fetched!
The main differences from mine are 24 inch barrel – mine 28 inch, Pellet lock – mine percussion (conversion?) there is no patch pocket on this one, The rear sling swivel is further back – maybe because of a shorter barrel. Both have same lock shape, same trigger guard shape, similar barrel section, almost identical breech plug with detachable bung into the side. Both have the same basic shape of cock and similar cock fixing nut. I wish I knew if this one had a serial number and proof marks.
WHAT IS IT ?
My best guess is that it is a rifle commissioned by someone in a foreign, big game rich country from Samuel Nock, who wanted something partly continental in appearance, and had it shipped directly to him. Anyway its an unusual gun, almost certainly genuine and all working parts are in very good condition. When the stock is sorted it will be a very attractive and unusual piece….. Watch this space!.
The Restoration…..
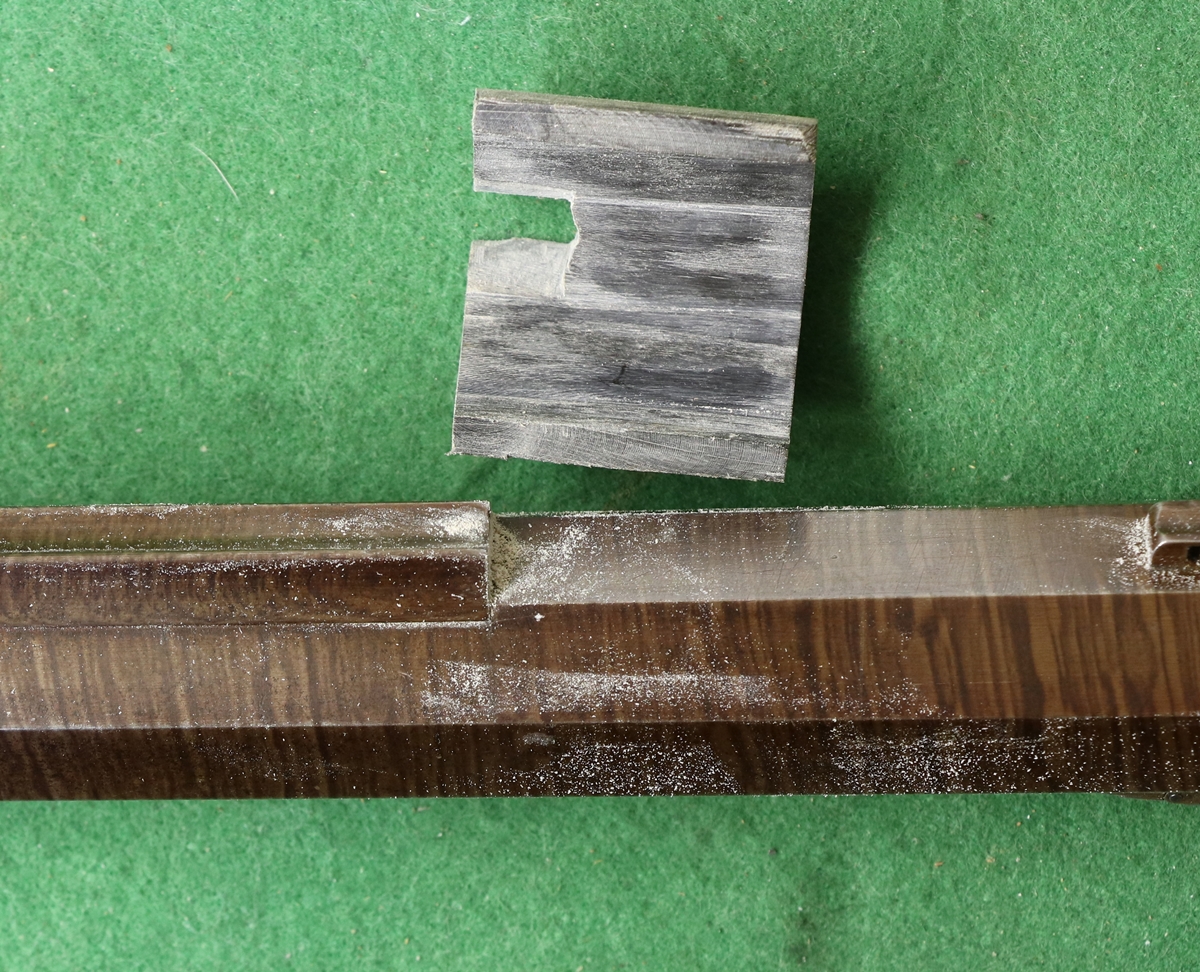
At least the start of it! Looking at the major split stock problem and the rather unsatisfactory appearance of the (bodged) repairs and finish, I decided that the right course of action was to strip the furniture and the finish and see where that led. It turned out that the finish was soluble in methylated spririt (ethyl/methyl alcohol) – presumably it was shellac, so was easy to remove, and the black stain came off with it. All the dings in the stock seem to have been filled with black or near black epoxy so its not possible to see whether they are just shallow depressions or deep holes. At the moment I am leaving that problem while I get ready to fix the split stock. It turns out to be a major crack with two branches that leaves the muzzle end held on by ‘not much’, so it needs careful alignment and fixing. The problem is made worse by the fact that a lot of wood has been removed from teh stock to accomodate the ramrod, leaving little more than a shell! Fortunately the two sides of the crack still fit closely together, although it will be a bit tricky to clamp them. I was contemplating using very low viscosity cyanoacrylate and bought some but it turns out to be a bad batch, and anyway I think I need more ‘open time’ than instant glues allow in order to clamp the bits, so I’ll use a fluid epoxy ( West Systems 105) with fast hardener that has an open time of around 20 minutes at room temperature, and is hard in 24 hours and completely cured in 48. The only disadvantage of epoxy is that it is not at its best with very thin glue lines, but I think it will bond this job well enough . |Its now a matter of sorting out how to hold it together while it sets and biting the bullet…… Here are some pictures with helpful (?) captions!
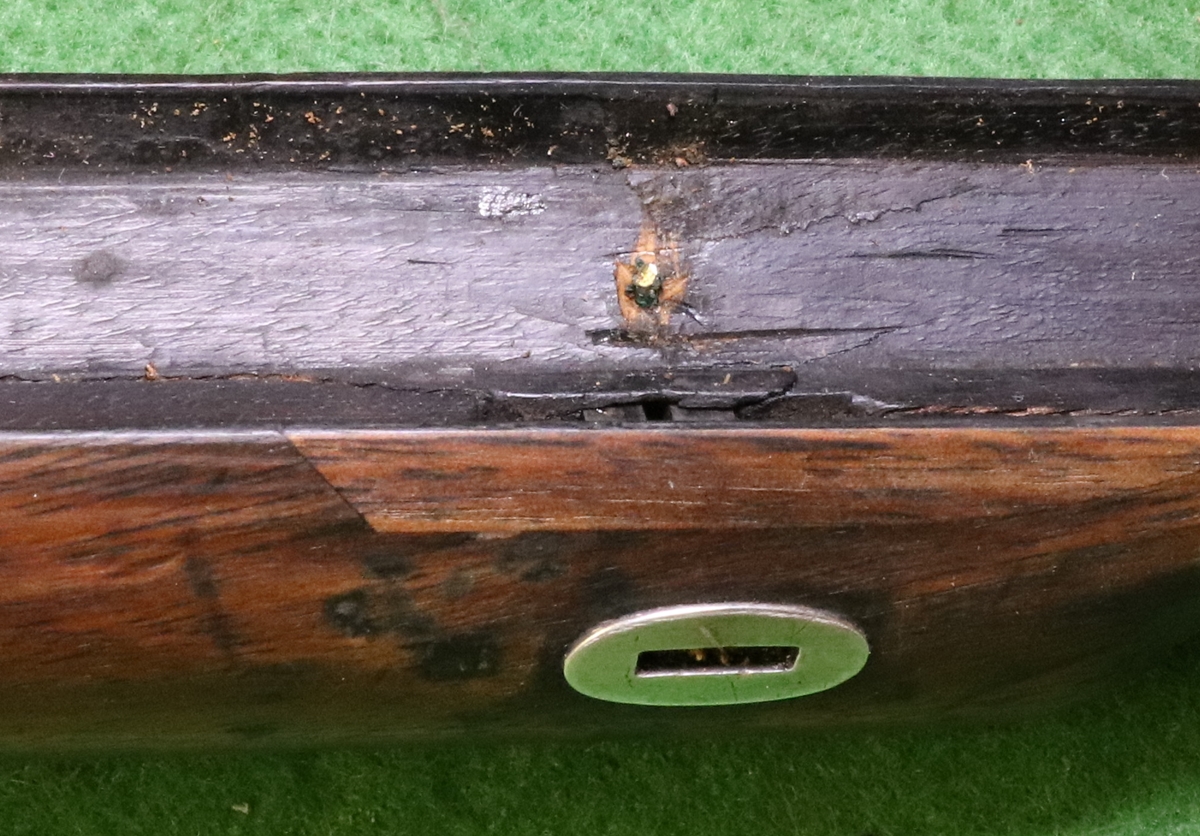
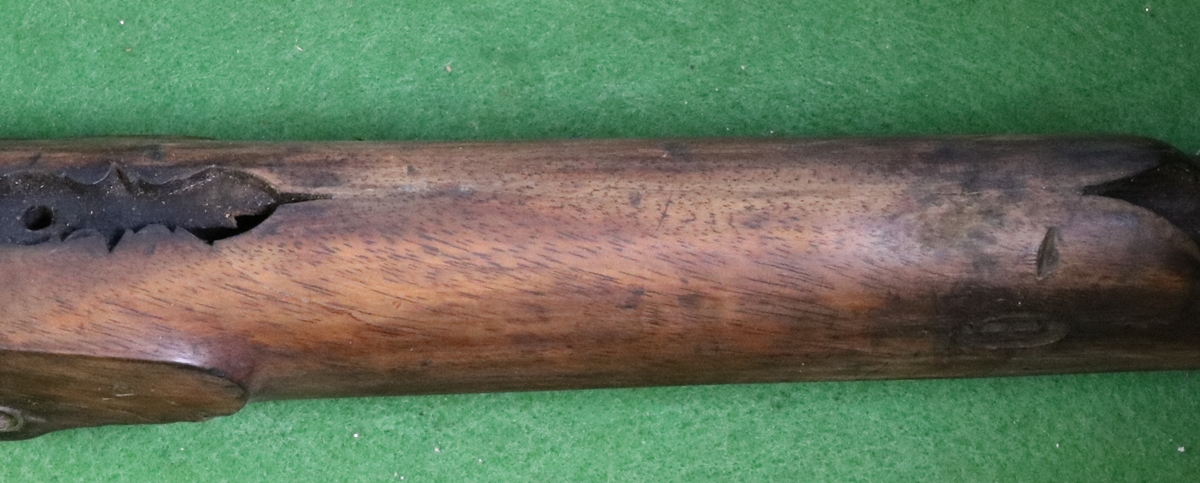
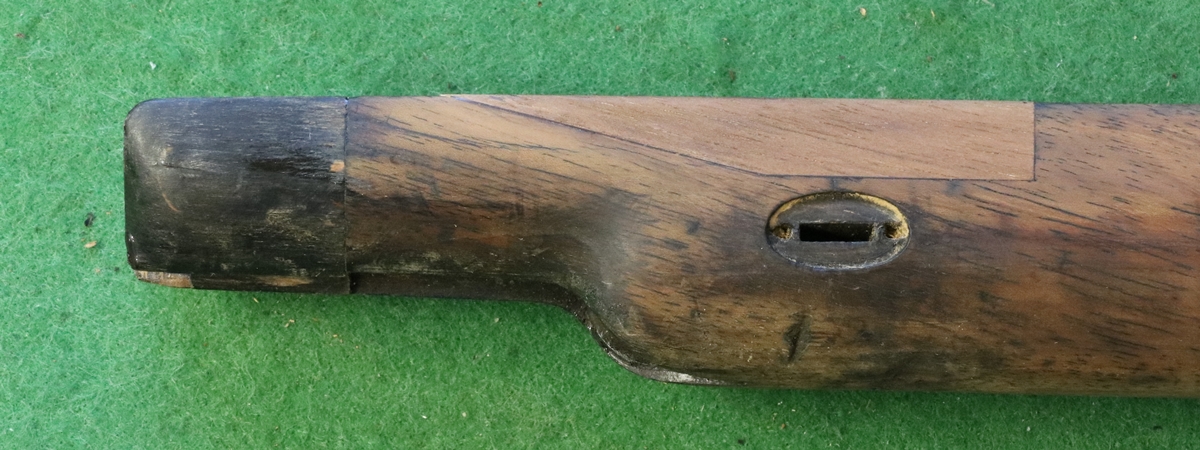
This is the full horror of the crack – you can just see in the recess for the finial that it has broken through into the ramrod hole – there is not much wood in the fore-end! Mostly it seems to be a shell between about 1/8th and 1/4 of an inch!
You can see a large and a small patch of black epoxy filler by the bolt escutcheon – maybe from firing the gun while it was resting on something rough.
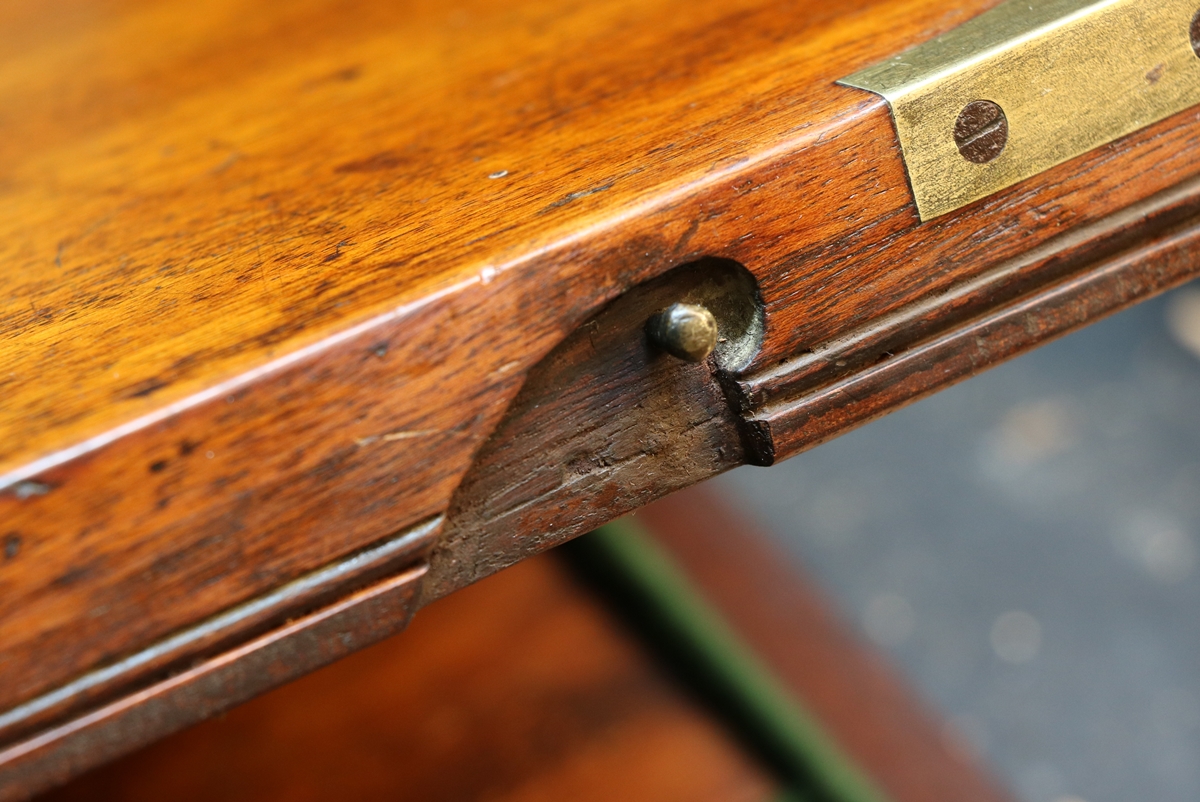
This pin holds the bolt in place – you need to chip a little wood from its sides so you can pull it with pliers or catch it with the edge of a knife or chisel.
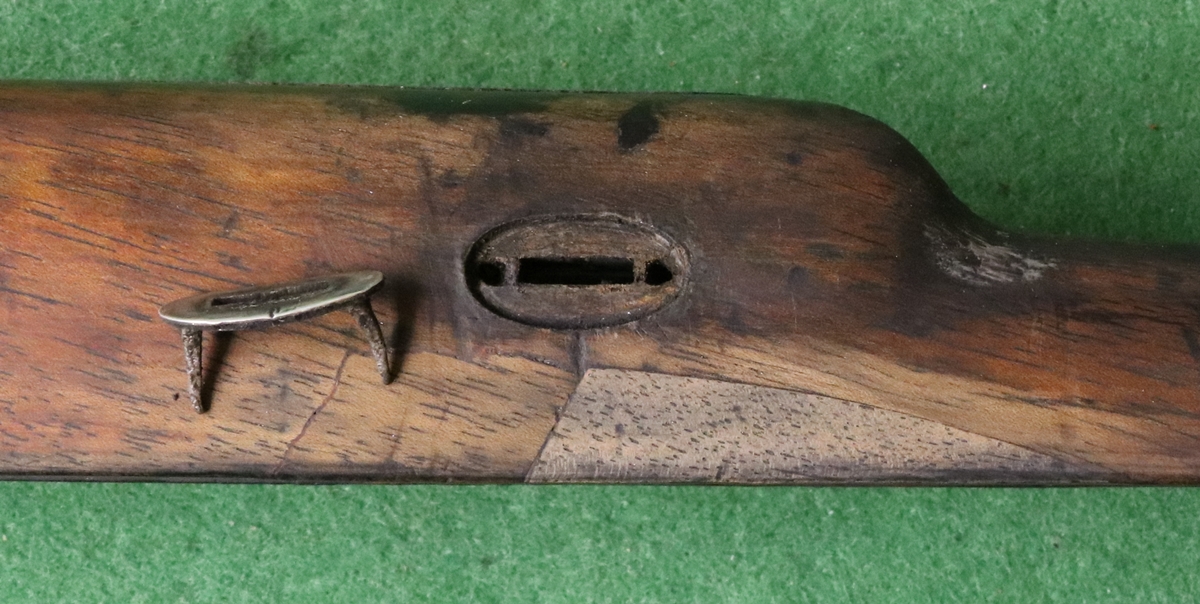
The escutcheons came out easily to a bit of prizing with a knife blade – I think the had just lifted a bit in their recesses, rather than the level of the wood being sanded back.
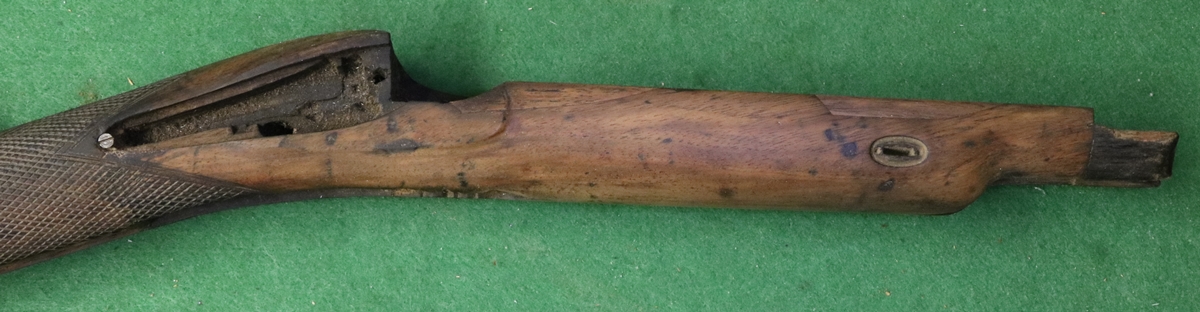
You can see what a bad match the old repair is, both in terms of colour and grain. There is a bit of the original wood that obviously came adrift and was glued back in when the repair was done.
This is a conspicuous problem – there are several black epoxy repairs that will need ‘dealing’ with somehow, and the inlet piece of wood is again mismatched
Now I have to steel myself to glue the stock…….. Once started there is no way back!
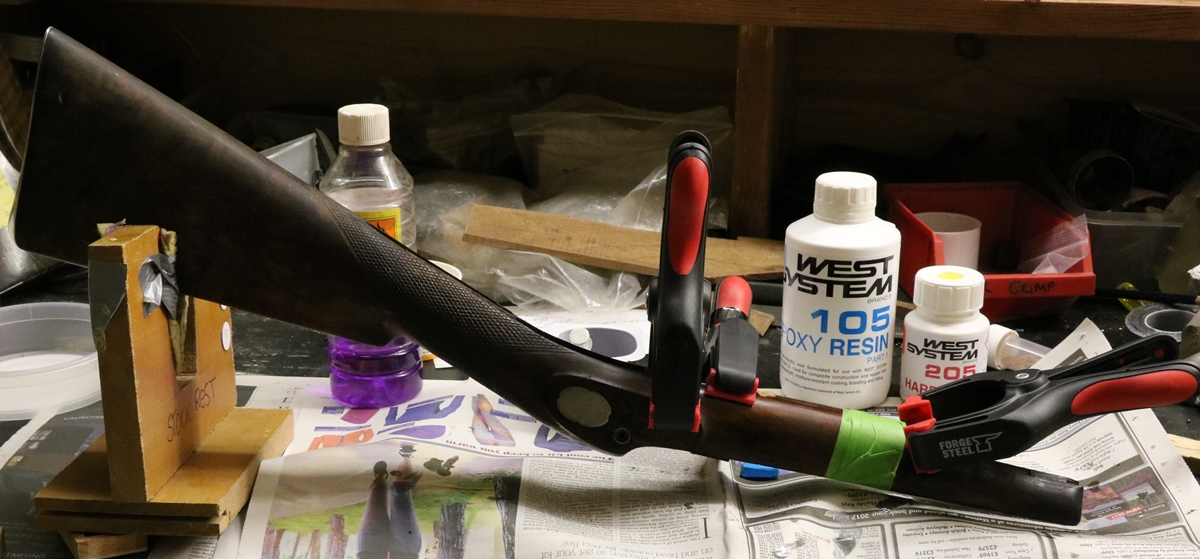
Now wait 24 hours to see if its all aligned properly – if not I don’t know what to do!
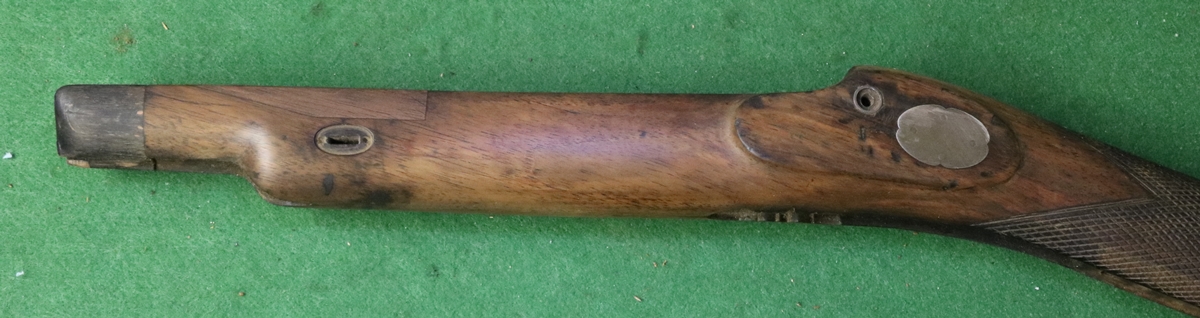
Here is the repaired frightening split – pretty much a perfect repair – even ‘in the flesh’ I can’t see most of it.
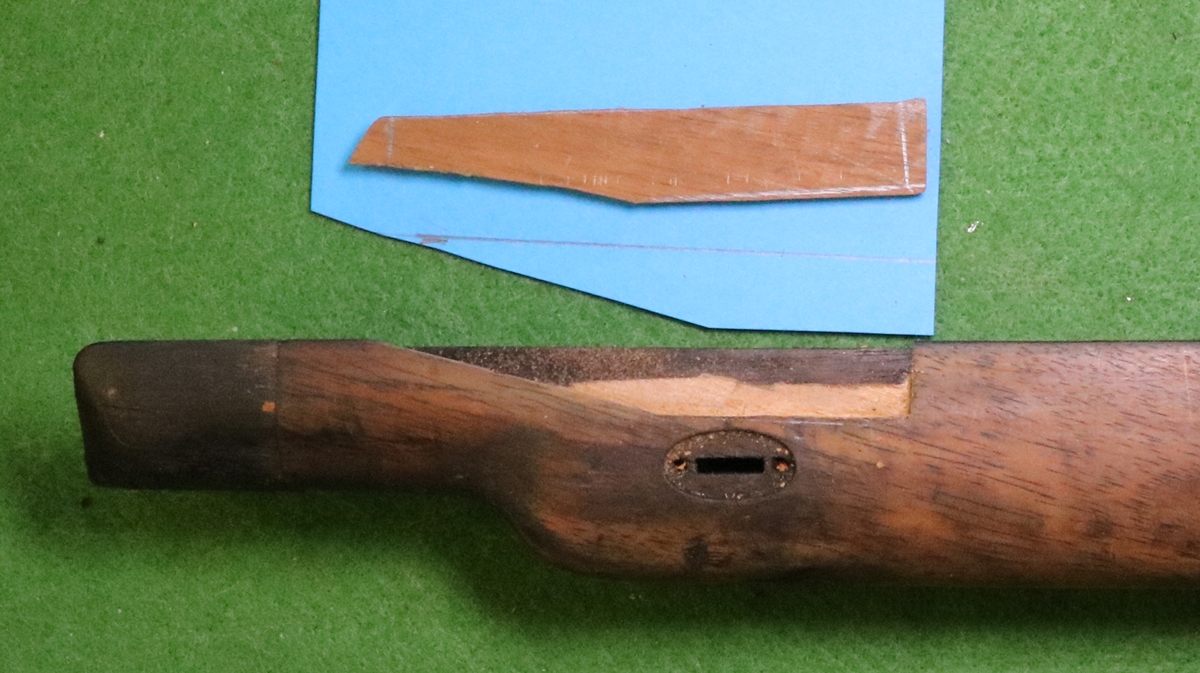
I milled and trimmed the left side and fitted a patch with matching grain and (more or less) matching colour
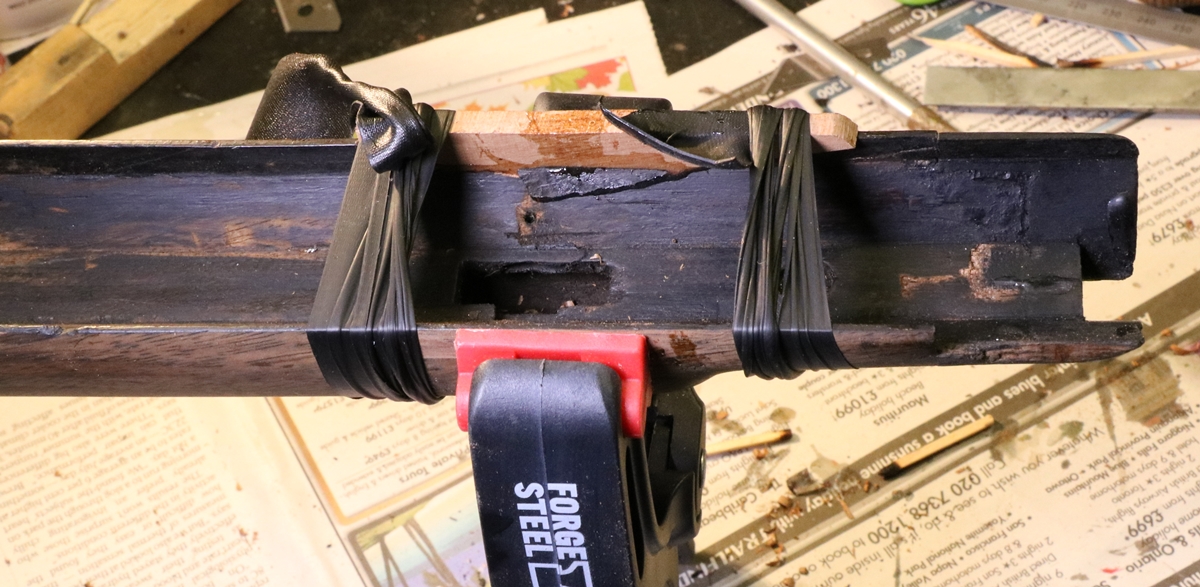
The patch being glued – the binding is self amalgamating tape – an extremely useful electrical product that can be wound under tension and stays put.
Here is the finished insert it needs a little more trimming – the joints aren’t as tight as I’d like but it will blend in better when coloured to match.
Having get rid of most of the epoxy filling in the depressions in the stock using a controllable electronics hot air gun at 165 degrees C, am now filling them with a mixture of walnut dust and epoxy, which I hope will be better than the black filling before. Then its a case of sanding or filing down the filler and lightly sanding the whole stock and colouring to blend in any patches. I haven’t replaced the two patches on the right hand fore end as they are not quite bad enough – only the grain direction is wrong. I found a source of black horn to replace the fore-end tip which is currently a poor piece of wood but unfortunately the firm (Highland Horn) is out of action for two weeks. The other Nock rifle (above) has a german silver fore-end tip, and I suppose I could try to cast one – but it would be a lot of work as I don’t have a pattern. I could carve one in Wolf Wax as I did for some bits (Kevin still hasn’t cast them!) but getting German silver might be even more difficult that the brass I asked for! One other thing that I can’t decide whether to tackle is the lock plate – the lock pocket has been deepened in the middle of the lock and putting a straight edge on the back of the lock suggests that this was to accomodate a bend in the lock plate – inwards in the middle. The mainspring doesn’t quite fit snugly as it would have done, so I may strip the lock and try to straighten it a little.
I’m now trying to get a more even finish on the fore-end before I start on the oiled/slackum finish, here are a copule of progress photos, some way to go with toning in teh patches, but I’ll probably wait until I have started the oil – teh spirit stain takes quite well through the oil.
Work continues…. I’ve put ‘red oil’ and turpentine on teh wood, then a couple of coats of a mix of red oil, slakum and talc, then some straight slakum, rubbing well in with my hand and putting it in a warm place (by the top of the AGA, about 35C ) and then polishing it off with a tissue and repeating…… I’ve occasionally put a little spirit dye on the lighter repairs. The furniture has been replaced, having straightened up t eh escucheons and making sure they were beede properly.
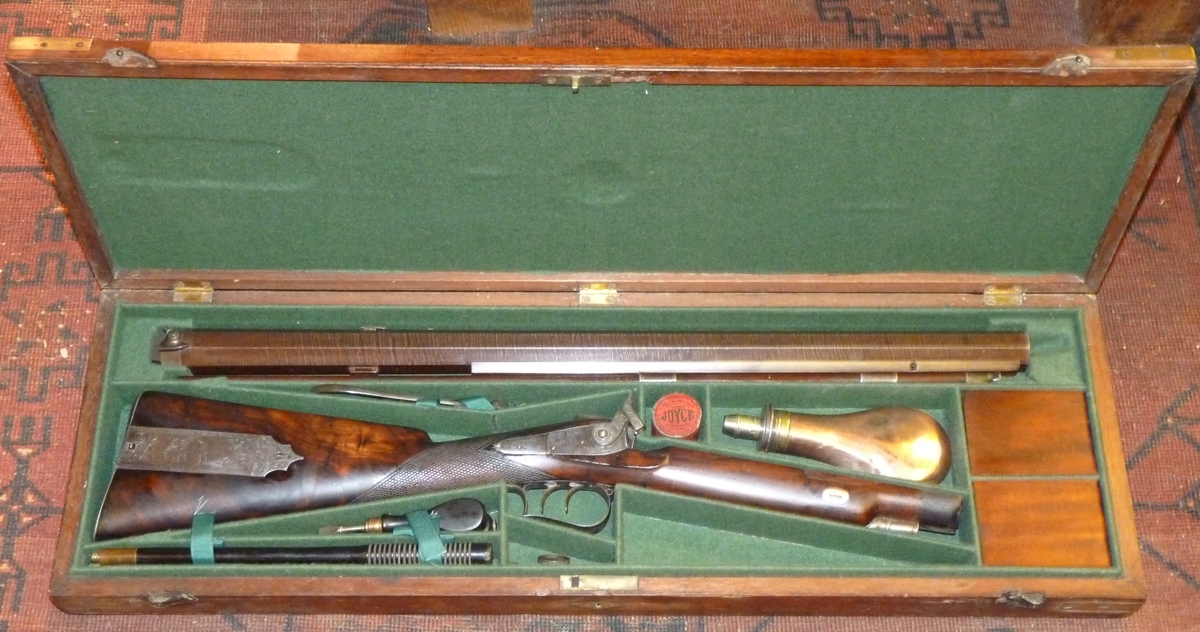
Here are some photos of the finished gun – its needed relatively little work – just the cracks sorted and a few small repairs to the stock ;-

I spent a happy morning with a friend who had come to collect the barrel with refitted nipple, and who is an experienced muzzle loading rifle shot – he brought a collection of various sized ball and various thickness patches to find the ideal combination for the Nock. I hadn’t realised in my ignorance what an exact science it was – I just thought that if you could get a ball down the barrel somehow it would then come out and hit the target! It is just as well I had a proper lesson or I would have had no luck at all. To engage with the rifling the ball, with its patch needs to be a comfortable push fit – and that apparently means that the size of the ball plus 2 thicknesses of patch must be within a thousanth of an inch or so of the correct diameter – particularly if you want to hit a target at 100 m rather than 25 or 50 metres. And if that wasn’t enough, I’ve got to feed the beast on Swiss No 4 powder at some horrendous cost – so that is 3 grades of powder to stock………. So I now have even more things to find/buy/sort out before I can shoot the beast, and I’m still waiting for a slot on my FAC for it – they ‘lost’ my FAC when I sent it in for a variation a fortnight ago, but found it today! My friend also bought me a couple more jobs to do – a ramrod pipe to refix to a flintlock by Theophilous Richards – a founder of the Westley Richards clan, and a very interesting single percussion from pellet lock with a lock signed Bradley and a barrel signed Sturman Barnsley, both in matching script with gold inlay so made as one gun – it has a very fine raised rib – most unusual. Joseph Manton patented his raised rib in Sept. 1806 No 2966, but it was specifically for double guns and was raised at the breech end but tapered to the muzzle – this is a single gun and the raised rib is more or less the same height all the way to the muzzle – I have never seen one like it. Anyway it is in need of a foreend tip and I’ll try to make one in silver if possible, or horn if that doesn’t work! On the subject of horn fore-end tips I have faced up to the job of fitting the horn tip to the Nock, it will take some time but I’ve made a start – fortunately horn files quite nicely so its a matter of patient work and trial and error.
Horn fore-end tip for the Nock – first stage is to get it to fit the barrel, then fit the inside to the projection on the stock and finally shape the outside, which will unfortunately mean refinishing the fore end of the stock.
20th Dec. Looking for infomation on ball sizes for the Nock, I found a reference to ‘slugging’ to get an accurate way of measuring the required size – it appears that you acquire a length of brass rod that fits into the barrel and is say half of its length – you drop this down the barrel and then hammer a lead plug into the barrel to make a close fitting bung, which you then get out of the barrel using the brass rod as an internal hammer – you then have a ‘slug’ to measure. There is then some argument about what diameter ball you should use and what thickness patch. One version says that the patch should be twice the thickness of the ‘windage’ (the difference between diameter inside rifling and ball diameter)… An experiment is called for!
19th Dec – lots of people have had trouble with ‘page not found’ errors with the picture of the Nock rifle (fin-rt-side.jpg) – I have found the pic and fixed the problem – I had copied it as fin-rt-side.JPG – that’s how fussy computers are!
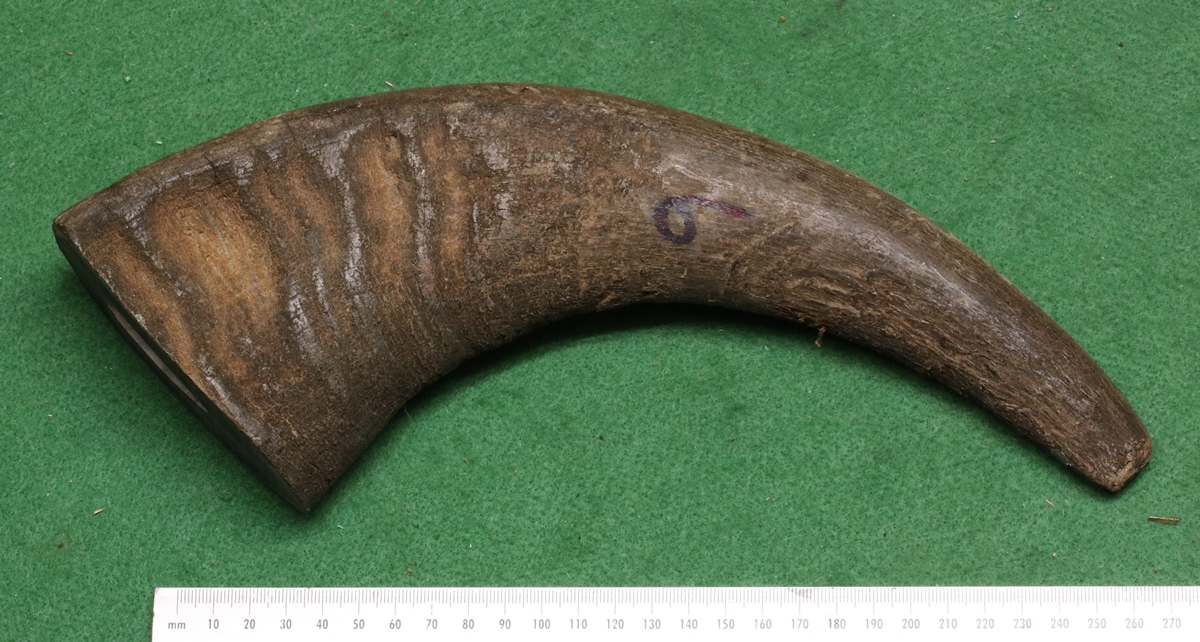
19th Dec. One of the advantages of keeping this blog up to date is that I can look back and see all the unfinished jobs in my to-do list, or, come to think of it, maybe that is a disadvantage! I tried to finish off the barrel with the damaged thread, and turned up a 28 t.p.i. nipple, but it didn’t fit safely as the thread in the barrel really isn’t up to scratch even after recutting it oversize, so another plan is called for – maybe tapping it 9/32 B.S.F and making a nipple of that size, or drilling out the hole and welding a sleeve in – something else to think about….anything that doesn’t involve cutting screw threads in silver steel on the lathe. The renovated powder flask for the Nock had lost most of its bronzed finish and I tried to replace it with some of Blackley’s brass browning but it looked a mess so I had no alternative but to take it down to bare copper. I also did a bit of work on the case – making lids and the corner supports for the two compartments. I need some more Copydex to glue down the cloth (and I’m waiting for green tape) – I know it should be rabbit skin glue, and I have some and have used it in repairs, but this is just a functional case! I started on the horn fore-end tip – I roughed out a piece for horn from the bit of buffalo I bought, but I realise its going to be challenging because the shell needs to be quite thin – its more difficult than a tip on a breechloader because the ramrod almost bificates it – I’ll have to cut away the wooden one and see what the fitting surface is like. Oh and I found time to make a start on my wife’s Christmas present ( I know she will never read this but even so I’m not going to tell you what it is!)
![]()
A small piece of a buffalo – I discovered during web a search that the main outlet for buffalo horn is pet shops – I had a bit of a problem with the idea of people keeping a buffalo horn as a pet, although undoubtedly less trouble than keeping a complete buffalo, but then it transpired that they were sold as dog chews – presumably to remind dogs of their wild hunting ancestors…… I can now fantisise about vast herds of hornless buffalo roaming the prairies for the benefit of our pets – except that it turns out to be water buffalo not bison.
18th Dec. I found an original ball mould amongst my junk that says its 24 bore but is actually about .650 – just a bit small maybe – I’ll have to cast up a ball or two and try – I hope it fits as its a nice mould and fits the space I’ve made for one in the case, which is coming along – I am now waiting for some green ribbon to make the ‘lift-outs to get the cleaning rods and turnscrew etc out of the pockets in the case – £1.99 for 3 m with free delivery on ebay, don’t ask me how or why anyone does it… I got the spout and the top off the flask – the Plusgas overnight didn’t shift it but a drop of oil followed by a generous swabbing with acetone did free it enough to undo – the lesson is that very volatile solvents penetrate much better and can carry the oil into the joints – Plusgas doesn’t cut the mustard ( for international visitors;- an English saying the origin of which is obscure – it means not coming up to scratch, which means…… and so on!). Then I’ve got to tackle the horn fore end tip….
15th Dec. Busy today with School Christmas Lunch and their Carol Service, and tomorrow the children in my STEM club are presenting their project in assembly so I’ll have to go and watch! I did a bit of work on the case for the Nock – I machined up a couple of blocks to support the ends of the barrel and covered them in green fabric – not sure its right yet but I won’t fix them in until the end so that I can have another go if they don’t come up to standard ;-
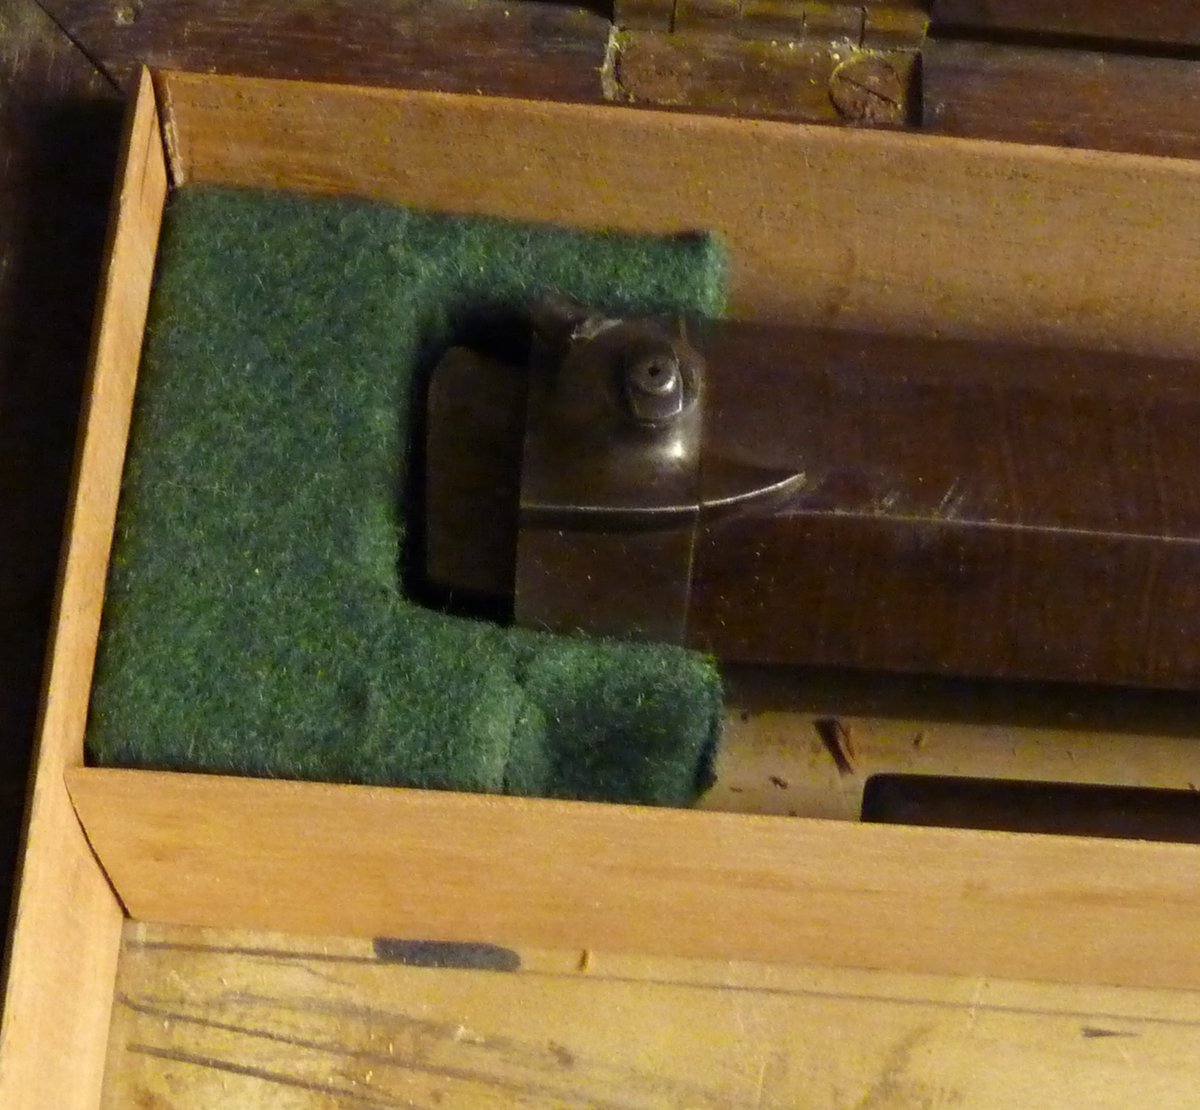

The groove at the end is for a finger to lift the barrel – its too heavy for a couple of tapes!
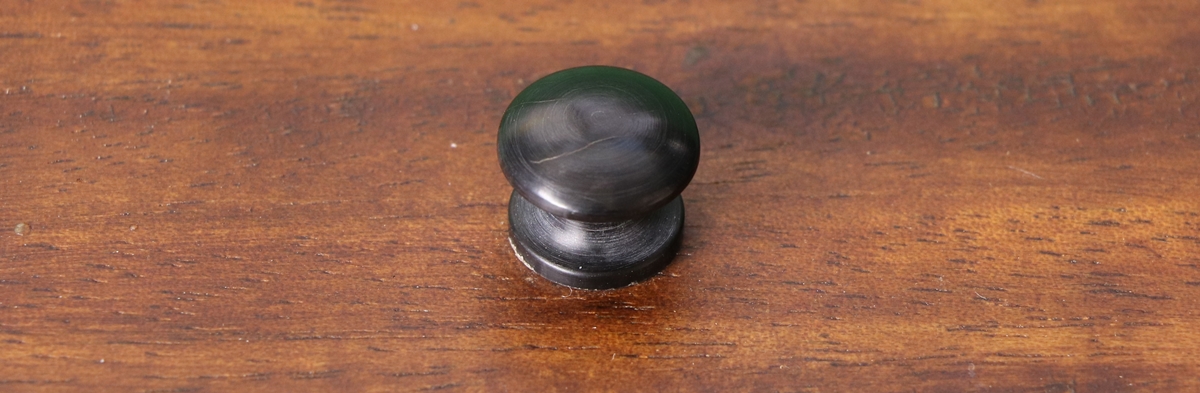
20th Dec. Got the bits and finished the lining of the case – all done except for one little job – there is always one thing that holds you up, in this case its the knobs for the wooden lids on the compartments – probably should be ivory, but it would be a sin to shoot an elephant for two small knobs, or indeed at all! I intend to make them from horn, but I am waiting for a 3/4 inch x 6 inch cylinder of horn from ebay as it will be easier to chuck and turn than a bit of my buffalo. I guess it could be horn from a deer, which would be whitish, but I don’t have such a thing to hand – my bits of antler are too thin. I did a bit of milling on the horn fore-end tip, to make the barrel groove, but I now need a 45 degree endmill – a cheap one is on order.
21st Dec. Having played with it, I’ve come to the conclusion that the Nock case is too difficult to shut and it is straining the lid, so I am going to take off the hinges & lock latch and glue a strip of mahogany about 3 to 4mm thick round the face edge of the lid so that it all shuts properly – I should have done it at the start, but I thought I could just get away with it – the layer of cloth (about 1.2mm) in the base was the straw that broke the camel’s back. I should glue it round the base edge, but I can’t get at the back of the lock to remove it, so that option is not available…… If I make it so that I don’t need the recess in the centre of the lid for the cock screw I might get a label……
The case is really about 5 mm too shallow – the cock screw and the catch on the patch box and part of the patch box cover need recesses in the lid, which is unfortunate, but the case must have been for a single barreled smoothbore, and not a heavy rifle like this one. Still it makes a nice outfit. I might make a mallet and bullet starter to fit in the empty compartment, and I suppose it needs a punch for patches. Also I ‘stole’ the turnscrew and nipple wrench that I had made for the Lancaster, so I ought to make another pair for this rifle.
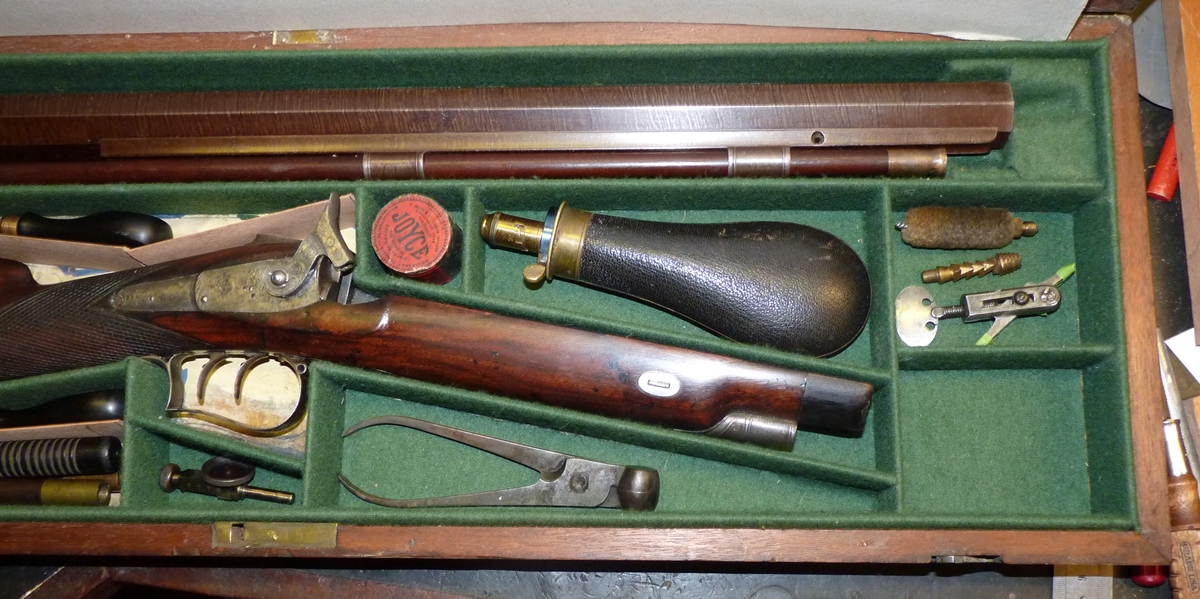
Still a couple more compartments to do, plus the lid. That isn’t the intended flask – its too nice to modify. Now I need a punch for patches!
18th Dec. Having got this far with the Nock, I am going to have to get a ball mould for the ball, which means that I’ll either have to get an original ball mould of exactly the right size, or have one made by ballmoulds.com for £30 to fit modern handles, of which I have a couple. In either case I need to find out what size ball fits the rifling in the gun and how much ‘windage’ to leave – a bit of research needed…..
17th later – I did manage to sneak off to the workshop and do a bit more on the Nock case – I also looked for a flask that fittted the space I’ve made for it and had what I think is the correct charge for the gun – the books say that those early percussion rifles firing a 1 oz ball used as little as 1 1/2 drams of powder – any more and the ball wouldn’t follow the rifling but stripped. All my flasks that fit throw a charge more suited to a smoothbore shotgun, where typically the flask would throw 2 1/4, 2 1/2 and 2 3/4 drams or within about 1/2 a dram of that range for a 1 oz shot load. I do have an old Sykes German silver flask that has a few dents and doesn’t have the charge stamped onto the nozzle, so I thought I might make a sleeve to reduce the charge to 1 1/2, 1 3/4 and 2 drams on the grounds that even the best modern powders are quite a bit less potent than even mediocre contemporary ones. Anyway at the moment the flask nozzle etc is soaking in Plusgas overnight ( Plusgas isn’t as effective as acetone and oil mix at penetrating, but it doesn’t evaporate as quickly).
17th Dec. With Christmas house sorting and preparations going on all round me, its difficult to concentrate on the really important things like playing with the Nock case etc! I got half a buffalo through the post today – at least a decent chunk of one in the form of one of its horns. The Nock Rifle has had the forend cap replaced with one made from rather poor wood at some time in the past, and I thought it would be good to make a new tip in black horn. I found Highland Horn on the web and emailed them with the size I needed. They said that they had found just the piece, big enough for several tips and other bits for £19 + VAT including postage, which seemed fair enough – I wasn’t expecting a complete horn, but at least I’m grateful that they detached the rest of the buffalo before posting it. The wide end has an indent for a couple of cm that will be lost in the barrel groove – otherwise its all solid and a nice dark colour. I don’t look forward to the smell of bandsawing it. I can see several tips and innumerable ramrod ends.

Rather nasty wooden fore-end tip in coarse grained wood
16 Dec. Into school at 9 to see some of my STEM club children put on an assembly demonstrating their club project – they’ve done the project and the assembly themselves – really heartwarming to see their enthusiasm and competence! Back to the Nock case – I decided that with such a heavy gun strength was vital, so I decided to line the case in an unconventional way taking advantage of modern epoxy – I’m not trying to fake an old case, just make the look right, so I can take liberties. I decided that the partitions needed to be glued to the base of the box, so I’ve covered them and then stuck them down in position – this means that the base cloth will be cut as individual bits for each pocket, instead of covering the whole base and having the partitions stuck to the cloth, which I think is the normal way ( I’ve not looked carefully at lots of cases so perhaps someone will correct me if I’m wrong?) I guess I’ll make paper patterns for the cloth floor. Of course I didn’t make enough strip, its difficult to believe how much goes into making all the dividers! I discovered that when I closed the lid the little catch on the patch pocket on the butt sticks into the lid – the case is just a couple of millimeters too low for the gun, but it can be fudged! Quite often you see old guncases with a hole or a worn bit in the lining of the lid so it won’t be too odd. It is possible to buy repro. labels from Peter Dyson to match the address on the barrel etc. I’ll have to think about it – they do look good but is that level of fakery OK? It can’t go in the middle of the lid as the cock screw has to have a recess, so it will be to one side and maybe that will spoil any appearance value – so maybe I’ll save my £20! The cloth I got from ‘Mike the Bolt’ at the re-enactors fair is just the job – I also have some red but its a bit thicker – the green is about as thick as you would want.
15th Dec. Busy today with School Christmas Lunch and their Carol Service, and tomorrow the children in my STEM club are presenting their project in assembly so I’ll have to go and watch! I did a bit of work on the case for the Nock – I machined up a couple of blocks to support the ends of the barrel and covered them in green fabric – not sure its right yet but I won’t fix them in until the end so that I can have another go if they don’t come up to standard ;-
The groove at the end is for a finger to lift the barrel – its too heavy for a couple of tapes!
The case of the Nock is now complete – I made a couple of horn knobs for the wooden lids – I’ll put up a photo – and now I’ve just got to finish the horn fore-end tip. In making the brass catches (see pic. below) I got tired of filing, being essentially lazy, and remembered I had bought a 13mm wide belt electric ‘file’ that I thought I’d use for shaping stocks but turned out to be much less good than a rasp. Mounted in a vice it turned out to be excellent for filing the outline of the catches as a small linisher – in fact I was so impressed that I will probably get a bench mounted 2 inch linisher – it will have to go into the (freezing) shed as it will generate too much dust in the ‘house’ workshop. Anyway, the cased Nock now looks absolutely fantastic, even though I say it myself, and the built up edge to the case looks entirely intentional. The fabric I brought from ‘Mike the Bolt’ – re-enactment cloth specialist – is completely ‘right’ for the job – I wish I had brought more, although I have enough for a couple of cases in green, and a couple in red, although the red cloth is a bit thicker.
24th Jan – not much time -again! My STEM club did a great job of presenting their work to parents etc. Managed to finish one catch on the Nock case….
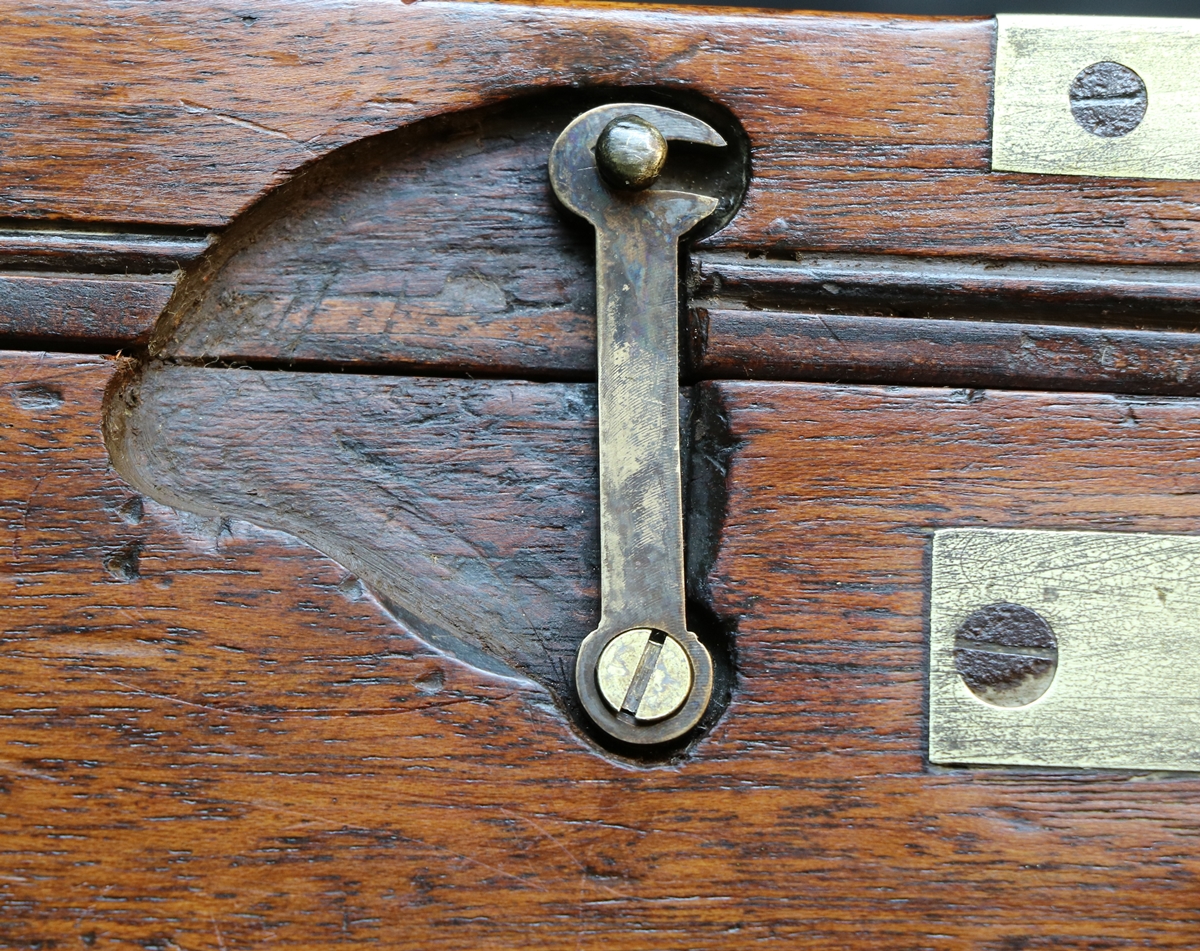
The brass catch is toned down with Blackley’s brass browning solution but the screw looks a bit too modern! ( slot in the middle and too wide and needs toning down too, as well as needing a bit deeper countersink. Its surprising how important the small details can be in creating a sympathetic whole – its not faking, just respecting the patina of age so it doesn’t shout at you!
23rd Jan – At school today – tomorrow my STEM club is putting on a presentation to parents, so great excitement! I almost finished off the Nock case – why is it always ‘almost’? One day I’ll actually finish finish something! That’s why I like doing work for other people, because it does end when you deliver it! Anyway, the additional 5 mm strip I put round the lid to give the case enough height to clear the gun looks pretty good now its coloured to match and the hinges and lock are all fitted. The brass hook catches are of course now 5 mm too short – I did think about moving the pivots or the pins they hook over, but then the recess would be the wrong shape, so I’ve opted to make new brass hooks 5 mm longer and slightly enlarge the recesses. I found a bit of brass the right thickness so now I’ll have to cut out the hooks. I also need to turn up a couple of horn knobs for the lids and make the horn fore-end tip……………. (re yesterday – it turned out that we had been missed off the oil delivery, so an urgent fill is on hand)
I’m quite pleased at how the additional strips look as if they belong, I thought they might look a bit odd. The recess for the hook will need a bit more shaping when I have made the new hooks.