ANTIQUE ENGLISH GUN ENGRAVING
1) ENGRAVING TECHNIQUES
to continue click …..
The engraving of antique English guns in the second half of the 18th and first half of the 19th century had a particular overall style and feel that was independent of any particular graphic that was used. In ‘English’ I include Welsh, Scottish and Irish – I’ve used English because that is what the style is universally called! I guess the unifiormity of style was the result of many factors, not the least being a tradition carried forward by the long, 7 year, apprenticeships and 3 years of journeyman work that preceded a craftsman setting up on his own – I know of no women engravers of that period although there are several excellent ones now. The materials and tools and the work environment must also have had a major influence. It is clear from looking at work from different sources on the continent of Europe and from America that other styles were practiced and could produce a completely different feel, either from using a different technique or a different approach or both.
If you want to understand British antique gun engraving, or indeed to be able to reproduce it, or to recognise the genuine from indifferent fakes you will need to learn what makes it different from other possible ways of making images and patterns in the surface of steel parts with hand tools. This understanding begins with the different ways of cutting the pattern in the steel surface – in the period when the originals were being made there were several possible techniques – push engraving using small gravers held in the hand and pushed by the power of the wrist and arm to cut out the metal, chasing using similar tools but tapping the graver with a small hammer to produce a somewhat similar effect to push engraving, carving or chasing using somewhat heavier chisels to shape the metal into relief carving, and etching using acid to cut into the areas of the metal that had not been masked. Normal English/British engraving on flat surfaces seems to have been exclusively push engraving, with chasing or carving reserved for low relief carving. Etching was a Continental practice – particularly French, and Continental guns were often more elaborately decorated than ours, with a fondness for relief carving but also flatwork – I guess also push engraving but I don’t really have much to go on.
To understand what is particular to the feel of English/British antique gun engraving of the period you need to have examples of it to look at, but also you need examples of what is NOT the real thing. There are several ways to produce engraving that is not ‘right’ for the period, the easiest one is to use the wrong technique, another is to use the idiom of more modern English gun engraving. A number of would be copiers of 18/19th century engraving, particularly in America, use one of the modern pneumatic engraving tools – the GRS or Lindsay – these are essentially push engravers without the push, which is supplied by the internal hammer action, and make it much easier to make the cuts that require a lot of effort in push engraving, with, I think, a quite marked effect on the appearance of the finished work. The effect is exacerbated by the use of turntable vices that allow cuts extending through complete circles instead of push being restricted to small segments. Engraving done by chasing also tends to produce a different quality from push engraving, partly I suspect because chasers usually, but not exclusively, use the dominant (right?) hand for the hammer and the left hand to guide the tool, and partly for reasons of the mechanics of cutting that I’ll cover later. If you look at illustrations of modern ‘antique’ gun engraving you will see that the overall result often bears little resemblance to what it purports to imitate, both in the innate quality of the cutting and in the interpretation of the design
I believe that push engraving gives the right feel to reproducing antique gun engraving, although as I shall illustrate, I don’t think push engraving guarantees a convincing result, nor am I sure that you can’t get a convincing result using chasing or a GRS/Lindsay tool – I am just not aware of any good examples!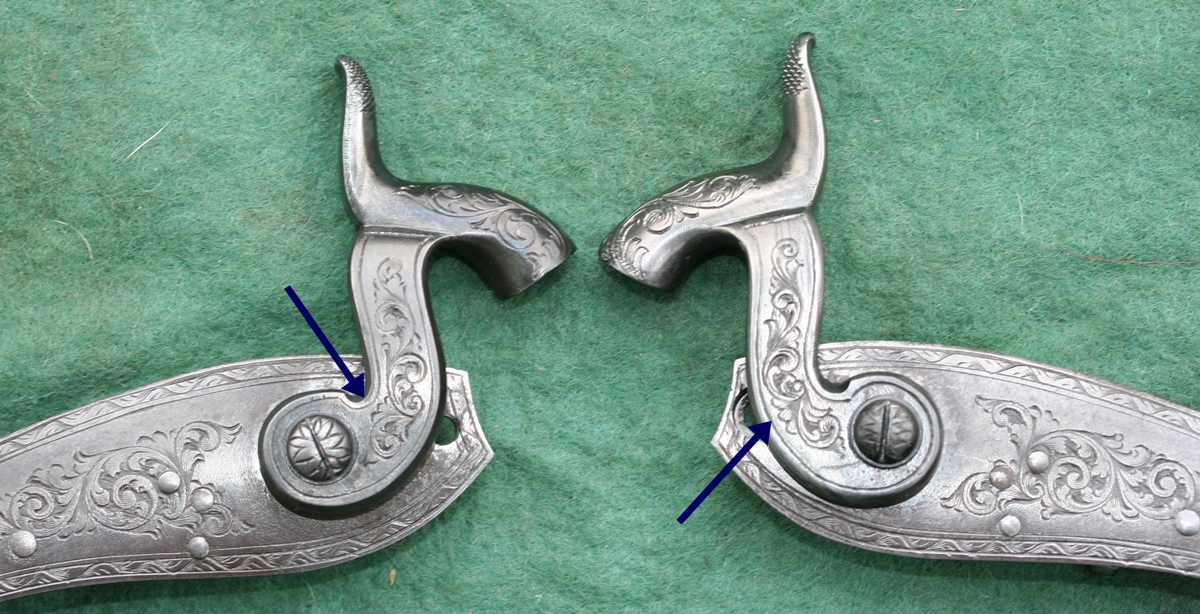
The cock on the right is a copy engraved by a very good modern engraver using push engraving, the rest is all original
Click on the photo to enlarge and increase resolution – use the browser back button to go back.

Close up of the modern take on the original. Note that the quality of this engraving is as good or better than the original – just not ‘right’.
This direct comparison illustrates the underlying difference in feel between the original and a not quite convincing modern effort, the actual patterns are to all intense and purposes identical, probably as similar as the original engraver would have got on the two cocks, but the modern take looks flat and uniform – look at the three loops pointed to by the arrows – in the original they were cut by rolling the tool as it enters and back on exit in one smooth and very comfortable sweep – the modern one is a ‘dead’ line. Look also at the overall weight of the pattern – there is much more life in the original. Interesting! The same observations can be made of many attempts to reproduce old engraving using chasing or pneumatic tools – have a look for yourself – I don’t want to point the finger, but many examples can be seen in America!
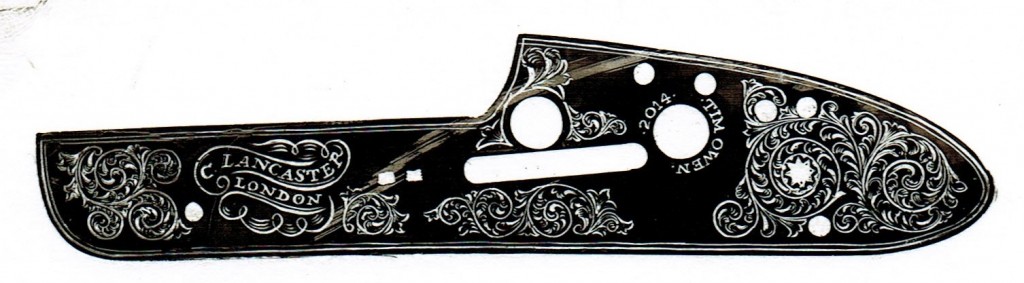
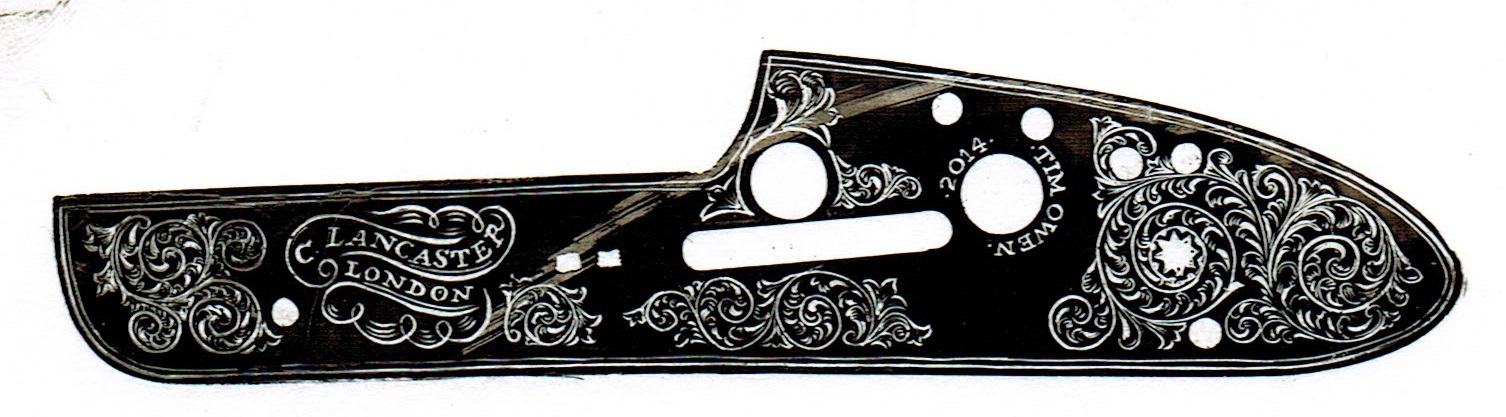
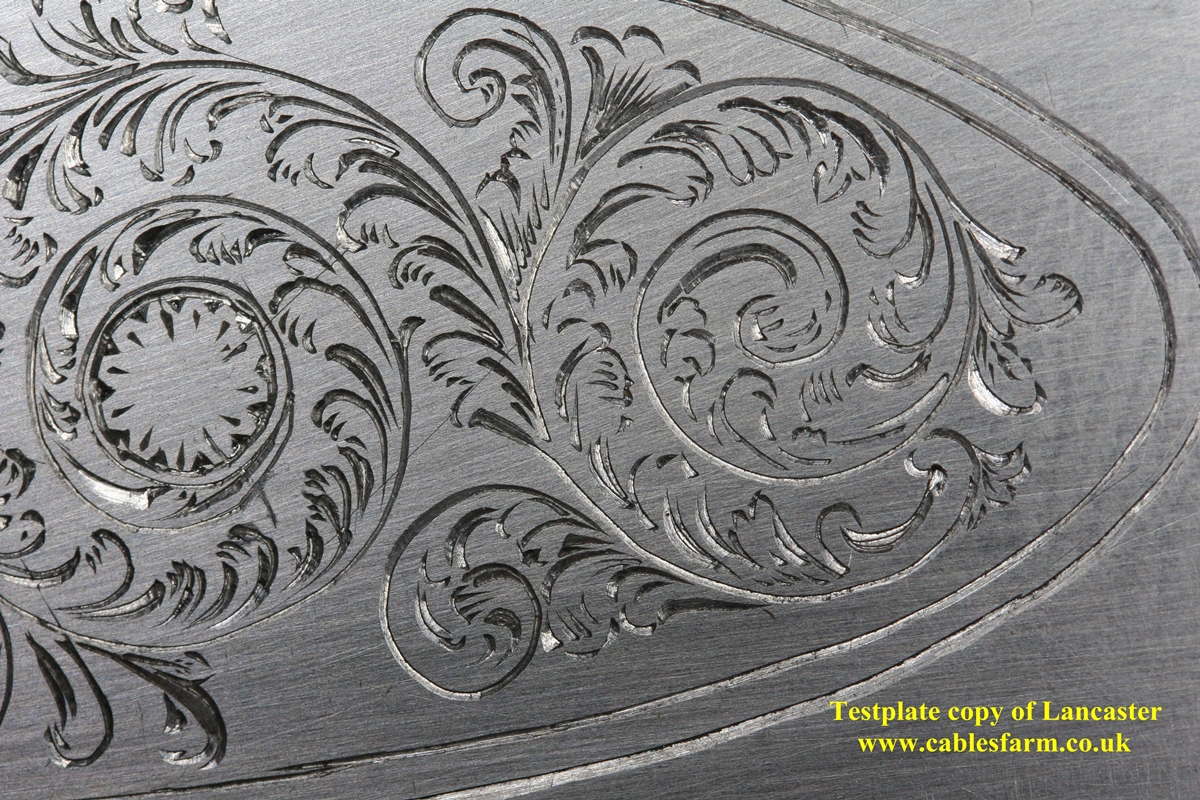
Its interesting to try to distill what it is that makes the late 18th/first half 19th century engraving difficult to reproduce when using different tools or when used to a totally different style of engraving. Period gun engraving went through a number of different styles – see Beginner’s guide No 4 on this site – but they do have some features in common. Here is an enlargement of the engraving on the Lancaster lock above.
This shows some features of a typical piece of engraving of the late 1830s or early 1840s on a Lancaster gun – one of the better gunmakers of the time. You will see that all the curves are segmented into bits covering about 40 degrees of angle, and that very few lines within the engraving are of constant width – most either start fine and get wider and then stop , or get narrower again before the end. Notice also that there is not a single straight line in the pattern, and that its very rare for a cut to swap directions of curvature in mid cut – in fact I can only see one, a short line in the bottom right near the start of the main scroll – when used as a significant feature of a pattern it always makes me uncomfortable! You can see that there is great economy, in that the pattern look convincing while have almost no surplus lines – you can imagine the engraver going at it very rapidly and wasting no time on unnecessary cuts. This exact pattern was used on many Lancaster guns and rifles for a number of years so presumably the engraver could do it in his sleep!
When you start to do push engraving you will find that cuts like the ones on this lock are the easiest and most natural cuts to make and will be almost the first real engraving that you are able to undertake.
The Mechanics of Engraving – a Theoretical view
Push engraving requires the application of well controlled force – one of the strangest things about it is that, given a decent microscope and a sharp tool, you can engrave things that you couldn’t draw easily – I can (just) engrave readable lettering about 1/4 to 1/3 of a mm (10 – 15 thou) high that I could never do with a pencil or scriber. The reason for this is in the nature of the control that you are exercising – when you write or draw or engrave, two different aspects of your senses are acting, firstly your motor skills – i.e your ability to make your muscles move whatever you are holding to the desired place – this is often based on the so called ‘muscle memory’ …. i.e. if I do this with my muscles then this action will result, and secondly using visual feedback – I can see where I want to be, and I can keep adjusting how I move my hand to achieve the goal. When learning a new skill like engraving you don’t have the muscle memory and so are mainly reliant on the second, visual feedback, to cut where you want to cut. The reason you can do these very fine things when engraving is because you are using visual feedback to control force rather than controlling position, Lets imagine you see that you need to extend a vertical stroke of a 1 m.m. ( 1000 micron/ 40 thou) high letter by 50 microns ( 2 thou) – that’s just enough to show in the height of lettering 1 mm high – if you are using a pencil or a scribe you have to exert the muscle control necessary to make this minute adjustment of position, but if you are engraving steel you just have to exert the necessary force in the right direction until you see that the tool has reached the position required, and its much easier to control the often substantial forces and use visual feedback. The forces come from your hand, wrist and arm, so with time you will develop the necessary muscles. Straight push force is not the only control needed, you also have to control the horizontal angle at which you apply the force to control the direction the cut goes, and vertical angle of the tool to control the depth of cut, plus the roll angle of the tool to control the expression of the line. Because of the way the muscles in your hand, wrist and arm work, and the necessity for your engraving hand to be supported by the work, some combinations of these controls are easy and feel natural, and some are difficult – for instance as you sit with your engraving hand ready to cut, you will want to rotate the work so that the line initially starts pointing to around 9 o’clock to 11 o’clock for a right handed engraver or 4 o’clock to 1 o’clock for a left hander. You will find that for the right handed engraver it is easier to turn the tool in an anti-clockwise cut, rather than a clockwise cut, and many engravers will reverse the work to avoid more than a very short clockwise cut. If you look at the cuts in the Lancaster engraving above is looks as if the cuts that are part of scroll growing anti-clockwise are made up of lines cut as they radiate from the scroll whereas cuts on scrolls growing clockwise are more often cut towards scroll. Cutting straight lines longer than about 2 c.m. ( 3/4 inch) will require that your hand is relocated at intervals as the line is cut ( your hand will be supported somewhere or your thumb will be supported on your left thumb) – in much original engraving you can see periodic uneven line widths in the lines round lock plates, often in segments of about 2 cm.
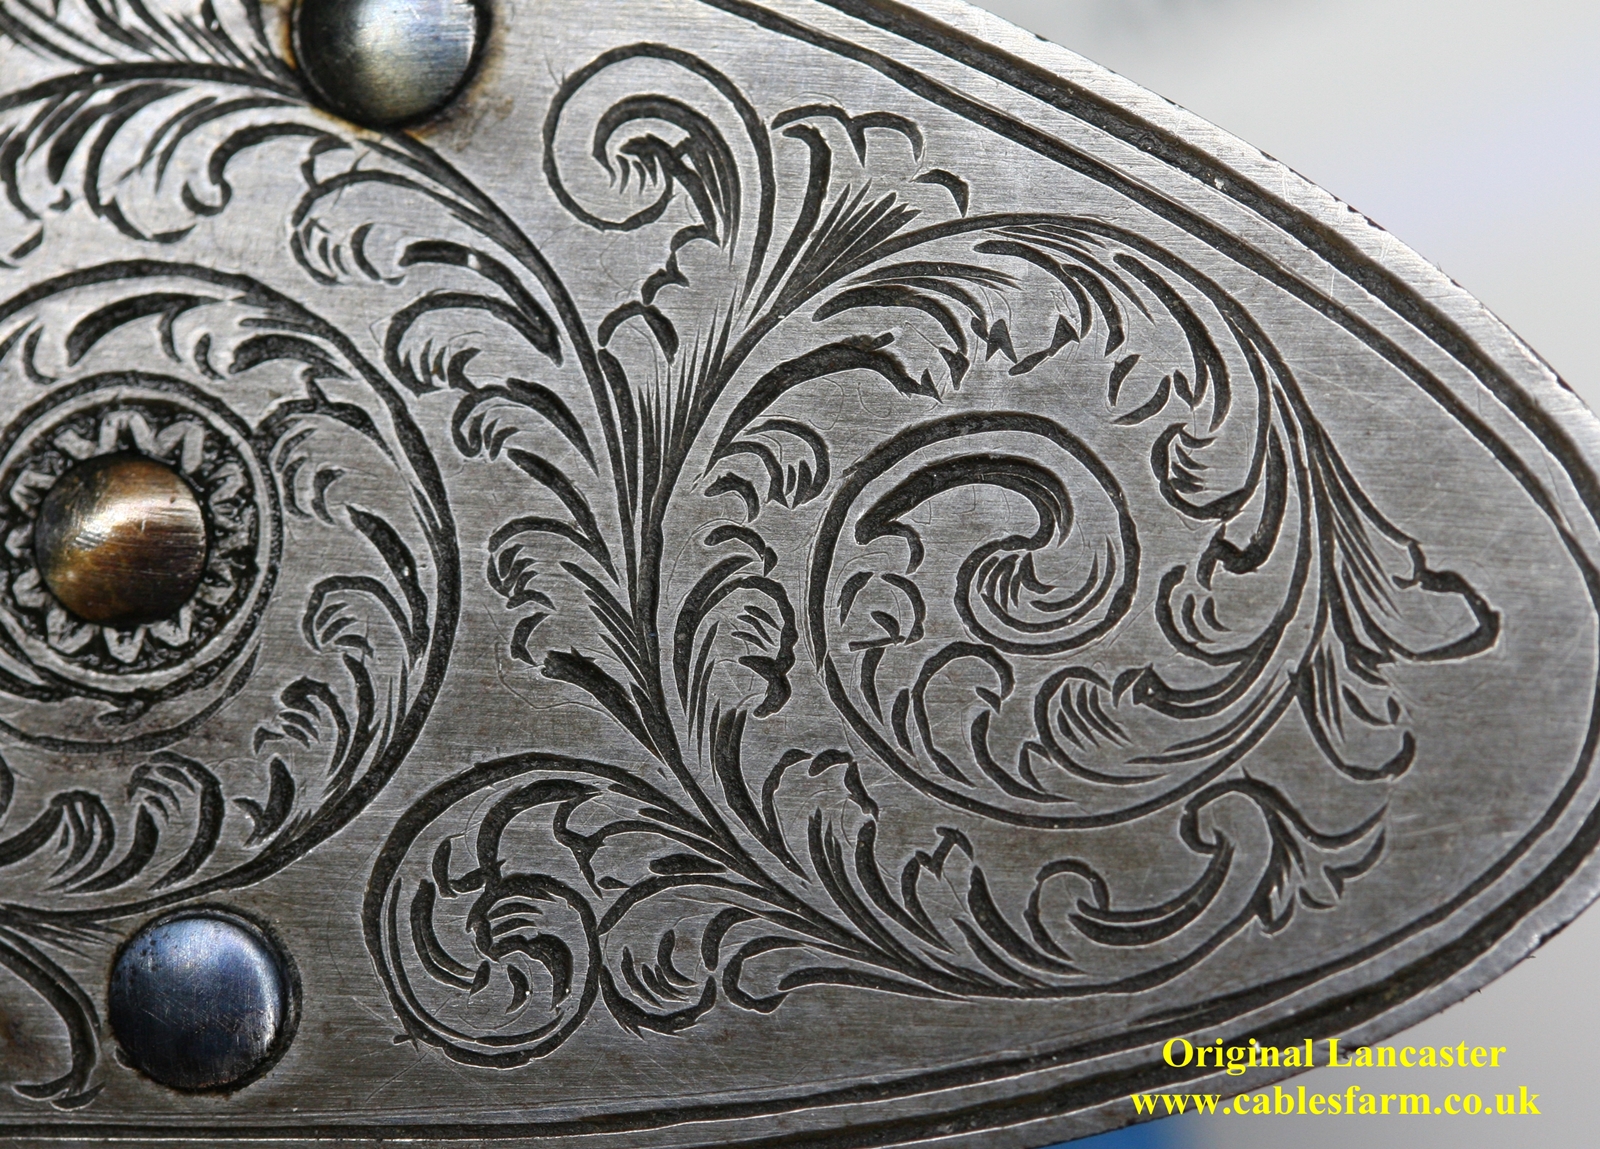
The most difficult action in engraving, particularly for beginners, is finishing a cut. This is the moment when you stand a good chance of breaking the very fine tip off the end of the graver, and trying to cut with a damaged graver is a certain way to generate a skid and cut a gouge across your work. For this reason you need to understand the mechanism by which the tool is damaged, and learn to sense when it has happened and immediately abandon that graver. When you are cutting a line the tip of the graver is slightly below the surface of the metal and typically a curl of swarf is coming up from the point of the tool and curving forward, so that the tip of the tool is actually under the root of swarf. To finish the cut and get the tool out you need to cut off the piece of swarf without leaving the tip of the tool buried in the metal! To do this you need to lift the graver while exerting a slight forward movement so that the tip can cut its way out, rather than lever the tool out by shearing off the tip – essentially you need to avoid just pushing the handle down on the metal without forward movement. This is something that takes time to master, and even experienced engravers sometimes get it wrong. If you look at the Lancaster engraving above you can see that the cuts end in a smooth taper as the forward motion continues as the tool is lifted – this lifting action is one of the few times that you need to do anything other than push and guide and roll.
Another situation where the tip of the graver is vulnerable is when you are cutting a line that intersects an existing deeper cut, and the tip of the graver jumps out of the metal as it hits the valley and digs into the far side – this happens often when trying to cut out background from around relief details.
As mentioned above, the roll angle of the tool is the primary way of giving expression to a line, coupled with increase and decrease in depth of cut achieved by raising and lowering the vertical angle of the tool, and in the Lancaster engraving above the lines that get widest do so as a result of rolling the tool. The action of rolling the tool comes naturally, its almost an instinct to roll the tool outwards as you go round an anti-clockwise curve and back again as you finish – i.e. you roll the tool in the OPPOSITE way to that which you would lean a bicycle if riding round the same curve. I suspect that the use of graver rolling is a feature of our period of gun engraving – and of much jewellery engraving, its a feature of the style of jewellery engraving called brightcut for obvious reasons – a lot of modern gun engraving is done with cutout backgrounds that don’t lend themselves to this technique, and it also doesn’t fit with the fine line engraving of some modern styles.
This testplate copy I did some time ago illustrates the difficulty I had in cutting the clockwise cuts – they are not anything like as expressive as the anti-clockwise going cuts.
These mechanical aspects of push engraving give it its unique style, and the physicallity of the process of cutting steel by hand can’t easily be emulated with techniqes that dispense with the intimate connection between the cutting force and the engraver’s senses. This is why, in my view, the use of GRS and Lindsay tools and the use of chasing with a hammer driven graver lack authenticity and tend to produce results that may look impressive, and may indeed be technically ‘better’ than push engraving but just don’t look right. I have used my GRS to do various types of engraving, and for some it is more or less indistinguishable from push engraving, but it lacks the contact between engraver and metal that gives the character to much early gun engraving, and I always come back to push engraving when I want to make things look ‘right’.

This Joseph Manton tubelock lock of about 1823 shows a different, higher quality style of antique gun engraving introduced by Manton around 1820, but it is still full of expression through the use of variable line weights. Look at the border lines – they are better but wander a little, especially the fine inner line. As an exercise, try to work out which direction each line was cut in. You need to learn push engraving to appreciate the potential!