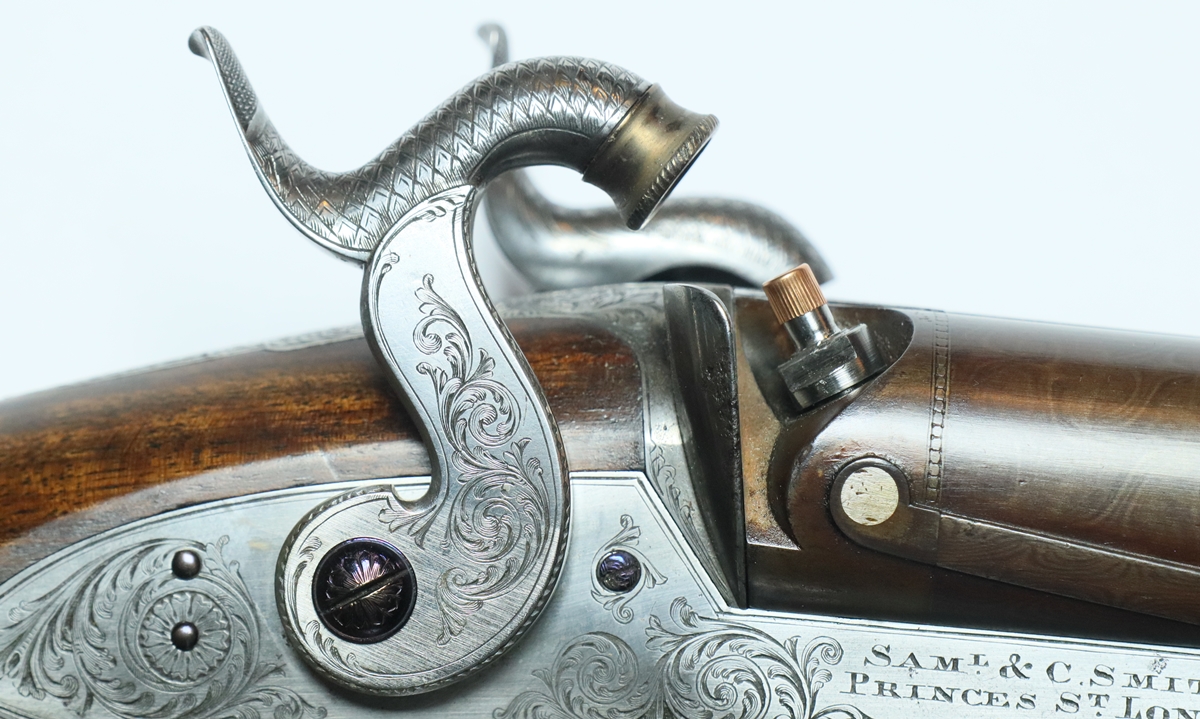
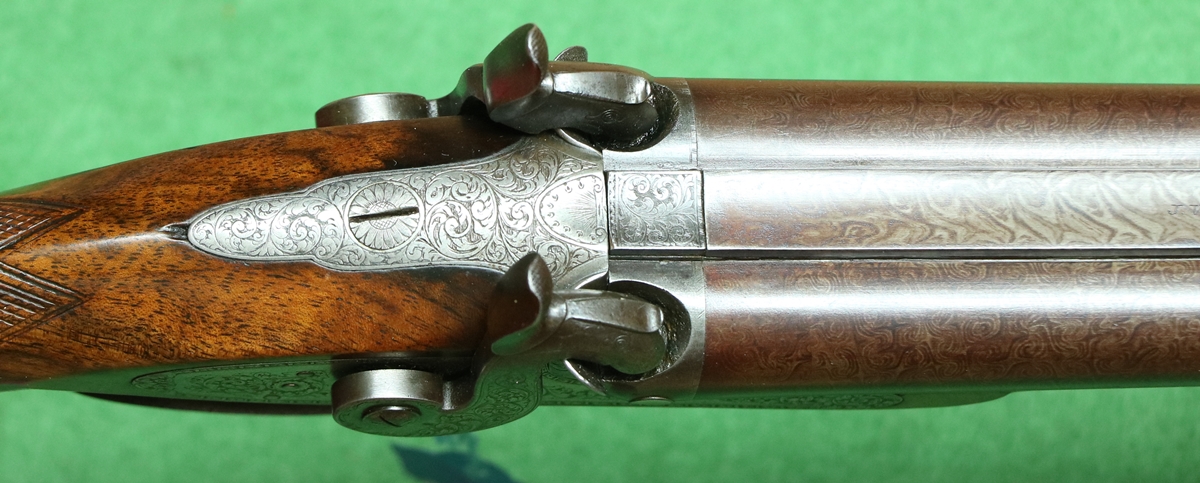
William Smith was a gunmaker apprenticed in 1766 to John Joyner who at the end of his career had his shop at 64 Princes Street, Soho from 1821 to 1824. The business passed to his son Samuel, who had the business from 1825. In 1830 he took out an English patent No 5978 for ‘Imperial caps and nipples’ to his own design. In 1834 he took his brother Charles into the business and it became Samuel and Charles Smith, still at 64 Princes Street Soho. In 1855 the business passed to Samuel’s sons, also Samuel and Charles, so continued to trade under the same name until 1877, although it moved to Haymarket for the last 6 years. Many of their sporting guns, rifles and pistols used the patent Imperial caps and nipples – some are now found cased with alternative conventional nipples so that common caps could be used. I do not know if Smith originally supplied them as an option, and if so whether alternative cock noses were supplied. Thus early (1831 -1834) Imperial guns would have Samuel Smith’s name alone, with the Prices Street address, for the rest of the percussion era guns would be under the name Samuel and Charles Smith (usually abbreviated as on the lock plate below.) still at the Princes Street address
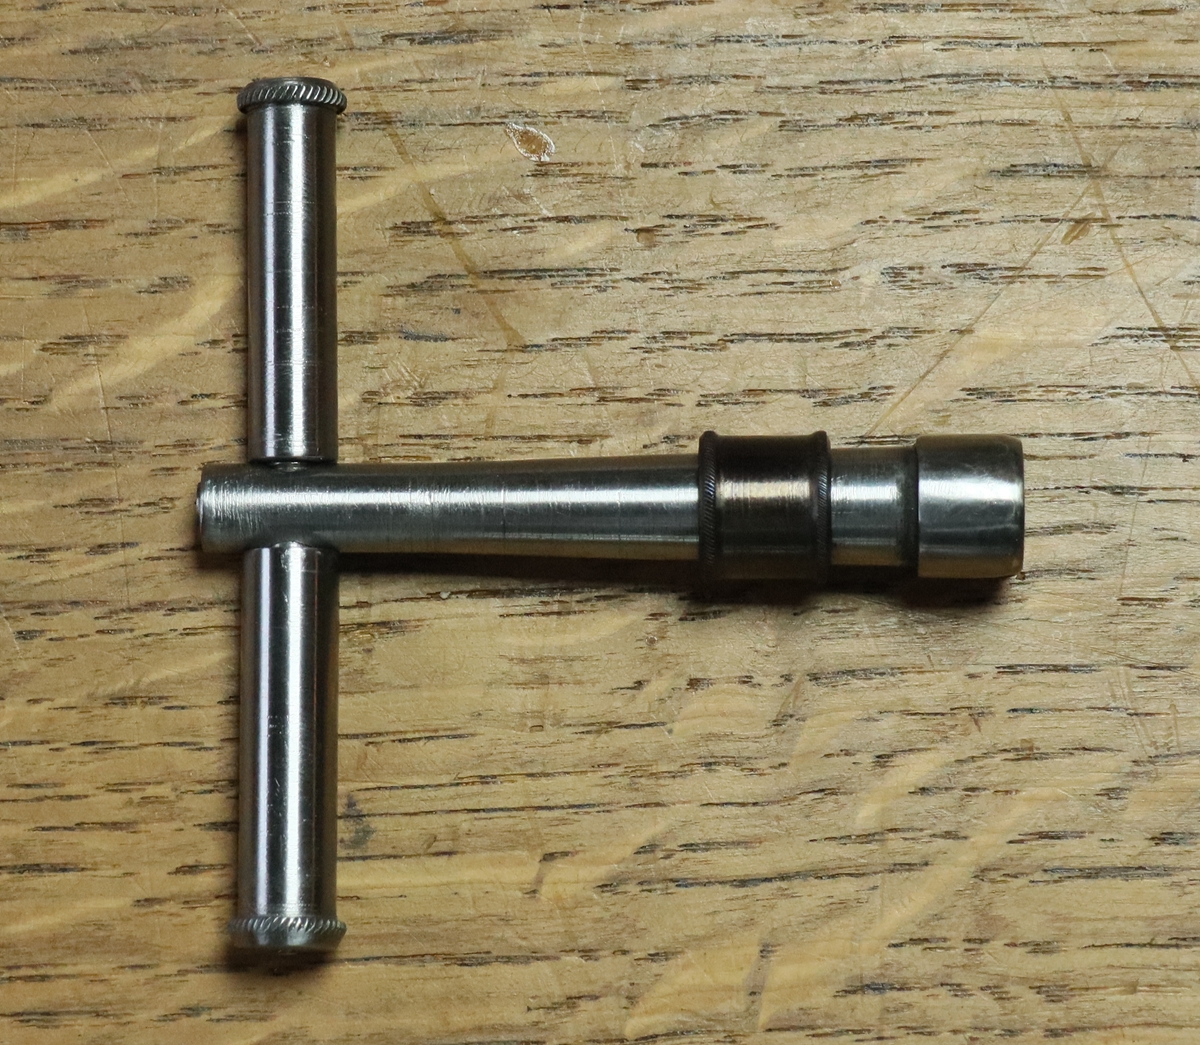
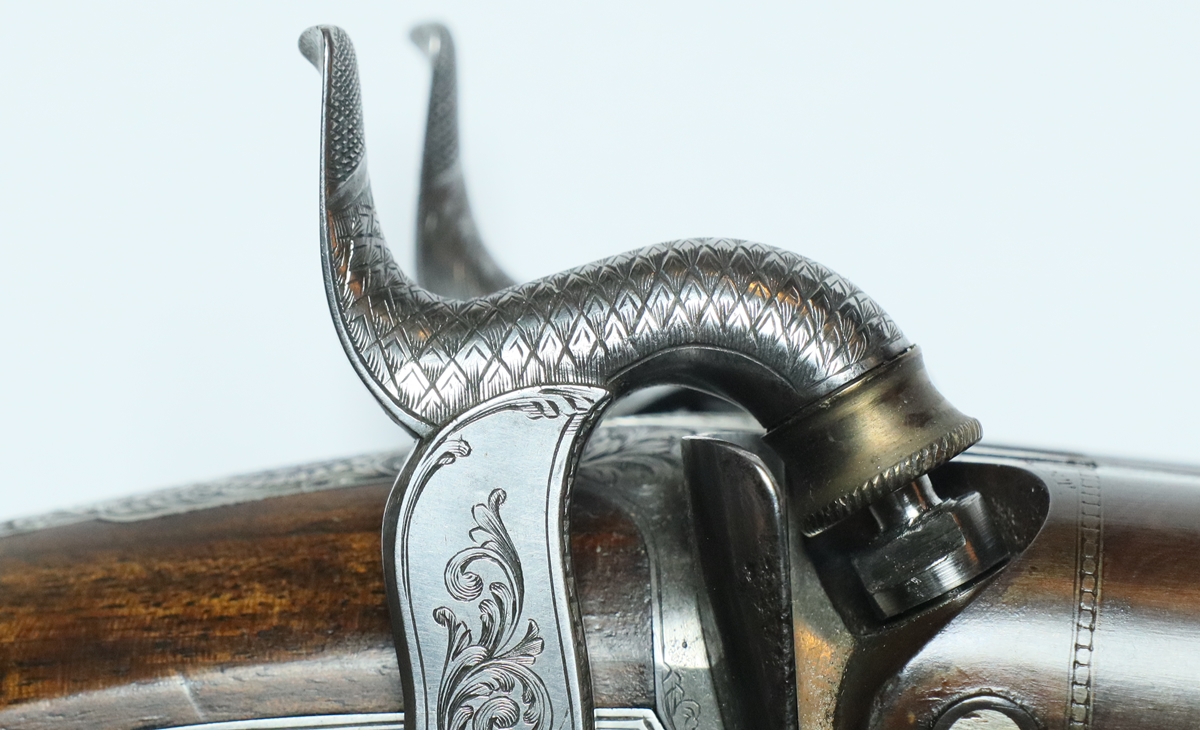
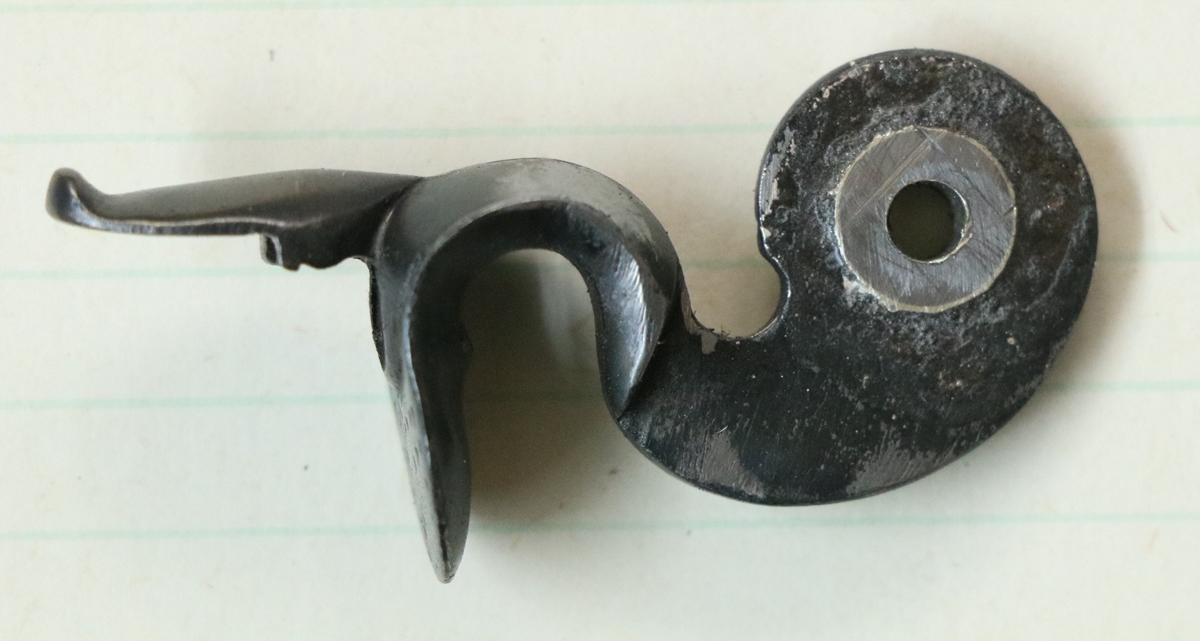
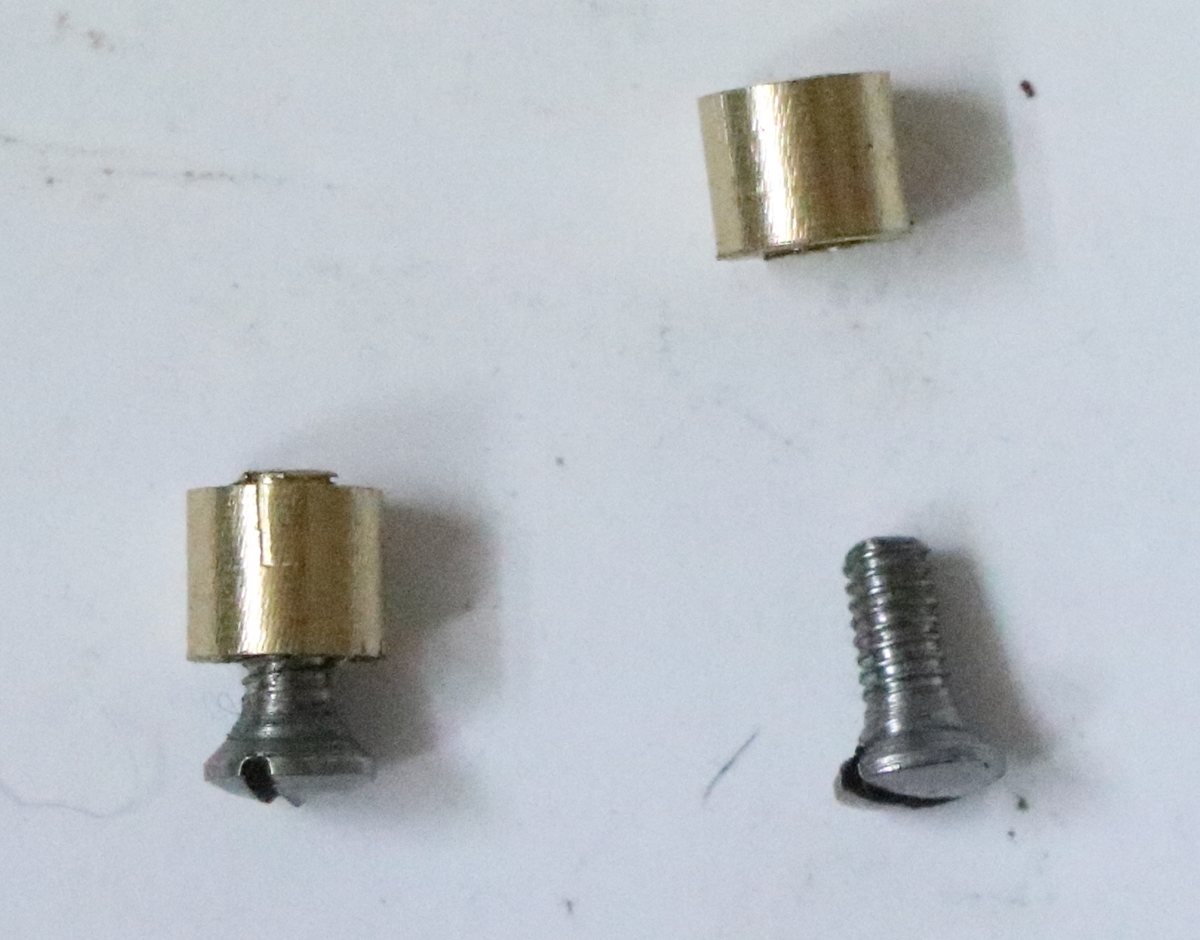
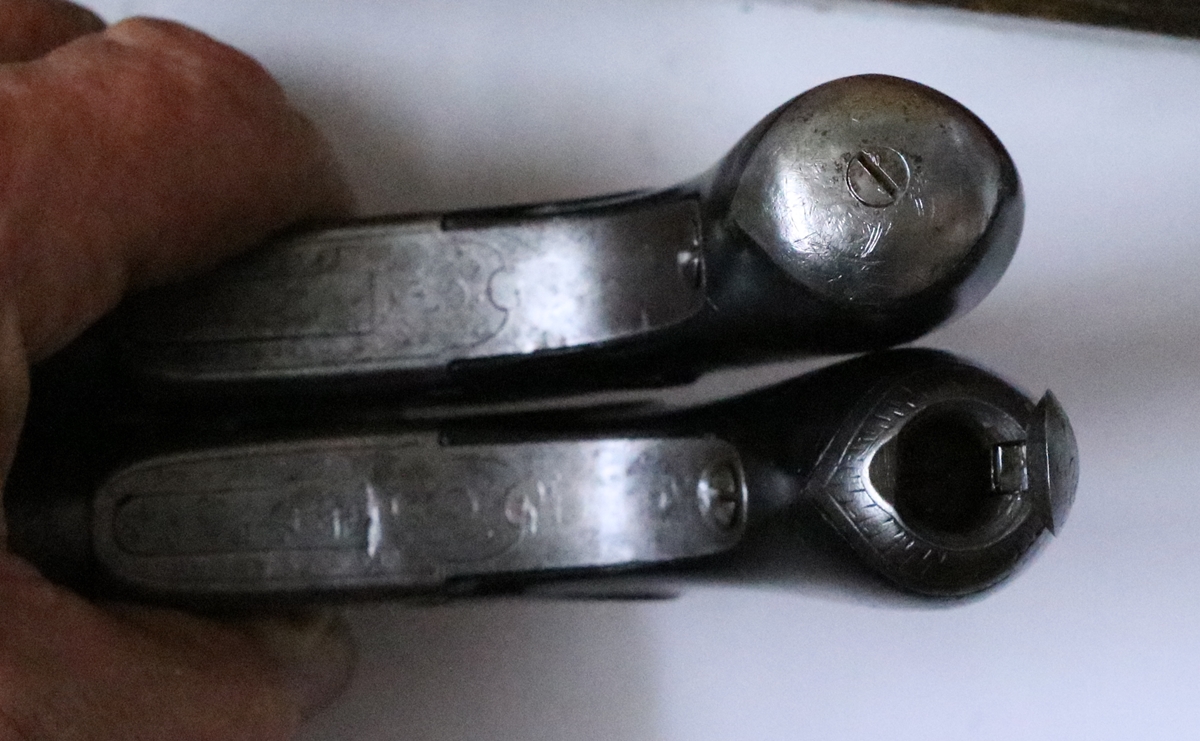
I haven’t yet seen the Smith patent so I cannot comment on what was claimed to be the advantage, but it was taken out fairly early in the percussion era so maybe the ‘standard’ percussion cap wasn’t yet fully established? ( I believe it was that they needed less primer, and were easier to make, plus had a shorter path to the main charge). The distinguishing feature of the Samuel Smith’s caps and nipples is that the caps were larger in overall diameter ( about 8.5 mm ) and sat over the round body of the nipple, which had a small projection in the centre with the hole for the flame – the projection forming the ‘anvil’ on which the cap was detonated by the cock. The nipple top was flat and circular except for the raised ‘anvil’ and so gave no purchase for a conventional nipple key – they were unscrewed using a special tool that fitted over the body of the nipple and had a small (2.5mm diameter) sprung peg that engaged with a hole in the side of the nipple body. The cocks of Smiths’ guns featured a removable nose on a 7/32 x 32 t.p.i thread – this was flared towards the end, which was around 12.3 mm in diameter (1/2 inch) and was recessed about 1.5 mm (1/16th in.) over most of its end diameter. Guns seen nowadays usually have conventional nipples to replace the Imperial ones, although they do stand higher by 4 – 6 mm than the Imperial nipples. I have not seen replacement noses for the cocks for use with conventional caps ( original or modern) so I don’t know if such things existed!
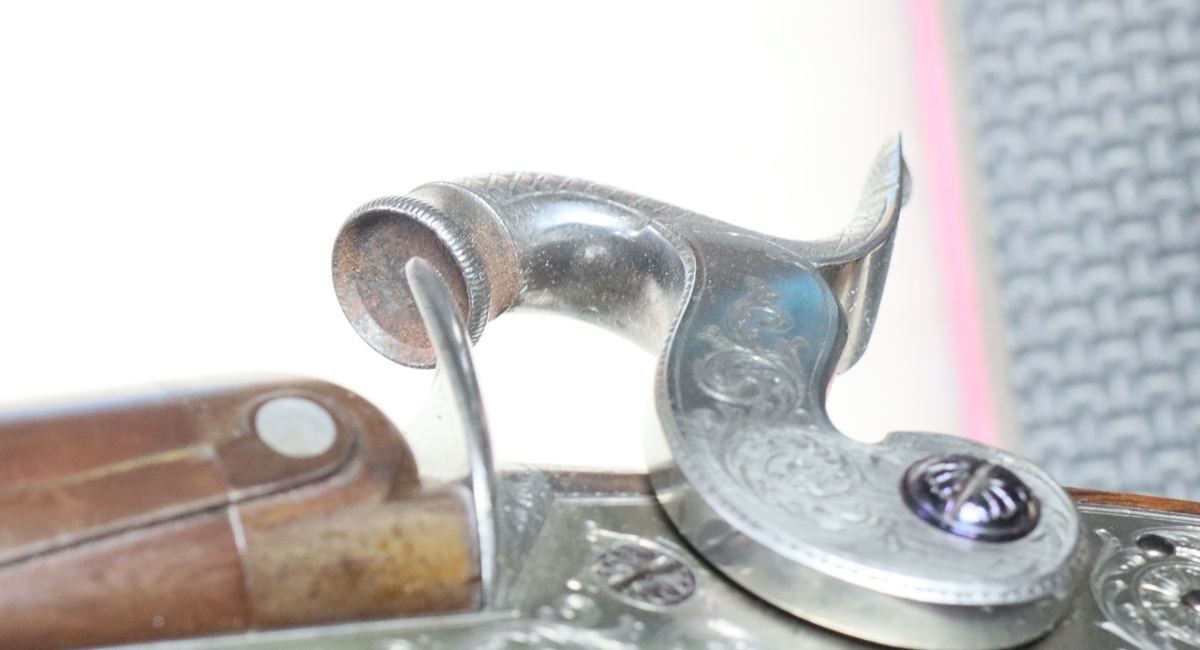
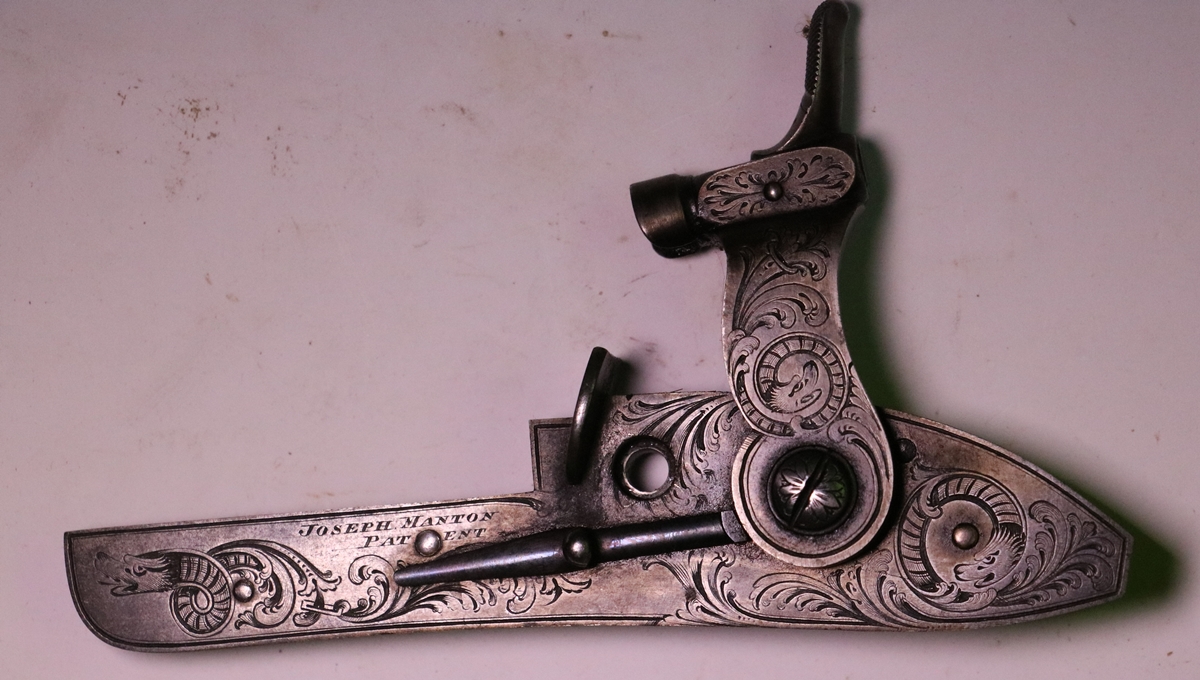
When conventional nipples are mounted in Smith guns that retain the original cock nose intended for Imperial caps, the caps are not guarded by the usual skirt on the cock nose of guns intended for conventional caps. The skirt on the nose of a conventional percussion is intended to prevent shards of red hot cap being blown out onto the shooter’s face and hands (it happens!). It is possible that the Smiths’ cock noses were made detachable to allow the user to fit a safer design for conventional caps? Early on a number of makers ( Joseph Manton, Samuel Nock etc…) did use detachable noses on the cocks, possibly a relic of the pill lock days – these, of course, did have protective skirts.
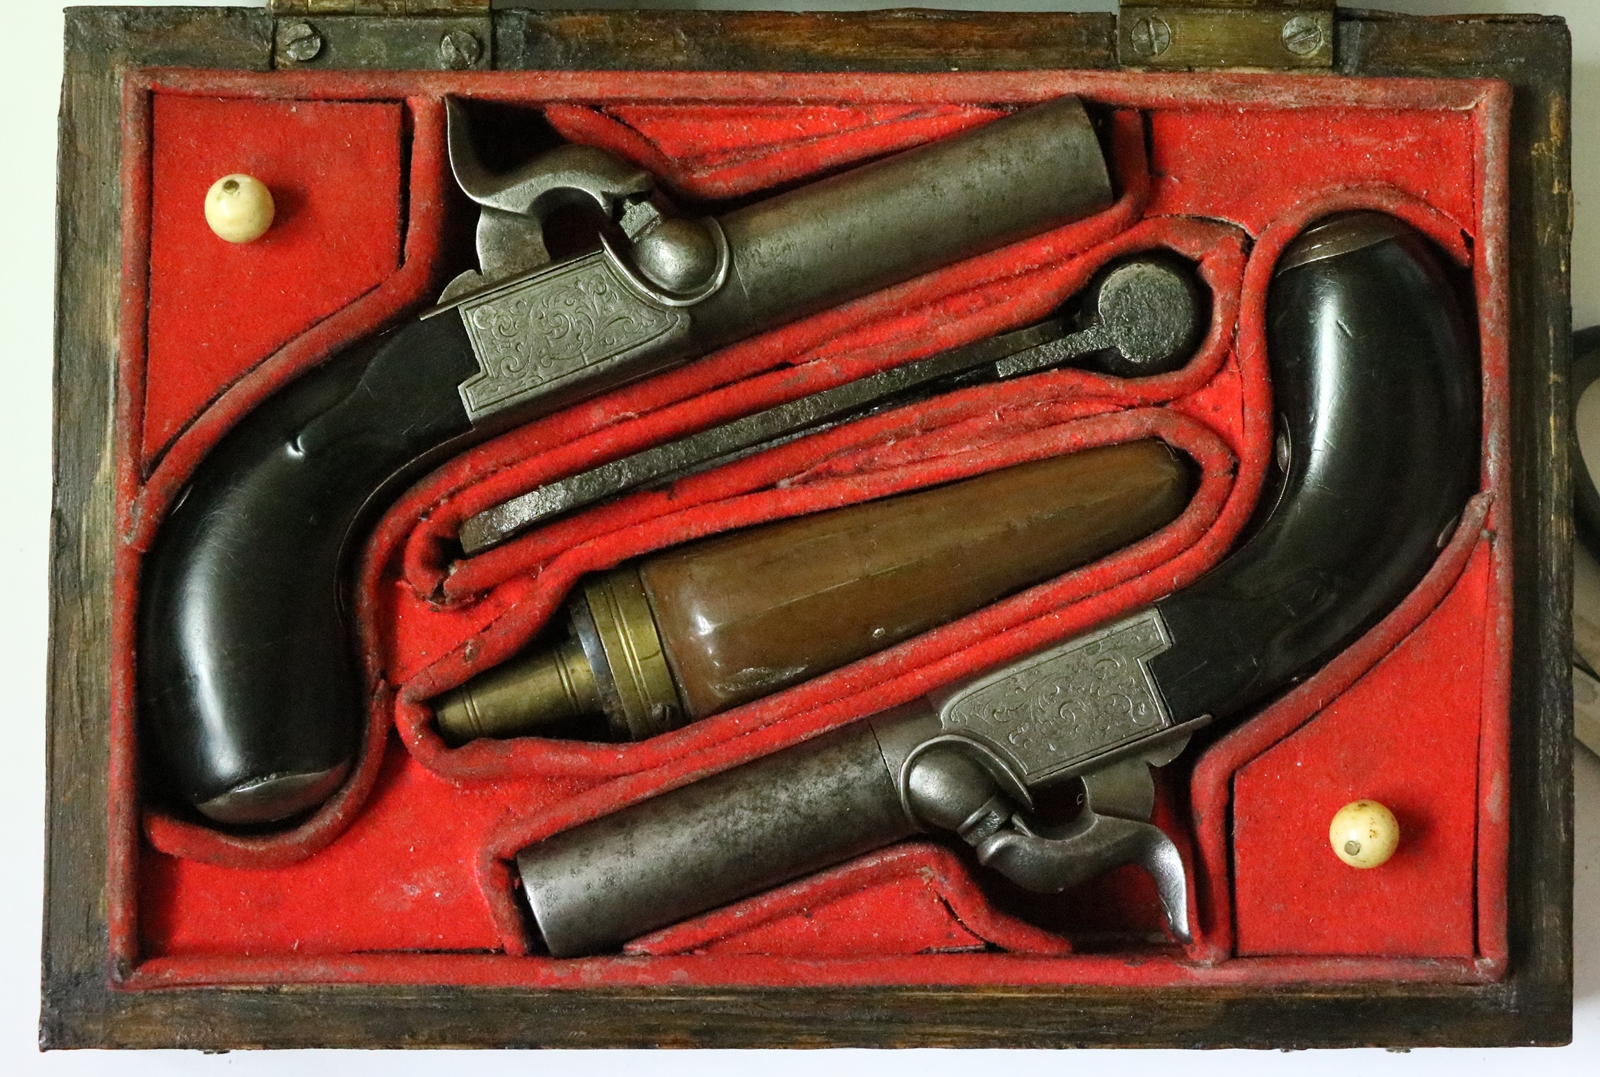
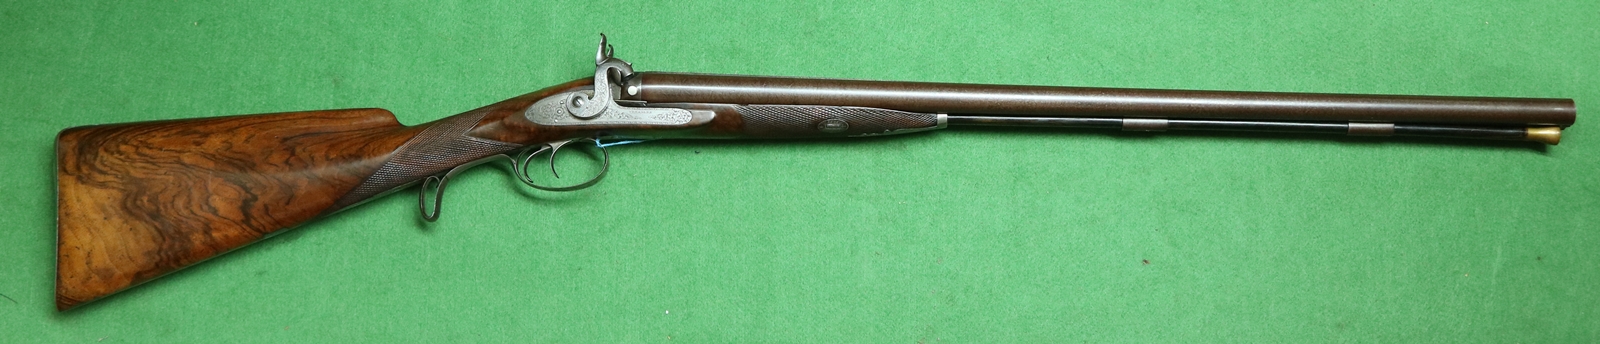
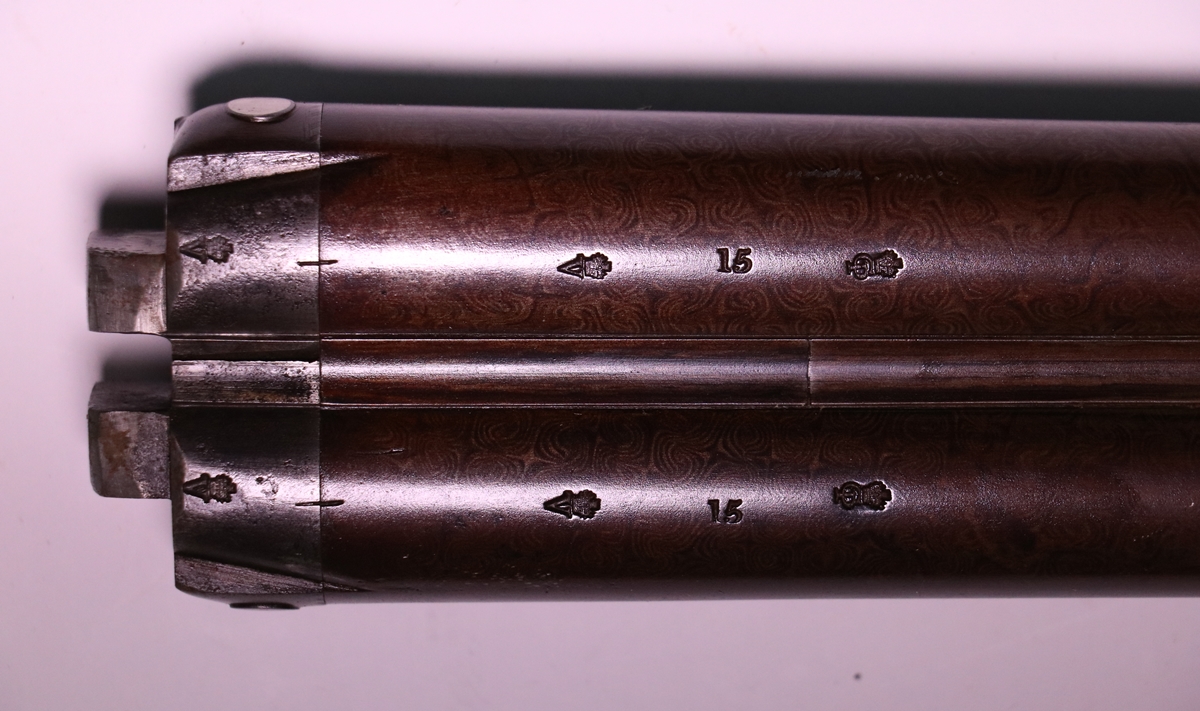
The Samuel and Charles Smith gun shown below is a double 12 bore and is fairly heavy for a normal percussion sporting gun, weighing around 7 lbs. It was made without a ramrod or fittings for one, which suggests that it was made as a live pigeon gun, probably around 1840, It is one of a cased trio of identical guns, two numbered consecutively and one later, all fitted with Imperial caps and without conversion nipples. The guns are not individually numbered 1,2 and 3 as one might expect (or is it too early for that?). The numbering of the guns suggests that they were made as a pair and that the third was made later to complete the trio. It is difficult to see why anyone would want to have a set of three live pigeon guns, and that makes a case for them being game guns for driven shoots where the shooter might have had two loaders and therefore 3 guns on the go at once, or were they made before the era of massive driven shoots? As always there exists an enjoyable puzzle!
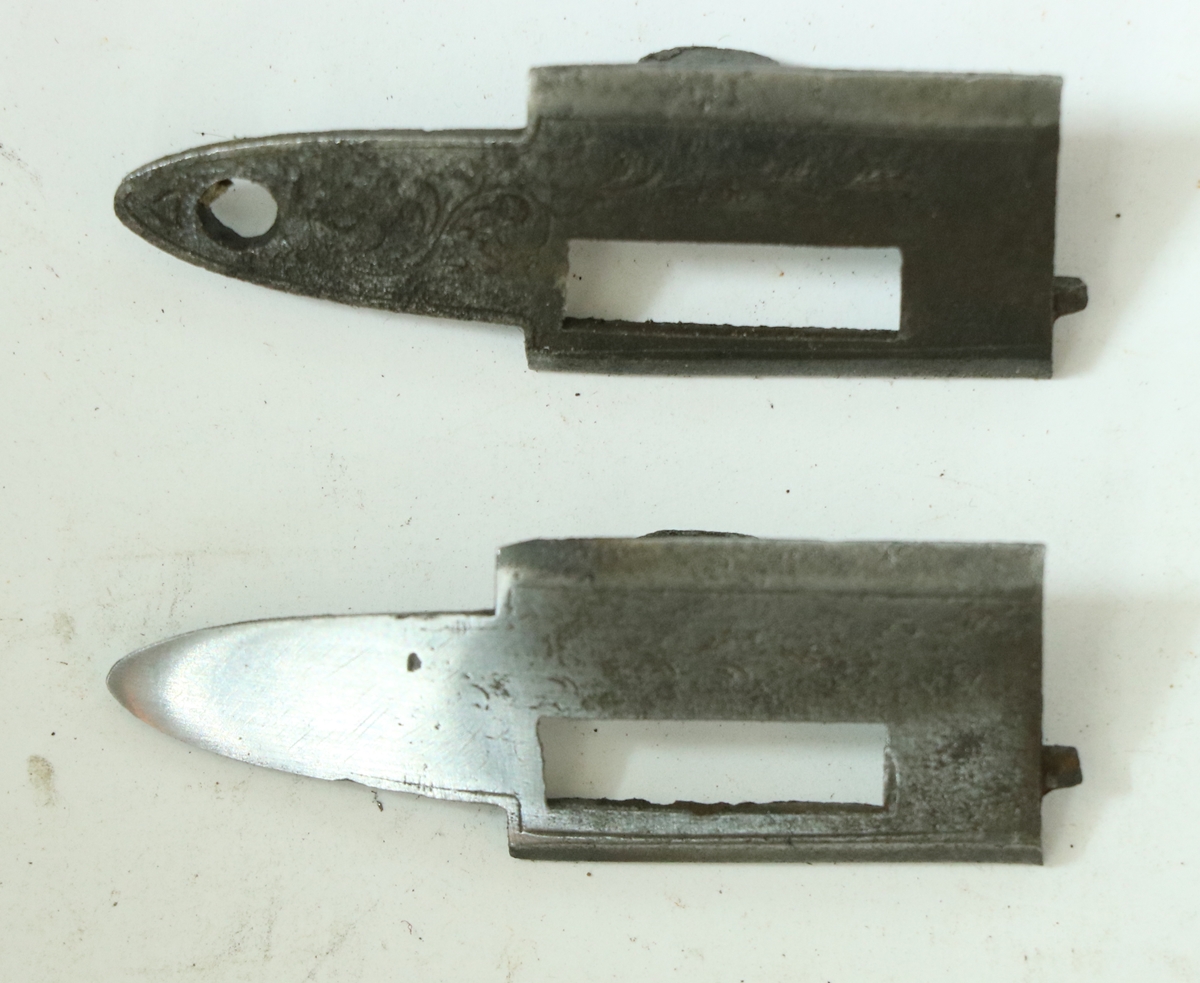
My project is to convert them to use conventional caps (reversibly and without damaging any original parts, naturally!). I will make new nipples of a squatter design that normal (modern nipples are about 1.5 mm shorter than the originals from 1840) and will also make new detachable noses for the cocks to protect the shooter from stray bits of cap.
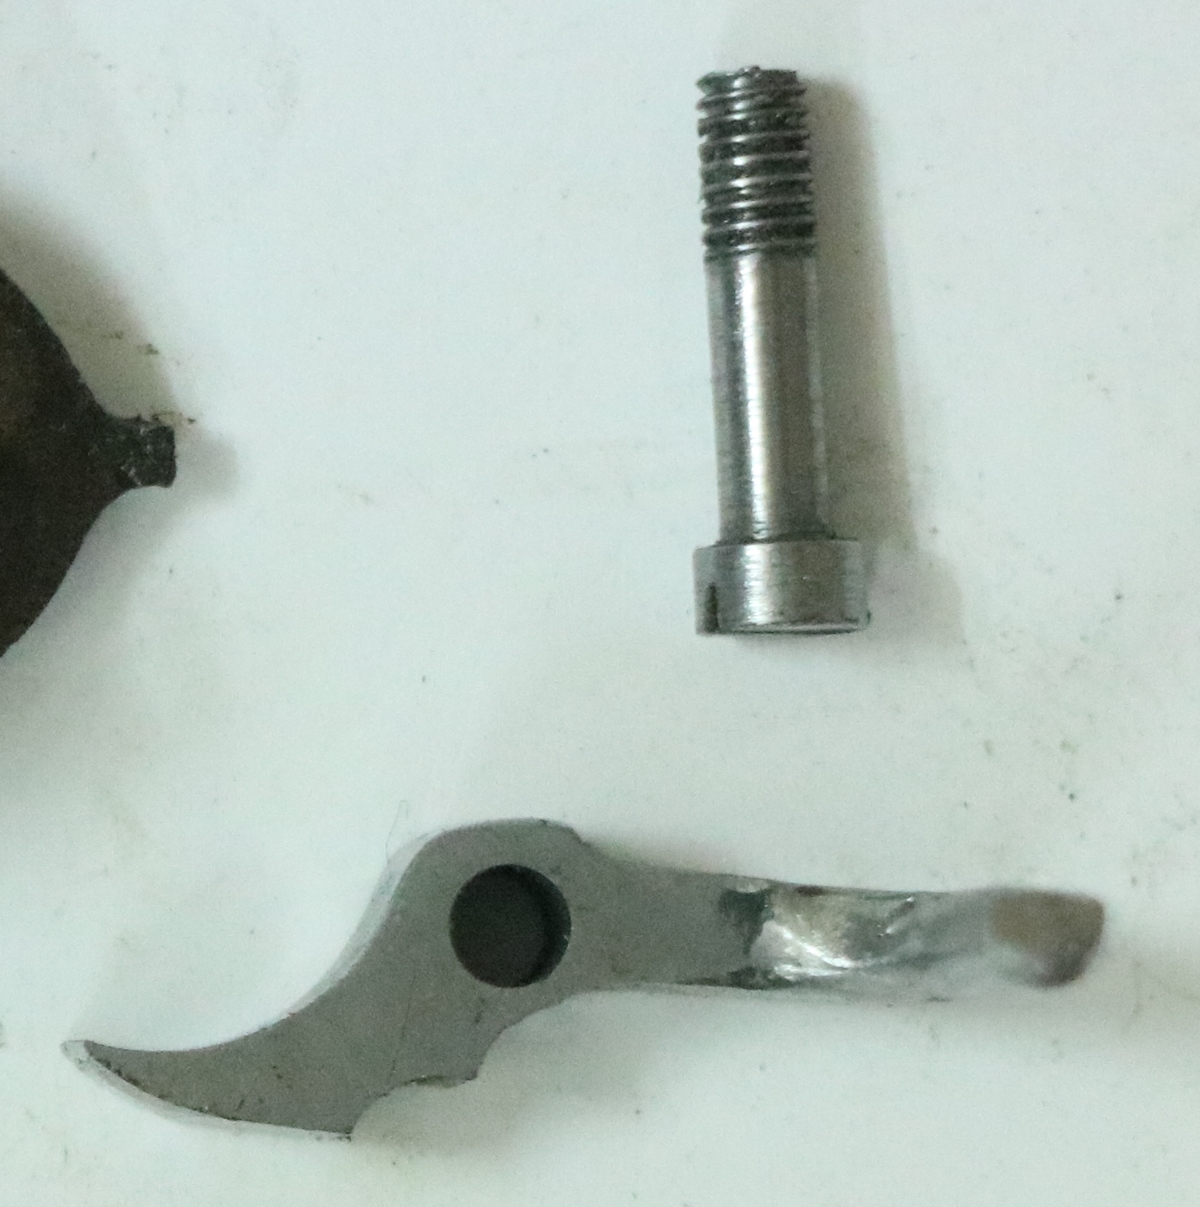
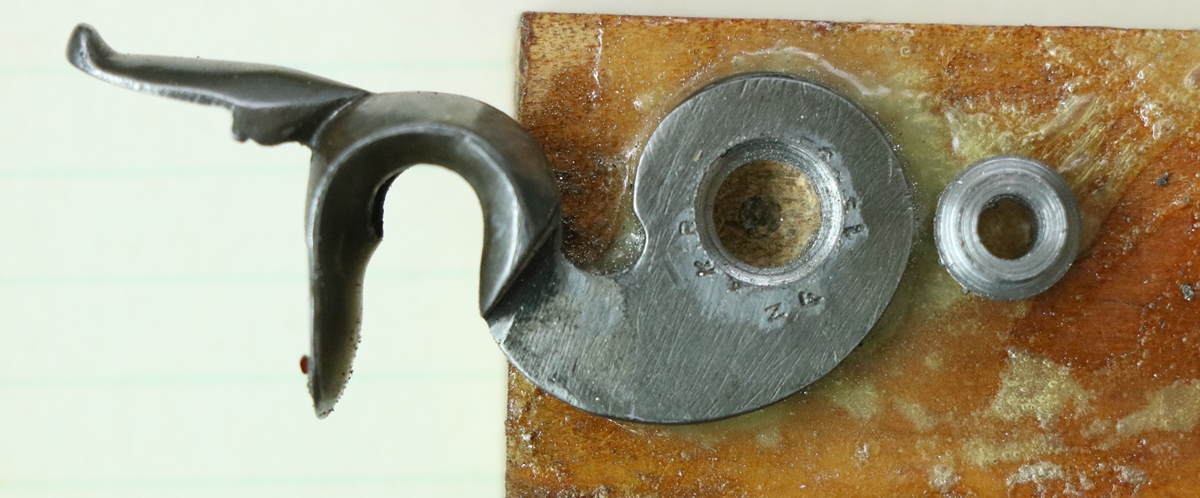
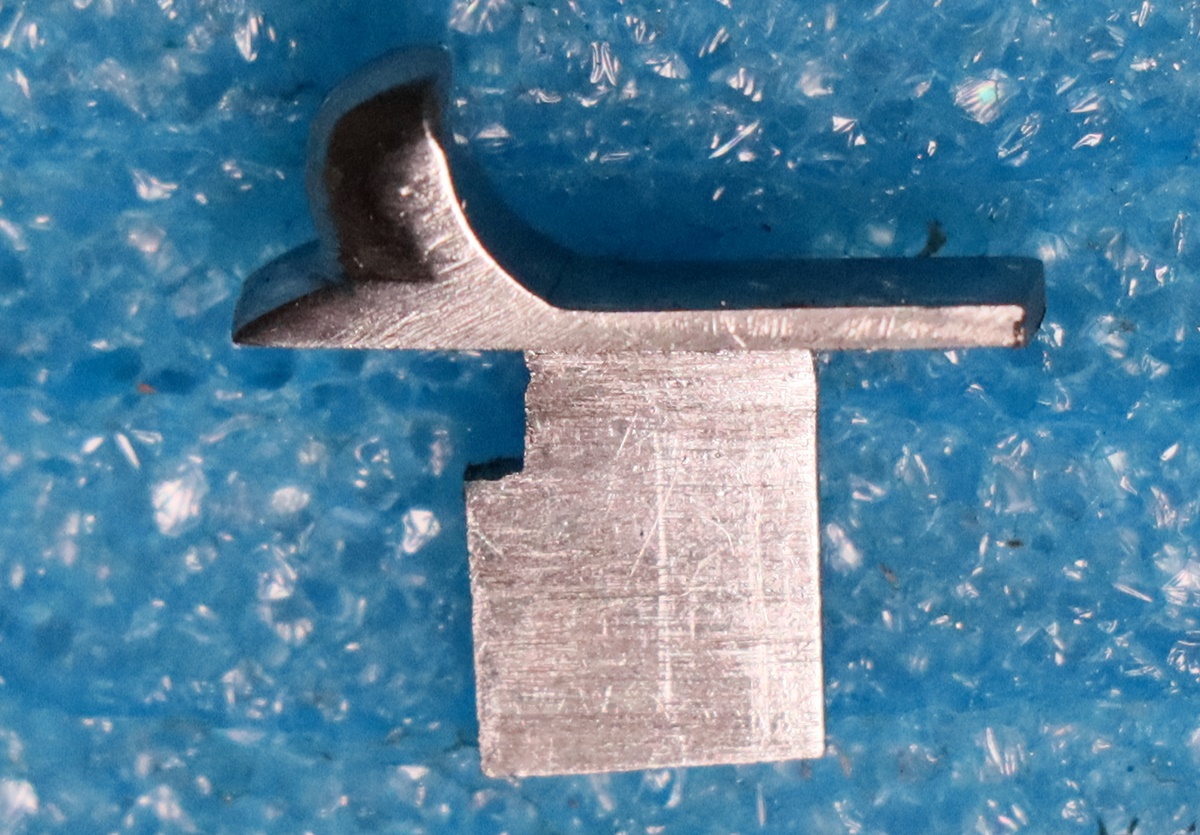
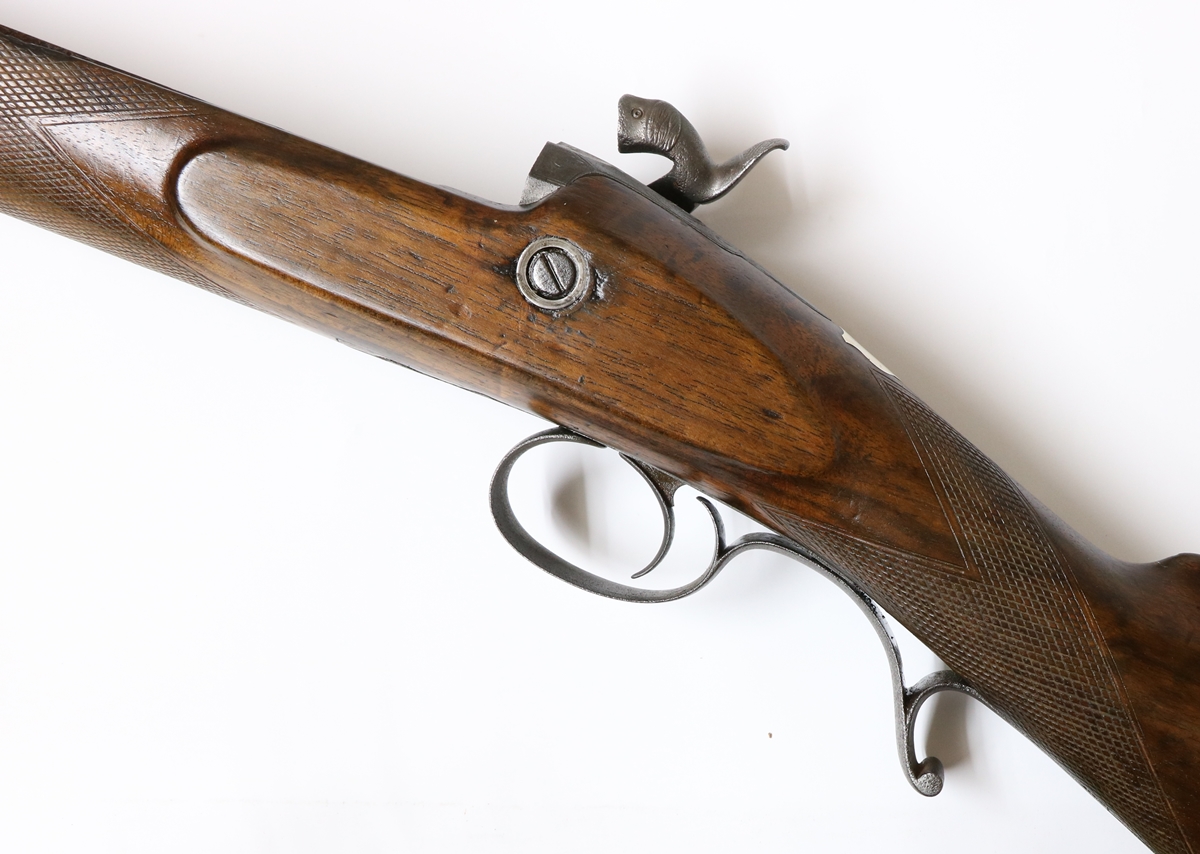
The nose on the Rt cock is my prototype nose for use with conventional caps & nipples.
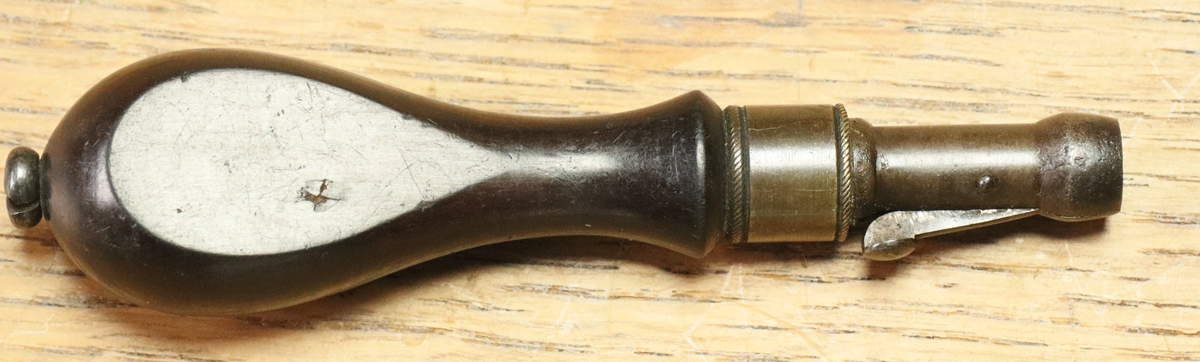
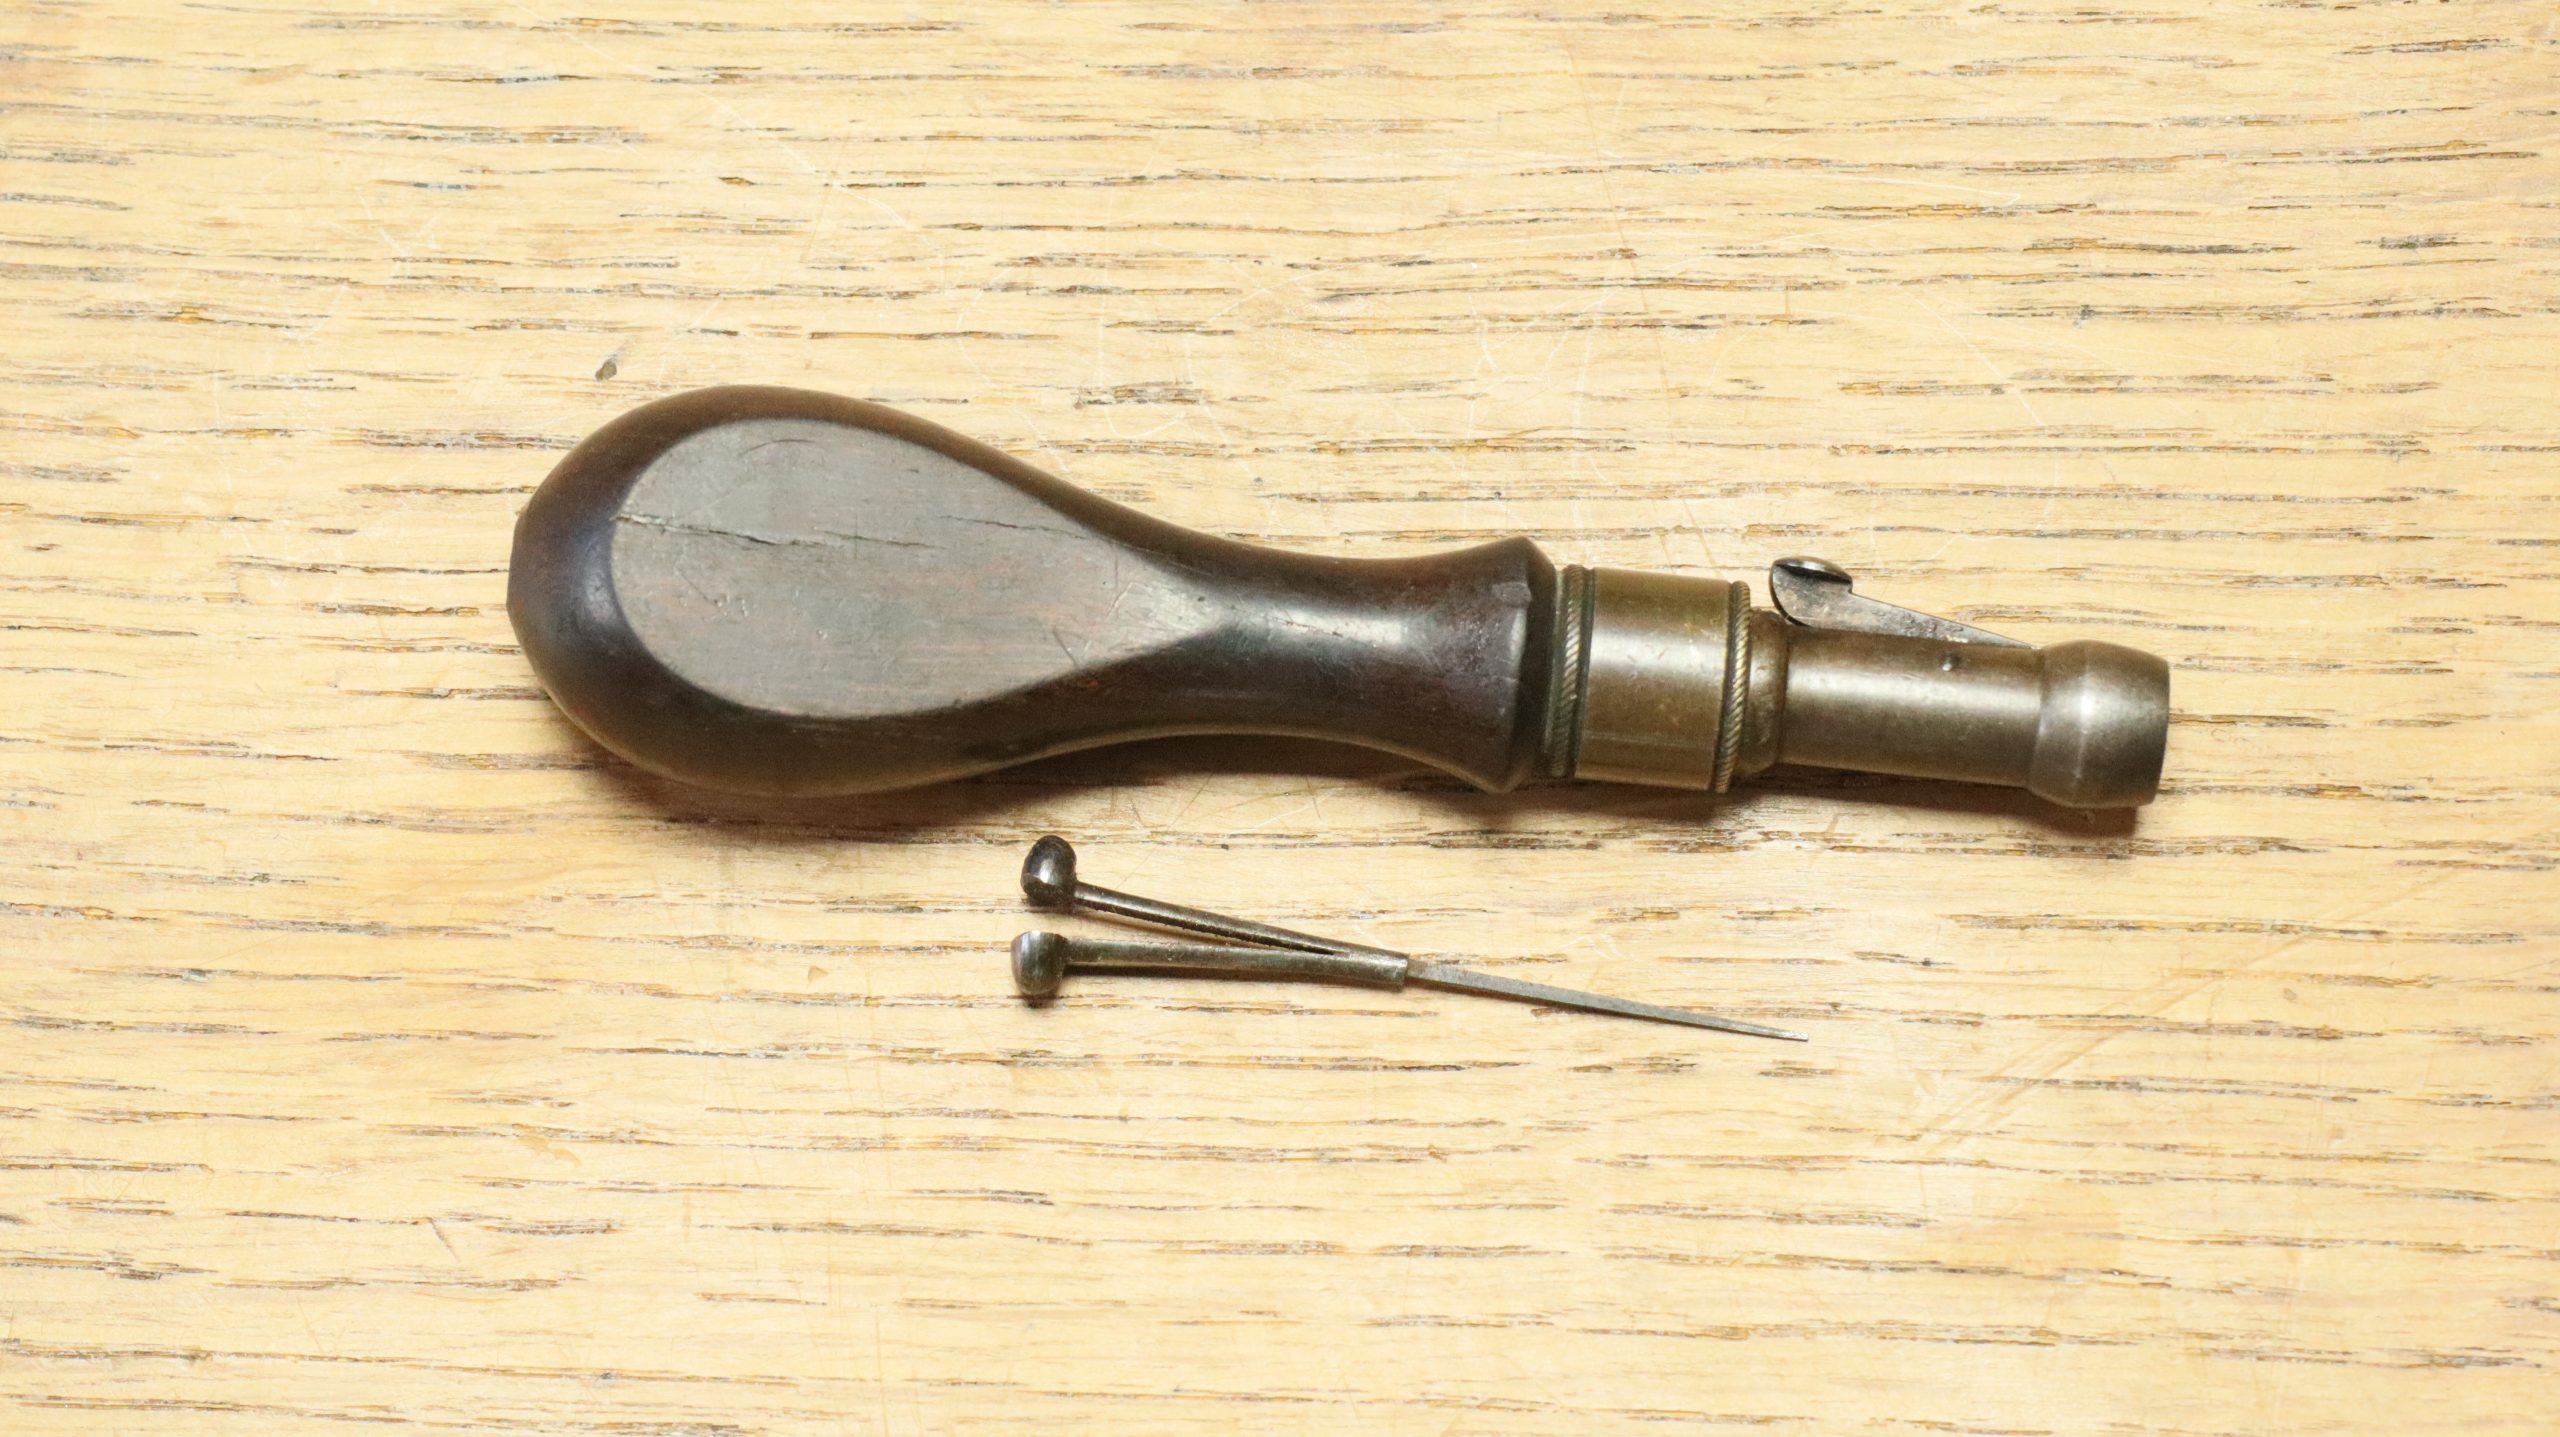
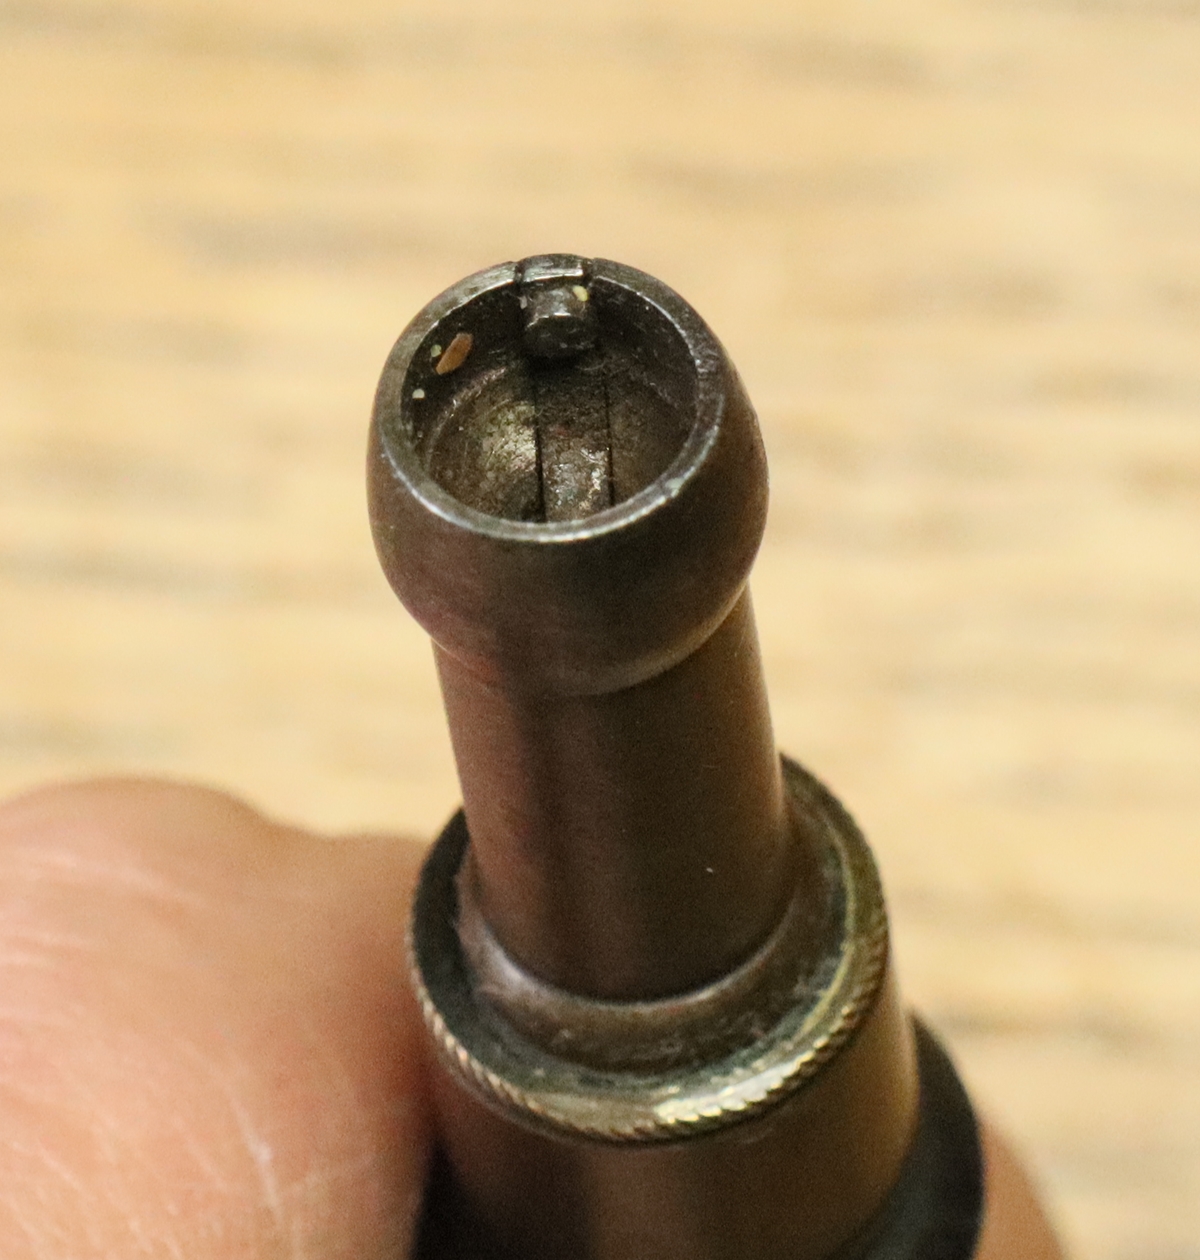
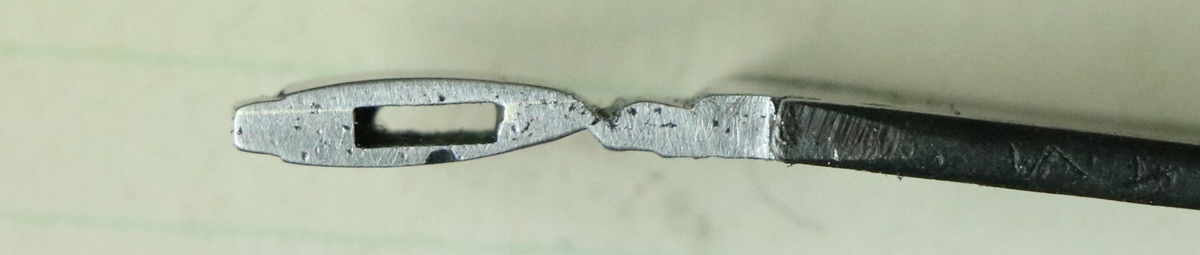
Here is the original tool for removing the Imperial nipples – note the spring loaded arm with the pin (approx 2.5 mm diameter) that engages with the radial hole in the nipple edge.
The tool is not particularly worn, but doesn’t fully grip one of the nipples, which I assume had had its hole damaged by trying too hard to remove it. I will try making a better design of tool – quite a challenge, although I do have a few ideas……
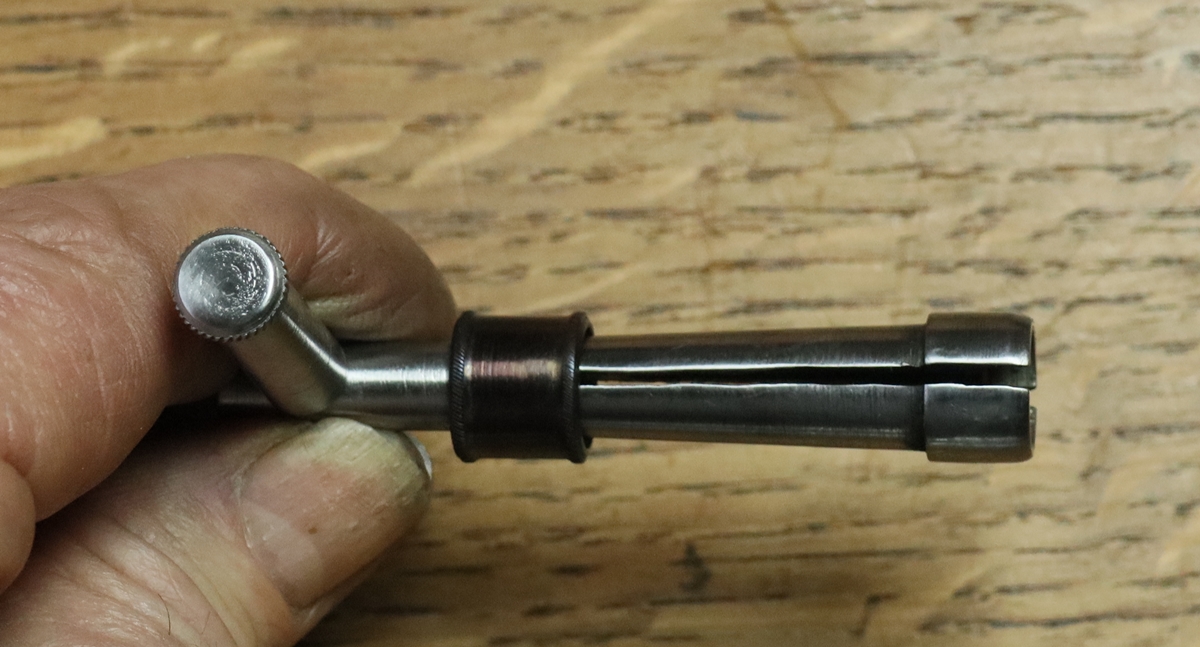
Here is the tool I made to get out the caps that the Smiths tool didn’t seem up to removing;-
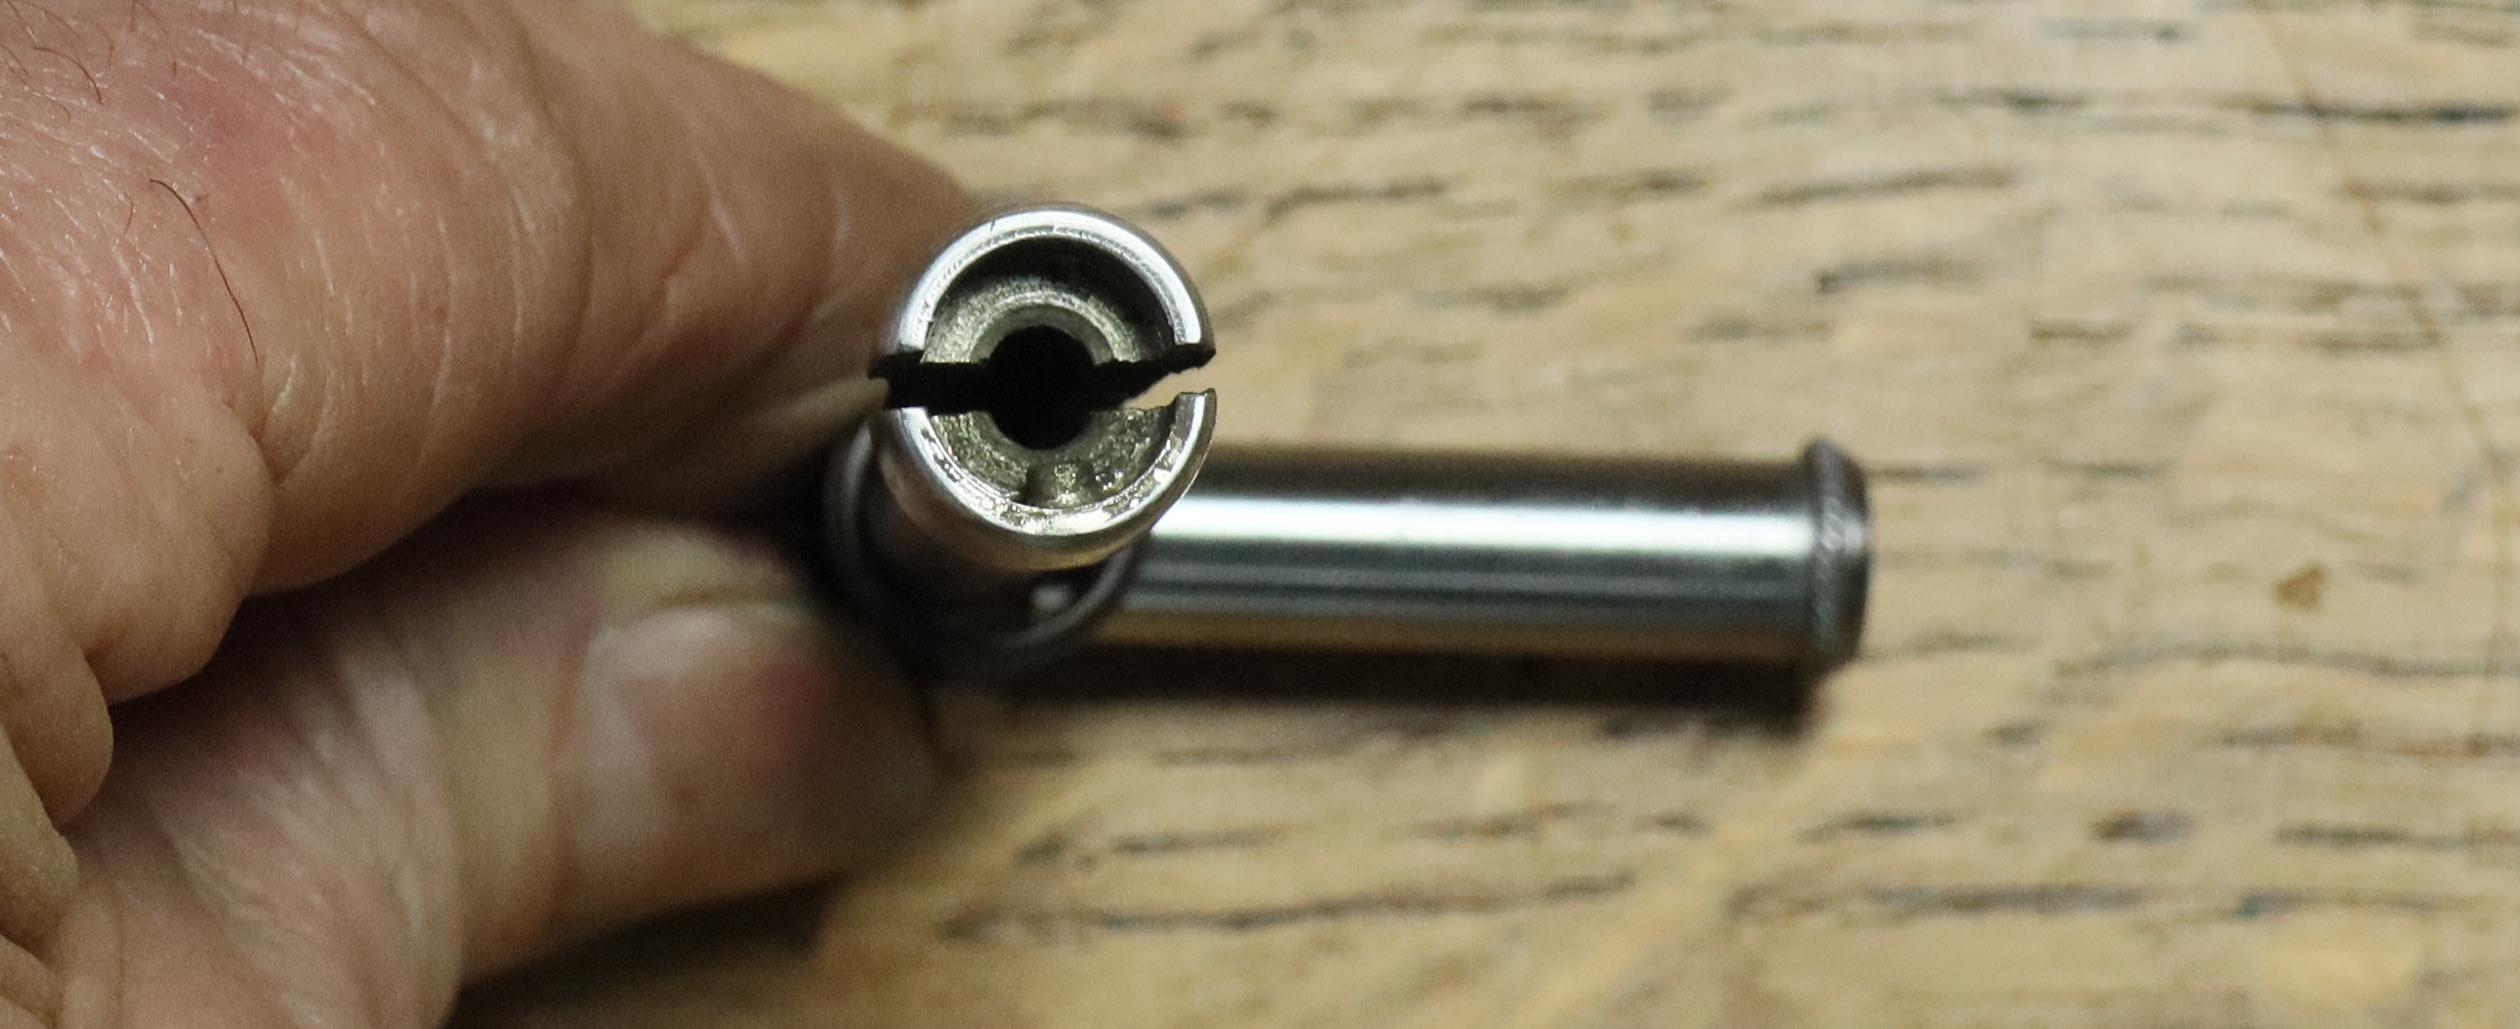
The ‘original Smiths tool (above) didn’t grip the cap well enough as the side hole in the nipples was a little worn, and I didn’t want to damage the rather weak joint between the metal and wood of the tool. I designed a ‘foolproof’ tool that I reckoned would allow me to put much more force on the recalcitrant caps and was ‘more or less’ guaranteed not to disengage in the process. The principle is that the cup for the base of the cap is a good fit over the cap, but the shaft and end is split so that it can be opened and closed to allow a fixed peg on the inside of the cup to slip into the hole in the cap, after which the cup is closed to grip the cap by sliding a tapered collar down the split and tapered shaft of the tool. I drilled a 2.5 mm hole through the cup and used a piece of hardened steel rod to engage the hole in the nipple – one nipple had the hole facing outward so I could leave the rod sticking out for a trial – it worked, although the thread was pretty stiff even after it had started to turn – too stiff for the original tool to work without holding the sprung loaded catch. I have now silver soldered the peg into the cup and quenched it to harden it all up, and I’ll try the finished tool on the other nipple. The thread on the nipple I have removed seems to be .253 O.D. and as near as I can judge 28 t.p.i. with a very shallow rounded thread as is common on old guns. As far as I can see the best fit would be an oversize 1/4 inch U.N.F thread (28t.p.i.) rather than the 1/4 inch B.S.F thread (26 t.p.i.) I was expecting. I will cut some test threads – I have a UNF die, and if its opened up to the maximum it will probably cut a big enough thread. If not I’ll open out a die holder and run a flame down one side of the die to soften it and open it some more………………………………………………………… nothing to do with old guns is straightforward! If you want one of these tools please email me, see SHOP page at top for price etc.
I ought to have put a nipple pricker in one of the arms – …….. next time?
I cut the slot with a hacksaw, hence the wobble – I don’t have a suitable slitting saw. It works!
There is still a bit of silver solder round the pin, it has now been removed.
New nose and nipple for 1075 caps.
The nipple could be a shade smaller diameter as the cap hasn’t gone fully down.
I made a new nipple with the same radial hole as the original Imperial nipples, and discovered that the space between the body of the nipple and the flash guard isn’t enough to allow either my tool or the original tool to engage with the nipples unless the radial hole happens to be pointing outwards. I don’t think the threads and hole were all aligned so wonder how the original tool was supposed to work! Anyway it isn’t a problem for the nipples I’m making as I can make them fit a normal nipple key, which I have done in the photo above.
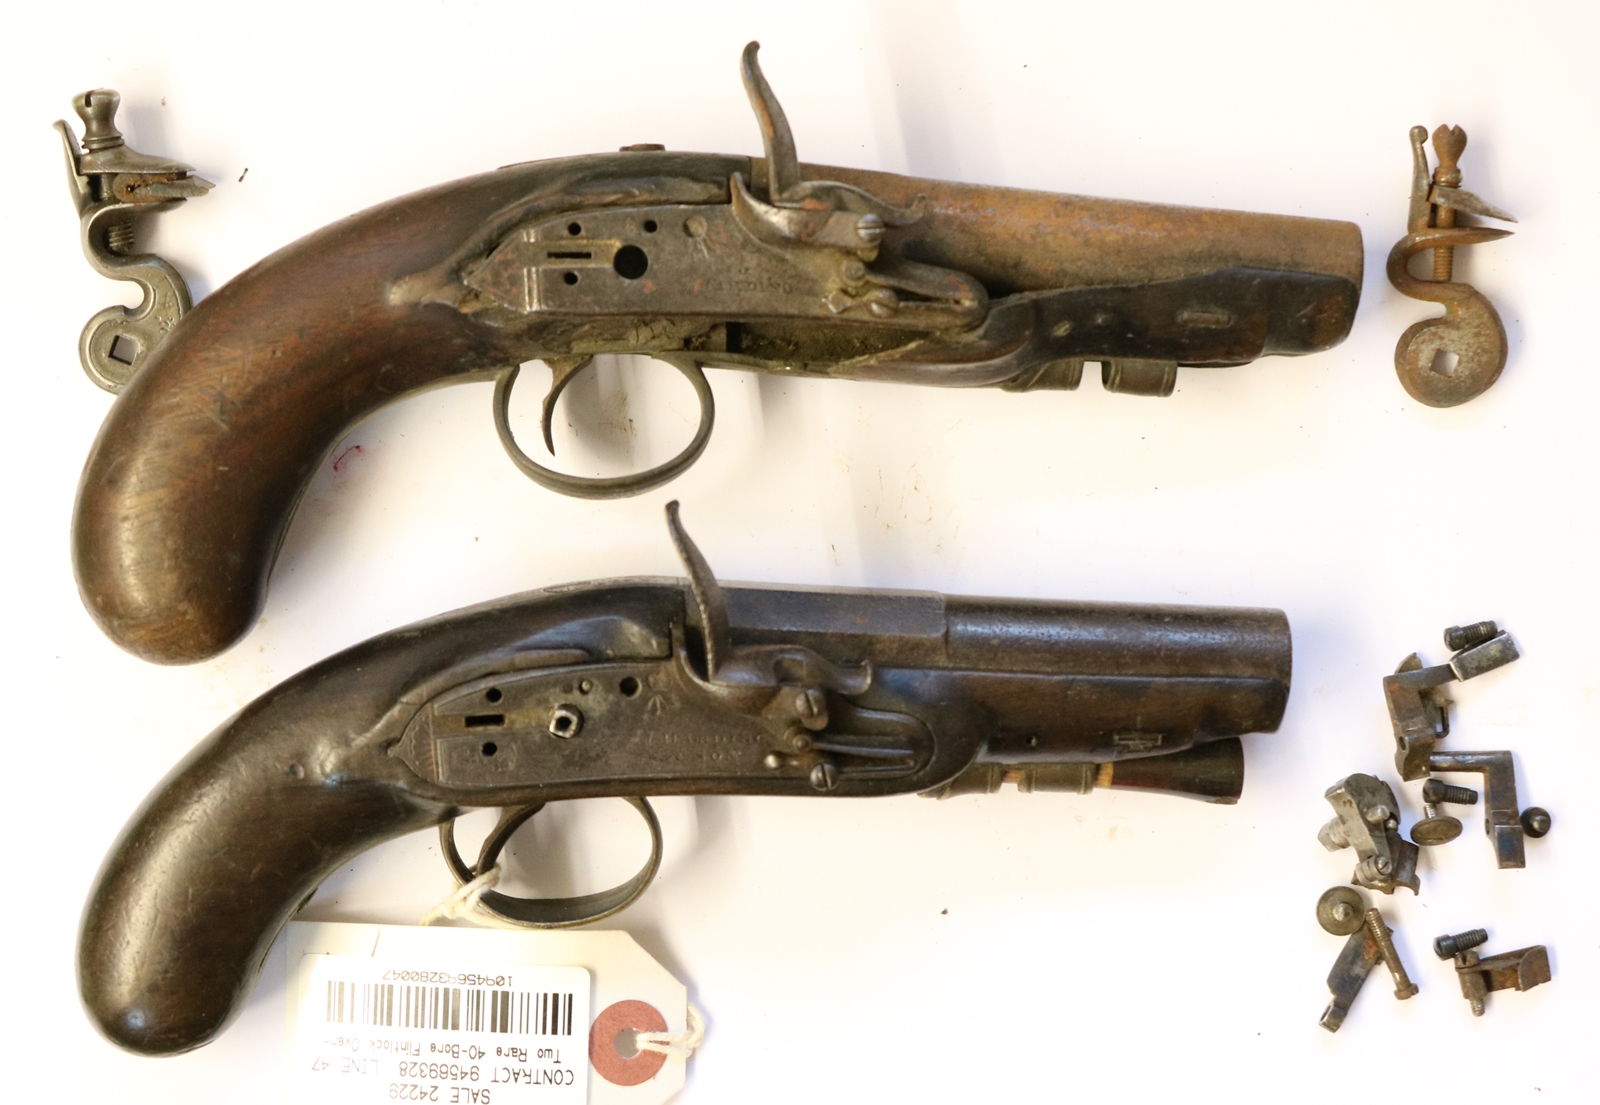
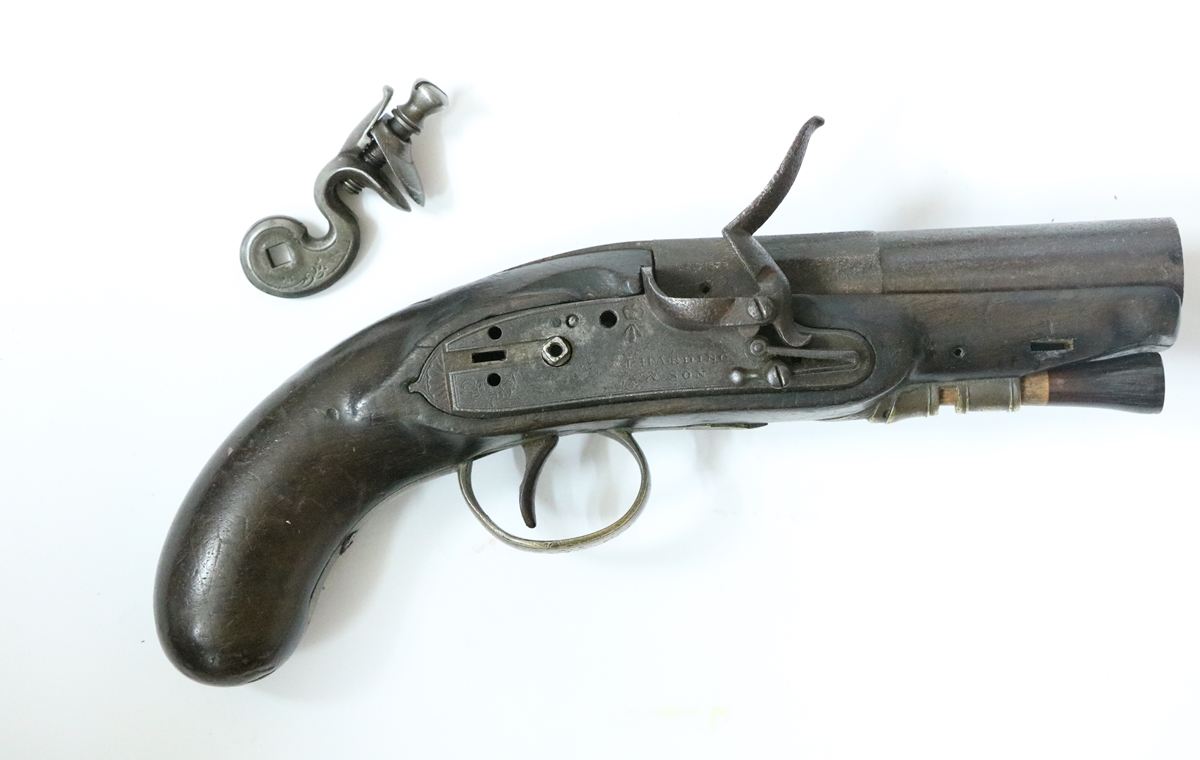
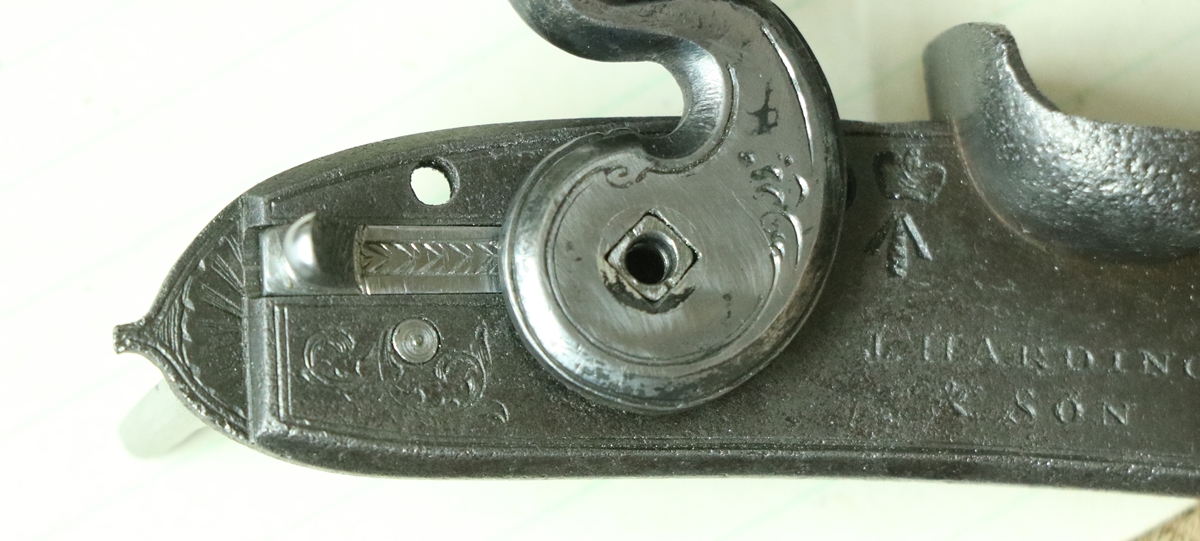
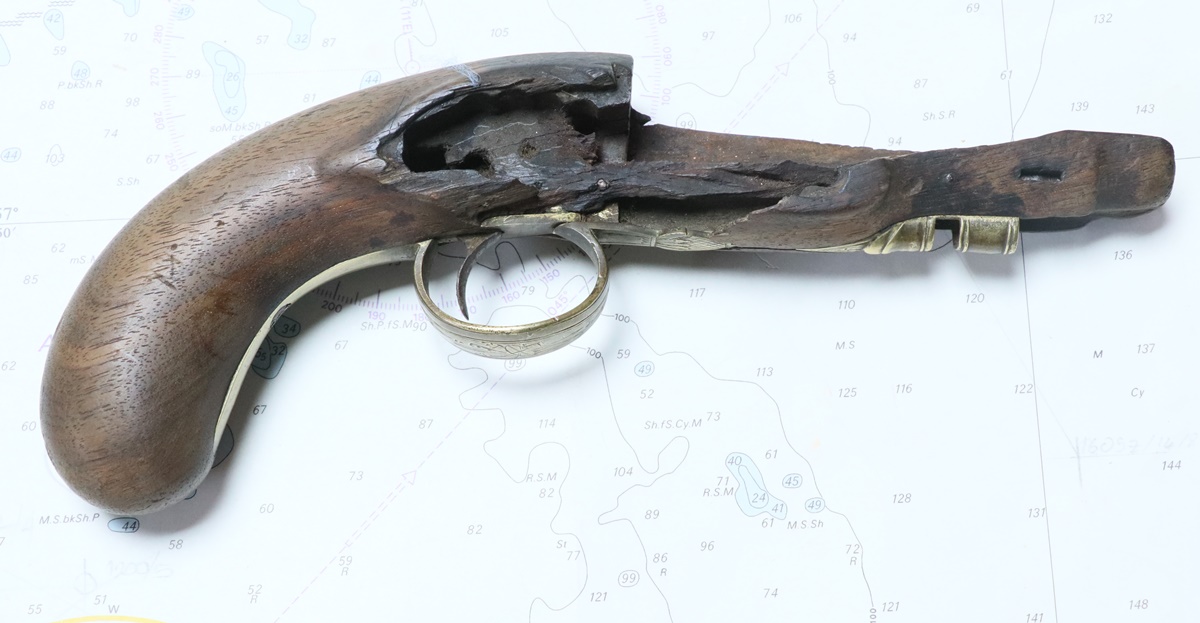
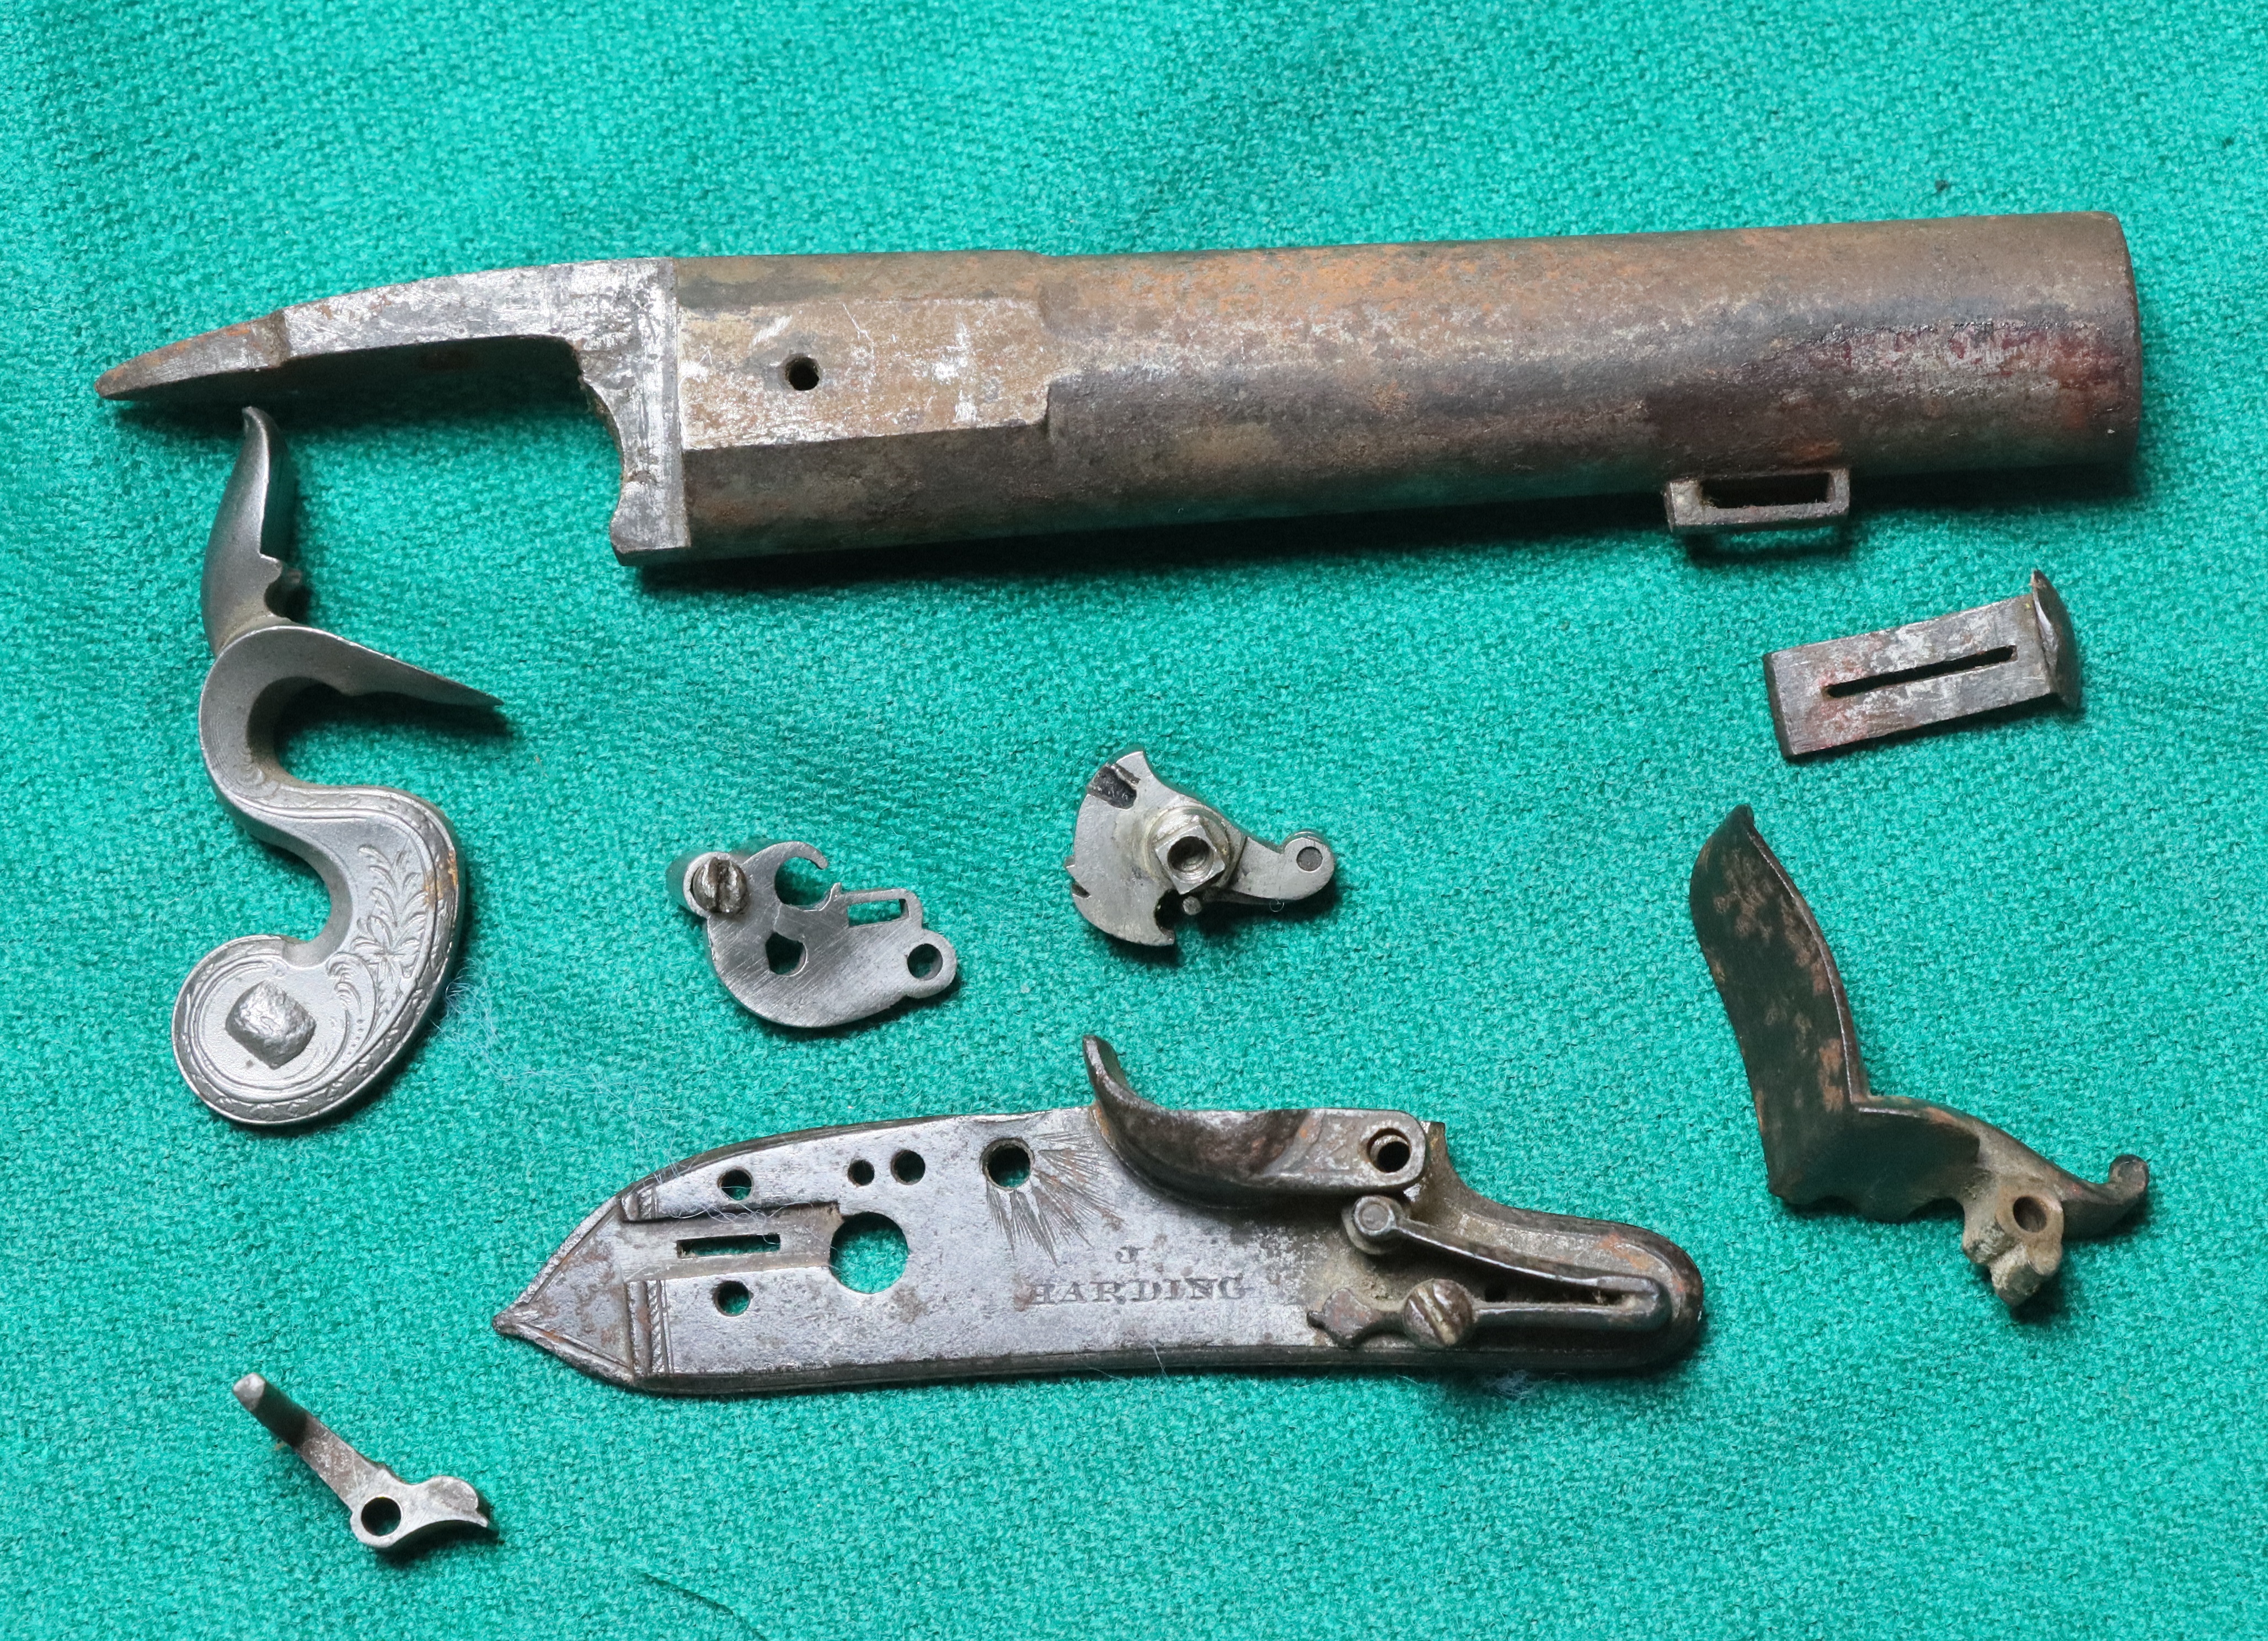
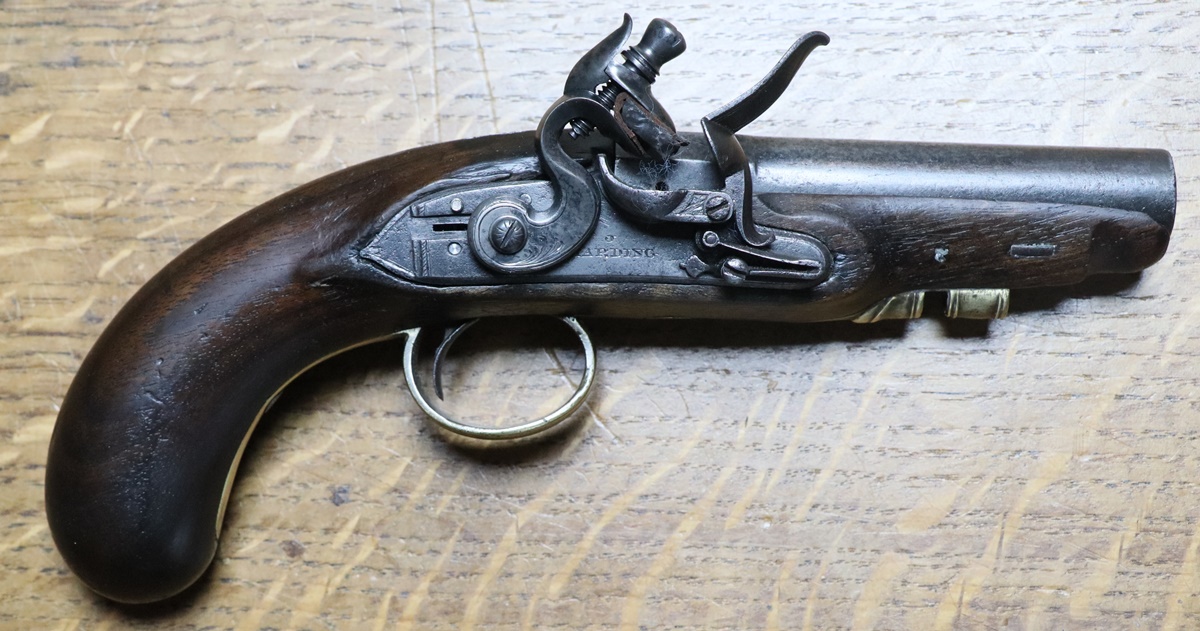
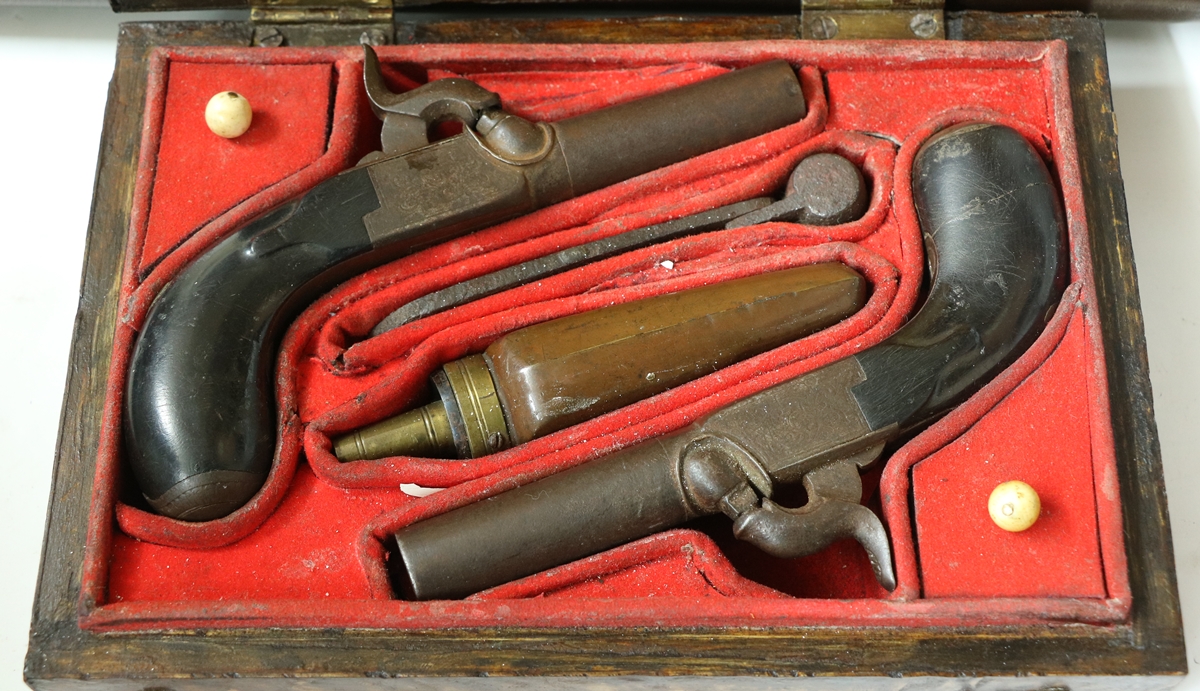
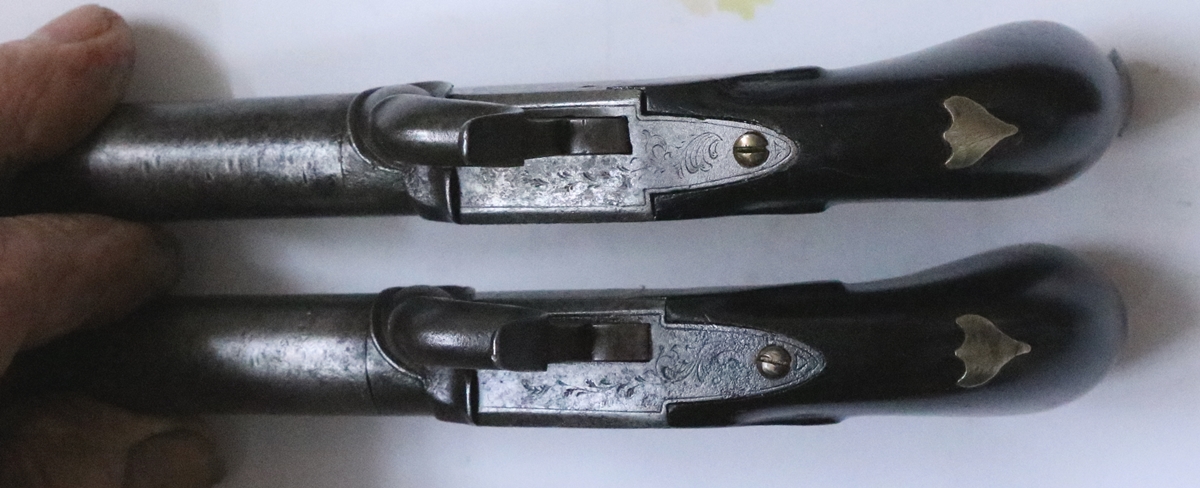
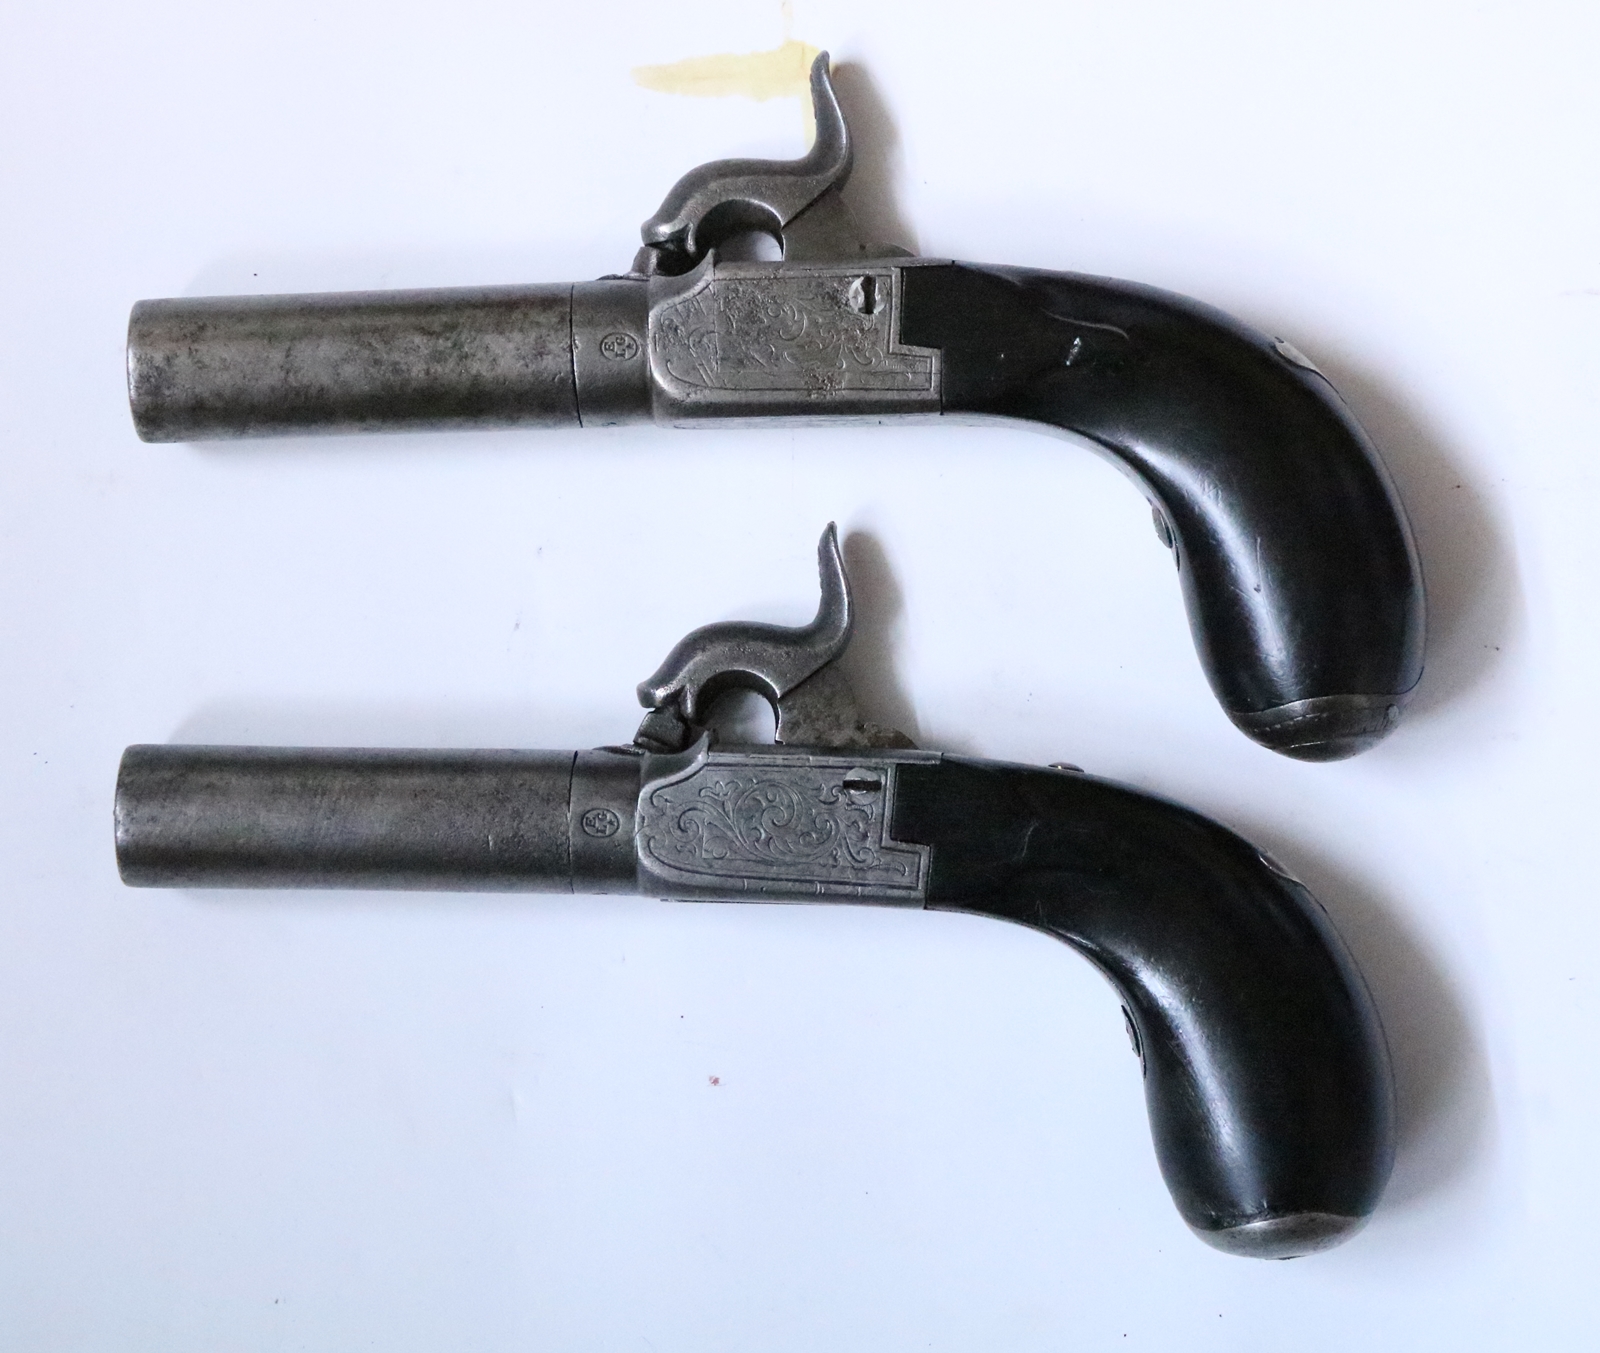
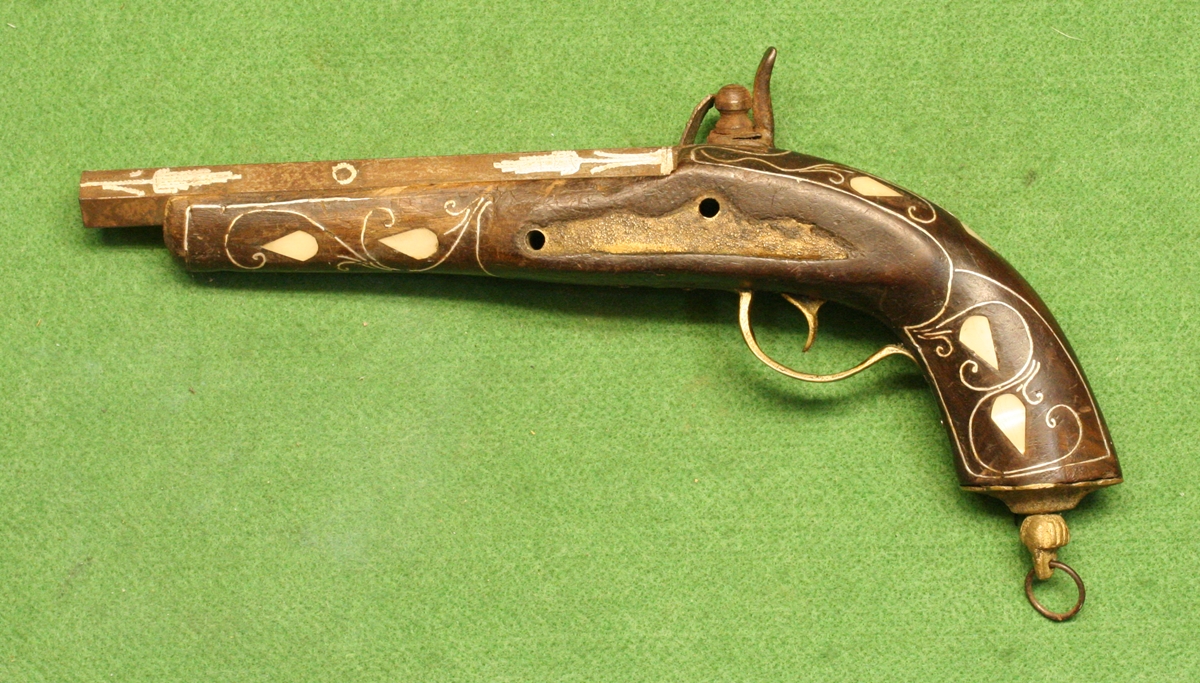
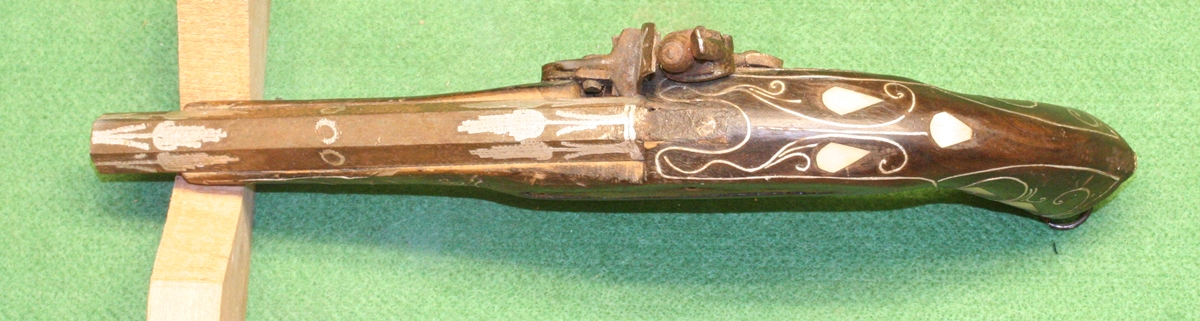
I bought a pile of bits at a Bonham’s Auction for a pretty exorbitant price and they sat in the tin box they came in for a year or so. One stock, barrel and lock plate were fine – fortunately the one with the Post Office stamps as that is a very rare pistol. J Harding was the official contractor to the Post Office and made many brass barrelled blunderbusses and brass barreled coach pistols for the mail coaches, plus it would seem, a very (?) few pocket pistols for Postmen on foot. There were bits for two pistols, they were not identical- the Post Office stamped one was by J Harding and Son and the other was just Harding, both of Borough in London. The names indicate that the Post Office pistol was post 1834, the other earlier. The differences between the two are subtle – slightly different butt shape and barrel shape, and slightly different lock size and action parts. Anyway when I came to sort out the pile of bits it was clear that only some were related, but I got enough parts to make most of the Post Office one – minus the sear , mainspring and sliding safety parts – there was one small part of the wood missing at the muzzle but apart from making a few new parts it is original, althought the cock is an old (1969) replacement and I had to re-adjust the square fit. The second pistol stock was a complete wreck and almost looked beyond repair, but in fact only needed three bits of wood let in and it is as good as new – in fact its difficult to distinguish it from the other. I had to find a cock, make a tumbler and sear etc and sliding safety, plus top jaw and cock and side screw. But now its finished what you see is largely original! Here are the before and after photos!
The positive is that they have the original barrels, lockplates, frizzens & frizzen springs, brass furniture and the overall woodwork – just a few minor details missing!
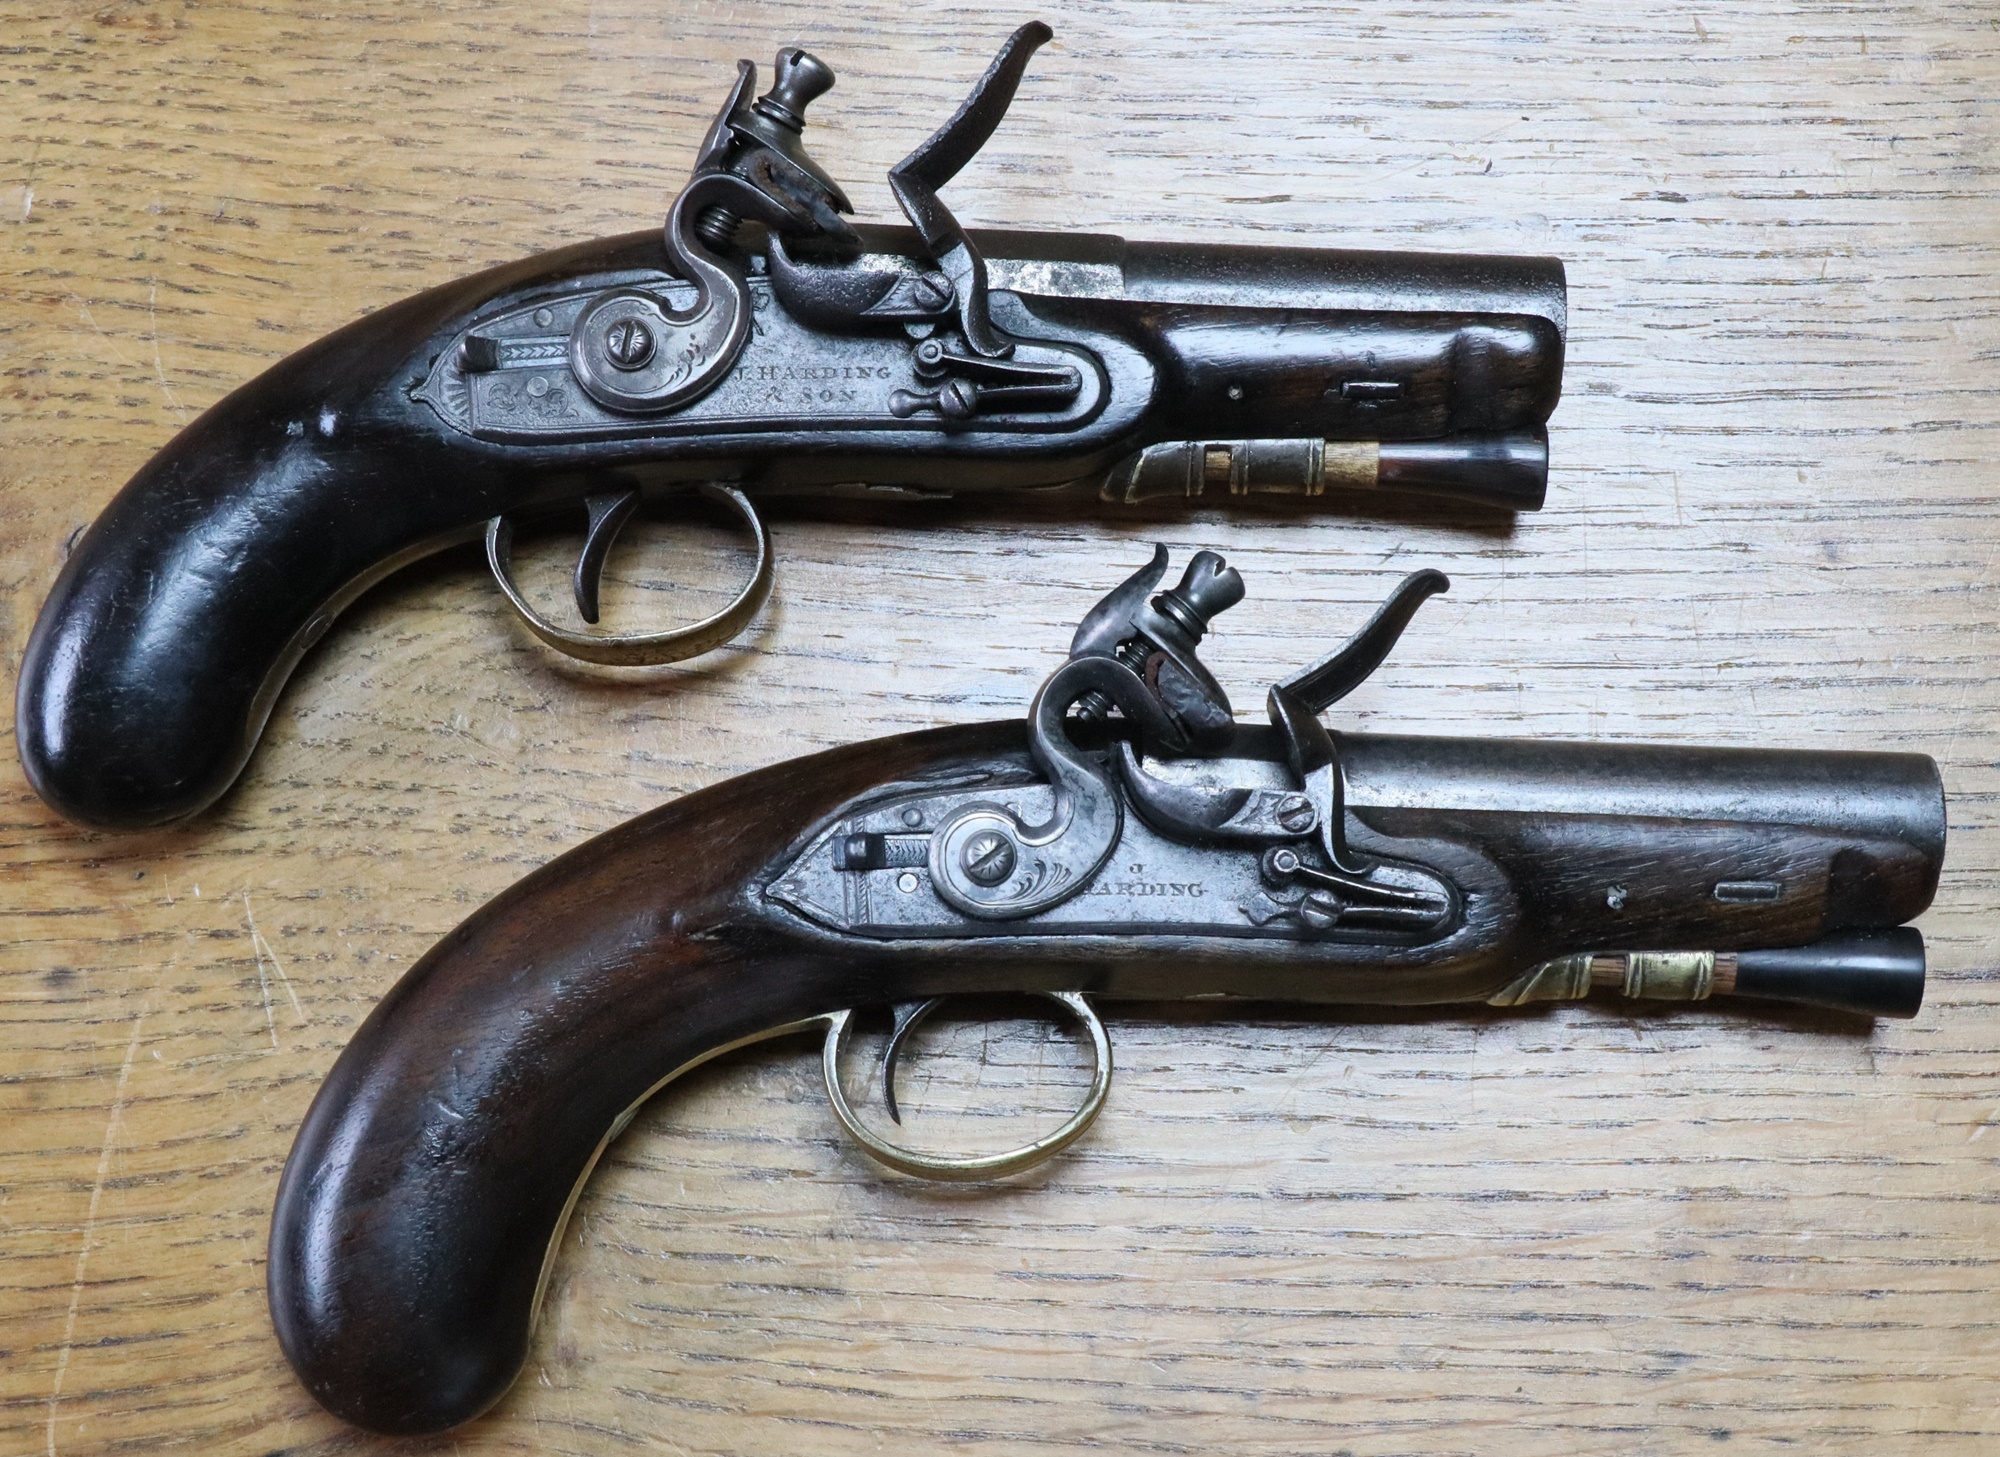
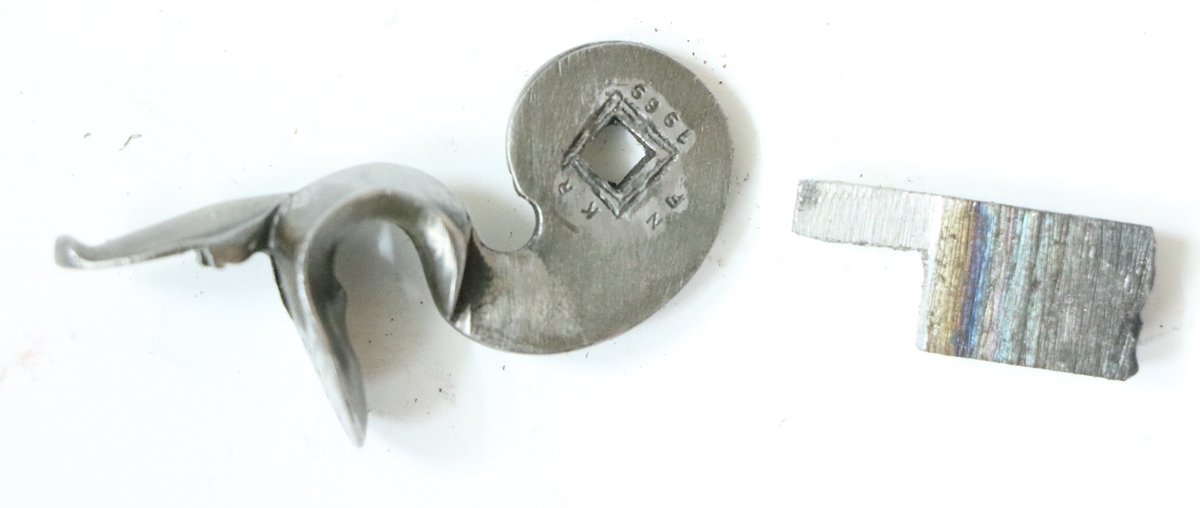
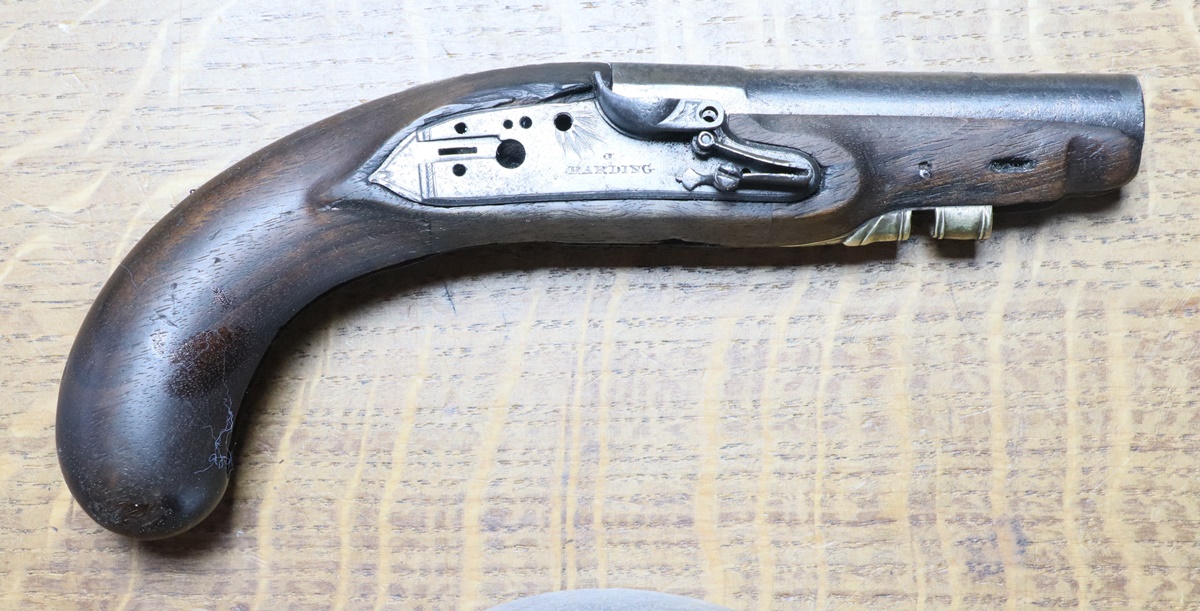
What you see in the end is almost entirely original except the cocks and slide safety catches and one (?) ramrod. The top cock is a 1969 replacement (it was dated on the back) and the bottom is my replacement – not identical but pretty similar. The top pistol is stamped for the Post Office.
The following bits are extracted from the Diary posts for 2018/19
This starts with the Post Office pistol – my ref 146A
26th December Pheww…… Christmas is passed, now just 2 big parties to organise and run in the next week – but at least we had today to relax! We even managed to go to the cinema and see ‘Mortal Engines’ which seemed rather like the last Star Wars film I saw, lots of shootups and clever cgi. Anyway I did manage to get more done on the sear for the Harding pistol – it just needs to be finally adjusted after the mainspring and cock have been sorted. I rather like fiddly machining, although I’m prone to being a bit careless at the last moment and taking off too much metal somewhere. I just about got the sear OK, – the arm that intersects the trigger plate was welded to the sear itself rather than machined as one piece to save more machine ops, and I left the joint as a fillet.
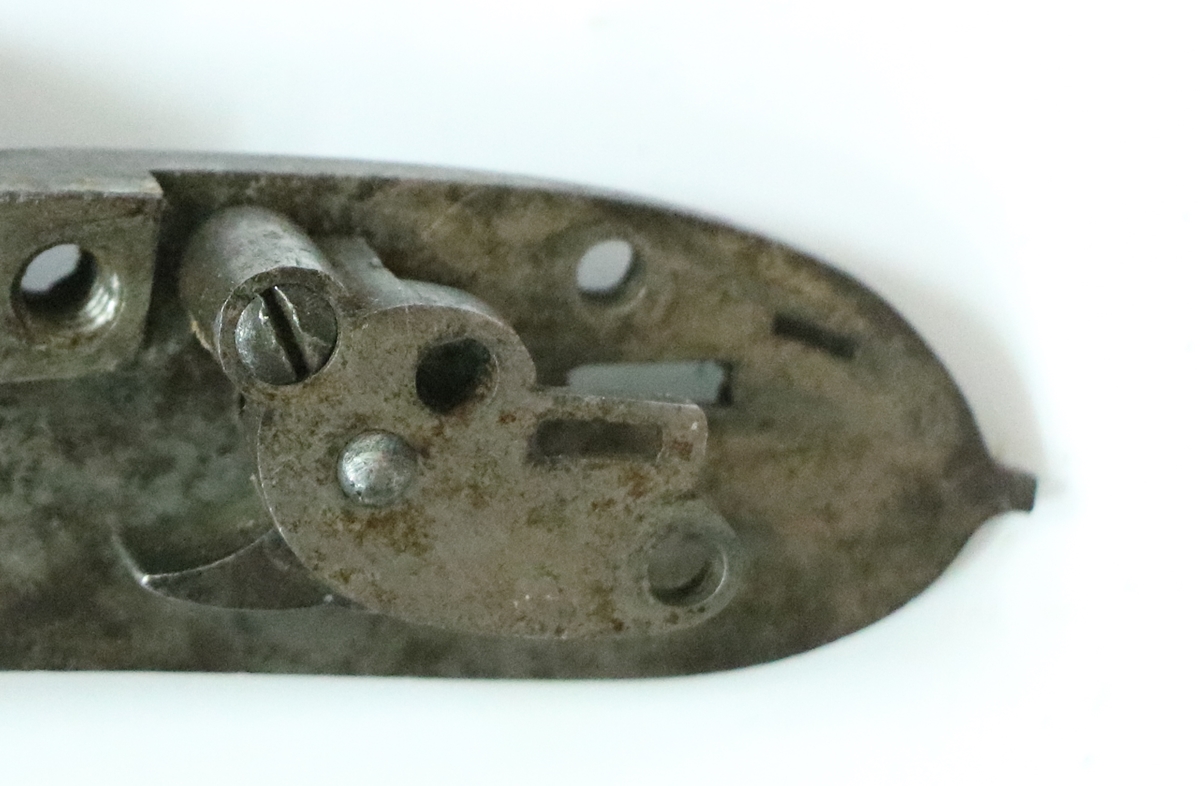
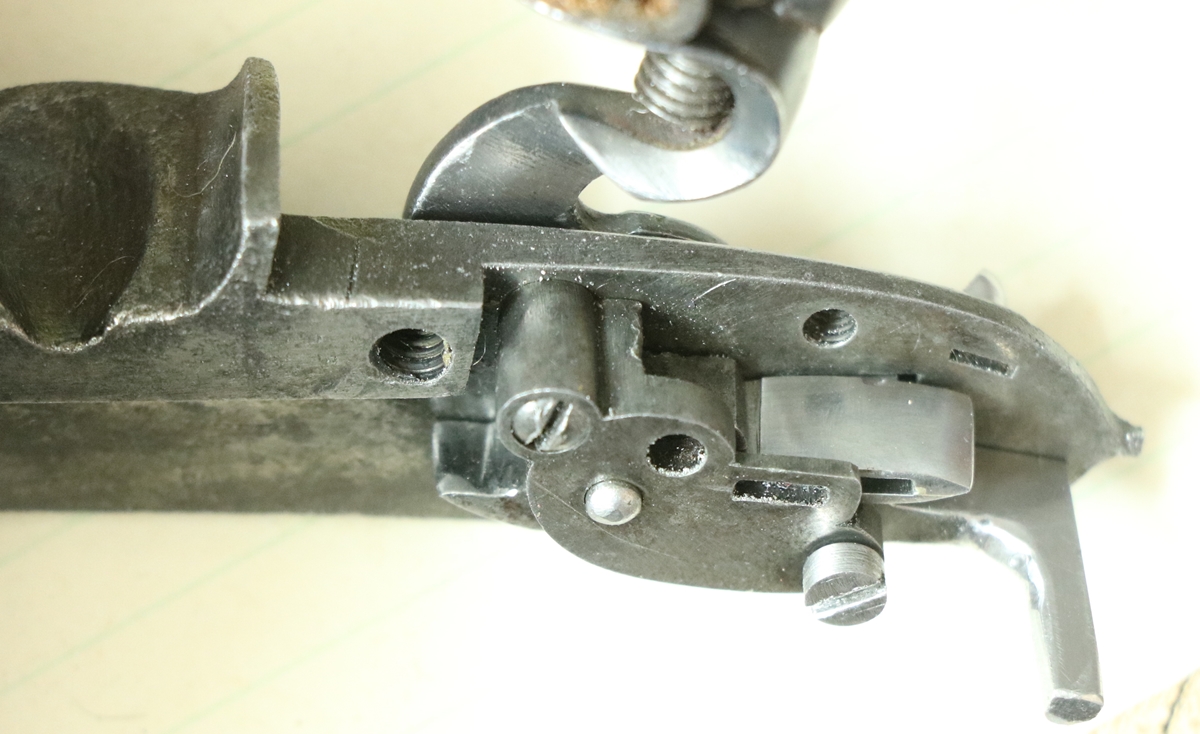
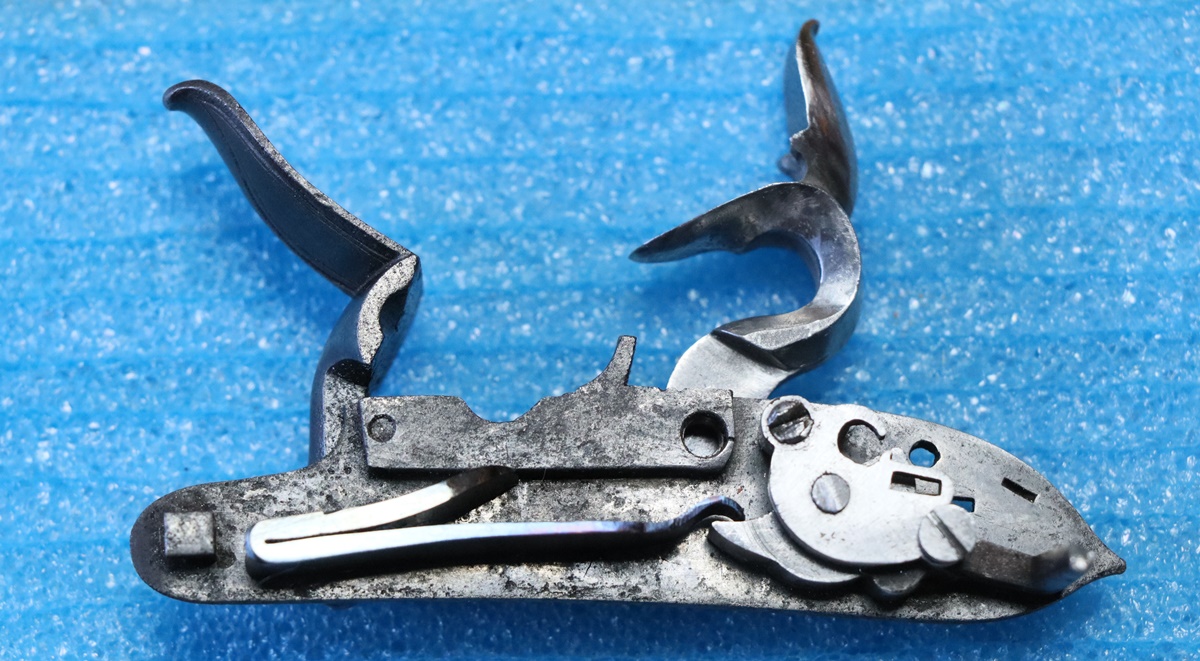
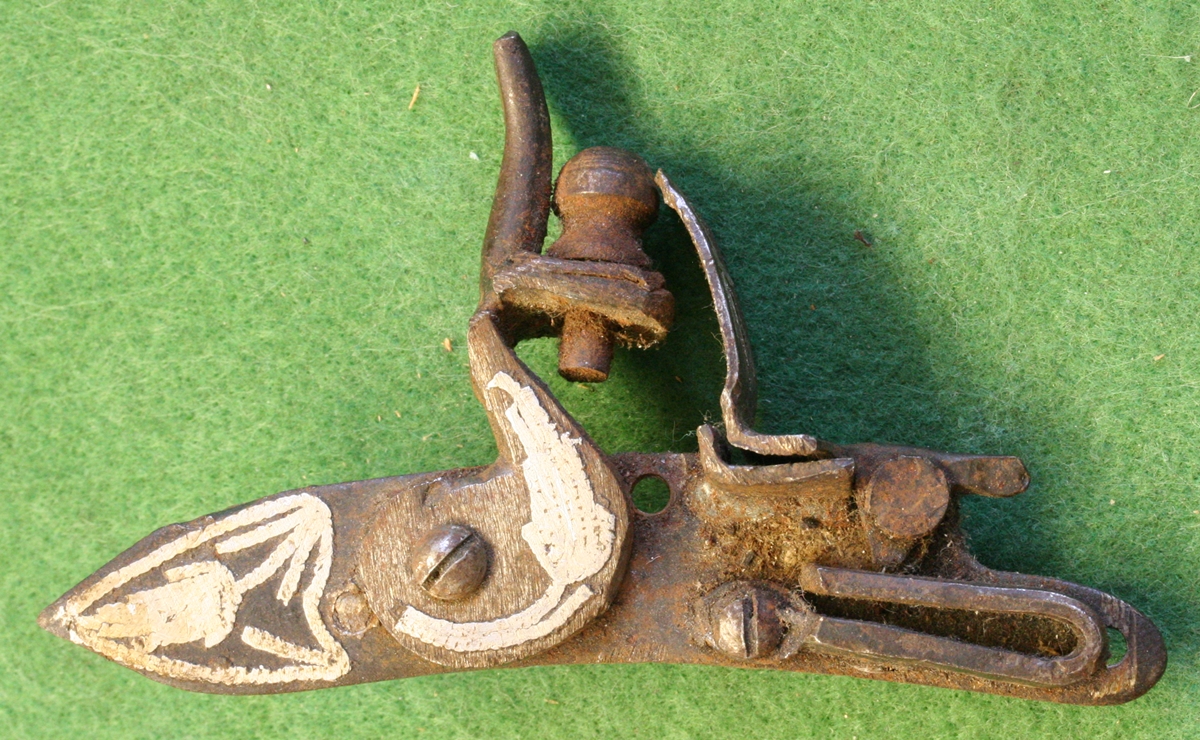
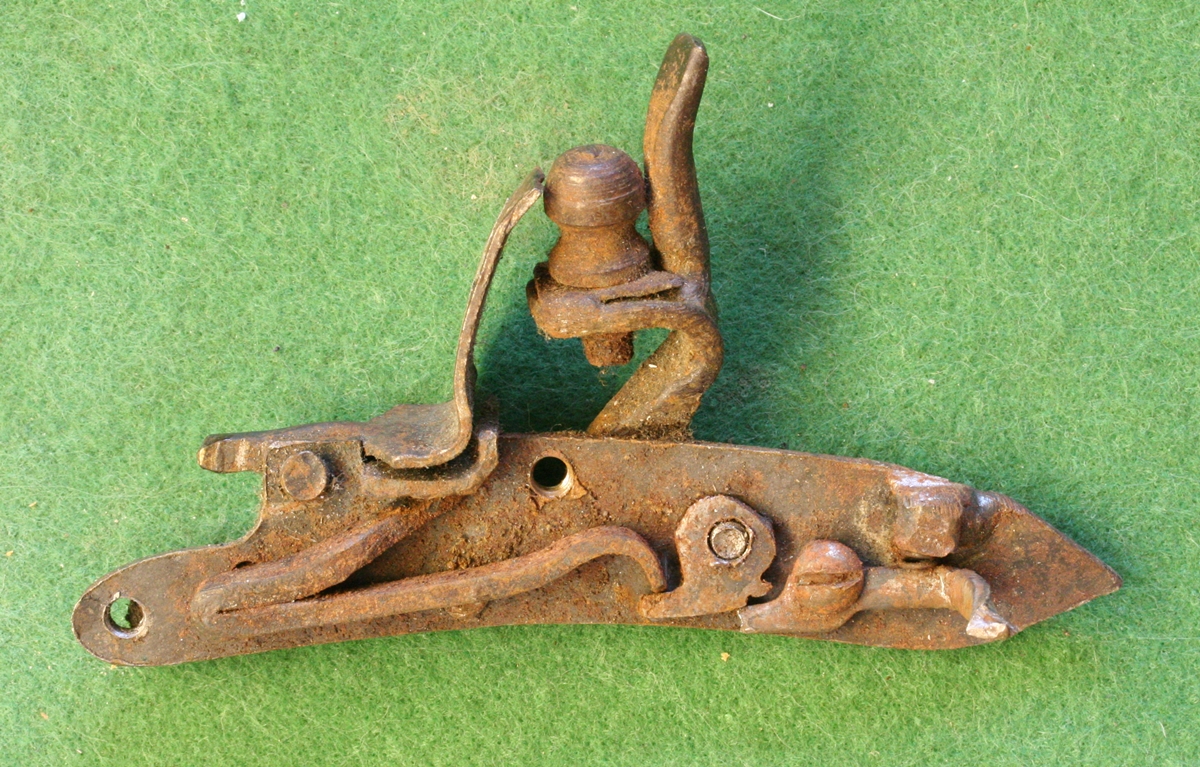
There is a bit of a puzzle with the works of this pistol that I can’t get my head round at the moment – the bridle appears to fit perfectly on the lock plate – the 2 screws, tumbler and the peg are in perfect alignment, and the tumbler seems right. The puzzle is that the lock plate has a slot for a sliding safety catch and the tumbler has a slot into which a catch would fit at half cock – all as it should be to work with a small part moving inside the V of the sear spring, with a cover spring with a pip to hold the catch in either position. All as I would expect – But the puzzle is that there is a slot in the bridle that doesn’t quite align with the slot for the catch in the lockplate, and a additional hole in the bridle that doesn’t coincide with a hole in the lockplate, and anyway is half obstructed by the tumbler when its on full cock – so what are the slot and the hole in the bridle for – they would appear to get in the way of the sliding safety and tumbler ? Any ideas or photos would be appreciated;-
25th December 00:12 hrs Happy Christmas, and thanks to all the followers of this blog who have contacted me over the past year – have a good day, and may Father Christmas bring you something special, or, more likely if you are like me, you’ll have to buy it yourself if its in the gun line!
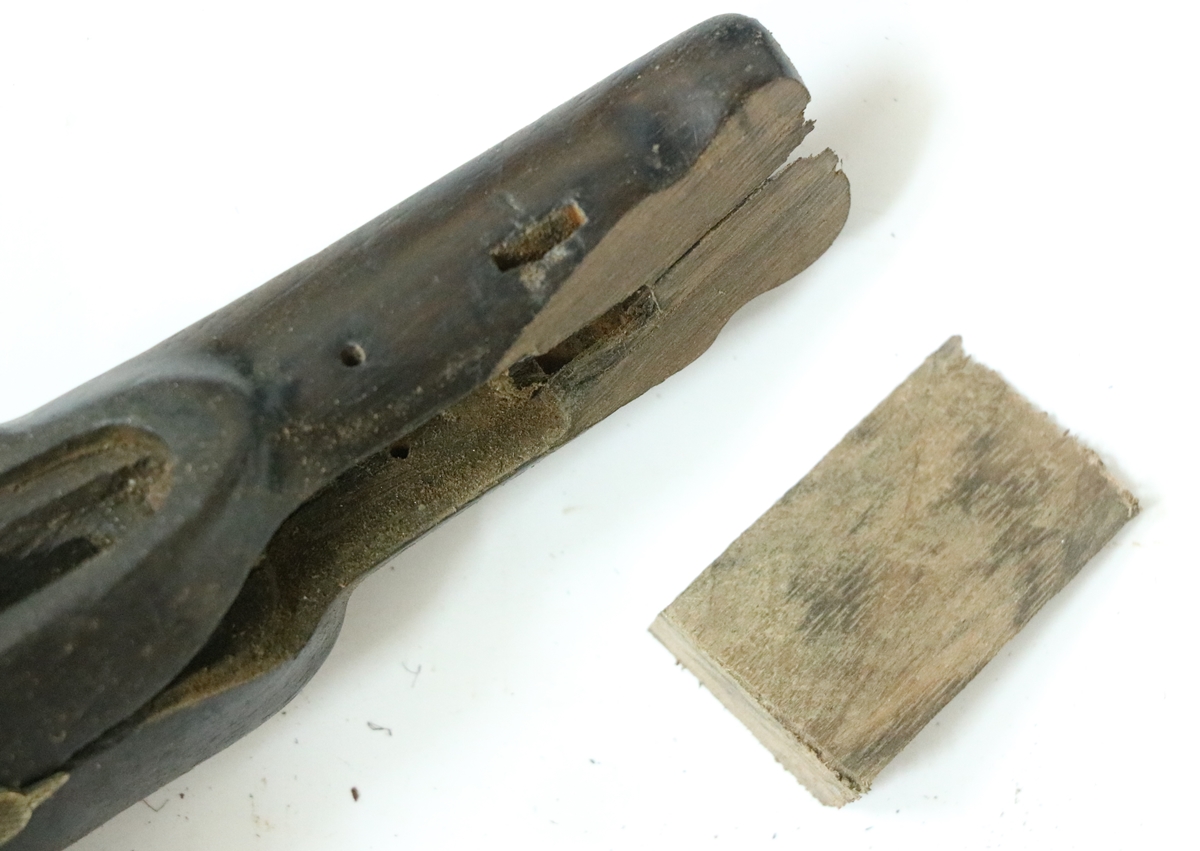
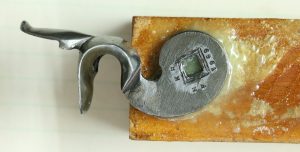
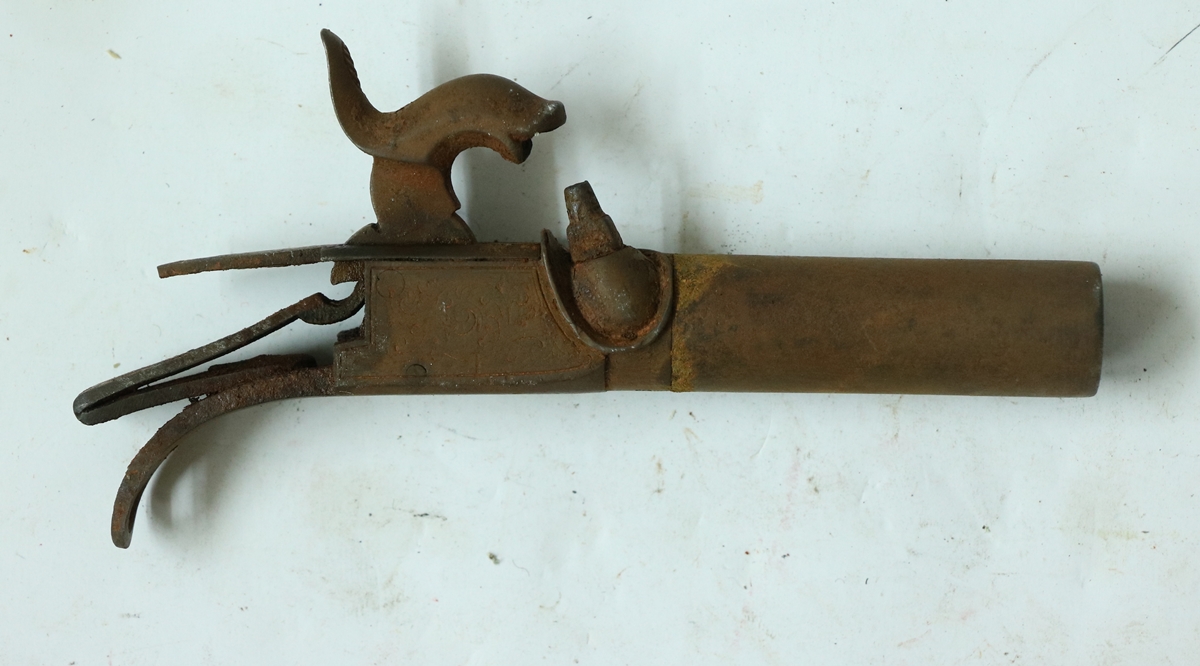
23th December – I couldn’t keep away from the workshop and came across the little pair of rubbish pistols I had bought at too high a price, and thought they deserved a bit of attention as at least one is restoreable. The first problem was fixing the stock – the muzzle end was cut away so I needed to splice on a bit of matching wood, glue up a crack down the middle ( partly covered by the patch wood) and then patch a couple of small holes with instant glue and sawdust, then steam a few dents out and colour up the patch. That is all going well so the next problem is the cock, which isn’t the original one – its a casting and is stamped on the back with initials and the date 1969. – it had never been fitted to this pistol as the square is completely out of alignment with the tumbler. I cleaned up the cock and recut the engraving and filed it up a bit to make it look a bit less like a casting – the next job is to fill up the hole in the cock and weld it all up ready for a new square to be cut. I’ll fill up the hole with a square plug of steel with a pilot hole drilled in the middle, and weld round it. I’ll need to get a sear that fits and make or find a mainspring, plus all the bits of the safety catch that locks the tumbler in half cock position.
De-rusted and ready for restoration.
The wood of the patch is a little light but it will colour down OK
24th January – Switched back to my little Harding Post Office pistol. I needed to remake the square in the cock as the cock was from another pistol. As mentioned I decided to bore out the tumbler hole in the cock and silver solder in a disk and put the square hole in that. The cock was Araldited to a scrap of wood and centered under the mill/drill and a 6 mm end mill put through – the square on the tumbler is a 5 mm diagonal, approx 4 mm square. I then dropped an 8 mm end mill into the back of the cock 1.5 mm deep, and turned up a disk to fit the two milled holes with about 0.2 mm proud on the back surface and a 3.5 mm hole in the centre to start the square from. I had intended to put the square in the disk before fixing it in the cock, but there is no way to hold it so I silver soldered it in place with ‘easy’ silver solder paste that melts at 650C (dull red heat). I then filed up the square hole very carefully to fit and , I thought, in the right orientation – but it turned out to be about 10 degrees from where I wanted it, so I just heated the cock up to dull red and turned the insert with the end of a screwdriver to the correct angle. That all went well so I worked on the sear to get it all aligned as I hadn’t done the final shaping until the cock was on. I am not sure that all the parts I had were from the same pistol, and the shape of the full cock bent was a bit too ‘re-entrant’ for the motion of the sear and you couldn’t fire the lock – so the bent had to be opened out a bit. All done so I tweaked the mainspring and hardened it and tempered it to blue – and then broke it while clamping it to put it in place! It was my fault as I couldn’t find a small mainspring clamp and used a mole grip too near the ‘elbow’ and overstressed it – another job to do, although I might just try welding it.
The cock is actually stopped by the step hitting the edge of the lock as it should be, but the ‘chin’ of the jaw is a bit close – the cock needs slightly reshaping, although I’ll have to be careful not to loose the square insert if I heat it to red heat…..
Yesterday I started on the safety catch slider for the Post Office pistol – I took a chunk of 8 mm EN8 and cut out a tab of about the right size on one end so I could work on it and have a decent bit to hold in a vice. I milled the rough blank – slightly oversize and still attached to the chunk – and filed it to fit, only separating it from at the last minute to shape the knob. It looks fine, or will do when I’ve engraved the slider – now to do the internals.
4th Feb Update – did a bit of work on the Harding Post Office pistol safety catch today (workshop was up around 25C!) – I couldn’t see a good way of making a 1.5mm wide slot through the inside bolt for the tongue of the external slider – my mill is nowhere near good enough to use such a small cutter, so I decided to mill a groove in a strip of metal and silver solder another piece over the top to complete the slot – worked a treat… And it all fitted together after a bit of filing – you can’t see the silver solder line. As before I left the part attached to the strip of metal until the last minute as its much easier to handle that way.
Strip with milled groove and piece silver soldered on top.
Shaped bolt still attached.
The bolt fits neatly over the tab on the slider – it will need pinning.
Safety slider is now engraved.
4th February – It continues cold, although I did get the indoor workshop up to 25 degrees C yesterday by burning wood at a rate of knots for 6 hours. I need to do a bit of TIG welding but by Argon has run out – annoying because it has leaked out of the cylinder – I’ve not used much in two years but its empty so I’ll have to change it. I couldn’t do that with the loan car as it wouldn’t fit in. but I’ll take it on Tuesday. I got some parts from Fred in the US to engrave for a gun he is making, so I’ll have to do a bit of design work. I have the Post Office pistol to finish making the safety catch parts for, and the Venables barrel to re-do, plus a bit of silver soldering for Dick on a flintcock to fix a disk for a remade square. I have converted Dick to using Bev’s method of re-doing the squares in cocks by milling out a hole and silver soldering in a disk. My method is to mill a stepped hole so there is some depth location when it comes to the soldering, but Dick has done a plain hole – We shall see if that works as well. The advantage of the stepped hole is that you can have a smaller ring of silver solder on the cock face so it doesn’t show round the cock screw but get an increased area for the solder as you can make the back mill of greater diameter. Anyway we shall see which is best….
The following is for 146B – the non PO J Harding pistol
Pistol has very nice brass furniture
The barrel, lockplate, frizzen and frizzen spring and barrel bolt are all original – I’m not sure about the bridle or tumbler but I think the are original – the tumbler is wrong.
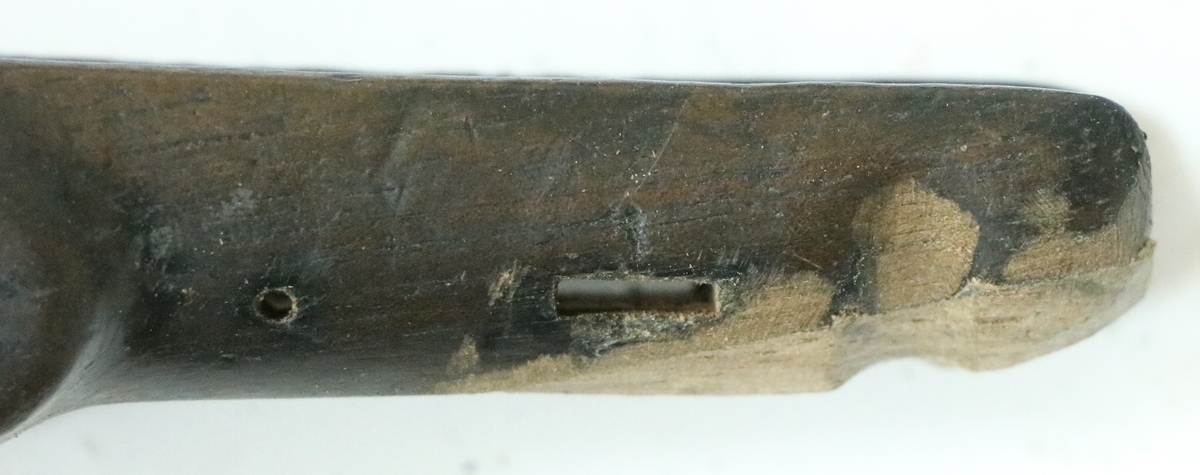
I did some more on the little pistol woodwork. It was fairly riddles with cracks as well as having chunks of wood missing, – the first job is to find all the cracks and see which move if you gently flex the wood. If they are wide or full of muck they need clearing out with the back of a modelling knife blade – these I fill with liquid epoxy, mixing in a bit of walnut dust to fill the surface. As you put the epoxy in, flex the wood to open the joint more and suck the glue in. You may need to clamp or bind the wood to close up cracks while the epoxy sets – I find self amlgamating tape is ideal for quick elastic binding of parts while glue sets – a couple of turns and it will stick to itself and hold things in place. For small cracks I use an instant isocyanate glue and again work the joint to get the glue in – I keep a spray can of activator handy to start the polymerisation. I also put walnut dust in the top of these cracks and drop a little instant glue on it and set it with the activator. I’ve done all that for the Harding pistol and the next step is to work out how to do the replacements and what needs milling out, and find a bit of matching walnut from my offcut box, or go over to Dick’s as he has a much bigger box of offcuts.
7th July – I started to strip the little Harding pistol so that I could sort the woodwork, but the woodscrew holding the tail of the triggerguard proved to be a major problem – first, the slot had got worn into a ramp and wouldn’t shift even with heat, then it turned out to be dead hard and I couldn’t drill it with any of my drills. I ended up grinding off the head and digging out bits of it with the GRS graver – that released the guard. That left the stub of the screw very firmly embedded – I tried cutting a slot in it with a small disk but the screw broke when I put a screwdriver on it! Only solution was to core out the remains of the screw so I made a corer from 8 mm silver steel with a 4 mm hole in the centre and a 5.5 mm outside diameter and filed up some teeth and hardened it – at least that got it out and I could glue in a wooden plug for the next screw! A lot of work to get one screw out – lucky I enjoy making tools! I derusted the lock and the barrel, which is in good condition – I lightly recut the barrel engraving. I will have to make a new tumbler as the one with the pistol is completely wrong, but I might get away with the existing bridle – I think it might have been the right one, but it had been broken and rewelded with the parts not quite aligned – I will make the tumbler and see if the sear is right before I decide whether to make a new bridle or fudge that one.
Corer for removing headless screw.
A bit of pitting but not too bad!
I more or less finished the woodwork for the second Harding pistol, at least in so far as anything is ever finished in this game! I’ve given it an initial coat of stain to darken it down and match the wood repairs in – a coat of Van Dyke solution first, that didn’t do much, then a coat of Jacobean Oak stain. The problem with stains that are supposed to be black is that there is no effective black stain – so they mostly contain black solids, which in this case I had to rub off, which leaves a decent dark brown colour that matches the original colour pretty well. The various joints are still visible but not too bad – I’ll work on them a bit as I apply finish – probable a couple of coats of sanding sealer, then alkonet root coloured oil finish to give a deep rich colour and finish off with a very hard wax finish. Any recalcitrant joints will probably get blended in with a black Sharpie pen and smeared with a finger! – it works a treat. One trick that does help if you want to disappear a joint is to take a very sharp modelling knife and create some ‘grain’ across the joint matching that around it – do this early on in the process so they get treated the same as real grain! Oh dear, maybe I shouldn’t reveal trade secrets here but anything that is continuous across the joint hides it from attention! On this pistol the main joint runs with the grain, so that technique is of marginal benefit!
10th July – I seem to have got landed with compiling a document for the school governors – I am thinking of enrolling for ‘Say No‘ lessons! It rather got in the way of my gun activities. I finished the blank for the tumbler for the Harding pistol and unglued it (heat) and then glued it onto a piece of scrap plate to put it centered on the turntable in my miller so I could reduce the diameter over most of the circumference – I did get some way, but the strain was too much for the glue, so I’ll have to finish it by hand. I’m made some progress on with the woodwork – I now have sundry bits of wood stuck onto the pistol and tonight I managed to inlet the barrel – I think its now just a matter of filing/sanding everything to shape and inletting the lock. I put some oxalic aid on the existing wood which got rid of most of the black stains – I should have done it before selecting the wood for the repairs as its now a bit darker than the original – but the other little Harding pistol is almost black so I can colour this one down – it will help to hide the repairs too. In the course of sanding down blocks of wood for the repairs I managed to sand the end of my thumb on the 12 inch disk sander – painfull still!
Tumbler blank on a scrap plate – the glue failed!
Clingfilm on a dowel to locate the repair in place – self amalgamating tape as an elastic binder. see earlier photo for the ‘before’ state.
9th July – several jobs on the go, which is handy when there is adhesive setting time involved. I started the new tumbler for the little pistol – I turned the axle that bears in the lockplate plus a bit for the square and tapped it No 4 UNC, and faced a 22mm diameter disk to make the actual tumbler out of, I then parted off the disk and axle, leaving a bit for the bearing in the bridle, faced off the bar left in the lathe and drilled a hole that is a good fit on the lock axle and Araldited the proto tumbler to the bar so I could finish the other side of the tumbler – its still in the lathe hardening off. I milled some of the broken wood from the pistol lock area and glued in a piece of walnut – there is still quite a lot of wood to be fitted in, but its starting to look less bad. I also decided to make another batch of de-cappers in case I get orders from the Holt’s shoot participants – I know Martin is keen for everyone to have one on safety grounds. And I got the new screen for my PC so that had to be set up…….
8th July – I got a request for a couple of my personalised decappers – I had run out of my original supply of metal and bought some 15m.m wide strip but it is a bit wide to fit round the nipples of some guns, so I picked up a length of scrap 1/2 x 1/8 from my old lab and made two decappers – when I came to engrave the names etc on them it was a bit of a revelation – they cut like butter, and it made me realise how horrible most of the metal I engrave is! I guess the scrap was mild steel but it didn’t have the cold rolled crust that most mild steel strip has. Anyway a pleasure to work with. I did some more on teh little pistol woodwork. It was fairly riddles with cracks as well as having chunks of wood missing, – the first job is to find all the cracks and see which move if you gently flex the wood. If they are wide or full of muck they need clearing out with the back of a modelling knife blade – these I fill with liquid epoxy, mixing in a bit of walnut dust to fill the surface. As you put the epoxy in, flex the wood to open the joint more and suck the glue in. You may need to clamp or bind the wood to close up cracks while the epoxy sets – I find self amlgamating tape is ideal for quick elastic binding of parts while glue sets – a couple of turns and it will stick to itself and hold things in place. For small cracks I use an instant isocyanate glue and again work the joint to get the glue in – I keep a spray can of activator handy to start the polymerisation. I also put walnut dust in the top of these cracks and drop a little instant glue on it and set it with the activator. I’ve done all that for the Harding pistol and the next step is to work out how to do the replacements and what needs milling out, and find a bit of matching walnut from my offcut box, or go over to Dick’s as he has a much bigger box of offcuts.
7th July – I started to strip the little Harding pistol so that I could sort the woodwork, but the woodscrew holding the tail of the triggerguard proved to be a major problem – first, the slot had got worn into a ramp and wouldn’t shift even with heat, then it turned out to be dead hard and I couldn’t drill it with any of my drills. I ended up grinding off the head and digging out bits of it with the GRS graver – that released the guard. That left the stub of the screw very firmly embedded – I tried cutting a slot in it with a small disk but the screw broke when I put a screwdriver on it! Only solution was to core out the remains of the screw so I made a corer from 8 mm silver steel with a 4 mm hole in the centre and a 5.5 mm outside diameter and filed up some teeth and hardened it – at least that got it out and I could glue in a wooden plug for the next screw! A lot of work to get one screw out – lucky I enjoy making tools! I derusted the lock and the barrel, which is in good condition – I lightly recut the barrel engraving. I will have to make a new tumbler as the one with the pistol is completely wrong, but I might get away with the existing bridle – I think it might have been the right one, but it had been broken and rewelded with the parts not quite aligned – I will make the tumbler and see if the sear is right before I decide whether to make a new bridle or fudge that one.
27th July – bit cooler and wetter today! Had a visit from a regular client to collect some pistols – I swapped some work for a little 1860s pistol case and a cased double pinfire 12 by Geo Sturman that need a little tidying – the barrel needs striking up and rebrowning – I need to have another go at browning as I am keen to improve my technique – basically slow it all down… I did a bit more fiddly work on the sliding safety of the second Harding pistol – this one turns out to be a bit different in its internals from the first, which was conventional. here there wasn’t a lot of space so I modified the mechanism so that the slider itself actually bolted the tumbler, the slider being retained by a small brass ‘bolt’ that had the ramp on its tail that engaged with a pip on a small spring retained by the sear spring screw. I found that this time the bridle had a slot that aligned with the slider, so I left a pip on the slider to engage in the slot – actually that’s not true – I’d already filed off the slider when I realised that the slot lined up, so I had to weld a tiny blob in the right place…..
Slider and its brass retainer – ramp on the tail, plus sear and slider springs – slider spring has dimple to engage ramp. ( bridle removed) All very fiddly as its a very small pistol.
25th July Predictably the pool got a lot of use today from friends and neighbours -seemed to be full of children all day! I sheltered from the heat in my ‘machine shop’ which keeps a reasonable temperature, so I was able to finish a couple of jobs on the Harding – I glued up a piece of dowel with a turned end into a horn blank – Araldite went off rapidly in the heat, and turned it all down together – looks fine and fits perfectly. I also turned up a side screw – I was going to cut off the thread portion and weld on a new head but found that an M3.5 thread would just do, so made a new screw – I had a very cheap non adjustable die for M 3.5 which worked well enough. I filed up the slider for the safety catch from the blank I machined yesterday – it must be one of the fiddliest jobs – especially for such a small pistol – anyway its almost done. Not quite sure how to do the mechanism inside – there is precious little room for the bolt to intersect the tumbler so I might just make a slot in the tumbler to take the blade of the slider, then make a dummy bolt to stop the slider falling out…. I’ll see what is possible. I gather we have a small group for the ‘Have a go’ tomorrow, and I’ll take a breech loader for some lazy shooting afterwards – not sure which – I’m not sure the Beretta I bought fits terribly well, so I might take something else.
24th July – rather warm today – when I got in my car to go to Dick’s it said 38 degrees (C) – that went down to 33 when I was moving! By 4 oclock I was ready for a swim in the giant bag of water – I reckon I’m up to 700m a session and am aiming for I km – that’s a lot of turning as its only 10m long- I think I’m going to have to make something to keep track of how many lengths I swim!. A good day on the tinkering front – I machined blanks for the top jaw and slide safety, and turned a top jaw screw and a better cock screw, and filed up the top jaw and gave them a once over with Blackley’s case hardening powder to colour them down a bit – they actually look quite good now. I ‘spiked up’ the bottom of the top jaw with a 45 degree graver without the heels, mounted in a metal rod and tapped with a small hammer – it throws up really vicious little hooks that are just like the originals must have been – its always a give away that a cock has been replaced by a casting as very few people bother to file off the cast ‘teeth’ and replace them with nice sharp ones. It only takes a few minutes! Anyway the little pistol is beginning to look really good – the photo has a nasty bit of flint I broke off a larger on as I don’t have any micro flints in stock – it does actually spark up although probably not reliable enough to set off priming consistently – anyway better than a repro Scottish Pistol I was looking at with Dick that would not spark except very occasionally one feeble little spark. I didn’t have any perfect flints with me – most had been used but you can usually persuade a few sparks out of the lock if you tap a new edge on the flint. It was sold as a working repro with proof marks so presumably was intended to shoot but I think its going to need some work on the frizzen, either some heat treatment or facing with a bit of old saw blade or whatever – I’ve never had any problems using Blackley’s frizzen casting – they spark OK – and I’ve never worn a frizzen to the point when it needed refacing. I don’t shoot flintlock that much – I have enough of a job hitting things with a percussion! Having said that I’m doing another corporate ‘have a go with a muzzle loader day’ on Friday for Cambridge Gun Club and I have to take both a flintlock and a percussion.
Slide safety and ramrod to do and it can join its ‘almost’ pair, the P.O. pistol
23rd July – I went into ‘my’ school for the ‘Leaver’s Assembly’ to say goodbye to the year 6 pupils who are moving on to secondary school – a few tears amonst them, but they will do well – their teachers have been so caring. More tinkering with the Harding – I used a chunk of thick tubing as a heat reservoir to temper the spring and it worked just fine with the radiant thermometer and got a good uniform blue towards the bright end of he spectrum – the spring fits, so I adjusted the full cock bent on the tumbler – very carefully in stages as I didn’t want to loose any more cock swing than necessary. Once that was done I case hardened the tumbler – it was made out of mild steel – and made a ‘cut price’ sear spring from a bit of spring steel sheet – works fine but looks a bit naff! might have to revisit. Anyway so far so good, the lock fits, the spring, trigger and sear work fine – I’ve filed up the cock to a slightly better shape and put a bit of engraving on it – I now need to tap the hole for the cock screw that holds the top jaw, and make a top jaw, plus the safety slider and internal bits – I realise that I case hardened the tumbler and haven’t put in the notch for the safety bolt, but I’m sure I can file through the case. I reckon the restoration of this pistol has already cost far more than it could possibly be worth and it isn’t finished yet – a true labour of love – but at least it all goes on the blog!
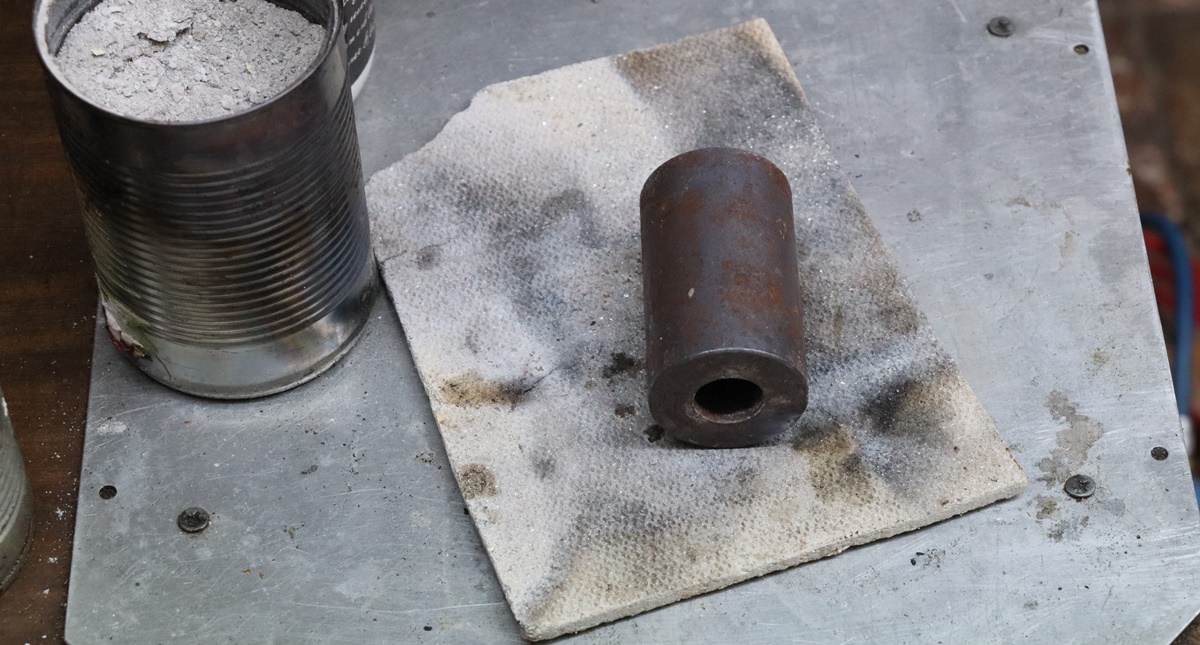
Thick tube as heat sink for tempering springs etc. Bean can holds wood ash insulation so parts cool slowly to avoid hardening them.
22nd July – Went into Cambridge to do some work on the Bullard Archive but ended up towing a giant skip with my Landcruiser and sorting some junk. I made one of the springs for the Harding pistols. This one looks a bit more convincing than the last one. I’ve hardened it with an oil quenching and its now glass hard so I’m being very careful not to break it – I suspect dropping it on a hard surface might even do it. Now I have to decide how to temper it, since I screwed up on that stage last time. I normally find a spot on the hotplate of the AGA which is the right temperature, using a remote temp probe and pop it on there with a couple of layers of aluminium foil over it and shut the lid down for ten minutes, but the AGA is out for the summer. The traditional method is to put the spring in a pool of oil in a tobacco tin (now a historic item!) and burn it off, after which the spring will have got to the right temper as if by magic. There is always a discussion about what oil to use – used engine oil is often quoted, but whether its the engine oil or the used bit that’s critical isn’t revealed. I think I’ll probably heat a thick walled tube in my furnace to 300C, check it with the radiant thermometer and then pop the spring in and leave it to cool down. – a lot more trouble than the burning oil, but at least measurable! As I wrote yesterday, the spring feels different now its fully hard, even when its just resting in my hand – mysterious or imaginary?
I can never decide if the two arms should touch along the joint – I think most original springs don’t so I’ve left this one slightly open – you can get a piece of thin card in the joint. I think this spring is a better shape than the last one. We shall see!
21st July – What a lovely day sailing in the dinghy on the Orwell! Yesterday I made a couple of blanks for new springs – This time I did the thicknessing of the blank on my medium soft grindwheel (after flattening it with a diamond tool) rather than the linisher and it worked much better. I had a look at the broken spring – it was fairly clear that I hadn’t tempered it sufficiently as I could barely mark it with a file – a spring properly tempered should just be fileable. Thinking about hardening, I sometimes think when I handle the occasional metal component that I can tell if they are soft or fully hard just by the feel of them – and not by trying to flex them either. It sounds pretty improbably, but I guess the elastic properties are quite different and maybe this affects the internal damping of vibrations so they do feel different? Or maybe its just a vivid imagination…….
19th July – Tragedy – my new spring broke when I tried to put it in the pistol! I had hardened it and tried to temper it in my furnace, the AGA being out for the summer, but its not good at controlling temperatures as low as 300 C and I don’t think it was taken to spring temper. Anyway it seemed a bit strong, and pinged when I compressed it – I think maybe it should have been thinned a bit more, and I need to be more careful to compress it at the ends to allow more of the spring to flex. Anyway its busted, so I can have the excitement of making another one – I’ll probably make two whle I’m about it as the other little pistol has a fudged spring…. Oh well, I’m going sailing on Sunday and will be busy tomorrow so it will just have to wait – at least I should be much quicker this time.
18th July – yet more tinkering with the little pistol! I worked on the tumbler and spring to get the combination working – its an iterative process – check, file, check as you converge on what looks like a satisfactory arrangement. I filed a square on the tumbler shaft and drilled and filed a matching hole in the cock so that I could see how that fitted at the same time. It all went together quite well as far as I can test at the moment. I found a sear that will probably do although I might have to bend the arm a bit as it threatens to foul the edge of the lock pocket – so now I’ll need to file the bents in the tumbler for half and full cock – the half cock is more difficult as it has to resist firing by letting the sear nose enter a slot. I’ll have to make a cock screw to keep the cock in place – although its not loose it still comes off, and also a screw for the sear pivot. The cock screw is 5 UNC ( I made the tumbler) but the sear pivot seems to accept an M2.5 thread, and I don’t have a die for that one – for the moment I can use an existing screw. That just leaves making hardening and tempering the spring and any other bits, and making the sliding safety catch and spring, oh and the sear spring…. not much to do then!
The shape of the end of the spring, the ‘spur of the tumbler and the orientation of the cock on its square all have to be right – its a slow job if you haven’t done it very often.
17th July Bit more tinkering with the little pistol – I made a new mainspring and also made a video of the operation – difficult to concentrate on two things at once – tryiing to bend the spring into a ‘hairpin’ while juggling an oxy/gas torch and talking to the camera is fun. I can’t put it down without turning it off, by which time the spring is cold. I got it in the end though. Anyway it is almost there – just got to alter the bend a little to make it more even and slightly less open, and shape the end that bears on teh tumbler. Very satisfying making springs! Much more so than struggleing with editing documents in Word – I’ll have grey hair if I have to do it much more – making springs etc is a doddle compared to struggling with Bill Gates’s constructions. I think I got the bridle to fit as well, so progress!
The bend has a face with a slight angle so it looks dark – its fine!
16th July I did some work on a gun case – I bought a set of ‘furniture pens and crayons’ from Amazon for a few pounds – they are meant for touching in scratches on furniture but they might be useful on guns and cases – I’ve aleady deployed the mahogany one – it helps but I really need darker shades. In my ‘spare’ time I’m still tinkering with the little Harding pistol. I put the proto tumbler in the miller and got a bit more metal off it, and have now filed it to an approximate shape. I found a sear that looks as if it will fit so I’ll have to sort out the bridle and fixing screws – I think I can use the bridle out of the box of bits if I weld up the hole for the tumbler extension shaft and re-drill it in the right place. Then its just a case of making the mainspring, the sear spring, and the sliding safety catch, bolt and spring – nothing really!!!!!
Part way there with the tumbler. not sure about the sear?
15th July – Looking through my Manton book yesterday I realised that whoever botched the single NOCK barrel to have a recessed breach didn’t need to recess the side opposite the lock – Joseph never did on single guns….
I bought back a pair of continental locks sans frizzens to see if we could find replacements for the owner – and indeed we found a pair of matching frizzens with pan lids exactly the right size – the tails need extending to reach the pivot position but that can be done…. a result.
My ‘office’ table is now covered with nautical charts as we begin to plan our summer trip to the NW of Scotland – we have a new charter yacht from Skye and will head out to the Outer Hebrides – we are a bit light on crew this year, so a bit more work for me, although the boat has in-mast reefing on the mainsail so not so much deck work needed – its 43 ft long so it will be interesting to see how we get on with just 3 of us. It’s the coming alongside in marinas that’s tricky, although we don’t do that very often. The last few years we’ve had the same boat so I knew how it handled under power – its going astern that is always tricky – most boats just won’t steer until they are moving so you never know quite how they will set off backwards so there will be a learning curve with this one.
The table is also covered with the bits of a pistol case that I am remaking – fortunately was just held together with animal glue – or indeed no glue at all! Anyway its all in pieces now.
I’ve had a couple of conversations with experts on gun browning in the last few days – one, supposed to be the best in England says it can take up to a month to get a good browning on some barrels, and he stops if the weather gets too hot. The other friend says he reckons up to 16 days and thinks that if you brown them faster than one rusting a day the browning wears off very quickly – so maybe I need to slow down as I had been aiming to get at least two brownings a day……..
14th July – Holts shoot at Cambridge Gun Club. Not my best day – but I did manage to hit one of every different clay except one – at least that shows something! Derek brought the owner of the Joseph Manton 22 bore featured in the posts and the gun for Nick Holt to have a look at – I was able to assist him in unravelling the gun as I’d done a blog on it. He was shown another gun that was a bit of a mystery – a very late Jo Manton flint lock on a single barreled gun signed H Nock on the barrel – its difficult to appraise a gun without my list of dates and references etc, but the gun had the patent Jo Manton recessed breech C1810(?), while the barrel and trigger guard looked older. My suspicions were confirmed when I noticed that the breech blocks had been machined down from a normal width to the recessed width to take the late lock, and not particularly carefully. The lock fitted quite well. Nothing on the bottom of the barrel made a lot of sense – no HN maker’s stamp as I would expect, or a number (Henry Nock was amonst the first to number his guns around 1790). In the absence of any further info I thought it was maybe a Nock gun of maybe 1790ish with the ‘wrong’ lock. Possibly a spuriously engraved NOCK? The left side of the breech plug had also been recessed – I didn’t see if the stock had had a bit glued on to fill the gap where the barrel was milled away. If not I’d have to suspect that it had been restocked – the lock was very well inletted so a possibility. I’m afraid the jury is out on that one! I was hoping for a valuation on the Post Office pistol – I know what its worth as a little pistol but not what the rarity value of the P.O. connection is – but it wasn’t fair to expect Nick to guess that. I actually found a reference to one similar being sold at Bonhams in 2015 for $2800 – so obviously some rarity value there….
13th July – bit more tinkering with the pistol below – I had to make a replacement screw ( I had to grind it out) for the tang of the trigger guard – I don’t like just using a woodscrew as the heads are never right and in this case they don’t work well into the endgrain of the plug I had to glue in, so I turned up a countersunk screw with a No 5 UNC thread and an extra false head. I slotted the false head and screwed it in, then marked the fore and aft line, cut off the false head, put in the aligned slot and filed it to conform to the curved shape, then engraved a few lines on it and used Blackley’s case hardening powder to colour it down (and incidentally harden it). Jobs left include all the works of the lock, some reshaping of the cock casting I have, to reduce the prominent breast it has and scale down the spur, and make a ramrod. Tomorrow is the Holts Shoot at the Cambridge Gun Club – I am, of course, going and will hope to exceed my 50% target – I didn’t quite make it at the Helice shoot – I was on target but missed all of the last 4 ‘easy’ birds! I’ve finished a batch of de-cappers to take to CGC – they make good engraving practice so I did a little stand of arms, and a stand of music and a sunburst and a scroll plus some borders. Quite interestingly (at least for me!), the strip I was using that I said was as soft as butter turned out to be pretty tough down the other end – just goes to show what cold rolling does to the grain structure near the surface.
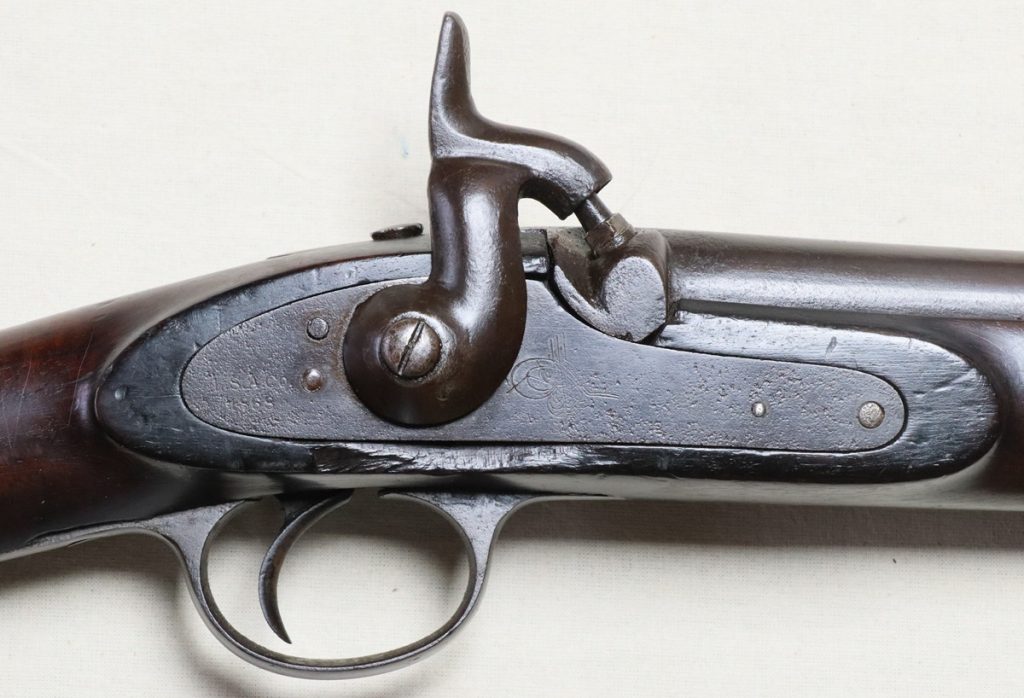
Here is a gun I picked up at a local auction that must have a story attached – perhaps visitors to the site could help me?
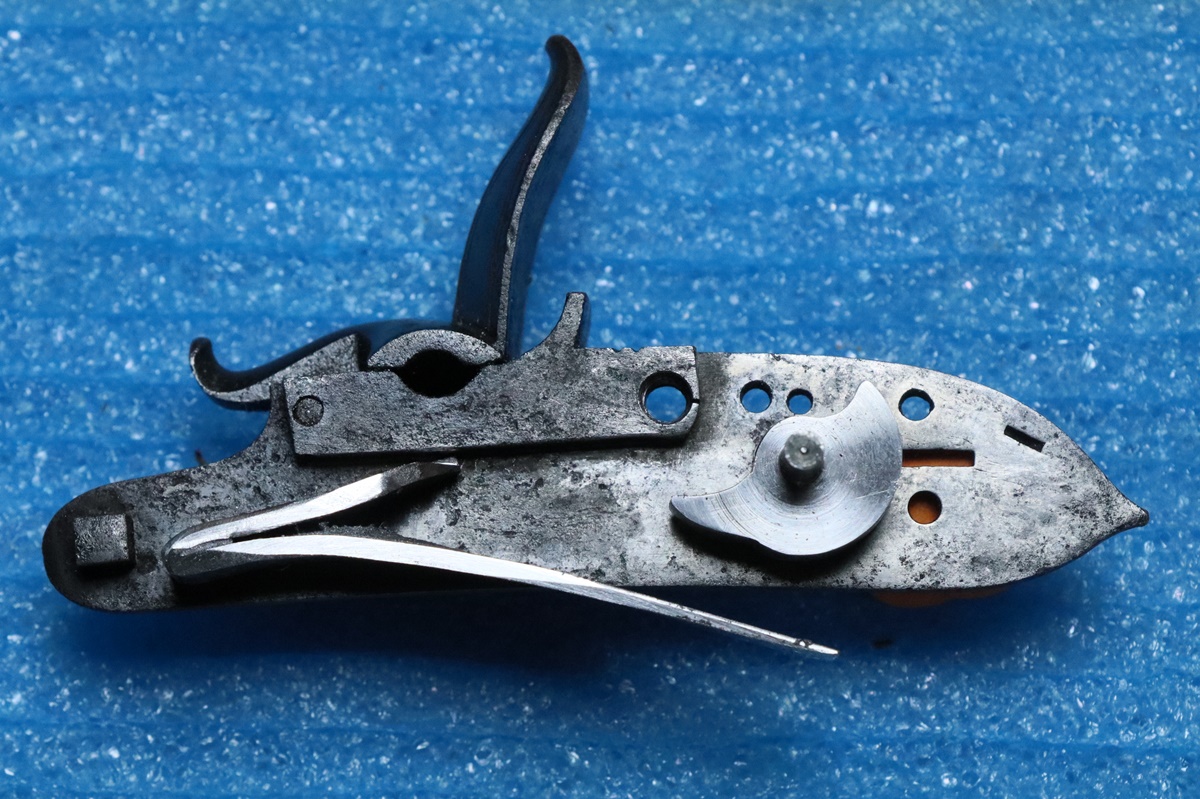
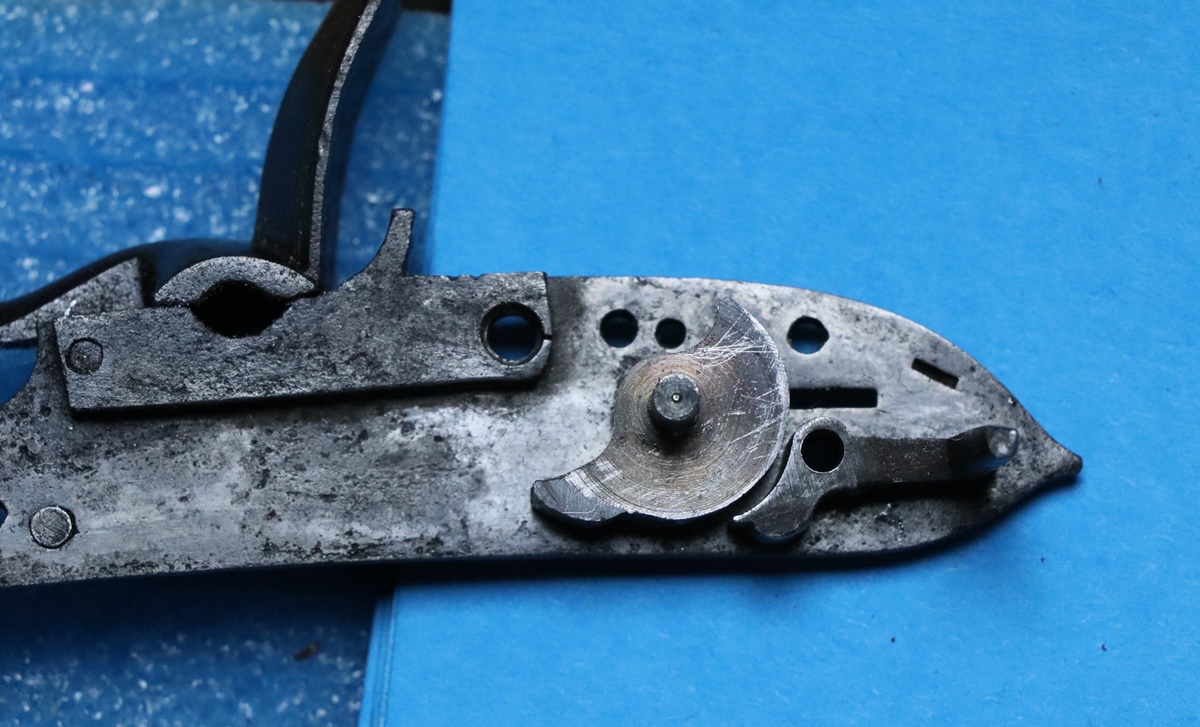
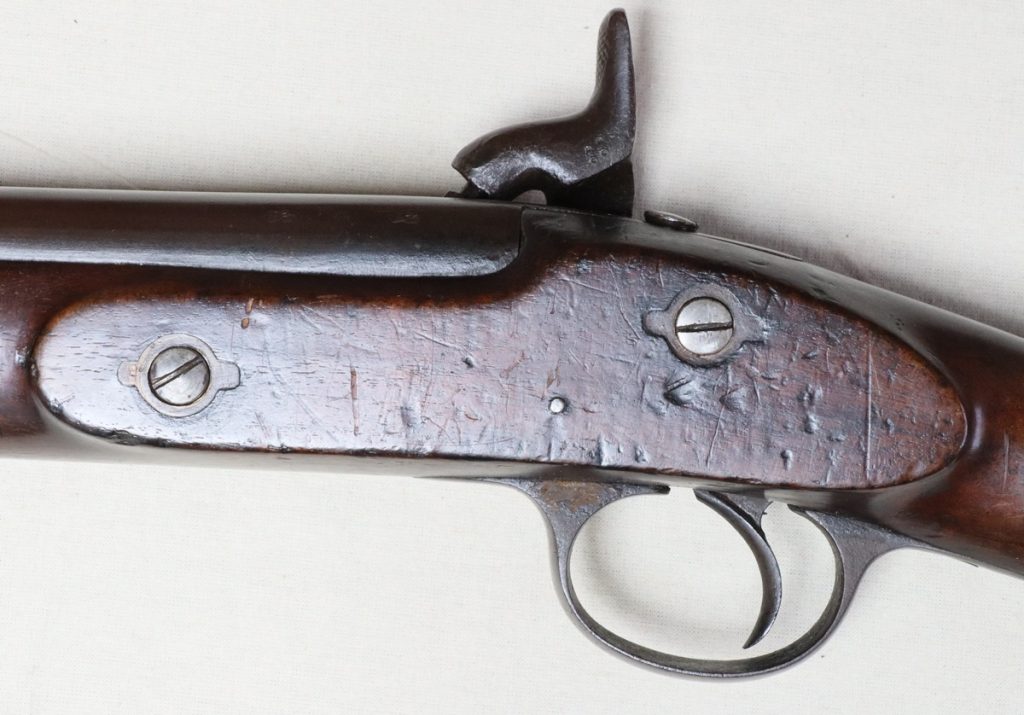
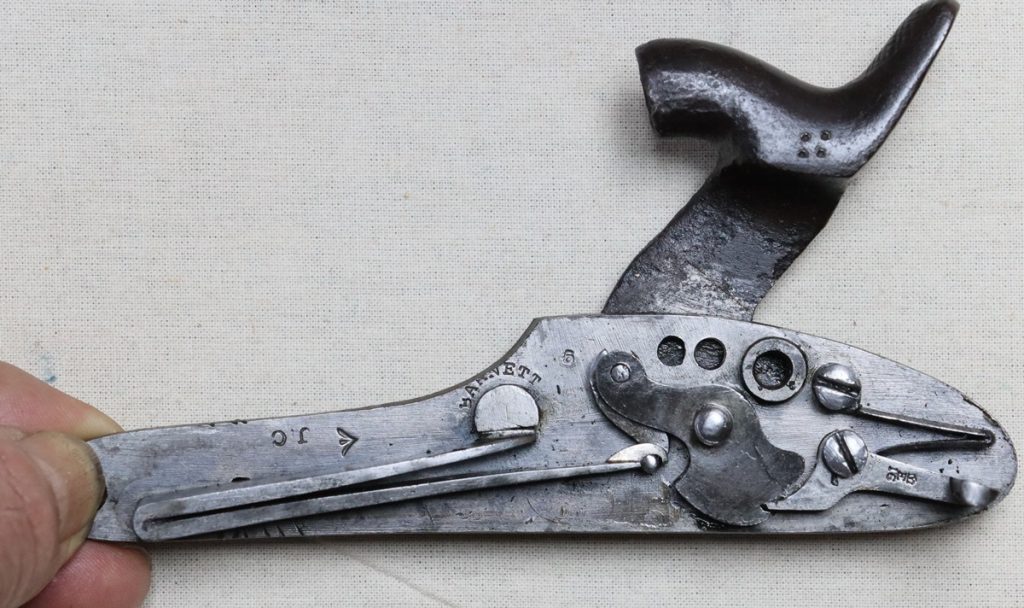
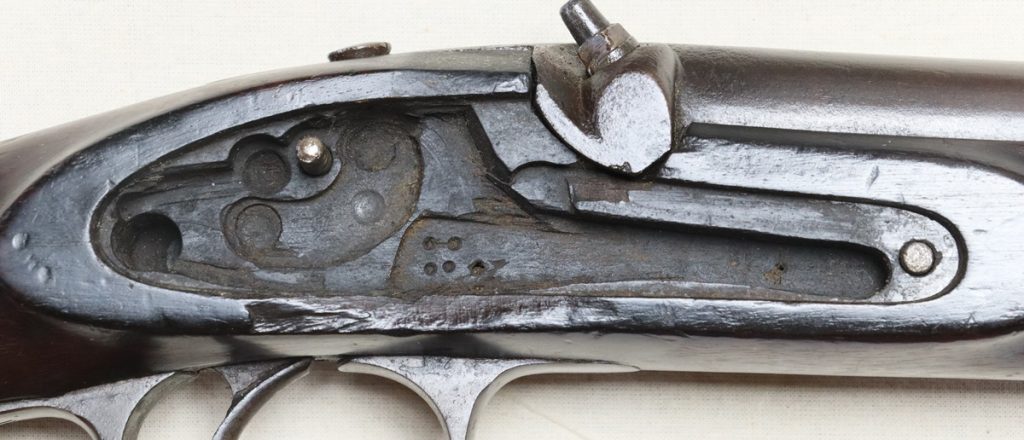
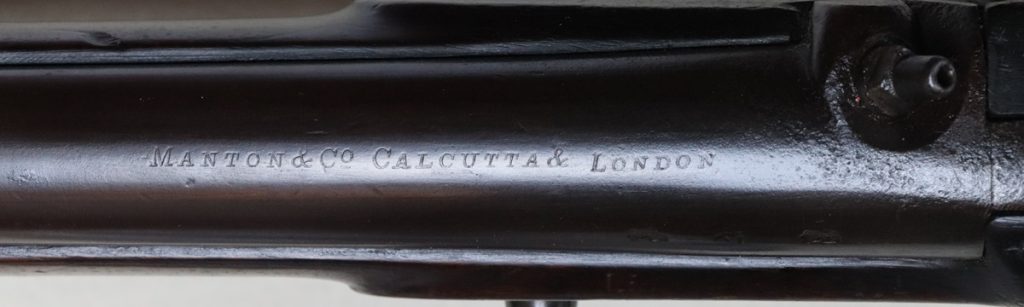
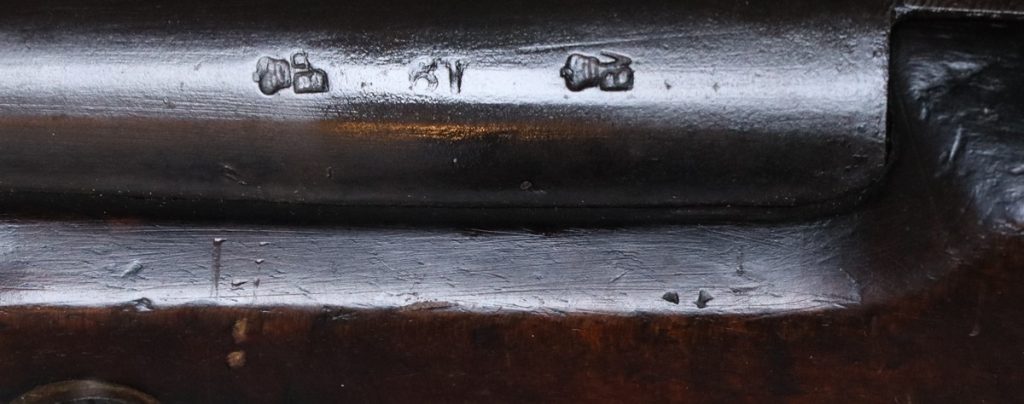
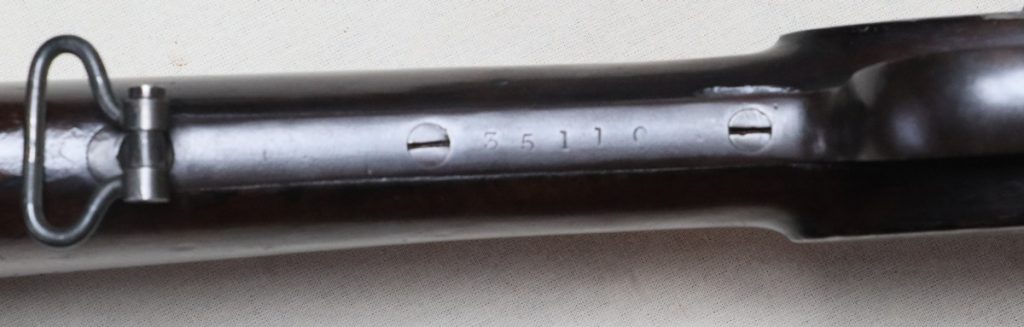
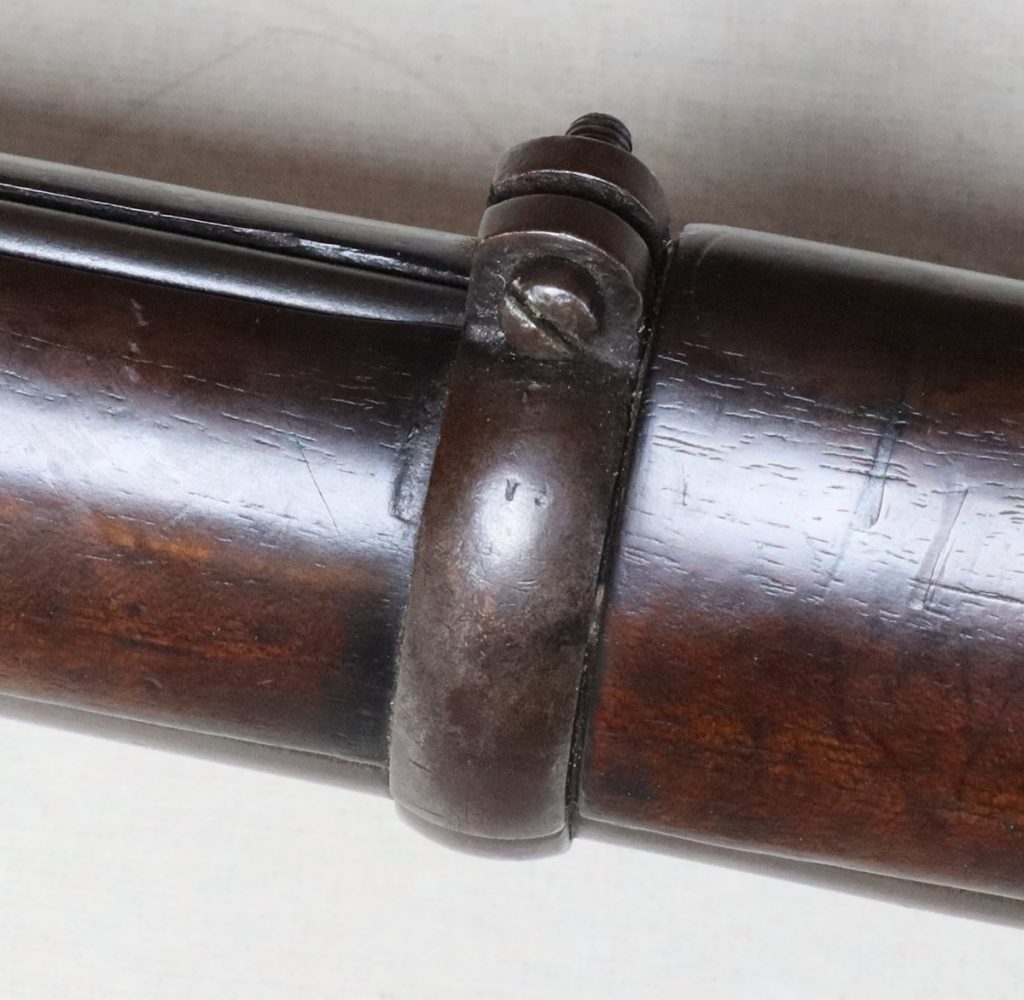
It has a P53 type lock externally marked LSA Co and 1868 with a strange pattern just visible in front of the cock – the lock is pretty pitted on the outside, but the inside is shiny & good quality and carries a broad arrow mark and the name Barnett plus the stamp J.C. – Barnett & Co made locks and barrels for the British Government from about 1854(?) It is missing its bridle (holes exist). The barrel appears to be a musket barrel of about .630 bore (not the .656 that was used when Enfields were made in smoothbore), of length 33 inches, giving the gun an overall length of 48 1/2 inches (weight 7 1/2 lbs) The barrel carries the stamped name ‘MANTON & CO CALCUTTA’ as one stamp, followed by ‘& LONDON’ made of individual letter stamps. It carries Liege proof marks – (no it doesn’t, they appear to be Birmingham post 1914 – more research needed- see comments). There is a bayonet boss in the usual place, and a foresight but no rear sight or any sign that one was ever fitted. The trigger guard is stamped with the number 35110 and the butt (LH side) has 88 in one place and 77 in another. The stock looks fairly like a normal P53 stock, although I’m not really familiar with them. It has three old style barrel bands (before Badderley) – the sling swivel is on the muzzle one, the other swivel is on the rear trigger guard screw. The ramrod is steel, and has a somewhat squared end with a slotted jag – no bulge – I can’t see a retaining spring in the stock. Overall it looks ‘of a piece’ and not mucked about with in recent times. The British were at pains to equip the Indian troops with guns that looked like Enfields but were not effective against their own weapons – this gun may have been made up or more probably imported by Manton & Co., Calcutta (at that time run by Wallis) using old British Enfield locks, or maybe old stock complete guns, with the barrels replaced by new smoothbore barrels to ensure inferior performance (and not capable of taking standard issue British ammunition!). It would seem that this gun must be one of many that were issued, hence the 35110 stamped on the trigger guard. Any thoughts gratefully received.
see comments for more information.
Looks a bit like an Enfield The four dots on the cock appear in the lock pocket too. Looks like a ‘proper’ Enfield lock?Manton & Co Calcutta & London – ‘& London’ is not part of the main stamp.Liege proof marksnumber 35110 – wonder where the other 55109 are? Sling swivel is at back of trigger guard.Old style barrel bands (3)
A nice gun for you today! Derek brought a gun that belongs to a friend of his for me to cast my eye over, so with his consent, I will put a few photos on the web and we can enjoy a little specualtion about the gun together!
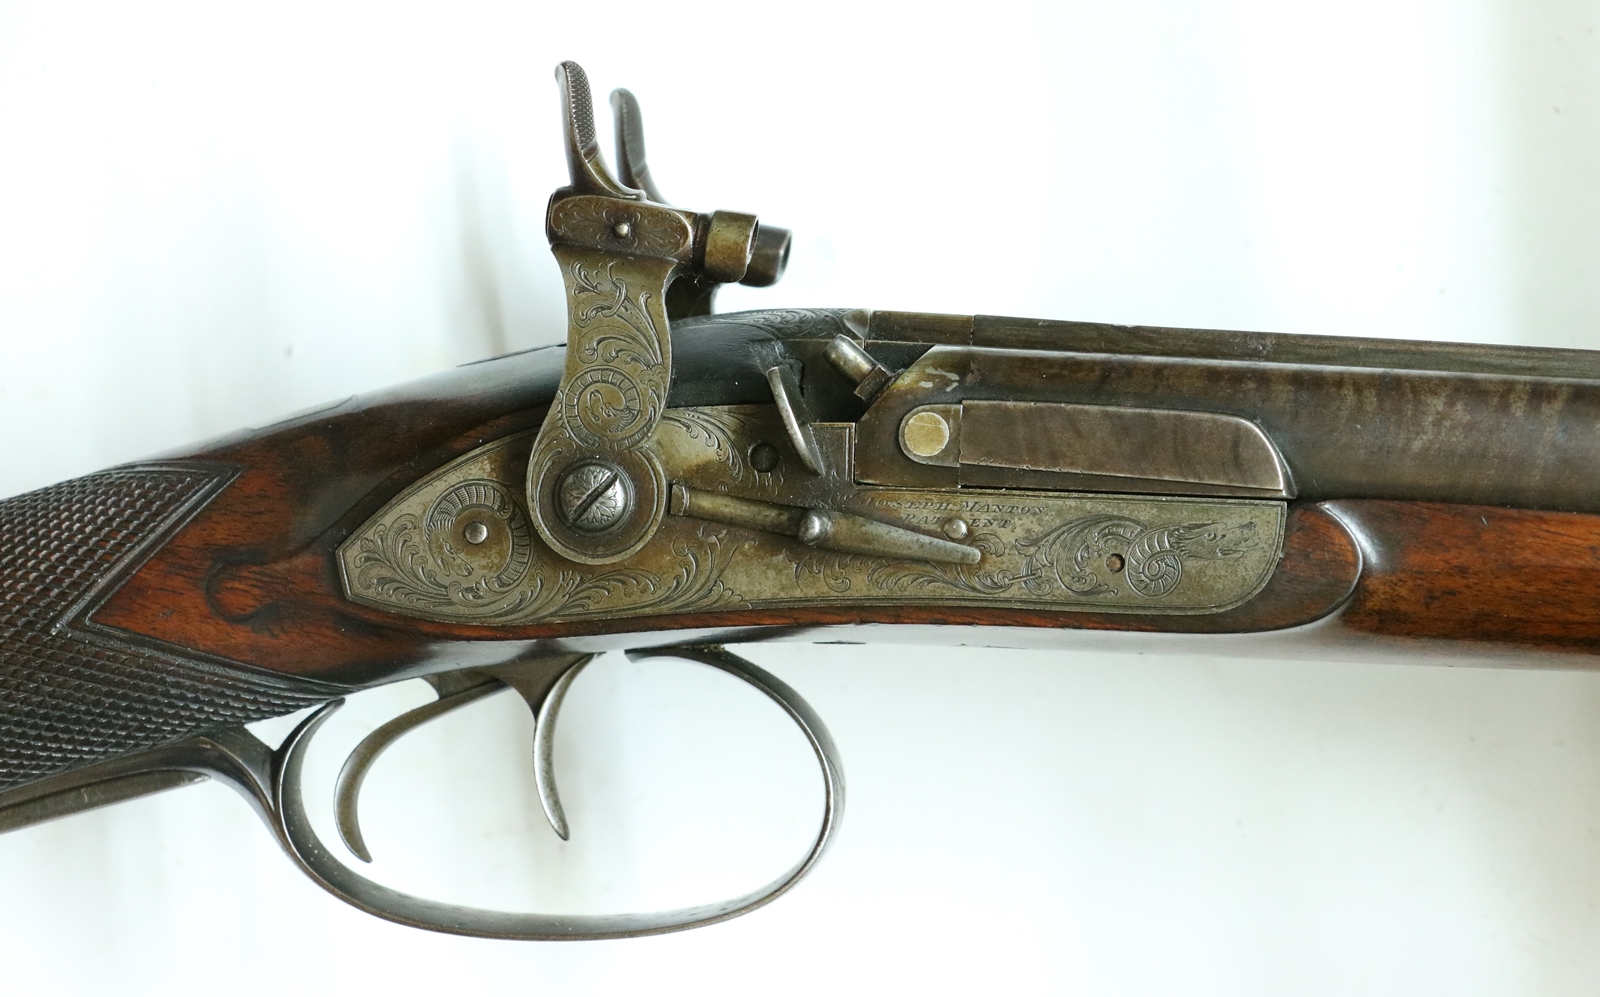
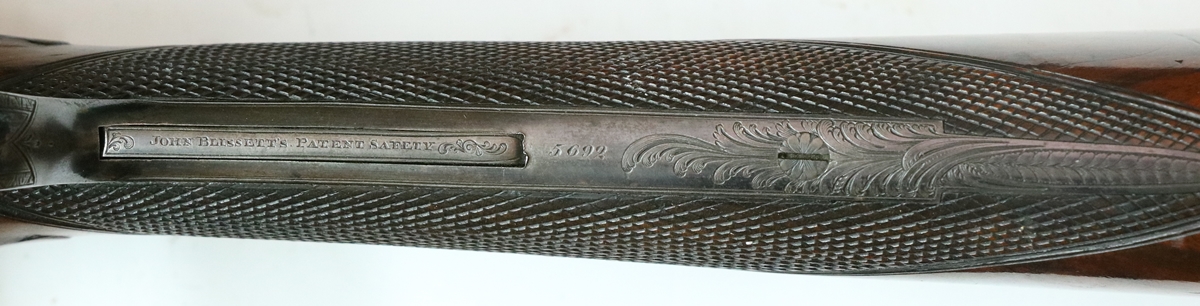
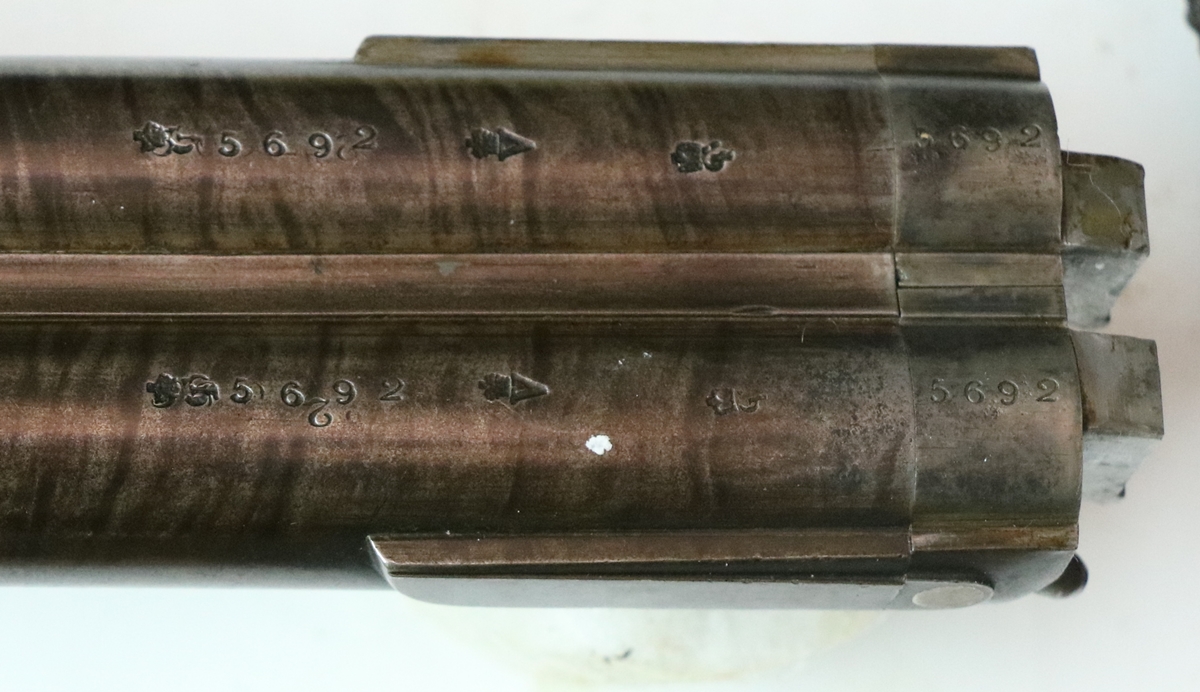
It’s a high quality percussion gun signed Joseph Manton on locks and barrel and with the serial number 5692 on the underside of the barrels, the breech block, the inside of both locks and the tang of the trigger guard. By the Manton book that serial number belongs to 1812 ( this gun is not in the book), still in the flintlock era although coming up to the tubelock and pellet lock transition period before the caplock, which this is by the usage in the Manton book. Its about 22 bore double with 30 inch barrels but without the elevator rib that Jo Manton patented before this date (? or a small one?). So it looks as if it is a conversion involving new locks and new breeching, or that it has been renumbered or is from a period later when his numbering MAY have gone haywire. There are a lot of interesting clues in the gun if you can bear to go through them;-
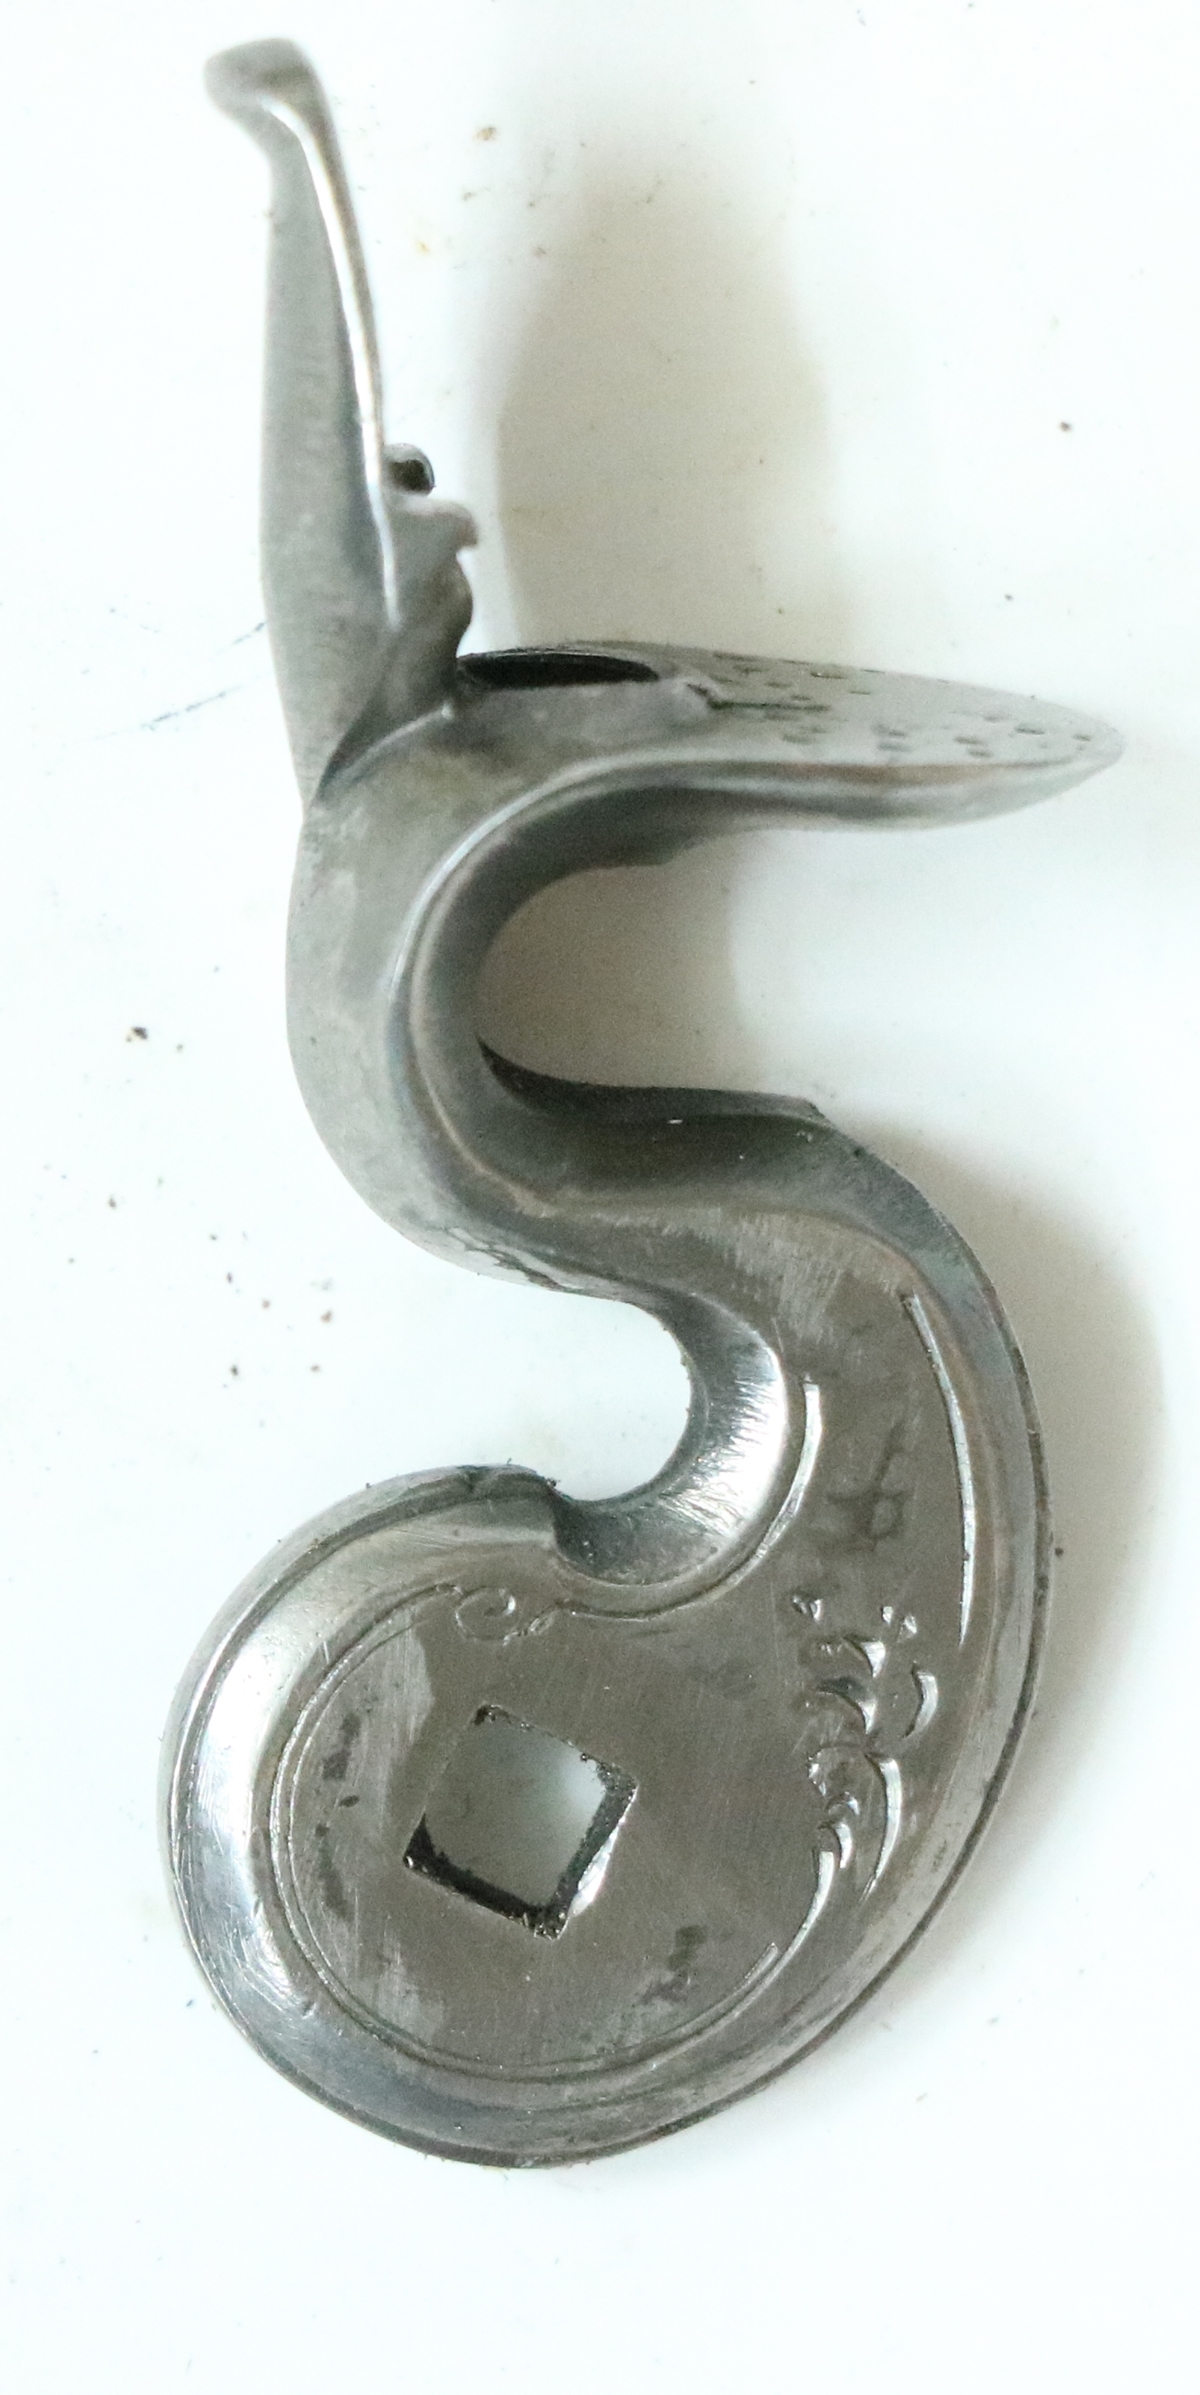
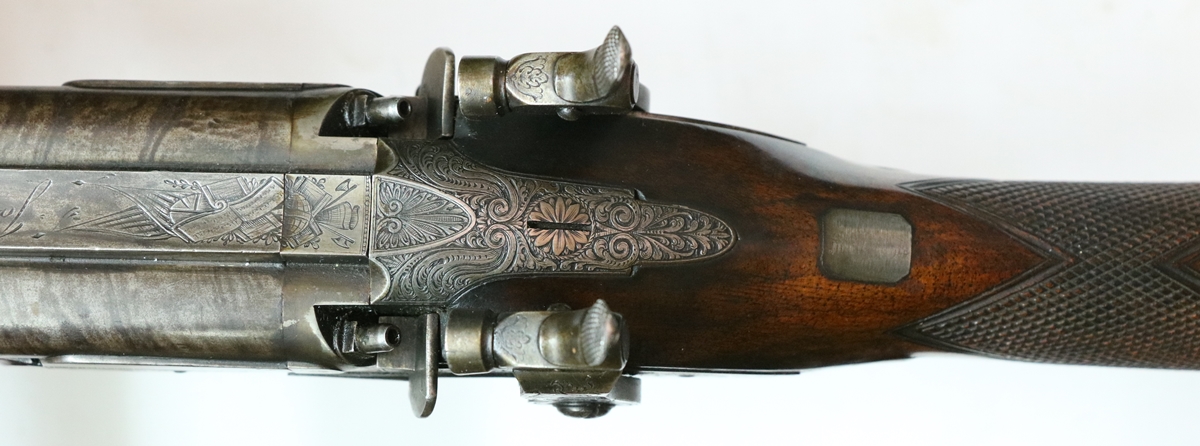
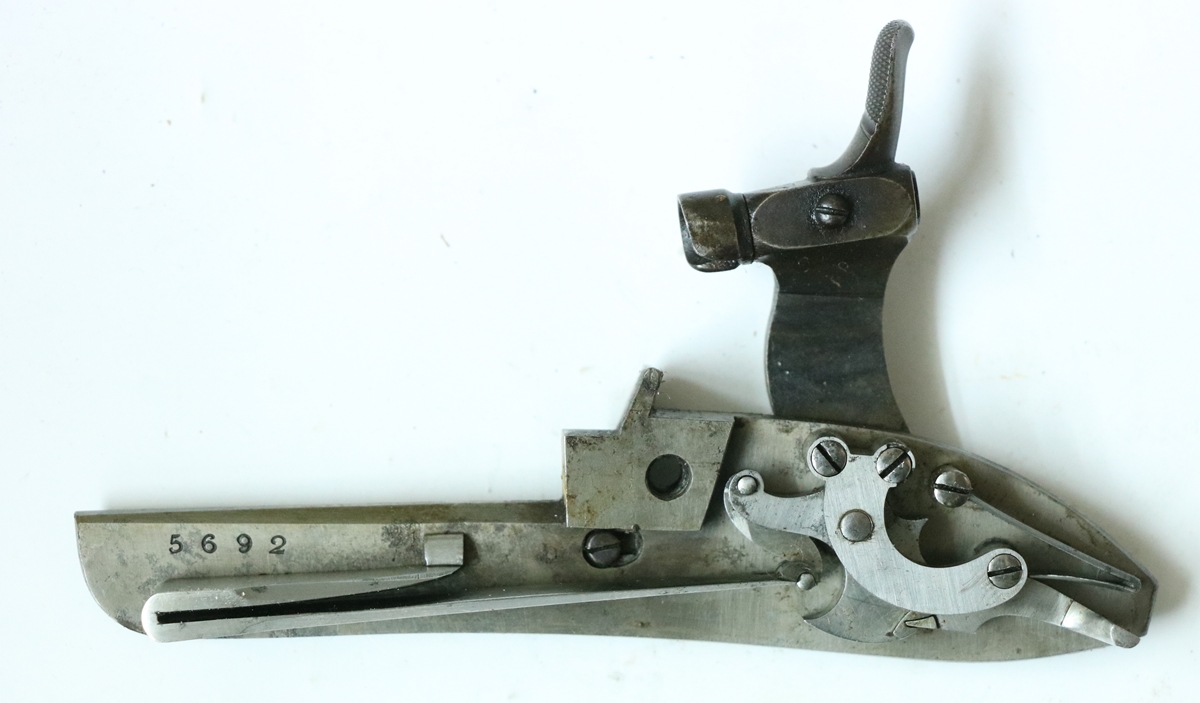
1) It has the cocks with removable hammers – a follow-on from pellet locks and used around 1828.
2) What are those safety catches in front of the cocks doing on a shotgun? (they engage in a slot cut in the back of the cock when its at half cock – I think they are a considerably later feature.
3) If its a conversion the ‘bolsters’ on the barrels above the locks look odd??
4) In addition to the sliding safetys on the cocks there is a grip safety – but it is engraved John Blisset Patent even though Jo Manton claimed to have invented it. There is a burr at the backof the slot that suggests it may be a retrofit. I can’t see Manton putting a grip safety with someone elses name on it!
5) The barrel wording is ‘Joseph Manton’s New Invention by His Majesty’s PATENT’ – a form of words that he appears to have used between 1812 and 1816 and not at any other time? It may have a slightly elevated rib – Manton’s recent Patent – I don’t know what constitutes ‘elevated’.
6) The numbering on the barrel looks as if it may have been restamped after previous numbers were dressed out – possibly also the numbers on the breech plugs. One breech plug is a bit misaligned.
7) It has two sets of CP proof marks on the barrel – one set looking as if they have been dressed down.
8) Everthing looks OK from on top although the breech plug doesn’t align perfectly with the rib – but the engraving IS continuous across the joint.
9) The locks have the number 5692 very clearly stamped on them. The trigger guard tang also has the number 5692 engraved on it and looks original.
10) The locks have the classic Joseph Manton ‘sea monster’ engraving by Gumbrell that was seen on his guns around 1820 – 1828? Oviously the front safety catches were not intended when the locks were made and engraved.
Now we can begin the speculation if you are still with me!
A good point to start is the locks –clearly made by Joseph Manton around 182X (on grounds of percussion caplock, engraving and style) or so and clearly numbered for 5692 and so intended for an 1812 gun of his. The locks have the sliding safety catches which can’t realistically be contemporary with their manufacture(?) but almost certainly a later modification but are unusual on shotguns, being much more usual on rifles, (and introduced at a later date then the 1820s? – maybe 1830 – 1850?). If he had wanted to put a safety catch on a gun in 1828 he would almost certainly have used one behind the cock intercepting the tumbler not the cock itself as on pistols of that era. Joe Manton didn’t make very many rifles. When you add in the grip safety, which looks like a retrofit on account of Manton claiming to have invented it and it having another gunmaker’s name on it (grip safetys were not in fashion for long as they are pretty unreliable) The grip and cock safety together might suggest that it was possibly converted from a rifle (unlikely) but more likely that it had a very cautious owner at some time – possibly at conversion but probably some time after – possibly in two phases, grip safety and then sliding safety. The condition of the blueing of the sliders suggests that the gun wasn’t used much if at all after they were fitted ? The gun has not had a lot of wear at any time – maybe some prior to conversion, but relatively little use as a percussion gun as there is almost no corrosion around the nipples on the breeches.
The stock and furniture seem OK for 1812, and the number 5692 on the trigger guard tang is almost certainly original so I’m inclined to put it all down as original – the engraving throughout is consistent in quality and design and could date from a few years earlier than the Sea Monster lock engraving.
The barrels are interesting – the signature etc is right for the serial number date of 1812 ( used up to 1816). There is no gold or platinum stamp on the breeches, but they are very small and maybe not wide enough to take his stamp. It looks as if they have been struck off and renumbered and rebrowned and reproofed but I believe that the gun has been untouched in the same family for many years and it is quite possible that the work was done when the gun was converted or when one or other of the safety devices were added – it is almost certainly not a recent rebrowning. While it is possible to speculate that the gun was at one time a rifle and has been rebarreled, one would have to allow that the present barrel was contemporary with the original 1812 date or else re-signed in perfect imitation of the earlier form.
My current guess is that the gun was built as a flintlock 22 bore shotgun in 1812 and carefully converted by Joseph Manton to caplock in about 1828 (say 1825 – 1830). At some point it was owned by a hyper cautious owner who had the safety grip added – maybe by John Blisset himself ( he became Blisset and Son in 1867). It is possible that being very cautious the owner had the barrels reproofed at that time or they may have been done at the time of conversion, although Manton did not always send guns to the proofhouse – he preferred his own hydraulic test. I incline to think that the sliding safety is somewhat later than the grip safety ( I’ve only seen it on guns of 1840 to 1860) and so may have been added later.
So its tentative history ( a guess!) ;
1812 made by Joseph Manton as a 22 bore flintlock shotgun
1828 ish converted by Joseph Manton to caplock
1830 ish grip safety added – ?by John Blisset? date based loosly on level of wear. & reproofed?
(1840 -1850) ?? front safety catches added and reproofed(?) Not much used thereafter?
I’m sure I’ll be proved wrong – I will take the gun to Geoff Walker at ‘The Flintlock Collection’ as he knows his Mantons much better than I do.
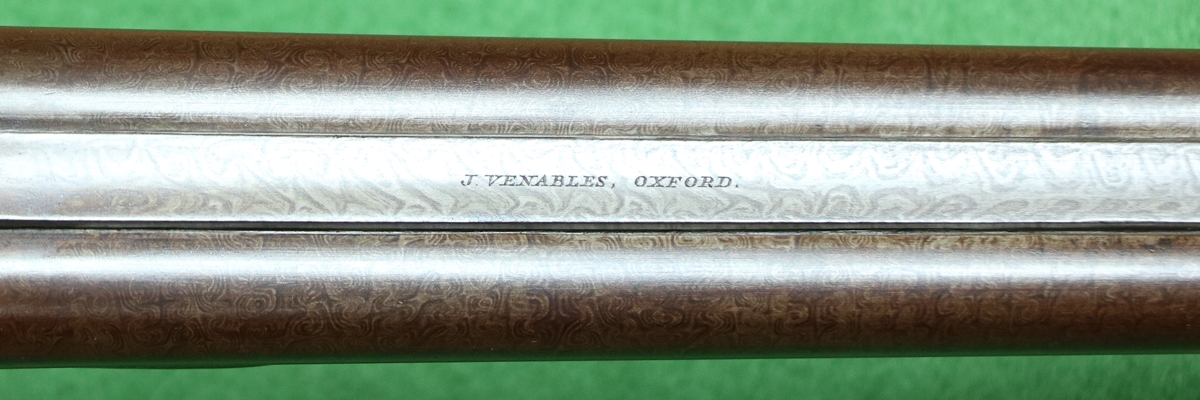
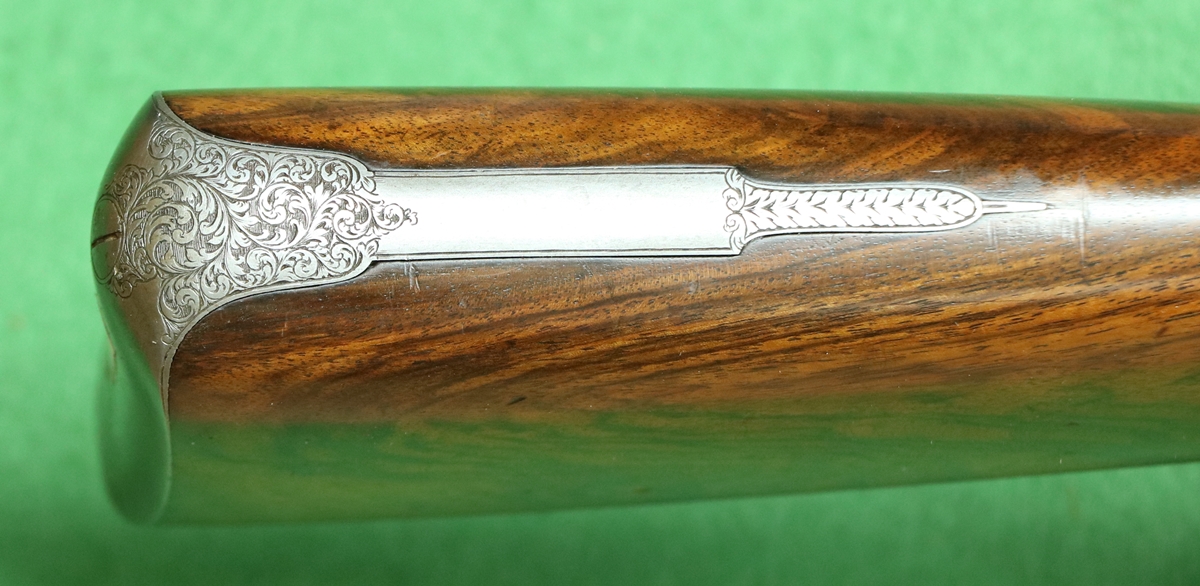
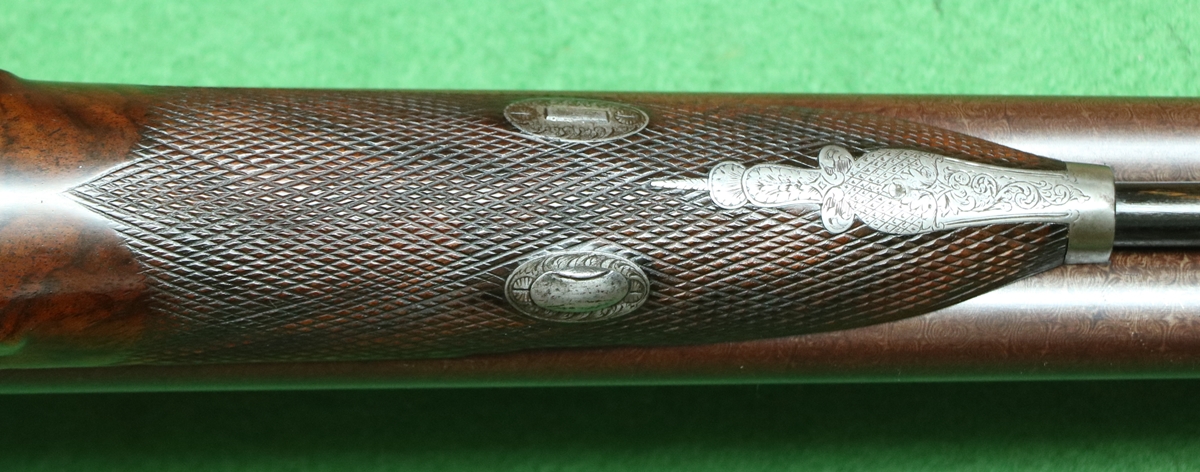
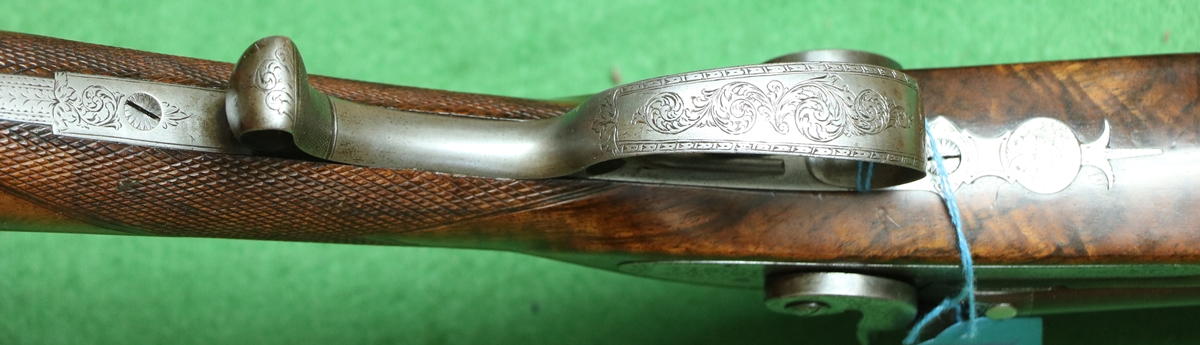
I bought this in the June Holts auction – it is a really fine London proofed gun with excellent wood, fresh and crisp chequering and true damascus barrels with very good bores, and the furniture and locks have high quality engraving. I keep thinking that there should be something major wrong with it to justify the low estimate, but if so its not obvious to me – as usual, the possibilities are that its a bitzer – ie the barrel doesn’t belong with the stock, or there are other bits from other guns , but it all seems to belong It weighs 6 3/4 lbs and has about 3/8 to 1/2 inch of cast for a right hander, and comes up well for me, although it might benefit from a thin pad on the stock. Here are some photos…..
My motto in gun buying is ‘if it looks too good to be true, it probably is’, but in this case it will do very nicely thank you, with or without hidden mysteries!
The wood would not look out of place on a modern Purdey or H&H etc….
The other side is even better figure.
Slight gap between corners of false breech and breech block – the gap between the rib and breech block is due to poor fixing of the rib
Lovely true damascus, maybe forgings from Leige, which made most of those barrels…
Butt plate and tang as clean and unmarked as the day it was made.
Chequering as clean and unworn as if done yesterday – maybe recut??
The trigger guard is a bit rifle-like but no other signs it doesn’t belong. The locks are shotgun locks (no detent).
Escutcheon on the underside of the stock with initials F P (?).
The barrel has been rebrowned, but in a good colour so I won’t have to redo it – London proof marks.
Extracted from my 2018 diary, so it is to be viewed in reverse order, start at the end and work back!
30th march – I put all the furniture back on the 8 bore, where I know the fit is bad I put a bit of hard black wax on the edge using my tiny hot air gun (1/4 inch nozzle) to take up the gap, and melt more into any remaining gaps. The butt plate needed the bottom edge trimmed slightly – they often stick out a bit and catch, anyway it all went together reasonably well, and I got the screw heads aligned perfectly. So its beginning to come together – at the moment its all covered with sticky slacum ( boiled linseed, beeswax and terbene driers) waiting for it to go jelly like so I can wipe/rub it all off again. This process will be repeated until the finish is good enough, although it is always possible after a few coats to change to wax furniture polish and cheat! I was checking Brownell’s website for honing stones – I might just buy a few bits to make up a hone – the regular ones go up to 10 bore but I’m sure I can fudge things – the extension rod to make the hones long enough to go down the barrel are much more expensive than the rest of the kit and definitely won’t work with 8 bore barrels, so again I’ll resort to making something. I wish I had access to a Delapina lap, but never mind! I am not sure I have the perfect recipe for Slacum – I did a series of trials and came up with a maximum of 5% beeswax and around 1% terbene driers – but it didn’t seem that critical, apart from keeping the beeswax content at 5% or less. On the last lot I made the terbene went into short strings when I added it to the oil – not sure what happened there……….. My hard wax is made up of beeswax and carbon black, but it is possible to buy very hard coloured wax for repairing scratches in furniture that would be better – trouble is it costs £100 for a kit and has mostly colours we wouldn’t use.
The steel cup is a bit thick (limited by size of available end mill!) and I didn’t get rid of all the defects around it, but its meant as a functional restoration. Steaming has taken most of the dings out – minimal sanding was done – it is very effective.
The finial is quite badly rusted round the edges, which makes the fit rather poor, but improved! It no linger looks like a tired old gun that has been neglected and I hope one day it will see use again when the barrel is done.
29th March – More 8 bore… I forgot to mention when discussing removing screws that one of the problems with fitted screws in old guns is that the heads are contoured to fit the furniture and as you unscrew them you need to keep the screwdriver aligned with the slot, which often means tilting it as you turn it, otherwise you partially come out of the slot. Anyway having stripped and cleaned all the furniture I escalated the job to include gently refinishing the stock as it had plenty of dings etc. I inlet a small piece of wood where a bit had come out round the finial of the trigger plate and cut the surface flush and refitted the finial temporarily, then set about steaming out the dings in the spout of a kettle on the AGA – difficult to do if you are using an electric kettle, but a wallpaper steamer would work. That got out or reduced a lot of the dings and destroyed some of the finish so I removed most of the rest on the butt with 320 grit sandpaper and methylated spirits (wood alcohol) as it was varnished with shellac. I cleaned the chequering using an old toothbrush and meths, enough to show the chequering reasonably clearly. Several goes over the stock with medium grade steel wool and meths got it to a reasonable finish – I didn’t want a complete strip to bare wood, just a somewhat better finish. There were a number of black stains – probably iron stains, so I very carefully applied oxalic acid with an artist’s paint brush to soften the stains – you need to be very careful or it will bleach the unstained wood very pale – if that happens you will need to colour it down with Van Dyke crystals in water or a spirit stain, applied carefully. When you apply oxalic acid or stain using an artist’s brush, apply it streakily along the grain of the wood – that way you hide any edges amongst the grain markings. Having got the wood to a fair finish and acceptable colour I wipe over it all with a piece of kitchen roll dipped in shellac dissolved in meths – button polish is one name for it – this seals the grain. Applying a second coat messes up the finish because it leaves smear marks, so at that point I’ll go to using ‘slacum’ to give an English oil finish, which will require several dozen coats, but before that I’ll remount all the furniture. At the moment I’m waiting for the butt plate screws and the sling mount to derust….. I also need to fit the steel cup for the side nail. The next big job will be to sort the barrel, but that may have to wait a while as I need to make/buy a tool for lapping the barrel before I rebrown it.
28th March – Continued with the 8 Bore restoration today with a visit to Dick to use his vice and torch to shift the breechblock, which we did successfully – its a strange fact that breech plugs almost always come out with perfect threads without a trace of rust. Any rust is usually confined to a tiny bit around the joint at the barrel and on the edge facing into the powder chamber. I don’t know what they used to lubricate the thread, but it certainly lasted 200 years or so! This one was no different, once heated almost to wood charring temperature and held very very securely in the vice it yielded to a 2 ft lever and came out easily thereafter. The passage from nipple to main chamber contained a lot of hard blackish powder, but as it was slightly damped with cleaner or whatever I couldn’t get it to flare like black powder although I think it may have had some in it – by the way, I DID carefully probe the barrel with a screw rod to check it wasn’t loaded before heating it! Anyway a trip to the electrolytic bath and a bit more picking out the passages with bits of bent wire and I’m sure its clear now. Now the breech plug is out I can see that the barrel is pretty reasonable, certainly shootable. I may have a go at lapping it if I can make a suitable tool. The side screw hole was a mess so I dropped a 16mm cutter into it and made a plug and glued it in, but I then made a steel cup for the head of the side nail so I might put that in instead. I initially thought that I would leave the butt plate as they are usually horrible to get out, but the rest of the furniture looked so much better than it did, so I took it off. The two screws holding the butt plate are almost guaranteed to be rusted around the heads and stuck fast. The threads are often rusty and stuck in the wood too, often pulling most of the threaded wood out with them. The technique to get them out is to very carefully pick out the slot in the head of the screws down to the metal, and put some release ‘oil’ on the joint – I put a small drop of gun oil and then take a brush of Acetone and brush it around the edge of the screws – it penetrates better than proprietary penetrating oils. You need to hold the butt very securely and have a screwdriver that is a perfect fit and try carefully. The top one is usually the worst – if it doesn’t budge fairly easily play a fine torch flame onto the screw head ( it does need to be a very fine flame) and try again. The 8 bore butt plate screws came out fairly easily, the top one with heat, and once started the screws themselves were as clean as a whistle. There was quite a bit of flake rust on the inside of the buttplate and on the wood and it took about 3 hours at 2.8Amps to derust the buttplate fully. Having derusted the furniture and thoroughly wire wheel brushed them ( .03mm wire brush) I generally coat the hidden surfaces with ‘Metalguard’ which leaves a thin anti-corrosion film over the surface of the metal as its in a fairly active state after derusting and will rust easily. I’m generally happy to put the furniture back with just the Metalguard as protection, sometimes putting on another coat if the part has been handled much since first coating. Most oils and greases soak into the wood so be sparing if you use any behind the fittings.
You know how it is? Having got so far with the restoration (actually more of a tidy-up) I can see that the woodwork could be a bit better, so for completeness I might just steam out the dings, and possibly refinish it – in for a penny, in for a pound……
Yes, I know its not quite centered!
The buttplate is held on by two screws and the tab along the top. After removing the screws the whole buttplate must be moved backwards by 6 mm to disengage the tab. As you can see, there was quite a lot of rust under the plate- its surprising that the two screws were in perfect condition in the wood.
27th March I stripped the furniture from the 8 bore and put it through the electrolytic derusting. It was quite pitted and the engraving is quite worn and pitted so it won’t restore to anything like original state, and as most of the bits are hardened, I can’t easily recut them. I did try on the finial of the trigger plate by annealing it, but its too far pitted to make any difference so I’ll leave it. The wood around the furniture is badly stained black, and on one side of the finial is missing – I think the staining is a combination of rust and too much oil on the wood – my father, who owned the 8 bore before me, used to slosh oil about on guns and several of ‘his’ guns suffered from staining, although in this case there is also quite a lot of rust under the furniture that I have now scraped away carefully. I’ll go down to Dicks tomorrow and we’ll remove the 8 bore breech plug (with luck) – I ran out of gas for my Butane torch today, and my vice is not really man enough.
Furniture as was – click on pictures to see in detail.
After an hour each in the electrolytic derusting bath and a fine wire wheel.
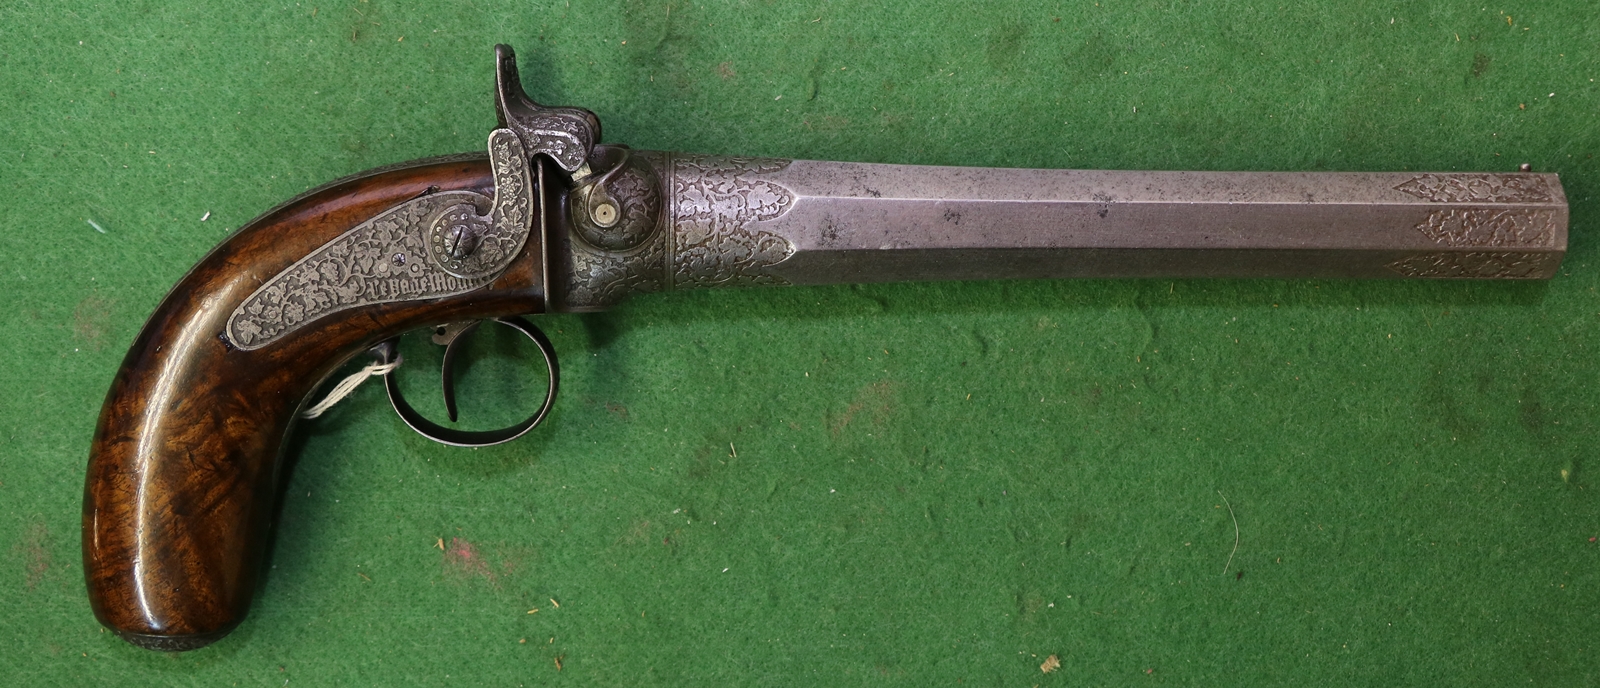
I dug out an interesting pistol from the recesses of the collection I inherited from my father. It’s French, by the well known Paris gunmaker Le Page and is a large bore percussion pistol firing superimposed charges – it has two cocks and a single bore into which two loads are placed, one after the other. The right hand nipple leads to the front charge, and the left hand nipple leads directly to the rear charge. It has a single trigger that releases one cock at a time – if both cocks are at full cock, the first pull fires the front charge, and the second pull the rear charge, but if only the left cock is at full cock it fires that one (corresponding to the rear charge, so it would be a bit unfortunate if it was double loaded and you accidentally cocked the left cock and didn’t cock the right! Maybe I will take the locks out and have a look at the mechanism that achieves this and put it on the site- I’d like to see how it shoots one day, its a big bore (a 20 bore cartridge just fits into the muzzle) for a relatively light pistol and must have used a pretty small charge. Obviously you need to get the loading dead right to make sure the flame channels line up with the charges – I can feel a dummy loading coming on………
Typical French etched decoration – almost never seen on English guns or pistols.
Here is a gun I borrowed from Dick to put on the website – its a fairly early French double 16 bore made as a dual pinfire ( the notches in the barrel for the pins have been filled)/centrefire gun (possibly a later conversion?) by ‘Le Faucheux a Paris’ according to the engraving on the locks – I don’t know if that is the same as Lefaucheux as its written in all the books, but it certainly looks right! It has ejectors but, as one would expect on an early gun, the locks are non-rebounding so you have to put the cocks on half cock to open and close the barrels. The date(?) 1853 is stamped under the barrel, along with the barrel maker’s name and two numbers and several stamps with LF in an oval (Le Faucheux?)- the action flat is stamped 1854 and LF in an oval and there are different numbers on the barrel( 7688 & 1103 and on the flat (225). Taking the barrels off involves opening the underlever and unscrewing a very large-headed screw that holds the front part of the metal fore- end in place. This then lifts off the screw boss and a loose ‘packing piece’ that forms the front face of the hinge bearing falls off – the gun can then be opened and the barrels unhooked from the hinge pin at the front of the action flat. You wouldn’t want to do that in the field as you would almost certainly loose the loose piece in the undergrowth! ( actually if you do it with the butt down it doesn’t fall off as its on a dovetail.) The pictures speak for themselves:
Here is a gun I bought back from Dick’s today to photograph – its been in his store for donkey’s years – the owner has long since forgotten he gave it to Dick for some repair of other but Dick seems to know who each gun belongs to from memory, which is quite a feat given most have been in store for well over ten years. Open the gun in the normal toplever way and you are in for a surprise….
Since posting this it has been identified as a Teshner/Collath of Frankfurt gun that takes a special cartridge – as I understand it these guns seem to have been manufactured up to about 1906 and the ammunition was available up to about 1911 – it is now unavailable, making this a Section 58 firearm rather than a Section 2 shotgun. (see end of post and comment)
Here is a German breechloader without any identification. Its a 16 bore hammerless double gun with damasus barrels with an underlever that initially moves the barrels forward away from the breech faces while leaving the extractors behind. Once the underlever has opened 90 degrees, further motion moves the barrel further and causes the bolt that is attached to the underside of the barrel flat to disengage from the slot beneath the breech face, allowing the barrels to fall on a small hingepin at the front of the fore-end. Dropping the barrels disengages the pin that has been holding the extractors in the backward position. The process of opening the gun also cocks it. There is a strange safety catch in the form of a butterfly nut on the top of the breech – when it is aligned fore and aft it is in the safe position and it obstructs the sight line down the barrel – when in the fire position at right angles to the sight line you can see across the middle of it, so it is immediately obvious when you come to shoot that the safety is still on – although it would be difficult to move it from one position to the other while it was anywhere near mounted. The safety is interesting in that it disconnects the triggers rather than blocks them – I haven’t stripped it as it isn’t mine, so I don’t know the details of the action, although I am now tempted. It has the usual continental decoration of raised design against a punched background – possibly etched before punching – rather fine when viewed under the microscope. It has a horn triggerguard and horn facing on the underlever. The gun has sling swivels as was common on continental shotguns, and the chambers appear to be highly tapered for the first 1.5 cm, loosing at least .5mm in diameter – I don’t have a 16 bore snap cap or cartridges to try but I’m sure it won’t fit safely. There are no marks on the gun except a London proof mark and a serial number 6525. The various labels attached to the gun say that it was bought at auction in 1989. There is one label that says Bolath (?) ( p.s. actually Collath) .
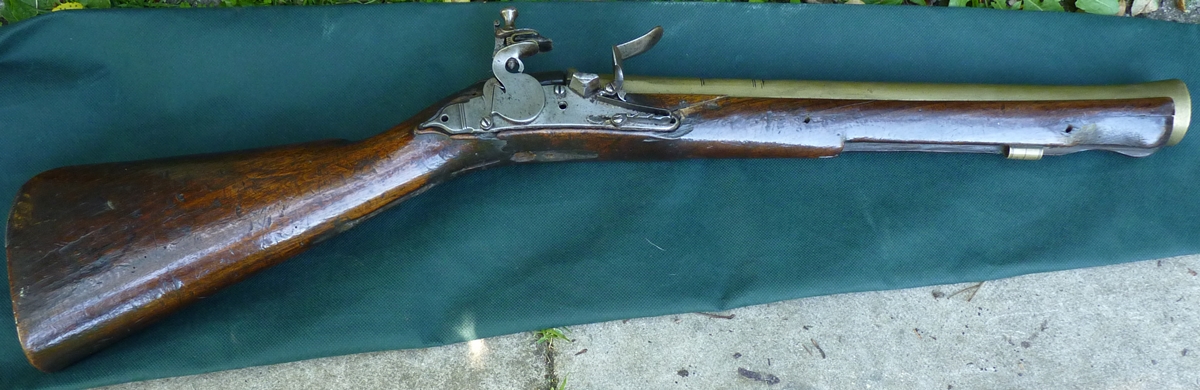
Here is an interesting and very old blunderbuss – if it is as it seems it may be as early as the English Civil War (1642 – 1651) – certainly it is of a design that was current from about 1640 to 1670 at the latest as far as I can see – there can’t be many guns about from that date, so it may be something of a rarity and of significant historical importance – enough to keep one from ANY conjectural restoration work and anything but the most sensitive repairs ! Features that signify an early date are the general shape of the stock, the dog lock with flat plate and ‘teat’ tail, the sear pivoting on a vertical shaft, the barrel tang secured by a ‘nail’ from underneath, the ramrod pipe made from sheet and opened out to fix it and probably the key early feature – the cock secured by a post passing through the tumbler and pinned on the inside. I’m not sure about the proof marks – London was using standard marks at that period but Birmingham was still 150 years from opening its first ordinance proof house – anything made in Commonwealth controlled parts e.g London, would have used the Parliamentarian proof marks of a shield – I suspect that this has a private Birmingham proof mark along with the barrrel stamp E I T and another mark I cannot read.
Here are some photos ( taken with my travelling camera so not quite up to normal standard!) – I’d welcome any ideas, particularly on the initials on the barrel stamp – they look like E I I or perhaps E I T with a sun above. One possibility for the maker is Edmund Truelocke (working 1660 – 1680?) with a shop in London.
The lock is held in by 3 screws – an early feature.
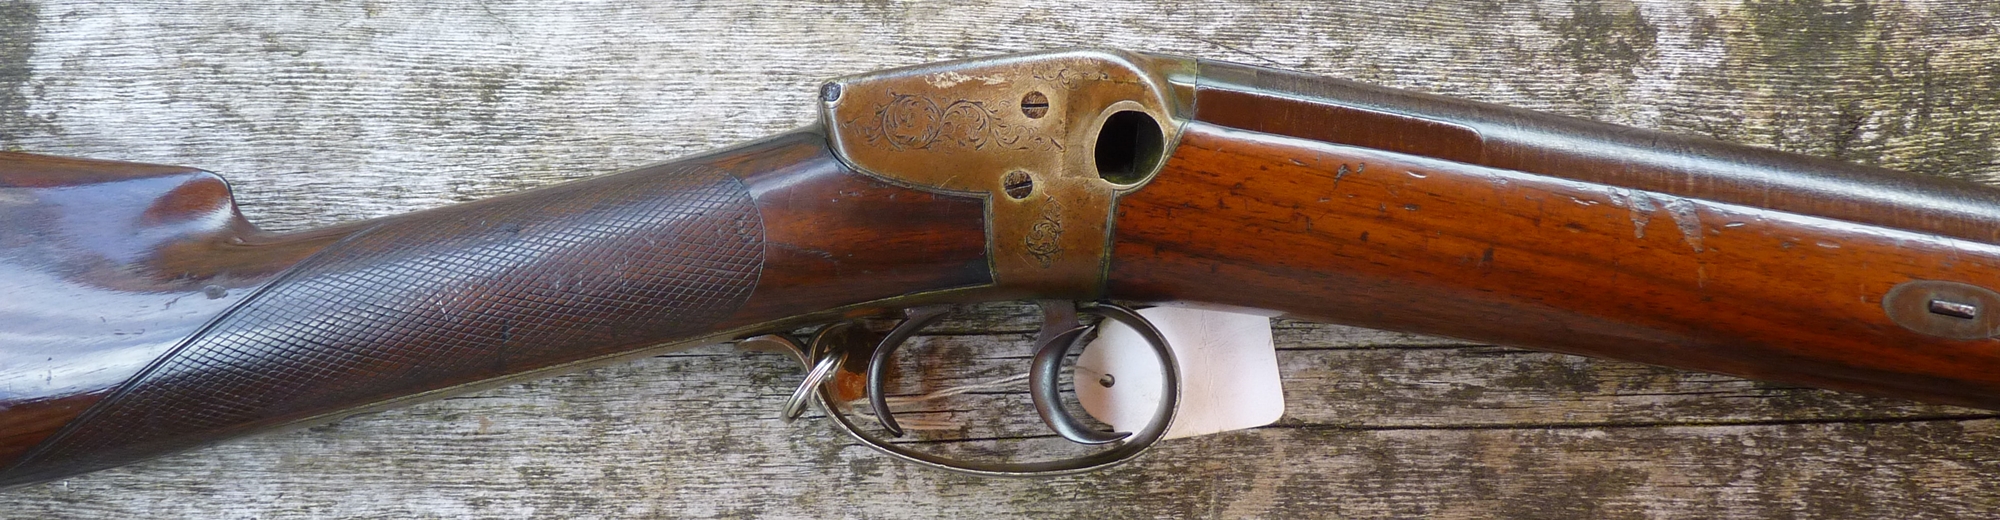
This gun is a rare example of a Jackson design for a method of speeding up combustion in percussion guns by directing the fire from the cap straight into the centre of the breech block. I haven’t yet found a patent, nor do I know if one exists for this design. Given that the patent breech by Henry Nock added a secondary chamber in order to speed up ignition by setting up a small primary explosion to set off the main charge, its not clear that going straight into the breech would actually achieve what Jackson intended. One can see why he might have thought it would, because Nock’s design is counter intuitive. i look forward to trying it out – I wonder if an ordinary video camera is fast enough to capture small differences in ignition speed – I rather doubt it. Judging purely by the style, the wood and the engraving I would put this latish in the percussion era – very probably post 1840.
Guns, UncategorizedComments Off on J R Cooper Patent Hammerless percussion shotgun
Feb132017
I’ve stuck some bits from my blog when I stripped the gun and got it going properly; see the end of the first bit….
This is a most unusual gun that I inherited from my father’s collection – I have no idea where he got it from, I have never seen another gun even vaguely like it, except perhaps a Jones Patent enclosed lock gun that is undoubtably of later date, and although I have shown it to many collectors and experts I haven’t met anyone who has a clue about it – and that includes Holt’s valuer and old gun guru Robert, who must have had most things through his hands at some time or another. So any information or comments would be valued!
Stock shape and barrel are early features – may be a case of re-use?
I bought a Samuel Nock Heavy Rifle of about 16 bore for restoration, I think it was made as a big game rifle, although it has been used recently as a target rifle. 12 lbs is a not unusual weight for a dangerous game rifle and the bore is appropriate, but larger than was popular as a target rifle.
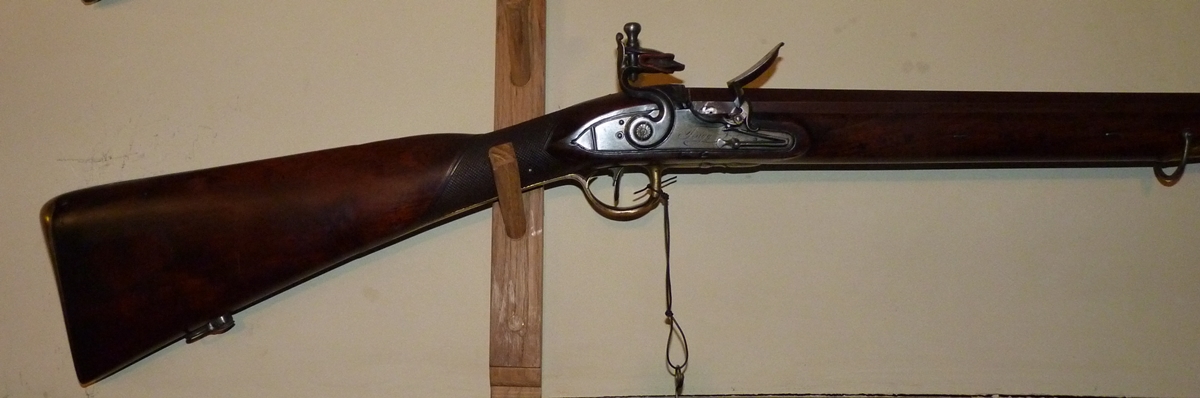
Urbanus Sartoris ( Sartorius) patented his breechloading system in 1817 ( Patent 4107) and 1819 ( improvements Patent 4336) around the time that Durs Egg was also producing his breechloading flintlock. Sartorius’s main contribution appears to have been the handle and opening mechanism, which seems to be ingenious and well made, but like most of the attempts to fit a breechloading mechanism into a flintlock or percussion gun, doomed to relative obscurity by the problems of gas leaks and fouling. Sartorius had sporting guns and rifles (total number unknown) made by Anthony Biven, and a number of the military carbines were made, although the total number is not known, Biven also made these. Biven was in business from 1822 to 1825 at No. 16 Regent Street London.
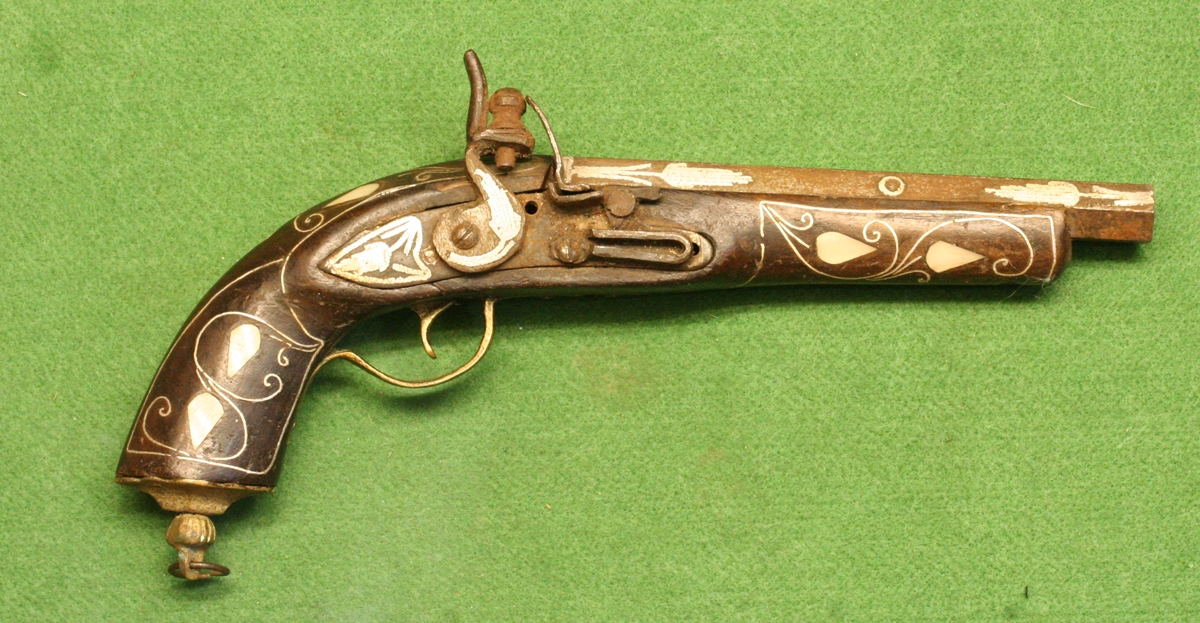
Here is an amazing pistol Dick bought for £20 – he tells me he will accept offers in three figures (not including the pence)!
Elegant inlaid aluminium !
Ingenious – coil spring for the sear – I somehow don’t think its a shooter! I’ll derust it anyway.
In many ways it has to be said that this is a masterpiece of the gunmaker’s art – somehow that sear, tumbler and cock function as they should! Its difficult to guess the age, but the spur of the cock is clearly welded on – a possible repair or original?. And how is a flint fixed in with the cock screw going through the middle of it? Clearly made for display – I decided that the patina of rust is actually part of the charm, and that it would be vandalism to clean it!
I bought this in the last Holts sale. It is a very carefully restored William Powell 12 bore hammer gun No 7748 made sometime in the 1870s (?) to Westley Richards patent single bite top lever design patented in 1871 – many features of the gun are shared with Westley Richards, including the distinctive ‘Crab Knuckle’ joint.
I thought I’d put up some photos of the single barreled flint gun that I got from Holts some time ago as a puzzle for you to see how many odd things about it you can spot, and what sort of date you would put on it – you might find some clues from my Black Powder articles and elsewhere on this site, and W Keith Neil’s book on Great British Gunmakers has clues. The gun was cataloged and sold as an antique Twigg shotgun – I bought it on its value to me as a shooting gun – the bore is very good, and in fact it has turned out to be a very reliable shooter – of the 30 or 40 shots I’ve fired with it, I haven’t had a hesitant ignition, and only one failed to fire, due to the wind having blown all the priming powder out of the pan, and I haven’t yet changed the flint! It won’t be the fastest gun in the East as it doesn’t have the refinements that came into flintlocks from about 1780 onwards such as roller on frizzen or frizzen spring, link on mainspring and Nock’s patent breech or Joe Manton’s stepped breech that speeded up the ignition process.
What do you think? Here are some photos I’ve put a few questions under each to help the less experienced……..
We’re off to Rugby for our muzzle loading Helice shoot on the 18th of July, which should be great fun. I’m trying to decide what gun I will shoot. Last Sunday I did much better than usual with my (possibly spuriously signed) D. Egg double 15 bore with back action locks and rather nice Stubb Twist barrels stamped TW with Birmingham proof marks . It’s a typical late percussion gun, probably mostly of Birmingham manufacture despite the D EGG LONDON barrel engraving – to me it has the feel of a Birmingham gun rather than a London gun. By the time this gun was (probably) made Durs Egg had died ( in 1831) and his son Joseph was running the business but still trading as Durs Egg so he may have simply retailed this gun or quite possibly it was made after 1834 when that trading name ceased to be used, in which case it is one of many spuriously named guns. It is of a decent standard – what I would call a good gentleman’s gun – in good condition with a reasonable bore – a very good bet for shooting. I picked it up at Holts in the sealed bid sale earlier this year – I hadn’t intended to look at it as at the time I disregarded anything with back action locks, but it seemed to fit well so I bought it after a slight haggle and I now quite like back action locks – less mess to clean after shooting! Being quite late in the evolution of muzzle loaders many good back action lock percussion shotguns had a relatively short working life. All I’ve had to do is replace the nipples with the ‘correct’ shape to avoid misfires. Here are some pictures of it;
Last week my friend Dick passed a heap of rust to me to see if my derusting technique ( see below) would reveal anything. He was a little concerned that it might turn out to be a Section 5 heap of rust, but I figured that anyone who described it as a firearm would be sectioned under the mental health act themselves!
Anyway after two or three days in the derusting tank, here it is;-
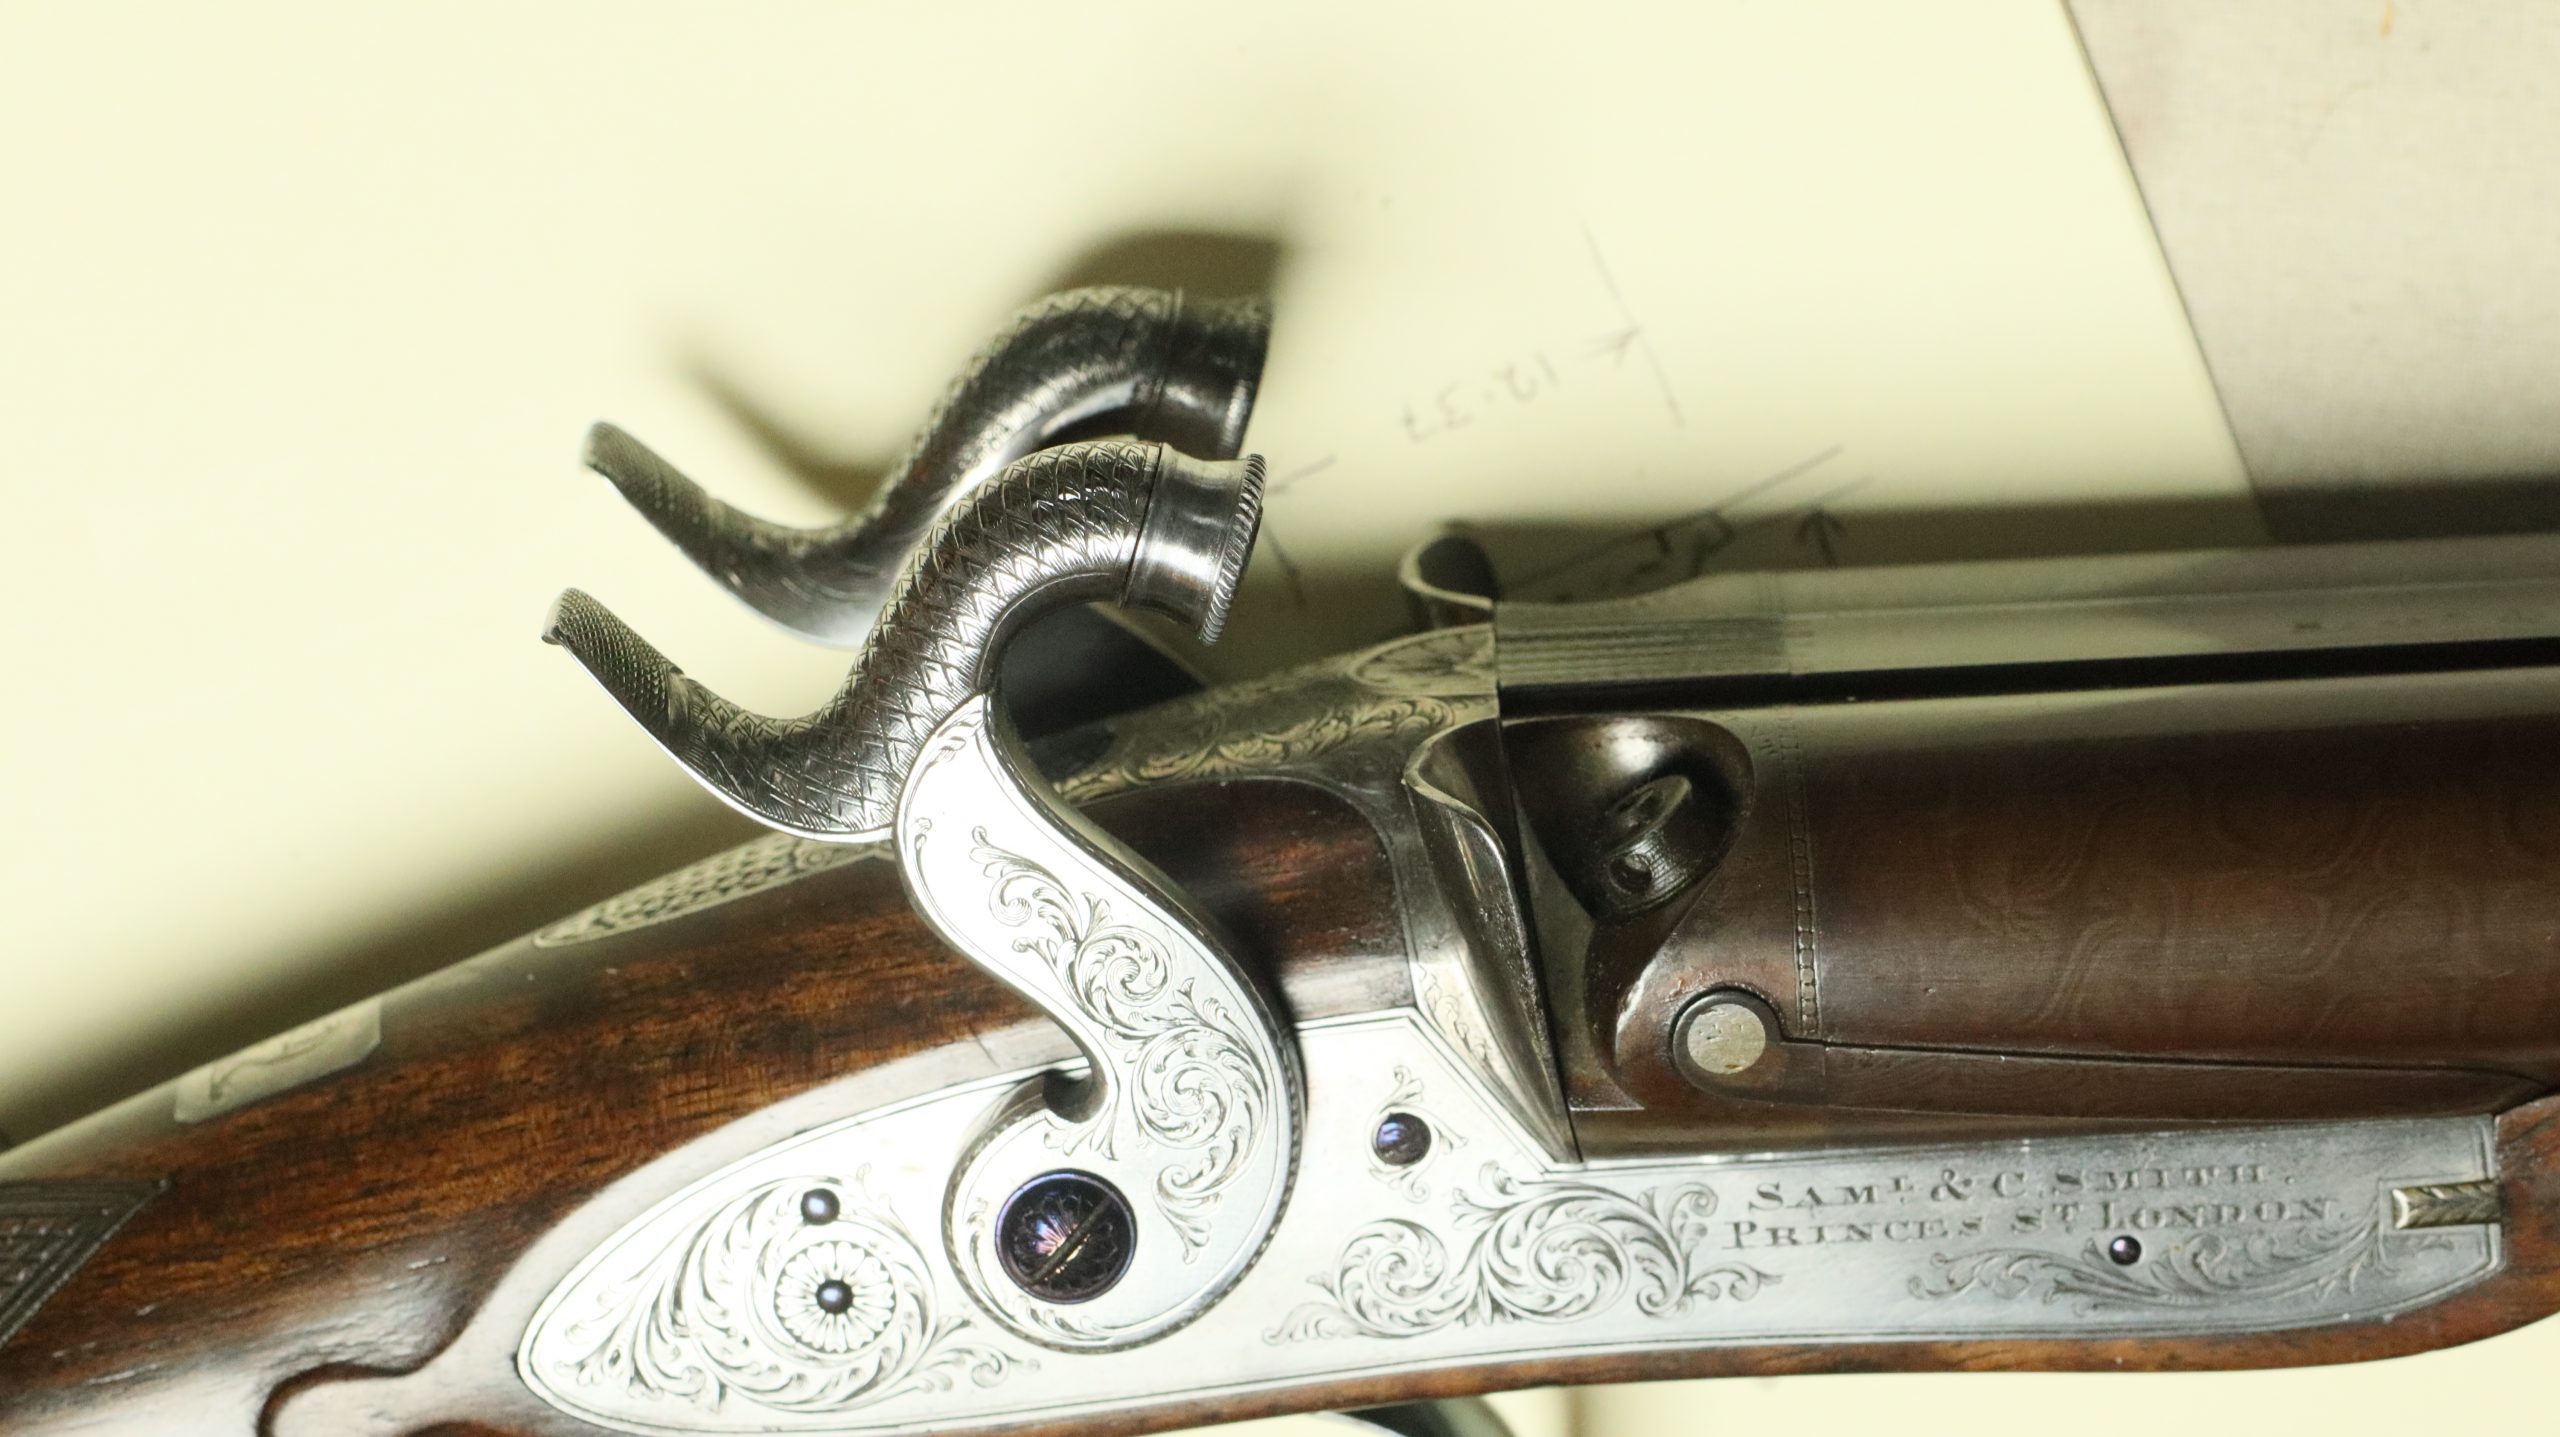 The nose on the Rt cock is my prototype nose for use with conventional caps & nipples.