Diary
25th March I finished the Sea Service lock engraving using the air graver to get a bit deeper than I usually go with a push engraver. The lock plate is quite pitted and worn but some of the old engraving could still be seen so I was somewhat constrained in what I could do, but I found a photo on the web (see below) that resembles what I could make out on the lockplate, even down to some assymetry. When I had finished engraving it all looked a bit raw, so I gave it a quick go over with my fine fibre wheel to round off the edges of the cuts a little. That did the trick, but left the lock looking a bit patchy and bright, so I gently heated it up with a propane torch until it turned grey, which looked much more comfortable – it can now go back to its owner for putting in the pistol. I can now think about Fred’s gun parts, which I haven’t yet unpacked. It was a lovely day here- probably all we’ll get for a summer- so I wandered around the garden and realised that I’d intended to replace the last of the old windows last summer, but couldn’t as our superb crop of tomatos was growing in front of it. So I really need to replace it before this year’s plants go in shortly. I made the frame about 20 years ago, and got the iron casement made, so I just have to make up the leaded light panels and fix the glazing bars and my security bars and put it all together, I haven’t done any leaded light making for years, but once I relearn how to cut old glass reliably, I’ll be away. You can’t really use modern float glass in leaded windows as it looks all wrong – the options are to buy modern hand made glass at a high cost, or to reuse salvaged window glass from before the invention of float glass (?mid 20th century) by Pilkinsons. I still have quite a collection left over from my major window building era, although quite a lot of it is almost too flat to use. Penny had her hip replaced a week ago and is going round on crutches – makes me think of Long John Silver whenever I hear her moving around.
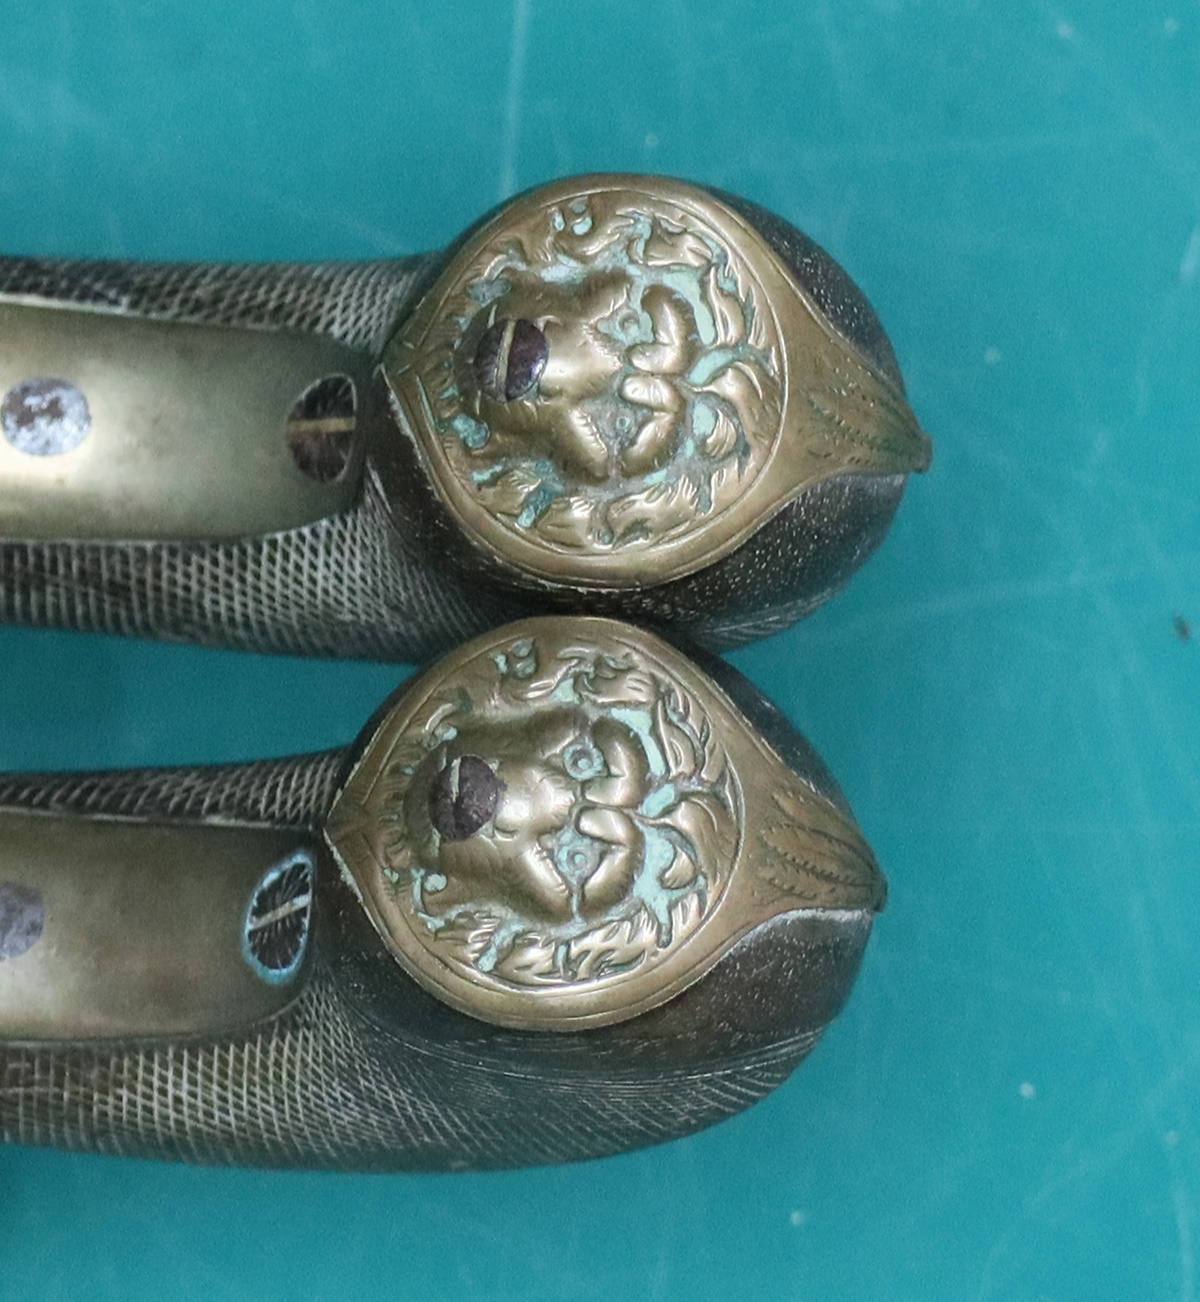
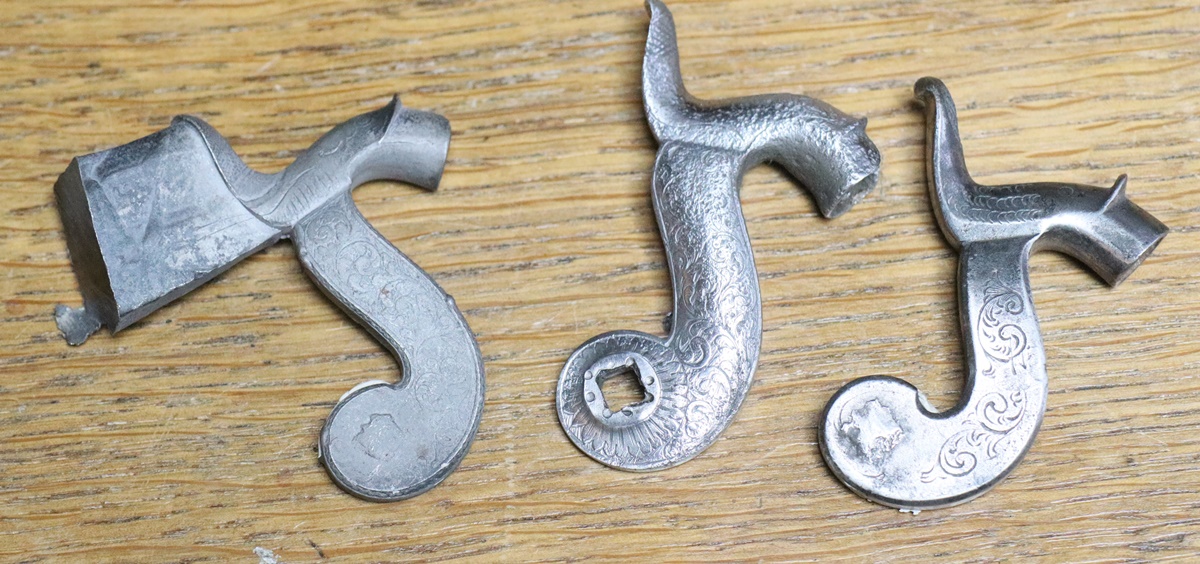
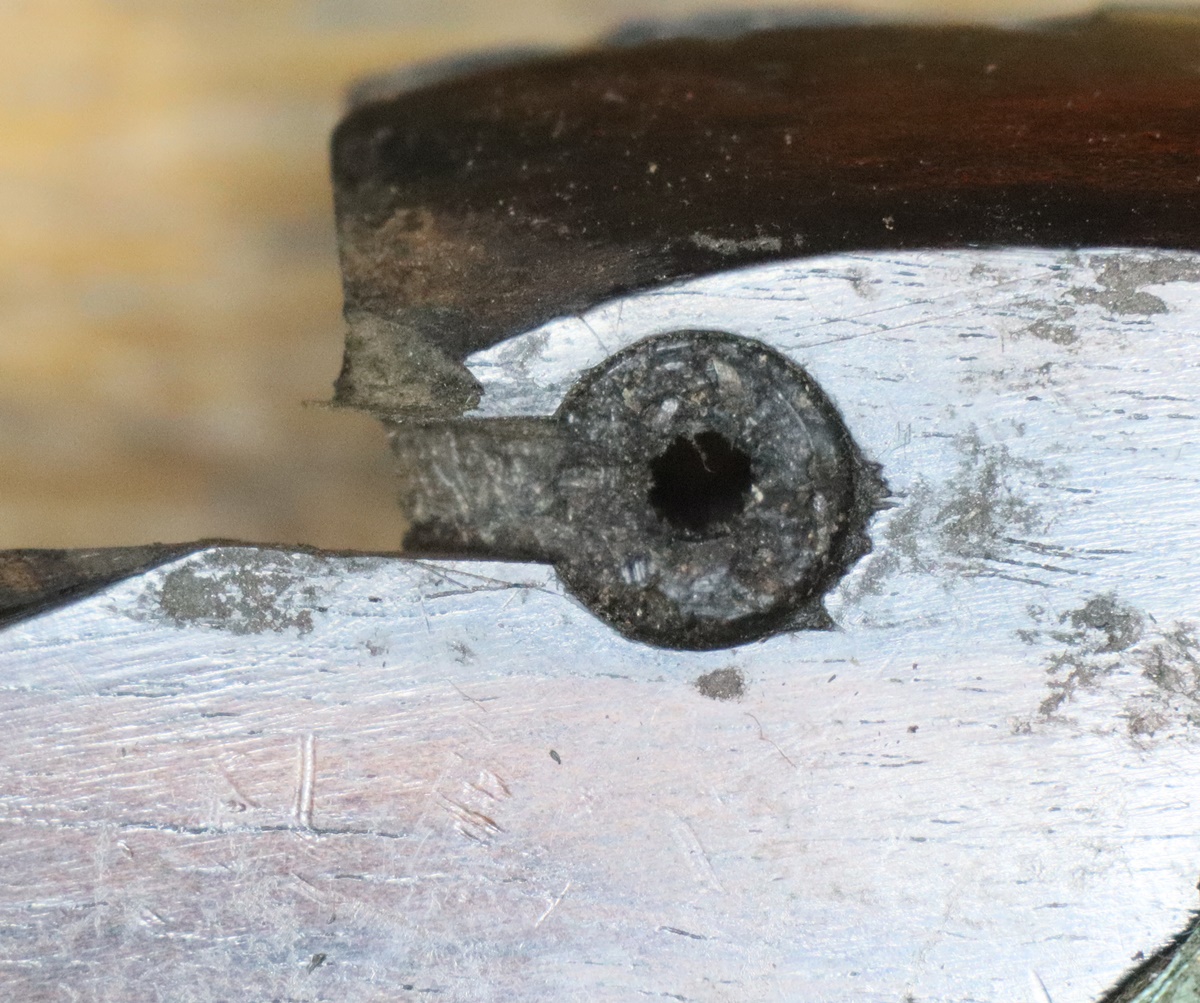
This example matches most closely the vestigges of the original engraving

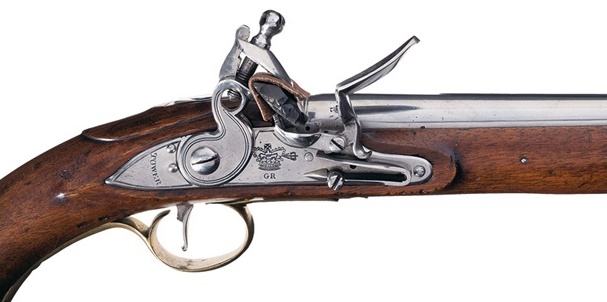
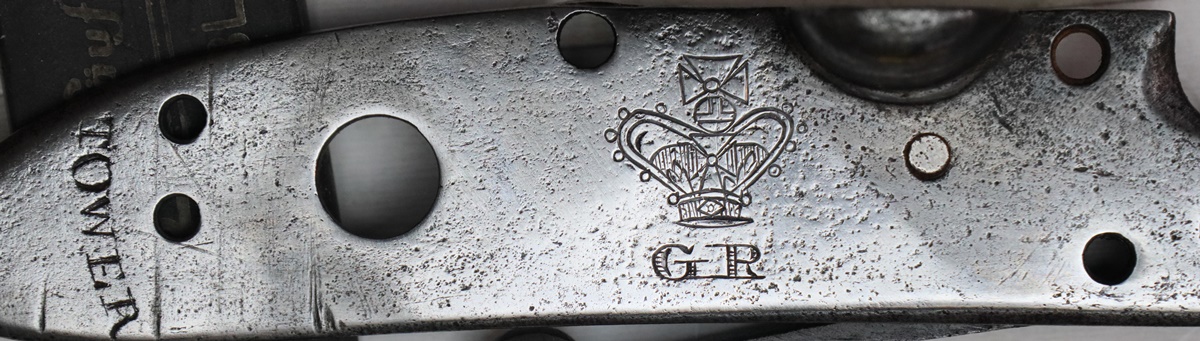
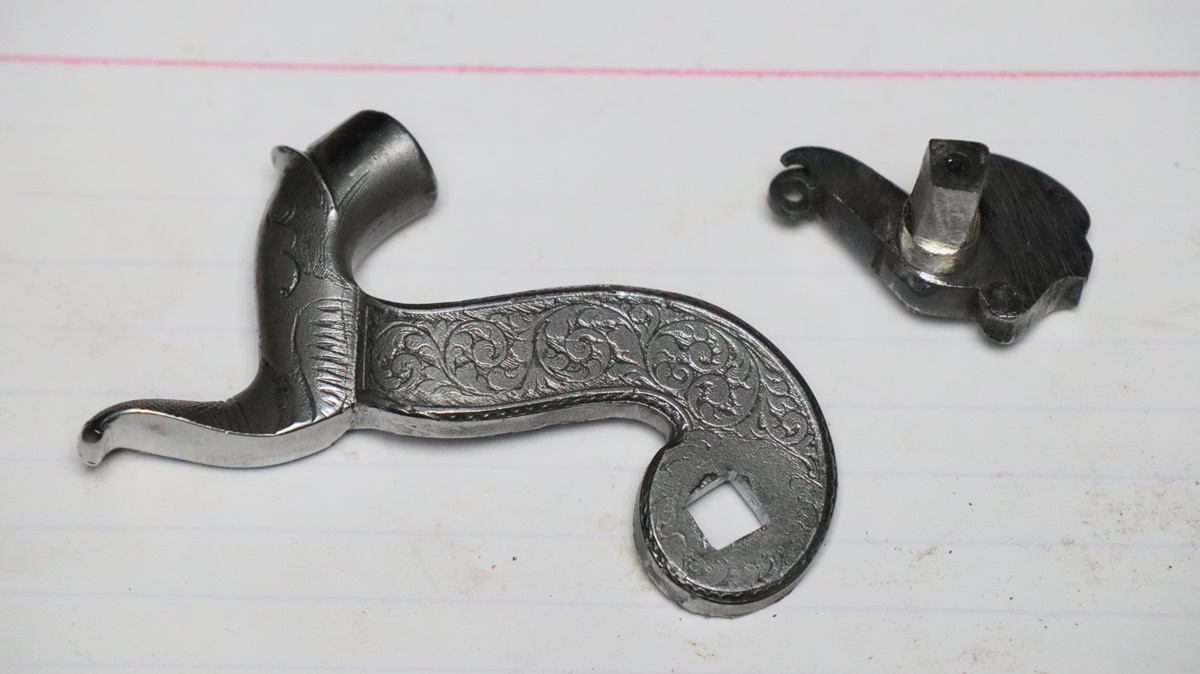
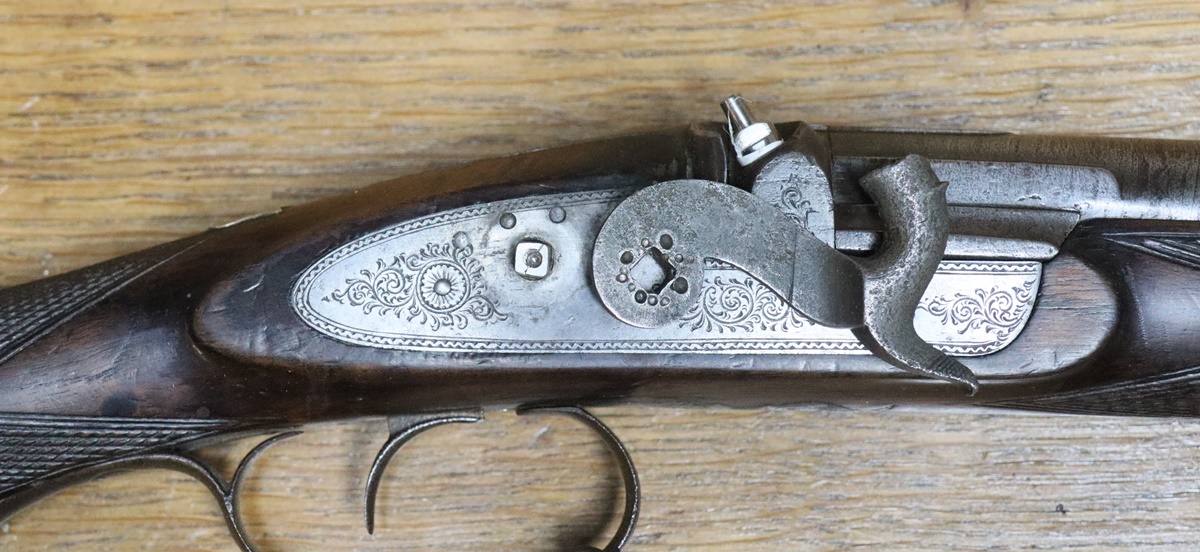
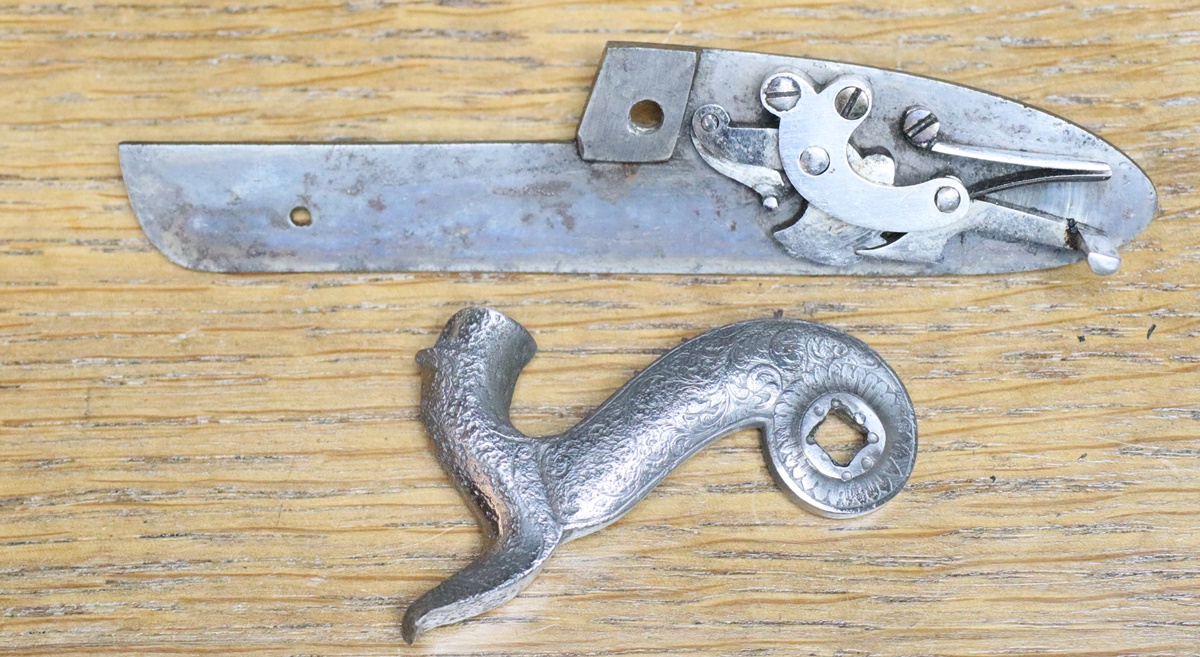
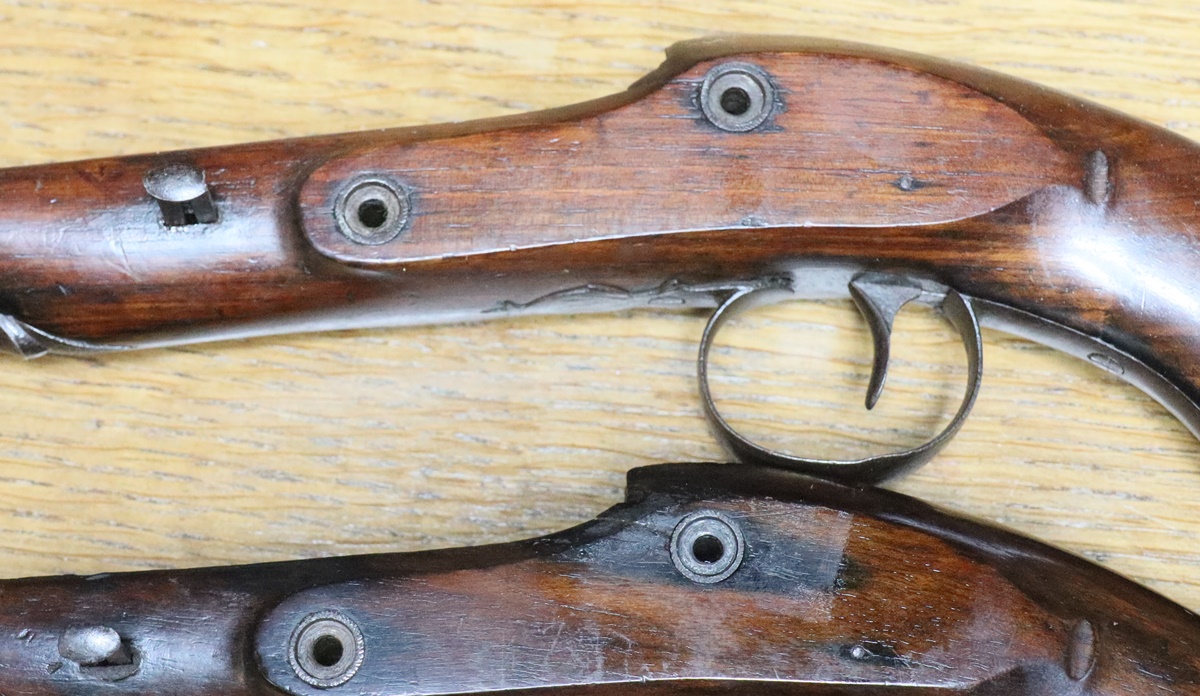
24th March – A bit busy the last week or so with Penny’s hip, but I got the bedroom finished, even as far as putting up a cafe curtain on a nice brass rod, and putting in some furniture – just waiting for a guest to occupy it! I have now got time for a few gun jobs – I had a pair of very nice pistols that the owner wanted me to take the furniture off so he could sort out the finish on the wood. The screws all came out perfectly without a sign of rust except for on small spot on one screw. The ‘nails’ were quite stiff to unscrew, all the way, as the grease, or whatever they had been put in with had gone quite stiff over the years (about 180) since they were made. Being high class pistols the holes for the nails were a pretty exact fit. In the end I didn’t take out the trigger plate and its finial as it didn’t come out easily, there was no obvious way to pull it out straight, and I was afraid that the very fine wood between the bits of the finial might break off if there was any adhesion or rusting on the edges. It will hve to be masked in situu. Anyway they are now done and delivered. The next job was re-engraving an old very worn sea service pistol lock of about 1777 or so – I hadn’t touched a graver for about 3 months, and as well as this job I have all the funiture for one of Fred’s creations waiting to engrave, so time for a bit of concentrated practice. The Sea Service lock needed to be engraved quite deep, and Fred is concerned that his lock and false breech are deep so that they will still show up if fairly brightly colour case hardened, so I had a few practices, and got out the Gravermax air graver – I can’t get quite as much control over it as I can with push engraving, but I did get good enough to do the Sea Service lock, which is not meant to be fine engraving – the originals were done for twopence each – a few years later Palmer was charging that per letter! So the Service engraving wasn’t particularly fine! Anyway I did a few practive engravings on 2″ x 2″ test plates that I bought some time ago, and then did the lock – there was a trace of bits of the original engraving, particularly the little circles ( which I think on the originals were put on with a punch as they are usually a bit eratic ) that I had to keep as they were quite deep, which gave a somewhat different shape from my templates, although a search round the web images did show one or two locks with similar crowns. I take it that the crown is a representation of what is known as the Imperial State Crown of George 1st made in 1714. It had more pronounced arches than later crowns, as on this lock. I realised I still need to add the broad arrow. Now I’ll get on with designing Fred’s gun engraving. I have to start work on the plans for the STEM club at school next term – the plan is for the children to build a safe and program a BBC microbit computer to control the opening of the safe, so that it can be coded. I decided that it would be good if I could make bits for them to use in building their safes (in groups of 3 children) using a 3D printer. My sons had a couple of 3D printers over the years, and make a few parts for me, but as Giles is now in Canada, and Tom doesn’t have a one, I thought it was time I joined the 21st century and got up to speed! I do have this idea that it is now possible to take multiple photos all round an object, and get them made into a 3D representation of the object, which in theory at least, you could import into a 3D printer and print in a plastic that can be used for lost wax casting, enabling you to make castings of the original parts. Along the way you could scale the model to compensate for shrinkage in the casting process – for the time being this will only exist as a dream as far as I am involved, although I’m sure lots of people are doing it. Anyway I have a 3D printer on order, and am working on the software and making the part designs. In case that doesn’t keep me busy, I’ve got a £2000 pile of the special double glazing glass sitting there waiting for me to make secondary glazing frames in oak, which is in the nice dry attic above the kitchen.

Bottom one filled in with a Sharpie to check details.
Lock engraved following the remnants of the original engraving, particularly the circles (distinct) and some other clues.
I’ve buffed over the finished engraving to remove the sharp edges – they didn’t look right.
14th March I got the night store heater wired in, and waited till the Off Peak period to test it – and discovered that instead of the 11 hour off peak tarrif we are paying for, we are only getting the standard 7 hour off peak – I guess it will be next to impossible to contact EON! Another waste of time and effort! Ayway I think the bedroom just needs a bit of topcoat painting to finish, then put in some furniture, mostly from Giles’s flat. Then a day clearing up the mess and piles of tools etc that resulted from the work, and I should be free to think about some gun stuff. Penny goes into hospital on Friday to have her other hip replaced, so some of my time will be spent being a nursemaid for a couple of weeks or so………………..
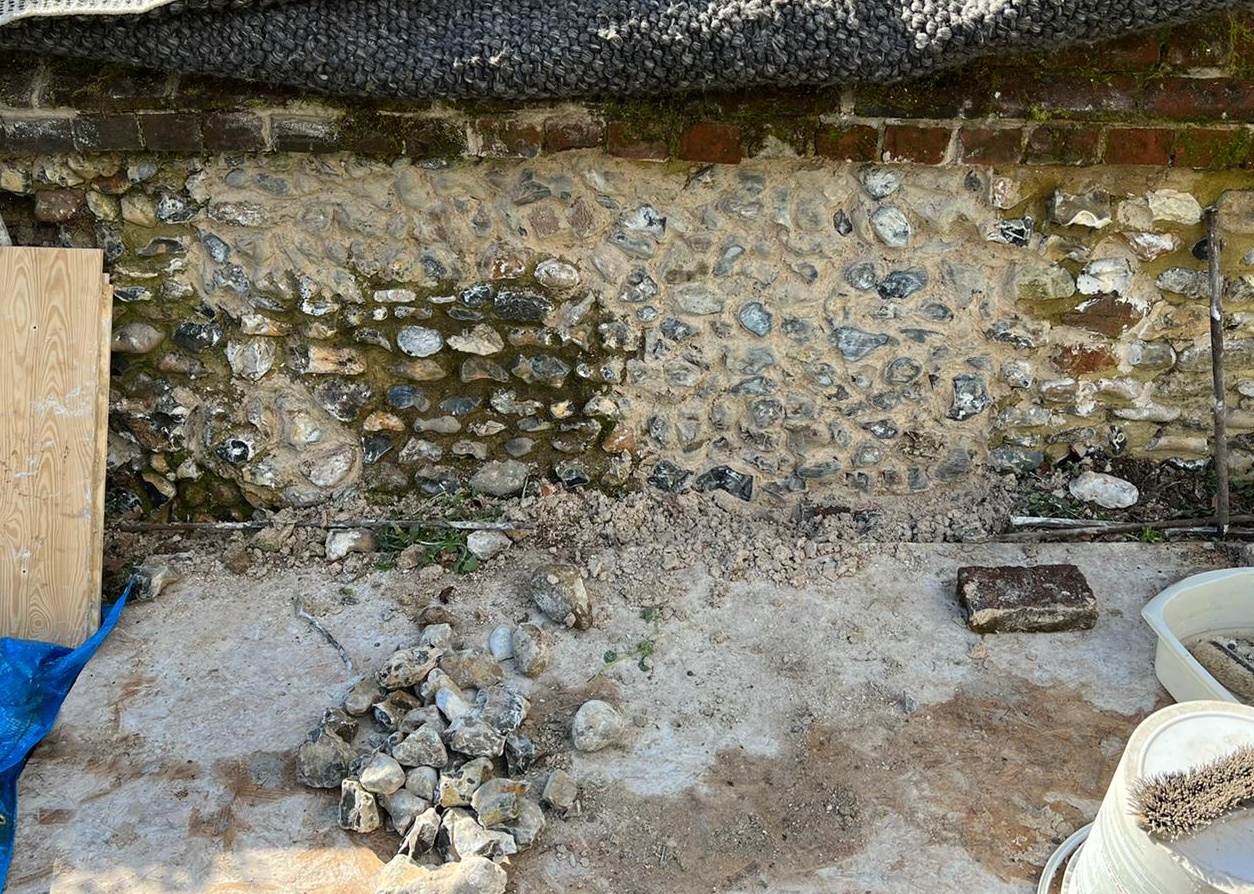
12th March I’ve been desperately trying to finish the bedroom so I can get on with a few gun related jobs,but the finishing stages always take much longer than you think. Basically I now just have some painting to finish, and the night store heater to install and connect to the off peak electricity and I had a few domestic maintenence chores to sort that took a day or so – The Aga was out because I had carelessly let us run out of oil, so I took the opportunity to clean out the burner, and couldn’t get it to relight after the oil delivery – not sure what was the problem but eventually it gave up the fight and lit. We also had a problem with the thermostat on our heatstore water cylinder – it mixes very hot water from a heat exchange coil with cold water to regulate the hot water suppl and had failed, giving only cold water or scalding water. I couldn’t get a direct replacement – on 3 months delivery – so got a near replacement that didn’t quite fit, so I had to fiddle about to get it to fit in the too small space left by the old one – quite a lot of water escaped before I finally conquered it – now OK, I hope – I always wrap the compression joints in tissue and go back later to see if the tissue is damp – doesn’t work very well on hot water pipes but OK on cold. I’m off tomorrow to do a bit more repair work on Tom’s flint wall – he has managed to take out a whole lot of dodgy wall and now has two big holes to fill. I just remembered that I’m waiting for some No 7 shot from Clay and Game – better ring on Monday and check when I will get it.
7th March Spent Sunday helping Tom repair an old flint wall – something I learnt after buying this house – I had a short structural survey which highlighted the high cost of repairs to the flint walls where the wallplate had moved outward and damaged the top foot or so of the flint facing – it actually turned out to be one of the easiest jobs on the house – replacing most of the windows with traditional oak and iron leaded windows took much longer, but at least I learnt how to make leaded windows and oak frames, although I got a local blacksmith to make the iron casements as I don’t have a forge. Anyway we filled in a large hole with lime mortar and flints – you can only build about 4 or 5 inches before the weight of the upper layers causes the whole lot to bulge out, so you have to put boards across the front as you build up. The mortar squeezes out between the flints, and anyway you have to be fairly generous to get a good bond round the edges of the patch, so when you take the boards away later it looks a horrible mess – the aim is to catch it when it is about the consistency of cheese (cheddar , not camembert) and then cut away the surplus with a fine detail trowel and when its a bit drier to brush vigorously to clean any residue off the faces of the flints and expose the coarse sand grains in the mortar. A lot of the wall had been repaired with hard cement, which is not a good idea, as when it gets too much moisture behind it, it comes off as one great big chunk and probably brings most of the wall with it – its not possible to remove it and replace it with lime mortar as the same thing would happen. Apart from that I am slowly getting nearer to finishing the bedroom – the lights and sockets are in now, so I just need to connect up the power and insulate the loft above and put another coat of wax on the floor and beam…. I really need to get it done as I am beginning to build up a queue of gun jobs – apart from the Sea Service pistol engraving, and stripping the metalwork from a pair of target pistols, I had a call from Fred in the US saying he had completed another two guns and needed them engraved – I have done a couple for him before, they are on the Blog somewhere! He gently raised the issue of the depth of my cutting – he sends his locks and furniture to a chap in the states who does pretty spectacular colour case hardening, with the emphasis on colour, and the effect of all the colour is to hide the engraving. I do know that I tend to engrave light – whether its because I’m not as strong in the wrist as a full time professional I don’t know, but I will try to see if I can go deeper……
Just waiting for the final brushing off. The sections of wall laid in horizontal courses are not traditional and use cement.
3rd February – The MOT expired on my car – all sorted now without any problems. My mechanic tells me that it is recommended that you change the tyres on a vehicle after 5 years irrespective of mileage! Mine have done 13 years and are still OK – Its a hefty price to replace them so I think they will do for another year! I got a worn lock for a sea service lock to recut the Crown, GR and etc. The lock is just soft enough to cut, I think, but whether I can cut as deep as the original I don’t know – I may have to resort to the air graver. I’ll put some photos on later when I start. The engravers who did the original locks got paid about 2p per lock – they must have banged them out in minutes! Making good progress with the bedroom – I put the first coat of wax on – I used a jar of home made wax polish to begin with and didn’t realise that it was intended for polishing guns and had linseed oil in it, which darkened the wood a bit more than I wanted – anyway I made some more polish with just beeswax and turpentine that ia a much paler finish, and managed to lighten the wrong finish a bit with white spirit. Once the first coat was on and more or less hardened I put on the skirting boards – mostly screwed on where there was something behind to screw onto, otherwise a modern building adhesive that grabs more or les instantly so no need to hold it. The elm floorboards look amazing – I didn’t realise you could still get elm – one timber merchant laughed at me when I asked if he had any – so I was really pleased to get these lovely boards – just look at the amazing grain pattern in the photo.

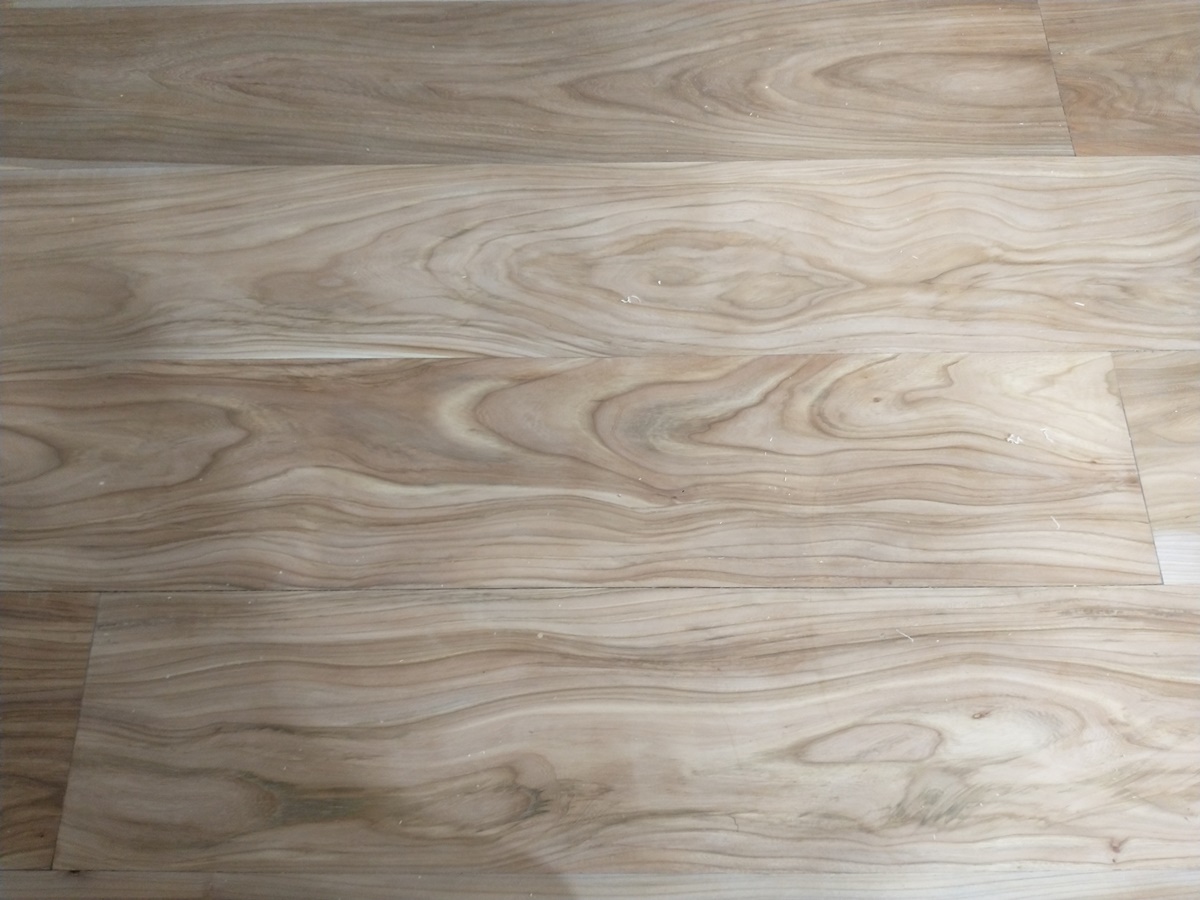
These Elm boards are 300mm wide – just look at the amazing figure in the grain!
28th February – Annoyingly I got a letter at the end of last week telling me that my direct debit wouldn’t take my Road Fund payment due 28th as my vehicle needed an MOT test, having expired on the 25th. Unfortunately the earliest I could get a test was next Thursday, so the car will sit in the drive til then – I just hope I don’t suddenly need something from Screwfix! Also means I can’t make a shooting session on the 3rd. Shame. Bedroom going OK – made the Oak shelves ready to finish and fit, and the skirting boards ditto. The elm floor looks beutiful in its natural pale state, so I’ve been looking to see what finish I can apply that doesn’t make it brighter and darker. Choices are varnish of one sort or another, Oil finish, Paste wax or liquid wax. I did phone a flooring shop, who said that they all gave about the same result, which looks the same as if you put water on the surface, unless you use a product with white pigment which helps retain the natural finish. I’m not too keen on that idea, so I tried a few of the products I had to hand on sanded scraps of elm floorboard. The Osma Polyx oil is definately a bit brighter and darker than commercial beeswax polish, which looks like a good finish, so I’ll go with that. I usually make up my own with grated beeswax and pure turpentine disolved in a bain marie (jar in a water bath bath) and I have a large supply of beeswax , so just need a bit more turpentine. I discovered a place on the floor where the boards creak – fortunately not where the bed will go, but the problem is that I didn’t take a photo of where the joists in that section run, and once laid there is little to tell me where I can put in screws to hold them tight – I don’t really want to perforate the floor with screwholes that miss the joists even though I am plugging the holes with elm pellets. Bit more on the sort of autobiography – its now 1/4 of the maximum size allowed for a Cambridge thesis!
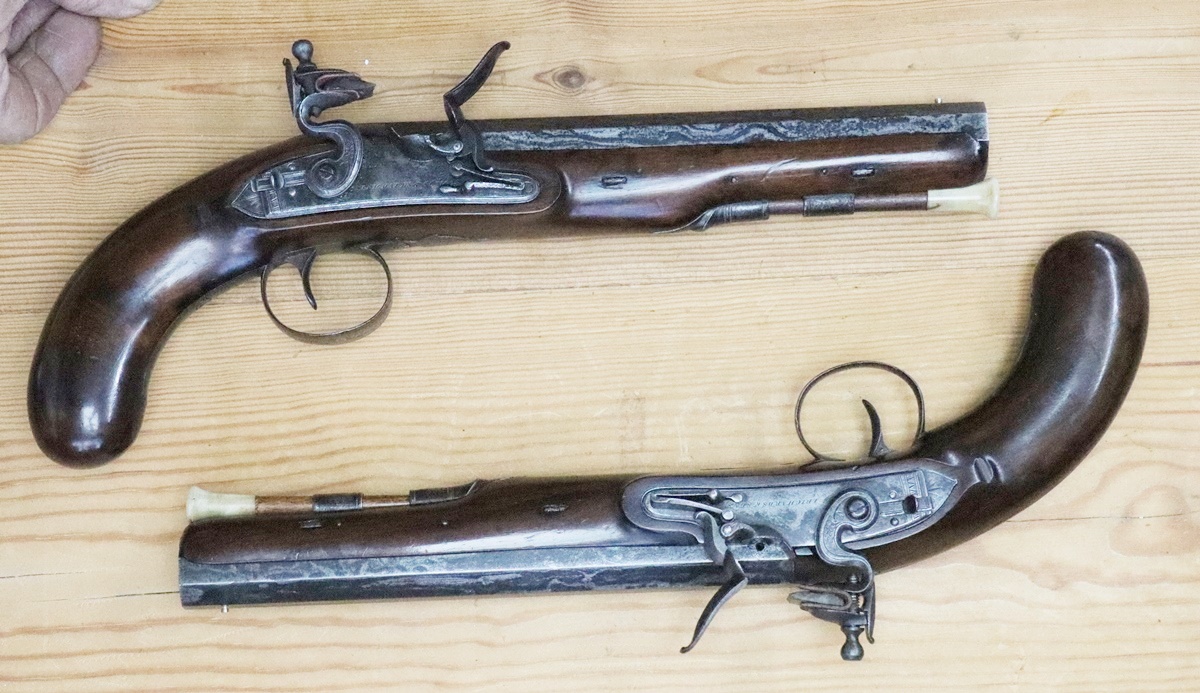
27th February A bit more work to do on the bedroom! The nearer you get to finishing, the slower the jobs seem to proceed – I’d guess 2 weeks, but I bet its nearer 4! I got a call from an old client who specialises in what are called in the trade ‘ investment quality’ antique pistols. He has a pair of pistols and wants the locks and furniture removed so he can refinish the woodwork, and doesn’t trust himself with a screwdriver so asked me if I would strip the metalwork from them for him – I am always honoured to be trusted with his stuff, and it always carries a significant stress – to the extent that I have to ‘walk round’ the job for a week or two until the mood takes me and I dive in! I’ve written about techniques for removing awkward screws several times on the site, but I’m hoping that as these pistols will be in immaculate condition, there won’t be any problems – just need to have perfect turnscrews and hold the pistols firmly without marking them.
24th February – Floor is now all down and fixed! I am just in the process of cutting the skirting boards to fit – the floor boards all fit together but there are still slopes and gentle curves in the floor that need the skirting boards carefully scribed in and cut. Once I’ve cut them I’ll put them aside while I sand and seal the floor, then fit them I’m beginning to get a sense that the job might actually get finished – it will have been 5 months by the end of Feb, and there is still at least a couple of weeks of work to do – fitting the electrical fittings and putting in the loft insualtion and a bit of painting, plus all the jobs I’ve forgotten. I’m looking forward to a bit of gun work when its finished, before I embark on building all the secondary double glazing oak frames for the pile of super insulated glass that sits in the drawing room. At last we are able to contemplate starting the STEM club at the school, so Dave and I can get a plan together for after the Easter holiday – we can be a bit more focussed and technical for the next session as it will be limited to children from years 5 and 6 – 9/10/11years old (ish). Might do something like we did for the Pop Up Workshop last summer.
21st February -Having discovered that the floor board saw blade wasn’t parallel to the sides of the sole plate, so the guide and the saw blade wern’t aligned , I took it back and changed it for a cordless circular saw, which does the job properly as well as allowing me to cut slanting overlaps at the joints. I have to say it was all very easy at Screwfix even though I bought the saw in October and don’t have the receipt – I don’t even have to give my name when I go to pick things up now, and my account lists all my past purchases if I want to return anything. I’ve now sorted all the boards for the floor and by good fortune I was able to do it all with good boards, and am left with three or four boards that are a bit too ‘characterful’ to be used – not sure what I’ll do with them – maybe make a knotty door for Tom. Now I need to put down the vermiculate insulation and away we go!
20th February – I got the joists down and started to sort out the floorboards – I think I have enough if I’m careful, but the difficulty is compounded by the different widths, which means that there is a limited choice to make up each width – the boards are mostly 2.4m long and the room is 4.2m wide but the joints have to land on a joist – good brain exercise. I ran into a problem when laying the first half, in that the saw I bought which is specifically designed for cutting floorboards didn’t seem to cut neatly at right angles, so I had a bit of a job neatly butting the boards. I spent some time today trying to find out what was going wrong, thinking that it was my technique, but I discovered that the blade of the saw is not parallel to the edges of it’s base plate, so it you try to cut along a guide line it cuts a slightly diverging path – its going back to Screwfix tomorrow!
18th February – The storm came through and cut off the power at 8:30 this morning – I got out the very cheap generator I bought about 10 years ago and have never used, and it just about managed to power enough work lights in the bedroom for me to work, but it struggles with power tools – fortunately I’d prepared all the extra joists so they only needed fixing in place – a slow job as they each have to be levelled at both ends, and there is a slight bow downwards in the middle, about 15mm. At the peak wind after lunch it detached my tarpaulin roof alongside the shed and pulled off half a dozen pantiles and broke some. Anyway the power did eventually come back on at around 5:30 pm so the generator saved me loosing a day’s work.
17th February – Good day’s work on the floor considering I had to go into Cambridge for a long appointment with my friendly dentist. We’re supposed to go to a funeral in Epping in a forest tomorrow but with 70 mile an hour winds forecast to peak at the time we have to be there we are pondering…… You can see photos of the Anglian Muzzle Loaders shoot last Saturday on www.matthewnunn.co.uk under clay shoots – dozens of photos, the has put one of my Manton firing on his display panel. I look a bit wild as I forgot my shooting cap and it was windy – I haven’t faced up to visiting the barber for a while!
16th February Got the floor up in the other half of the room and vacuumed up the mess – not as much as the first half = I think this floor hasn’t been messed about with since around 1700 . The joists and floorboards are deeply embedded in the flint walls, which must have been built over the timber framed shell of the building, and there are only nail holes in the joists from these old boards – its a shame that the old boards are too bad to re-use. I found that the space between a couple of pairs of joists was filled with hop petals as an insulation, and I think because they were supposed to keep insects at bay. I’ve bagged up all the petals, along with quite a lot of dust, and will put them back before I lay the new floor. I seem to remember that when the National Trust did a restoration at Wimpole Hall they found some similar old insulation, probably chaff, and carefully seived it to remove the dust – I shall claim the dust is historically important and put it back. Building conservation is a funny business – I did an evening course run by three Local Authority conservation officers for a couple of years, so I do understand the issues! I saw advice somewhere that one should check one’s blood pressure every few years, so I got out my meter and changed the batteries. I managed to get 3 completely different readings one after the other – the first was 209/115 – almost an ambulance job, but the other readings were a bit more sensible, but still higher than I expected so I put it on one side and tried again the next day – after a few more strange readings I realised I hadn’t got it on my wrist quite properly so I think it was having to compress my tendons as well as the blood vessel – anyway now seems about what I would expect at my age – around 123/65 so I’ll probably live to finish the floor. I’m hoping it will all be finished by the end of February – I’d like to get on with something else! Bit more on the ‘sort of autobiography’ for those not totally bored by it! Claire just sent me a fantastic photo of my Manton firing – I’ll ask the photographer for permission to put it on here.
 The floor does slope, but not that much! Quite bent and rough 17 century (?) joists
14th February – Happy Valentines Day ! I forgot til just now. The half of the floor I am working on is now more or less all finally down. I got a pair of very cheap (£6 each) strap clamps from Screwfix that let me pull the boards together, and I got some nifty little screws (Tongue Tite) that go in at an angle through the tongue of the T & G boards and hold the edge down and in. All very neat _ I just needed to make sure the ends of the boards mated up, and that the edges of the boards were reasonably straight – I had to plane a sliver off a couple. I’ve just got a few boards to sort and lay in the passage and then I’ll start to remove the old floor from the other half of the room.
12 th February Club shoot today – windy and cold – not an ideal day for shooting flintlock as the wind made it difficult to keep the fine priming powder in the pan – I use Swiss OB, which is horrendously expensive but you only need a small amount. I didn’t hit many clays. but I was primarily concerned with getting the gun going reliably – I was the only person shooting flint, but had the advice of Bev, who knows most of the tricks, having been shooting flint for years. Unlike percussion, which is pretty reliable given a reasonable gun, flinters can be a bit fussy as the ignition system is not ‘cast iron’. You have to get the main powder charge to come up close behind the touch hole – possibly by tapping the barrel or bumping the butt on the ground in some cases, or by putting a wad down the barrel quickly to act as a pump. Then you need to get the right amount of powder, preferably the right fine priming powder, in the right place in the pan – not covering the touch hole, with a flint approximately the right length and with a good edge for making sparks. I had a couple of misfires of the second barrel (left) after shooting at overhead clays with the first barrel that Bev suggested might be caused by left frizzen lifting slightly on recoil and allowing some powder to escape. I had been being pretty mean with the priming powder, and the problem went away when I was a bit more generous. I couldn’t decide whether I should load the barrels with the frizzens open or closed – open you can’t tell if any of the main charge has been ‘pumped through’ as it will fall away. With the frizzens close my left frizzen has a shutter with a very small hole that is designed to obstruct the touch hole, so that doesn’t show any main charge. The right frizzen has lost its little shutter, and does show a bit of powder in the pan after loading. So as you can see, that is a lot of things to go wrong! I did have one shot where the left barrel fired itself immediately the right barrel went off – I was shooting at a tricky clay I had missed several times already, but this time I hit it, although I have no idea which of the shots did the damage! I assume that the left sear doesn’t always seat in the bent – its only happened twice in 100 or so shots, and I think (maybe) that if I am conscious when I cock that side I can move the cack past the ‘drop in point’ and make sure its firmly engaged. I’ll try to do a bit more on the sort of autobiograpy post……
11th February Going to the Anglia Muzzle Loaders club shoot tomorrow – I haven’t been for quite a while so I thought I’d see how I got on with the flintlock, and avoiding Covid! I have been shooting a number of different guns lately – percussion, flint and .410 and 20 bore, all of which are quite light, particularly the old Webley bolt action single, which waves about in the breeze when trying to shoot, but the funny thing is that I get about the same success rate with all of them, so I thought I’d get out my Berretta o/u 12 bore for the afternoon and see what happened if I had a moderately heavy gun…. Will report back. I took up all the boards as in the photo to tidy up the under structure. I’ve been wondering for some time about the problems of moisture and shrinkage and warping of the boards. I reckon the floor will be impervious to vapour as the boards are tongued and grooved, so if laid directly above the ceiling the underside will stabilise at the relative humidity of the workshop, which has a brick floor directly on the earth and the upper surface will be at a lower humidity as it is well insulated and may well be heated if its in use. Recipe for the boards to curl up at the edges. So I’m putting a polythene sheet under the boards so they can stabilise at the moisture content of the room and hopefully over time will stay flat. I have just started fixing the first boards down – I’m using flooring screws that are meant to go into the tongues at an angle of 30 degrees to the horizontal and hold the boards down,, but the first boards need screwing down on the groove side. I found a 6mm plug cutter in my drill box, and so I am quite happy to put the small flooring screws in from the top and plug the holes before sanding it all down – I don’t think they will show, but I’ll try to keep them regular. The flooring screws through the tongues are suposed to be all that is necessary, but whether that works for 300 mm wide boards I don’t know.
10th February – Busy sorting the flooring. My beautiful Elm 300mm wide boards are proving quite a challenge to sort out and lay – they are all different lengths, although mostly about 8 ft , a few are somewhat longer, and a few are mixed shorter lengths. About half are pretty clear of faults, the rest vary from small knots, with a lot having voids or knots going through the boards that will need filling with epoxy resin. Some have pretty big knots and defects and I think it was a bit of a cheek including them in the order. Adding to the complication is the fact that the widths vary by more than can be accomodated in the normal gaps between boards – between 300 and 304 mm, so not only do I have to try to match lengths to minimise waste, but I’m restricted to using boards that are within about 1 to 1.5 mm in width for each span. I’ve done about 1/3rd of the floor with very little waste as I started with lots of boards to choose from. I’ve managed to avoid short lengths of waste so far by putting in trimmers between joists if I need to join boards where there isn’t a joist – I have some spare boards, but there are quite a few I’d rather not use if possible – The bit of the floor I’ve done so far is the most visible bit – the other main area will be where a large double bed goes so I can get away with less good boards there – we shall see…………………. I’m putting fibre insulation under the boards as the workshop below is not usually heated – made from recycled plastic bottles and much nicer to handle than glass or mineral wool, I’ve used up my store of it and I’m not sure if it is still available readily locally. Oh, and I got my letter from the tax man, instead of the £160 I thought I was owed, it turned out to be 60p, so for the 3 hours of doing the return its 20p per hour instead of £53 – shame.
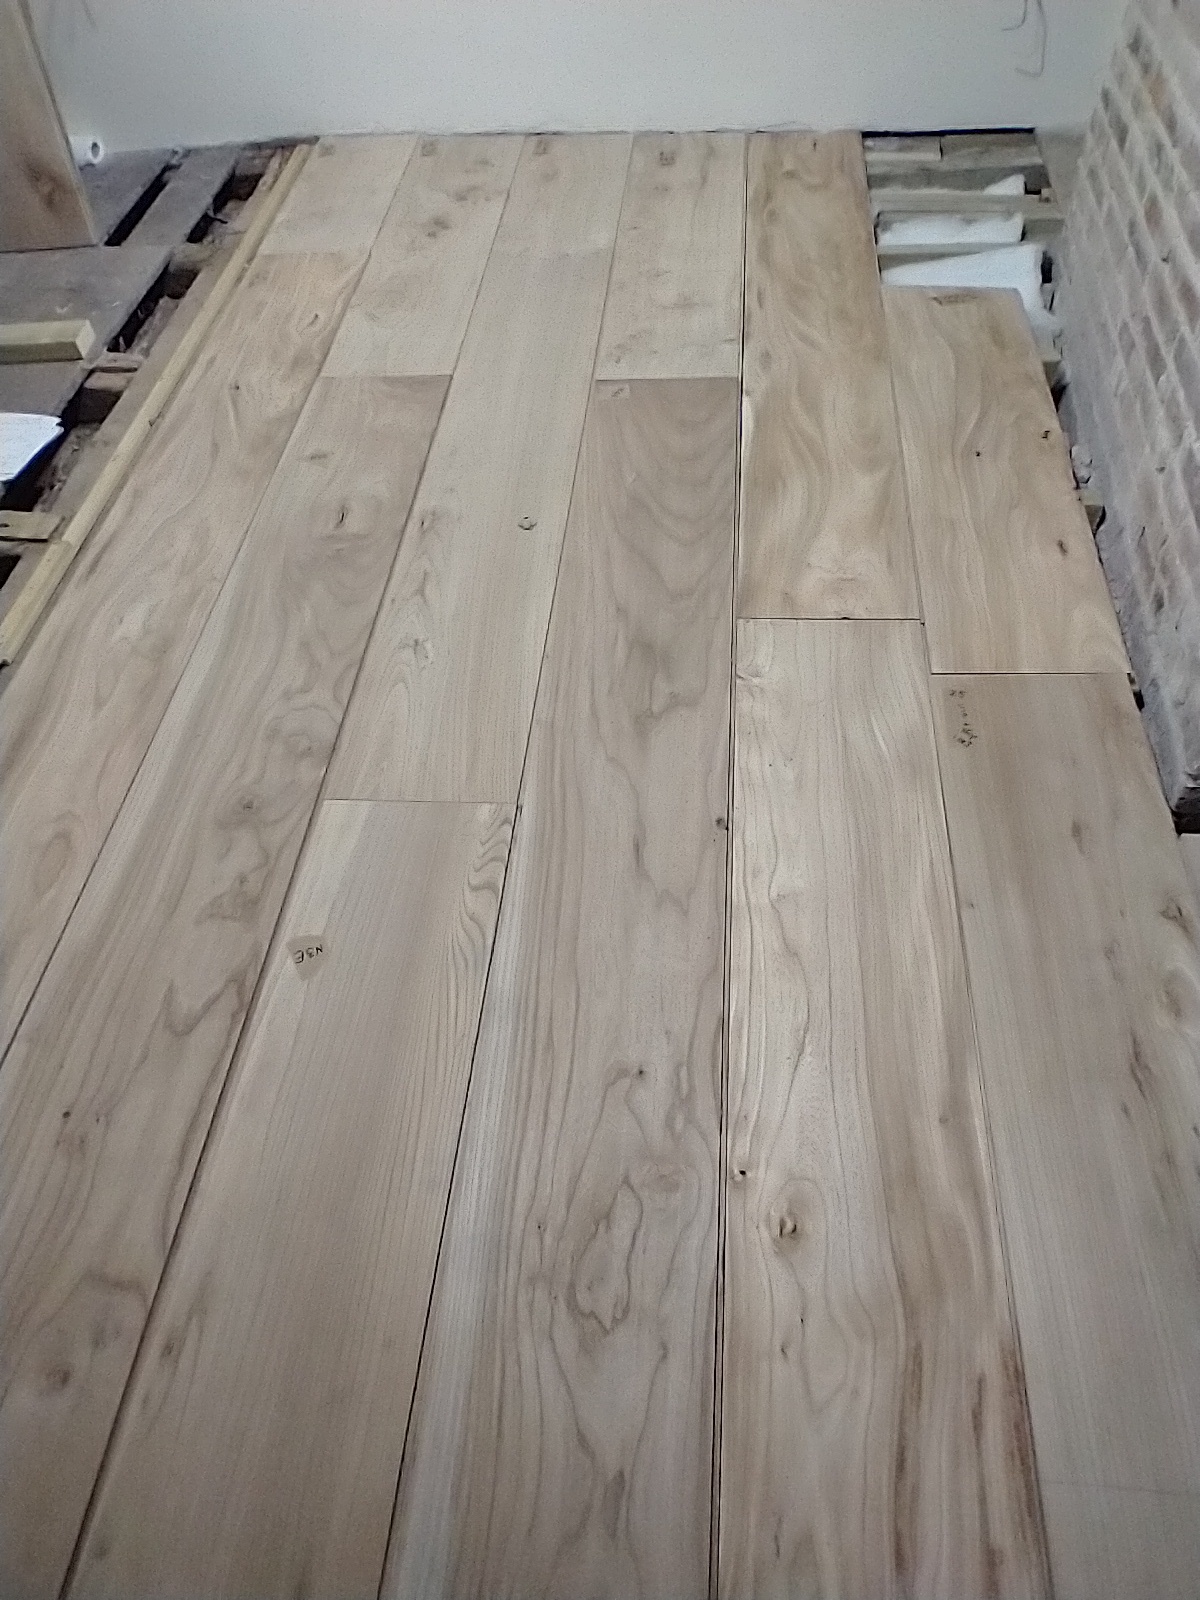
Boards cut and trial positioning – not yet tight and fixed. ( the boards on the right side are not part of the scheme)
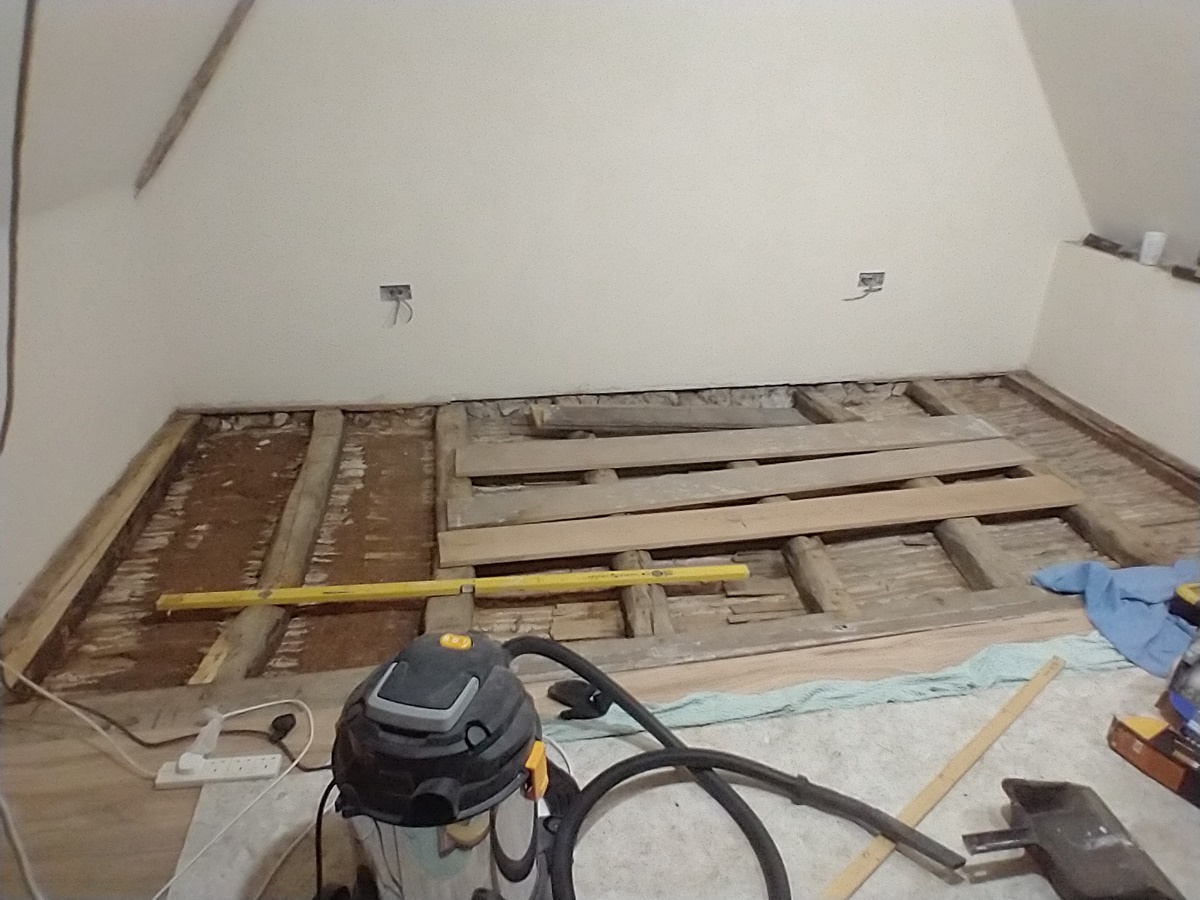
6th February. To my brother’s funeral on Friday – it was a jolly occasion, a bit religious considering he was an atheist, but I suppose its the price to pay for being buried in a beautiful churchyard. The wake was in Rockingham Castle Walker room and half the village turned up so there must have been over a hundred in quite a small space. My patchy knowledge of statistics told me that it was very likely that at least a couple of them will have Covid, in fact quite unlikely there won’t be anyone with it there, so I stayed outside with an old friend from school who I used to build model aircraft with. Its funny, and nice, now even after more than 60 years and only a couple of contacts since, we drop into a familiar pattern of conversation immediately. He pointed out that even then I would turn whatever I was doing for myself into an opportunity to sell it to other people. I’m afraid its true! I really want to get back to doing some gun stuff – I have two barrels that are crying out for rebrowning, but luckily no client jobs outstanding as the renovation of the bedroom is taking up all my time – I took up half the old floor so I could sort out the levels for the extra joists I will have to put in to straighten it. I can’t make the floor level as that would mean raising the corner where the door is by about 10 cm (4 inches) and the door, which dates from about 1650 and so must be kept intact, is already very low, as they often were then as people were shorter. I can make sure that the falls are smooth and no bigger than necessary, which means putting in about 8 new joists alongside the old ones where I can. I got out about 40 Kg of dirt and mess from under about 10 sq m of the floor I lifted – its mostly compacted dirt and some chaff that was presumably put there for rudimentary insulation – loads of walnut shell with mouse nibblings (there are walnut trees in the garden). I found one mouse skeleton and one bat skeleton. The older bits of the floor are probably almost 300 years old, so the dirt probably is too!
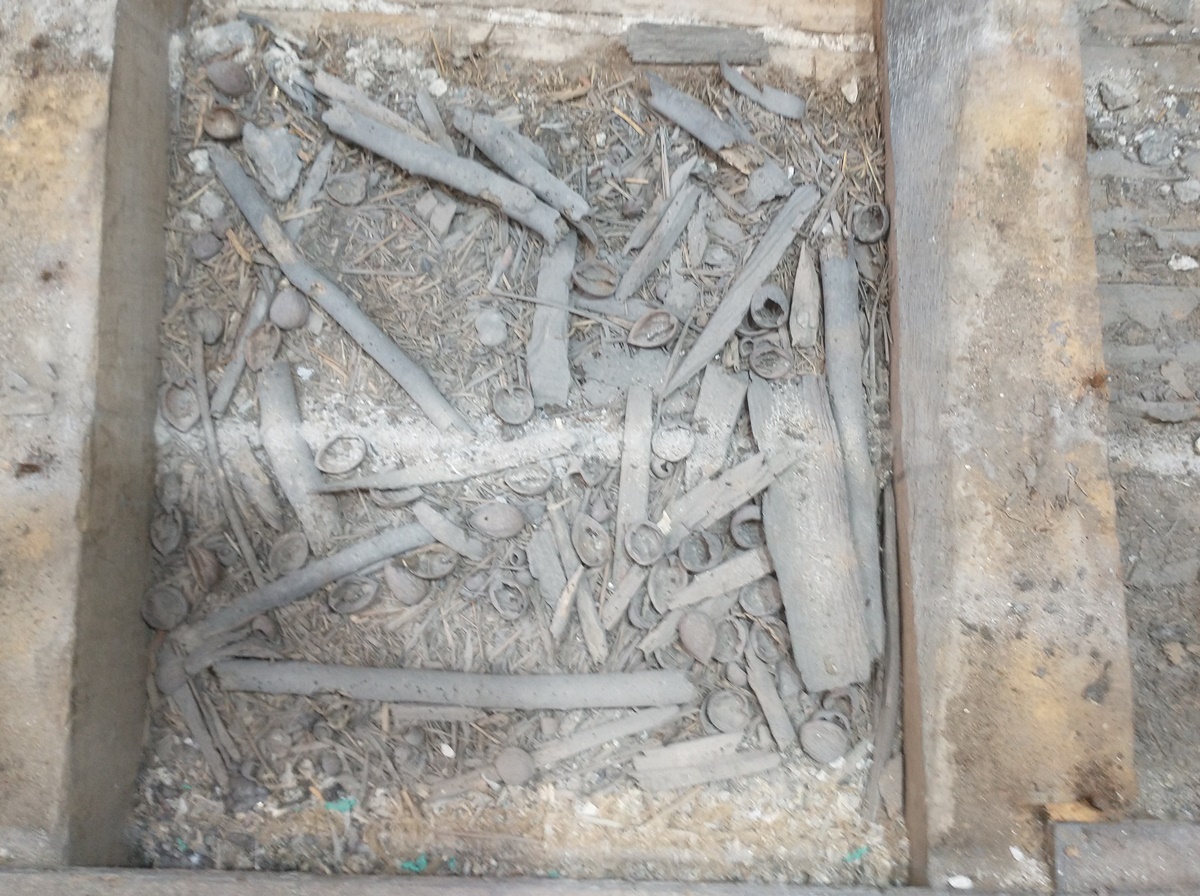 Most of the floor didn’t have this many sticks under it………….
3rd February. Yesterday I went through all the boards I had picked up and measured them and noted their quality – a number had knots and voids that will need filling with epoxy or similar and they are all slightly different lengths – mostly around 8 ft. So I have been trying to work out which bits of the floor will be the most conspicuous and which will be hidden under the bed etc. I had planned to start at the side of the room where the bed will be, but then I changed my mind and decided to start with the visible bits, so I could use the best boards there and see how I get on – I’m not sure how much I will have left – the joists are fairly widely spaced, the room is 14 ft wide, and so using the boards economically requires some thought and planning. So today I started pulling up the old floorboards at the end I want to lay the best boards. The floor is very uneven at that end – a 2 meter straight edge has a 3 cm gap in the middle- anyway under the floorboards is a mess – lots of bits of joist, and lots of dirt, and quite worrying, the ‘nibs’ that should stick up between the lathes to hold the plaster on the ceiling are not there, and not much sign they ever were ( OK where I patched it though). We have my brother’s funeral near Corby tomorrow – poor chap had Parkinsons and rapidly deteriorating health so in a way it was a relief when he died peacefully at home doing what he loved – sorting out his junk….. Anyway in his honour I decided to wash my Land Cruiser as it had been off road recently, but when out this morning I saw a hand car wash – run by Eastern Europeans as usual, and amazing – it has never has such a thorough clean, including under all the wheel arches and round the doors – £20 and it has not been so clean since it came out of the showroom where I bought it second hand about 5 years ago. I just wished that the inside had been empty so I could have had that done too. Here is a bit of what was under the bedroom floor;-
 I put in some bits when I rebuilt the chimney 20 years ago.
1 Feb – Well I did get my tax done, and it wasn’t as bad as I thought, about 3 hours. The tax man ends up owing me £160 so that works out at £53 per hour – not bad! I went to fetch my floorboards today. I’d arranged to borrow a local trailer, but when I had a look at it yesterday I got a bit worried about the state of the tyres – last time I borrowed it I ended up buying one new tyre, this time I wasn’t sure any of the 4 were road legal so rather than risk 3 points of my license for each bad tyre (thats what they dish out) I hired a massive flatbed trailer – a full 20 ft long and brand new for £70 a day – a bit steep but it would have cost £200 to get the wood delivered. So now I have a massive pile of elm boards. Laying the floor is going to be challenging as the room is 14ft wide, most of the boards are 8 ft +- 2 inches and the joists are spaced about 1m apart, so it looks as if I’m going to have to be a bit creative, and possibly splice some boards together so they butt away from a joist – quite a puzzle. On my trip to the sawmill, which was in Sotterley, a smallish place in the country not too far from Beccles, I was reminded of a peculiarity of Google Maps routing algorithm that I’d noticed before. If you ask it to find a route from A to B is will usually find a quick easy way to get on the nearest main road from A, but in the approaches to B it will start to route you down all sorts of small one way roads – on this occasion I found myself driving my trailer down miles of very narrow roads, hoping that anything that came the other way would be good at reversing ( I can reverse trailers, but hadn’t tried with the hire one). When you come to route back from B to A, it finds a nice quick way to the nearest main road, not the way you came. My solution when I think about it is to get somewhere is to route backwards then reverse it – you’ll probably know the roads around you if it does the silly small road thing so you can do your own thing until you are on the main road. I’ve named the problem ‘Google’s symetrical routing algorithm’.
30th january – I managed another day without doing my tax! sorted out a few things and got the week’s shopping in, sorted out how to fix the floorboards when I get them, and had a look at lead shot prices on the internet ( I found a source at £31.70 /Kg. – I’ll ring them tomorrow), and did a bit more of the autobiograpy post, but have now run out of excuses……………
28th January – Just a quick correction – I got the calculation about the moisture content of wood wrong yesterday – its not as bad as I thought. I got a bit mixed up with air humidity and wood moisture – normal household relative humidity in the UK is probably in the range 40 to 55% which gives an equilibrium moisture content in wood of from 8 to 10% which gives a change in across grain dimension of most timber of around 1/2 %, or 1.5 mm across my 300mm boards. I can just about live with that, but I’ll have to make sure I get it right before I butt the boards tight against each other. Looking at the old pine floor today, I realised that not only is it a patchwork of newer and older boards and short bits and repairs, but it actually alters alignment as it crosses the room by a few degrees – so somewhere I’ll have to taper a board. Oh, for me the bad news is that I have to do my tax return before the 1st of Feb, although there is supposed to be a 1 month Covid extension………
27th January Had a pleasant day’s shoot at Cambridge Gun Club today – as mentioned I took the Manton double flintlock and managed to hit quite e few clays – no worst than with anything else I shoot, which is pretty good for only the third or forth time I’ve used a flintlock. By the time I’d worked out a few of its little pecadillos with Bev and Pete’s help – both are flintlock experts – I got it going well, and it was shooting relianbly. One thing tha we realised was that using semolina instead of a wad on top of the powder missed having the piston effect of wooshing the air down the barrel and carrying the powder into the chamber behind the touch hole. There is the overshot card but maybe that isn’t as effective. As I didn’t have any wads of 14 bore with me I used a card over the semolina. How big a pproblem this is/was we were not sure – to begin with I didn’t have any problems with ignition and was using Swiss No 1 as the priming powder – later I had a few occasions where a frizzen sparked but didn’t ignite the powder in the pan, whcih we put down to the priming powder and I changed to the much finer Swiss OB. I’m always a bit unsure about these changes that one makes, because one tends to stick with them on the basis of pretty unscientific evidence and nere revisits the issues. Bev said he had a couple of near identical flintlock doubles, one of which went off quickly and the other was quite slow to fire, so he took the breechplugs out of both to see what the difference was – caution, both he and I are very cautious about taking the breechplugs out of doubles in case we separate the barrels so we use various clamping arrangements. anyway both breechblocks had a fairly deep hole down from the face of the plug that forms one pattern of patent breech, but the ‘good’ gun had a hole of about 7mm and the ‘bad’ one more like 3/16th of an inch ( that is how he told me – 3/16 is 4.7 mm ). He drilled the smaller one out to match the good gun and polished it with a Dremel and it was certainly shooting better. I could never quite work out the relation between the volume of the reduced bore in relation to the total powder charge – I think that only part of the powder goes into the hole, and some sits in what is usually a semicircular depression in the top of the plug – the original idas of the patent, I think, was to start the explosion in a small relatively enclosed space and the flash front would propogate faster that ignition through the powder.. This was certainly the principle of Nock’s patent breech which had a small trnsverse chamber behind the touch hole that communicated with the main chamber via a fairly small hole. You can tell this breech because it had s screw plug on the opposite side of the breechplug to the touch hole. Or have I got this all wrong? someone will tell me! I took my little Webley bolt action .410 (the Rat Gun) for the post lunch breech loading bit of the shoot using 2 1/2 inch cartridges firing 11 gm of shot as against 24 or 28 in the ‘big boy’s’ guns. The Webley has a very tight choke and probably covers well less than half the area that a 12 bore covers on normal cylinder bore . Judging by a shot into the bank at a ‘rabbit, about 1/2 to 2/3 of the diameter, so you need to be that much more accurate in your shooting – anyway I did quite well with it and broke a fair number of clays when I was onto a good run. Back to the bedroom tomorrow – the limewash is now done so its a major cleanup, then go and get the floorboards and juggle around with the Relative Humidity of the room and the moisture content of the wood – a 5% change in R.H. makes about a 1% change in dimension across the grain in most woods – thats about 3 mm in a 300 mm wide board – so I ought to aim to get it sorted to within a couple of degrees of the highest RH its likely to experience during the year, or the floor will warp! Probably should have specified narrower boards – oh well, too late!
26th January The 4th Jab made me feel a bit rough for a while, but I think I have recovered quicker than from the 3rd. I’m off to CGC tomorrow for a spot of clay shooting. I’m going to try my John Manton flintlock double – when Bev was over here picking up his guns he pressed me to shoot it again, so I’ll give it a try. Its a nice gun and was a bargain as it has a repair spliced into the fore-end, the only thing I don’t like is that it has ginger browning on the barrels – the real shame is that its done perfectly, so I’m reluctant to get rid of it and try for a better colour. I’ve now finished the limewashing of the bedroom walls – I ended up putting 4 coats on to get the colour solid, but its pretty quick so not a problem! I now have to get the room finally dried out so I can go and collect the elm floorboards from Sotterley next week – I think laying them is going to be quite a job as the existing floor is all over the place in terms of levels and a bit springy in places – I’ll have to do a lot of firring to level up the joists, which are bits of wood probably put there in 1750 ish and not squared very well, and a ropey in patches… are well, if I will take on these tricky jobs!
24th January Got my 4th Covid Jab tomorrow – I’ll be beginning to feel like a pincushion! Got two coats of limewash on the walls and ceiling – it is an amazing paint on lime plaster – it just becomes part of the wall and you can’t rub it off without taking the surface of the wall with it. Not sure if I’ll do one or two more coats. The lime putty and the Buff Titanium pigment came to about £25 and that would be enough to to the room (40 sq m) with 4 coats 10 times over. bit more on the Sort of Autobiography, which is getting some positive comments. I plan to do the University stuff and then my own business .
22nd January At last, the pair of pistols is finished and in a box ready to post! When Bev had a look at the trouble I was having getting colur onto the steel of the barrels in the browning he suggested that I try Logwood chips in solution. I had imagined that they might be a dye, and indeed they are used as a dye to colour fabric deep red, however then used on iron they give a chemical reaction , the Heamatoxylin in the Logwood giving a strong reaction with the iron to colour it shades of black, and leaving a light scum of black particles on the surface of the liquid. I followed recommendations I found on the web for guns and dipped the barrels in boiling Logwood solution for a couple of minutes and the steel that had refused to colour came out a light grey – a pleasing overall effect. while hot I poured clean boiling water over the barrels, and when they had cooled a bit, I rubbed beeswax over them and wiped it off again. The overall job now passes my standards, and I’m happy to return them to their owner. Having done that I went with Tom to Giles’s flat in Cambridge to clear out the last of his stuff and say goodbye to my three months of work renovating it!
21st January – Went to see my Oncologist today – he was cheerful as usual – his Christmas skiing break in France had been great, although he had only made it across the French border about 20 minutes before they closed it to Brits. Life on the edge! A bit more on my Sort of autobiography…………. – it had 20 views yesterday! Mixed up some more limewash – I need to check the colours in daylight tomorrow.
20th January – got a coat of limewash on all the walls and ceilings. Sorting out a colour is a bit of a pain – there is too much surface area for lime white to be suitable – it would be blinding, and we didn’t want a strong colour. There is a bitof a puzzle as its an attic room, and a lot of the area is the roof slope and there isn’t a sharp boundary between the slope and the ceiling so it would be difficult to use a different colour on those surfaces. We thougth a neutral buff shade would do, and I came across ‘buff titanium’ – a different form of titanium oxide, not the stark white that one usually associates with titanium. I had a bit of acrylic buff titanium in a tube, enogh to make a few samples on white paper, which is a good way to test colours as you can dry them out quickly. I got a couple ,more tubes from the art shop – enough for the first coat, but its rather pale and needs more pigment. I found a website that sells the raw pigment as a powder, so I’ve ordered 2 Kg, which should be enough to colour the limewash a bit stronger and put on another 3 or 4 coats. It is beginning to look like a room – I am keen to get it pained as soon as possible so it can dry thoroughly before I ship in the floorboards – the limewashing will eventually put about 24 litres of water into the room over 4 coats, and that has to be taken out – my dehudifier extracts about 6 or 7 litres a day…..
19th January – Tidying up the bedroom bits that need sorting before the floor goes in – painting the woodwork etc.
18th January – I think I’v got to the end of the plastering, so I’m letting it dry out before giving it a few coats of limewash. Limewas is a beautiful, tough and very cheap paint – its basically a bit of lime putty and a lot of water, left for a day so the Calcium Hydroxide dissolves into the water, with a bit of colour added using acrylic paints dissolved in clean water and then added to the limewash. The Calcium Hysroxide only disolves to a fairly low concentration ( 1.6 gm per litre) but its enough to react with the carbon dioxide in the air to form calcium carbonate – limestone on your wall – a very tough finish and beautiful too. I am putting a bit on the autobiographical post each day – really just a series of anecdotes as Penny says.
16th January Last week’s extra job was helping Giles emigrate to Canada, at least, getting hin out of his flat, although Tom and I have to go back next weekend to clear out the last few bits. I’m still plastering – is going so-so. I’m beginning to get fed up with it to be honest, and almost at the point of wishing I’d got someone in to do it! I now just have to put a very thin coat of skim lime and chalk to level out the surfaces before limewashing it with 4 or 5 coats of homemade limewash of a sutiable muted shade of nothing. The problem I’m finding is that the setting of the plaster is very uneven – the ceiling and the tops of the walls sets up well before the walls near floor level – I’m pretty certain most of this is caused by the pattern of airflow and heat distribution in the room – I have a dehumidifier running some of the time, and occasionally a heater, but mostly I leave it to its own devices so that the lime has a chance to carbonate before it dries too much. I hppe, optimisticall, that by the end of next weekend I will have got the plastering and limewash finished……… well, one can but hope! I have been contemplating putting an account of bits of my working life etc on the site as a sort of autobiograpical post – I enjoy writing, and there might just be someone out there amongst the hundreds of thousands of people who have visited this blog who would find it a handy way of passing an idle moment. Anyone not interested could always ignore it!
 Nice open texture – I don’t always manage to get it this good!
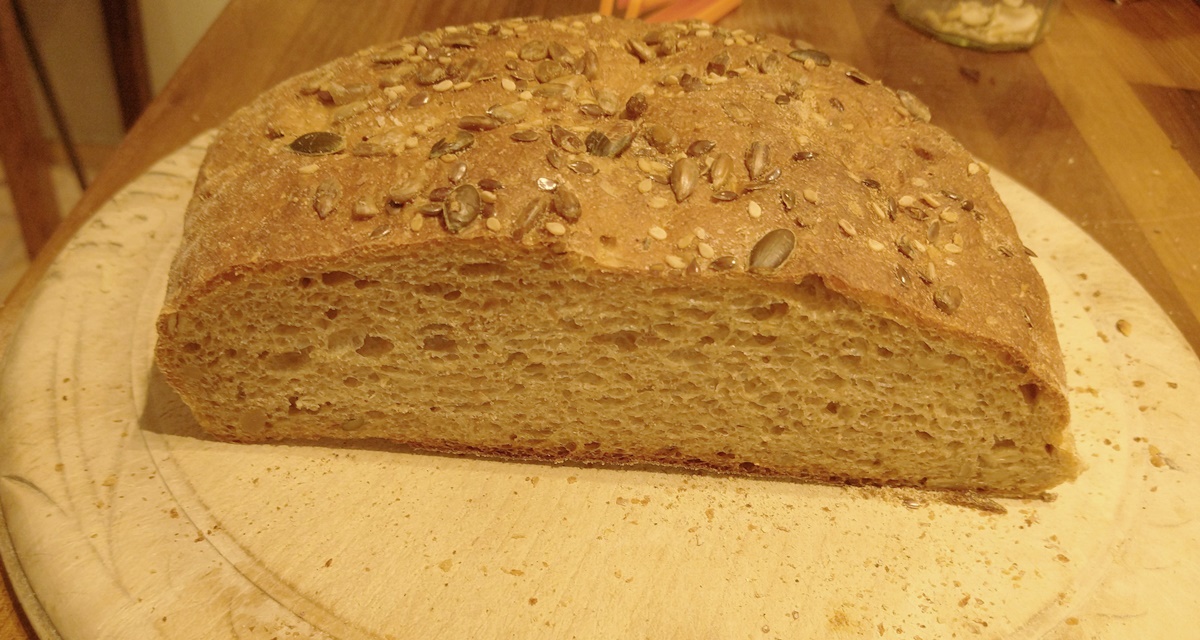
12th January Plastering going OK, but it is difficult to find the point at which the plaster is right for the surface to be reworked. This evening’s job was to make some more bread as we have run out – I make most of it, although I’m lazy and buy the odd loaf from the surpermarket when we’re going shopping.

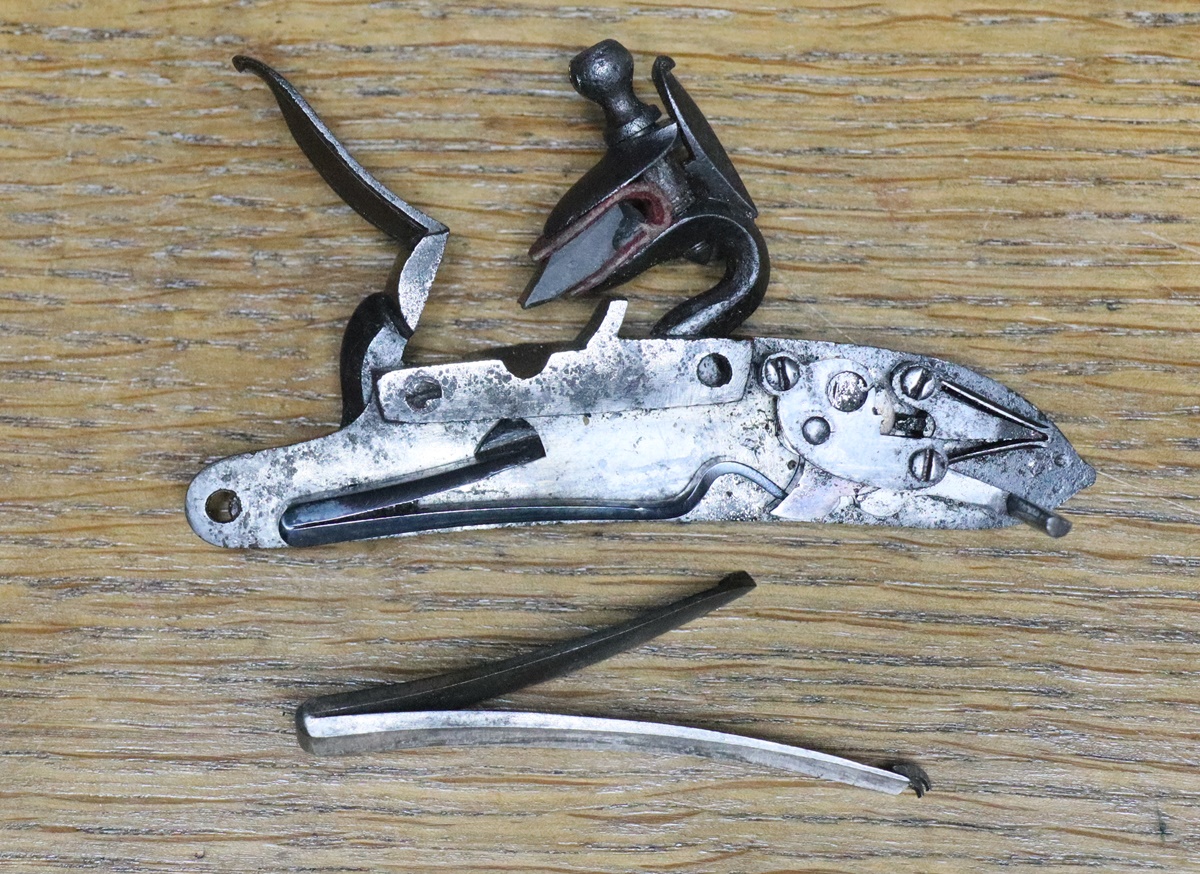
11th January – Plastering not going well! I mixed up the lime putty with sand and used half a bag of sand I had to hand, as well as a bag of kiln dried sand I bought – unfortunately the bag I had was one that I’d discarded when I did the kitchen because it had some large grit (2 -3mm) along with the sand – I should have put it in the skip then. Anyway it makes it almost impossible to put on a 2 mm skim coat, so I’ll have to chuck the large tub of plaster I mixed and start again using the fine sand – expletive deleted here. After yesterday’s shoot Bev accidentally left his guns in my Land Cruiser that he’d been in, so he came over today to pick them up. While he was shooting his double flinter on the shoot, it split at the wrist on the recoil, pinching a bit of his hand in the crack. The crack goes pretty well all through the wrist and as he uses quite meaty charges it won’t be adequate just to glue it. We had a good look at the problem – my solution would be to strip the stock of the trigger guard and probably the false breech as well, and mill a deep slot into the recess where the tang of the trigger guard fits, and make a block of wood that is about 1/4 mm narrower than the slot and comes to the right level for the tang to go back onto. This can then be glued in with epoxy, the clearance allowing a glue line – necessary with epoxy. The trigger guard is fixed with a screw into wood and then unwinds from a threaded hole in the trigger plate at the front of the trigger guard – if necessry I would drill out the screw – the new screw will go into the new block, so no need to plug the hole. I’d be pretty picky about the wood I put in the slot so that the grain didn’t follow the split – I might even use good quality ply. Thinking about holding it all together while the epoxy sets, I thought the ideal thing would be to bind it all with self amalgamating /self vulcanising tape – its a fantastically useful stuff – rubbery, will stretch to 5 times its length and then slowly shrinks somewhat, and the layers bond together into a solid mass, still rubbery and retaing a lot of tension – one of those magic things like electrolytic derusting! On another gun issue I was showing him the pistol barrels and lamented that they hadn’t really taken – he thought they were great, and the client would be delighted! So maybe I need to look at them in a different way………………………………….
10th January – Game shoot today – actually only 25 minutes away on very slippery roads! I wasn’t on form, and was mostly out of the action, so that left most of the birds for those who were! Anyway it was good to be out in the countryside and it wasn’t so cold and there was no wind, so all in all an enjoyable day. I can now do another experiment in gun cleaning…… Back to plastering tomorrow – Tom and Giles came round yesterday for tea and I sneakily got them to take the bags of unused NHL plaster down and bring up the very heavy tubs of lime putty plaster – a tub holds 25 Kg of the lime putty, but when mixed with 2 parts sand ready to go on the walls the tub holds more, even when only half full. Giles flys to Canada on Friday, so Thursday is reserved for shifting the last things in his flat, which means I only have 3 days work this week. I am trying to get the wet jobs done as soon as possible so I can get the elm for the floor into the room and laid. It is supplied planed to 22 mm thick but needs sanding – at the moment I’m not sure whether to sand it before its laid, or after, or some of both – I guess it will be clear when I see it! the existing floor is very uneven – probably the variation in height is about 3 or 4 inches overall, and includes quite a slope. Should be fun to lay……
9th January – I thought I’d tackle a couple of outstanding jobs today – fixing up wires and pruning the vine that yielded a splendid crop of grapes this year, and finding out why there were a couple of damp spots on the sloping ceiling of one of the bedrooms came from – turned out to be a valley that was lead dressed in about 1994 – very well done judging by the superb lead welding – turned out that a slate had slid down the roof and made a very small crack/cut, or at least that is where I think the leak was. I contemplated doing a lead weld myself – I’ve done them in the past but I not an expert and its a difficult job. In the end I cleaned it all up and used Fix-all. I had a real gun surprise – as I mentioned earlier, when I finish shooting on Thursday I spray WD 40 down the barrel and planned to clean it next day – well I forgot , and didn’t remember until late yesterday when I was just going to bed, so I gave it another shot of WD 40 and left it. I finally got round to cleaning it this evening – boiling water, a few drops of washing up liquid and a scour with a bronze brush, rinse with boiling water and remove nipple, then a few drops of 303 cleaner (emulsifying oil) and pump vigorously with polyester wadding round a jag. Leave to dry for a few minutes then one run through with a folded kitchen tissue on a jag to remove water, then a new tissue with WD 40 – repeat a few times….. Only this time the tissues came out almost completely clean, whereas they are usually dark grey/black for as long as I keep replacing them. Final wipe through with gun oil. Not sure why it was so clean, but a lot more dirt came out with the wadding clean water than usual – I will certainly repeat the experiment ( delay of 72 hours and 2 sprays of WD 40) – a completely surprise result – I don’t think I’ve had such a clean barrel since I cleaned a newly honed barrel!
7th January 2022 – now finished the second coat plaster and mixed up some lime putty plaster to start the final coat – I’ll wait til Tuesday to start that, and hope that my sponged finish is rough enough for the plaster to adhere. I had a very pleasant clay shoot at CGC yesterday – it was pretty cold, but actually I kept quite warm, except my right hand – putting caps on is a challenge in cold weather. I did have my Zippo hand warmer in my pocket, but there isn’t much opportunity to hold it, I had one of the disposable warmers on one shoot – it was actually a foot warmer with a self adhesive pad for sticking in your shoe, but I found it ideal to stick round the wrist of my gun so I was holding it most of the time. The disposable ones seem to chuck out more heat than the Zippos or the charcoal ones and last at least as long – it always amazes me that they can work just by rusting a few grams of iron powder, but it makes you realise why its a good idea to keep guns oiled! I’d been vaguely lamenting that I had no more game shoots this year, but was rung up last night and offered a muzzle loading shoot on Monday as someone had dropped out – its pretty much my favourite shoot and only about 40 minutes away. I had run out of semolina yesterday, so had to use cous cous – which seemed to work just fine, so I’ll have to add semolina to tomorrows shopping list. Several of my fellow shooters seem to have adopted the habit of putting WD 40 liberally in the barrels of their guns (out of the stocks) after use, and leaving them overnight before the usual boiling water wash in the morning. I’ve been doing this for some time (and not just for lazyness) and it does make them quite noticably easier to clean. I was looking at the visitor statistics for this blog – most visitors are from the US, next is UK then Europe, with lots from China and Russia – not sure what they make of it, or if its all attempted hijacks! I had an email from a work colleague from about 50 years ago who had come across this website and managed to associate it with me – goodness knows how as he isn’t an antique gun person.
3rd January – Back to plastering all day – the NHL plaster drives me mad, but I’m learning to get the better of it, although the floor is knee deep in blobs of plaster! I am using my 1 meter long springy edge (plastering spatula) to level the plaster, and then after a decent interval of 4 to 6 hours going over it vigorously with a sponge float to get rid of any lines etc. Seems to work. I will go over it all with some decent lime putty plaster as a finisheng coat. I was reminded that this web site was originally started to post breadmaking information, hence the un-gunlike name. It had a brief period as a roof restoration story, and then became a gun blog. I still make almost all the bread as we prefer it to anything ou can buy in the supermarkets, and we don’t have access to a decent baker, Cambridge and it’s several French bakers being too far and too much parking trouble. I was reminded yesterday of my early days of experimenting when I made a couple of loaves – Giles is emigrating this month and gave us his Kenwood Chef – its a lot better at least in theory, than mine, which was a very cheap version from TKMAX many years ago and has suffered many indignities, including falling off the table while mixing dough and continuing to mix while lying on its side on the floor – several times. Its now tied on! Anyway Giles’s has a posh stainless steel bowl, ours has a cheap plastic one – but when I tried the stainless one it wouldn’t mix dough at my preferred consistency – the dough just spread itself round the outside of the bowl and left a void in the middle in which the blade rotated and I had to intervene several times. Its all down to the brushed stainless surface which the dough stickes to – its more difficult to clean too – you leave the plastic one and the bits of dough fall off when they dry, not so the metal one. When made the bread didn’t rise quite as it should – its interesting because it shows how many variables there are in the process….. As a boring scientist I’m always interested in how domestic appliences etc earn their keep – if the breadmaker cost £100 and I use it twice a week for ten years, that still adds about 10p to the cost of a loaf. When we first had the above ground swimming pool I used to note the cost per swim – its now about £2 per person per swim. Makes you think….. End of Christmas holidays tomorrow, although mine ended a couple of days ago – lets hope for a better 2022……………….
2nd January 2022 Well, I made it into 2022 in one piece! Given the ever circling Covid and it’s attempt in March 2020 to do for me, that has to be good. My best wishes for 2022 to all the followers of this blog, and my particular thanks to the kind and thoughtful people who email me from around the world when I don’t post for a while to see if I’m OK. I started on the second coat plastering yesterday – I got the plaster recommended by the supplier of the wood fibre boards, but I think its not really the right stuff for the job – I think it is meant for external render. I always use lime plaster as its an old house, and in the past I have always made my plaster using lime putty, sand and chalk, but this time I’m using the recommended bagged lime plaster which is based on Naturally Hydraulic Lime (NHL) which sets by forming silicates as well as combining with carbon dioxide, whereas the lime putty doesn’t form silicates and sets much more slowly. Anyway the plaster I have for the second coat ( and enough for a final coat) is a real pain to use! Lime putty plaster is ‘fat’ and workable and spreads easily as its somewhat thixotropic – this stuff is horribly sticky, even when quite soft and begins to stiffen up almost immediately you have mixed it – not at all pleasant to work with, and not really possible to ‘bring it back ‘ to rework the surface when its beginning to harden up – horrid stuff, but I have another 8 bags, so I will probably use it for the second coat and try to level out all the surfaces, then switch to ‘real’ lime putty. I put the single barreled gun together – its quite a nice single percussion – I had made a lock for it and engraved my name on the lock and barrel and re-browned the barrel, but the rib came off so I had to resolder it and then re-brown it – I just hope that the relevant authorities can see that its actually made from antique parts and is thus an antique! I dug out the Westley Richards double percussion that I used to shoot when I was a teenager going out in the evening to shoot pidgeons to feed the ferrets. ( turns out Pete, one of the Anglia Muzzle Loaders used to shoot the same wood when he lived at Fingringhoe!). I used it again for a year or so when I started shooting with the Anglian Muzzle loaders but gave up on it as it would bung up and misfire from the 30th shot on any session – clean it thoroughly and it was fine for another 30 shots . Anyway it looks a bit sad as the barrel is a bit rusted and stained although the bore is good and there is plenty of metal, so I think I’ll have a go at re-browning it – I’m keen to find something that actually browns ‘properly’ rather than these pistol barrels which are still resisting colouring on the steel after 10 brownings, I might also investigate why it misfired, although I am always reluctant to remove the breech blocks from doubles as its easy to put a force on them that separates the barrels – and that leads to a major, beastly job.
 The barrel of the single has a mild but acceptable browning.
 My old Westley Richards percussion – I’m hoping the barrels will clean up a bit without taking off too much metal
I think it looks worse that it is – we shall see!
31st December – Its late, New Year soon! I didn’t start the plastering today, just sorted a few tools and got the lads to carry 10 bags of plaster upstairs. I’m still browning the pistol barrels, but maybe they will shortly come good. I resoldered the rib on a single percussion some time ago and got fed up trying to brown it, so after about a dozen brownings without much colour I propped it up in the workshop and left it (probably for 3 months). I thought It looked pretty rusty, so I thought I’d better at least clean off the rust and oil it or it would just clutter up the workshop and mean that gun was useless. I wire brushed it fairly vigorously and it didn’t look too bad – I heated it up on the AGA and poured boiling water over it several times and rubbed it over with a block of beeswax while still hot (my favourite finish) and I have to say it looks quite a decent lightish brown, but certainly within the range of decent shades and with a strong twist figure. Now Ive got to find the breechblock! Happy New Year in 2 minutes………….
30th December – The percussion lock is now done. I realised that I couldn’t re harden the tumbler without disturbing the silver soldered extension, but when I heated it up to I probably didn’t take the bits round the bents up to a high enough temperature to anneal them – anyway it works just fine! I coloured up the cock a little – I tried to get the area round the square red hot and dumped it in water, but it didn’t harden much. As I mentioned its a late percussion gun ?1850 ish? so the mainspring is more like that of a modern sidelock – the early springs often? usually? had a short top arm compared to the acting arm but later on they got more nearly equal lengths. I had always wondered about the elegant taper of mainsprings, and I read somewhere that the test of a good spring was that when amost fully closed you could just run a 10 thou feeler gauge all the way along the gap between the blades. The spring in this gun is extremely strong and when the lock is on full cock the blades of the spring are almost closed. I am a bit concerned that the spring is so strong that it will strain my cock-tumbler square! I’m tempted to anneal it and close it up a bit as there is no need for such a strong spring, although I suppose it might take the odd millisecond off the firing delay. I’m trying to steel myself for a return to plastering – I was going to buy a new, £60, replacement for my old plastering trowel which was bowed, but I had a look at the new one in Screwfix and decided that they were meant to be like that, so saved that expense! I do have a nice new finishing trowel that is flat, so that will suffice for the final stages. I’m still trying to brown the barrels of the two pistols and its still not happening – the soft iron is getting well rusted and dark, but the steel is acting like stainless steel and doesn’t take any colour to speak of. I’m half a dozen rustings into the third attempt, lets hope……………….. I have never seen this problem before! Well, actually see tomorrows entry- I did despair of the single barrel.
Little blob of grease from the cock screw spoils the picture!
 As was – I’d already changed the nipple for one of my titanium ones
29th December – 2022 is approaching rapidly! I tried to drill out the bits in the cock thread, but the thread extractor metal was harder then the rest even after annealing, so the drill just started to wander, so that was a fail. I Araldited the tumbler in a bit of faced off bar located by the bearing on the back and cut off the square and faced the 3mm stub and put a 4mm end mill into it for about 3.5mm and turned up a short piece of bar to fit to replace the square and silver soldered it in place, then filed a square on it. Its interesting that there was a de-facto standard amonst percussion gunmakers that defined the alignment of the square on the tumbler shaft so that cocks are often interchangeable. I tried to use this standard orientaion and filed up the cock to match – As with many gunmakers I didn’t get a perfect square, but I did get a reasonable fit in the correct orientation – I used one of my unused castings for the cock as the original was pretty horrible. All that remains to do now is to reharden the tumbler and colour up the cock – not sure that it needs hardening – and make the No 4 UNF cock screw. I had a bit of a problem with my lathe today – a few times recently it hasn’t powered up when I’ve switched the mains on, and I’ve had to feel round the back in the wiring box and reset the circuit breaker (switching off at the mains first!) This time it was dead whatever I did to the circuit breaker. It’s a big lathe and weighs over half a ton and the wiring box is at the back and there is only about 4 inches clearance to the wall. I cursed, and went and got my testmeter and a crowbar – but when I came back it was on so did the job. Went out later and same thing, came back an hour later and it was on. I suspect the main circuit breaker may be faulty as the work light isn’t on and that doesn’t have any of the trips and interlocks in its circuit……Have to dig out the crcuit diagram if I can find it….. Something else to sort out. I ought to get back to plastering tomorrow – I need to go to Screwfix to pick up a new plastering trowel as my old one is bowed – thats £50! I forgot when I was having my rant about the building inspectorate failings to include Grenfell.
The 2 punch marks are interesting – possibly to shift the stopping point of the tumbler?

just hope the brazed joint is strong enough over such a small area…..
I used the one on the left to replace the central one.
Getting on for a day’s work…….
28th December While waiting for the third try at browning the pistol barrels (!) I got out the slip that was waiting in the office and had a look at the next job which I had more or less forgotten about… Its a percussion single – not particularly special, Birmingham and late. The cock screw had sheared off, and the owner had resourcefully acquired a screw extractor to try to remove it. As anyone who has tried that with an old gun will tell you (with hindsight!), that is a recipe for disaster because the extractor, in doing its job expands the stuck piece of thread, which of course means that its stuck even more firmly – the harder you try the harder it is locked in place until, as in this case, the screw extractor also shears off – and that is likely to be even harder metal than the original screw. Usually with a flintlock or older percussion I would araldite the tumbler to a bar in the lathe and turn off the whole square and drill out the tumbler and silver solder in a new axle and put a new square on the end and tap a new hole – takes a while but is straightforward although it does mean annealing and re-hardening the tumbler. However, with this late gun the tumbler has a link to the mainspring (no link on older guns), and the link folds into a slot in the arm on the tumbler, and the slot actually crosses into the tumbler axis so if I made a new axle I’d have to cut a slot through it, and I am not confident my miller will be accurate enough to cut a 1/16 inch slot. So that solution is not easy, although I could file the slot before fixing the axle in the tumbler. That leaves softening the tumbler and trying to drill out the broken extractor and bit of screw, and hoping there is enough metal left to tap a thread without weakening the square – maybe I’ll try that and if it doesn’t work I’ll try the new axle. The cock (hammer) is a bit of a mess, probably a bad a casting, and has had multiple attempts at tightening it on the square. I can either fit another cock – I do have 2 suitable castings – or drop a milling cutter through the cock and silver solder in a disk and remake the square to fit the tumbler…. I will have to get back to plastering soon, but I might just sneak another day tomorrow – I did manage to do some work on the loft hatch today so at least some work was done…… Oh and I did a little tinkering on the pistol wood repair and it looks even better.
 The hammer looks as if its got some terrible skin disease on its nose
27th December More work on the pistol stock. I had to cut back quite a chunk to get to good wood – some of the black stained (rust) wood was very weak – anyway I glued in a chunk of walnut with isocyanate – its quick and makes a thin glue line and doesn’t need clamping, just a quick squirt of activator. I have now cut it back to match the curves and coloured it up – unfortunately there is still some stained wood around that it would not have been sensible to cut out, so I had to stain the patch black to match. Then a couple of coats of thin shellac and a rub down with 2500 paper and its looking good – I gave the wood a quick polish with my favourite wax polish – its actually a hard mould release wax polish that gives a good finish and doesn’t clog things too much. I listened to a program on house ventilation this morning that set me thinking – modern building regs call for 0.4 air changes per hour – if you put 10 people in a 30 cu meter room in about an hour with that low level of ventilation they will be be breathing 5% of other people’s breath even if the air mixes perfectly – ideal for transmitting Omicron! My old house probably runs at more than 5 air changes per hour – if I hold up a sheet of newspaper in a doorway it isn’t vertical. Much healthier . So once again building regs have got it wrong – in the 1940’s it was cement as strong as brick, so cracks propogate through walls, in the 1970 is was all reinforced concrete now rusting and spalling off. Now we are burying tons of carbon intensive concrete in massive foundations – a friend got permission for a 3m x 3m extension to his small Victorian cottage – the building inspector insisted on 2m deep foundations, then looked at them and said they needed to go to 3m deep – right up against the cottage with its ?600mm deep foundations! How stupid can you get – my friend is now waiting for cracks to appear in the cottage while the extension sits rock solid!
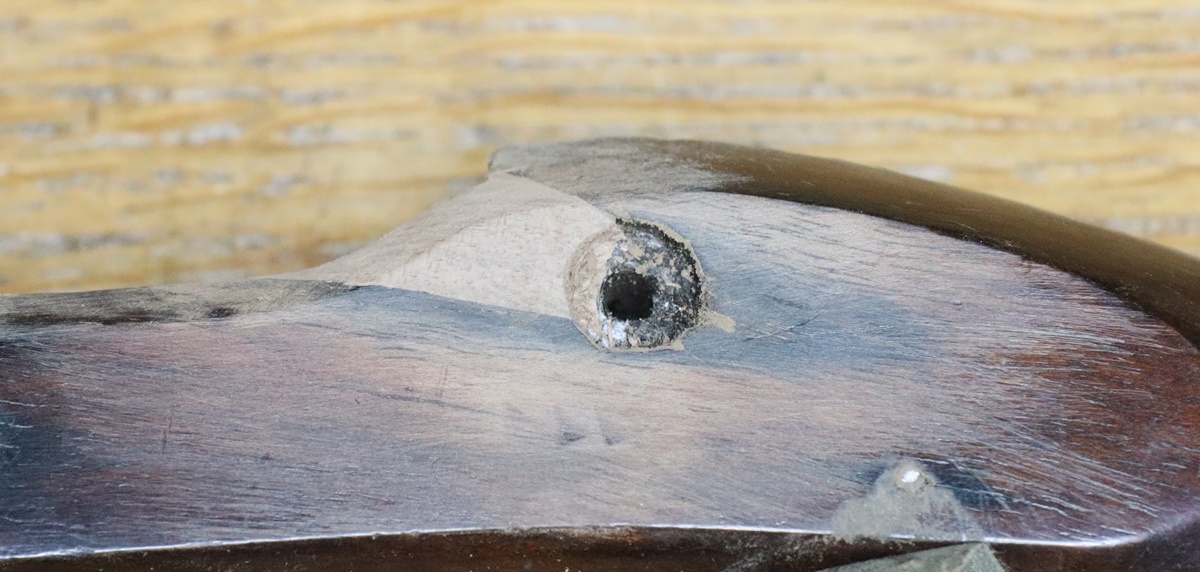
I think this pistol must have been lying on a damp surface for years judging by the stains.
 Final clean up and polish still to do.
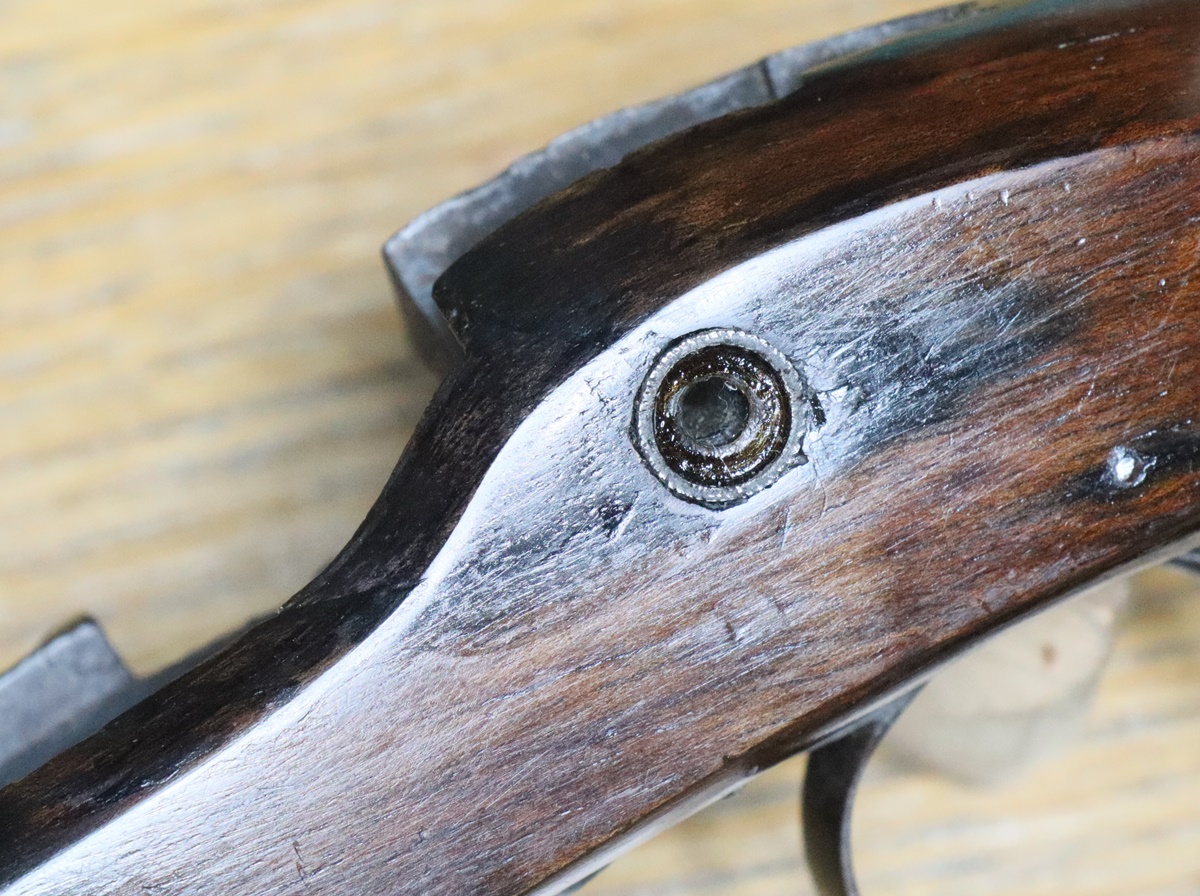
26th December My holiday from plastering continues, so I got a bit more gun stuff done today (about time too, I hear you say!). I hardened the spring I modified yesterday with the propane torch and polished it and found a nice spot on the less hot plate of the AGA where the temperature was about 310 C, so I put the spring down there and covered it with a pad of fibreglass insulation (the sort used in roofs) and left it for 15 minutes. When I got it out it was a nice blue colour indicative of about the required temperature for tempering springs – 305 to 310 C according to my book. I had been quite careful to open the spring to the same extent as the extant spring on the other pistol while it was soft, and was extremely careful to ‘work the spring in’ to let any stress in the metal redistribute itself before fully compressing it. I even kept it fairly warm to make sure it didn’t fracture – it works, thank goodness, so that is one more job out of the way. The photo shows the new spring in place and a modern sidelock spring very similar to the one I modified to make it – the critical detail is the distance of the peg on the side of the upper leaf from the ‘elbow’ of the spring, the rest can be sorted in the cutting, bending and welding – the top leg needs a fairly high tab built up on it, or the elbow hangs down below the edge of the lock and the top arm touches the barrel. The stock of one of the pistols has a crack running forward from the rear side nail cup and looks a bit of a mess – its a very common place for pistols to crack – they tend to crack from the side nail hole right through the stock, often on both sides. First thing is to investigate the obvious crack – I do this under the microscope as its easier to see what the materials are, picking the crack out with a modelling knife to get to some wood. In this case I found I was digging in black filler/glue ( not wax as it didn’t melt). Now there is no point in trying to put a repair on top of an old repair, so its a matter of digging away till you get to some solid wood, in this case taking out quite a lot of the filler. you then need to finish the gap with straight sides, preferably tapering so you can get a good fit. I think I’m now almost back to wood, so tomorrow I’ll shape a matching piece of walnut with the right grain and glue it in place. It is always better to make sure you cut back to a sound foundation – trying to keep repairs as small as possible often doesn’t quite look right if there is still some damage on either side.
New spring and modern sidelock or late percussion spring very similar to the one modified for the new spring.
 Still a bit more at the top to come off as there is still some damage to be cut out and the gap needs to be tapered for a good fit.
25th December – I can’t believe how long it is since I last posted – I’m sorry, but I guess a lot of my regular readers will have got fed up and deserted – don’t blame them! My excuse is that I’ve been desperately working on the house restoration, trying to get to the point of finishing the ‘wet trades’ i.e. plastering before Christmas. I wasn’t sure if I could do the plastering myself, or if I’d need to get a professional in to do it. Well, I did just manage to finish the first coats on everything and so get the bulk of the drying out of the way – I’m quite slow, which is OK with lime plaster as it doesn’t ‘go off’ like gypsom plaster, so it took me around 5 days to do the 50 sq meters of the walls and ceiling, which were mostly wood fibre board (in place of the original laths) and some cork insulation. It all required a base coat, then pressing in a fibreglass mesh to stabilise it, then going over with another thin coat to hide the mesh. One job I didn’t enjoy was pressing 3 meter lengths of mesh into the wet plaster on the ceiling – until you have got most of it stuck it doesn’t stay up, and once its stuck you can’t move it around to align it, and then it all falls down and you are left standing there draped in mesh partly covered in plaster – not fun. It went reasonably well and is flat enough for the top coat, although I found that my big posh finishing trowel had got slightly banana shaped somehow so it won’t do for the top coats – fortunately I bought another one earlier. I hadn’t realised that there was what I call ‘tool porn’ in the plastering trade, where manufacturers try to make functional tools look sexy and posh as well as functioning well, I also notice that the cool tool colours are now black and yellow- copied from DeWalt tools. My excuse for not posting is that at my age 7 or 8 hours work, including plastering leaves one completely zonked out ( is that still a word – we used it when I was a child) so I miss my usual active late night slot. Today being Christmas I have a bit more energy – we had a small family Christmas party, but as some of us are vulnerable, including me, we decided to have it outside round the fire pit with hand food, like we did last year – it actually worked pretty well and no-one died of hypothermia, or at least not before they left. On the gun front I haven’t done much although I will do some over the next few days while I rest from plastering. I had a clay shoot with a few friends a CGC a coupleof weeks ago and shot the best I have done for years, if not ever – I wonder if having shot very little for the last two years has got rid of some bad habits I had! The cheering thing was that I shot well with my percussion Nock single ( the only muzzle loader that I shoot nowadays), but also with a 20 bore hammer gun, I am getting back to the broken spring job, having made one new spring and then broken it, I’ve found another spring that could be modified, and bent, filed and welded it to fit – I now have to harden and temper it and hope that it will not break – I will be very gently and will probably end up with a spring that is on the weak side, but better than another broken one. I still haven’t managed to get a decent brown on the pistol barrels – I got rather deperessed by my previous attempts, but am steeling myself for attempt no 3. I also realised there is another job in a gun slip in the office that a friend left to be sorted out – I can’t even remember the exact details, although I think I wanted to find another percussion cock for it, and was going over to see Dick before this latest Covid thing happened – his wife has type 1 diabetes so is vulnerable, and he is on immunosuppressive drugs and so is very vulnerable, so that won’t happen for at least a few months. I wish the vaccine refusenics realised the stress they cause, including to the hospital staff I know who have to pick up the pieces of their obstinacy! Lets all get jabbed and boosted and re boosted and take care so we can get back to something resembling a normal life again. The drug companies are doing a great job designing new treatments as well as vaccines so I hope the days are approaching when Covid can be treated the same way as seasonal flu – I got an email form the NHS a couple of days ago saying I would get one of the new monoclonal antibody drugs if I got Covid so I’m on their radar which is good news….. Take care, and I hope you have a good 2022.
11 November – Really good muzzle loading shoot yesterday! Weather very cloudy and occasional Scotch mist – enough to twart one of the flintlockers for one drive – and not a breath of wind to deflect the birds. The bag was fairly small – 67, but the birds were flying well and the drives were good and even, so everyone had a most enjoyable time – proving that numbers are not everything. I had mostly pegs on the outskirts and wasn’t in line for any big flushes, and I decided that I prefer it that way, especially as I shoot my single barreled percussion gun, so ‘left and rights’ are not possible. I seem to be the only person to shoot a single – someone asked my why I used it – the answer is I shoot better with it than any other gun I have, it is light to carry about all day (5 1/4 lbs), and it saves the dilemma of whether to reload after shooting one barrel or wait til you have shot both. I was surprised in discussion to learn that other experienced shooters had inadvertently reloaded with a cap still on the live barrel! I did make a small plastic ‘top hat’ that fits over the nipple and is locked in place by the cock, but I haven’t used it. All in all a very good day, enhanced by the fact that it was only 25 minutes drive from home. I seem to have got my left eye under control – I have a vintage pair of big gold round frame glasses of the type the NHS used to issue that have a W bridge instead of nose pads – so they fit closer to my face than normal specs and thus offer better protection from bits of cap. I put a bit of sellotape over the top quarter of the left lens which is just enough to stop my left eye dominating when my head is down on the stock – I don’t notice it when looking normally. I’m carrying on the browning of the pistol barrels – I think we are getting somewhere this time – I’m about 6 or 7 rustings in, so hopefully we will be nearly there. Work on the bedroom continues – still not much visible reconstruction yet, but lots of fiddly framing started, and I’m now putting in conduits to pull the electrics through later. I need to use conduits as the house seems to have had a severe mouse problem at some time – much to my surprise they seem to be happy burrowing and making nests in the fibreglass insulation – which makes it pretty disgusting – I’m replacing it with wood fibre (Seico Flex 036) and I’ll try to compartmentalise it to keep rodents out. I did come across one power wire that had the insulation nibbled off – jut not enough to electrocute the perpetrator! In my last house when I lifted a floorboard there was a 2 meter length of flat cable with all the copper exposed like a railway track! That was the advantage of the old TRS rubber covered cable – nothing ate it, although it did get brittle.
7th November – I’m sorry for the missed blogs – I got a nasty infection that made me feel rather useless – and it took a while to sort out – I even stopped working on the bedroom restoration and sat on the sofa most of the day. I did try and do a bit of gun work, but that turned out to be a disaster! My browning of the pistol barrels got no-where – goodness knows why. I never managed to touch some of the steel layers – almost as if it was stainless steel, and the rest didn’t get any colour to speak of – a complete mystery – I ran it to about 14 browning and then gave up and decided to start again when I felt a bit more dynamic! I hardened and tempered the pistol spring, but wasn’t really ‘with it’ and it ended up a bit too open and the ‘hook’ end snapped when I tried to put it in the pistol – I will have to tackle that shortly! I am now more or less back on track and working on the bedroom again, which is just as well as there is a load of work to do – as I pointed out before, I do tend to get more ruthless as I begin to be able to see the job in hand – so I did a bit more demolition and removed an old built-in cupboard that was built of completely woodwormed uprights. I now have a larger room to finish. I have taken it all back to the rafters I put in in 2002, and will put in lots of insulation before putting on Savolit wood fibre board – its a substitute for lathes and can be diretly plastered over. There 1s a lot of plastering to do – 40 or so sq meters at three coats, I’m not very quick at plastereing so I might ‘cheat’ and get a professional in to do it if I can find someone who is good with lime plaster. We had Giles’s flat plastered by a pro – a joy to watch and perfectly smooth, but he left one room to his mate, and that was no better than I could have done (but quicker).
25th October The browning of the two barrels looks a bit more promising – I may have found a clue – I suspect that if you put on the browning too generously it actually takes off the existing oxide layer? sounds improbably I know, but I’m now wiping on a very little browning solution. I spent the afternoon scrubbing distemper off the gable end wall (horrid job) so I could dub it out flat ready for attaching the cork. I rang the floor board chap this morning to confirm their bank details as my bank doesn’t like me using bank details that come from emails – there are loads of scams called BECS going the rounds, where somehow a scammer intercepts genuine emails from a business and sends an email perporting to come from that business but with the scammer’s own bank details. It is usually directed at big business and has raked in hundreds of millions of pounds for the scammers. Penny got scammed out of £500 pounds when having carpets fitted in the cottage in Cornwall, so I take it seriously……. Anyway the floor board chap (Ben at Sutton Timber if you need floorboards!) pointed out that I’d better get all the ‘wet trades’ finished before fitting the floor or the boards would curl up ( actually curl down is more likely!) so I must push ahead with the plastering, but a lot to do first – like putting in the conduits for the power and lights, and sticking the wood fibre boards up so I have something to plaster onto!
24th October – Well, a bit of a gap again – sorry! I had a skip delivered so have been trying to fill it to justify 6 cu yds! Work on the bedroom has been progressing – I have been debating what to do about the floor – its a mix of old and not so old pine boards with lots of patches and gaps – I was going to board it with OSB and have it carpeted but Giles pursuaded me that that wasn’t in keeping with all the other fearures of the room – I did think of getting a few old pine boards and lifting the floor and relaying it, but figured that that would be quite difficult as the nails will surely tear the wood if they are lifted. Anyway after a discussion and a search on the internet I have opted for new Elm floorboards (I didn’t know you could still get Elm in England!) 300 mm wide – we have other rooms with old Elm floorboards, so its a reasonable choice. One really surprising thing came to light when I lifted a section of floorboard – the space between the joists was filled with tan coloured loose material that looked like perfect insulation – at first I thought it was coarse sawdust, but careful examination showed it was plant material that I identified as the petals of hops – I got some hops from the garden, and apart from the colour (garden ones are paler) they were identical. Goodness knows how many hops would be needed to fill around 10 sq meters of floor to a depth of about 7 cm (3 ins) – I wondered if they were a byproduct of brewing or something. Anyway they are clean and a good insulator (the room underneath was the dairy) and will stay, possibly supplemented with some vermiculite if there are empty joists. I’ve never heard of hop petals being used as insulation in old buildings – must make some enquiries…. Things happened on the gun front, but slowly – I did about 8 rustings of the two pistol barrels but they haven’t started to brown yet – in despair I rang Dick to see if he would like to have a go, but he said it usually takes him 10 to 12 rustings and I should be a bit more patient! I have adjusted my technique, being careful to apply browning with an almost dry sponge, and using medium steel wool…. we shall see………. The pistol’s owner sent me the stocks to make sure things fit and work – I was having problems with the heel of the spring coming below the lock edge, so I welded a longer stud on the top arm that locates on the bolster, that kicked the heel up, but the tumbler end of the spring then got a bit low and was too short – straightening out the bent bit a little fixed the length, and bending it down cured the problem of the low spring – now I just have to reharden it. Now I just have a little bit of woodwork to do on one stock and finish the browning, then I have another gun to sort out and another client is threatening to visit wih more work….. And I think I have another pistol to do that I’d forgotten about! And the frames to make for the secondary double glazing…… Plus I have to plan and buy stuff for the STEM club that starts after half term next week………….. Maybe I should retire for the third or fourth time, but I don’t seem very good at it!
17th October – I got one gun job out of the way this morning – a repaired spur and ‘mouth’ on a percussion cock to engrave – difficult as its all on a steep curve, so I resorted to the GRS – the welds are not altogether even textured so it was not straightforward, but the overall effect is OK. I coloured it down with my gas-oxy torch, and then made its mate the same – I think it looks good, but I don’t have the gun to check the overall effect. I photographed the cocks together after I’d engraved the top and the photo showed that the repaired cock had much less engraving on the high part of the body – its a thing I’ve noticed before – you think a job is done and you photograph it, and pack it up to go, then later you look at the photo and see a problem. Anyway I got the cock out again and recut that bit of engraving – the two cocks are subtely different in engraving and surface texture but now look a bit more of a pair. I’ve done two brownings of the pistol barrels – they are beginning to show figure, but there is still a fair amount of metal the browning won’t bite on. I’ve been taking photos after each browning, but they don’t show up as much as in actuality – I must see if I can find a photo trick to show the actual effect. You can distinctly see that the barrel is made of strands of different iron/steel rather than a homogenous material, but as its a pistol barrel the composite bar wasn’t wound round a mandrell in a spiral as it would be in the case of a long gun, but was made into a strip and wrapped round the mandrell and hammer welded into a tube in a series of grooves in an anvil with a lap joint so broadly the pattern runs along the barrel. I believe most pistols were made this way, as were all (?) military muskets and rifles. Some fancy pistols did have wound barrels and elaborate patterning, but most didn’t.
 After second rusting – there is pattern, but faint, and a lot of untouched metal!
 the cock on the left has lost its engraving on the high part

Recut – original engraving not identical on the two cocks…… (& different lighting)
 Here is the bedroom I’m working on – the visible vapour membrane is directly inside the slates. –
there is 140 mm of wood fibre insulation to go in and 60 mm of cork on the gable end wall.
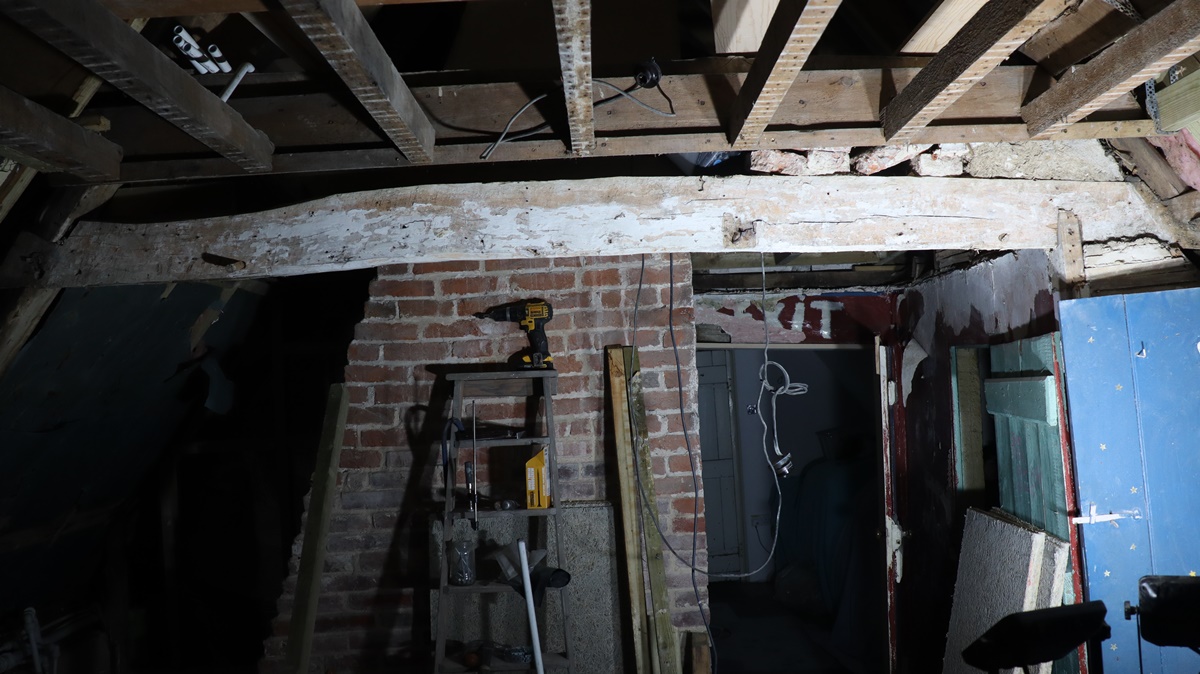 This beam is probably at least 250 years old – it has a curved brace at the left end that I’m repairing as its half rotten.
A similar brace at the right end is missing and will be re-instated when I can find a curved bit of wood.
16th October -More work on the bedroom yesterday – got me thinking about the 7 deadly sins of old house restoration and what would be the 7 deadly sins of old gun restoration. My 7 for old buildings are :- 1) Cement, 2) UPVC in any shape or form, 3) MDF board, 4) Plasterboard, 5) Vapour barriers, 6 Struck pointing of brickwork, 7) Float glass. Not sure I can get to 7 for guns ;- 1) Sandblasting (yes, it has been done!), 2) Brazing of broken parts, 3) Use of woodfiller, 4) Polyurethane or similar varnish, 5) stainless steel, 6) Slotted head woodscrews, 7) Almost all sanding of existing wookwork. This weekend is devoted to getting some gun jobs done – I’ve prepped the barrels and cleaned them with water and washing up liquid to get rid of any oil, then given them a wash over with chalk and water mixed like thin cream. When this was allowed to dry you can see some figure showing through as faint rust marks – the beginnings of browning – its now having its first proper browning. I decided to make a completely new top jaw screw and cut the thread on the lathe since it is set up for a suitable thread pitch – 28 tpi. I heated up the top of the screw and dipped it in colour case hardening compound not to full read heat – anyway that dulled it down a bit. I then reverse electrolytically derusted it ( i.e. rusted it rapidly) – in order to slightly dull the surface. Its actually put some natural looking blobs of the surface too. Its not a bad match for the original, I’m satisfied. There is one niggling job that I need to attend to;- the new mainspring I made/converted is very close to the edge of the lock, and probably won’t fit within the lock pocket of the completed pistol (which I don’t have) = There are 2 options, either move the hole in the lockplate that houses the peg on the top leg of the spring, or reshape or remake the spring. Either way its a great bore and will take a while – the lock plate is hardened so I’d have to anneal it, which won’t improve it, so I’ll proably work on the spring! I got an email from school a couple of days ago asking if I’d organise/run a project for 2 classes to build their Nativity display models for the local church – I’ll be delighted to do it, I’ve already bought a couple of strings of LED christmas lights to illuminate Bethlehem! Bit ironic for an atheist to be doing the church display but hey ho, thats life……
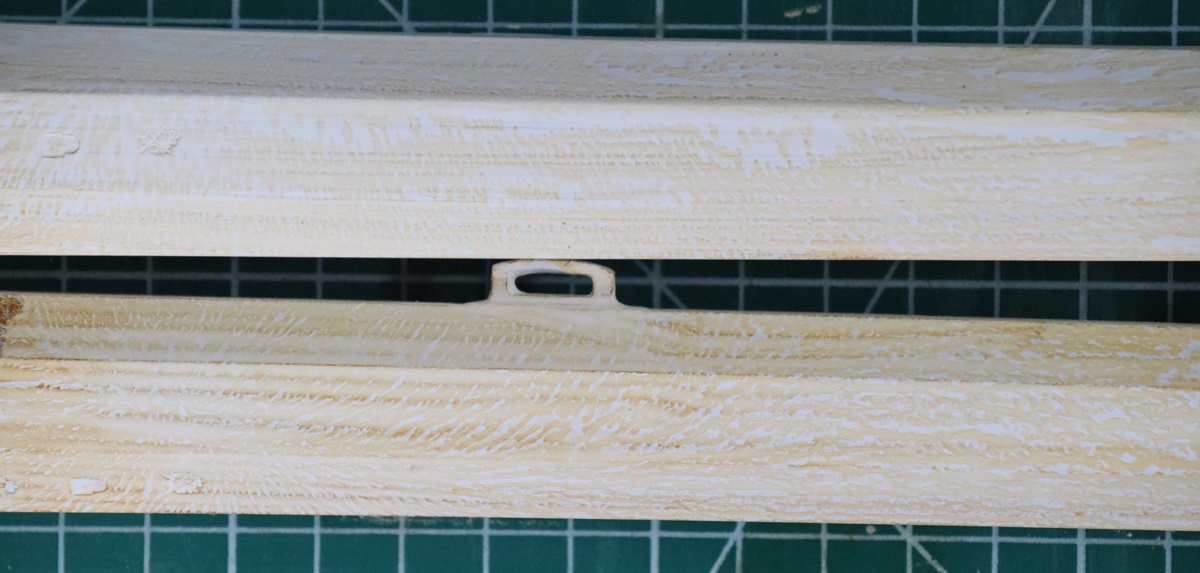
I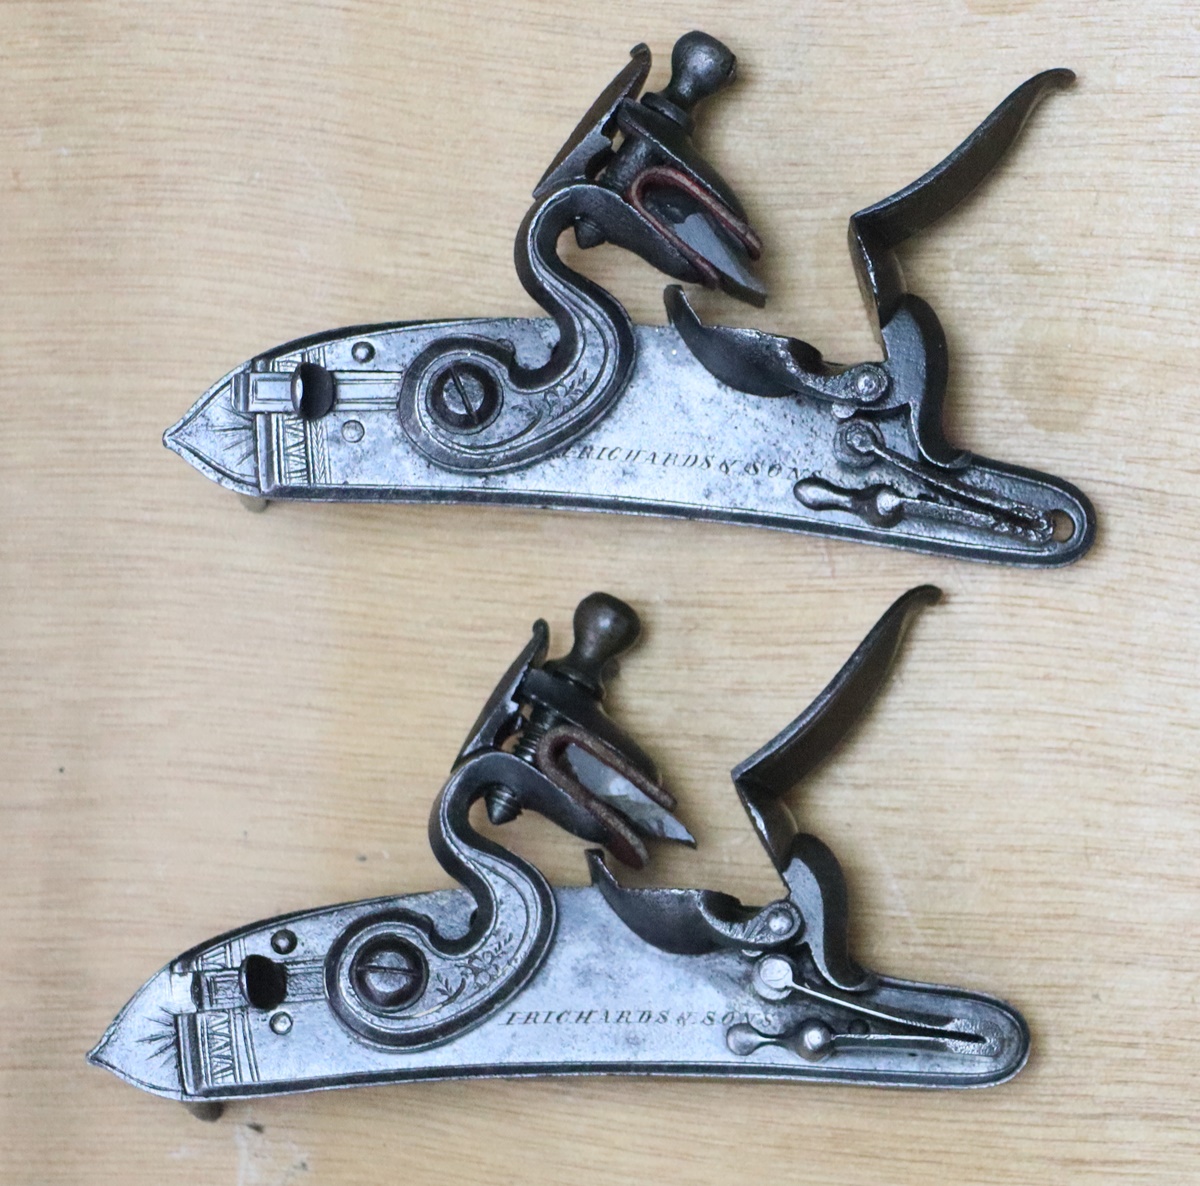 I can tell them apart ‘in the flesh’ but don’t know which is which from the photo, so must be OK!
14th October – Destruction more or less complete – just waiting to get the last 20 bags of rubble and muck down to the ground using my ‘crane’ – actually just a pulley stuck out on an arm from the window. It needs two people, one up one down, to operate so I have to wait for Giles to come over tomorrow. I was just about to finish in time for my 4 p.m. transfer to gun jobs when the materials for rebuilding were delivered on a couple of pallets and dumped outside – that took most of my afternoon gun time to sort out, anyway nearly ready to go, some framing up to do and it will be ready to stick on the sheets of wood fibreboard (Savilit) that will be the base for plastering with lime plaster. So I had better go and get a few minutes work on outstanding gun jobs. I’ve got a percussion cock that has been welded to re-engrave – its all curved surfaces which are very difficult to do hand encraving as you can only keep a constant depth of cut by EXACTLY following the curved surfaces, otherwise you almost invariably slip and make horrid cuts. My solution for this is to use the pneumatic graver (GRS) that operates with almost no push and so doesn’t tend to slip. I’ll go and start now………
13th October – Still destroying! Quite mild here – how long will it last? We have a massive crop of green tomatoes in need of another week’s sun – can’t face that much chutney! We planted a grape vine about 5 years ago and have never had more than a handful of unripe grapes, but this year it made it from its trelis to the south facing wall of the house and went mad – we must have had enough grapes for a Chateau Cablesfarm vintage – bottles running to two or three figures ( that’s roman numerals). It won’t happen, as the potential winemaker ate them all at about a bunch a day for the last month. I’m still experimenting with striking up the pistol barrels. One of the problems with using a file is that occasionally a speck of metal gets embedded in the file and creates a deeper scratch. I tend to file wet as this helps avoid the problem – some people use chalk for the same purpose, not sure which is best. I got good results from using a small fine diamond sharpener stuck to a plastic handle (EZE-LAP) until the white spirit I was using disolved the adhesive holding the diamond onto the plastic. My current best guess at a good technique is filing down to No 4, then use a fine slip, then 400 grit and finally 1000 grit. Looking under my x25 microscope there is still plenty for the browning to get a bite on. I’ve recut the engraving on the barrels a couple of times as I’ve filed so that they still look crisp. The microscope x25 does reveal that the surface still has multiple small pits, but I think when browned they will not show (they don’t really show to the naked eye) so I think I’m now ready to go! I have had to divide my day up to get both the bedroom and the guns done – I reckon 6 hours of labouring is enough at my age, so at 4 p.m. I retire to the gun workshop for a bit of filing etc. ( after a cup of tea of course) until 6, then maybe back again after dinner for an hour or two if I feel energetic, then attend to the blog if I have anything to say!
 Photo a month ago – a few of the many bunches – almost all eaten now!
12th October – Mostly busy on the bedroom renovation – still in the destruction phase. I went out today to buy some 12 mm OSB sheets for some ‘undersheets’ and to make the floor fit for a carpet, but it turns out that OSB is now in very short supply and is almost impossible to get. Shame as there are no really good substitutes. I spent a bit of time on Sunday and this evening striking off the two pistol barrels. Nick, a fellow antique firearms collector sent me a link to a facebook page re my post about the difficulty of browning barrels if you burnish them too well. The link said that the correspondent never went any finer than 360 grit paper, so the browning had something to bite on. I wouldn’t be as catagorical as that, some very high class pistols had very highly polished barrels under the browning, but it does make the point. I rang Dick, who has done many more barrels than I have – he basically works up through the paper grades to 1500. His browning is good. I feel it is ‘horses for courses’ as usual – looking at a number of guns you can see distinct longitudinal marks (scratches) along the barrel in guns that have never been re-browned, so they were quite coarsely finished when made. The pistol barrels I’m doing are fairly badly rusted in places, so there is no chance of striking them off to get rid of all the pits, so I figure it would be better not to have a highly polished brown. For pistols with Octagonal barrels my current technique is to strike off the flats with a good No. 3 file used lubricated with thin oil or white spirit (could use water with a drop of detergent but you can’t leave the work in progress or it will rust) either used as in draw filing with the file at right angles to the barrel, or if the barrel faces are flat along the barrel ( these ones are) then you can use the file parallel to the barrel. Follow this up with a No 4 file used similarly. then a N0 6. I then have a small slip stone that gets rid of most of the file marks. The advantage of using files and the slip is that they are completely flat surfaces and therefore keep the flats flat. In fact, often the flats are not flat but very slightly convex, so you can allow for that as you file. I really don’t like using abrasive paper any more than I have to, as I think it is always liable to round the corners off, but after I have filed and stoned, I’ll work through a couple of grades of paper wrapped round a flat surface narrower than the flat of the barrel. If you have engraving you want to preserve, be careful if you use paper as it invariably rounds the edges of the lettering. I did try to get the breechplugs out of these barrels, but failed, and it wasn’t essential so I left them in.
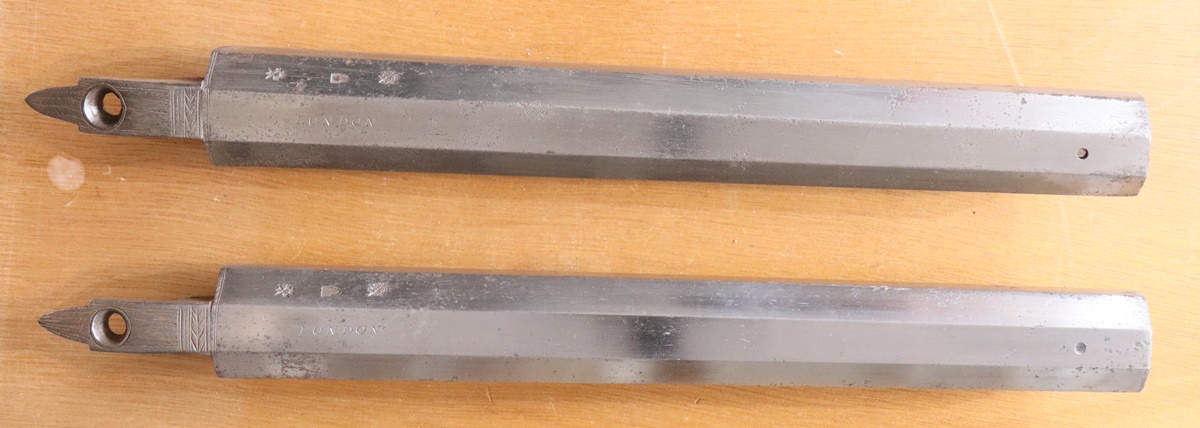
If you click on the images you’ll see the rust pitting – it won’t be too conspicuous when done, but its too much to be filed off completely
Top one is at 800 grit stage, buottom one is at slip-stone stage.
8th October – Still hoping to get down to some decent gun work – I have 2 pistol barrels to strike off and brown, but the last two I have done have been a bit of a pain as it took more rustings than usual to get the browning to bite on the steel component of the iron/steel mix in the twist barrels. I suspect that I may be rubbing the rust off too well between rustings and burnishing the metal to a surface that resisted the rust? I have been using 0000 steel wool, while conventional advice is to use a wire brush, but I didn’t have anything except a very coarse brush that I thought would scratch the metal. Anyway I had to do something to put things right, so a search on the web brought up ‘The Wire Brush company’or something like that, and I was able to buy a couple of brushes that were (probably) more suitable – one with .015 mm diameter wire and one with .035 diameter. I think the website was the one where I found my very fine Vertex wire wheel recently. I will be interested to see how the next two barrels turn out. The stripping out of the bedroom is progressing well – as usual the more I do the more drastic my stripping becomes! Having taken the plaster off the lathes, it was clear the lathes were going to be problematic to retain, and also I needed to improve the insulation between the rafters (its an attic bedroom), so all the lathes are coming out and after I have put in the new insulation (140 mm of wood fibre) I will put on a 15mm board made of bonded long wood fibres that can be plastered on. We started to remove the plaster from one of the slopes, only to discover that it was plastered onto reeds, and so is probably a considerably older generation of work than the lathe and plaster – anyway its interesting enough that I decided to retain it – it has 150mm of fibreglass inulation behind it, so not too bad. The gable end wall can’t be insulated on the outside ( its a flint wall and it would be desecration) so I’ll add a layer of insulation inside. Unfortunately there isn’t a lot of space due to the shape of the room – too thick a wall and there wouldn’t be room for a double bed, so I will have to make do with 50 mm of cork insulation and the plaster applied to that. I’ve been having fun calculating U values and juggling things! Insulation Rebellion would be proud if only they were really interested in getting people on-side instead of just driving diesel cars and living in uninsulated houses and alienating people !
6th October – Excellent day’s shooting yesterday – after fretting all week at the dire weather forecast we had only 5 minutes of light rain the whole day, and any moisture had evaporated in ten minutes! It took me a while to get my eye in – there was quite a breeze and I had a couple of stands at the beginning that were at the downwind end of the line so the birds were motoring. I thought I was better at partridges, but in fact I had a better hit rate at pheasants. Anyway good fun, and it was nice to see a group of friends who I hadn’t seen for almost two years. The world is coming back to life again, and I’ve gone from having no restoration work coming in for the last couple of years to having 3 or 4 jobs drop on me in the last month. I had a visit from the ‘magic’ double glazing chap this morning, and Dave and I had a look at the sample – It is rather impressive – two sheets of glass about 3.8 mm thick with a 0.1 mm gap in the middle which is a vacuum, giving a toal thickness of 7.8 mm. Normal double glazing has a 20 mm gap filled with argon or krypton that transmits heat by convection – around 70% of the total heat transferred. Triple glazing is a way to overcome this but then you end up with very thick & heavy units. The magic units give a thermal performance better than good triple glazing! They are also pretty good at sound insulation as sound doesn’t travel in a vacuum. The secret of how the relatively thin glass doesn’t bend inward under the vacuum is a series of 0.5 mm diameter pillars on a grid of about 25 mm that you just don’t see when its in a window – if you place the unit on a sheet of white paper you can see them but they are not particularly obvious. So I decided to do a couple more windows and replace the glass in the back door. It is expensive – its very complex to make – but we all have to do what we can to fight global warming, and insulating homes is (probably) one of the best ways. Oh, and the units are fully recyclable – I’m beginning to feel virtuous…… I do get a bit fed up with most of the discussions of what we need to do to get to carbon neutral – a very necessary aim in itself – because we seem blind to the enormous amount of energy that will go into manufacturing all the electric cars, trucks, houses, boilers, heat pumps, nuclear power plants and even wind farms themselves – That will probably balance out any benefits from the use of these fossil fuel saving systems for years to come, and we won’t have low carbon technologies on line to make these low carbon technologies. On the other hand we have to start somewhere!
4th October. work has started on the bedroom- I found a newspaper I had put there when I first did a preliminary rebuild in prparation for the full works – the newspaper was dated 2002! How time flies…. I spent a happy hour starting on a new cock screw. I couldn’t find a suitable thread to use on the new one, so I have turned up a head and plan to weld it onto the old screw – I’ve done it before with side nails and it does work although its a bit fiddly getting the two bits lined up and getting electrical connection for the welder too. I’ve jigged them up in a piece of brass channel in the hope that that will work. I use modelling clay to hold the bits while I make the initial tack as it lasts long enough, just. Shooting tomorrow so no chance of any gun work – I’m still pondering the welder – I put a current sensing resistor in the celectrode cable, so I will do some esperiments to see what current I want to work at. The weather for the shoot tomorrow looks a little better than it did, but not too brilliant!
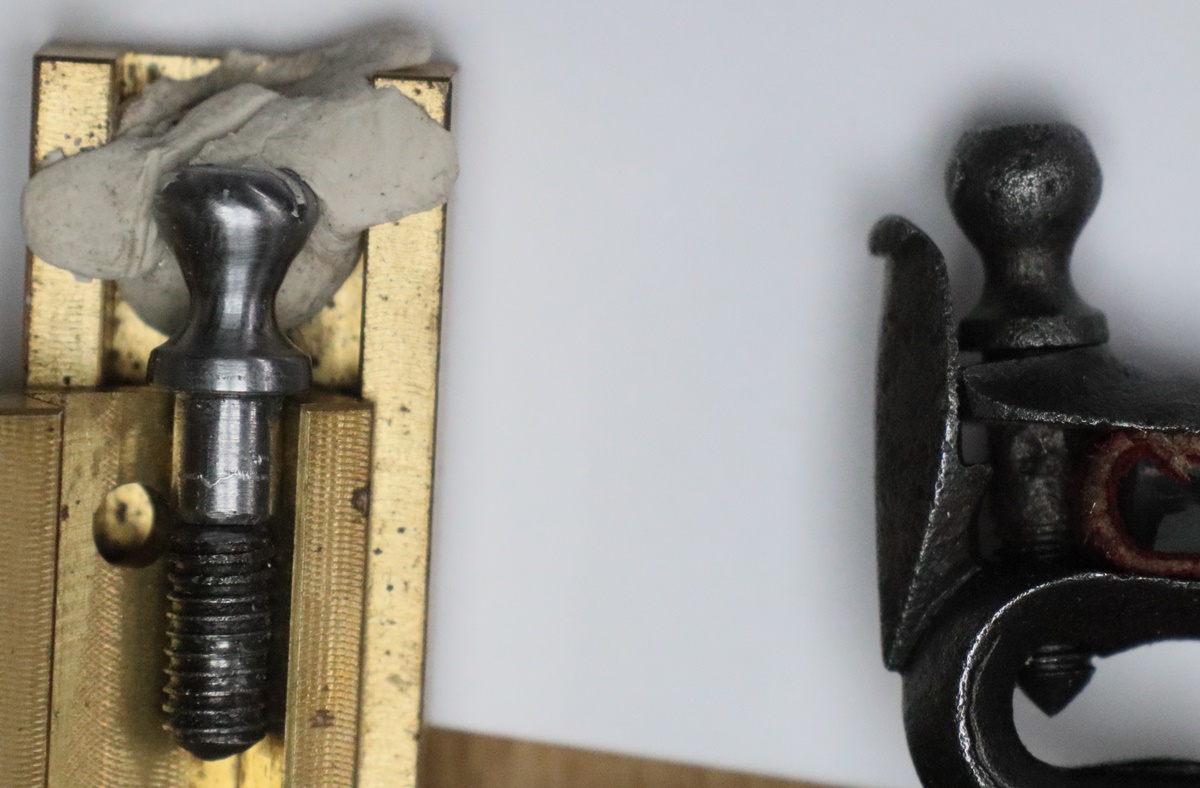 Not sure about that – might have another go – its not rounded enough!
3rd October managed to fit in a bit of work on the pistol sear – mainly ‘tuning’ it to give the right position of half and full cock – its sensitive to the length of the nose of the sear, as you would expect, so you need to file the nose down with extreme caution to avoid taking too much off and having to start over again. Anyway it now works and I straightened out the sear arm as I hope it no longer needs to be cranked, then hardened it and tempered it a bit in a fine flame, avoiding directly heating the sear nose, just letting the colour run down and dunking it in water when it had gone straw coloured. I annealed the sear arm, holding the body of the sear in the vice to keep it cool, as it may need to be bent to fit – I haven’t got the stocks of the pistols so I hope it fits, otherwise the owner will have to try bending it! The welding on the underside of the sear is not perfect – I was struggling a bit as I mentioned before – I went on the web looking for advice on low current welding but it seems that there may be a number of issues with welders, particularly cheap ones, that mitigate against very fine welding – I understand that welders give a short pulse of quite a significant current to start the arc – maybe as much as 50 amps so my quest for a very controllable low current welder may be pushing me up out of my price range – thats what usually happens when I try to be particular about what I want! If I can’t find a suitable welder at a reasonable price I will program up a microcomputer to give me short pulses as in a more expensive welder. I spent a couple of hours building a crane to stick out of the bedroom window to lower the old plaster and get the new stuff up as we don’t really want it trecked through the house and over the Persian carpet in the living room! A major triumph – I did a sortie after diesel – my car is OK but Penny’s is quite low, so I took a 10 litre can and did a reccy and found the local Tescos had diesel so a quick call got Penny out to fill up. It really is quite difficult round here – it seems to be pretty easy to get petrol but not diesel. If we hadn’t got some for Penny’s car I was going to borrow a petrol car for a while! I’m shooting on Tuesday, which is the only day in the next fortnight that is forecast to have heavy rain! We are to bring a breechloader in case its too wet for muzzle loaders. I’m not too sure how game reacts to heavy rain but I would be surprised if they can be persuaded to leave cover! I’ll take my 1950s Bereta 20 bore hammer gun – it has a very tight choke on both barrels so will be a challenge to hit anything, assuming there is anything to hit! I would take my bolt action .410 ( the rat gun!) as a challenge, only I don’t have enough 2 1/2 inch cartridges to be worth it. But it will be nice to get out!
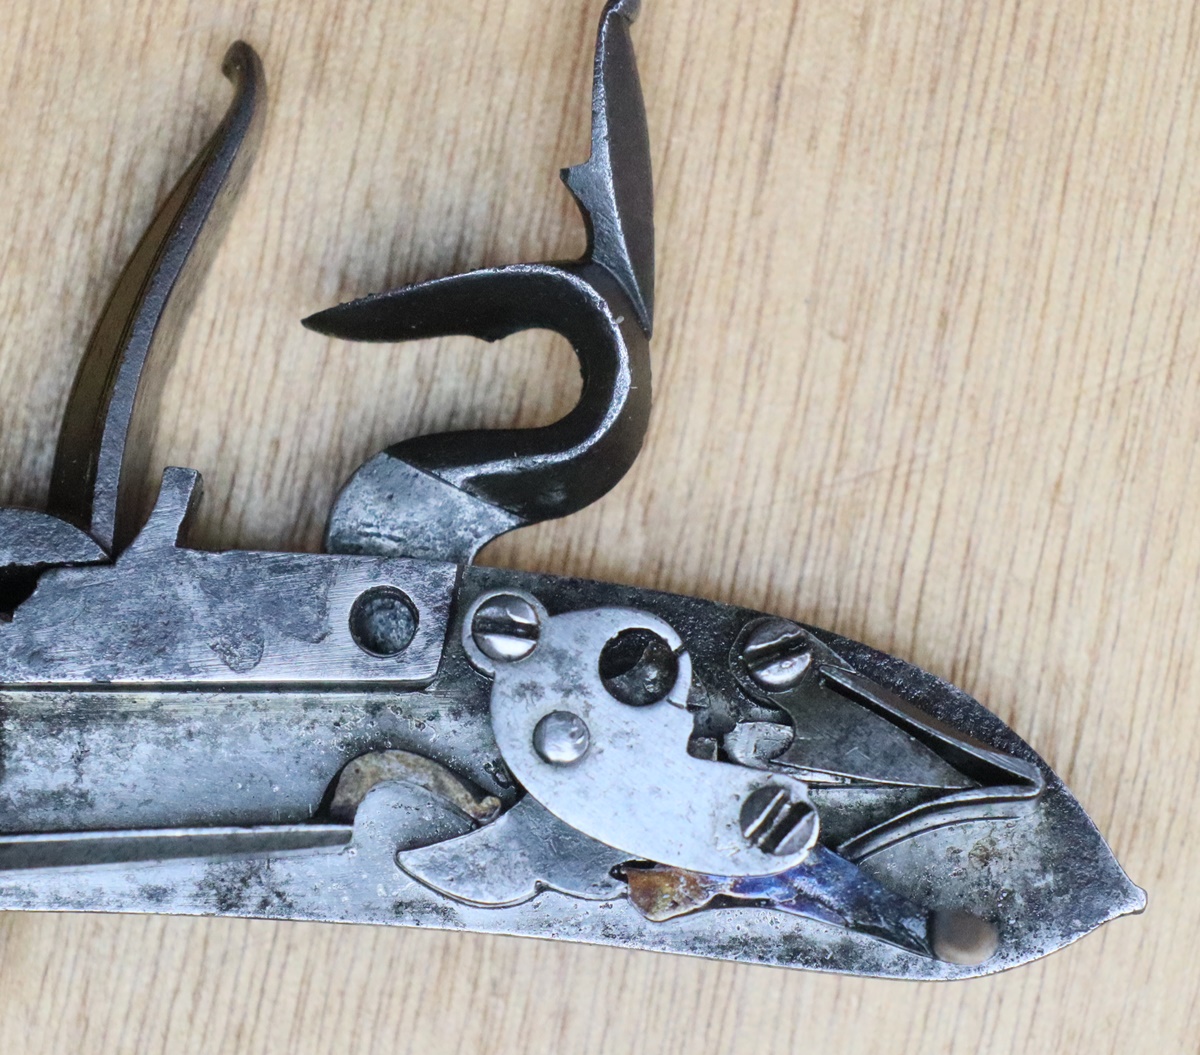
1 October – I’ve had to spend time prepping the work area for next week and finishing the prototype secondary glazing frame so I can work out the exact sizes of the super insulating glass to order – its on 8 weeks delivery so I wan to get the order in ASAP. My gun workshop is now getting cold so I have to get the woodburning stove going, which inhibits me from short expeditions to work on guns. We did manage to fill up the Land Cruiser with fuel and put 10 litres from a can into Penny’s car, but that won’t last long…………
28th September -I’ve spent some time getting ready to start work on the spare bedroom – plaster to be stripped, insulation put on the external wall and all replastered with lime plaster – my grand-daughter starts work on it next Monday – she is used to working on building sites and has done some demolition work so should be well suited! I’ve also been preparing the wood for one of the secondary glazing frames as a trial. In the gun line, I’ve made a new spring for one of the Richards pistols out of a modern mainspring – I welded a ‘flag’ on to space it off the bolster – my welder wasn’t set up very well so its not visually perfect, but it is sound and it all works well. I can’t get that abrupt right angle that the old springs had at the start of the ‘hook’ that engages with the tumbler, but never mind, this one works very well. ( I think I don’t have a hot enough flame). I’m now working on the sear – you can see from the photo what the difference in the sear shape is for the two pistols. I tuned up the welder so it started at a lower current, but now it doesn’t really have enough electrode current to strike a proper arc when you just turn it on with the pedal, but does start the high voltage discharge that is supposed to initiate the arc – the high voltage discharge is a bit fierce and seems to blow the tip off the electrode. I’ll have to have another go at adjusting it, or I might just put in another potentiometer to allow me to adjust the start current. Nothing is straighforward – I suppose I should have bought a proper TIG welder with a pedal control and pulse drive instead of modifying a cheap one! Anyway, be that as it may, I did manage a bit of blob welding on the sear without destroying any vital bits, and am now filing it to shape – its a slow process as I must avoid taking too much off! I think there is a problem with the contact point for the sear spring which means that I may have to file down that area to get it to work. I had a meeting with the head of ‘my’ school yesterday about restarting my STEM club after half term, and what we would be doing. There is a bit of a problem as the school has moved over to Chromebooks instead of laptop PCs, and the they run an operating system based on linux but not standard linux, so only a few programs can run on them – unfortunately our favourite Python front end (Mu python) is one that won’t run for the BBC microbits, and its an essential part of our plans! We’re suffering a bit due to the ‘petrol’crisis as Penny’s car is almost empty and so my Land Cruiser is getting a lot of use! I did try to syphon the diesel out of mine as her car does about twice the mileage that mine does, but mine has a crafty anti-syphon block at or near the tank and I can’t manage to get a pipe into the fuel, even quite a thin one…………………. Oh and I just spotted what I think is my first visitor from the Falkland Islands on this website – welcome!
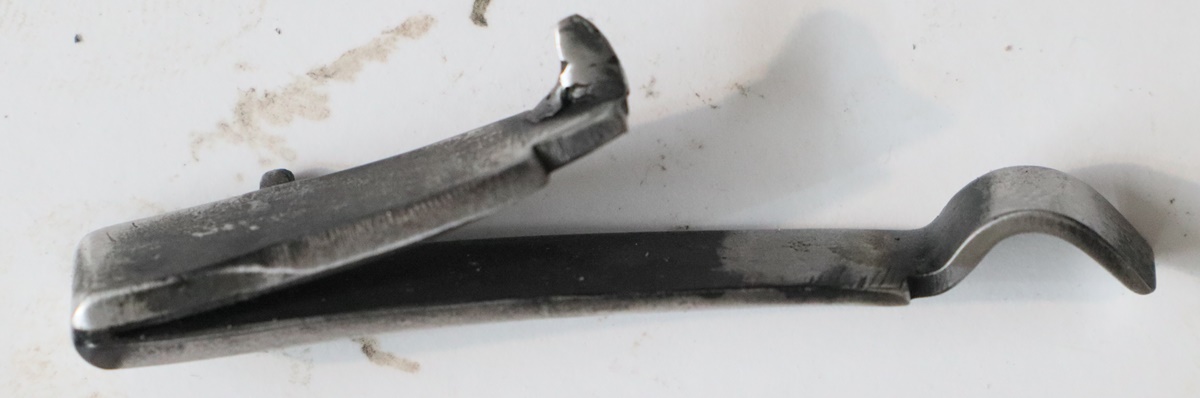
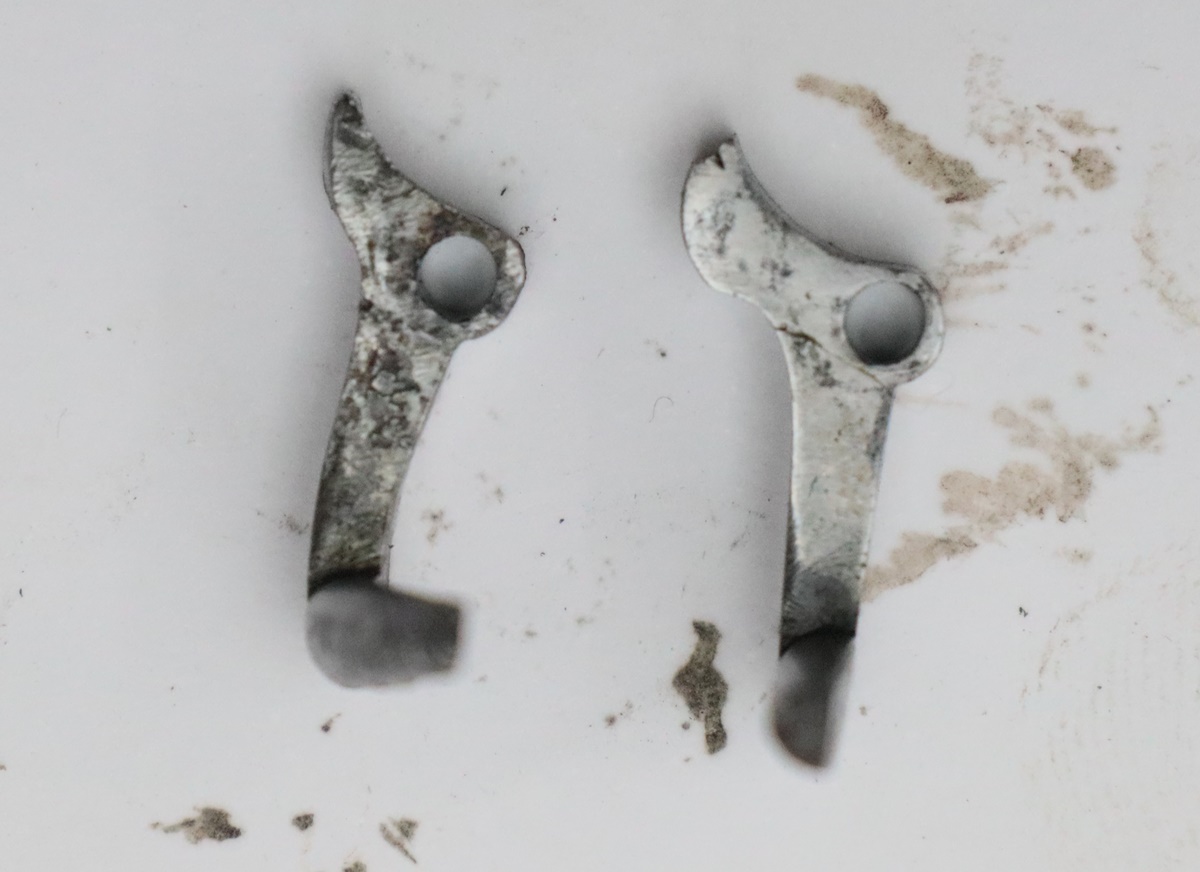
The one on the left is the ‘wrong’ one – its too short so the cock doesn’t clear the frizzen at half cock – also you can see the bends in it.
25th September – I spent the afternoon sawing and planing up the oak for the first secondary glazing frame for the kitchen window – I just had enough oak in stock to complete the job with oak that was a reasonable match to iteslf, although it’s very light compared to the existing frames, which were quite dark to start with and have darkened in the last 20 odd years. I got round to some work on the bits of the Richards pistols I have to restore – the locks were a little pitted in places and I scraped off a bit of rust from the insides and stripped the works to check everything was OK and wire brushed the whole lot with my 3 thou wire brush to even up the finish. The No 1 pistol needs a new mainspring – I think I have a modern one that can be cut down and modified to fit – I have annealed it and begun the work – I need to weld the pillar that engages in the slot in the bolster on the short leg, and shape the hook on the long arm. Cleaning and checking the No 2 pistol I found when I tried to put a flint in it, that at half cock the top jaw collides with the frizzen. I also found that it was very hard to move the sear. You can also see that several attempts have been made to bend the sear arm, and you can also see that the angle the sear spring makes with the top of the sear is too steep so there is too much friction when you try to lift the sear. All this can be put down to a replacement sear that is too short in the nose where it engages with the bents – it needs the nose extended by some 1 1/2 to 2 mm to work properly, or a new sear made. In all probability the sear was a poor working life replacement, as was (probably) the top jaw screw on No 2, which is just not quite right. What to do about the sear? The pistol is not a shooter, so it doesn’t really affect it directly, but its up to the client – I’ll email and see what he wants me to do.
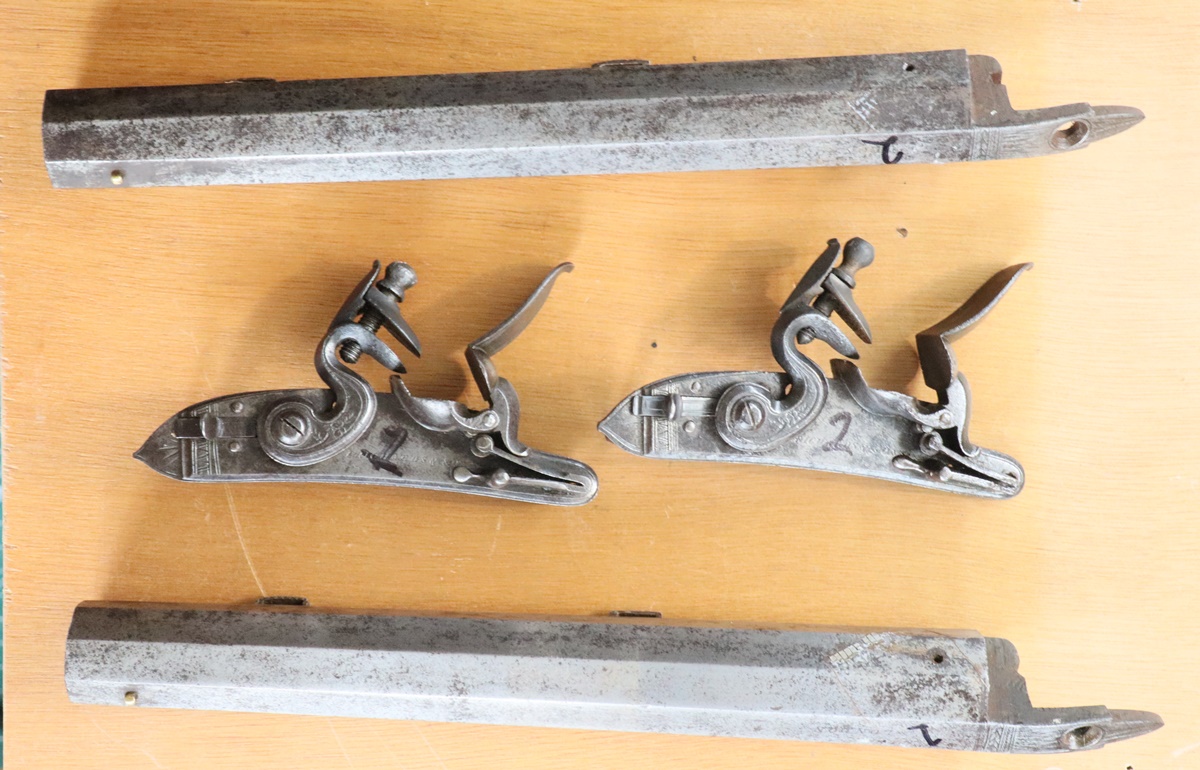
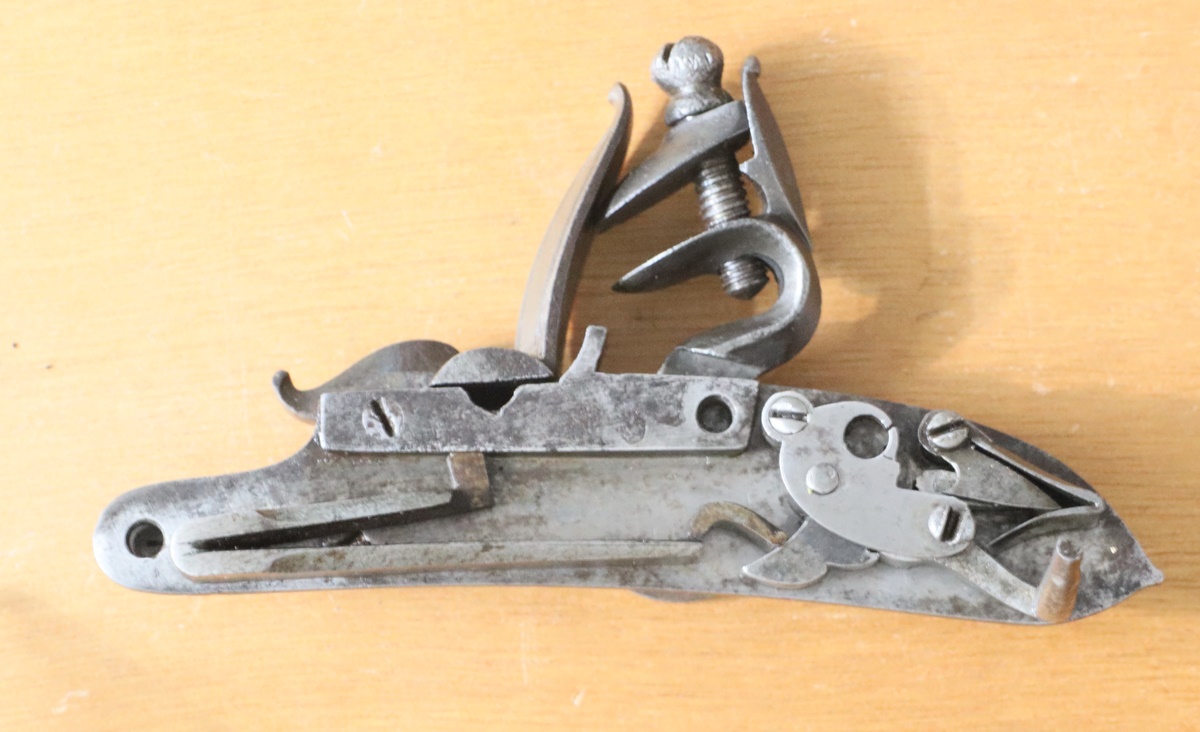 Half cock – note frizzen isn’t quite closed, sear arm is too low, sear spring angle is wrong and sear arm is bent slightly. Sear nose is too short!
22nd September – In keeping with the spirit of the age I’m preparing to double glaze the leaded windows in the kitchen, living room, library and one bedroom. I made the frames and leaded windows around 20 years ago – each is slightly different as the openings were not identical, having been originally made around 1800 when the old 17/18th century house was given a makeover. I plan to make additional internal frames for secondary glazing. I was looking on the web at prices and performance for toughened glass, perspex or polycarbonate when I came across a strange product that is a very thin sealed glass unit claiming a performance better than most double glazing. Its intended for replacing the glass in wooden window frames as its not much thicker (6.7mm) than normal window glass, but gives you an insulation performance better than 20 mm thick sealed units. Yes, I was sceptical too! It does this using very thin glass (3mm) and a .7mm vacuum gap with glass micro pillars keeping the two sides apart. It is of course quite expensive at about £280 per square meter, but I’m intrigued. I’ve talked to the UK agent ( its made in Belgium) and am waiting for a sample. The snag is an 8 week delivery delay. My plan is to use this glass in the secondary glazing, which should give a very good insulation – I’ll keep you posted on progress – if I get a sample I’ll run my own insulation test! I got the gun with the sheared off tumbler bolt and ratty looking hammer to fix, so that is a job in the queue. I also have a couple of business card sized plates to engrave to go on presentations, so I ordered a couple of bits of 0.8mm sterling silver from Cooksongold. When I took the protective film off them the surfaces were strongly marked with striations all over. I put one surface on the buffing wheel but that just made the surface look worse. Obviously a major cock-up somewhere at Cooksongold. I phoned and they asked for photos, which I sent and I’ve been trying to ring them all day but there seems to be something wrong with their phone…… Off tomorrow for a quiet shoot at Cambridge to see if I can hit anything – I’ll use the little Nock 16 Bore single again, I am so comfortable with that gun – and its light to lug about (5 1/4 lbs) – I shoot 2 1/2 drams of Czech powder and 1 oz of shot. I guess it kicks a bit, but fortunately I am not particularly sensitive to it – I have noticed a strange phenomenon – I can shoot that load at clays or game all day without noticing it, but if at the end of a game shoot I need to clear the gun by firing it into the air with a normal hold, it kicks like hell….. others have noticed the effect too. Must remember to take the taped glasses!
This was supposed to be polished silver!
19th September – Most enjoyable shoot on Saturday. I put a bit of clear sellotape over the top of the left lens of my spare glasses – I only use that bit of the lens when shooting (the glasses have big round lenses) so I can see normally the rest of the time. The sellotape just fuzzes the view enough to make the brain switch dominance to the right eye but not enough to make one conscious of it. Anyway it worked and I had a sucessful day – I was back to my ususal habit of shooting really well for the first couple of stands, and then not quite so well – the same happens in competitions at clays. Using a single barreled gun is bit limiting on a game shoot, but I am very quick at reloading as I am using semolina in place of wads – very few of the ‘gang’ who tried semolina still use it, although as far as I can discover the reasons are not related to shooting performance. I reckon I can reload in less than half the time it takes wad users to load a double. It was a beautiful warm day with mostly gentle breezes – absolutely lovely to be out in the country – it has really boosted my mood and I’m feeling dynamic – just as well in view of my pile of work in hand. Nick sent me a couple of photos of a very small flint pocket pistol in a pretty poor condition that he’de found in a flea market and asking my advice on whether to buy it – I thought it would make a good project, and as it was pretty cheap it might be a good opportunity to give it a more thorough makeover than I would if a pistol had more intrinsic value. Final decision will wait ’til its in my hands……. Among the jobs in hand is possibly replacing some of the silver inlay in the pocket pistol. I had hoped that I could draw silver wire flat, but it doesn’t really work – there is no substitute for a set of rolls, which I don’t have – so I either have to get some rolls, make some, or get someone who does have jeweller’s roll to flatten the wire for me.
17th September – Shoot tomorrow – I am a bit concerned about my ability to hit anything after my last outing at clays as I still have a left eye dominance problem so I am reverting to my most reliable percussion, my little Henry Nock single. In previous posts I described converting it to flint, and it worked well, but I’m not confident to use it on a game shoot as a flintlock so I have swapped it back. I converted it by making a new lock plate etc and just used the mainspring, tumbler, bridle, sear and sear spring from the old lock ( I made new screws as I couldn’t match the threads of the old lockplate) Anyway it was the work of half an hour to swap the touch hole for the drum and nipple and swap the bits over to the old lockplate. I got used to shooting a single barreled gun and I do find it more pointable – which is why under and over breech loaders have more or less completely taken over from side by side guns. Using a single has the disadvantage, of course, that you can never get a nice left and right, and you do miss having a second barrel at times, but on the other hand it saves that terrible dilemma with a muzzle loader – whether to reload after one shot if there is a lull, or hang on a shoot both barrels before reloading. Reloading one barrel is a pain as you have to remove the cap from the ‘live’ barrel, which is always a fiddle, even with my design of decapper. I saw my Oncologist today and asked about my level of immunity to a second dose of Covid – answer, more or less, is my guess is as good as his but probably not great – its a good excuse to avoid what I don’t particularly want to do but not enough to totally avoid what I do want to do! Simple really.
15th September – I seem to have a couple of restoration jobs about to come in – both with a bit of a story behind them! One is a fairly basic Birmingham Percussion single that has a replacement cock/hammer that doesn’t fit very well. The owner went to unscrew the cock screw that holds it onto the tumbler and the head came off ‘ in his hand’ without any great force. I was able to reassure him that we had all been there several times before! There are two possible causes – either the screw is fractured or corroded and so has very little strength left, or that has already happened to the last owner and he stuck it on with glue.! I’ve had both. In this case my friend tried a thread extractor in a drilled hole in the remains of the screw, and broke off the extractor. I have to say that I have only used a thread extractor once on a gun as far as I can remember, and that wasn’t very sucessful either! The basic problem is that the screw/stud/thread extractor forces its way into the remains of the screw and in doing so expands the screw to ensure its an even tighter fit in the threads – the harder you screw in the extractor, the tighter the screw gets…. obvious really! There are in my view a very limited set of circumstances in which an extractor is any use – its a fine balance in keeping the hole for the extractor fairly small compared with the screw root diameter so there is enough metal in the remains of the screw to resist the radial expansion, while at the same time getting a big enough extractor that it won’t break. Maybe some people have better luck with them on car engines etc. Given the existing situation there are a couple of possible solutions – 1) heat the tumbler shaft up and anneal it to soften the bit of the extractor and try to drill it all out and retap the hole, or mount a bit of bar in the chuck of the lathe, drill a hole for the back bearing of the tumbler and araldite the tumbler to the block, then cut off the squared bit of the tumbler shaft and drill the tumbler out, then turn up a new shaft and silver solder it in, taking care to get the orientation right when you file on the square ( although you can always heat it up and try again! The second job involves a mainspring that broke due to mild thermal shock – again I’ve had a mainspring break because I looked at it, or at least that is how it felt at the time. I also put a mainspring in my derusting tank and came back 10 minutes later to find it in 3 pieces in the bottom of the tank – when I looked at it there were loads of laminar cracks in the spring – the odd thing is that I’m sure it worked before I took it out of the lock! I do know about hydrogen embritlement but that is only supposed to happen quite slowly as hydrogen diffuses into the metal and then only on high strength steels….. I finished the browning of the single barrel as the surface was getting slightly rough – I probably left it too long, but my patience was stretched! If it was a proper job I’d have paid a bit more attention, but its a rough old gun anyway! The onset of Autumn brought the usual plague of small rodents entering the house (heaven knows where they get in) – I got 7 in 3 days which give me a short lull to go round and find any ways for them to move between rooms – the standard test is that a mouse can get through any crack you can push a pencil into – obviously there has to be some width….
13th September – Following my comment about cateracts I had a very helpful email from a regular viewer of this website – he recommended that when I have my discussion with the opthalmologist I mention that I shoot, as it is possible to specify different lenses for different applications. Driving lenses are apparently designed to limit dazzle but lenses suitable for shooting are brighter. I will definately have that conversation. One of the tricky aspects of this blog is deciding just how much personal stuff to include – like cateracts. I am sure some regulars would prefer that the site was exclusively about antique firearms, while I believe others do enjoy a more rounded view of what I do! Talking of which, I am gearing up to renovate a bedroom – move a wall, insulate the outside aslls, redo the floor and redo the lath and plaster ceiling and walls, and at the moment its rather full of furniture that ought to go to the saleroom, although none of it is worth much. Anyway one nice item is an oak roll-top desk that we have had for some time – the tambour (the roll bit) came apart in me hands, honest guv, so after a quick check on the web I took the desk apart and retrieved the tambour, which had clearly been patched up half a dozen times already – that left me with a choice – do I take all the canvas off the back and start over again or patch the worst bits – in the end I opted for patching – I’m not sure it was the right decision but it should work well enough. If the renovation sounds like a big job, it is! I re-roofed that part of the house about 20 years ago – its basically an attic with sloping walls – and left the old roof timbers holding up the plaster while I planted a new roof and new wall plate on top. We didn’t need the room then so its still as I left it after the re-roofing…. should be loads of fun! I’m still browning the barrel of my single gun – I didn’t give it a dunk in copper sulphate, which I should have done, so it took around 12 rustings before it would put any colour on the lighter bits of the metal, and even then only if I steamed it after each rusting…. I think its getting there now but I haven’t checked the last rusting. I started off using Blackley’s Slow Brown, then moved to my ex printed circuit solution and then tried Dyson’s slow brown – but as I was using the same bit of sponge to put it on with, and didn’t wash it out between rustings I was clearly using a mix of all three for all the latter rustings… better go and have a look at it. And I’ve got some bread rising too. I had a long conversation with a shooting friend who had been very ill and lost a lot of weight, as I did with Covid – Like me, he had to carry a cushion around as he couldn’t sit on a hard chair, but he is now recovered enough to be shooting and playing golf again. We are both a bit surprised at how even at our age you can ‘re-inflate’ muscle if you eat enough – maybe we should try extreme bodybuilding to see if it works for us!
9th Septemeber – Shooting today at Cambridge Gun Club – hopeless! I did a lot worse than I did at the helice (which wasn’t particularly good but it is develish hard) and just couldn’t get on the clays.. When I got home I think I found the problem – I have cateracts in both eyes – not bad enough to get them done on the NHS, but progressive, and my left eye seems to be taking over. I have used glasses with a piece of sellotape across the left lense to supress the left eye in the past when it has been a problem, but I didn’t think of it this time as I didn’t identify the problem – stupid really! Anyway I think on general grounds I am going to have to get them done, even if I have to pay the 2.5K each eye will cost – have to sell some of my best guns! I guess I’ll have to wait until I can find a several weeks when I don’t need to drive. I may need to slip off to CGC for a private check before the game shoot – with sellotaped glasses! On the plus side I found my box of card/wad punches right in plain view….. Definately time to get my eyes done!
8th September Disaster – I’m shooting (clays) tomorrow for a warm-up for the next game shoot and I’ve mislaid my box of card punches and I’m not sure I have enough overshot cards. I know I have seen them fairly recently, which makes it all the more maddening! I was thinking I might shoot my 11 bore Westley Richards for game shoots, but I got it out of the cabinet but found it much too heavy although last time I’d handled it I thought it would be OK – probably my arms/shoulders were a bit tired from swimming – it does weigh 8 lbs which is a bit much for swinging about after partridges! I had an email from a chap in Canada with some photos of a pistol by H W Mortimer and Son that he had bought at auction asking about restoration. It got me thinking about what is a good candidate for restoration and what is not, at least from my perspective. In most cases if something is missing, broken or not working then, provided its viable from a cost perspective or has some personal significance, then it’s reasonable to fix it. Similarly its obviously valid to clean active rust and remove dirt from metal and wood, but one needs to exercise care if that destroys the original finish or a patina that has developed with time. Beyond that, its a matter of judgement – for instance, one often finds a pistol with the barrel in a worse state than the lock and furniture – the barrel being soft and the rest hard or semi hard – if the barrel has deep rust it can be a mistake to try and refinish it – you may end up making the rust stand out, but if a light striking off refreshes the surface rebrowning may well enhance the result. I don’t belong to the school of thought that likes to see antiques restored to the condition they left the maker, patina and the odd dings are part of the gun’s history, but each situation needs careful thought – sorry there is no easy answer! I spent this morning doing silverwork – my sister in law had 3 napkin rings that she wanted worked on, one to remove the badge of the Clacton on Sea Bowls Association and the other two to cover the inscription/name with a silver plate so I could engrave the names of her grandchildren. I had just enough .7mm thick silver to make plaques, and some ‘easy’ silver solder paste – it melts at 680C, well below the melting point of the silver., so now I just have to engrave the names on them. I’ll do a few test engravings in copper to get my hand in – its harder than the silver but near enough. We are having a few days of late summer – I have managed a swim on the last 3 days, the water in the pool is gradually rising from about 19C last week and its now about 22C – the surface gets a bit hotter after mid-day – I think tomorrow will be the last hot day.
5th September – Family birthday party today – outside in lovely weather for a change! Lots of fun for my grand daughter of 11 playing with the boat we made at school on our pool, joined by adults too. On my birthday I started a course of drugs for my CLL (Chronic Lymphocytic Leukeamia) – I currently don’t have any effects from the CLL but my specialist thinks I soon will so is keen to get me popping Acalbrutinib. So far no side effects, touch wood. I’m still undecided whether my first partridge shoot should be flint of percussion, but I am moving towards a percussion as my good flint is only single barreled and that is a bit of a disadvantage. I resoldered the rib on my ‘Tim Owen’ single percussion as it came off recently – I think its on OK, although not the most elegant job. I really hate resoldering barrels as its so difficult to clean up the metal to get it to tin properly, Now I have to re-brown the barrel, – it has a nice damascus pattern (I think) so I am wondering whether to ‘flash’ it in copper sulphate to etch the surface a bit and bring out the pattern. I still have the Venebles to re-do, I soldered the barrels but it subsequently sprung the rib (its a double so double trouble!) so I’ve to do it over again. I do get asked from time to time if I do restorations for clients – the answer is I do, I’m careful about what I can offer to achieve, and prefer not to do work that doesn’t ‘earn its keep’ by adding to the value of the gun. I won’t do deliberate faking – like changing the maker’s name etc, and I prefer work I can put on this blog, even if sometimes I hide the maker’s name. I don’t do work on licensed breech loading firearms or modern repros, and I ask anyone sending me an antique to remove it from their certificate to ensure that it is a Sect. 58/2 firearm (an antique that can be held without a license) as I am not a registered firearms dealer.
2nd Sept – my birthday today! So I can be allowed a rant! The latest report of the Independent Inquiry into Child Sex Abuse was published yesterday and makes pretty sickening reading – almost all of the major religions in the UK have significant failings in parts, for instance some don’t accept some reports of child sex abuse ( one requires 2 witnesses, would you believe it !) or try to cover them up, so the remarks I wrote yesterday before I saw it do look uncomfortably near the truth. Rant over! ………………………………. Apart from tidying up the garden for a party on Sunday , I did manage to nickel plate the trigger of the cigar cutter- it seemed to lay a thin coat of nickel, then a thicker coat that didn’t properly attach to the thinner coat and peeled off if scratched with a finger nail…. not sure what happened, but it looks about OK against the abraded plating on the rest of the pistol, so I’ll leave it.
You can download the full ‘child sex abuse in religious organisations’ report here;-
1st September – bit of a pause as I had to go down to Wales to set a memorial stone on mum in laws grave in a field, then it was the bank holiday. I have been playing around with silver wire, and built a little adjustable jig for flattening silver wire – works quite nicely – I can get 0.4 mm wire down to strip about .16 thick which should be OK for the superimposed pistol butt. I have also been doing some preliminary experiments with nickel plating. You can use an electolyte made by mixing spirit viengar (basically aceatic acid) with a bit of salt and passing a current through a couple of nickel electrodes ’til the vinegar turns nicely green. I did an experimental plate which seemed to work, but the finish was not perfect – I shall use a lower voltage and colder solution and see how it comes out. I’ve been reading an account of Cook’s voyages by William Kingston, published in about 1880 by the the Religious Track Society. I find it mindblowing how arrogant the author was in regard to ‘converting the heathen’ , and his objection to Cook’s complete omission of any ‘missionary’ activities. Although the book is now 150 years old I guess we still unfortunately see that sort of blinkered religious belief in parts of the world – and sometimes close to home…… One of the (6) leaders of a religious group present in the UK ( I won’t name it!) is reported in today’s Times as saying that it was an offense under their religious law to report child sexual abuse unless the victim was under 12 or 13!
25th August – a fun day filling a skip with rubbish! I managed to get the cigar cutter trigger to work after silver soldering a couple of bits to it – I looked at ‘cigar cutter pistols’ on ebay – one for £185 and one for over £400. Probably somewhat better than mine, but it does justify the time spent making a new trigger! Perhaps I’ll sell it when its finished….

The bad joint is OK on the other side – just a bit wonky – quick job…
24th August – did a bit of work on a trigger for the cigar cutter – think I have filed off too much, may have to hard solder a bit back on! I was looking at an antiques website that hosts sales from dealers across all sectors – the site claims to have done over 100 million pounds of business this year. Anyway I was looking at a pair of duelling pistols at some fairly high price, I can’t remember the details or the maker but that doesn’t matter as I’m not trying to shame anyone. As always I was looking at the biggest photo I could get of the pair, and idly scanning for hints that the pistols had been restored – now dealers have one of three approaches to work done on antique firearms – be open about it, keep it quiet or not look too carefully! Or of course they may not have the experience to tell. These pistols looked pretty genuine, and then I started looking in detail……………. Its very common for top jaws and top jaw screws to be replaced – but its actually quite tricky to make a really authentic looking top jaw screw! – I had fun making one for the superimposed pistol below because the shape is quite critical to the eye – a few thou here and there can make all the difference. Anyway this pair of pistols had top jaw screws that were subtly different in the washer bit that bears on the top jaw. One had a fairly narrow collar that was slightly tapered, the other had a deeper collar that wasn’t tapered – my eye immediately called the second one into question – didn’t look right. I don’t know if that was the replacement, but no decent gunmaker would sell a pair with that much difference. Still its a common repair and not that important…. but you need to keep looking …. so then the rollers on the frizzen springs were different sizes – very noticably so. Again no gunmaker would put out a pair with that difference. This is a more serious sign as other bits must have been replaced for it to need the roller replaced, so you don’t know where it will end! So these pistols have been ‘worked on’ – maybe even a reconversion to flint – maybe the dealer knows this, maybe not – but now you know and can walk away……………………………. happy hunting!
23rd August – Bit of garden tidying today! The following is for UK viewers! ………….. Browsing the web for something or other I came across a circular on the Antique Firearms Regulations 2021 – this is the regulation that for the first time defined ‘antique’ in terms of firearms. Most public comment in the gun business as about the removal of half a dozen cartidges from the list of Obselete Calibres, meaning that a number of interesting early revolvers jump from being antiques to be prohibited weapons under Section 5 of the Firearms Act. As a sweetener 41 cartridges are added to the Obselete Calibre list – mostly for long guns. The argument for this is that these revolvers were occasionally used in crime by obtaining ammunition. In truth that much was to be expected, if a bit of an over-reaction since possessing the ammunition is itself an offence. One small paragraph at the end did however cause me some alarm – stuck on the end of the regulations was the extension of Section 126(3) para 19 and 20 of the 1968 Firearms Act to include antique firearms – this is important to everyone who owns or handles any antique firearms for it means that under 19 it is now a criminal offence to have any antique firearm in a public place without a reasonable excuse despite it being perfectly legal to own, display, buy and sell ( but not to anyone with a crim. record!) them – another opportunity for the police to bother us if they are so minded. Under 20 its now also a criminal offence to trespass with an antique, although its not a criminal offence to trespass in itself.
I also had a look at the Firearms Security Handbook 2020 – its quite interesting in the way its framed, implying that the details of security are up to the owner, but then piling on the suggested regulations, while leaving a lot of room for individual firearms officers to interpret them as they see fit. It does however suggest that all licensed muzzle loading firearms may be excluded from any counting exercise used to determine the security level demanded… n.b any muzzle loading firearm made after Sept 1939 is NOT an antique and must be on either a Shotgun license or a Firearms certificate.
The transition period for getting rid of newly declared Sect 5 pistols etc under the Antique Firearms Regulations 2021 end on 21st Sept 2021, so not long.
They can be found here;-
https://www.gov.uk/government/publications/circular-0012021-antique-firearms/circular-0012021-antique-firearms-regulations-2021-and-the-policing-and-crime-act-2017-commencement-no11-and-transitional-provisions-regulations or just Google search for ;- circular 001/2021 Antique Firearms
https://www.gov.uk/government/publications/firearms-security-handbook
Happy collecting – while we still can…………………………………
22nd August – The little Rooke pistol I made a new trigger for was occasionally refusing to drop the trigger and cock, so I stripped it (again!) and found that the trigger was maybe 10 thou too short on the lumps that the cock moved to drop the trigger, and was jamming. I had to weld tiny blobs onto the tips of the trigger arms which are only about 1 mm x 1 1/2 mm – I managed it by switching my modified TIG welder on and off with the foot pedal for maybe 1/2 a second or less and wearing 2 pairs of specs, and managed to fettle it all up so it works – no room for error – I’d love a better welder! Anyway that job seems to be done satisfactorily. I welded using piano wire as a filler rod and the resultant blobs were so hard I could only shape them on the diamond hone – a file wouldn’t touch them. Phew… Reading ‘The Handgun’ by Geoffrey Boothroyd this evening I discoverd, re my earlier discussion about cock positions that allowd a cap to sit on the nipple without falling off, that Irish percussion pistols, particularly those made by Rigby, often had 3 bents in the tumbler for that purpose. Always something new to learn………….
21st August I found a box that might do for the pair of pistols by Rooke if I don’t make one. It had in it the parts of a small nickel plated ‘pistol’ that turned out to be a cigar cutter, rather badly bashed about. I straigtened it out as best I could and put it back together – its missing a trigger, but otherwise seems to be OK and more or less works. It is a rather fun thing, so I think I’ll restore for a bit of light amusement, which will involve making a trigger. I assume from the chequering on the hammer and its shape that it was single action thumb cocked, so I’ll try to remove the hammer so I can check dimensions etc. Another little distraction – I used to do nickel plating when I was a kid, but I didn’t keep the chemicals and can’t remember what salt to use – time to check the web! I’ll file the trigger up out of brass – I have a suitable bar, just need to mill it down to the right thickness and maybe rough it out…… You put the mouth end of the cigar in the funnel shaped opening on top of the cylinder and the hammer cuts a V shaped notch in it. I’ve posted a new Post on pocket pistols – not finished but some photos – I’ll do more as I get round to doing the video….
 Little cigar cutter – the (fixed) ‘cylinder’ has ratchets for 5 chambers, but the face has 6 holes!
20th August I finished the trigger detent spring and hardened and tempered it and put the mechanical parts of the pistol together and it worked perfectly – the full and half cock were even it the right places! I did a bit of patching on the butt where it joins the metal, and sorted the plate in the butt that carries the screw from the top strap – its a common weakness in these little pistols -they have a small steel plate let in under the top of the butt that is tapped to take the screw and it isn’t visible from outside and never gets oiled or protected so it rusts. As its usually let into a tight fitting recess in the wood, when it rusts it expands and forces the sides of the front of the butt apart, causing a split. One of the Rooke pistols had one, and this superimposed pistol does too, see photo. I took the metal plate out – its held by a small woodscrew that sheared off, and cleaned up the metal plate and put it back with a drop of instant glue – it only needs to be held in place until the top strap is screwed on. I clamped the split up as best I could and flooded the inside with more instant glue. I’m now looking at doing some work on the silver inlay. I have ordered some silver wire of 0.3 and 0.4 diameter and will experiment with making a draw plate to pull it through to flatten it. I also ordered some low viscosity instant glue to fix the inlay as I had run out. I realised that I have repaired and restored a number of these little pistols and that I ought to do a video on how to take them apart and repair them – they are tricky little pistols, quite difficult to work on because they mostly haven’t had any attention and the screws tend to rust in and, being small are tricky to undo and prone to shearing off if not treated carefully. It’s a knack to take them apart and put them together again – I think it used to take me ages – and still does if the screws won’t obligue. I only had one difficult screw on the superimposed pistol, one of the ones holding the top plate on and it eventually came out using the following treatment: The secret of removing obstinate screws is a) clean any rust around the screw head carefully with a modelling knife and clean out the slot b) soak them in penetrating oil for a couple of days – c) if you can get any movement in the parts that it holds together, move them. d) apply penetrating oil/acetone mix as it penetrates better. e) Only use a perfectly fitting screwdriver – if necessary grind/sharpen it so its blade is sharp. f) work the screw in both directions – if it unscrews a bit and is tight, just keep working it back and forth, going a little further each time and making sure you have plenty of penetrating oil around. g) don’t over force it, even a minute amount of movement if ‘worked’ should eventually get it out. Heat may help, but too much can damage the finish, – it works better on screws that go into wood. If those don’t help you are down to filing off the head/drilling it out and all the fuss that follows! …….. Oh, and another thing I realised about this pistol – the tap has a depression for a pan of its own, so if you prime it generously with the tap open to the bottom barrel and then close it, you trap a priming charge in the tap barrel, then when you have fired the front charge using the remains of the priming in the main pan, you open the tap and its ready primed for the breech end charge …. crafty.
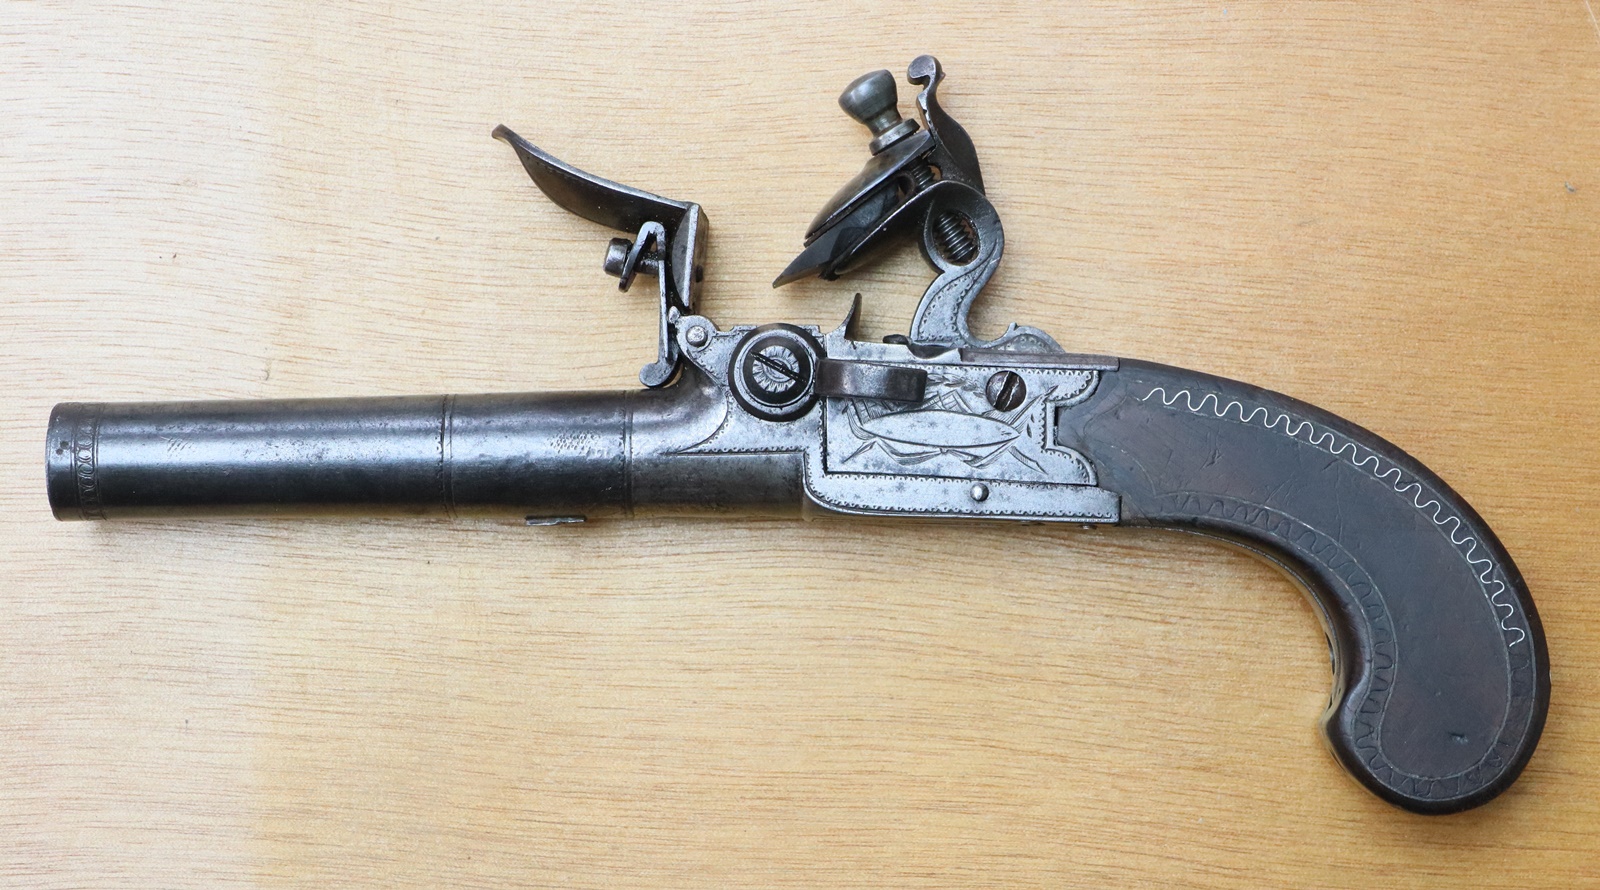 Looking much better! The inlay is odd – may be German silver and I can’t make out what the outlines are/were filled with, apart from muck = bit of a mystery!
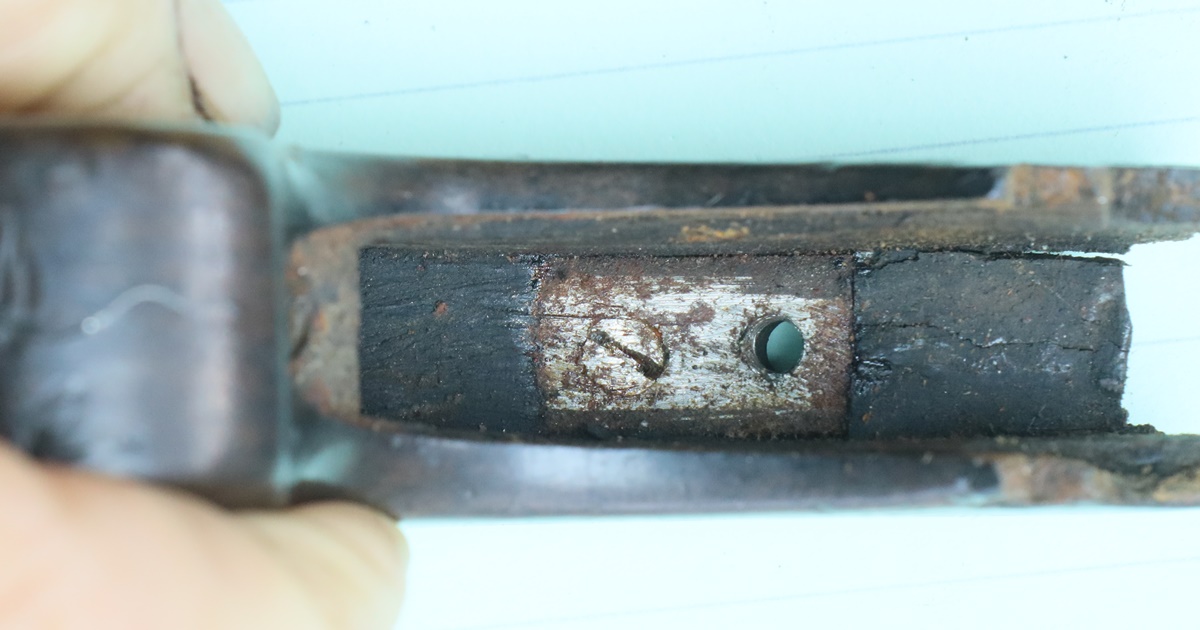
These inserts are a pain – they rust and crack the butts!
19th August – I cleaned up the bits of the superimposed pistol and made a blank for the top jaw and filed it up, and made a top jaw screw. I case hardened these parts, then decided to temper the top jaw to add a bit of colour, but not having the AGA I used a torch, and it came out a brilliant peacock blue, which isn’t quite authentic! took it off with 0000 steel wool and used a bit of slow brown, plus steam and it looks good. I’ve now just got to make the little spring that retracts the folding trigger, and put it all together – I don’t even think I need to make any new screws, pins or nails for a change! I had a look at the silver inlay on the butt – the strip that was used was about .15 mm thick x 1.5 (?) mm and I can only get .3 mm thick x 3 mm – the right way to do it would be to get some wire of about .3 mm and run it through jewellers rolls, but I don’t have any – I could either make some, borrow some or try flattening wire in a press – to be decided! first I need to get the wire – but I do have a draw plate. In the photo of the top jaw you can see how I rough sketch the parts I need on a card so I can take it into the machine shop – I keep the cards in case I need to refer back. I have quite a pile! Much of the shaping is done by eye in the end……

![]() Jaw blank milled to rough thickness and card template glued on. Once the outline is filed, it will be cut off and glued to a block.
Jaw blank milled to rough thickness and card template glued on. Once the outline is filed, it will be cut off and glued to a block.
18th August – I’ve now stripped the current pistol and had a good look at how it works – the barrel comes unscrewed in two places, the part next to the breech is removed using a ‘normal’ ring spanner with a notch to fit over a lump on the barrel, and the muzzle end is unscrewed using a star wrench into the bore. SO obvioulsy you remove both bits, put powder in the breech, drop the ball in and put back the breech end barrel, then load that and put on the remaining bit of barrel – simple as! I also realised that the touch hole going to the front charge (which must go through the removable breech section of barrel) is always open, the tap merely shuts off the touch hole to the rear charge. Still seems to be nothing to stop you firing both barrels together – would be interesting to see what happened if you did (NO, I’m not going to fire it!). Stripping the action revealed that indeed the head of the sear had broken off, and also the spring that acts to close the trigger had broken, leaving only a small part and the retaining screw. I spent most of the day on the stripping and machined a blank for the sear and new top jaw and filing the sear to fit – as I explained for the Rooke pistol, the trigger and sear have so many functions that need to be adjusted that it takes ages to fettle them to work. Anyway I think I have got the sear right so I hardened it – the sear edge is quite fragile as it has to fit tiny bents in the hammer. I was a bit worried about heating it to red heat to harden it as the edge could overheat, but once coated in Blackleys colour case hardening powder it was somewhat protected – I had better temper it or it will break, which is tricky as the AGA is not on.
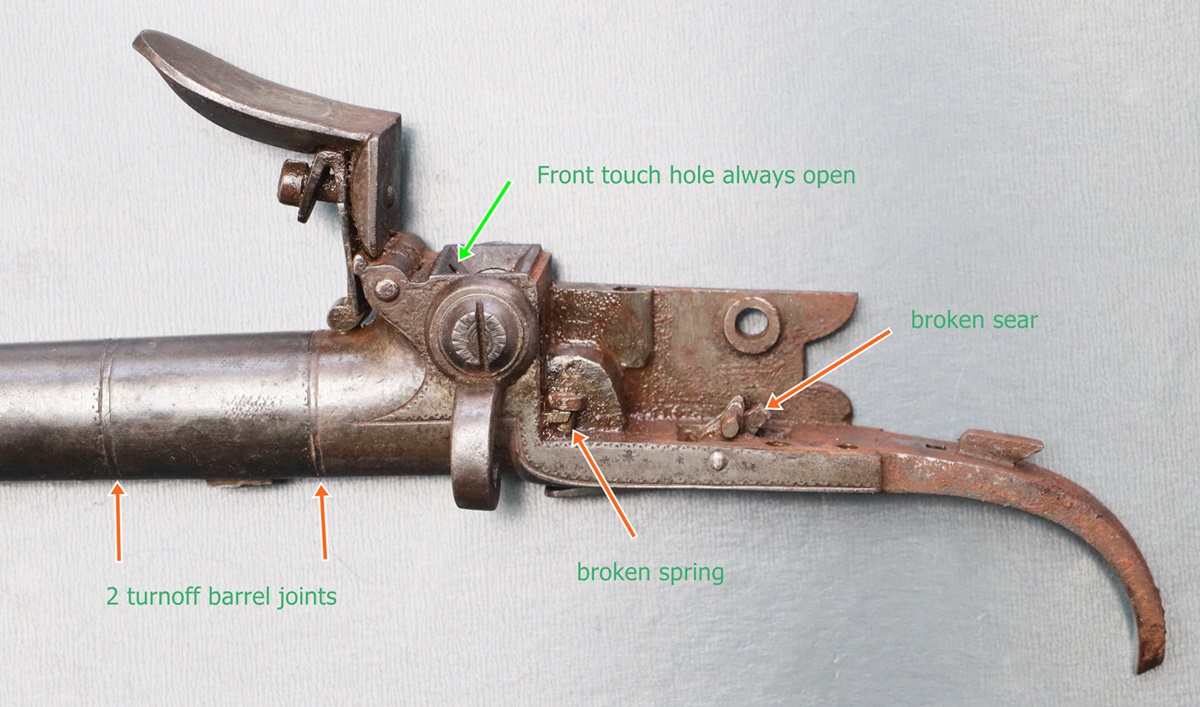
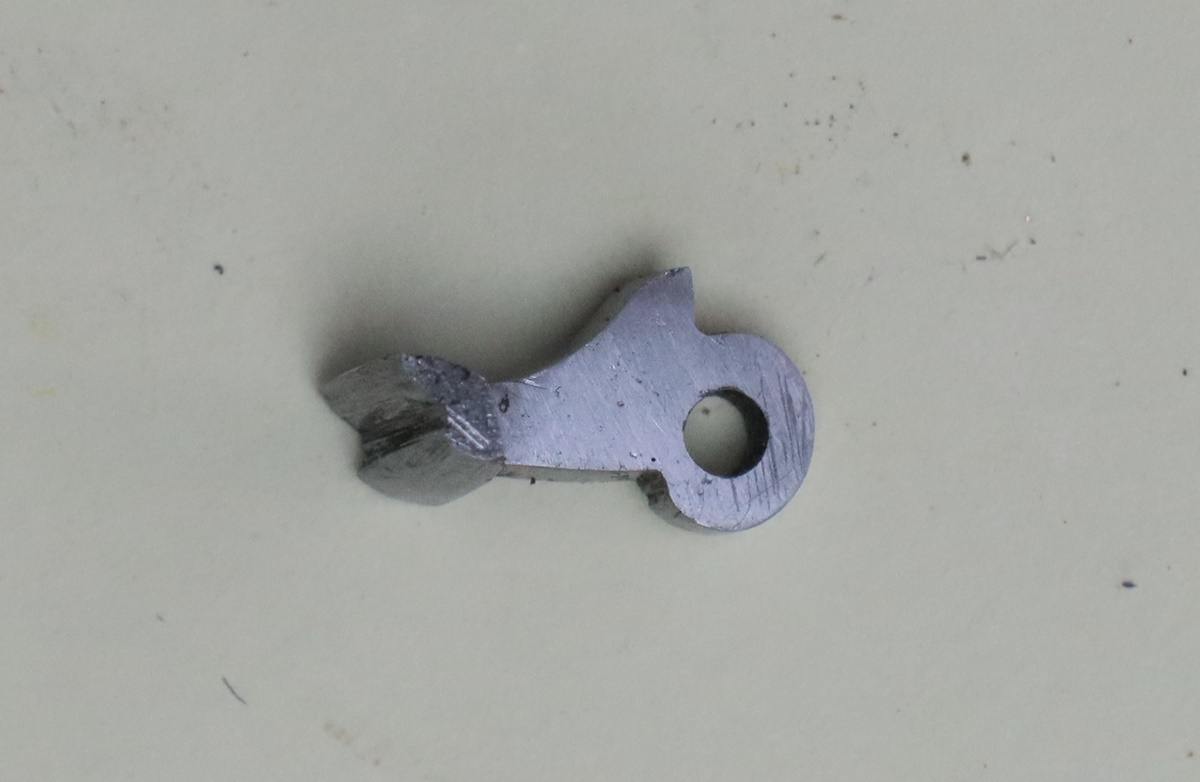 For scale, hole is 2 m.m. diameter
17th August – I’ve now finished the Rooke pistols, and very nice they look too, although whether the impovement really justifies almost 6 days work is a mute point! Luckily I don’t have to pay myself…. I may get the urge to put them in a case – not because they would originally have been cased, but because it makes them easier to store, and I enjoy casemaking! Below is a before and after. I’m now starting on another job in the queue – even more unusual than the ‘cap guard’ (aka top hat – not a good name) pistols. It is a flintlock pocket pistol, somewhat larger and has a tap action. What makes it unusual is that there is only one (turnoff) barrel, so what does the tap do if it isn’t switching between two barrels – the answer is that its a superimposed load pistol – you load the barrel with one charge and ball, then put another charge and ball in front of it. The tap controls two touch hole paths, one to the first charge loaded, and the other to the front, superimposed charge. I haven’t stripped it down yet, but there doesn’t seem to be any mechanical means to stop the back charge being fired while the front charge is unfired, which would appear to be a bit of a defect! I do have a French superimposed pistol of large bore by le Page, but that is percussion and does have separate cocks for each load and the trigger is cunningly controlled to make sure the front charge fires first. I guess this smaller flint pocket pistol only fires a small charge, so perhaps it isn’t such an issue if you fire the back charge and push out its ball plus the front load? Still I guess it gives the firer a bit of a jolt, and can’t have much range – plus if the powder from the front charge ignites in the barrel or as it leaves it will be quite a firework! Anyway this little pistol has a broken action (I think the sear is broken – a very fiddly job to replace) and the top jaw is missing and the top jaw screw is broken off and rusted solid. Probably a couple of days work – maybe more if I try to replace the silver inlay in the butt. I’ll strip it down and probably electolytically derust any screws etc that are badly rusted. The rest will clean up with a fine Vertex wire wheel on the grinder. I have a problem with the wire wheel from time to time – they are very soft and so don’t hurt if you use your fingers to hold small parts, but are still effective at cleaning the parts of loose rust and reducing sharp burrs. My problem is that from time to time the wheel gets a grip on the part and takes it out of my fingers and it ping onto the floor and it takes ages to find. I’ve now made a catcher to sit under the wheel and hopefully stop the part bouncing onto the floor. It may still allow the parts to bounce out, in which case I’ll have to fill it with water! At least having sorted the Rookes I’m up to speed on the mechanics of these posket pistols – they are all very similar inside and out….. and all very fiddly! Its a bit of an art stripping them and assembling them, so I might do a video………………
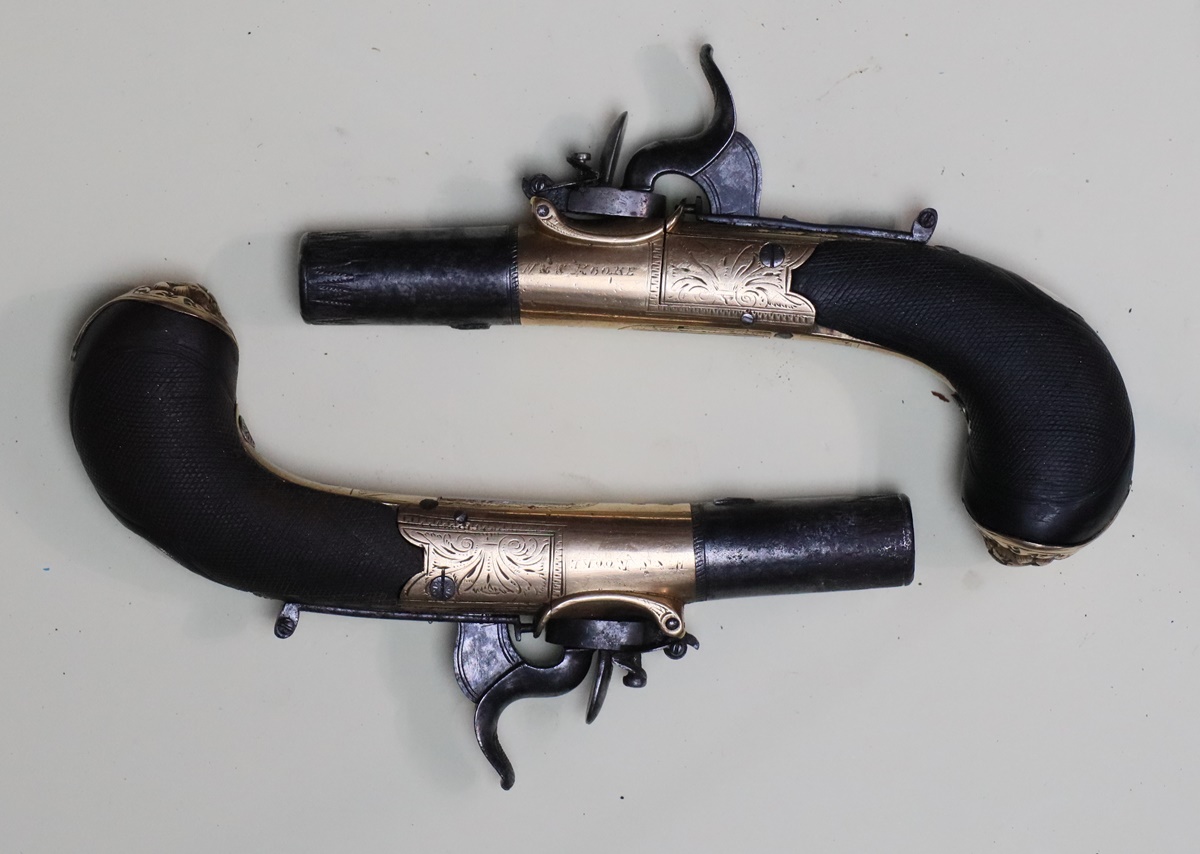
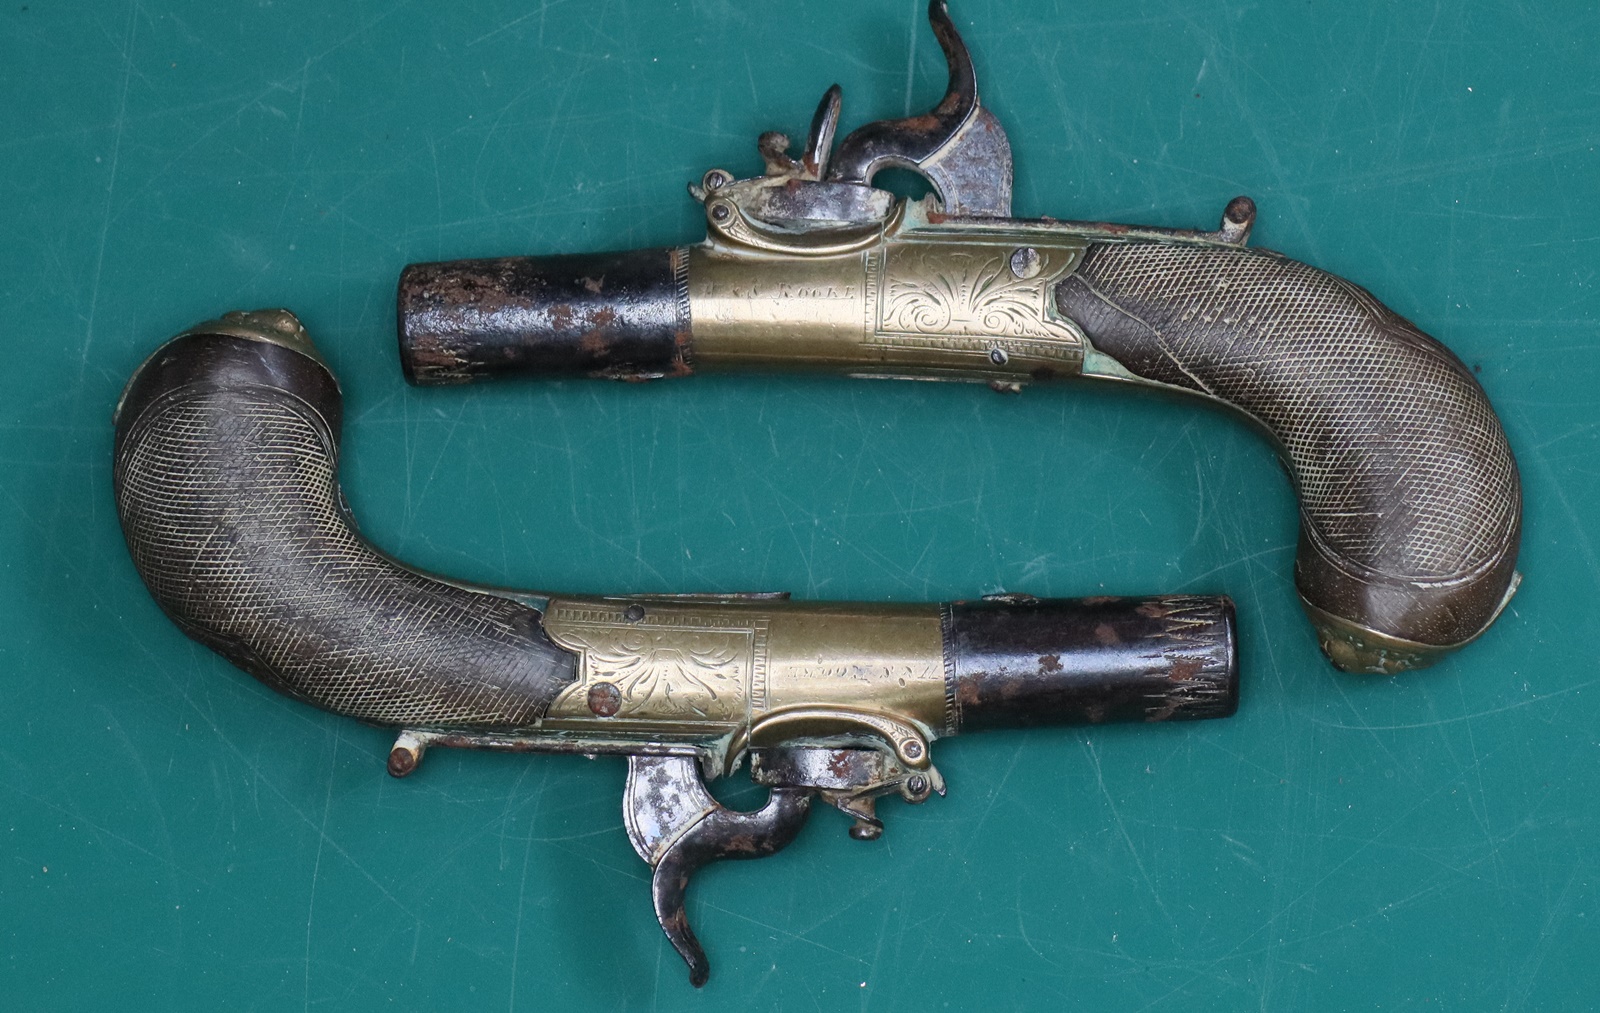
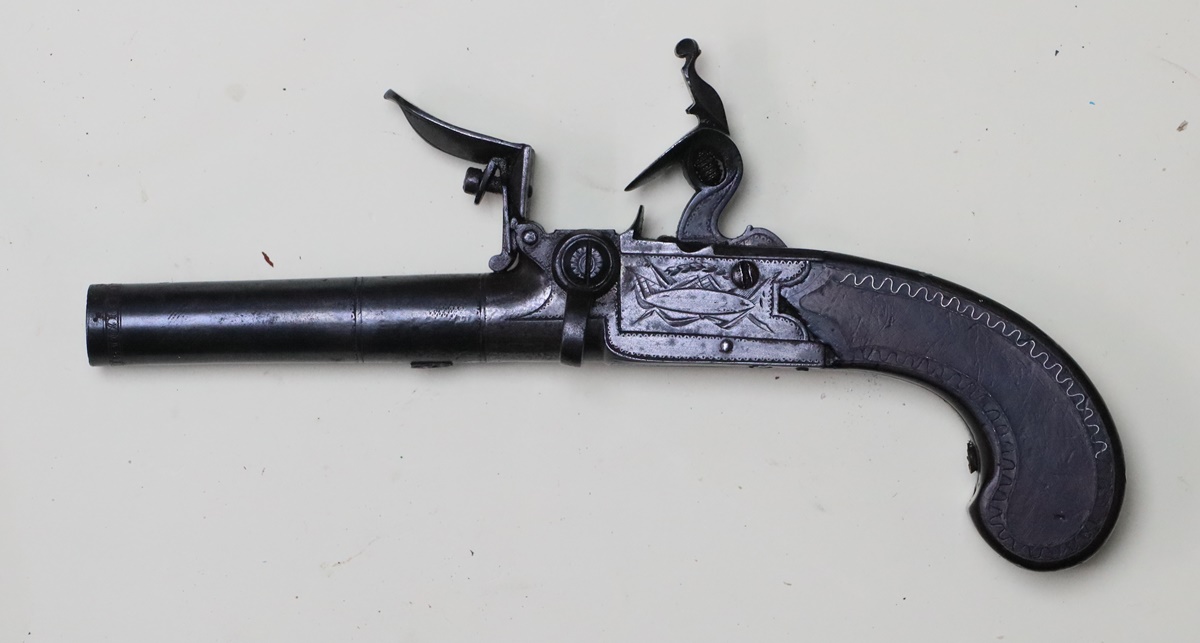
16th August 2021 – you learn something new every day! At the helice we were looking at an Egg single conversion from flint and I noticed a screw head under the butt half way between the butt plate and the trigger guard that I hadn’t noticed before – I said it looked as if there had been a sling swivel there as for a rifle, but the friend viewing it with me said that it was more likely to be a spare side nail, and that a few guns had this. Indeed when I got it home and had a well fitting turnscrew to hand it was a spare side nail, and fortunately not rusted except for round the head. There you are – another piece of gun lore from the blog! On the subject of information my correpondent who is researching ‘cap guard’ pistols commented that I correctly hadn’t assumed that the Rooke pair were conversions from flint. I have to admit that I hadn’t really examined one before, and the flip-up cap guard gave me a moments pause, although it soon became clear that they had been made as percussions for two reasons; first, there was no trace of a pan ever having existed, and second that the whole pistol was ‘of a piece’ as antique experts might say. He has identified 220 of these little ‘cap guard’ pistols by various makers – all were originally made as percussion. My restoration continued… Ithe first pistol has enough of a nipple to fit a cap on and fire, but the second had a mashed up nipple, so I decided it deserved a new one. By design there seems to be nothing to get a wrench on, or any othere way of turning the nipple, and a thread extractor did nothing so I drilled it out, trying not to cut into the brass. The resultant hole looked OK for a 1/4 inch tap and I was going to use the standard 1/4 BSF x26 t.p.i tap, but thought in the brass a finer thread would be better, so I opted for 1/4 BSEF x 32 t.p.i. which worked well and seemed to be the same as the original thread (?) (actually, to be honest, I couldn’t find a 1/4 BSF plug tap but did have a BSEF – Extra Fine !). So a new nipple was made and fitted. I have now made the pivots and put the mechanical bits together, and finished repairing the butt. Now just got to sort out the screws for the butt cap and to fix the body to the butt, and its done… Another friend at the Helice was telling me he had double gun by Forsyth dated to 1822 (he was sure about that date) that had been made for percussion caps, not pellet lock conversion. I was sceptical, as the earliest date for caps is generally taken to be 1823 and I didn’t expect Forsyth to be the first to use them. Indeed D.H.L.Back’s book on Forsythe puts the earliest caplock made by Forsyth as about No 3327 in 1826. Which make my friendd’s gun very important, or the date or details wrong. Sometimes a really good conversion done by the original maker not too long after manufacture will effectively be a rebuild with a new beech plug and a new lock and will be very hard to distinguish – and may well have kept the original number. There is seldom any absolute certainty in such cases – one of the attractions of the hobby is the detective work that collecting involves.
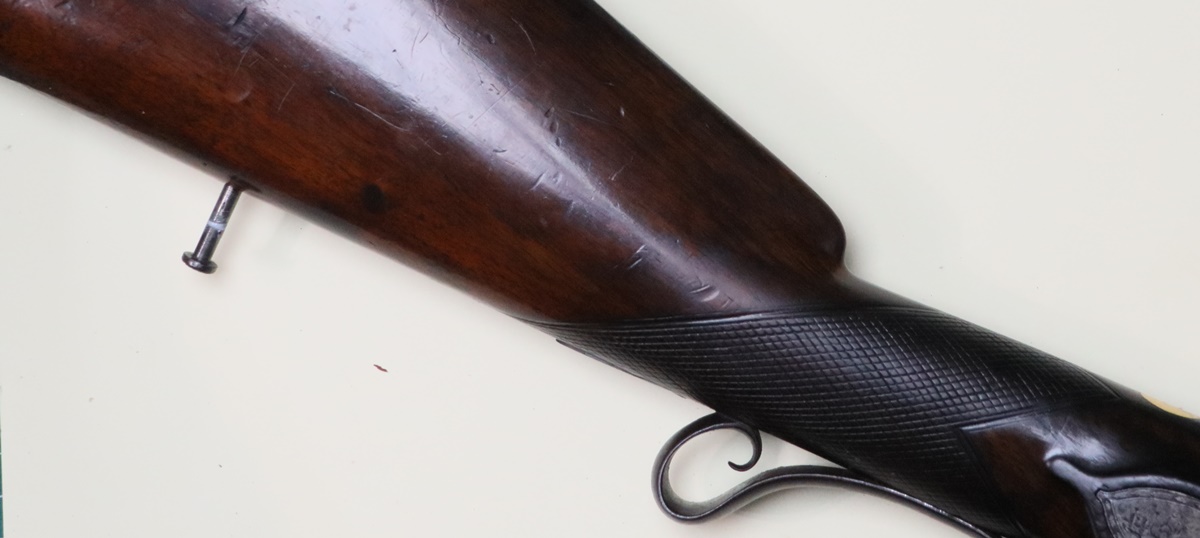 Spare side nail in stock of single barreled percussion converted from flint Durs Egg.
15th August Helice yesterday at the Rugby ground sandwiched between the M1 and a windfarm. I was shooting a gun I hadn’t really ever shot in ernest but I did hit 4 out of 20 – in case you think that is bad, half a dozen of the 25 odd shooters did worse – I was reasonably satisfied! Tom hadn’t handled a gun since 2018, and hadn’t shot that gun for 8 years and had only shot Helice once before but managed to hit 8 including a some of the very difficult ground hugging ones – he’s pretty quick, age on his side! Anyway only half a dozen or so shot better than he did, so he was rightly pretty happy. Anyway a good day was had by all. I finished the escutcheon of the first little pistol – left me wondering what, if anything, I should engrave on it ? I started to repair the butt of the other pistol – a bit of the wood had broken off rather messily. I was going to try gluing it back on – which I know from past experience only works (sometimes) if the break is recent, new and clean, which this wasn’t – but I was saved the dilemma as I couldn’t find the piece anyway. I found a bit of dark walnut from my scrap drawer and cut and glued it on with superglue and shaved and filed it to an approximate fit – it’s much better job and the wood matches pretty exactly. I just have to finish the final shaping and recut the chequering onto the new piece, then make the screws and pivots for that pistol and put it together. I thought someone might like to see what’s on my workbench when I’m working on the guns so I’ve included a photo. There are a selection of tools including half a dozen screwdrivers (mostly watchmakers for such small pistols) and a couple of dozen files plus chisels and modelling knives etc. Drills and machines and gas torches are elsewhere, I just use this bench for ‘fettling’ by hand – taps and dies are in the tray to go to the machine workshop. Plastic trays from packaging get a second lease of life in the workshop!
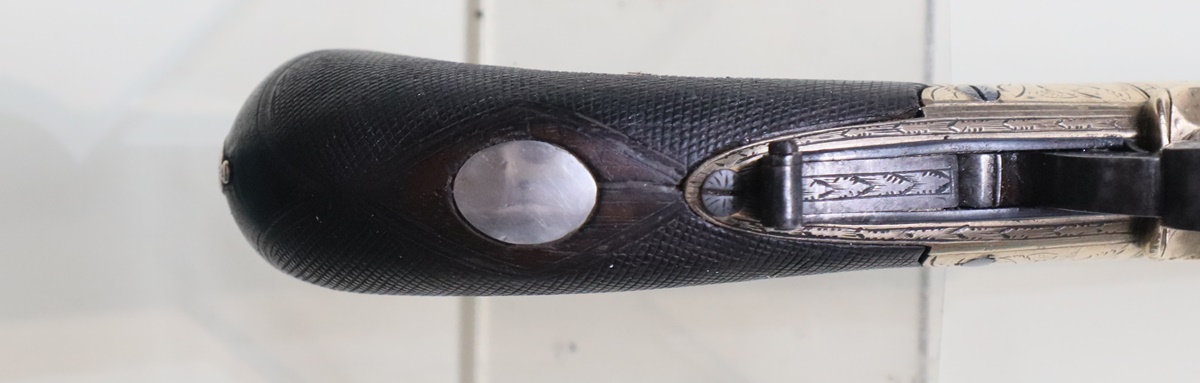
Last job on the first pistol;- I need to fill the crack – I can’t close it without removing metal inserts inside.
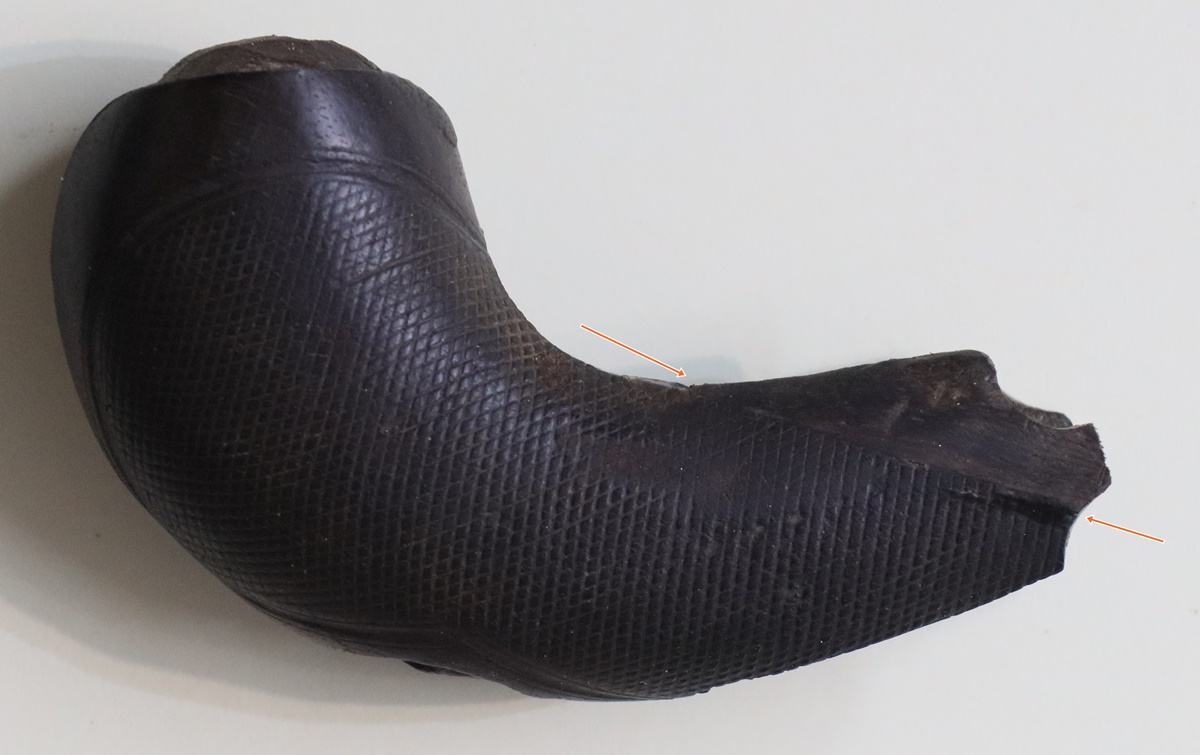 Second pistol;- The two very faint red lines show where the joint is – the colour match is very good, not yet finally shaped.
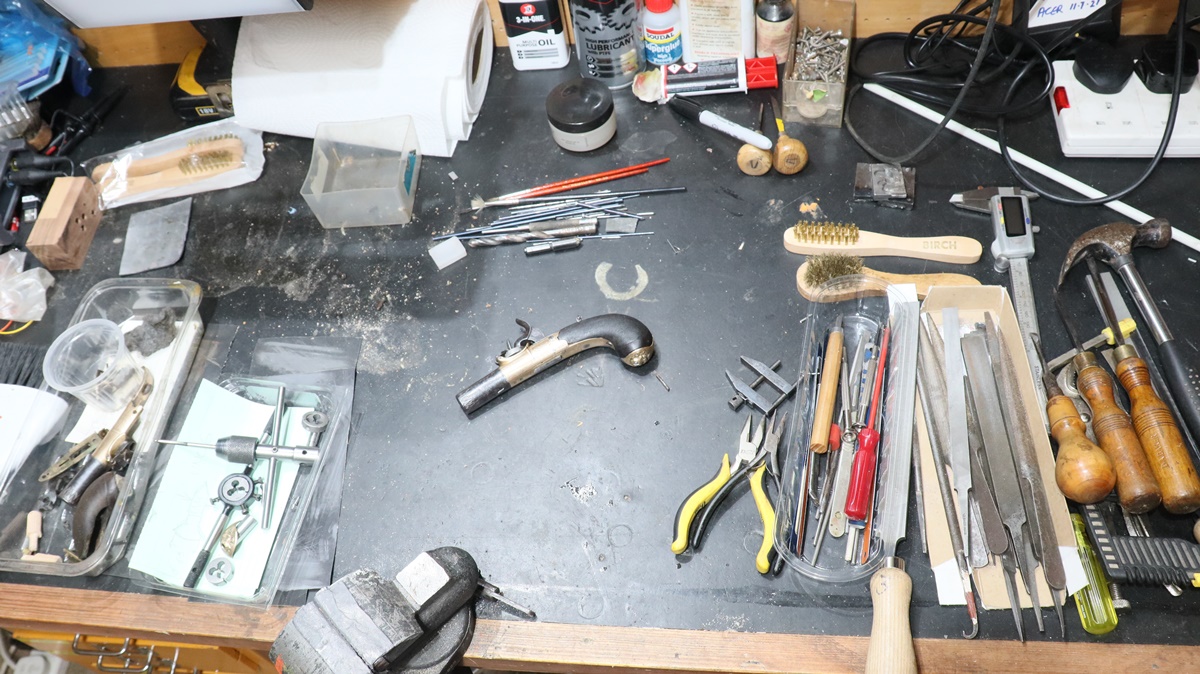
I shudder to think how much I spent on the finer files – they can be up to £35 each.
13th August Visit to the dentist to have a tooth extracted – not too bad – I’m shooting the Helice at the Rugby Clay ground tomorrow with Tom, so I hope it has settled down by then! I started to make the silver escutcheon for the completed Rooke pistol – I decided that it didn’t merit all the fuss of casting as I had a piece of silver sheet and am happy to epoxy glue it in place, so I made a former and am peining it into shape. As I have only got a piece of silver just big enough its difficult to shape it, so I will probably have to make the female part of the former to get it curved enough. I made the replacement screws and filed the heads to profile – its quite tricky as you can’t file them in situu without damaging the brass body of the pistol, and also because the slots have to end up fore and aft. I then case hardened them and heated them to colour them a bit. So the first one is all together and working – just waiting for the escutcheon. I’m taking some of my spare pecussion doubles with me tomorrow on the offchance someone is in the market – they have all been restored and Ive tried them all – I’ll put them on the page on this site when I get a mo.
11th August Still working on the little pistols. I coloured up the top hat of No 1 and finished the hammer pivot and the top hat pivot. I tried to make a No 2 UNF screw ( 2.2 mm OD) to hold the spring on the top hat, but the metal I was using just would not let me cut such a fine thread – I ended up finding an old steel 10 BA pan head screw and using that. When I came to make the pivot for the top hat I found a short length of bar that had been a part of something or other that turned and threaded much better – I will keep it safe for small threads! anyway that pistol is now mechanically complete and functional – it just needs the butt restored. The screw holding the but cap was securely rusted in place, and the screw on the under tang had been beheaded but was still firmly embedded. I filed and drilled the butt cap screw to get the head off, then made a small coring drill 5.5 mm O.D. with a 4 mm hole in the middle and filed some teeth in the end and cored out the remains of the screws so that I can plug the holes for new screws – I had to take the butt cap off as it had loads of the white powder (brass polish??) under the edge so it didn’t fit flush. Now got to sort out the chequering (very fine) and make some new screws – it really doesn’t work to use ordinary woodscrews, even old Nettlefolds slot headed screws, on guns, they never look right, for a start the slots are always too wide. I usually turn up a short untapered screw and cut a UNC or Whitworth thread on it and put a point on the end, which is how most gun screws were made anyway. I am still prevaricating about the extent of any recutting of engraving to do. I will touch im amy damaged engraving, and very gently go over the light lines that have disappeared – i.e. some of the serifs, so that the lettering can still be read. Anything more will stand out unless I cut it deep and then polish it down, which will likely loose some of the original stuff – you then get of a cycle of more recutting, polishing, more recutting etc… better not to start!
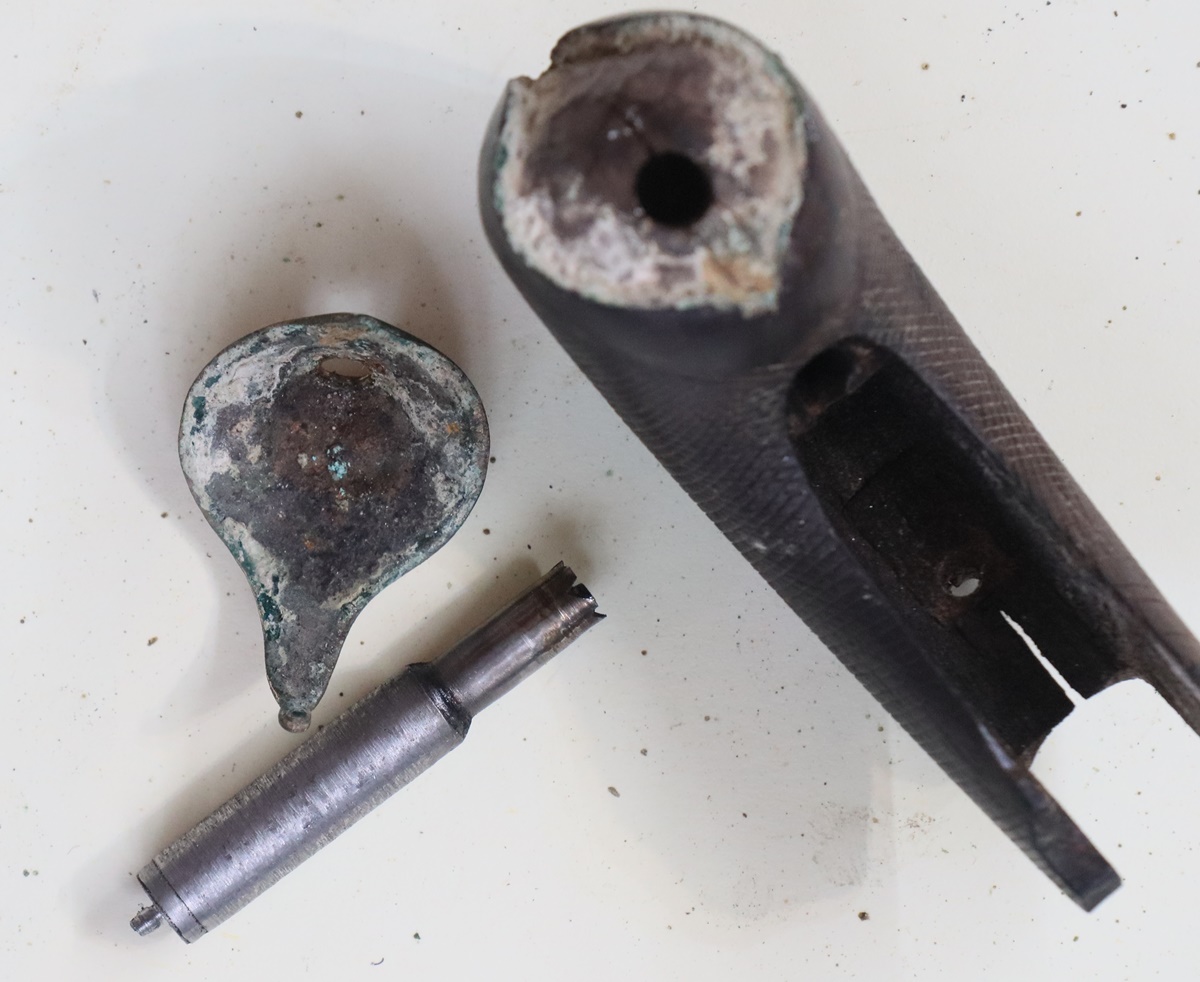
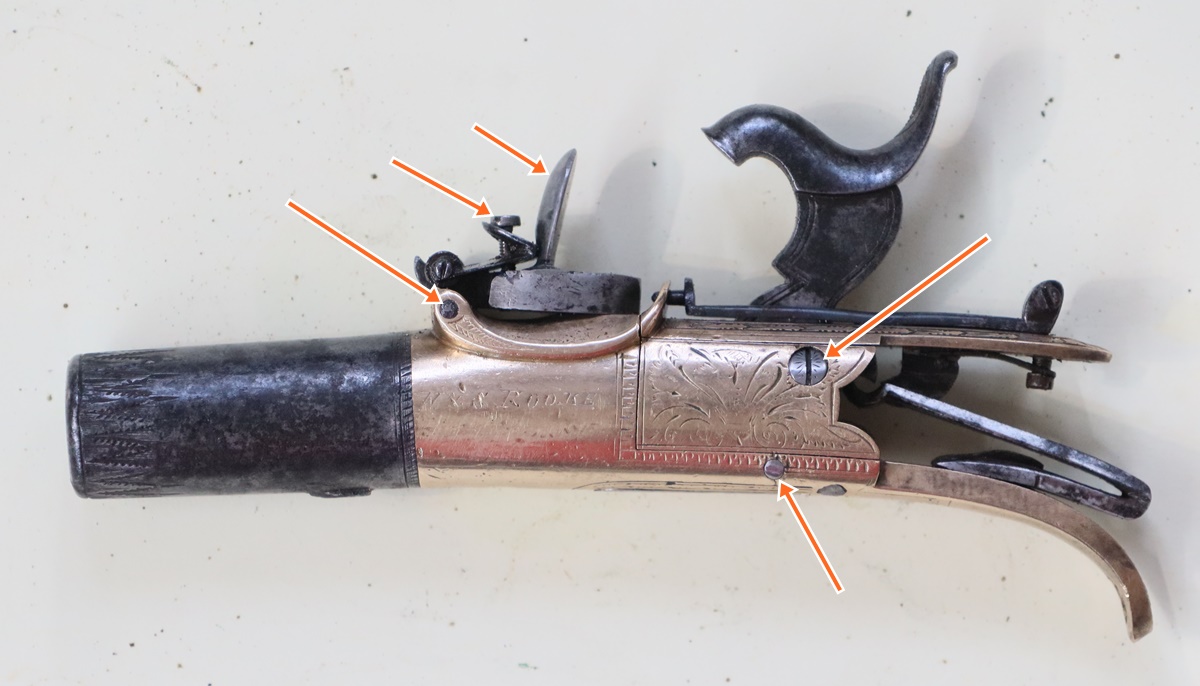
Arrows point to new bits- mostly pivots and screws plus the ‘cap guard’ upstand.
9th August – Another day fixing up the little pistols, with a break for an eye test ( result – I need my cateracts done sometime – optician can’t quite understand why I can see as well as I can! ). So back to the W & S Rooke pistols…… If I add up all the time I will have spent restoring them it will, in the end, come to at least five days, so its hardly a bargain. Of course, profit is not my motive, but a better return would be good! The main time consuming part has been a replacement trigger – in these little folding trigger pistols it has a lot of interacting surfaces that have to do their job, The trigger spindle also carries the sear that engages the bent in the hammer. it has a stop against the trigger to lift the sear out of the bents when the trigger is pulled. The hammer has a projection that has to hit the back of the trigger when the pistol is cocked with the trigger retracted to open it, but the trigger must clear the hammer once it is extended. The stud on the side of the trigger head engages with a small spring that acts over-centre to retract the trigger into its recess and to spring it open – All quite complex on account of the whole firing mechanism only having 3 parts and 3 springs, and of course all the bits have to be quite accurately fitted. Although the pistols are clearly a pair and match I was surprised to discover that there was a 2mm difference in the length of the triggers so it isn’t safe just to copy parts from one to the other. Anyway the replacement trigger is now made and in so far as I can test it, works. I’ve also made new hammer pivots. Both pistols had the hammer pivots sheared inside on the left side of the hammer (Note that the hammer pivots and the knockout pins like the trigger pivot all go in from the left side as is usual on guns) – this meant that I had no means of extracting the bit through the hammer , and no way to strip it down further because almost the first step is to remove the hammer. So the pivot had to be drilled out very accurately to avoid damaging the hole in the hammer or the right side of the body….. All very time consuming as I’m not familiar enough with the works of these pistols to sort things without a bit of messing about! One little triumph today ;- Dick and I both use very fine wire brushes on our grinders to clean up light rust and polish up steel parts without removing the patina – they are so soft that you can hold parts in your fingers without any problems. When I moved my workshop back in January I couldn’t find the wheel, and worse, couldn’t find anything similar in the UK. As I wanted to use one for this job I had another hunt on the web and found a company – I think called The Polishing Co or something similar, that sold exactly similar wheels – they go by the name of Vertex wheels and have wooden hubs and wires of 0.1 or 0.08 mm diameter ( 4 or 3 thou) and cost around £25 and fit on taper screws – I got two and am now a happy bunny! I feel the need to make another video soon – I was going to do one on restoring the little pistols, which would be interesting but doesn’t lend itself to short films as its mostly tinkering. I have a couple of unusual percussion shotguns with totally enclosed mechanisms – one by J R Cooper that I believe is the only example known, and one a Jones Patent – they would make a good youtube video. Also the Satorius might make a video… We shall see. I was thinking about all the toools and machines I use, and wondering if I should do a post of suggestions for someone setting up to do the odd restoration – one constraint is that the most common job in any restoration is making screws, which really involves at least a small metalwork lathe of reasonable quality. I am lucky in that I did quite a lot of prototype building as part of my instrument development company before I took to the restoration racket, and it funded all of my metal and wood working machine tools – there is no way restoration as a hobby would justify a £5000 lathe ( a fairly big Axminster Chinese lathe with digital readouts, not the smoothest but adequate!).

The arrow points to the sear that pivots independently on the trigger pivot (the long temporary rod) Each of the surfaces on the trigger and sear has a precise function!
8th August – One of the nicest parts of running this website (when I have time!) are the contacts I make with other collectors and antique gun owners around the world. Many contacts are requests for information or owners wanting restoration work or advice, but a number are from collectors adding information on guns I have featured, often from people who have specialised in that particular class of antique and know much more about them than I do, which is always welcome. I had a couple of those recently, one relating to my Satorius Carbine from a US collector who is making an inventory of all the Satorius patent guns he can find. He has amassed quite a list – most are sporting guns not putative military weapons like mine. The odd thing is that the serial numbers of the military types are spread over the complete distribution of numbers, implying that they were not produced as a batch for a single customer as I had assumed. I’ll add the additional information to the Satorius post in due course when I have his consent. Another email concerned the pair of percussion pistols I am currently working on. He points out that the makers are W & S Rooke, not H & S as I misread it. Blackmore says they were active in Birmingham from 1820 to 1837 and marked their guns London, but my old book by Merwyn Casey gives ” W & S Rooke [1770 to 1820] Under Royal Government contract made flintlock holster pistols with swivel ramrods, also cased flintlock coach pistols. Shop in London” Obviously the little percussion pistols were made well after 1820 so I incline to believe Blackmore, but Casey is very specific, and Google images has a pair of fine flintlock duelling pistols (probably early 1800s) and a blunderbuss (attributed to the late 1770s) – looks like both could be more or less right although its doubtful if the same people ran the business for 67 years. De Witt Bailley and Nye don’t mention him among Birmingham gunmakers but Nigel Brown says “est 1810 Gun & Rifle makers Whitall St B’ham 1820 -21, Bath St 1822 – 1836, Samuel only 1837 – 392” You pays your money and you takes your choice as the saying goes……. My correspondent points out that the flipping bit that surrounds the nipple is meant to be down when the pistol is fired to stop shards of cap escaping, and it therefore doesn’t allow the pistol to be carried capped with the hammer resting on the ‘flipper. He thinks that ‘cap guard’ is a better name for the hinged part, rather than the common ‘top hat’ and I agree – it is a much better description. Anyway if he consents I’ll put all his information on the blog. It is surprising that there are not more common ways of making a pistol safe to carry with a cap in place given the fiddle involved in capping it – if the half cock position is close enough to the nipple to stop the cap falling off it would be too close to allow the cap to be put on, and anyway it would still be unsafe as half cock can fail if the hammer is hit. The only safe system I have come across is that on the Hanovarian conversions of the New Land Pistols taken back after the Napoleonic wars when the Austrian troops returned. They use a bolt through the breech that intercepts the hammer just above the nipple – a very substantial stop (see the Post on this pistol on this website. I did a bit more work on the little pistols – I’ve started to freshen up the wood and get rid of the remnants of brass polish that are all over the place, and am planning to make new escutcheons in silver – I’ll probably cast them, either in lost wax, which is a long and tedious job as it atakes all day to make the investment, or maybe in cuttlefish bone and clean them up afterwards – it will probably be a lot quicker, I just need a brass pattern ! I’ve started to make a new trigger for the second pistol – quite tricky! I’ve got a chunk of steel in the milling machine so I can make a blank…
7 August – back at last! Its been a busy month and I am sorry that the blog got left at the bottom of the queue! The Pop-up Workshop went very well and the kids enjoyed it and we made a great boat – we built the boat – making most of the parts in the tent with my small CNC machine, and used the radio control systems I had programmed up to control it, Dave had programmed up a voice syntesizer so that the childern could write messages for broadcasting from the boat, and it happily sailed around my swimming pool making a string of announcements and siren noises. Great fun and fortunately it worked first (and only) time they had to try it. I (mis) spent a week afterwards trying to get the Microbits to work with a GPS module, but couldn’t get it to work well as there is not enough memory . It was then time for our annual sailing holiday in Scotland, so off we all went to Oban to take over Pollyanna, a Dufor 425, for 10 days or so. The weather had been quite settled and we had hopes of making it to St Kilda as the trip 40 miles out into the Atlantic needs settled weather, but no sooner had we got out of the marina than things changed and it wasn’t clear what the weather was going to do. In fact we had mostly very light winds and quite a bit of sun , which meant that we didn’t get much exciting sailing, but had several lazy, sunny sail/drift days. We didn’t get as far North as usual, but went over to Eriskay and up South and North Uist as far as Loch Maddy, then across to the West coast of Skye and back via the Small Isles and the West coast of Mull. All in all a good time was had! Now I’m back and determined to get catch up on the gun restoration! I had an email for John O’Sullivan (author of the Wogdon book) saying nice things about my reconstructed Wogdon, and asking for some hi res photos, which I will send. Anyway the first job on the list is to restore the pair of brass pistols (see diary for 2nd June). I had got as far as to remove the butt of one and discover that the pivot screw for the flipping nipple guard was broken somewhere along its length and wouldn’t come out. So after fiddling for half an hour to be certain I couldn’t get it out, I set the pistol in the machine vice of my milling machine using hardboard packing and gripping it tightly and very carefully lined up a small centre drill – I’d filed what was left of the screwhead flat so I could drill it more easily. Using the mill is much better than using a drill press as the traverses let you line it up exactly. Just don’t try starting with a normal drill or it will surely wander – use a small centre drill to start. Anyway I then drilled a 2mm hole through the shaft about 3/4 of the way through and then opened it up to 2.4 mm which allowed me to break the flipper out. I decided that I wasn’t going to be able to put a drill right through as I didn’t think I could line it up well enough, so I have left a bit of the old screw in the far end, and I’ll screw a shorter screw into the head end = a bit of a fudge, but it should be OK. The flipping nipple guard on that pistol had lost the mock ‘steel’ bit that acts as a lever for opening the flip, so next job was to weld a new bit to be filed into the right shape. That went reasonably well, except that the battery on my welding mask was dead. I changed it for a new one but it seemed far too dark and the mask has no adjustment – I shaped the bit but I can’t finish that part of the job as I need some smaller taps and dies, so I ordered some UNF 2 and UNF 3 taps and dies from Tracy Tools – I guess I had not made such small screws before – I don’t even have metric taps and dies that small although I think somewhere I have a 10 B.A. tap….. I’ve stripped and cleaned that pistol and checked that things should work when it all goes together – I still have the stock to sort out. The other pistol of the pair has a broken folding trigger with most of it missing so I’m going to have to make a new one. That will be very fiddly as there is quite a lot of critical shaping – the top of the trigger has a slot into which pivots the sear, and a pin sticking out of the side that the trigger retaing spring bears on. It also has an edge that presses on the sear to lift it from the cock to fire the pistol……………….. Not particularly easy to fabricate! Here are some photos of last month;-
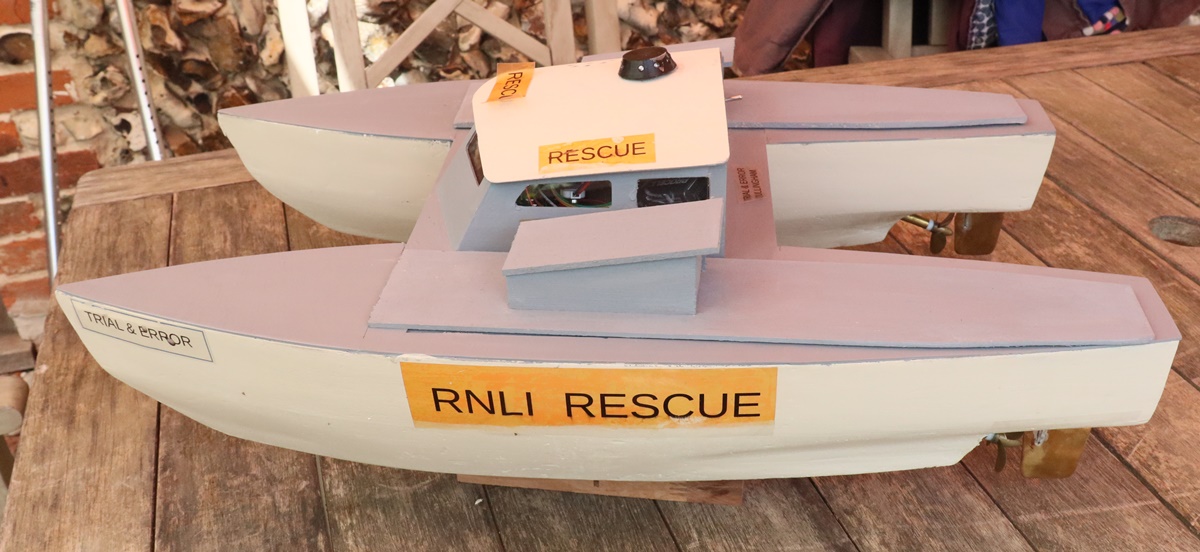
Hulls made from blue foam painted with Farrow and Ball emulsion in a tasteful shade, cabin cut from 1/16 ply on the cnc machine.
Here is my ‘patent’ motor mount for easy alignment – just pushed onto the 8mm diameter prop shaft tube, with a tension spring for a flexible coupling.

On a mooring in Loch Scressort, Rum. Mostly we anchored – this was not a particularly comfortable place to be – a bit rolly at times
despite the fact that there was almost no wind – I should have anchored nearer the shore out of the fetch.
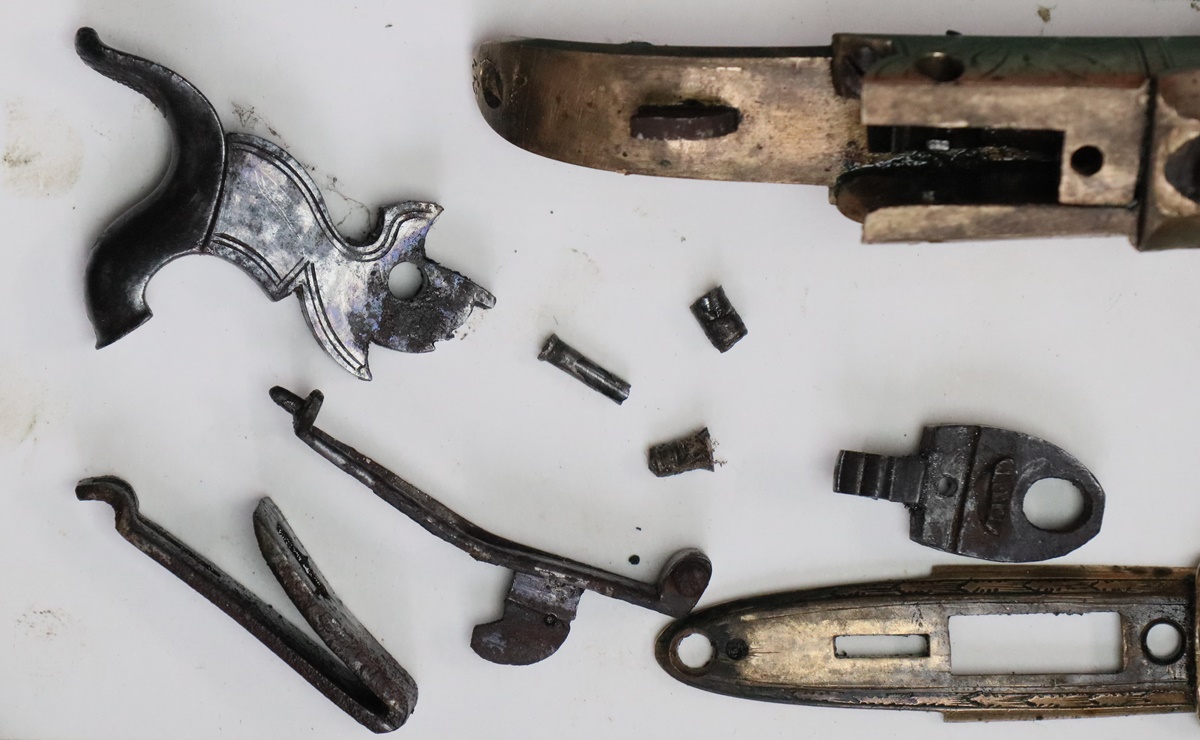
Bits ready to clean etc. The long rod in the centre is the drilled out pivot.
4th July – another month gone by and the weather pretty unsummery – our plastic bag swimming pool is not getting used as its pretty cold in there! I have been working flat out getting my school project ready – its now called ‘The Fantastic Pop-up Workshop’ and today Marin and Claire came down and kindly brought me their 3m x 4m magic tent that they use for the MLAGB shoots at country fairs etc. Looks fantastic and just right – its the first time they have put the sides on, its usually just a shelter. I was going to have two tents but when I saw how big that was I decided we didn’t need the second on, My fellow engineer Dave and I have been working away at getting the project sorted – I think I have now written all the G-Code for cutting out the hull interiors and the decks, hatches and cabin sides and windows, and built and programmed the control systems for motors and rudder. I made a neat motor mount that clamps on the propeller tube and keeps it all lined up, and my own take on a flexible coupling using a section of compression spring filled with set silicone compound – hope it works, its very flexible! Dave has written the draft code for the audio link – a second controller will send phrases to a speaker on the boat, and operate a blue flashing light and siren. In all a fairly major task given my state of knowledge when I began. Anyway tomorrow is the start of the Pop Up Workshop, and the back of my Landcruiser is filled with boxes of materials and tools, my CNC milling machine, computers etc. so we will see how the kids enjoy it. I was talking to Martin about upcoming shoots – I really enjoy the Helice shoot in Rugby and Tom is keen to come. My only problem is that I sort of decided only to shoot flintlock from now onwards (apart from the odd fun breech loader shoot – i.e. at clays with a bolt action .410 with 2 1/2 inch cartridges. So I’m undecided whether to do the Helice with a flintlock or give up on my intentions and revert to percussion – very few people have done the helice with a flintlock – it requires quick shooting, but I’m usually not that good that it will make much difference! Besides my favourite percussion gun (the H Nock) is now converted to flint. Thinking back over my comments on shooting clays and live quarry in the last post, I realised that you can break clays at much greater range than you can kill live quarry because 1 pellet can chip a clay and count as a kill, whereas one pellet is unlikely to drop a pheasant, so you need to hit with, probably 4 or more pellits to stand a chance of a live quarry drop. Also the pellet energy (mass x velocity) and momentum (mass x velocity squared) are much less with a blackpowder gun that a with modern cartridges and you need more energy to penetrate the body of a pheasant than to break a normal clay.
24th June – A long time without posting here – I apologise! I have been getting ready for a week long project at ‘my’ primary school where I have volunteered to run a project for a group of year 6 ( age 10) children who are not going on a course at the British Racing School involving ponies and riding, so have to be given an equivalent value activity at school! There are only 4 children involved so it can be quite intensive, and my STEM club partner Dave will be helping so we can be ambitious. My plan is to build a working model boat with radio control – the boat will largely be constructed on site by the children using parts that they will make on my small CNC milling machine out of XPS foam or 1.6mm ply (I have written the cutting programs in advance). The radio control will be using BBC microbit computers that are programmed in Python to control the boat from a hand held microbit transmitter. The children will help wire it all together and be involved in loading the program and putting together the final stages of the software from modules I have written, plus they will program a second radio system to operate lights and sound on the boat, and possibly get feedback from the boat. So I’ve been writing the programs for cutting out the hulls and deck and cabin etc in ‘G’ Code, as well as learning to program in Python and writing all the control modules. Since its about 15 years since I last wrote any computer code ( in ‘C’) it has been a steep learning curve! Anyway I’ve made good progress, and I’ve arranged to borrow a couple of big tents to house it all in from Martin Crix, plus some tables so it is coming together – so I haven’t been wasting my time – at least in my view! I did go shooting with Bev and Pete today at CGC – I wanted to prove the Nock flint conversion, and in particular the re-welded frizzen that failed on my initial tests. The three of us had a very enjoyable morning, and I managed to fire off 50 shots with only 4 or so misfires due to the flint being so worn it was not sparking at all and none that were ‘a flash in the pan’. You can usually get away a couple of times re-working the edge of the flint in situ by tapping with a 1/2 inch brass rod, but eventually the edge of the flint gets too steep an angle on it and cannot be pursuaded to slice slivers of white hot metal from the frizzen. I did hit a few clays including a couple that evaded Bev and Pete on their first attempts, Bev brought a range finder with him and we checked the ranges of some of the fixed points around the place to get an idea of the ranges to the clays. Our conclusion was that many (most?) of them were in excess of 40 yards, some we thought up to 60 or so yards. Given that we were all shooting flintlock guns of over 200 years old it is amazing that the others managed to break most of the clays! I have said before that I think the shooting grounds have upped the difficulty of clays since I started some 8 to 10 years ago – I’m sure there were lots of clays that more or less landed in your lap! I’m not sure why that would be, maybe our shooting grounds are hosting more and better competitions and so need to compete at a higher level? We agreed, I think, that we would not attempt to shoot game at some of the ranges that the clays were persented at – it being generally held to be unsporting to shoot at live quarry at much more than 40 yards with a cylinder bored barrel. Today certainly made me much more confident shooting my flintlock – although its easy with a couple of experts in attendance! Oh, and my ebay selling of bits and pieces from the loft is going well – old (vintage!) computers go well but I have also got rid of a few bits and pieces left over from my electronics business – so far I’ve made enough to pay for a basic percussion gun, not that I need another! And anyway I’m spending the money, or some of it, on the school project…….. As an afterthought its sad to report that visits to this blog both direct and via search engines almost halve if I don’t post for this long – serves me right!
4th June More views on this blog than for a while – up from about 150 to 200 per day – must be because I’ve started a restoration project! I did some more on the Rooke pistol I am working on – its quite a challenge! The cock pivot that I mentioned had broken leaves behind half its length so you can’t remove the cock, and the bit left in is of course threaded into the brass – can’t be knocked out with a pin punch, don’t know what I was thinking yesterday! I shifted my attention to the flipping top hat – the screw for the pivot turned about 30 degrees easily but is also broken somewhere along its length and the head section will not come out despite it turning its 30 degrees freely back and forth- not sure why at the moment. So not a very productive day! I can’t find my can of acetone – I’m now a firm believer in parallel universes – there must be one in which all the items from my workshop that I can’t find since using it as a temporary kitchen have migrated – some are key things like my very fine wire brush that can’t be bought anywhere on the internet in the UK! I had to use model aircraft engine fuel as a penetrating oil but its not really up to much… I shall need to have a strategy for sorting out the broken / stuck screws – the key issue is not to damage the brass body of the pistol, the screws themselves are (fairly!) easily replaced – even if they come out, the heads are often messed up. If the flip top hat didn’t need welding I’d not bother to take it apart, but clean it in situ, but I will need to remove it from the pistol and take off the spring before it can be welded so as not to damage things. I’m reluctant to use heat here because I don’t want to have to retemper the spring I’ll post some pics tomorrow…… Harking back a year to my Covid, I had a CT scan for other issues, but the radiologist reported that I had lung damage consistent with Covid-19 – my consultant said maybe I was lucky to have survived – I’m pretty glad I managed to sort out oxygen and so avoid hospital in the very early days of the pandemic – I think there is a story to be told there, but I guess it has been/will be buried.
3rd June – I couldn’t resist starting on one of the Rooke pistols below. The finish on much of the steel is the original bluing, worn in places and with patches of rust, but still quite distinct from the finish you get from electrolytic derusting, which basically removes all oxides, including those responsible for the bluing. So that means basically the rust has to be removed by hand in a way that only affects the rust patches. My technique is to scrape the rust patches gently with the back edge of fine modelling knife held at shallow angle to the surface. To make sure that I don’t put any scratches on the surrounding blued finish I hone the back edge of the blade on a static ceramic wheel with 0.5 micron diamond paste, and gently round off the corners slightly to reduce the risk of scratching. It is a surprisingly effective if laborious technique, it works because the bluing is basically harder than the rust. It is a good idea to apply WD 40 or AC 90 as a lubricant. I am working on one pistol first, I’ll do the second later, first step was to remove the wooden butt – as usual it is held by two screws, one at the top through the back strap, and one below through the tail of the bottom tang. First step is to clean out the slots with the modelling knife – which gave me a warning – the slots are very deep and narrow, and go down as far as the shank of the screw. The top screw came out easily enough with an accurately fitting screwdriver (it is tapped into a steel plate in the butt) but the bottom screw wouldn’t shift ( its a wood screw) even with a bit of low viscosity fluid with a drop of oil ( I had cellulose thinners to hand). Before I could put any real force on it, the two sides of the head had started to open out, and one broke off leaving half a head. Its not possible to get hold of the remaining half, so I ground it down a bit with the Dremel (equivalent) with a dental burr until I could get the remains of the head through the hole. It came out but I’ll have to unscrew the bit of screw left in the butt before I can refix it. Having got the wood out of the way I gave the metalwork a good spray with WD40 and left it for a few hours – much to my amazement the pistol cocked and fired without any more work – the only fault is that the hidden trigger doesn’t come out unaided when the gun is cocked – it’s a bit stiff and needs a hand. I tried to remove the cock pivot but although half of it came out easily, half of it is stuck in the brass body on the right side of the pistol – it will probably come out with a light tap from a pin punch. I’ll finish stripping the lock and cleaning up the parts with my modelling knife, or possibly in the electrolytic tank if they are bad, On this pistol the frizzen like protrusion on the ‘flip top hat’ that gives you something to use to open it with is broken, so I’ll have to make a replacement part and weld it on, or have a more expert welder do it, which would be a better idea as it is very fiddly. The engraving is pretty worn so I have the usual dilemma – should I recut it or leave it? My instinct is always to do the minimum in the way of intervention, so for the moment I’ll leave it. The wood will take a fair bit of work to patch the missing corners, and I’ll probably freshen up the chequering a bit (not too much) as I’ll have to blend in the repairs anyway. All in all my impression is that the pistols are really in good shape under a bit of rust and a build-up of brass polish, and won’t take too long to get back into good order
2nd June – Oh dear, quite a gap in the diary! I have been trying to get my head round programming the BBC microbit in Python and building servo and motor drive circuits, as well as taking advantage of the hot weather to attack the fallen walnut tree with a 20 inch chain saw. Hopefully that will change over the next few weeks as I had a visit from a friend and fellow collector. I’d fixed a little double barreled pistol for him and he had found and bought a little pair of pistols that need A LOT of work – he bought them to pass on to me, so I could put the work on this blog, and kindly sold them to me for what he paid for them. They were a decent and pretty pair of brass percussion muff or small ‘turn off’ pocket pistols signed H & S Rooke and engraved ‘London’ on the other side. H & S Rooke were Birmingham gunmakers in business from 1810 to 1836 who were known to mark their pistols ‘London’ to increase their appeal (and value). They have the flipping ‘top hat’ covers that hinge down to allow the pistols to be carried safely with caps in place and be ready for firing by cocking them and flipping the cover. It is a similar mechanism to the frizzens of little flintlocks and I suppose might lead one to believe they were conversions of flintlock pistols – I don’t believe these are, but as everything is seized solid with rust and gunk I can’t be certain. Obviously they have been seriously neglected rather than heavily used, as where the rust hasn’t got at the barrels you can see a nicely blued surface. The escutcheons on the butts have been picked out, so presumably they were gold. It will be interesting to see how to go about the restoration – at the moment I haven’t really formed any plans – were they all steel I would remove the wood and chuck the whole lot in the electrolytic derusting tank so I could strip it down but I’m not sure how the brass would react to the process – maybe have to experiment first. They are also pretty bunged up with the residue of brass polish, including the chequering and there is some damage to the wood too….Obviously first job is the separate the wood from the metal! My friend also bought an unusual pocket pistol, a bit larger – it looks like a typical bog standard flintlock pocket pistol with a turn-off barrel, until you notice the tap on the side and look in the pan. Its a superimposed load pistol, where you unscrew the barrel and load the breech end twice. The tap diverts the flame to the charge nearest the muzzle first, then you operate the tap to feed the flame to the rear charge, The rotating part beneath the pan allows a priming charge to be rotated with the tap and stored while the first charge is fired with the priming in the ‘open’ pan (closed by the frizzen). These pistols normally used tiny charges, which is just as well because there doesn’t appear to be any interlock to prevent the back charge being fired first. ( for another example of a superimposed load pistol see the post on this blog) .The pistol is pretty much OK, but needs a top jaw and top jaw screw. If I feel really daring, there is a bit of the silver inlay missing on the butt (I’ll post photos and a better description of this pistol later). I think I will make a few videos of the restoration of the little brass pistols on YouTube – I get quite a few views and subscribers – people who wouldn’t find cablesfarm.co.uk, and there are very few videos of work on real muzzle loading antiques – besides, I quite enjoy making them…..
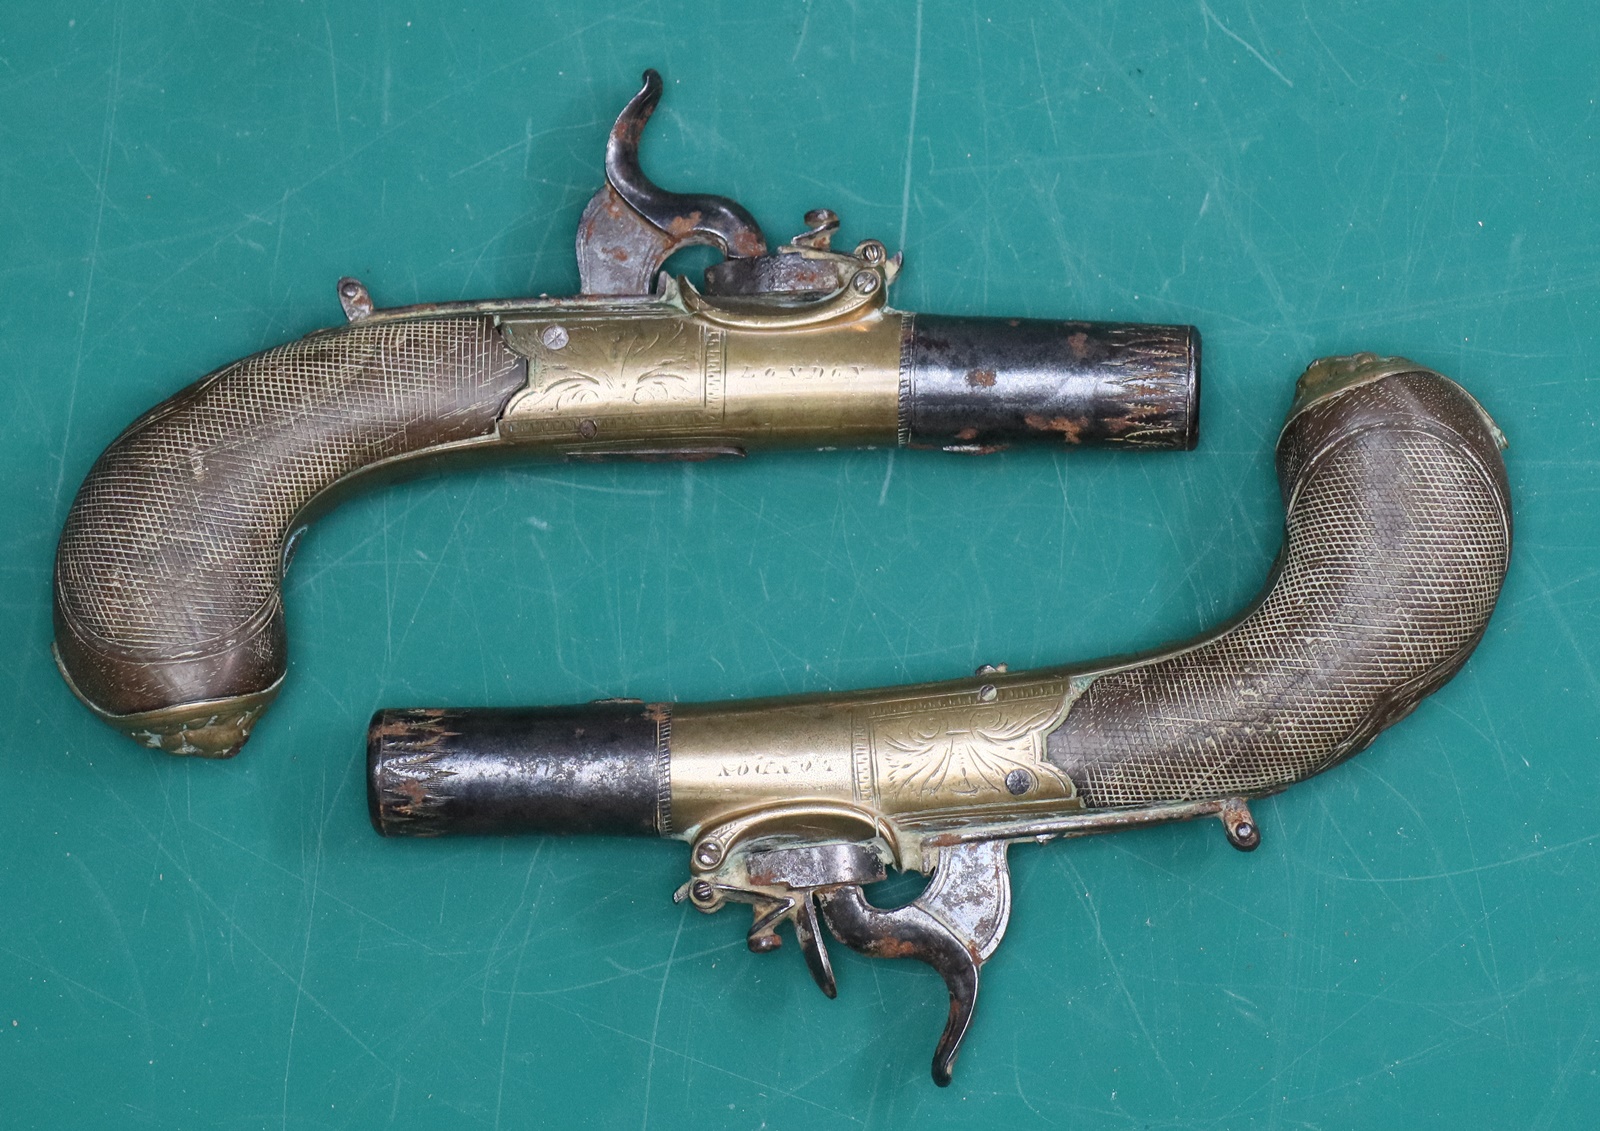
The top pistol is missing the tab on the ‘flipping’ cover that look like a minature frizzen and is needed to flip it.
I think one cock may have a crack – mostly hidden. Crack and some missing wood on the butt of the upper pistol.
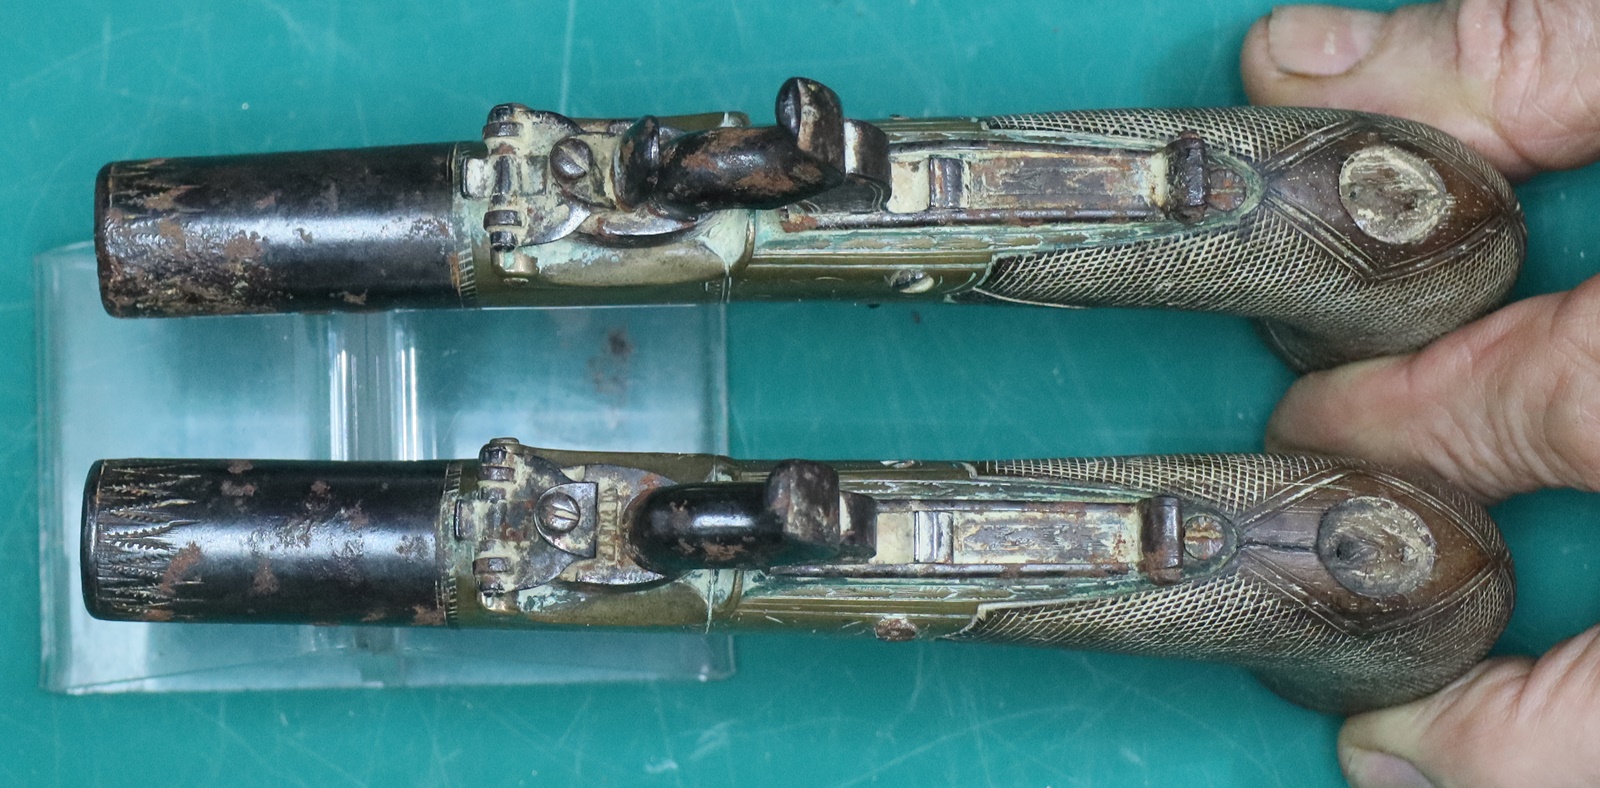

one trigger is broken off and missing