Here is the diary:
30th December – Nothing much to add – cleaned up the workshop a bit which took all the time I had – I did find a little book from 1941 – a handy guide to Enemy Weapons with brief instructions so that they could be pressed into service by the British if needed…….
Its complete – someone has ticked off most of the weapons so presumably they had absorbed the information, or maybe actually handled the weapon.
I’ll probably be arrested for putting it on the web! I might just compound my sin by scanning it and putting the whole thing on the web sometime. I like the instruction that it shouldn’t fall into enemy hands – did they think the enemy didn’t already know about the weapons they used?
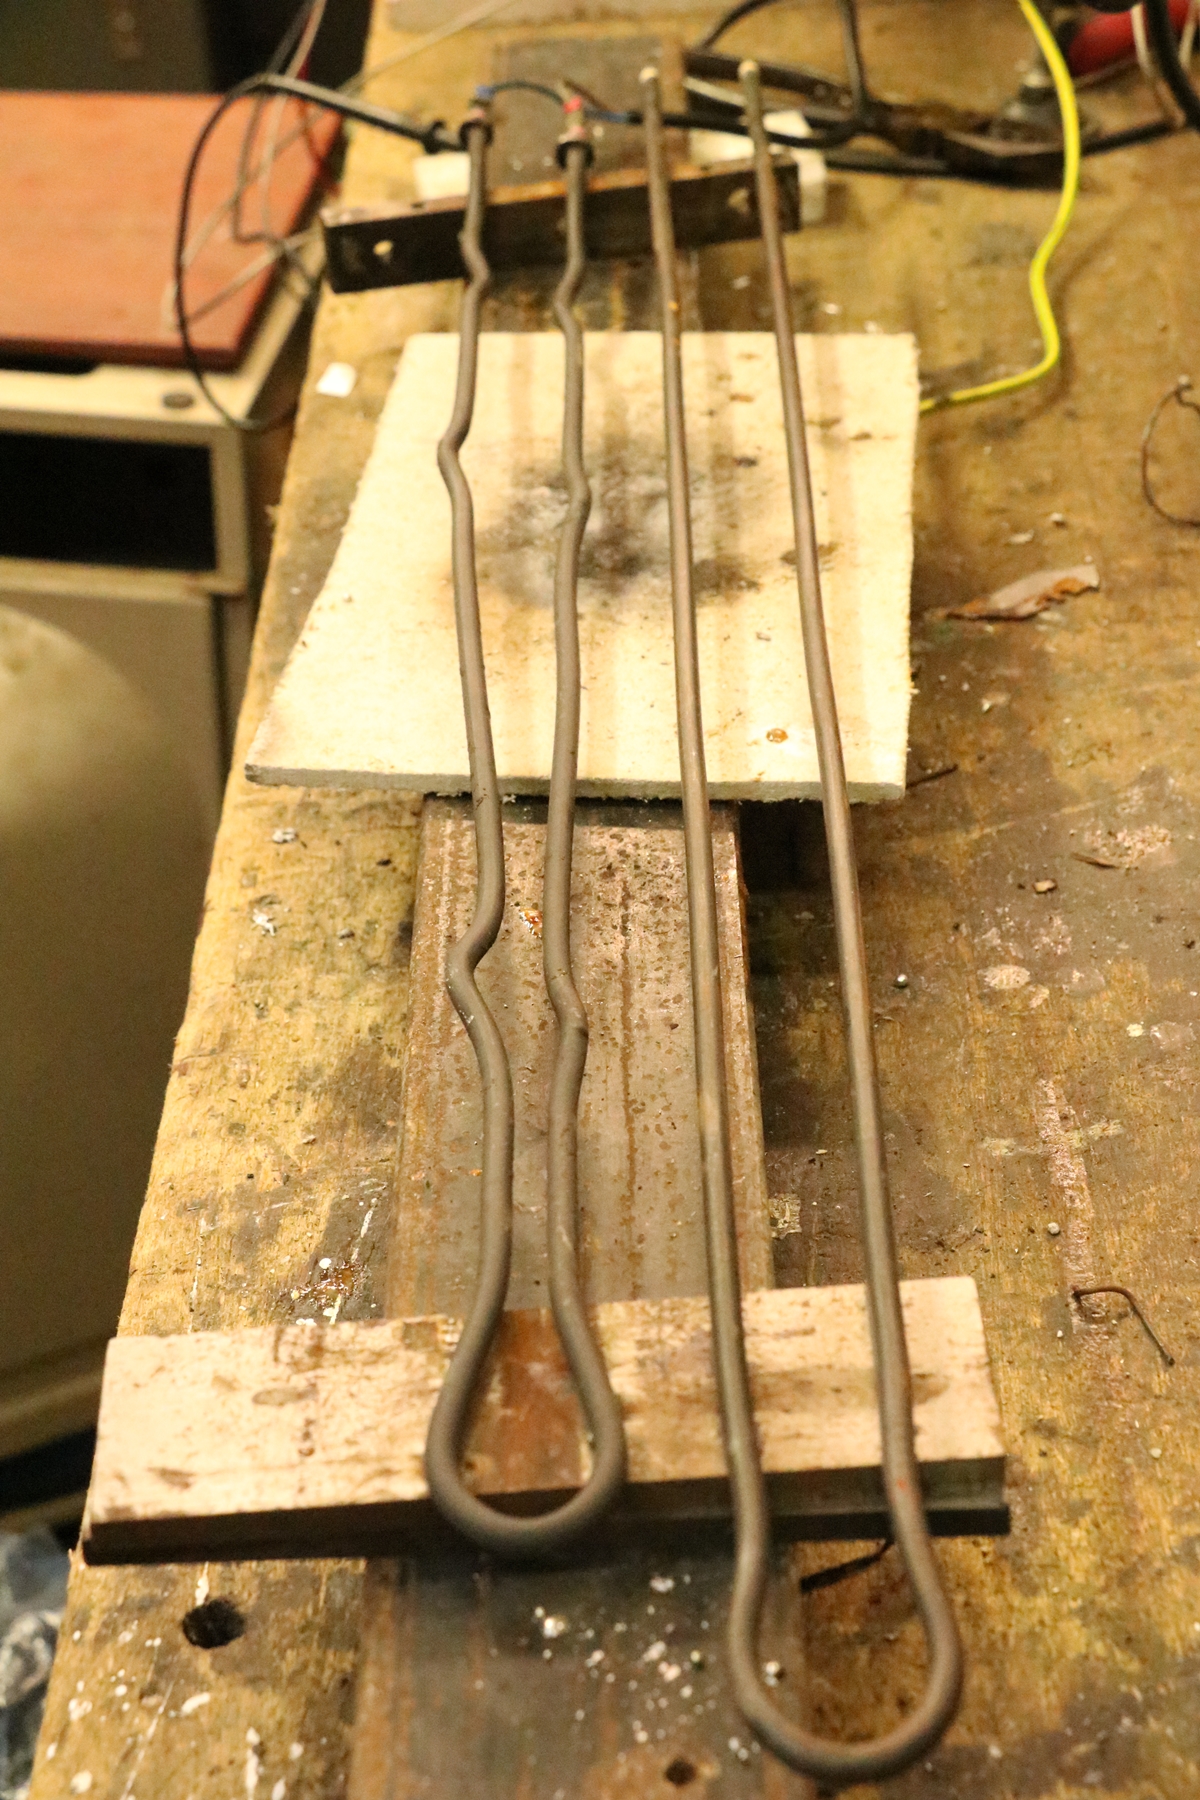
29th December – One party done – 23 members of the family for a sit down lunch – lovely to see them all every year. Now back to normal for 24 hours, then another prep for the next party! Managed to get a visit to the climbing wall for another bouldering session where I met an old college friend who, like me, is a climbing geriatric – he has been climbing for many years, I’ve done it three times and am told that my technique is rubbish, but I did manage to do a grade 4 and 5 climb today in spite of that. I found time to start on the mainspring for the little Harding pistol – I had a strip of 2 mm thick spring steel and cut out a profile with an angle grinder and annealed it in the furnace then put in the hairpin bend in about the right place – note the tab which will eventually make the pin that goes in the hole in the lockplate – best not to make it too small at this stage as you don’t know how the bend will turn out. Heat to red heat and bend at 90 degrees then hammer a bit flatter and eventually almost close up the joint ( keep heating it up between stages). it’s then shaped a bit more and the thickness and width tapered and then you can file down the pin so that the ‘elbow’ just clears the protrusion on the nose of the lock that holds it in place. I had to heat and bend the pin very slightly to get the spring to lie flat. I then opened up the spring a little and heated the the end that rests on the tumbler ( there is no link on this pistol) and bent it to shape. Having got the shape of the end more or less right, I annealed to by making a hollow in a pile of wood ash and heating the spring with a butane torch, then pushing the ash over the spring to slow down the cooling. After polishing it I was able to offer it up in place – it looks reasonable, but may need a little more adjusting before it is finally opened up a bit and hardened and tempered, of which more later…. I think it will be OK, if I’d had a slightly thicker spring steel I might have preferred to make it 2.25 mm thick, but I think it will do – I do have to put a dab of weld on the top arm so I can file up a little wedge to go into the small indent on the underside of the lock ledge. I can then finish the sear nose and get on to the cock.

26th December Pheww…… Christmas is passed, now just 2 big parties to organise and run in the next week – but at least we had today to relax! We even managed to go to the cinema and see ‘Mortal Engines’ which seemed rather like the last Star Wars film I saw, lots of shootups and clever cgi. Anyway I did manage to get more done on the sear for the Harding pistol – it just needs to be finally adjusted after the mainspring and cock have been sorted. I rather like fiddly machining, although I’m prone to being a bit careless at the last moment and taking off too much metal somewhere. I just about got the sear OK, – the arm that intersects the trigger plate was welded to the sear itself rather than machined as one piece to save more machine ops, and I left the joint as a fillet.
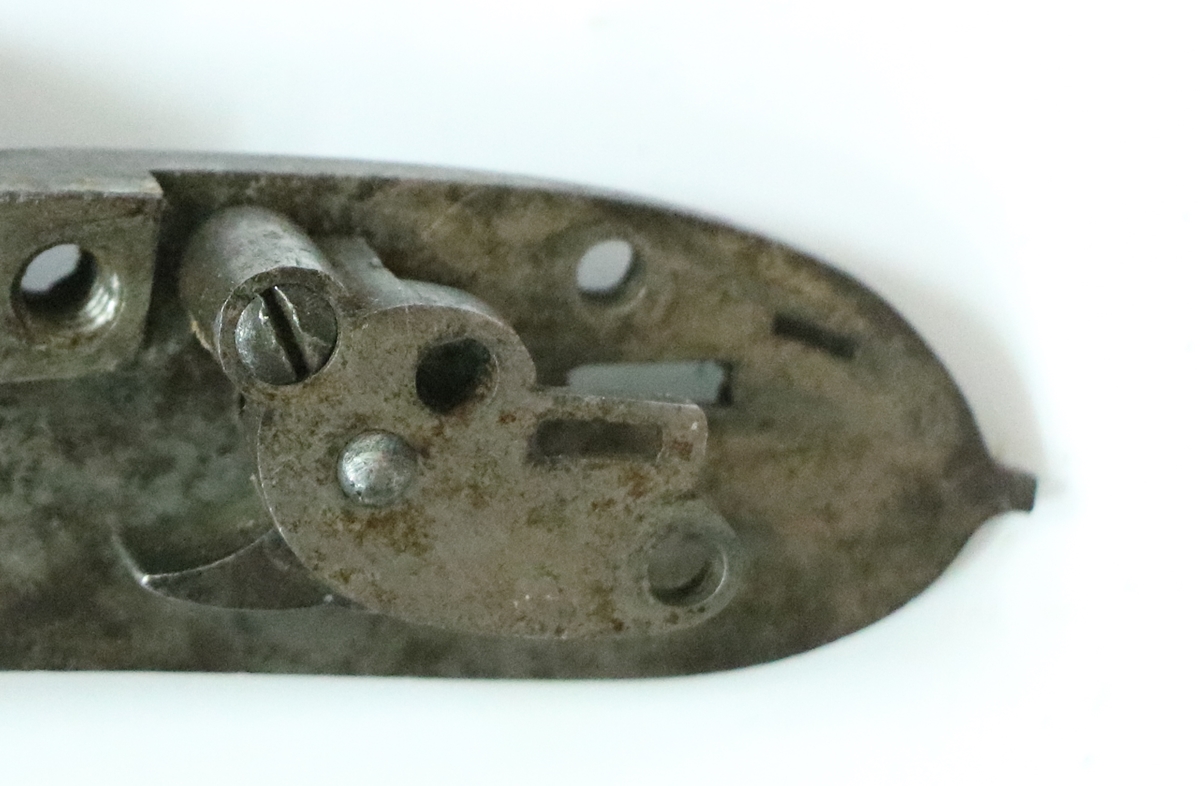
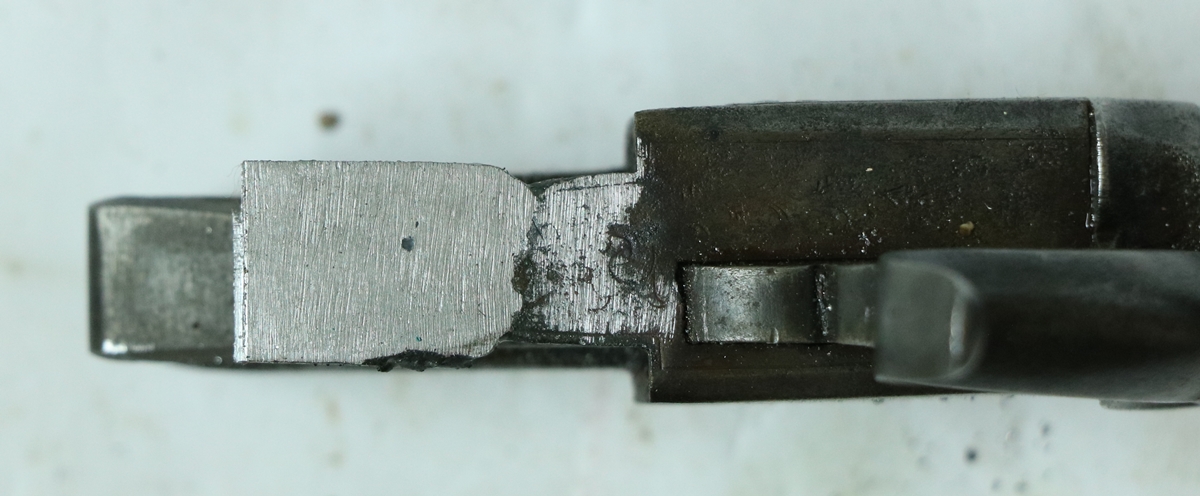
There is a bit of a puzzle with the works of this pistol that I can’t get my head round at the moment – the bridle appears to fit perfectly on the lock plate – the 2 screws, tumbler and the peg are in perfect alignment, and the tumbler seems right. The puzzle is that the lock plate has a slot for a sliding safety catch and the tumbler has a slot into which a catch would fit at half cock – all as it should be to work with a small part moving inside the V of the sear spring, with a cover spring with a pip to hold the catch in either position. All as I would expect – But the puzzle is that there is a slot in the bridle that doesn’t quite align with the slot for the catch in the lockplate, and a additional hole in the bridle that doesn’t coincide with a hole in the lockplate, and anyway is half obstructed by the tumbler when its on full cock – so what are the slot and the hole in the bridle for – they would appear to get in the way of the sliding safety and tumbler ? Any ideas or photos would be appreciated;-
25th December 00:12 hrs Happy Christmas, and thanks to all the followers of this blog who have contacted me over the past year – have a good day, and may Father Christmas bring you something special, or, more likely if you are like me, you’ll have to buy it yourself if its in the gun line!
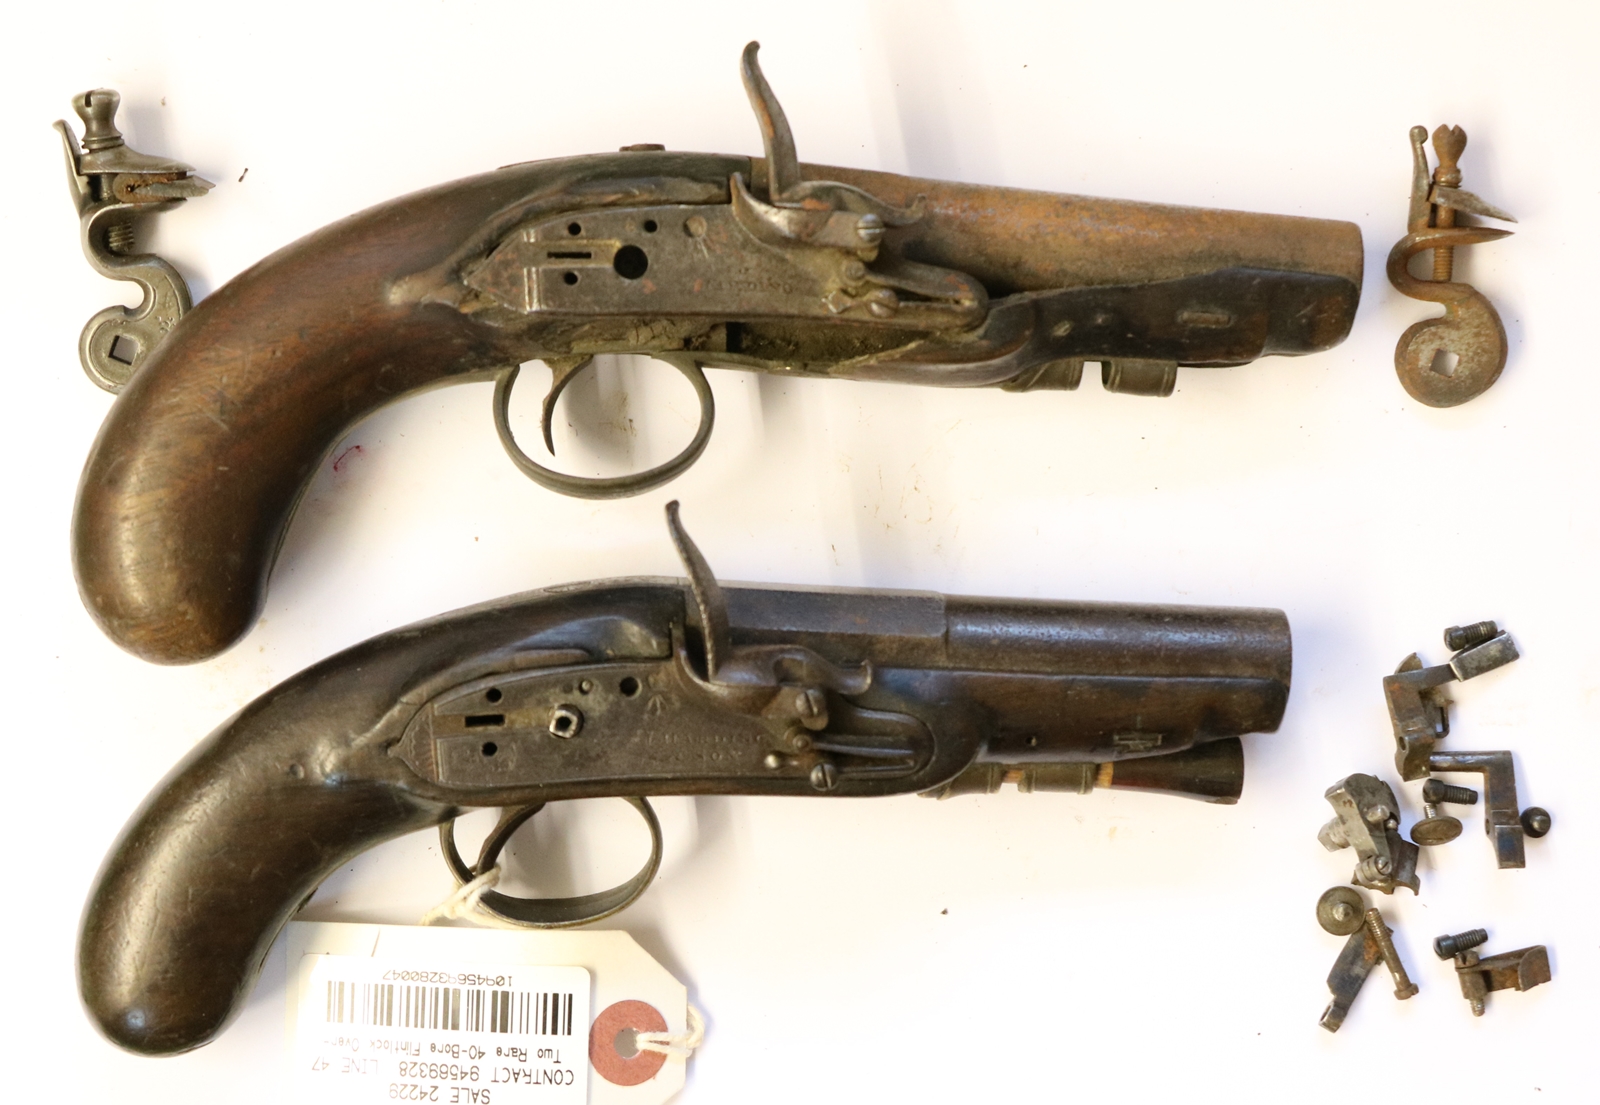
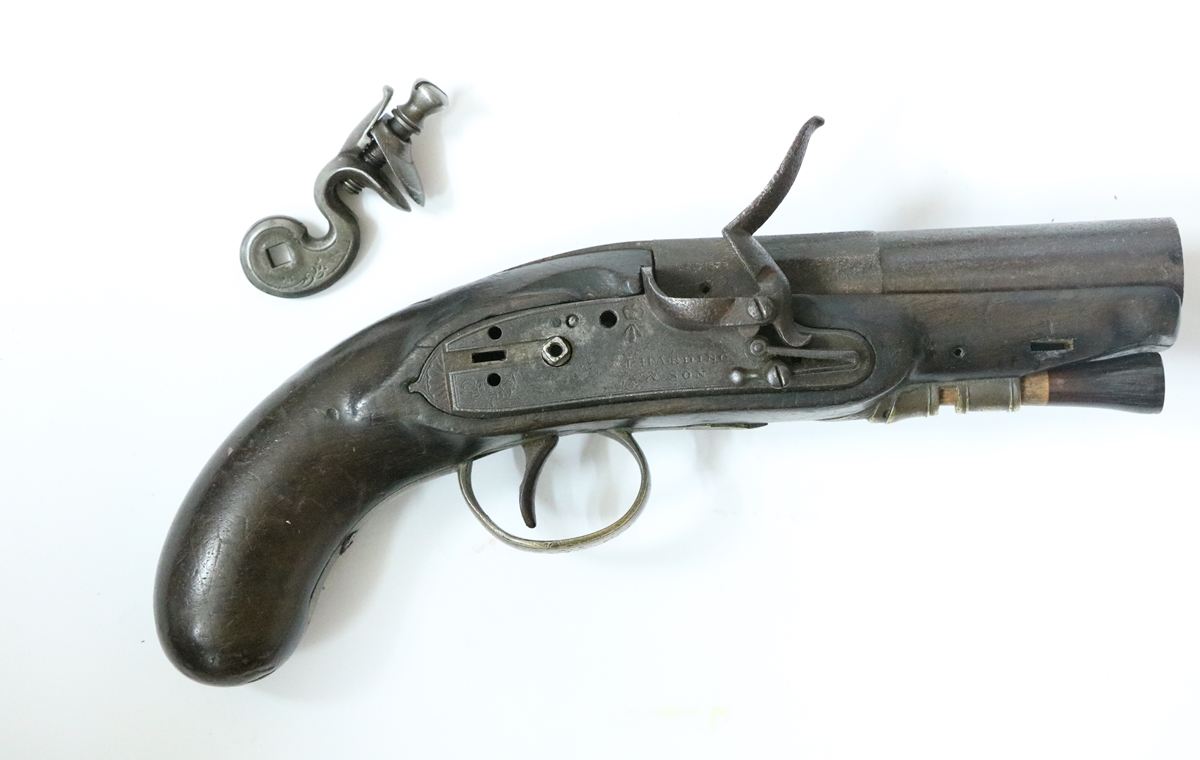
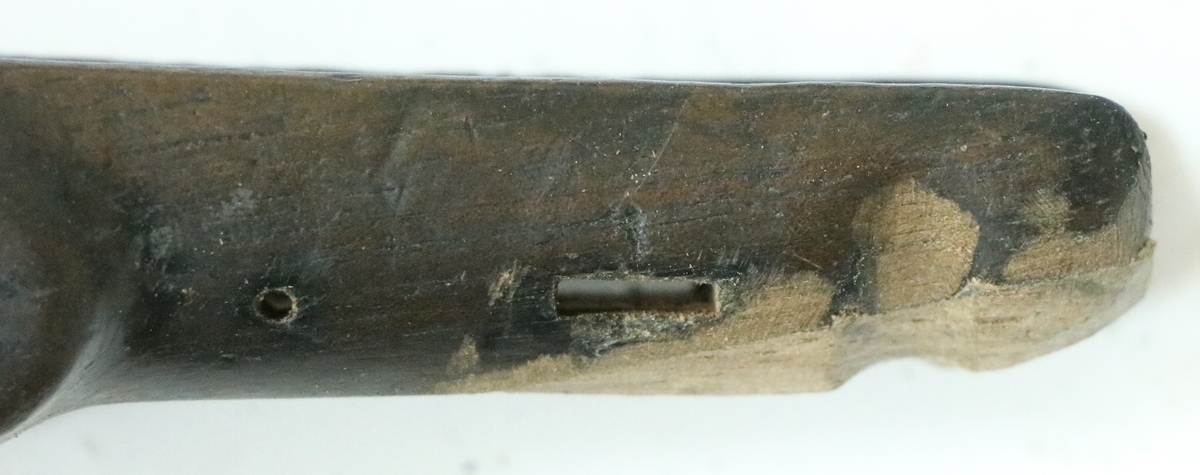
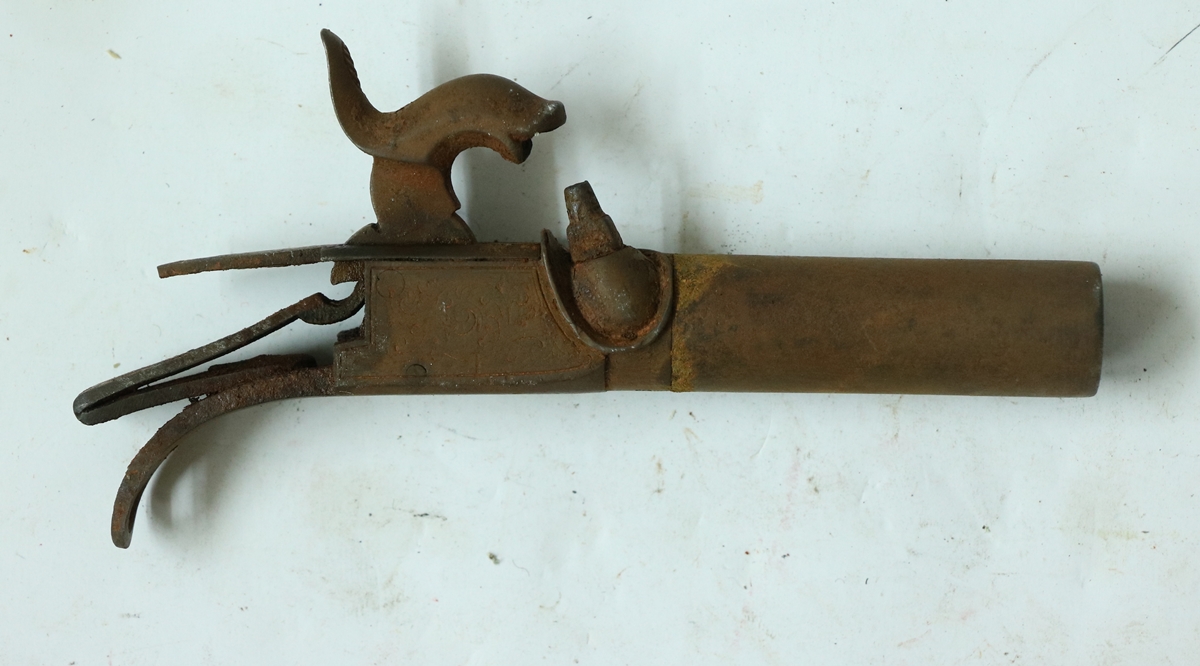
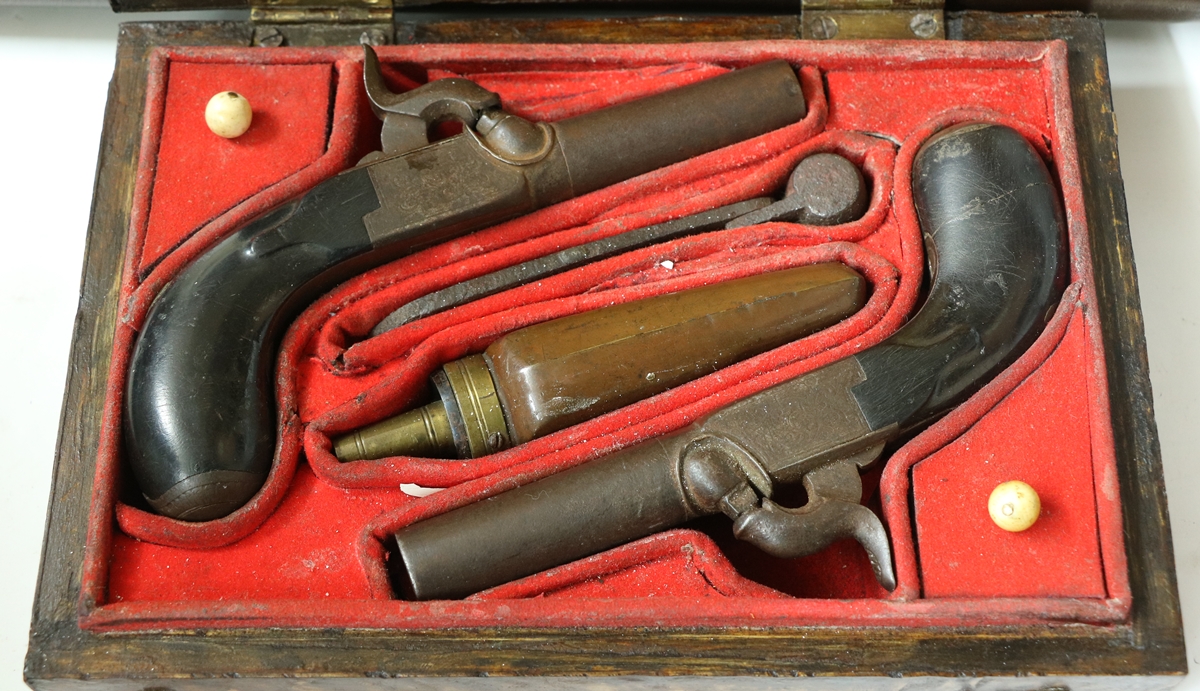
23th December – I couldn’t keep away from the workshop and came across the little pair of rubbish pistols I had bought at too high a price, and thought they deserved a bit of attention as at least one is restoreable. The first problem was fixing the stock – the muzzle end was cut away so I needed to splice on a bit of matching wood, glue up a crack down the middle ( partly covered by the patch wood) and then patch a couple of small holes with instant glue and sawdust, then steam a few dents out and colour up the patch. That is all going well so the next problem is the cock, which isn’t the original one – its a casting and is stamped on the back with initials and the date 1969. – it had never been fitted to this pistol as the square is completely out of alignment with the tumbler. I cleaned up the cock and recut the engraving and filed it up a bit to make it look a bit less like a casting – the next job is to fill up the hole in the cock and weld it all up ready for a new square to be cut. I’ll fill up the hole with a square plug of steel with a pilot hole drilled in the middle, and weld round it. I’ll need to get a sear that fits and make or find a mainspring, plus all the bits of the safety catch that locks the tumbler in half cock position.
De-rusted and ready for restoration.
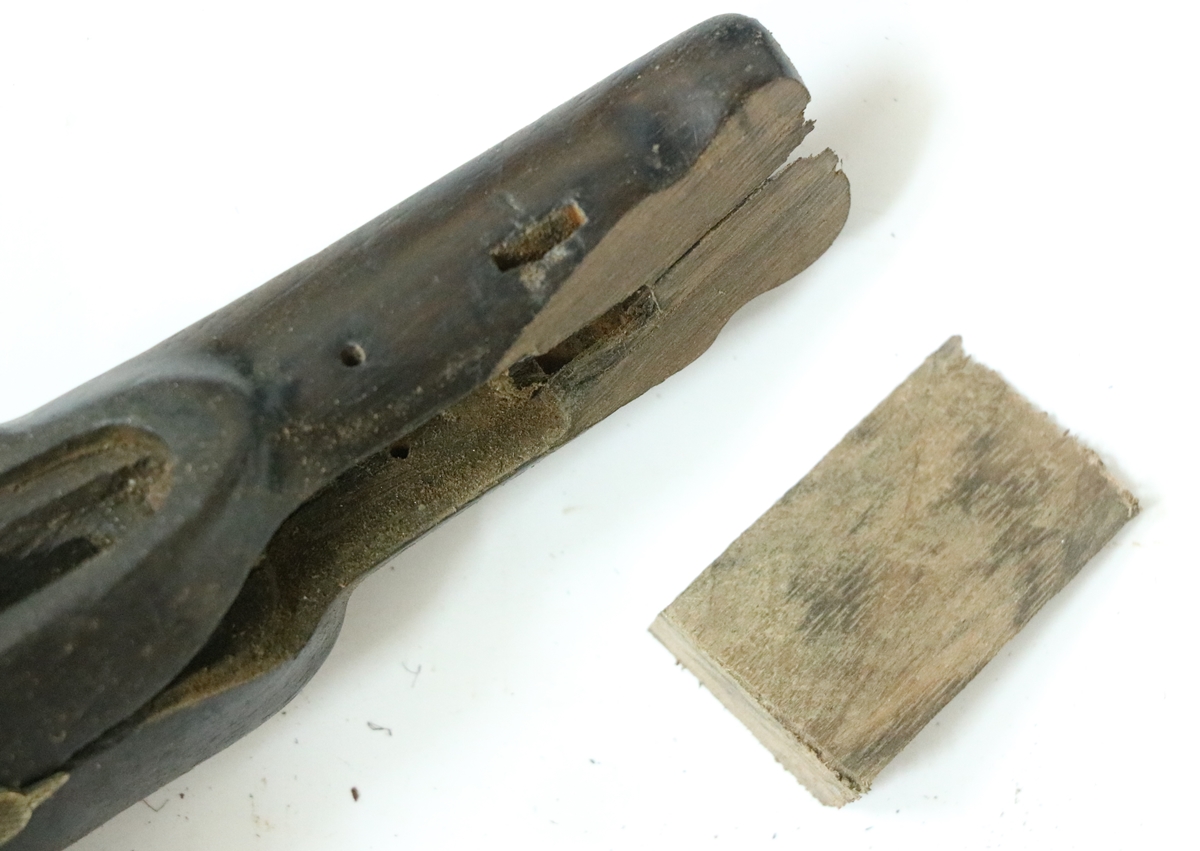
The wood of the patch is a little light but it will colour down OK
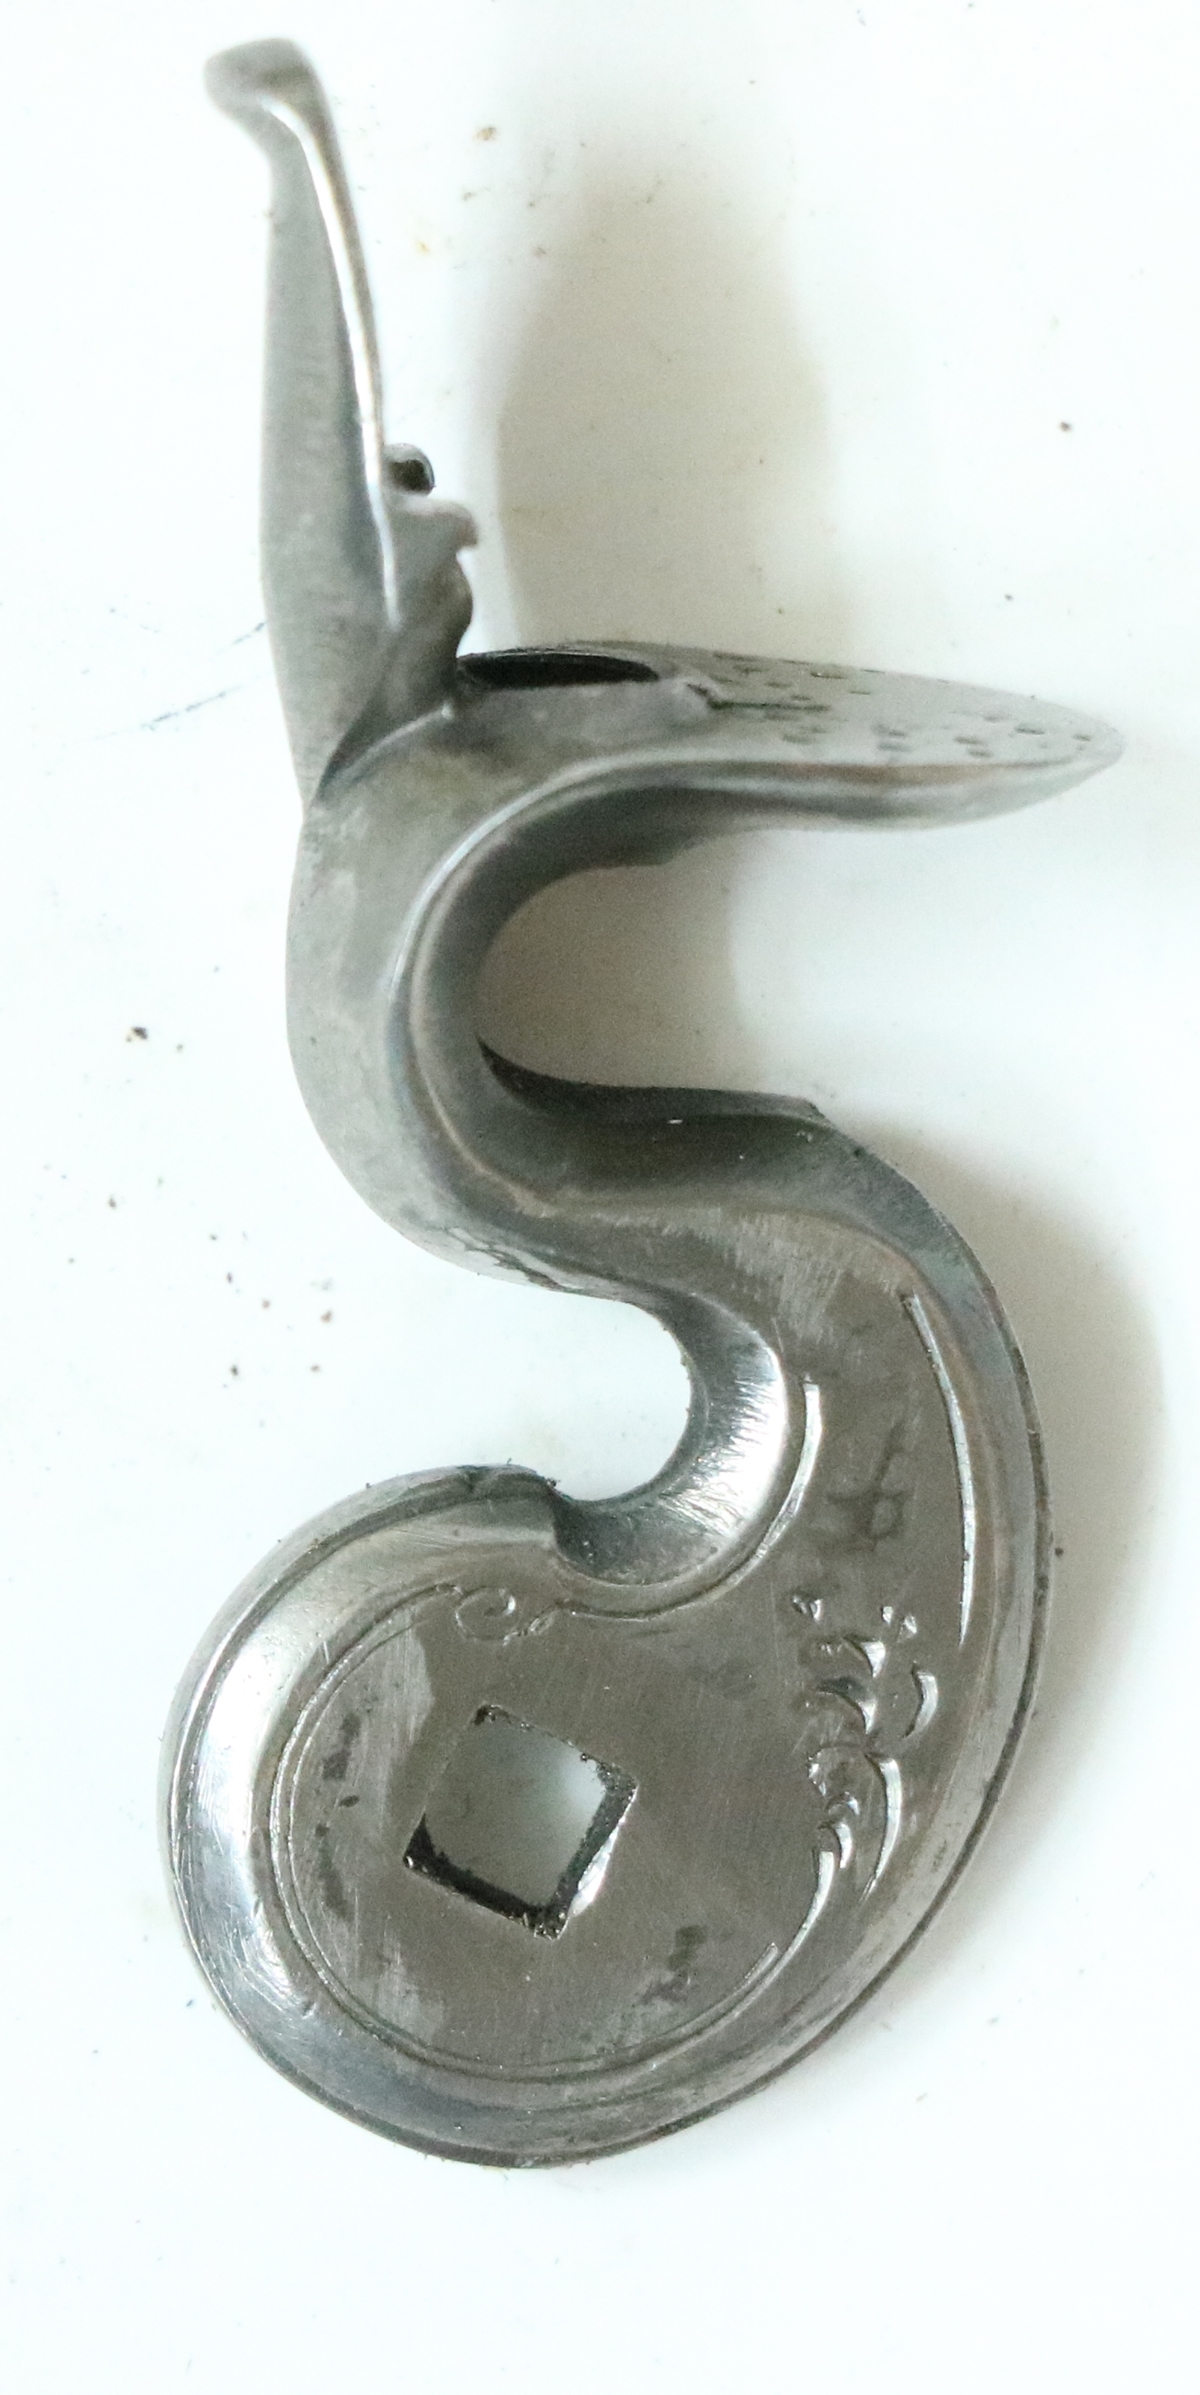
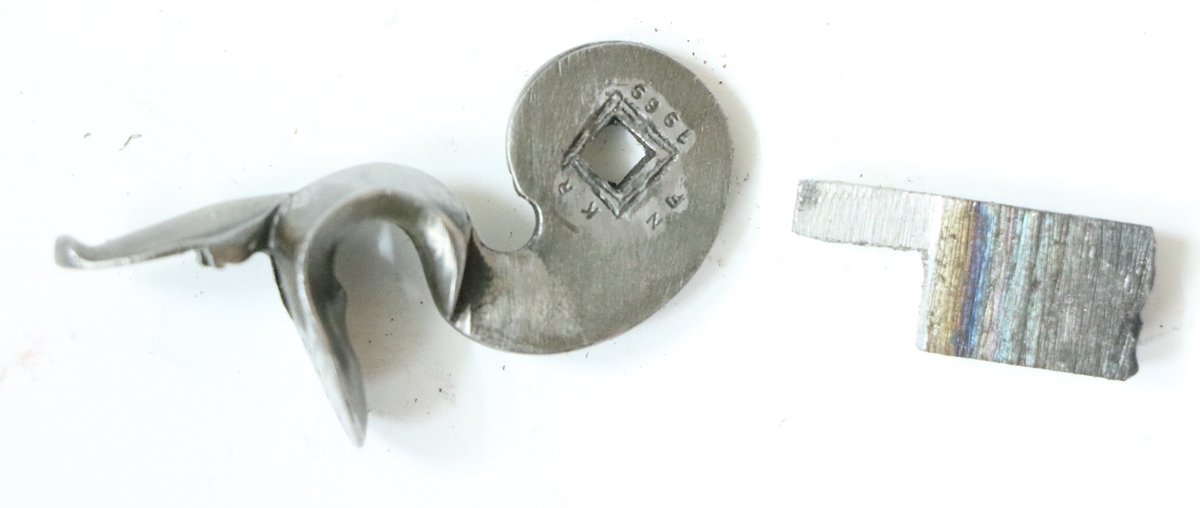
Cock stamped 1969 – with plug to block the square.
22nd December – I had another session of ‘Bouldering’ with Giles this afternoon (see diary 17 Dec.). I managed a few of the third grade climbs but found that after a few climbs I didn’t have the strength in my arms to do overhanging climbs – I’ll have to ask Father Christmas for some weights! I was reading a copy of ‘Muzzle Blasts’, the American magazine from 1968 and was amazed to see that the US Senate was considering legislation to require a State licence in order to transport any firearm in an automobile through that state! In some states it was apparently already an offense to have a firearm anywhere in a public place or in a vehicle except in the local hunting season. Given that level of proposed restriction its not difficult to see why the NRA so vigorously defends the freedoms it eventually won from excessively restrictive laws. The UK may well find itself in the same boat in the next few years if there is a change of government, and in the event of a ‘no deal brexit’ transporting guns through Europe may well require permits from every country transited! There are currently government proposals to prohibit the instruction of under 18s in the handling of air weapons on private land or ranges, which would be loose one of the main opportunities to train youngsters in the safe handling of guns of all types – I guess you and I know that few people with any land will take any notice, meaning that those without are being penalised again! There is also pressure to get some kind of regulation of antiques, at least of obsolete calibre breech loaders. See the latest copy of Black Powder’ for the battles being fought on our behalf by the BASC, MLAGB, Sir Geoffery Clifton-Brown and others. If you are not a member of either organisation, please join as they are doing a fine job defending all aspects of out hobby………. Oh well, moan over, and by the way, have a Happy Christmas, that is, if the drones don’t get you…. and I’ll try to find something more interesting to blog about in for 2019!
21st December – Looking over my stock of unfinished projects to see what I can do to escape from Christmas! I have a set of parts for a pair of Mortimer dueling pistols that were machined up by an ex. Purdy gunmaker – its not a complete set, it needs pipes and cocks and one false breech, and the cast trigger guards that I have with it are too narrow to do the job properly. I think I’ll have to prioritse finishing them sometime but I won’t start till I have all the bits ready. In the meantime I ought to finish putting the ribs on the Venables barrels – the only trouble with that job is that it probably ought to be done in the rough workshop which has no heating to speak of – still its not that cold at the moment…
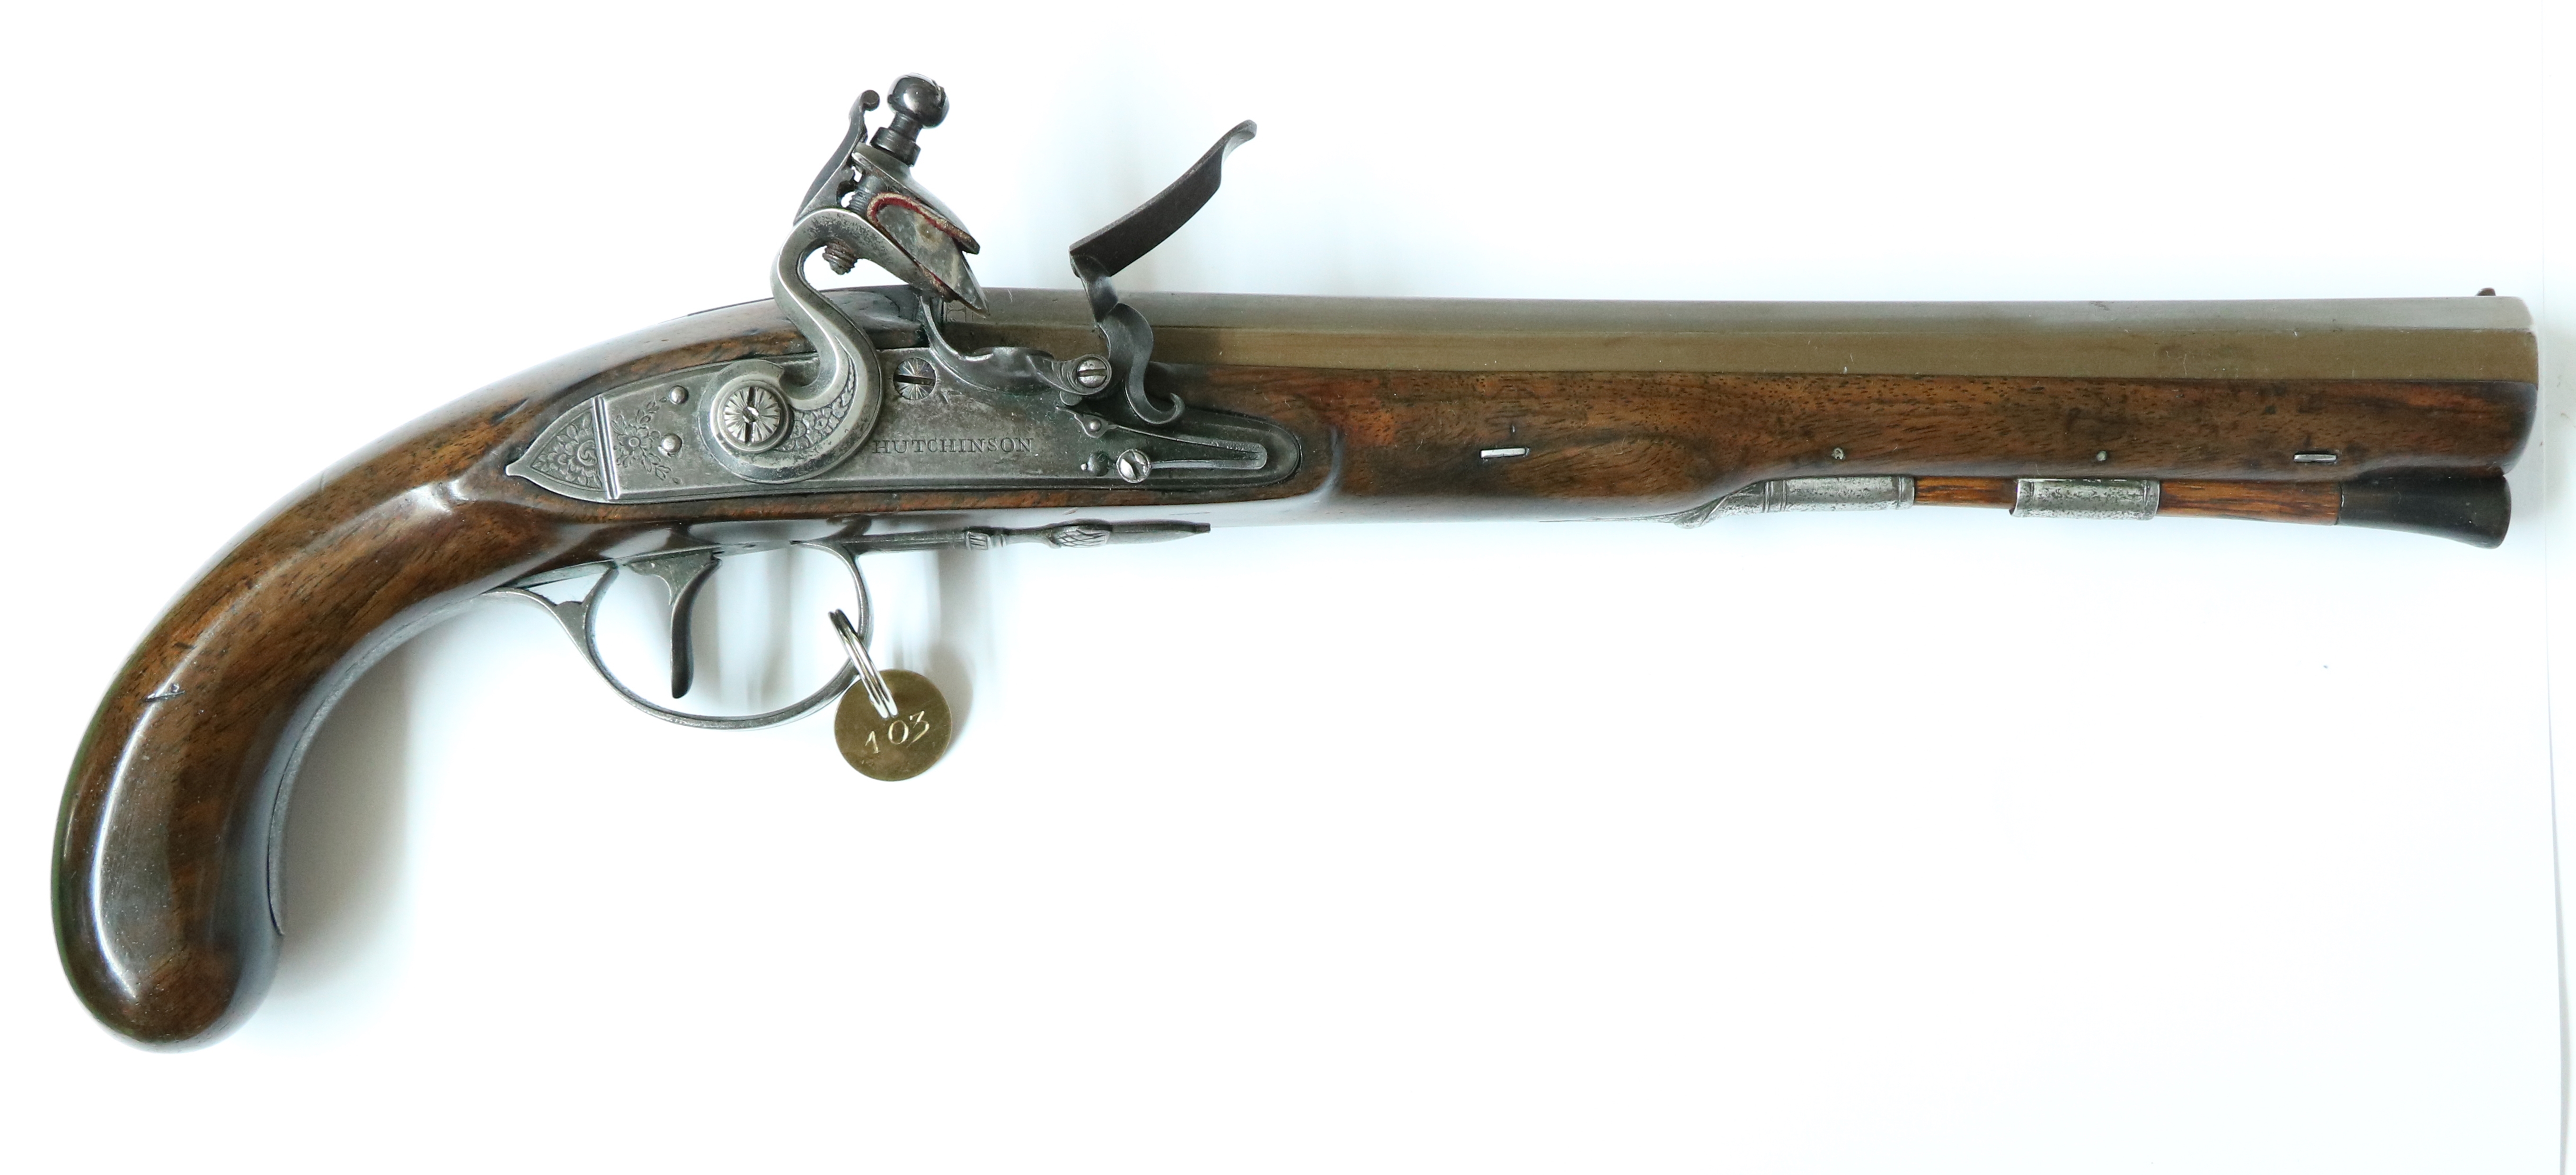
20th December – I found my Hutchinson Dueler that I’d ‘lost’. when I went away in the summer I found it lying around after I’d put the other guns I had in the house into secure storage – so I thought I’d better hide it, which I did rather successfully, because I have been unable to find it since! Anyway today I was clearing out a part of my workshop and found it behind a large box. It was about the third gun I bought in the early days and I had some of the work on it done by Dick and the barrel struck up and the name freshened by a professional engraver. It was in fairly good condition except that the cock had been broken and repaired very badly by brazing so that it was not really possible to re-weld it – I had a copy of a cock from my very similar Edwards duellers, both Dublin, both the same era and very similar in engraving. That was before I regularly posted stuff on this blog so there is no post – I will put up some photos, mostly of the finished job. See new POST
18th December – One more screw to make today – a side nail for the duelling pistol – one was worn but OK and the other was a bit too far gone around the turnscrew slot. I was going to make a complete new screw but I couldn’t find a thread that would work – neither 2 BA or 10 UNC would cut the mustard. Fortunately the thread on the existing nail was OK, so that gives two possibilities – weld up the head slot and file and recut it, or graft a new head onto the old stem. Welding up the head slot is dodgy if you are an indifferent TIG welder like me, but I know I can make a reasonable fist of welding the stems of side nails and similar size screws. I turned up a new head with 10mm of shaft and cut the appropriate length from the top of the existing screw. A slightly precarious jigging of the parts and a dab of weld fixed it and I could then weld round it. Of course the old metal had a fair bit of carbon, but I managed to do a strong weld using piano wire filler rod.
The head was then shaped a bit using a drill and file and the slot cut with a slightly ground 12 inch hacksaw blade, brushed on a fibre wheel, given a quick reverse electrolysis and engraved to match the other nail and re-brushed. Then case hardening with Blackley’s colour case hardening powder followed by quenching, then a wire brush and a short rusting with slow brown. Overall effect is satisfactory!
Re-heading a nail by welding on a new head.
The nail on the left is the new one.
17th December – bit tired today as I went ‘bouldering’ with Giles yesterday in Cambridge. I had seen it before when I went with the children from school for their activity week, but hadn’t really tried it. Its basically free climbing on a wall 4.5m high with hand and footholds without a rope – if you fall you have about 500mm deep of soft flooring to absorb the shock. The holds are coloured and each colour defines a climb, graded according to difficulty- I managed the first two of the 8 grades – above that the handholds are less positive and my grip isn’t up to it yet. There are lots of climbs at each grade, including overhangs, so lots of things to try and scare yourself with! I only found one of the second grade that I couldn’t do, and I think I must have spent well over an hour without repeating any climbs – great fun… see photo (not the Cambridge wall). I did a bit of work at the Bullard Archive this morning, photographing old equipment, since I seem to be the photographer in view of the number of photos I take for this blog! I had a little session of lathe work this afternoon, having measured and planned the screws I need to make to restore the duelling pistol I’m working on. I keep a supply of old screws to try in holes if I have to make new screws, and also thread gauges if I need to check a thread. The table of thread sizes I compiled is invaluable for finding a match – its on this blog on the USEFUL DATA page in downloadable form. I have most small taps and dies, except not a very good selection of Metric sizes like M3.5 and M4.5 . Most threads of British or Irish guns turn out to be replaceable with either UNF or UNC threads ( or 1/4 BSF for nipples – not the same as 1/4 UNF! ) so those are my ‘go-to’ threads. I needed a screw of about 4.5 mm diameter for the tang screw at 32 t.p.i – I took a chance on No 10 UNF which should be 4.82 mm diameter but tightening the screws on the die holder cut a perfect 4.51 diameter thread. I did the checking and sketch the screws needed while in my warm workshop and then migrated to the freezing shed where my lathe is, taking cards with sketches on. I managed three screws in a short afternoon including simple engraving and aging, and also finished off a replacement blank for the link I have to remake.
15th December – I finished the link today, only to find that its really still a bit short for the mainspring I want to use – I think I may have mis-measured somewhere along the line – not to worry, its the first one I’ve made and I now know I can make them pretty quickly – I left the pins on that one a bit big too, so I’ll make a better job next time – I didn’t bother to finish it once it more or less fitted as I could see it wasn’t going to work…. I think the technique will work for links with two pins as the tumbler end pin can be silver soldered in if necessary. I’m also going over the ribs of the Venables to make sure they are properly tinned, and I’ll do the barrel some time but the main heating element is set up in the shed and its freezing in there! Anyway here are some more photos of the link…
Complete disk 1/16th inch thick as a blank for the link
Hacksawed, ground and filed to shape – its not quite long enough!
14th December – I started work on sorting a lock for a client – it had a home-made mainspring and a short bodged link between the claw on the mainspring and the tumbler. My first job is to make a new link – this lock has a screwed pin as the pivot in the tumbler, so there is only one end of the link that needs a permanent pin fixed through it. This opens up a neat way of making a replacement. First I hacked out a rough disk of steel from a sheet of 8 mm EN8 steel with an angle grinder and Araldited it onto the face of a piece of 1 1/2 inch bar that I’d faced off in the lathe. A couple of hours on the AGA top hardened the adhesive, and I was able to turn the blank to about 35 mm diameter and then turn off the face 3 mm deep leaving a 2.0 mm peg sticking up in the centre. putting the whole caboosh on the AGA hotplate didn’t quite destroy the glue bond but a few minutes with a kitchen blow torch finished the job. I now have to re-chuck the bar and skim it flat and put a 2.1 mm hole in the centre, and glue the disk on, then face it down so the disk is 1.55 mm thick and also leave a 2.00 peg in the centre – then I just have to cut out and file the link to shape and drill the hole for the tumbler pin. I’ll have to be careful to make sure I get the disk thickness right.
The link is too short – a poor replacement at some time…
One side of the disk faced off.
13th December – That work on the AGA didn’t achieve a solution! it went out overnight due to overheating and cutting out, and I had another couple of hours trying to get it right. Its a delicate system, quite simple in principle but dependent on the burner and the reservoir being exactly at the right relative levels relative to each other. I’m not sure that even now I’ve got it right – the trouble is that it takes around 6 hours to cool down enough to work on and 6 hours at least to get back to working temperature. Anyway I did get to post the gravers and make a graver sharpener for a client, and I also found a decapper for another client – I have to say that the retail sales figures for cablesfarm.co.uk have taken a big upturn – that is, from about 1 every 3 months to 3 in a fortnight! maybe its people stocking up on Christmas presents or as a precaution against a hard brexit! I did get to go to the school for their Christmas lunch and I even dressed up a bit – went into the little ones classroom as the were being fitted with paper hats, and they all wanted to try on my top hat. I now have a pile of gun stuff to do and its getting near to Christmas panic time in cablesfarm – I can feel the pitch rising, so I’ll have to make myself useful to avoid a meltdown! A correspondent pointed out that the photo of the funeral reminded him of a sketch from Monty Python – it reminds me of a sketch that they could have made, but not the famous (totally tasteless) one they actually made. I’m sure I’ve seen a scene of a group of pallbearers struggling across rough ground somewhere though……….
13th December – I realised why I hadn’t got much done yesterday – I spent 2 hours struggling with the AGA which had gone out while we were in Wales. There is a major problem with AGAs with the the old style wick burners using modern oil with biofuel added as they clog up with sticky soot – this time it lasted only 6 weeks or so since I scoured it out thoroughly. ( Actually looking back over this blog I see that I cleaned it on 12th Sept, so actually 3 months, not so bad, but still not ideal!). Anyway its now playing up and tripping the overheating sensor and turning itself off, so another session this a.m. trying to fix it – while I have a heap of other jobs waiting! I thought you might like this photo from mother in law’s funeral while you wait for more gun stuff!
12th More – Managed to get two gravers made – doesn’t seem much for a day, but I did have a visit from a collector/dealer who bought a revolver case from me and left a couple of pistols that need a bit of work. One percussion pocket pistol just needs a cock – I only have long gun cocks in my spares box but I’m hoping that Dick can come up with something, otherwise its a bit of a hacksaw and weld job – amazing what you can do with a bit of brute force and ignorance! The other one is a flintlock – it needs the usual clean up and the woodwork patching and sorting and probably a couple of screws made – as regulars will know that is one of my favourite jobs – it is also due a barrel re-browning. To give you some idea of costs, the flintlock will probably cost around £300 to £350 to sort – and it should add about £500 to the value – obviously we don’t often do work that costs more than the added value, although occasionally people want antiques restored for sentimental value. I reckon making a simple screw if I have a die for it is around £20 to £30 with the head engraved and coloured down.
12th December – back from the Welsh funeral – wonderful way to go – the sight of the coffin being carried up a steep muddy track and across a bumpy field to be buried in her field was very moving – bit of a struggle for the guys carrying it though. Anyway back now and a list of jobs to get out of the way before Christmas – make a couple of gravers, revisit my designs for sharpeners and make one for a client, fix the two locks – make or find a tumbler link and last but not least finish the barrels – they are beginning to haunt me!
8th December – Had a good clay shoot today – something must have changed in the way I’m shooting, although I can’t think what, but I did much better than usual with my usual Sam Nock percussion double – long may it last… Unusually for me I had a ‘misfire’ and some trouble unloading the barrel, but I think I made a mistake when I probed the barrel with the loading rod and in fact it wasn’t loaded at all! – we all make silly mistakes at times but its much safer to assume a gun is loaded when its not, than the other way round. After unloading the other barrel and tipping out the powder I fired off a cap – this showed that even after unloading and inverting and tapping the gun, quite a lot of powder remains adhering to the inside of the barrel – judging from the muzzle flash. I did know this from a previous occasion when I had loaded directly after tipping out the powder and suffering a very hefty wallop on firing………. We had our Anglian Muzzle Loader’s Christmas Dinner (at 4 p.m., normal time for a cup of tea and a crumpet!) and raffle – I put in a de-capper and a worm for a loading rod – I was planning to offer to tap the recipient’s loading rod to take the worm, but I’d chosen to put a 9/32 x 26 thread on it as that seemed to be the most common thread on older cleaning rods, and it was picked up by someone who was looking for a worm for a cleaning rod that fitted it. The decapper went to a good home too – there can’t be many percussion shooters in the area who don’t have one of my decappers, I’ve made so many!
Sandra, our very efficient AML scorer and button pusher!
7th December – signed on today to find the WordPress software that powers this site was due for an update, which included a new editor, so now I’m not sure quite what I’m doing – so far it doesn’t look that different so maybe I’ll be able to manage! If you are thinking of setting up a website and want a DIY job, go for WordPress with Wordfence to guard it from rogues! Without them I wouldn’t be running this blog. I’m off to Cambridge Gun Club for our monthly shoot and Christmas Dinner tomorrow – muzzle loading shooting involves a comprehensive list of equipment, most of which has to be carried round from stand to stand. I have a leather ‘bum bag’ with a waist strap that sits in front, it has wads and cards and spare caps and the unloading worm end for my loading rod. My capper is on a chain and holds about 20 caps – its one of the Ted Cash ones from Kranks and works well. I have a large shot flask on a strap hanging at my waist that will just about do 40 shots at 1 1/4 oz. My powder flask can sit in a coat pocket or on a table if there is one. My loading rod is leaned against something handy for clays, or fitted into a tube that is stuck in the ground for driven game shooting. Remembering all this paraphernalia is challenging, and its not uncommon for someone to get to the first stand and realise that they haven’t brought their loading rod from their car, or worse still, at all.
6th December – I did one of those daft jobs today that takes longer than its really worth, but sometimes one has to in order to get a project finished- the pair of cased pocket pistols I bought as a blog project needed new screws for the backstrap/tang, and the steel inserts they went into had got damaged when I had to drill out the screw. So I made a couple of screws, and matching brass inserts to Araldite into 5 mm holes where I had drilled out the inserts – it turned out that 7 B.A. was a good thread size that I had a tap and die for – I have a more or less full set of B.A. and UNC & UNF but am a bit short on Metric threads in the smaller sizes. By the time that job was done the morning had gone…. Anyway the little pistols are now together and working fine, so I’ll put them on the ‘for sale’ page. I also cleaned up and tinned the top and under rib of the Venables (again!) and made a new heating element by straightening out an old grill element and bending it into a ‘hairpin’. Unfortunately it turns out to be a bit short – I think it will work with the Venables barrels which are only 26 1/2 inches long, but only just! I have got a couple of storeage heater elements that are 650 W each so I will straighten them and use one for each barrel – I’ll need some ceramic connector blocks to join them, the grill elements come with ‘faston’ tabs.
Used grill element – it does work but its a bit short.
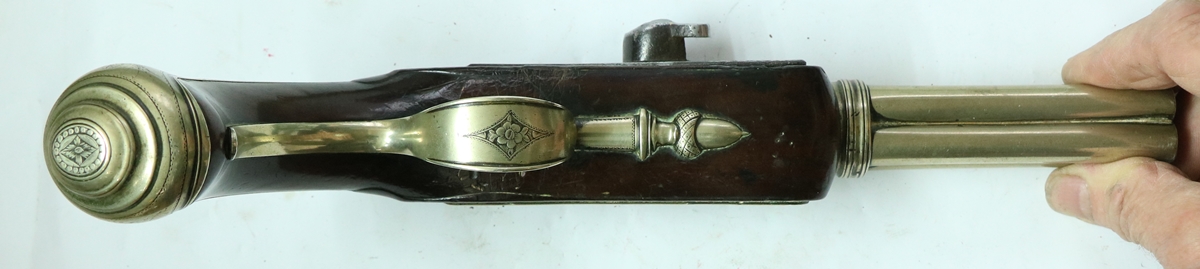
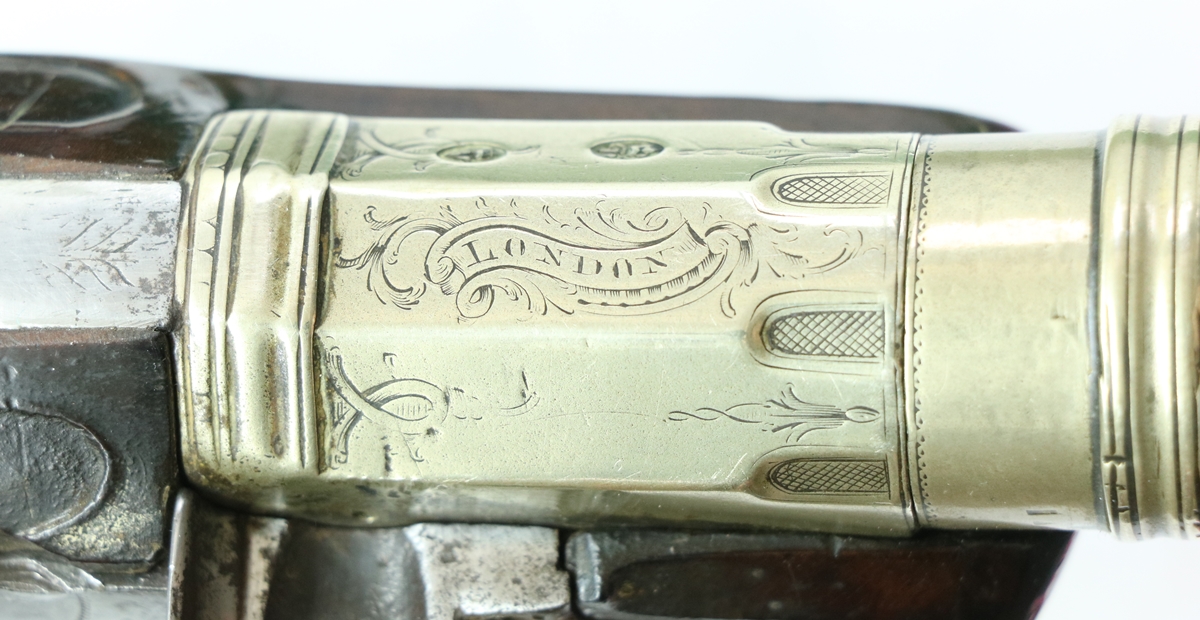
5th December – I took the pair of London locks over to Dicks and we tried to find a pair of springs to replace the rather poor ones that someone had made for them – I hoped Dick would take on the job but unfortunately he is already overloaded, so I’ll have to have a look at it – we found a couple of springs that might fit, but we will probably have to find or make new tumbler links – luckily the links are fitted with a screw onto the tumbler so don’t need a through pin both ends, which reduces the work a bit. The locks need a bit of welding as one cock is very loose on its square – someone had put in a couple of bits of metal as packing to stop it wobbling around! Also the step in the cock that should act as a stop by hitting the top edge of the lock is not making contact – the cock is being stopped by the tumbler colliding with the bridle, which is not right! I’ll post some pictures. I’ve derusted the little pocket pistol ( called C51 in my list for some reason) and it doesn’t look quite as bad as I expected! I am now tidying up the butt and re-sinking the escutcheon that had ended up standing well proud of the surface. The little cased pair of pocket pistols is having the butts oil finished – it needs a couple of small screws made – I think 7 B.A. is about right and I have the taps and dies for that…….
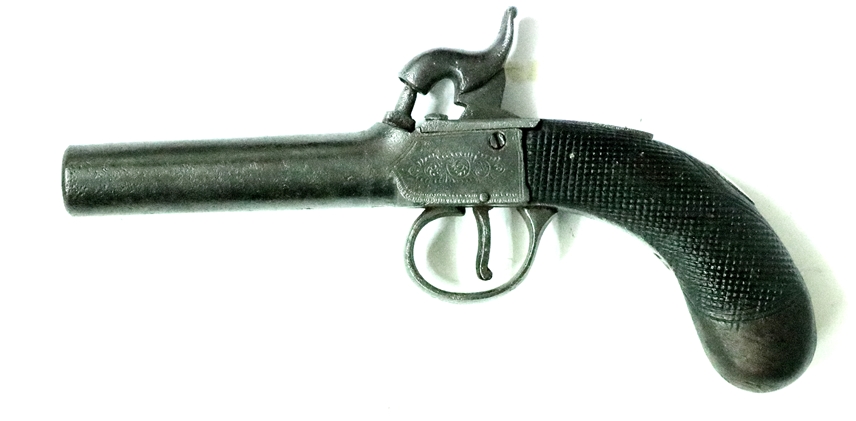
(C51) Definitely worth the effort derusting it ! Its a good example of a very cheap pocket pistol of around 1850ish. The engraving on the boxlock is what I regard as the most rudimentary engraving possible and is a strong signal to me that it was cheap, although the butt is better than most cheap pistols. Note that the pistol is shown at half cock, in which state it could possibly be carried with a cap on the nipple without the cap falling off – maybe if one felt in imminent danger? You certainly couldn’t put a cap on the nipple at half cock.
4th December – Busy today buying a Christmas tree and other chores – household duties piling up as the season approaches and we have a family funeral on Monday (not mine, you will be relieved to hear). A new viewer of this blog expressed some surprise that it had a quarter of a million visitors over time, until I explained that I couldn’t distinguish between 250,000 different people visiting, and one person visiting 250,000 times, given the information my computer logs – I probably could do it if I downloaded each day’s visitor’s IP addresses and correlated them but I’ll just assume that it has about a hundred regulars at most and lots of casual hits! What I do know is that on average visitors click on around 3 or 4 posts each time they visit
3rd December – Sorry about the gap – don’t know what happened to the time! I got set up for soldering the ribs on the Venables on Saturday – carefully tinned all the surfaces and put the heating element in and started to warm the barrel and I thought I had the bottom rib settled in place and the solder melting when all the lights went out leaving me in total darkness at the back of a very cluttered shed! Turned out that an electrical leakage in the heating element was tripping the electricity, so that was the end of that for the time being! Sunday in daylight I had the idea of making sure the barrels which I had previously carefully earthed were not grounded, and letting them float at whatever voltage the leakage generated – all I had to do was the switch off the power at a double pole switch before touching the barrel! That worked – I had a voltmeter on the barrel and it wasn’t above about 50 volts so no problem…… Anyway I thought I’d got the ribs soldered on BUT no such luck – there wasn’t enough solder and most of it was dry joints so off it has come again, and I’ll try again with more solder on the joints – I had tinned them all but I’d wiped the tinned surfaces with a tissue and not left enough solder on them. I had a couple of late London locks to work on because they don’t spark up as the mainsprings were too weak. Actually they will take a bit more sorting out! I’m still trying to work out the recent history of the locks – both springs appear to be much narrower than any I’ve seen before, one is certainly home made, and one link is wrong. They are from the period when main and frizzen springs were made very strong to speed up ignition, so its a bit of a mystery… I tried to get the little pair of pocket pistols done – I made a new screw for the butt under tang – No 8 UNC – and aged the head by reverse electrolysing and then browning tit – looks fairly convincing. I’ll get them together shortly – I have to sort out screws for the top tangs, they are tapped into metal inserts in the wood of the butt, which appears to be ebony – class pistols! I have started to de-rust another little percussion pocket pistol from my bits and pieces box – not sure this one is going to amount to much, but we shall see……………
Very rusty and basic pocket pistol (C51)- lets see what we can make of it!
29th November – Back from a marathon session of auction watching at Bonhams! What is to report? I guess that the general view was that prices were ‘soft’ when compared with a few years ago. Not much surprised me – there were as usual one or two things that went well above estimate but nothing that got applause from the room, and a lot of the small pistols that went within estimate or just one bid above. A pair of silver mounted pistols from 1650 (estimate £6000-9000) made £13000 (Hammer price)- I think that old stuff – i.e. up to mid 18th century – is undervalued compared to the mass of late 18th through early 19th century firearms, just on the basis of the quantity that is out there. A pair of nice Scottish pistols of good quality by John Murdoch of 1760 also made over the estimate, again no doubt due to the scarcity of such good early stuff. Most small tap action pistols didn’t shine – some were unsold, but a pair by D Egg made £5500 (Hammer price) on an estimate of £2 -£3K. The hammer price has a 25% buyer’s premium plus VAT on the premium meaning you pay 30% more than you bid – I’m used to it and plan carefully, but it used to get me in the very early days – I’d think I’d got a bargain, only to find when I went to pay that it didn’t look so great, even though I did know about it, its just psychologically difficult to include it while bidding, which is of course what all auctions trade on! By the time a dealer has added on a reasonable margin, minimum 25%, probably up to 100% or more (no names, no pack drill, but you might know who I’m referring to!), things are getting expensive. One thing that is interesting is that mid and lower priced cased pairs of pistols often don’t fetch as much as you would have expected them to fetch if sold either uncased or as single pistols, especially if you add on the value of the case, flask and accessories. One dealer who bought one cased pair said he would split it up to get more for it. I was annoyed at myself for not bidding higher on a box of flasks, but you can never know how far the other bidder would have taken you unless you try! I had intended to bid on some pistols for restoration on the blog but they just crept out of my top prices.
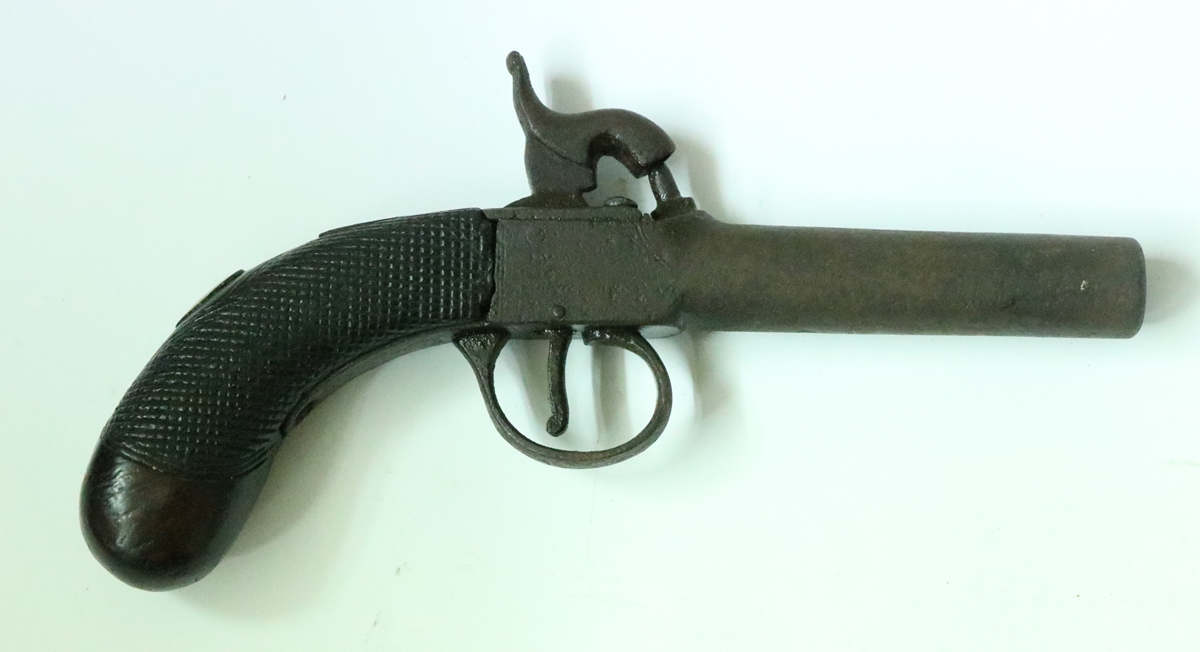
If you are wondering if I actually bought anything or just spent my time writing down the prices things made, I did – I bought a nice cased Pryce and Cashmore Daw patent pistol, and , on the spur of the moment, I bought a ‘small’ double barreled flintlock pistol of 18 bore by Fishenden of Tunbridge in rather good condition – except for 3 small dings on the barrel that must have been made after it was re-browned as they could easily have been reduced in appearance by a little filing of the raised bits thrown up by the dents – I might have to do it! Anyway it is otherwise in nice condition. I think I’m going to try to make up cases for all my pistols as near as possible in the style of originals – not by way of faking but just because they look so nice in a case! Oak pistol cases should be easy as the top and bottom are screwed on with small brass screws. A couple of pistols like ones I have got made cheering amounts – a Remington o/u Derringer in poor condition made £450 hammer price – mine retains most of its original finish……
Fishenden of Tunbridge 18 bore Pistol
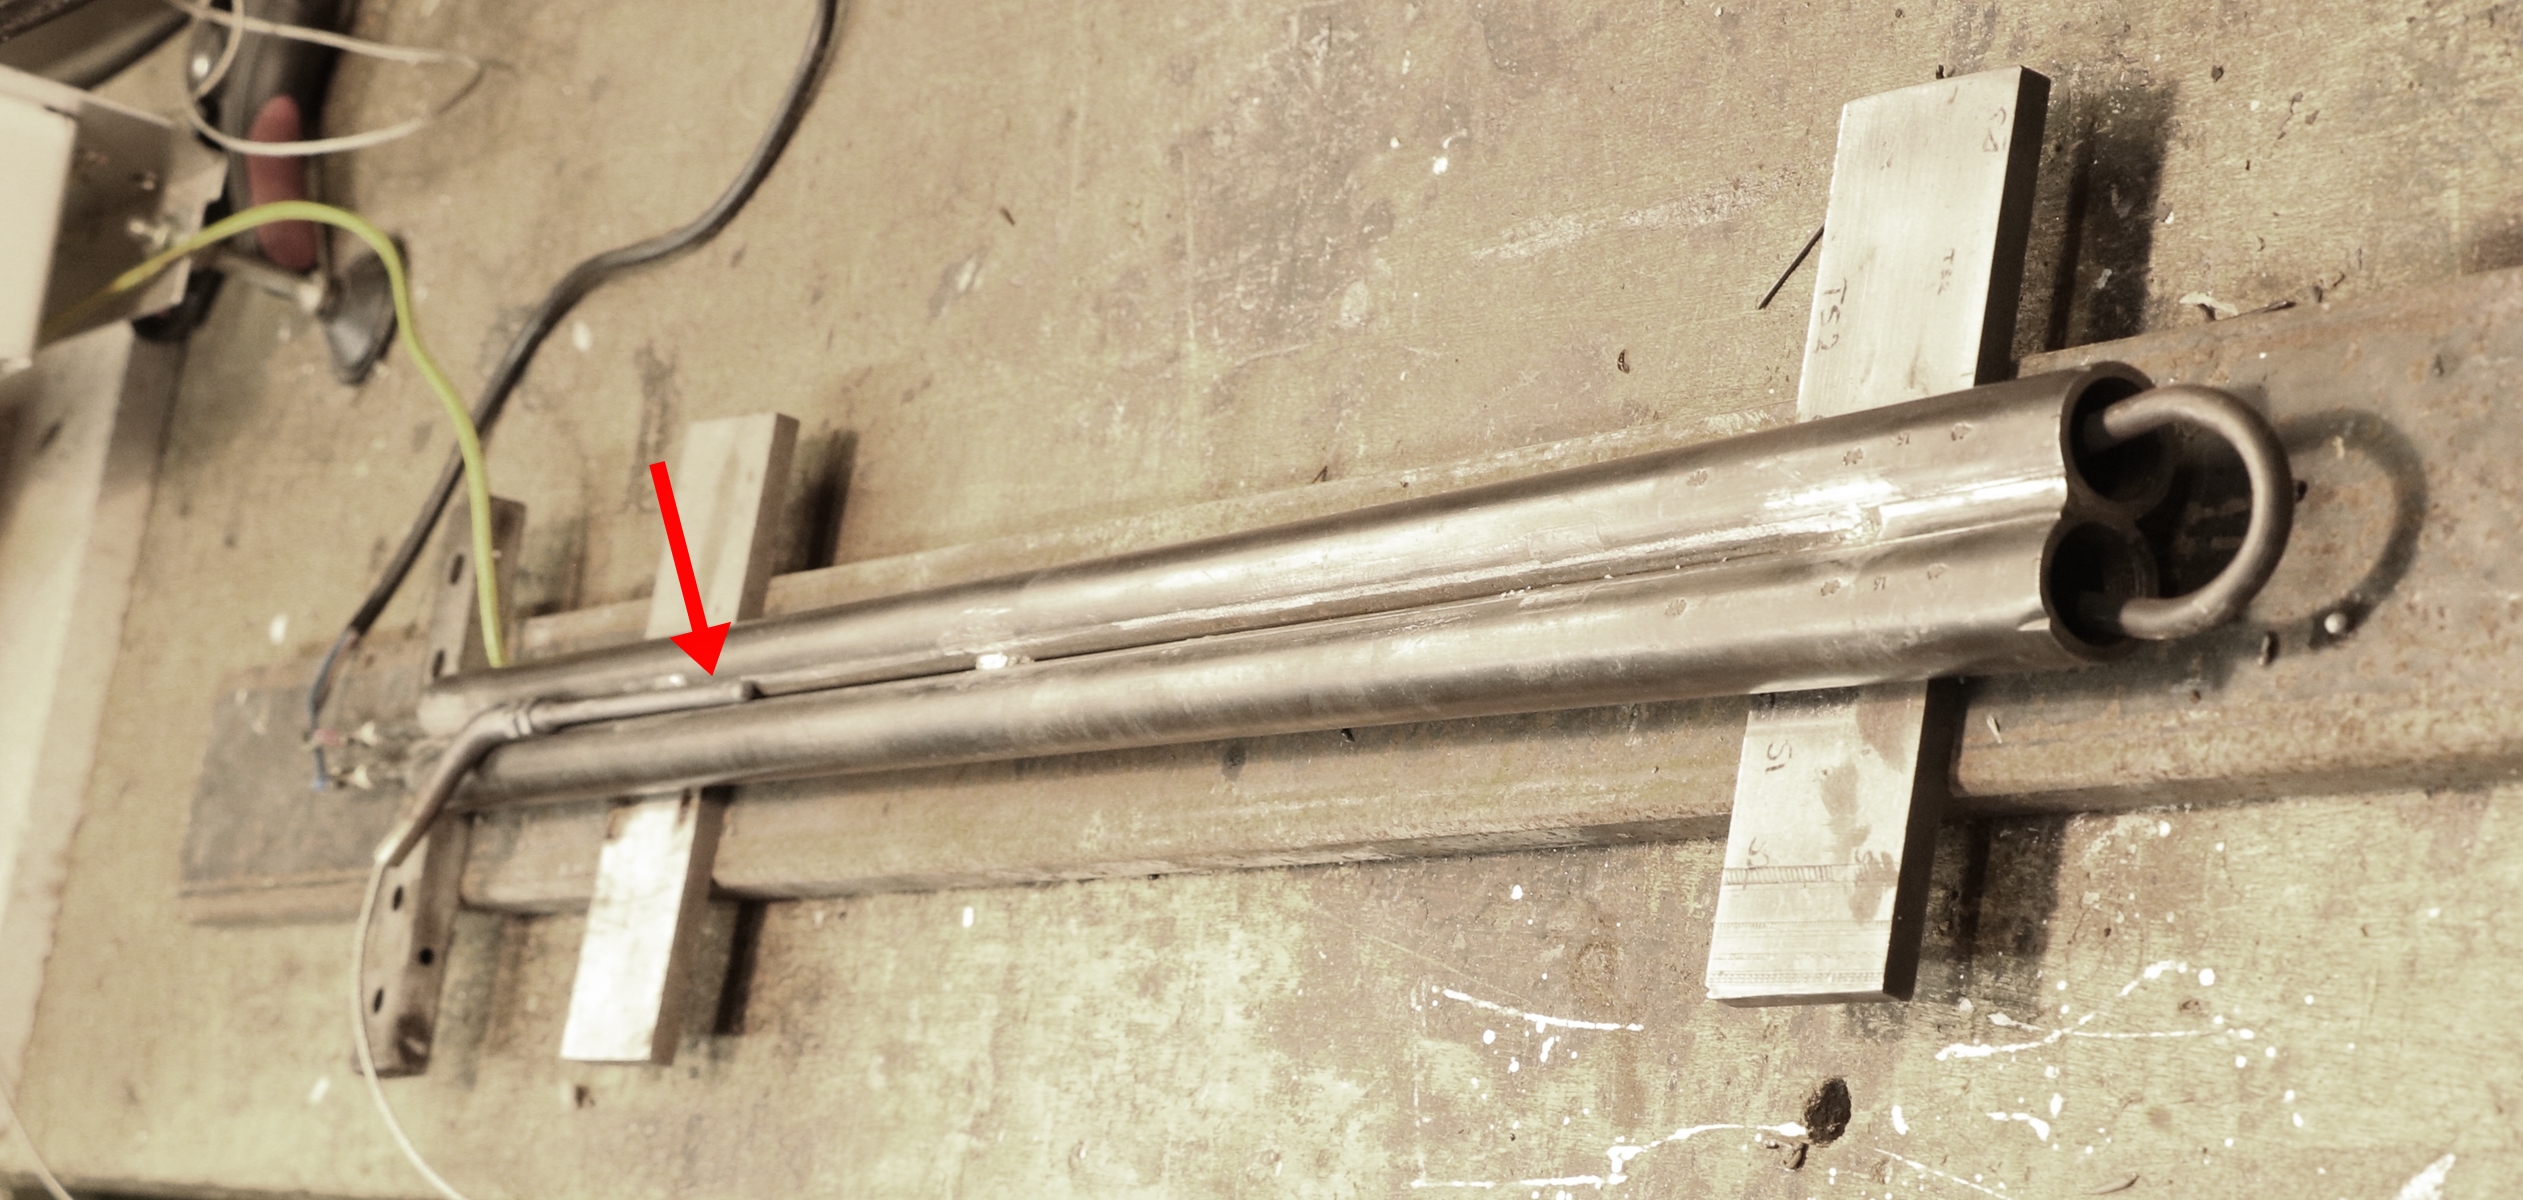
26th November – I had a school visit this morning and my STEM club in the afternoon, so didn’t do much to the barrel except clean up the surfaces that the ribs will attach to. I checked that the breech blocks still fitted perfectly together, so I must have got the barrels joined in exactly the right orientation – that is a relief! Here are a couple of photos of the setup – the red arrow points to the K type thermocouple that monitors temperature and can control the heater – it is covered with a bit of glass wool in use so that it picks up the barrel temperature – I also have an IR thermometer that gives spot temperatures so it is possible to control the heat and thus hopefully get the soldering right. I’ll buy some lead free solder paste for the ribs. I’m off tomorrow to view Bonham’s Wednesday and Thursday auctions. There are very few percussion or flint sporting guns in the sale – a few large bores but very little of interest to the low budget shooter! I will look at a few percussion and flint pistols to see if anything is worth fettling, and I’m tempted to look at percussion revolvers although the piggy bank is pretty empty! Even if I am not seriously buying, I’m always interested to watch the auctions as it gives a good idea of the market and who is buying. I have a feeling that Bonhams is normally the hunting ground of dealers, whereas Holts has more collectors – I know that the saying in the trade is ‘ buy at Bonhams, sell at Holts’ and I suspect that there may be some truth in it – one difference is that Bonhams will often sell below the bottom estimate if there is little interest in a lot, whereas Holts almost never does – in all their auctions I’ve only seen it happen a couple of times – Holts do have their on-line unsold lots sale as a backstop. Anyway I’ll report back………..
Without additional heat from a torch, the element only gets the barrel up to just above 280 C – the melting point of tin.
Make sure you earth everything including the barrel!
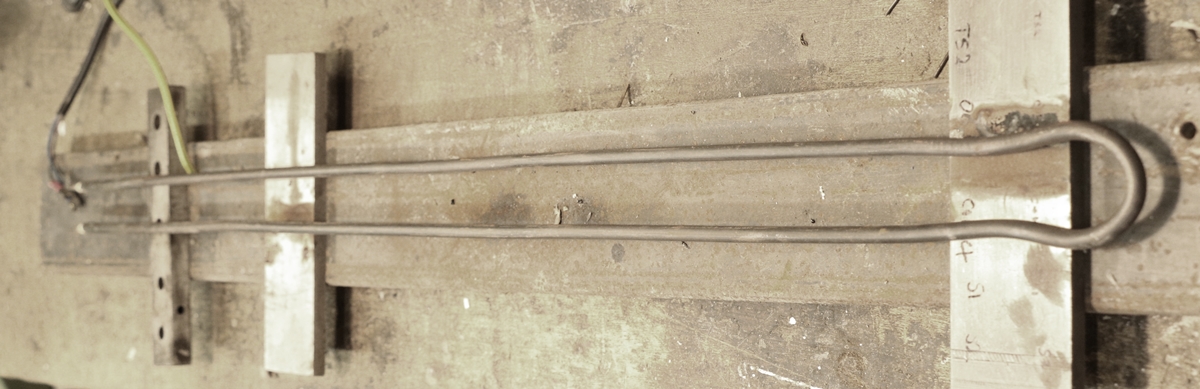
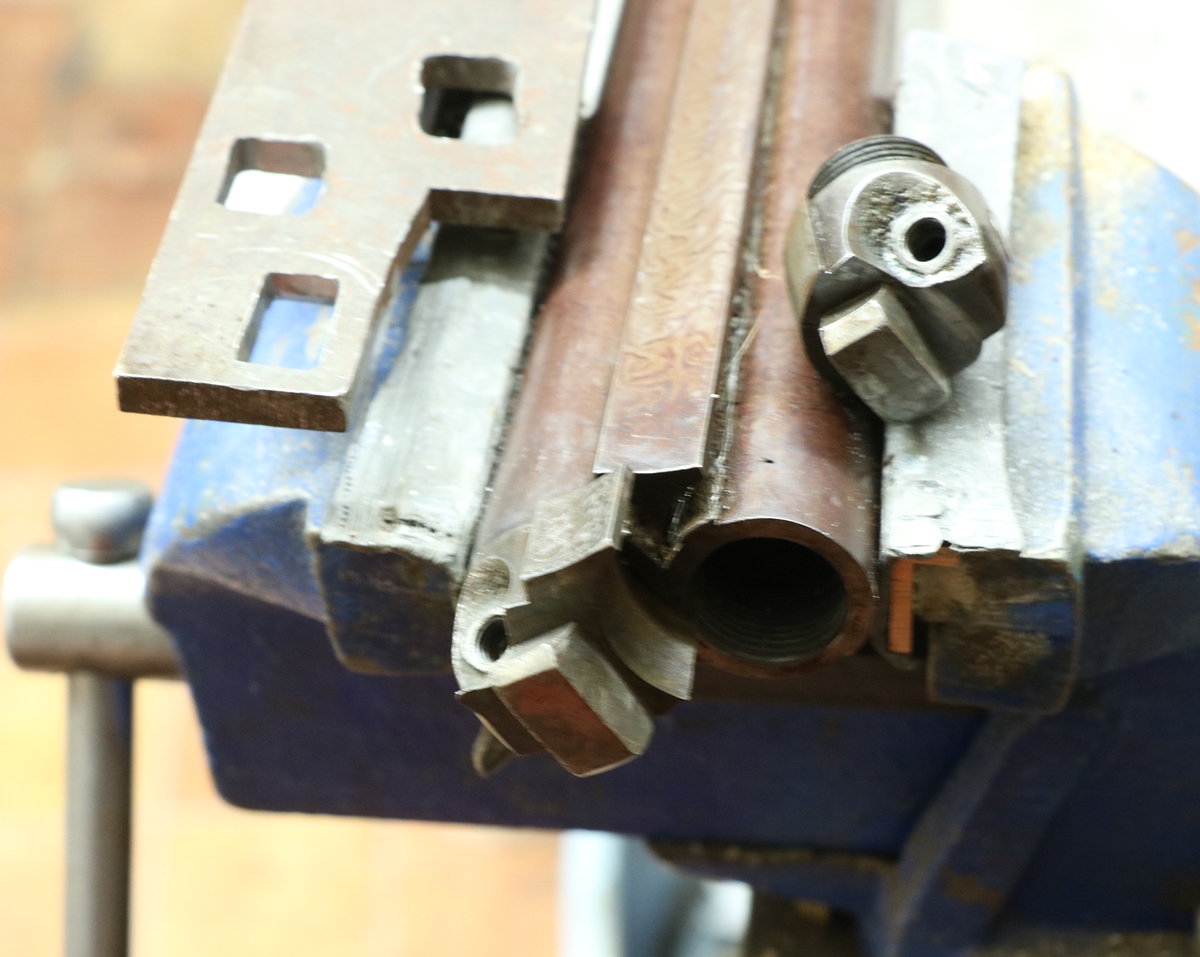
Dick bought a straight element, but you can straighten curved ones if you can’t get a similar one.
the weird colour is due to the lighting in the shed – in this case an LED bulb – I’ve toned it down from deep yellow!
25th November – Started putting the Venables barrel back together today. I set up Dick’s 2 KW ‘hairpin element on the controller for my furnace, so that I could control the barrel temperature using a probe, so that it didn’t overheat. I wanted to start by silver soldering the barrels together at the breech and muzzle, and decided it needed one small packing piece between the barrels in the middle as they were quite easy to bend and I was worried that when I came to put the ribs on they would force the barrels apart – the packing piece was about 1.5 mm thick since the barrels are a bit flared – properly referred to as ‘swamped’ for some reason. I needed to get the temperature of the bits to be joined up to 680 C – the melting point of ‘Easy’ silver solder – which is actually about dull red heat – the element only raised the temperature to about 300 C (so no need for the controller at this stage!), which will be enough for the tin solder that I’ll use for fixing the ribs themselves, but I had to use a small gas-oxygen torch as well to get the areas to be silver soldered up to the extra required heat. Anyway it all seemed to work out OK and I now have the barrels firmly joined in a way that will allow me to get them hot enough to re-fix the ribs without the barrels coming apart. I now have to clean them up and re-tin the margins where the ribs will touch. I’ll need to wire on both top and bottom ribs and solder both together. The standard method is to tie soft iron wire round the barrels with the ends twisted together with pliers, and drive cut nails as wedges to hold the ribs- they can then be tightened up as the wire expands on heating – I also have half a dozen small ‘vice grips’ modified to clamp ribs in place. The ramrod tube with the hole for the bolt needs to go on at the same time, and it probably a good idea to fix the other pipes at the same time. Refixing barrels is about the worst job there is on guns, particularly on old guns where the metal surfaces that the ribs touch may be pitted and hard to clean – I wish I had a minature sand blaster, then I could mask the strips off and clean them thoroughly. I’ll be interested to see how well this one goes – it would be good to have a reliable method! I’m already thinking about lapping the barrels – again, it would be really good to have a setup that would let me lap barrels easily. I guess that the soldering of the ribs will have to wait a week as I’m in London most of the week at Bonham’s sales – if I can manage to find time and internet access I’ll post reports!
24th November – I realised I needed cufflinks for a black tie dinner shortly, and I had lost one of mine so I thought I’d buy a cheap pair and construct my own with the bits and some nice Quorn Hunt buttons I have. In the end I found a cheap pair in the keycutting/engraving shop for £11.99 – the assistant asked if I wanted them engraved (machine), and I said I did hand engraving myself – she asked if I did commissions as they occasionally got asked for hand engraved things… anyway it made me think it would be fun to engrave the plain ones I’d just bought in the style of an early 19th century gun lock. The link blanks were a treat to engrave, being thinly plated copper – I might even be tempted to do their engraving after all! I’ll get another pair when I go past again as I’m not particularly happy with the second one (not shown here!). Maybe I should take commissions for Christmas presents! I wonder if the gold plating would take – the decapper I plated wore/rusted through very quickly but I’d only put a gold wash on it.
Here are 5 motifs from the end of the 18th, beginning of the 19th century gun locks – bird, flower, fence, plant and sunburst – they are about 1/4 of the size they would be on a gunlock – about 1 cm square. They are in typical William Palmer style .
23rd – We did pass 250000 visitors! I did a little prep on the Venables barrels but decided that I needed an infra red thermometer as mine had disappeared to Gile’s flat! As usual I got escalated into buying the most expensive one that Screwfix had – it does infra red up to 1000C and also had a K type thermocouple for contact measurement, so I should be able to get the silver solder temperature right without overheating the barrels etc. The cheaper infra red thermometers only go to 300 – 500 C. I did some more work on the small pair of pistols – I had to drill out the screw in the tang and in doing so I enlarged the hole somewhat – it was pretty rusted up and the screw fitted into a steel insert in the butt that was completely rusted to the screw. I tried to weld up the screw hole, which should have been an easy job, but my foot pedal control on the welder had got out of adjustment and was on full power all the time, so that more or less destroyed the tang before I had a chance to take my foot off the gas! Anyway I fixed the pedal and welded a new tail on the tang, filed it up and engraved it, then matted it down by ‘reverse derusting’ it which pitts the surface slightly. Now have to sort out the insert in the butt, make a new screw and adjust the hole in the tang…. a stupid amount of work for a couple of errors!

23rd – November – some time today this blog should reach a quarter of a million visitors since it started! Amazing for such a minority interest site….
22rd November – Great game shoot in Hertfordshire – 4 cracking drives with lots of very well presented pheasants in nice varied country. When we arrived at the first drive it was raining, but it stopped by the time we had got to the pegs and was cloudy and a bit chilly but not uncomfortably so. As usual our overall shots to birds ratio was excellent at about 2.3:1, which is much better than the average breech loading shoot – discussing it over lunch I reckon its because the keen Anglian Muzzle Loading game shooters shoot clays and game with equal enthusiasm, and thus shoot all year round, whereas breech loaders tend to shoot either clays or game, so the game shooters in general don’t shoot as much as we do. Anyway I was pretty pleased with my shooting for a change – I don’t think I quite made it to 2.3 :1 but I think I was better than 3:1 and I got 11 pheasants. I’ve cleaned up the Venables, its now a question of tinning the barrels for the ribs and silver soldering the breech and muzzle together. I discovered today that the Venables was put into Holts by a friend of mine, so I could have bought it off him and avoided the buyer’s premium if only I’d known! Next week will be busy as I’m planning to go the Bonham’s sales on 28th and 29th – not that I can buy much but its a good way of keeping an eye on the market.
20th November – I cleaned up the little pair of pocket pistols – stripping off the butts so the rest could go in the deruster was tricky as the screws were stuck fast. Going round the heads with a modelling knife point broke the outer rust layer and lets the release oil soak into the joint, but I still had to use heat on one top one, and one top one just wouldn’t budge as the head was too far gone so I had to drill it out – slightly enlarging the hole in the top tang in the process, so that will have to be welded, filed and coloured up. I put the rest of the pistols in the derusting bath without taking anything apart – they have cleaned up well on the outside and although I can’t get at the inside to brush the loose rust off, I’ll probably leave it as it all looks fine and works well – a touch of oil is all it needs. I managed to unscrew one barrel with my hand, the other I can’t shift at the moment – not sure whether I’ll bother. I had to go out so I left one of the derusted pistols without wire brushing or oiling it – you can see that it looks rusty, but all that brushes off. I took the Venables barrels over to Dick’s to use his U shaped heating element to take the barrels apart. I’m glad I took them apart as they are a mess with rust and poor soldering – the bottom rib was not well attached and there were a lot of shims between the barrels that were not properly fixed – it looked like a botched job. The barrels were joined at the breech by what looked like brazing but it came off and didn’t look as it had made a proper joint. Anyway now to run the through the de-ruster again and then clean them up and tin them along the rib edges. I saw a lovely job of barrel assembly and blacking at the shoot on Sunday, but it had cost £500 and that is just too much for the value of the gun, so I’ll do it myself with Dick’s help. He says that soldering barrels together is the worst job he had to do – actually he hasn’t done any since I last did one with him last year.
You need to break the rust seal round the screw head and dig out the slot, then add penetrating oil and use a well fitting turnscrew.
I left this to dry after derusting as I had to go out – it looks worse than before but it will all brush off….

Here it is after a brush on the fine wheel – the nipple looks a bit short!
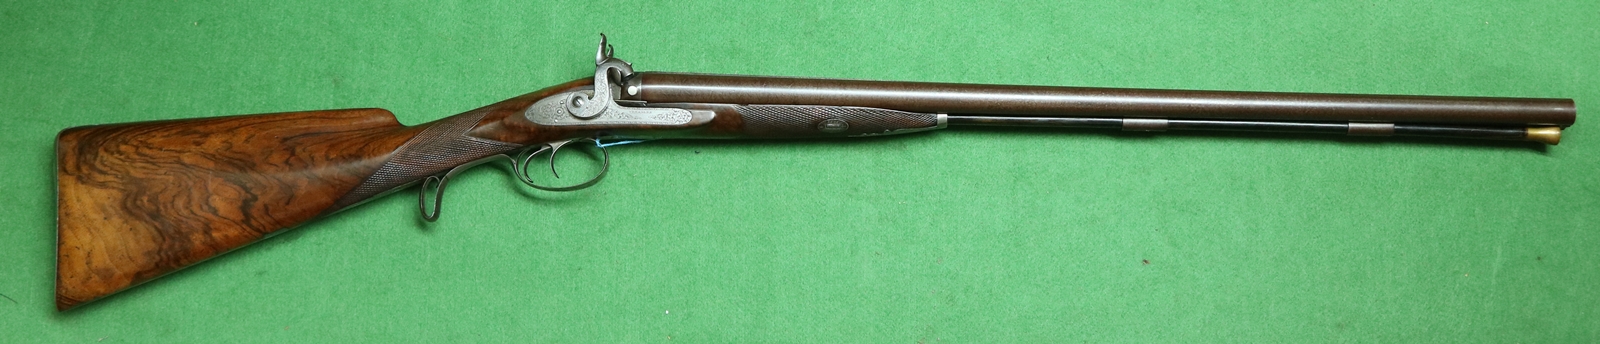
18th. I had a game shoot on Friday – I didn’t hit much – some days you draw the short straw, but its all part of life’s rich pattern! Clay shoot today in our black powder hammer gun competition – I was shooting my William Powell gun made to Westley Richard’s 1874 patent with the ‘crab knuckle’ joint and bar in wood lock – it always gets admiring comments whenever I take it out – it has been rather over restored with blackened hammers (wrong!) but it still looks stunning if you are not a pedant! I finished off in the afternoon re-shooting some of the same clays with my little side by side 20 bore Beretta hammer gun of 1955 vintage – I did slightly better, approaching 50%! Next week I need to tackle the barrels of the Venables with Dick – I saw a beautiful job of refixing barrels today, but at a cost of £500 – that would make the gun too expensive, so I’ll have to do it! I’ve been poring over the Bonham’s catalogues for 28/29 of this month – such a lot of things one could buy if one had money to spare!
15th November – More Land Cruiser expenses – the calipers were seized on the inside cylinders of both front wheels – anyway the front end is all done now – it had a fairly low mileage for its age so I guess these are symptoms of it standing around rather than working hard. Definitely put paid to buying anything at Bonhams, although the catalogue for the sale on 29th arrived today – they are selling the collection of a Canadian ‘Wild West’ fanatic – he had around 130 assorted Winchester underlever rifles and repros thereof – Winchester kept making special editions for various event and anniversaries etc., and he obviously felt obliged to buy one of each. I can’t imagine a more tedious collection! I fixed the lock of the coachman’s pistol today – it turned out when I had got the cock close to the lock that there was a bit of play around the tumbler/cock joint, so I had to apply a little weld to build the tumbler up, which of course messed up the threaded hole for the cock screw – but I was able to tap it out again to a decent state. I turned up a new cock screw with UNF No 4 thread ( .112 OD & 48 t.p.i.) – I turn up the thread diameter and thread it, then turn the shank to the OD of the head and part off enough for the head – I have a number of 25 mm cylinders tapped for different thread sizes, so I can then screw the thread into a cylinder and turn the head. I then cut a slot with a section of 12 inch hacksaw blade that has had its sides ground down. After polishing on the fibre wheel ( still in the cylinder) it is removed and heated to red heat and dipped in colour case hardening powder a couple of times, then dropped it in water – colour is then restored by heating to a grey blue colour which also tempers it. Unfortunately the first one I made had the thread too long and it pinged off somewhere while I was trying to shorten it and I couldn’t find it – so had to make another. I reckon it takes 30 ish minutes to make & finish a screw, 10 minutes more if it is engraved, less if I’m making a batch……
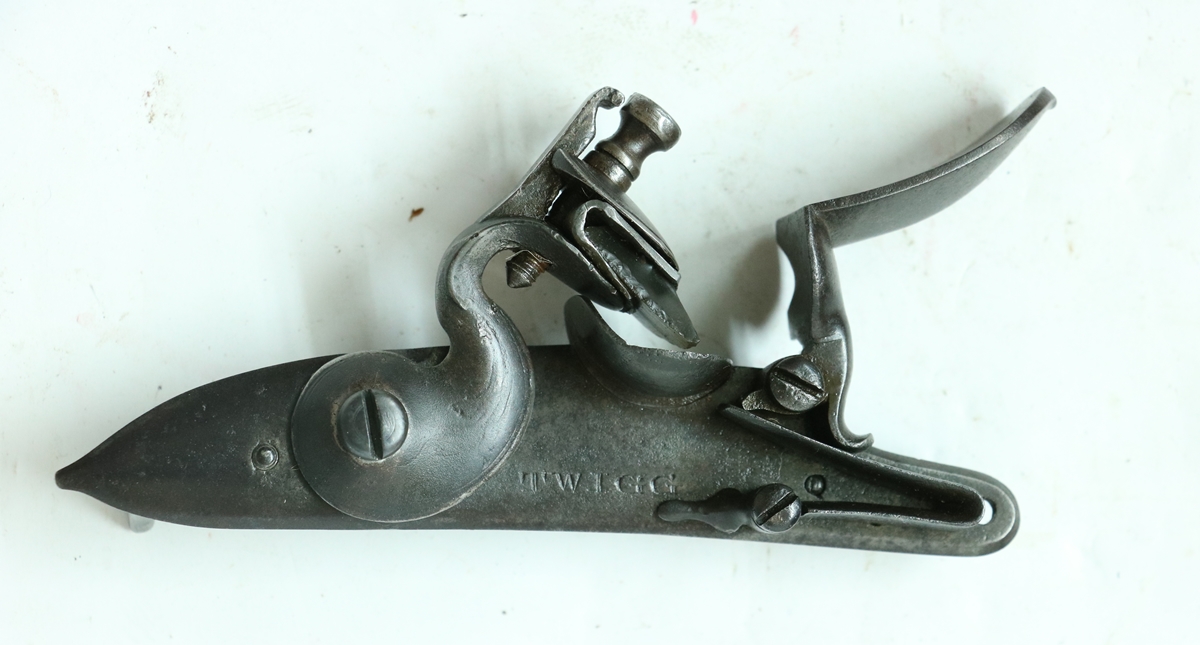
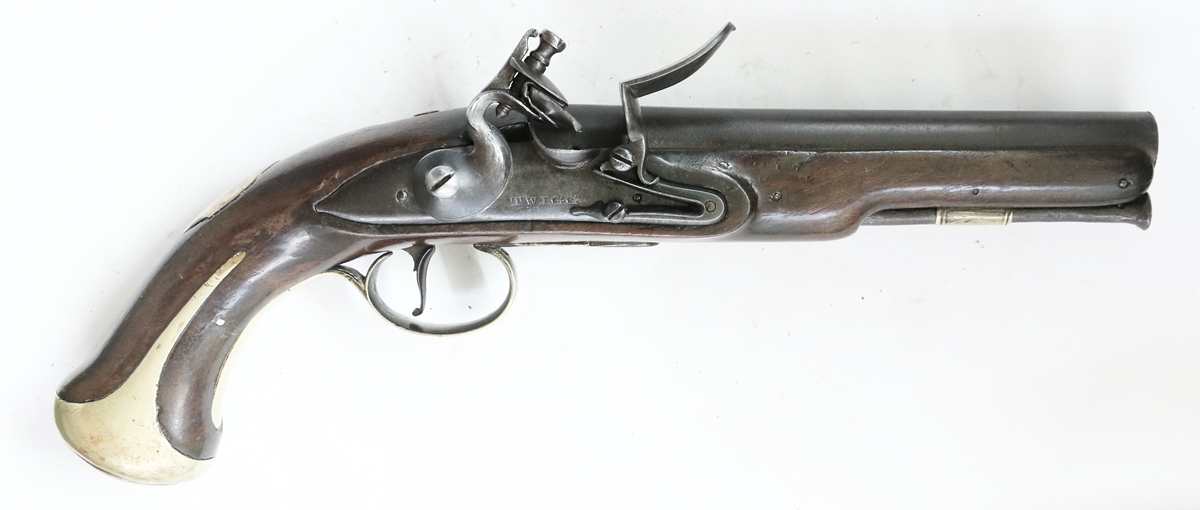
14th November – My Land Cruiser went in for MOT today – the front tyres failed as they had perished – never heard of that on a normal vehicle – it usually happens on trailers that don’t get much use, they were not even particularly worn either – plus it needs new disks and pads – oops, bang goes the chances of buying anything at the Bonhams auction on 28th – just when I had arranged to go and spend a couple of days in London staying with my daughter so that I could ‘do’ the auction properly! I just hope its back by Friday as I have a shoot (again). I had a go at soldering the fillet into the Venables barrel and tinning the rib. It is difficult to get the tin – used as solder as its stronger than lead-tin -to stick to steel, even with flux. One problem with tin is that it has no transition state between solid and liquid, and the liquid is low viscosity so it won’t bridge gaps – just runs through, whereas tin lead has a bit more of a semi liquid stage. Its a bit like welding aluminium, which also goes straight from solid to low viscosity liquid so you can end up with a great hole where you thought you had a weld if you put in too much heat. I did manage to get the edges of the rib all tinned so I just have to do the same to the barrel and join them. I’ve put a few pictures of the pocket pistol on the GUNS FOR SALE page – its in nice condition, almost worth finding a box for it. I got the lock of the Little pistol I had cleaned up back as I’d sent it out before I’d finished fitting the cock back on properly! I have to make a new cock screw too as the ‘original’ has almost split in two at the slot – I had a look in the books for a pattern for it and found a photo in ‘Great British Gunmakers 1740 – 1790 by Keith-Neil and Back. Its a good reference for photos of guns and pistols from that period and has the perfect matching photo – a coachman’s pistol by TWIGG of 1760 (see below fig 100). I hadn’t really registered ‘coachman’s pistol’ as a type, but it makes logical sense for those dangerous times. The choices for a cock screw of that period on plain pistols appear to be a domed plain screw or a flat headed screw with slightly tapered sides – a bit later and fancier and it would have been a shallow dome with a very thin rim, still probably plain, but soon being engraved… or at least so it would seem. Of course you always have to be wary as its always possible (likely?) that cock screws have been replaced with the ‘wrong’ pattern. The existing cock screw appears to have been an approximation to UNF 4,- O.D. .112 inches, and 48 t.p.i. so it will be easy to make one – I think probably the flat shape would be most suitable.
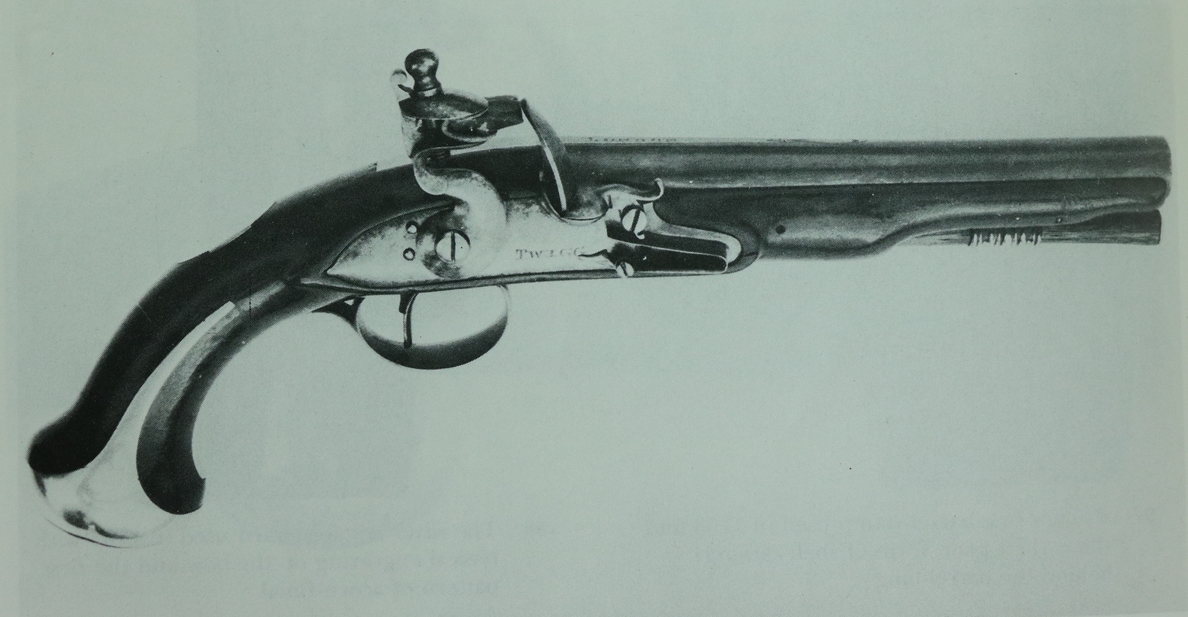
Most things are similar – the ramrod pipe is a bit more elaborate on the illustration and the fore-end is a slightly different shape, but not much else – both are by TWIGG and have his first signature, (c 1760) so it will do as a model for the screw!.
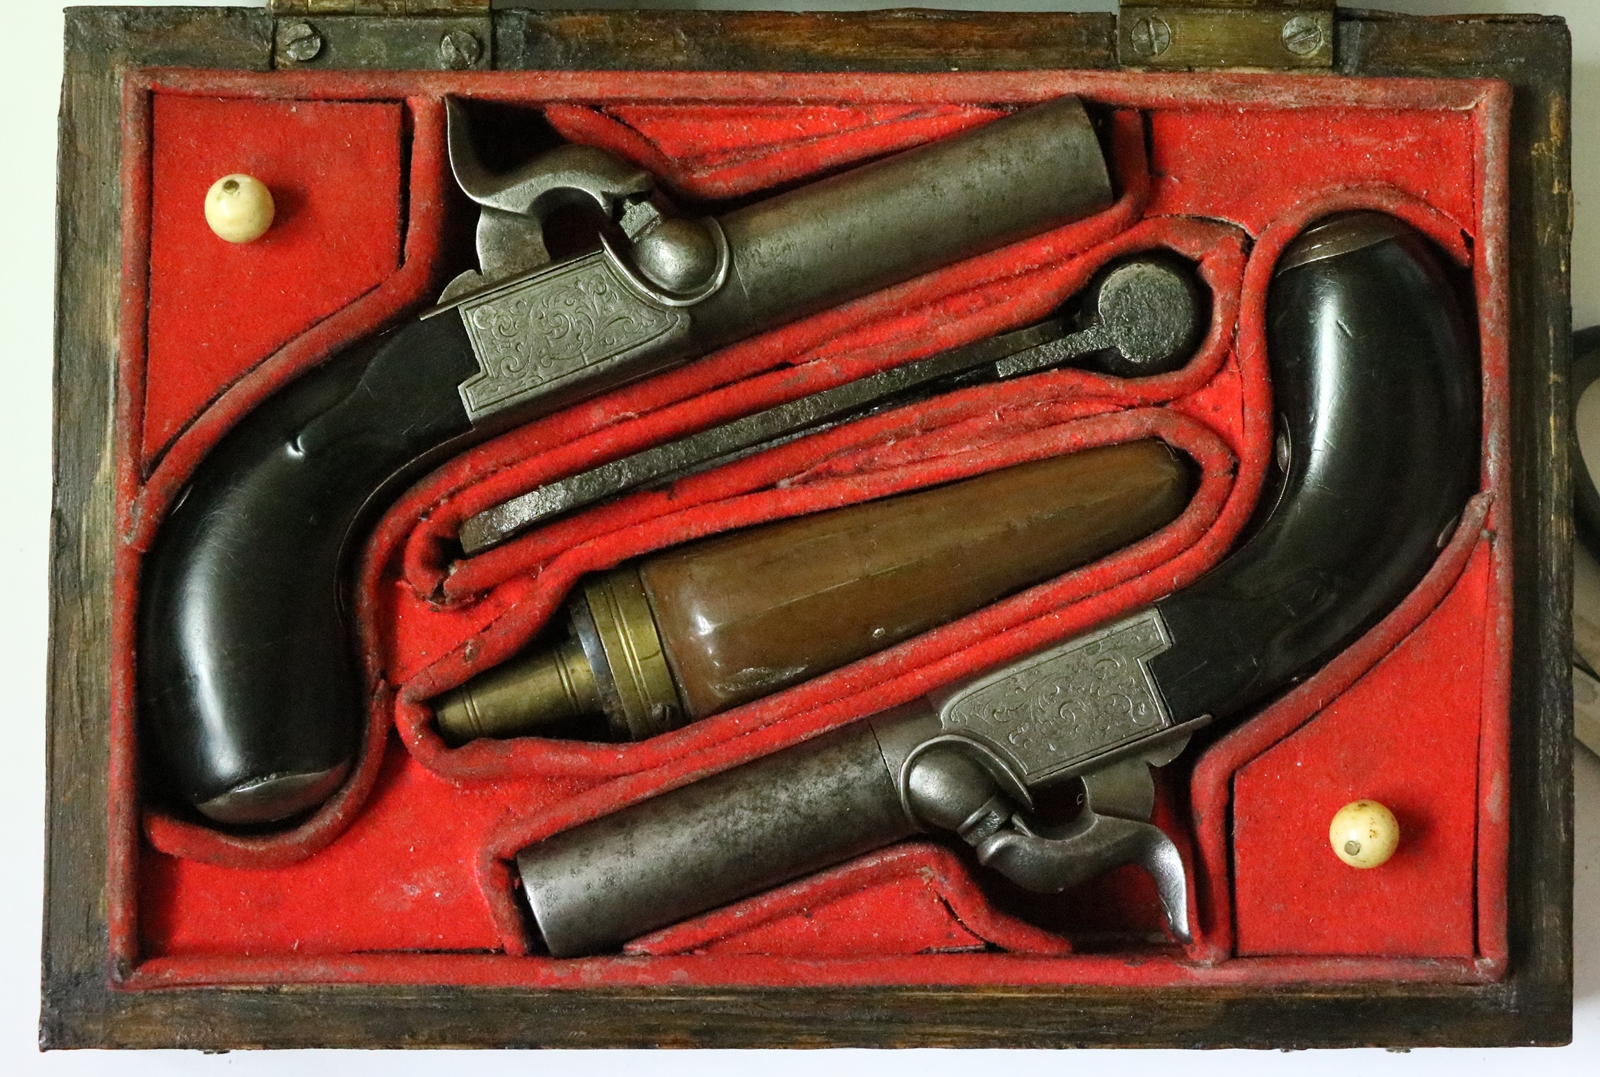
13th November – I took the Venables barrel over to Dick for his opinion on whether it needed to be taken to pieces – his view was that the bottom rib was OK and it would be a bit of a fuss to put it all together. I remain to be convinced, but I will probably put the top rib on, which I should be able to do without disrupting the joining of the barrels, and then see if I can get the bottom rib off and back on without them coming apart. The barrels had an 8 inch long fillet in the top joint near the breech that wasn’t properly soldered in and was stopping the rib fitting down on the barrel – Neither Dick nor I had come across such a thing before, and I suspect that it was part of a botched repair when the rib came loose (see photo a few back). I might put a bit of it back as it will help to keep the barrels together at the breech if I do take off the bottom rib. I ‘borrowed’ some pure tin solder from Dick as ribs etc were always fixed with tin, not tin lead solder. I bought a small pocket pistol from Dick that he had cleaned up – it is quite a tidy little pistol, and unusual in that it has an attached stirrup ramrod – very handy. Anyway it will go on the GUNS FOR SALE page as soon as I can find a few moments to do it and to take a few more photos – let me know if you are interested. I also have the cased pair of pistols below to clean up – they will probably go for sale too – little pistols are really popular now – long guns take up too much room for most people.
12th November – I de-rusted the barrel of the Venables to remove the rust that was lurking under the now removed rib. The process left the barrel looking really good – you can still see the rather nice damascus pattern, but it now looks as if it is just an old finish and hasn’t been rebrowned. If I wasn’t going to have to make a bit of a mess cleaning up the barrel to refit the rib etc. I’d probably be happy to leave it. I noticed that a bit of the under rib is lifting, so I don’t think I can leave it, which means a complete strip down of the barrels to their individual parts ( 2 barrels, top rib, bottom rib in 2 sections, 2 pipes, muzzle fillets, pipe for bolt.) Dick says it is not difficult to refix the barrels together – I have done it once ( on the Perrins restoration) but it was a bit tricky. He did say that it wasn’t overly expensive to get it done by Ladbrooks, so I might explore that option as they could be lapped at the same time. I had a visit from a friend/collector yesterday and got a small pair of inlaid pistols to fix, plus I bought a pair of pocket pistols in a case that I wanted so that I could do a ‘typical’ restoration for this blog. They are nothing very special, but they are a pair which is not common, and ‘as found’ and fairly rusted and the case is quite pretty so it will be a useful job for the Blog when I’ve finished the Venables.
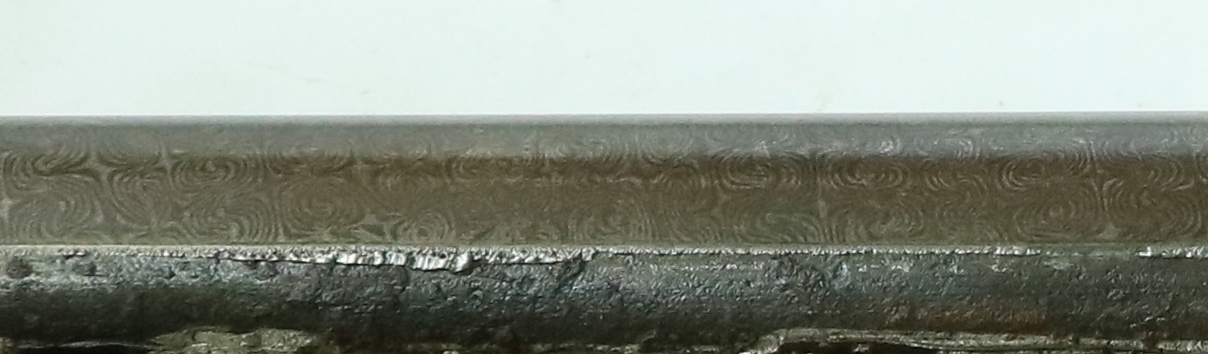
If you click on this you’ll see that there is quite a decent pattern visible after de-rusting. There is a bit of corrosion under the rib but not enough to cause concern in terms of strength.
Pair of pocket pistols for restoration – it will be interesting to see how they turn out! Someone must have had fun doing the box.
11th November – I knew it would happen soon – that I’d get the urge to do something to one of the guns that is sitting round the place waiting patiently for attention! In the end it was the Venables double 15 bore percussion that I’d bought at Holts with a sprung rib at the breech end but otherwise a nice gun. I kept walking past it until this afternoon when I picked it up and decided that I would do the job properly, take out the breech plugs and remove the top rib completely to see what else needed doing. Getting the breech plugs out of a double is always a bit fraught as you have to hold the tubes tightly in a lead lined vice while you put a pretty massive force on a 2 ft long wrench. You then risk breaking the barrels apart, although in this case I may end up taking them apart anyway With a double gun you don’t have much room around the hook of the first plug out as the hook of the second barrel gets in the way so as soon as it moves you have to change tools ( in this case to a big ‘vise grip’). Fortune was smiling – my breech plug spanner fitted perfectly with a little filing, and the first plug came out easily – I suspect it had been removed recently. The second was still in tight and needed quite a bit of heat to shift it ( I did check the barrel wasn’t loaded!), but in the end it came out OK – at least you can use the long wrench for all of that one. I then ran the butane torch down the top rib and detached the 2/3 that was still attached. The rib was hiding a fair amount of rust, and wasn’t particularly well stuck on anywhere. Now that I can see up the barrels properly, I can see that the bores are pretty good, so I will probably send them to Ladbrooks to be lapped when I’ve put them together (or perhaps have a go myself?). I now have to decide whether to take the bottom rib out to get rid of any rust there, or to leave it so that the alignment and regulation of the barrels is retained. I’ll probably derust them as they are now so I can see how much the rust has eaten into the barrel before deciding whether to strip the barrels down to the individual tubes. I think someone had started to do the rib before, but hadn’t managed to get the second plug out, so had given up and put it in the auction. I’m more than ever convinced that it will be a fine gun when finished – it will be quite handy as the barrel is short for a percussion gun (27 inches) – I suspect it has been shortened, although given the very clean state of the bore, not for the usual reason of getting rid of a thin muzzle. Anyway gun work is on again! P.S bits are currently being derusted at 2.6 amps so I’ll leave them for an hour or so – it will, of course, destroy the browning, but cleaning and re-soldering the rib would have done that anyway.
Barrel with RH hand plug removed and LH plug started – it was held vertically in the vice to get this far. The long wrench is shown – larger cutouts fit single barrelled breech plugs – the barrels are still joined although it looks as if they are apart. (sorry about the photo, hand held, poor light and in a hurry)

Barrel and rib – the rib is very thin and it and the barrel are quite rusted on the inside surfaces. I’ll derust both and see if the bottom rib needs to come off.
The Venables of Oxford before I started messing about with it – beautiful stock…
9th November – My STEM club children did their presentation to an assembly today which was great fun – they presented their ‘cookie alarms’ – amazingly all 8 alarms worked! Now we have to think of projects for them for the rest of the term! I was looking through a blog that had an argument about how much one should restore antique guns. One school of thought says that one should try to return them to the state they were when new – by if necessary doing a complete refinish. They compare antique guns to old cars and watches, which they claim are always restored fully, including repainting and re-upholstering, and add to their argument by conflating ‘patina’ with ‘rust’. Their argument fails on several counts, firstly because the purpose of restoring old cars and watches is to be able to use them for their original purpose, even if only occasionally, whereas very few old guns are ever shot, even once for a test. The same argument applies to watches. The main argument against trying to recreate the original finish on guns is that it is not usually possible to do so without destroying something else. With cars the paint is a superficial layer that can be removed and replaced without any damage to the underlying structure, whereas removing the ‘patina’ to generate a surface smooth enough to refinish back to the original standard will inevitably degrade the engraving, and it is virtually impossible to recut a whole gun decoration without loosing part of its essential character. At that point it is really easier to start from scratch and make a new ‘antique’! Some parts will inevitably be worn in such a way that they can’t be returned to original condition, so there will be a mismatch at the end of the process. The other fallacy is the claim that fully restored cars and watches are more valuable than ones in good original condition – they are not by a long way! Guns, cars, watches – a full refinishing may hide anything and if the purpose is to have something to display rather than use, that should be a warning to would be purchasers that all may not be as it seems. My approach is that with guns of poor quality or in poor condition there is very little to loose by doing whatever restoration is necessary to make something worth keeping for posterity. For mid range value and condition I would try to restore functionality by doing any necessary mechanical work and cleaning off all surface rust – either by gently mechanical means or electrolytically if there is enough rust to warrant it, which process leaves its own quite acceptable finish that requires no further treatment beside oiling. Repairs to the wood depend on the extent of any damage – structural cracks and missing wood need to be attended to, extensive denting may with advantage be steamed out after which some refinishing will be necessary. High class guns have a higher threshold before interventions are acceptable, and will probably be restricted to restoring mechanical function and repairing major defects. The most common refinishing is re-browning of barrels, which seems to be something done for/by collectors almost as a matter of course. The metal from which barrels are made is soft and liable to corrosion and marking and scratching whereas most of the rest of the metalwork is hardened and more protected, so barrels are almost always in the worst condition of any part of the gun and can really drag down the appearance, so its understandable that they get re-browned. I suspect that it may not have been uncommon for the barrels of guns to be re-browned occasionally while they were in service for the same reason – evidence for in service re-browning comes from the wear often seen in the lettering on barrels. It’s certainly a common re-finishing operation and if done carefully probably doesn’t detract from the value, although a gun with a good original finish will always fetch more. Descriptions are something else that is fought over. I guess ‘original’ is the key work – if it is unqualified it should mean that all the parts are original, and the appearance of the gun hasn’t been changed – i.e. reconverted to flint. Where the finish is original throughout this would be noted as ‘original finish’ or something similar. Where barrels have been re-browned this should usually be indicated, but isn’t always obvious. My take on re-browning barrels is that you shouldn’t aim to get them back to ‘shop’ condition because they will then show up the rest of the gun – just just to create a compatible and discrete finish without to much shine.
8th November – I just got the Bonham’s catalogues for the next sale on 28th November – what a treasure trove of stuff, there are two large quality collections up for sale. It strikes me that many of the serious collectors in the business are of a ‘certain’ age, and that there may not be so many younger collectors waiting in the wings to pick up the spoils – my guess is that a lot of the good stuff will go overseas, probably to the US where there is more general interest in these things and the currency is favourable. I know of one or two good collections that are bound to be on the market within the next few years. Anyway in the meantime the really desirable guns are the rare pieces and fine, preferably cased, pistols in really good condition, and I expect the run of the mill stuff to go for reasonable prices! I don’t know if that will turn out to be the case – we shall see, but the estimates don’t look excessive! Given the impending legislation on ivory it will be interesting to see if the pair of ivory handled pocket pistols sell.
6th November – Dick has been relining a gun case for a Joseph Manton percussion gun, I gave him some green biase that was a bit bright (from Bernie the Bolt) – I had faded it down using dilute bleach when I used it, but he used too much bleach and it went a bit grey . He then tried a hot wash in the washing machine on the remainder of the cloth, which gave a decent result, but by that time he had not got enough left to finish the job, which means raiding my stock again! I’m still fixing up my internet wiring under the floor etc – I got a new crimper but the cost was nearer £50 – still it works and I can remove the patch cables that were running round the house in an untidy and conspicuous way….. I will get back to some gun work shortly but its so cold in the workshop if I’m not moving that its only worth starting when I have time to get the woodburner up to temperature and let it warm up the room.
5th November – Here are some photos of the 4 barreled pistol I did some work on for Dick for a client – I engraved the barrel tang as it had been welded – I forgot to take photos of the finished job but here are some of the pistol – Dick had stripped the lock down to repair so I didn’t have those bits on hand to photograph. It has an indistinct name on the lock that could be HUNT – its not very clear overall but the N and T are fairly clear and most other possible names don’t fit – the initial letter definitely had a straight vertical line in it!. Hunt appears several times in the list of Birmingham and Provincial makers – the most likely being Joseph Hunt, gun and pistol maker of Bull St Birmingham 1766 – 1774, or Robert Hunt listed in Rotherham in 1783. I would date the gun from around 1780 on stylistic grounds and based on photographs of broadly similar 4 barreled pistols that are dated to around that time by Keith Neal. Probably they ought to be called Volley guns as they were incapable of firing individual barrels. The 4 barreled assembly unscrewed as one and left a small single powder chamber in the middle that was linked to the barrels by 4 groves in a rim round the mouth of the powder chamber – I’m not sure how closely the breech fitted to the barrel – maybe there was a gap for the expanding gap – there wouldn’t have been any powder on the barrel side of the connection. I would guess that the pistol used a very small charge, as the barrels don’t look as if they would stand much pressure. I’m not sure what the pistol was loaded with or how – the normal single barreled turn-off pistol has a powder chamber and the breech end of the barrel is slightly larger diameter than the bore, so the balls are held captive and also serve to retain the powder until fired – handy for a pistol likely to be carried around far more than actually used. The volley pistol has no such bore enlargement at the breech, so nothing to stop the load coming out of the muzzle – perhaps it had wads down the barrel to hold the load in place? (answers on a postcard please!)

4th November – Fantastic shoot yesterday at Sotterley near Beccles – we have been very lucky with the weather this year, and apart from the need to add a layer from time to time as winter approaches its been gloriously sunny most times. The bag was around 120 birds for a hit ratio of 1 for every three shots on average, which is excellent – few breech loading shoots manage to better that. We were double pegging ( 2 guns per peg to give reloading time) and 14 guns in all. I shot my Nock double – I’m used to it and it is reliable – misfires are very few and almost always ‘finger trouble’ rather than a failure of the equipment. Anyway a really good day, although it has to be said that on the last drive of 7 I saw more foxes (1) than game birds (0)! I had a question from a fellow muzzle loading shooter concerning a John Manton single barreled percussion gun – the lock had to be removed before the barrel could be disengaged from the false breech because the side nail (screw that holds the lock on) passed through the breech block. It was normal for the locks of quality flintlocks to be removed when cleaning the gun as priming powder residue is very corrosive and could penetrate into the inside of the lock or at least get into the edges. Both John and Joseph Manton cased their flintlocks with a place for the locks to be stored out of the stock. This was done for guns where it was physically possible to get the barrel off without removing the locks, although it should be noted that on some flintlocks, including some Mantons, the frizzen fouls on the barrel, particularly where the breech is recessed in late flintlocks, and it is advisable or even necessary to remove the locks before removing the barrel. The Mantons continued to case percussion guns with detached locks, quite possibly because the early caps of fulminate or chlorate were very corrosive and the same precautions were necessary as with flintlocks. I am not sure how common the through breech plug side nail was, but I’ve seen it before. It was probably more common in pistols without a false breech- I seem to think military pistols, but they are not really my thing!. The gun described to me fits with an illustration in the Manton Book facing page 41, which illustrates a single barreled gun serial no 9689 of 1828 – i.e. an early percussion gun and specifies that the side nail passes through the breech plug. For my sins I’ve been trying to wire up some network cables in the house, but the connnectors (RJ45) have proved difficult to crimp onto the end of the cable – my first problem was that the connectors obviously didn’t match the cable – in fact I’ve no idea what they did fit, and my second problem , after getting the right connectors, – more difficult to spot – was that the crimp tool I’d bought on ebay wasn’t crimping properly as it had a slightly faulty casting for driving the contacts into the wires – thus wasting at least 3 hours more of my time! Ah well I’ll have to shell out £35 for a decent tool – I should have learnt by now never to buy cheap tools – although my experience of buying cheap Ebauer power tools from Screwfix has been uniformly good – not that they get much work.

31st October – I bought back a little 4 barreled pistol to do some engraving on for Dick. I have been having a discussion about the Warner Civil War Carbine of 1864 with someone who also has one sans breech block – I realised that although there are a couple of photos of the Warner on this site, there is no proper post, so I’ll have to do one. The Warner is one of dozens of designs for a breech loading Carbine for the Union side in the American Civil War. When the war started the army of the North was quite small was armed almost entirely with muzzle loading percussion guns, there was no one obvious choice of arm, and the manufacturing facilities didn’t exist to produce a single design in large quantities. The union thus gave our orders to a number of would be manufacturers of various designs to produce samples for inspection, so be followed up with orders for a modest quantity with the promise that if the Carbine was satisfactory the Union Armouries would take as many guns as the manufacturer could turn out. The result was a proliferation of new designs, of with around a dozen made it to the production stage, of which the Warner was one. After a bit of a fuss it did get a patent, although not for the features that had originally been claimed! In the end the only features patented were the semicircular bottom to the chamber and the use of a firing pin without a return spring that used a chamfer on the breech to move the firing pin out of the fired position, a feature that partly led to the eventual downfall of the design. The main reason the gun failed in service wasn’t really the fault of the Warner gun, but was due to the tendency of the rimfire cartridges to burst at the rim due to faulty metal cases – this produced a number of problems – in the beginning it invariably blew the (Snieder tyrpe) breechblock away – that was mostly cured by drilling a hole in the bottom of the chamsber to relieve the pressure, but finally it was binding of the firing pin when a burst occurred that jammed the gun – all because Warner wanted to use a ramp on the breech to retract the firing pin instead of a spring like everyone else. I guess if you think about it, a Snieder like sideways hinged breech block can never produce and sustain as tight fit on the head of the cartridge as a cammed bolt, so will always be more prone to rim bursting in a rimfire cartridge than bolt guns. Photos and a new post will follow…….
e28th October – Yesterday at Homerton College Festival for 250th anniversary doing engraving demonstration – mostly screwheads. I’d forgotten that the Cambridge liberal academic community on the whole didn’t really like guns, and had taken a few to display, but they hardly got a glance, while my engraved screwheads attracted a lot of attention. I gave them out as ‘rewards’ to those children who showed real interest, of which there were a fair number. I’d made some little oak blocks to mount them in, and gave some to the really really keen kids! I decided to use the Amscope microscope I bought some time ago – I bougth it in the mistaken belief that it would allow me to have a digital camera displayed while I engraved – it turned out that to use the camera you have to divert the image from one eyepiece, so not a lot of use to me. Anyway my little pen sized camera stuck on the side of the microscope sufficed. The Amscope actually worked perfectly well, and at about £450 is a good buy for an engraving microscope – just make sure you get a useful stand with it. See blog post on engraving setup for more…..
I finished off the Twigg pistol – it all went together OK – I didn’t dare to bend the trigger guard to be a perfect fit as it had an incipient crack and would probably have broken if any strain was put on it. The tumbler welding worked well, and is perfectly aligned and is strong enough for the intended purpose – if you look down this blog you’ll see that the square had broken off, and a new square had been tapped into the tumbler but was free to turn relative to the tumbler. I put a few dabs of weld around the joint – it was clear that the tapped hole had not left much of a wall thickness in the bearing part of the tumbler but the pistol isn’t going to be shot so great strength is not an issue and it all filed up and fitted OK with the cock in the right alignment. If it had been a gun that was likely to be used for shooting I would have used a different approach, and annealed the tumbler, drilled a hole right through it and made a new tumbler axle with the square on it and silver soldered or welded it in place and then re-hardening and annealing it – a lot more work that wasn’t justified in an old pistol.
Lug soft soldered onto the trigger guard – it widens at the base to give strength, I didn’t want to silver solder it. The guard is riveted to the finial and I didn’t want to solder over the rivet so the tab is displaced a bit.
Finished pistol – minimal repairs to preserve as much of the original appearance and patina as possible – the cock screw needs colouring down as I reshaped it a bit – it now looked too like a machine screw!
25th October – I made a brass tab to solder onto the trigger guard of the flintlock pistol I have to fettle – it all soldered together well and is now ready for the final installation in the pistol- I left a flared end on the tab so it has a decent surface area to soft solder as I didn’t want to heat the trigger guard up enough for silver solder. Photo tomorrow if I remember before I fix it in place!
24th October – If you are in Cambridge this Saturday come along to the College in Hills Road – I’ll be in the Senior Combination Room with the other local crafts – and introduce yourself.
Busy today – remove the breasts from yesterday’s bag for the freezer – we have a good supply of game for the winter and will no doubt add to that from future shoots – nice warming game casseroles on the menu! Some venison would be a good addition, I do fancy a bit of deer stalking! I am also beginning to think a wild boar shoot in Poland would be quite fun. I finished the little addition to the escutcheon and a couple of screwheads for a gun Dick is repairing ( see photo). I offered to do an engraving demo at the Homerton College 250th anniversary on Saturday, and said I’d bring along a few antique guns that were (a bit) relevant to the 250 yr history of the college. I hadn’t realised that this would involve the college in telling the police and receiving a list of frankly over the top conditions, including that my flintlocks should be ‘deactivated’ by removing the flints! This is not a legal requirement since none of the guns require a license, but who would argue? Fortunately most of the public events I do don’t attract such ad hoc rules. Anyway I will mostly be doing an engraving demo, which requires I ship in a whole lot of equipment, tables, turntable, microscope, stool etc. I usually just engrave screw-heads as not requiring too much concentration so leaving me free to talk – I have 20 nice big 1/2 inch old Nettlefold steel screws from ebay that I have polished up. This time I have made some wooden blocks to mount them in, which I’ll try to sell to raise a bit of cash for buying bits for my STEM club at school – the kids seem to eat batteries, buzzers and reed switches and sticky tape at the moment. I also have a project to engrave the Homerton Coat of Arms on a piece of brass sheet I have cleaned up – fortunately it appears to be quite tractable so I’m optimistic that I can engrave it more easily than the dog-disks I usually buy. Probably not a good project for a public session though.
I got given tweed shooting suit – circa 1958 – today, and it fits me almost perfectly so now I’ll be able to hold my own with the toffs on the shoots for the rest of the season – I fully expect my shooting to improve with the new addition, although obviously an over and under would be totally inappropriate – I think our next club shoot is hammer guns so I might take my William Powell – reasonably in keeping, although probably it should be an Army and Navy or some such. Come to think of it, a shooting suit is probably a bit over the top for a club shoot, and I wouldn’t want to be a laughing stock…………
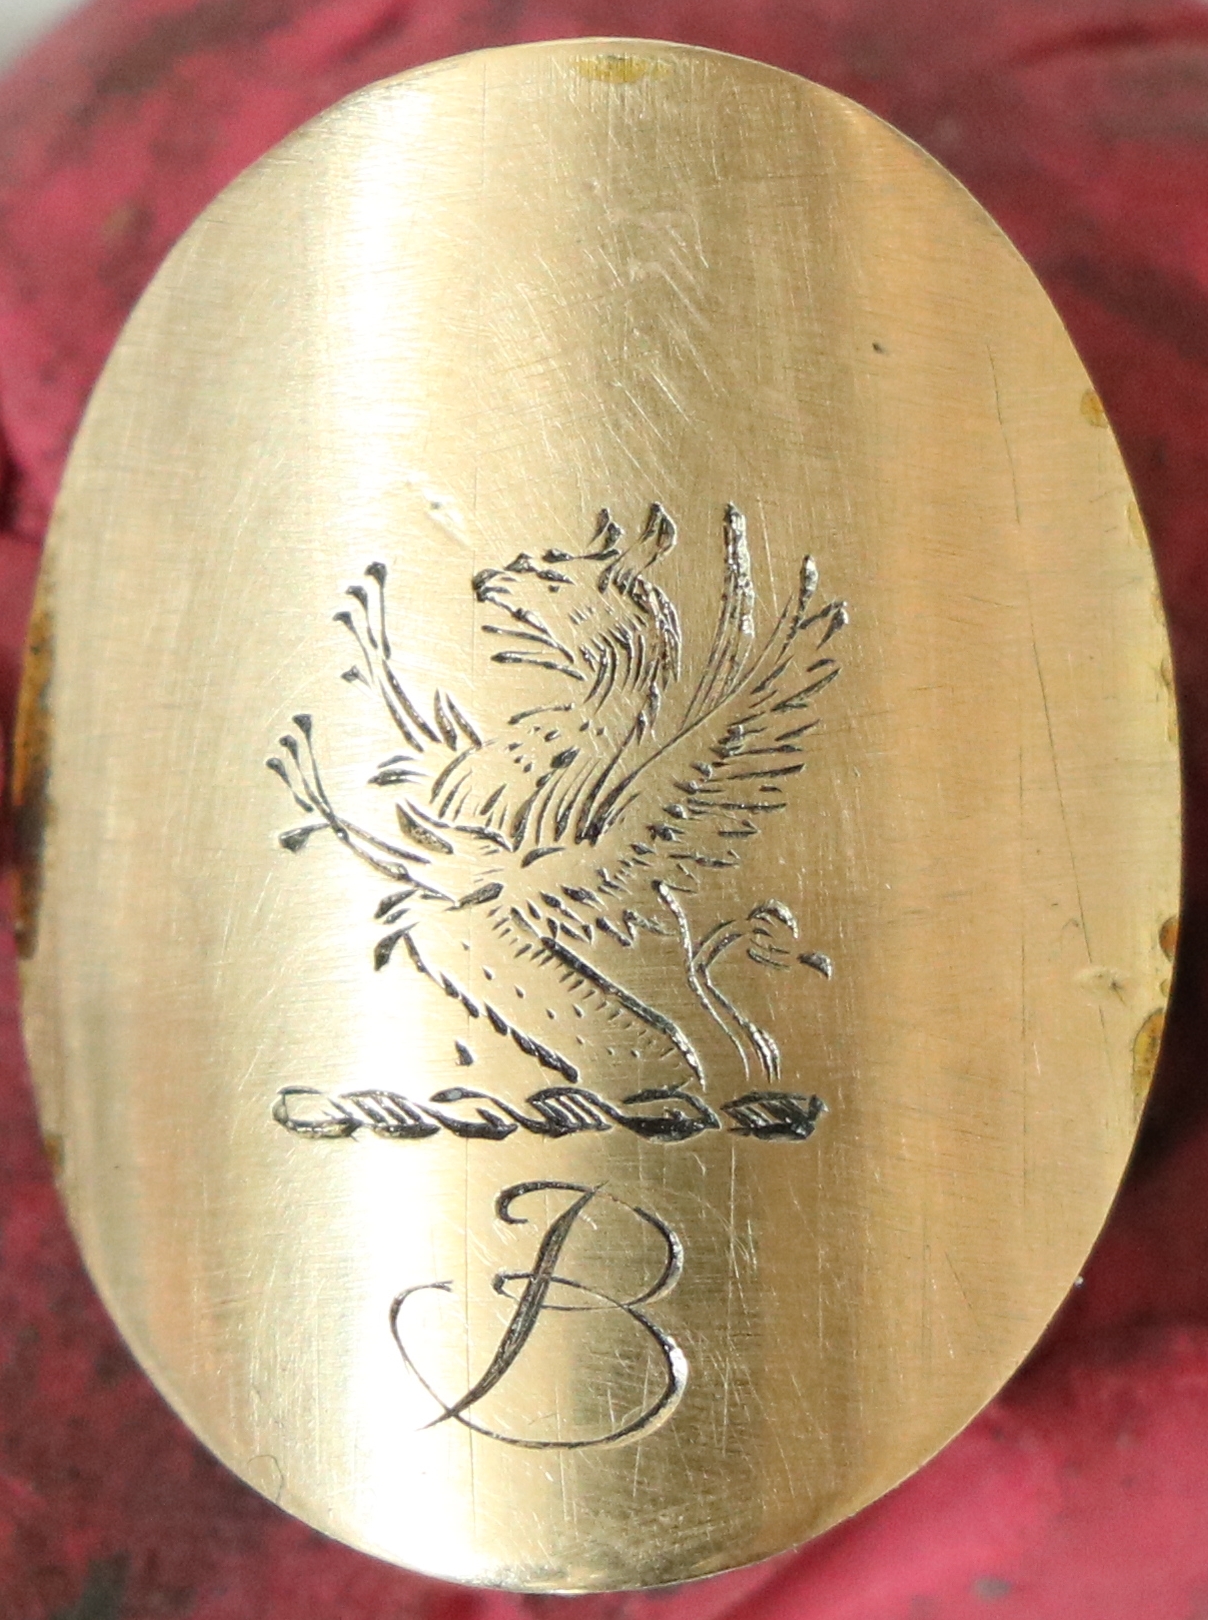
I didn’t do the Griffin, just the B. The Griffin is also big in the Homerton Coat of Arms.
23rd October – Fantastic day’s shoot at Glemham Hall kindly organised by Bev (thank you!) – lots of walking – we all got to walk up a drive behind the beaters, and several standing drives, over pasture and rough ground so a nice change from standing in a long line in the middle of a crop field. A decent breeze aided things, and I had some good drives – in the end I got five birds, which was a fair score for me – the average bag per person was about 7. I treated my son Tom to the shoot too, as he was down from St Andrews – he too enjoyed it. We had a team of pointers doing the flushing – beautifully trained, they were all either field champions or on the way, and much of the pleasure of the shoot, especially for the walking guns, was seeing the dogs work – sort of makes me wish we had a dog, but I don’t think it would fit in with the family life we currently lead – in fact it would need a pretty dramatic change – one day perhaps…. We’ve now cleaned the guns and packed things away so I can slump til bedtime, having used up all my spare energy.
18th October – I’m off tomorrow to Norfolk to visit a very keen collector of flintlocks – might take a couple of guns to see if he is interested – part of my ‘divestment program’ – I have a few strange things that could find a more appreciative home! I have a game shoot next Tuesday , muzzle loading of course – they seem to be coming thick and fast at the moment – I feel a bit bad about the extravagance! I was trying to work out why I can shoot the two types of clay that I can hit and not all the bulk of them – the common feature of the ones I find relatively easy is that they are going vertically, either up or down so I don’t need to separate how far above or below the clay I shoot from how far in front – it all gets subsumed into the same guess! I did find yesterday that I could shoot crossers from the high platform when I was looking down on them, so maybe my problem is just shooting above or below, and if you mostly miss that way, you never home in on the right lead to give? Maybe I ought to have some coaching!
17th October – Really good morning shooting clays at Eriswell with Clare and Jan, a friend over from Holland, despite the fact that it started off with light drizzle – not exactly ideal for muzzle loaders. Clare wanted to concentrate on the ‘Driven’ stand – clays coming towards you off a tower that simulate driven game birds but we had to fill in time before it became free, so I did my usual erratic shooting at ‘crossers’. Things looked up when we got on the driven stand as they are one of the two types of clays I can get a reasonable hit rate on ( the other is clays dropping out of the sky!). So unusually for me, I was able to hold my own…. It’s a relief that I can shoot these simulated game clays as it means I’m reasonably OK on real game! Towards the end of our morning’s shoot a breech loading shooter came over to see if he could use the driven range after us , so Clare gave him a go with her single percussion, (hit) and I gave him a go with my double (2 hits) so Clare tried to seduce him over to the dark side (as in blackpowder muzzle loaders) – it may even work, he was pretty interested. I took the Venables of Oxford for Clare to have a look at, but the rib is now hanging off so I can’t put that job off any more – not my favourite job, and it will entail rebrowning the barrels after resoldering the rib – resoldering the rib will involve taking out the breech plugs, which itself can be a pain… Ah well, it was something of a bargain so I shouldn’t complain.
13th October – I should be at the AML Big Bore shoot tomorrow, but something unexpected came up so I probably won’t be able to get out my 6 1/2 bore Gasquoine and Dyson live pigeon gun – I will try to pop over at the end of the shoot to deliver a few bits.
I’m busy painting and re-glazing a sash window that my friendly carpenter/joiner built to replace a partly rotten one – He replaced one 23 years ago but didn’t get round to doing the other one that needed replacing, although he machined up all the timber for it – despite having built and fitted French doors and re-roofed almost half the house in the interim, he somehow hadn’t got round to making the window in spite of periodic reminders until last week, when he had a spare day or two between jobs. So its been in the job queue for 23 years – He bought his son to help – he now works with his father but hadn’t been born when the job was put on the queue! The sashes are large and have old Victorian wobbly glass – 2 panes to a sash – they are at the very limit of the size you can buy in Polish handmade glass and thus difficult to source, and are pretty expensive so there is a high premium on not breaking them in removing them from the old frames and fitting them into the new ones. They are now out and cleaned up and the frames primed and undercoated so its time to putty the glass in – care needed!
11th October – very enjoyable shoot yesterday in brilliant sunny weather with very light breeze – perhaps not the ideal Partridge weather as they tended to fly very low so that it often wasn’t safe to shoot. Still we all had fun and a reasonable bag. Its very early in the season and most of the pheasants were too immature. Anyway, I collected a very early Joseph Manton double 22 bore shotgun converted from flint to percussion with drum and nipple in a reasonably competent manner – but certainly not to Joseph’s standards, so presumably by a second tier gunsmith, and probably after it had passed out of its original ownership. The serial number is 331, which puts it at 1791 and is the first double flintlock listed in Keith Neil’s book, although I think several early ones have since come out of the woodwork. It belongs to the period when the front trigger was a lot smaller than the rear one. The gun looks ‘of a piece’, although the trigger guard shape and the sling fixing behind the trigger guard ( without a matching fixing on a ramrod pipe) don’t quite fit in as they look a bit rifle-like. The locks are of high quality inside and the engraving good – the screw holding the false breech has asymmetric engraving matching the engraving on the tang, which is unusual. The bores are pretty good, but the barrels are quite thin at the muzzle. The escutcheon has initials with a crest above, but I can’t read them. Many old guns one sees have a ‘mystery feature’ that you can’t explain and which leaves a question mark hanging in the air – its part of the charm of collecting – in this case its the missing muzzle end sling eye – I can’t see any trace of where it was, although I’m quite prepared to accept that a shotgun in 1791 did have a sling fitted. It has been suggested to me that this gun would be a perfect candidate for a re-conversion to flintlock – but I would resist the temptation – its an early Joseph Manton in reasonably original shape, and as such is fairly rare – re-converting it would turn it into a lie, and my view is that it would be ethically wrong. It will clean up quite nicely as what it is, and could possibly make a shooter. I think it is for sale, so drop me an email if you are interested. I’ll put more photos in the post ‘Joseph Manton 331’. I brought it back to photograph and show to a Manton specialist, but I don’t think I’ll buy it as I have enough doubles!

8th October – My little STEM club this afternoon – real buzz, bordering on chaos! All the cookie jar alarms mean that the room is full of little 9 Volt buzzers going off all the time – why do I do it? answers on a postcard please ( but not sent to me!). I decided to strip the Twigg pistol and have a look at it in detail – I’d already got the tumbler out, so here is a picture of the neat repair to replace the sheared off square. Getting the trigger guard off pistols of that age is always tricky because they are held in by pins through the wood that are usually rusty, and if you knock them out carelessly they will take out a chunk of wood with the pin and leave a messy hole. The pins are invariably put in from the left side of the gun/pistol so you need to knock them out from the right side. To do this you need a small pin punch and a tack hammer – its fairly easy to take out pins that emerge from a flat surface – you just need to fold up and hammer flat a piece of lead sheet to 5 mm thick and put that under the pin so it supports the wood, then tap the pin out – the pin will make a hole through the lead, which will support the wood – in this case it worked just fine as you can see for the front trigger finial pin – in this pistol the pin didn’t do anything as the tab had broken off the back of the finial. The pin holding the back of the trigger guard was a bigger problem as the grip is curved so its difficult to support the wood around the pin as you knock it out – in this case it was complicated because there appeared to be two pin ends on the right side of the butt. I shaped up a lead pad and found the right pin, and that one came out OK and released the trigger guard – previous disassembly had damaged the wood a bit, but I managed not to make it worse! Both wood and the back of the finial were coated in epoxy glue but seemingly without any contact between them – I need to clean out the slot for the tab I’ll put on the finial as its filled with epoxy. Not sure whether I can get away with soft solder for the tab, or whether I need to silver solder it – Silver soldering might alter the patina – I’ll think about it…………………………………. ( just had to break off to take my bread out of the oven!)
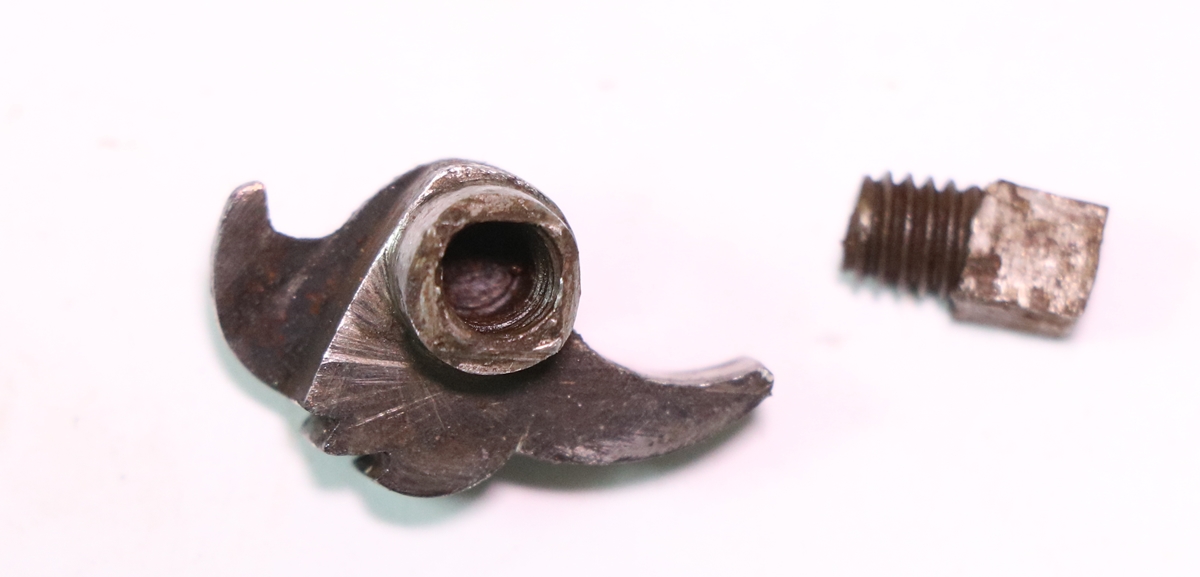
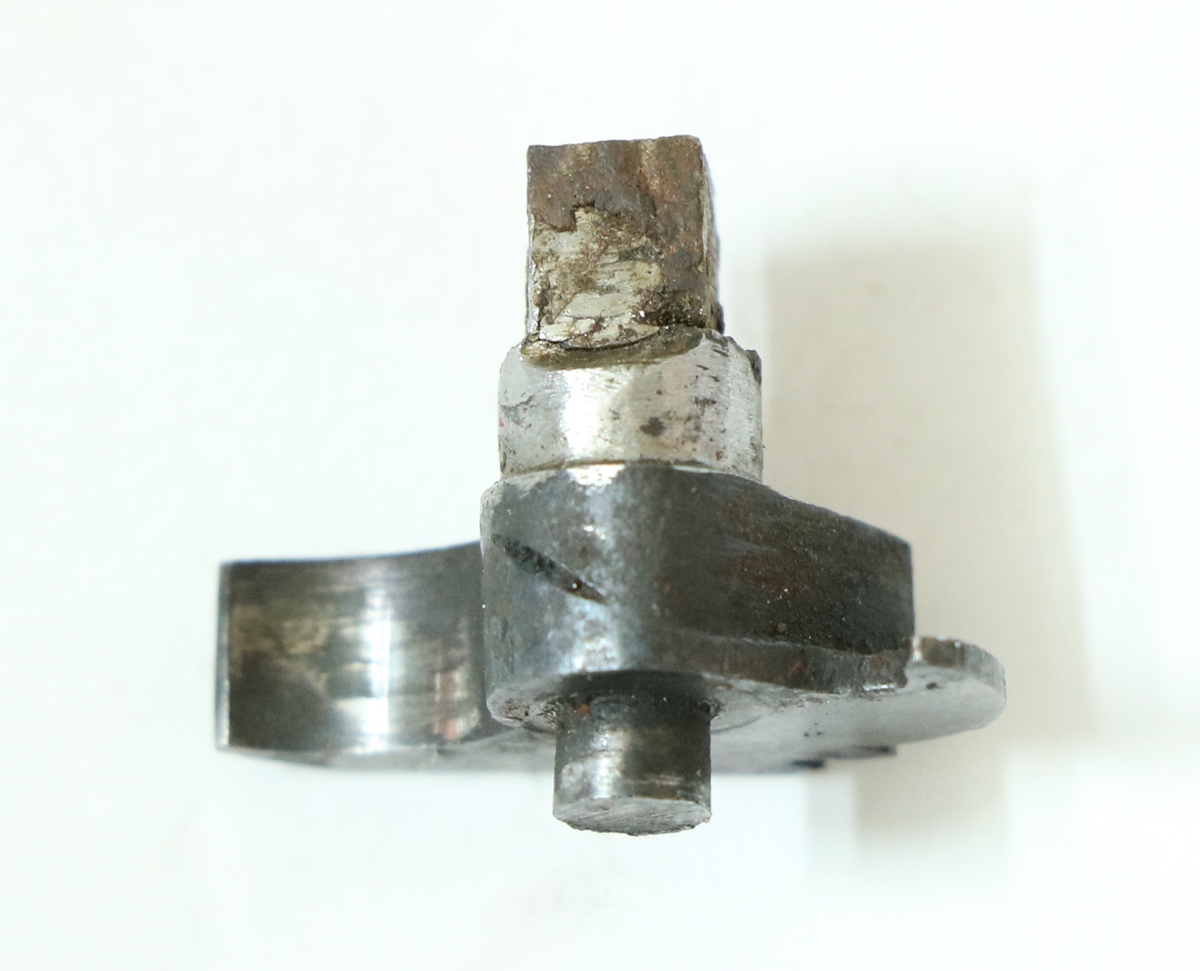
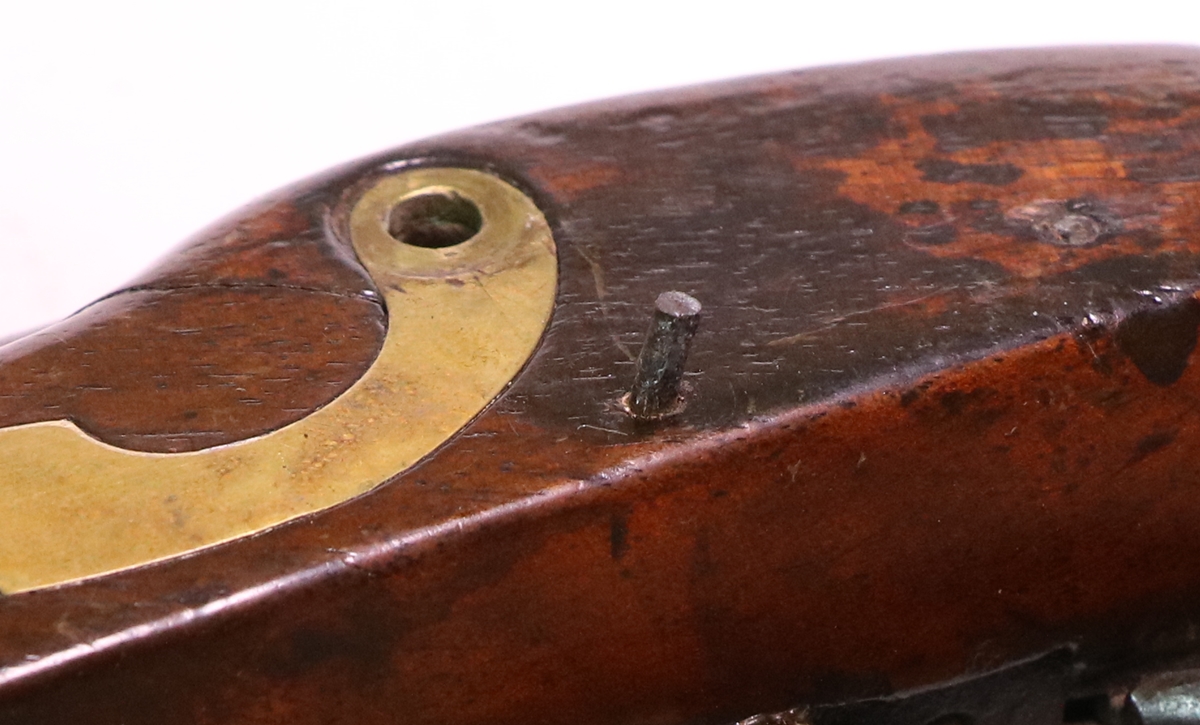
The pin is coming out very cleanly, thanks to a lead pad. The potential for damage is considerable!
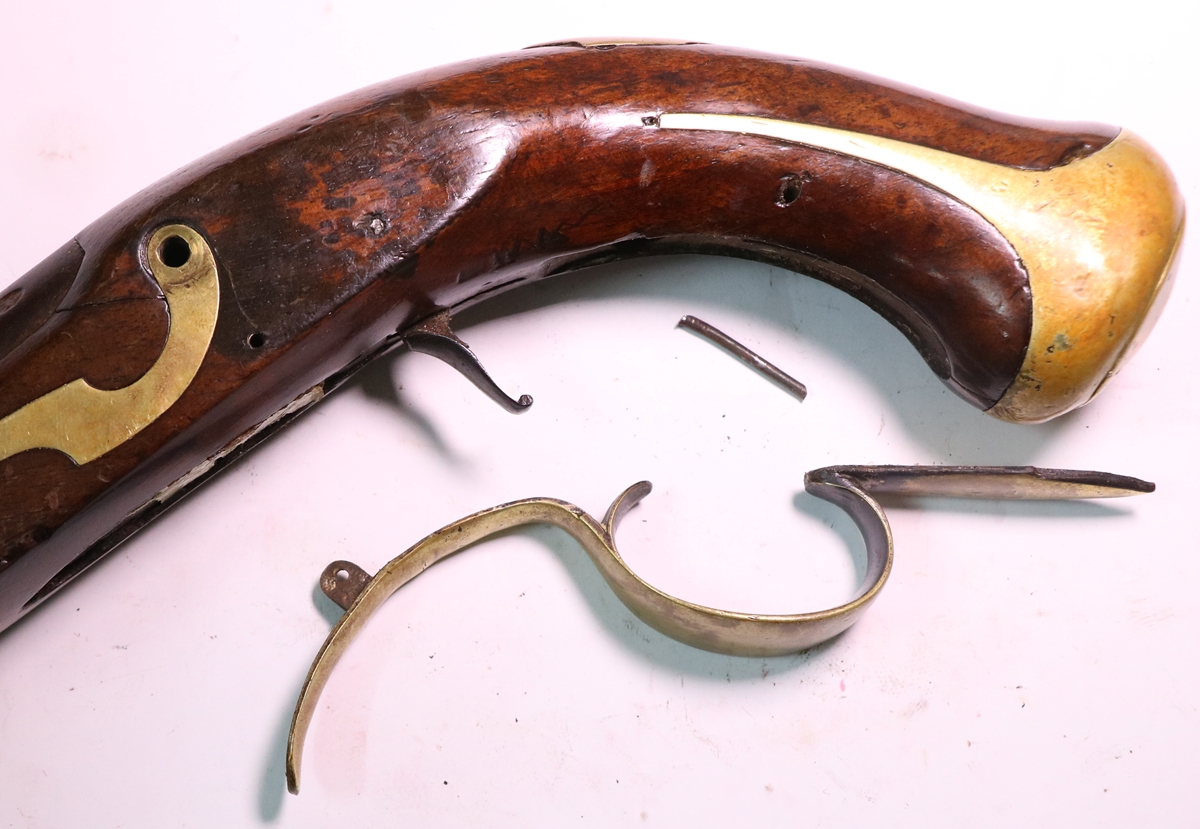
This pin also came out fairly cleanly but had been rather crudely knocked out before when the front finial was glued in.
The trigger guard is backwards – just to confuse you!
7th October – We have now agreed the work to be done on the Twigg pistol, so that can start. I spent an hour today clearing out the drain from the kitchen sink and water softener – I mention this because it was interesting – the drain where it goes into the gully was bunged up by soft white ‘rock’ that looks to be calcium (carbonate?) based – the water softener works by ion exchange, it exchanges the calcium ions in the incoming water for sodium ions and traps the calcium ions in the resin, then when it back flushes to recharge the ion exchange resin it must flush all the calcium ions from the resin and replace them with sodium ions – so the small volume of flushing water must contain all the calcium from the much larger volume of water softened. What the chemistry of the formation of the deposits in the drain is, I don’t know but it accounts for the amount of calcium … Next week is busy, I have a shoot on Wednesday, so a very early start to get there by 8:30. I think I have everything I need – I have No 6 shot, although I hear that most of my shooting friends have now changed to No 6 1/2 shot, which corresponds to a metric size (not sure what) – presumably when we leave the EC we will not be allowed to use metric measurements any more………
5th October – Sorry, bit of a gap while I attended to school matters and did some work on a couple of windows. I got a nice little pistol in the post today to be fixed – not that it has much wrong with it – its an early flintlock pistol by TWIGG, first signature and first finial design, but very plain, although none the worse for that, and well made. Probably made between 1760 and 1770 but I am uncertain what to call it. The barrel length is 7 1/4 inches, a bit small for a normal holster pistol (typically 9 -10 inches) or an officer’s pistol ( not sure if that description works as early as this anyway). Maybe a small coach pistol, or one to have about the house in case personal protection was needed? Anyway its a pretty thing and has had very little wear over the years – it looks ‘of a piece’ and pretty genuine – if it were percussion it would be in the age of sticking spurious names on guns and one might suspect it was a ‘fake’ but 1770 is a bit early for that sort of thing. At some point the square broke off the tumbler and the cock fell off – someone carefully tapped a hole into the tumbler and screwed in a piece of metal and filed up a square on it – the only problem is that they didn’t provide any way to stop the thread unscrewing, so now the cock moves independently of the tumbler – it will need brazing or welding… Also the tab on teh back of the trigger guard by the finial has snapped off, letting the trigger guard hang loose – I’ll have to drive out the pins securing the trigger guard and bit of the tang, and silver solder the tang back on. There is a little bit of surface rust around the top jaw etc, and behind the frizzen spring that needs cleaning off, but other wise it is best left pretty well untouched. I really like this sort of utilitarian pistol – nicely made but not for show.
1 Oct – Another month…. Getting to do some gun work would be a great luxury as I seem ridiculously busy on other things – today I was working on the Geophysics Archive followed by my Stem Club – we have 11 very enthusiastic kids all making alarms to fit on to cookie jars etc… Tomorrow is again busy with meetings but on Wednesday I will reward myself with a couple of hours clay shooting in the morning to get my eye in for driven game – update – ( post script…no I won’t, I think no-one else is going!) – my next shoot is on 10th. After that I have a school meeting at 1300 hrs of all the inconvenient times! I’m shortly due to get a pistol to refurbish – details will follow…..
30th September – Had a very nice email from the owner of the Martini Henry (see below) saying how pleased he was, and that he never expected the chequering to turn out so well! All credit to Dick. I had a recent email from the US asking about calibers of percussion rifles – a quick look at Donald Dallas’s 2003 book ‘ The British Sporting Gun and Rifle’ has interesting details. In the early days of percussion, sporting rifles fired mostly cloth (or occasionally fine leather) patched round balls. Since the grip on the rifling was minimal, basically limited to the patch thickness, it didn’t take much to cause the ball to strip from the rifling and fail to spin properly – so it was not possible to accelerate the ball sharply or to achieve high velocities if you wanted to benefit from the increased accuracy that the rifling should in theory provide. Thus you were limited to effective ranges of 50 to 100 yards at the most. Much of this difficulty was caused because the rate of twist of the rifling was carried over from flintlock rifles, where the acceleration was much more gentle due to the slower burn of the powder resulting from flint ignition. Had a slower twist been used, it might have been possible to use higher velocities. In fact experiments with smooth bore muskets showed that there was little to be gained by rifling below 50 yards. Once shaped bullets were introduced the ratio of mass to drag improved, so the bullets held their velocity for longer, and the longer contact of the bullet walls with the rifling meant that higher initial velocities were possible using bigger charges. A further improvement was the principle of the Minie bullet with a conical hollow in the base and a wooden or clay plug in the hollow that expanded the skirt of the bullet on firing, and got a better grip on the rifling – later found to work quite well without the plug. The main benefit of this was in the military because it allowed bullets with more windage, that could be more easily loaded when the barrels began to get fouled. Simple conical bullets allowed ranges of 100 to 300 yards. The next big jump in velocity came from using keyed bullets with deep grooves that had a large resistance to stripping – examples being the Jacob’s patent arms made by Daw, and the Express rifles of Purdey using belted ball bullets. A couple of rifling ‘inventions’ along the way were significant improvements – in large measure because they tackled the problem of rifling fouling – they were Lancaster’s oval bore rifling, which is what it says it is, and Whitworth’s hexagonal rifling. All the improvements made it possible to shoot at ranges up to 1000 yards, allbeit with cleaning of the barrel between shots. An interesting instruction with a Purdey 50 bore rifle No 3852 of 1844 from Dallas’s book gives the charge for a round ball of .453 cal as half a dram of No 2 powder with a stout linen patch, and of a conical bullet for the same rifle as 2 drams of No 6 powder with a thin cambric patch and the hollow in the tail of the bullet filled with grease – quite a difference. The same sights were marked 50 & 100 yds for the ball and 100 & 150 yds for the bullet – illustrating the much greater drop on the ball.
26th September – The Martini Henry stock and fore end are now finished and dispatched, see below. I haven’t had a moment to do any more gun stuff as school things have been pressing – I have a new group of young children ( 6 -9) in our STEM club and Dave and I are having to reset our complexity index many steps lower. The trolley is now complete and I’m getting some of the BBC microbit computers sorted out as they seem just the job for the kids. Plus a a couple of school meetings this week, and two next week – being a school governor is a fairly big commitment but pretty satisfying.

I can’t claim any credit for this chequering – Dick is the expert!
23rd September – Spent today building my ‘cupboard on wheels’ for the STEM club – its amazing how much 3 sheets of 12 mm ply weigh – it will be a struggle to get it out of the workshop but will tidy up all our stuff at school. I had a look through the visitors to the website yesterday, and there were dozens of visits from different cities in China that didn’t seem to do anything, just make 2 quick visits – they seemed coordinated too as they all did the same thing over a short period – something suspicious no doubt! Anyway today they are not doing it. I get between 250 and 300 ‘proper’ visitors a day, who on average click on about 6 things, which for a small unpublicised specialty website I reckon is pretty good. It certainly generates a few inquiries and the occasional restoration – If you do want to know about a gun or pistol email me (see CONTACT) and attach a few photos from different angles, including one of the whole thing and one of the lock etc. I can often give you general information on non specialist stuff and have a fair idea of auction prices for common types of gun and pistol (not military though!)
22nd September – I finished repairing the surface of the Egg stock which looked very poor as the fairly thick varnish had come off in patches allowing oil stains to form. I steamed the wood and got rid of some of the varnish and some of the dings, then wiped over with shelac and put on several coats of ‘slacum’ ( linseed oil, driers and a little beeswax). I didn’t want it to look too re-finished, just not quite so pock marked, and it seems to have worked. I can now put that job away as I’ve done the case and the stock, although I did notice that the loading rod in the case is not quite long enough for the barrel – but I don’t suppose anyone will notice. Dick has now finished the Martini Henry stock so I will collect it and take some photos before returning it.
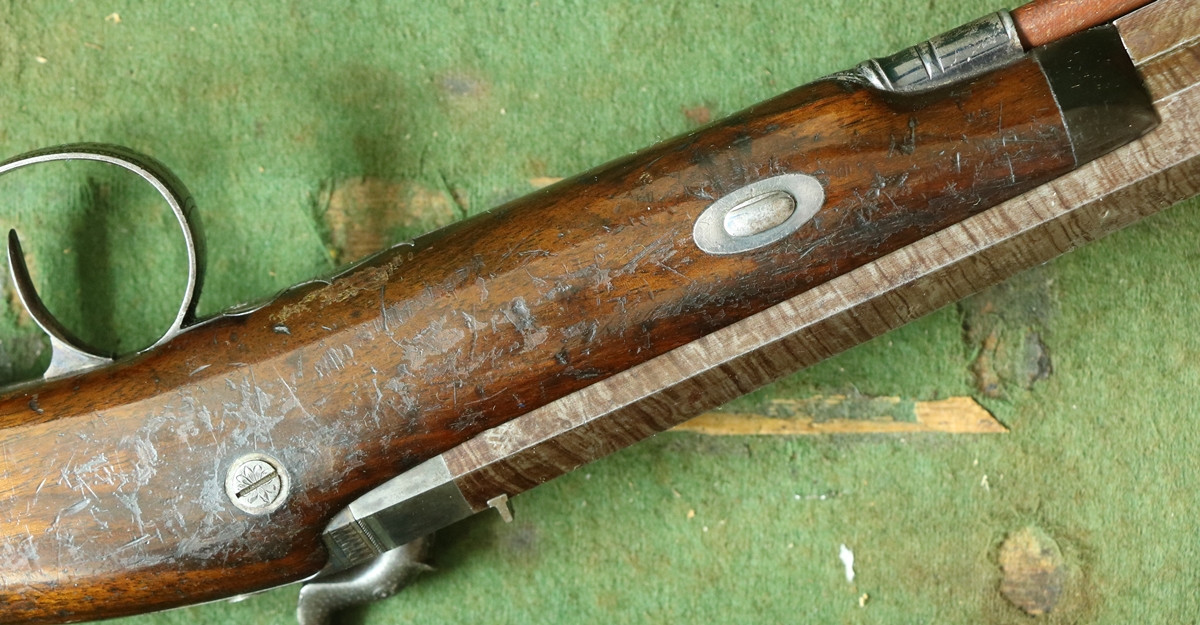
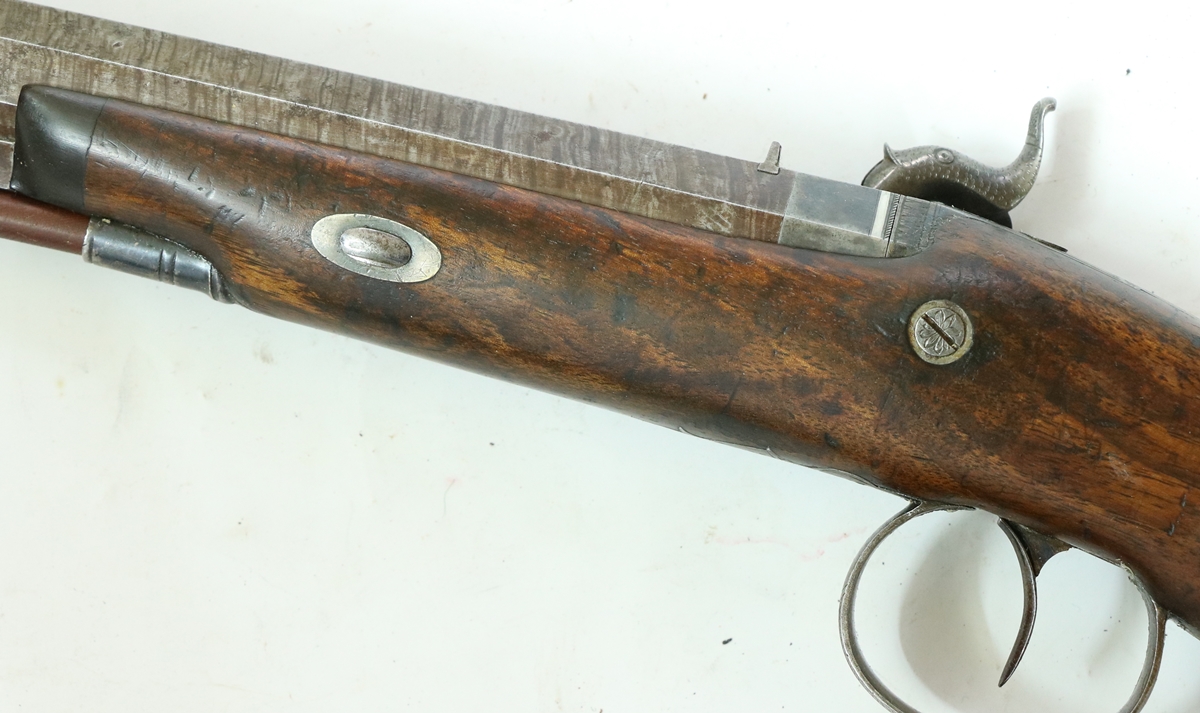
21st September – a day of relative quiet! My STEM club at the junior school starts next Monday and I’ve been politely told by the teaching assistant in the classroom I use that I can’t leave our bits and half finished projects around the classroom all week. As she seems quite adamant I think I had better take notice, so I designed a trolley to hold it all that can be wheeled into a store room, assuming there is any room there. Anyway I worked out the I could make it from 3 sheets of 12 mm ply and have given Ridgeons a cutting list, so tomorow I’ll see how many of the 20 specified cuts are in the right places! I went to Dicks to see how he is getting on and he sold me a nice overcoat pistol that will eventually appear on the website – it will be cleaned and repaired so nothing to show here! He has been doing some re-chequering on the stock and forend of a Martini Henry, which has taken him an age and is very well done – looks fantastic – I will have to pack it up and return it to it’s owner. I don’t understand how Dick did it for what he is charging – I keep telling him to count his hours on jobs and charge a fair rate, but he won’t learn! ( he doesn’t look at this website, or any other!) I took over some baise for lining a Joseph Manton percussion double case as Dick thought his was too bright – I have a few meters of various colours – some lovely thin burgundy stuff that I long to make a case with.
19th September – I’m afraid that the last couple of days talking to groups of schoolchildren as part of Cambridge University’s Physics at Work event has left me with little energy for going into the workshop and doing anything to guns in what is left of the evenings! So far I’ve talked to 24 groups (20 minutes each) and I have another 12 tomorrow – my voice is just about hanging in there… Gun stuff will appear in time.
17th September – Back from a cracking day out ( now where does that come from ?) at Bawdsey with a super group of people on my first shoot of the season after Partridge. Nice breeze meant fast birds and great fun was had by all – 73 birds for about 240 shots by 8 guns – a fair ratio by any account. I managed to stretch my supply of tubes for most of the day but had to borrow a few just in case. Tubes for the tubelock guns are precious as each is handmade by us and it’s quite a lot slower than reloading black powder cartridges – I can make about half a dozen tubes an hour if I concentrate. My gun has now been cleaned – the composition in the tubes is highly corrosive and the lock(s) need to be taken out and washed and scrubbed to remove all residue. We had a reporter from the Shooting Times and a photographer, so expect a feature on muzzle loading game shooting in the mag in a month or two. Everyone who is involved with the shoot in any way is always impressed by how good humoured and relaxed we are about our sport – unlike a number of groups shooting breech loaders! We always enjoy our shoots whatever the bag, and always have a modest impact on the estate. I can see muzzle loading game shoots being on the increase – we just need to find a good way to initiate others into the skills needed to transition.
16th September – I’m of to my first shoot of the season at Bawdsey tomorrow. I gather we will have the press there, so best bib and tucker ( whatever that is)… Two of my friends are shooting tubelocks, and I thought that out of solidarity with them I should do the same. I only have a single barreled gun so no ‘left and rights’ but at least it takes away the indecision about whether to reload after firing one barrel of a double or to wait for the next bird. I will take my Nock double percussion in case I can’t hit anything with the tubelock – I haven fired ti for a while and its a bit high in the comb so I’ve had to add a butt pad which makes it a bit long but at least brings the gun up in a reasonable direction. I’ve made a batch of decappers to take as I usually give a few away at shoots….. news of the shoot later!
12th September – I got the information on the Irish Registration act from an old copy of Classic Arms which was a magazine devoted to antique firearms, around 1990 – I ‘inherited’ a pile of old magazines from my father, which I rediscovered recently and an slowly working my way through. As well as the Classic Arms, which was an impressive UK publication full of adverts from dealers and detailed articles by many of the authors of ‘standard’tbooks on particular subjects, I have a pile of copies of ‘ The American Rifleman’ of various dates, the earliest from 1945, and then some from the 1960s. All these old magazines have excellent articles on old firearms – the American Rifleman is of course mostly current guns and is interesting because the earliest copies cover the period after the war in Europe was over but before the Japanese had surrendered. I was interested to note that the supply of guns and ammunition had halted during the war and was only just coming back in 1946 – there was strict price control on guns and ammunition – basically limiting the price to that before the war. Manufacturers were allowed to charge 9% more but the extra had to be absorbed by the dealer and not passed on to the end customer – if anything was available anyway – supplies of copper and lead were restricted – one doesn’t think of America having that sort of restrictions!. There were loads of advertisments for ex military arms of every nationality, and dire warnings about using Japanese rifles with American high velocity ammunition. There was an official way that troops could bring back a ‘souvenir’ weapon with official blessing, but nothing with a barrel less than 18 inches long. You could pick up a working Webley Mk 4 revolver back in the States for $14, which was probably less than a fiver! The 1990’s UK mags covered the banning of handguns and were full of anguished debate and hand wringing – I fear we may have a repeat coming soon……. I didn’t do much gun work today as I had to service and clean the AGA (cooker) – its that time of year, but I engraved a few decappers this evening. Out of interest I cut through the box section of the other trailing arm of the suspension unit from my boat trailer – this was the one that didn’t fail on my trip, but you can see that it wasn’t far off. Of course it look OK from the outside!
11 September – I was wrong about the Irish Firearms registration act being 18th century – it came in in 1843 and was repealed in 1846 – it is thought that about a quarter of a million guns may have been registered – the registration ID consisted of 2 letters for the county and a (usually) 4 figure number stamped on the barrel or occasionally on expensive guns, in a more discreet place.
11 September – I ordered a new capper from Kranks as I’d lost my old Pedesoli straight capper in a field somewhere last season – the guy at Kranks said the Ted Cash inline capper was better so I ordered one. It’s different in that the spring is short and you push the caps down with the knob – it has a crafty loop that holds the knob back while you feed in caps – it claims to be patented but I can’t see what or why – I’ll have a look later as all US patents are now on the web. Anyway the problem with both the Pedesoli and the Ted Cash cappers is that they don’t hold enough caps and are too fiddly to reload with cold hands in the middle of a shoot. I modified my last one with a bit of brass to form a slide to feed the caps down and it worked very well, so I thought I’d do the same for the new one – its just a small brass bit soldered on by the loading hole with a groove shaped to fit a cap – seems to work well. I find you need a small 1.6 mm pin on a chain as some caps fall over in the groove and need to be prised upright – don’t put force on the compound or they will go off! I thought that it would be better to hang the capper off a ring on my new block as the loop on the end needs to be free to hold back the knob. I always carry a decapper and a small pricker made of 0.7mm steel wire to clean out blocked nipples.

Ted Cash capper from Henry Kranks with Cablesfarm modification.

Cablesfarm decapper – customised version in gold – don’t ask, you can’t afford one!
I carried on cleaning the Turner – it all went in the deruster and then had a good brush down on the fine rotary brush. I coat all the surfaces with ‘Metalguard’ which forms a very thin anti-corrosion layer over the metal – especially useful on the inside metal surfaces as there was a fair amount of internal rust – a lot adhering to the wood that had to be carefully scraped off so the furniture bedded properly. Anyway I stripped off the lock workings and cleaned each part – derusting actually gets to all the surfaces so its just a matter of cleaning them – on the wheel if they are big enough to hold safely ( I have spend enough of my life looking for little bits that have pinged off when I’ve been brushing them !), The ‘fly’ or ‘detent on the tumbler designed to block the sear from entering the half cock bent as the cock falls is a particularly fiddly little part that is only too easy to loose. Once re-assembled the pistol doesn’t look much different, but is in a much better state to weather the next 100 years.
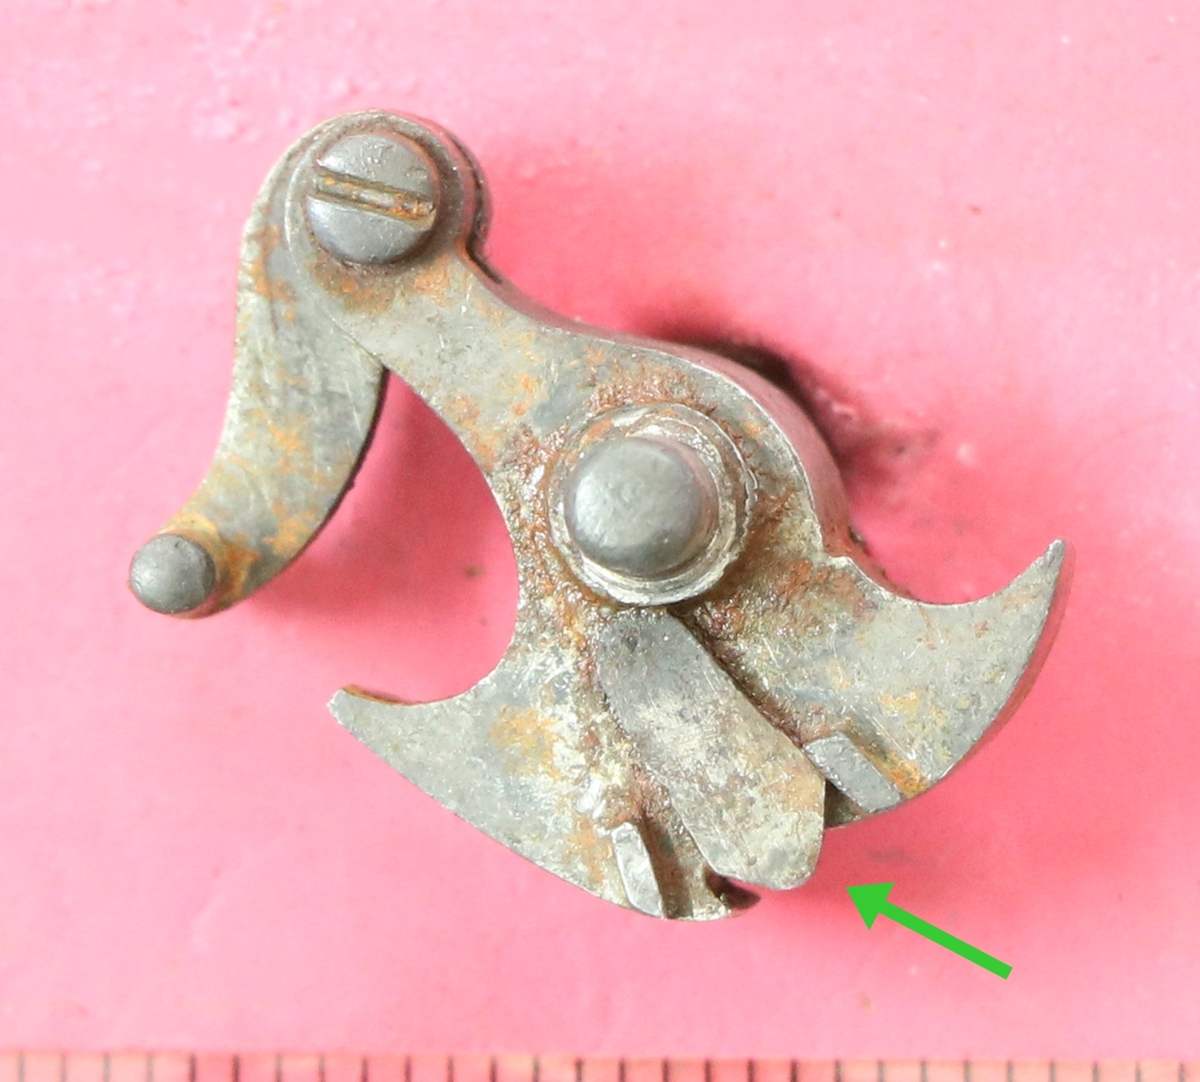
Its been derusted and the rust will now just brush off but you can see how much there was. Arrow points to the ‘fly’.
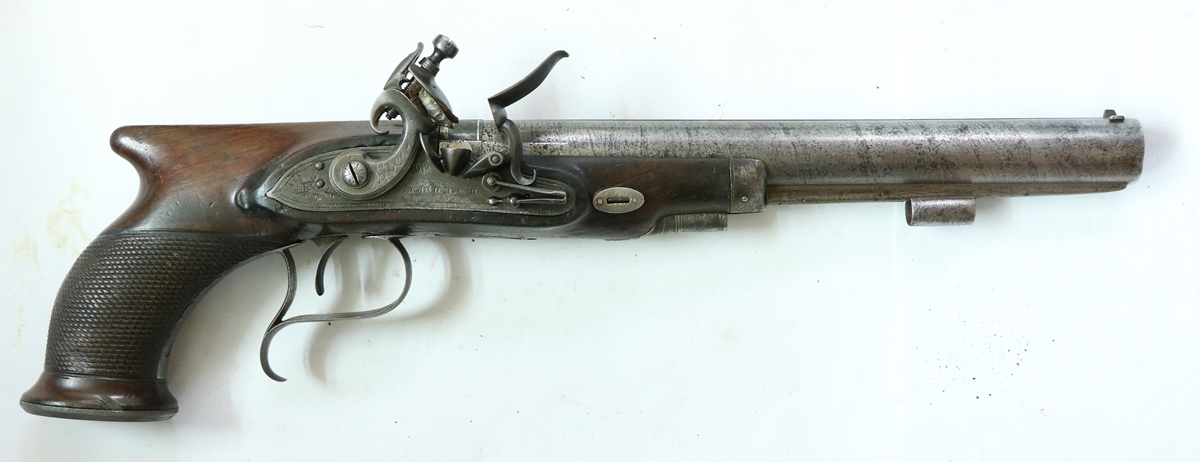
Stripped and cleaned externally and internally. There was a lot of rust under the furniture and the furniture now fits better – click on the photos and you can see that the finial is a better fit than in the unrestored photo.
10th September – Quite busy on the gun front! I had a commission for five individually named decappers, and after a bit of hunting around I found some spring steel strip that was suitable although it needed annealing. So that is now done – I gold plated one for a friend for fun- the process is SO easy (see post Gold Plating). I must make another combination field tool consisting of a brass ‘hammer’ for chipping flints and a short wide turnscrew for the top jaw screw to complement my percussion decappers. I collected the ‘central fire lock to engrave a new cock screw- it is certainly a weird thing – like nothing I have ever seen before! (see below). Dick received a sawhandled flintlock pistol ( duelling/officers) with a .57 bore and heavy barrel to be restored and passed it to me to derust and clean. Locks signed Turner, and a very faint DU1049 on the barrel – that was a mark introduced in the 18th century (?) in Ireland to control guns – they had to be registered under pain of a considerable penalty. From the DU mark I assume that the maker was G Turner of Dublin. Given the Irish enthusiasm for duelling pistols, I assume that is what it was intended for. The pistol is in reasonable but worn condition and is a good example of many such. The issue here is how far to go in stripping it and cleaning it. If the fit of wood and furniture is good, there is a danger that it will not be as tight after work. On the other hand there is the possibility that there is significant rust behind the iron furniture that is pushing it out of the wood. In this case I could see that the edges of the trigger guard were rusting and the finial was raised. It is usually necessary to remove the cock from flintlocks to get surface rust from behind it and give a uniform finish, and the same goes for the frizzen spring. In this case I took all the furniture off ( very carefully, but fortunately the screws all came out easily and no damage was done. I haven’t stripped the ‘works’ off the back of the lock, or taken off the frizzen yet, but that may follow after derusting, which works just fine on assemblies. I have removed the mainspring as I am a bit careful after a couple of springs fell apart in the derusting bath! It will all go in the derusting bath except the mainspring.
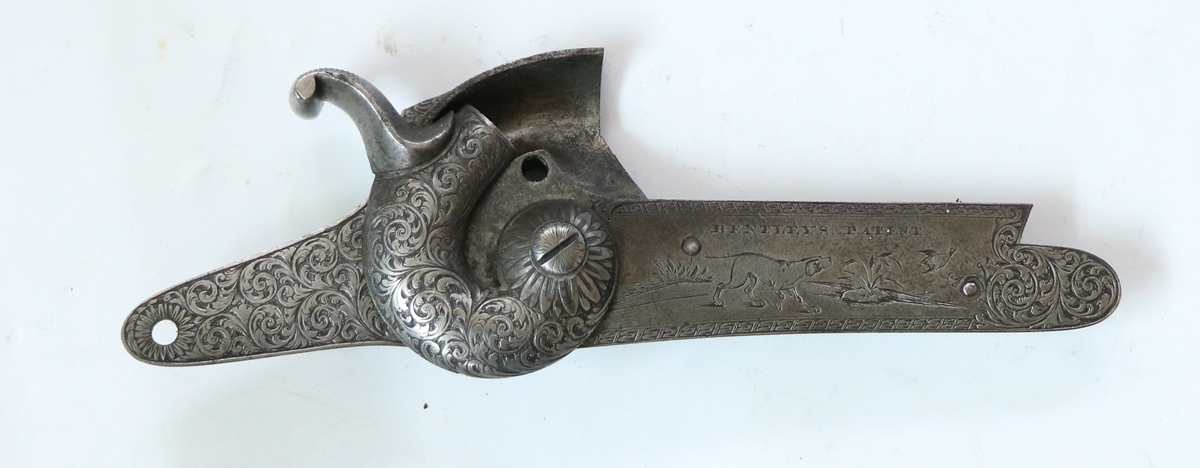
Weird or what? Bentley’s Patent percussion axial fire lock, full cock……
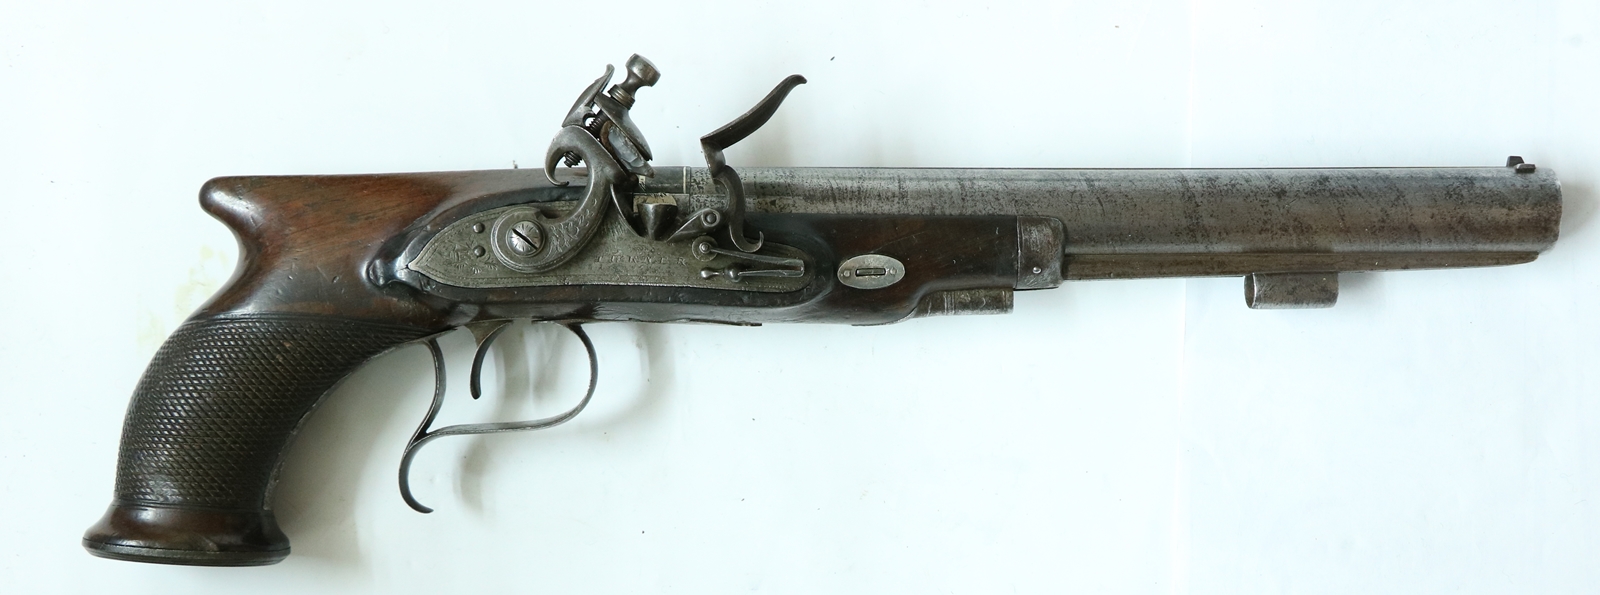
Turner of Dublin (DU 1049) before restoration
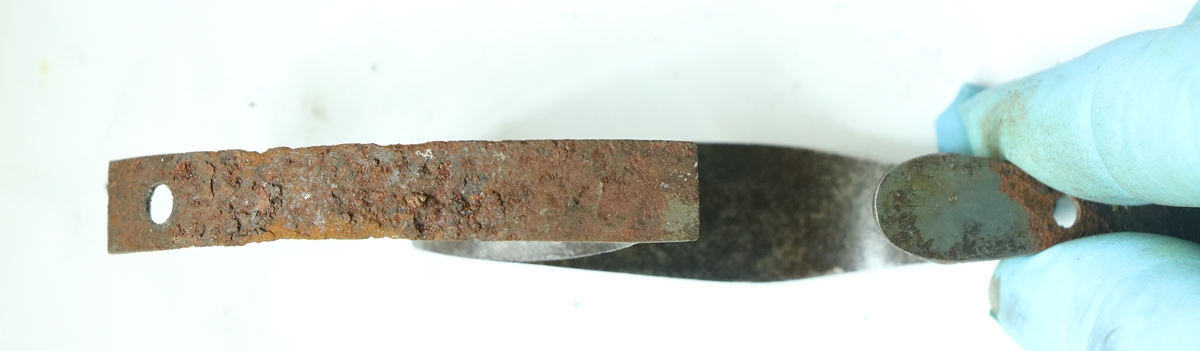
Back of trigger guard – you could say this is more conservation than restoration!
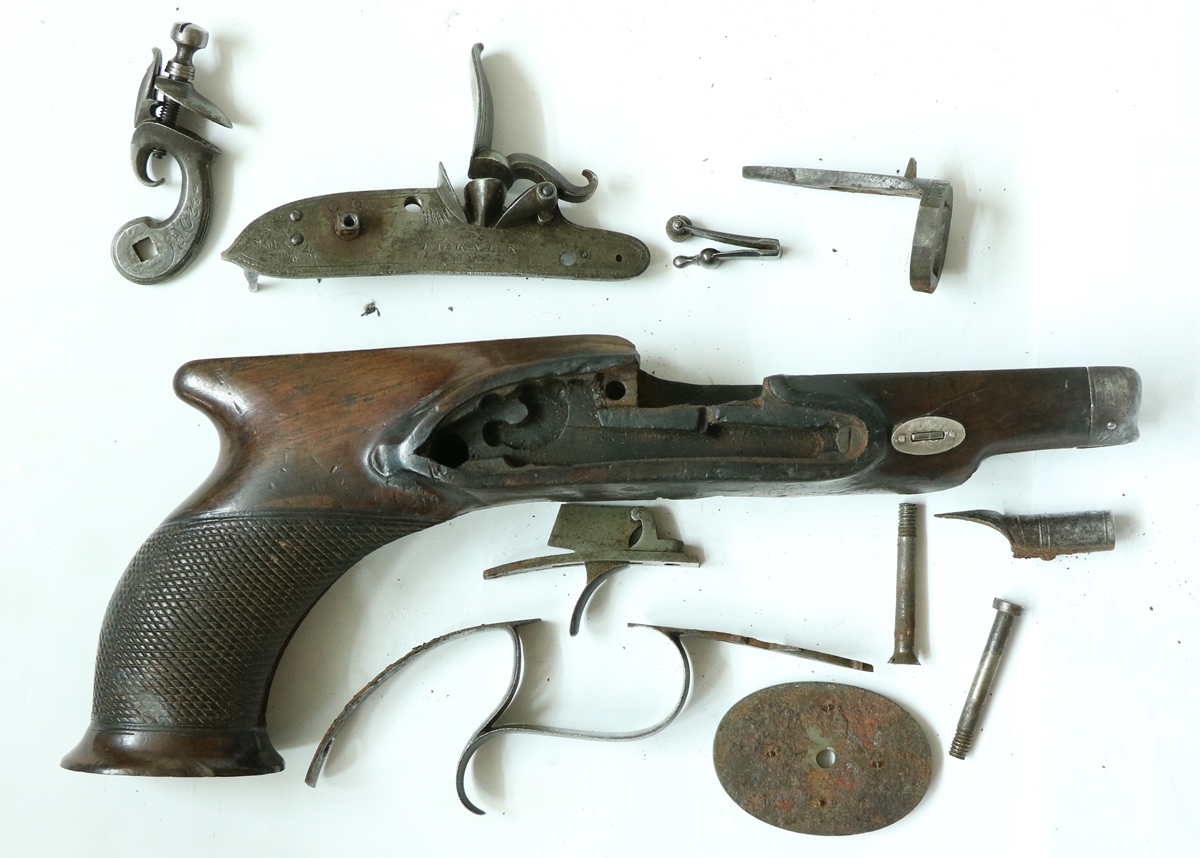
Stripped – it turned out to be easy to remove all the furniture without damaging any screws.
8th Septemeber – I did the ‘Have a Go’ at CGC yesterday, with my Nock double percussion. I took my Jackson Central Fire patent double intending to use that, but the geometry of the cocks in relation to the nipples is constrained by the fact that the nipples exit into the centre of the chamber, hence central fire. This leaves very little room to put the caps on the nipples. I realised as I was getting ready for the clients to arrive and capping off the guns that I would have a difficulty capping while someone else was holding the gun, and quickly swapped to my usual double, the Samuel Nock. I saw a very interesting Central Fire percussion double a couple of days ago – the nipples didn’t just exit into the middle of the chamber, but were also aligned along the axis of the barrel so it was a true central fire – this led to a really neat cocks that were scultped into the action, and when cocked did not protrude above the action body – I’ll try to get a photo shortly, I had never seen anything like it! I can’t remember the maker, but need to find out!
6th September – I fiddled around this morning filling a couple of gaps in the Egg pistol’s woodwork around the lockpocket – I haven’t managed to get rid of one visible rise where a knot goes through the wood, maybe a bit more work. As I lay in the dentist’s chair for an hour this afternoon I kept thinking how nice it would be to have all her tools in my workshop- when I said ( in an odd moment when I could speak) that I’d love to have them at home, she said she wished she had them at home too – not sure what she would do with them – by then I couldn’t ask and relaxed back into contemplation – very restful…. Tomorrow I’m doing another ‘have a go’ shoot at Cambridge Gun Club – almost out of shot and wads but I think I can wing it – not sure how many others are helping out, but I probably won’t do more than 30 shots so I’ll probably manage. I’m tempted to take my 20 bore breech loader for a bit of fun afterwards, but perhaps I should stick to the one muzzle loading gun for the shooting season. I still can’t be sure which gun fits me best – cetrtainly NOT the Venables, and today I had a bit of a problem when try mounting guns because I couldn’t stop my left eye being very dominant – I’m sure I’m usually right eye dominant or neutral !
4th September – I very reluctantly decided today that I wasn’t going to go to the Sandringham Game Fair next weekend to do my engraving demonstration as I have too many other calls on my time at the moment – I spent 4 hours this morning being ‘trained’ on safeguarding as a school governor – I have to say that it was very poorly presented and about the most inefficient knowledge transfer I have witnessed in years! How a school can’t manage to work out how to communicate knowledge defies belief but there it is. I took the Joseph Manton and case to Dick’s to get his view on relining the case, and met a good friend and very knowledgeable dealer of good guns who recommended selling the gun and case ‘as is’ separately to get the best return on the basis that the most likely purchaser of the gun would want it to shoot and would therefore have little use for the case. I must say I find it annoying to have to keep a gun in the locked cabinet and the empty case elsewhere, so I can see his point.
3rd September -I finished the middle compartment for the Egg box today – its a bit of a tight fit but I think it will be OK . The mystery of the breech block I couldn’t engrave is solved – although the person who made it hadn’t hardened it, the material he used had been ‘pre treated’ – which means heat treated and tempered/annealed, so no wonder I couldn’t engrave it. I need to make some more de-cappers, for which I need 1/2 x 1/8 spring steel strip in an annealed state, but I can’t find any on the web. I’m sure when I last made some I found it easily, but I am not sure now where I got it from. In the end I ordered some nearly the right size from Kevin Blackley, but I’d prefer to find a supplier of bigger quantities than 12 inch lengths.
2nd September – Went to a historic re-constructors event at Quy – lots of tents selling everything medieval and groups of reenactors camped around – I always love those events as everyone is so committed to their particular period or activity, and always enthusiastic to talk about it – thank goodness for enthusiastic people who actually do things! I bought a few ash dowels (intended for arrows) that will make simple ramrods when I can’t justify the work of a full ebony rod. I was pleased to see ‘Bernie the Bolt’ had his stand – he sells all kinds of fabric for historical costume that he has made up and dyed to period colours. He’s a good source of baize for lining gun cases as he sells a woolen cloth woven and dyed in Yorkshire in good colours for gun cases. I have used it and it is a reasonable substitute – its actually slightly too thick but will do – it is woven at about 450 gm/sq m whereas the guy on the stall said it should really be about 250 – 300 gm/sq m. for gun cases. He said that the mill would make the lighter material but wanted £13 per m ( 1 m wide) by the bolt and they couldn’t see any profit in it, since he sells the heavier stuff at £15 per meter (Dyson sells both thick and thin but no weights given, at £16 per foot). For gun cases £15 per m is nothing, bearing in mind how much work goes into using 1 meter of cloth on a relining. The case I have to reline came with the cloth from a billiards table, but looking at it it is much too thick and won’t bend over the top of the partitions, so I bought 1 m of a very dark green that I think will do much better. I started to make up a quick and dirty ramrod for one of my old shooting guns out of a new arrow blank as it looks a bit bare without one – I’ve given it a dummy brass end and will fix it up with a horn tip. When I have worked out the technique for rounding and tapering the ebony squares I have, I’ll make a better one!
1 September – another month gone! Had a mixed day at Cambridge Gun Club – in the morning I couldn’t hit anything – the couple of clays I did hit were when I fired and was pretty sure I wasn’t on target. I was trying my Venables, but I’d forgotten that it had a lot of cast on the stock – almost 3/4 of an inch. I realised that I’d been making a mistake every time I tried a gun to see if it ‘came up’ well for me – I’d done it with my eyes open and that forces me to put my head in the best position so I think the gun fits perfectly as long as the comb is not too high – I realised the proper way to try a gun for fit is to hold it in the normal position just before mounting, and close your eyes as you mount, then open them to see if its right – doing that with the Venables showed me that I’m probably shooting 20 or 30 inches to the right of where I think I am, enough to put a target outside the shot pattern. In the afternoon I reverted to the good old Samuel Nock and was back to my normal hit one miss one routine, except for ‘crows’ and I wait for those to get falling properly and can normally pick them off. Anyway it was a very useful shoot as it saves me from the mistake of taking the Venables on a game shoot. I came back with a couple of jobs, a new breech block for a double percussion gun to engrave, and a case to remodel inside and reline. I am not sure if I can engrave the breech block as it seems to have been hardened and tempered, or to be made of a high strength steel on a hard state – I will try with the Gravermax on the underside, but I’m not hopeful….. Anglia Muzzle Loaders goes from strength to strength, its almost embarrassing – every month or two a new face appears – existing members are just not dying off fast enough to keep the population stable ( as one of the older members perhaps I should take note!) Bev had a problem with a new lot of OB priming powder that didn’t work – the company makes Swiss O.B. in two grades with the same name and only a difference in how the label is put on – one works and is the proper one, the other clumps up and is useless. Heaven knows why its made or sold – anyway there is more on the MLAGB blog.
31st August – I had to tackle the big Yew bushes in the front garden today – they are about 20 ft high and needed trimming all over so I ended up at the top of a 16 ft ladder using a hedge cutter with both hands – I didn’t fall off….. Looking at the case for the Egg duelling pistols I realised that it couldn’t have been a flintlock case as there was no-where for the frizzens to go, so as its a very close fit I came to the conclusion that it is original to the pistols – don’t know why I didn’t realise that before, but I think when I was a greenhorn someone told me it was the ‘wrong’ case…. I am not sure why the middle compartment is missing, the lining shows where it was, and looks as if it got ripped when the compartment walls were removed – the pistols should just fit with the compartment in place. Or maybe the compartment fell to pieces – several of the bits of the dividers are coming adrift. I decided that I will replace the central compartment and fix in place the rest of the dividers so that it is tidy. It would not be sensible to reline the whole case as it would then be difficult to be sure it was originally for the pistols. I checked through my supplies of biase for lining the new dividers, and found a good green that is probably a fair match for the original lining colour but is slightly too dark for the current state of it. I thought as an exercise I’d try to make it match in colour and texture (it is a bit thick and has a bit much pile). A sample came down in colour nicely after an hour or so in domestic bleach, and shaving the surface with a razor and rubbing with coarse sandpaper followed by a quick flash over with a flame got rid of the excess pile, so now I just have to hope that the process works on a piece big enough to do the job!
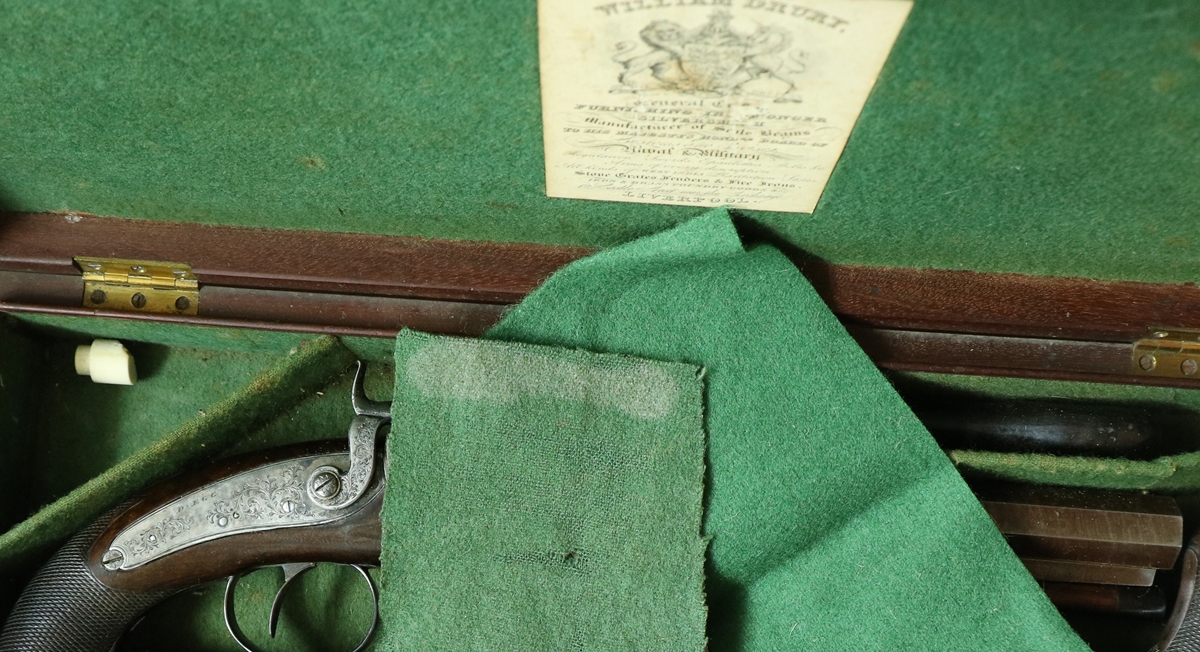
The ‘aged’ biase is on top – the top streak was undiluted bleach! Click to view.
I have reluctantly come to the conclusion that the woodwork on the unrepaired pistol is too marked and will need to be refinished – no doubt it is a shellac based varnish and with luck I will get away with just a very light steaming to raise the marks – the important thing is NOT to round off any sharp corners by rubbing things down too vigorously. Here is the problem, the other side is visible in a previous photo.
Most of the damage is to the varnish!
I’m shooting at Cambridge Gun Club tomorrow – and I’ll take my ‘spare’ percussion doubles to see if I can sell any!
30th August – I seem to be back in the gun tinkering business again! I’m sure those visitors to the site who have faithfully stuck it out all summer will breath a sigh of relief! I cleaned up the other Edwards as it looked worse once I’d done the first! I am now struck by how damaged the wood is – maybe I won’t be able to resist refinishing it lightly? In the course of getting the cocks and frizzen etc. off I used my two favourite disassembly methods to good effect – if a screw is reluctant to come out, don’t try too hard to unscrew it, especially if the head is a bit mangled – instead tighten it very slightly if you can – a very tiny movement will be enough to break any sticking, and the screw head will probably be perfect for use in that direction – once you have a slight movement, some WD 40 or equivalent, or better still a little acetone with a touch of oil will help as you work it back and forth until it becomes easy. The other trick is releasing the cock from the square on the tumbler – lay the lock face up on your thigh and using the largest pin punch that fits the square, tap smartly with a light hammer a few times and the cock will gradually come off – I know it sounds improbably but it works for most things that need driving out with a pin punch!

Having finished with the Edwards I looked at another cased pair I have that needed attention – a pair of percussion back action lock duelling pistols by D Egg – they too came form my father’s collection and were rather sad as one pistol was broken through the lock area, and someone had attempted to glue it rather badly and had then lost the lock. I got Blackleys to make a set of castings from the good lock and freshened up the engraving and got DIck to fix the wood and make up the lock castings (it was in the early days and I wasn’t confident I could do it). Anyway at some point I looked at the pair as possible shooting pistols, but Dick hadn’t finished off the lock action fully and the sear caught on the half cock notch when the cock was let down. Its one of those faults that one comes across from time to time in locks that don’t have a detent to lift the sear over the half cock bent. The remedy is usually to reshape the half cock bent, and possibly refine the full cock bent a little. Fortunately the tumbler hadn’t been hardened so I didn’t need to anneal it. To get the sear past the half cock notch, the notch needs to be shaped so that the end of the sear is deflected outwards as it passes in firing, which in order to get a secure half cock notch means that the sear needs to slide into the half cock notch without being lifted at all. None of the standard files are suitable for shaping the half cock notch as it needs a true knife edge – I have a very fine flat file that I’ve ground off to leave a fine edge on one side. Anyway I managed to re-work the half cock notch and polish it all up and harden it – and it now works a treat…….

The Eggs are interesting – they were obviously good quality pistols and, replacement lock apart, are in reasonable shape. They are in a case that was obviously for a pair of flintlocks that has been crudely modified for the Eggs – it would be natural to assume that some collector put them in a box he happened to have BUT both case and pistols have the crest of the Earl of Sefton ( Liverpool) and the case has a Liverpool ironmonge’s label, so it looks as if they were put in the current case by the Seftons – one can imagine that the Earl might have been a bit strapped for cash but wanted to upgrade his flintlocks for the latest thing in percussion, so he traded his flintlock pistols in and put the new pistols in the old case, having removed the central box as there wasn’t room for it. Or maybe William Drury did it for him and put his label in the case? Anyway both case and pistols obviously belonged to the Earl at some point, so you can invent you own story!
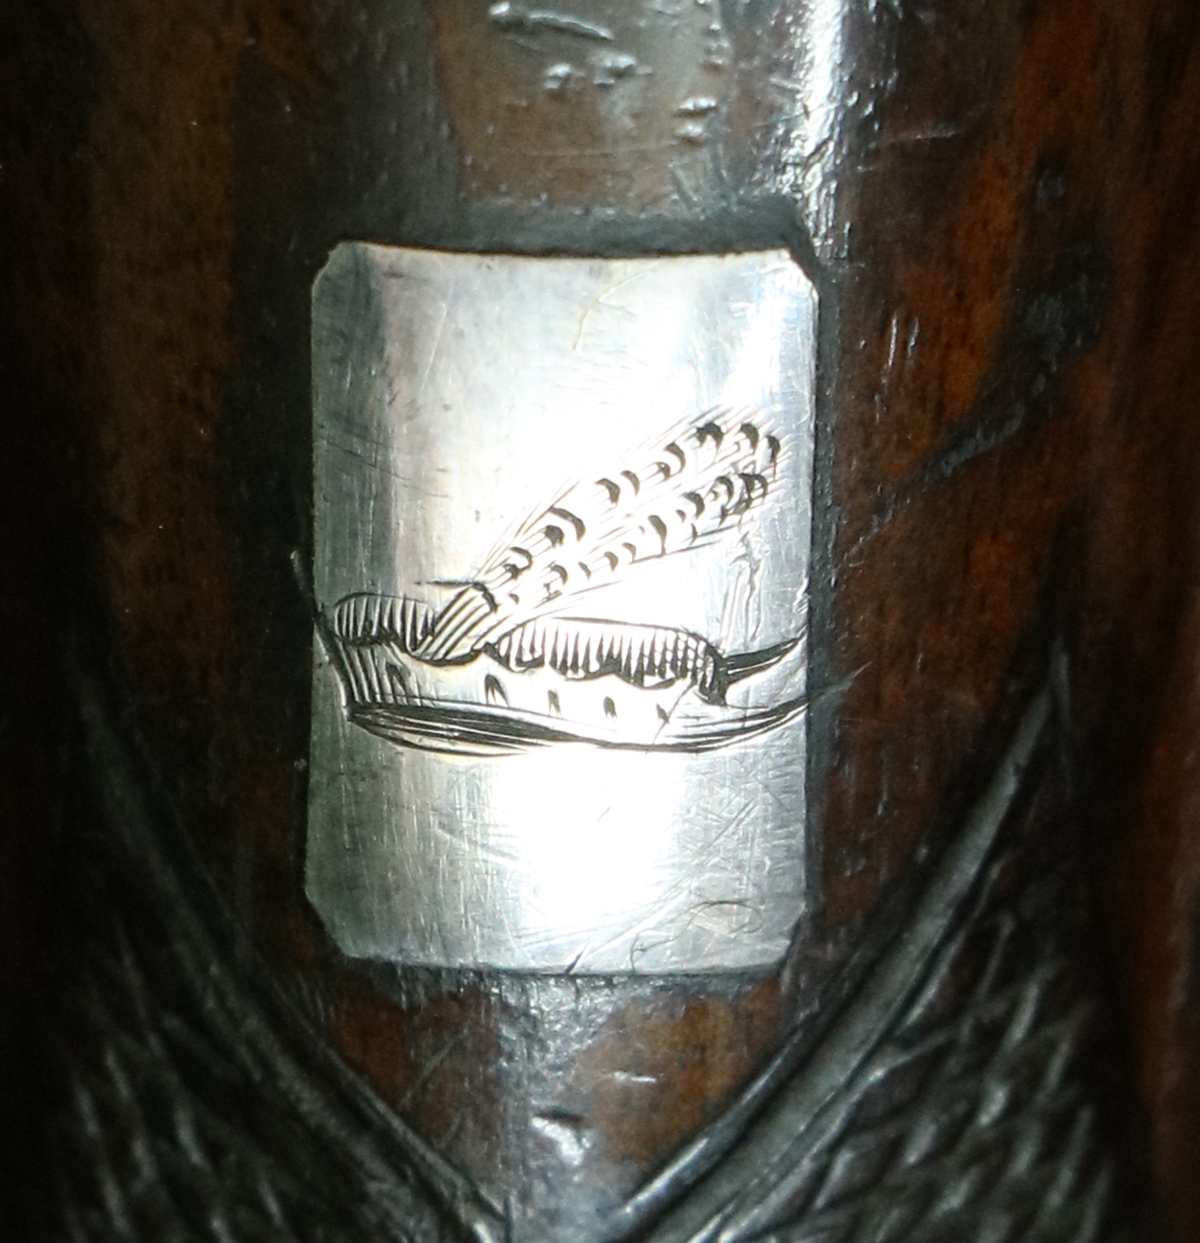
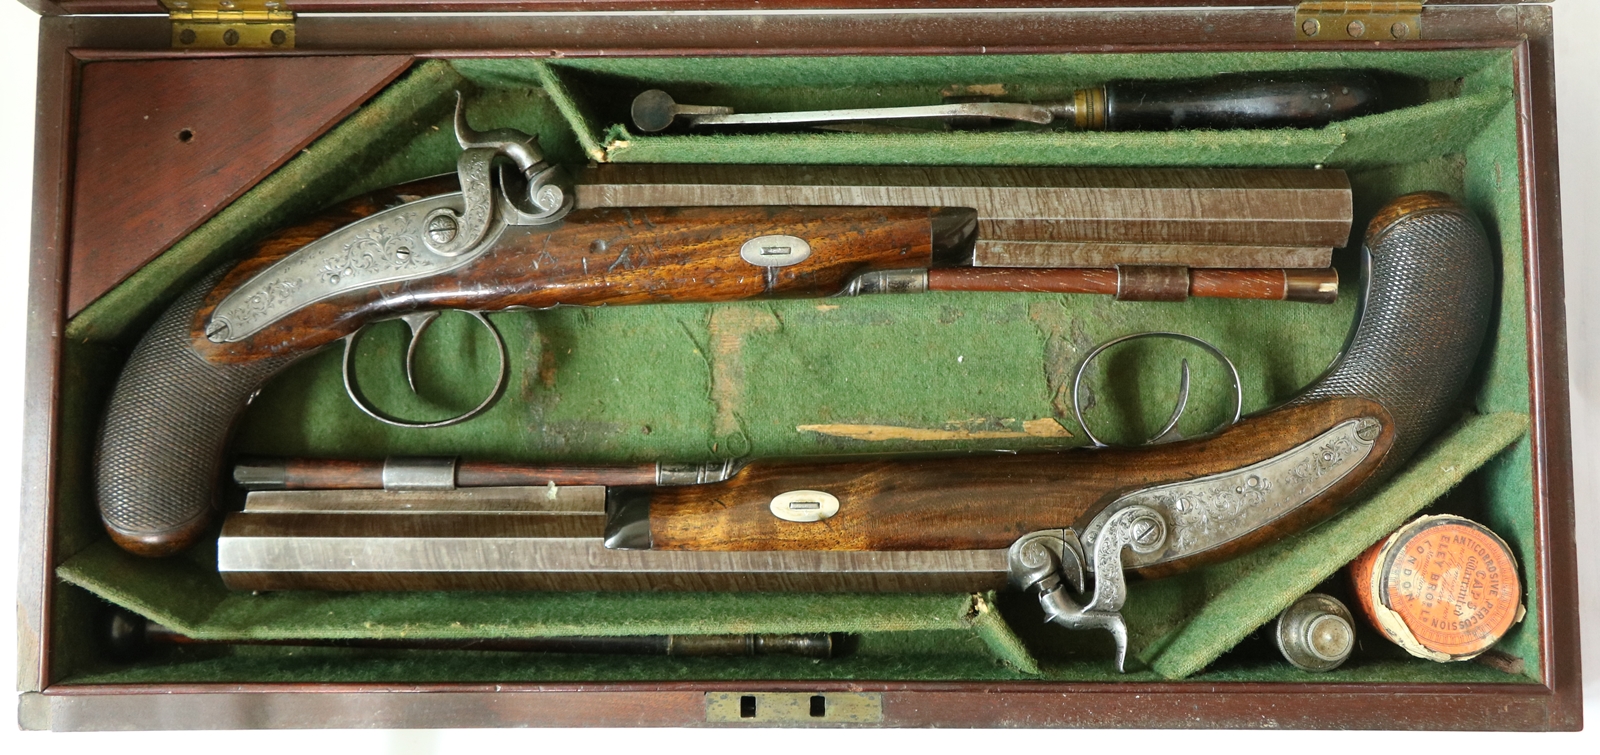
They just fit, but only just!