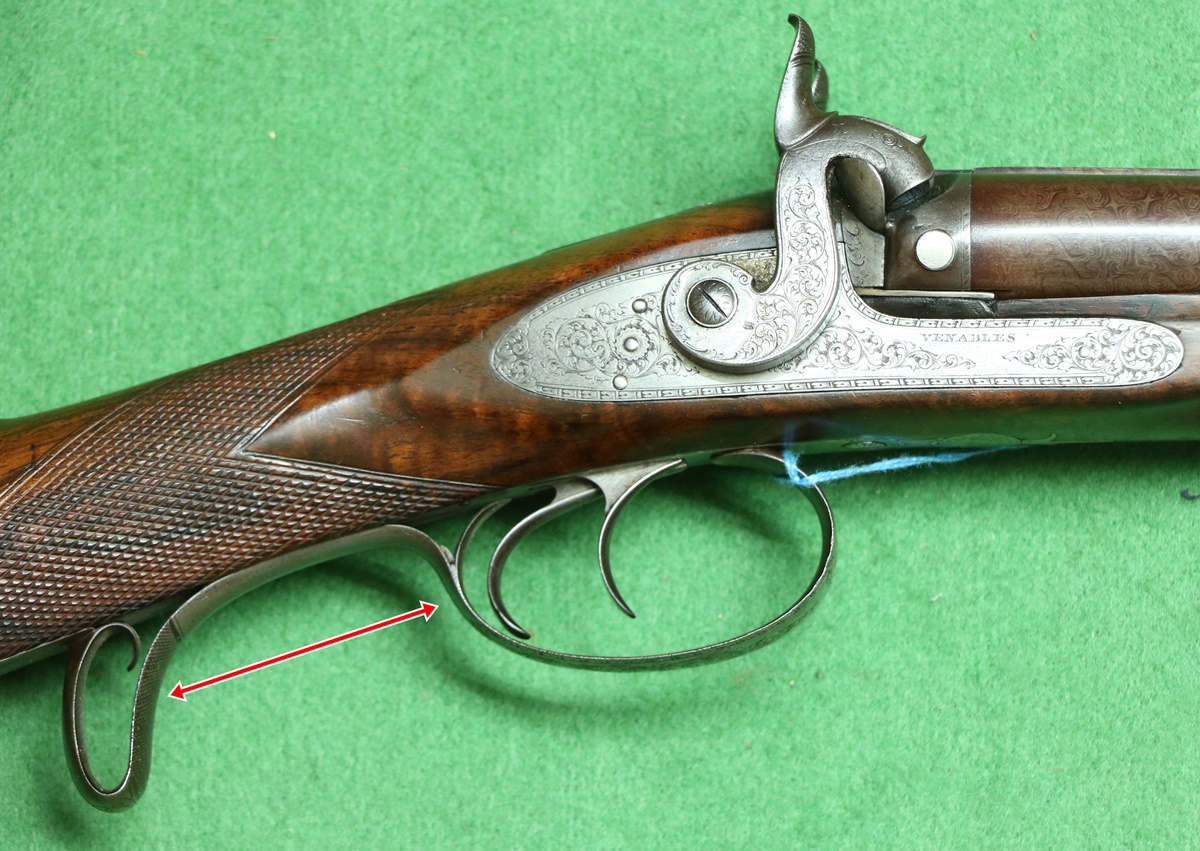
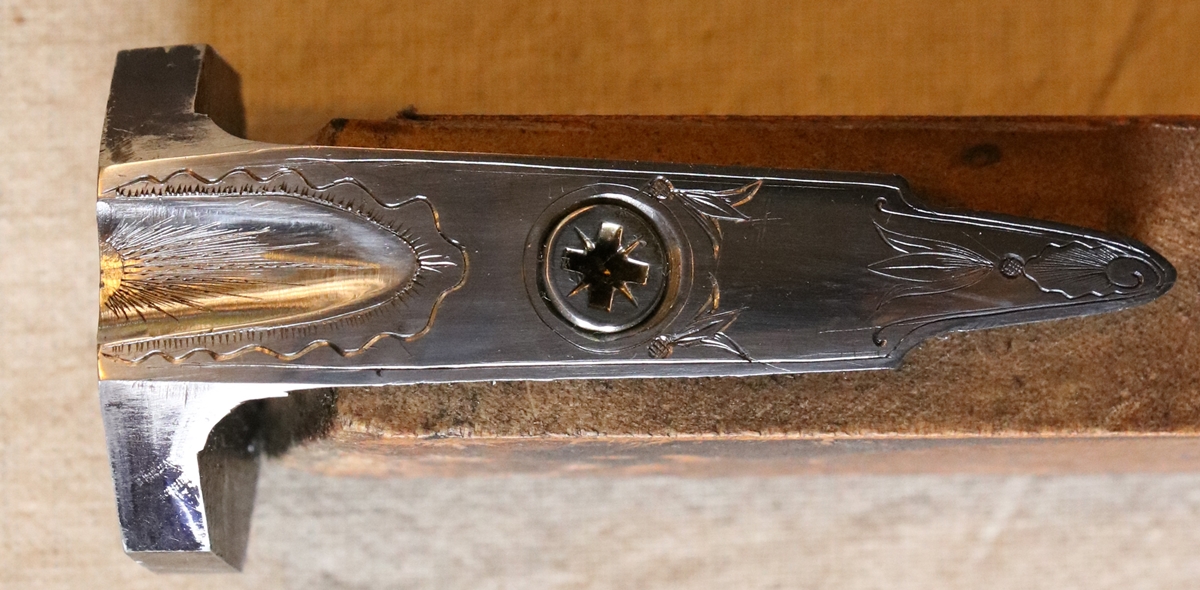
30th June – Shooting Helice at Rugby yesterday – boy was it hot! Its a difficult form of clays and great fun – I wasn’t the worst there by any means – lets leave it at that! I don’t know who won as I left after my last shot ( knowing it wasn’t me!) to have dinner with the family. I jumped in the swimming pool aka large plastic bag of water and when I got out sons pointed out that I had a spectacular bruise on my shoulder in the shape of a gun stock. I was shooting in shirtsleeves with my 14 bore – weight 6.4 lbs – using 2 1/2 drams of Swiss No 2 and ( it turned out when I checked the flask) 1 1/4 oz of shot, which I suppose is a fairly heavy load for the gun, although its what I usually shoot without feeling anything special in the way of recoil – in fact I had been using 2 3/4 drams and the same shot load – I probably ought to put a bit of sheet metal in the flask neck to get it down to 1 oz. The only thing that bothered me is that the trigger guard makes a mess of my second finger – I smoothed it down, which stopped it cutting my finger but it still pummels it into gory submission. I realised afterwards that the trigger guard has a rear loop as in rifles and If I grasp the wrist of the gun in my normal shotgun way there is only just room for three fingers on the guard so my second finger is already pressed on the guard. You don’t often see those guards on shotguns – thinking about it, I shoot shotguns with a full grip using the joint of my finger on the trigger whereas I hold rifles so that I use the middle of the first joint of my finger on the trigger to get more feel, in which case there would be a lesser grip and more room in the guard. Maybe that accounts for the different guards in shotgun and rifles. Not sure what to do about it – it was suggested that its because the stock is too short, but it measures up OK and is longer than many guns I shoot without problems. I more or less finished the Trophy (see past diary) today – cutting and milling the old stock and making a base – wood courtesy of Chris Hobbs. Looks quite good now – I’ll post some photos when I get a moment!
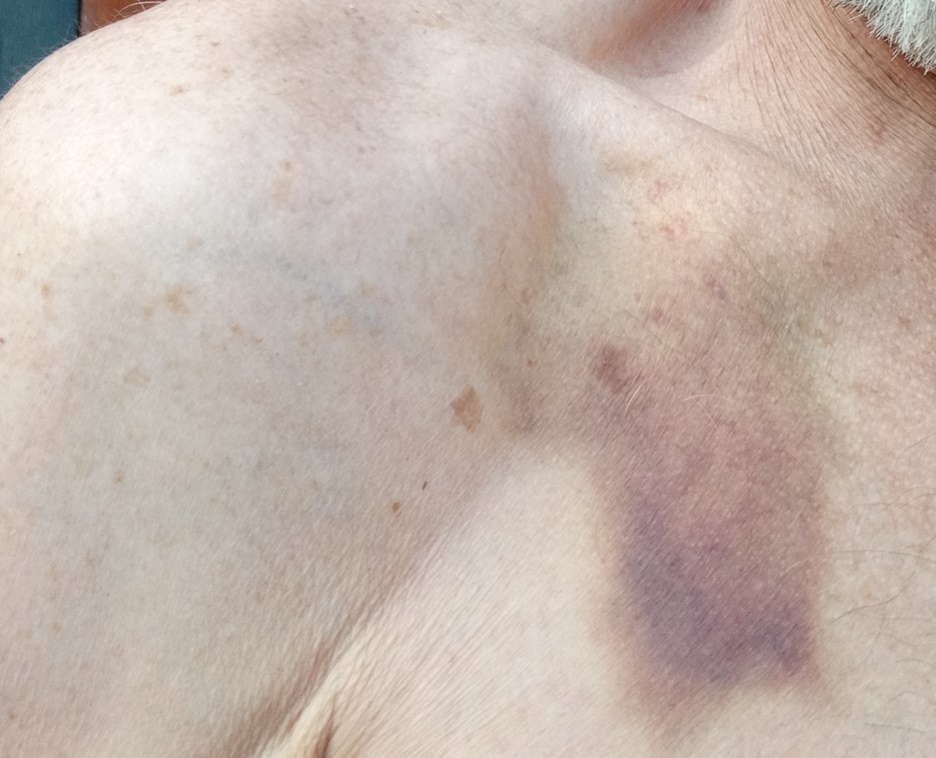
The effect of 20 shots – 2 1/2 oz of Swiss 2 and 1 1/4 oz of shot in a 14 bore weighing 6 1/4 lbs – strangely I didn’t feel it as particularly savage.
 Quite limited gap for 3 fingers!
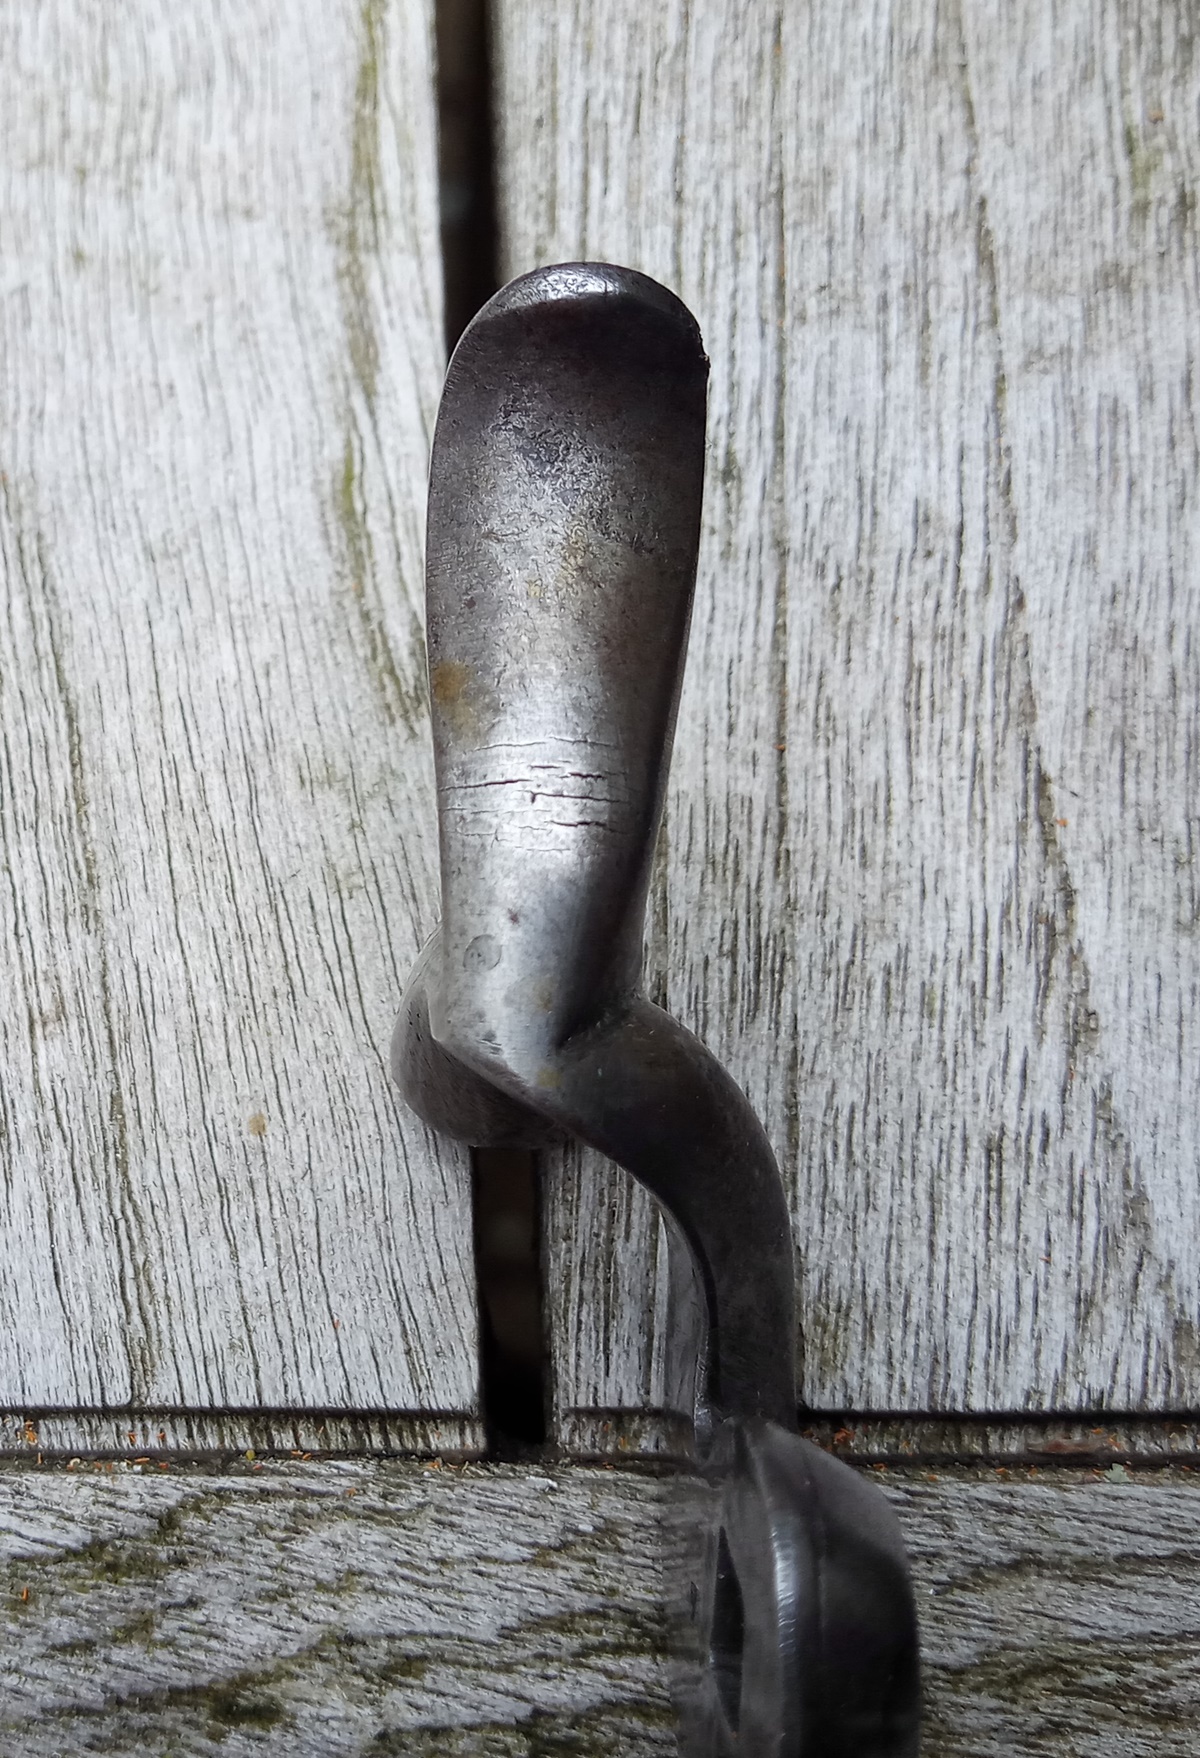
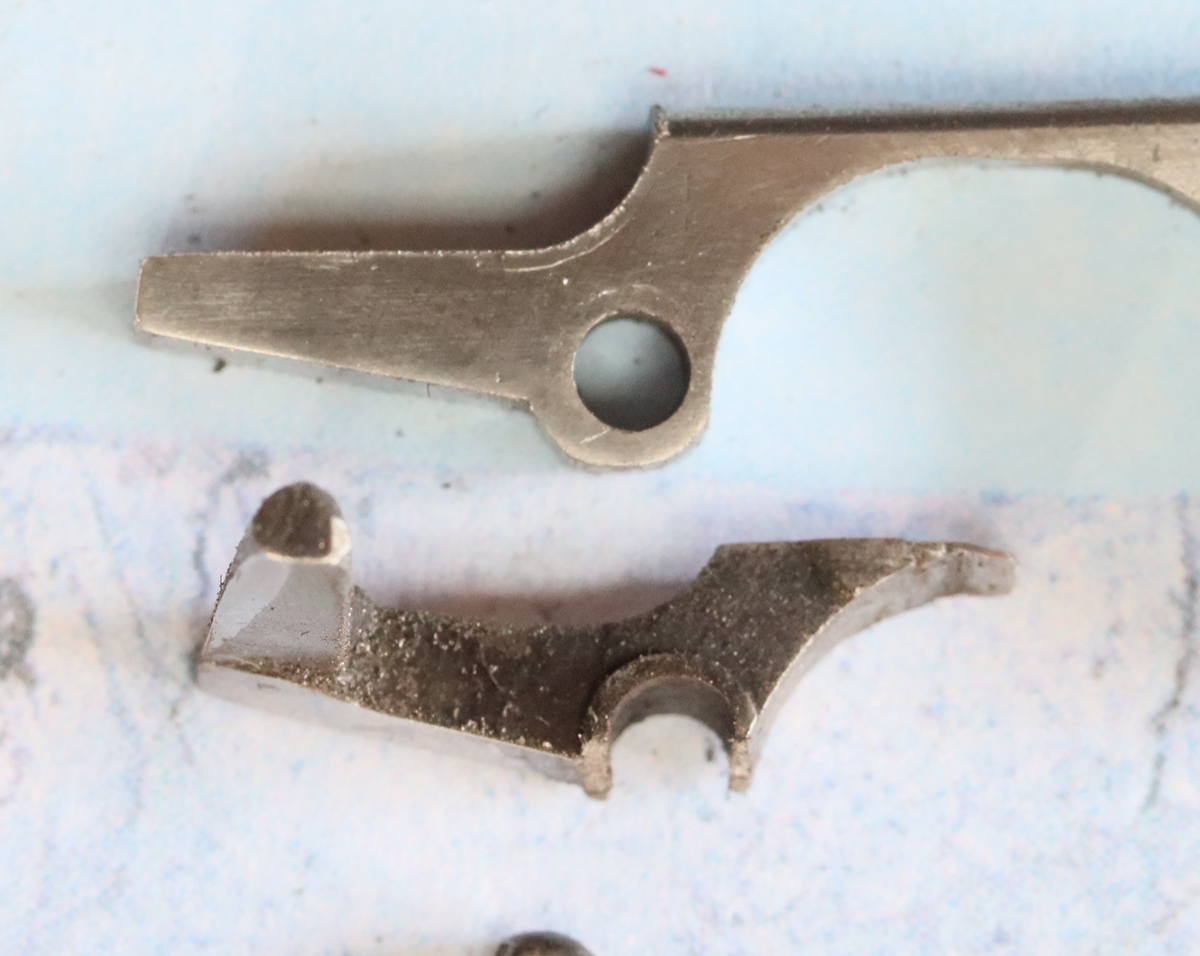
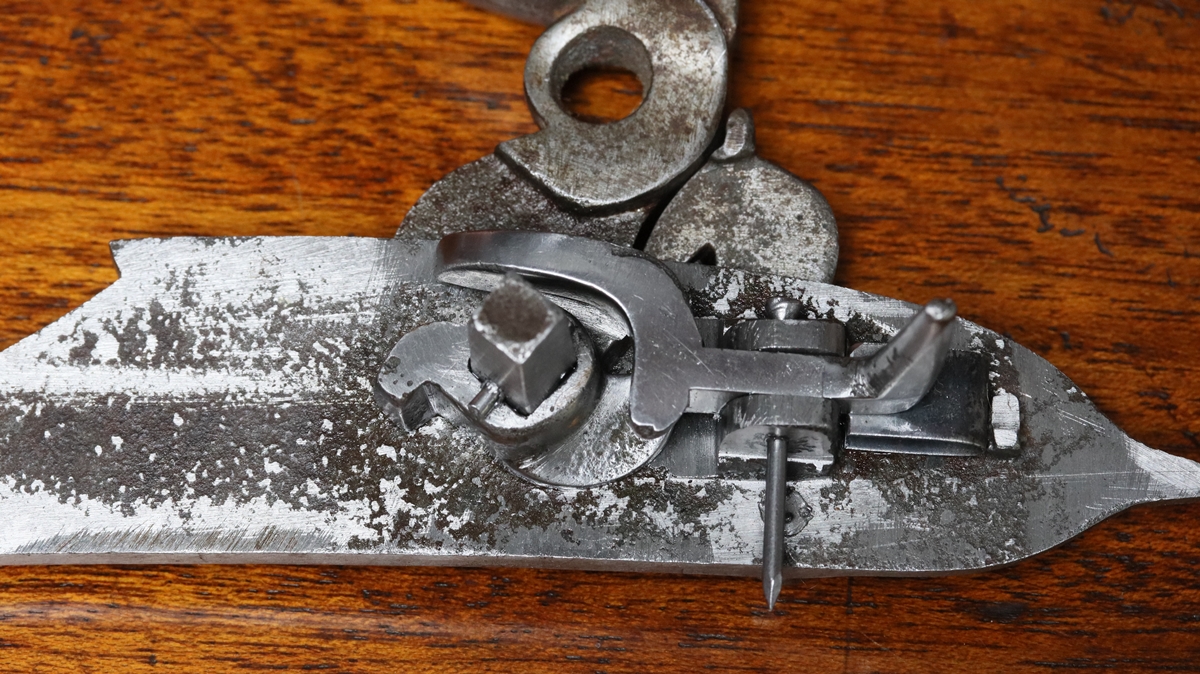
28th June – Shooting yesterday – seem to have lost my previous form! Obviously not a good idea to change guns…. Off to the Helice shoot at Rugby so I’ll shoot my regular percussion gun for that….. I had a a cock off a hammer gun sent to me to have welded as the spur had broken off, so I asked for both to be sent so that I could be sure the spur got put back on at the matching angle. When I looked at the ‘good’ cock I noticed that it had a bit of a kink in the line of the spur (see arrow) – A closer inspection showed a whole lot of small cracks across the back of the spur at the bottom, indicating that it too was not far from breaking. There is a popular misconception that the spurs (and cocks of flintlocks) break because of the force of cocking them – but the actuality is that they break due to the sudden stop when the cock connects with whatever halts its progress and the part ‘outboard’ of the stop carries on under interia.- in the case of a hammer gun probably the cock hitting the surround of the firing pin if the firing pin doesn’t offer enough resistance to slow the cock – this might happen e.g. if the gun is dry fired without a snap cap, or a flintlock is fired with the frizzen open – or just through inadequate design or poor materials..
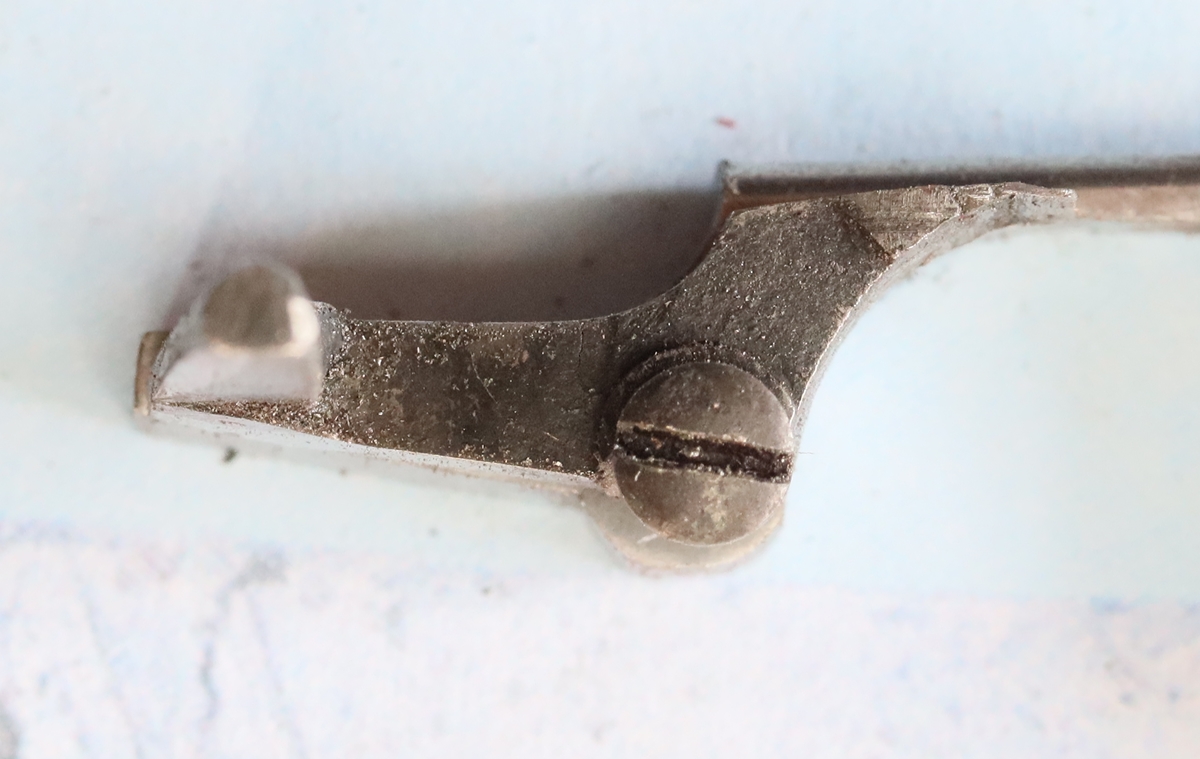
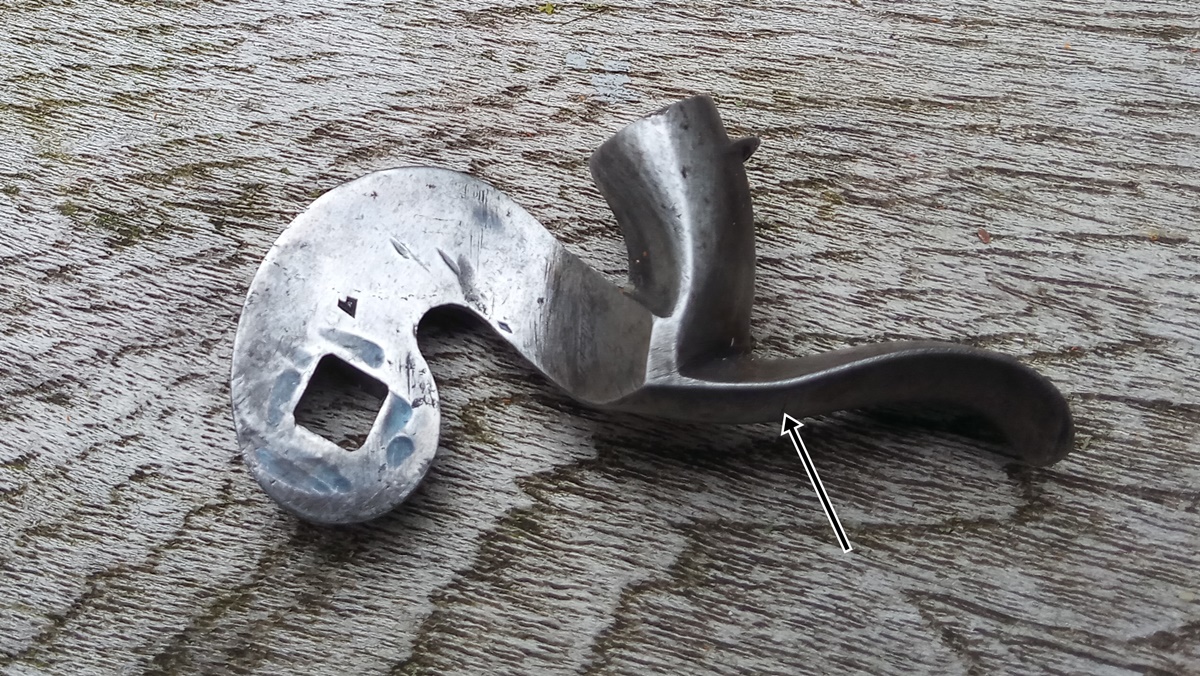 Arrow shows slight kink in the line of the spur – dents on the back of the cock show where it had been tightened up on the square.
 Very clear cracking on the back of the ‘good’ cock show its not far from breaking – there is a slight compression crease forming on the front of the cock! It will get welded along with the broken one. The weld needs to be deep to put some strength back, and use a reasonably high carbon steel rod.
26 th June – I cleaned up the lock of the Pistoia pistol – my electrolytic deruster ran out of steam as the iron positive electrode had got so rusted (the rust is stripped from the negative electrode and forms on the positive where the active oxygen is released. I cleaned off the positive electrode but decided to electrolytically derust it properly by putting a sacrificial chunk of mild steel as the positive. I left it for about an hour at about 2 1/2 amps and the result was quite impressive, at least in terms of the rust on my chunk of steel –

I needed a ramrod for the 11 bore Westley Richards – its a ‘working gun’ so it doesn’t need to be fantastic, so I spared the ebony and used a 10 m.m. ash dowel I bought at a re-enactment fair as an arrow blank – I selected all his straight ones! I wrapped masking tape round one end so it fitted in the chuck of my woodturning lathe – the other end just rested inside the hollow tailstock. Using 80 grade sandpaper I tapered the rod to 8.5 m.m at the end, and smoothed it down. I have had problems staining the wood to match ebony – the ash is not very absorbent and its difficult to get a deep enough colour – I did think of ‘ebonising’ it with a blowtorch but wasn’t sure if it would work. In the end I got a black felt pen of the sort that marks on everything and ran it down the rod while the lathe turned slowly so as to cover the entire surface – result a fantastic deep black – a couple of coats of water based satin varnish rubbed in with a tissue and its a very convincing ebony rod! I decided to make a proper screw end as they are sometimes handy if I forget my unloading rod. I has a 1/4 x 32 tap and die (Model Engineer threads) for the cap thread, and cut off a 5 m.m. hardened zinc plated screw – getting rid of enough of the tread to solder into the brass body was done by putting the screw point first in a drill and running it against the grindwheel. A 5.4 mm hole up the cap end cleared the screw and was right for tapping the 1/4 x 32 thread. The head was turned freehand – not perfect but OK – result a perfectly acceptable substitute for the real thing – NOT a fake – you can tell because I Araldited the ends on and didn’t put ‘fake’ pins through! Note for future efforts – be more careful to size the rod and ends to the same diameter and make sure the reduced diameter on teh rod is concentric.
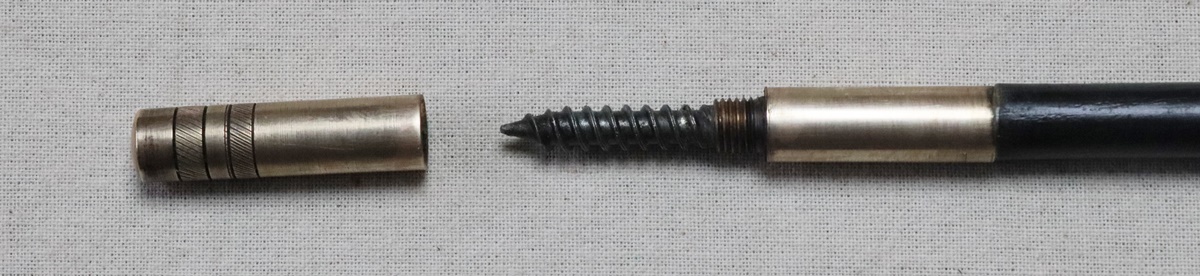 The zinc plated screw was blacked with TIFOO instant gun black.
It really should be lemon coloured brass, but it will still work!
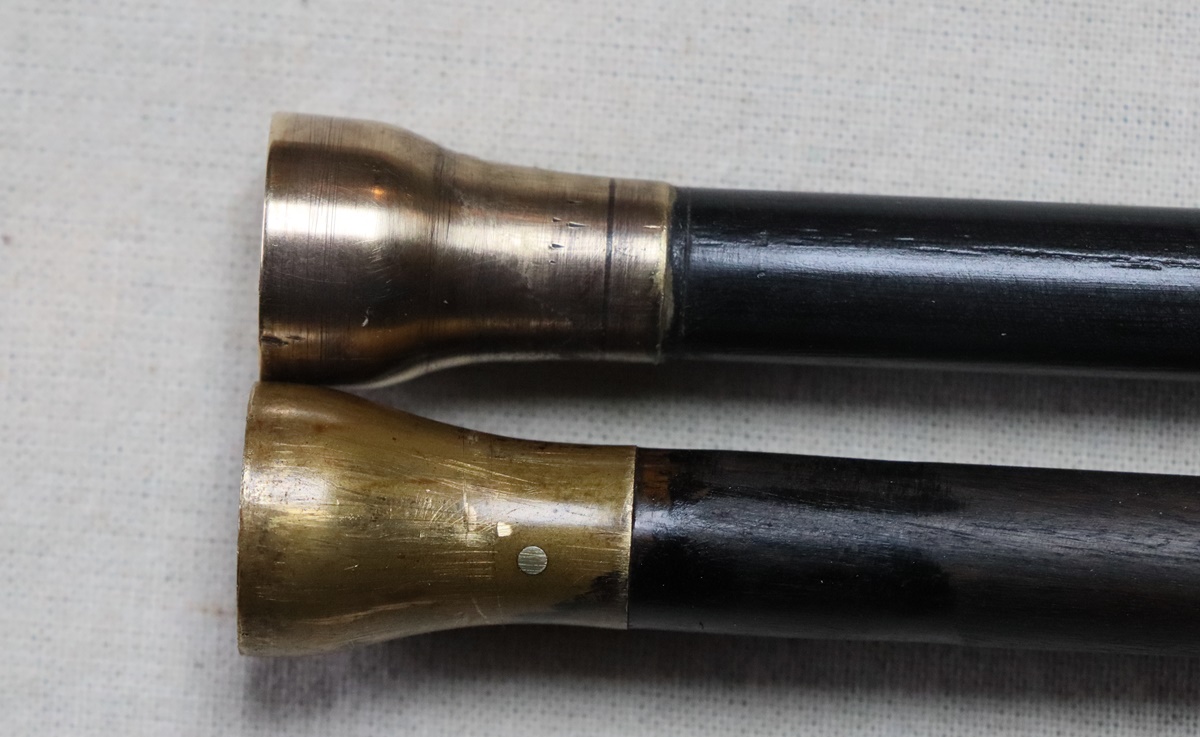
I think I soldered the screw in slightly crooked so its pushing the cap out of true – I’ll fix it sometime! (or just get used to it). The brass has been toned down a bit with dilute Blackley’s brass browning solution.
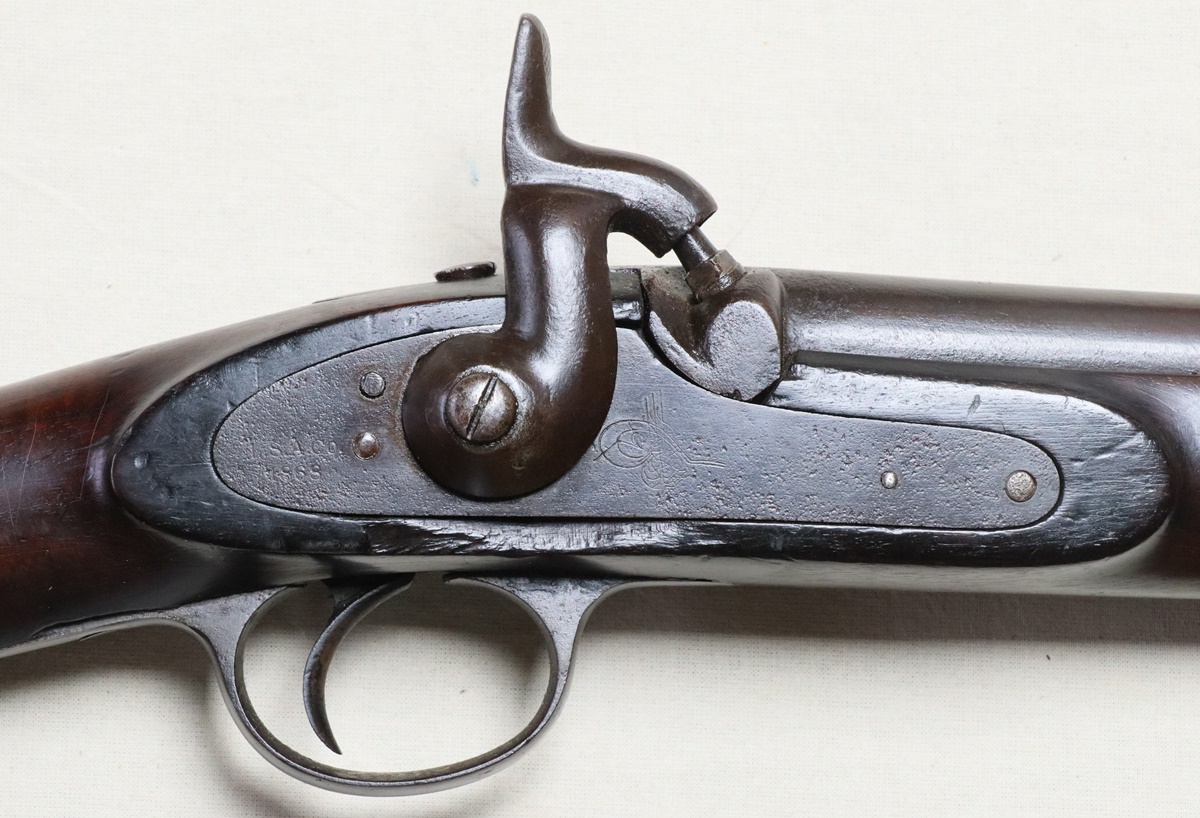
25th June. Thinking to put the Westley Richards on my certificate to shoot it so I had a look for wads and cards – I decided that it would just about work with hard 12 bore wads soaked in oil/wax but Pete says he has some I can use. I decided to make a wad punch for cards anyway, but couldn’t find any suitable metal in the workshop short of turning down a bar of 2 inch steel – then I remembered a set of box spanners that I had and didn’t use – the biggest, 20/22 mm had a section of tube in the middle that was just about the right size. It turned out to be quite hard and my parting tool didn’t want to cut it so I cut it with a hacksaw (it finished the blade!) leaving one spanner with a short stem, and the other with a long stem – I bored the end of the long tube with a carbide tool & turned the outside taper with a carbide tipped tool and got a good edge – it works very well – the only disadvantage is that I was too lazy to cut a hole in the side for the cards/wads to escape, so they have to be pushed out with a rod. The size was about right – .770. I started to clean up the Pistoia pistol – see that post. I’ve been finishing a pair of duelling pistols for a client – we had a discussion about what the appropriate finish was. The arguments revolve around whether it should be varnish or oil finish. Most of the originals were probably varnished, but it is a very unforgiving finish and needs almost perfect woodwork or it shows up every ripple and unevenness – these pistols have less than perfect wood so I think a high shine oil finish would be better – they also have potentially uneven colouration that has been toned down – varnish needs an almost perfect substrate. We shall see how it turns out…… I did a bit more research into the P53 type gun – Looks like after the failed Indian Mutiny of 1857 when the British Government took over the administration of India from the East India Company there were effectively 3 Indian armies officered by the British for three provinces – I presume that this gun was issued at some point to one of the armies. I can’t quite identify the proof marks on the barrel – I don’t think its Liege, but it is not in my book as a London or Birmingham proof for anthing like 1868.
24th June. I picked up my purchases from the local auction – I missed out on the nice little flintlock pocket pistol (picture below) because someone had put in the same top bid before me. Anyway I got a pretty little continental(?) pistol and a percussion Enfield style musket that I’d like some help from visitors to this site to pin down. It has a P53 type lock externally marked LSA Co and 1868 with a strange pattern just visible in front of the cock – the lock is pretty pitted on the outside, but the inside is shiny & good quality and carries a broad arrow mark and the name Barnett plus the stamp J.C. – Barnett & Co made locks and barrels for the British Government from about 1854(?) It is missing its bridle (holes exist). The barrel appears to be a musket barrel of about .630 bore (not the .656 that was used when Enfields were made in smoothbore), of length 33 inches, giving the gun an overall length of 48 1/2 inches (weight 7 1/2 lbs) The barrel carries the stamped name ‘MANTON & CO CALCUTTA’ as one stamp, followed by ‘& LONDON’ made of individual letter stamps. It carries Liege proof marks. There is a bayonet boss in the usual place, and a foresight but no rear sight or any sign that one was ever fitted. The trigger guard is stamped with the number 35110 and the butt (LH side) has 88 in one place and 77 in another. The stock looks fairly like a normal P53 stock, although I’m not really familiar with them. It has three old style barrel bands (before Badderley) – the sling swivel is on the muzzle one, the other swivel is on the rear trigger guard screw. The ramrod is steel, and has a somewhat squared end with a slotted jag – no bulge – I can’t see a retaining spring in the stock. Overall it looks ‘of a piece’ and not mucked about with in recent times. The British were at pains to equip the Indian troops with guns that looked like Enfields but were not effective against their own weapons – this gun may have been made up by Manton Calcutta (at that time run by Wallis) using old British Enfield locks, or maybe old stock complete guns, with the barrels replaced by new Liege smoothbore barrels to ensure inferior performance. It would seem that this gun must be one of many that were issued, hence the 35110 stamped on the trigger guard. Any thoughts gratefully received.
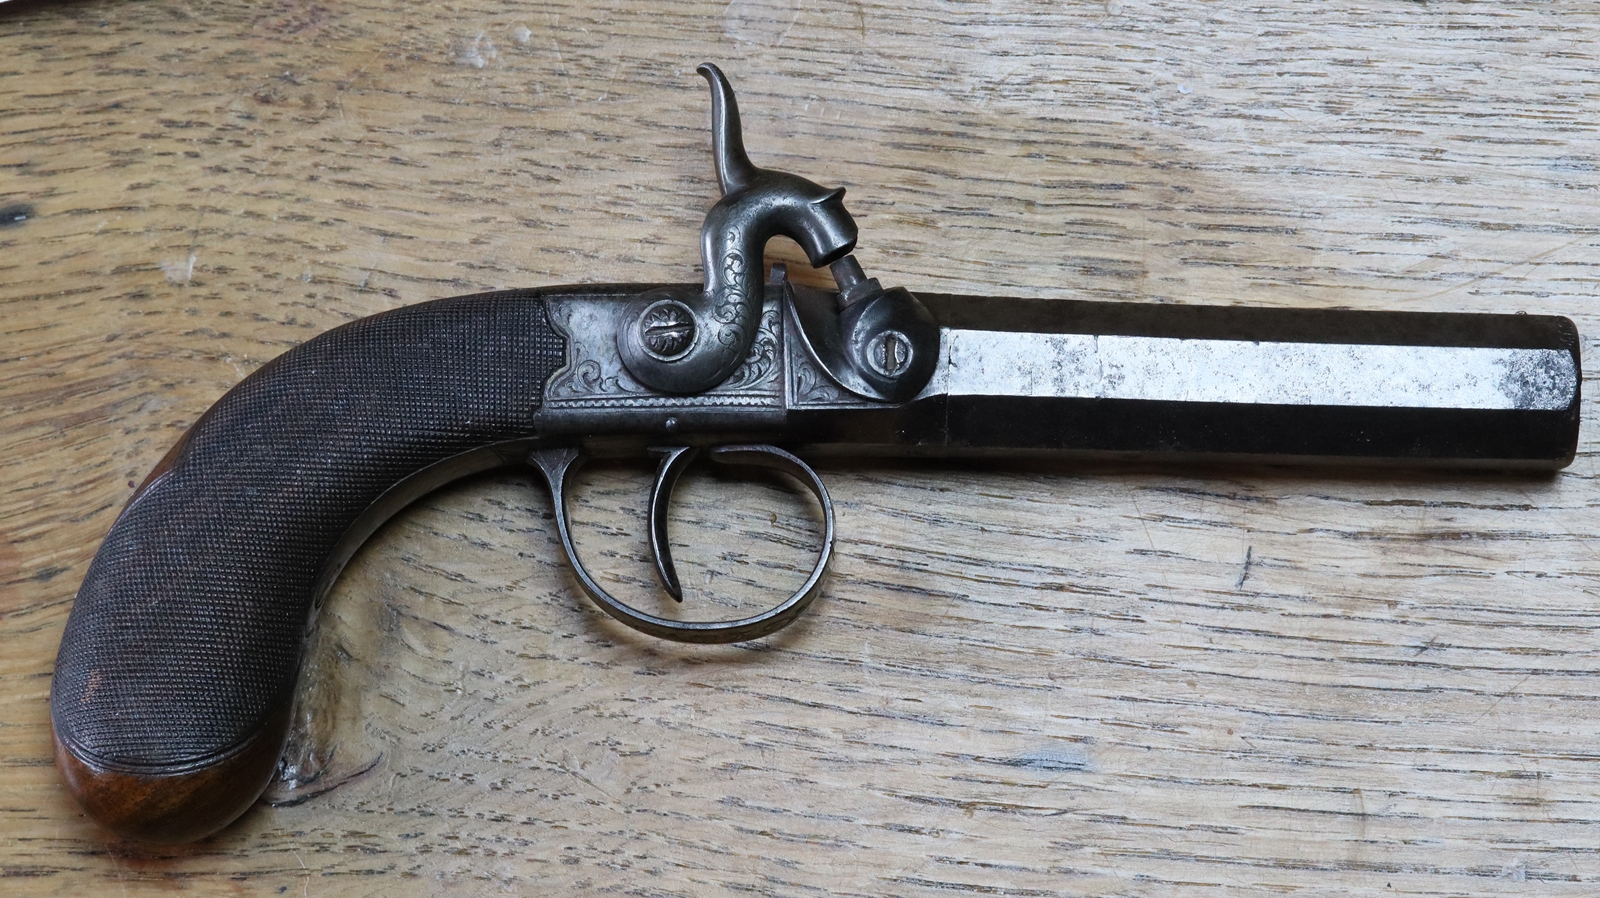
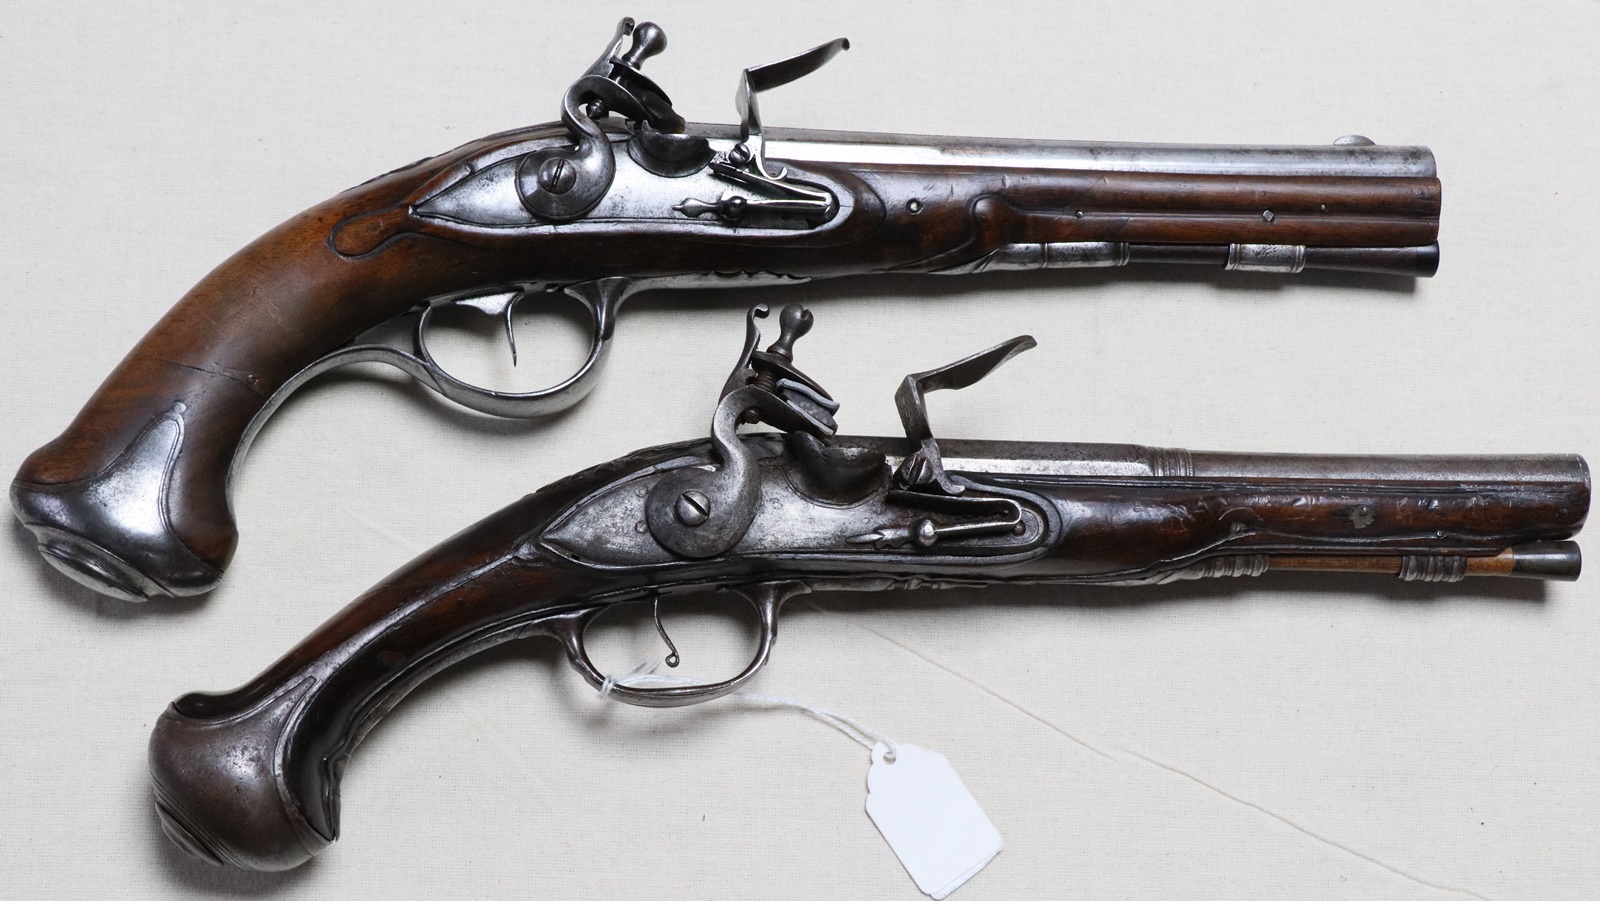
I am also contemplating the two pistols below – rather pretty little Continental pistols, the top German, the bottom has a possibly Italian barrel with a gold PISTOIA stamp and a lion stamp( or might be a a fake Italian barrel?) one – any ideas?? New poston this too – Continental Pistols.
See new post ‘Indian Enfield’ for the bulk of the photos.
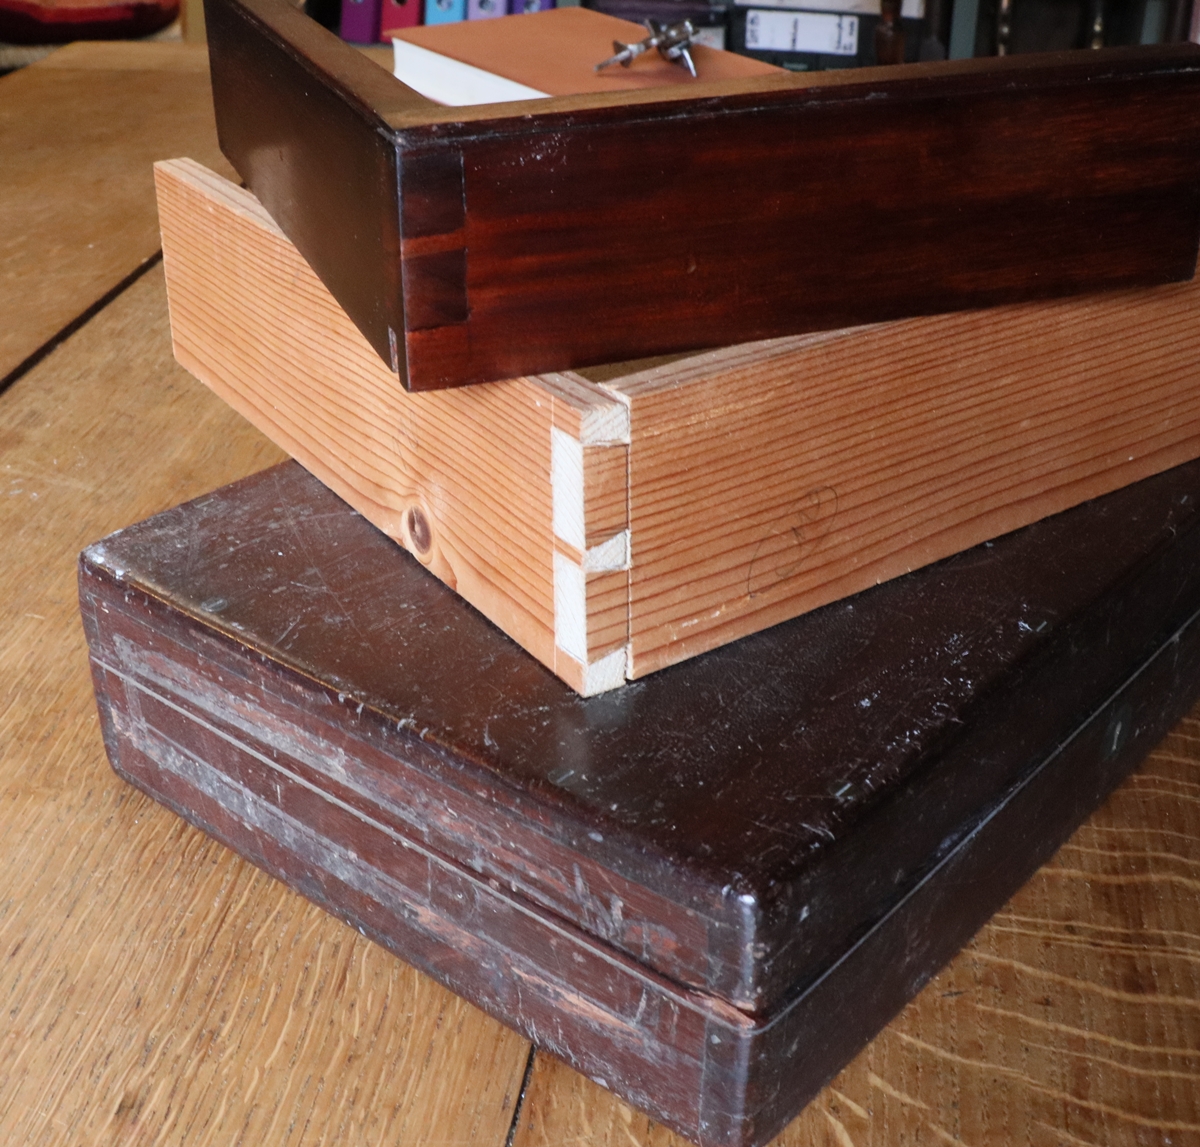
22nd June – Yesterday I went to look at the guns in the Willingham Auction and was amazed at how random the cataloguing was! There was an obvious repro blunderbuss that might or might not have been Section 2 catalogued as an antique with ‘loss of patina’ to the stock! I emailed them to warn them and I’m glad to say it was withdrawn. There was a ‘percussion pocket pistol with bayonet under the barrel’ that, on a cursory glance was actually a diecast toy pistol – I should have warned them but it wasn’t a matter of law so I didn’t. It sold for £120 – I just hope the buyer throws it back! I got the only 3 guns that hadn’t been messed about and were not relics – a little turnoff flintlock pocket pistol, a pretty ?French pistol and a P53 type rifle by Manton of Calcutta. I’m off the Birmingham Arms Fair tomorrow with a couple of guns for David Stroud to put on his stand – I need to recoup some money to fund my recent purchases. The P53 will get some TLC and appear on this site – I’ll probably keep the French pistol, and I might or might not keep the little pocket pistol (photo below) – I am tempted to make a box for it – I know they didn’t come in boxes, but they look nice and I don’t think its a terrible sin to sell people a pretty little boxed pistol! I tracked down the problem with my screen colours – it got a technical review as having the worst contrast of any that the reviewer had ever seen – I should have read the reviews before I bought it – my stupid fault.
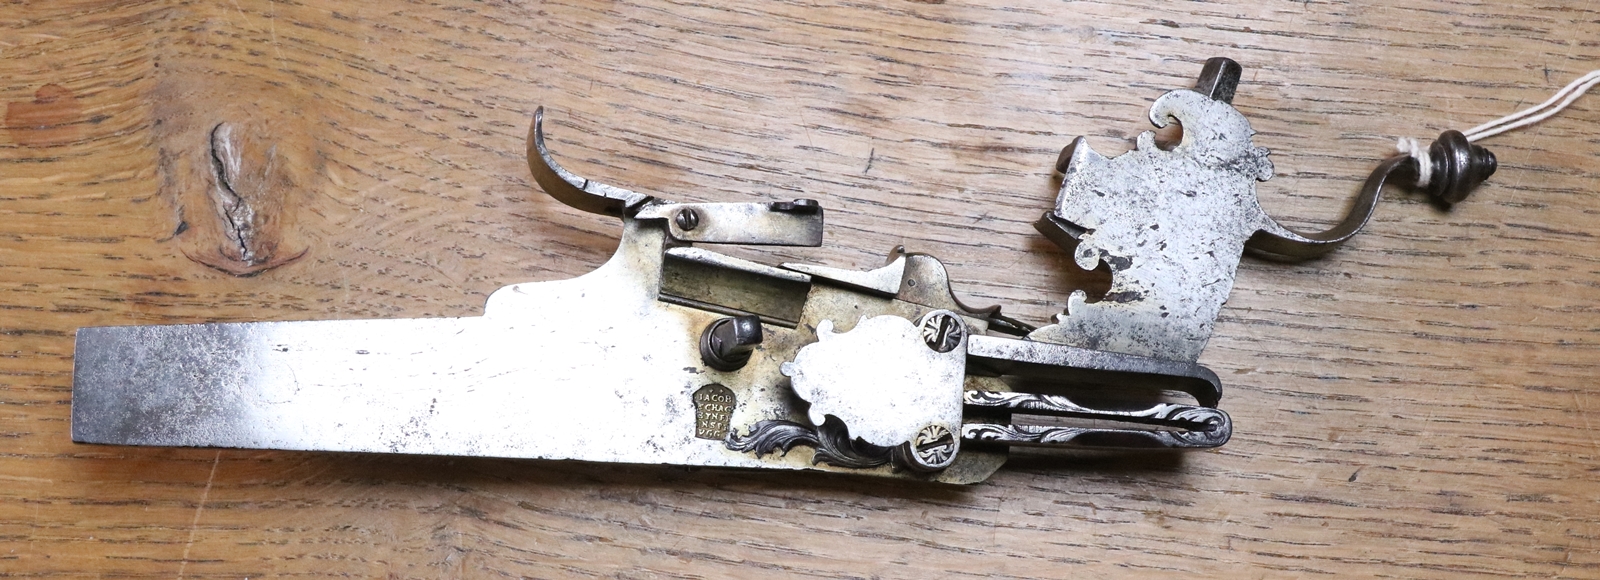
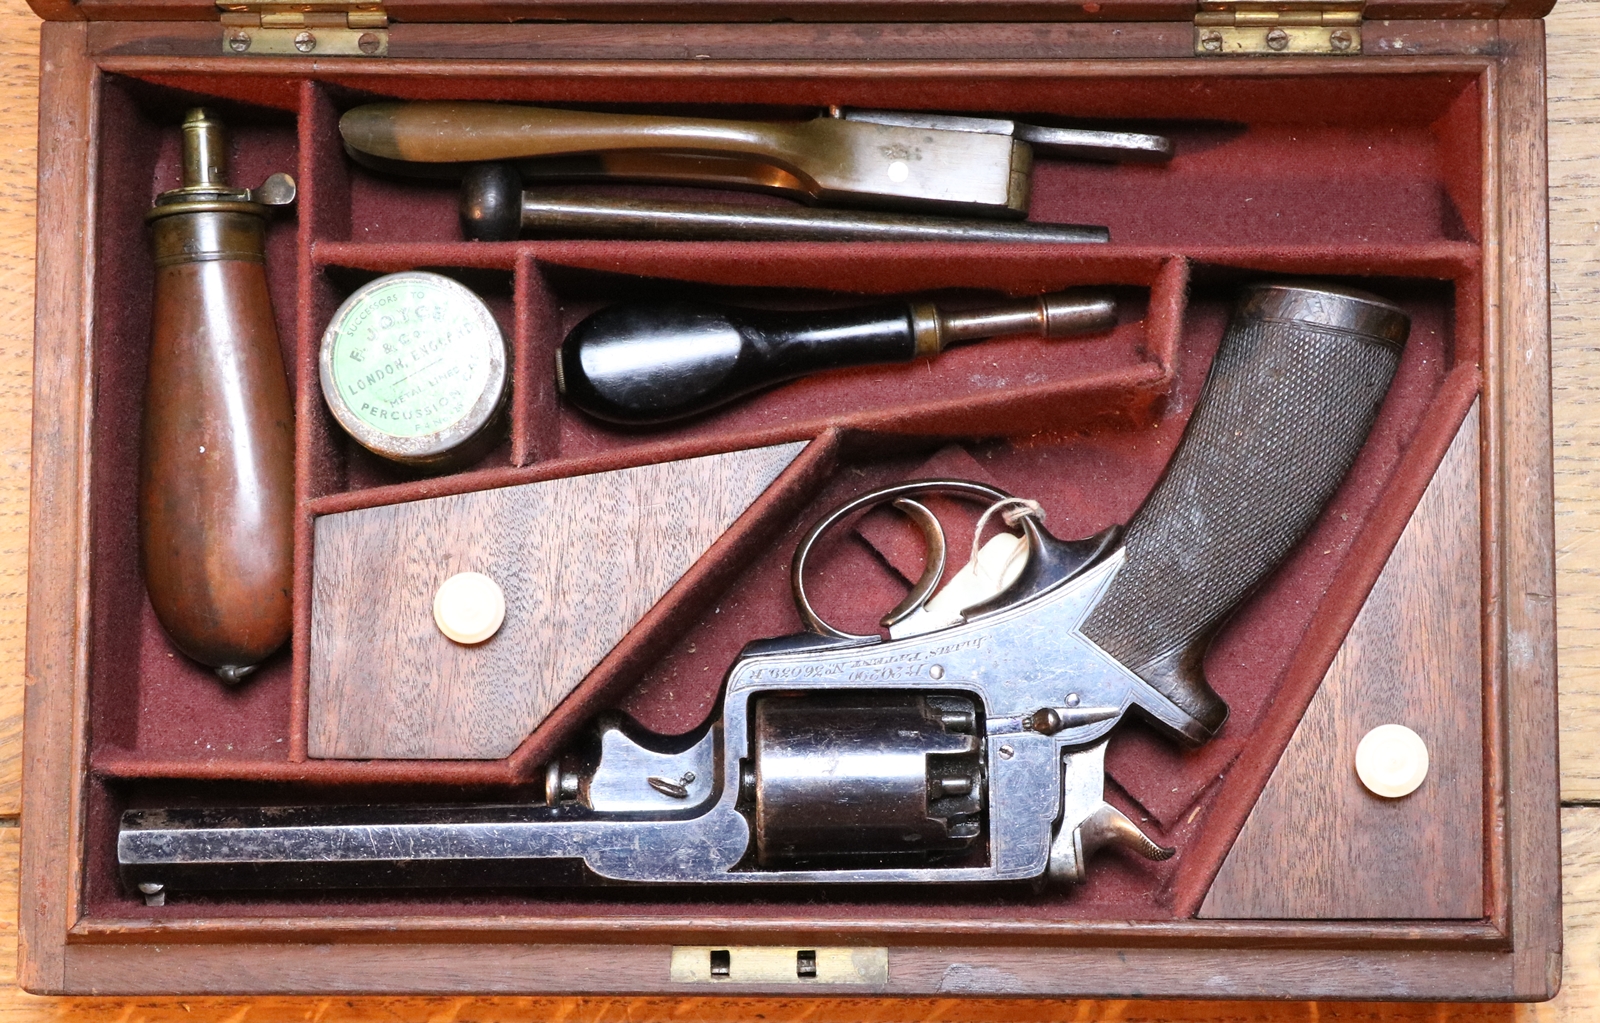
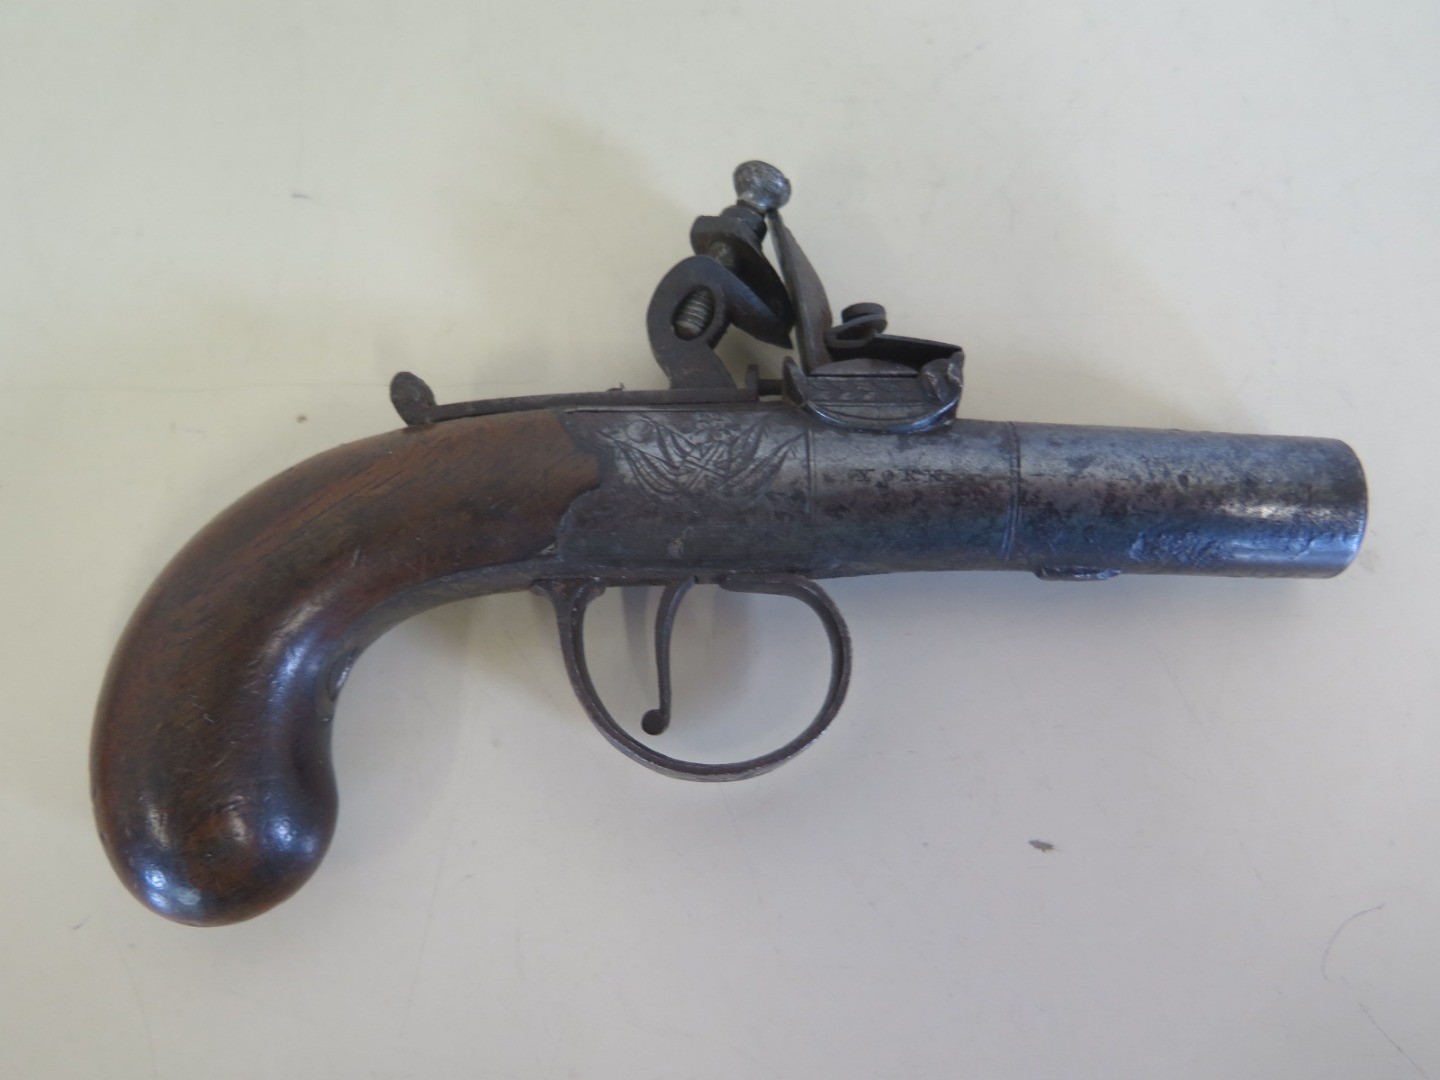 It’s all there – needs the action fixing, which is a nice exercise!
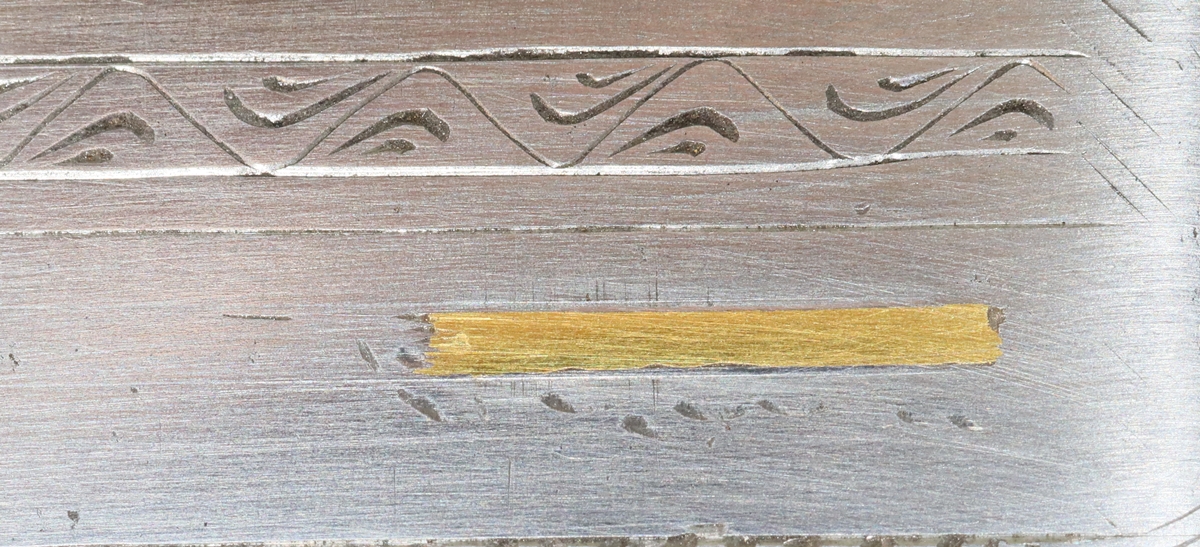
21st June – Going through the photos I took in Norfolk – which was difficult because I brought a completely useless monitor with my new computer – I came across a detail I hadn’t seen when I looked at the gun. On a good quality brass blunderbuss of mid 18th century by Barbar I found one part of the lock engraving that had been (partly ?) chased with a hammer and chisels – the rest of the lock and cock and all the brass seemed to have been engraved by ‘push’ engraving – I think that is the first time I’ve noticed chasing on old English guns. I found a similar age blunderbuss by Turvey that definitely had the steel engraving on the lock done by push engraving.
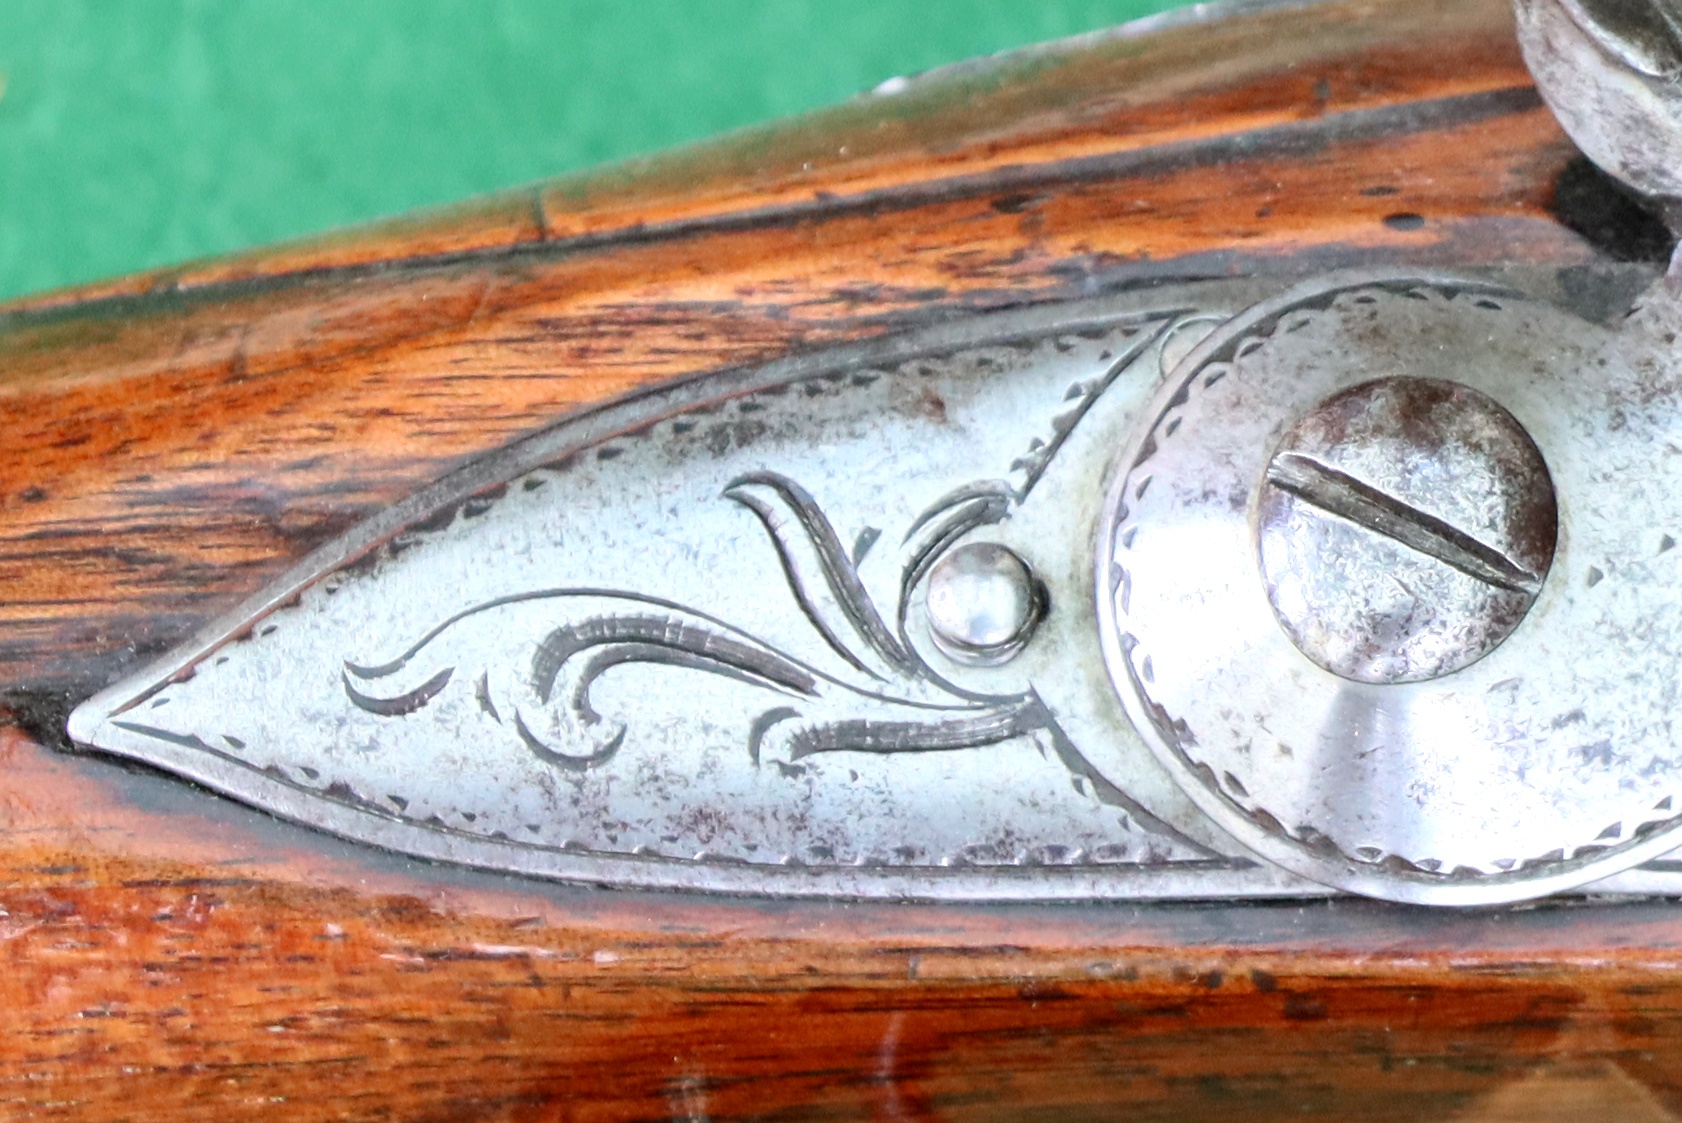 Blunderbuss by Barbar – classic early engraving
Click on the photo and you will see the serrations on the lines of the foliage – at least you should if your monitor is not as bad as mine (its going back- I’ll have to replace it with a more expensive one though!)
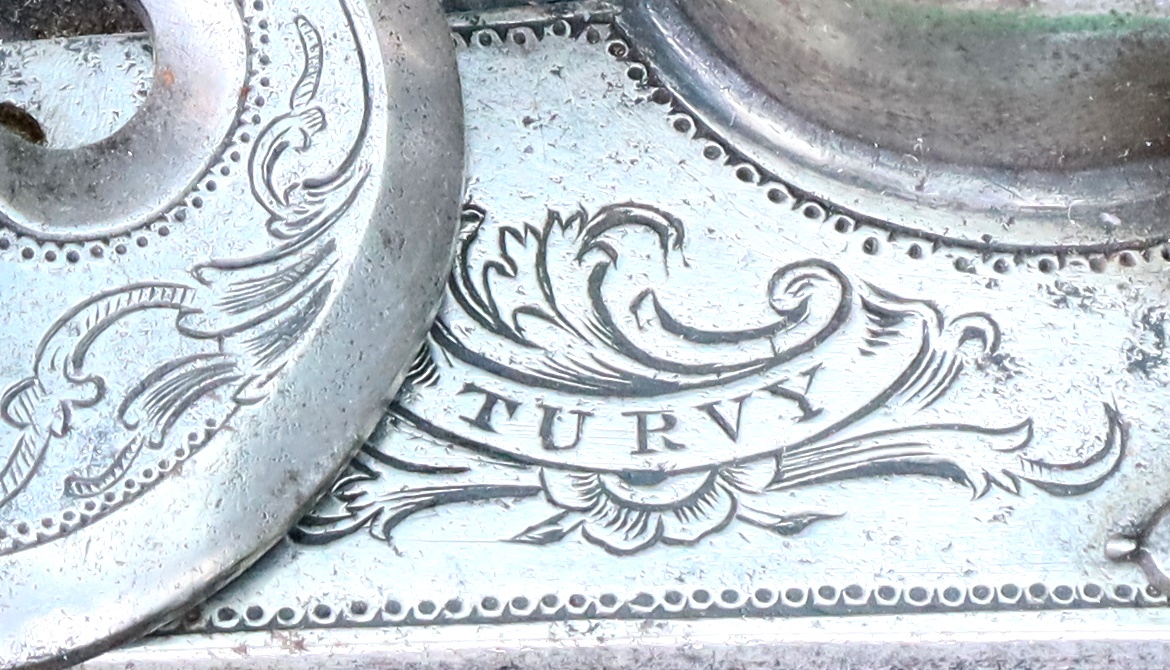
This all looks like bona fide push engraving!
20th June – Back from Norfolk, where I have been photographing guns from a friend’s extensive collection – I’m adding to my library of early gun English engraving as my own own limited collection is mostly late 18th and 19th century sporting guns. He has some nice engraved blunderbusses and pistols from early and mid 18th century that have the characteristic shapes of that period, and I’m planning a series of plates showing the different styles at different periods. Photos will follow!
18th June – Edited another part of the trophy engraving series – Engraving the Thistle, which I have now put on Youtube.
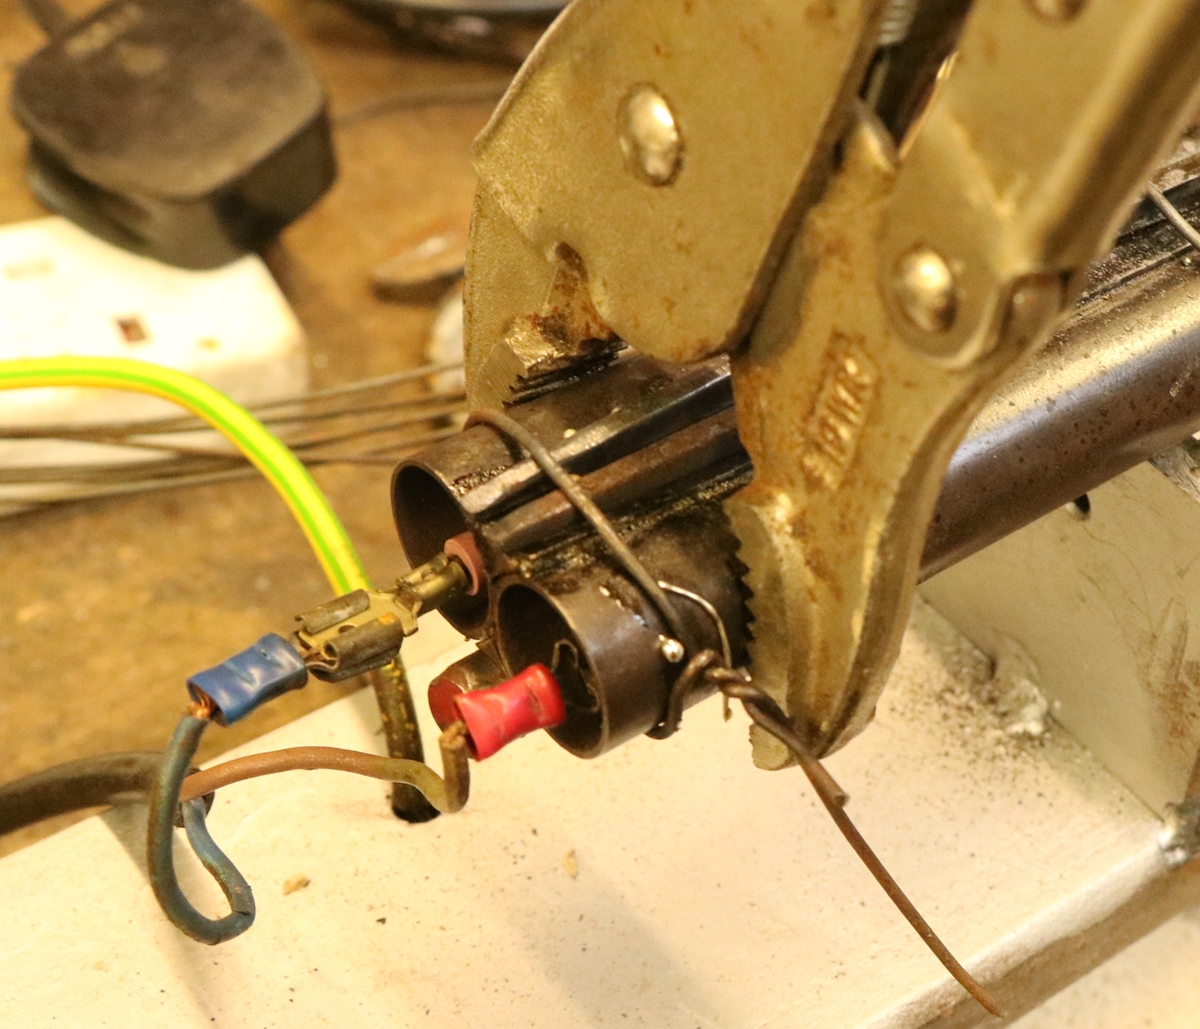
17th June – AT a school meeting all day! I did manage to make another nipple for the Westley Richards, so I’ll be able to try it sometime – the stock is very heavy, so I think it must be weighted, or at least a specially dense wood! The Bonham’s auction crept up on me un-noticed so I haven’t viewed it – just a quick glance through the catalogue. Nothing that excites me – the Adam’s revolvers were nothing special, a good lot of American stuff, but that’s not really my scene. There were an interesting assortment of percussion shotguns – maybe somewhere among them there is a bargain! No flintlock rifles, which is my next ‘want’ – its about the only long gun I haven’t got, apart from a blunderbuss. I put a new Video showing engraving of a Stand of Arms on the site, see VIDEOS at the top.
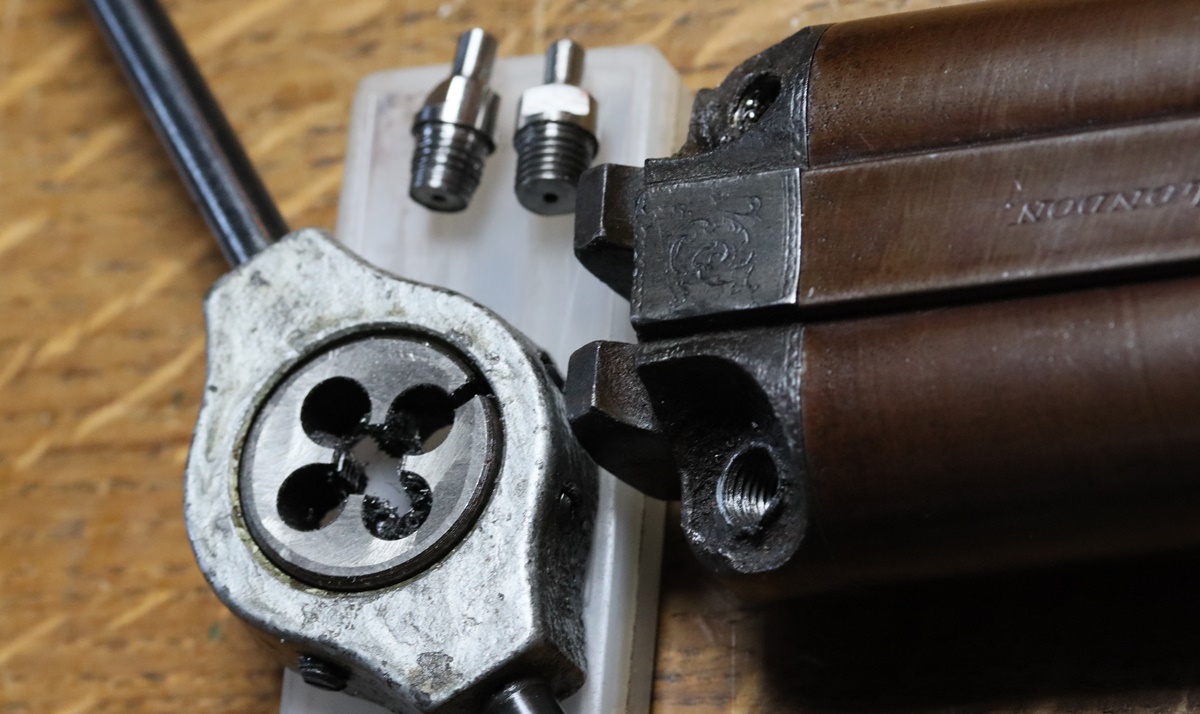
16th June – three parties in 2 days left me a bit dazed… Anyway it was out annual Recession shoot at Cottenham today – we ‘invented’ the competition in the bad old days to be shot with 1/2 oz of shot only – muzzle loaders of coarse – it is amazing how little difference it makes halving the shot load. I left before the final tally, but our group contained its share of the top M/L shooters – top score in our group was 21 out of 30 – I was very pleased to hit 18 – my aim is to do a little better each shoot, but strictly keeping to the game shooting technique and not shooting ‘gun up’ like most of the people who bettered me! I borrowed a set of oversize taps to fix the nipple holes on the Westley Richards, but even the 15 thou oversize one was still a bit loose, and they are UNF which is 28 t.p.i. ( 1/4 and 9/32 BSF are 26 t.p.i. and 1/4 is what is used on most later English percussion nipples) which means that in 1/4 deep hole you are almost half a thread out by the bottom. So I tapped them out 9/32 BSF, which is 30 thou bigger than 1/4 BSF, and that worked fine. I made a couple of titanium nipples, but one didn’t start the die properly, and doesn’t have a very good thread so I’ll remake it before I try to use the gun. The photo shows the back of the die, which I have ground on the 5 inch grindwheel so that it can cut the thread right up to the shoulder of the nipple – use the unmodified side first. Here are a few shots of the WR markings etc…. The gun is 11 bore, weighs 7 1/4 lbs and has a pull of 14 1/4 inches – about 1/4 inch of cast off.
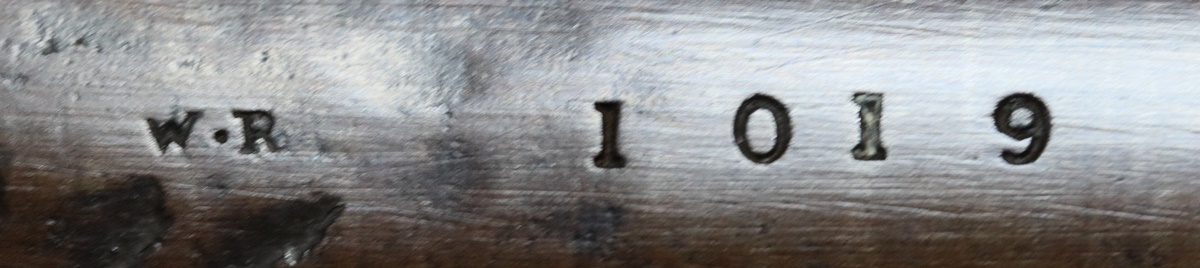
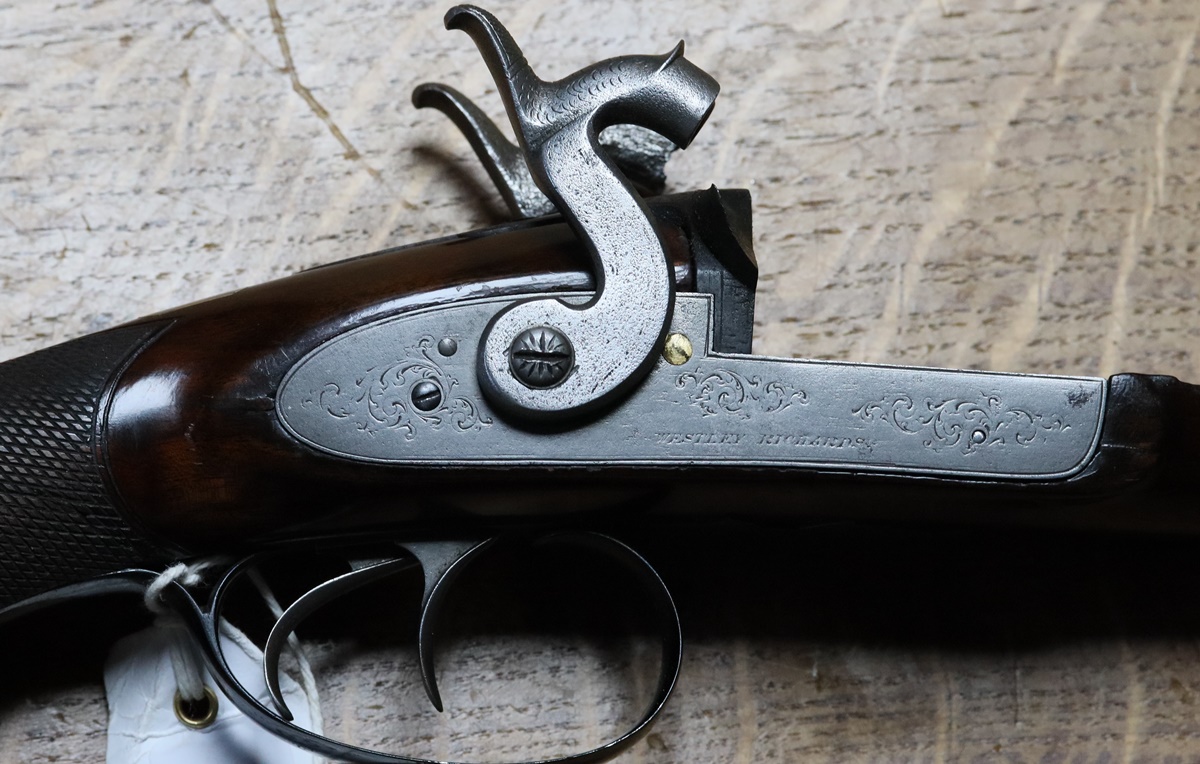
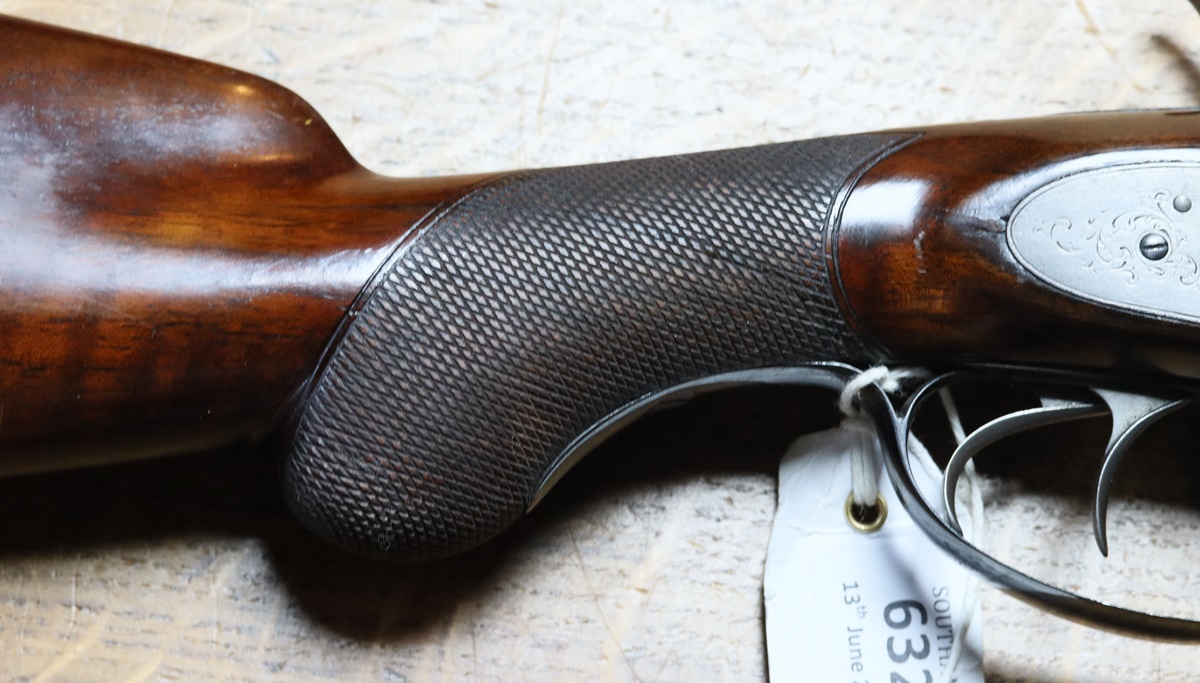
14th June – I got the gun I wanted at Southams, but not the two miscellaneous lots – someone else must have spotted the Blackley flintlock castings in the box of junk as the lot went for £110 Hammer price, as did the oak case I was after – both just a bit more than my limit. I did buy a flintlock pistol by Kruchenreuter that is nice although it needs a bit of tlc. The gun I bought is a Westley Richards percussion double 11 bore – I had left a bid well above the bottom estimate, but got it for £380 Hammer price – just below the bottom estimate, so good! There were a couple of expensive Westley Richards guns for sale that went for what I thought were fairly high prices given their condition, which frankly wasn’t wonderful, but I bought this one as I thought it would make a good shooter. It is a bit of a dog’s dinner, and I havent yet quite worked it out fully. The barrel is very good externally with pretty fair bores – its genuine Westley Richards with his barrel maker’s stamp, signature ( very clear and unworn and looks genuine but unusually read from muzzle to breech ) ‘Westley Richards & Co 23 Conduit Street London’ and Birmingham proof marks V & BPC which were used 1868 to 1925. The problem is the address – it was only occupied by WR & Co from 1917. The barrels are numbered 1019 as are the locks – all looking like they are original numbers. The numbers, according to Nigel Brown’s book, should be for 1843 ish. The gun has a rounded or semi-pistol stock which was quite a late style (?) . There are a number of things that are notably odd – the stock at the breech isn’t deep enough to cover the sides of the false breech by about a mm or so. The forend pipe and trigger finial don’t quite fit the cutouts suggesting that they are replacements. The forend ramrod pipe has somewhat abbreviated engraving, the trigger guard finial very abbreviated but of classic shape. The trigger guard has no engraving and is blued, the butt cap is full steel and similarly plain and blued. The barrel looks much less worn than the lock plates which are signed Westley Richards and numbered 1019 on the insides – the cocks are poor replacement castings. The nipples are loose – the holes are too big for 1/4 BSF and too small for 9/32 BSF so I’ll see if borrowing oversize 1/4 BSF taps will work. The screw holding the locks in has been replaced with a round headed brass screw with the head filed down. There is no ramrod.
What would I speculate about the gun? one guess is that there was an 11 bore percussion gun made in 1843 ( the locks are signed Westley Richards, not ‘& Co’, and are fairly worn). The gun was then rebarreled by WR & Co post 1917 (I know it sounds unlikely?). The stock is not original to the 1843 gun but is later, possibly reused from something else, but fairly unworn and certainly not 1843 style. The good news is that WR records still exist and I should be able to track the gun down from the serial number. Photos of my purchases tomorrow. I am also working on an engraving video or two to put on Youtube based on the trophy engraving – I have something like 60 GBytes of videos to edit down to about 5 Gb!
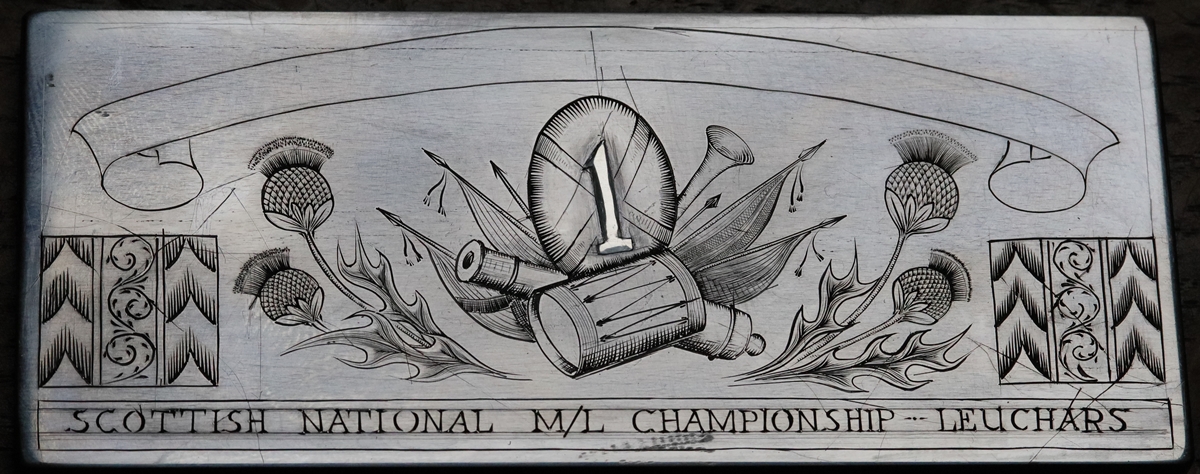
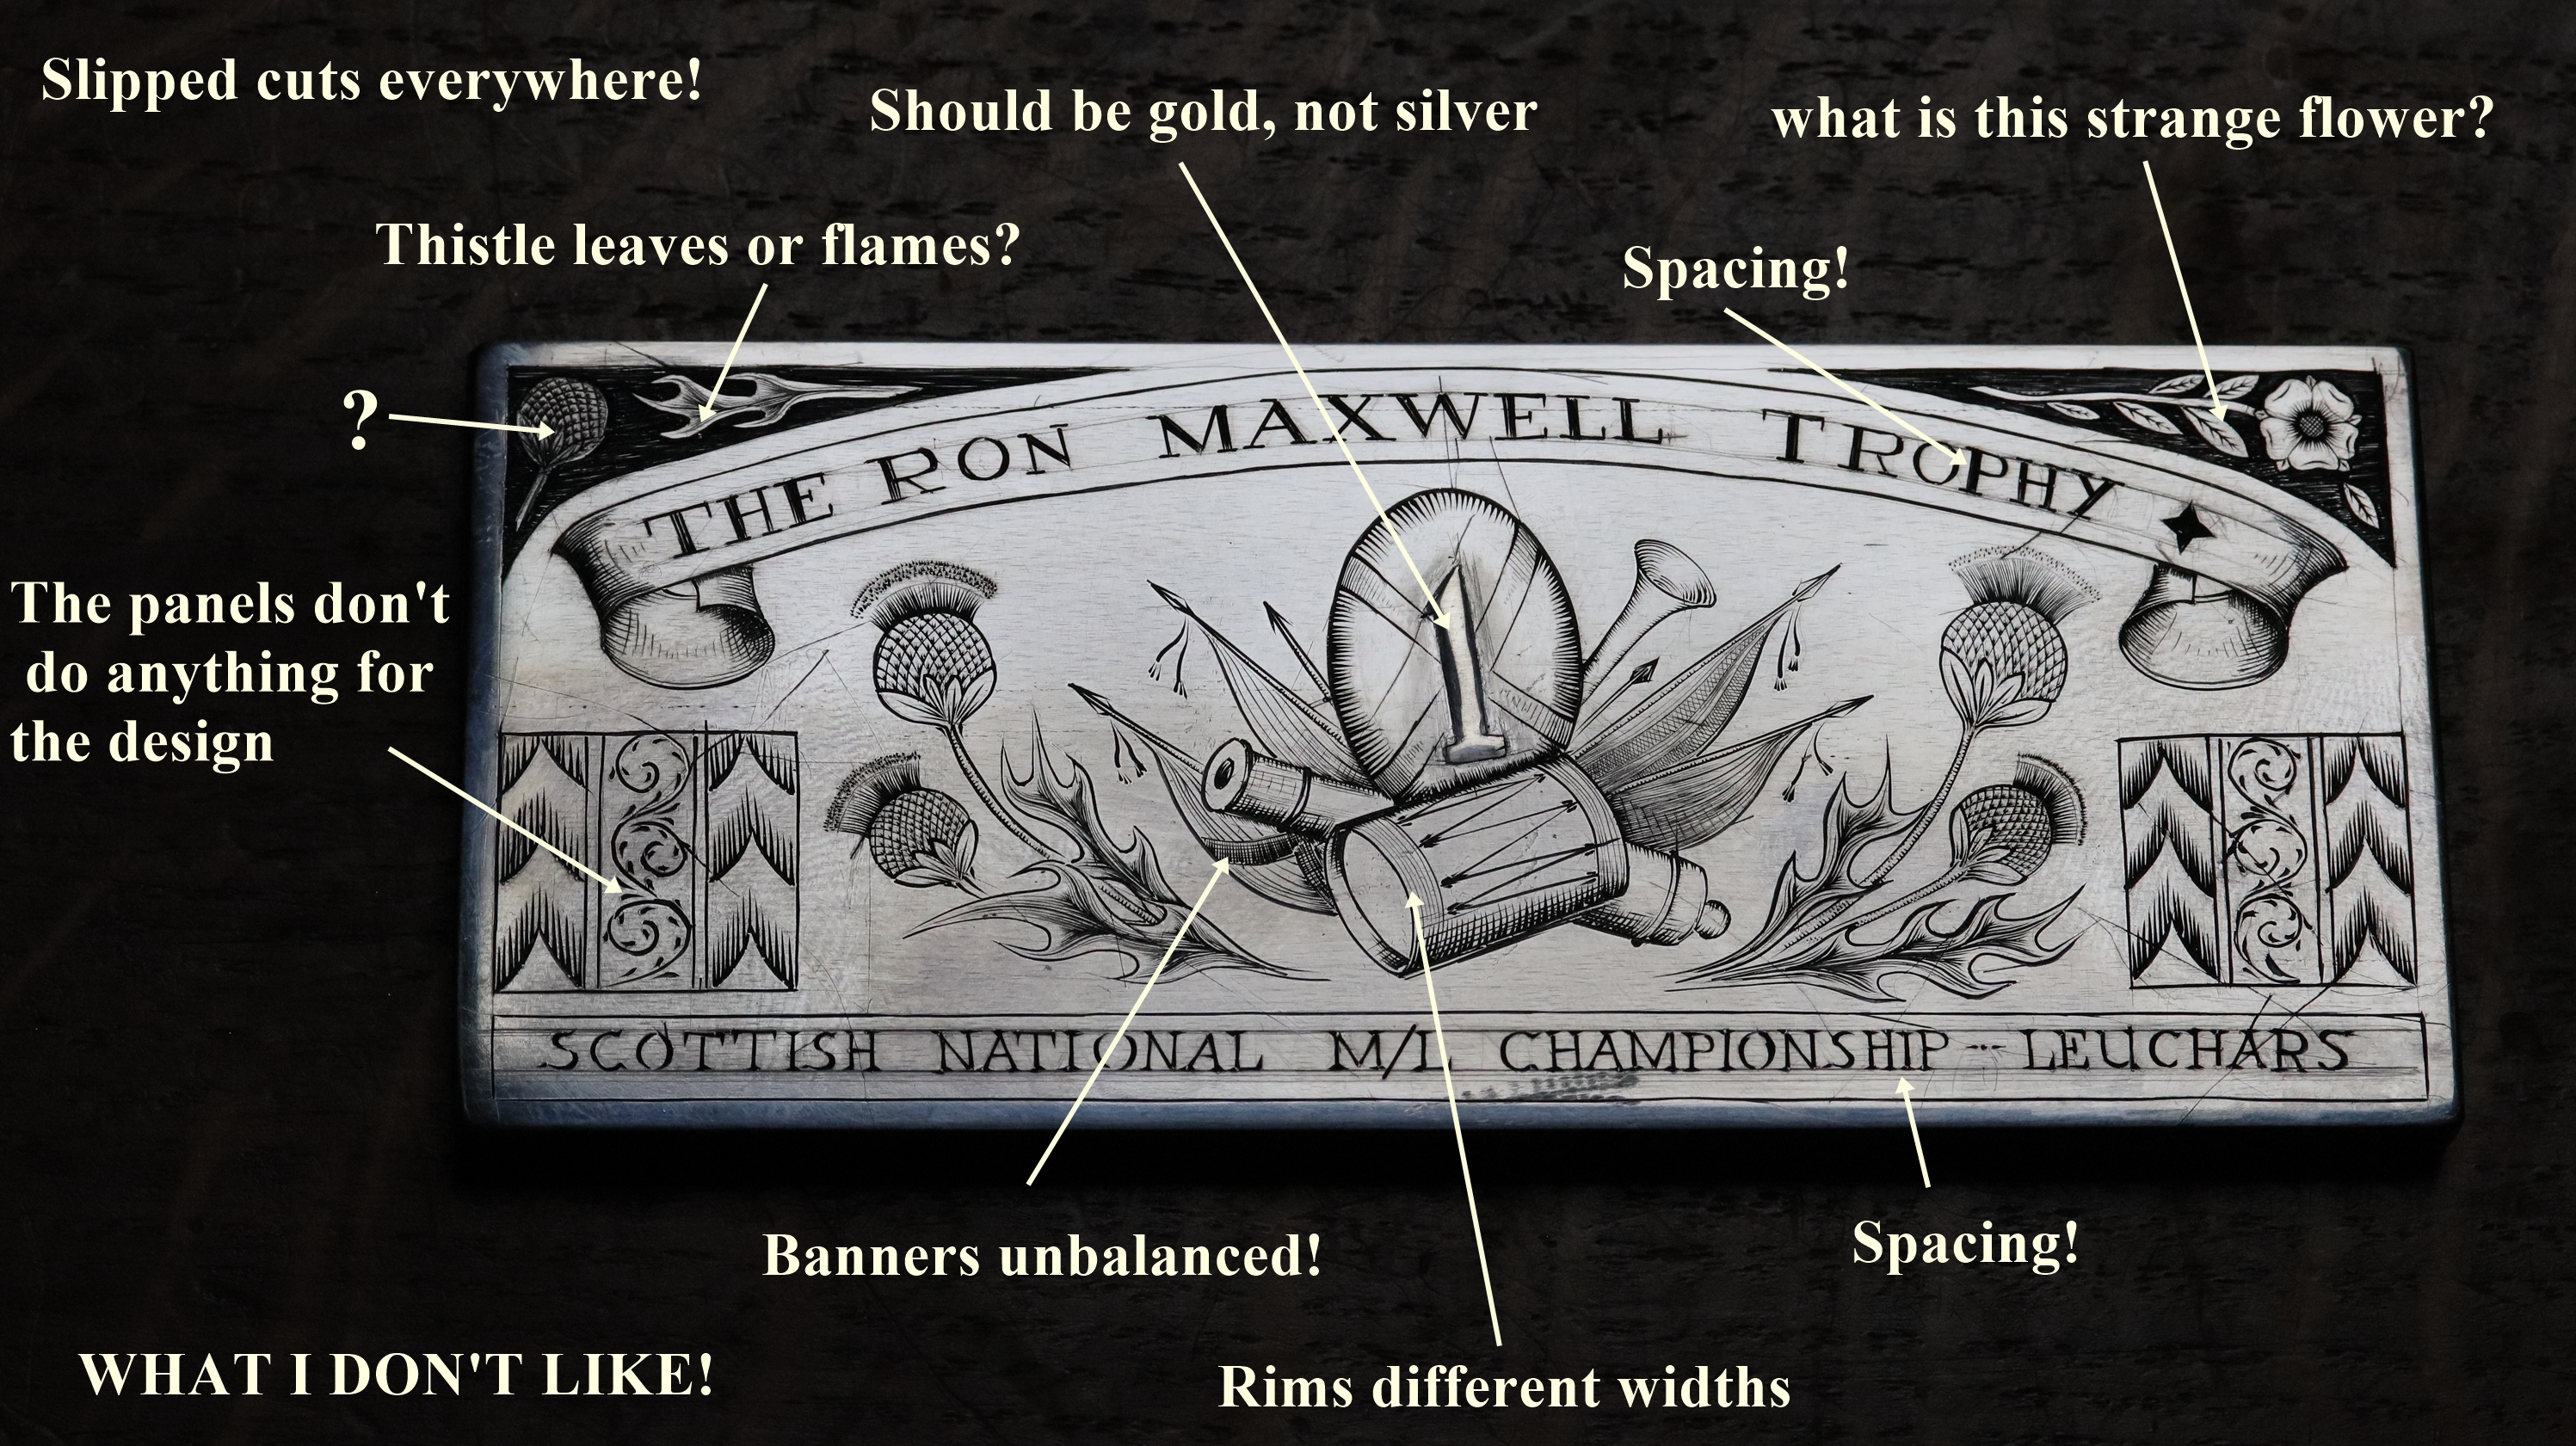
11th June – I went to Southam’s Antique firearms etc auction viewing in the big new Auction Centre outside Bedford – a pretty impressive place and quite an expansion in the volume of stuff that Southams had gathered (I was going to say ‘raked up’ but that would be a little unfair!) for the sale compared to their previous sales – they now have their sights on Bonhams and Holts but will somehow have to pursuade the vendors of quality antique arms that they can achieve top prices – their big selling point as far as buyers are concerned is the 17 1/2% commission as against 27 1/2 elsewhere.. I guess they are more like Holts in that they clearly take everything anyone wants to sell, and had all those delicious boxes of junk that mirror what we all have in our workshops! There were one or two good antiques, but I didn’t find anything in the way of English 1850s revolvers that excited me- most were just not good enough to make it into my collection – I found a couple of hidden treasures in the junk listed for a song, and one possible gun for restoration, but I’m not going to give anything away at this point! I did a bit of sleuthing for a friend so he will have a couple of bids. Not sure if I’ll watch the auction on line, I might be tempted to bid on other things….. I still think I will redo the Trophy, although people tell me its fine – here are some of the things I think are wrong with it….
10th June – I fixed the element back in my furnace and finished ‘normalising’ the steel test plates. Cleaning off the anti-scale paint is a pain, but having done that, the metal seems to be much better to cut, although I only did a small bit on the edge. Surprisingly the plates have distorted very slightly so that a sheet of 1200 grit on a flat plate doesn’t abrade the whole surface – the surface is probably out of true by about 1/10th of a mm in a smooth curve, not enough to matter for my purposes, but in future I’ll ‘regularise’ the metal BEFORE I get it ground flat! Obviously some stress relief took place. Looking at my Trophy engraving, I think I’ll have another go at it – there are a few details I’m not happy with, and I wasn’t careful enough with the lettering spacing – it is one of the problems of engraving using a microscope, that your field of view is small – only a few letters – so you can ‘drift’ away from your chosen spacing – I mark out the lettering, then when I come to cut it I adjust somewhat as I go along, and then find its not all evenly spaced. Anyway I’ll have another go, and make sure that I get the gold inlay right this time. I could do with more practice! I’m about to start on the wheellock video, but got held up because the hard drive on my computer is almost full (it takes ages to do anything) and all my SD cards for the camera are full. An upgrade of my computer system is on the way – I can go about 5 years before the system gets too slow and clogged up, at which point I get fed up and replace it – by then it will have earned its retirement! My new system will have 6 terabytes of hard disk – which should see me OK for a few more years, although its only enough space for about 1000 videos.
9th June – a Pleasant party today making Elderflower wine with friends. I had a chance to ask Giles’s girlfriend, who is a doing a PhD in materials science, about my struggles with mild steel blanks. I had thought that as they are more or less pure iron with very little carbon they wouldn’t suffer from hardening, although it was clear from experience that they did. Anyway I now understand what happens, more or less. Its all to do with the grain boundaries and the stresses within the grains and between grains which are generated by the cold rolling process, essentially work hardening – so the answer is to anneal the blanks – I thought I’d tried that without a great deal of success, but apparently I should take the metal to around 80% of melting temperature for a good long soak. That means going to around 1000C for a couple of hours, which I should be able to do in my furnace, but when I tried tonight I got it up to about 950 but after half an hour the element in the furnace came out of its groove and tripped the supply by shorting to the metal load, so I’ve left it to cool to see whether it managed to anneal or not. The tedious part is the preparations you have to make to prevent scale forming on the plates – I have some antiscale paint (it is difficult to remove after heating) and also some stainless/titanium foil that you can make packages from that you seal by folding over the edges to exclude air- its vicious stuff as its thin, hard and sharp as a razor. I used both tonight. The trophy engraving is now complete – there are a number of slips and bits I would do better a second time, but it is not too bad! I wouldn’t want to do it again with the metal in that state – I must have sharpened my gravers over 100 times in the course of engraving it – about half because I snapped the points off, which is mainly down to my lack of practice with hard metal , and half wore down and were ploughing through the metal rather than cutting it cleanly as they should – they wore much more quickly than they should. My previous test plates were EN8 steel with a bit of carbon but I had 1/2 mm ground off the surface which got rid of some of the work hardened layer.

8th June – a bit more work on the trophy engraving, starting with sharpening about 20 gravers! I also made a key for the wheellock so I could wind it up properly and see how/if it worked. The answer is that sear is worn and won’t hold the wheel against the mainspring, which is pretty strong. Also the cam action that is supposed to open the pan as the wheel starts is worn. but overall it seems to be complete and potentially working. but I have yet to work out how the trigger operates the sear – the tail of the sear has a small spring catch that could be a safety catch. I haven’t yet stripped the lock down so I can’t see all the works, but its in good condition with almost no rust except around the pan where it has been fired, although the wheel is perfect. As soon as I’ve done a bit more exploration I’ll make a video. I was hoping to make a video of the engraving of the trophy, and I have got quite a lot of bits of the engraving etc, but the job has taken maybe 12 hours, and its difficult to attend to the camera and the enraving – when I look at the camera its often run out of battery ( rather poor capacity for videos) or the card is full or its got knocked and the focus is off….. so I’m not sure I’m really keen on the job of editing it all down to a manageable length! Anyway here is the key I made for the wheellock…..
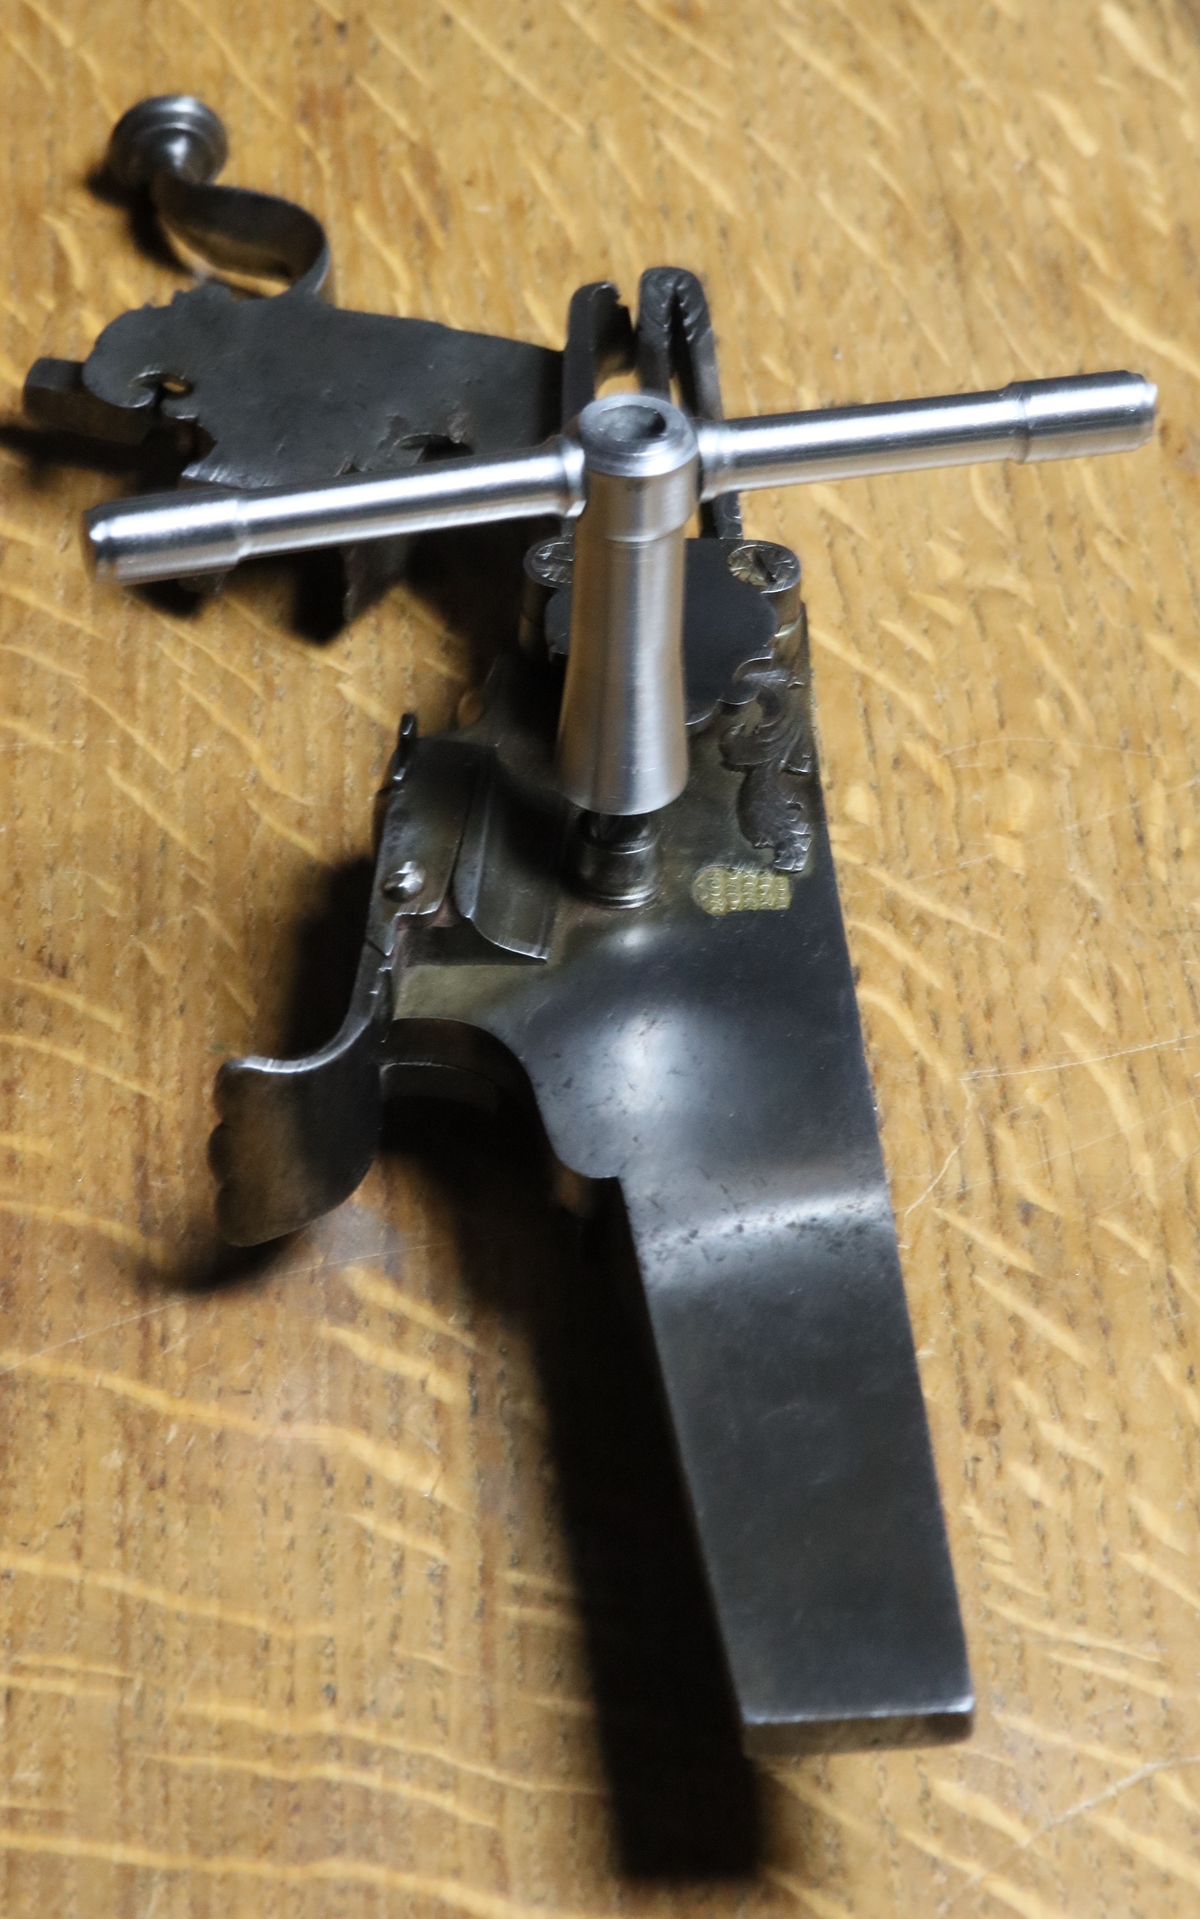
Filing the square hole up the middle was a tedious job – luckily I had a square file just the right size.

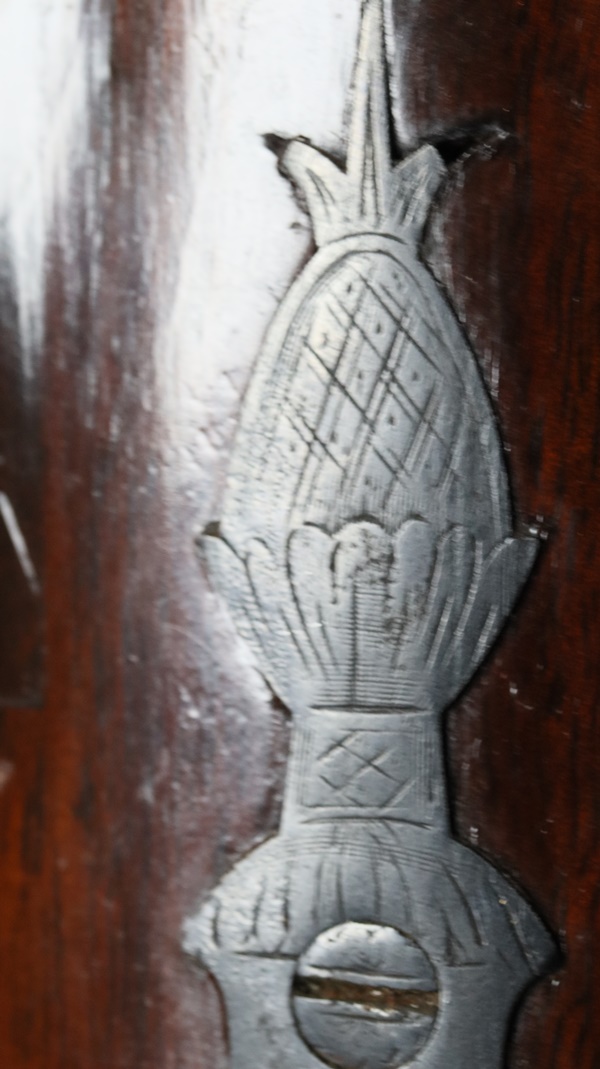
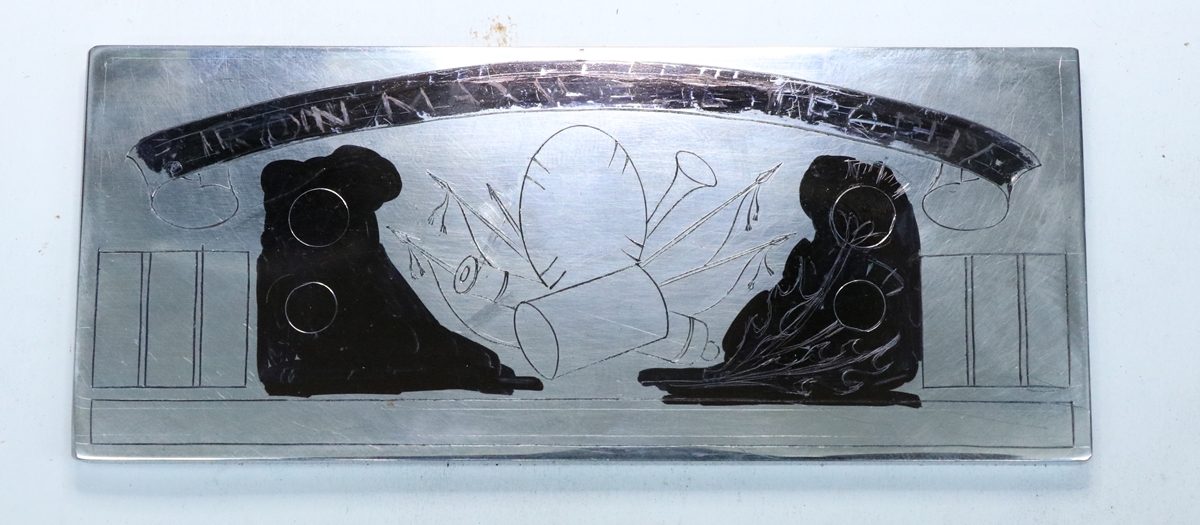
7th June – I spent today on my tropy engraving, the metal is somewhat challenging and I spent ages sharpening gravers that had worn blunt – I have a pile with the points broken off, but they will have to wait til another time… I finished the pictorial stuff (excpt for a couple of bits I only just remembered) and started to think about inlaying a gold ‘1’ in the centre of the shield – I did a practice on a scrap plate and it worked reasonably well – I made the upright wide enough to take two pieces of 0.5mm gold wire side by side. When I cut the final one I made the recess too deep so that 2 wires didn’t fill it but I couldn’t get a third piece of wire to stick in the middle as it didn’t have any undercuts to grip. Despair for a moment! I pulled all the gold I had got fixed out – it was pretty firmly in the undercuts. Anyway I have some silver sheet so I cut a strip the width of my cutout and ‘hammered’ that in using a polished rod in the GRS gravermax as a ‘Kango Hammer’ – it actually worked very well and stands proud in a nice convex surface that catches the eye. It should be gold, but that is for another time when I’m feeling rich!
 It looks as if Bev is worried about his barrels coming off!
He did, however, win some medals , which is more than I did!
I got back my bits of steel that Allan Wellings had kindly ground off for me – a perfect finish for engraving test plates or making locks – I can’t wait to start on a project. I may have a couple of bits spare if anyone wants a 50 x 140 x 6 mm mild steel blank – email me.
23rd May – I’m sorry for the gap here, but things got a bit hectic and I had to make several trips to London, one to the Bonham’s viewing. There were a couple of things I thought it might be nice to have, always with the proviso that they looked like reasonable value. I had my eye on a detached wheellock, a box of flasks and a cased Beaumont Adams pistol that had been completely refinished in a very dramatic way – as far as I was concerned completely ruining it as a collector’s piece. I wanted it as I have a fairly decent one and was planning to swap it into the case and use the refinished one for shooting – I was niavely expecting it to go at the estimate (£500) on account of the abuse it had suffered, but there are obviously people out there who are not put off by refinishing because it made £1200 hammer price ( around £1650 to pay)- not much different from the price of a decent one. I did get my wheel lock, not quite as cheaply as I hoped, but still OK at only 2 bids above the bottom estimate, I had a couple of pokes at small pistols in passing, but they all escaped my clutches – on balance most guns made somewhere in the range of the estimates, although a lot of the swords went below estimate. There were not many really nice pistols in good condition. The box of flasks, of course, made almost twice the top estimate. I did see a cased pair of Mortimer pistols with the nastiest re-browning I’ve ever seen – a sort of salmon pink colour – glinting through was the most extreme and un- sympatetic recutting of engraving I’ve seen for a long time – fortunately I didn’t have a magnifying glass with me so I was spared the worst of the horrors (and they made £10K!!!!) There is no accounting for people, as my Mum used to say…. (If you bought them, I didn’t mean it). Tomorrow I’m off to Scotland to shoot in the national M/L competition. I’m hoping that my improved form means I won’t be the worst shot there! Some hope…..
18th – started to make the small jigs for sharpening the heels of gravers – it involved milling 3 mm wide grooves across a stainless steel bar, Unfortunately my miller has too much play in the slides and the metal is on the tough side, so the cutter didn’t survive beyond the first one. In my usual bodging way I found it was pretty quick to cut the slot roughly with a 1 m.m. disk in an angle grinder and then file it out, but it took me all the time I had available to make two. It would be a simple and cheap job to put them out to someone with a cnc machine, but the turnover is not really enough to justify the setup costs, so I suppose I will just have to struggle on!
I tried to make up some rabbit skin glue to stick the lining on my pistol case, but put too much water with it, so will have to start again! Next week is the Bonham’s Arms and Armour sale on Thursday – there are a number of possible interests, as I’m looking to extend my collection backwards in time. I’m in London on Tuesday so I’ll go to the viewing in the afternoon, and see if its worth going for the auction, or whether to bid by phone, or just sit on my hands! There is the rest of the enormous collection of Winchester lever action rifles for sale – you could probably pick up a good repro for a song…………
16th May – SATS exams are over – last one this morning – much to the relief of the children (and me, as it means I can have my mornings back). I always seem to have several jobs on the go at once, partly because I like to leave them on the side to ‘mature’ and come back to them later with a fresh eye! At the moment my engraving bench is occupied by the 4 bore Tolley Barrel, and I am part way through refitting a case for the Baumont Adams revolver. I had to spend today making up some graver sharpening jigs as I have a couple of orders pending – I made a few of the simplified 45 degree jigs, and tomorrow I’ll make a few of the 15 degree ones, which should be a little easier. The 45 degree ones are a bore as I have to machine a 90 degree V slot in the top of a piece of hex bar, which involves tilting the head of the miller and fiddling to get the cut in the right place – my miller is a feeble and rickety device so it is always touch and go whether things will turn out right – in this case not too bad, only one hiccough.

Today’s jobs in progress!
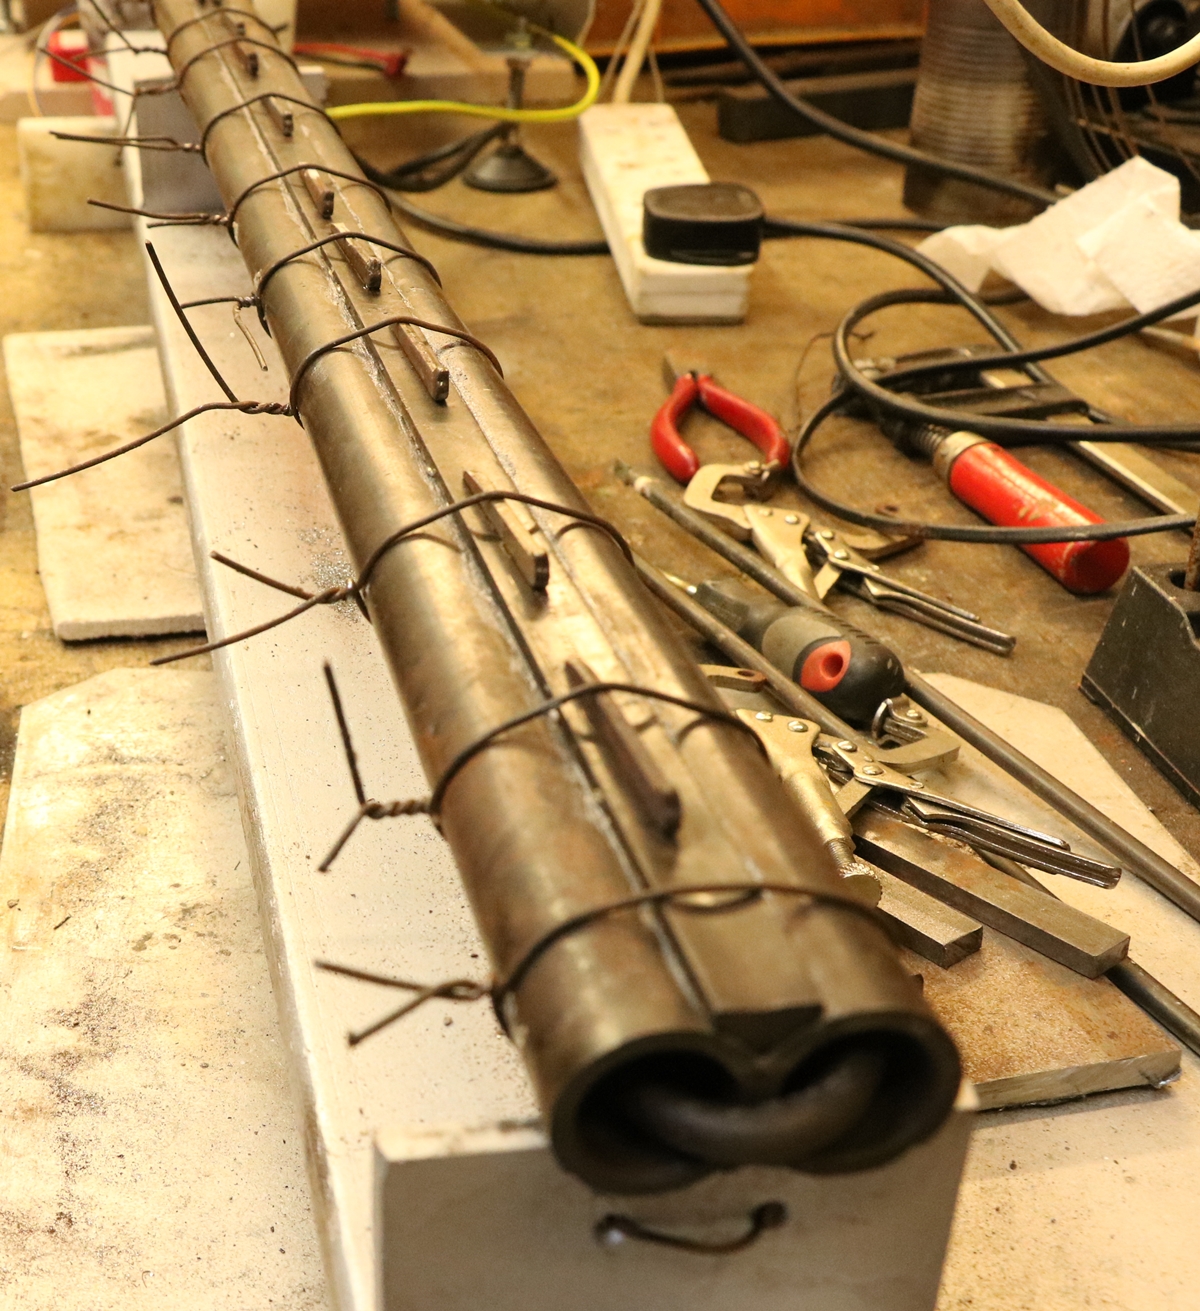
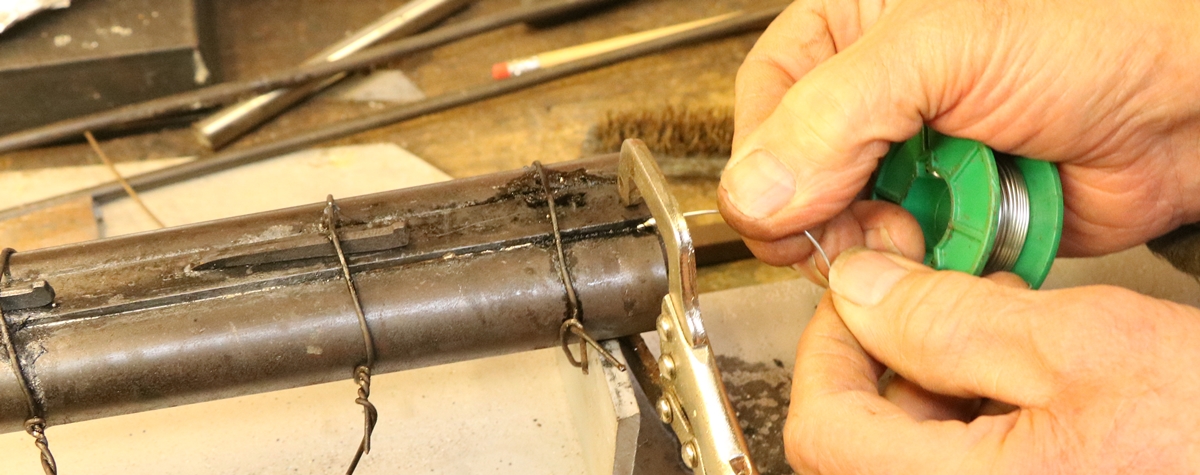
15th May – More exams in school – I did the KS2 SATS first maths papers this morning – Arithmetic and Maths Reasoning – more tomorrow….. I got a barrel re-engraving job to do while at the Northern Shooting Show – a 4 bore double Tolley – the barrel is a little rusted in patches and is going to be struck off and re-browned when I return it. I have tried to get a reasonably deep re-cut as its going to loose some metal on striking off – ideally when I’m re-browning them myself I like to lightly recut the engraving before its struck off, then recut it again while in the white before re-browning – that way I can judge the finished effect. In this case I’ve recut a little deeper as I can see some metal will have to come off. If necessary I’ll have the barrels back in the white. Unusually for barrel lettering, the existing lettering made extensive use of a flat graver, and so isn’t as deep as that done with a 90 degree one – as usual ther first stage of the ‘re-cutting’ was actually cleaning out the rust, but this didn’t restore things completely as it sometimes does. I will have to make a few more engraving tool sharpening jigs soon as I keep getting the odd order, and sharpening is a really difficult thing for beginners to master. I’m busy refitting a nice original oak pistol case that will be perfect for my Beaumaont Adams 54 bore revolver – all the inside has been stripped out in the past, so I have a clean slate to work on. I’m doing it in deep maroon baize as I have some nice very thin stuff from ‘Bernie the Bolt’, supplier of fabrics to re-enactors. At the moment I’m considering what glue to use to stick the lining in with. The quick and dirty way is to use spray photo mount if you can mask it well enough, but traditionally it should be an animal glue – I do have a jar of rabbit skin glue, so maybe I’ll do the job in the traditional way and use that….. After that I fancy making a mahogany case for my Fishenden double carriage pistol – it will require a quite small but deep box.
13th May – back from Harrogate, where I had a very busy Northern Shooting Show. It made me realise how integral the shooting sports are to the North of England compared to our namby pamby Southern counties! It is a huge show and very popular – crowds surge in at 8 a.m. and it is busy all day until about 4 p.m. I met lots of interesting people, including a number of friends who I only know at the show from past years. Saturday was better than Sunday as people stopped to look and talk – Sunday seemed like a constant procession of people spending a few seconds and moving on. I engrave screw heads as its easy and doesn’t require concentration, and give them to any children that show a decent level of interest – on Saturday I was giving them away as fast as I was doing them but on Sunday hardly any child qualified for one and I ended up with a stock for next time. Today I was in school invidulating the SATS exams – it was an English paper and contained one bad mistake – treating ‘team’ as a plural, when it is clearly singular! tut tut – comes to something when an English exam contains gramatical mistakes…………………………………
8th May – I made a couple of Youtube videos today on stripping and assembling a flint lock – mostly because I felt guilty about all the equipment I’d bought to make videos and hadn’t really used – so the Great British Youtube watching public will just have to suffer! (see a link on VIDEOS at the top of the page) Talking of suffering, a friend rang me up in distress as he is quite ill, and asked me to pick up his gun tomorrow and get rid of it for him as he will never use it again – I guess it comes to all of us in time. I’ll put it on my license for a while and sort it out later. I’m off on Friday and have a pretty full day tomorrow so I ought to be sorting all my engraving stuff to take to the Northern Shooting Show on Friday – at least I did manage to make 4 new gravers in case anyone wants to buy one. I am optimistic that I’ll get it all sorted in time…………………………………..!
7th May again – I decided to start my case making by fitting out an original pistol case from about 1855 ish that is right for an Adams style revolver. The case has been partially stripped out, so I just had to get rid of the remnants of the internal lining – stuck on with the usual animal glue so it is relatively easy to steam it and scrape it out – horrid sticky mess though. The bit I find difficult with fitting/refitting cases is making the partitions – they are thin strips of wood (around 4mm thick x 45mm wide) that need to be chamfered to a fine 1mm edge at the top to wrap the fabric over. I have yet to find a satisfactory way of putting the bevels on – using a low angle hand plane doesn’t get a very even result so I tried to set up my router table to do the job, but that didn’t do a very even job either. Maybe I’ll try sanding the bevel on tomorrow – at least its covered by fabric! When I come to making a new box there is also the problem of the lining strip that goes round the inside of the box – they have a slight chamfer at the top on the outside, and a steeper one on the inside and also a slight recess about 8mm down from the top on the inside that takes the top edge of the fabric. The lining strips are very conspicuous as the wood shows above the fabric, and need to be made quite cleanly with sharp angles etc. so can’t be fudged. Not sure how I’ll make them, especially the outside chamfer of maybe 5 degrees which is there to clear the opening of the lid. I may try using my surface planer in some way with a jig, but handling thin strips of wood is very tricky, it might be better to clamp the wood down and use a hand router with an angled baseplate – maybe stick a soleplate on at an angle and fix up some guides – I need to think about it! I can at least temporarily screw the strips to a bearer as the holes can be filled and will be covered by the fabric………
7th May – Sunday morning AML shoot was good – I managed to hit half the clays, which was my target, as they are now quite challenging, although there was one ‘teal’ coming straight towards the muzzle of the gun that I think only one person managed to miss, and only once at that. I have to correct my ‘tool porn’ post – I said that there were over a dozen models of the expensive planes – actually when I counted it was 36! And some hand saws at over £200 each – equipping your ‘tool porn’ workshop with fancy hand tools is going to cost you the price of quite a decent car – which I suppose is fair enough if you like that sort of thing! I’m doing well filling the skip, and can now get to my woodworking machines – I’ve planed up some 3/8th thick oak to make a pistol box this morning, and fixed my big router back in its table with a car jack under it for height adjustment, so I’m now ready to start! Now I need to decide what I’m going to box up!
4th May – I can now tell you with some authority that trying to load a flintlock in a hailstorm is no fun. Its really difficult fishing the hailstones out of the pan before they wet the priming powder! Apart from that, the ‘Have A Go’ day was good and the participants had fun – fortunately we had just about done the first session when the hail arrived, so we could retire for a cup of tea, and we had similarly just about reached the end of the second session when the lashing rain and howling wind overtook us and lunch beckoned. My Manton flintlock was going off well – just one ‘flash in the pan’ and a couple of misfires as one flint was on its last legs ( my fault for being famously mean with flints), and one noticeably slow discharge. We’ve got our regular 40 bird competition tomorrow so I’ll take a percussion double, maybe the Venables. I should be spending time clearing things out at home as I have a 10 yard skip parked in the drive waiting to be filled with rubbish from my sheds and the house – so far its half full of stuff from the yard and one shed – it would be a pity not to use up all the expensive space…..
I had a look in the Axminster catalogue for a fine saw for making the dovetails – their catalogue always amuses me, I’m afraid I call it ‘tool porn’ for all the ridiculaously expensive cult tools, especially planes – you can pay up to about £470 for a plane, and then you can buy special fancy screwdrivers for working on it for about £25 each – you’ll probably need a set of eight to cover all the screws – oh and if you want the two alternative blocks to give you very slightly different blade angles they will set you back over £100. Now there are of course over a dozen different planes in the series, so you are heading for quite an expensive hobby, even without all the other fancy hand tools you will be needing – and I think you can even buy special bags to keep each of them in – truly tool porn! Me, I’ll stick to my old slightly rusty Record plane (or more probably the old planer-thicknesser that I had to get the rust off the beds when I finally fought my way through to it yesterday), but they do have a basic saw for £13 that will probably do for the joints…………
3rd May – I seem to have been rather busy with school etc the last few days and the change of month passed me by! I decided that it would be fun to try my hand at making reproduction pistol cases, particularly for revolvers as they are rather easier to make – they were mostly oak and the tops were often screwed on with small brass screws. They also have a simple escutcheon on the lid that is not too hard to make as its circular. The only problem is getting suitable stop hinges that only open to about 95 degrees. You can buy them but they are expensive – I do have one pair on a rather boring cutlery box so I’ll use those. I was going to try using a router and a jig for cutting the dovetails but the originals have very small wedges, smaller than any router bits. Anyway I watched a couple of Youtube videos of cutting dovetails and came to the conclusion that it wasn’t really such a big deal making them by hand, and they would be more authentic. It struck me that there were two very different approaches to getting to be able to make passable joints – one can either start out very carefully doing everything as well as possible, aiming for a perfect result and taking a long time about it so that the first one eventually and with luck turns out right, or one can go at it fast, without worrying too much about getting perfection, but doing it in a fraction of the time of the first method, and then just doing it again several times, keeping the speed but getting better each time. The second method suits my personality, and means that it doesn’t mattter if you make a mistake – you will have learnt for the next one. Anyway my second and third attempts are shown below. Tomorrow I’m helping run a ‘Have a Go ‘ day at Cambridge Gun Club – we will be giving each person 8 percussion shots and two flint shots – I think w’ll have 8 ‘customers’ each so thats 80 shots which is quite a lot with a muzzle loader. I’ll use my Sam Nock percussion as it takes the same wads etc as my flint Manton. Should be a busy day. Then on Sunday we have our monthly shoot at Cambridge so its going to be a very black powder bank holiday w/e. Its getting near to the Northern Shooting Show – I’ll be packing my kit into the Land Cruiser and heading North to set up my stand in a week- with luck it won’t be too cold as I shall be camping in it when the geat is out. Most of the MLAGB gang camp so we have a bit of a party on Saturday night. If you come to the show, make sure you look me out in the ‘Artisans’ area.
The wood on the top one (third attempt) is a bit thick for a box so it looks wrong. The bottom box is a real one that will have my Beaumont Adams in it when I’ve done the inside.
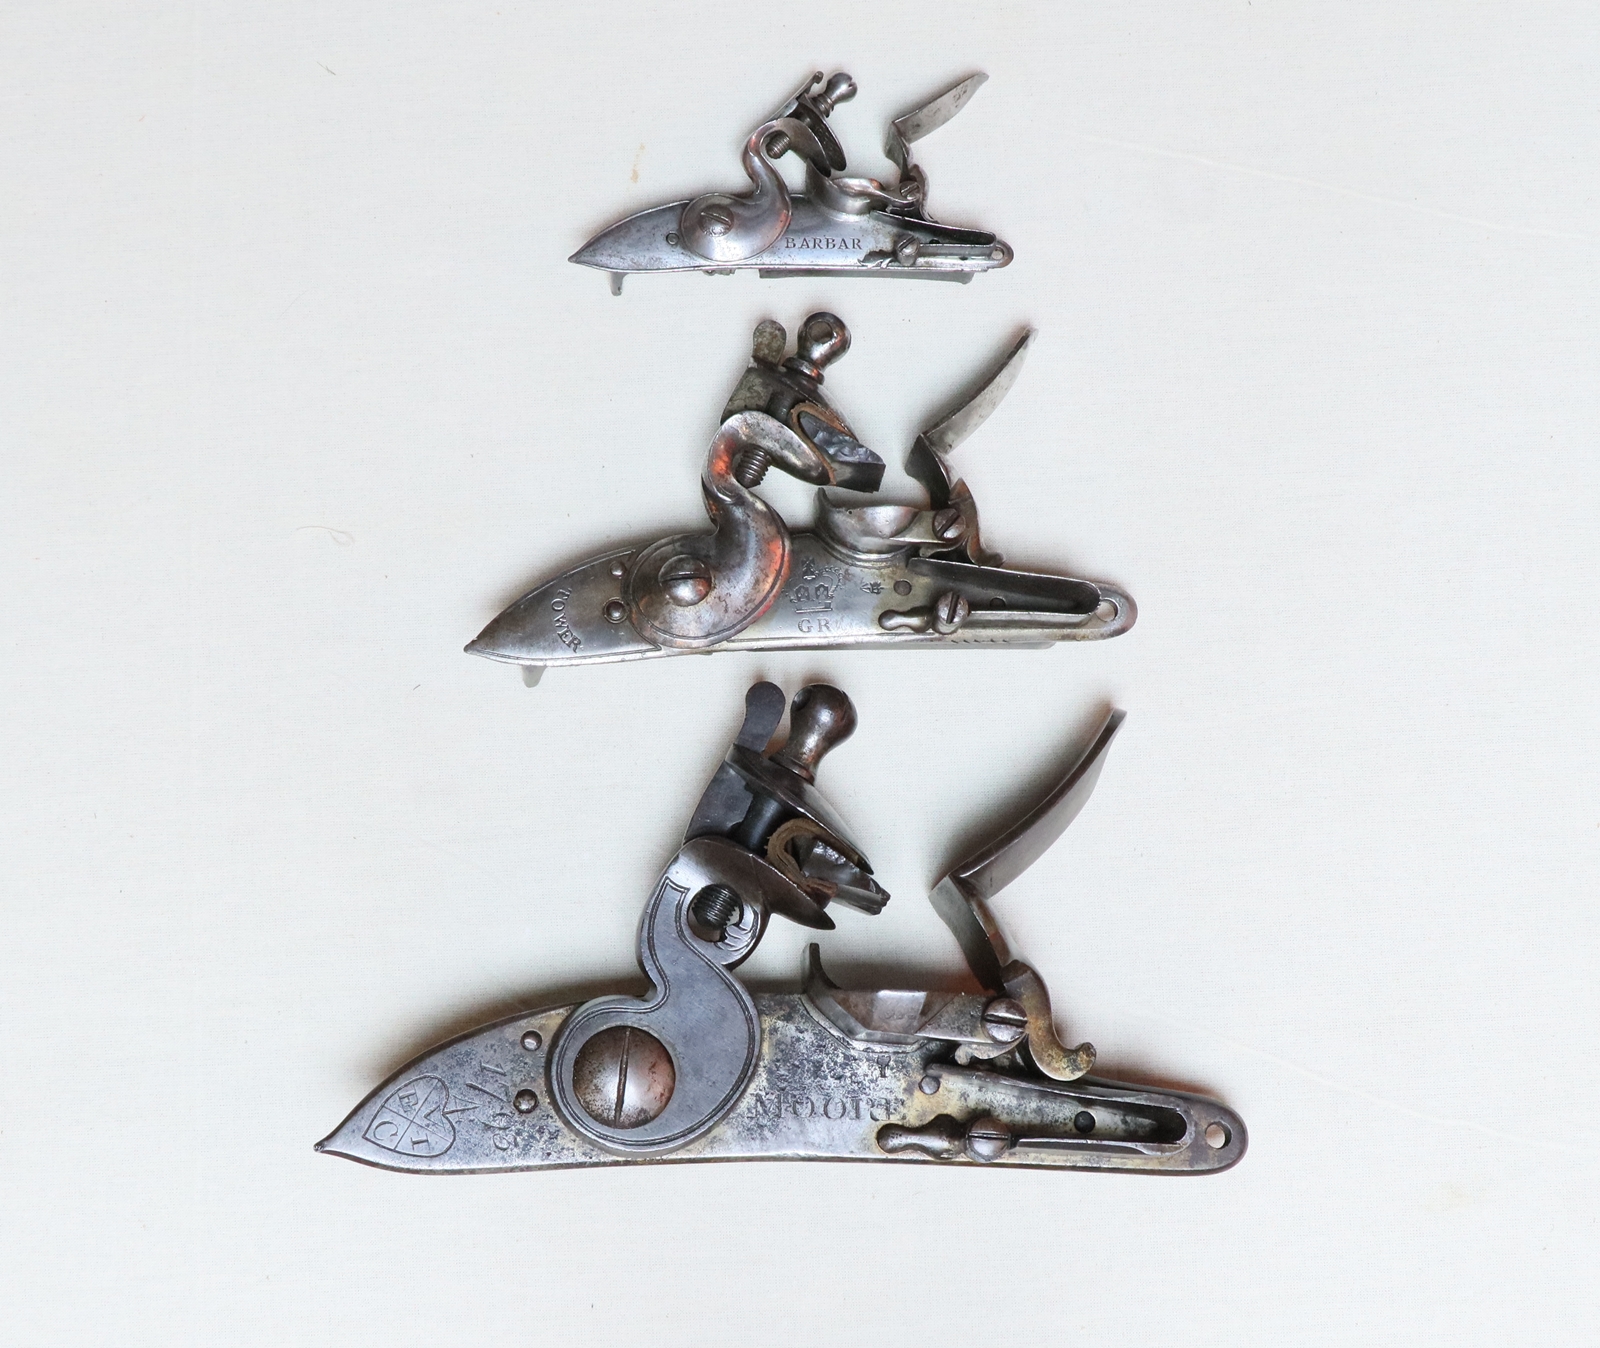
28th April – I’m sure I posted on here a couple of days ago, but must have forgotten to press the ‘publish’ button! Put it down to age….. I had a pleasant trip to deepest Norfolk to see a friend who has a nice collection. I have been invited to go and photograph some of his guns for the blog, so as soon as I can find a couple of days free I’ll go. The O/U is now finished – I reshaped the ramrod end as it didn’t rest easy against the barrel and rib, and it now looks comfortable! I was looking through ‘The Price Guide to Antique Guns and Pistols’ by Peter Hawkins – its of course massively out of date (1977) so the prices are of historic interest only, but it has over 1000 illustrations and useful comments – Peter Hawkins was the Christies gun man before they gave up selling guns, so his observations are still valid. I am amused by some of his comments on the aesthetics of some lesser pistols! I had a session of making cloth covers for any gun or pistol cases that don’t already have them, as they are handy if you pile up cases and try to pull ones out of the middle of the pile! I need to shift some more of my collection to make room for new acquisitions – I am putting a cased pair of Liege pistols that Dick restored some time ago on the For Sale page. Email me if you are interested. I was looking out some locks for a YouTube video on lock mechanisms and found these three as a nice size contrast;-The biggest is from an East India Company wall gun of 1793, its 9 1/4 inches long. The second is (probably) a bog standard India pattern type Musket lock, probably of the Napoleaonic war period ( I don’t have the musket it came off) and the little lock is from a fine silver mounted horse pistol by Barbar of about 1760. All have in common a mainspring without a link, a frizzen without roller and a frizzen spring held by an external screw.
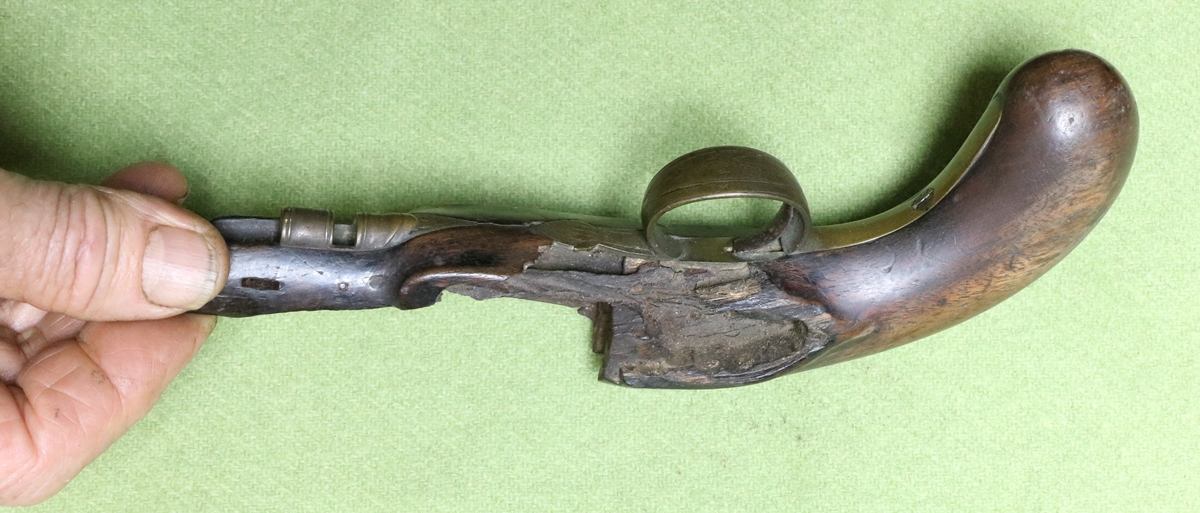
24th April – I went into school as The Black Knight this morning, having put my suit of armour in the classroom under wraps yesterday – great fun with the year 1 & 2 kids (5/6/7). I spent another few hours sorting the O/U pistol first bending the left cock to match the right, and then inumerable goes at filing a bit off the sear and putting it back and checking to see if the full and half cock poisitions of the cocks lined up. I had made the new sear as a careful copy of the old one ( which was a bit bent and not working) but in the end had to file the nose down 1 1/2 mm to get the cocks to line up – ergo the damaged sear could not have been the right one? Anyway I got them lined up to a pretty good tolerance – I then found when I put the locks in the pistol ( I’d been doing the lining up in a jig) that the new sear arm needed slightly bending to give a bit of clearance on the trigger blade. Once done the sear was hardened and then tempered at about 225 degrees C to take the brittleness out of it. I just need to decide if I need to modify the ramrod, and we are done. I had a look at the remaining Harding little pistol parts – the stock is in need on pretty major surgery – its one of those jobs where you think it might almost be easier to restock it rather than struggel to repair, but that is almost never a good option as any value in the pistol is much reduced compared to a careful repair. I cleaned off the wood with paint stripper to see what was there and discovered that there were old repairs using panel pins – I need to get the furniture off and have a good look, but in the meantime here is a photo;-
22nd April – yet more lovely weather! I sorted out the boat from yesterday and then remade the ramrod for the O/U pistol as it had been badly damaged – I bought a nice length of straight grained ebony about 30 mm square some time ago and cut some lengths into 12 x 12 mm for ramrods so I cut a bit off a long length for the pistol and turned it in the woodturning lathe – it was quite short, so no problem with whip – actually I was amazed at how strong the ebony was, I turned a bit down to about 1 mm diameter to separate it and it was quite difficult to break! Anyway its all coming together now – I realised that before I can finish the sear to give the exact positions I need to bend one of the cocks slightly as it was at some time dropped on it, the bend is no problem as its only a few mm but it will make a difference to the sear. I will heat it up before bending in case that turns out to be problematic too. I was going to try to soften the little screw that is sheared off in the lockplate by playing a very fine flame on it – I have the perfect torch – a Turbogas 90 – that I had for lead welding, it can use a hypodermic syringe of 18 gauge for a nozzle so has an extremely fine flame. Unfortunately it has run out of Oxygen, so I’ll have to wait while some comes care of ebay! Oh, and I did manage to fit in an hour and a half of climbing (bouldering) this afternoon, so I should sleep well tonight! They are making all the climbs more difficult, or I am getting worse, I prefer the former explanation.
Here is the browned O/U barrel with the new ramrod.
21st April – another lovely day here! Took the dinghy to Wolverston and had a decent sail on the Orwell – extremely pleasant, just an adequate breeze for 4 in the dinghy without any gymnastics, I didn’t have any time for anything else, but I was thinking about the problems with the internal lock parts of the O/U pistol – when I got it to sort there were a couple of bits of the bridles broken where they were thin round the screws, even though they shouldn’t come under any great stress. I asked a materials scientist friend of Giles who was sailing with us about possible causes, and she offered to take a sample and polish it and look at it under a Scanning Electron Micaroscope to see what the structure is and look for any possible problems. There is always someone in Cambridge who can provide expert advice on technical problems if you can find them! I think all the bits of the pistol works have been hardened to an inch of their lives – one of the screws was broken off in the lock plate and as there was nothing to get hold of, I tried to drill a small hole through the embedded screw – my brand new HSS drills wouldn’t even mark it. Screws are not usually that hard as it makes them too brittle, so I’m not sure what is going on. I don’t know if I dare to put the whole lot in a furnace and temper them to dark blue to get rid of any brittleness.
.
20 th April I spent a happy 4 hours on the replacement sear for the O/U pistol, as well as getting the boat ready for a sail tomorrow – take advantage of the weather while you can! For the sear, I milled a strip of spring steel to fix the main shape and then filed it – I am now at the stage of very cautiously filing the nose of the sear to set the full cock position – since the pistol has a lock on each side, its critical that the cocks are aligned at half and full cock or it looks like poor workmanship or a bodged repair. The sear probably needs to be filed and honed after hardening and tempering to within 1/10 th of a mm. I had a couple of problems with getting clearance for the sliding safety that was catching on the sear, until I discovered a drip of araldite on the safety from some crude previous repair! I always leave small parts attached to the bulk of the metal until the last moment as it makes life much easier – After shaping the sear I welded the arm on and tidied it up. It would all be so much easier if I had a working cnc miller!
 New and old stacked – not a bad fit!
Final fitting and tidying up to do, but more or less there, thank goodness!
19th April I put the O/U pistol together and the right hand lock would not cock – on taking it out the sear fell out – half the bearing had broken off – this was the sear that had been welded in the past, and had a folded over tip I had to straighten out. Not sure what happened to the metal here, but it clean broke off the thin bit of the bearing. I guess I could get Jason to pile a bit of weld on it, or do it myself, but the nose of the sear is still a source of concern after it was straightened out, so I think its a case of making a new sear. I’ve photgraphed the sear against a rule so I can work out the necessary two hole centres, one for the bearing and the other for the curve that fits against the tumbler – if I get those right and drill/mill my blank it should fit when I attack the rest of the outline. Its a job I could do without, but I don’t think there is any sensible alternative. It won’t happen for a few days as the weather is so nice that I’m getting the dinghy ready to go sailing on Sunday on the Stour.
There is a small crack from the bottom just to the right of the bearing hole so definitely not worth trying to repair!
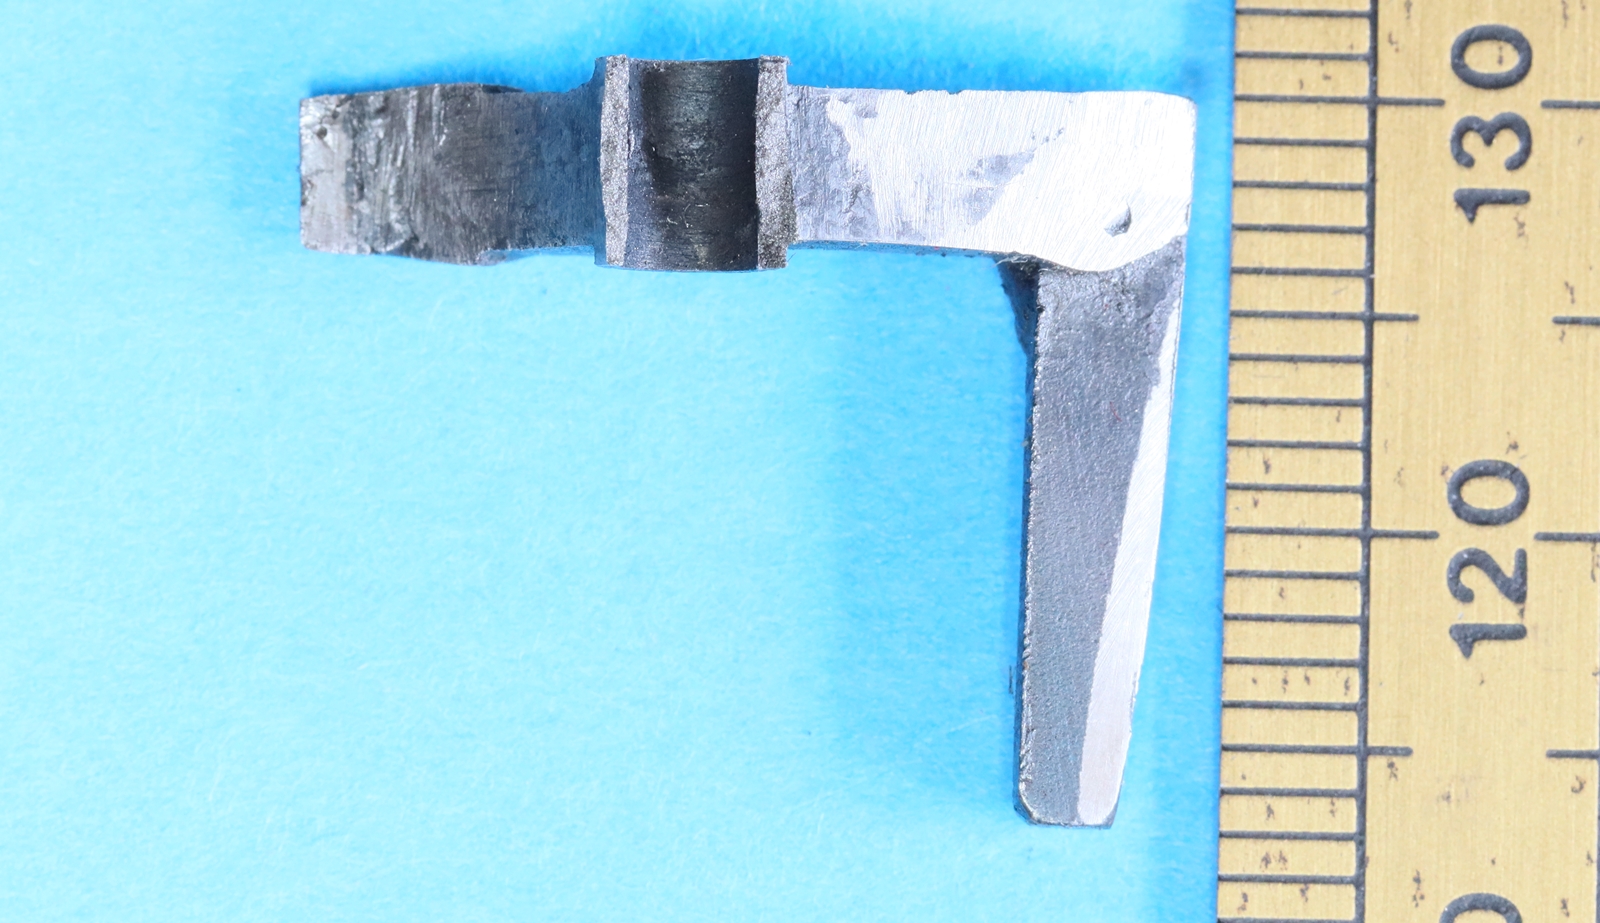
The arm was already repaired – I guess its just a bad piece of metal!
18th April I finished the browning of the O/U pistol barrel – a nice even figure. I have cleaned out the chequering a little, not recut it, just got rid of the ingrained dirt that always obscures it. I also renewed the escutchon as the oniginal had dents and scratches that I couldn’t get out. It is looking good. I ordered some old Nettlefold woodscrews from ebay to engrave at the Northern Shooting Show where I’ll be doing my regular engraving demonstrations – I give engraved screws to children who show interest. The seller, Tony, rang me to say he hadn’t got the size I’d specified but as the length isn’t important he had others suitable. We had a very interesting discussion about the uses of pre war woodscrews – he has a brisk business selling old stock to all sorts of restoration projects and reenactment makers – I’m his first screw-head engraver! Anyway as I give them away to children he kindly upped the quentities he was sending – so I probably have a lifetime’s supply now. I will engrave a couple for him – he said he will make a donation to a charity that makes prostheses for children without any official funding – have a look at http://www.teamunlimbited.org and donate if you feel inspired. I’ll make a donation in return for all those extra screws too. I finished the tumbler/sear/sear spring bits of the dog lock – enough to demonstrate how the horizontal sear works. Shame I haven’t got the mainspring casting for it – maybe I’ll make one some day. ( the nail pivot for the sear is so that I can easily remove it to show the workings).
17th April – I made a ramrod for the Purdey Rifle – it needed something as it looked a bit bare without one. I didn’t have time to make a proper one out of the ebony that I have, so I made a simple one with a dummy instead of a worm. I went to a re-enactors fair last year and there was a chap selling ash blanks for arrrows so I bought all of the straight ones he had and have kept them taped to a straight edge. The nominal 10 mm ones fitted the pipes on the Purdey almost perfectly – I just needed to put the blank in the lathe and sand the inboard end down a bit to give a good fit, then fit the dummy end and the top end and colour the wood up a bit, and the gun looks much happier although its a nice rifle and does deserve better – I’ll get round to it when I have time to round off the ebony squares and can find my worm ends. I’m rebrowning the O/U barrel again – I stripped the over browning off in the electrolytic deruster and then polished off the residue with 7000 grade paper. Its looking good and I’m proceeding very carefully to avoid a repeat of the over browning. I am fettling up a partial set of castings of an English doglock as a demonstration piece to show a lock with a horizontal sear – it took me a while to work out how the lock was supposed to function as it wasn’t immediately obvious from the bits I had – I have now got the sear working on full and half cock, and need to make a sear spring – its also missing the mainspring and the steel/frizzen/hammer or whatever you choose to call it. Not sure if I’ll bother to make all the bits as I don’t intend to make a gun from it at the moment.
16th April – Busy day – I got out a couple of percussion rifles to see what I might put on my license and shoot at some point this summer – I found bullet moulds for my Staudenmeyer 30 bore – it takes a 34 bore ball and a 10 thou patch, and my Purdey that takes a 95 bore ball with a 12 thou patch. Anyway I did a bit of casting – the best accessory I’ve come across is the pourer designed by Jeff Tanner consisting of a small CO2 cylinder with the outlet hole cleared and a section cut off the top of the back, mounted on a shaft with a wooden handle. Keep it in the molten lead and just pour it nto the bullet mould – keeps the dross out, and once the mould is up to temperature it gives a nice clean cast. I occasionally get asked if I do gold inlay, so I thought it was time I had a go, so I splashed out on 2 inches of 0.5 mm pure gold wire – that was about £8, so £1 per quarter inch! Anway I blew a bit of it on a test inlay 1 mm wide, which worked except that in punching it in I slightly dented the steel and didn’t quite get the groove I’d cut filled – there was not much surplus gold above the surface. I have a supply of fine silver in the shape of vacuum gaskets so I decided it would be cheaper to mess about with that and save my remaining bit of gold! I did a quick test to see if the silver was soft enough (it needed annealing), using a script letter I had previously cut – and it worked – this time I had a decent excess of silver after I had punched it in, so it filled the cut properly. I made the cuts with a number of cuts with the square graver to remove metal, then cut to the edges with the square graver canted to give a near vertical edge, then undercust with an Onglette as best I could. I also nicked the bottoms of the grooves with the point of the square graver to give the silver some more purchase. It looks possible, at least worth trying to do it properly!
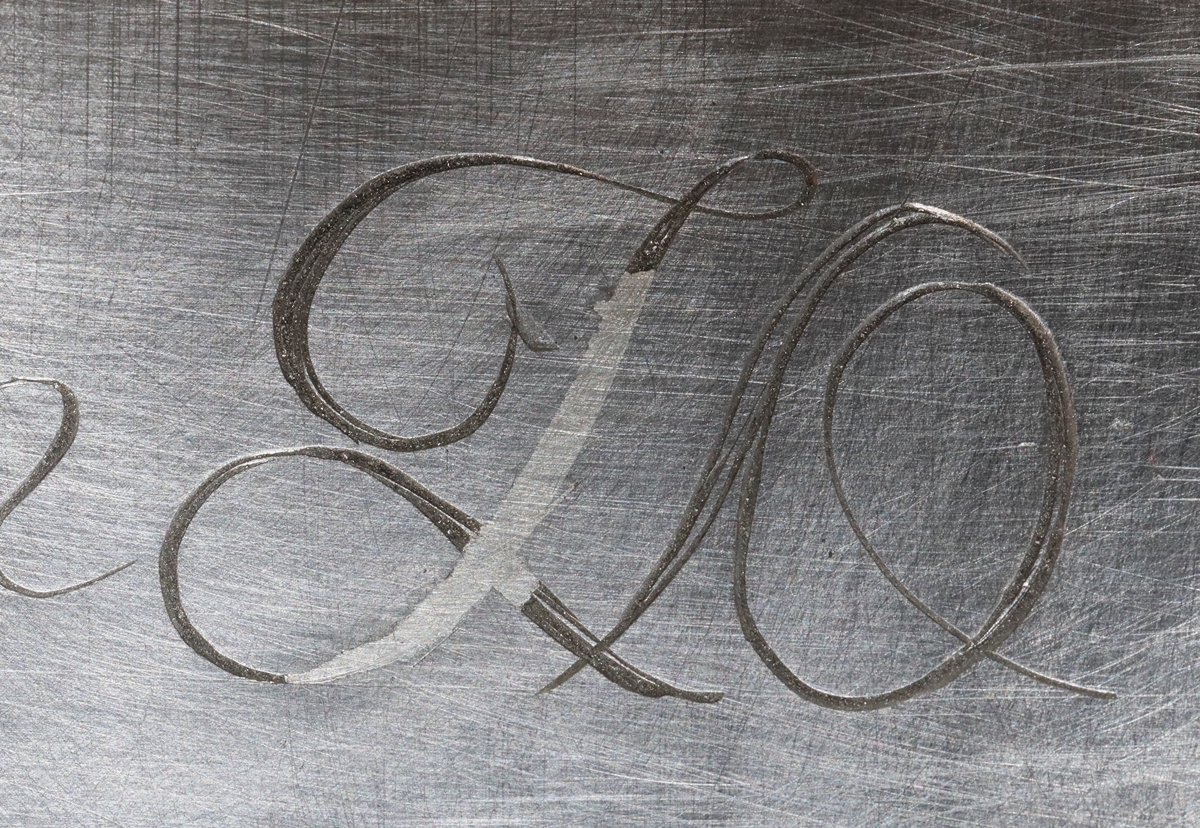
Well, its a start!
14th April – I’ve been away for a couple of days sorting our cottage in Cornwall ready for letting via AirB&B – Mainly a new cooker and smarten up the terrace. Back home I was looking through my bits and pieces to see what projects I could come up with. I found a massive original East India Company flintpock by Moore (with replacement cock) that I was going to drop into my wall gun that had been converted to a punt gun. I also have a set of original parts for a 1768 military pistol that needs a barrel and a stock and few bits and pieces. Plus a set of parts for a pair of Wogden duelling pistols (minus cocksand stocks and a few bits) and a set of castings and wood for a double flint gun. I ought to put some of the bits on my ‘guns for sale’ page so other people could have a go at making them up – I’ll sort through and see what I can find. I’m still trying to get a cock for the other little Harding that almost matches my Post Office pistol. I’m in communication with Jessica at the Post Office Museum, they have a little Harding pistol very similar to mine and I emailed to ask if it has the crown and broad arrow stamps on lock and barrel like mine. If not, they should aquire mine and have the real thing! The reason I was rumaging was to find a set of doglock castings that I had somewhere, to use them in a video – I found them – there are a few bits missing but there are enough to show the principle – so I started to file them up so I could make the bits I| have work enough to demonstrate the horizontal sear
10th April – I was doing my homework in preparation for making some videos on the history of antique firearms and came across a series of youtube videos – called Forgotten Weapons -from the US that describe some of the guns being offered by Rock Island auction house – mostly breech loaders but a few real antiques like the Lorenzoni and a couple of wheellocks. The videos are well made and informative so I’ll take what I can learn from them and not duplicate what they already do. I have yet to see a video of anyone actually firing a Lorenzoni but there must be someone out there who has. I do have a friend who has one in his collection but I haven’t so far managed to persuade him to let me fire it!!!!!
8th April – I ordered a 3 m length of 1/4 inch by 2 inch mild steel bar, cut into 300 mm lengths to use as trial plates for engraving practice. A friend offered to surface grind them to get rid of the cold rolled skin that makes engraving them a bit like engraving a ploughed field although you can’t actually see the unevenness. When they are ready I’ll cut them in half and put some on the ‘For Sale’ page. I have a project for half a dozen of them – I want to make a set representing different vernacular gun engraving styles ( i.e. from guns that were intended to be used, not presentation pieces which I find altogether over the top). I am fond of the late 17th century / early 18th century style – strawberry leaves and grotesque faces, but things went a bit quiet on the engraving front for a few years, then a rather loopy but quite sparse style came in towards the third quarter of the 18th century. The last quarter of the 18th century and the beginning of the 19th were the heyday of the Palmer style with running leaf borders and poor representations of birds and dogs with liberal additions of scrolls. The second quarter of the 19th century saw a marked improvement in the technical aspects of gun engraving with Gumbrell and contempories which persisted alongside the heirs to the Palmer tradition, plus the introduction of all over simple scrollwork and a wide variety of border styles round locks with a range of finess. By the late 19th century engraving had become almost the only thing that distinguished the guns of the top gunmakers like Boss, Purdy and Holland, causing them to adopt distinctive engraving styles – at that point I loose interest! Before anyone corrects me, I do realise that the above is a gross simplification, but does convey a sense of the progress of the art. See Beginners Guide to Engraving on this blog…. Anyway it will make a nice set of exercises for me!
7 th April – Sorry about the absence of diary entries – other work took precedence. I browned the big o/u barrel – it was going nicely but a bit light coloured, so I used my ex PCB browning – I must have swabbed it on too liberally and then wiped off some of the excess as it went very wrong – part of the barrel went quite black, some stayed brown with the twist pattern visible and some appeared to have lost most of its browning – there is nothing for it but to start again. I will use the electrolytic derusting as that should remove most of the browning without taking any more metal off. I may have to go over it with 2000 grit paper but will take care to avoid the lettering. I am still busy with sorting out some patent work so it will have tobe put on hold for a week or so! I feel stupid as I am perfectly aware that you need to put the browning on very sparingly – hardly wetting the surface at all.
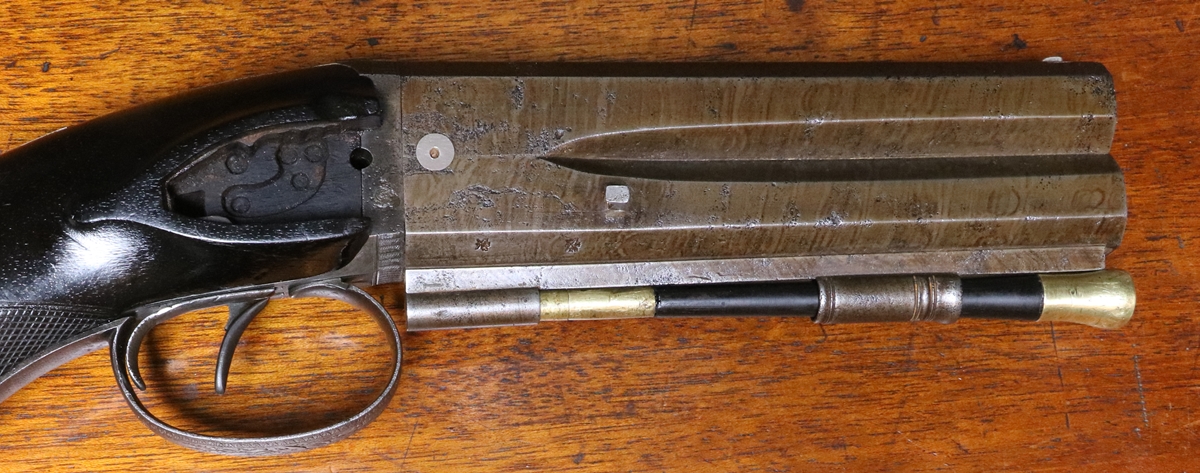
3rd April – I was preparing the barrel of the big over and under flintlock pistol and decided that my expensive ( £25) 6 inch No 6 file was a bit dead so I remembered reading somewhere that you could revitalise files by putting them in dilute (10%) Nitric acid, so as I happen to have some Nitric Acid left over from my experiments with anodising, I tried it. well, the file fizzed happily for a few minutes before I rescued it, and did seem a quite a bit better. so I put most of my 6 inch files in the acid for a few minutes. They need drying and oiling afterwards as the surface is highly reactive. Anyway, I finished the barrel with 3 grades of wet and dry wrapped round a hard, flat object ( small sharpening stone) – 600, 1000 and 2000 after the No 6 draw filing. I’ve given it about half a dozen rustings so far, not letting any of them run too long, and its developing a good figure – those classic flintlock over and under pistols usually had well figured barrels, and the two barrels were made separately and brazed together – I have a feeling that they matched up the two barrels at the joint pretty carefully to respect the twist pattern.
2nd April II – Yesterday I got a very nice 12 bore boxlock ejector by Askill for a friend, who was delighted with it – nice side by side shotguns can be had for a song as hardly anyone shoots them now. I finished the engraving of Fred’s gun bits today – a few difficulties, like a screwhead that my normal gravers couldn’t mark – I had to dig away with the GRS pneumatic, and then only managed a few crude cuts – it wasn’t hard, just very tough. Another one I had to engrave was dead hard, but that was Ok because it annealed OK. I finished the false breech for a single barreled gun of 1770 style, based loosly on that of my Twigg single of about the same date – The metal was pretty horrible and part of it had to be done with the GRS, I am ashamed to say! I’ve been stripping and fettling a heavy flintlock over and under pistol – one of the locks wouldn’t engage half cock, and then wouldn’t engage either bent. stripping it revealed the tip of the sear bent into a nice U shape! The leg of the sear had been welded, so the tip must have been annealed in the welding process and being quite thin, just bent right over. Anyway I managed to heat it up to red heat and bend it with a fine pair of round nosed pliers until I could flatten it. It was then heated to bright red and quenched and tempered so it is now working. In stripping the pistol I had some difficulty in freeing the ‘nail’ in the false breech tang – in most guns it goes through the stock into the trigger plate, so is a ‘bolt’, but in this case it was just a woodscrew, which explains why it was really difficult to get out even when it had started. ( loading these photos I realised I still needed to engrave the ‘flanks’ of the false breech as they shouldn’t be left plain.)

Obviously the screw is not the proper screw – its just to hold it for engraving!
2nd April – The blog has just passed 2 million visits in the 5 years it has been going – here is a snapshot at 11 a.m.
| Online Users: |
0 |
| |
Visitors |
Visits |
| Today: |
93 |
475 |
| Yesterday: |
196 |
1,222 |
| Last 7 Days: |
1,313 |
9,010 |
| Last 30 Days: |
5,593 |
37,526 |
| Last 365 Days: |
96,261 |
693,216 |
| Total: |
284,659 |
2,001,208 |
| |
31 March – I had to make a new pair of nipples for the Venables as the originals were just too small to hold the standard caps tightly and I had a couple of ‘misfires’ where the cap had fallen off, so I had to pinch each cap slightly before putting it on. Is a shame as the originals were ‘proper’ nipples with a small (about 1 m.m.) hole through a narrow waist in the centre of the nipple. I made a video of the making, but the second one just didn’t go well! I got too gung ho and tried to cut the titanium too fast with my HSS tool – quite spectacular as the heat set light to the swarf coming off the cut and there was a very bright flash that burnt the tip of the tool away! Not sure if I have that on video or not. Anyway I eventually ended up with a pair of nipples that are a perfect fit for the caps. Then lawn mowing took over……………..
30th March – shooting at Cambridge Gun Club – with the Venables. It obviously fits me as I only missed one clay in the first 8 but it was downhill from there as usual – still I do manage most of the ones that simulate game! I shot some ‘driven’ clays later with my big Miruku and that was OK ish so not too unhappy at the result! There was a supplementary shoot in the afternoon with long range clays – 60 yds and up – I didn’t take part as it seemed a triumph of hope over expectation – the best score was 5/13. At that range with the average antique barrel I would reckon that at best you would stand a 50% chance of breaking the clay even if it was in the centre of your pattern as there are usually plenty of clay sized holes at that range. I’ve now got all the bits for filming videos, although I’m having trouble getting my old camera to cooperate with the HDMI screen. I’m trying to put together something on the history of firearms as an intro, but the trouble is that its very difficult to get hold of anything before about 1750 to film, and I don’t know anyone who shoots wheellocks, or Mingulet locks for that mattter. Anyway I’m working on it, and on some more engraving videos. I have been doing a bit of practice and I am beginning to think it might just be worth using special steel gravers – GRS sell some in what they call GLENSTEEL – I have one and as long as you don’t break the point it lasts much longer than my normal ones before it needs sharpening – the only trouble is that when the point breaks it usually takes of quite a chunk of metal and takes longer to sharpen as its harder. I have one single barreled false breech to engrave for Fred, so I’ll try and do a video of that – I may copy the false breech of my Joseph Manton Tubelock as its quite attractive and not too longwinded – to be decided, as they say.
29th March – I have thought of a great new business opportunity – selling newspapers from which every mention of Brexit has been expunged – I anticipate a brisk trade, although I fear there won’t be much left to read ! Had a pleasant morning discussing guns with a regular client who collected a pair of pistols that we renovated, and left a nice cased pair of 1785 ish pistols that need a bit of attention, and a hefty over and under flint pocket pistol of around 1810 or so that will freshen up into something better. I didn’t get any time for engraving – I’m keen to keep my hand in and maybe do a couple more videos – I guess that ones of something being engraved are likely to be more popular than explanations! I just remembered in time that I’m shooting tomorrow and that the Venables is a 14 bore and all my overshot cards are a bit small at 16 bore, so I had to dig out a 14 bore punch and make a few. I will try the Venables, as I’ve spent so long doing it up that I need to get some use from it. I think I have now sorted out resoldering barrels after three tries, so I’m quite gung ho about another try!
28th March – Almost at the end of another month! I had another look at the Venables with a view to shooting it – it still has the nipples that I bought it with, and they have a fairly big hole right the way through. I tried to fit the spare titanium nipples I have but they wouldn’t go all the way in – checking the depth of the tapped holes in the gun I think it is not that they are too long in the thread, but that I haven’t tapped them far enough up to the flange. Its a problem because the dies always have a long taper on the lead-in and don’t cut right up to the shoulder. I tried relieving the thread at the top but obviously not enough. My die is ground off on the reverse side so that it doesn’t have such a long taper, but obviously not enough to do the job. I would have a go at sorting the titanium ones, but tomorrow is a busy day and I’m shooting on Saturday – in fat I don’t know when I will be able to fit in next week’s shopping… maybe we’ll starve! I’ve continued to sort out what I will need to do my videos of guns – I am making some test runs to try out different lighting arrangements.
27th March – I survived my Ofsted interrogation so far, we have to return tomorrow afternoon to learn what the Inspector makes of our school! I’ve put another screwheads video on youtube – and on the VIDEOS page here. I’m just doing a few simple ones as practice for what I hope will be a series on the history of firearms. We have an AML clay shoot at Cambridge on Saturday, I may just put the Venables on my ticket and try it, or I might follow my resolution and just stick to one gun, my old Samuel Nock. I have been a bit dissapointed at my shooting with my 20 bore hammer gun (when I give up on stuffing things down the barrel of the muzzle loader) – it has a very tight choke, but I don’t think that is the main reason – I have a feeling that it is a bit light and I end up waving it about in the air. I might just take my big Miroku U/O and see if I can still shoot with that, it hasn’t had an outing for ages.
26th March – it never rains but it pours! We learnt this evening that the school is to have an OFSTED inspection tomorrow, so governors have to go in to be quizzed by one of Her Majesty’s Inspectors about what we are doing to improve the school! I wish there was a simple answer to that, but I don’t expect repairing the doorbell will cut much ice! My youtube videos are getting a few views, I’ve nearly done another one, but I find that I really need a decent microphone – is there no end to the expense involved? They are relaying the road just outside our house through the nights this week, and at the moment there is an enormous machine that is shaking the whole house in a very disturbing way – no chance of sleep while that is going on 20 yards from the bedroom window, so not only do I have to face an OFSTED grilling, but have to do it after a sleepless night. Please excuse my somewhat negative post!
25th March – Did our STEM club at school – we were doing the experiment of inverting a glass over a burning candle – two competent scientists and we still couldn’t work out exactly what is going on – all the simple explanations on the web are clearly wrong, being far too simple – I think it is a number of processes going on simultaneously but we couldn’t work out any numbers. The main problem is where all the oxygen ends up after it is burnt – it should be converted to carbon dioxide and take a comparable volume, but it doesn’t! Puzzle……. And while at school I was asked to take my suit of armour in and be a knight next term – makes a change from fixing their doorbell today!
24th March – I had a comment (see CONTACTS) from someone who took me to task for restoring firearms and for shooting animals. As it’s the first time I’ve received such a comment I thought I’d reply via this post. I support the right of my correspondent to hold whatever legal views she likes, and am more than happy to give my response in detail on this occasion. My interest in restoring antique firearms is separate from my interest in shooting – in fact most of the restoration I do is of guns that could not be used, and would be unsuitable for any kind of sporting use. Our cultural and engineering history has been intimately connected with firearms for the last 400 years – during that time they represented the only advanced mechanical systems manufactured in any significant quantities, and most advances in metalurgy and engineering were associated with firearms manufacture – two examples illustrate this, the first that around 7 milion examples of the Brown Bess musket and its derivatives were made to a broadly similar design in the years from1700 to 1830 while NO other engineering products even reached a thousanth of that output – giving rise to the concept of pattern manufacture and standardisation. The second example is that when Newcomen invented the steam engine he was dependent upon technology developed for cannon boring to produce the cylinders. Guns represented the peak of both quantity and quality production and are deeply embedded in our history – To ignore or allow such important artefacts to decay because of a recent cultural shift, however well meaning, would be to trample on our history. As far as using guns for shooting is concerned, most people who shoot do so at either clays or targets, not game, and as such enjoy a challenging and physical sport that harms no-one. I defend my right to shoot game – like the majority of the population I eat meat and don’t shy away from occasionally killing to provide some of that meat rather than sub-contract all the killing to others. I am, as are my friends , always conscious of our duty to have regard for our quarry and to avoid wounding, and there are some aspects of game shooting, particularly when it doesn’t give rise to useful food, that I disapprove of. As far as culling and control is concerned, in most cases shooting is widely regarded as the most humane method – think of more humane alternatives to shooting for deer or boar control. One large estate in Eastern England has been told by Nature England that it needs to cull 400 older head of deer a year to maintain a healthy population – I don’t know of any method more humane than (skilled) shooting to selectively cull such large numbers – perhaps my correspondent knows of a better way? Humans have removed the top predators from some species and we need to take on that role to preserve the health of the stock. There are now supposed to be more deer in the UK than at any time in our history, and its likely to be true of wild boar within 30 years. Finally, I challenge the assertion she makes that I have no moral conscience or compassion – it just may not align completely with hers, although I bet it does over the vast majority of issues!
P.S. I did a Youtube video on engraving screw heads – see VIDEOS at the top.
23rd March – I didn’t find the foresight of the Venables so I had great fun making a new one – very fiddly! the hole appeared to be tapped 8 B.A. so I made mine that size although Dick said they were mostly 7 B.A. Anyway the Venables is now complete and a very fine gun too! I may replace one of my shooting doubles with it. I’ve been planning a few more Youtube videos for the future – I’m told that things like watching engraving are popular, so I’ll do a few, but I really want to do some on the history of firearms – I’d like to be able to show some of the splendid guns that various friends have in their collections – there is so much of interest in the history.
20th March – I bit the bullet and had a go at straightening the stock of the Venables which if you look back in the diary, you’ll see had a 3/4 inch cast off. First it is necessary to set up a jig to hold the gun (stripped of its trigger guard and trigger plate and locks) against a straight piece of wood that can act as the reference plane, packing the muzzle so that the centreline of the gun is parallel to the reference plane and clamping the muzzle to the plane and the bench so it can’t move or twist. Your reference plane must be straight and rigid – my wooden plank was backed by a 1″ x 3″ steel bar that ensured it didn’t bend as the clamp on the butt was tightened. The stock is clamped to the reference plane with suitable packing in the lock area. You can now measure the offset of the centre line of the gun from the reference plane and measure the amount of cast-off ( about 3/4 inch in this case). I wrapped the lock area in aluminium foil to protect it from heat as I wanted to restrict the bending to the wrist area, and wrapped the wrist in a sheet of kitchen roll folded in half. I poured a little very hot vegetable oil on the tissue and played a heat gun on medium heat on the wrist – it takes a long time for the heat to penetrate the wood, but eventually ( >3/4 hour) you should find that the butt will flex a bit, and its time to start gently tightening the clamp holding the butt to the reference plane and measuring the cast. Make sure you clamp so that the stock isn’t twisted. There is no need to rush this stage and force the wood as it is likely to spring back if it isn’t allowed to relax into its new shape. The butt will spring back a bit when its no longer held by the clamp, so its best to tighten the clamp on the butt just a bit more than you want the evenatual cast off to be – I bent it to about 0 to 1/8 inch cast off and then went off and had lunch and did a few jobs so it had about 3 hours to cool – when I unclamped it, it has a cast of around 3/16th to 1/4 inch – just perfect for me. So I’ve now put it back together – the lockpockets were a bit of a tight fit as presumably the wood has changed shape slightly. I was pleased to see that the finish of the stock is still perfect.The only bit of the job left is to find the nipples and the foresight bead….. I’m sure they were somewhere! – there is always something else to do to finish the job.

This is how it started out! It really is that bent.
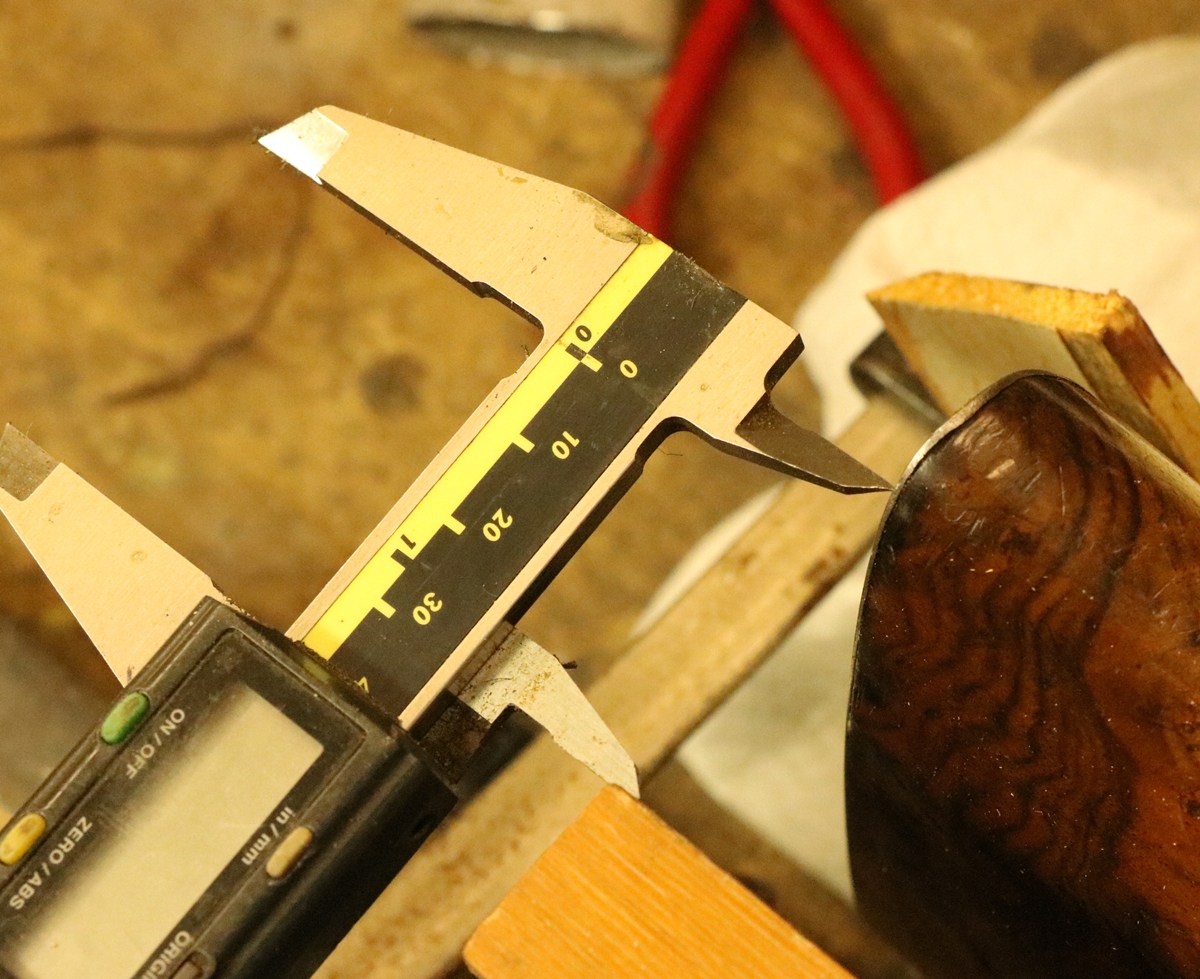
Caliper set to offset of centreline so still about 1/2″ cast off
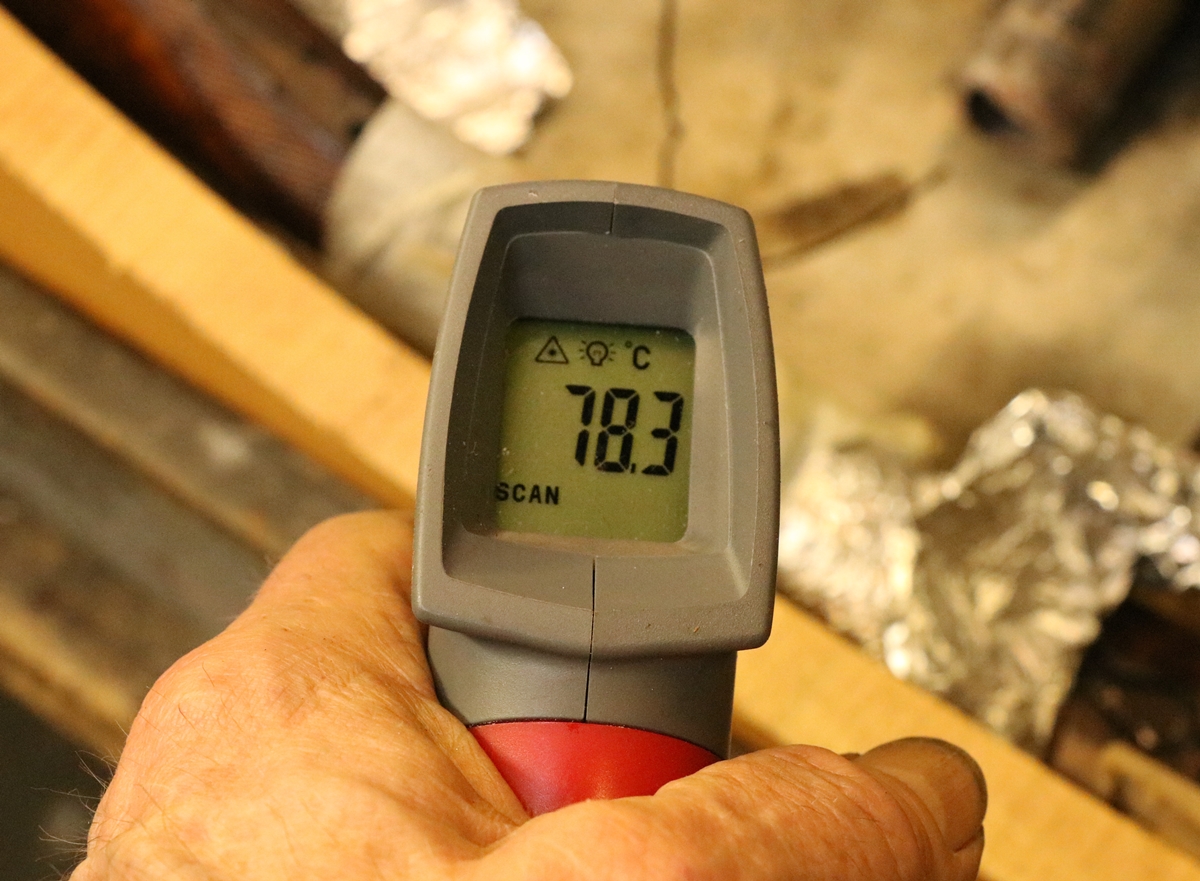
I kept the temperature to less than 100C – just takes time to work
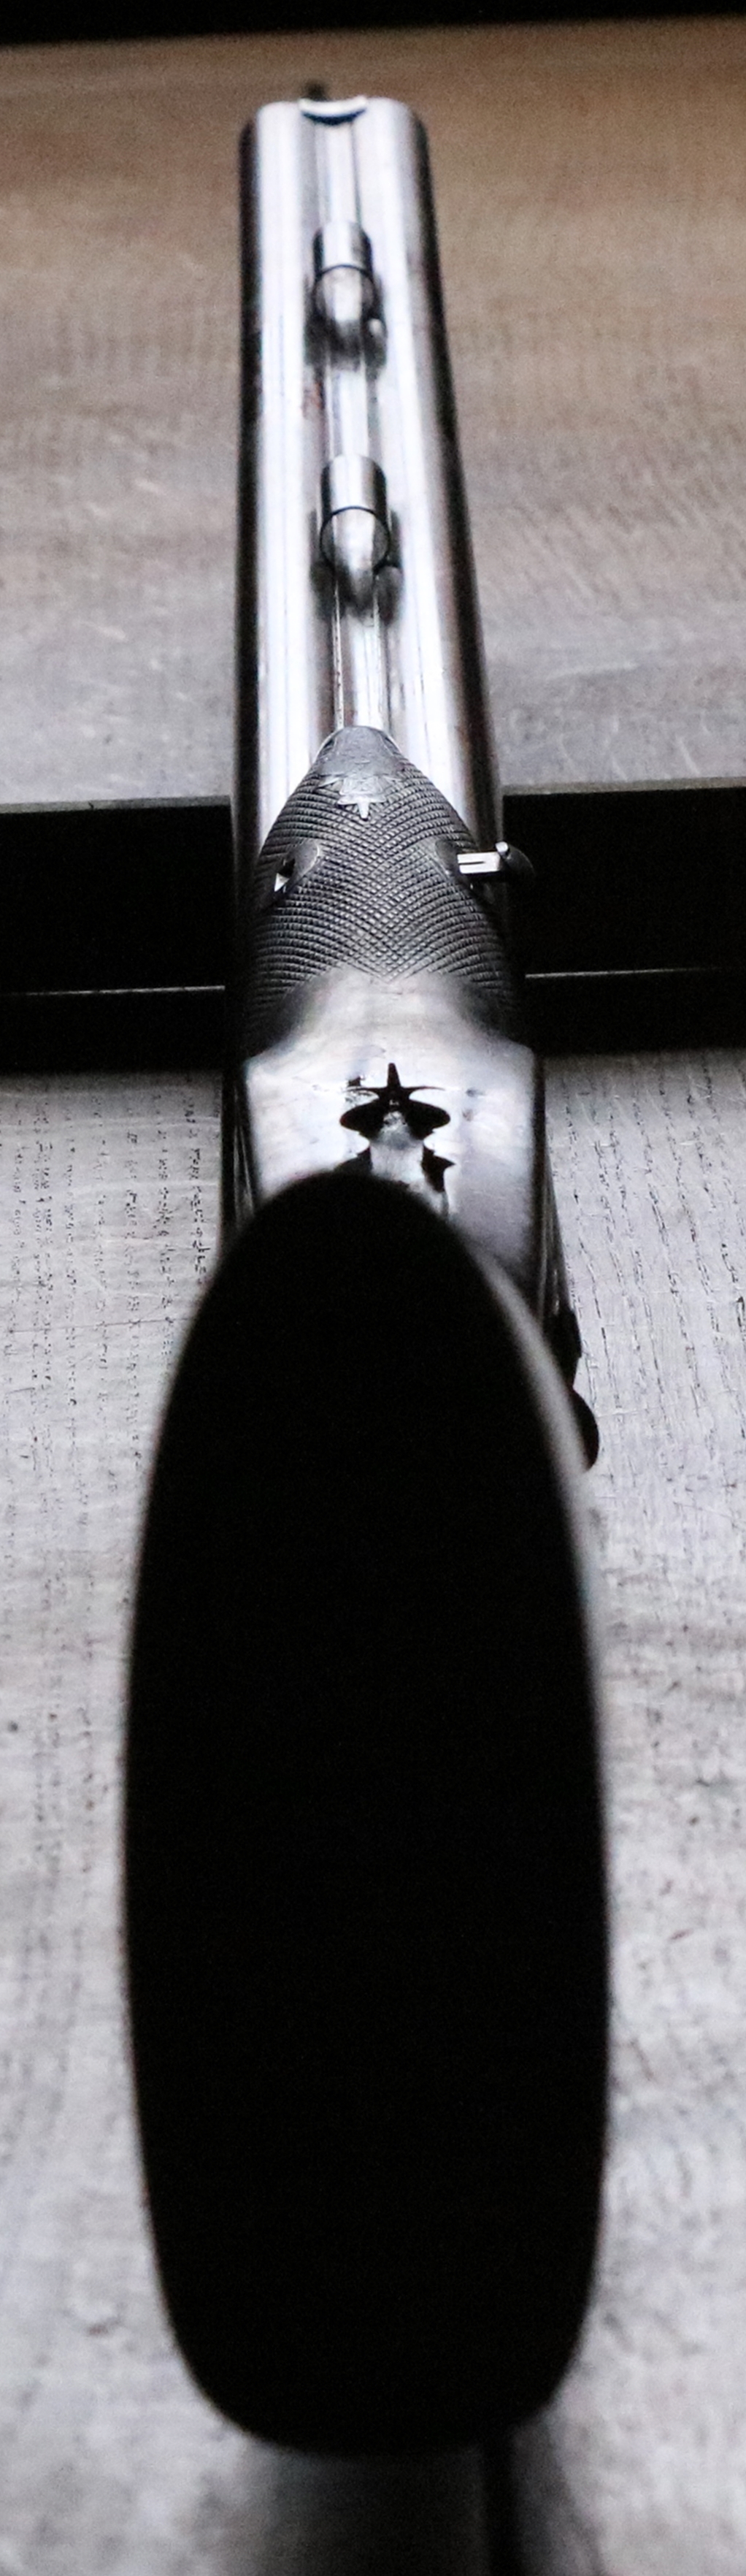
Done -about 1/4 inch of cast off now – perfect for me.
19th March – watched bits of Holts sale on the web – I was right about the percussion guns being overpriced – lots didn’t sell and some just crept in over the line. I didn’t buy – I was hoping the Fenton repro flint rifle (410) would go for near the bottom estimate as I wanted it to shoot but had reservations about the lockwork, which didn’t quite match up to the standard of the rest of the rifle – any way it just crept above my limit so I didn’t bid – I usually wait until everyone has had a shout before I come in – I always bid at Holts by phone as I feel it gives more control. I picked out two other lots to watch, the Samuel Nock single gun (526) which had a perfect barrel, although I’m sure it was a Birmingham gun and I wouldn’t attach much weight to the Nock name on the barrel – there was no name on the lock – it made £800 – I might have been vaguely interested at £700 but by the time you add the 30% buyer’s premium (Inc VAT) things get expensive. My thoughts that the Pape boxlock was nice (1700) were shared by a couple of other people, so it went above top estimate. Pistols did a bit better than percussion long guns but the auctioneers were having to work hard to shift stuff. The Unsold Lots sale will be bulging! I filled in the time around the auction finishing off the false breech of Fred’s gun – I am reasonably happy with how it looks – I put a flower and foliage on the tip of the tang and then realised that traditionally the tang engraving has a cutout background so I dug it out. My struggle with the metal of the false breech was real – the right side was soft, and the left side was a pig to engrave, so I resorted to the GRS gravermax for all of it. If you look carefully you might see the difference between the engraving of the flower and foliage near the breech that I did by hand and the ‘assisted’ engraving of the rest. It is almost impossible to reproduce the effect of hand engraving using an ‘assisted’ graver – but you would need to be quite used to looking in detail at old style engraving to know the difference. But it explains why any traditional ‘English’ engraving done using a GRS on Lindsay graver or a hammer looks completely wrong to me – and unfortunately that is most of the ’19 century English’ stuff turned out in the States.

18th March – Don’t know what happened, I put up a post on my viewing at Holts but it didn’t get published, I must have forgotten to press the button. Anyway a few things of interest – lots of expensive percussion double shotguns – all the rage and some are definately overpriced, particularly if you want them for shooting. The best bargain I saw was a single barreled percussion with a bore to die for – I’d buy it but I have a couple already and am trying to slim down my collection. I was tempted by a Pape boxlock ejector which was very sound and pretty but I’ve already got a gun lined up for my friend so don’t need another shotgun. I do have one bid in, but you’ll have to wait til tomorrow to find out what it is/was. I have been getting on with Fred’s engraving – I had another go at the false breech of the double 1795 gun – in the end I used my 1803 John Manton as a pattern. The metal was very variable – one side of the breech end was like butter and the other side was very tricky – I ended up doing some of it with my GRS gravemax pneumatic graver – I am reluctant to use it because the engraving you do with it isn’t really right for the 19th century, but its fine for straight border lines. I have to finish the tang off but overall I’m happy with it although at the moment I seem to be doing rather fine and delicate engraving – I’m not sure what has changed, or indeed if anything has! I put my first cablesfarm YouTube video up today – graver sharpening, its not wonderful, but they will get better. I am building up my equipment for making videos – I managed to get a nearly new £140 tripod head for £12 from ebay – it is quite time consuming making the videos but it will get easier… I got caught at school today while running my club – could I come in for the next three Friday afternoons to work with one lad? Welll yes….. And another school puzzle that Dave and I are struggling with – if you light a candle in a plate of water and invert a glass over it, the water will rise in the glass – why? We reckon that the volume of gas produced by combusion (CO2) is the equal to the oxygen (O2) burned by Avogadro’s law, and the heat produced would have the opposite effect and lower the water level – we don’t like any of the conventional explanations we have seen so far, including that from Harvard University. We don’t buy into the heat argument as it doesn’t work the right way and the burning oxygen doesn’t work because the CO2 is equal in volume ( where else could the Oxygen go?). There are two factors that are not usually taken into account – since the burning process breaks down hydrocarbons water is produced as steam which should increase the pressure inside the glass. The other factor to check out is that the carbon dioxide produced dissolves in water to a greater extent than oxygen, but not enough, we think. to produce the observed effect. We plan to try with an oil film on the water to eliminate that possibility. Suggestions on a postcard…. as they used to say before email!
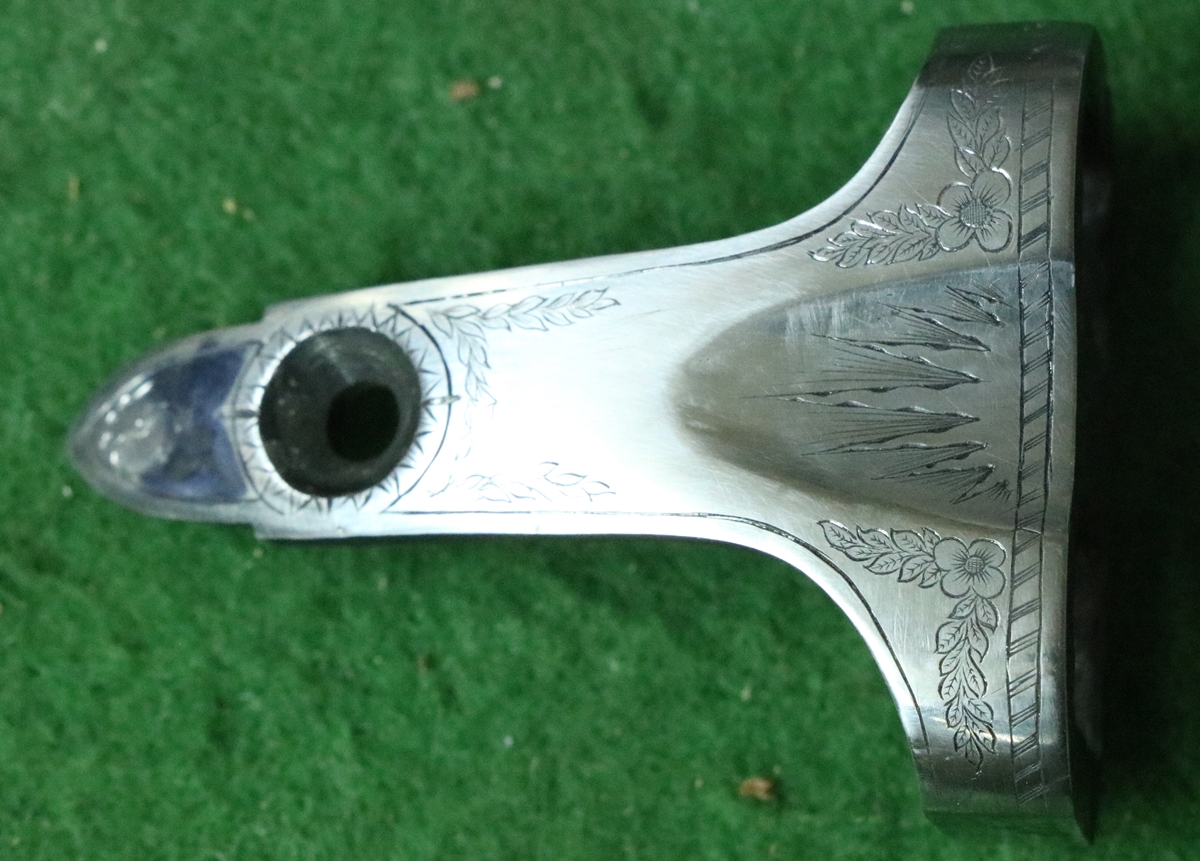
I didn’t get the lighting right!
15th March – Off to Holts to look at a few guns tomorrow – there is not much of great interest, and some seems a bit expensive. Shootable flint and percussion sporting guns are now desirable as more and more people get into game shooting the slow way and the better quality percussion guns are rising in price somewhat, even without a ‘famous’ name. I have been making a trial video of graver sharpening – not as bad as I thought it might be! I have plans for a series for YouTube to drive traffic for this website – it will be interesting to see if more people find them than arrive at this website. The first one is at https://www.youtube.com/watch?v=Mi4DuohCRLE
14th March – Some of the lads were shooting at Eriswell today (OAP cheap day!) but when I saw the rain and wind I suddenly remembered all the other things I needed to do! The Venables barrel turned out very nicely after its copper sulphate dip and five brownings with Blackley’s slow brown and one overnight browning with nothing, plus a good steaming at the end. All the ‘rustings’ were stopped before it looked anything like rust – in fact the only way I could really tell anything had happened was when I came to rub off the surface with 0000 steel wool and there was some very slight roughness in the surface finish that went when rubbed lightly. The photo below was taken hand-held – something I never normally do, hence the slight shake. I went to see Dick as a colleague was bringing a 12 bore boxlock ejector for me to have a look at – I am trying to find a nnice one for a friend. This one will, I think, do very nicely – its an Atkins Birmingham gun, nicely finished and with immaculate barrels. My only slight reservation is that its chambered 2 1/2 inch and I did want a 2 3/4 gun, but the this one will do fine as the recipient doesn’t shoot big loads. You get such good stuff for almost no money in those side by side guns if you steer clear of a few overpriced makers. I’ve done the first bit of Fred’s engraving for a gun he is making – a sideplate – I put on a simple border and copied (with a fair amount of licence) a ‘stand of arms’ from a pull he sent me of an original. Mine is quite lightly engraved – I was using a little GRS C-MAX square graver in carbide instead of my normal 1/8 inch squares, and I think that made me a bit more delicate. It was actually quite nice to work with, I might use it for a bit now, and maybe buy another one or two ( at £22 each!) I have been sorting out stuff to begin making videos, and have added a new Canon M50 camera to my collection to keep by the microscope.
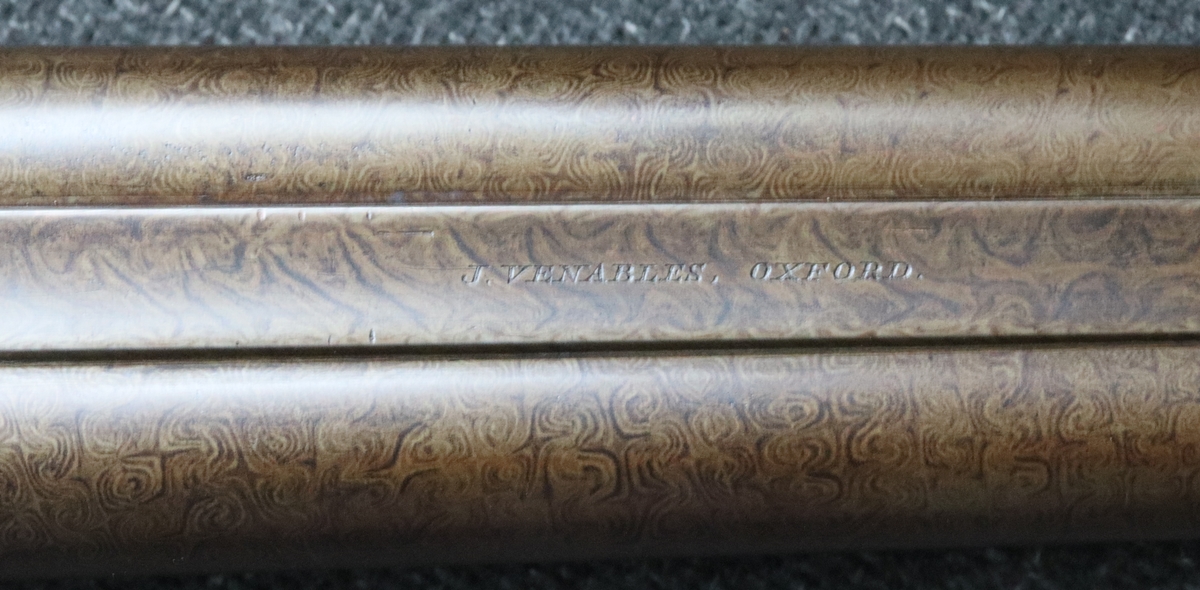
Poor photo but you can see the true damascus stands out well.
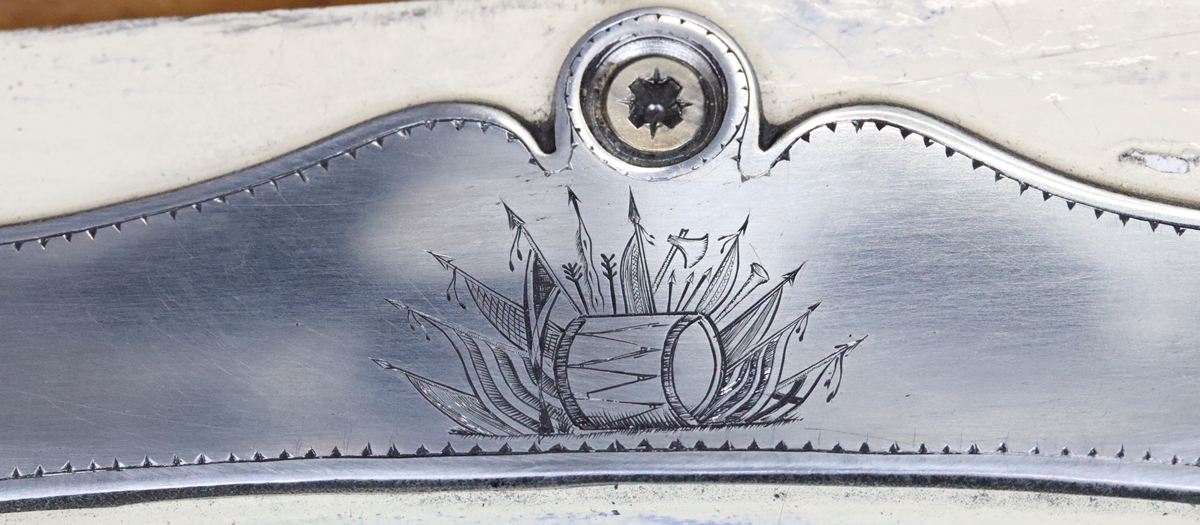
Side plate for a new flintlock in the style of about 1770 ish.
12th March – the day for tackling the Venables Barrel. I cleaned out my derusting barrel tank (a half section of rectangular plastic ventilation duct) and put in enough saturated copper sulphate solution to cover a barrel (guessed). I was unsure how long the barrel should be in the solution – I seemed to remember 2 minutes being given, but Angier in Firearms Blueing and Browning gives 45 minutes. Anyway I put the barrel in and it was more or less instantly covered with a coating of copper all over. As the copper is deposited because it is swapped with iron in the solution, quite a lot of iron was being lost by the barrel. Seeing the rate copper was forming, I decided that the 2 minute option was the safest choice, and when the copper was brushed off and the barrel washed, the damascus was discreetly enhanced. I’ve done two ‘rustings’ since, rubbing off the barrel well before thick brown rust is formed – in fact I’m rubbing off with 0000 steel wool quite early in the rusting when the barrel has just begun to look changed – it seems to be working as I can see a decent pattern emerging. I went climbing this evening and bumped into a couple of people I know – its a ver sociable sport – I should sleep well tonight!
11th March – Did my Stem club today – one lad ahd an experiment he wanted to do for his science project that he had got off You Tube, which looked dodgy to me – turns out that some criminal idiot is putting spoof science videos for children on You Tube – I’ll have to go in tomorrow and put the lad right or he will be in for a big disappointment – I’d like to get my hands on said criminal idiot………! I did manage to help another child write a rather neat progam for teh microbit computer so not all gloom and doom! I’m continuing to experiment in preparation for making videos – I got my expensive 60mm Canon macro lens back from the lab – its just the thing for filming engraving so I built a handy stand and had a tryout on autofocus – I’ve now got to maser the video editing and I should be away! I need a quick way to show the tool tips at high magnification with good illumination – its quite difficult to see, even at x25 magnification in my microscope as the heels are only about 1/4 mm long.
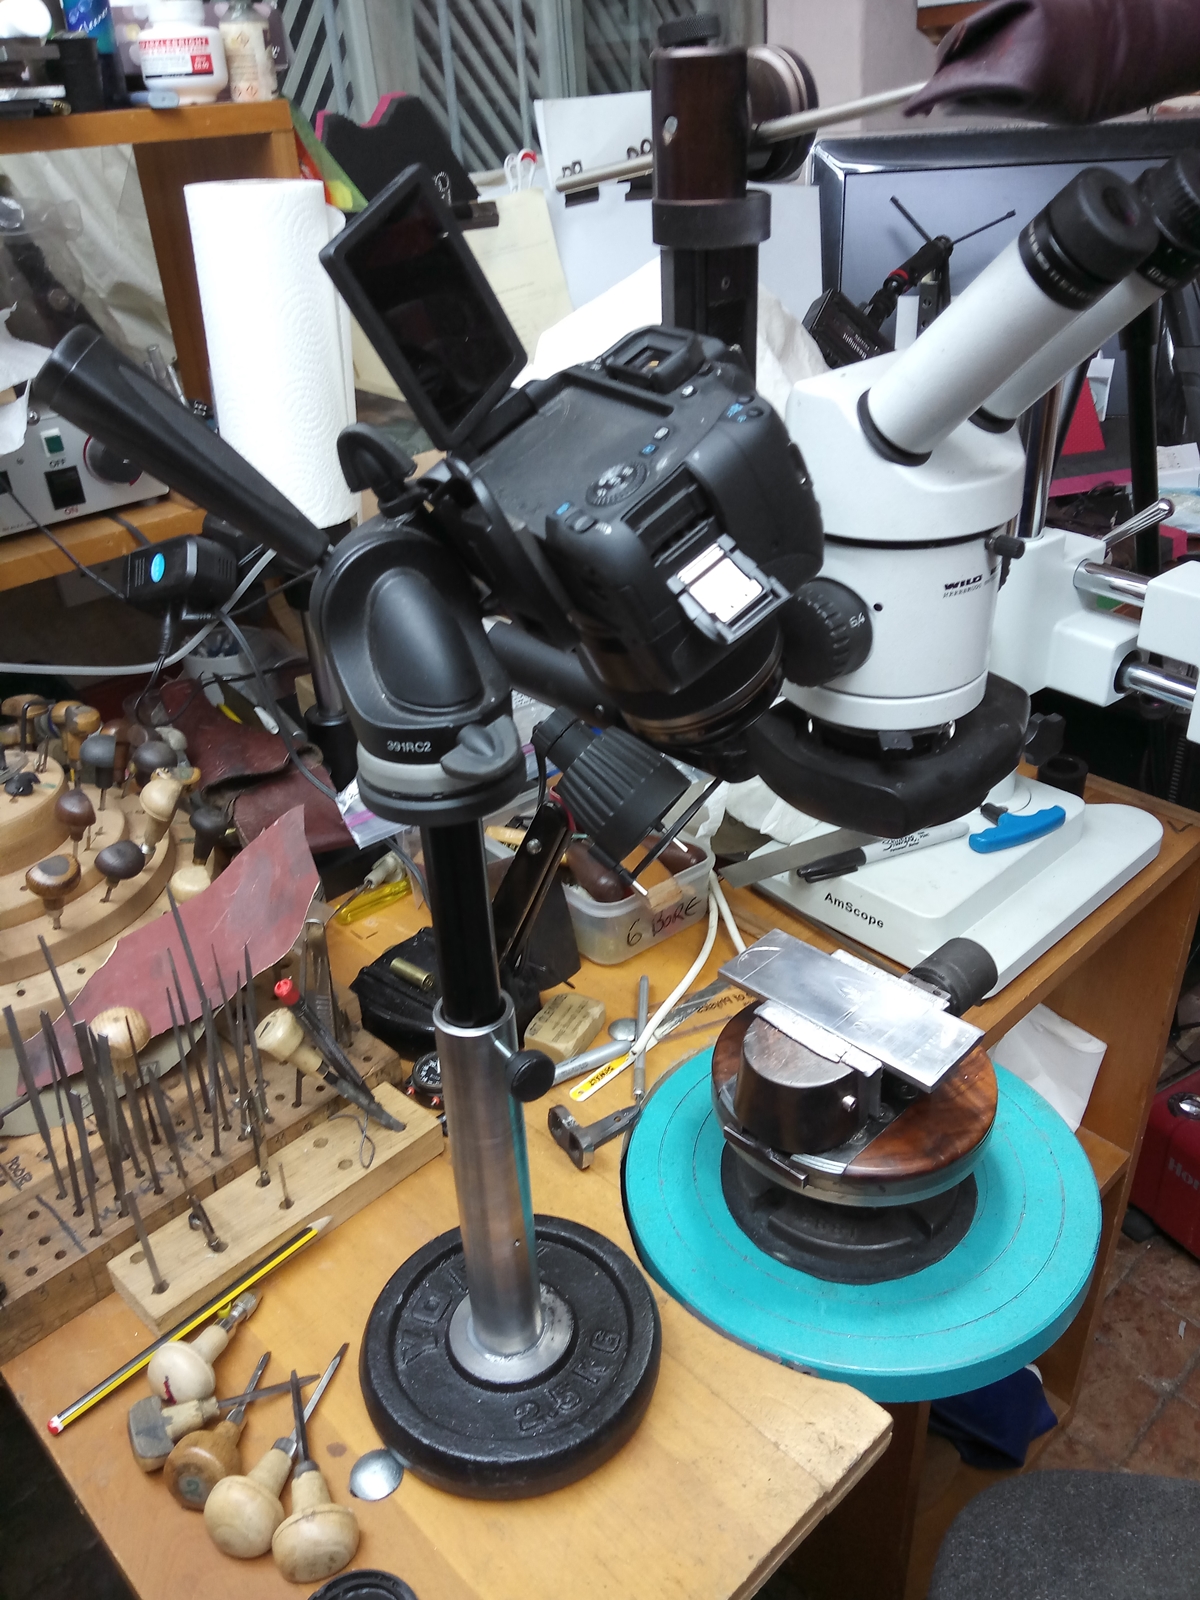
Camera stand from a bit of tube and a 2.5 Kg gym weight
not sure why the turntable looks so bright – its really quite dull!
10th March – The Venables barrel is becoming a bit of a saga! I’ve now taken all the browning off again, and am toying with the idea of giving it a dip in copper sulphate solution to give the damascus a bit of a boost – it slightly etches the steel and iron differently. I’ll try to get it all finished and wrapped up this week! I have been experimenting with making videos of engraving – I can’t use my microscope cameras as neither are really good enough and the better of the two takes up one eyepiece of the microscope so I have to engrave one-eyed which I don’t like. I find that I can fix my normal Canon EOS 760D with its 55 -135mm lens so it takes a reasonable video of engraving at a decent magnification, so I’m trying that – I just need to make a stand for it and learn to use a free video editor – VDSC. I want to make a few You Tube videos to complement this website – they seem to get loads of views so it would probably help get a few more visitors to the blog. I am planning one on making gravers, one on sharpening and a few on looking at historic gun engraving and doing a few examples of classic bits of design. It will help keep me off the streets, – I can’t give up climbing thought as I’ve just bought a pair of climbing shoes and it will take me 23 sessions to recoup the investment compared to hiring the shoes each time!
8th – I continued to brown the Venables barrel and it was going quite slowly but I could see the true damascus pattern coming out, then, on the fourth browning it went a dark opaque chestnut colour and showed almost no pattern whatsoever – I’m not sure what happened, maybe I left it a bit too long before rubbing off the rust. I tried rubbing it down with 5000 grit paper and 000 grade wire wool but it didn’t seem to do much. The I tried the 000 wool lubricated with gun lube and before I had realised it, I’d rubbed almost through a patch of browning – I don’t quite understand why the gun lube suddenly made the wire wool bite, but it did. Anyway I will take the browning back to a uniform level and have another go – what a bore. It has happened before to Dick with my Bales of Ipswich barrels, so I shouldn’t be surprised although I have never had any problems in 10 or more jobs I have done so far. I was idly looking at a you tube on graver sharpening and came across the alternative sharpening technique of putting ‘parallel heels’ on gravers. The claimed advantage is that the graver isn’t so liable to throw up spurious marks round the outside of tight curves as a triangular heel does. In the parallel heel sharpening, the heels are continuous surfaces of constant width ( 1/4 to 1/2 mm) parallel to the bottom edges of the main face, rather than small triangular faces. The problem with parallel heels is jigging them to the right angle for sharpening as the graver needs to be held at a compound angle and its tricky to set up without a proper GRS setting jig that is very expensive and slow to use. I have tried and failed in the past to make a suitable jig – I’ll have to think about it some more. It would be quite handy as it would be easier to control the heel cut as more metal would need to be removed. Anyway something to think about….. Here is a photo of the cast off on the Venables stock – it must be getting on for 3/4 inch and needs to be reduced to 1/4 or 5/16ths. I have had to take off the furniture as the trigger plate runs into the bend in the stock and is currently inlet slightly off centre, so it will have to be adjusted after straigtening the stock. I’ll have to make an adjustable jig and heat up the ‘hand’ to make it flexible – it can be heated with a hot air gun, a steamer or wrapping in cloth and pouring hot oil over it. The first way runs the risk of overheating the finish on the wood and possibly charring it. I’m not sure of the pros and cons of 2 & 3. I can see that both could do some harm to the finish, I’ll probably wrap a hot oily rag round the stock to protect it and then use the hot air gun on the rag, being careful to avoid a fire! I did watch Dave Becker do one for me (with a hot air gun) so I know it takes a long time to heat up and even longer to cool down – we shot at quite a lot of clays while waiting! On the subject of the Venables, I ran some 6oo grit paper through the barrels with a plastic jag using an electric drill – I have a long fibreglass rod with an end to take brushes, jags etc and a 6mm hex on the other end – the fibreglass rod has a loose plastic tube slipped over it so it doesn’t rub the barrel and so you can hold it to guide it. Anyway a few passes, the last with oil, put a half decent finish on the bores – not perfect but very good by the standards of an almost 200 year old gun!
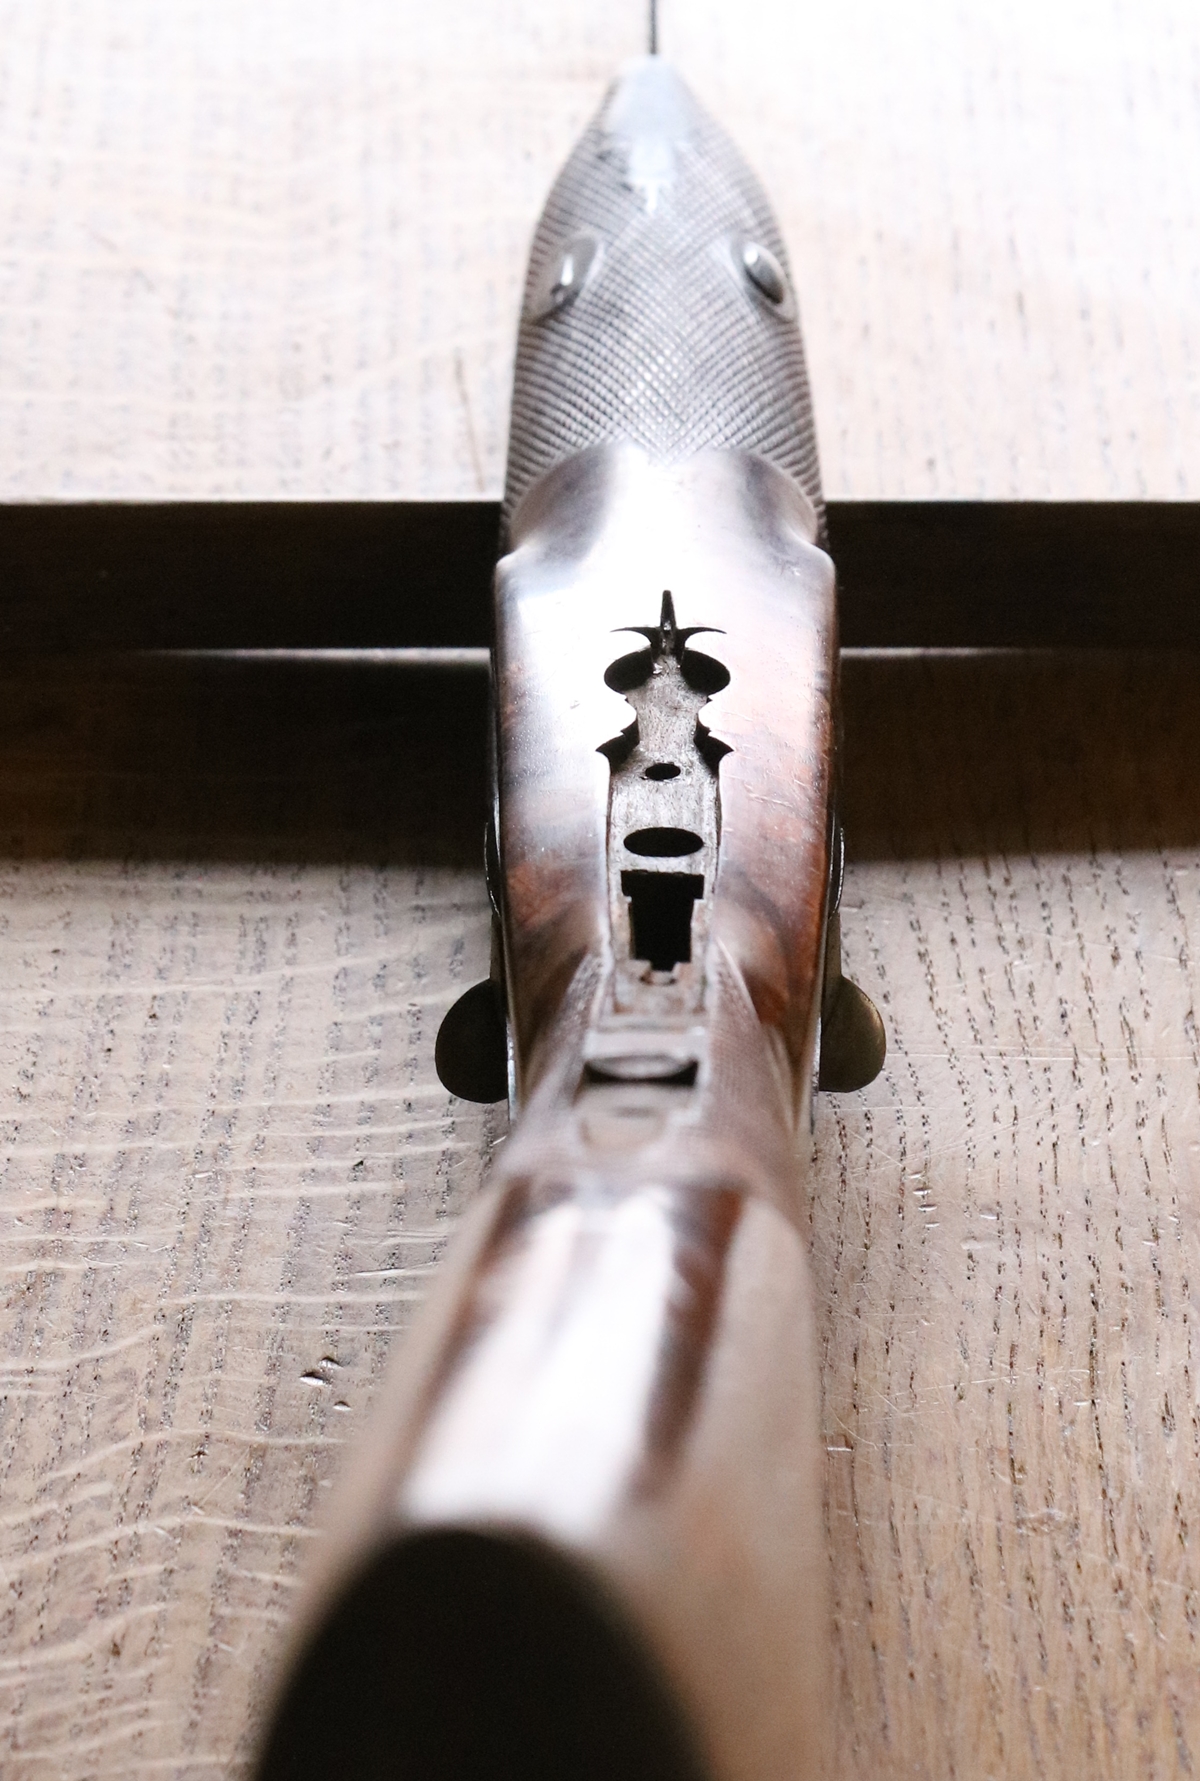
Yes, it really is that bent!
7th later – the number of visitors to the site has just fallen quite noticably – I wonder if its anything to do with the fact that I blocked a number of nuisance visitors a couple of days ago? p.s – I don’t think that is the reason, I think it may be that the software has stopped counting some of the spurious attempts to interfere with the site as if they were proper visitors.
7th March – I’ve started rebrowning the Venables barrels – first washed in detergent and warm water, then chalk brushed on and left to dry, then rubbed off (wearing latex gloves) and then into the browning – I have started with Blakley’s Slow Brown which gives a good colour, rubbing the rust off with 0000 wire wool, wrapping the wire wool round a bit of brass sheet to get into the angles along the rib etc. So far I have done 2 rustings with the barrel hanging inside a 6 inch plastic tube on the back of the Aga with the base of the tube standing in a little warm water to speed things up. Overnight I’ll leave it in the cool cellar to rust as it mustn”t go too far before its rubbed off. After this rusting I’ll probably do one with my old printed circuit solution to give it a bit of a blacker colour – I think a greyish browning looks less like an obvious rebrowning job. The darker colour can be enhanced by steaming the barrel between rustings – I’ll see how it goes before trying that.
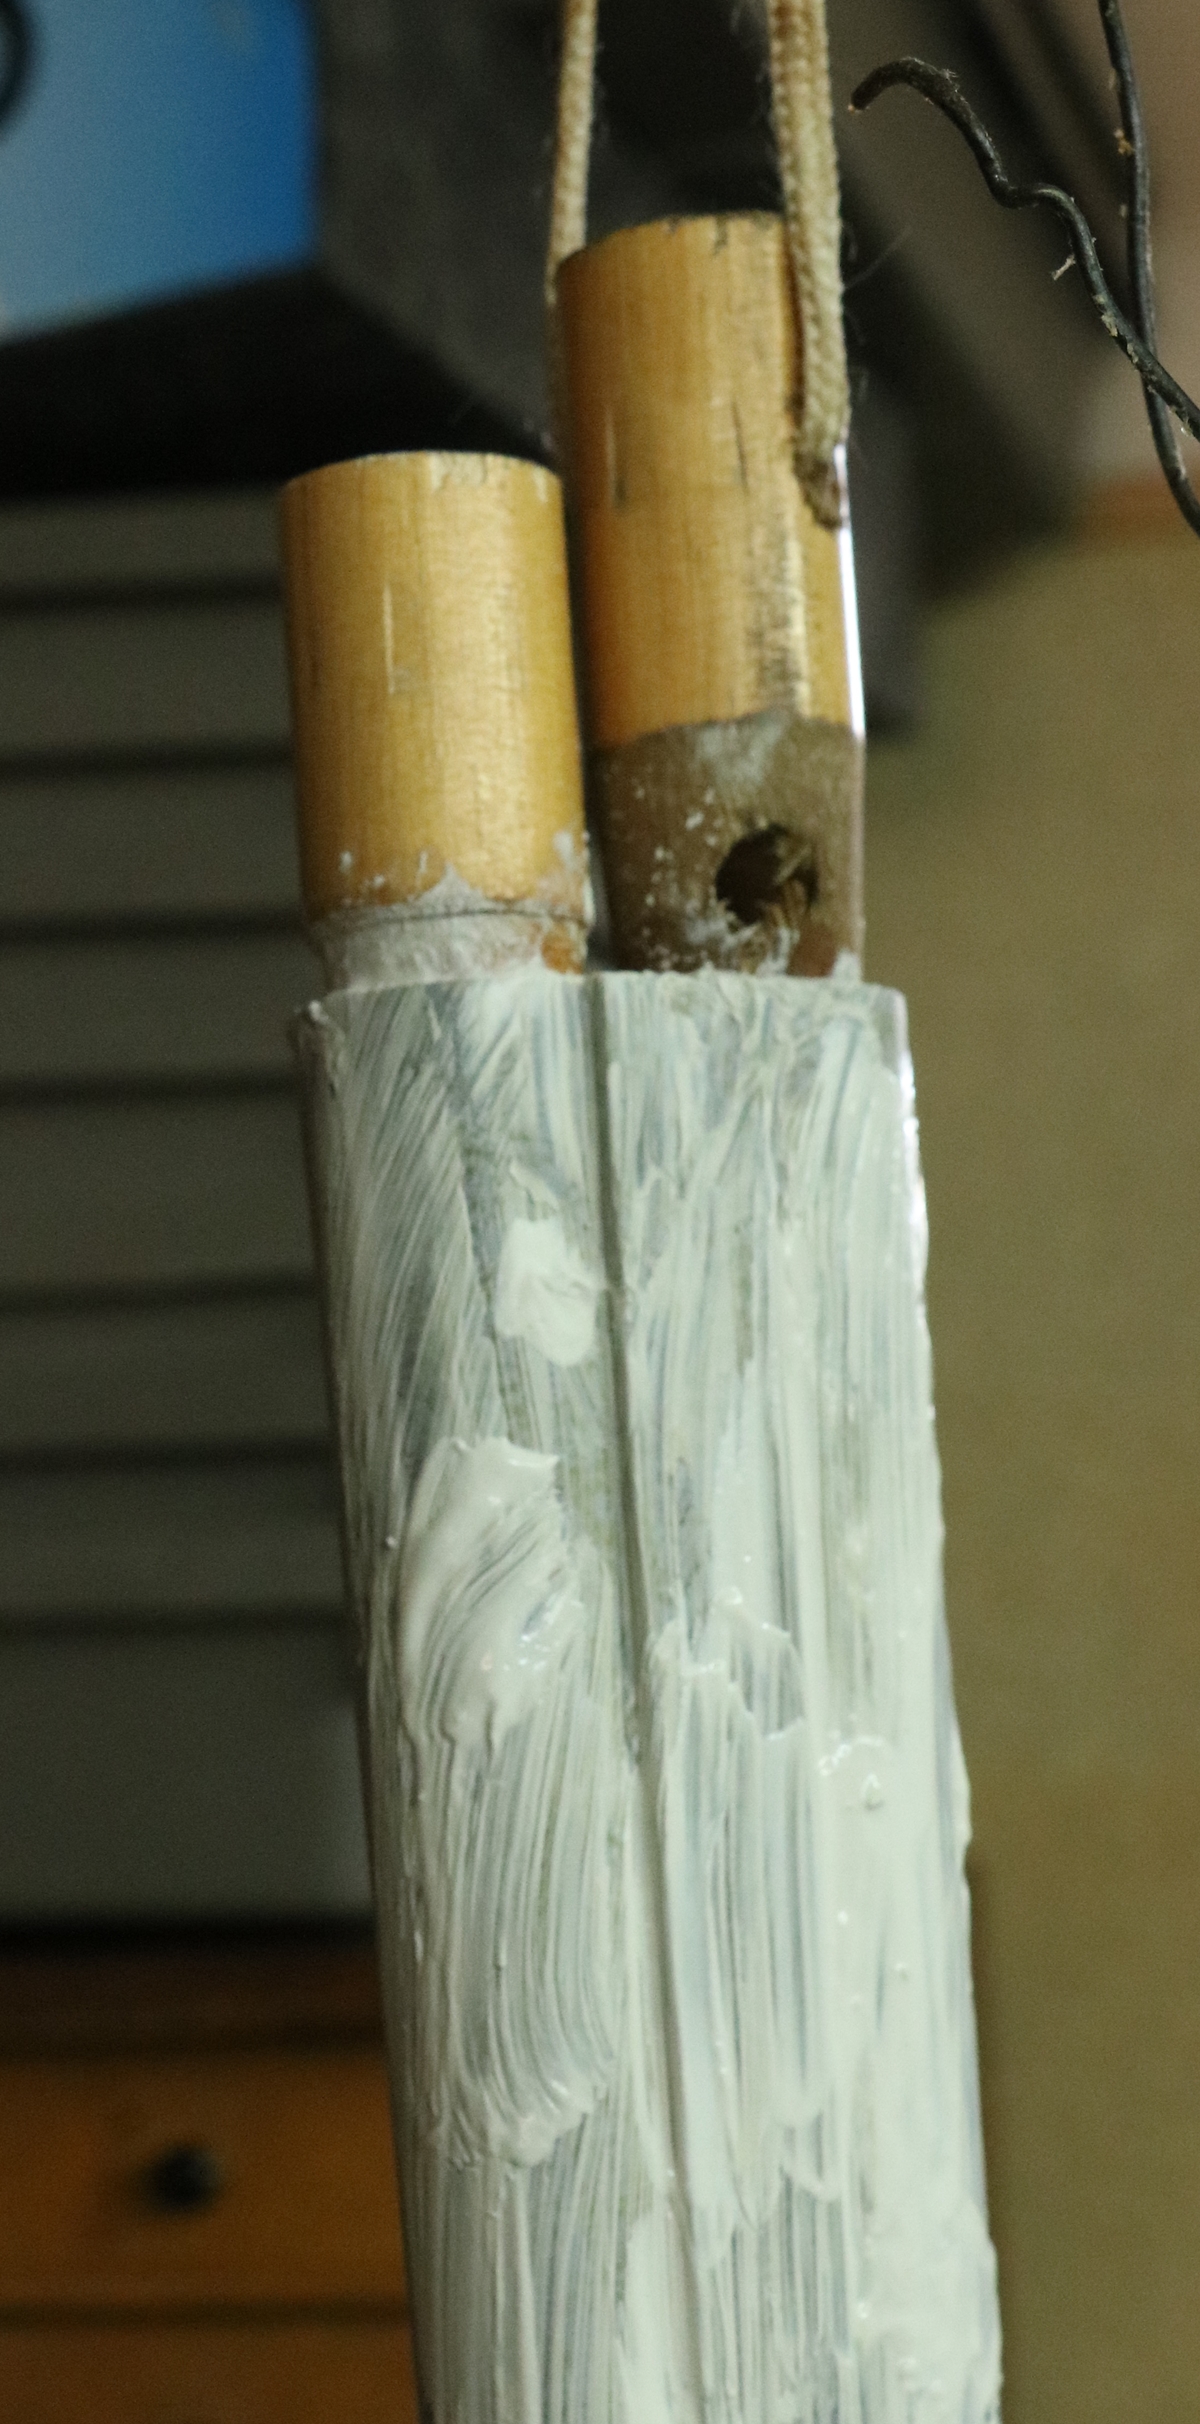
6th March – A tiny bit of engraving today – a practice ‘stand of music’ for a butt tang base. I also did a bit more cleaning up on the Venables barrel which will, I hope, be ready for browning before the end of the week – I will be glad to put that job to bed, then just removing some of the 5/8 inches of cast off from the stock – unless of course anyone looking at this blog needs a nice percussion gun with that much cast off – its not quite a cross stock and I can’t think what shape one would need to be to fit it, but someone must have had it made like that – its fortunately avoided the problem of having to have the locks made on a curve!
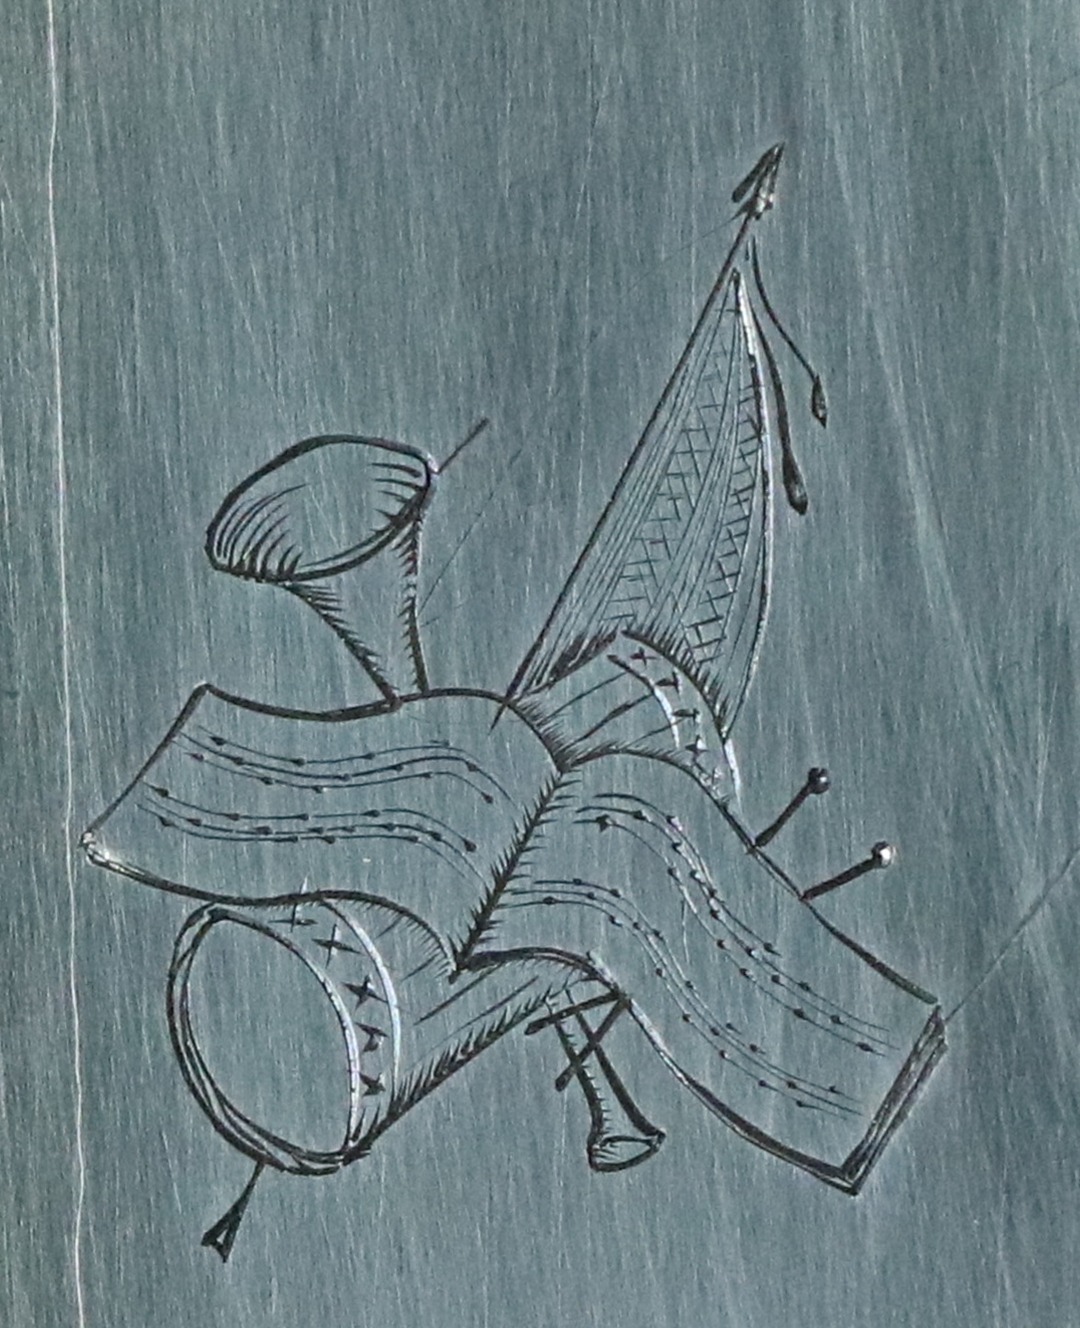
This is magnified about 4 times real size.
5th March – I did the ‘Extreme Earth’ presentation to the year 5 and 6 children at ‘my’ primary- I did volcanos, which partly involved the kids putting a little water and a fizzy tablet in old film canisters and putting the lid on quickly, then retreating to a safe distance! Great fun was had by all. It is lovely being involved with the school – if I have lunch in school there are always children who come and sit with me and chat. I think I get the best deal, all the fun and none of the hard work the teachers have to do! I did manage to make a graver for someone who had found this website while looking for engraving bits – it is always surprising how many people come to the site for interests other than guns – like sailing or welders or Land Cruiser steering!
4th March – Busy at the lab writing up early marine heat flow instrumentation, and then at my school STEM club – tomorrow I am going in with a researcher from Cambridge to do a presentation on Earthquakes and Volcanos to year 5 & 6, which should be fun. I had a few emails about using the electric cooker elements to solder barrels, so a bit more information might be useful. The element I’m currently using is from the grill of an old cooker we chucked out. The elements are made of an outer metal tube filled with a powdered oxide insulator with a solid wire heater in the middle. They are all made straight and cold bent to shape afterwards, so can be straightened too, you just need to be very careful not to kink them or bend them too sharply – they will come out a bit wavy but with a bit of careful and gently straightening in the vice will just fit down a 16 bore barrel. The need connecting via ‘ 1/4 inch Faston terminals using heat proof wire ( also salvaged from a cooker. The elements run on mains voltage and will probably be 1 or 1.5 KW power – i.e they will draw 4.3 or 6.5 amps at 240 volts approx (use a 6 A fuse). It is possible that the act of straigtening them may damage the internal insulation and give rise to leakage from the element to the casing, in which case DONT use the element – If you wire up the system according to my recommendations the electricity supply will trip out if there is significant leakage. Please DONT try to use this barrel heating system if you are not confident with mains electricity – if you do try, make sure that the barrel and any metalwork around is bonded very firmly to earth on the electricity supply and the supply is via an Residual Current trip that trips at no more than 30 mAmps. Unplug before working on any part of the barrel etc. Don’t follow my example if you are at all unsure – I have a (too) long experience of dealing with mains electricity – my first experiment was connecting a 3 Volt torch bulb to an unshuttered power socket at the age of 9 – my mother never found out what blew all the fuses (no Residual Current trips then!) and I sadly never found my bulb, but surprisingly I survived unscathed. As a teenager I ‘invented’ the radio alarm using a large mains powered valve radio and a clockwork alarm clock with a pull switch with exposed contacts actuated by the alarm winder starting to turn – it worked a treat and woke me up extremely rapidly as I always reached out to stop the alarm ringing and put my hand on the mains (still no Residual Current trips – just as well or it would have tripped out the radio and defeated the whole purpose). I don’t know if there was such a thing as a commercial alarm radio in the mid 1950’s but anyway I had one and it worked! So if you are not very confident and experienced with mains electricity stick to a gas torch for barrel soldering…… ( A Residual Current trip is a device that compares the current flowing in the live and neutral wires and trips the supply out if they differ by more than 30 mA due to leakage – they are, in theory, sensitive enough to trip and protect you if you become the circuit that the ‘missing’ 30 mA flows through – all modern domestic installations should have them fitted.)
3rd March – Barometer dropping like a stone and wind getting up =- glad I’m not at sea. I have been doing a bit of practice engraving on and off for the last few days – actually its more a matter of graver destroying as when I get back to it I begin by breaking the points of my gravers with almost every cut because I don’t finish the cuts correctly with a flick out push, but lift them and leave the point behind – always gets me to begin with, so tonight I had 14 gravers to regrind. I have a few bits of a gun for Fred to engrave – a butt plate tang and a breech block. I’ve started on the butt plate trial design – I wanted to do a classic scroll at the heel, with lots of empty space and then a ‘wheat ear’ pattern at the tip. The challenge of the scrolls is getting them to look uniform in ‘texture’ and balanced in the space available – I’m using a pretty tough steel for my test piece (EN8) which contributes to the brakages but its good practice. The pattern round the ‘screw hole’ is not really right, I won’t use it on the real thing, and I might change the scrolls for a ‘stand of music’. I managed to more or less finish the little post office pistol by J Harding – I got the safety catch working and made a triangular ‘cover spring to go in the sear spring but I cheated and it relies on friction rather than a sprung detent as I couldn’t work out how I was going to make that on such a small scale – anyway it works fine. I will have to make the mainspring a bit stronger as it won’t open the pan fully when you fire it off but otherwise it all seems to work and look good – the barrel is a bit pitted and I didn’t want to strike it down, so I have left most of the pistol more or less ‘as was’. I was going to finsih the Venables barrel bits, but went climbing instead and an now a bit knackered……….