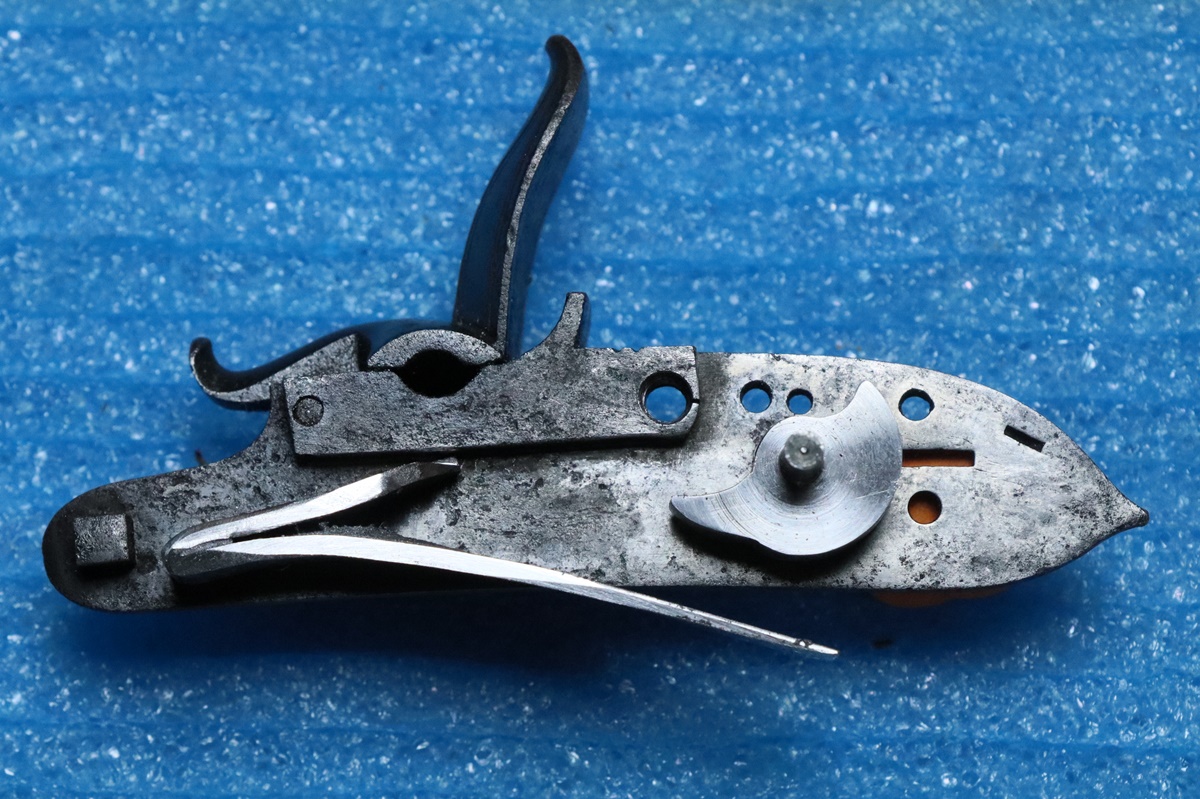
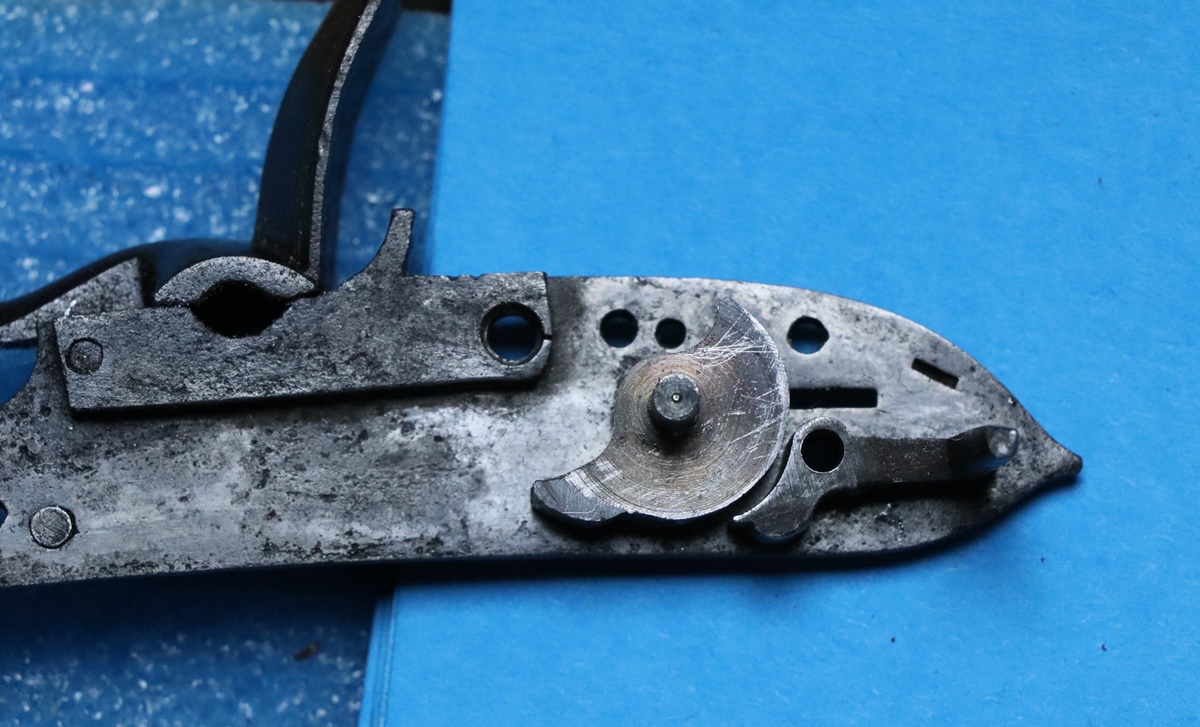
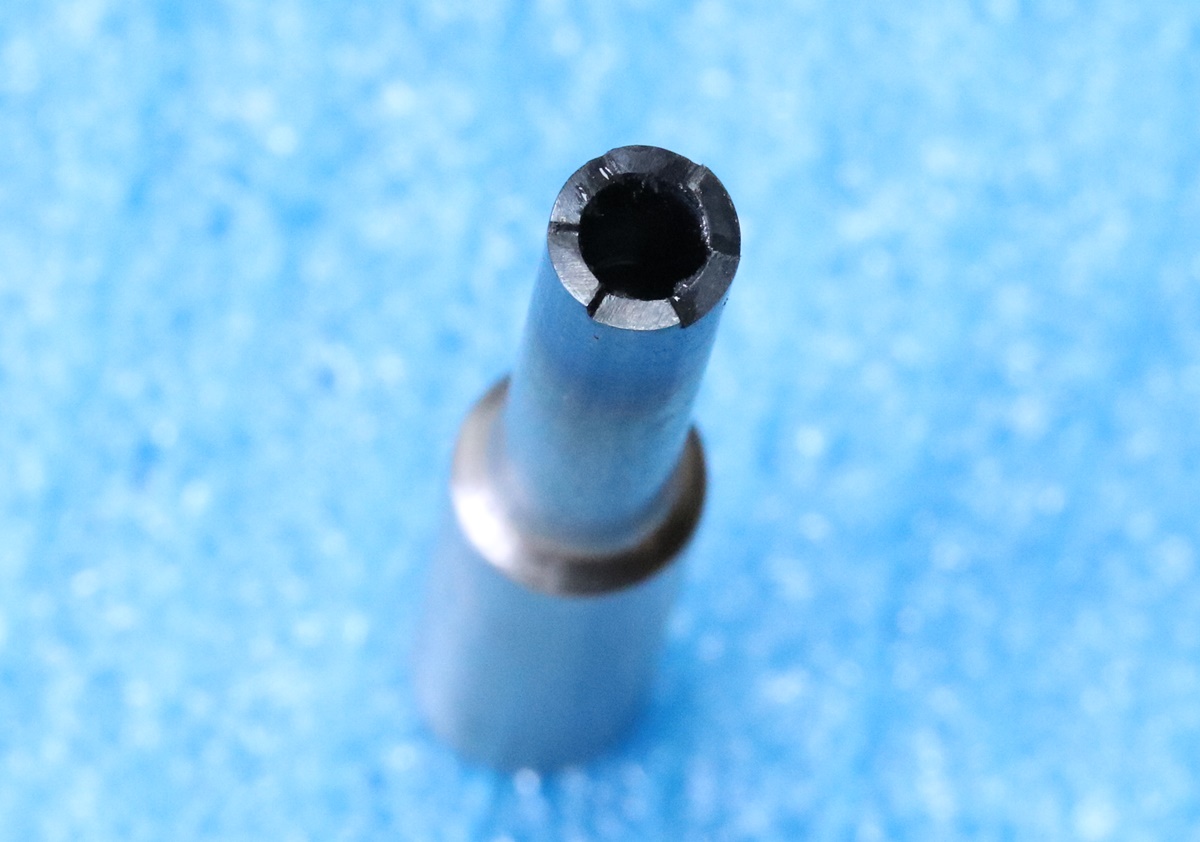
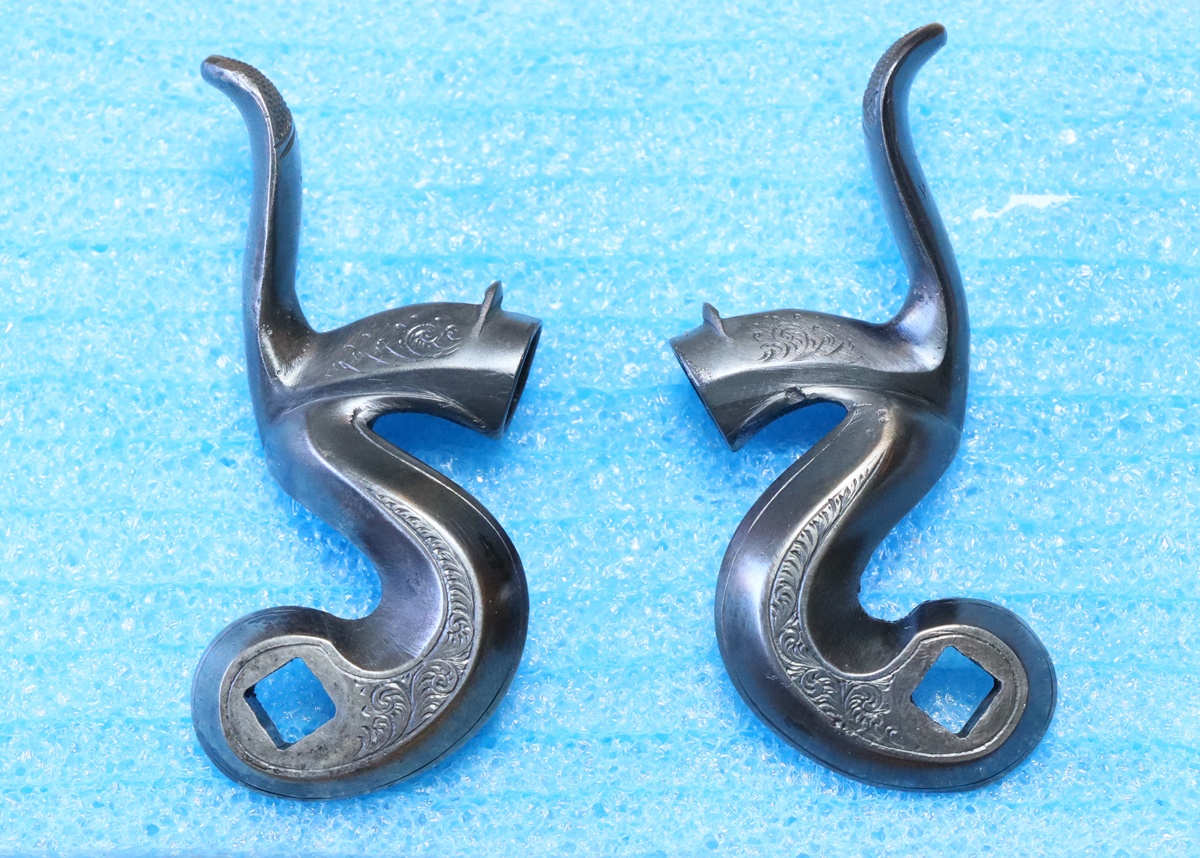
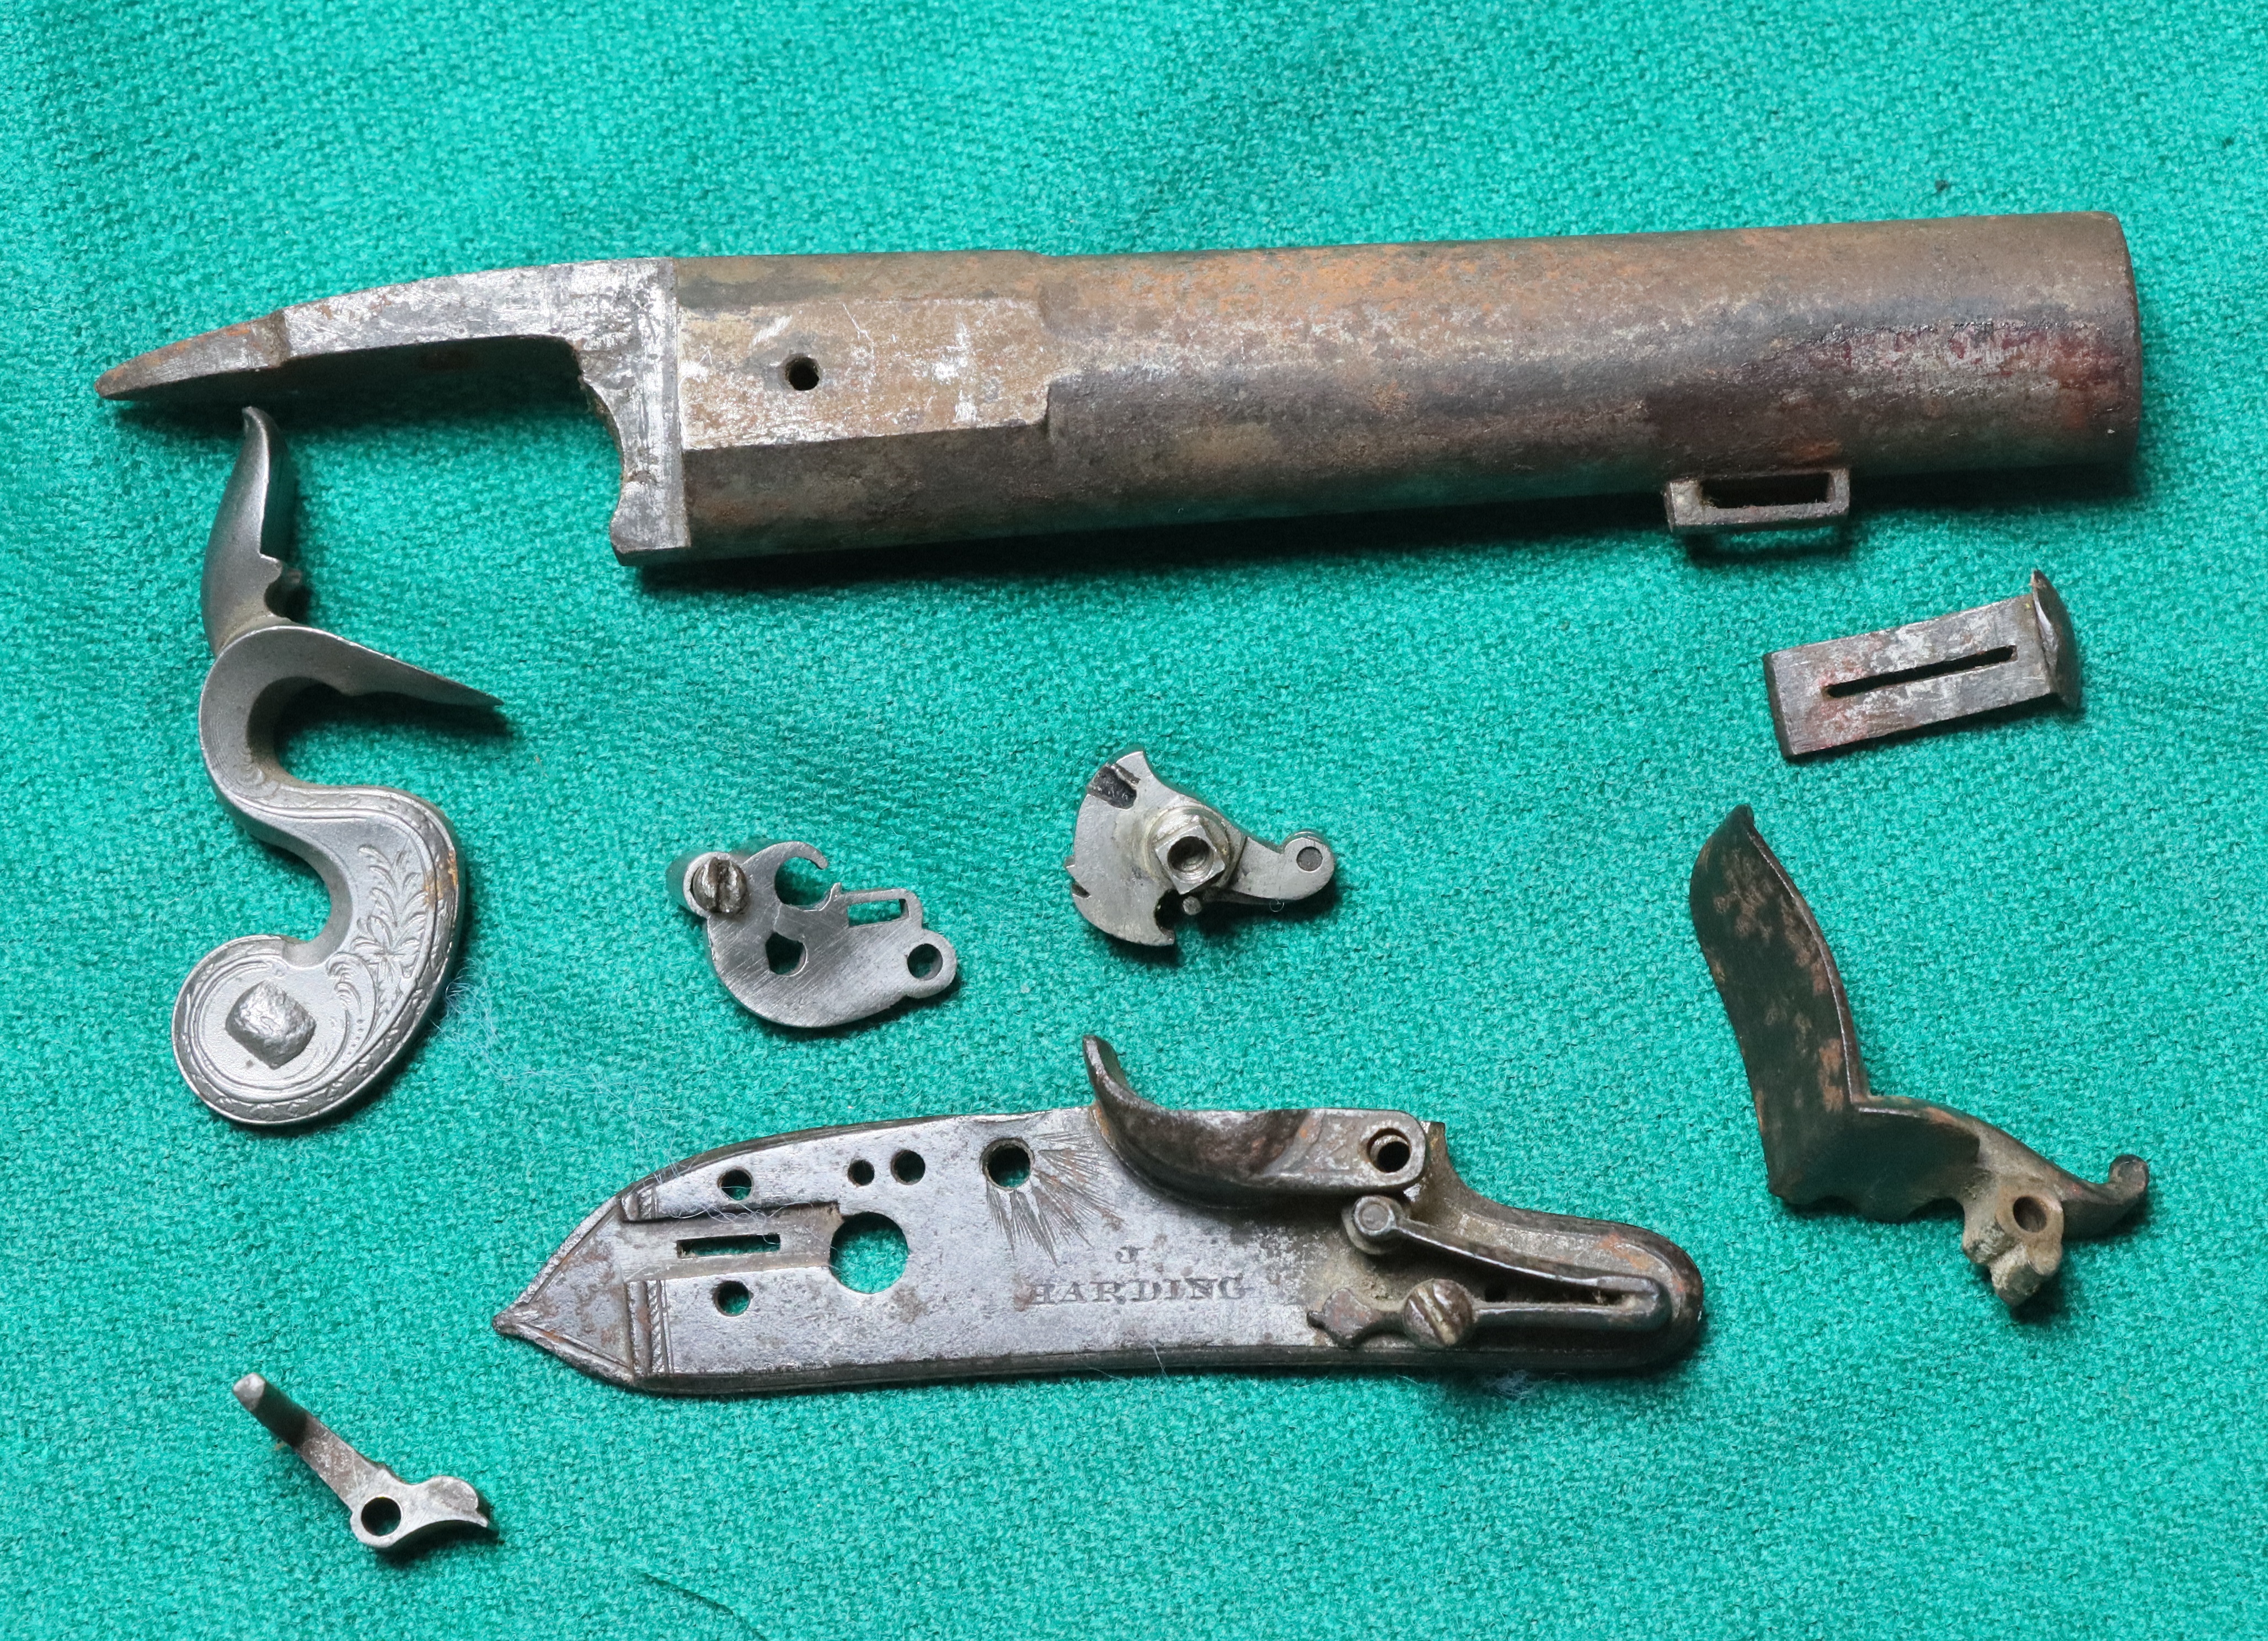
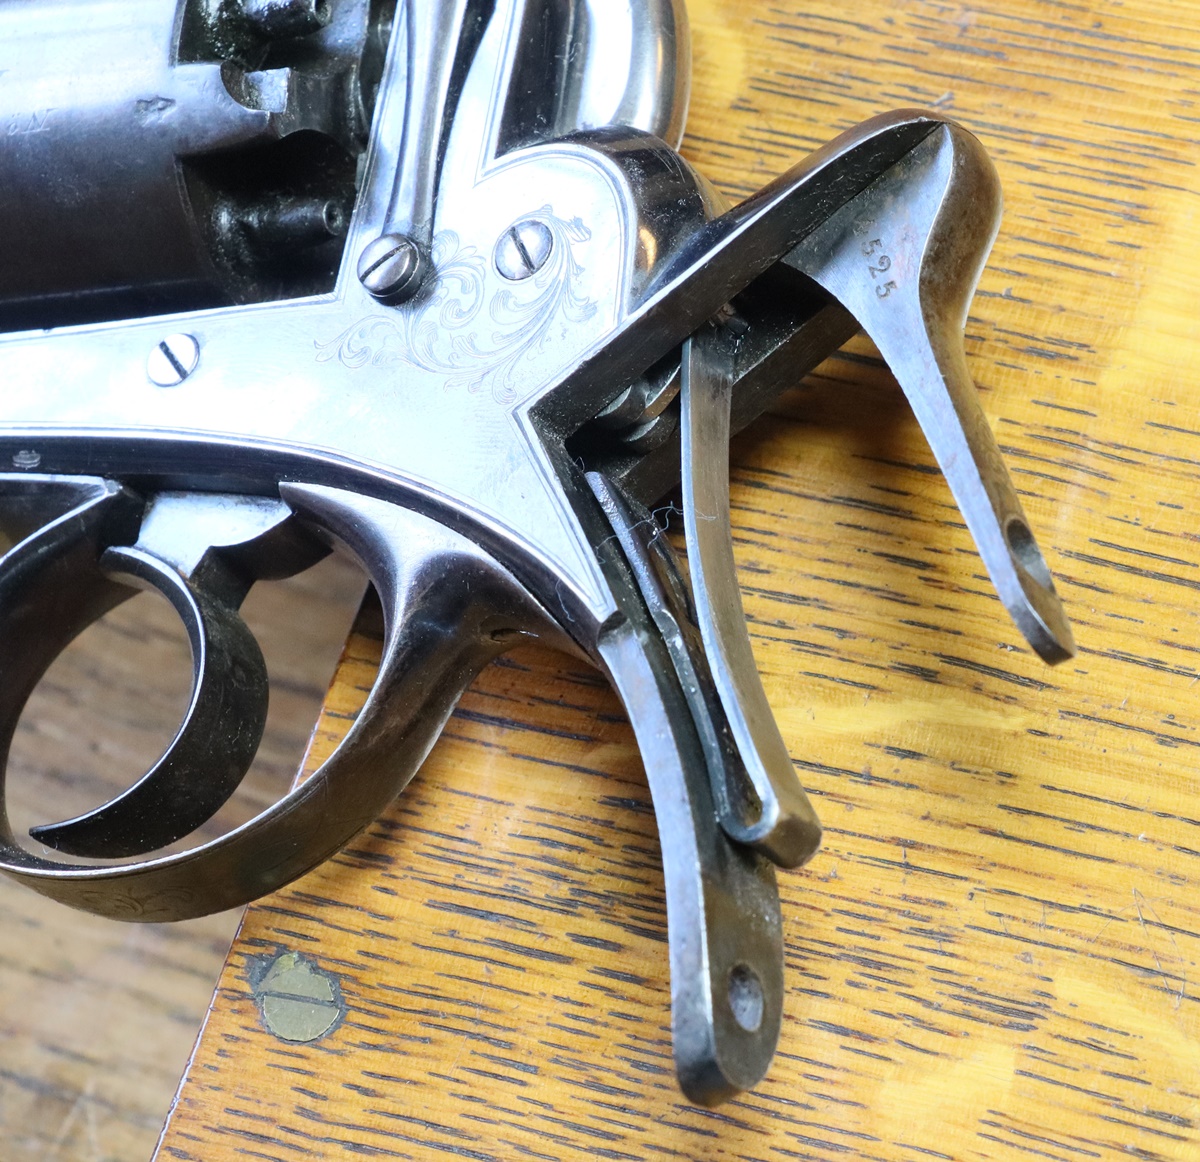
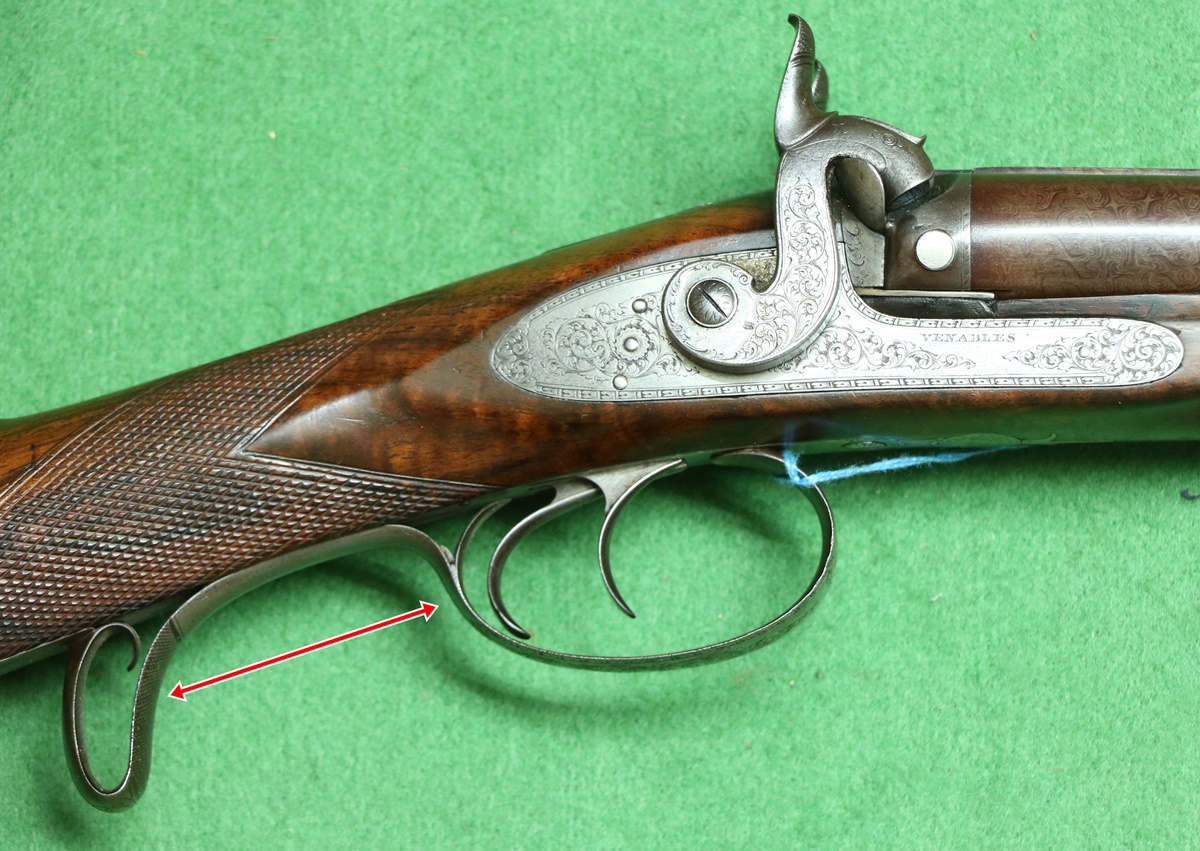
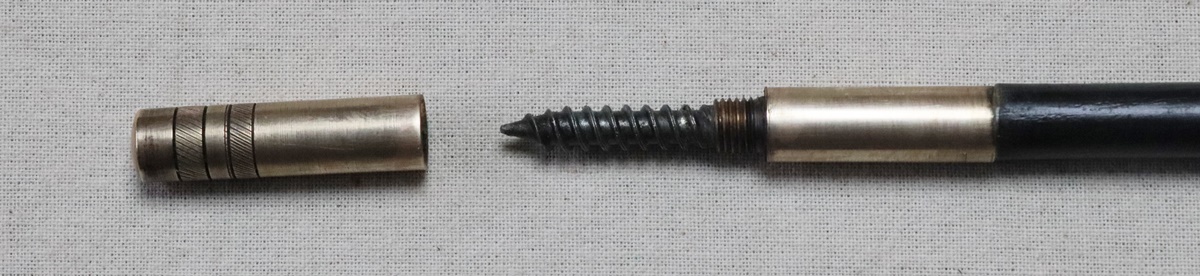
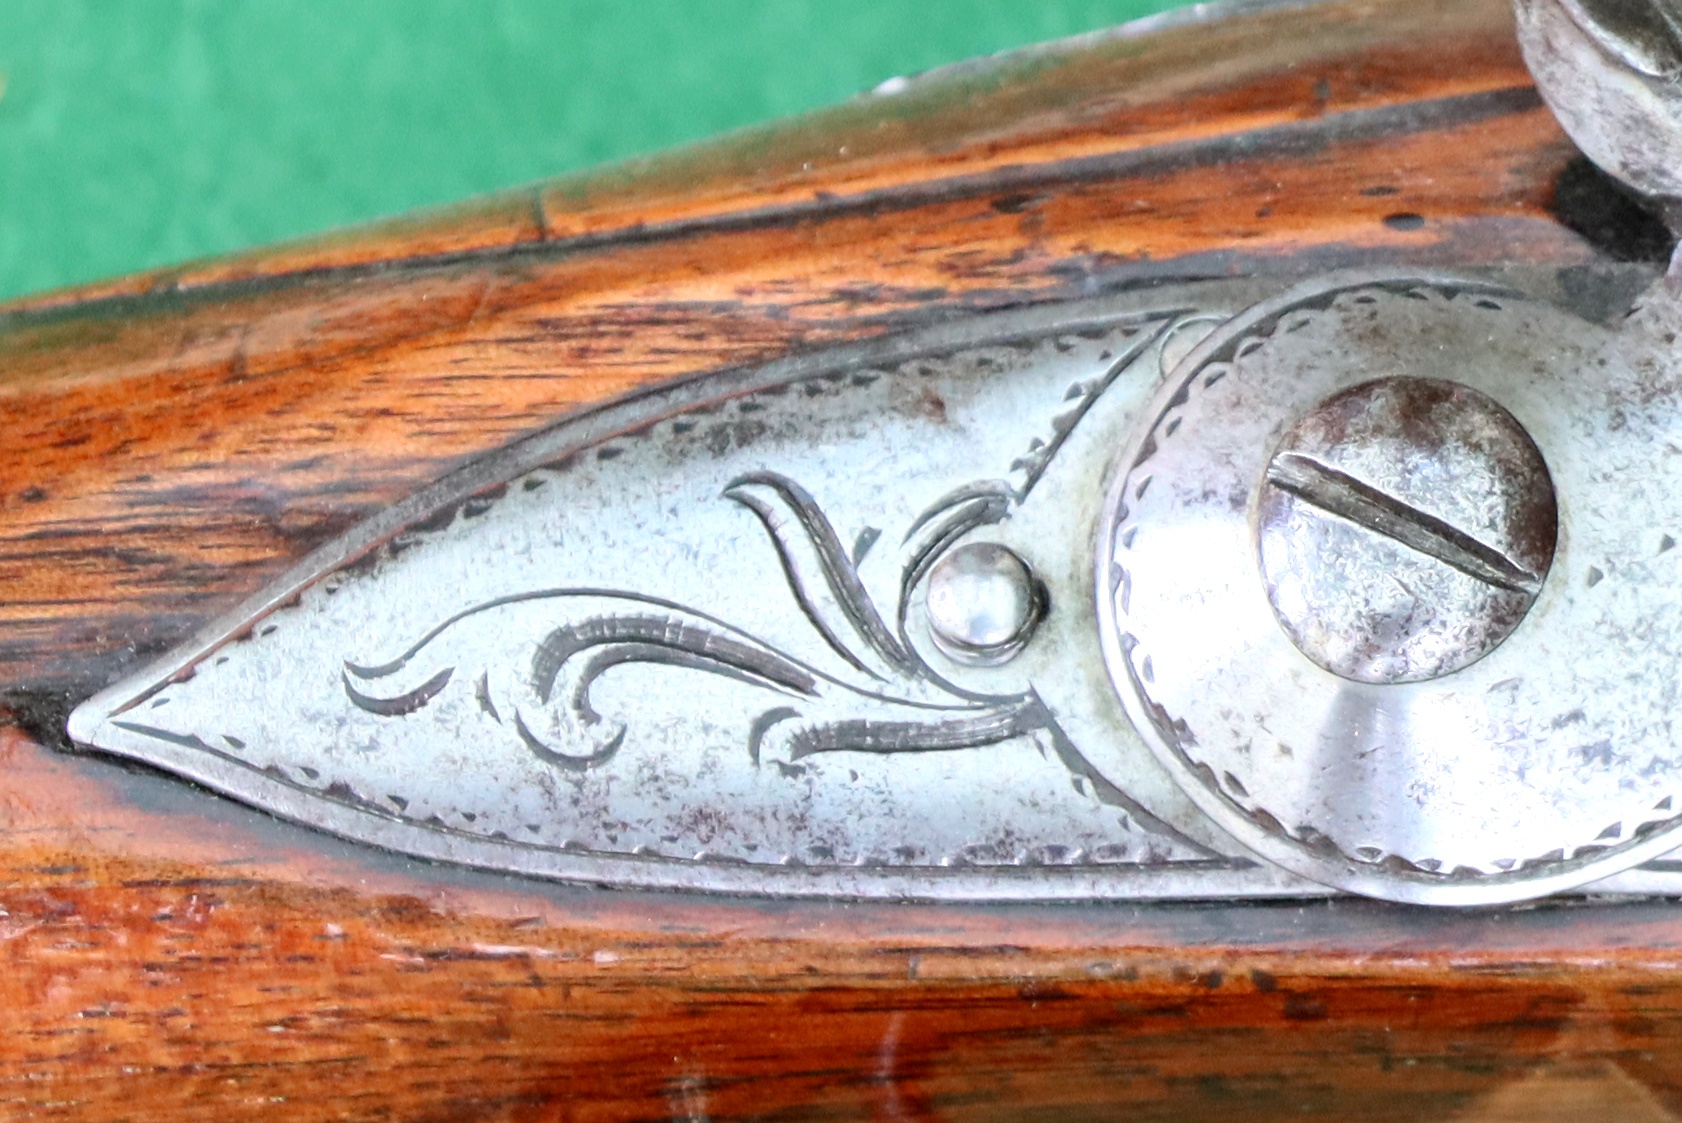
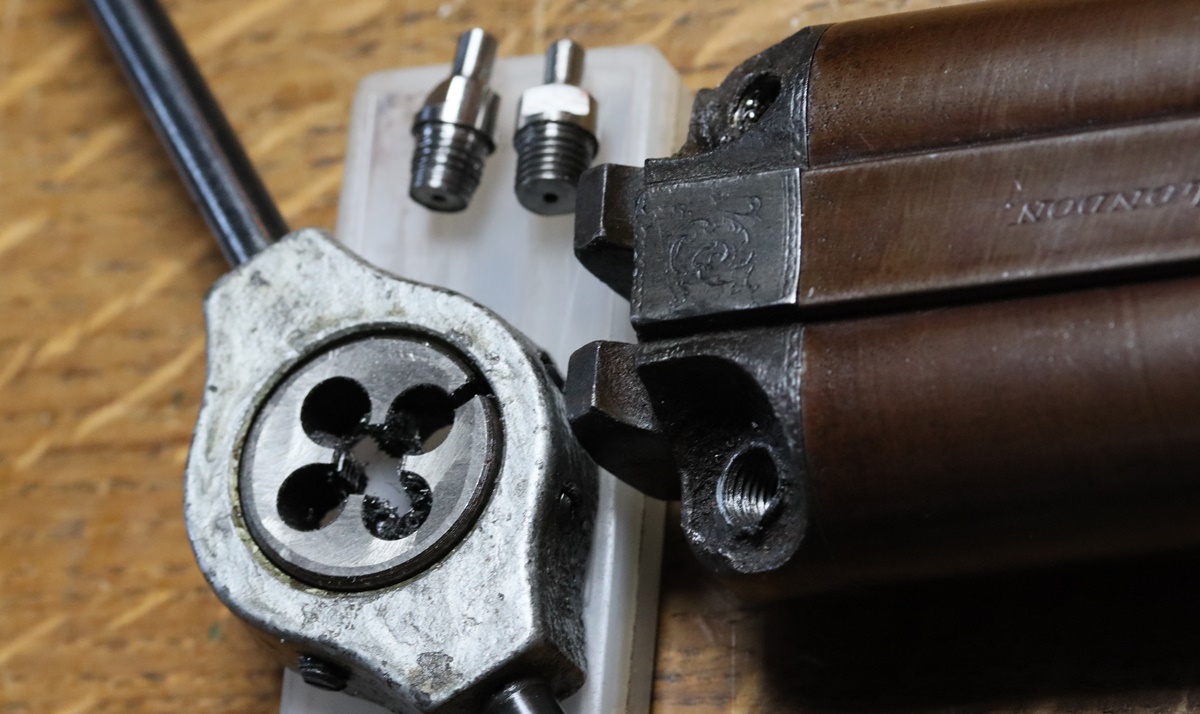
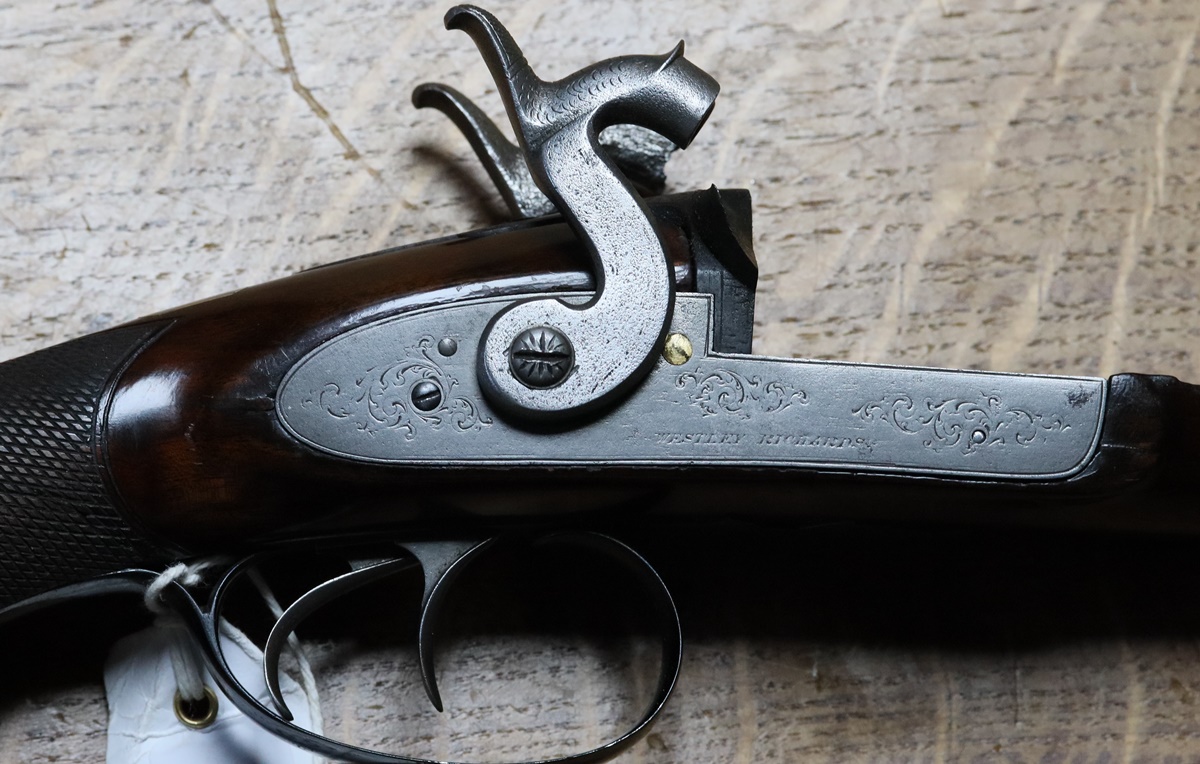
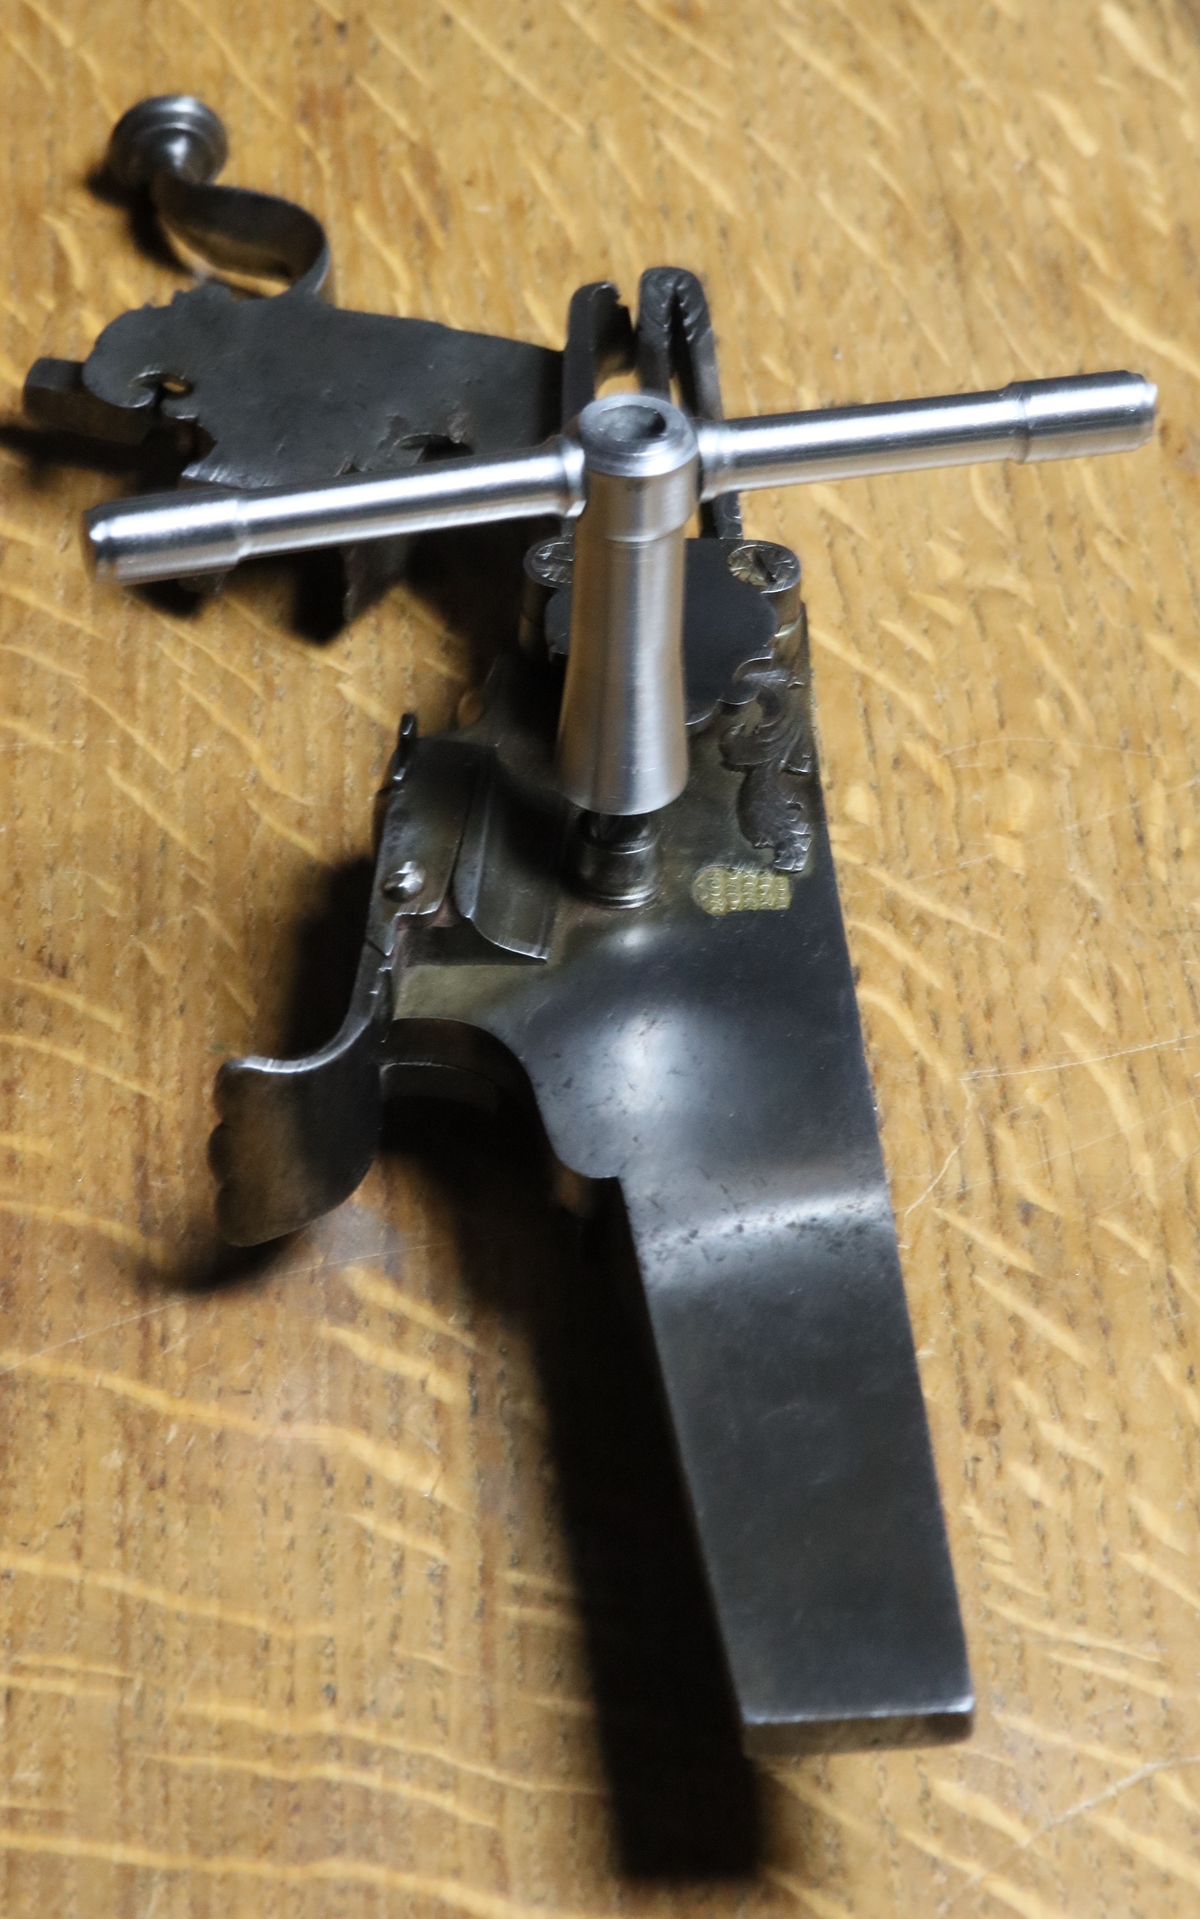
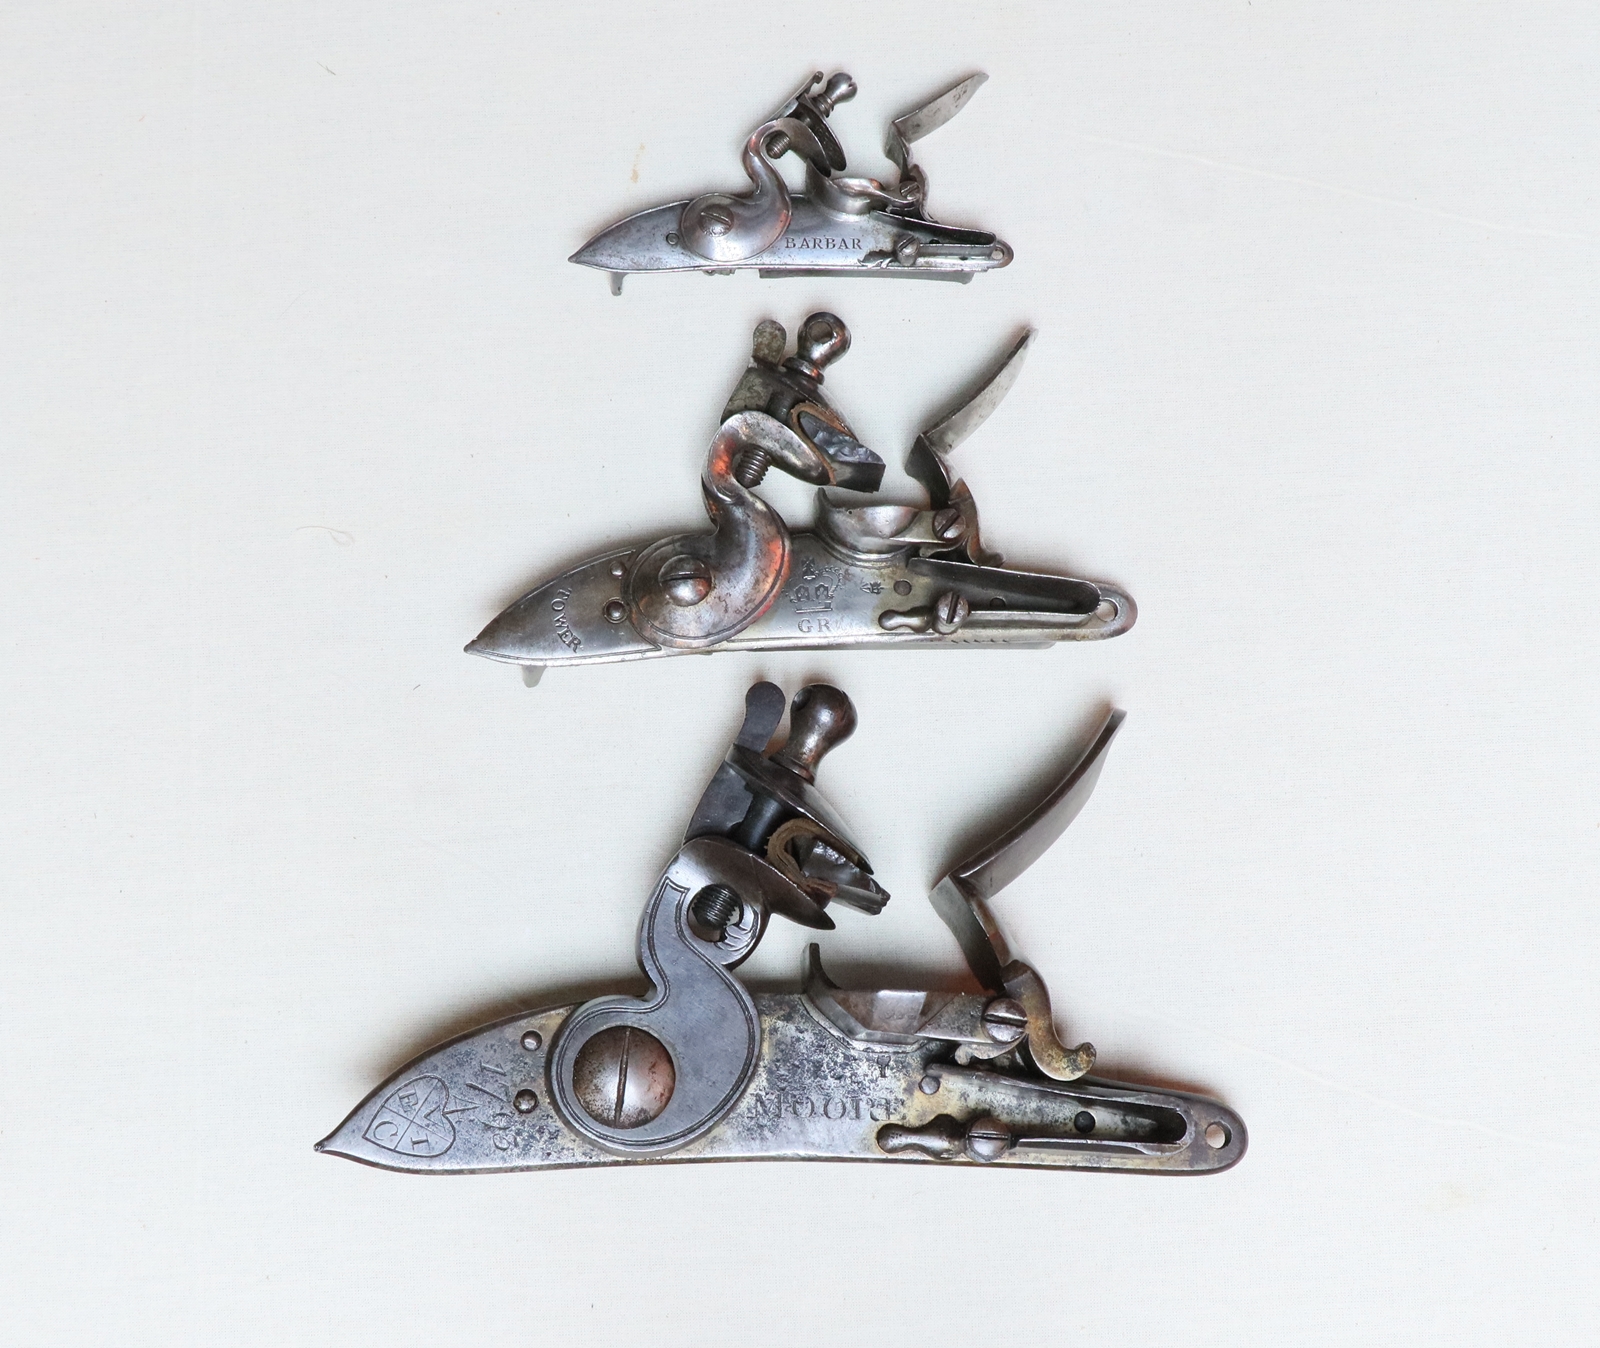
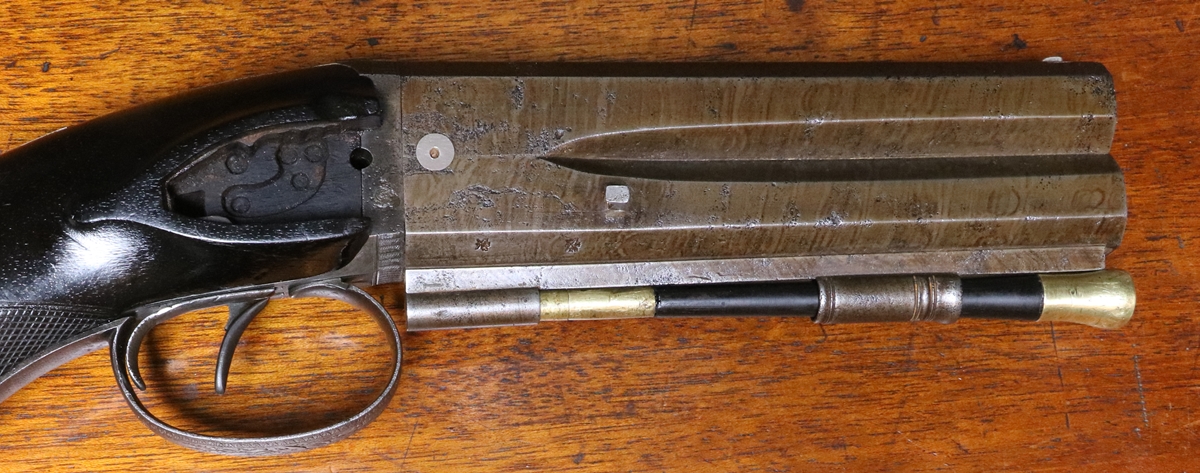
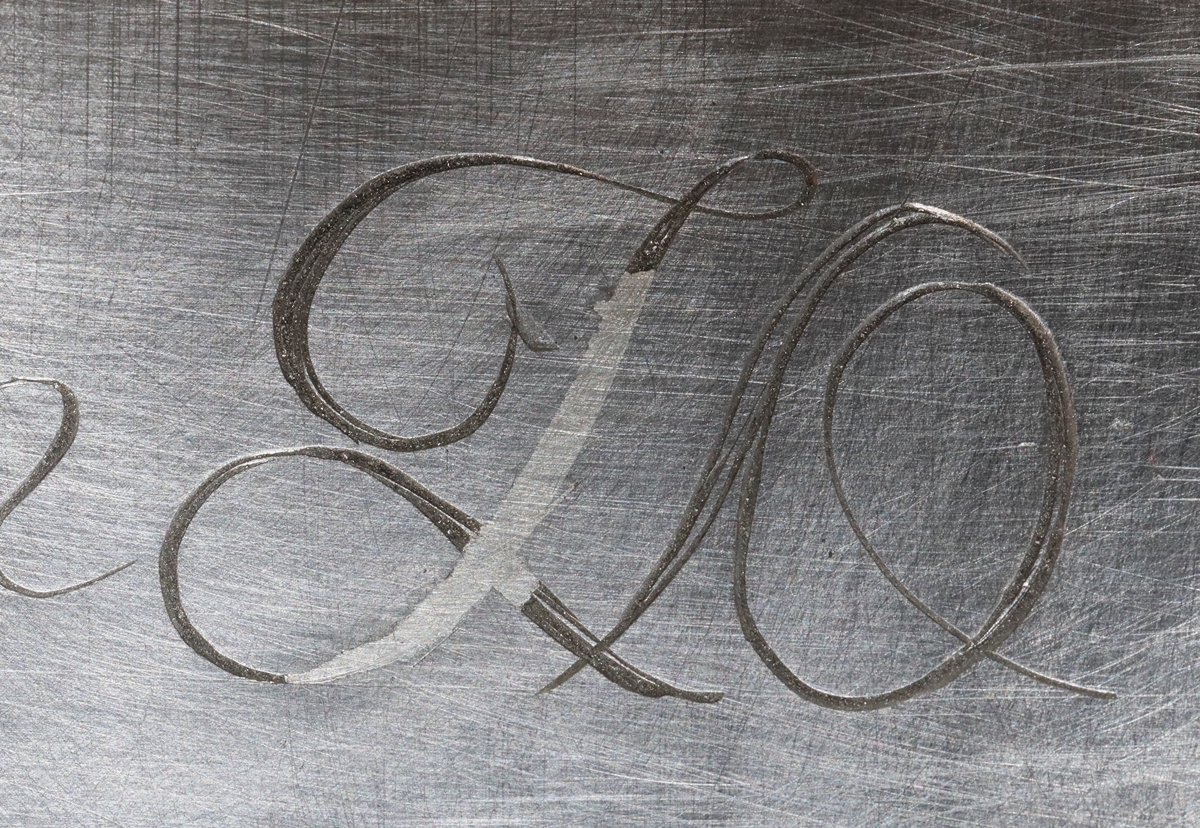
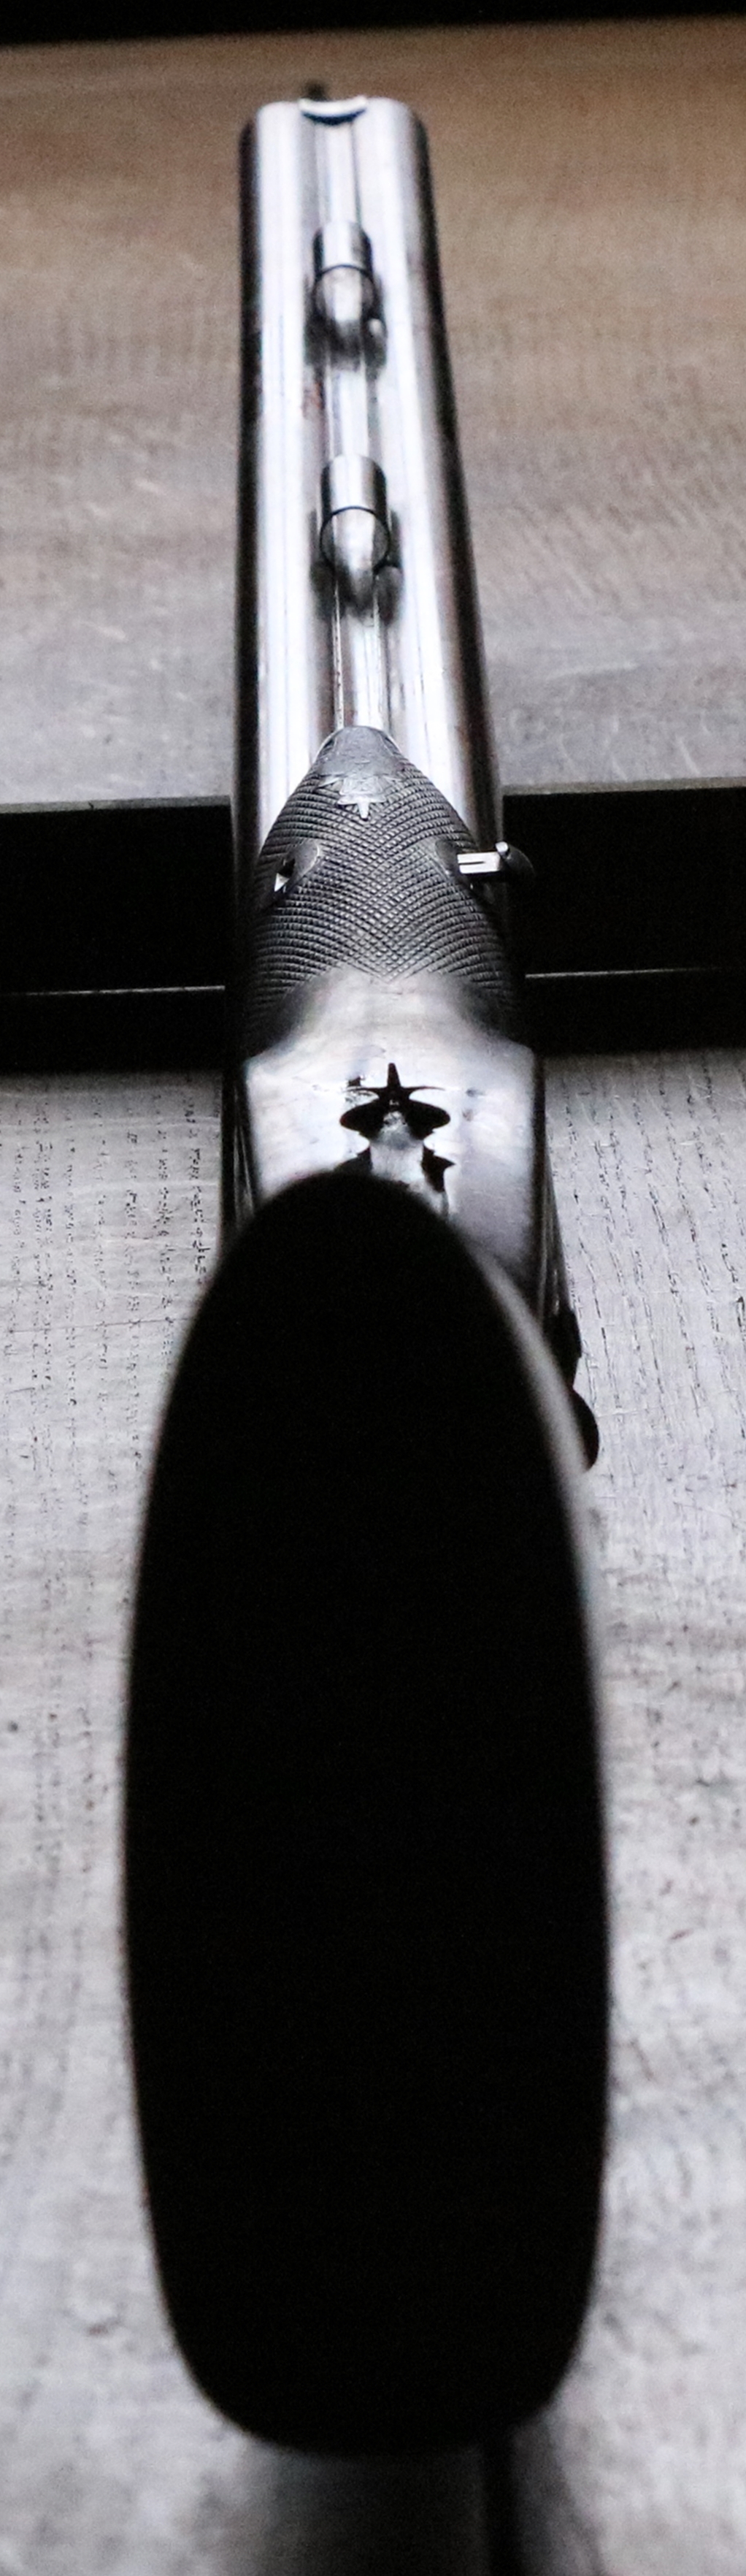
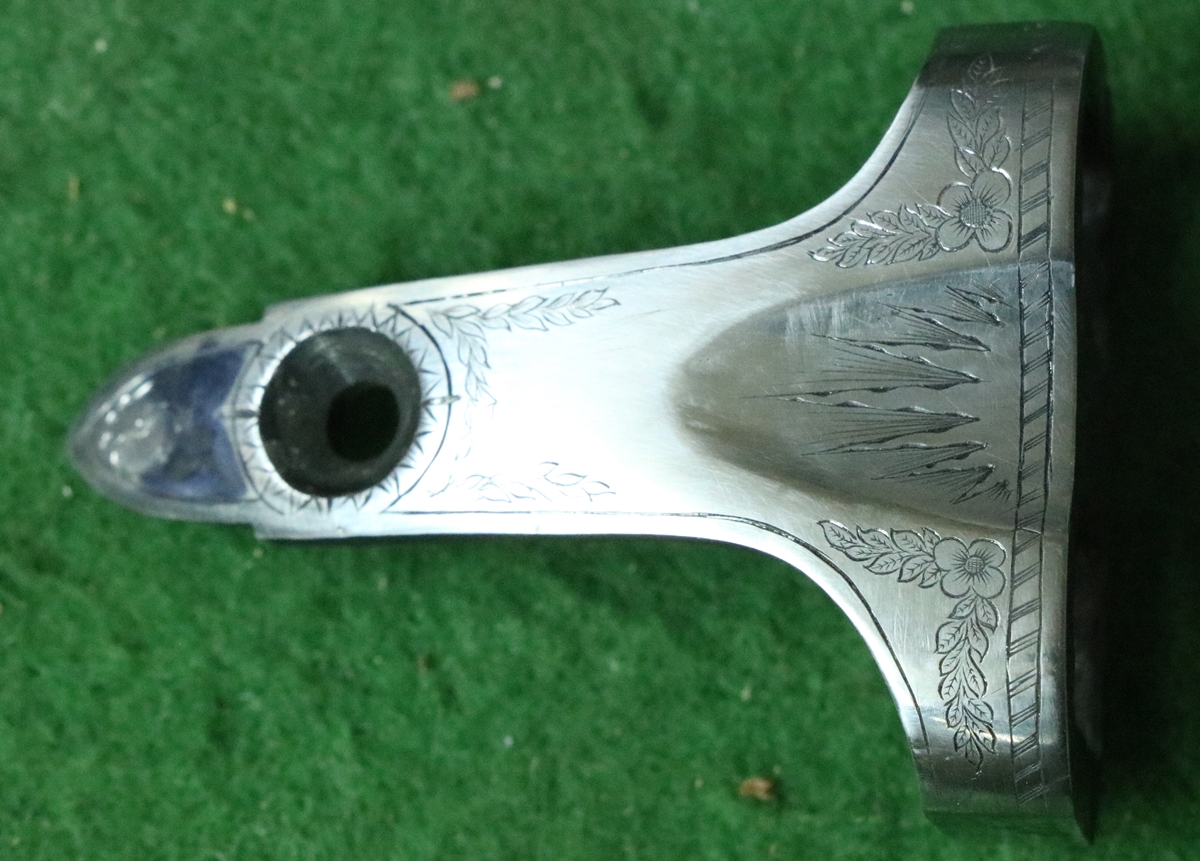
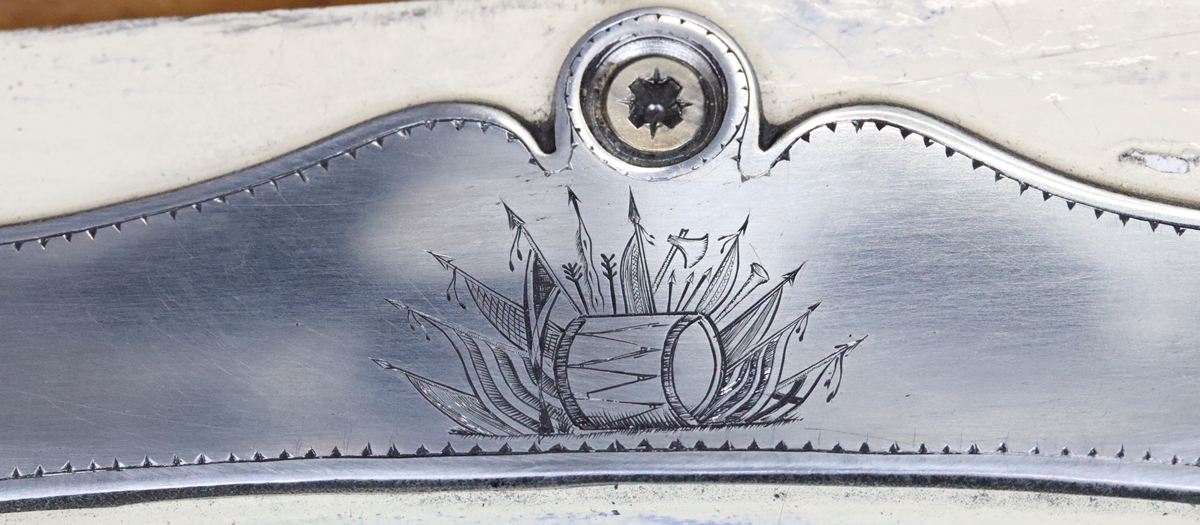
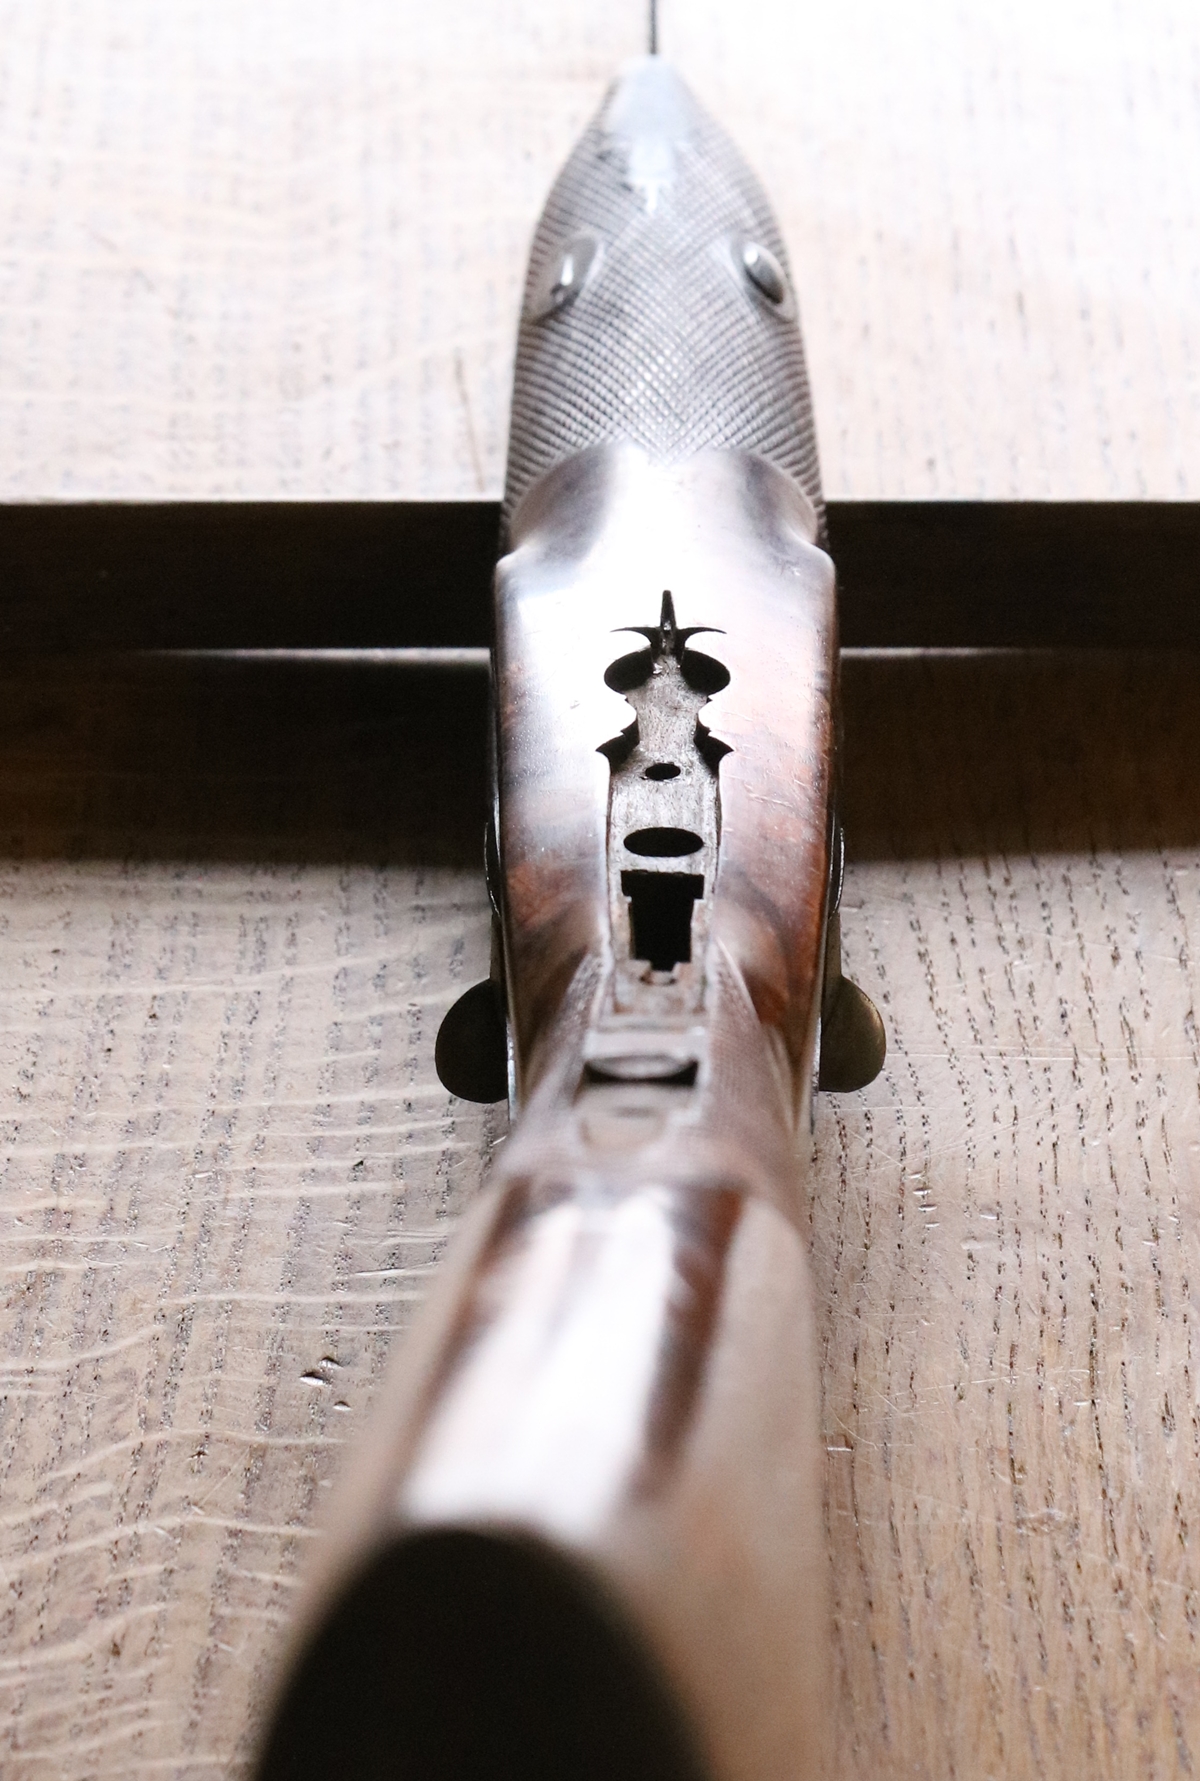
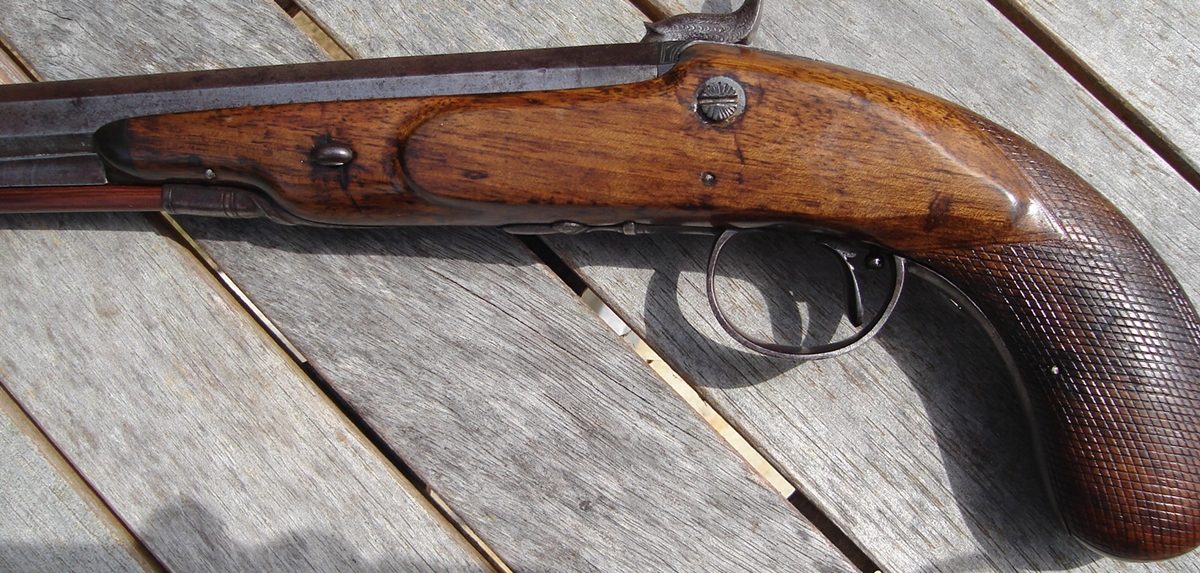
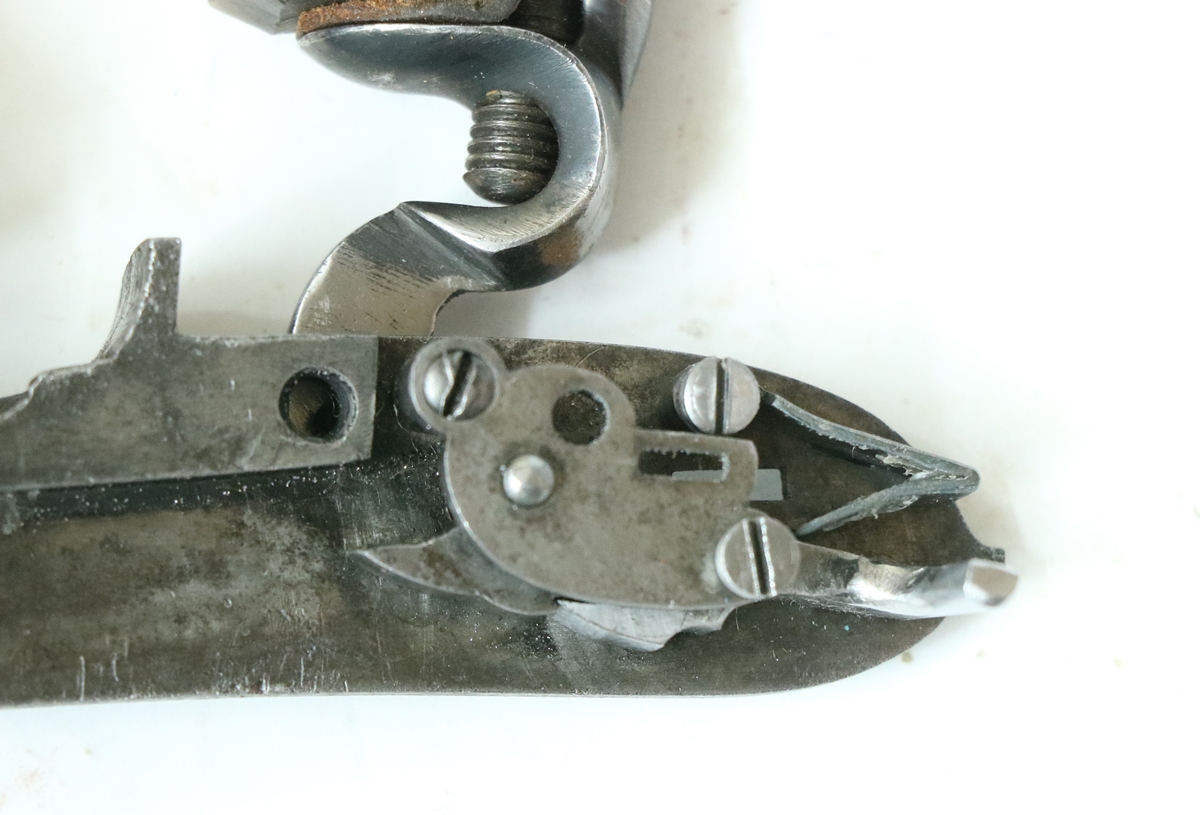
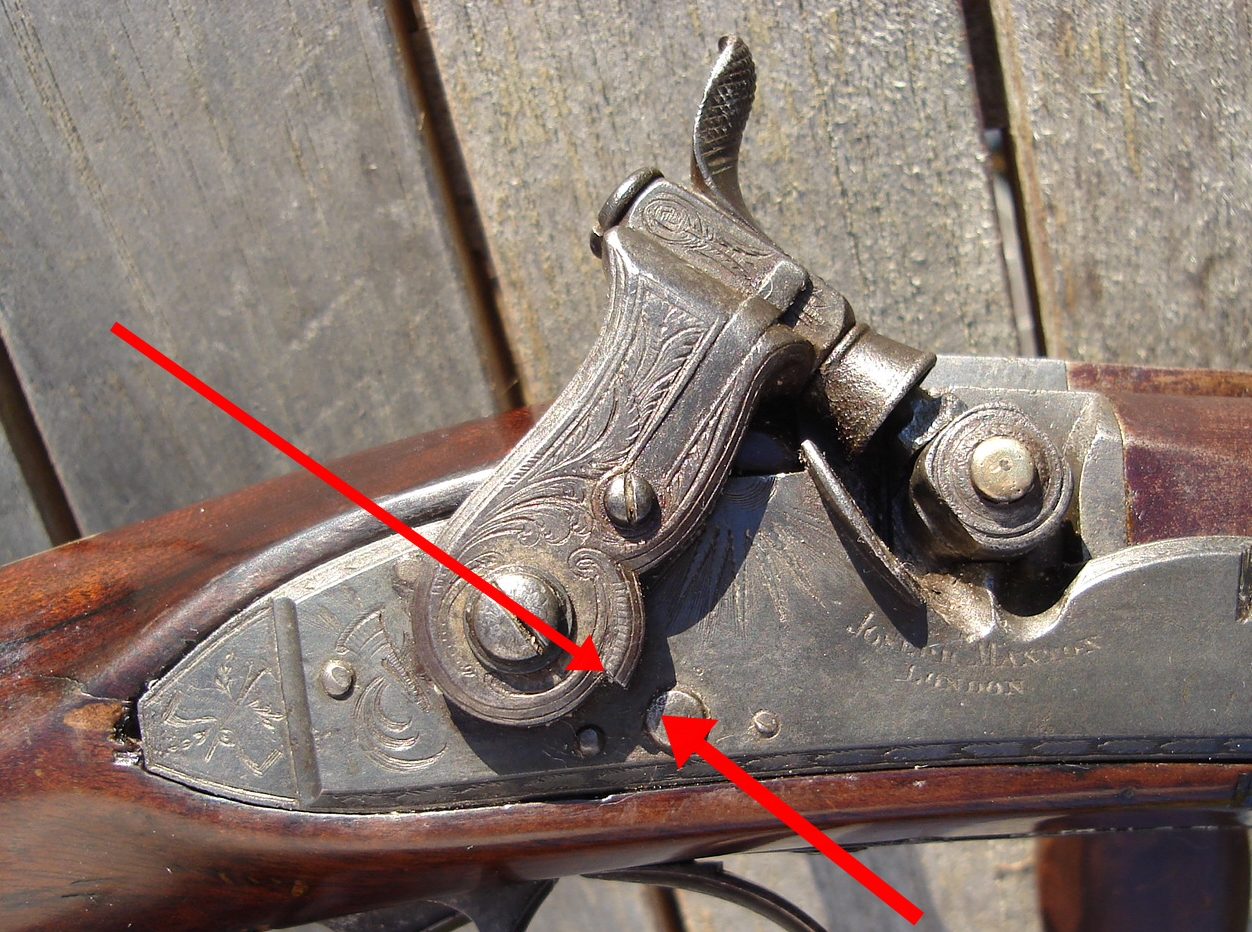
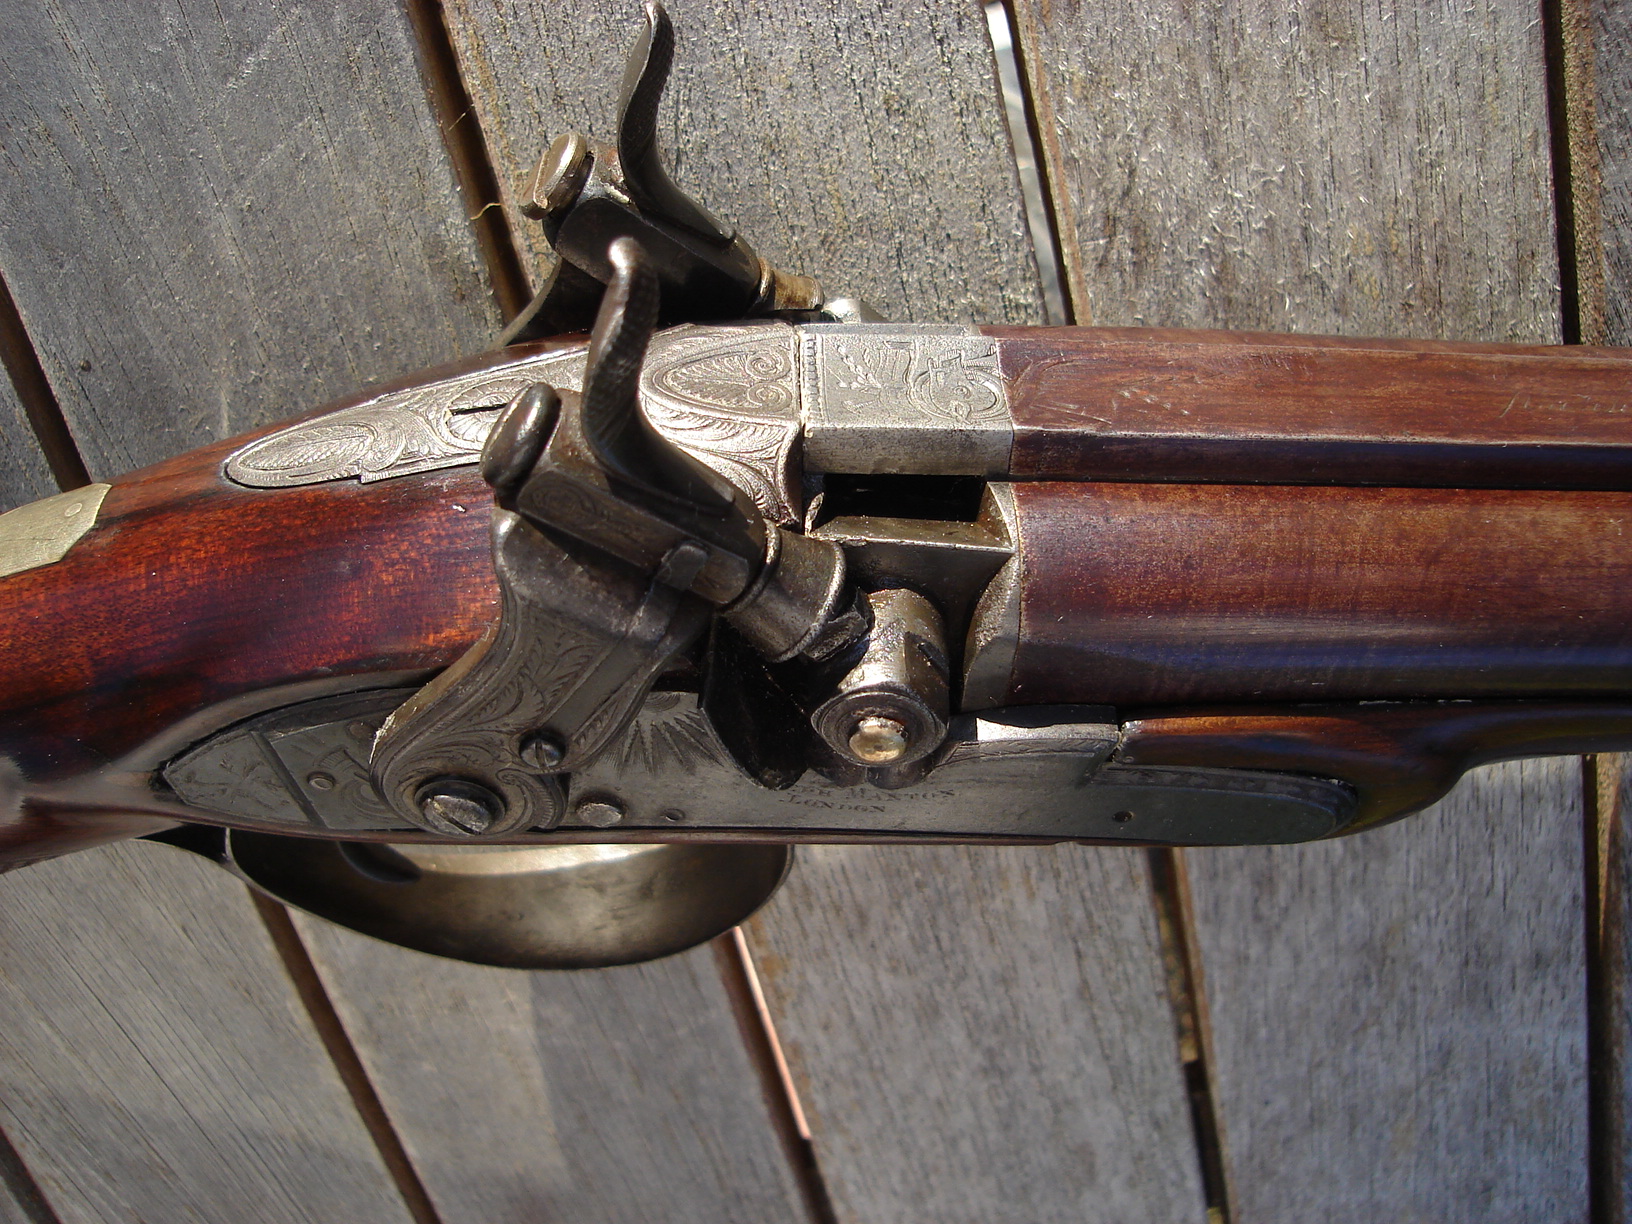
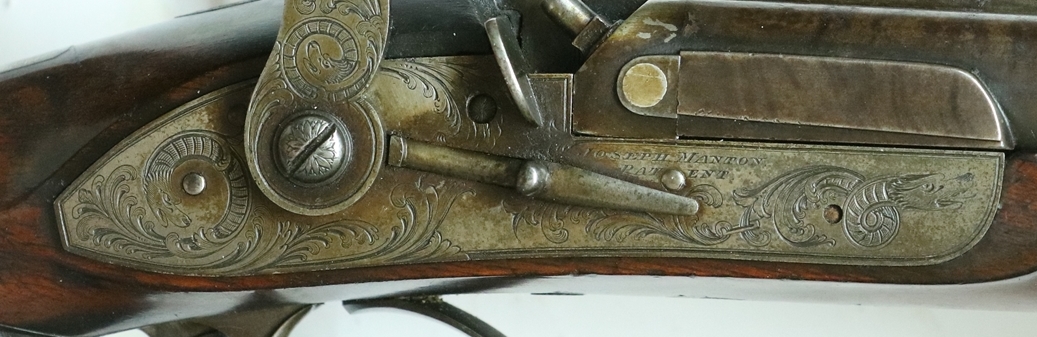
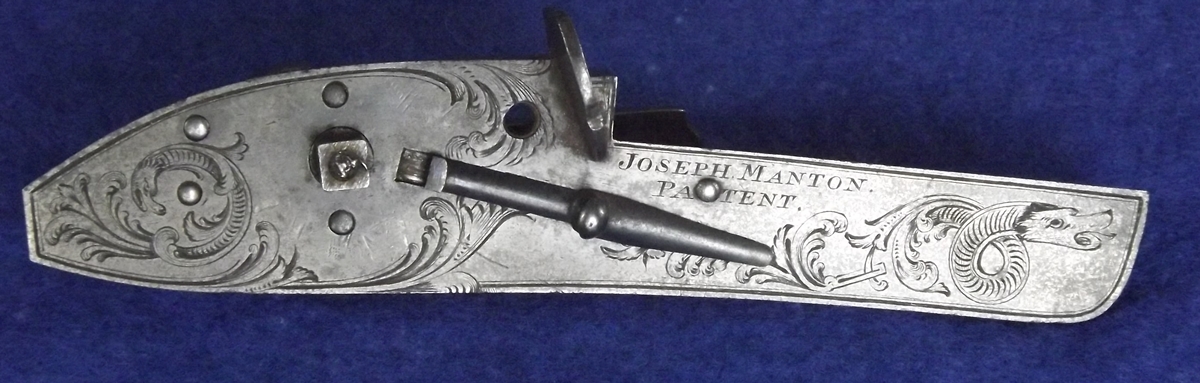
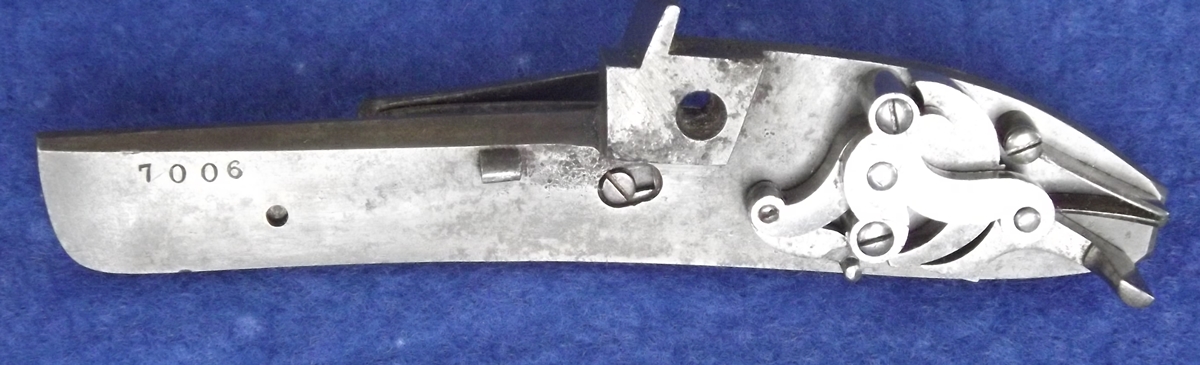
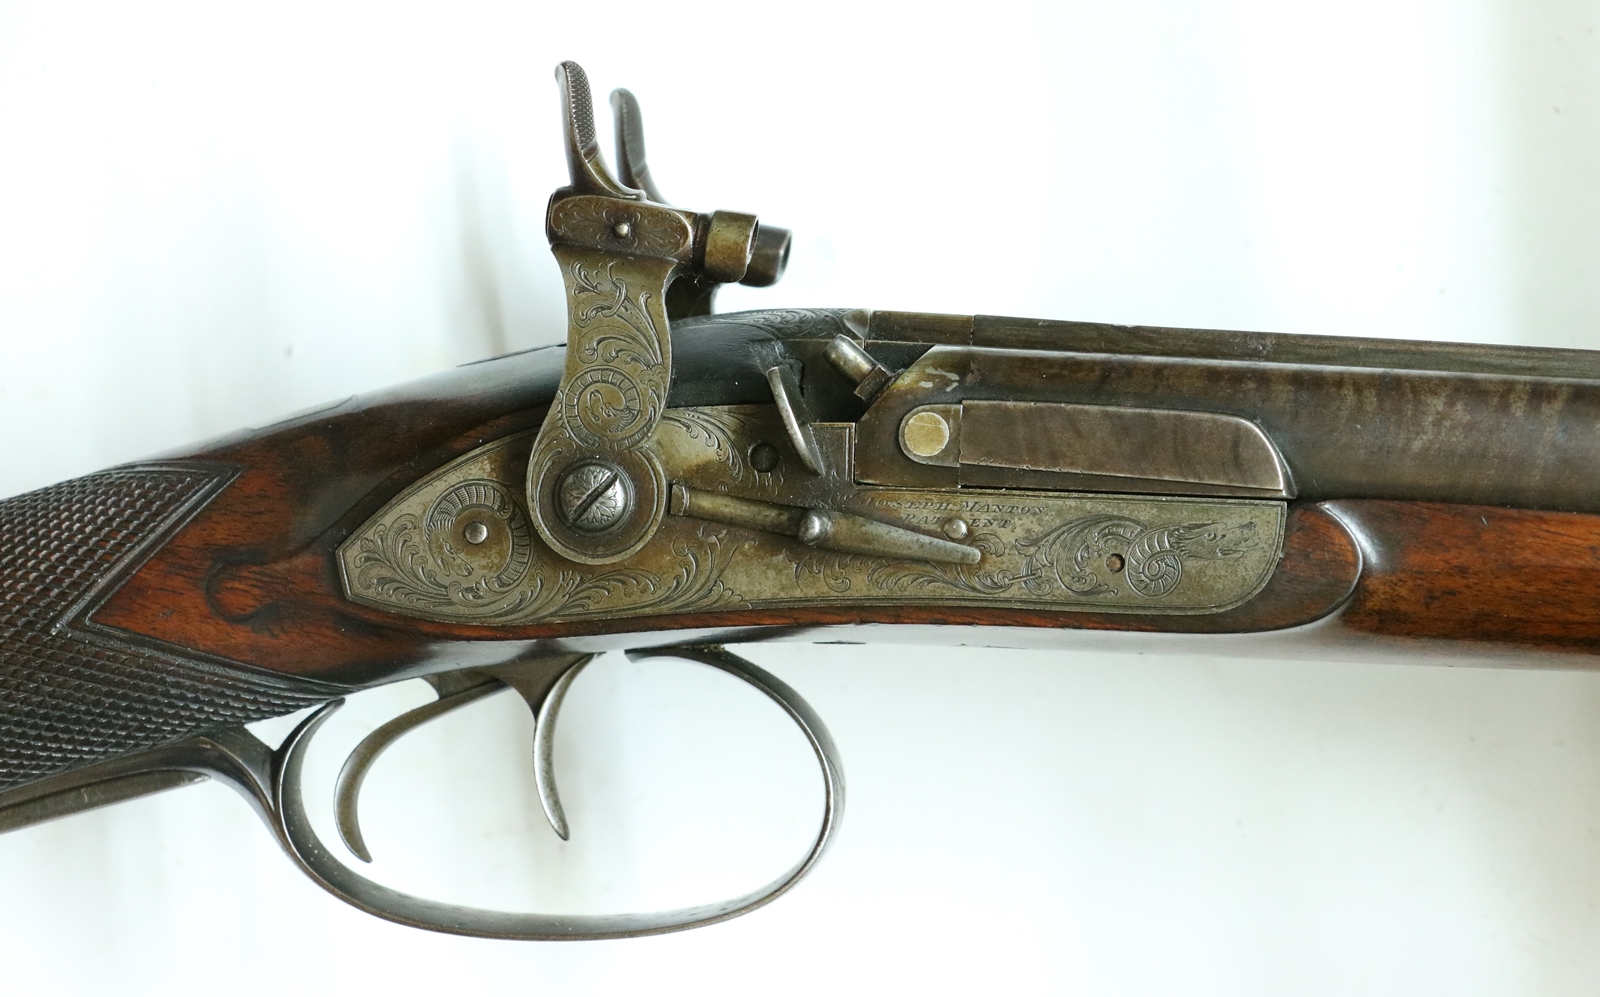
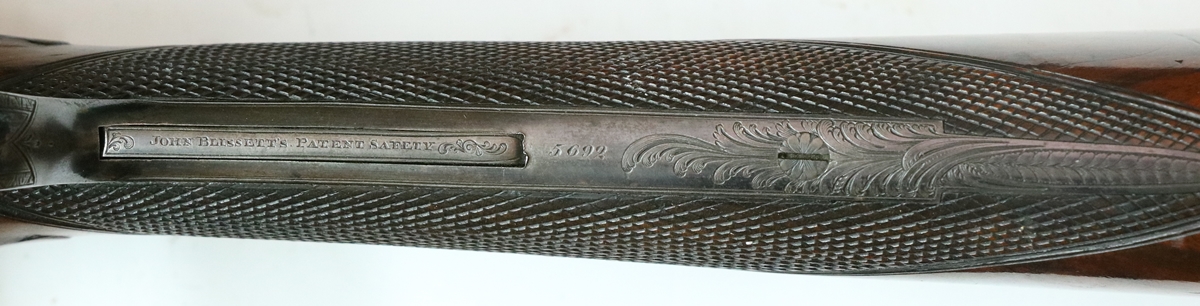
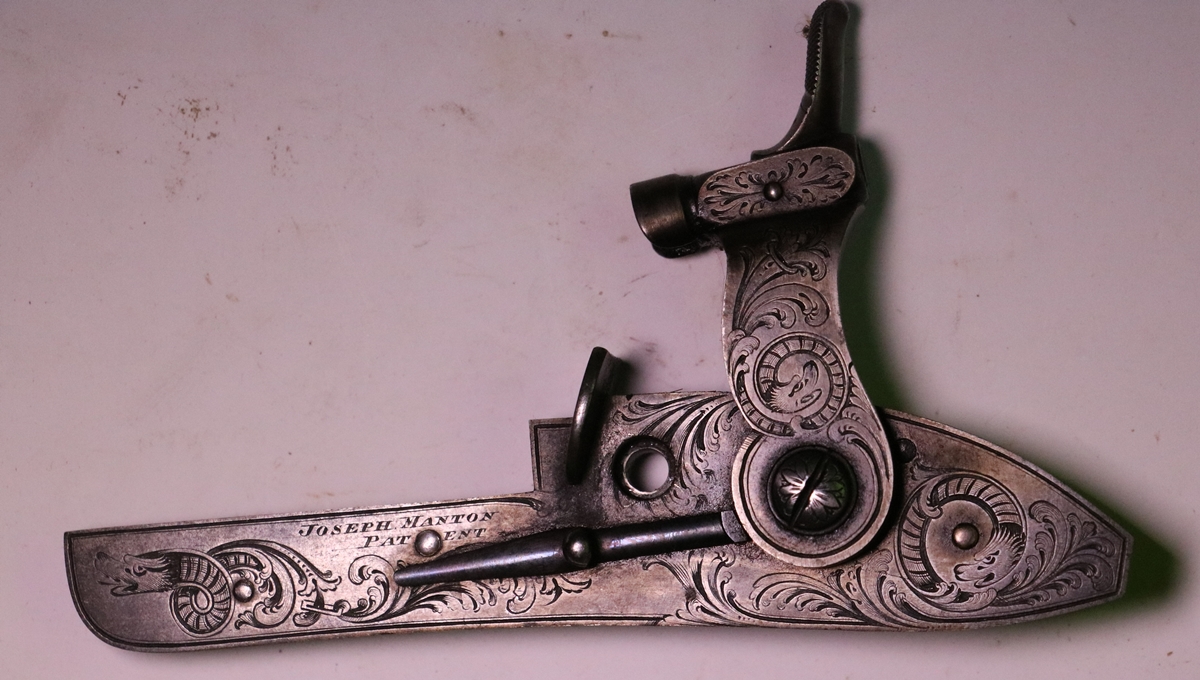
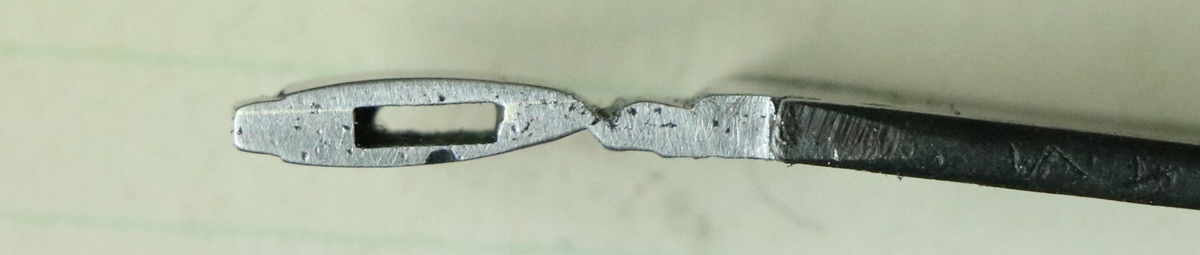
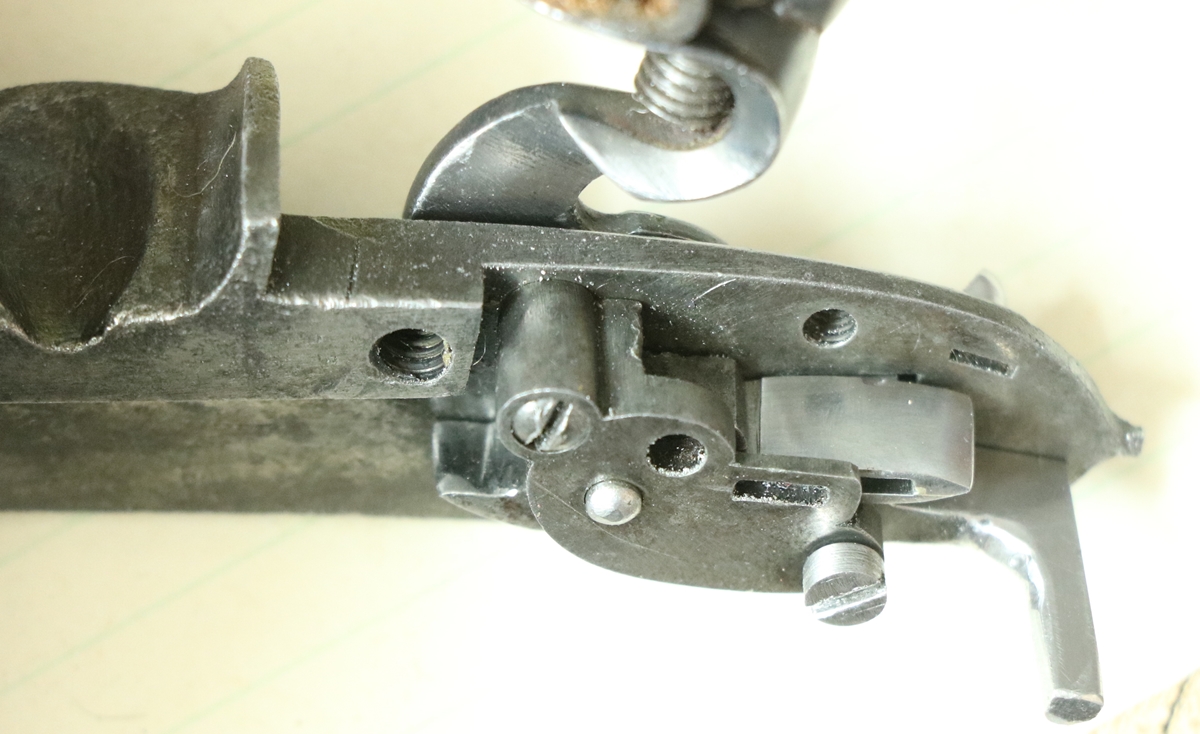
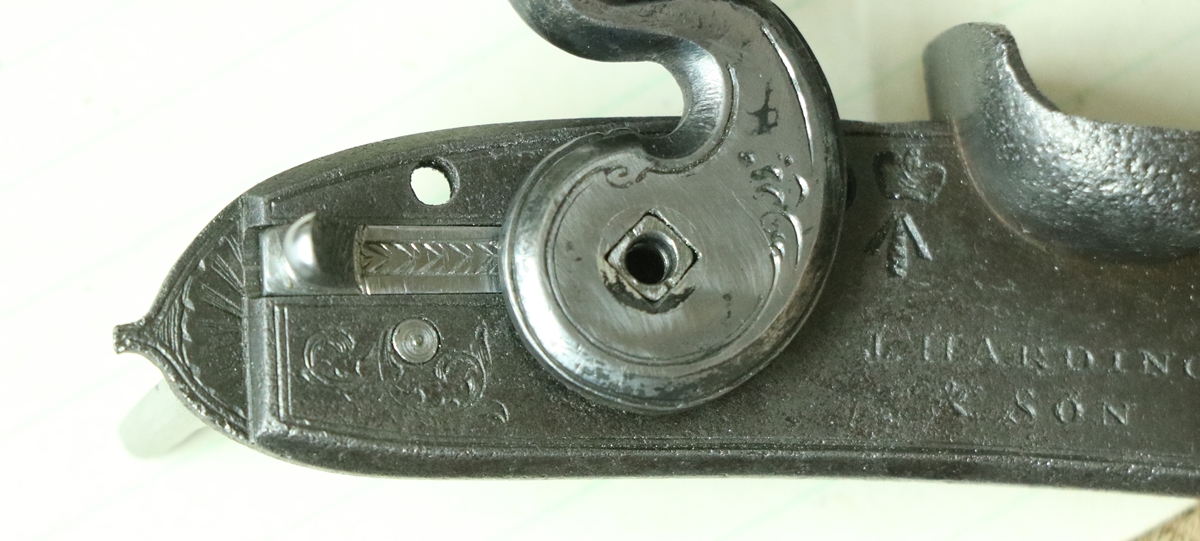
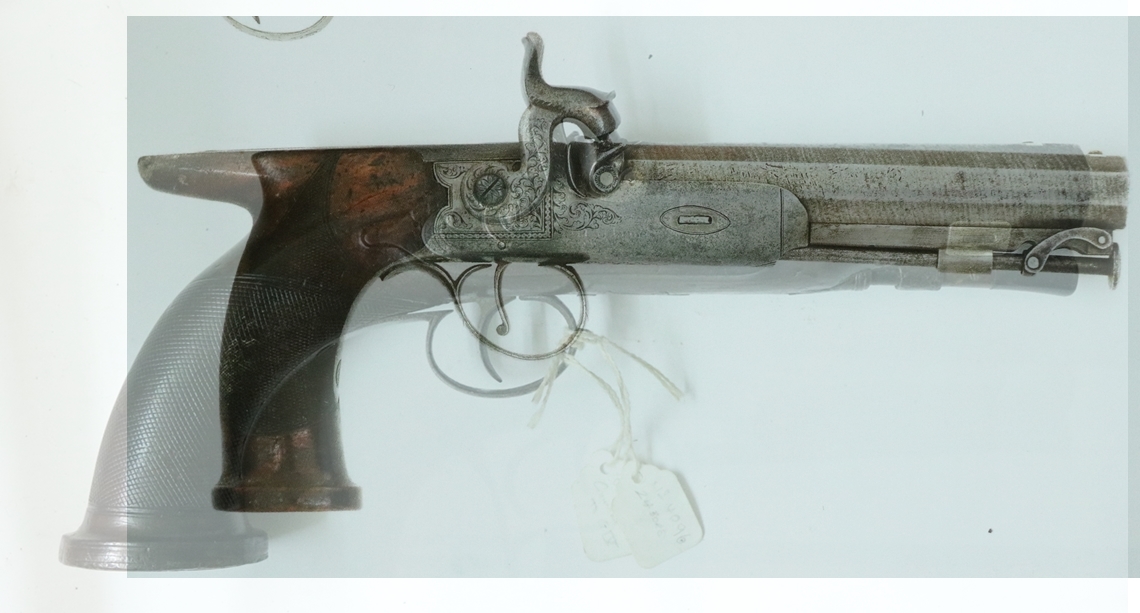
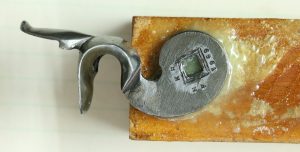
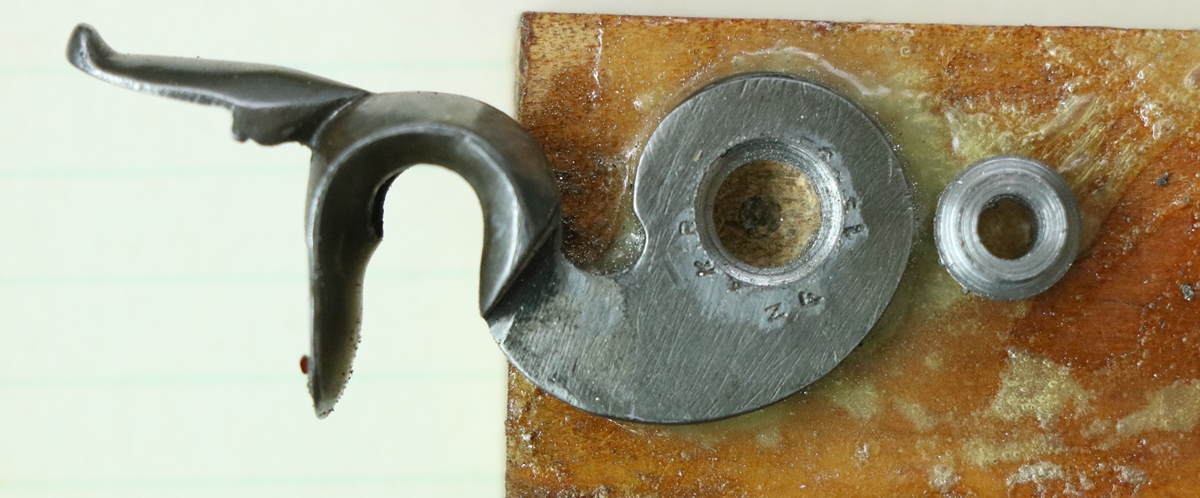
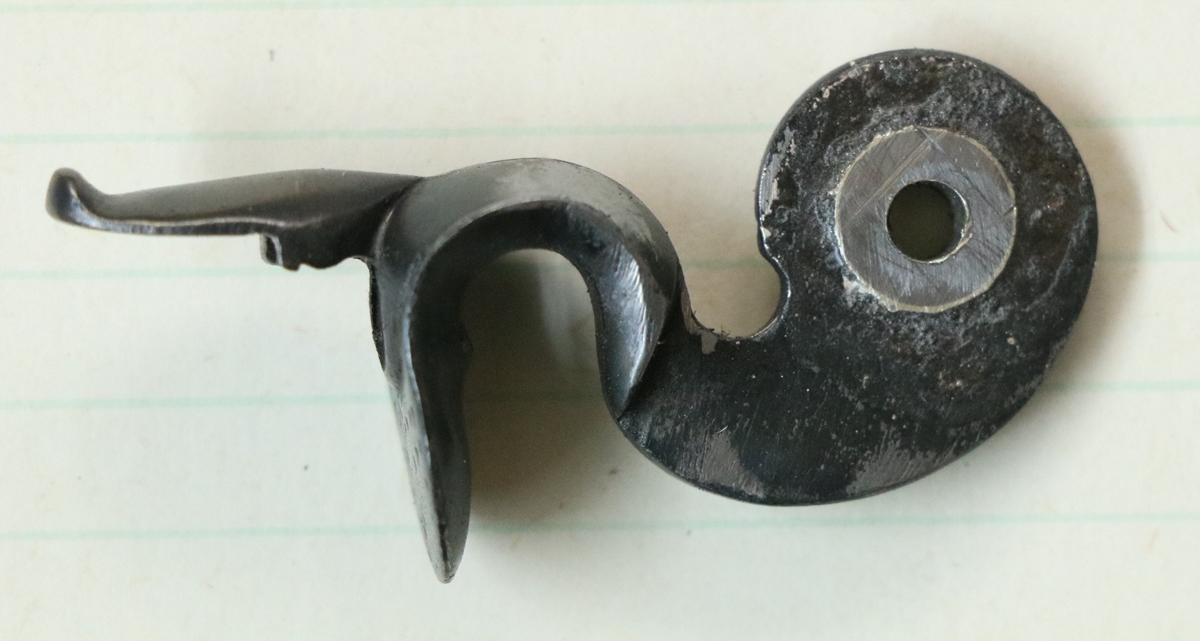
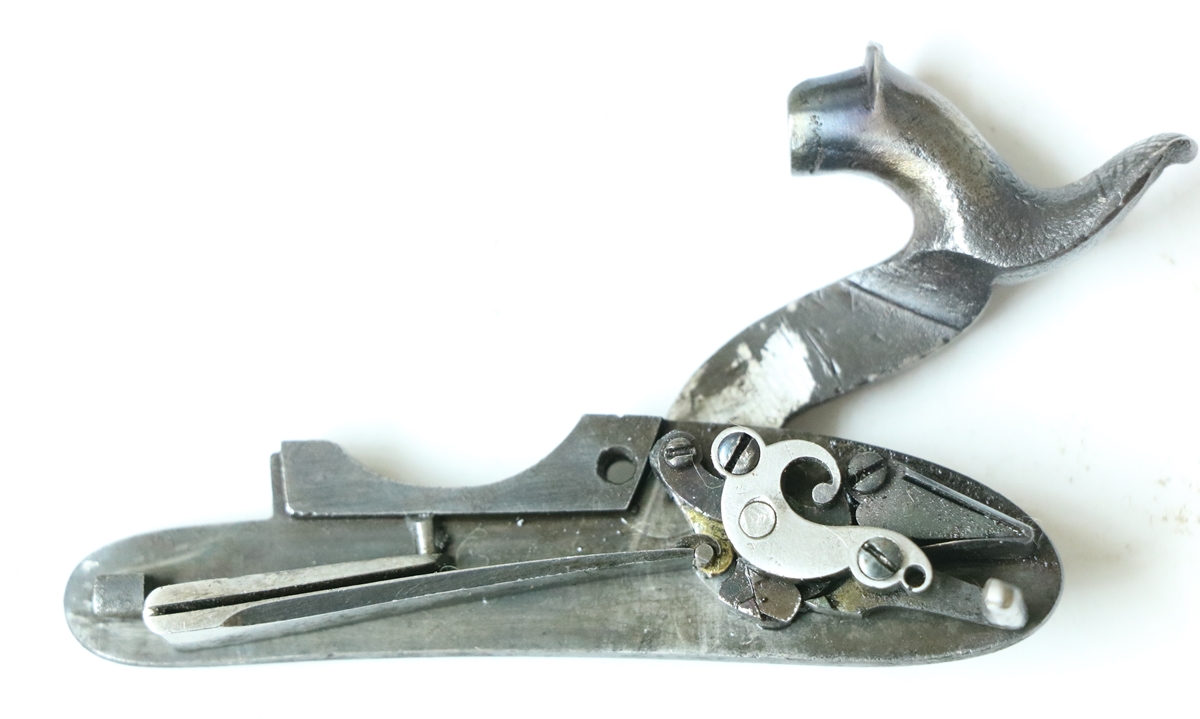
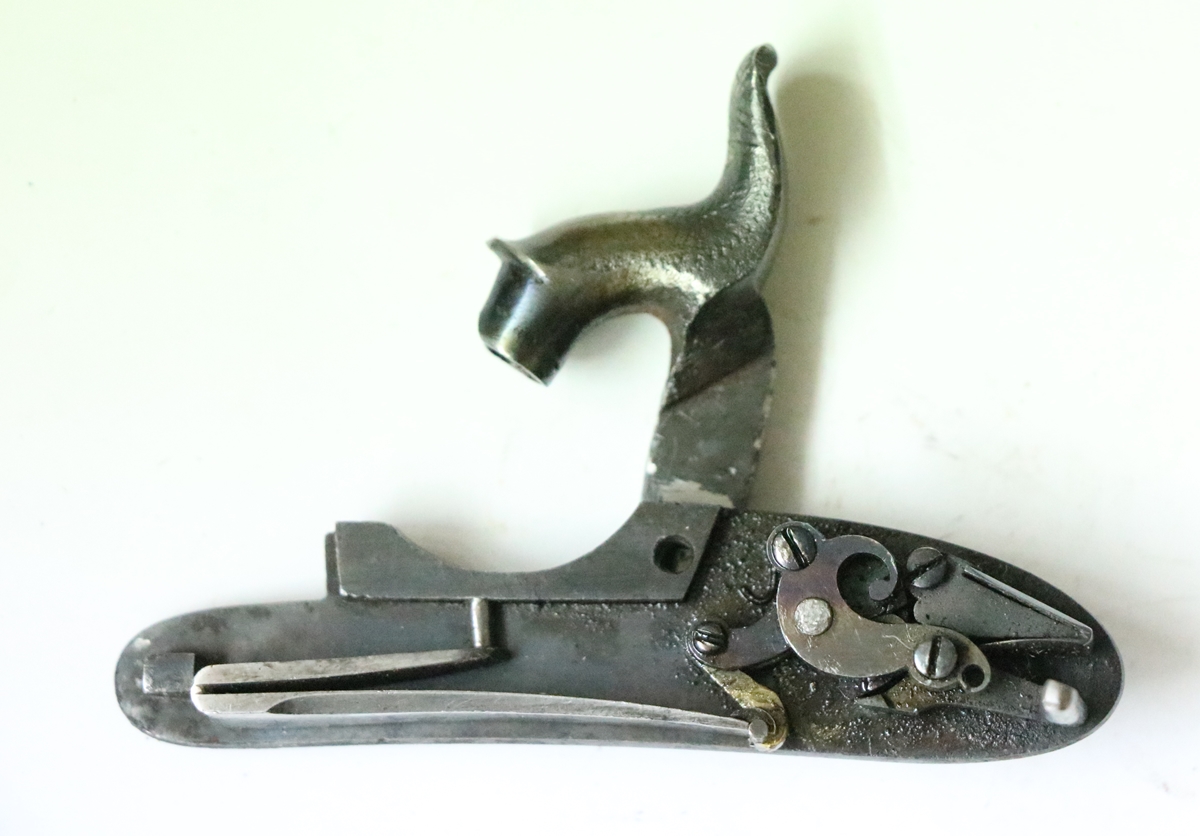
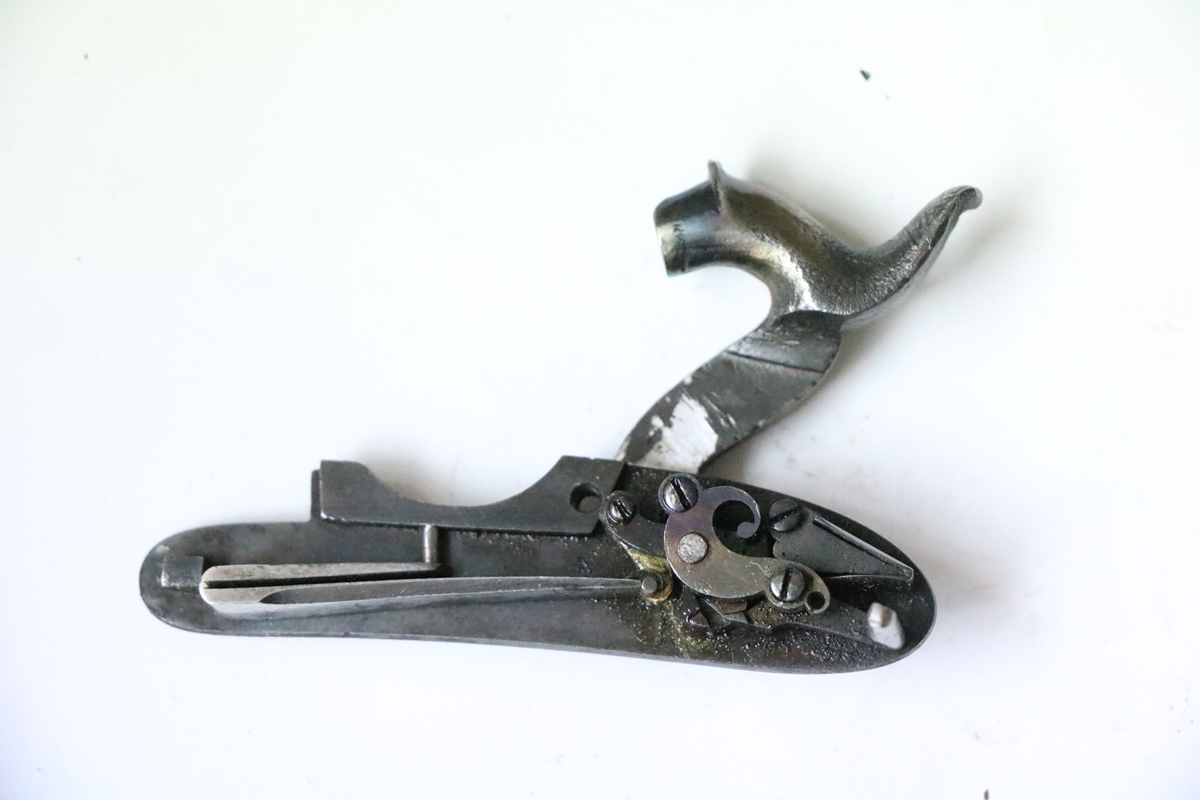
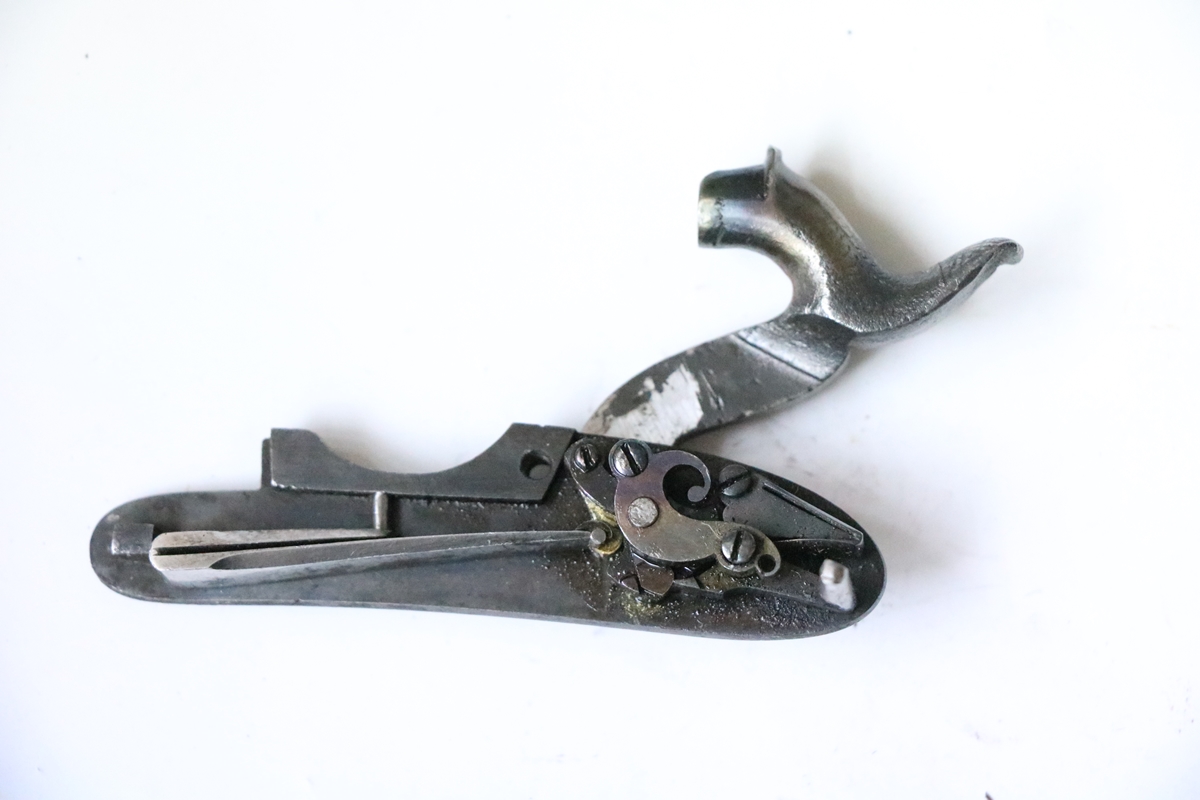
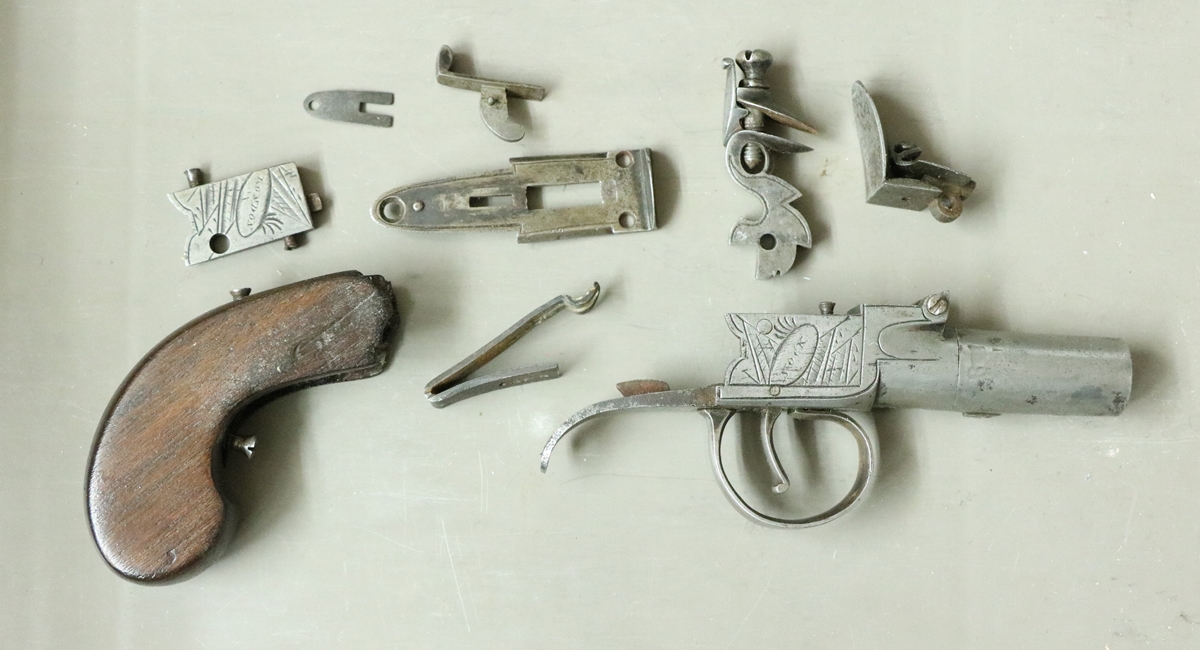
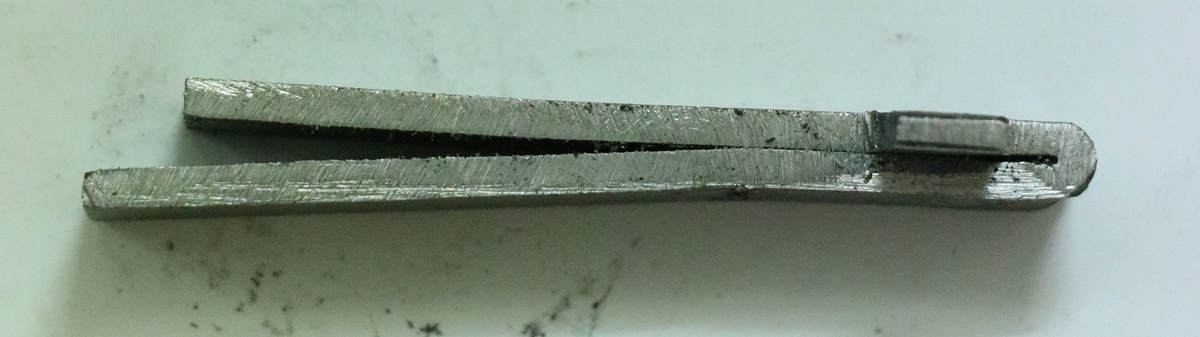
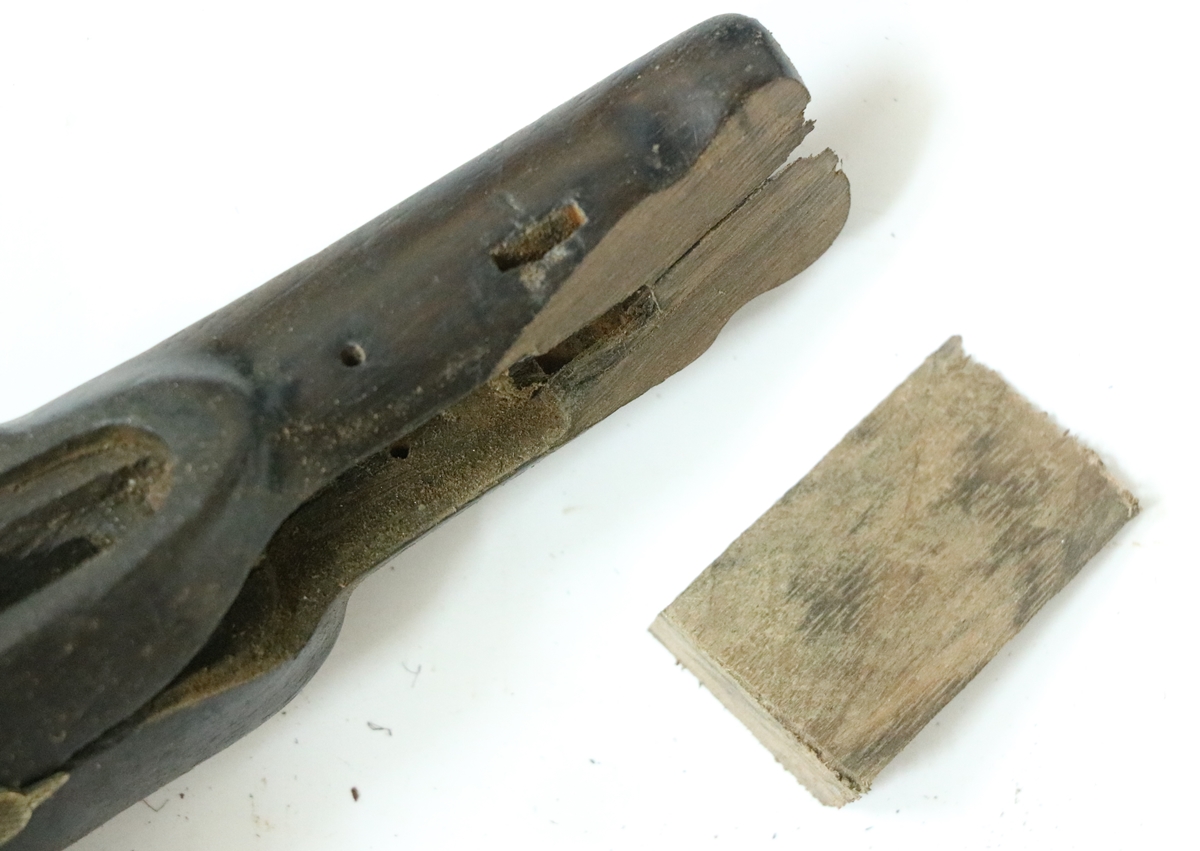
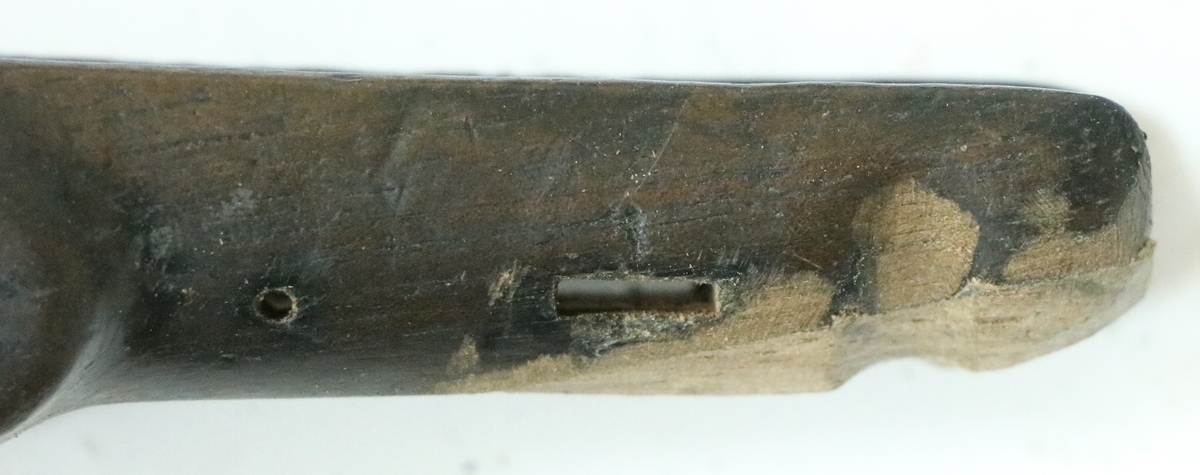
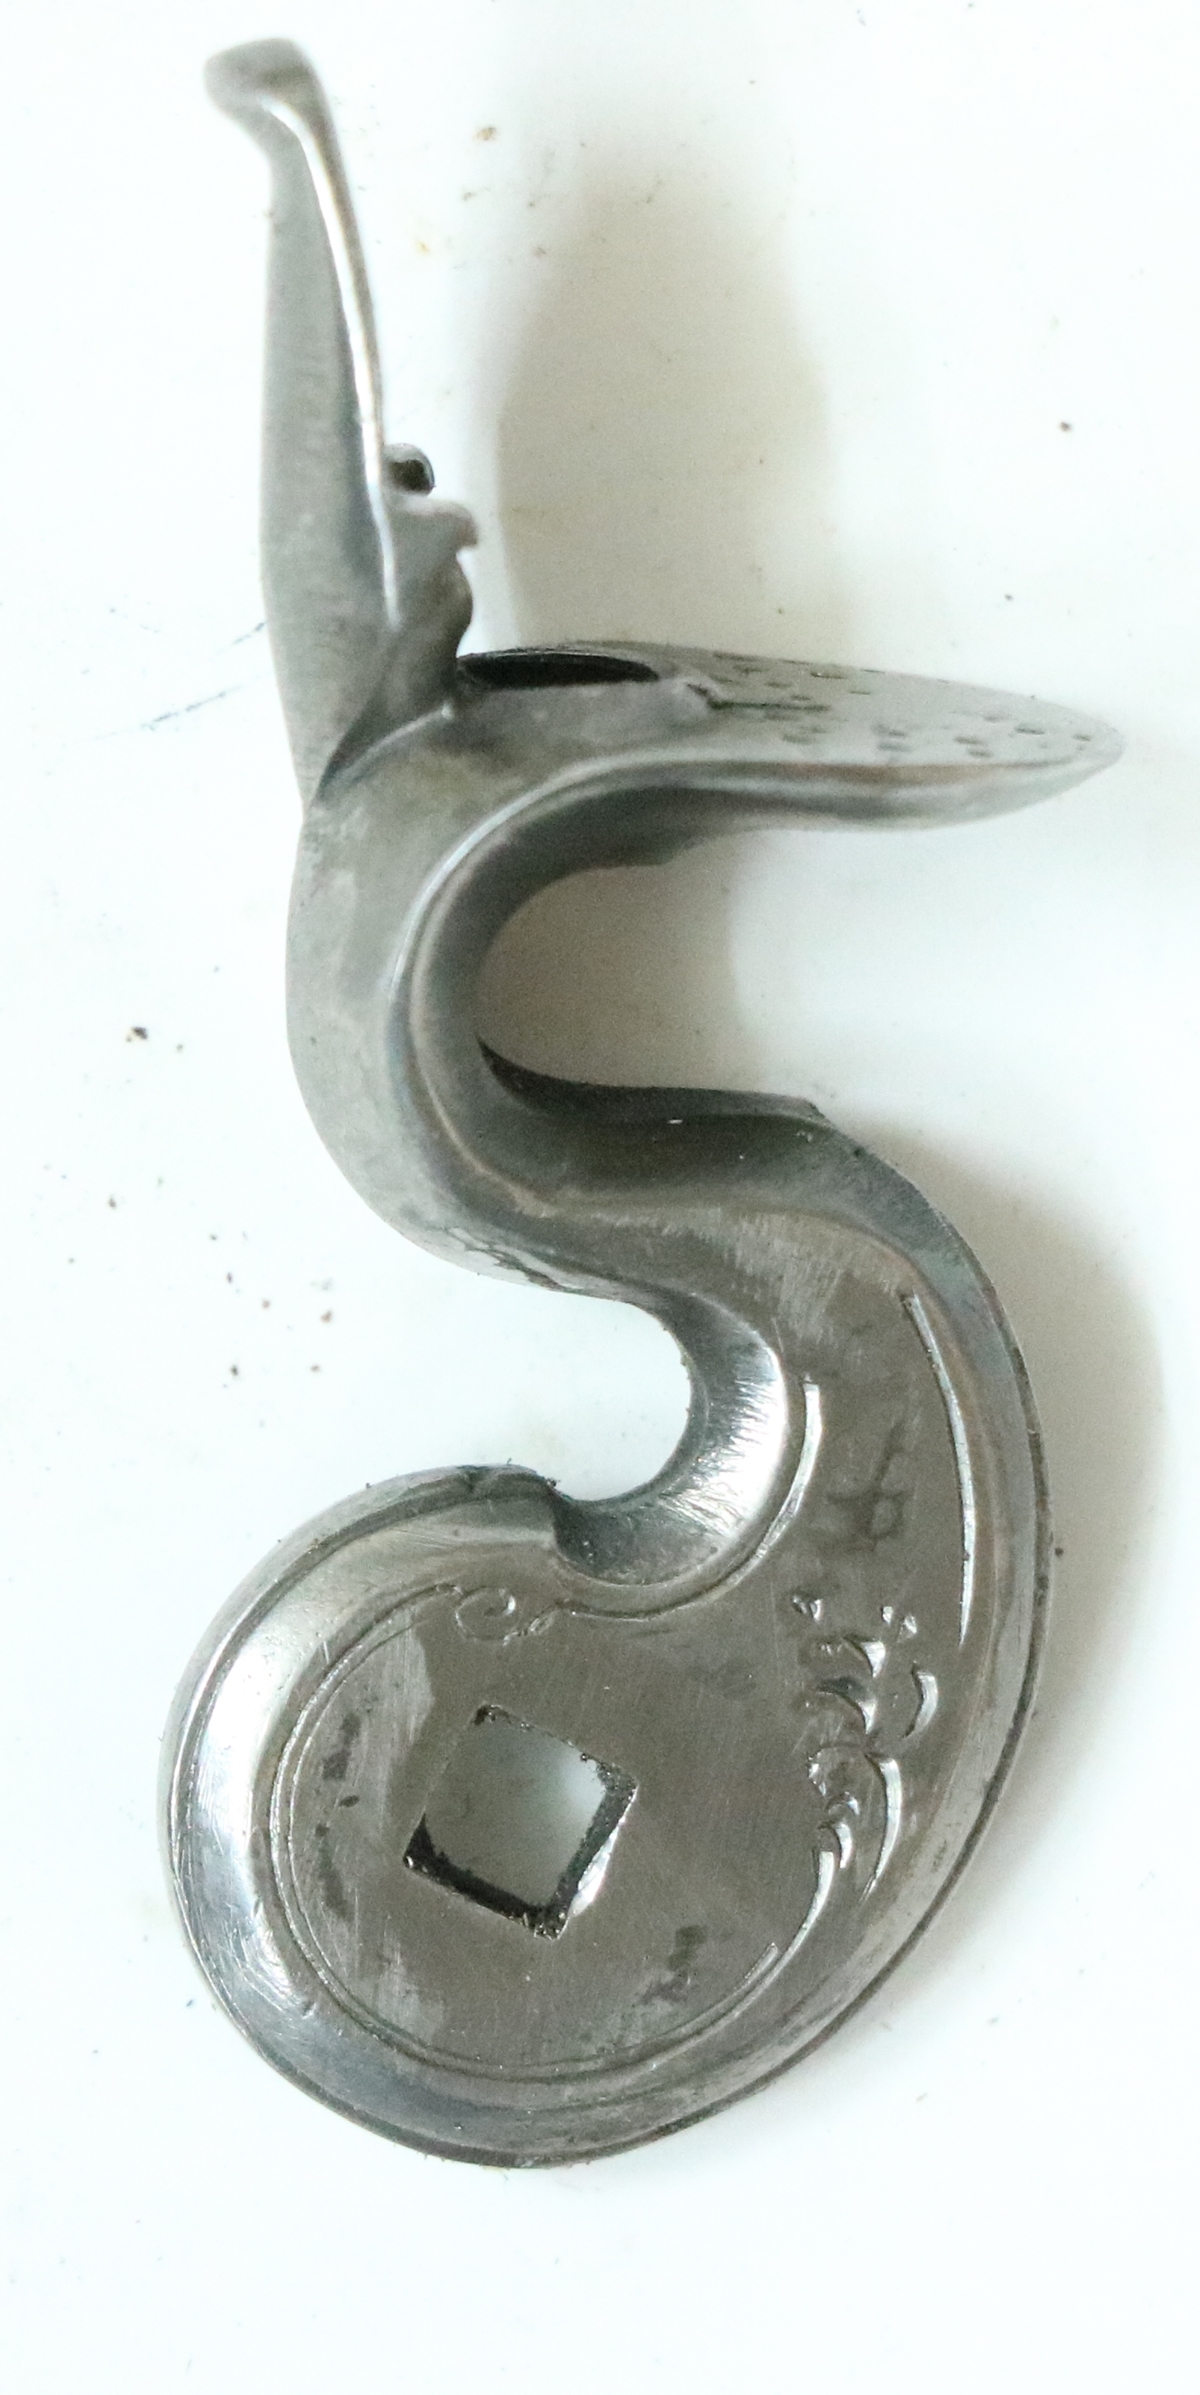
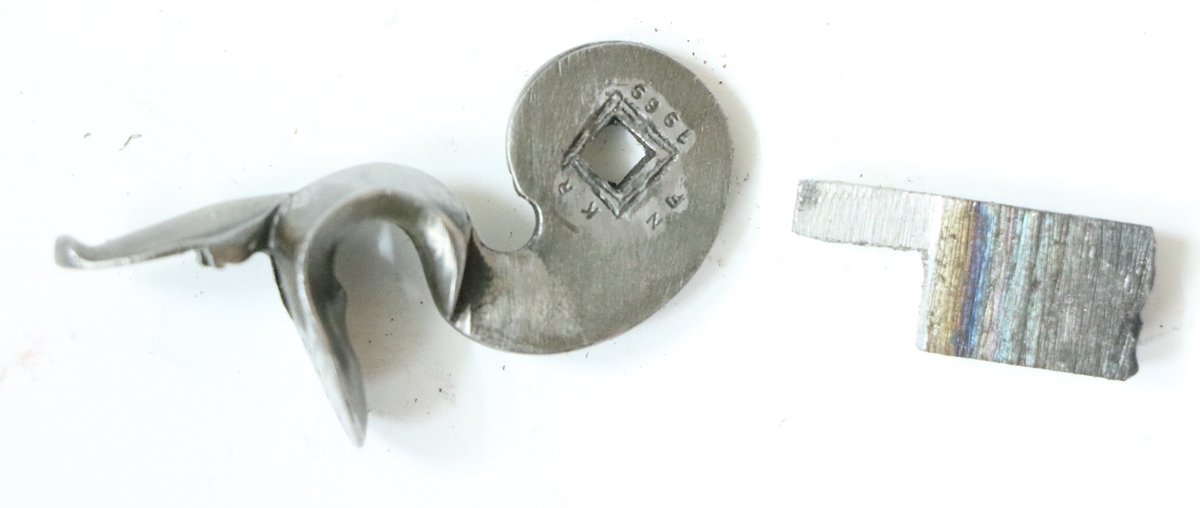
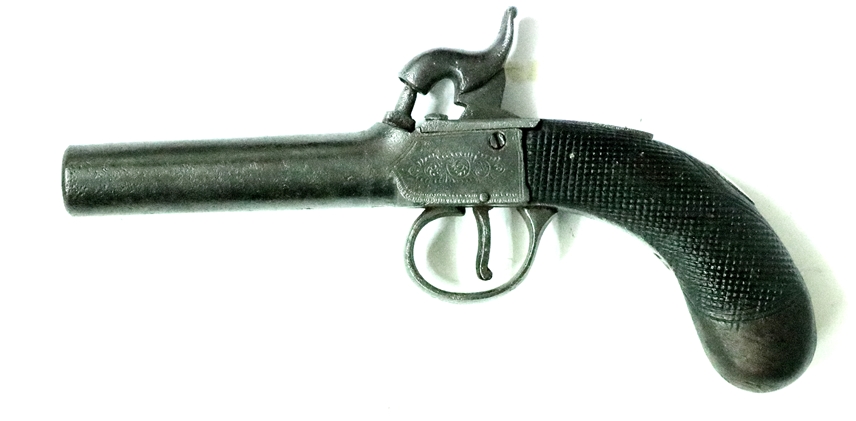
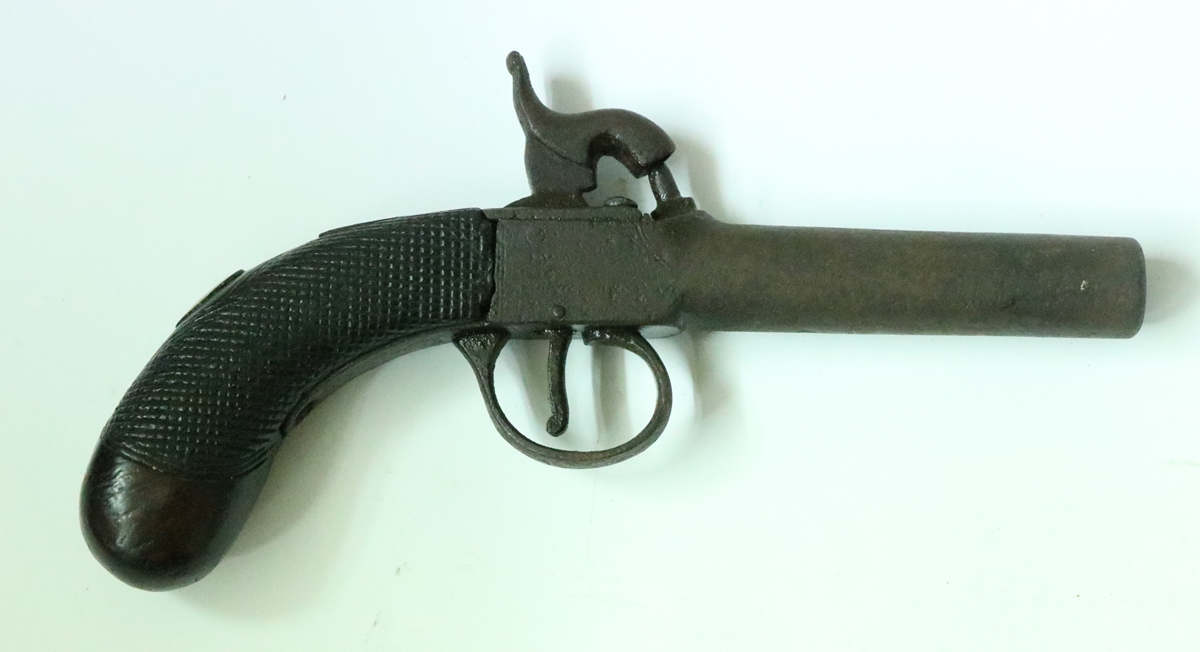
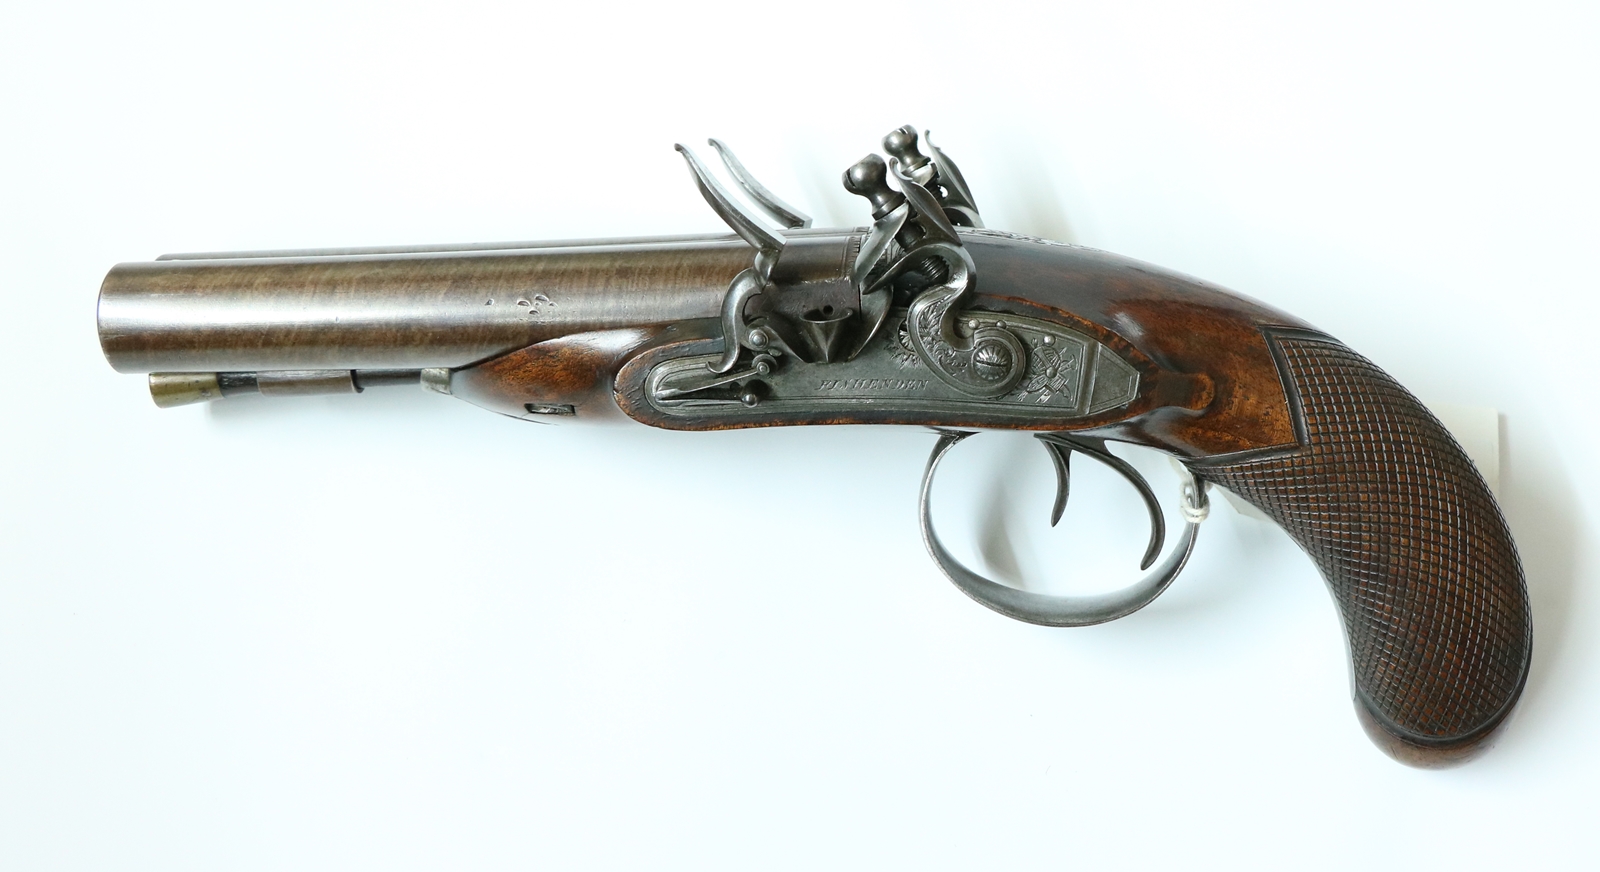
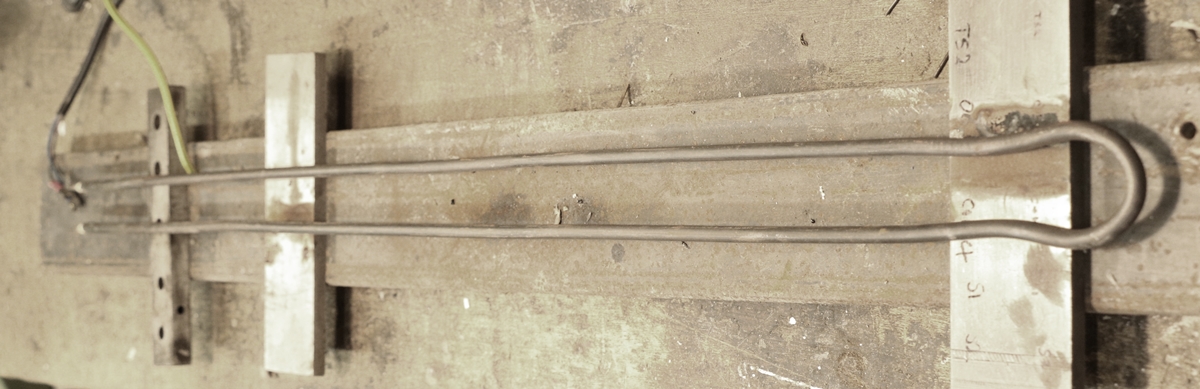
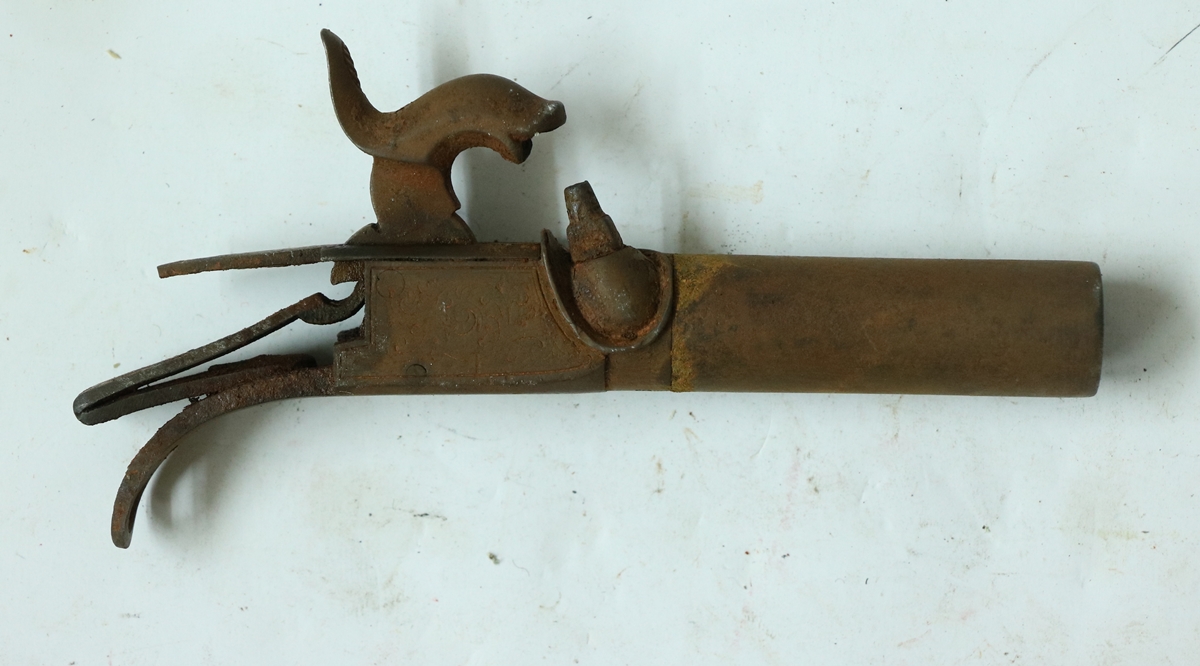
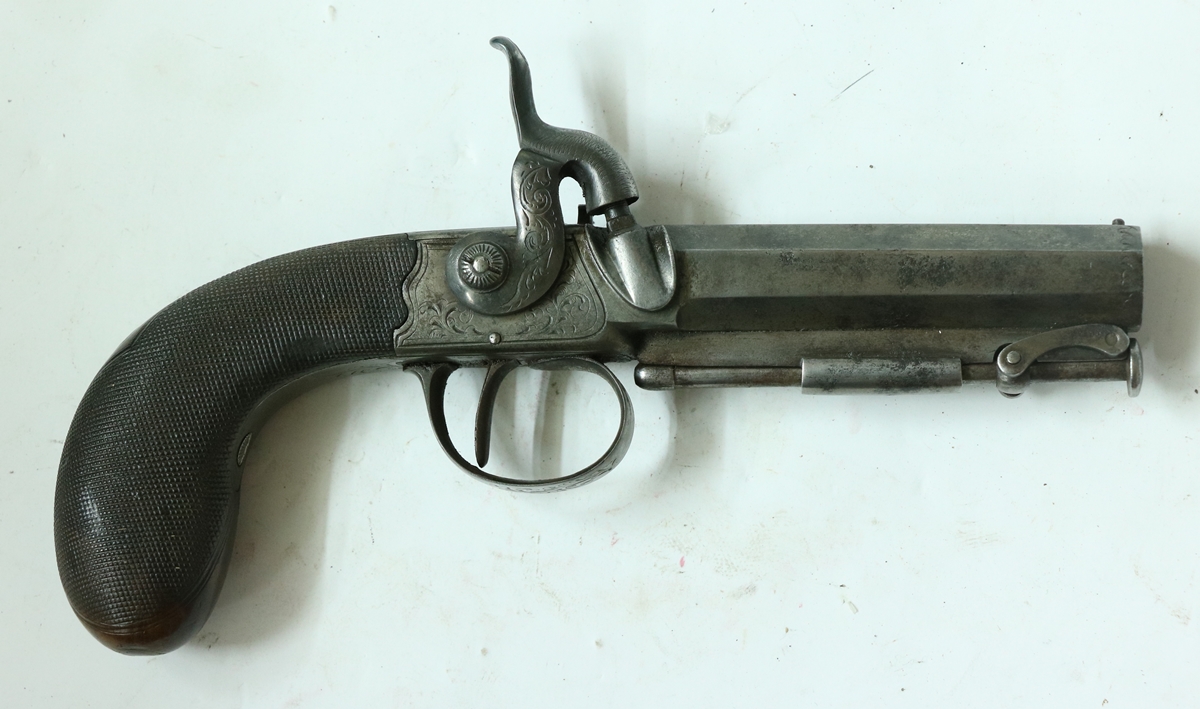
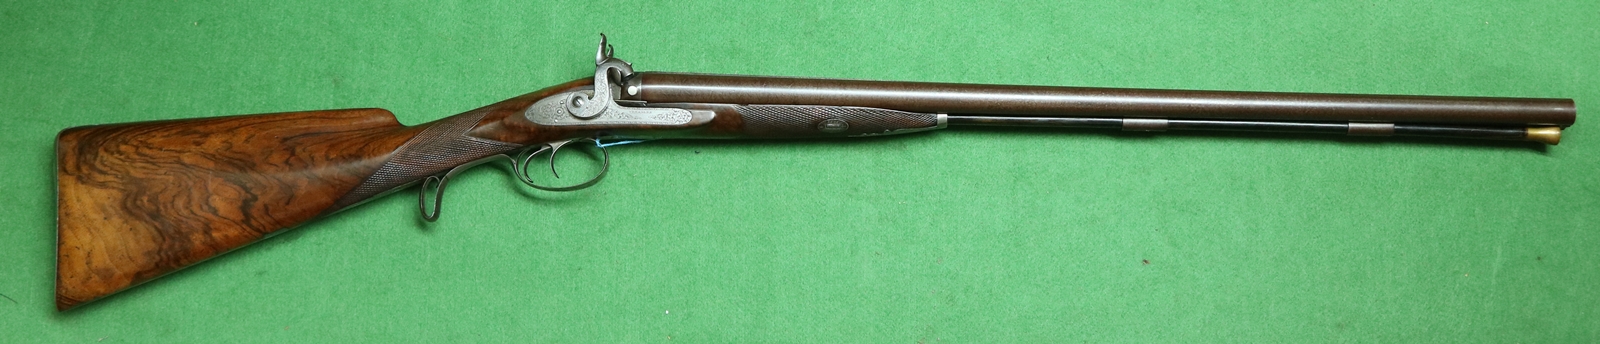
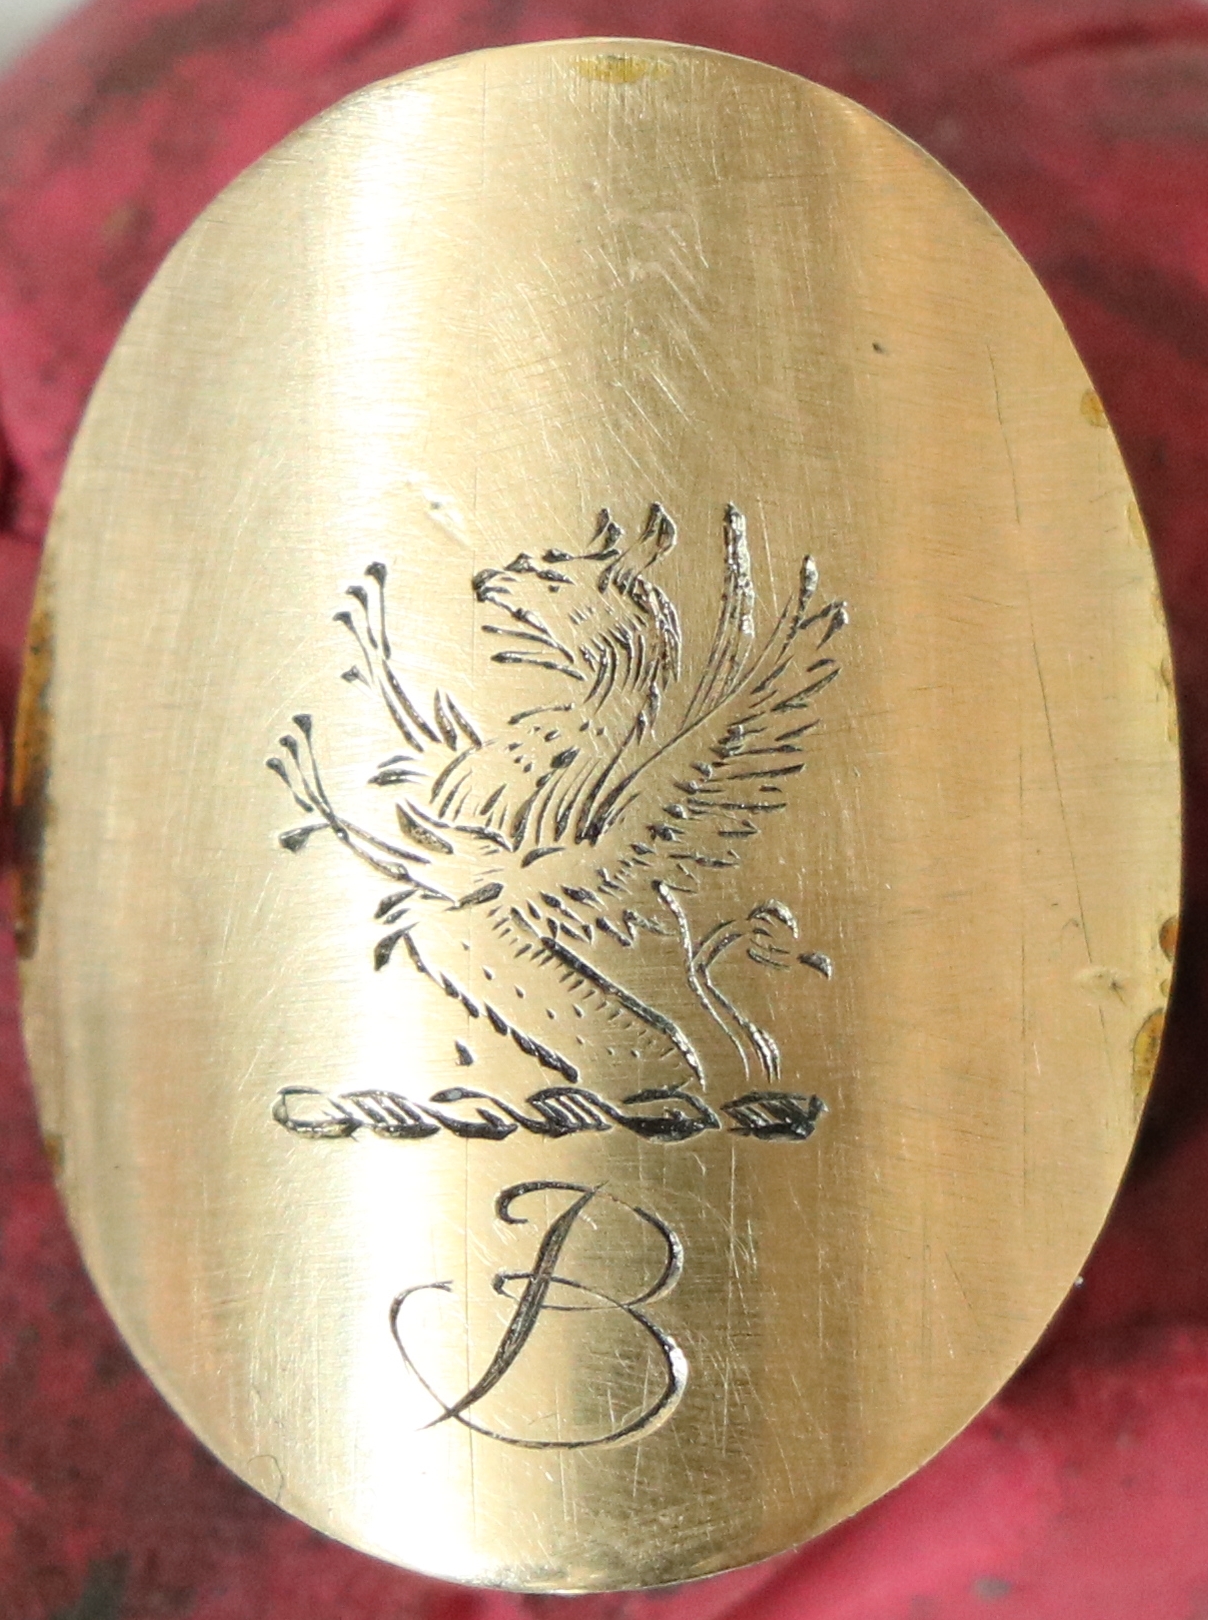
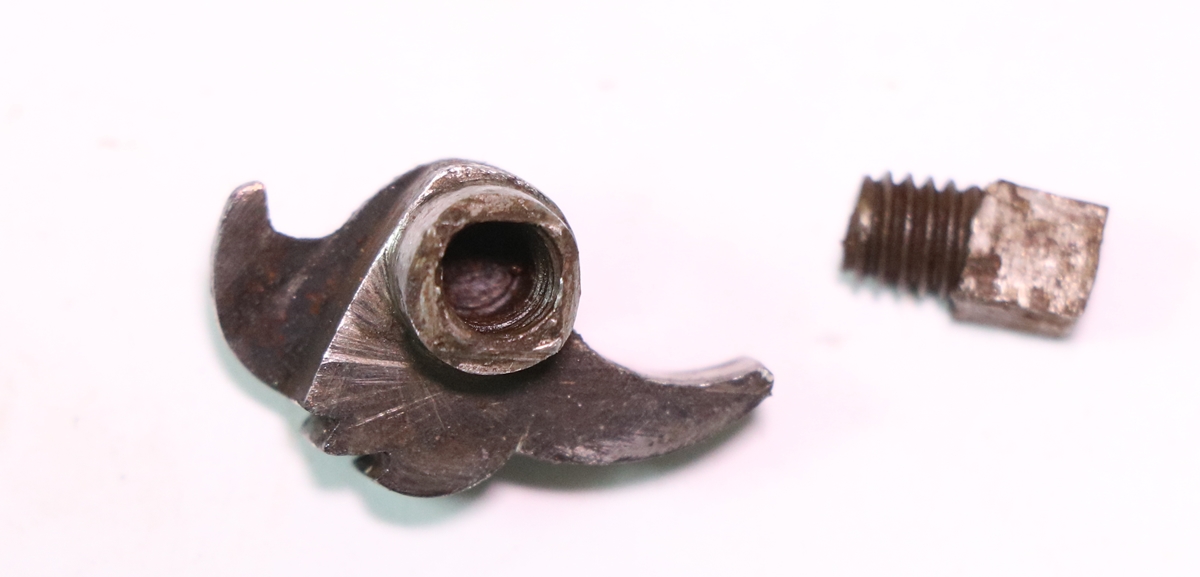
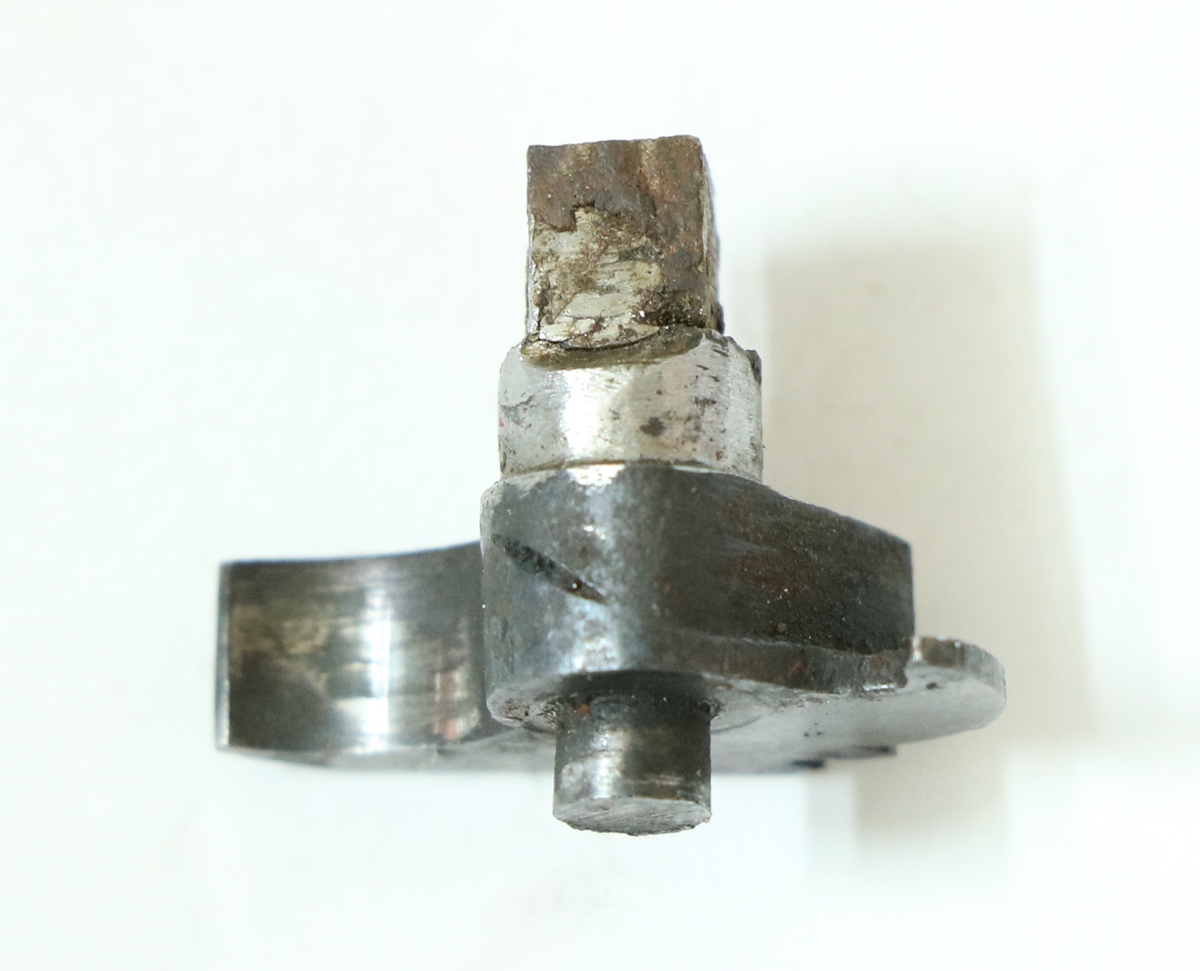
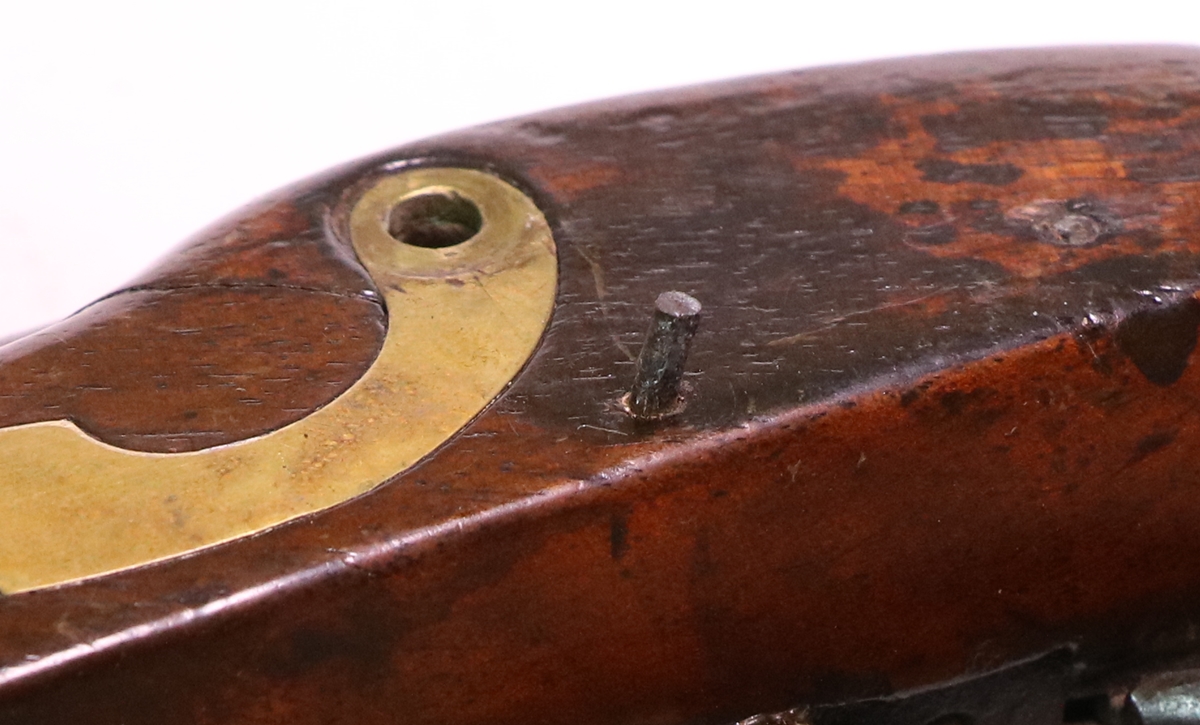
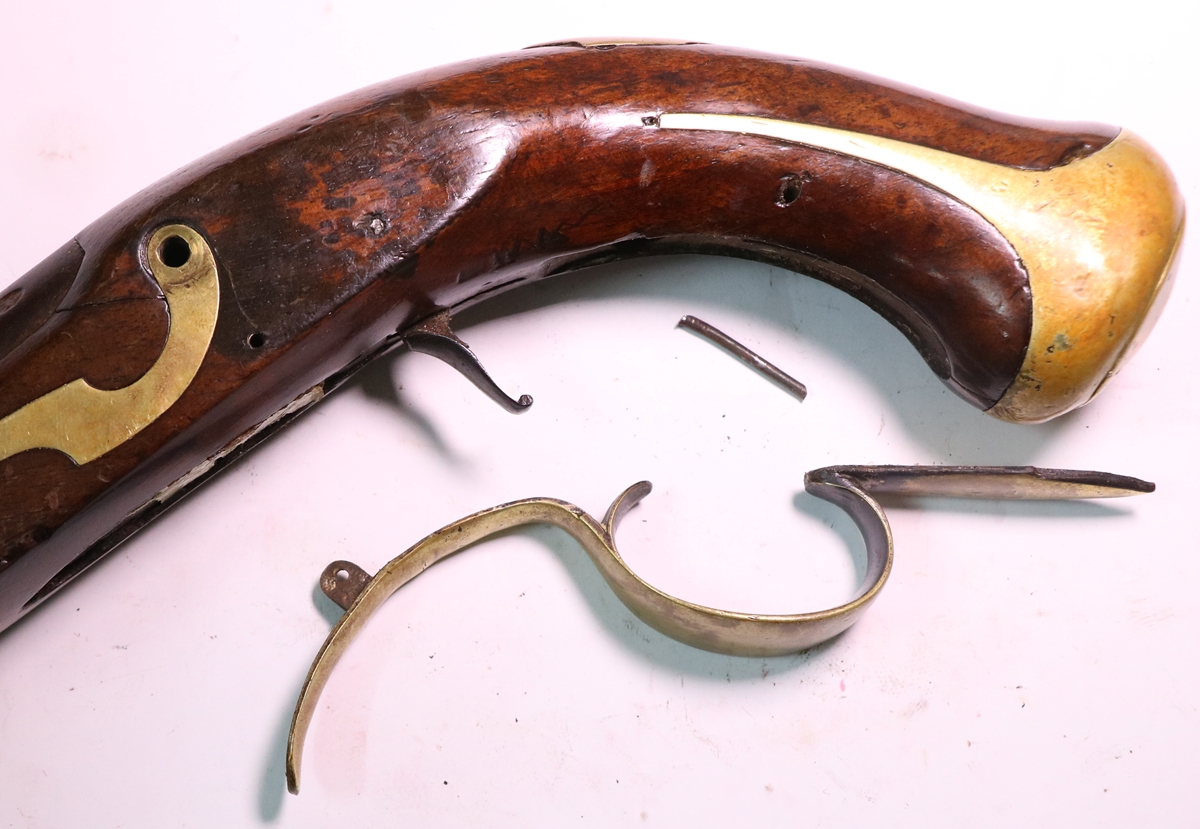
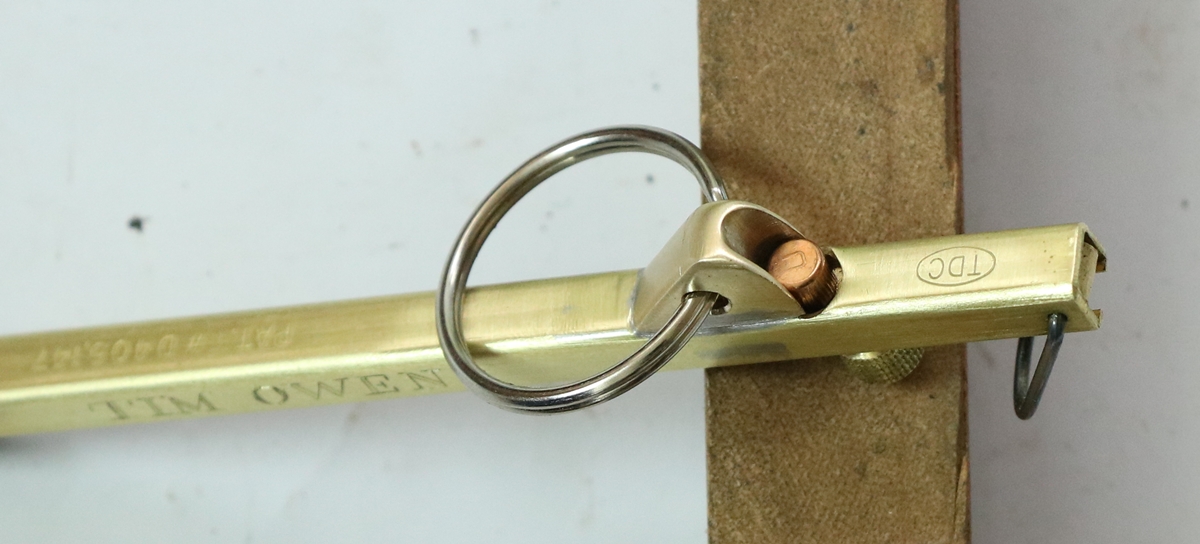
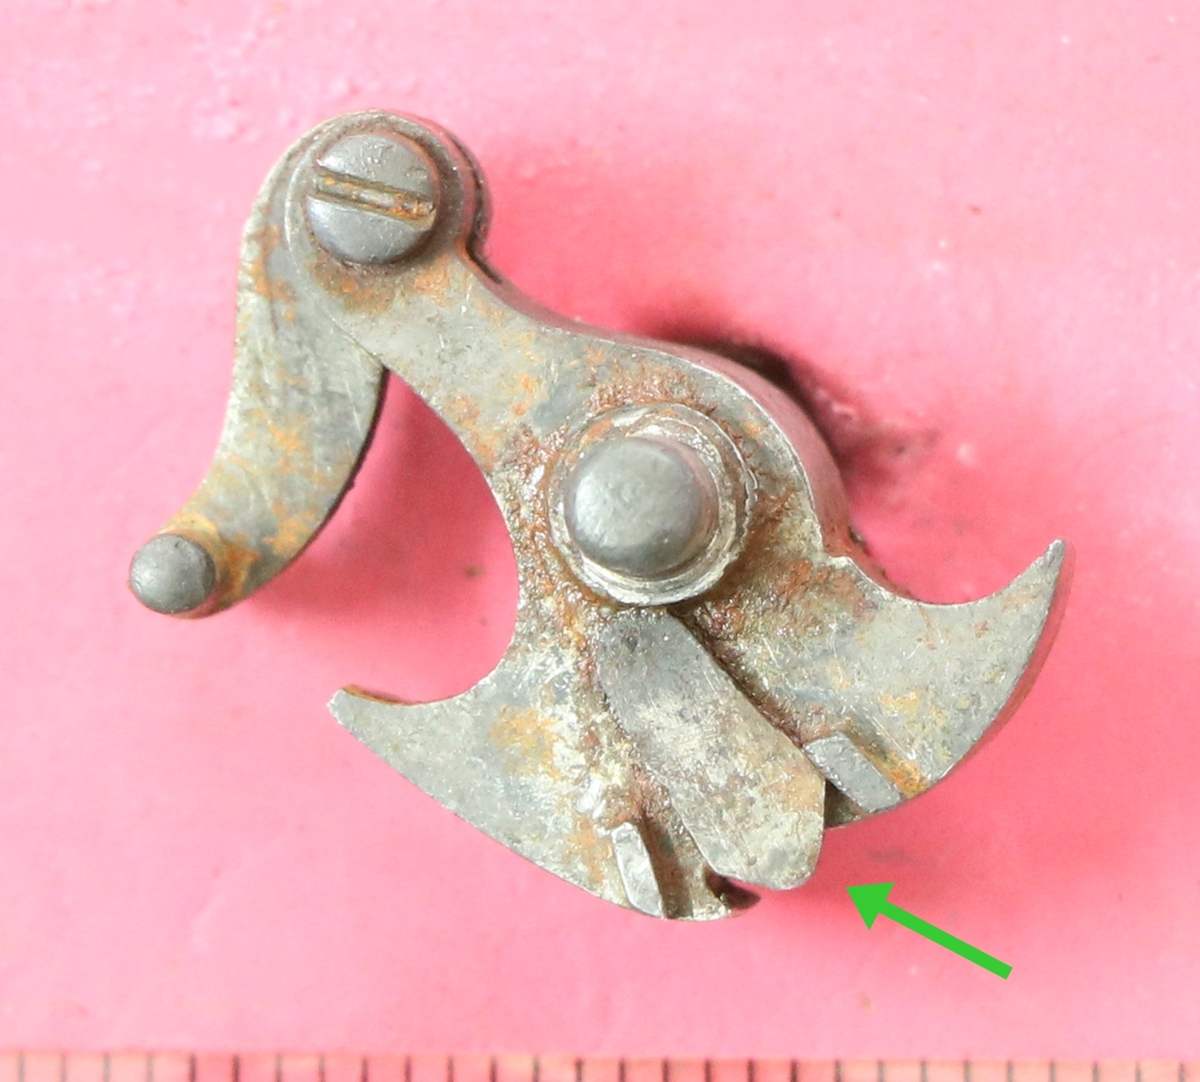
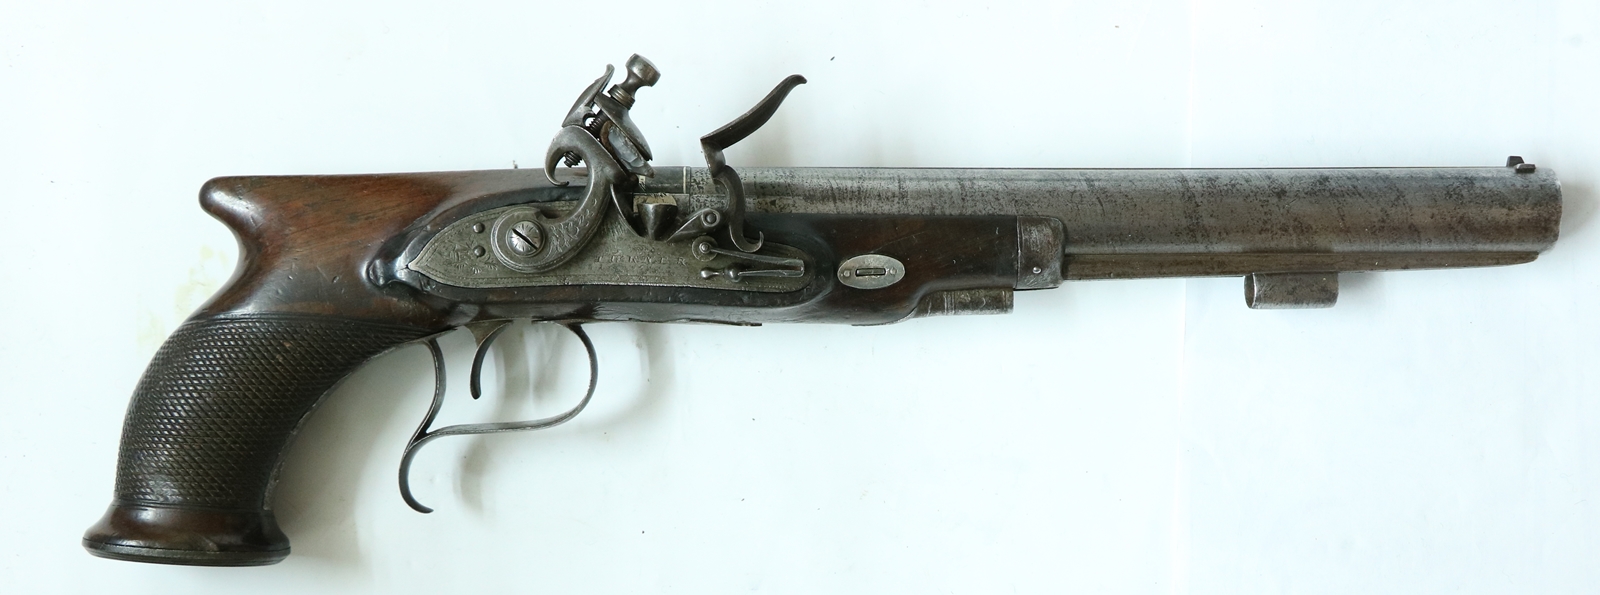
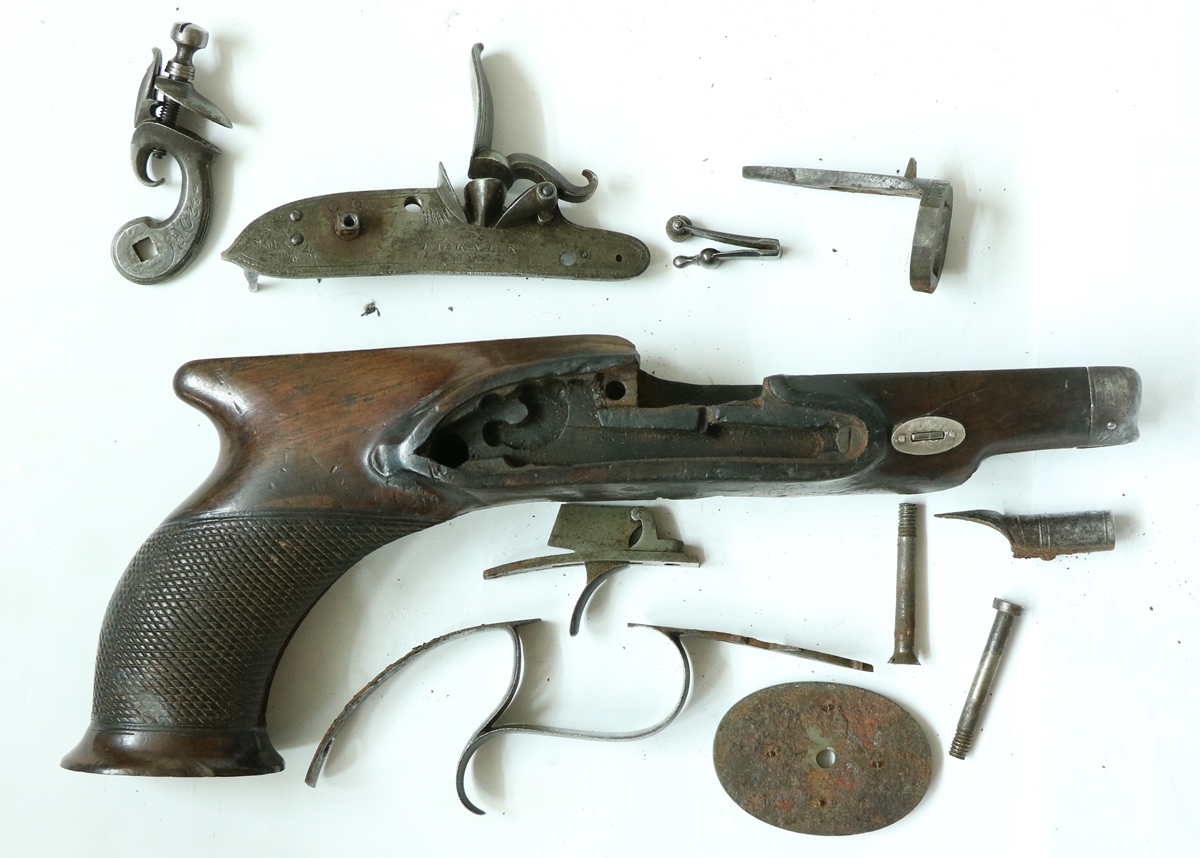
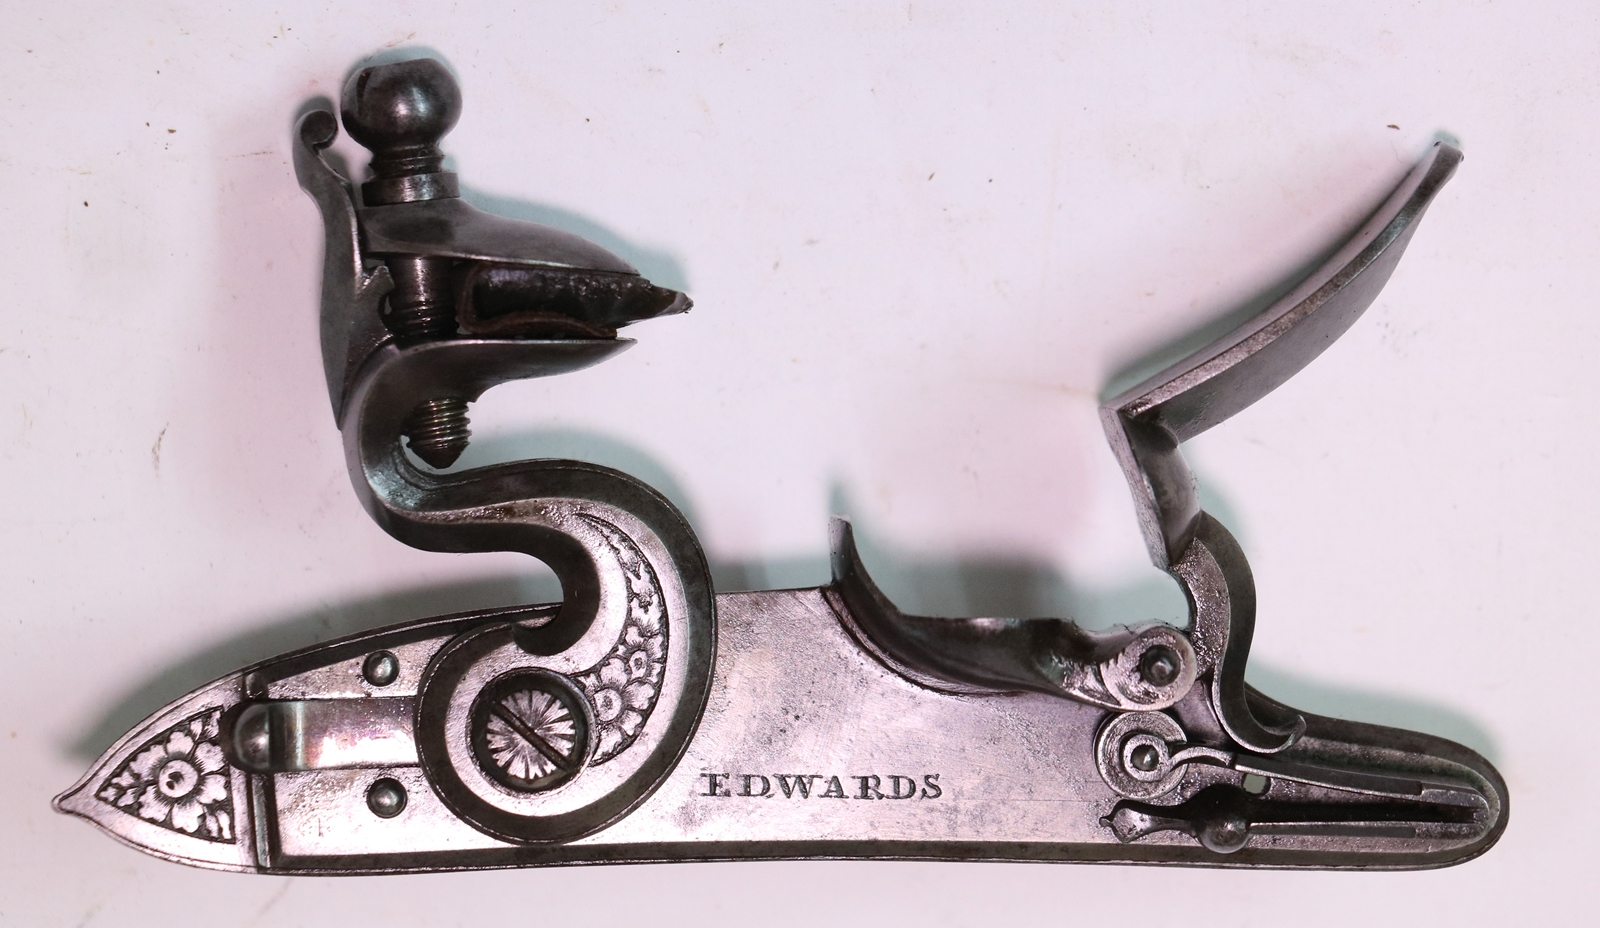
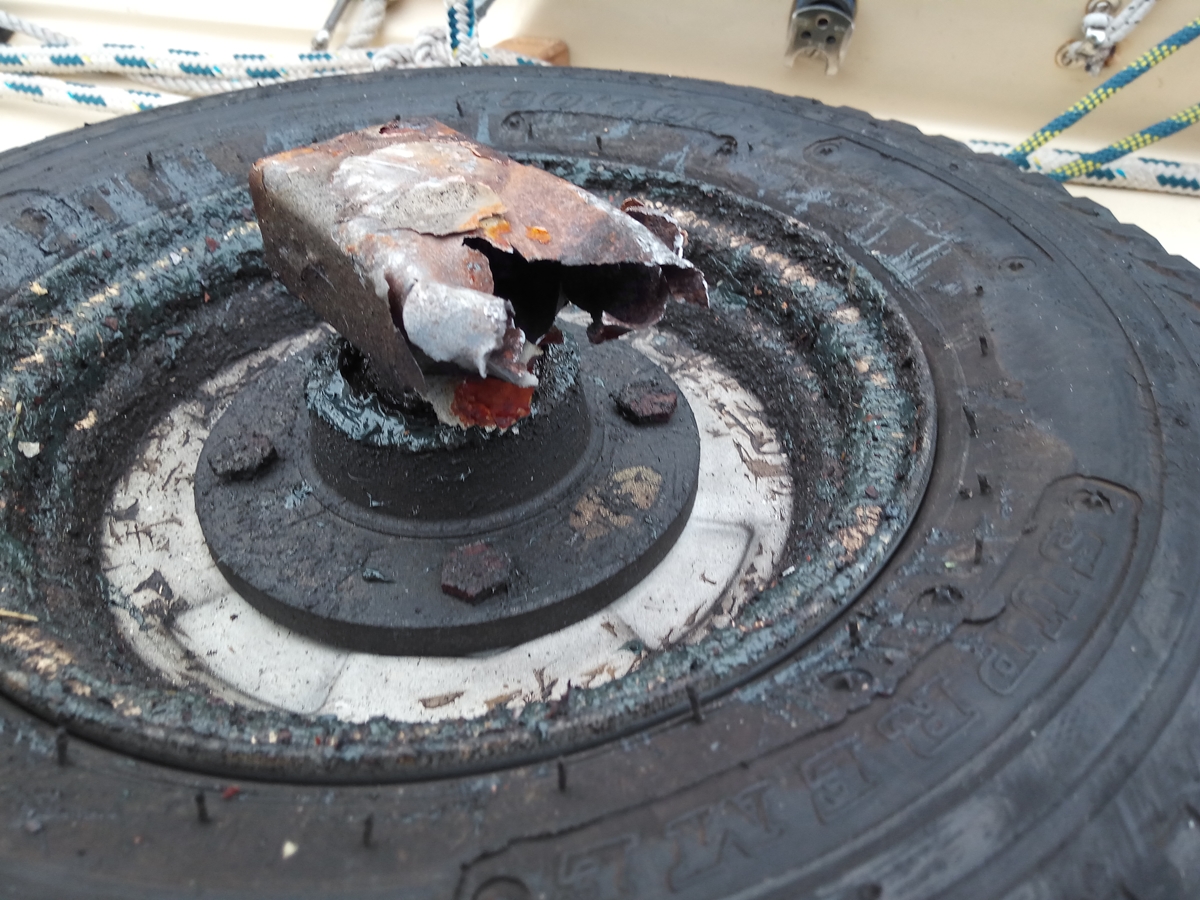
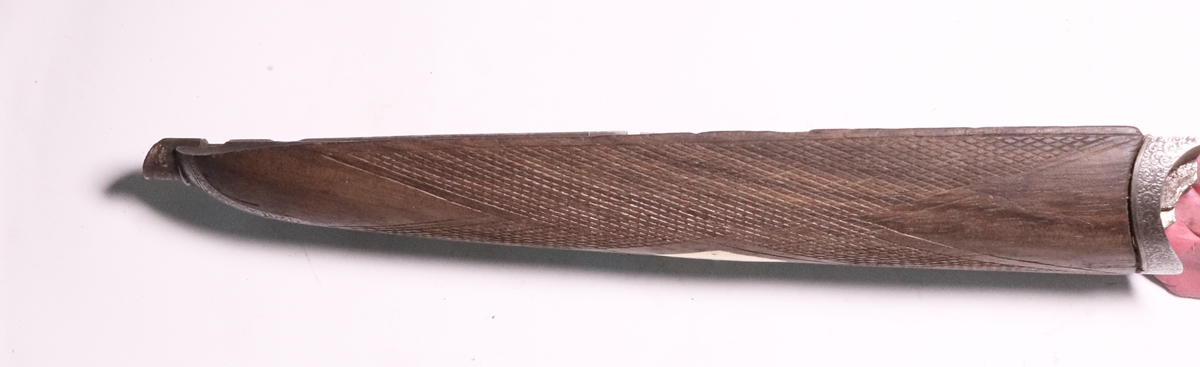
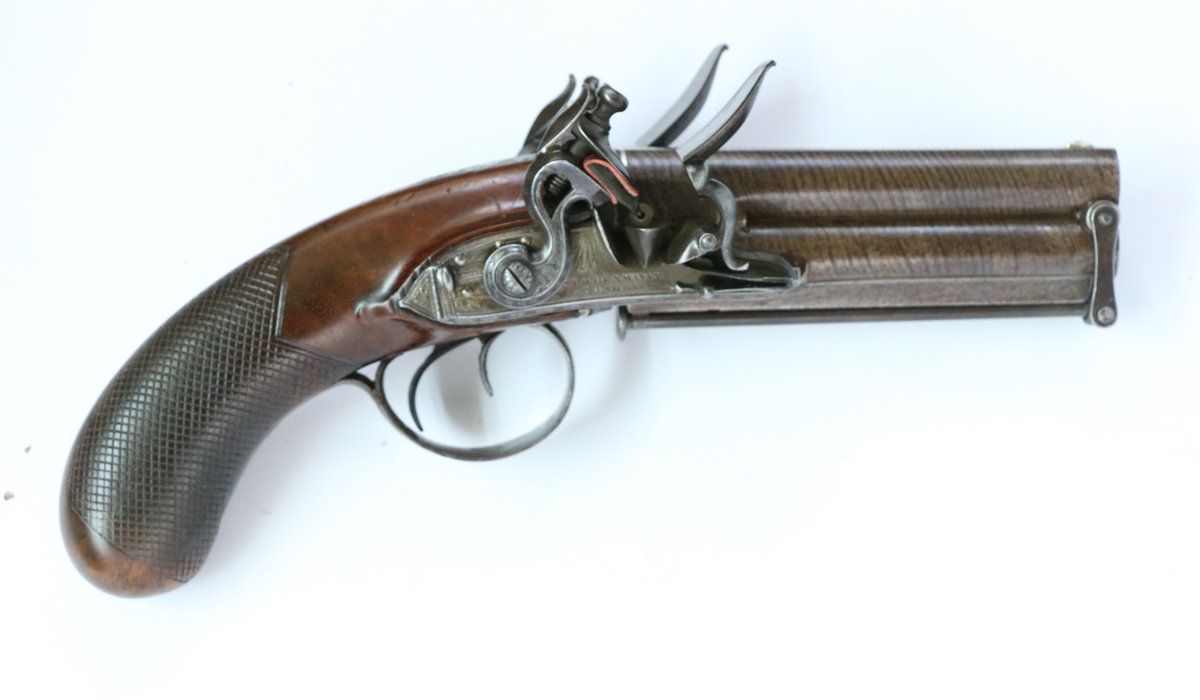
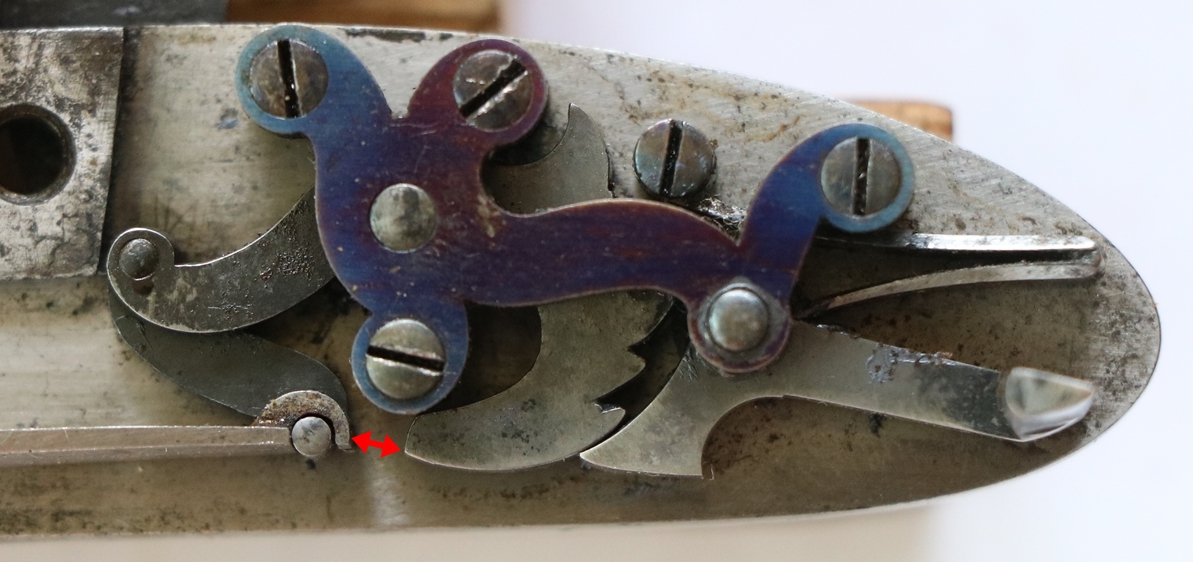
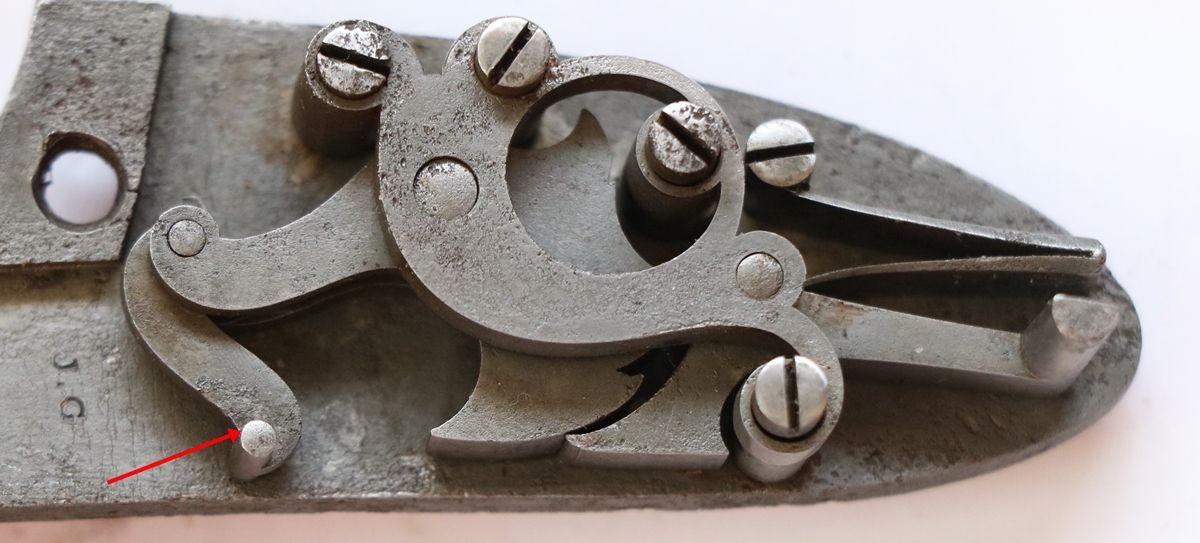
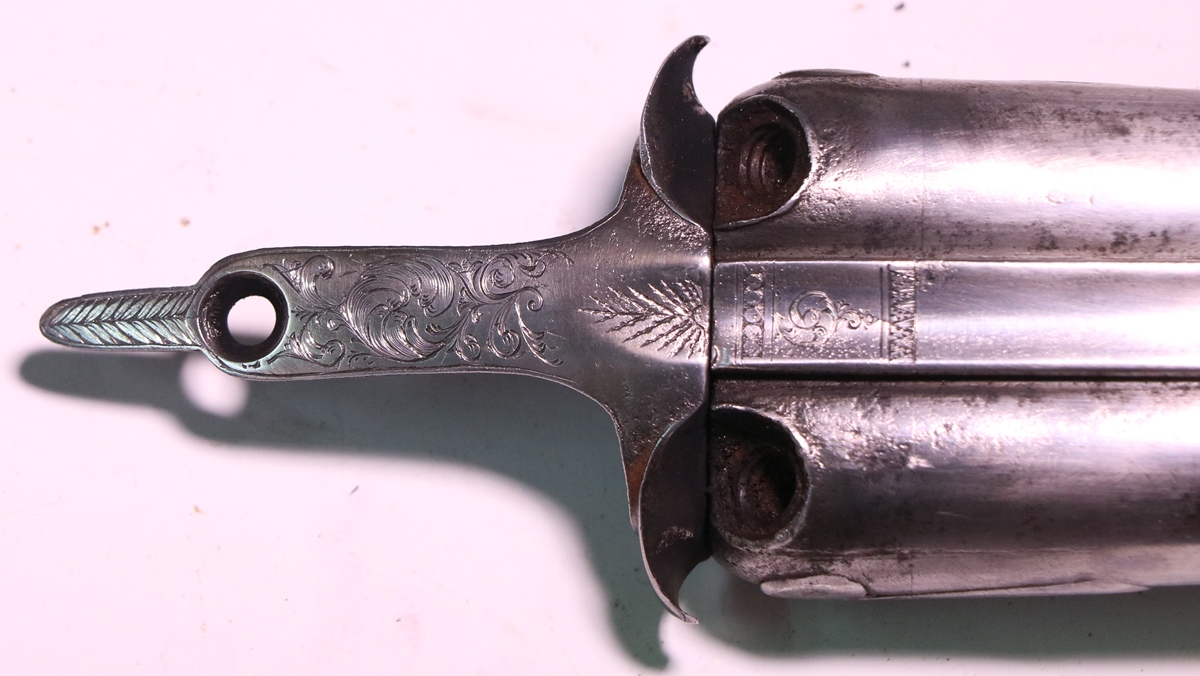
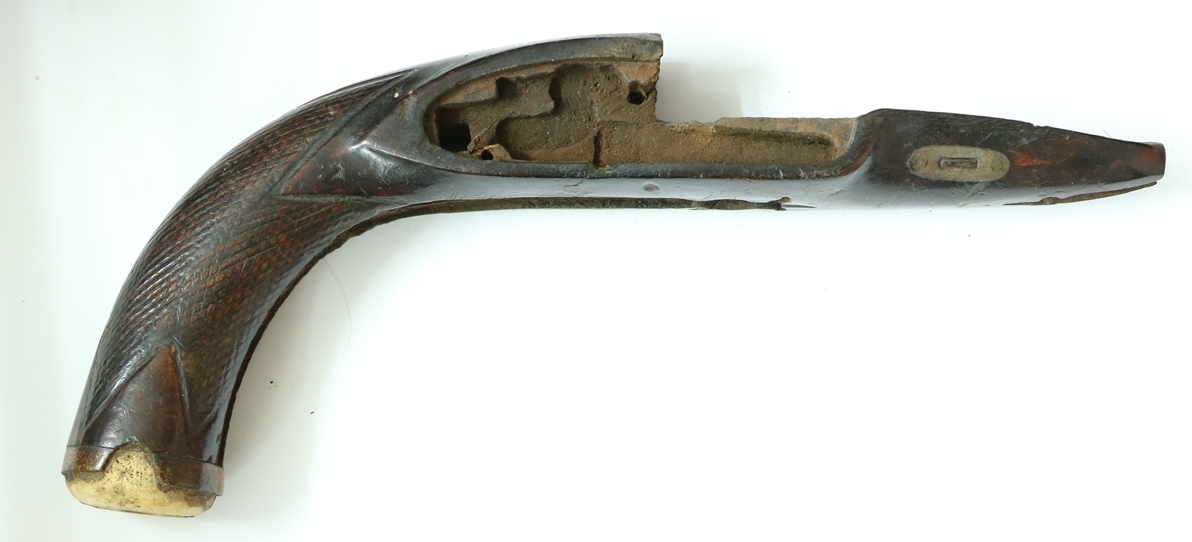
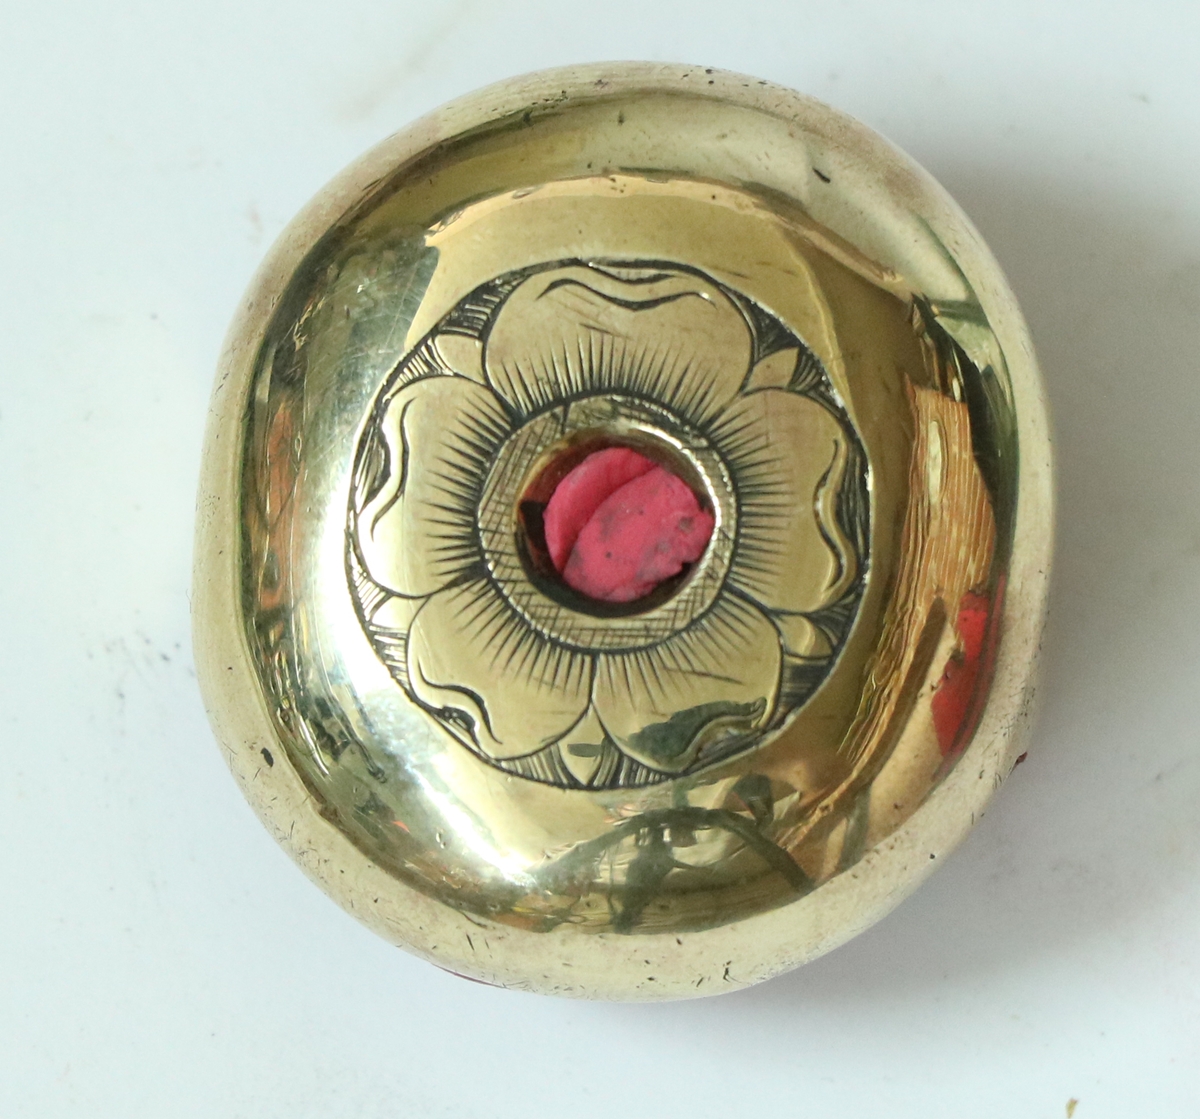
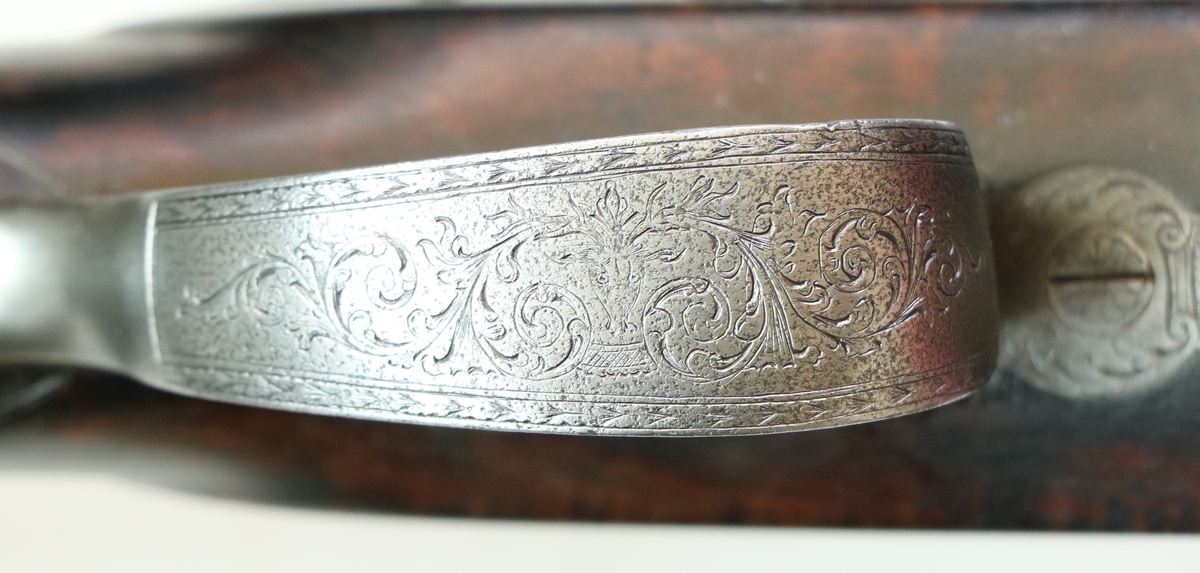
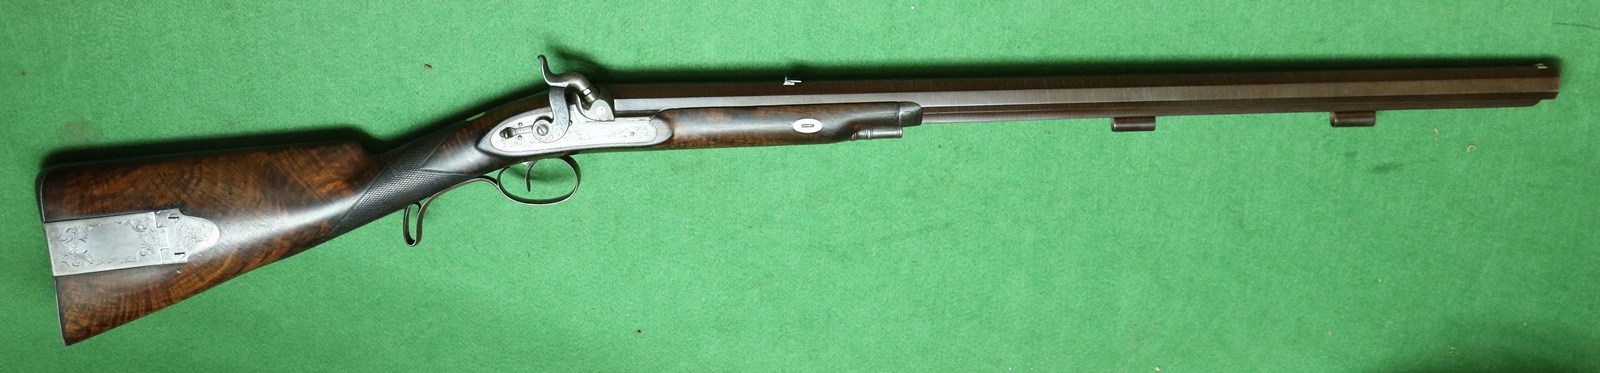
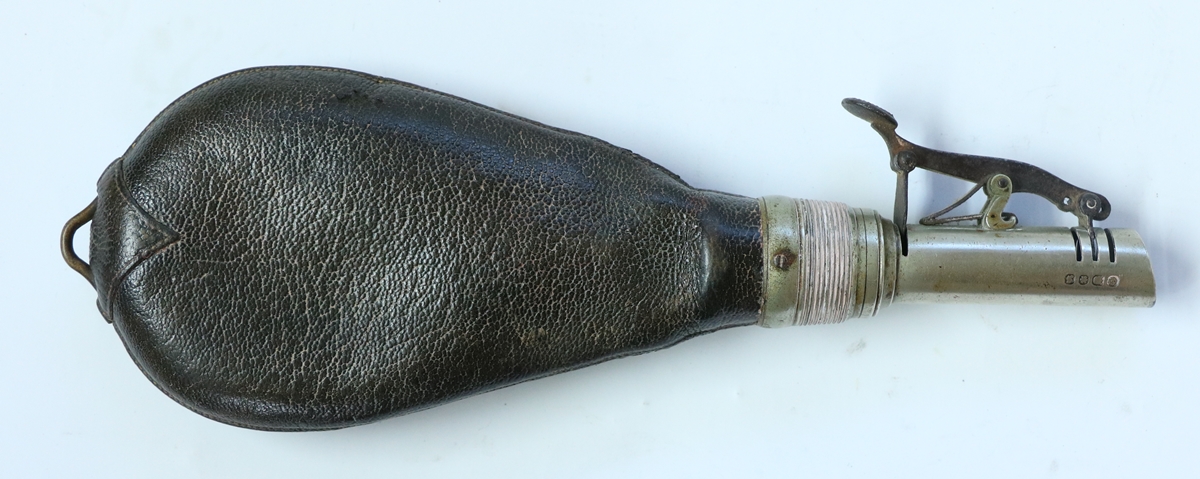
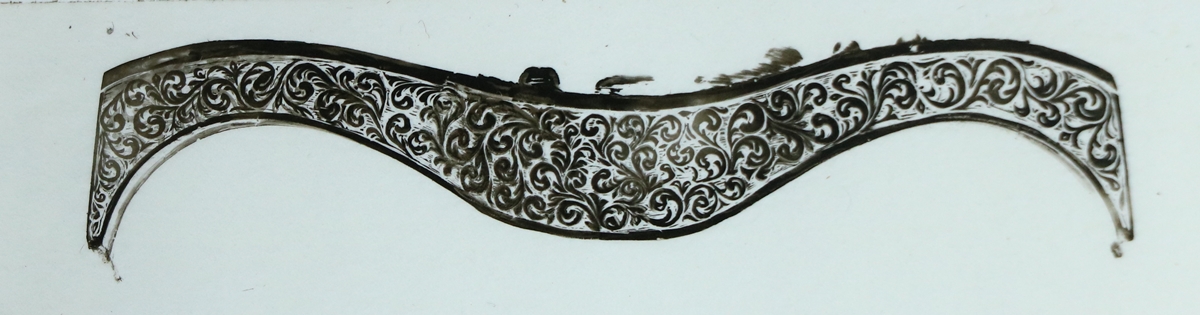
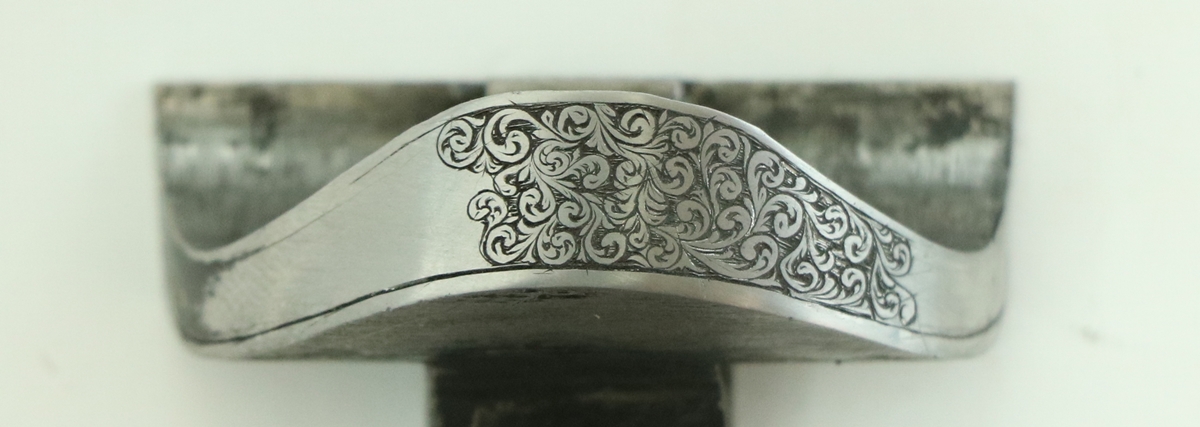
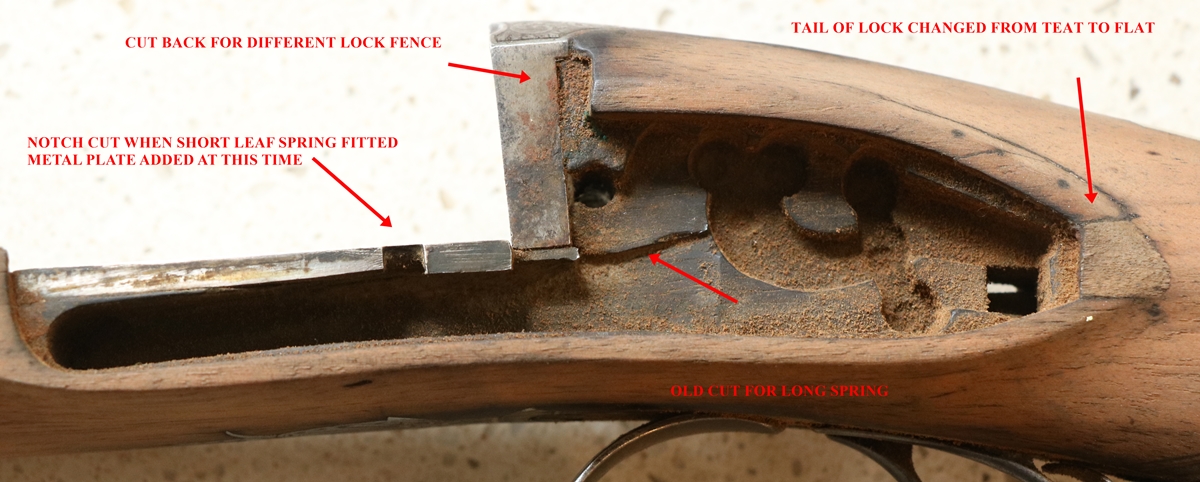
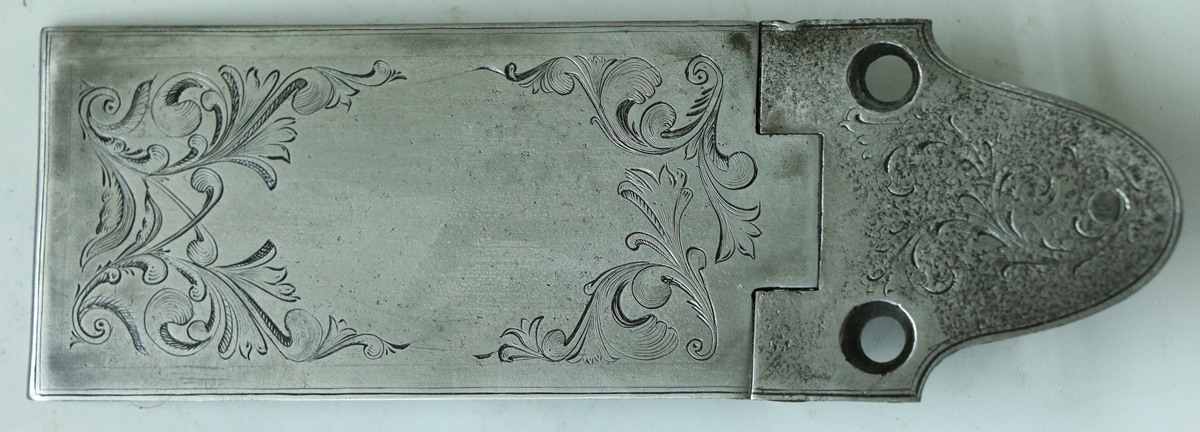
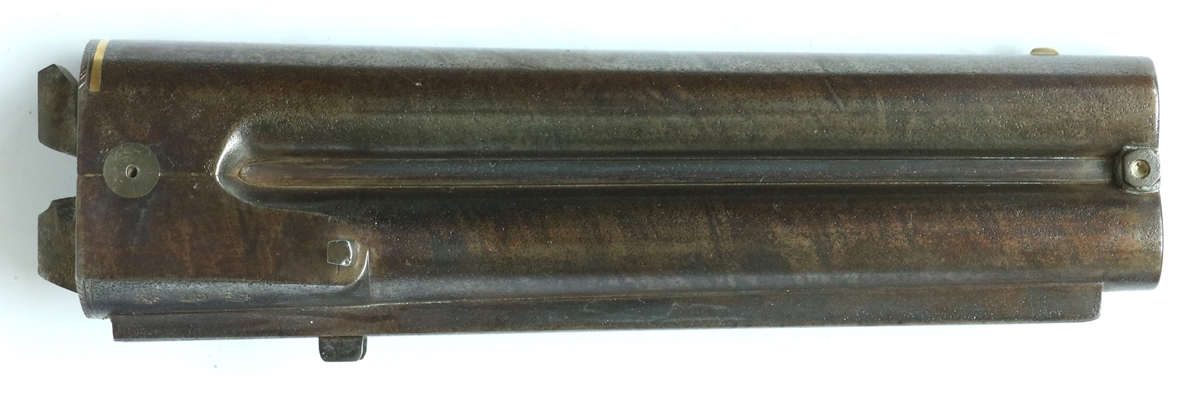
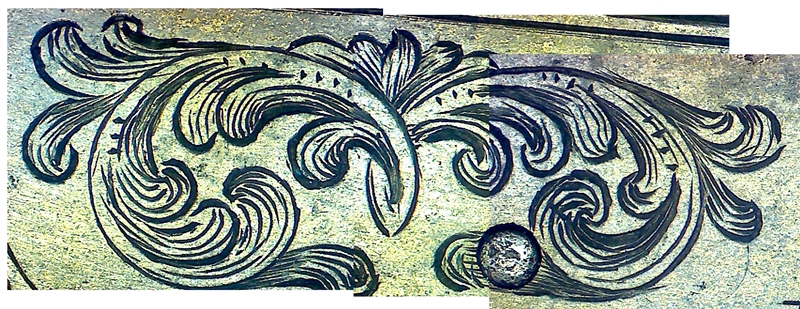
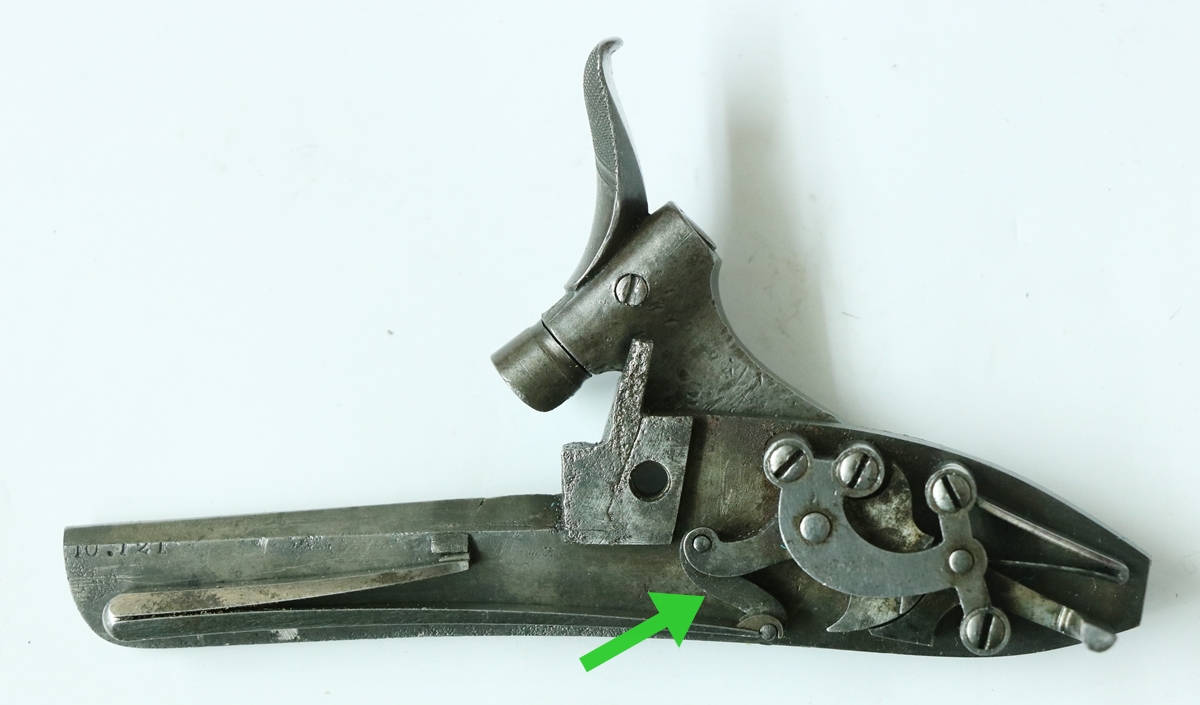
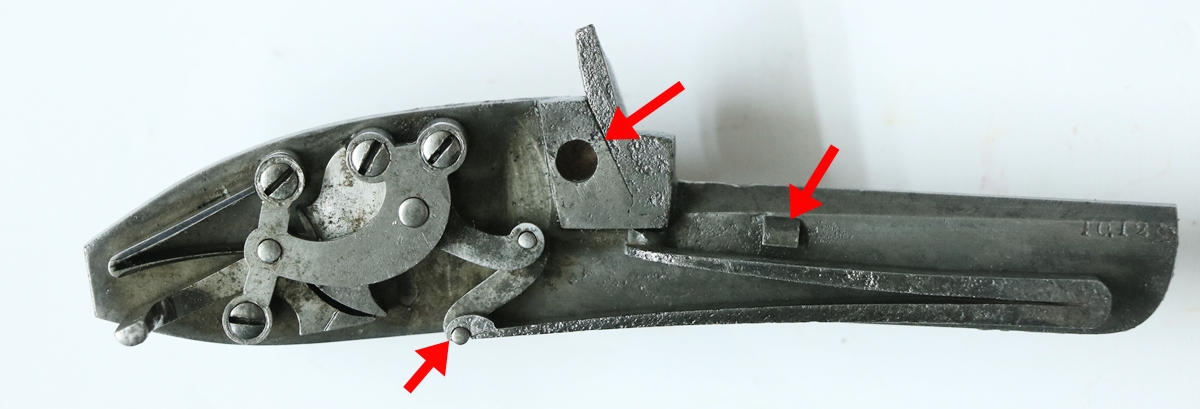
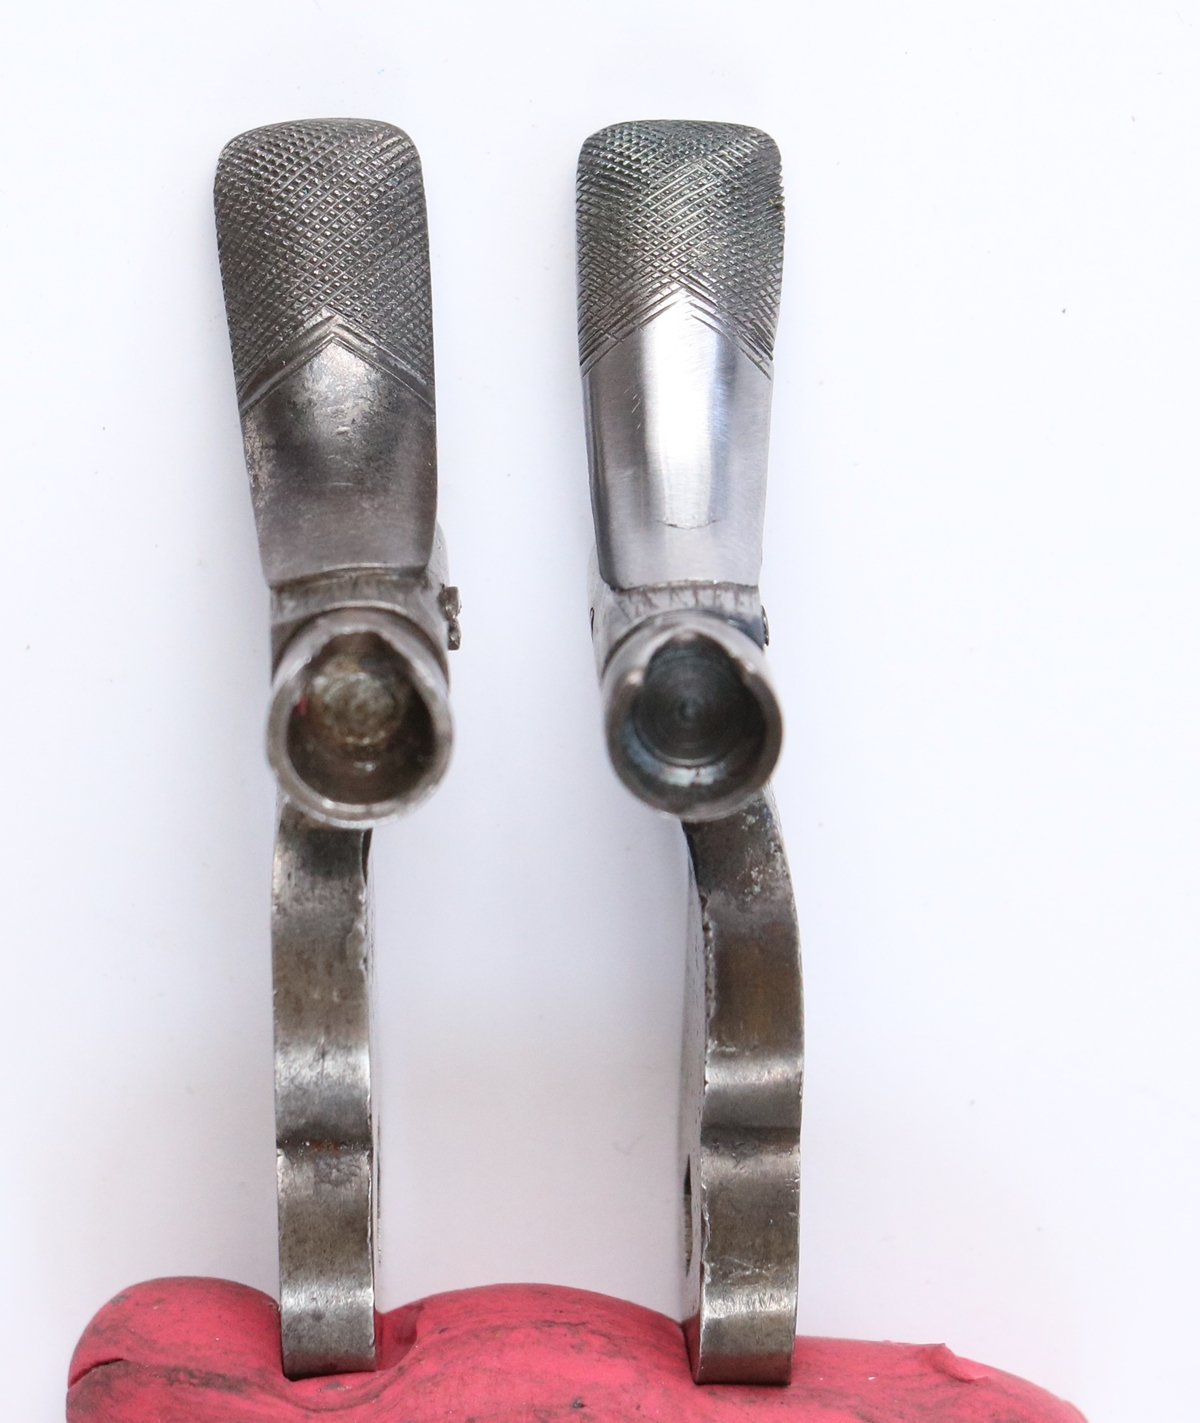
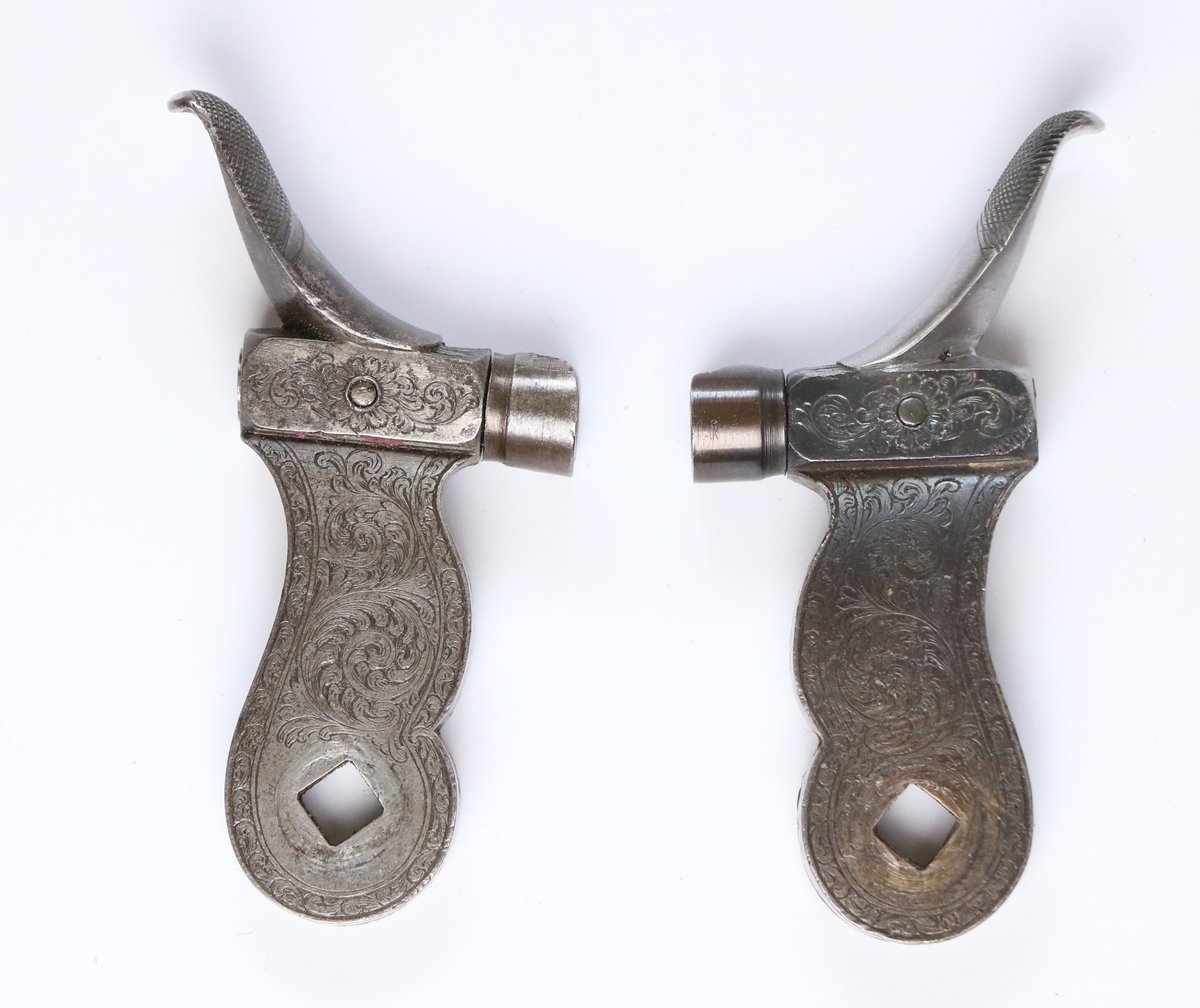
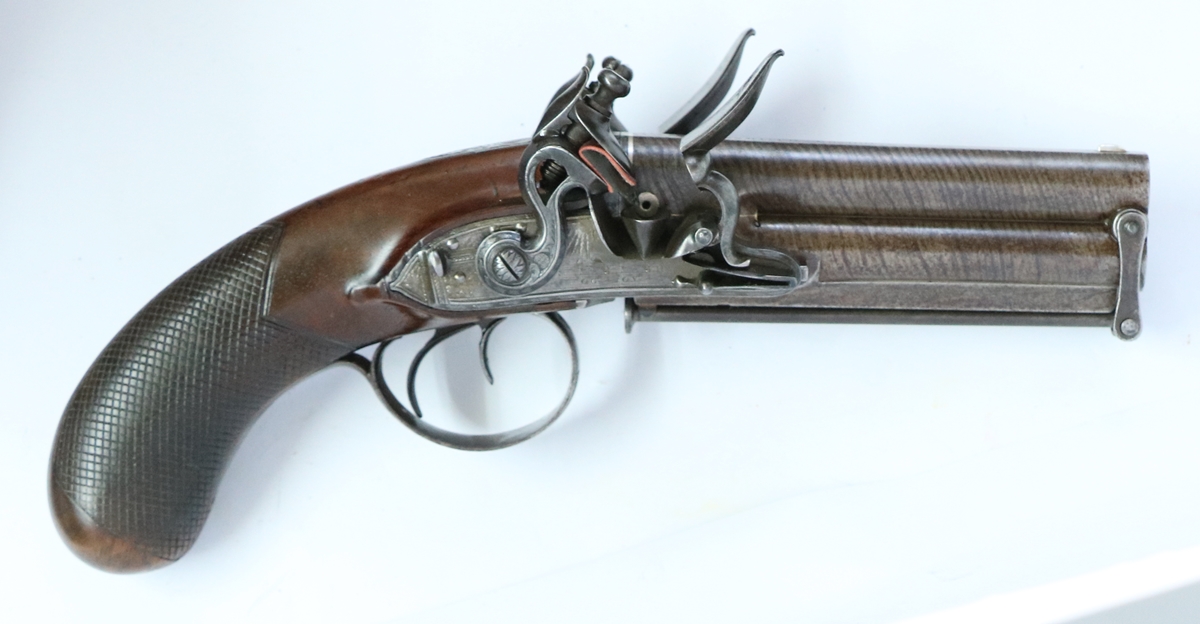
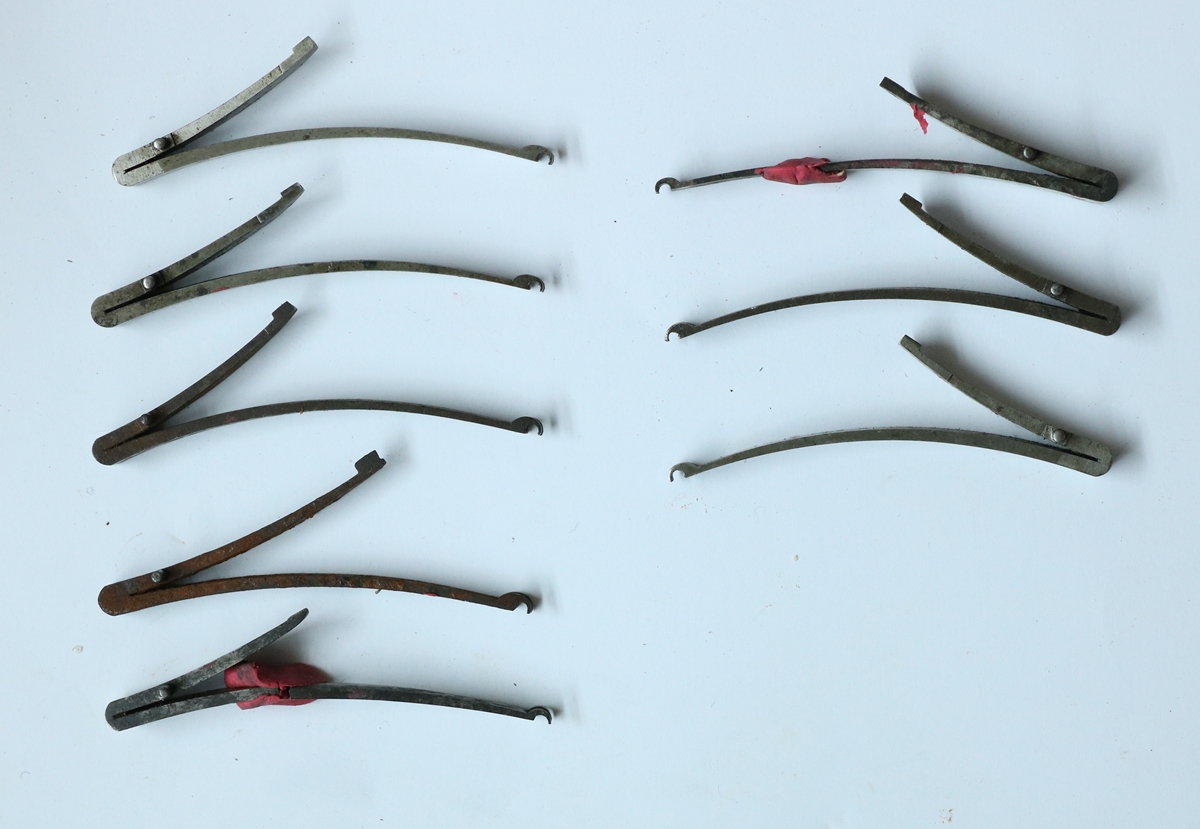
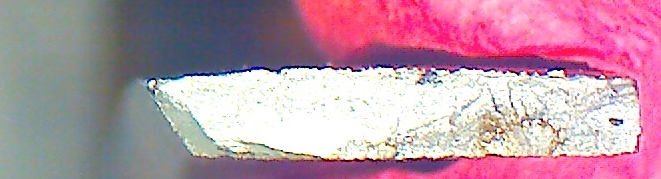
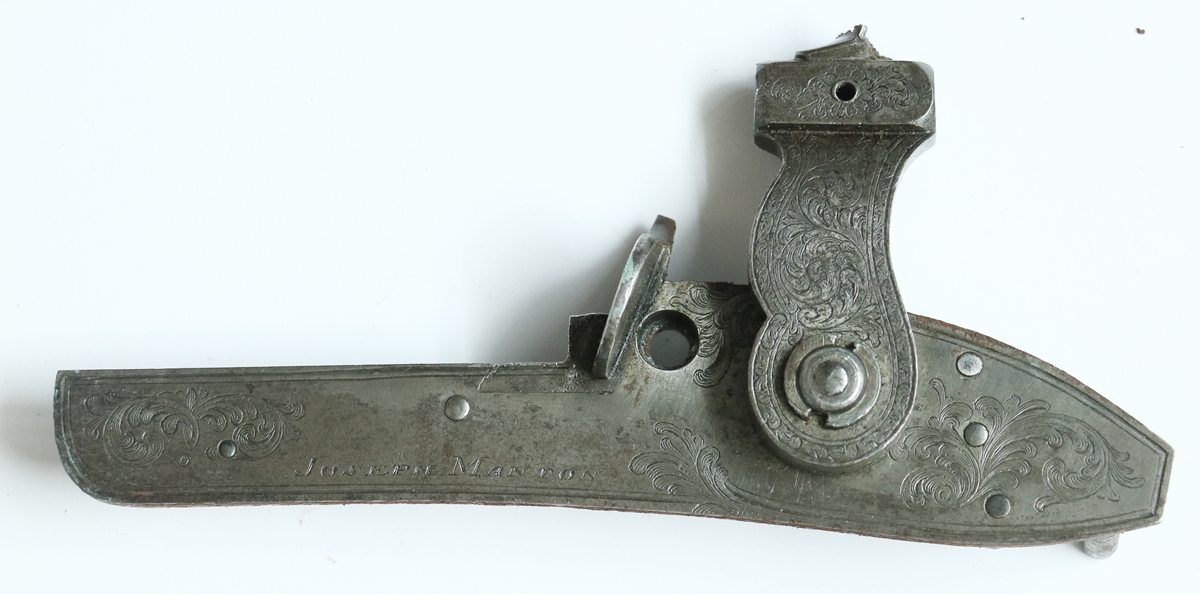
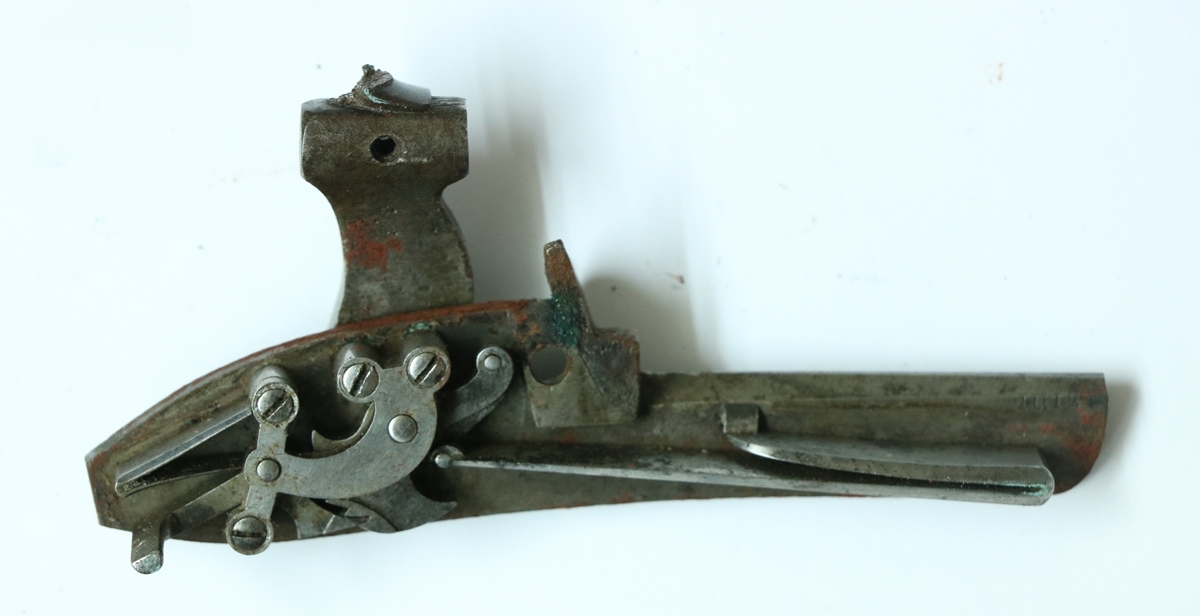
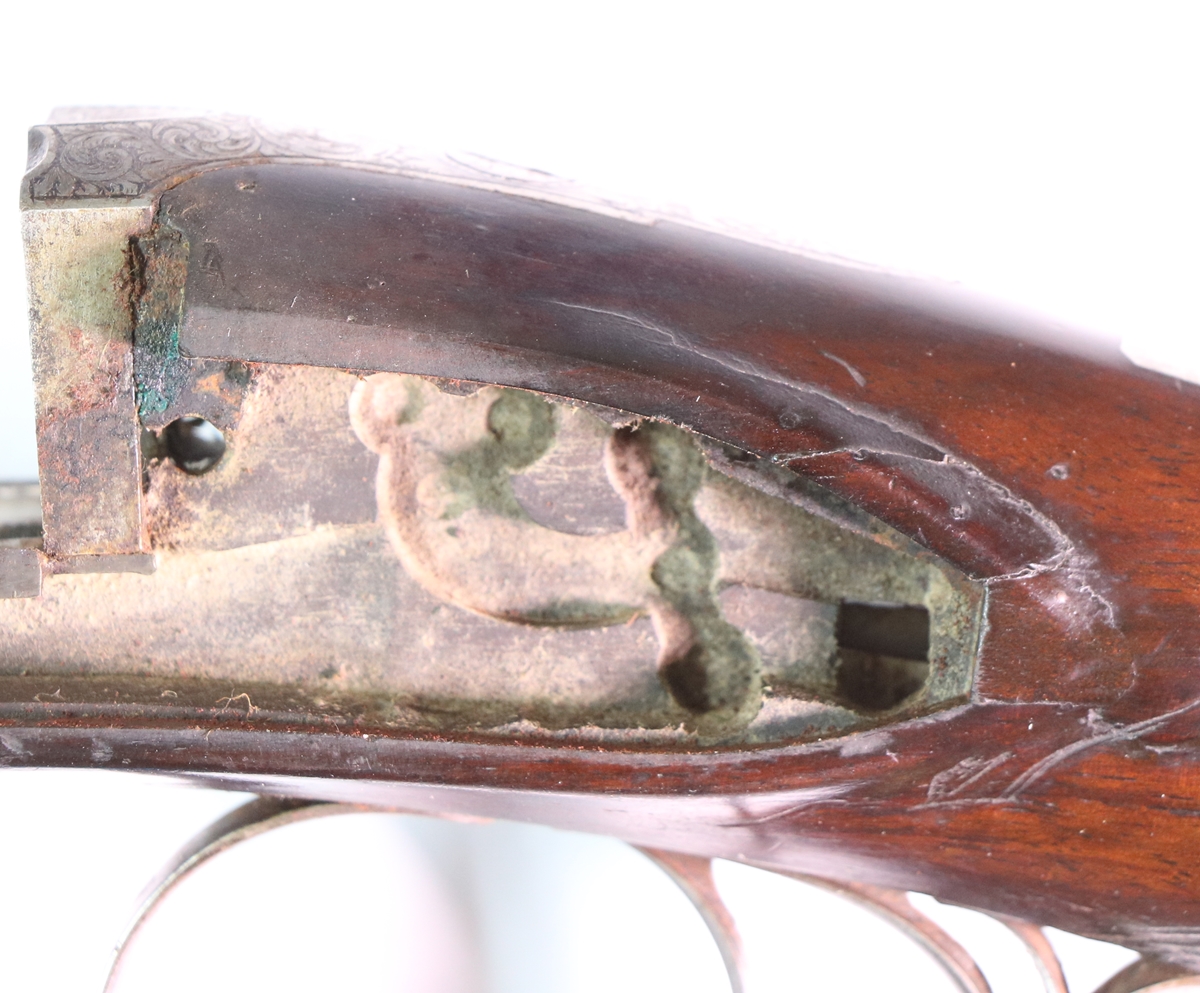
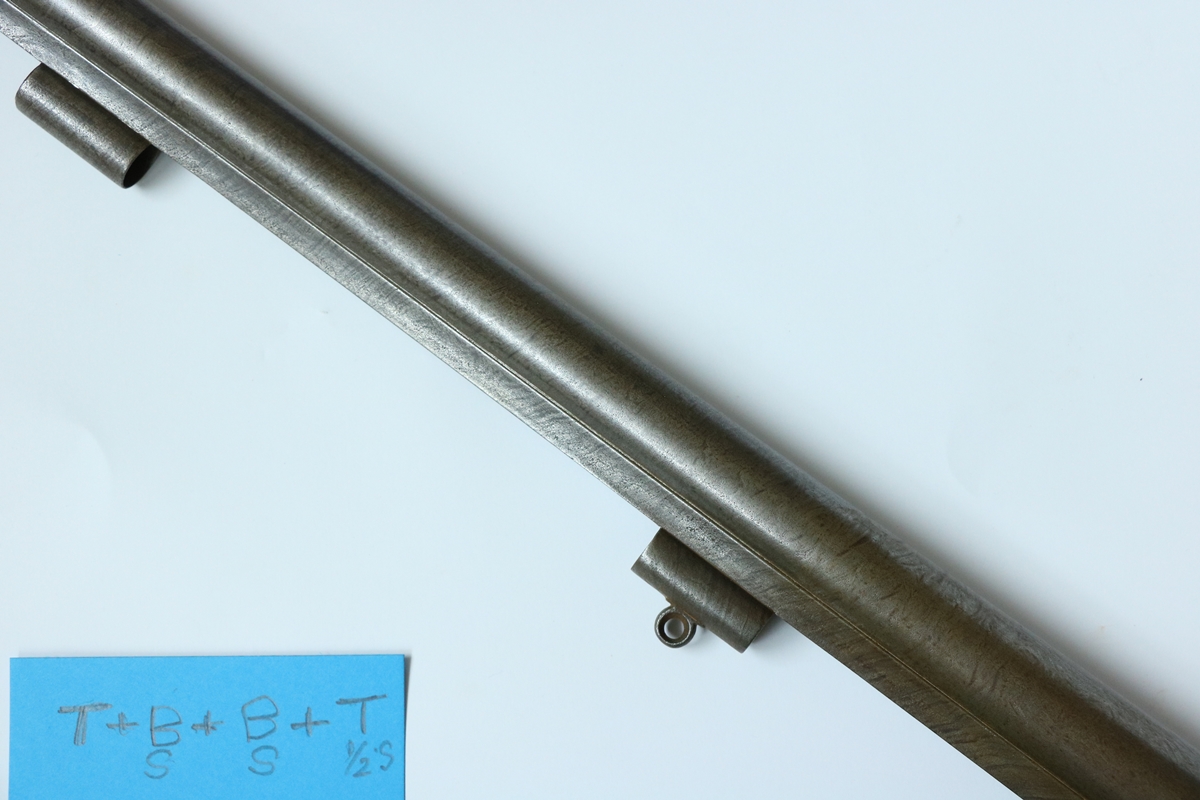
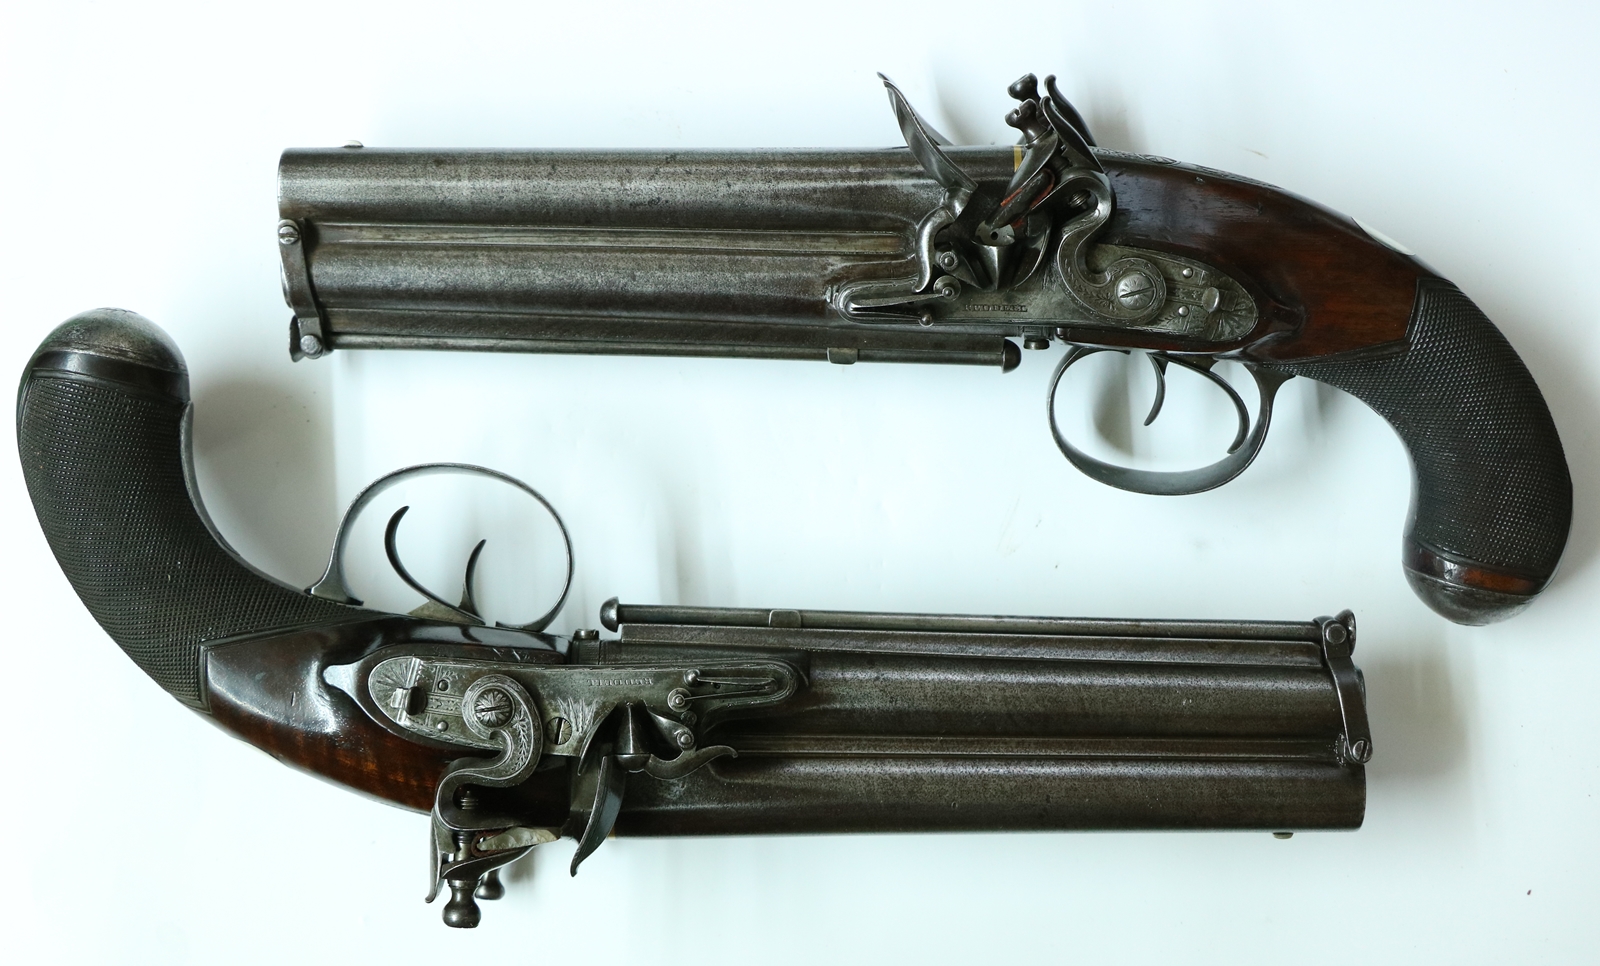
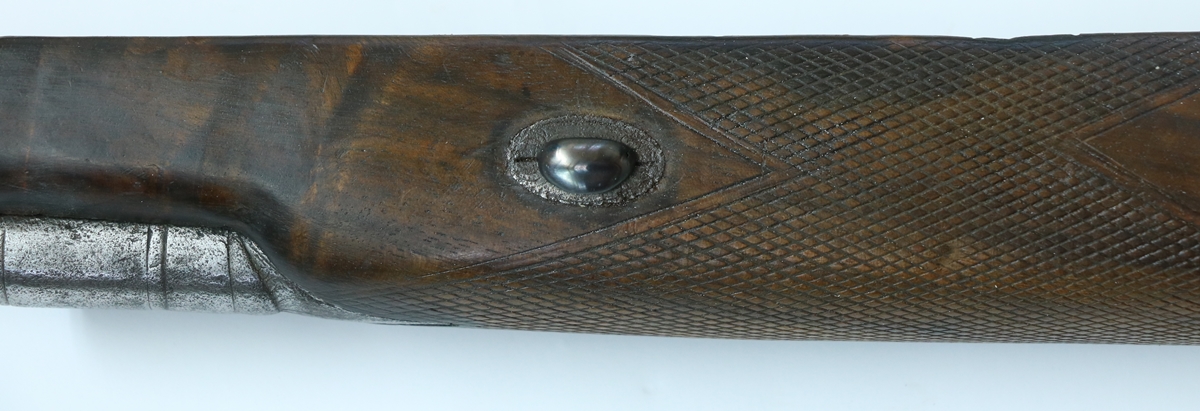
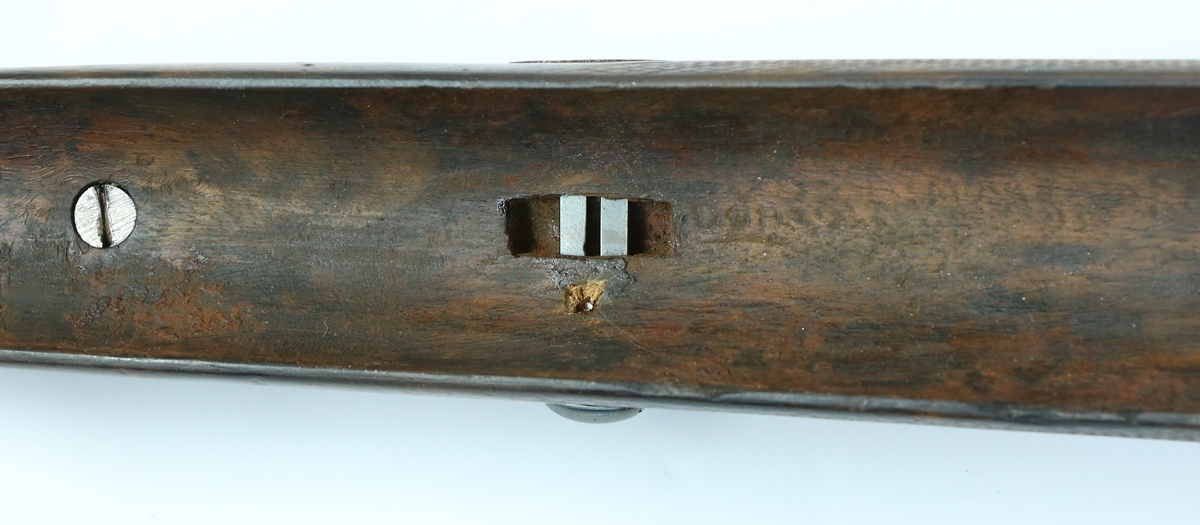
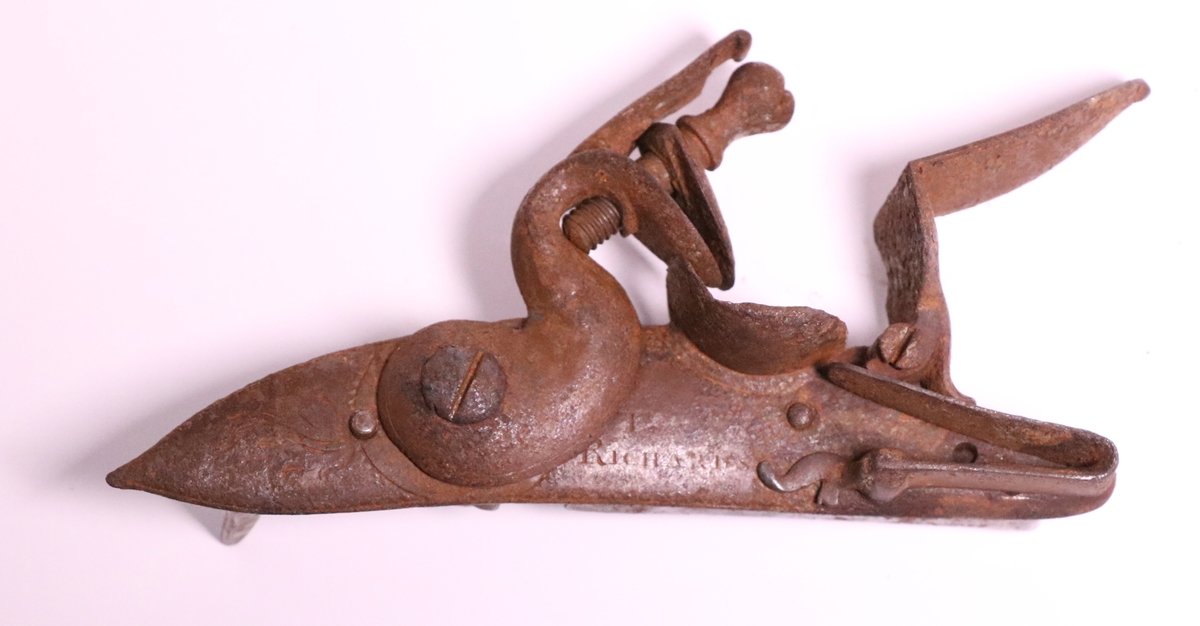
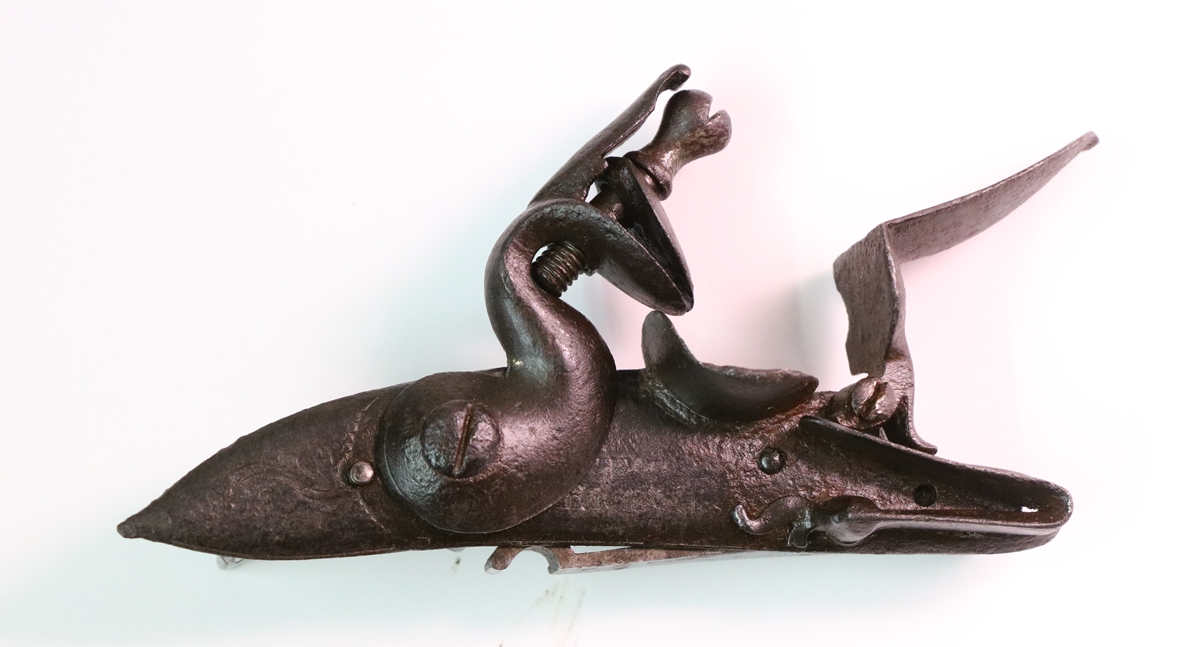
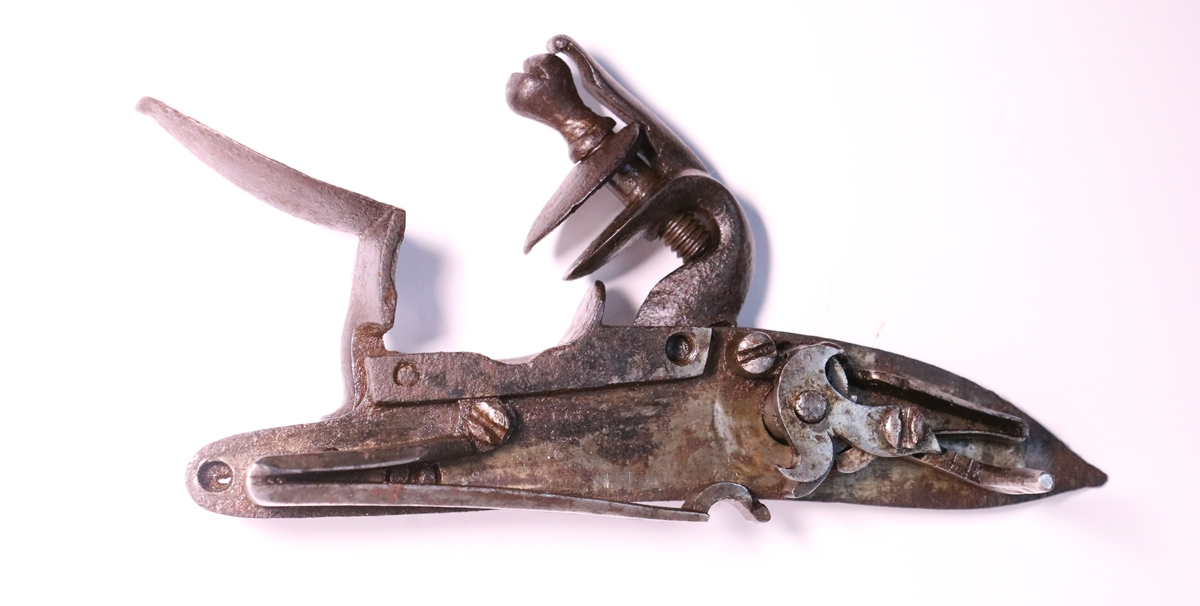
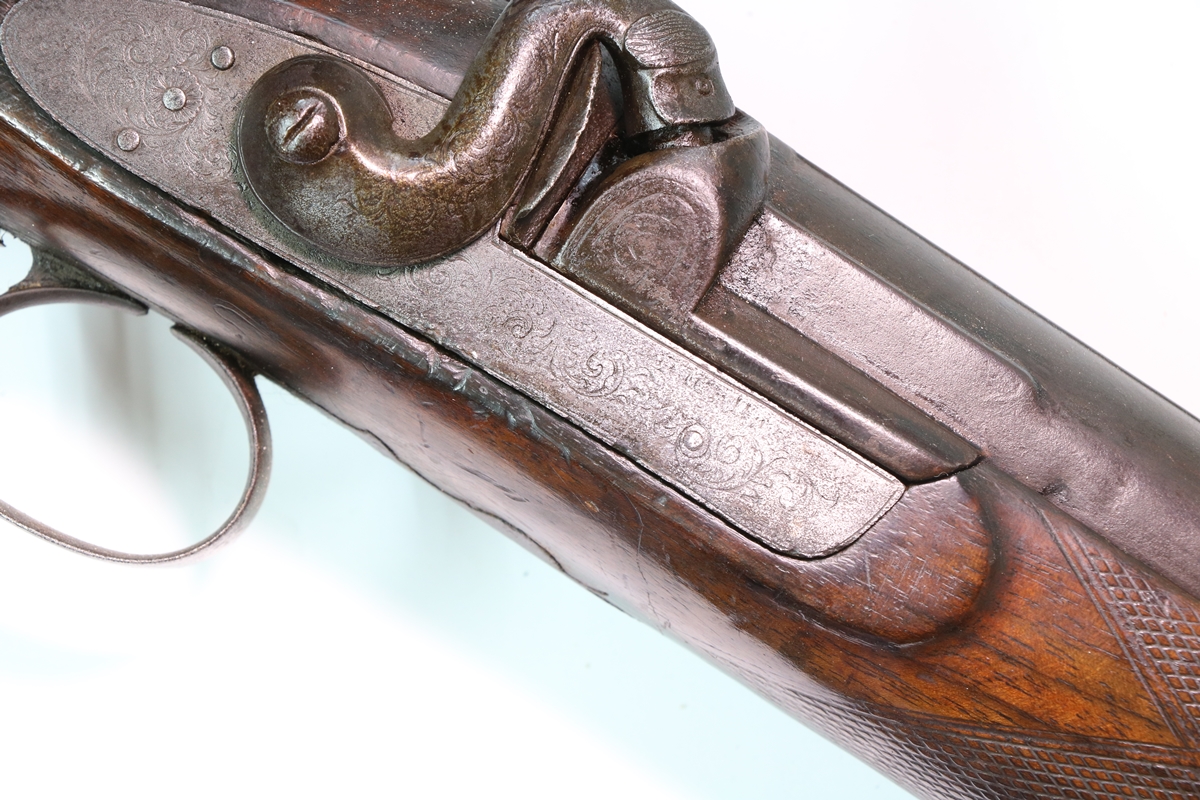
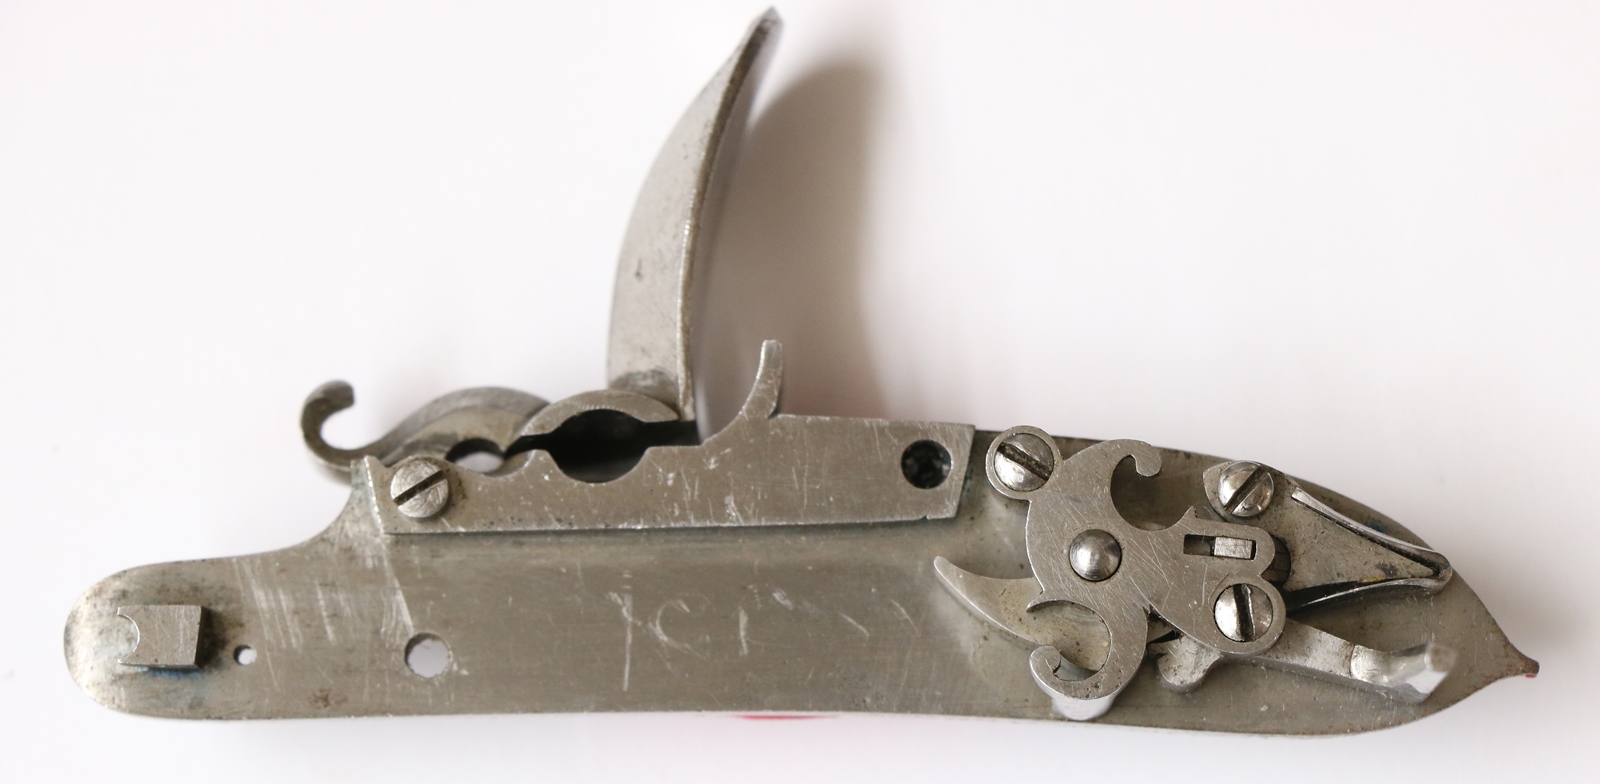
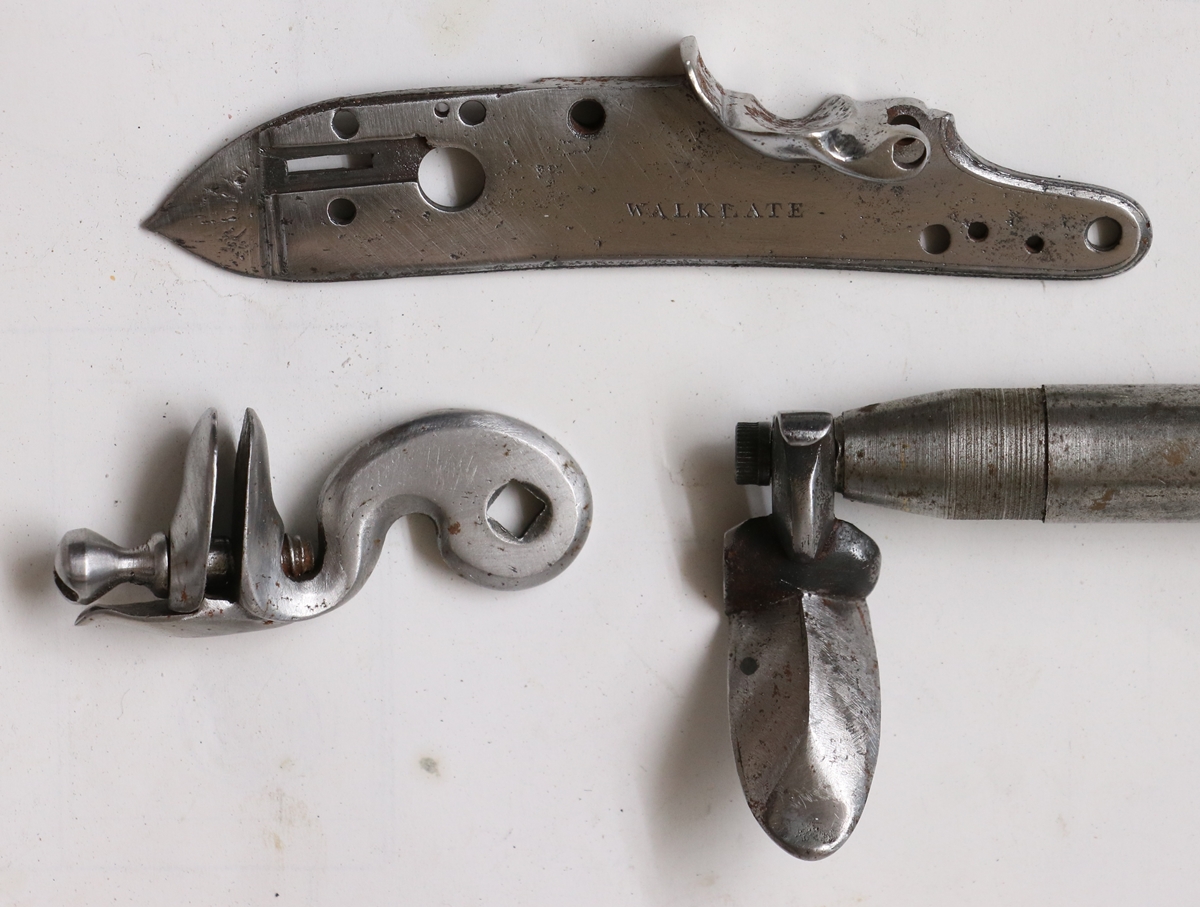
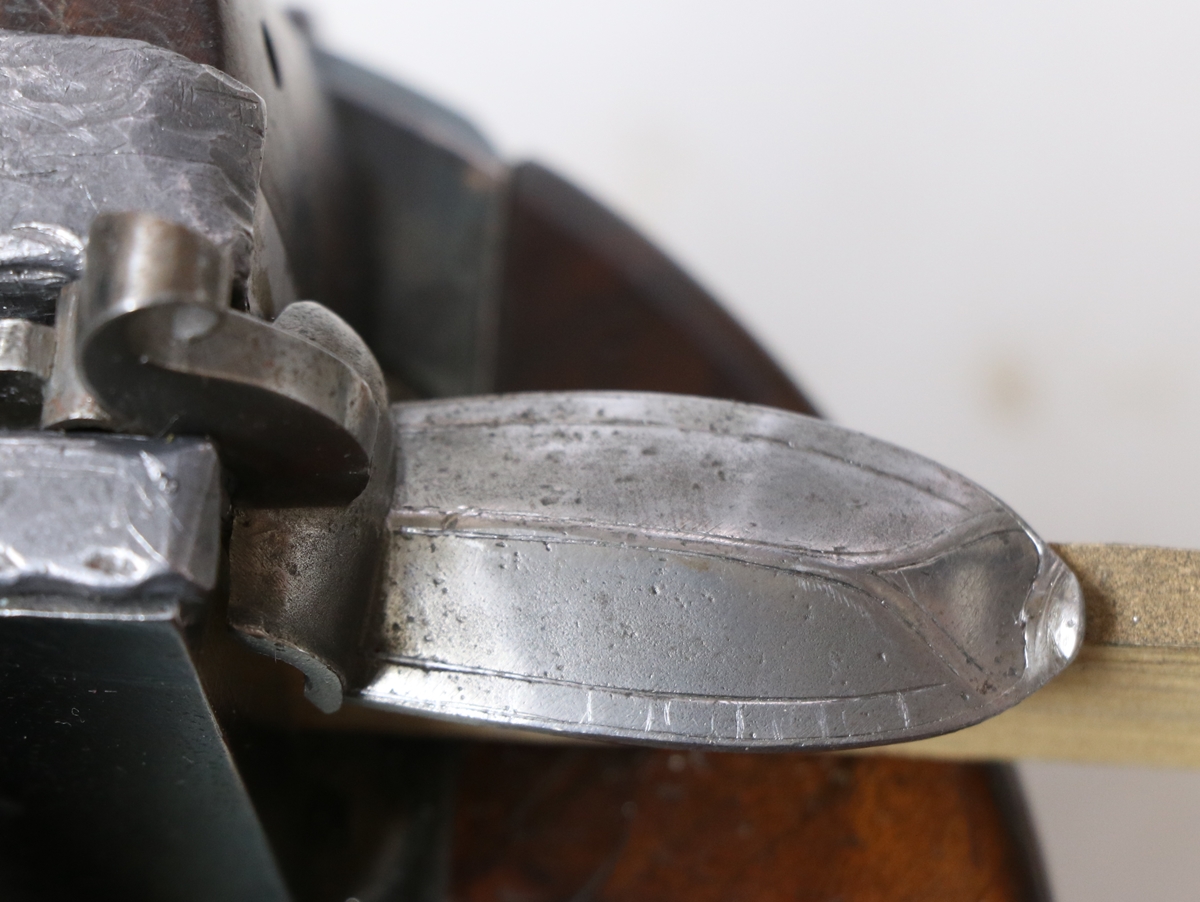
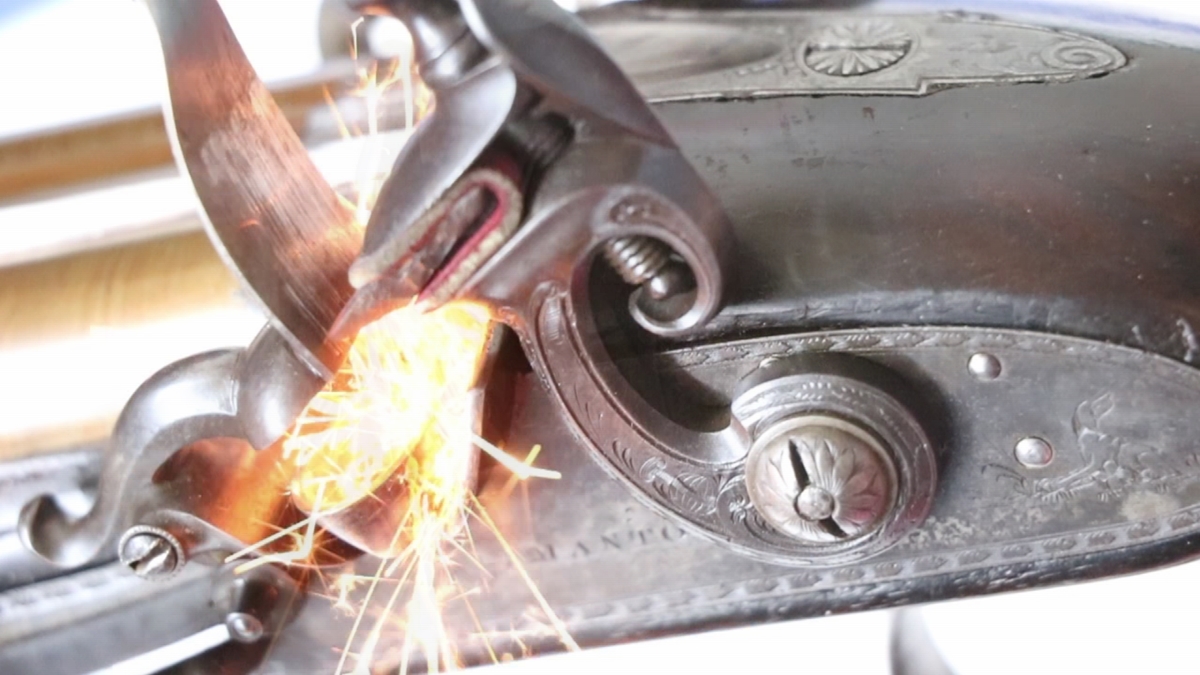
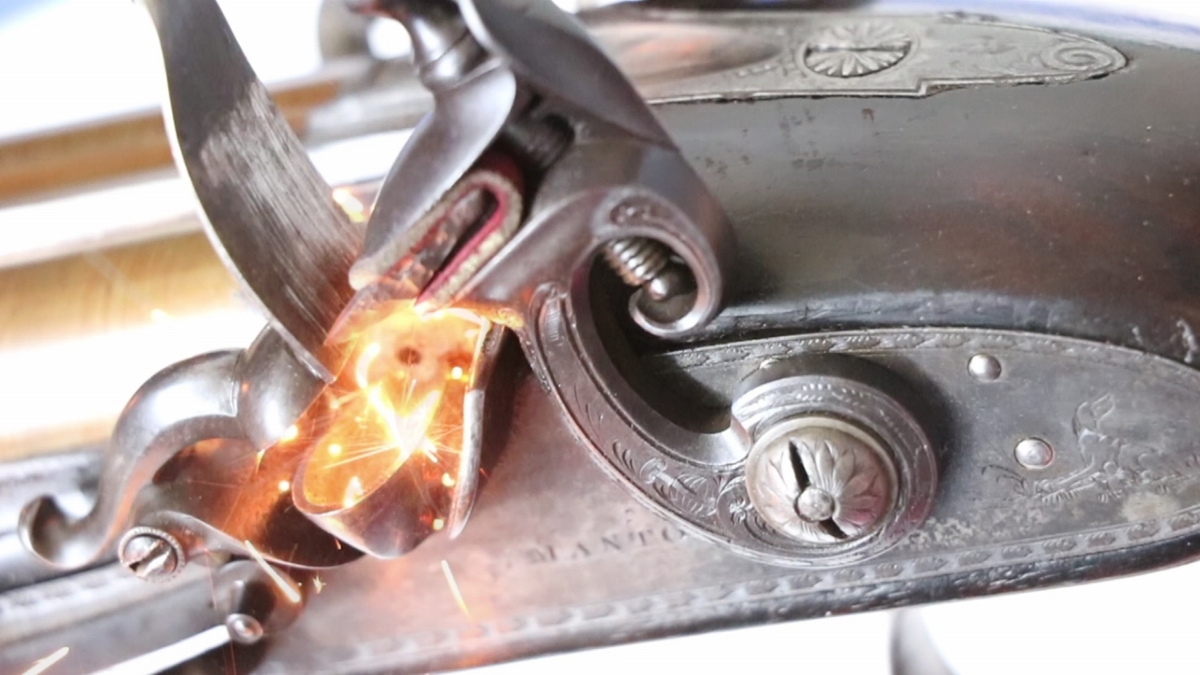
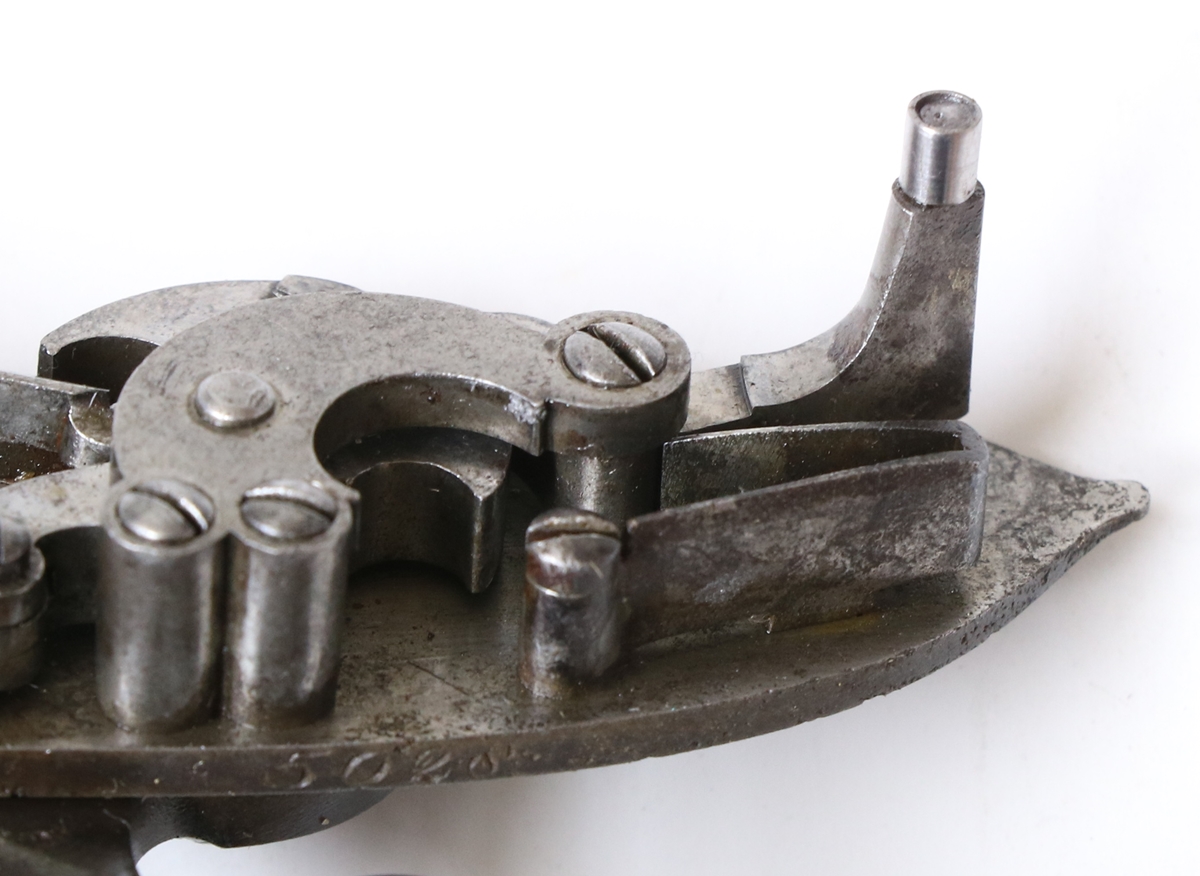
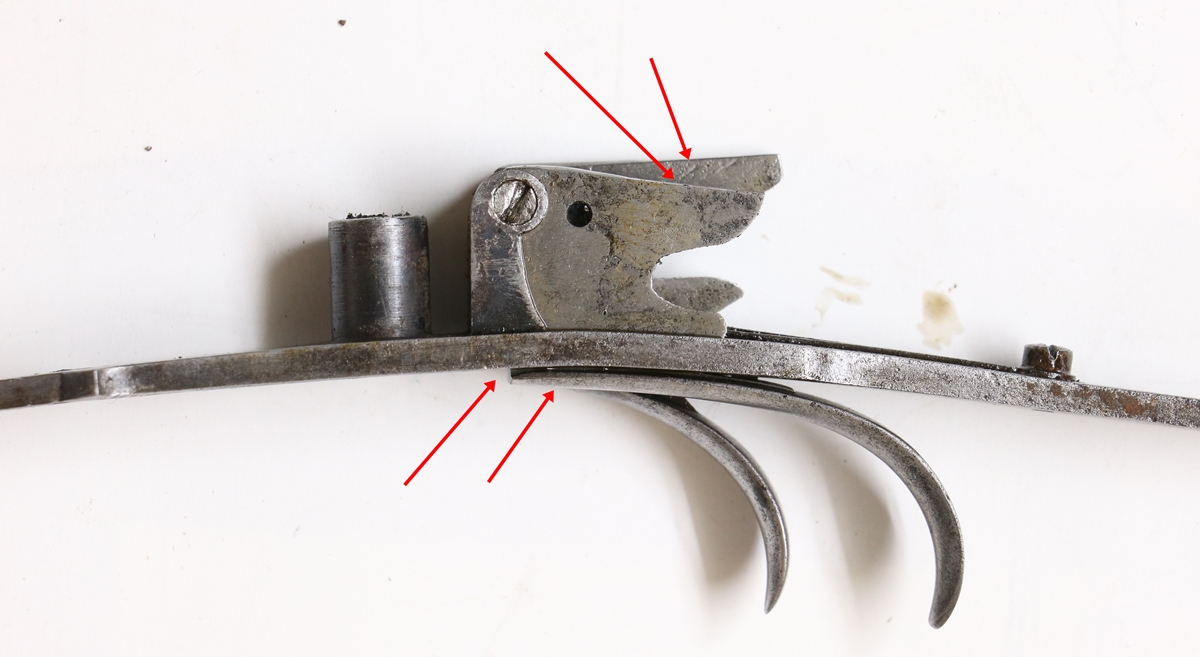
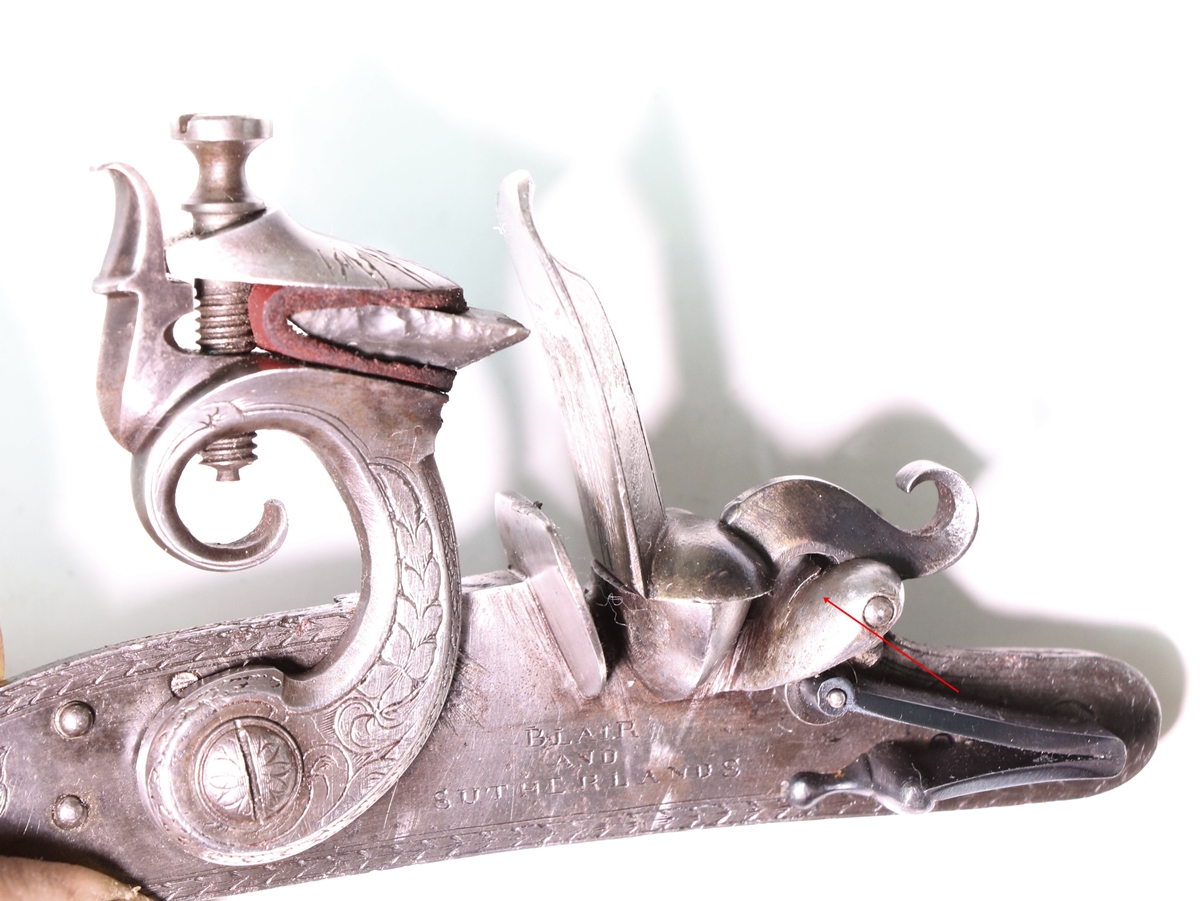
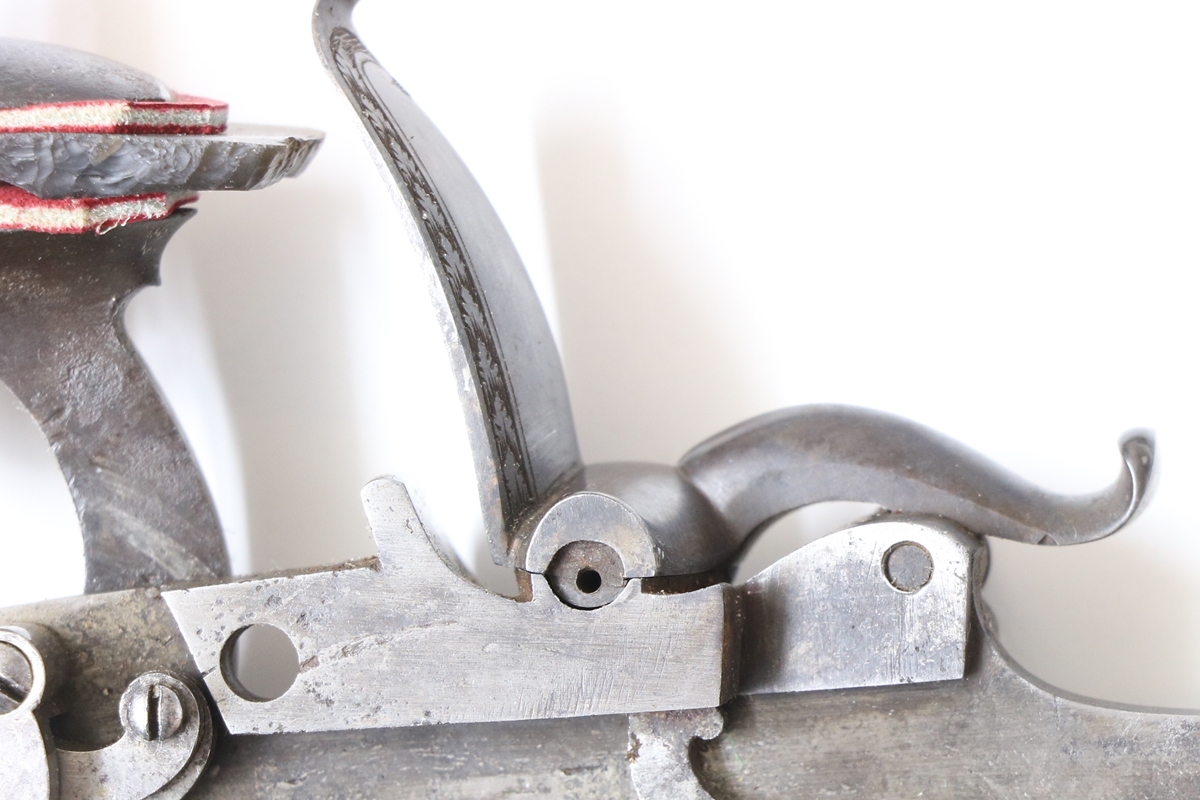
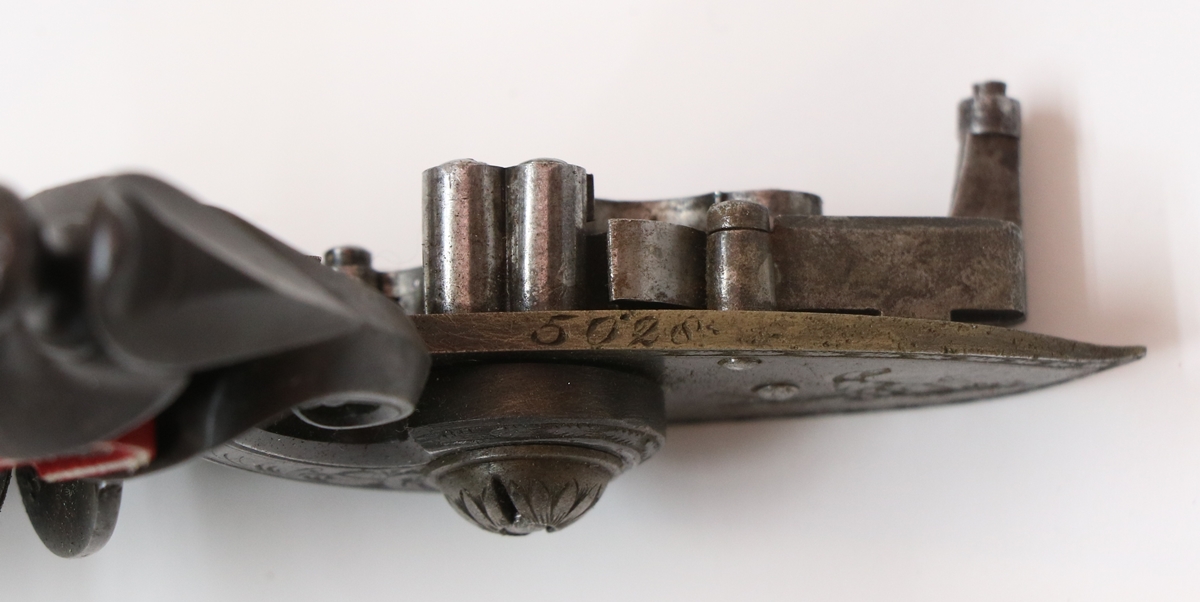
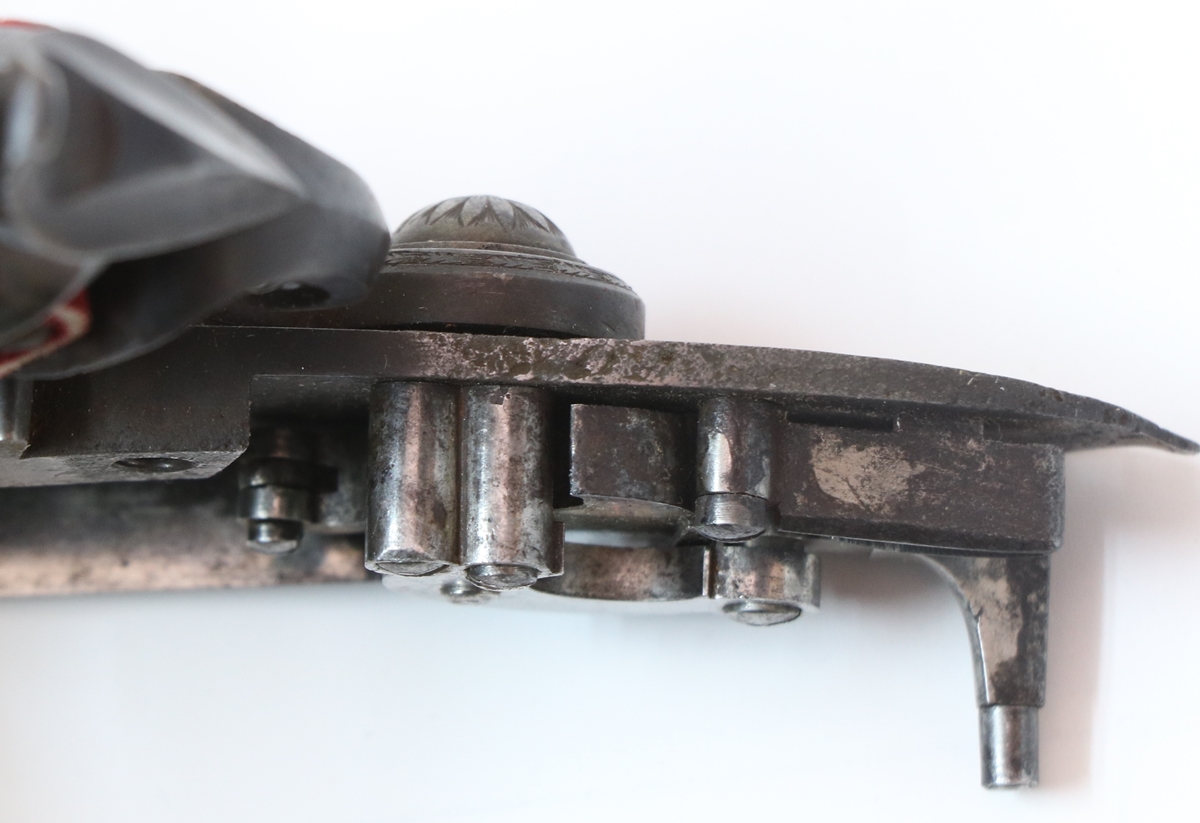
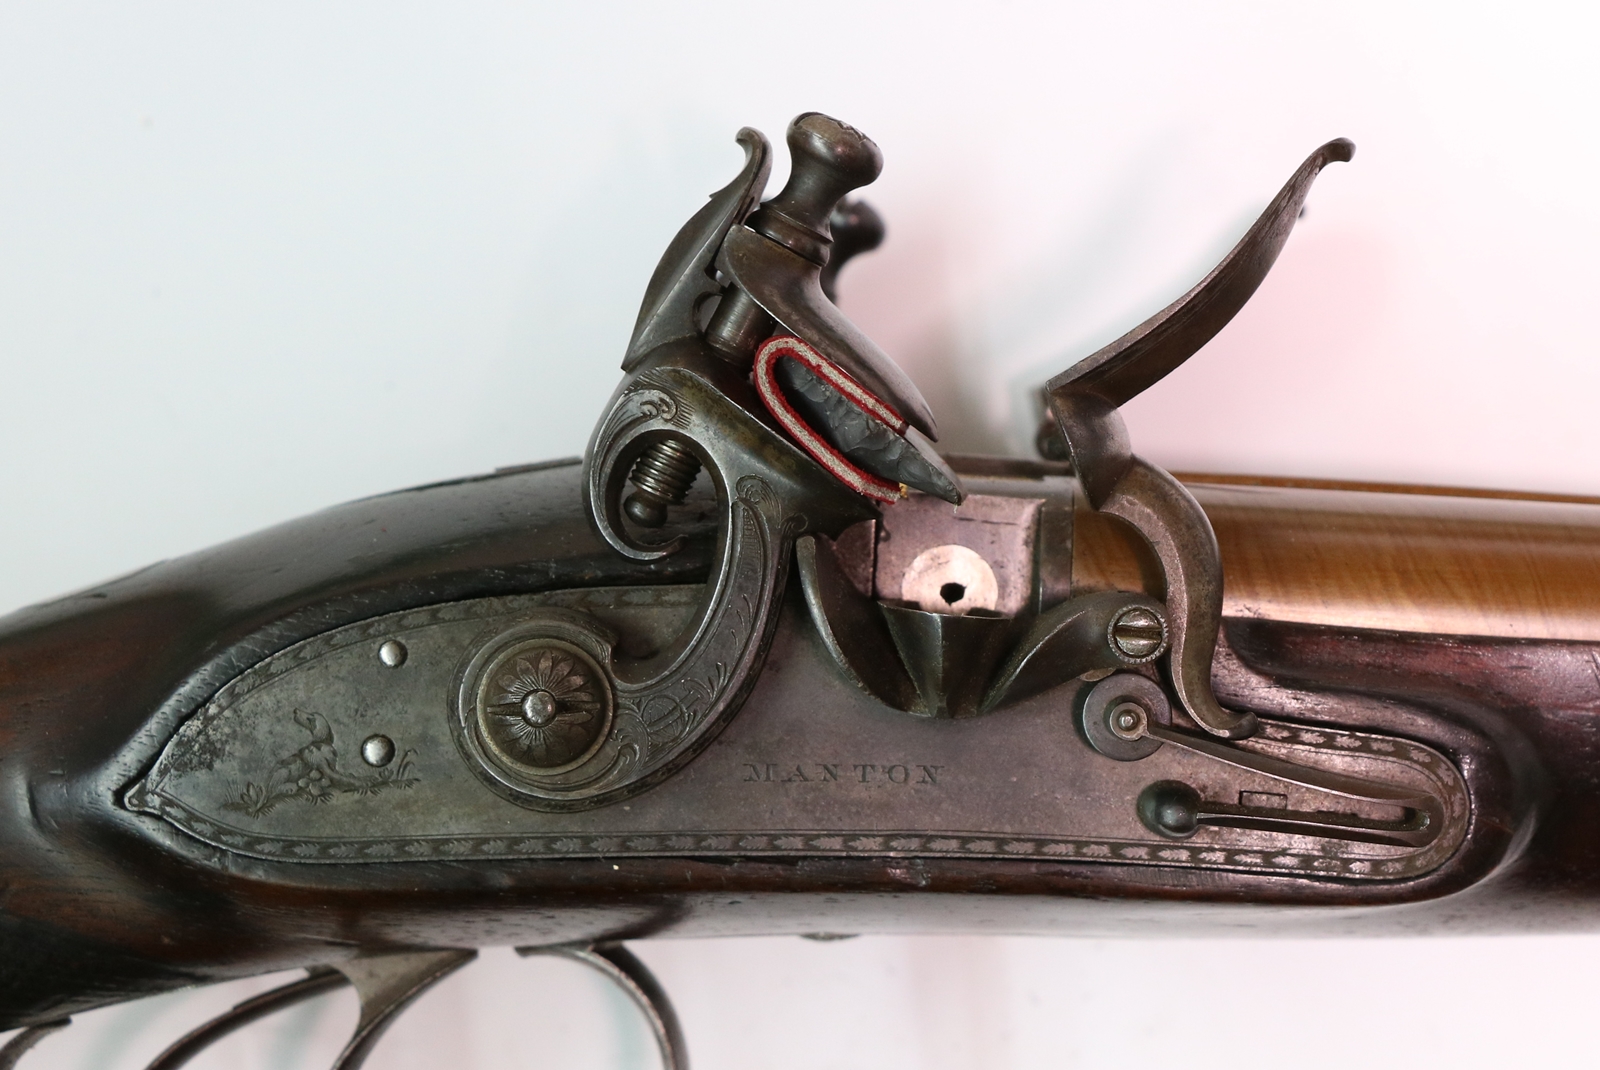
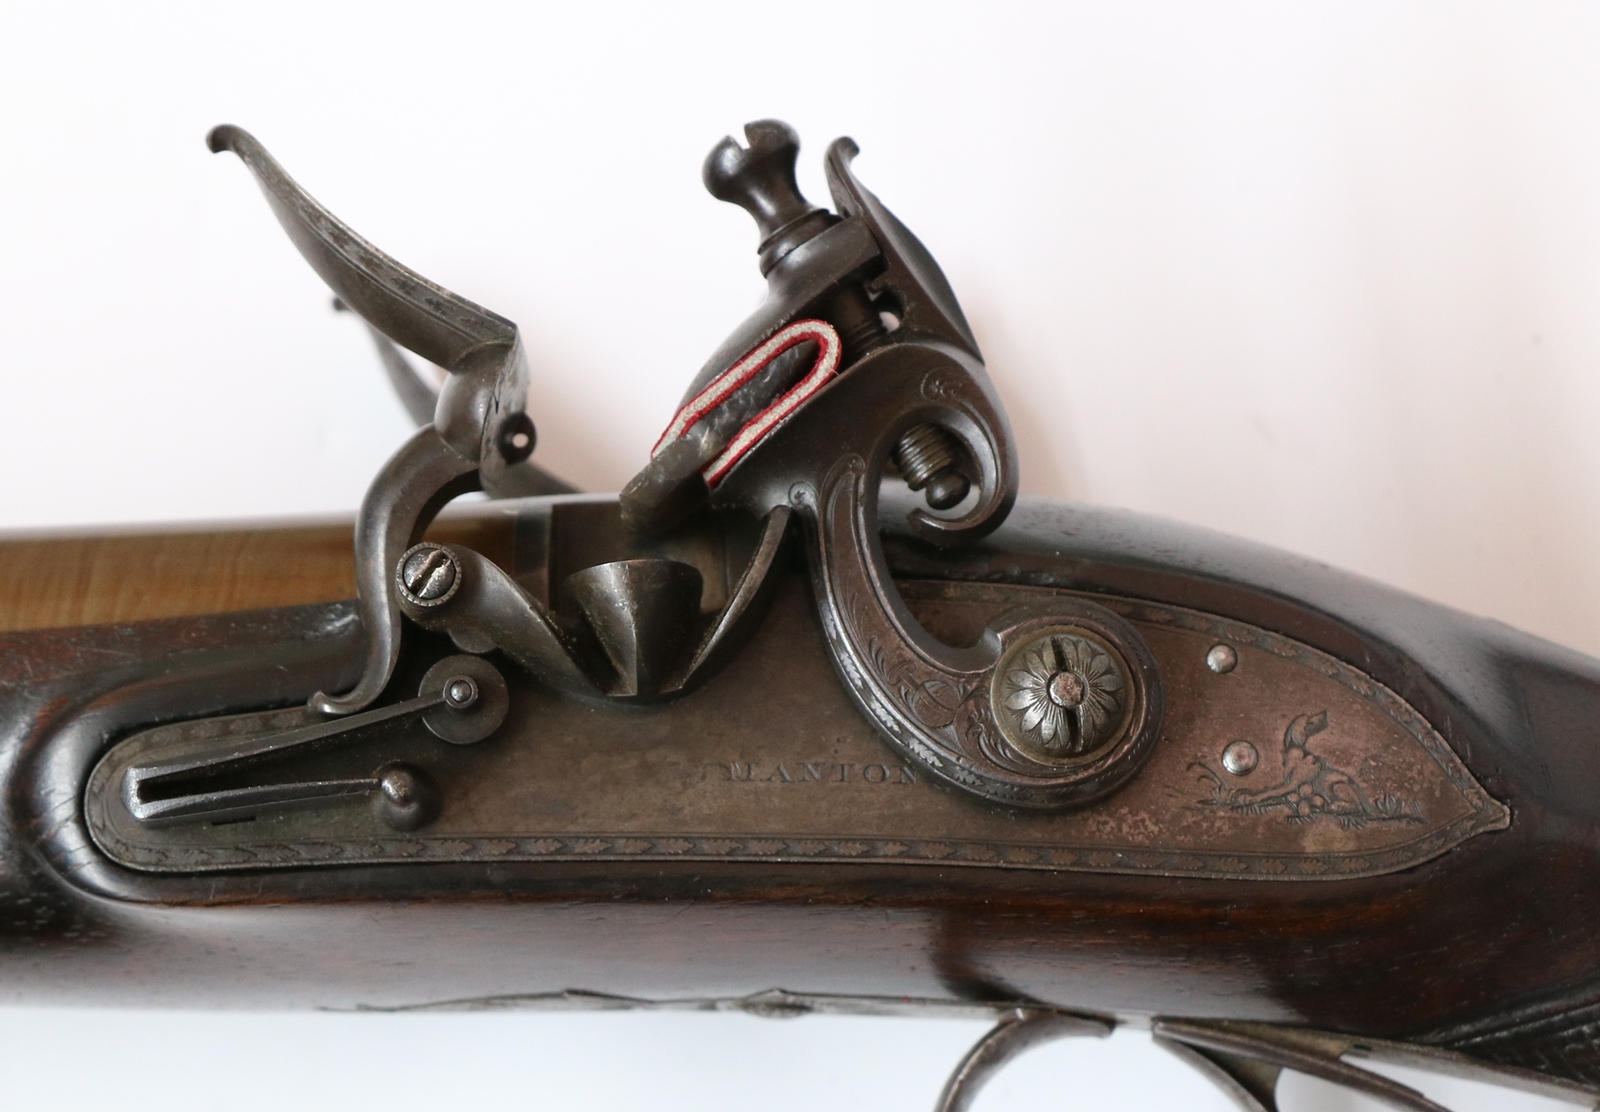
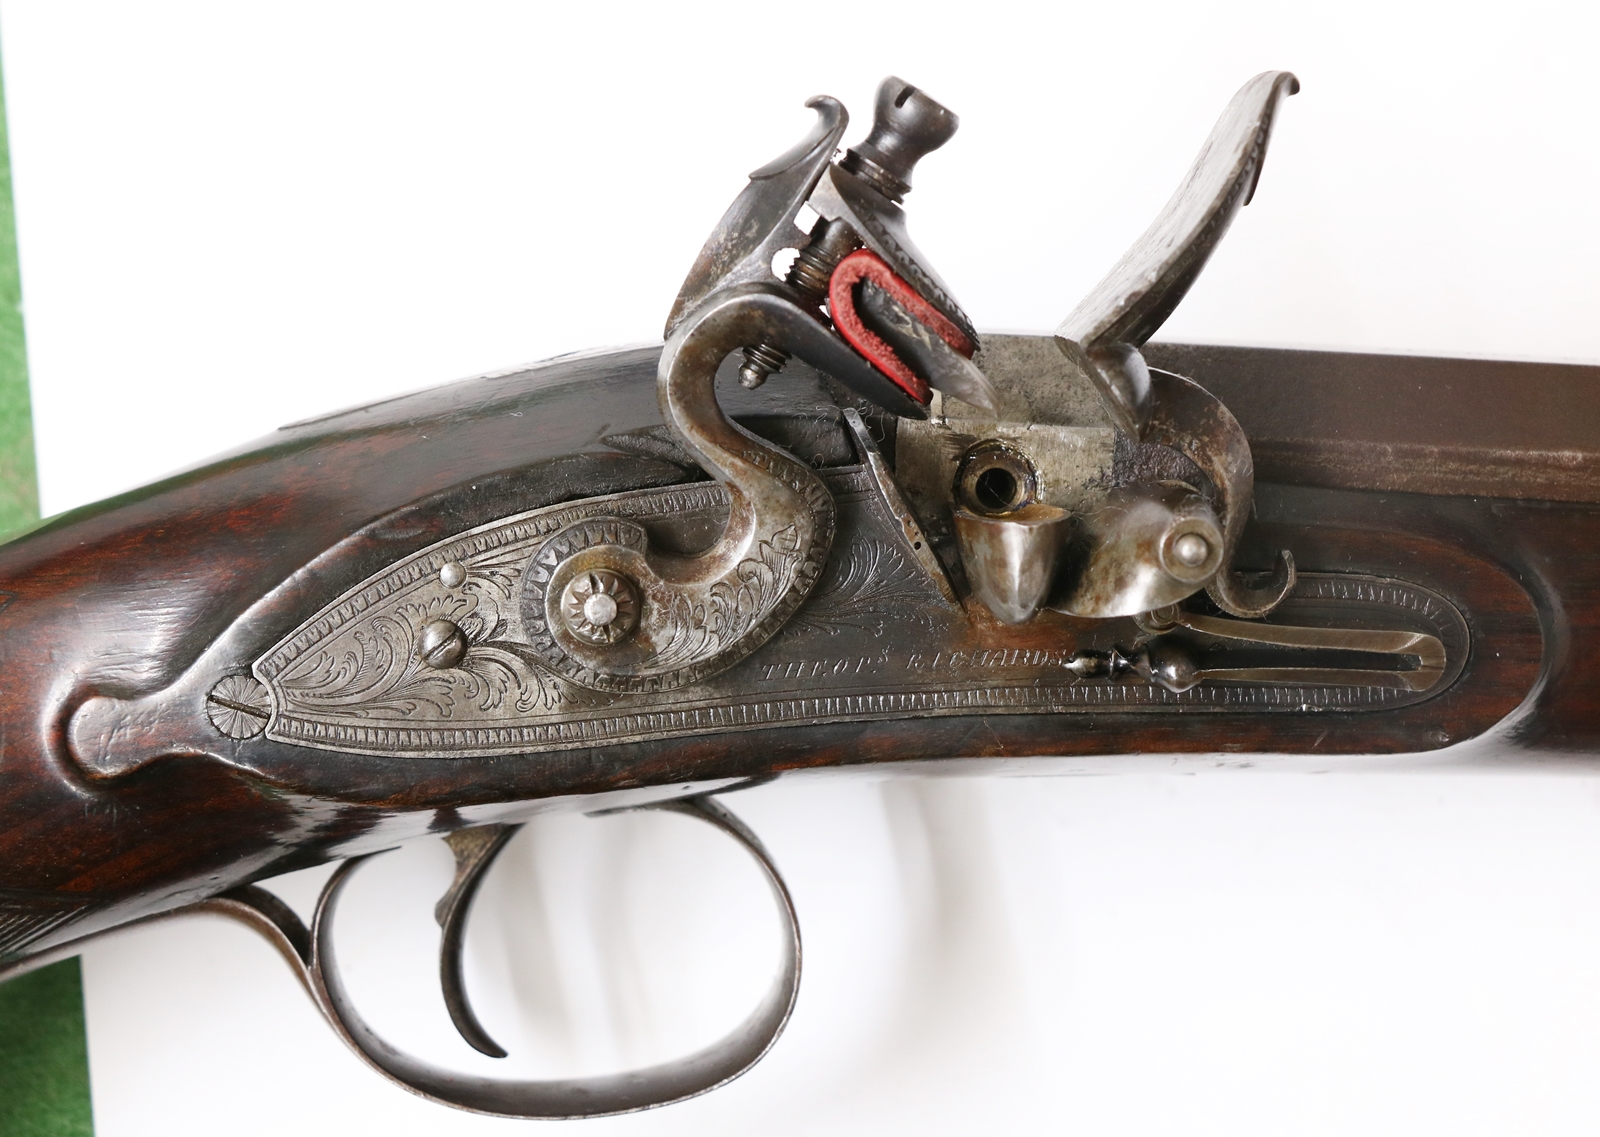
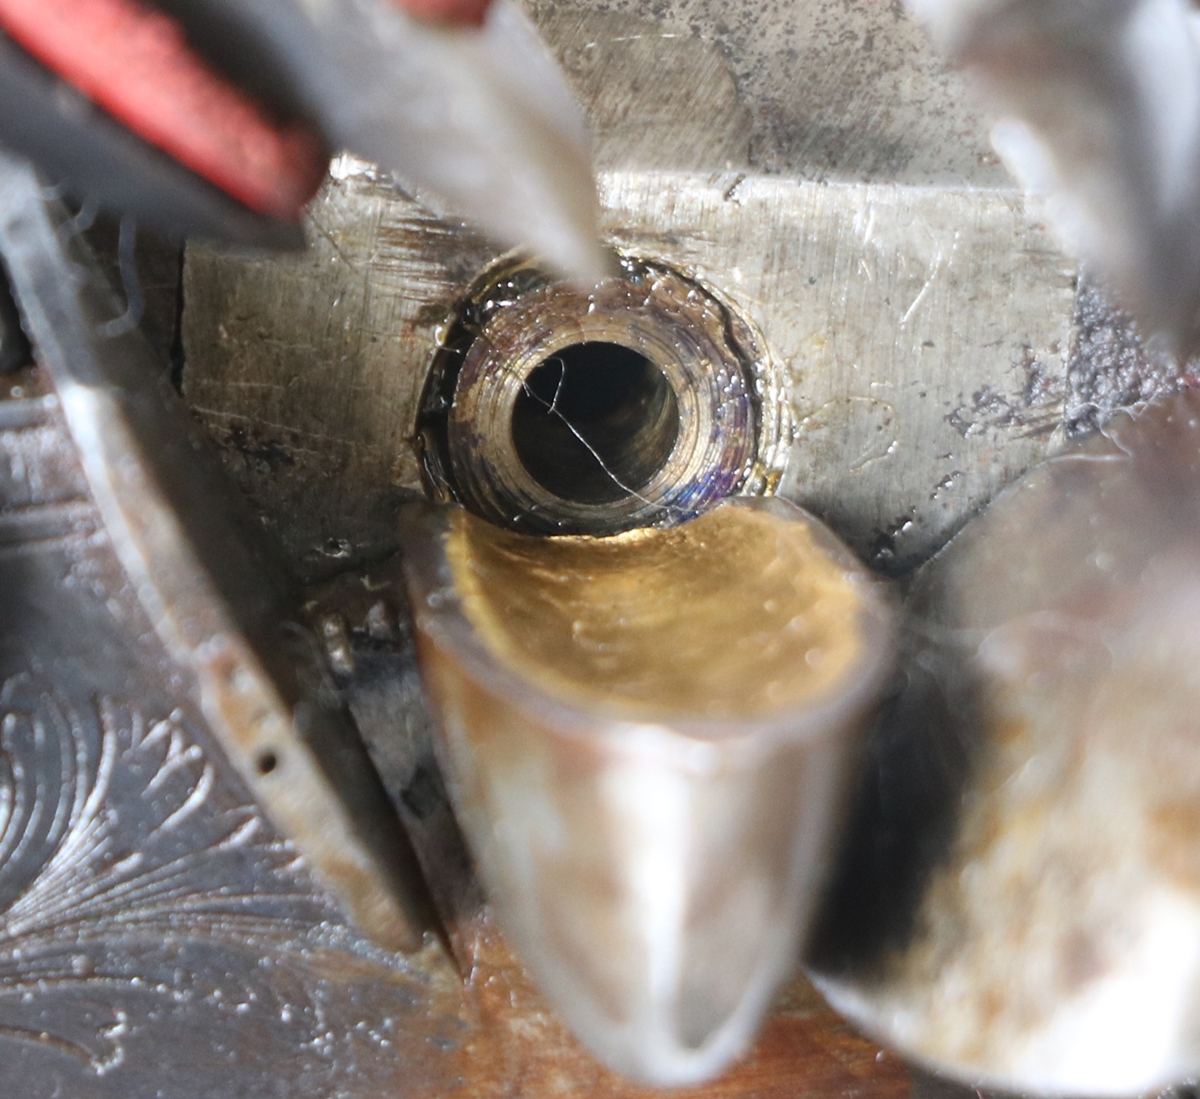
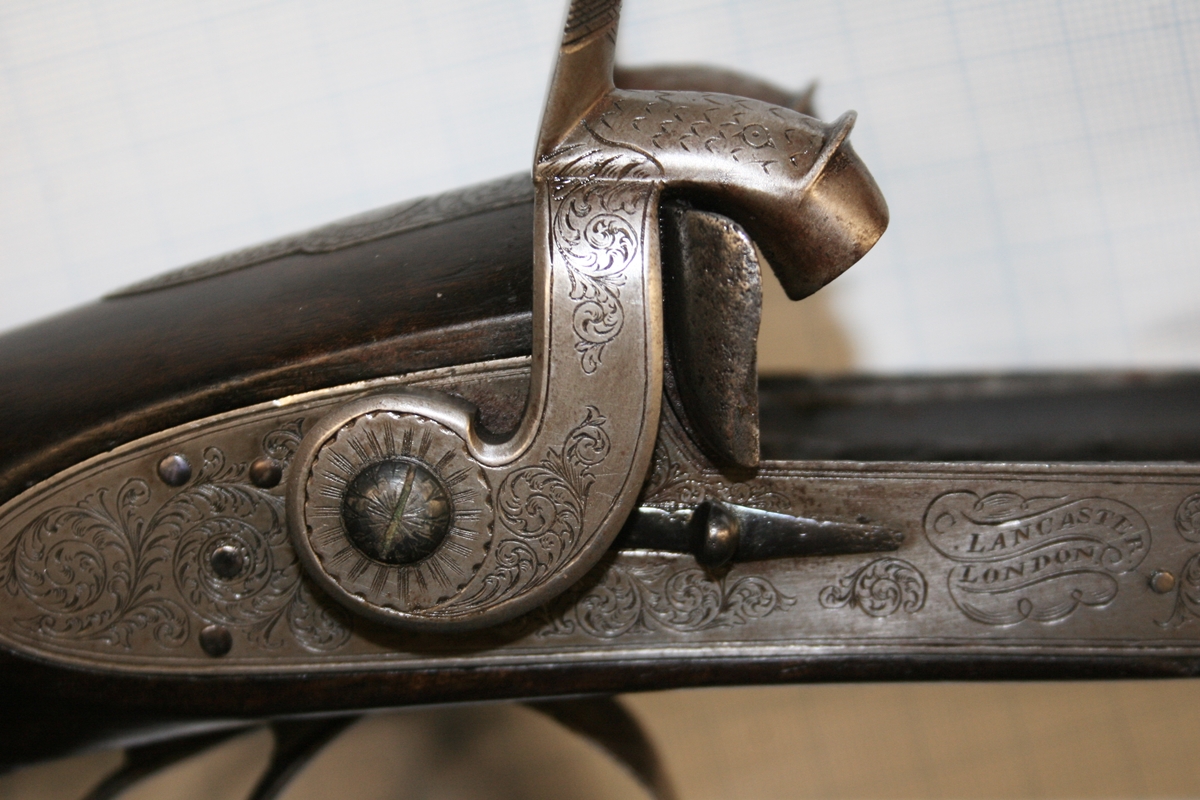
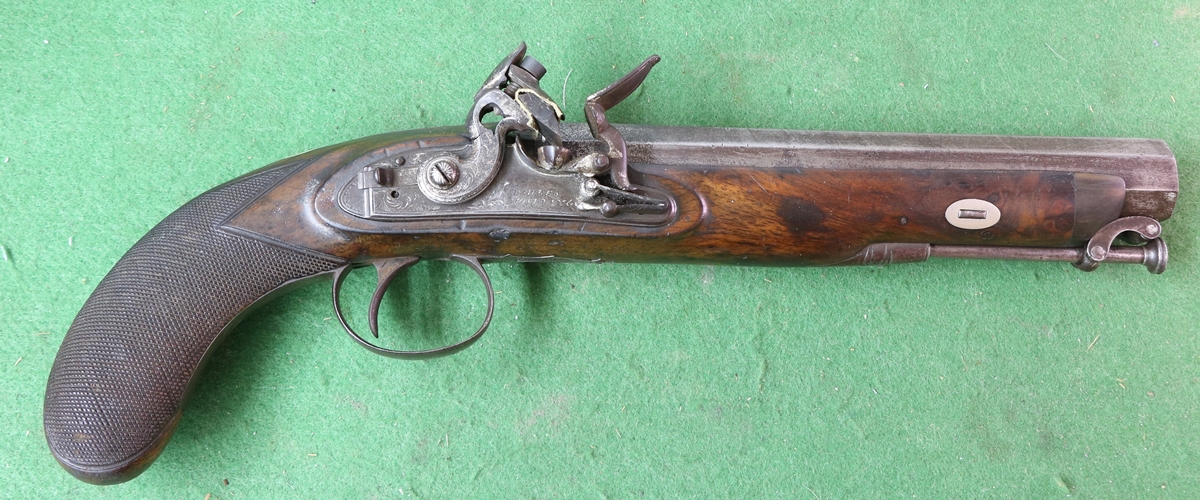
6th November. I was asked about safety catches on muzzle loaders by a correspondent, so I thought it was time that the website had something gun related! I’ll start a separate post ‘Muzzle Loading Safety Catches’ but in the meantime here are a couple of examples that come to hand. The ‘standard’ safety e.g. on pistols like the Andrews described on this site being back converted to flint – acts to lock the tumbler in the half cock position when the slider situated behind the cock is slid forward. The slider moves in a groove cut in the outside face of the lock plate with a tab passing through a slot cut through the lock plate within the groove – the groove and slot define the movement of the slider. A ‘ bolt’ is fitted on the tab of the slider on the inside of the lock and held by a pin. The bolt has a protruding square that engages with a slot in the tumbler when in the forward, lock, position. There is a small triangular spring which attaches under the head of the screw that secures the sear spring and covers the V of the sear spring. It has a small protrusion on the inside of the spring that engages with depressions in the bolt and acts as a detente to hold it in either the safe or fire positions. The spring has a small notch near the attachment hole that engages with a small notch in the sear spring and helps to hold it in the correct position. The safety spring is a very fiddly thing to make on account of the small protrusion and detailed shape.

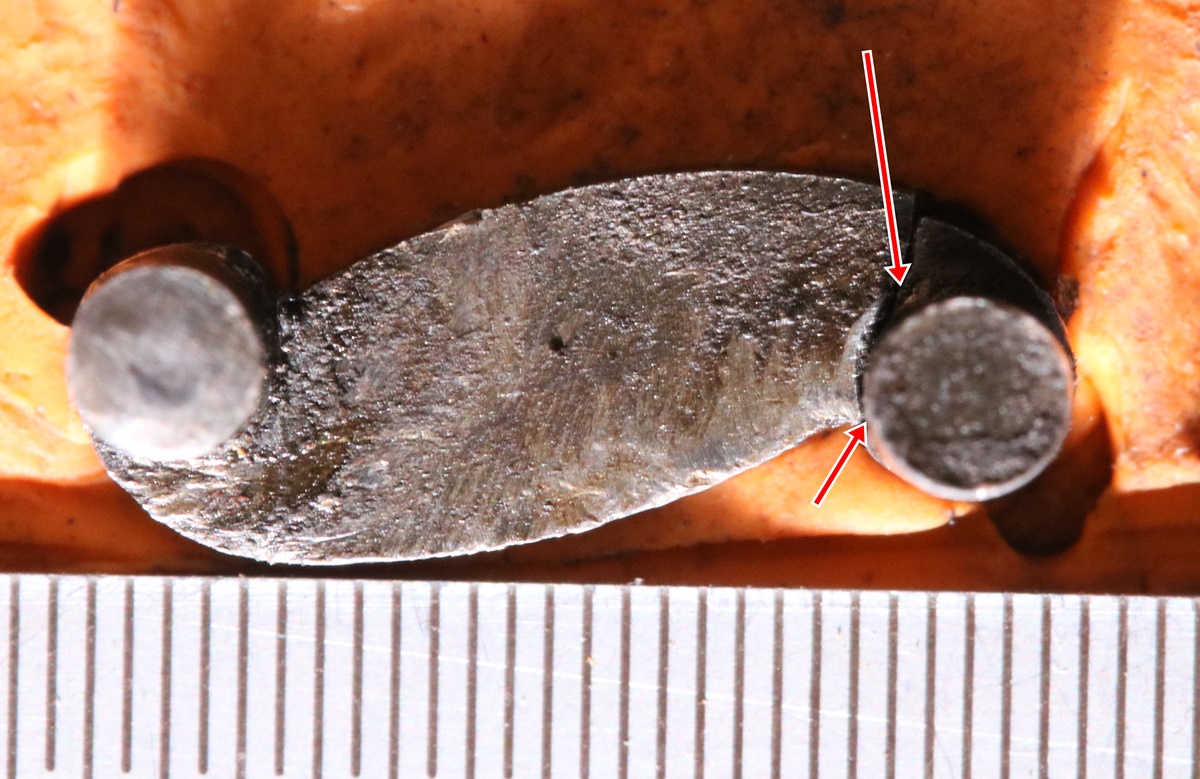
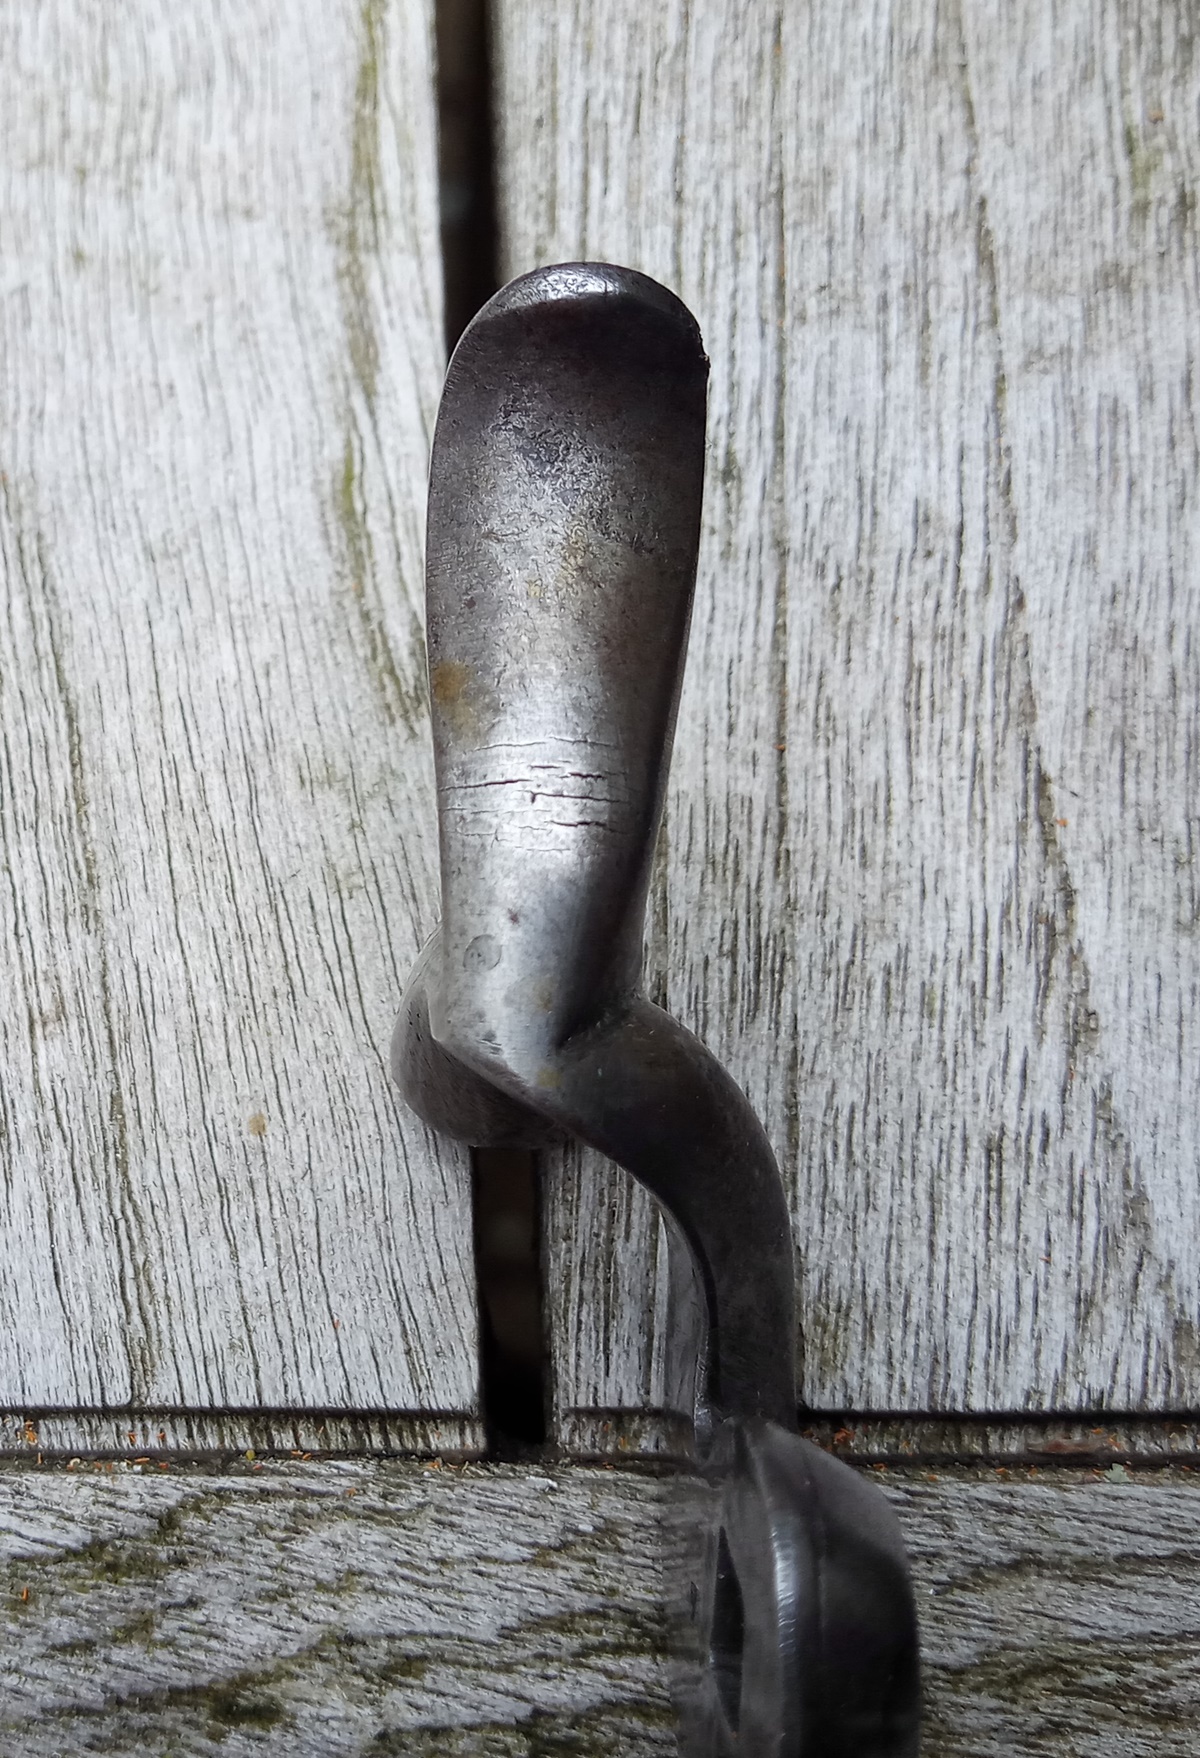
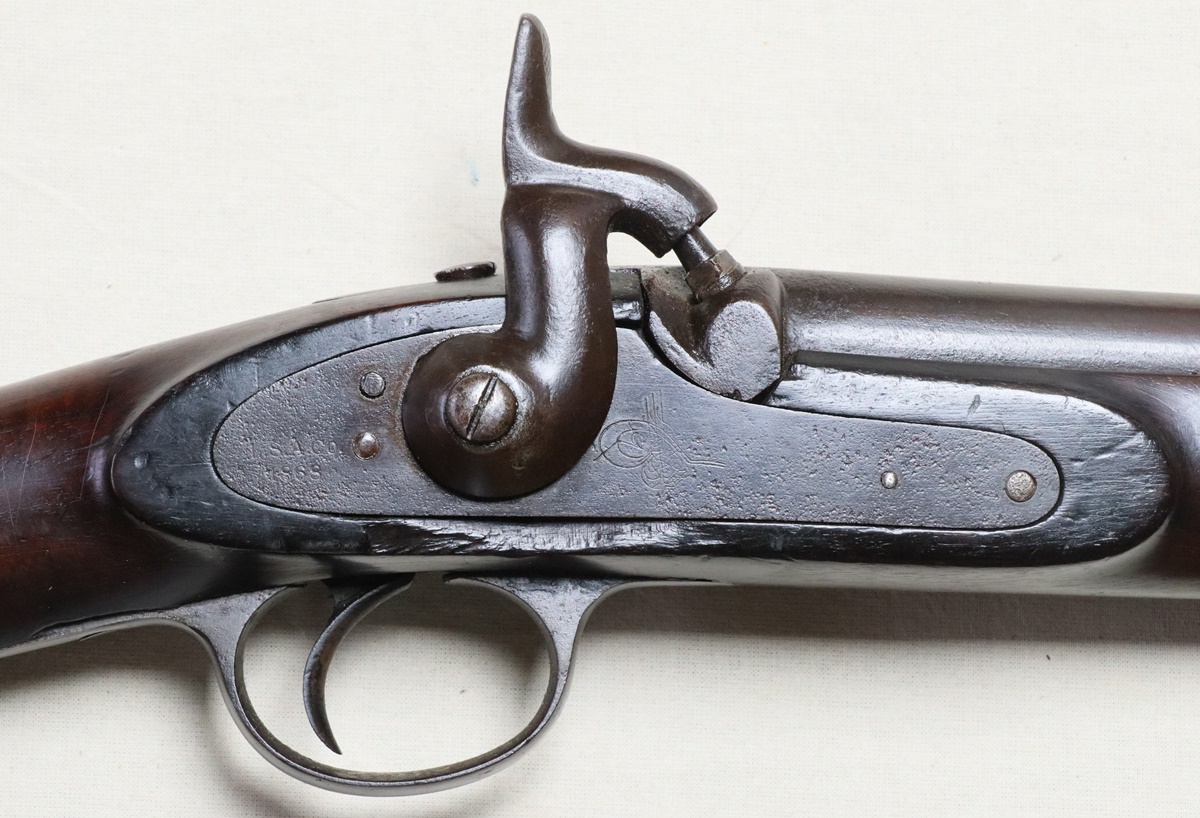
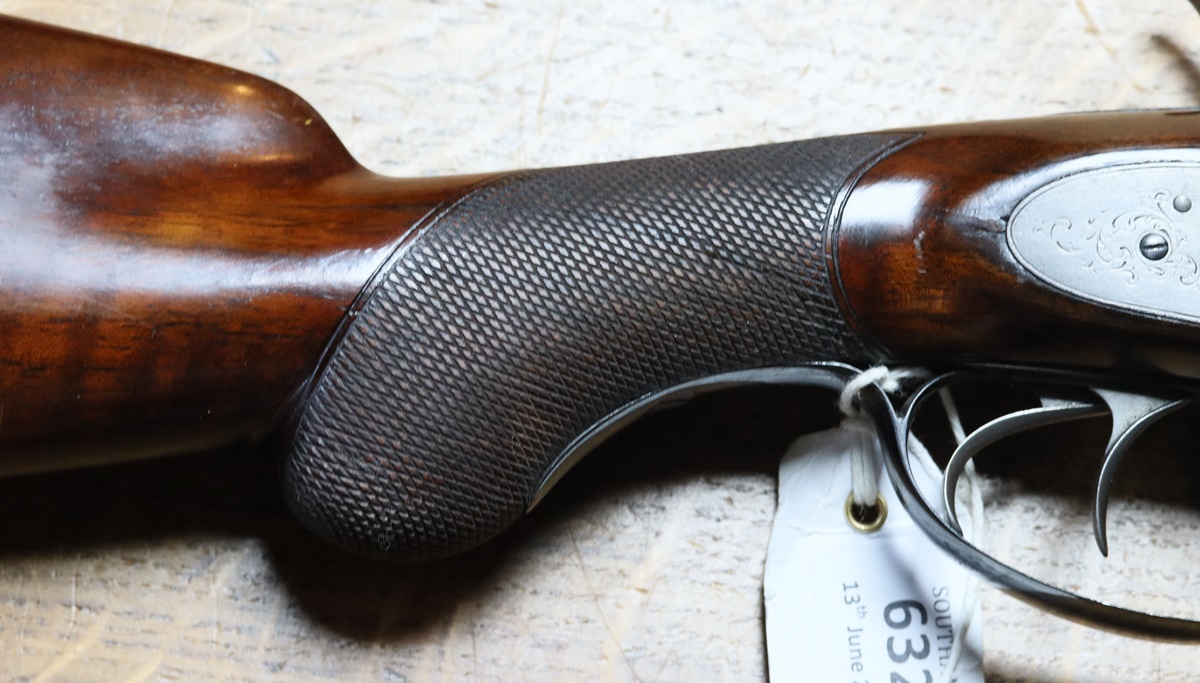
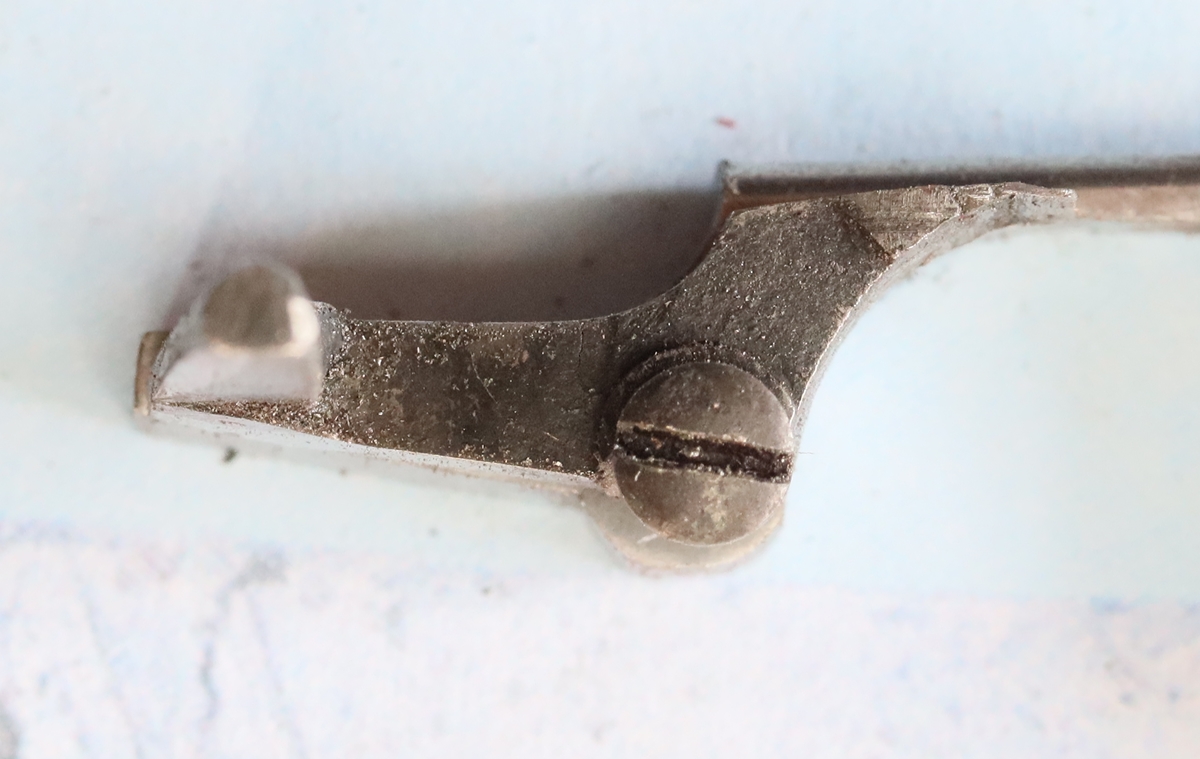
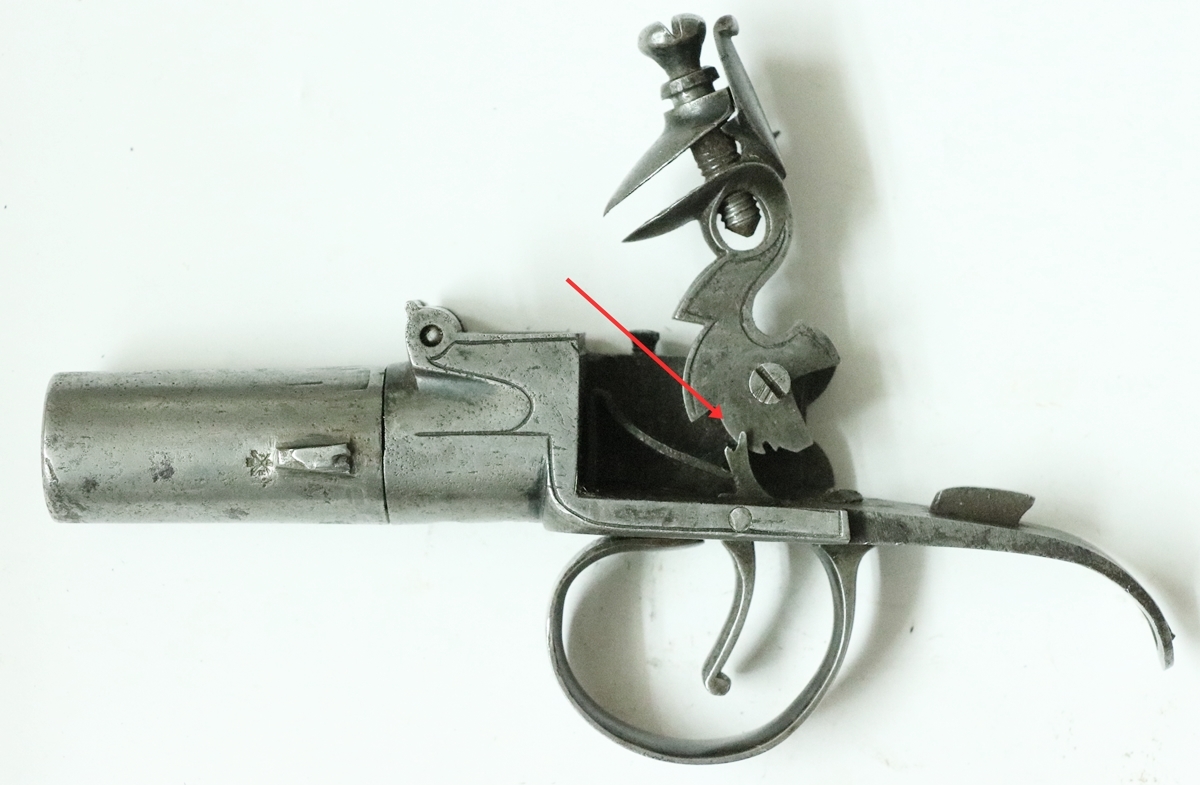
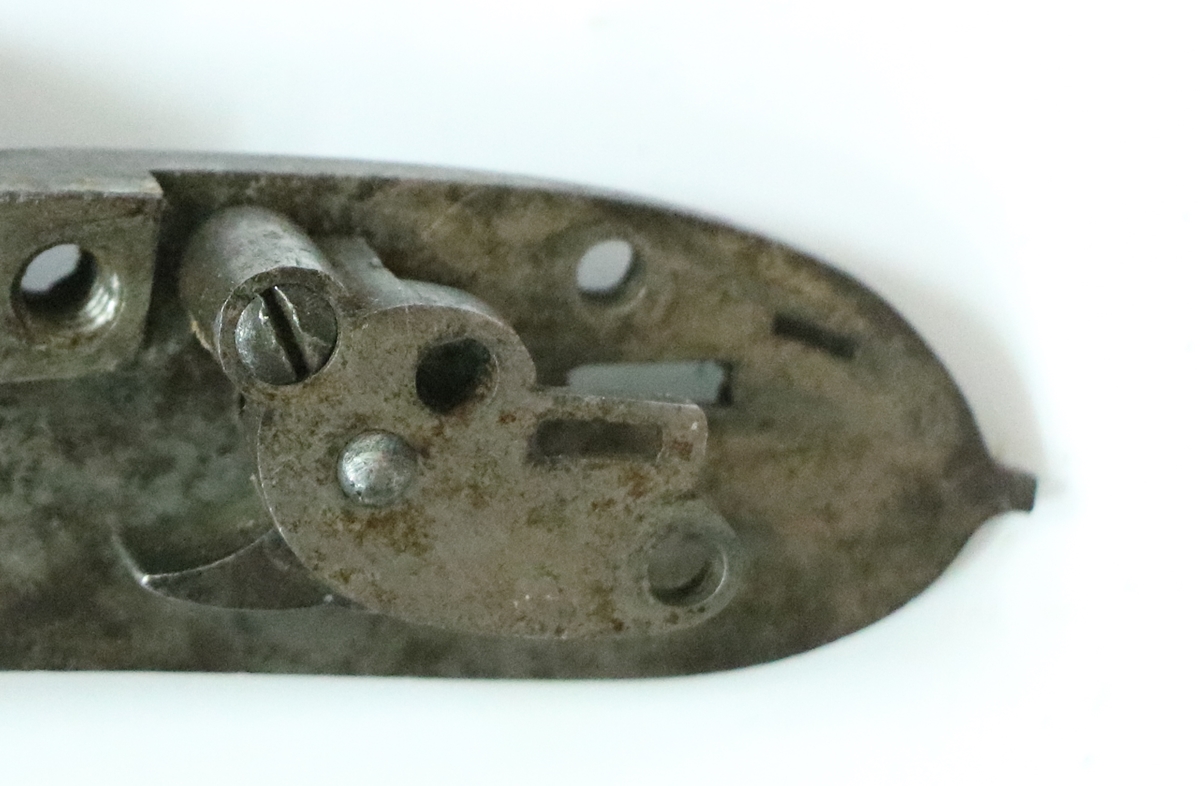
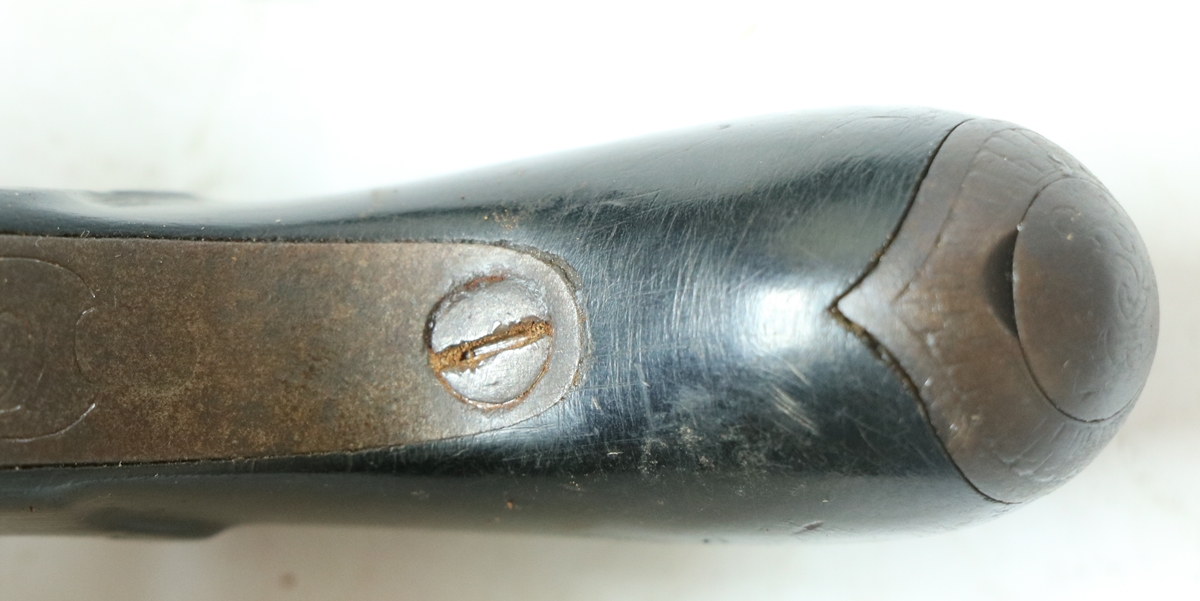
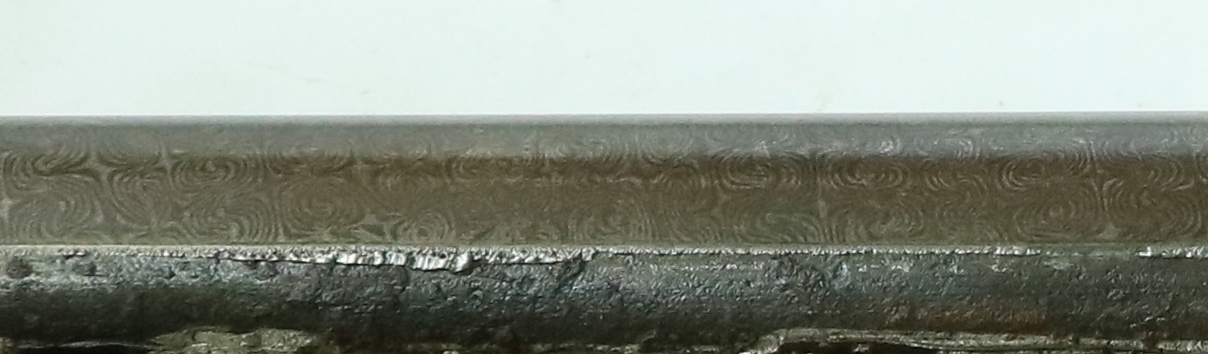
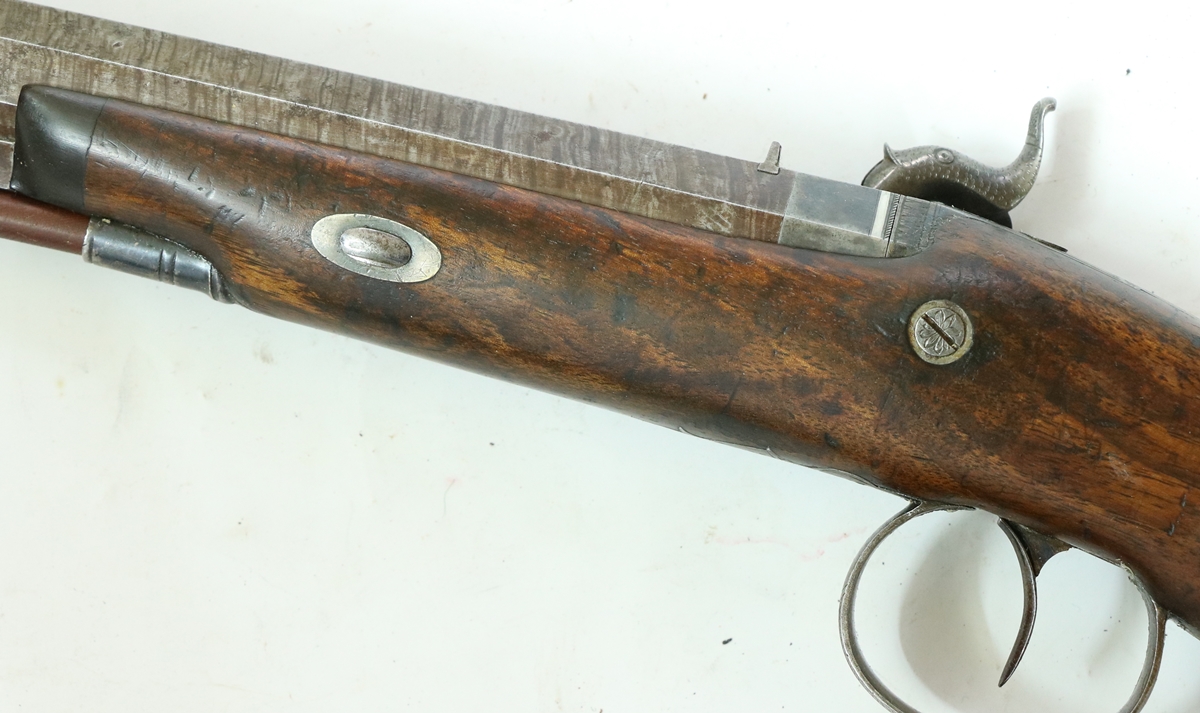
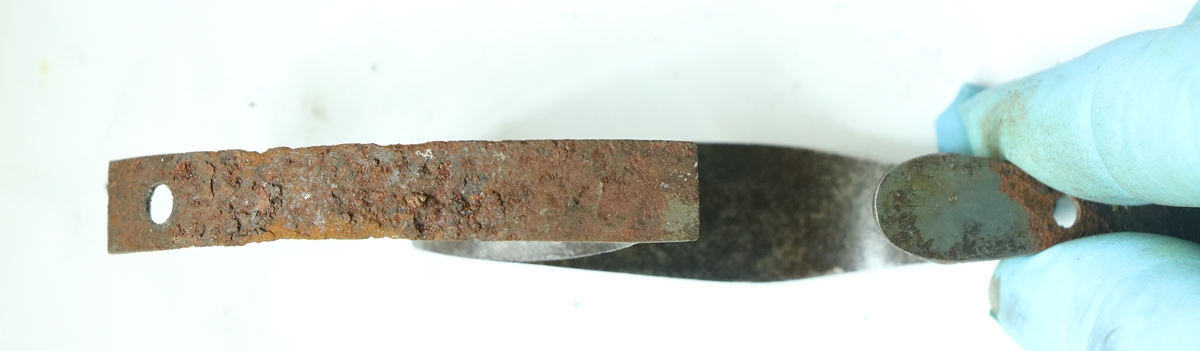
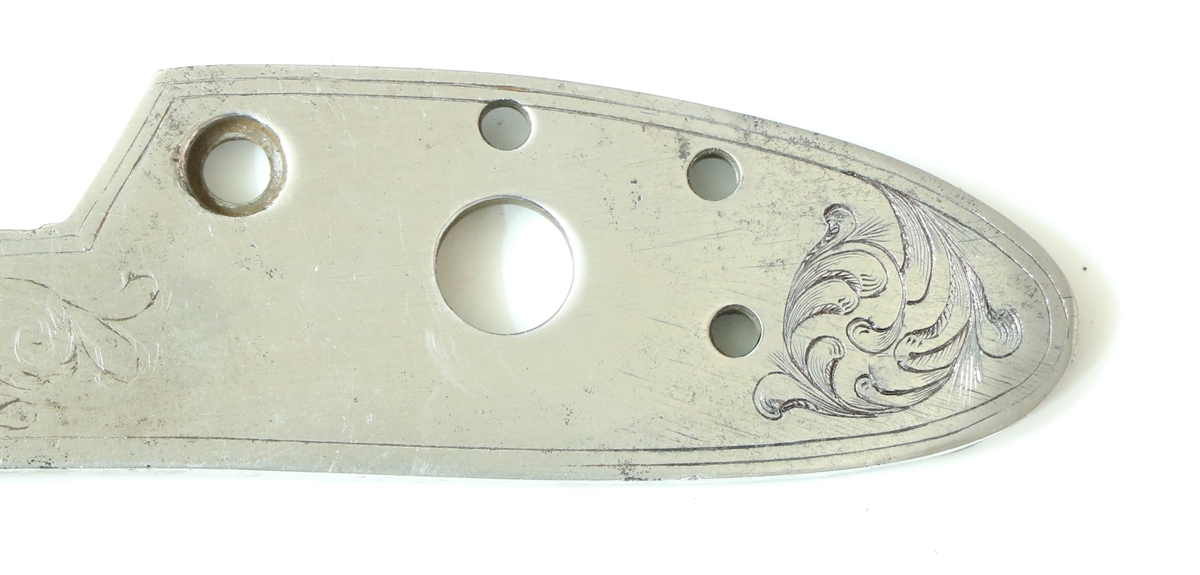
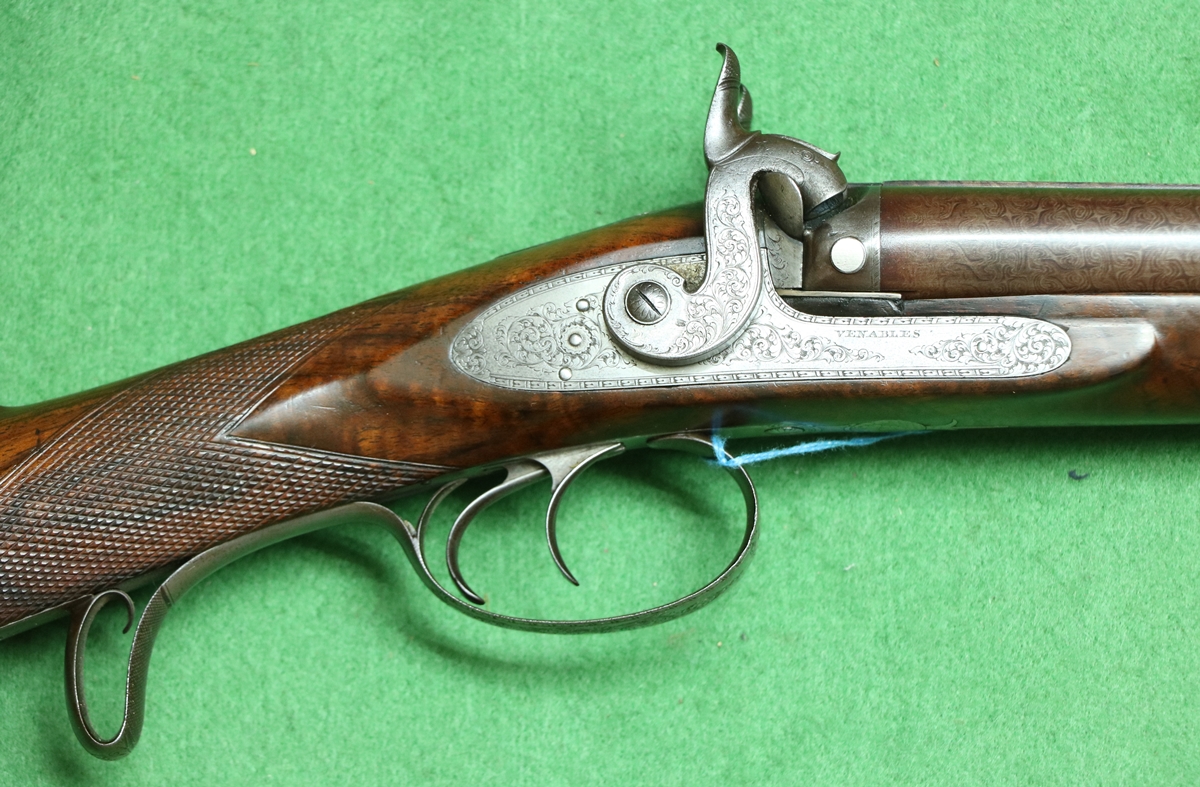
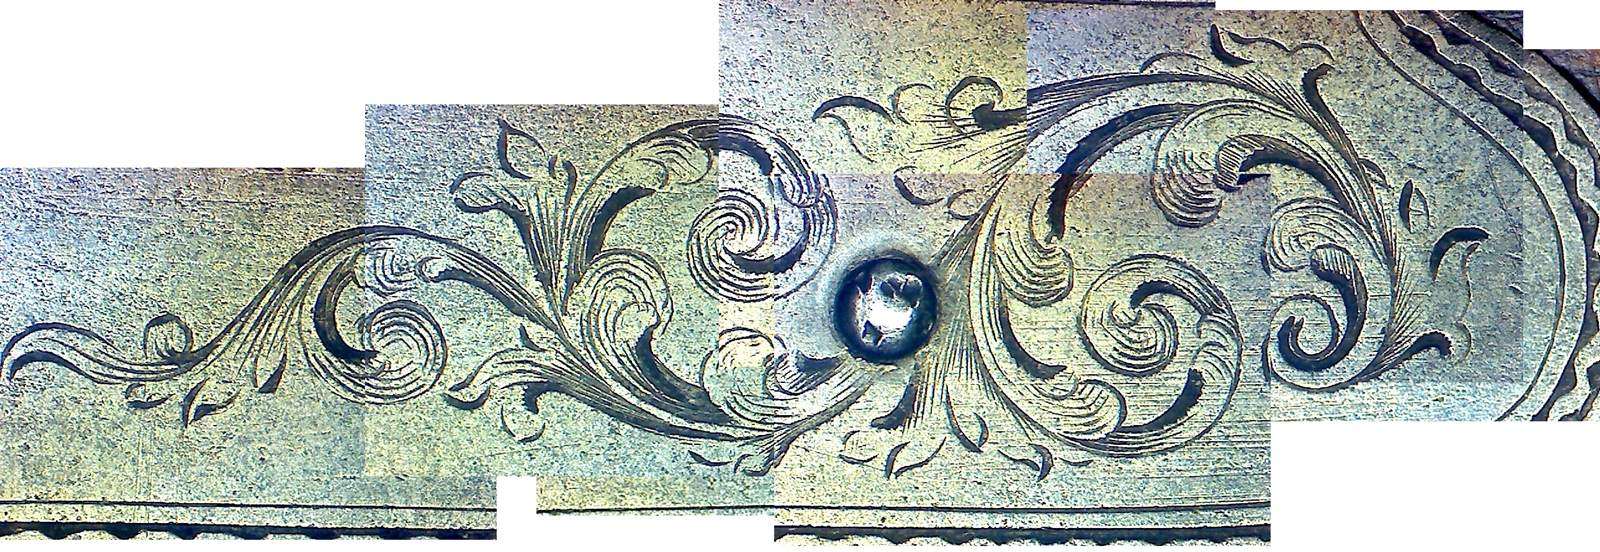
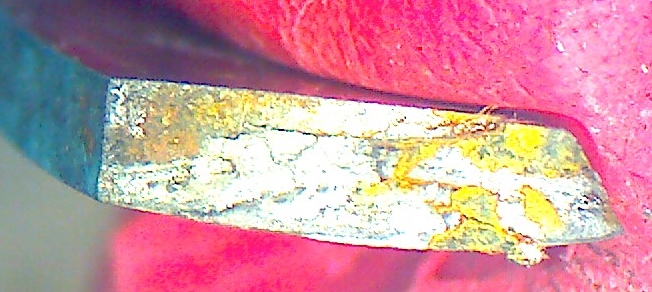
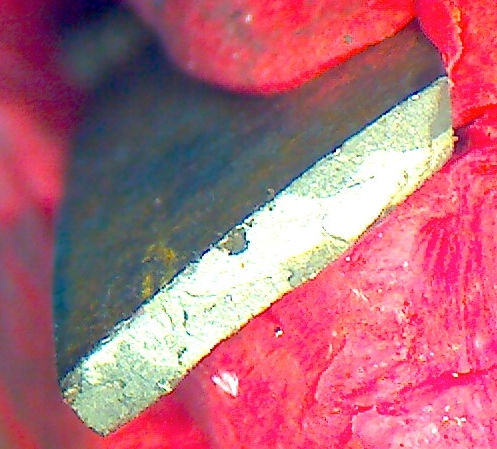
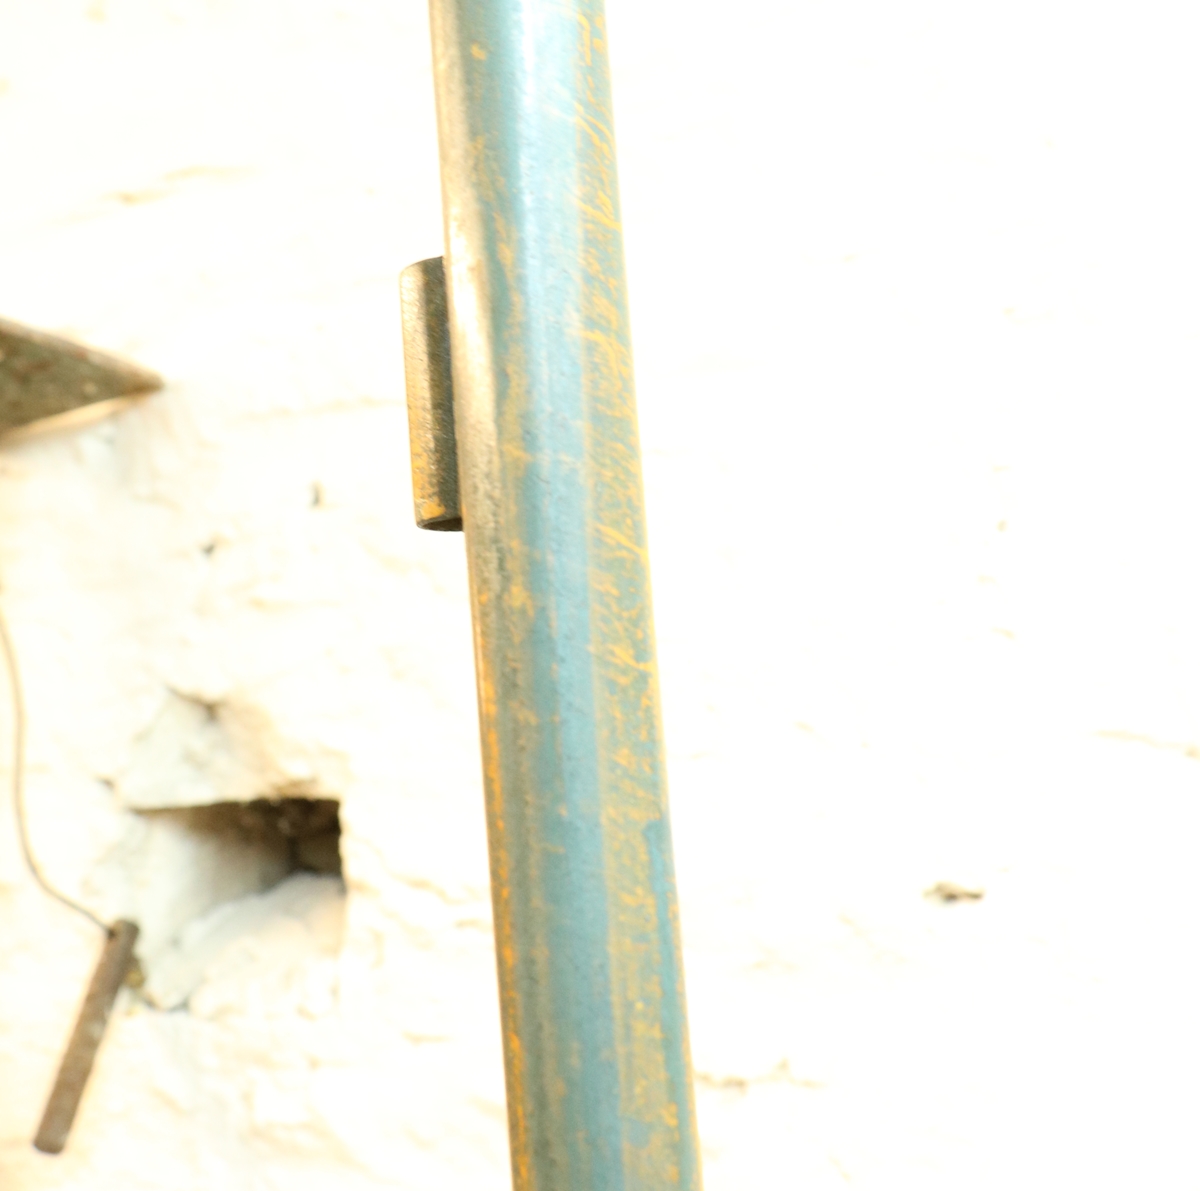
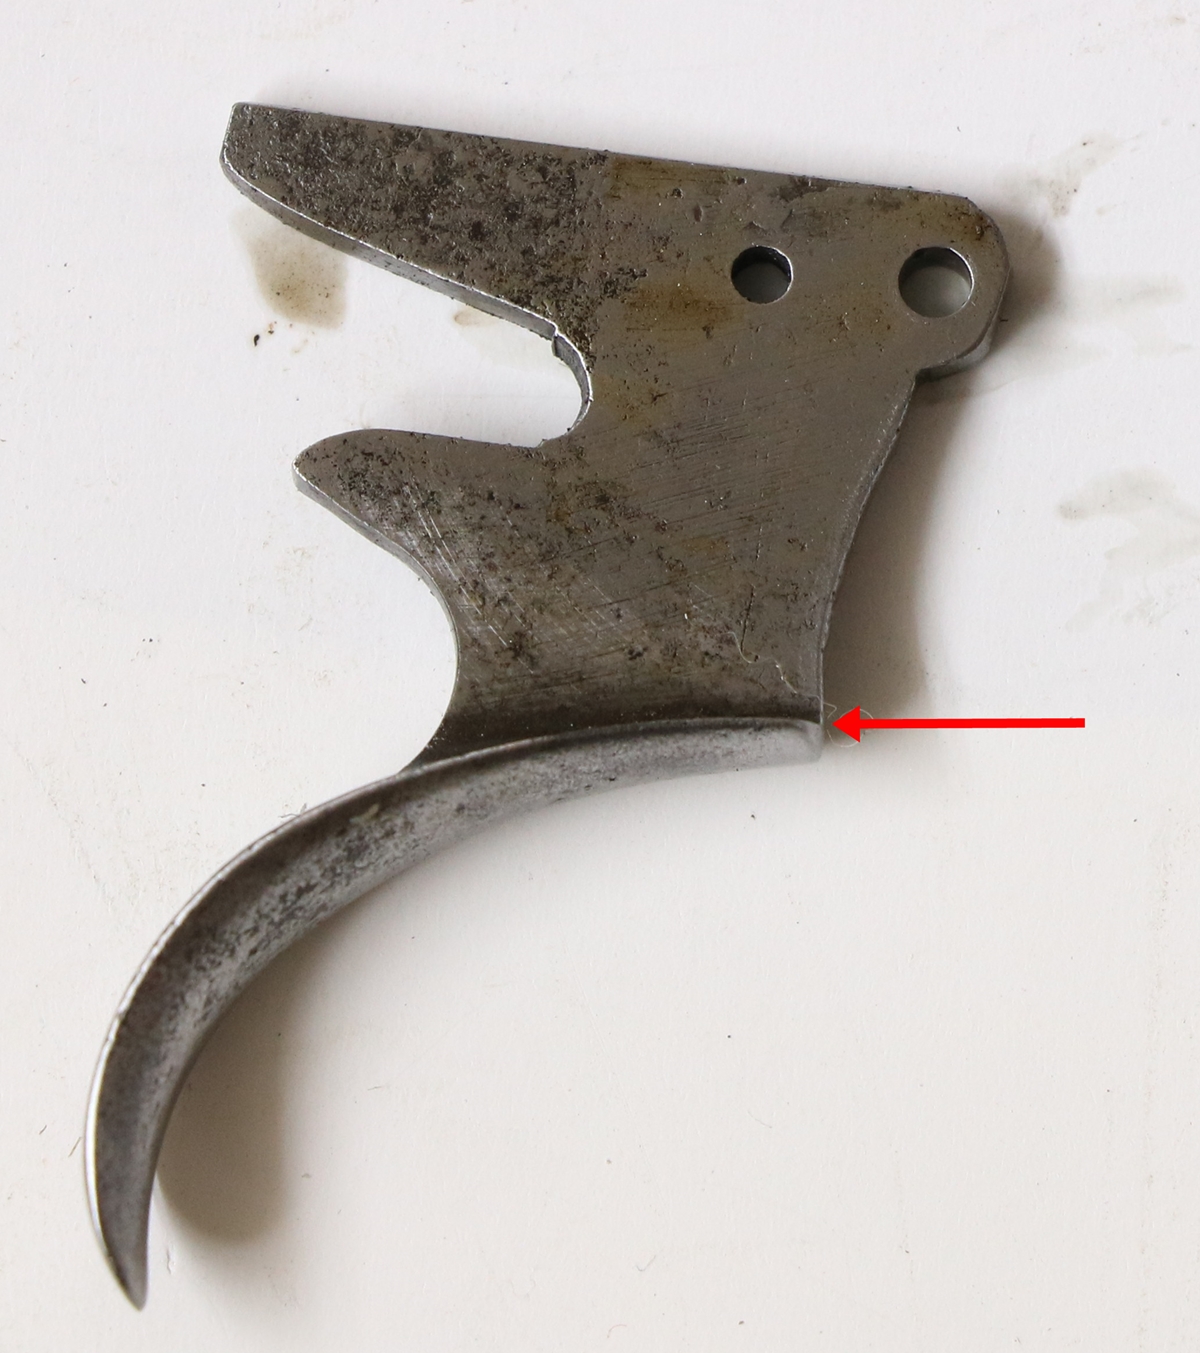
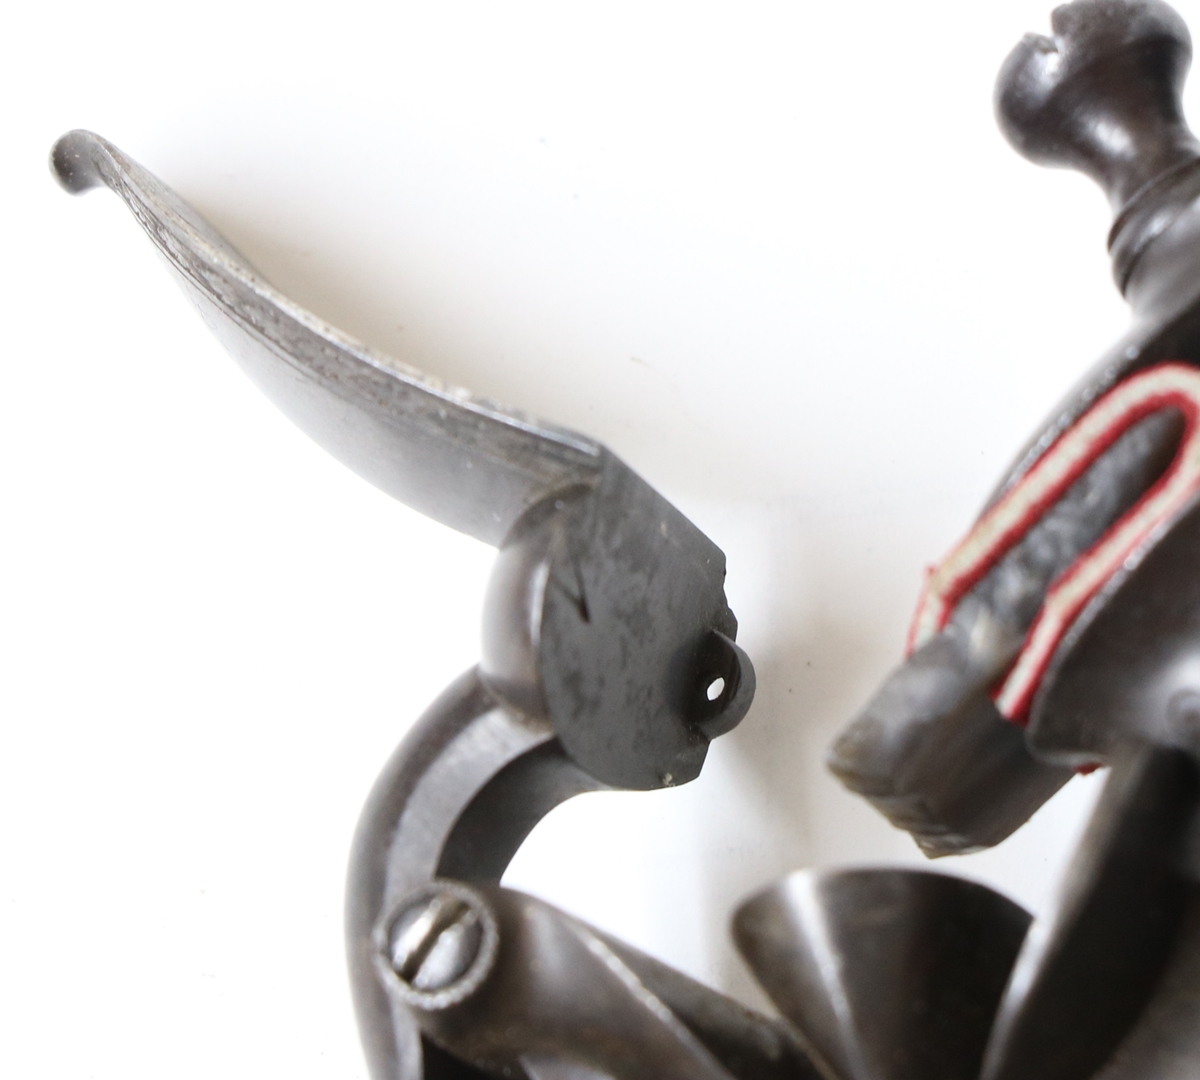
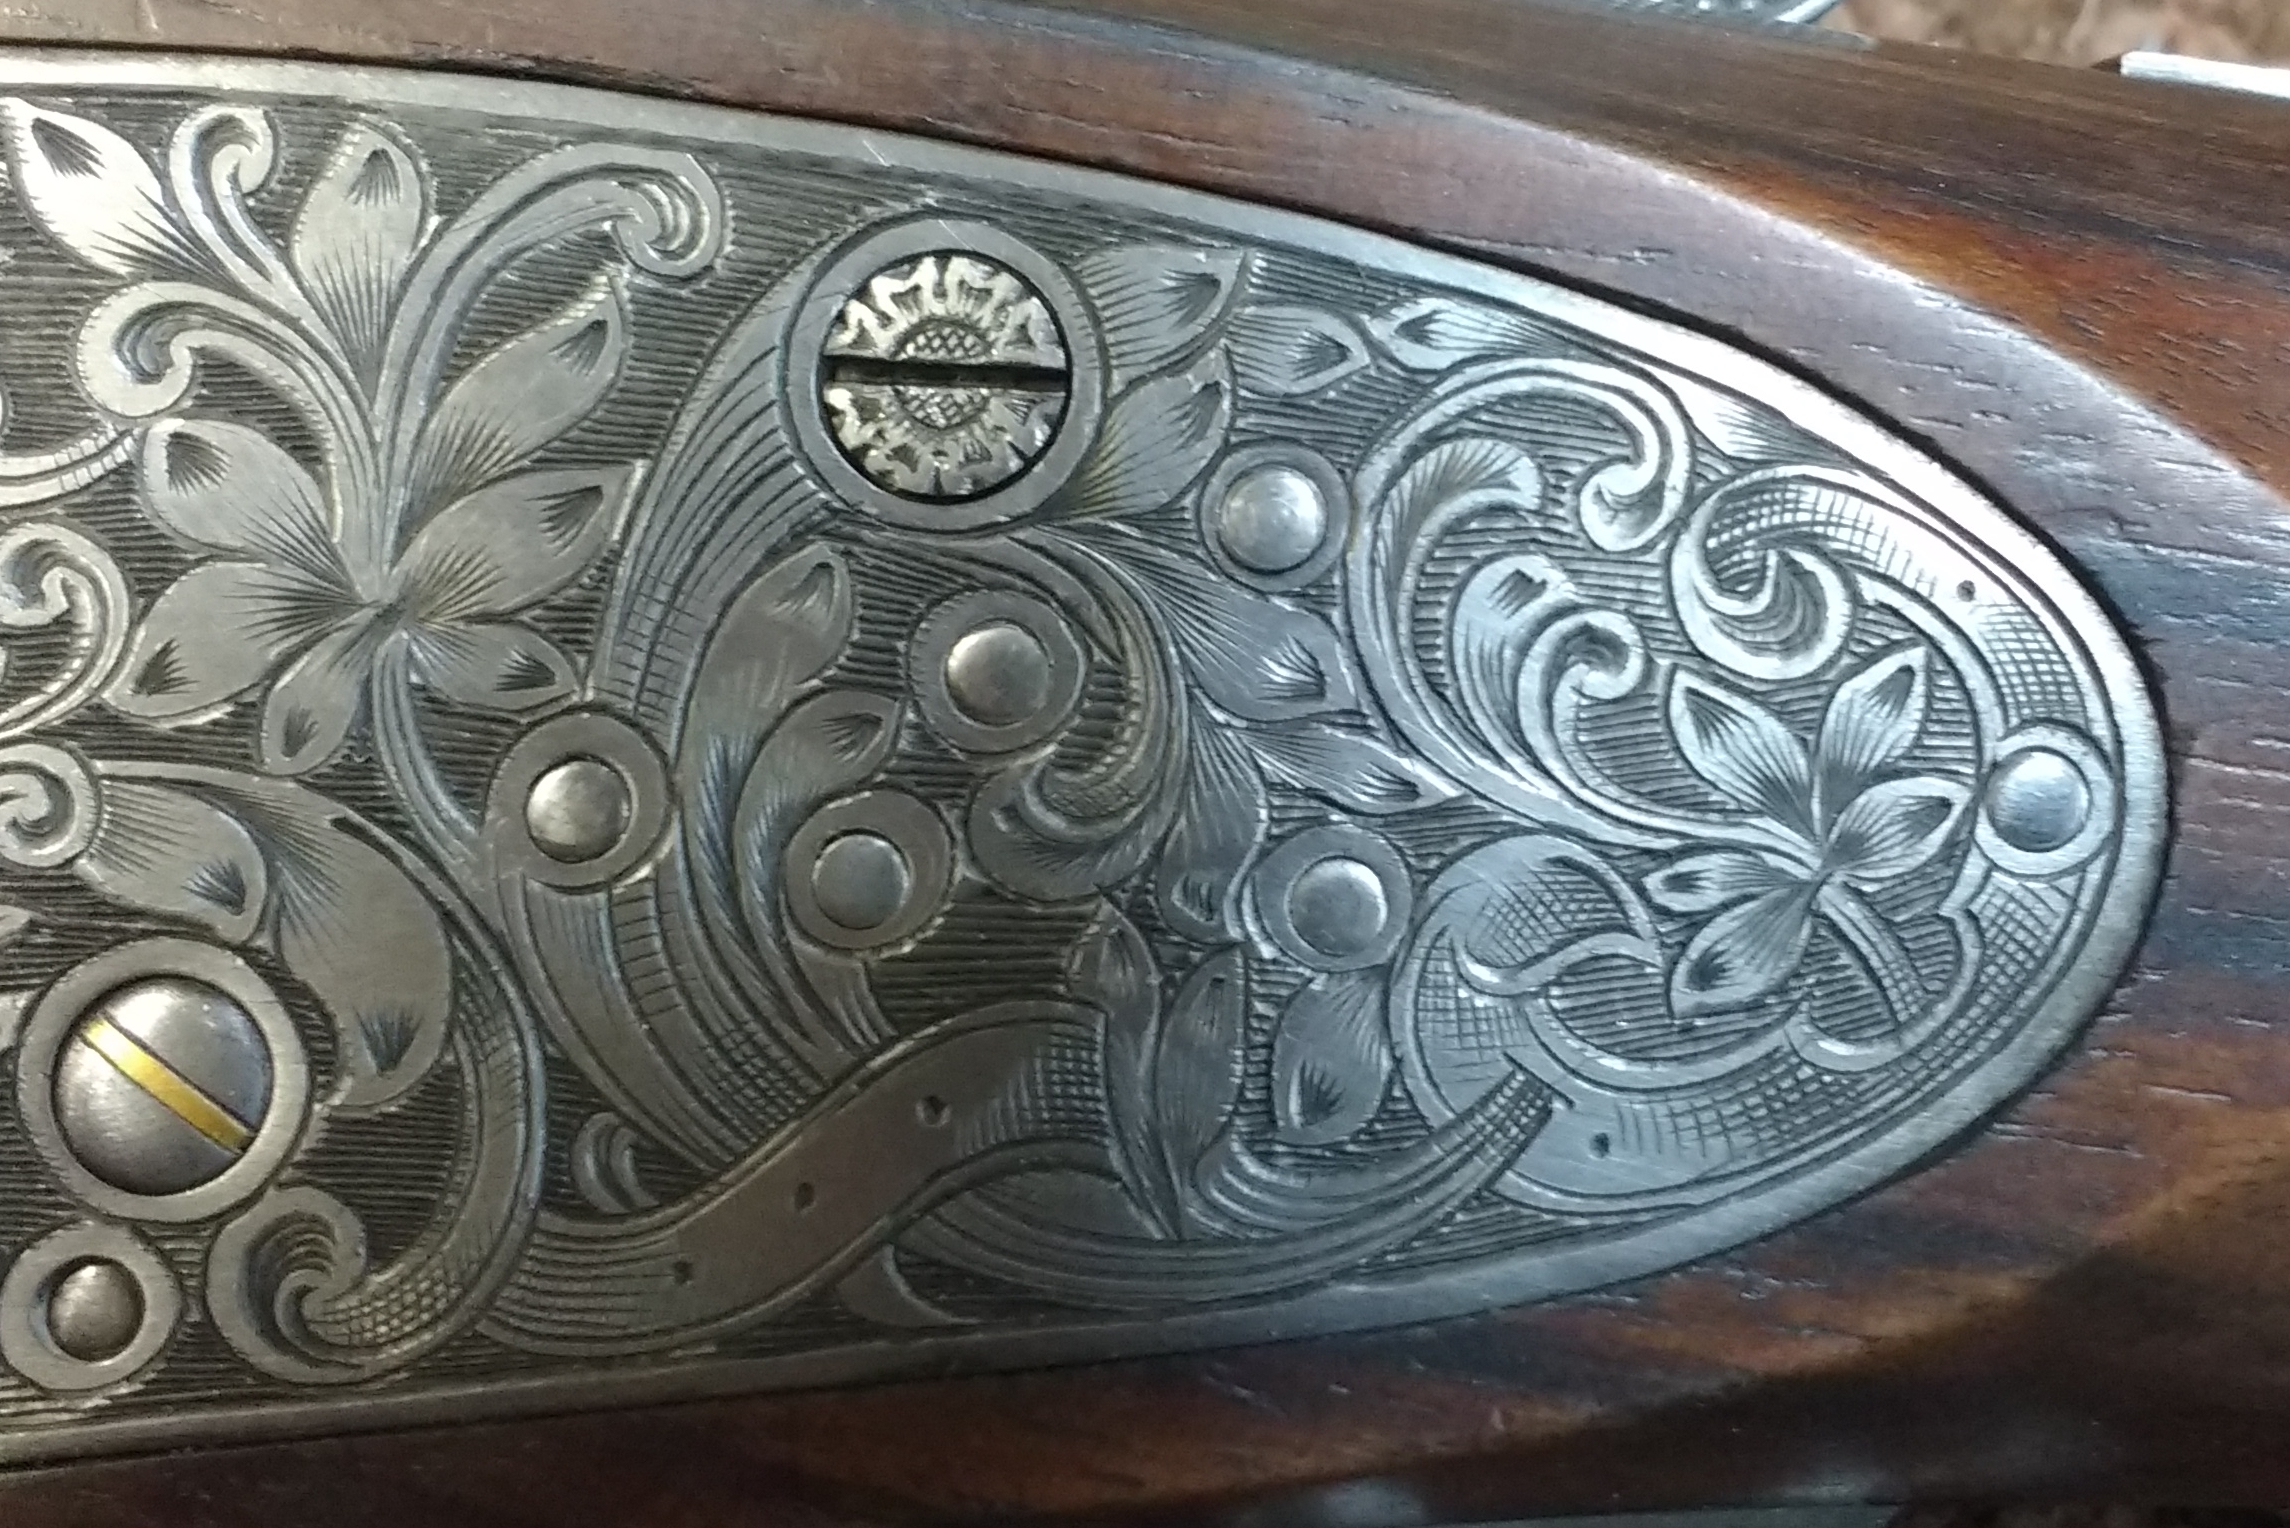
looks like a bit of rust on the safety!

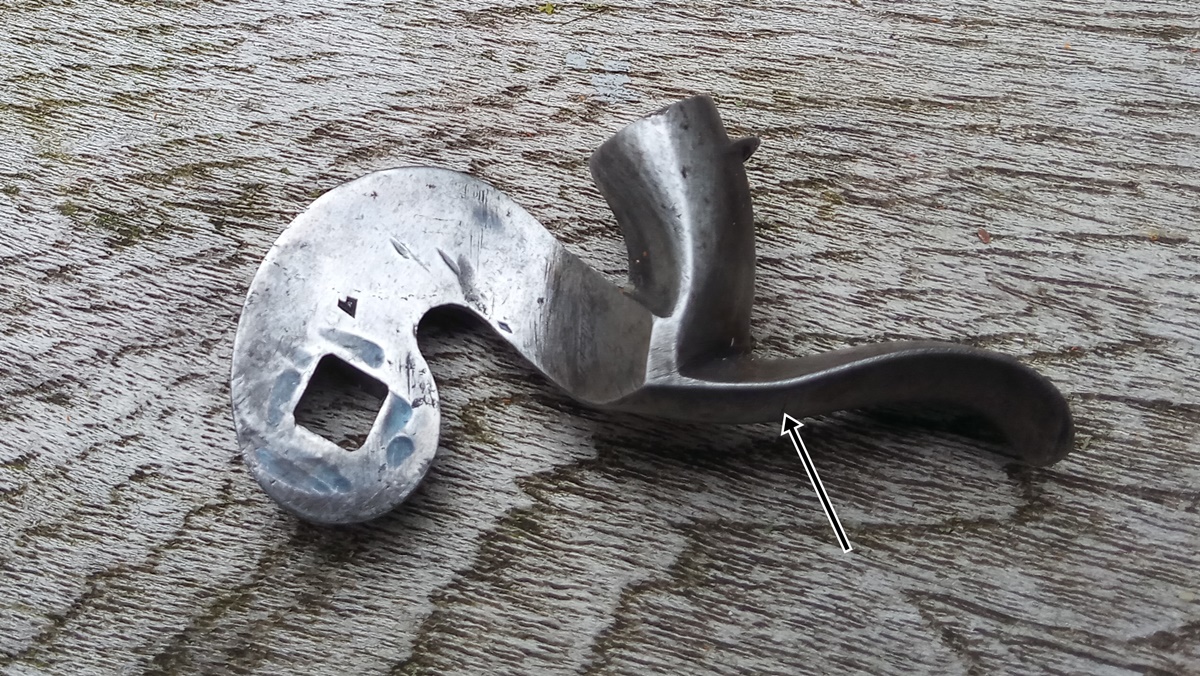
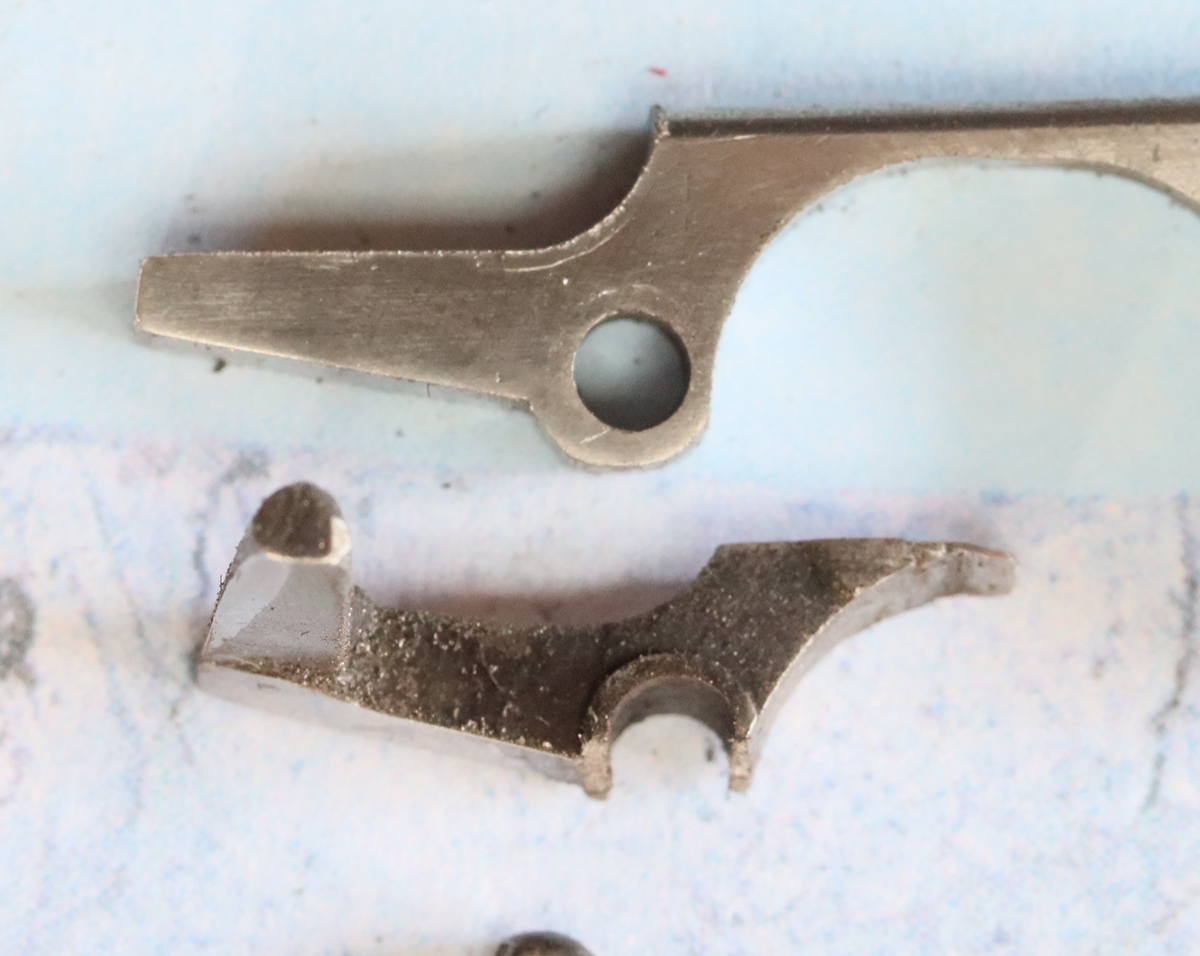
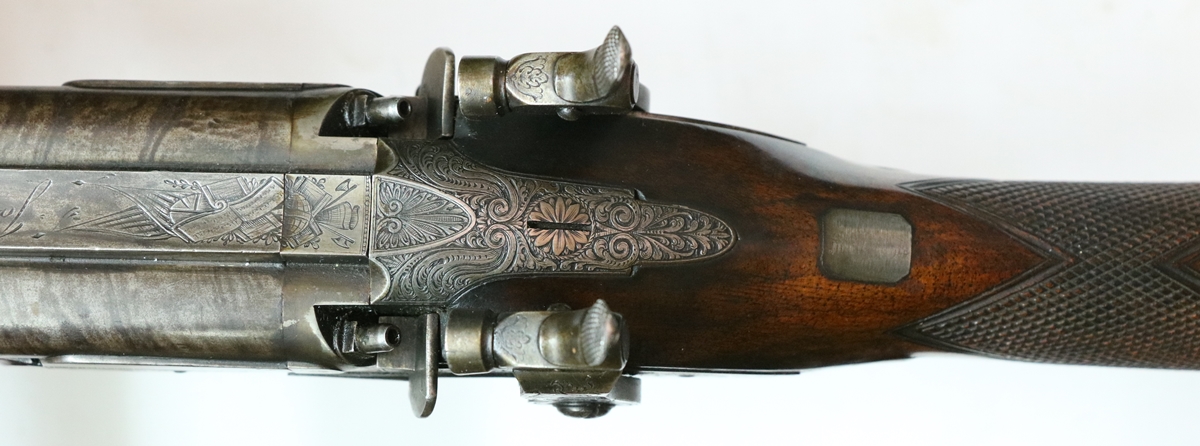
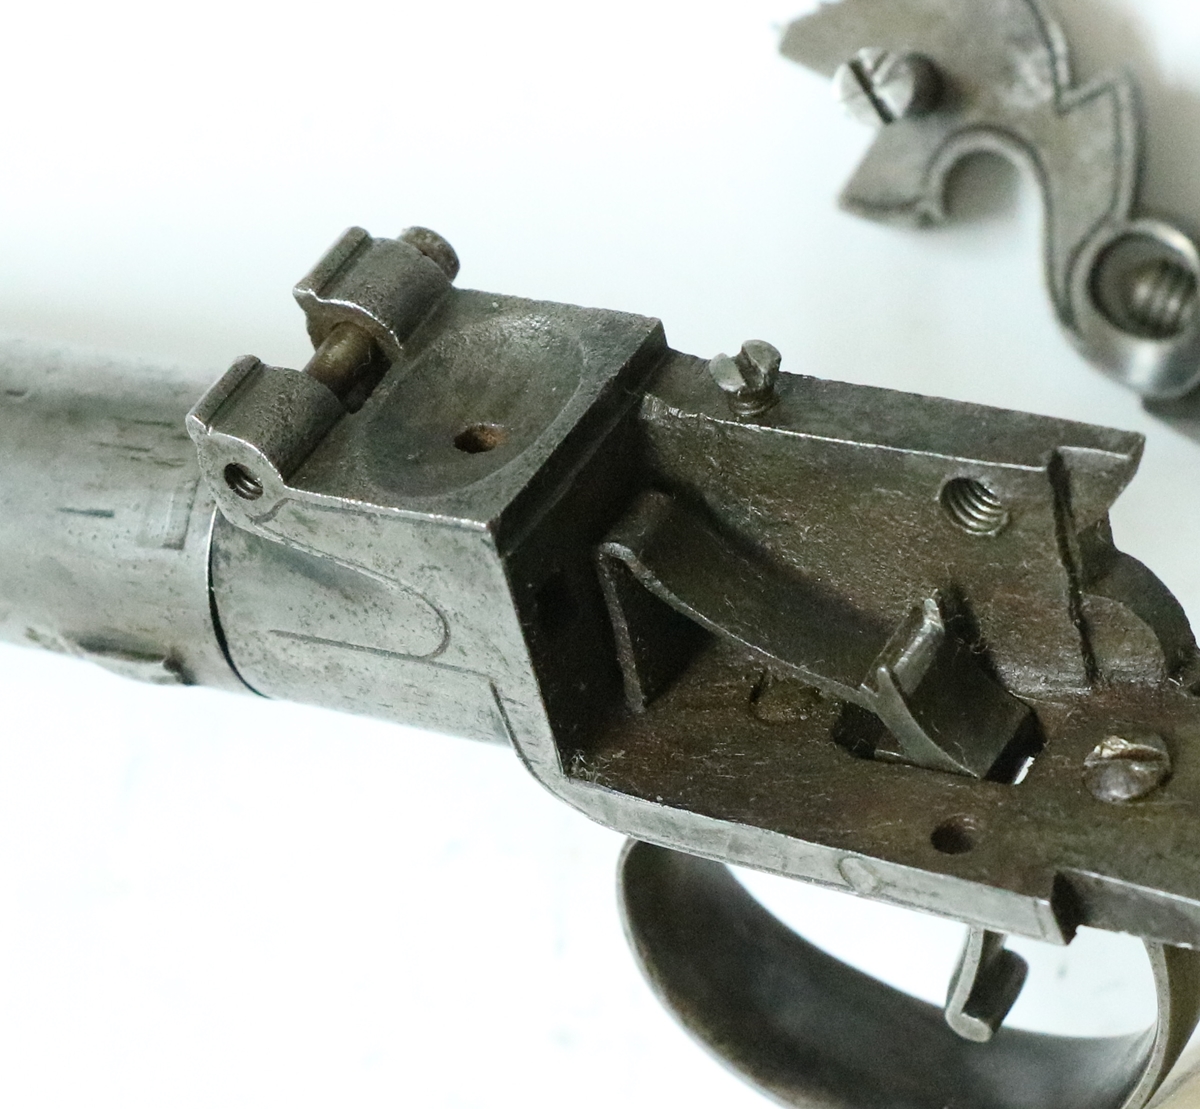
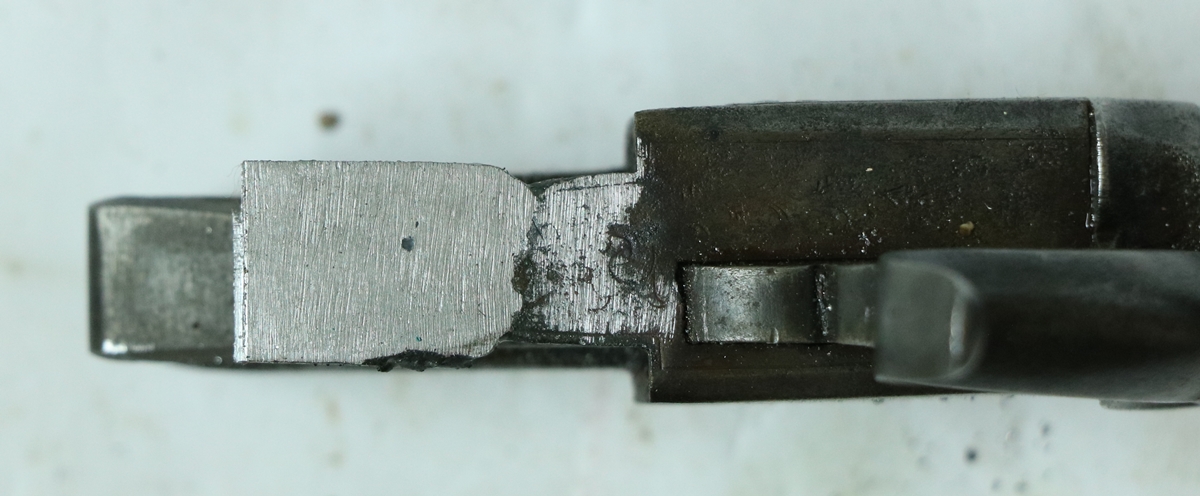
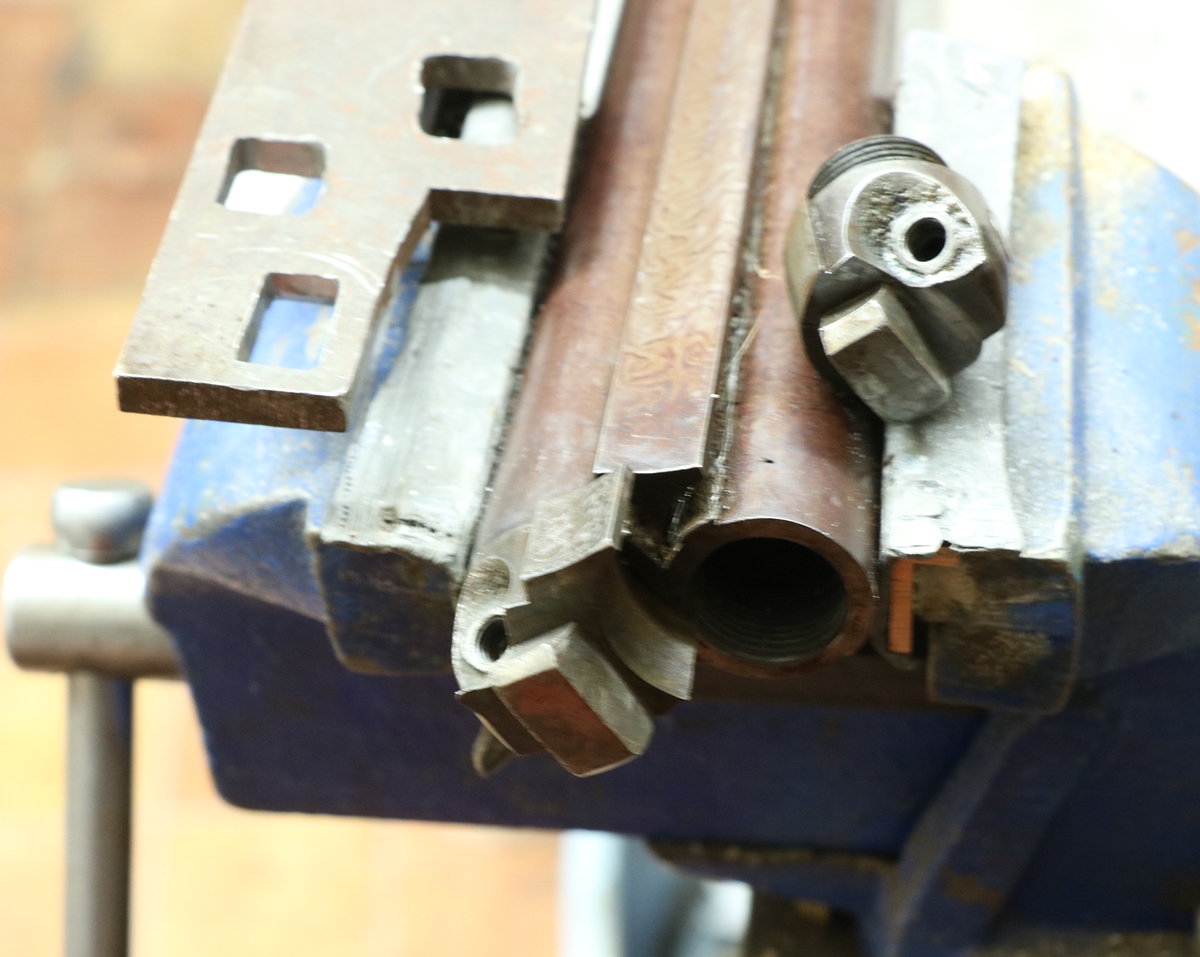
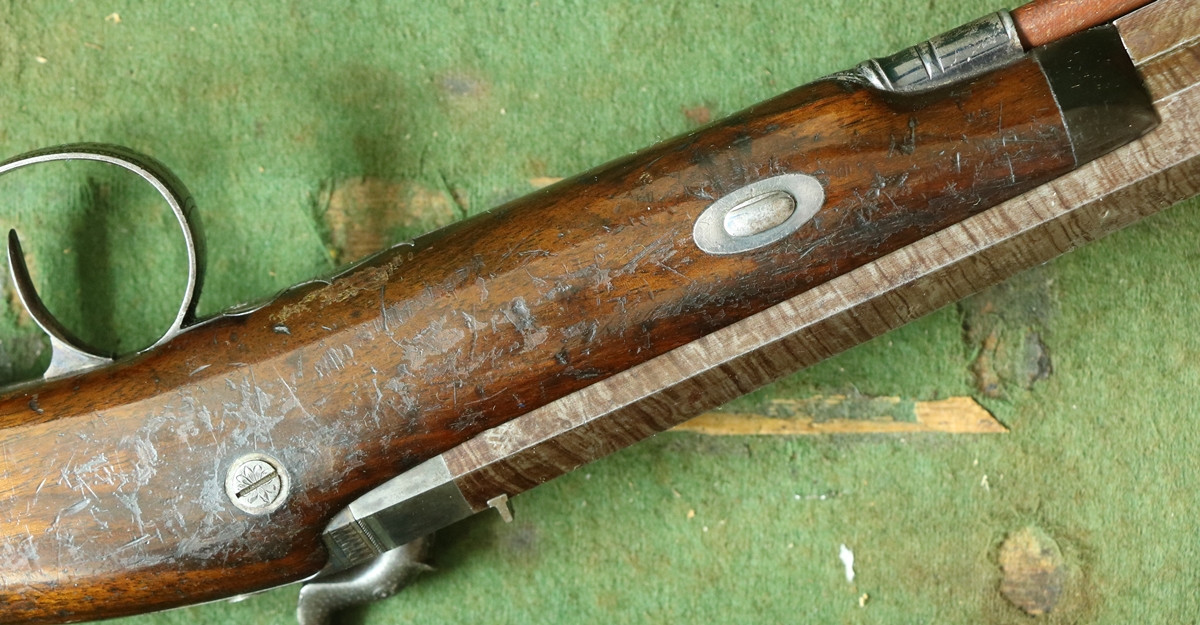
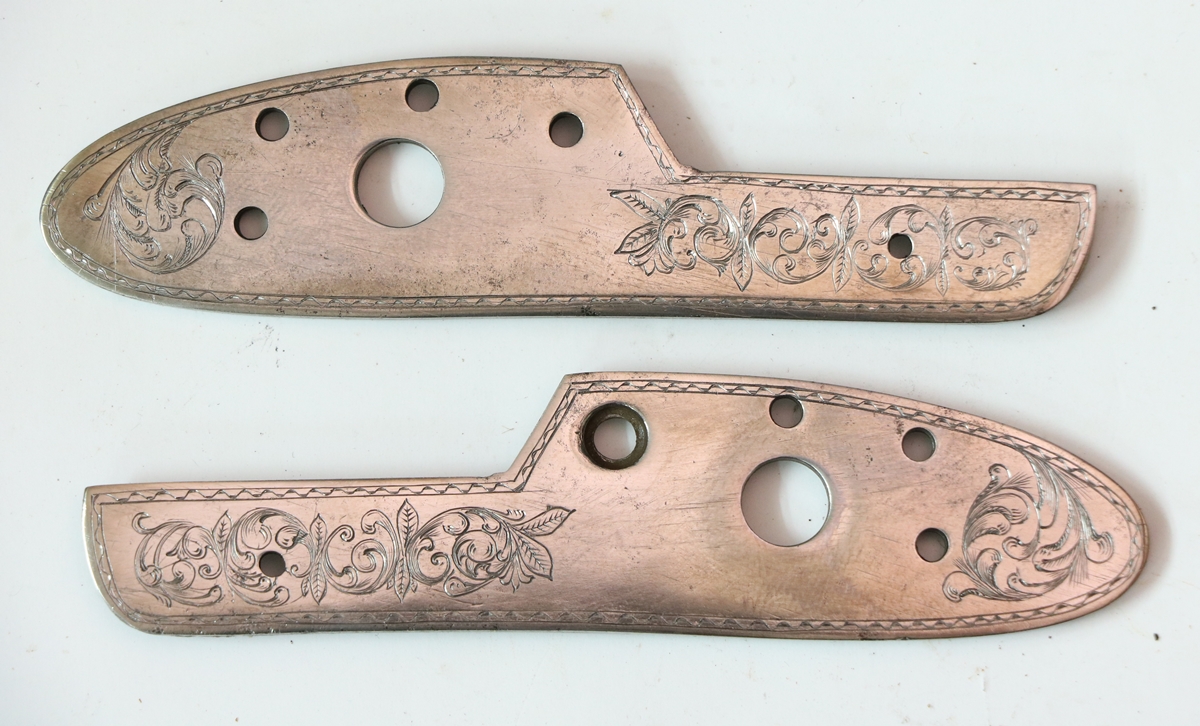
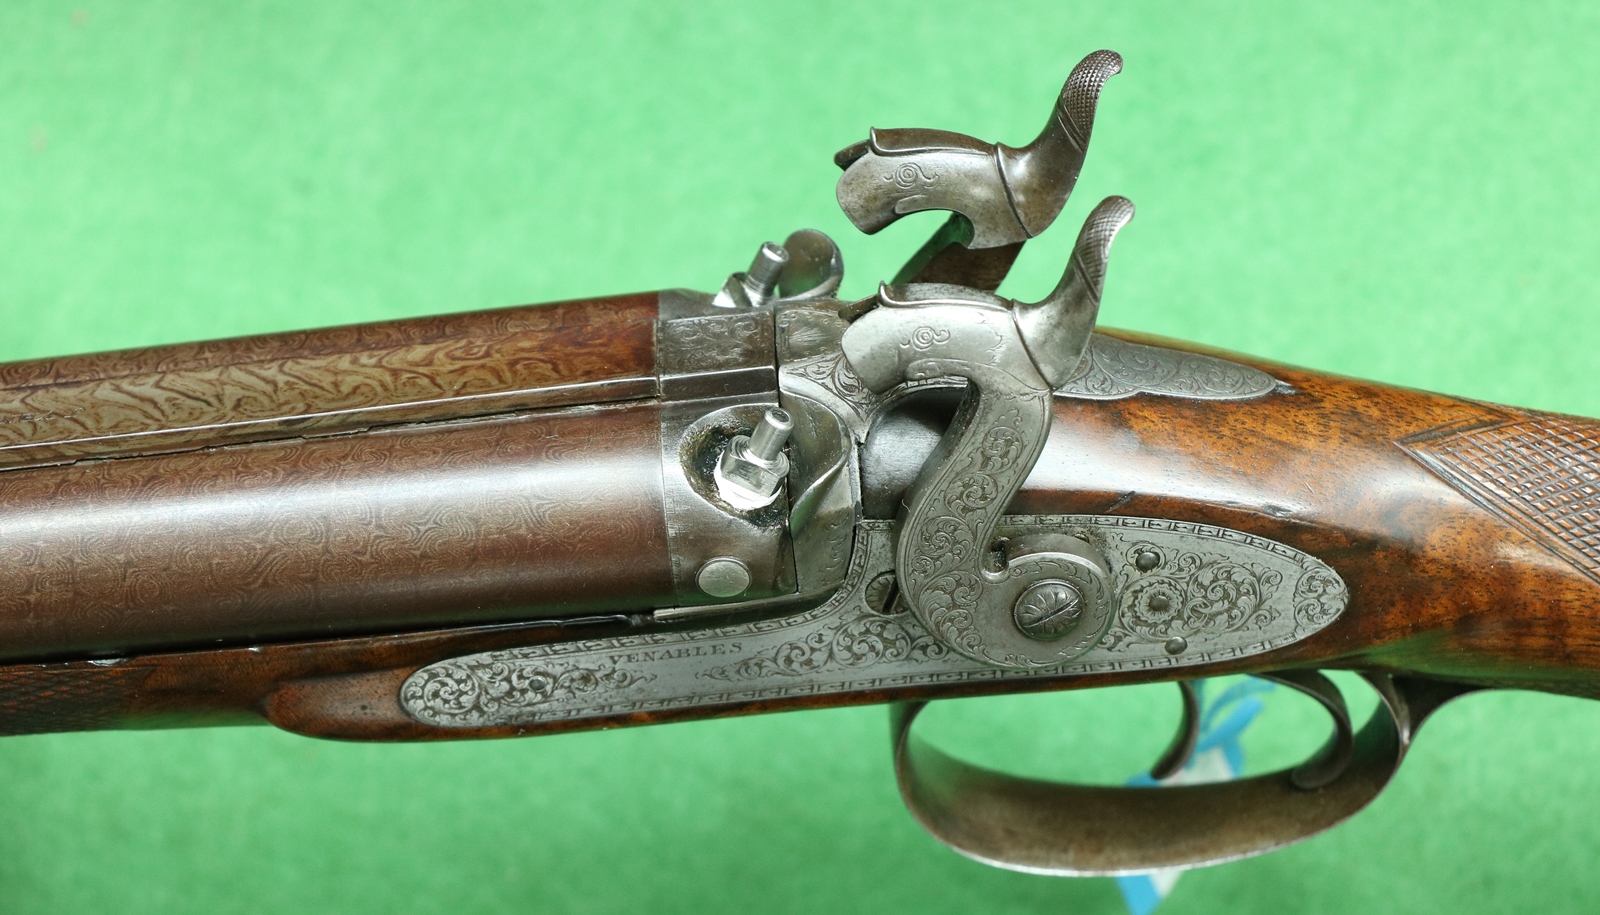
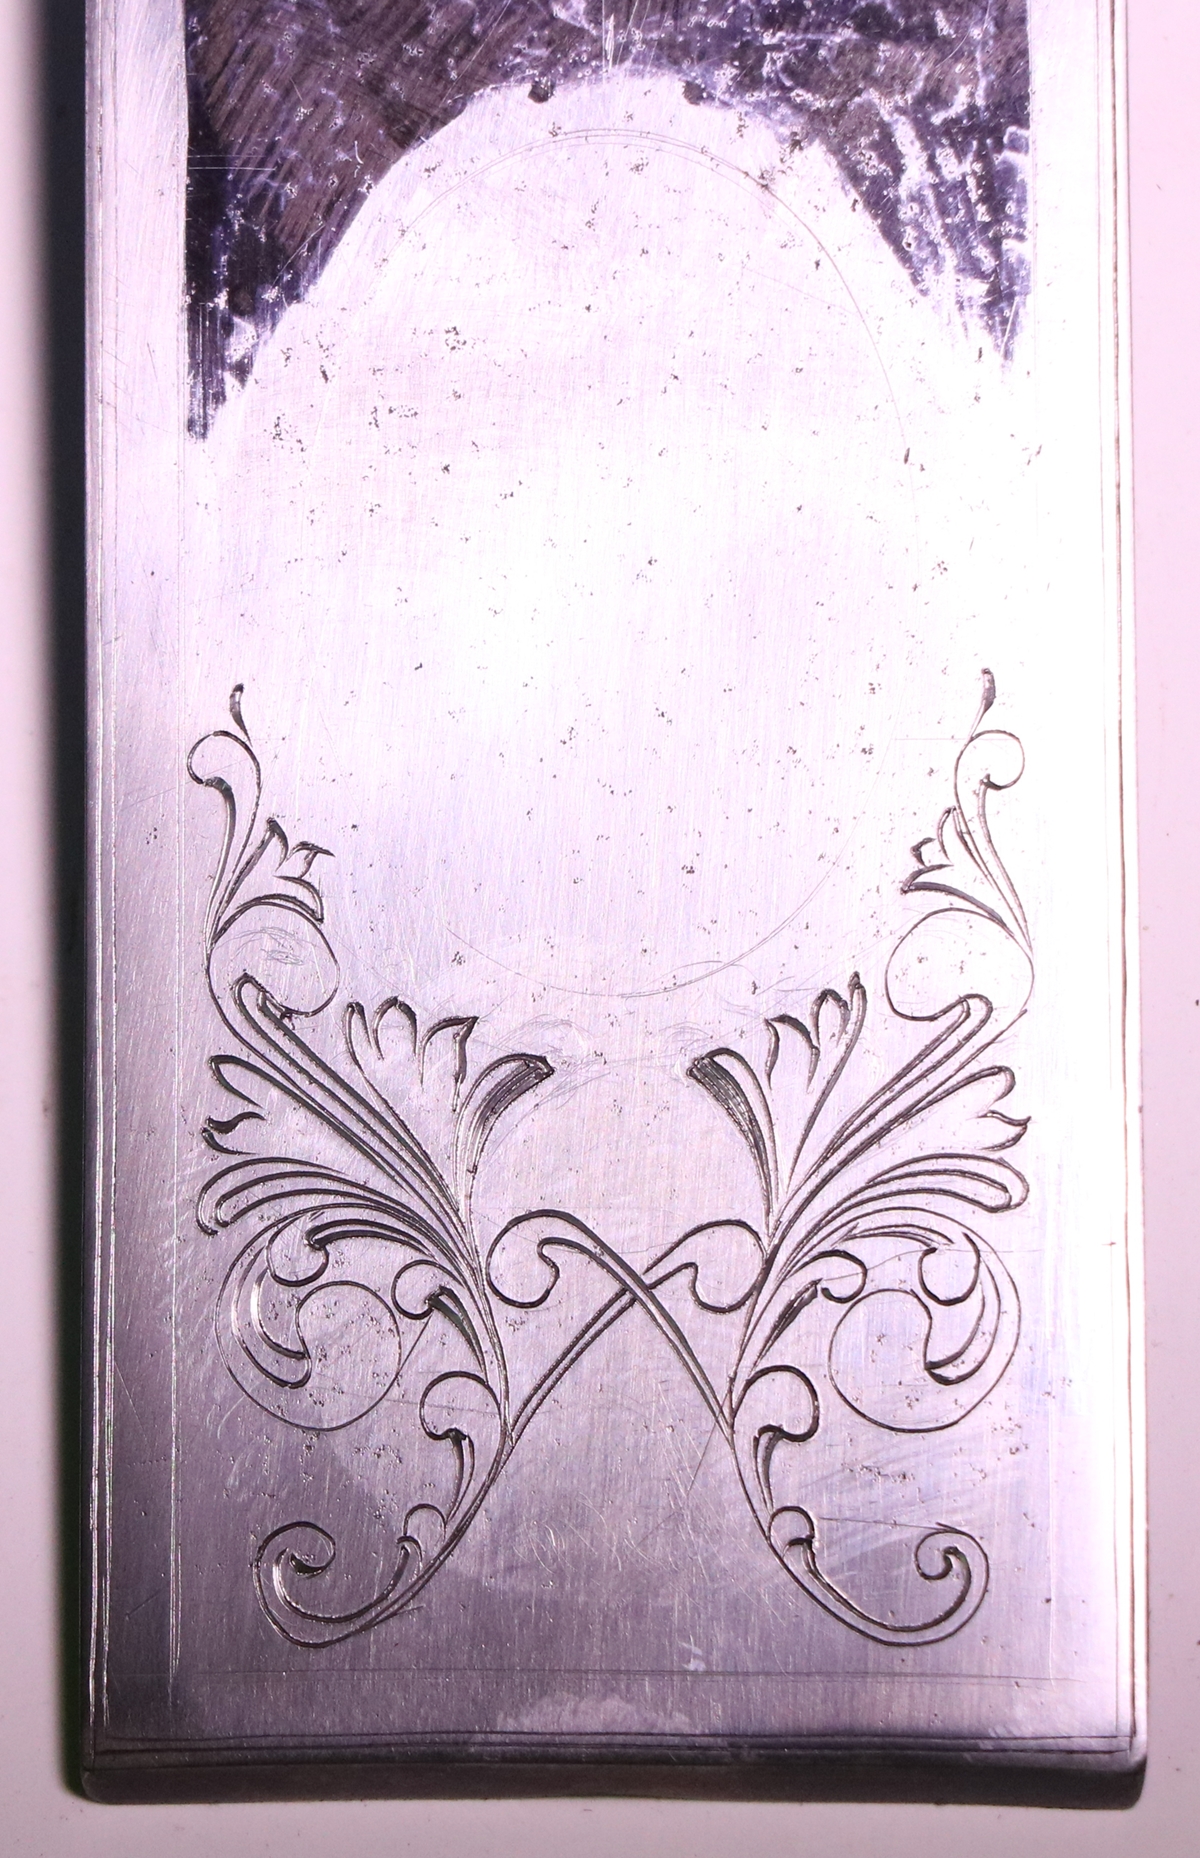
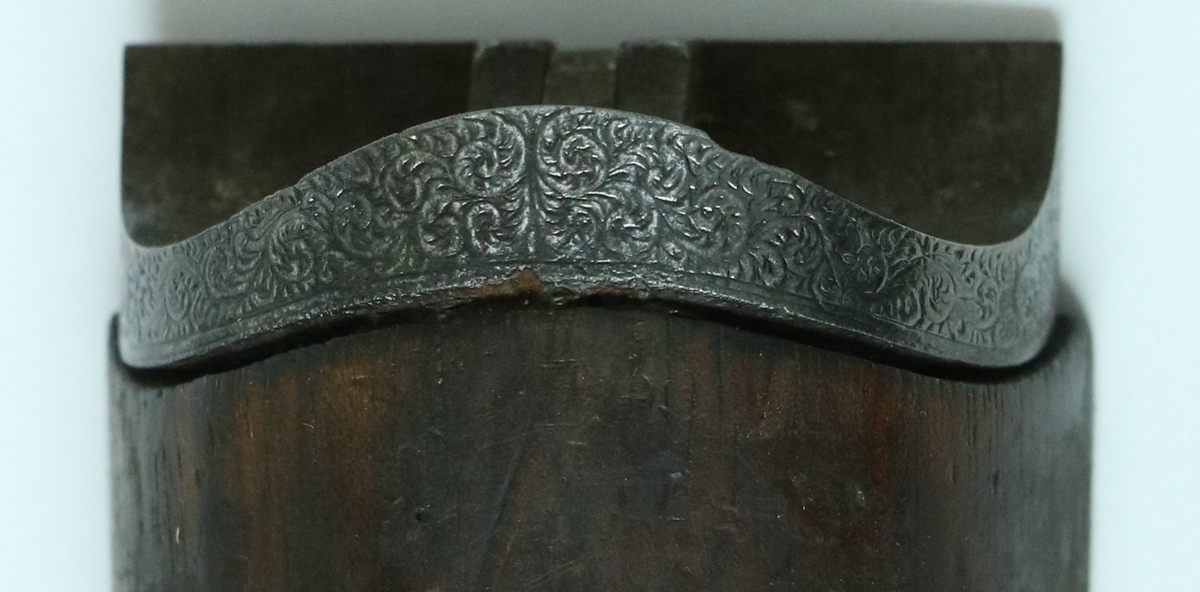
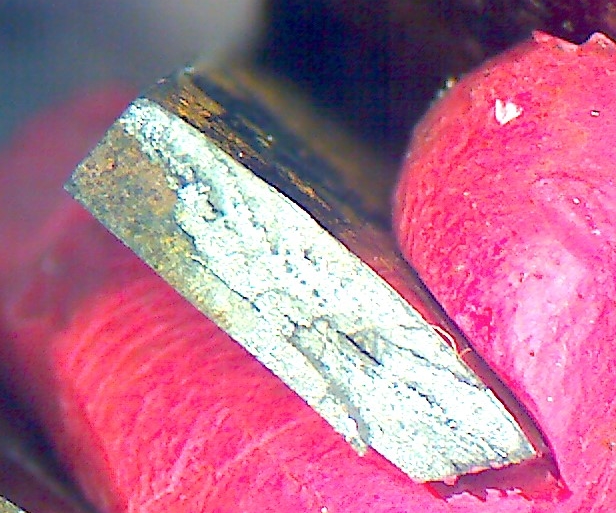
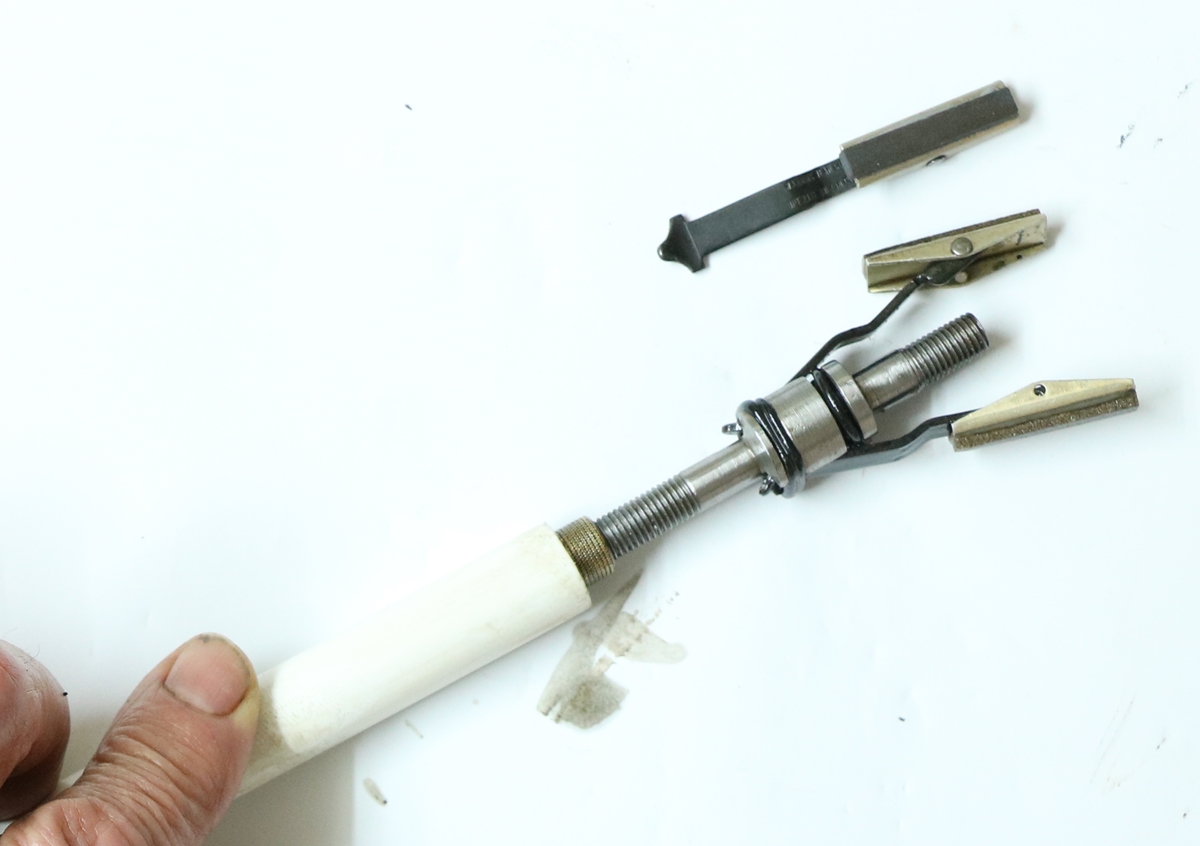
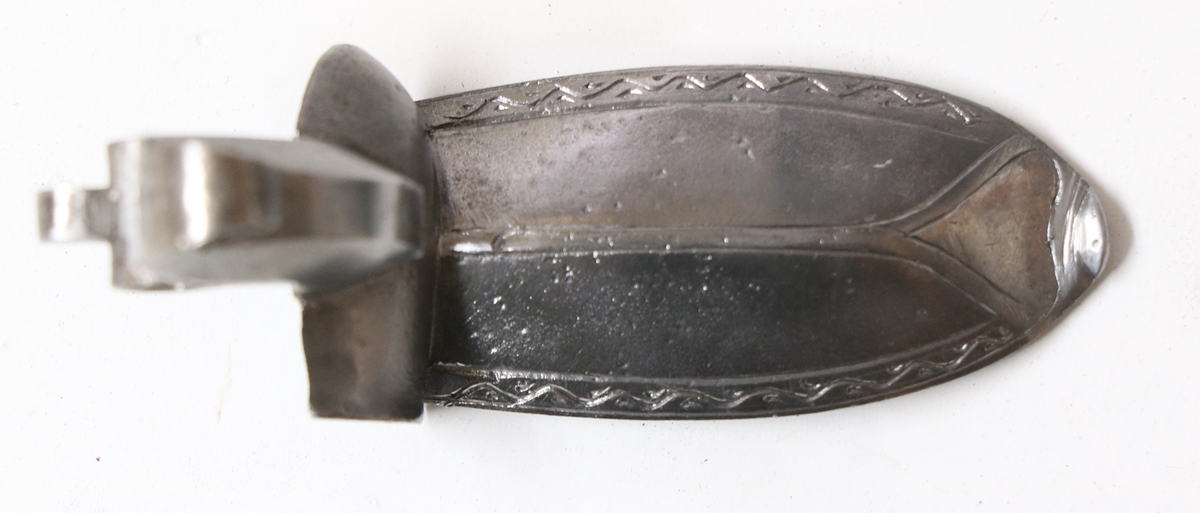
The safety catch spring sits over the V of the sear spring.

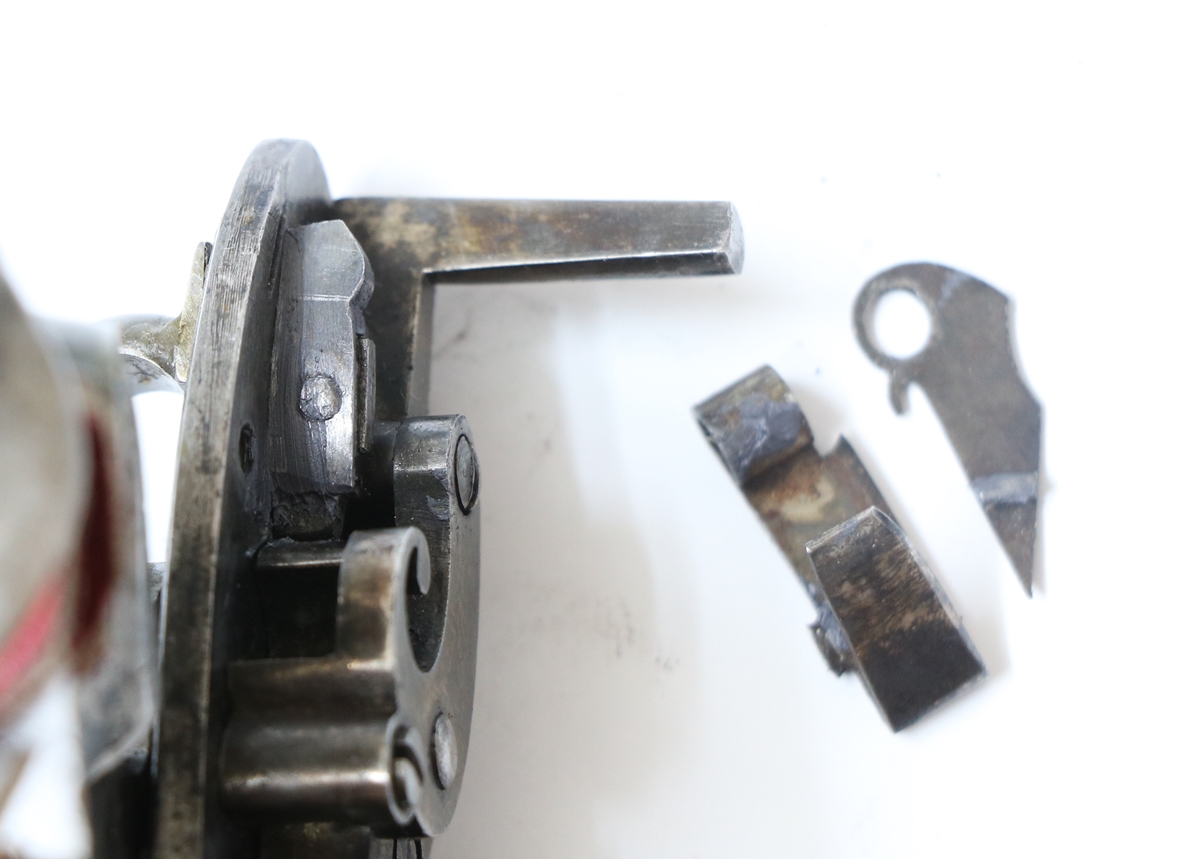
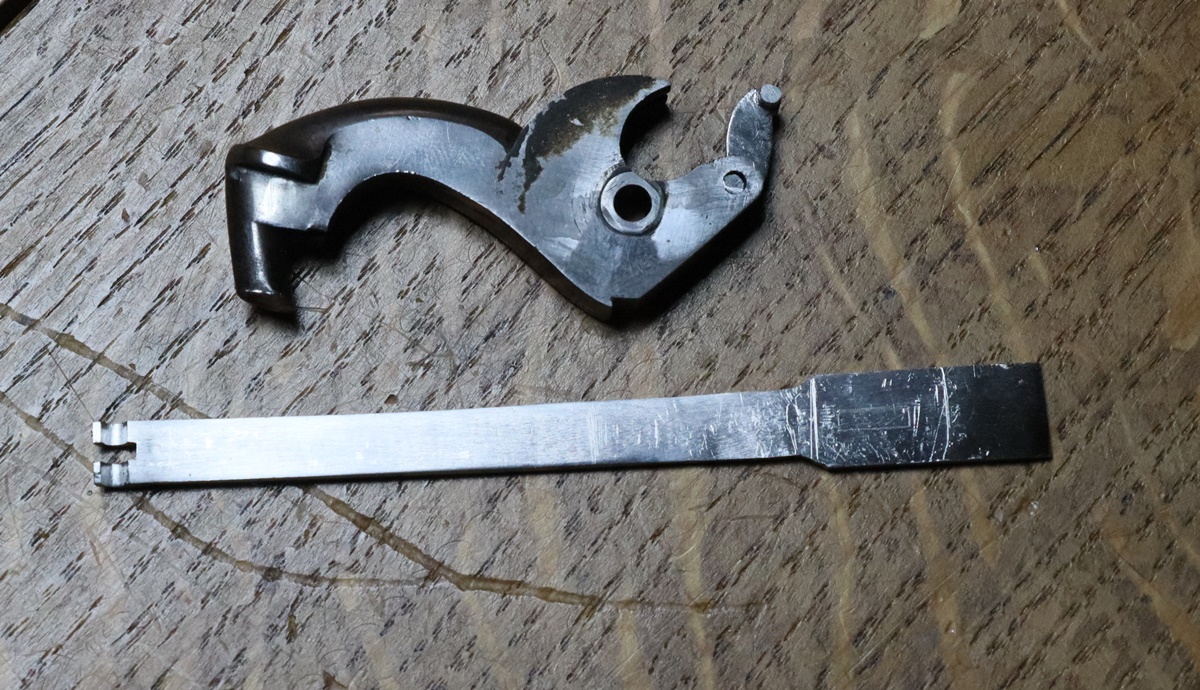
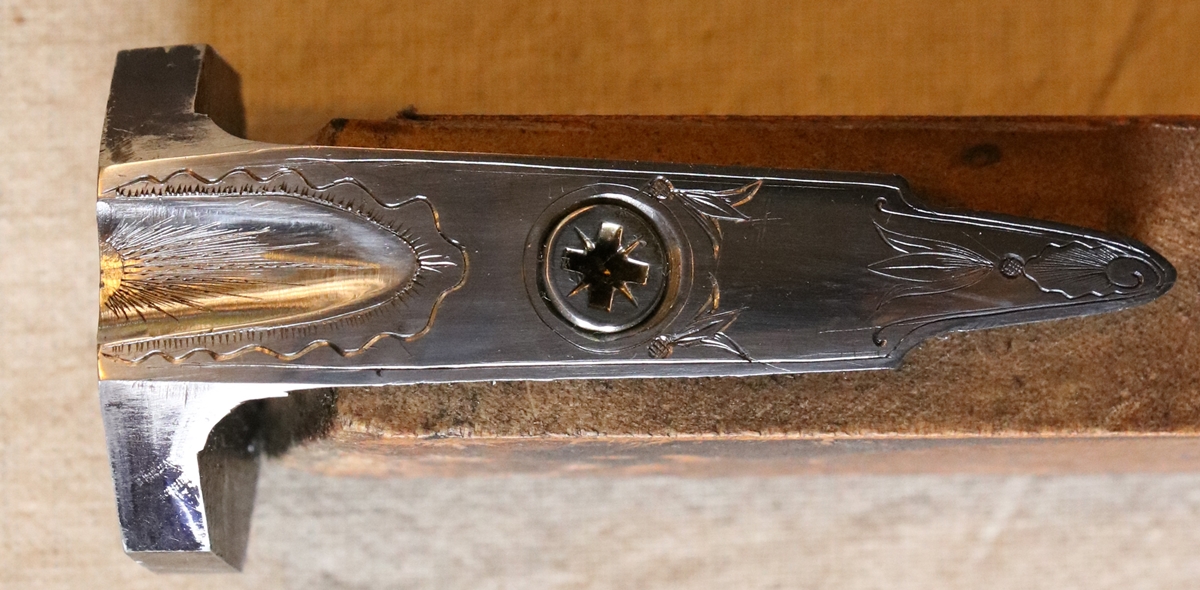
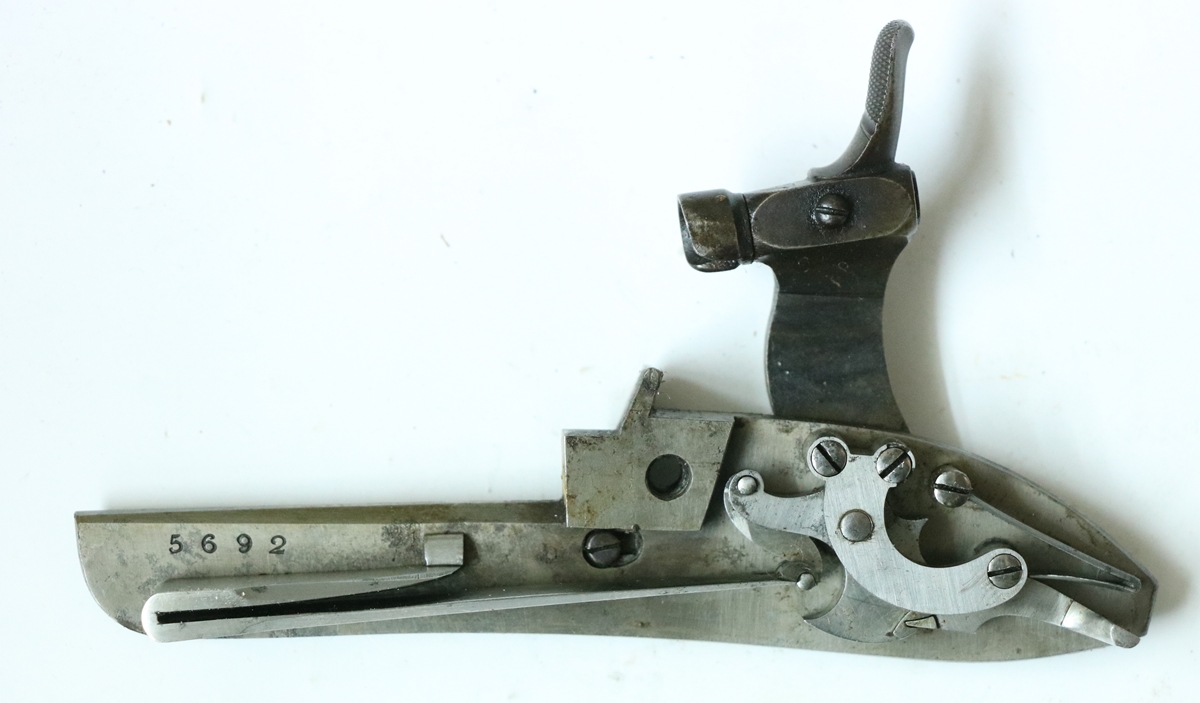
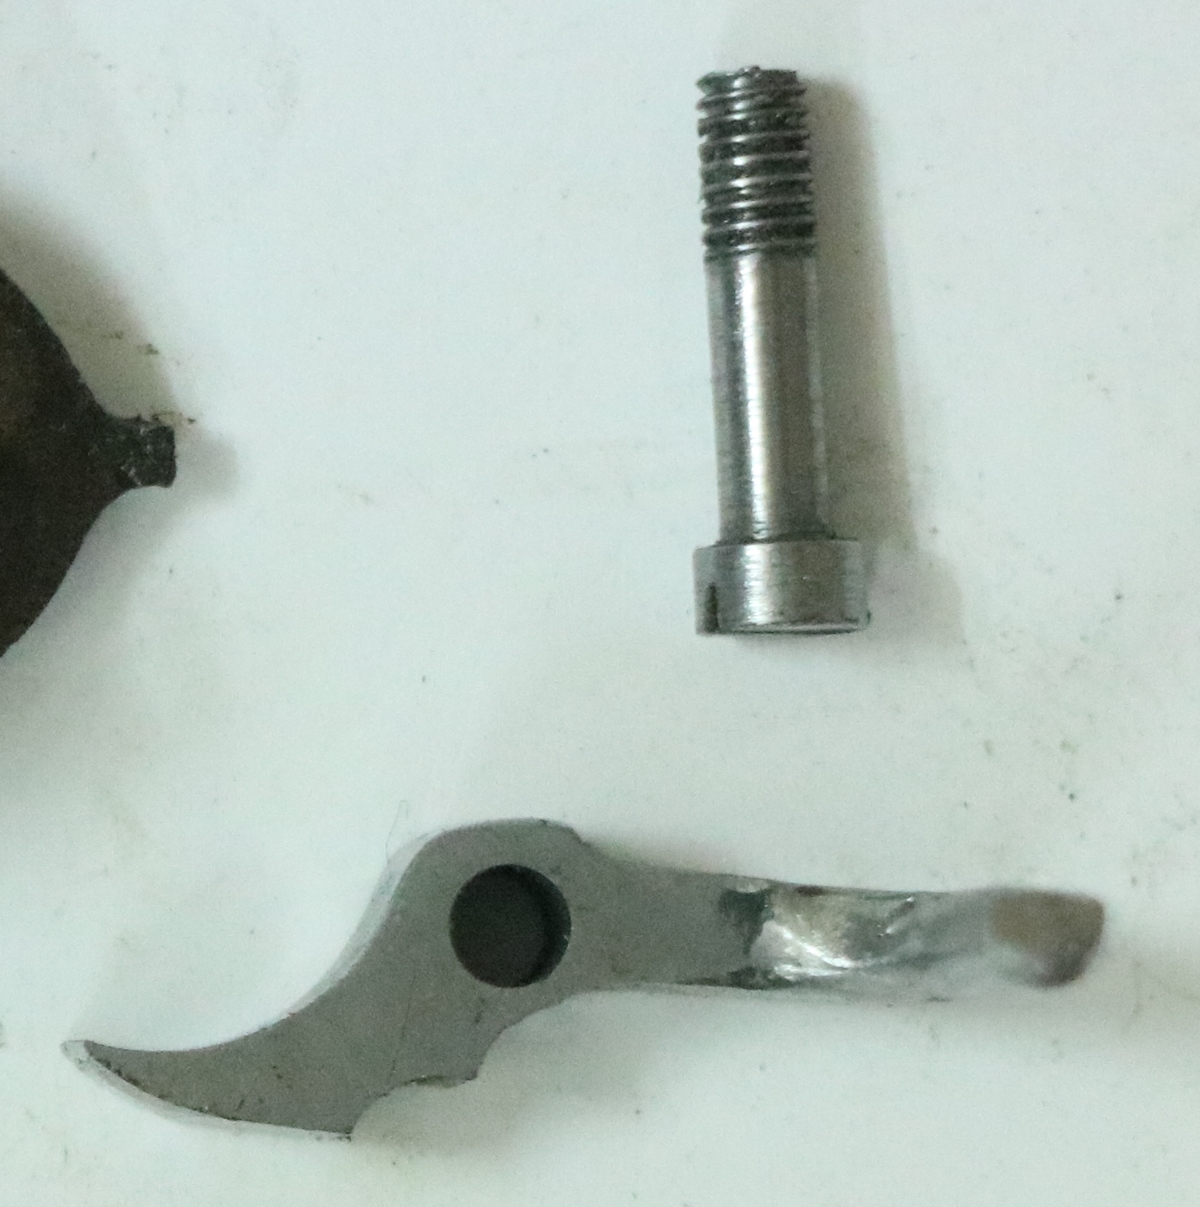
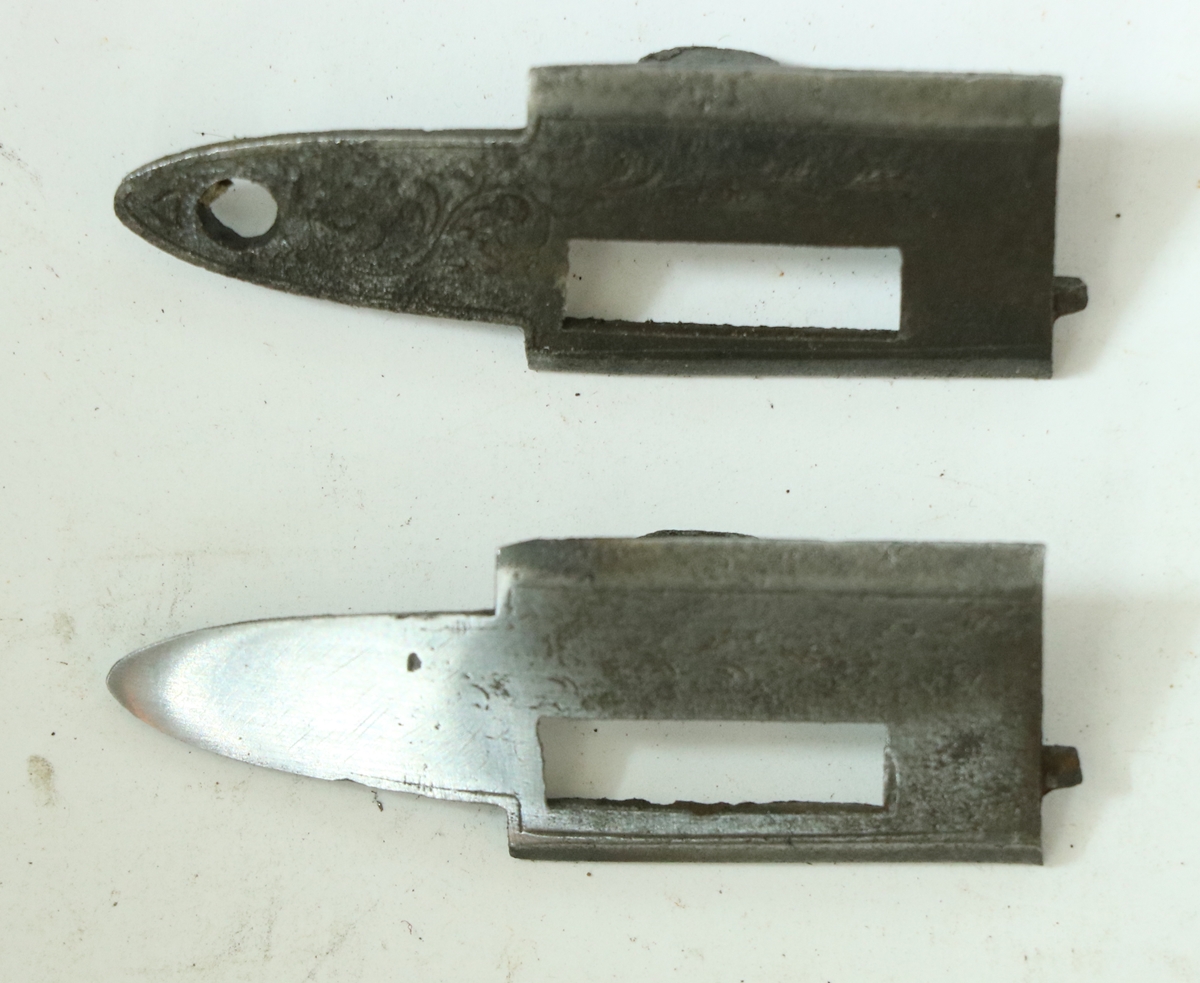
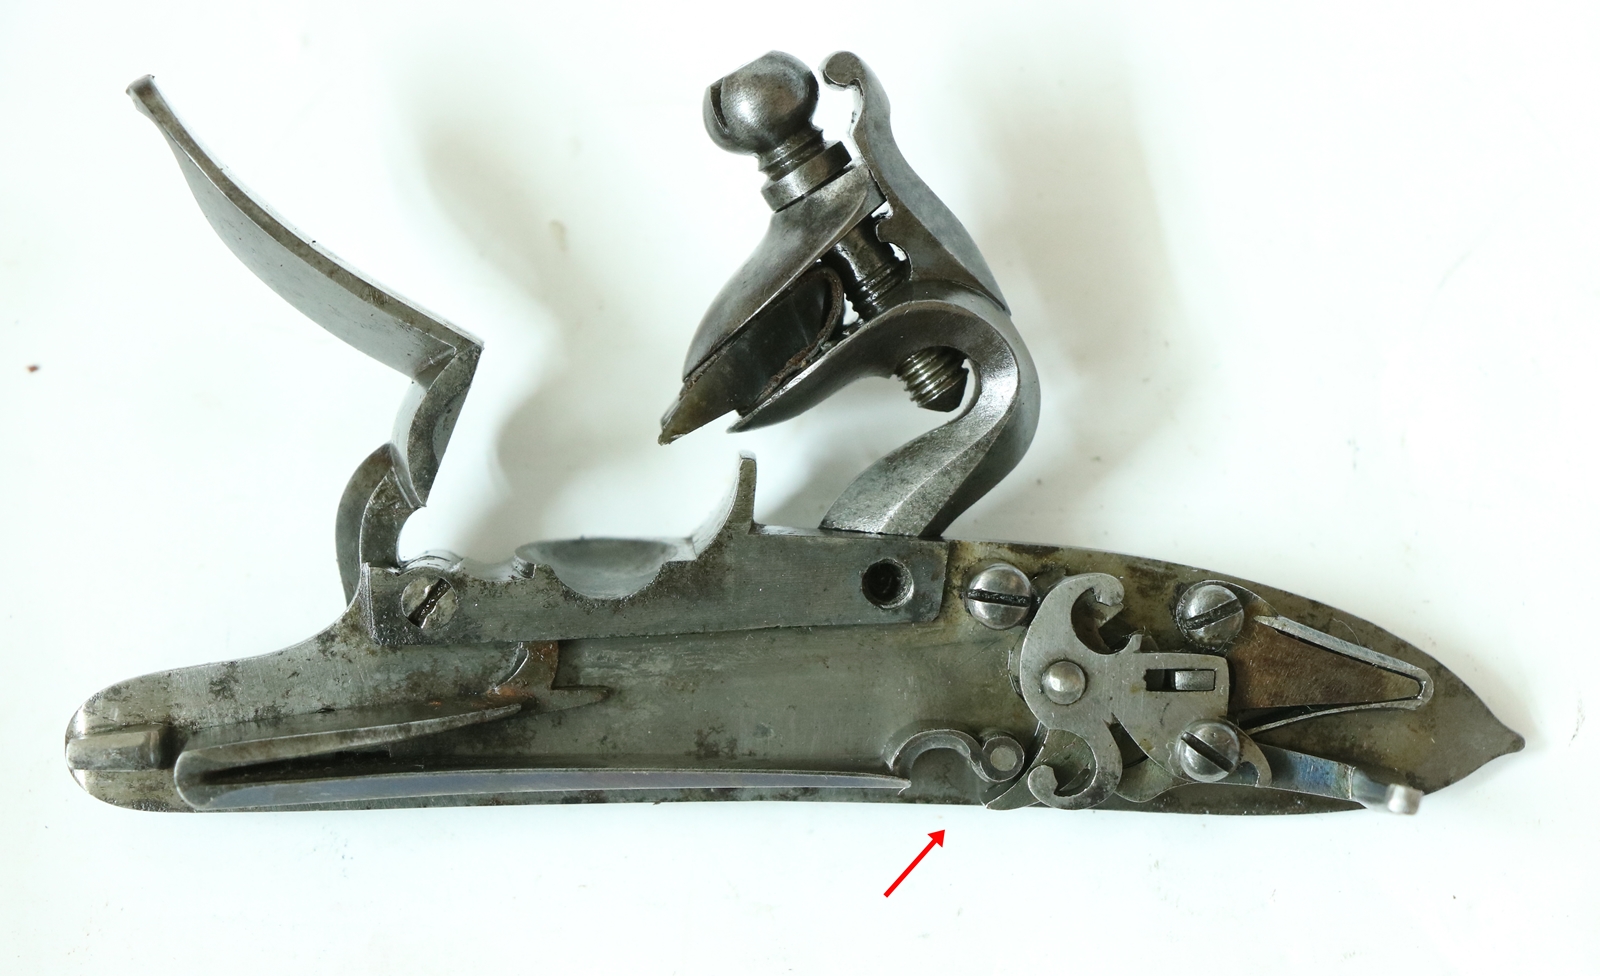
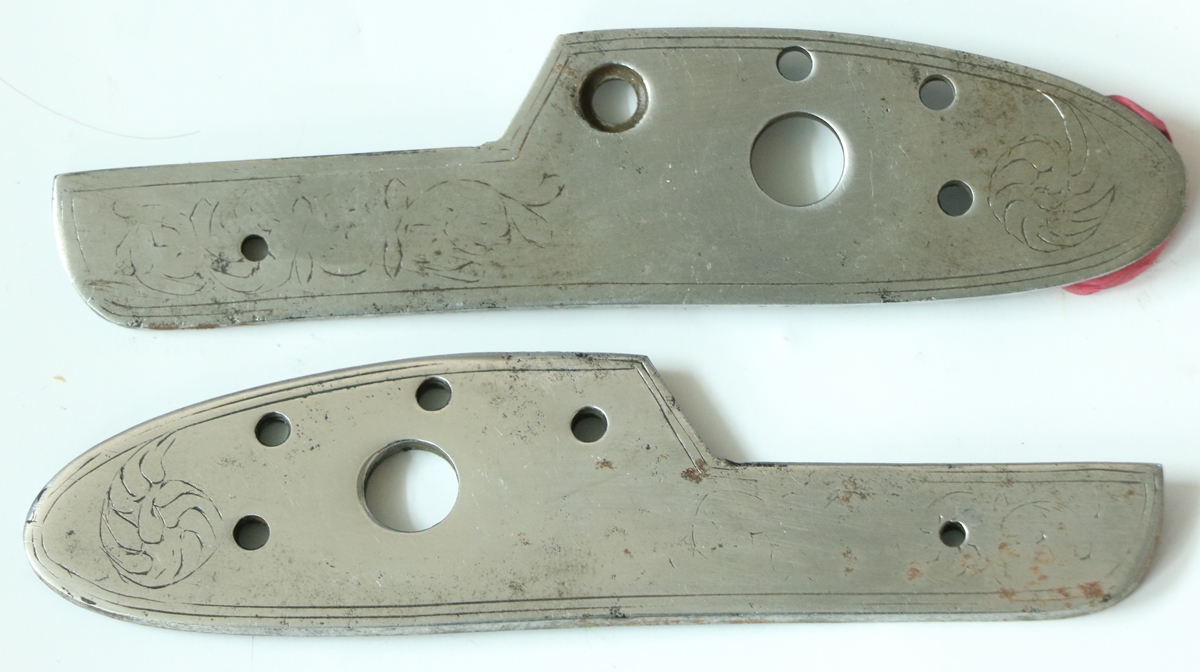
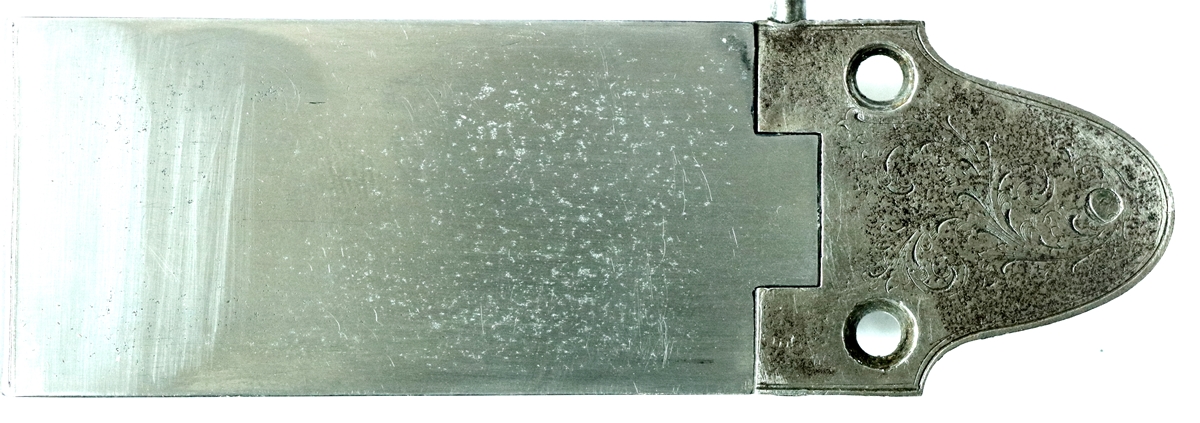
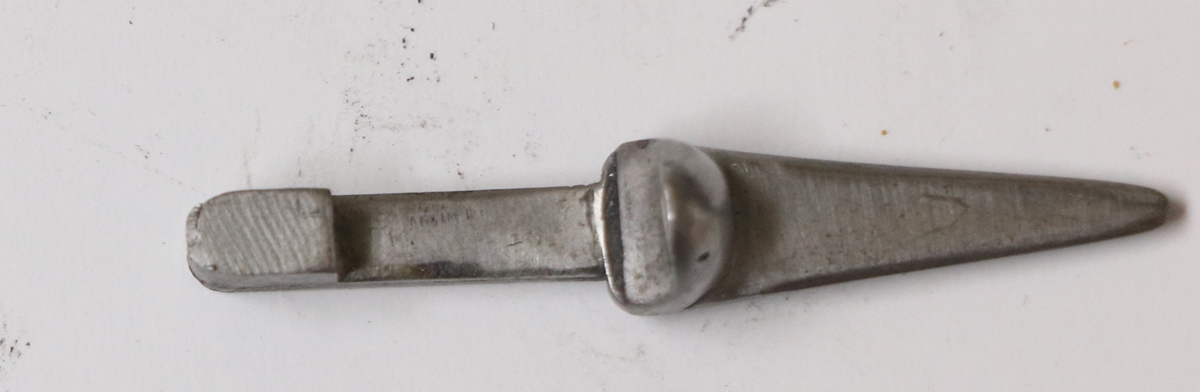
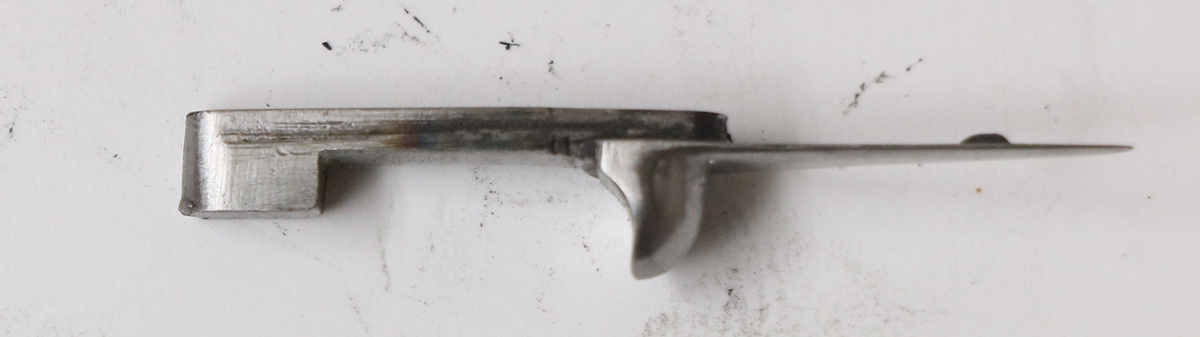
The bolt on the back of the slider is held by the pin you can see. The tail of the bolt is shaped as a detente for the spring.

The next example will have to wait – I’m exhaused by all the building work!
5th November – Went with Giles to take the cast iron bath (in 2 parts) to the skip, so we struggled to get it out of the flat and down the stairs on the stair climbing sack barrow and just managed between us to lift it into the land cruiser. At the dump we got it out, and one of the dump men came and gave Giles a hand getting it up the steps to the skip – I think he then decided we were wimps because he then picked up the second half, put it on his shoulder and took it up to the skip and threw it in – we felt rather deflated at our pathetic attempts to lift it – office work doesn’t prepare you for heavy lifting. I was still a bit stiff from walking through thick gummy mud yesterday on the shoot with a Kg of mud on each boot – driving back I got bad cramp in my right leg – I had cruise control on but thought I might have difficulty braking in emergency – anyway a lay-by appeared before I panicked!
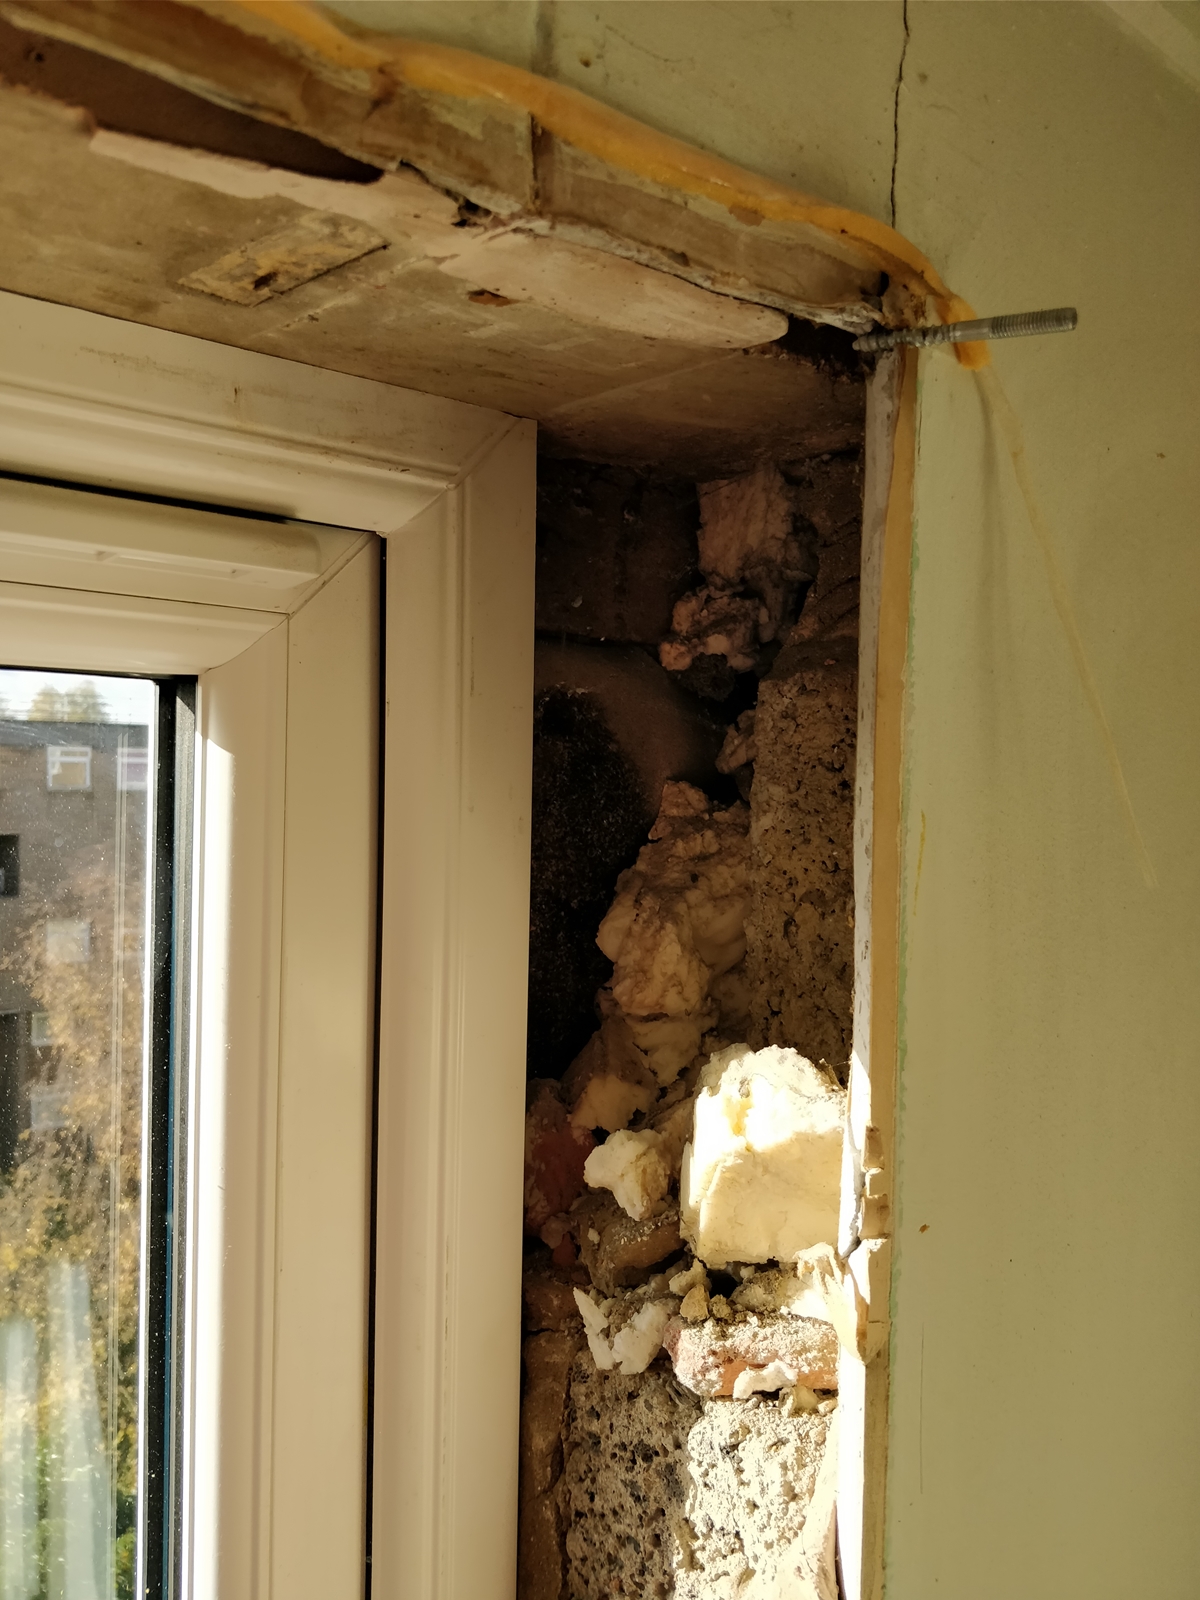
4th November – apologies for going AWOL….. busy & then some! Just come back from a splendid shoot near Beccles organised by one of our AML group. Quite damp, but not enough to spoil the day although by the end there were a couple of guns that had started to hangfire or misfire – the guns were quite wet, and mostly had to be carried from drive to drive inside a damp slip, so not ideal for their welfare. My Egg double 16 bore performed impeccably as usual (touch wood) – the only problem I had was when I forgot to put any shot in one barrel! about simultaneously Martin double shotted one barrel of his gun – probably just coincidence, but who knows? By the end of the shoot my Egg had developed a light pattern of rust spots on the barrels – it had been lightly oiled but obviously not well enough! When I came to clean it the spots merged into the browning after a bit of work with grade 0000 steel wool and oil, but I’ll be more careful to do something more protective next time there is rain about on a shoot! My shooting wasn’t too bad – I wasn’t on very plentiful pegs for several drives, although my peg partner (double pegging) managed two right & lets in good style – I had enough good shots to make the day both enjoyable and satisfying! I need a rest tomorrow, but its the only chance to get help taking the bath to the dump! I feel terrible about cutting the bath in half – I can hardly maneuver the lighter half, the whole thing must have weighted around 100 Kg. and apart from the enamel was in perfect condition – the casting was a very even 7 mm in thickness – a masterpiece of the casting art! Anyway we’ll try to get rid of it as its taking up space we need to work in. The windows are going to be fitted on Monday, so that is another bit of progress. I’m going to have to do my VAT tomorrow as I got a nasty letter from the vatman saying he was watching me! And so on…………
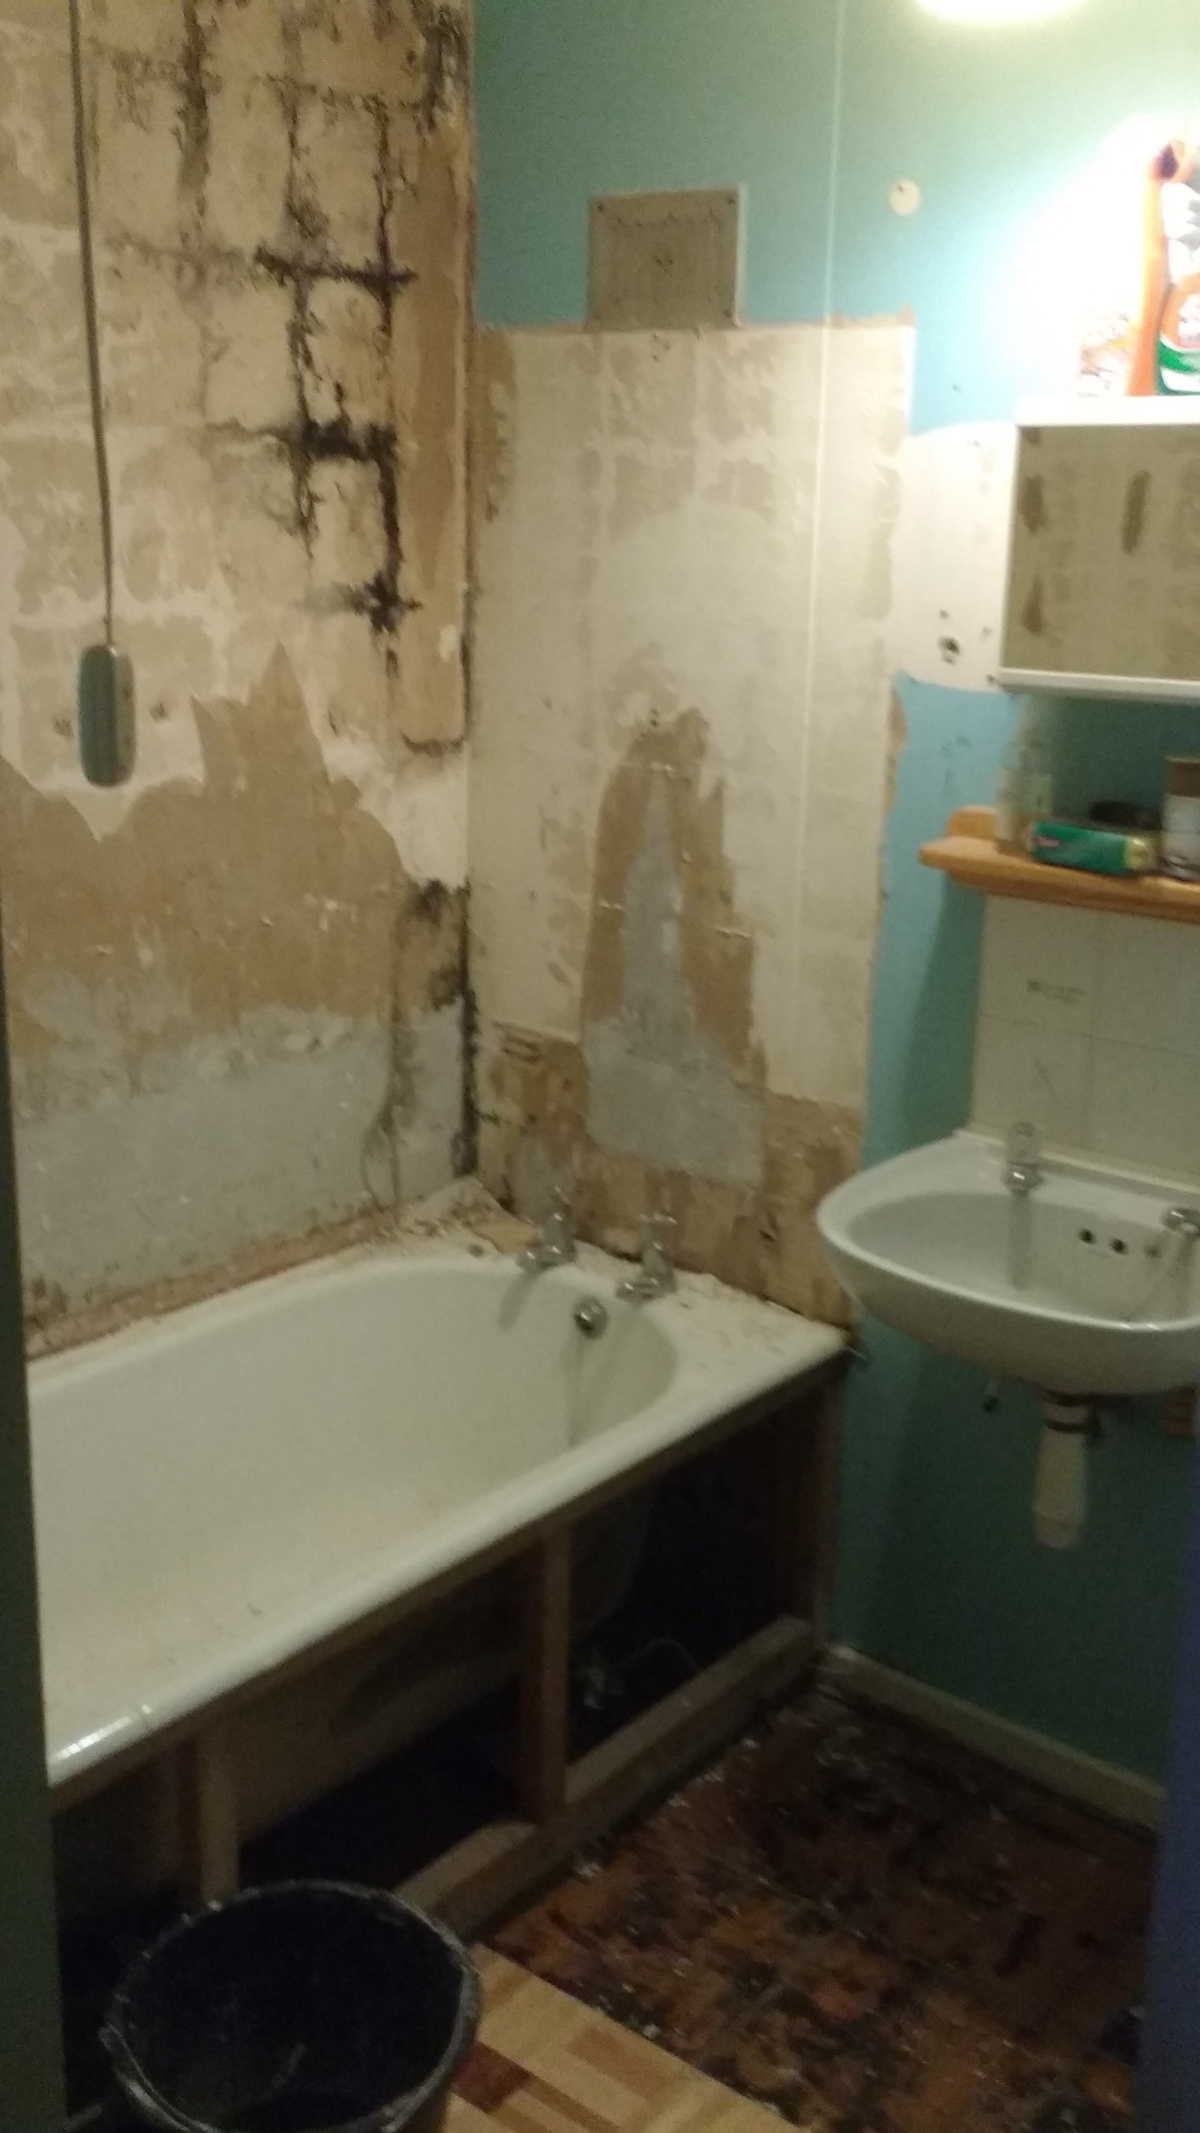
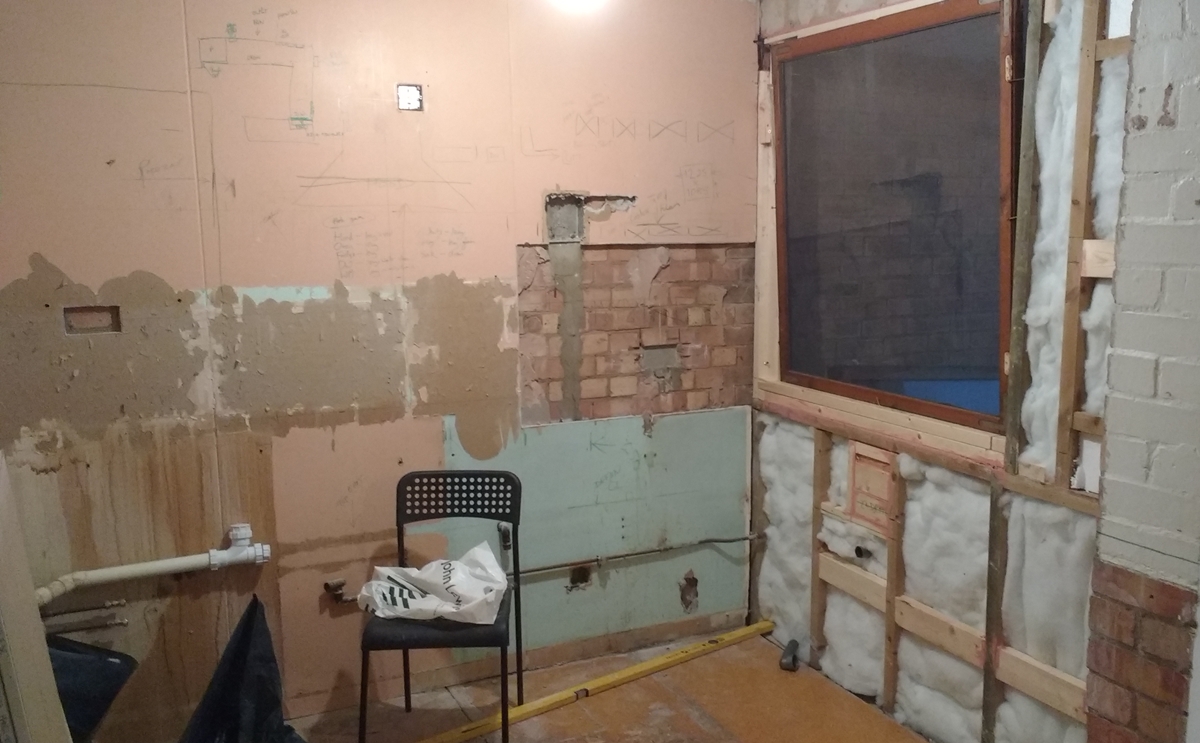
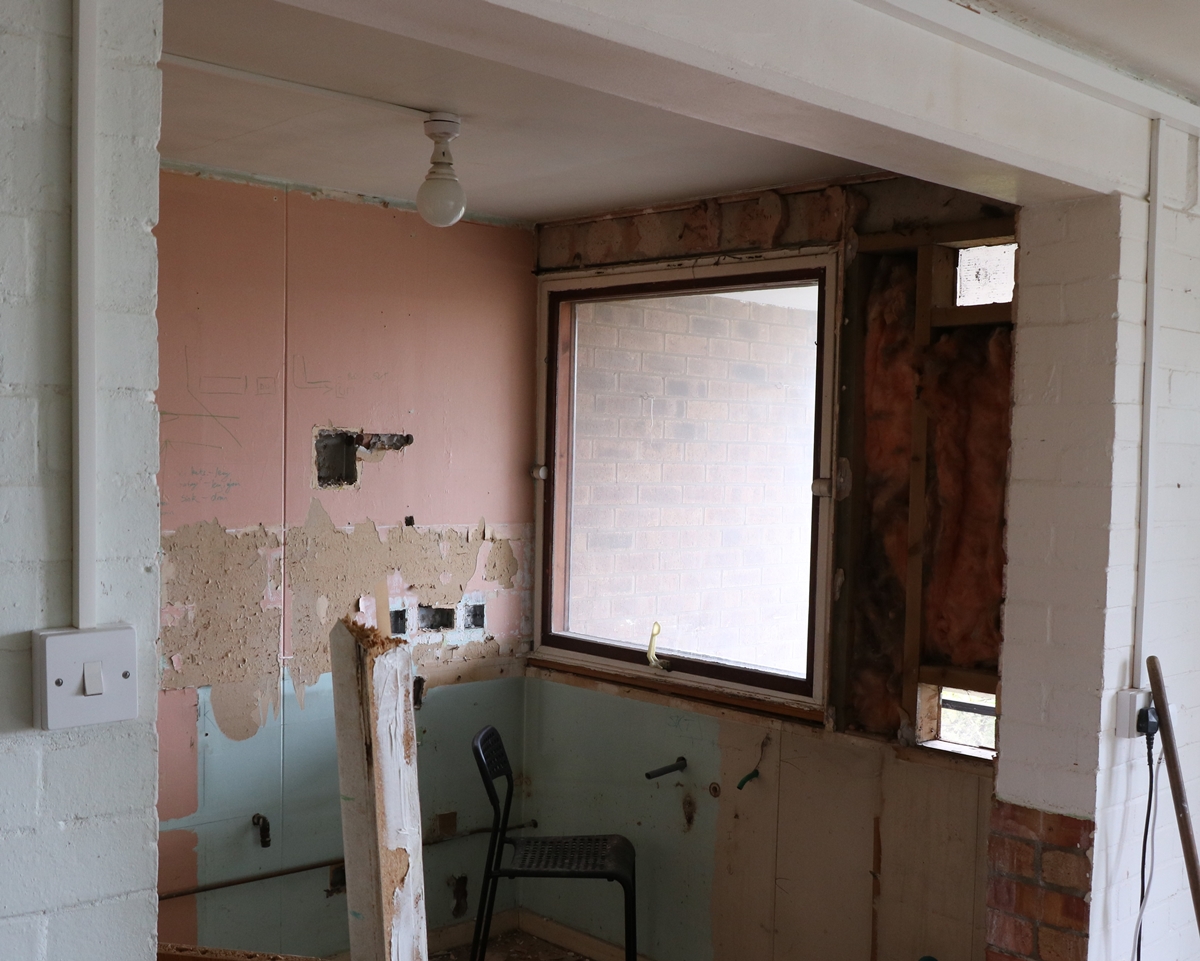
1st November – Another month gone! Still destroying Giles’s flat with abandon! The kitchen has paused and I am now reducing the bathroom to a shell. I spent most of today unplumbing the bath and washbasin, having taken most of the tiles off yesterday. In order to disconnect the bath and basin I had to remove most of the original plumbing, including some in the almost inaccessible service duct – very tedious! Having done that I tried to lift the full sized cast iron bath but it was jammed between the walls and very heavy – desperate situations call for desperate measures so out came the angle grinder and I cut the bath in half- I was amazed that it was so easy and only consumed a couple of disks, but it made a horrible dusty mess! I don’t know if I’ll be able to move it now – I went home immediately I’d done it and had a bath! My evening reading of one of the Badminton library books of the 1870s is quite interesting on the subject of gun cleaning, which seemed to consist of a lot of use of paraffin – two things seemed odd, one was the use of felt covered rods that fitted snugly in the barrels to keep them rust free (!), and the other was running mercury up and down the barrels to form an amalgam with the lead and thus remove it. Apart from some use of neatsfoot oil they didn’t seem to have any good oils, although it did mention the possible use of clock oil – presumably one of the only non-gummy oils available. Wikipedia explains that neatsfoot oil is extracted from the feet and lower leg bones of cattle and is used because it is liquid at room temperature, unlike the rest of the fat in the animal’s body – the lower legs and feet not being kept at full body temperature – so now you know – another pearl of wisdom courtesy of cablesfarm! I have another shoot this Saturday in Norfolk – I’m going to have to acquire some more No 6 shot after this one although I’m not sure where from as the carriage charge is so high!
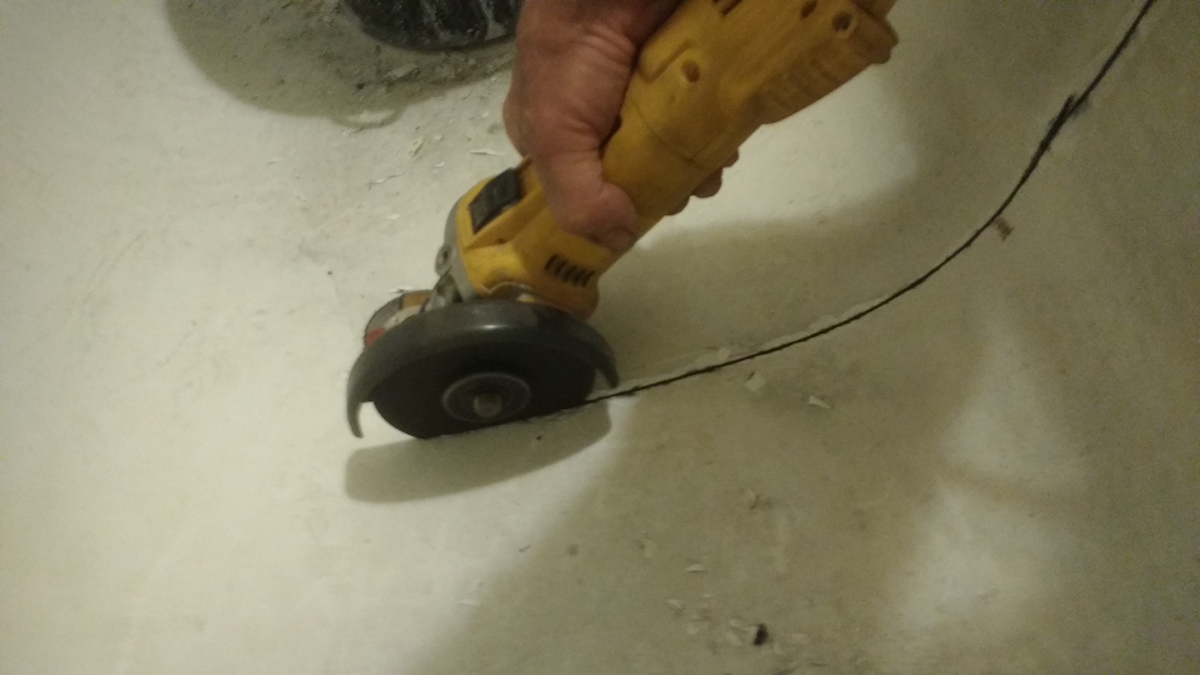
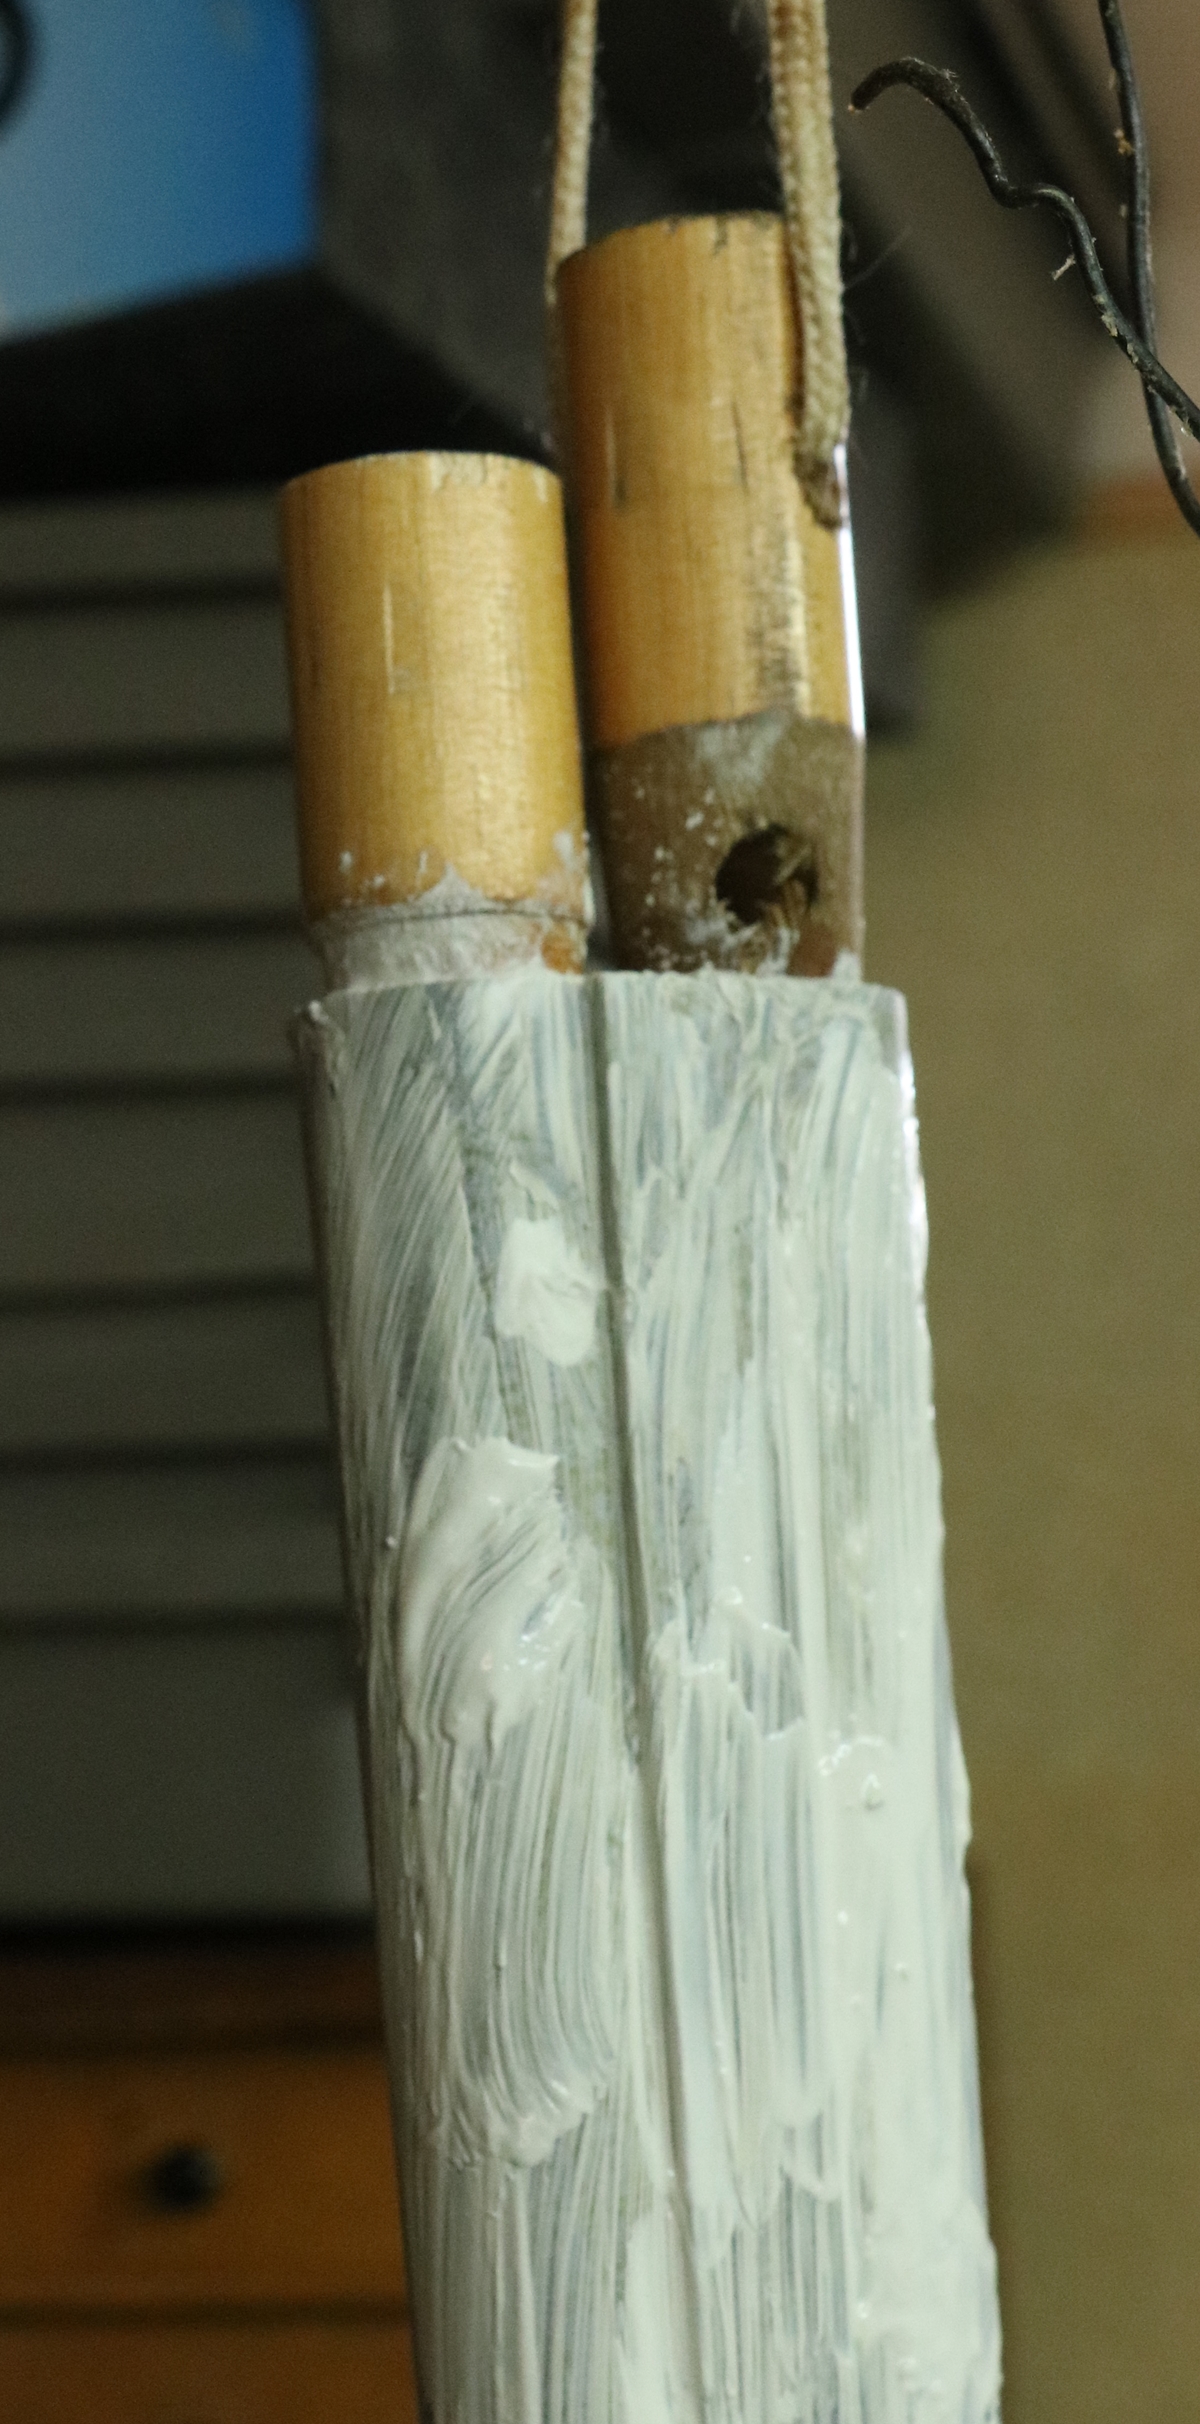
Desperate measures! It was surprisingly quick and easy with 1 mm blades.
30th October – I’ve been oiling the worktops in Giles’s flat with linseed oil and driers (terbine) using paper kitchen roll and wearing latex gloves – the finish is coming on well, although I’m not sure it will be robust enough – any way the point of mentioning it is that I was aware that any rags soaked in oil could in theory ignite so I didn’t leave them in the flat but bought them home to light the woodburner – when I picked them up a couple of hours later they were very hot! I carefully put today’s on a piece of metal and bought them home again – this time they were cold but the paper was badly scorched and brittle! So be warned – the most dangerous combination is when fine steel wool, itself highly inflammable, has been used with linseed oil mix to rub down a stock. I burnt a hole half way through a 3/4 inch MDF benchtop with a spark from a grinder landing on a dry lump of 0000 steel wool the size of a bar of soap – I was lucky not to burn down the workshop as I didn’t see it ’til days later! – with oil it probably wouldn’t need the spark).
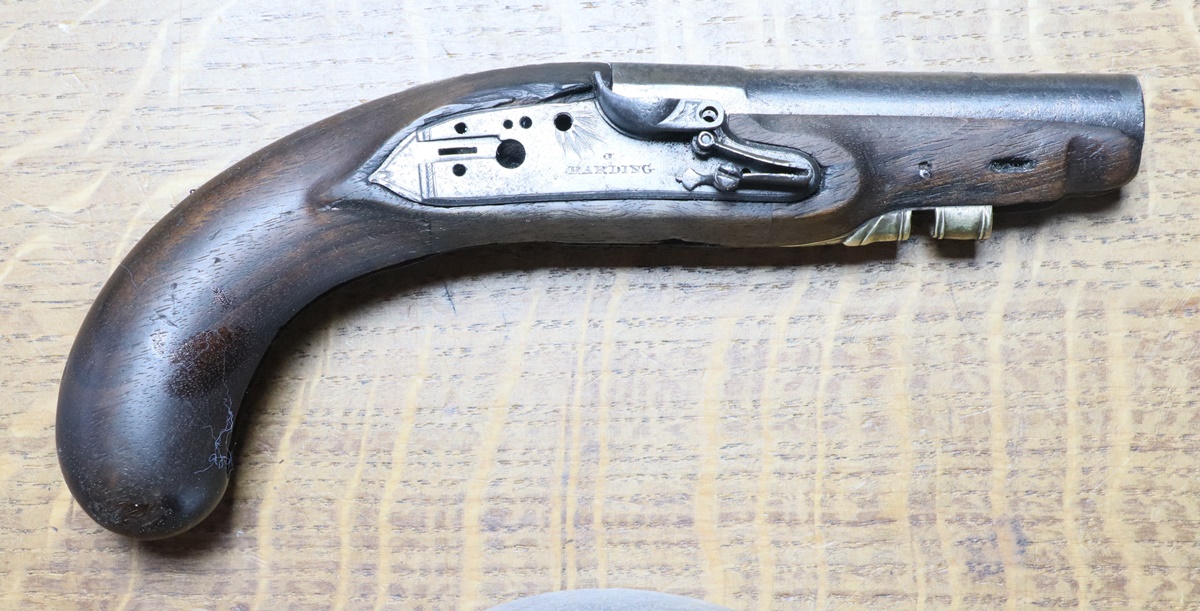
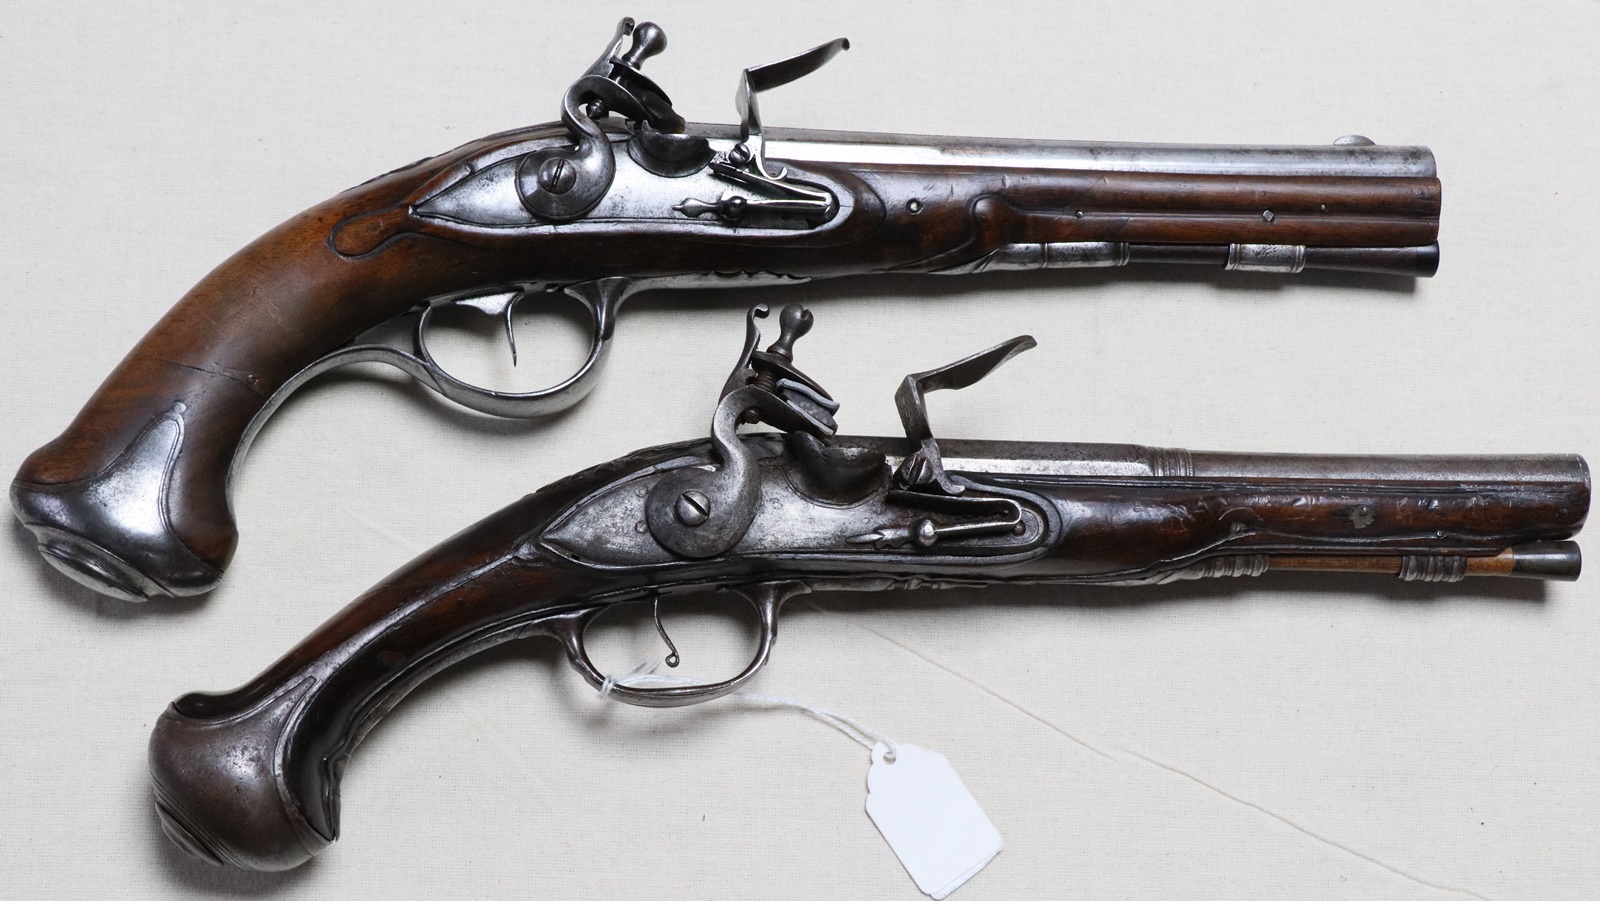
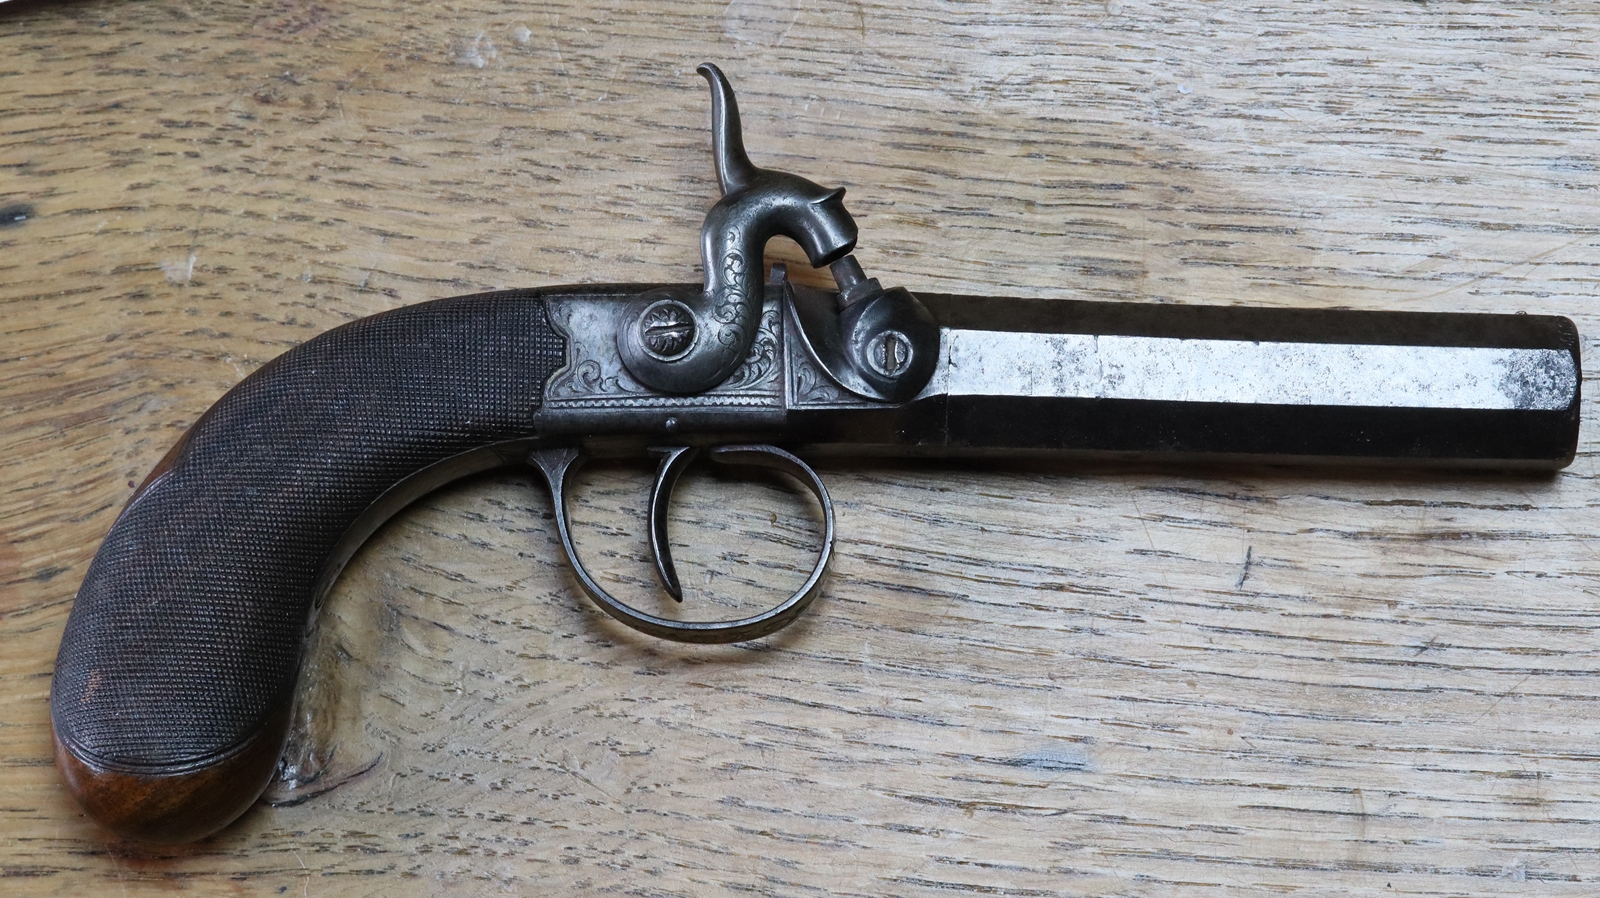
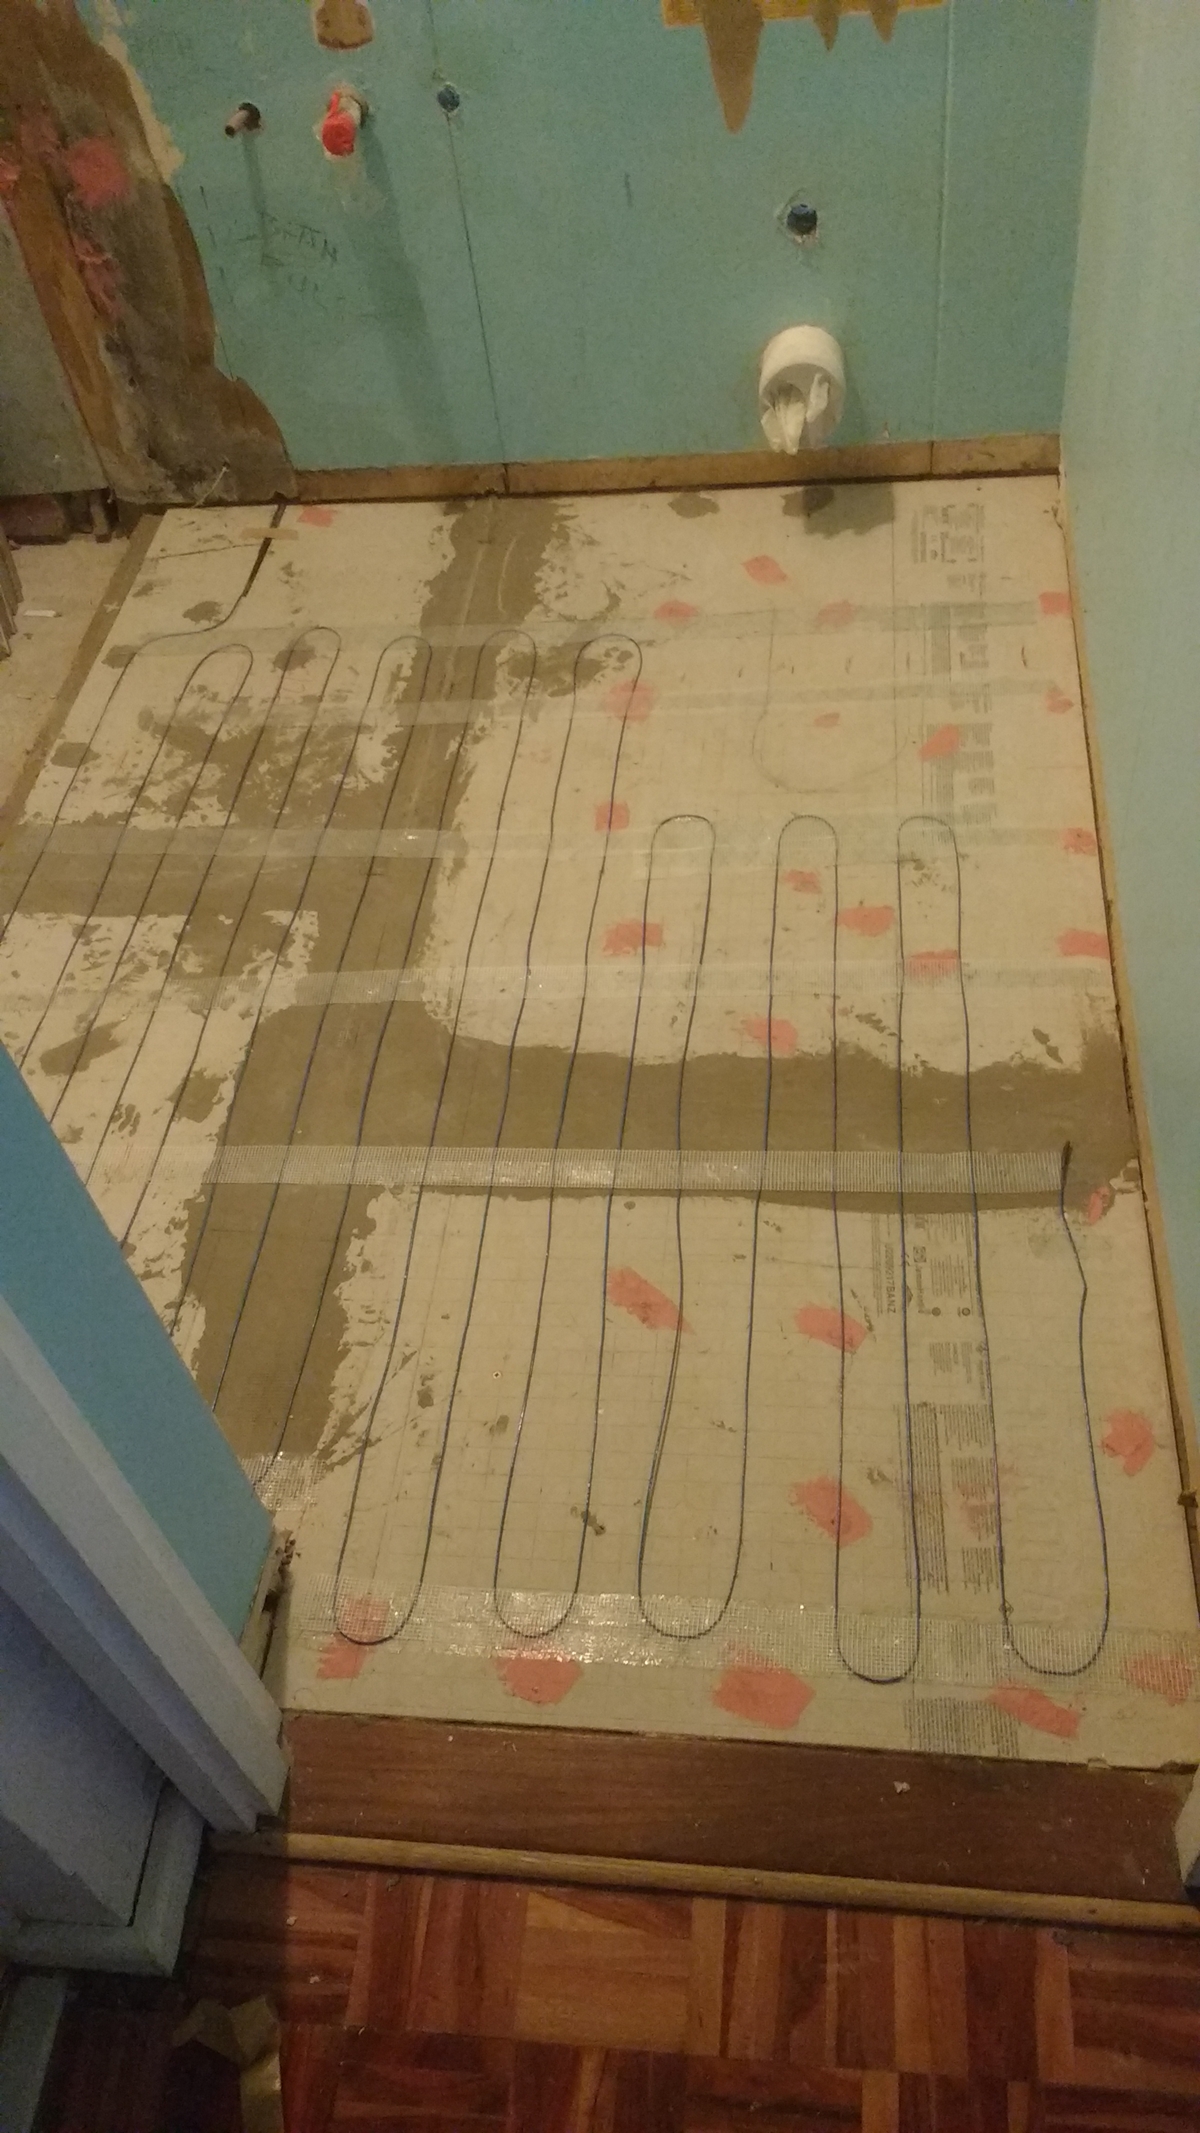
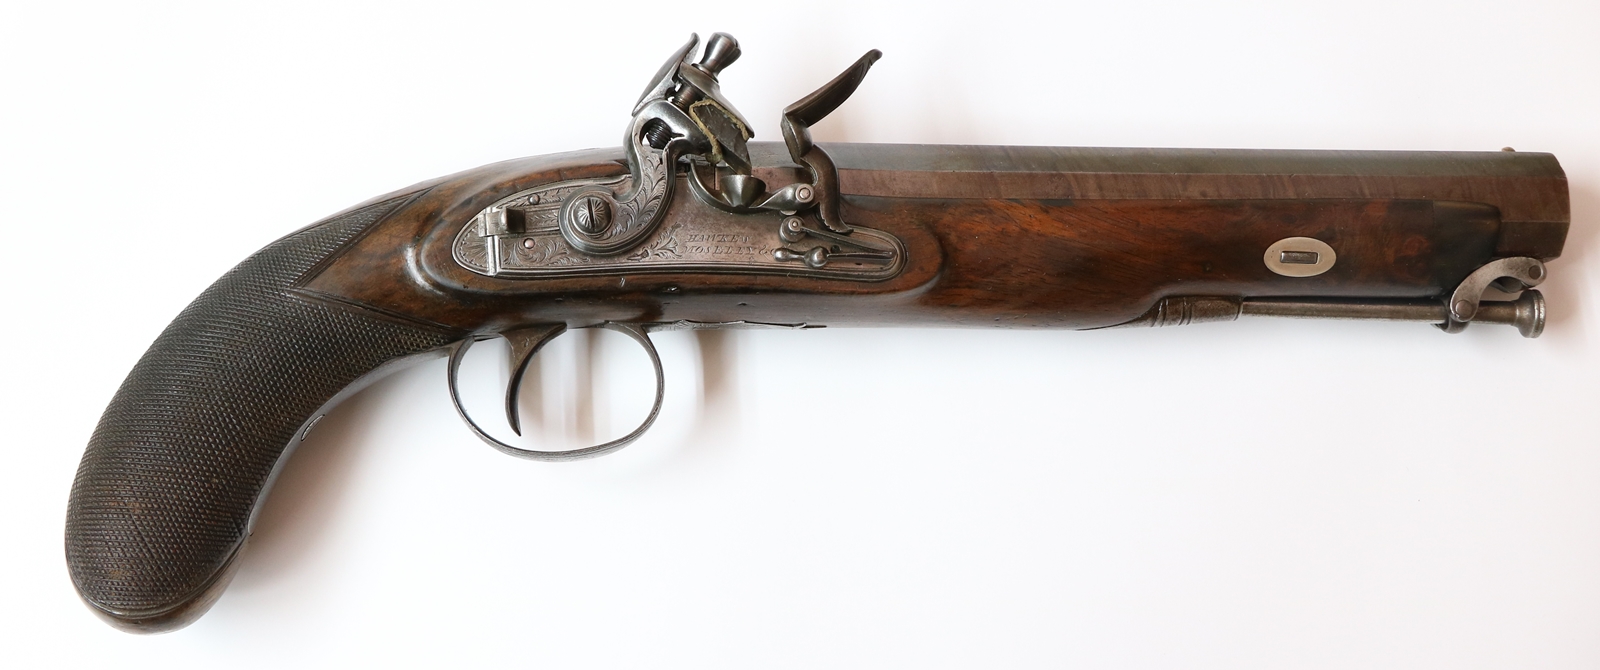
29th October – Handed back the Hawkes and Mosley pistol today and realised it was the dead spit of the Andrews pistol I reconverted – they were a pretty standard pattern of heavy personal protection pistols – presumably carried on horse or in a carriage, but not in the pocket! My shotgun and firearms and explosive certificates all need renewing together in January so I shall find out if my GP tries to charge me for a letter! I’ll use it as a good opportunity to sort out what could be returned to section 58 and what to include on the FAC from section 58. Shotguns are no problem but its a hastle to change the FAC so I might as well get it right. I gather that the Cambridge Gun Club is planning to open a pistol range in January, and there are several people wanting to shoot muzzle loading pistols, so I might see what I have that would be fun to shoot – the trouble is that I’d really like to try all my antiques, but that involves a lot of paperwork! Went to the flat with Giles and agreed on the bathroom layout and units in about half an hour – I guess choosing the wall & floor tiles will take a lot longer! I am planning to put down underfloor heating as its easy and out of the way – it is of course a very low wattage so not sure if it will provide adequate heat – I’ll probably put in an electric towel rail to supplement it, then if necessary we can install a bathroom fan heater (- we have one at home for really cold mornings). I got the instant water heater plumbed in yesterday – as usual there is one compression joint out of a dozen that leaked a bit, but I think that is now OK – I forgot to turn off the stopcock when I left, so I hope so!
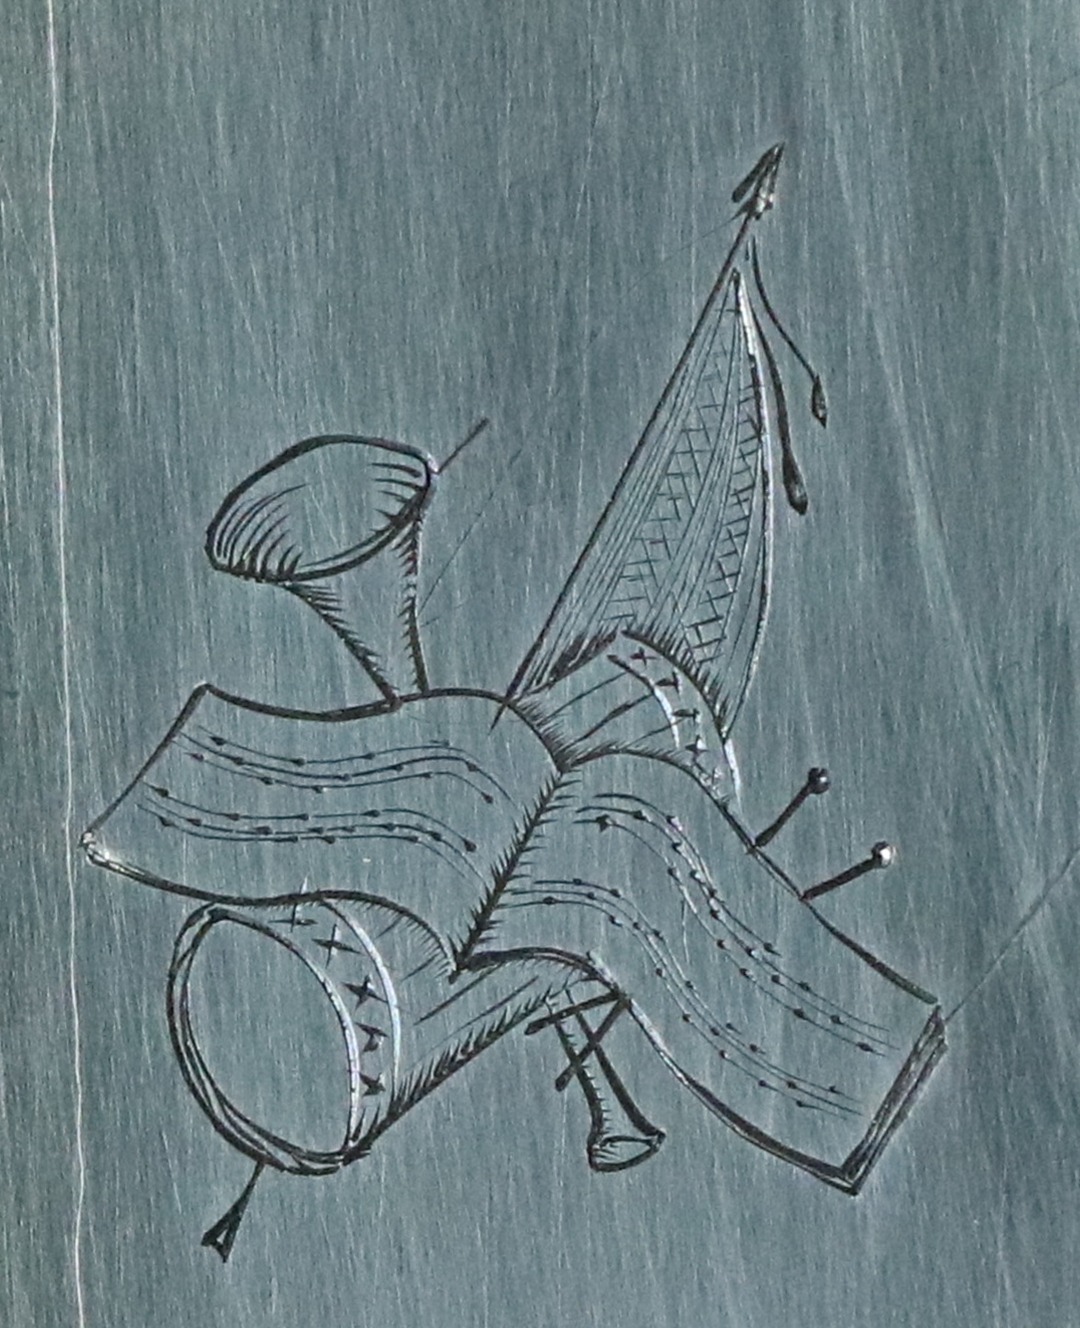
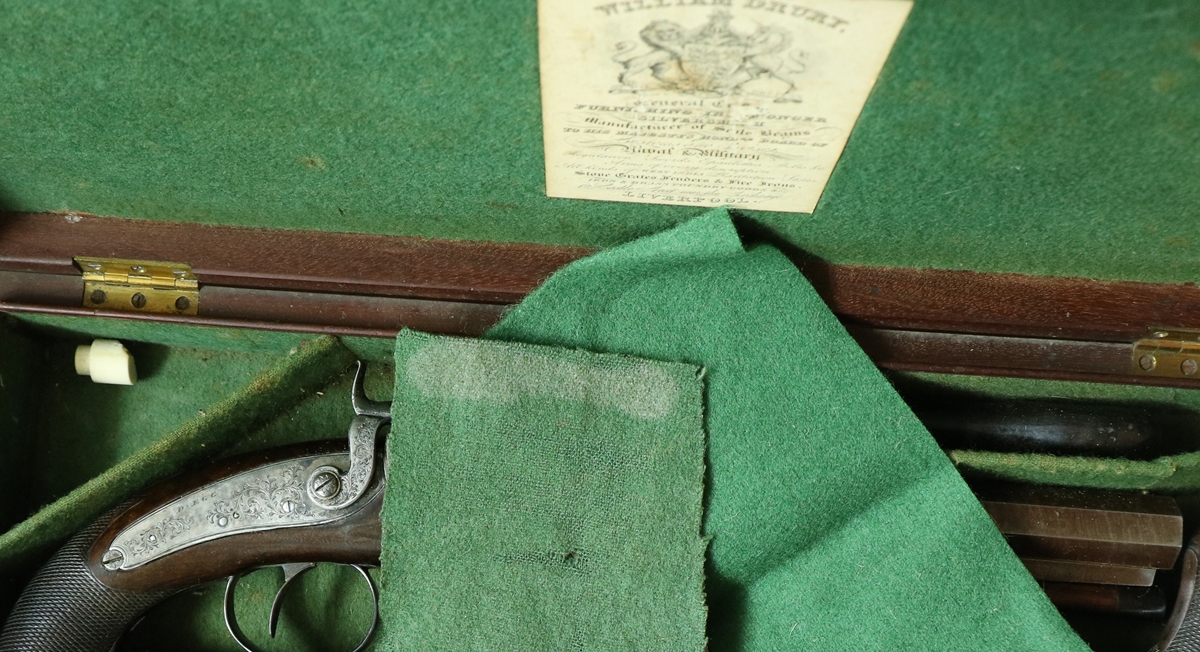
27th October – I collected the Hawkes and Mosley pistol from Dick and touched up the engraving on the cock – I hadn’t touched a graver for weeks but fortunately it wasn’t a complex job! Anyway the pistol looks great – when seen in the flesh it’s complete transformation without any fakery – the best sort! Photo below and a few more in the post on the pistol. I had a further email from my rifle club about the medical fee – the police are NOT asking for the fee, and in fact tell applicants not to pay it, and that it won’t change anything! Well done them. AML shoot tomorrow – its the Big Bore competition so I have got out my Gasquoine and Dyson 6 1/2 bore and made a batch of wads and cards and semi-wads out of cork table mats. I can’t remember if I can shoot with it or not – when I mount it my eye is above the sight line, so it will shoot high – I have put on a butt extension to correct it slightly, but the pigeon guns were designed to shoot high as the birds were always rising. I’ll probably load 3 drams and 1 1/4 oz of shot, maybe 3 1/2 drams – I’ll see. I really should stick with my usual gun as I do need the practice for game shoots – I am beginning to get a much better image of what the ‘bird’ should look like when I pull the trigger, so maybe the penny has dropped at last! Work on the flat continued – I was plumbing in an instant water heater but couldn’t find a fitting that mated with the inlet and outlet connectors except a flexible connector, which I used on the outlet side. The male 1/2 inch nipples on the unit look as if they should take a tap connector but the hole in the middle is too small for the nozzle of the tap connector – I’m sure there is a proper solution, but I just made a modification of the tap connector on a service valve and it fits fine for the inlet. There is the usual one leaky compression joint as usual – probably because the alignment isn’t perfect! One of the joys of working on the flat is that there is a fantastic boulangerie and patisserie – Maison Clement- just 70 steps from the door ( once you have gone down 4 flights of stairs) so my treat of the day is a trip out to buy the paper and have a cappuccino and pain au chocolat at 11. It also means I can pick up a decent loaf and don’t have to bake bread twice a week! Simple pleasures……
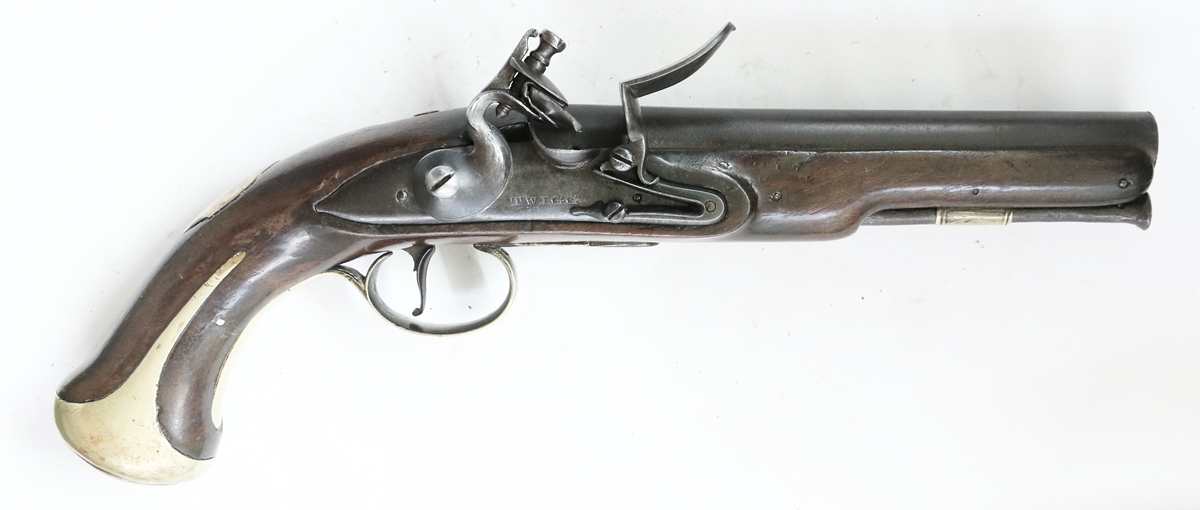
26th October – The Hawkes and Mosely pistol is now ready for return to its owner. The barrel has been lightly struck to restore sharp corners and it has come up with a beautiful twist. The damage to the wood came out with gentle steaming and its been lightly refinished to even it all out. The cock has been precision welded – it turned out that it was a break in an old weld repair, which is better than the more common brazed repair that needs extensive clearing out to get rid of the braze. Anyway it is a very neat weld by Jason and I doubt it will fail again. I am sure flintcocks fail because they are snapped off without a flint or with the frizzen open so that the cock comes up hard on its stop and inertia puts s strain on the back of the cock. If there is a proper strike of flint on frizzen the cock is substantially slowed at the crucial moment of impact. If the breaks were due to the impact of the flint on the frizzen then cracks would open on the other side of the cock, nearest to the frizzen – and that is very unusual. I have to pick the pistol up tomorrow and I’ll photograph it then. Work continues on the flat – we have now hit a snag with the location of the gas hob in relation to the units potentially not complying with new regulations, so probably have a bit of a rethink….. I removed the hot water tank today – to my surprise is seems to be made of fibreglass or similar and to be rectangular – its very shallow – less than 2 feet tall – and encased in a rectangular hardboard box with foam insulation with a plastic cold water tank above – obviously a ready to install unit with built in immersion heaters etc. Anyway its now gone and will be replaced by an instant water heater – it didn’t work a proper shower anyway so no loss.
25th – More flat work ( not what it means in the racing industry) – got thesink plumbing working – there is always one compression joint in a system that insists on weeping ever so slowly and resists efforts to tighten it – I had a bit of a battle with one joint this afternoon, lying on my back on the floor with a head torch watching for a tiny meniscus to grow – its a real contortion as I wear bifocals and so I can’t look up and focus on things close by! I think I fixed it but I’ll see in the morning – I wrapped the joint in tissue. The island worktop is now in place an the oiling process has started – its amazing how uneven the absorbance of the tops is – its what is incorrectly called butcher block – proper butcher block is of course end grain beech. The next problem is getting two waste pipes – from the dishwasher and washing machine – into the waste system with only a single inlet – I have now got hold of a non-return valve so I can plumb one directly into the waste pipe downstream of the U bend.
24th October – The Land Cruiser MOT gave me a bit of a scare as the mechanic said it needed the front wheel bearings replaced – as I had spent a small king’s ransom having the front wheel hubs completely rebuilt six months ago I was getting ready to do a bit of forensics and get legal – but it turned out that they just needed tightening – still shouldn’t have needed it but…………. anyway my number-plate lights obviously passed muster! One LED bulb is in a TicTac box and the other in a wee sample bottle – all held together with silicone sealant! Giles’s flat is now has a virtual kitchen – just needs the water, drain, gas and oven connected and the appliances fixed, plus the window and fix up some lighting. Then I have to remove the hot water cylinder and put in a 10.8 Kw instant water heater for shower and sink and build a couple of cupboards in the space it occupies…… and re-do the bathroom… and rewire the living room and skim coat it and put in a fancy fanned storeage heater…………….. and then re-decorate everything (except the kitchen, which has been done…….
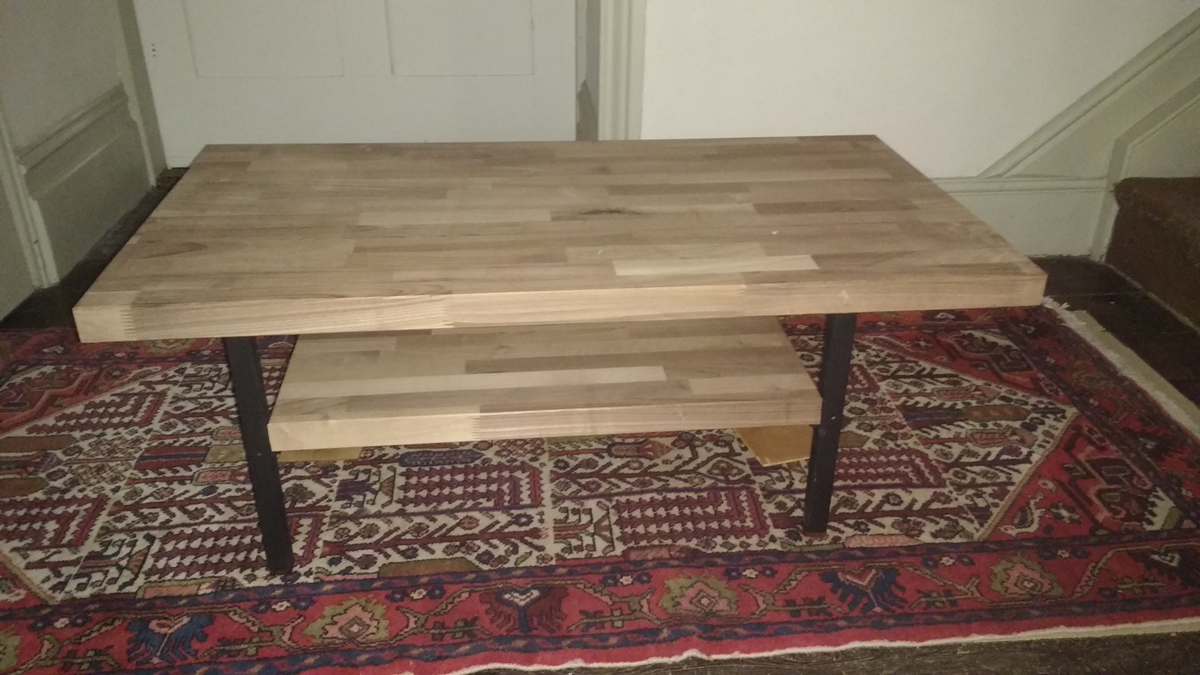
Worktop in the foreground has to have its corners radiused and then it can be oiled to match the others.
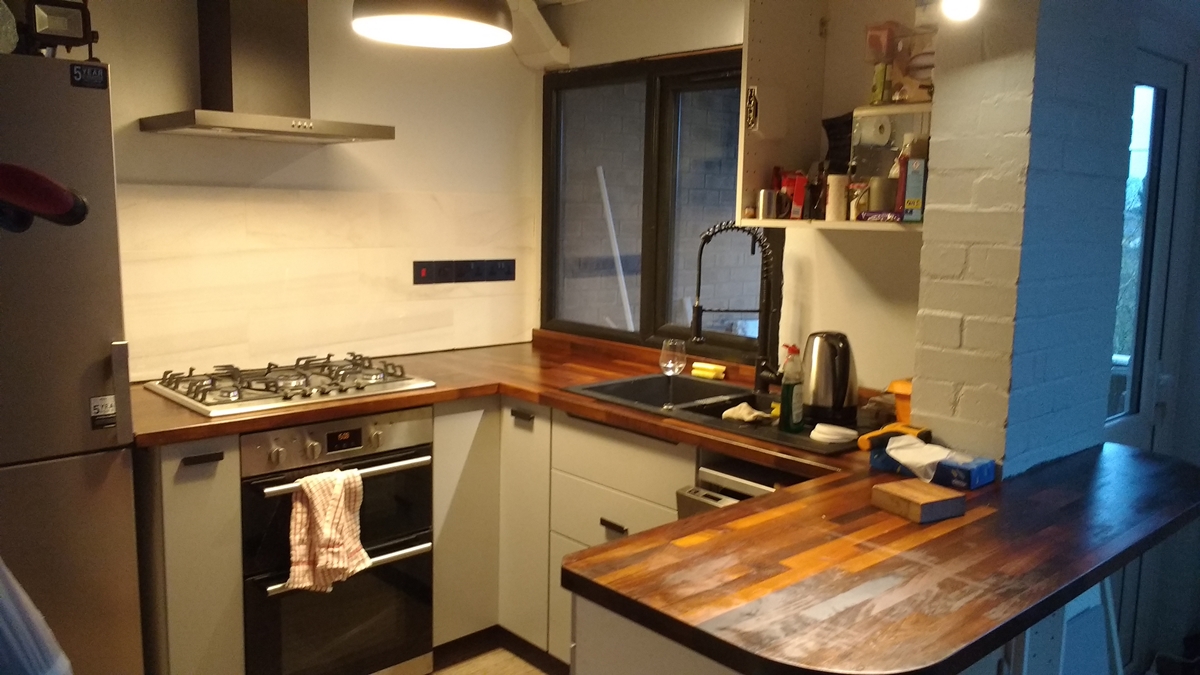
23rd October – Just had an email from my rifle club saying that Cambs Firearms Licensing are ( at random) asking GPs for medical information when they receive a renewal or new application for a shotgun or firearms license and either they, or the GP are asking holders for a fee for supplying the information. This is contrary to Home Office Guidance and to the agreement made by Doctors representatives with the government during negotiations. The advice from BASC ( https://basc.org.uk/blog/press-releases/latest-news/basc-urges-members-not-to-pay-gp-fees/)and clubs is that you should not pay. If you don’t pay the firearms officer must, if a letter to the contrary is not received from the GP within 21 days, assume that there is no medical reason to withold a certificate…….. Giles’s flat kitchen has started to look a bit better now – the tiling is done, the worktops are in and the wiring is functioning – I was particularly pleased with the bank of switches and sockets in the tiles that have slate effect pop-on fronts and line up and fit perfectly – as Giles’s cousin says, it is a masculine looking kitchen, but that is appropriate! Inspecting the consumer unit I discovered that it only takes circuit breakers and switches etc that are of one particular make and design – I really hate proprietary bits and pieces – I found that the consumer units in our house were a proprietary design that became obsolete about ten years after fitting, so spares had to be located at great expense. The electrics in the flat were a bit hairy – there is a protective RCD on the power sockets, but the metal radiant heater on the wall of the bathroom has none! I am fairly gung-ho about some risks, but that is a step too far for me!……… I came home from the flat late and had to fix the number plate light on the Landcruiser as it has to have an MOT tomorrow – like many old LCs the bottom of the lift up back door is rusted, so I had to do a bit of improvising – I had some suitable 12 V LED bulbs that fitted, so was able to cobble something together – probably a better light than the original – lots of silicon sealant was used – enough said! Probably time for an upgrade, although the Land Cruisers have been on a downward trajectory since they started adding more and more fancy bits and pieces of electronics.
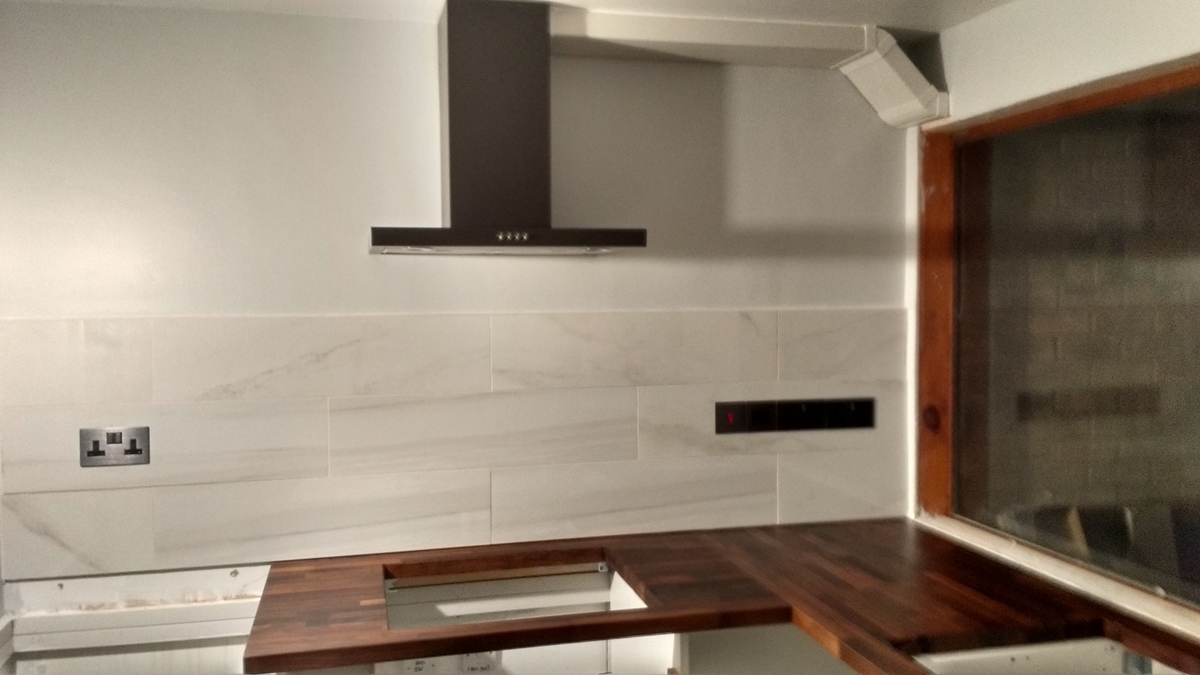
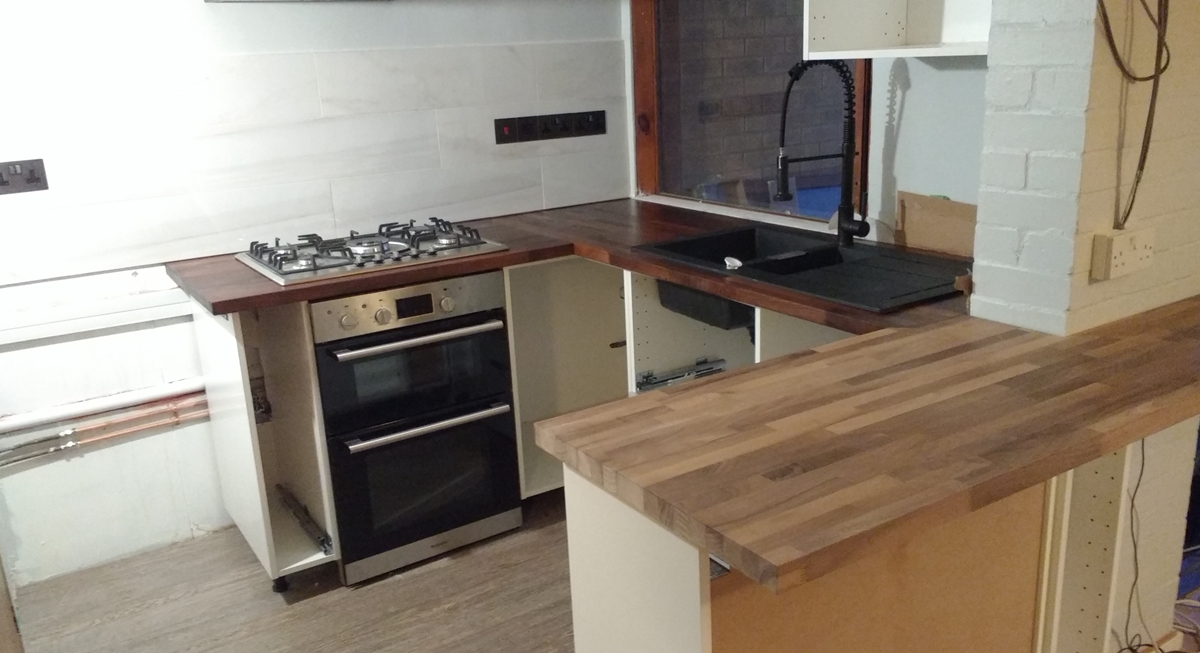
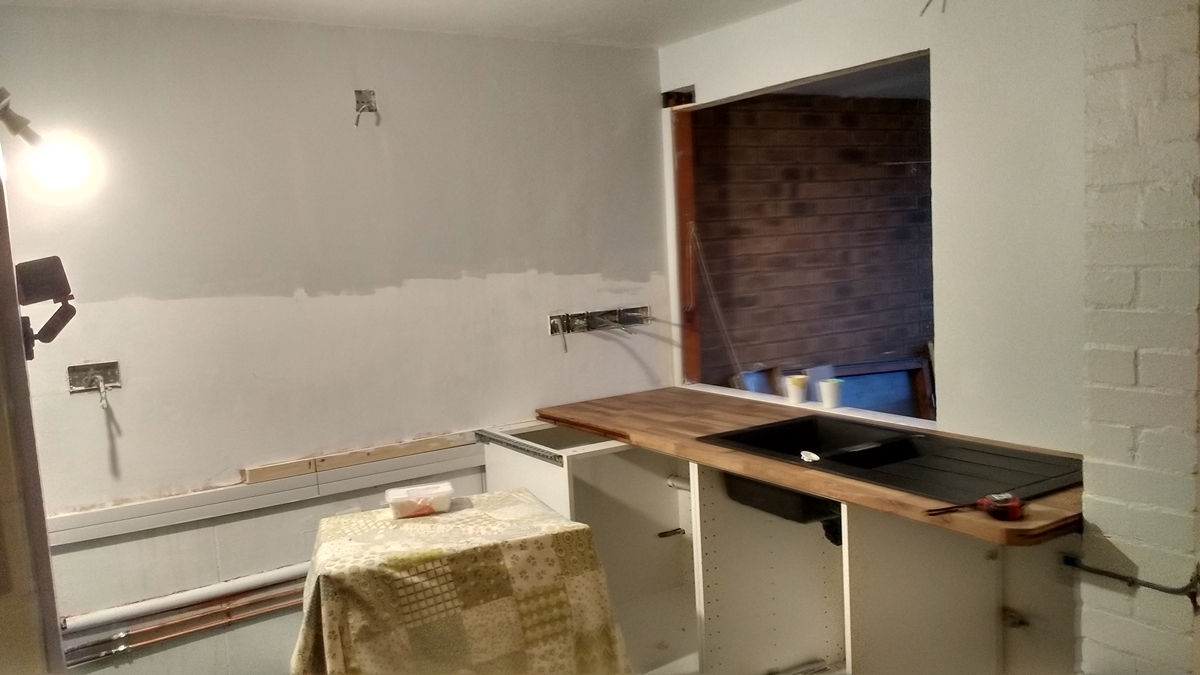
The American Walnut worktops are getting an oiling that would do justice to a Purdy – it may be some time before the sink and hob are fitted! The grain of the American is much more open that that of the European Walnut and the oil just gets sucked in in patches – I’m applying a little talc and a drop or two of driers with the oil to fill some of the grain – at the moment when you wipe off the excess it leaves a beautiful satin finish. Protecting it from dust is a bit of a problem! I probably should have centered the right hand sockets etc on the vertical tile joints at top and bottom – never mind, that would probably bring them too near the hob. The extractor duct is a little inelegant, but there is no where else to put it – the ceiling is cast concrete and its a party wall. I haven’t yet figured out how to get my phone to focus!
20th October – Still a lot to do to the kitchen – the nearer it gets to completion the more jobs emerge from the woodwork, so to speak. We have started fixing the units in place, and I’ve done about half of the second fix electrics and made reinforcing angles to stop the worktops bowing. Giles has painted the walls and ceiling. We need to sand and pre-oil the Walnut worktops before they go in, then we can fix the tiles after cutting them round the electrics, which will be quite a challenge. We ordered the kitchen window from ‘supply- only.co.uk’ and they told us a week ago that it had gone into production – when Giles rang today to ask for the delivery date they said that they had to order the sections in because we had ordered black, and there was something wrong with the specification – which they didn’t seem to be clear about. So that is still some time away, so much for 3 week delivery! I can see that Sunday working is called for this week! Even so it won’t be finished by Monday…….. Evening reading has now taken in hunting all the Indian animals that it was possible to hunt in 1890 – It was unsporting to shoot wild boar then because they were hunted on horseback with spears – pig sticking. An elephant charge was described as magnificent, although presumably less so if you are the focus of the charge. Apparently it is possible to shoot an Indian elephant head on, whereas an African elephant has a bony mass at the root of the tusks that stops the low velocity 8 bore ball (driven by 12 drams of powder, no less). By 1890 the writing gives some clues that big game hunting was recognised as not altogether good for the natural balance of things, and there was a concentration on collecting specimen heads and skins of the largest specimens – which mostly took out the older males, which is more or less what culling does now.
It doesn’t look much like progress – but it IS coming together, we keep telling ourselves! My plastering doesn’t look too bad with a little local rectification – its now gently rolling hills instead of a mountain range! Its mostly going to be covered up anyway.
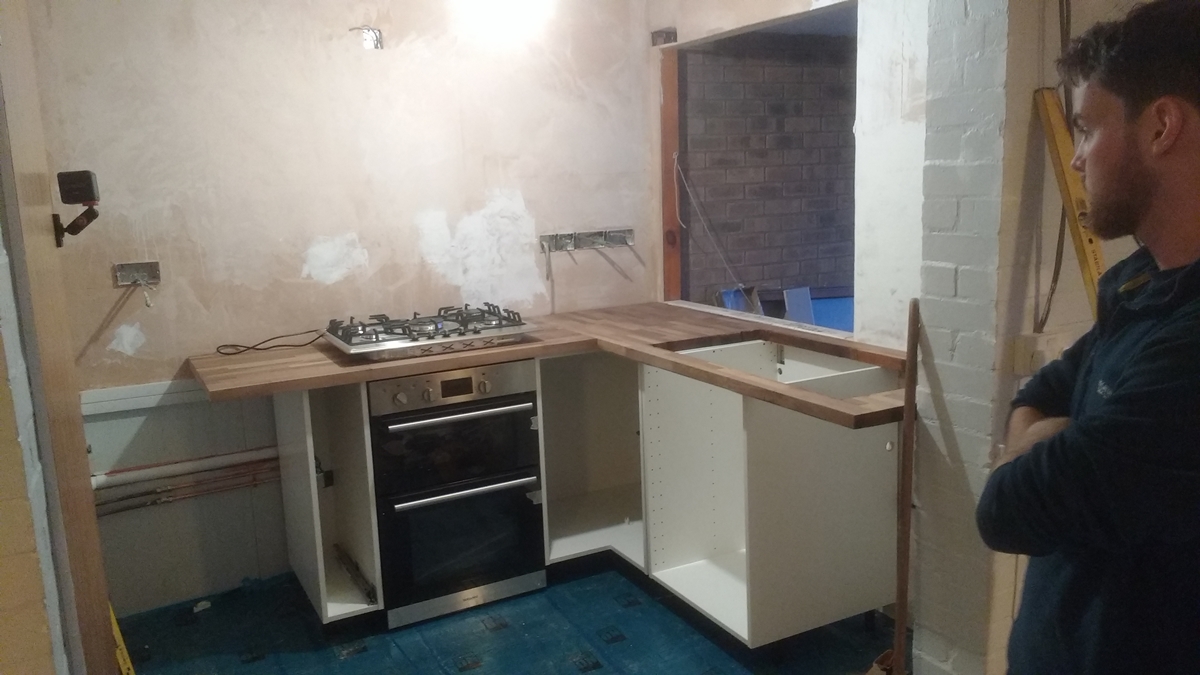
18th October – Big push to get the kitchen sorted by the end of the week! It’s beginning to come together – I did rest of the plumbing and we got half of the worktop cut for the sink and the units perforated for the numerous wastepipes and plumbing that wends its way in and out of the cabinets. We have now offered everything up to check where it will fit, but so far haven’t permanently fixed anything. The oven arrived, weighing 55 Kg, but the Hotpoint delivery driver wouldn’t bring it up the necessary last flight of stairs from the lift on his own, and wouldn’t let us help him on health and safety grounds so we had to take delivery on the landing and bring it up ourselves, although he did, perversely, offer to help us ! – John Lewis hadn’t asked us if we had stairs, and had sent the delivery by a single driver. He had already aborted two John Lewis deliveries by the time he got to us and wasn’t in the best of tempers! Another annoyance trying to fit together the folding doors of the corner unit – it looks like a production fault in the fancy hinge parts resulted in a slot being too narrow to fit over a 2.5mm pin – since it will take weeks to get IKEA to sort it out, we’ll take a needle file and do it ourselves tomorrow. As you can see from the photo the new kitchen has a large double oven and a 5 burner gas hob – Giles takes cooking seriously! My evening reading – for as long as I can stay awake – was about tiger shooting in India in the 1890s – I hadn’t realised that India had both lions and tigers in those days. The lion was regarded as as a rather inferior animal and not so much sport to hunt as the tiger which as everyone knows from innumerable illustrations was most often hunted on elephants, with dozens of supporting elephants used to surround the tiger and get it out into a position where it would be exposed, when it often then selectively attacked the elephants carrying the hunters. Makes shooting pheasants seem like a walk in the park, which I suppose it mostly is.
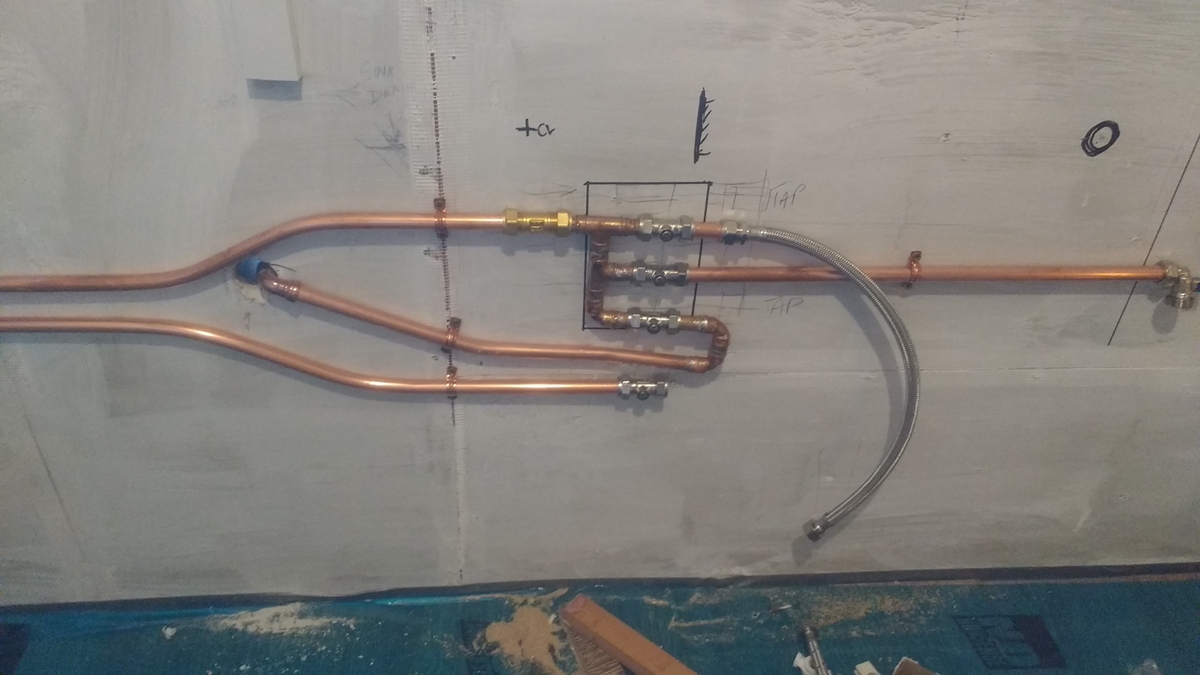
17th October – Had a fantastic day’s shooting at Glemham Hall in Suffolk with 7 other muzzle loading game shooters from Anglian Muzzle loaders on Monday. It started as a driven stand, that was followed by a walk up through sugar beet with half a dozen pointers working the beet field ahead of the guns which flushed a few pheasants, we then crossed a ditch into a beet field that converged on a bit of rough and more pheasants and a couple of partridges – I hadn’t been on a walk-up shoot before and had only seen dogs used to find and retrieve, but these dogs were amazingly well trained to hunt to the whistle and voice, and to point, and were controlled as if on rails. I was amused to see that when retrieving a dead bird, the dogs would point the bird and wait for the command to retrieve before collecting it. Giles’s flat continues to make progress – while I was out shooting he did a round of the ‘white goods’ emporia and bought a hob, oven, dishwasher, washing machine and fridge, all in a remarkably rapid trip! I am concentrating on getting the plumbing sorted – I always seem to end up with dozens of service valves – which are now normal on every tap or appliance. We are putting in a charcoal filter in the kitchen tap supply as the Cambridge water makes horrible tea (regular readers will yawn at another reference to tea) so that is another service valve – total planned so far is 5 under the sink! I just hope my plumbing is neat enough to put a photo on the blog – I normally use ‘Coppefit’ push fittings but they take up too much room for complex pipework so I’ll have to used Yorkshire fittings and solder them for the maze under the sink.
15th October – I went to look at the Hawkes and Moseley pistol that Dick is restoring for me – you would not recognise it as the same pistol, it looks fantastic – the barrel has browned beautifully and Dick restored the flats a little so it looks like new. I was intending to photograph it but by the time we had had a cup of tea the light was too bad. (I realise that tea has figured rather often in the diary of late – I wasn’t aware that I had become obsessed, but then one never is aware of one’s own obsessions!)
14th October – Two weeks into the renovation of Giles’s flat and we are seeing some progress on the kitchen – walls plastered, first fix electrics, floor laid, part plumbing fixed, window opening sorted with vent aperture, and units pre-assembled – definitely time for a cuppa! The aim is to get the kitchen usable by the end of next week when Giles starts his new job and moves in – I’ll carry on with the rest on my own as long as it takes to get the rest of the house in order – the only big job to be undertaken is the bathroom, which needs completely stripping out and underfloor heating installed. Getting a new bath up to the 4th floor will be interesting! I have another shoot on Monday this time partly a walk-up shoot over dogs, which I’ve never done before. This year I seem to have more shoots arranged than ever before – all muzzle loading. I think I am going to try to do a few with a flintlock, but I probably need more practice at clays before I swap! I’m also going to have to get some appropriate clothing for the period. On the mechanics of running this blog site, I was getting about a thousand attempts to hack the site every day – I keep a careful eye on who gets blocked by my security software for trying to hack the site, and every so often I spot a persistent attacker and contact their Internet Service Provider and ask them to stop the abuse – last time it cut the attacks down to 300 per day. It will build up again but by careful checking I’ll probably manage to stop a fair bit of it!

I appear in these photos as they were taken by Giles – not my choice!

The problem of lack of space behind the IKEA units was solved by half burying the waste pipe in the wall – the units are now spaced 25 mm off the wall – allowing space for the water pipes, trunking and half the waste pipe. On the wall to the right they will run inside the cabinets.
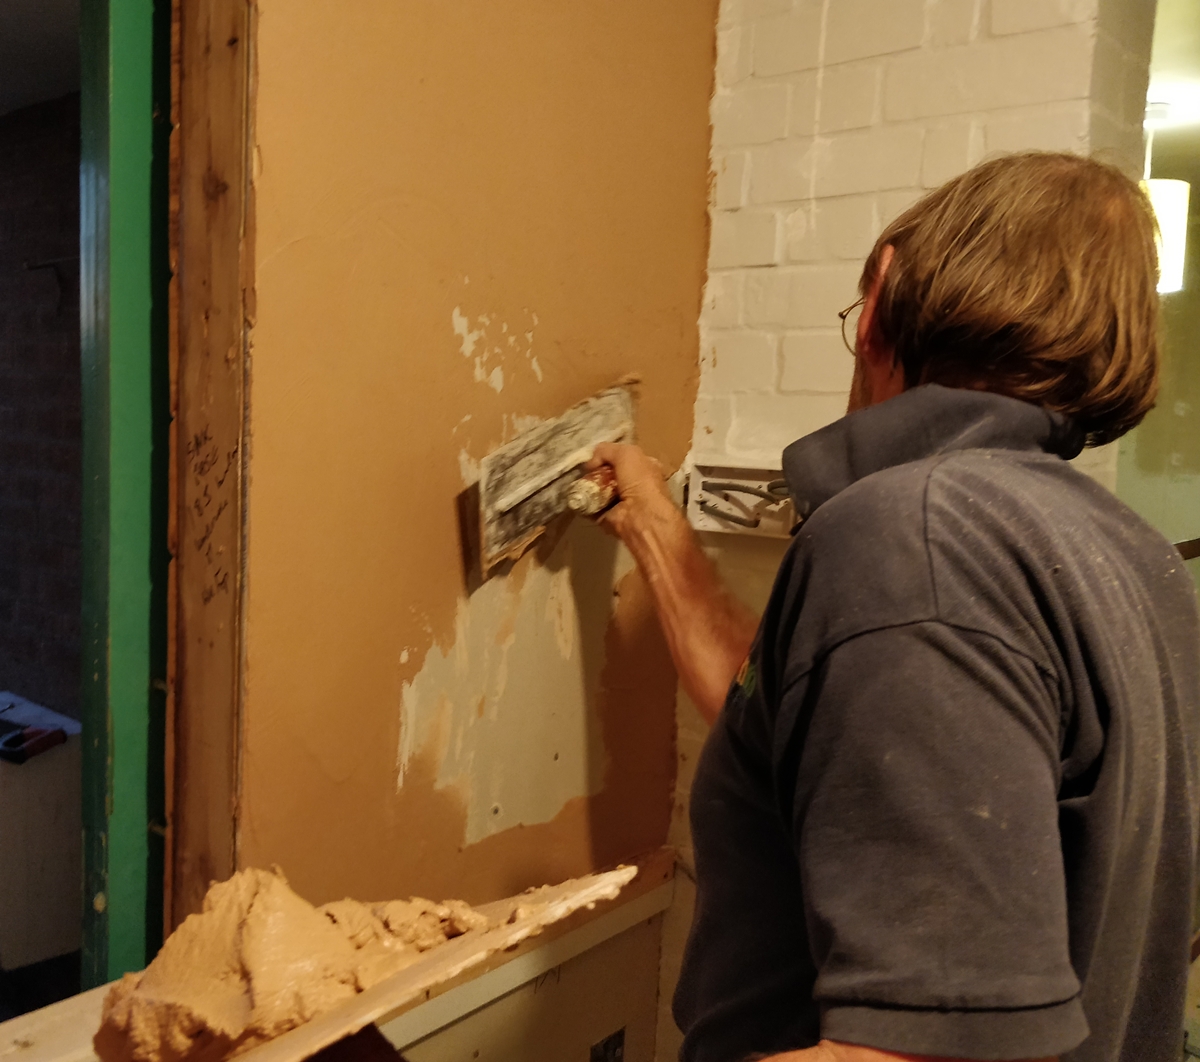
My plastering is not so hot – on the first wall I made the mistake of working from left to right so I kept touching the wet plaster with the hawk in my left hand!
13th October – Decided to start skimming plaster on the kitchen walls at 4:30 so didn’t finish till late – now well past thinking….
12th October – beginning to see a bit of progress on the flat – the first fix of the electrics in the kitchen is done and the plasterboard is back – so now its time to skim the walls and lay the new floor, then finish the plumbing of the water – which is fixed to the walls behind the cabinet backs ( there is about 25mm of space max) after which the cabinets will be fixed and the waste plumbing installed completely inside the cabinets – I’m still puzzling over the design of the IKEA units – even with 650 wide worktops we can’t get space to fix the waste pipes behind the units. For my evening reading I’ve been browsing another 19th century Big Game shooting book – this time about shooting in the Arctic, the prey being Walrus and Polar Bears – the author claims that its more sport shooting Walrus than Polar Bears, although by his accounts I’m not sure either sounds very sporting. The problem with Walrus is that their ivory tusks are not big enough to make billiard balls from (!), and that if wounded, even severely, they dive deep and are lost. There is a sporting element, I suppose, in that occasionally one will attack the small boat used to hunt them and puncture it (the boats carried sheet lead to make temporary repairs). The preferred method of taking them was to harpoon them, but that depended on a professional harpooner so didn’t seem to involve much skill on the ‘hunters’ part. Part of the difficulty in shooting them is that the front of the head is a mass of bone and the tusks and is difficult to penetrate – the (small) brain is situated in what looks like the neck. The recommended hunting trip was to leave Tromso in May with a 40 ton walrus boat carrying a couple of the light 20 ft.hunting boats aboard, with a crew of 15, returning in September – the cost was then estimated at £450 but that didn’t include tea! £450 then converts to around $60,000 now, which sounds like a bargain for 15 men and a boat for almost 4 months. Tea seems to be a constant in all Big Game expeditions from the late 19th century – about the only sentiment in the whole ‘adventure’ that I can share!

Things are on the upward path!
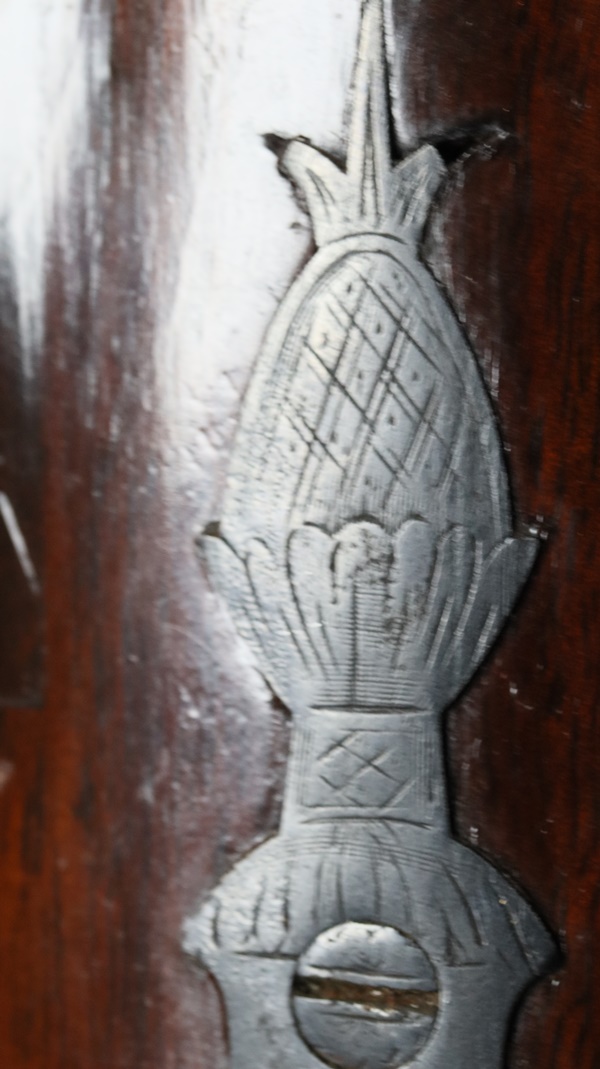
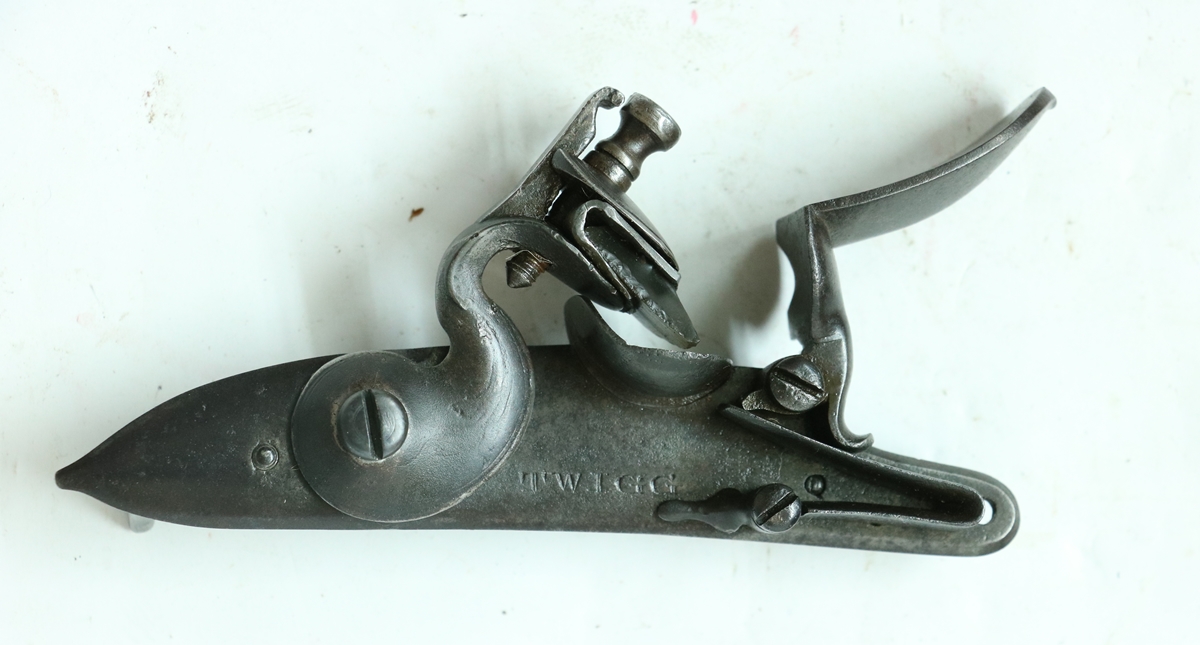
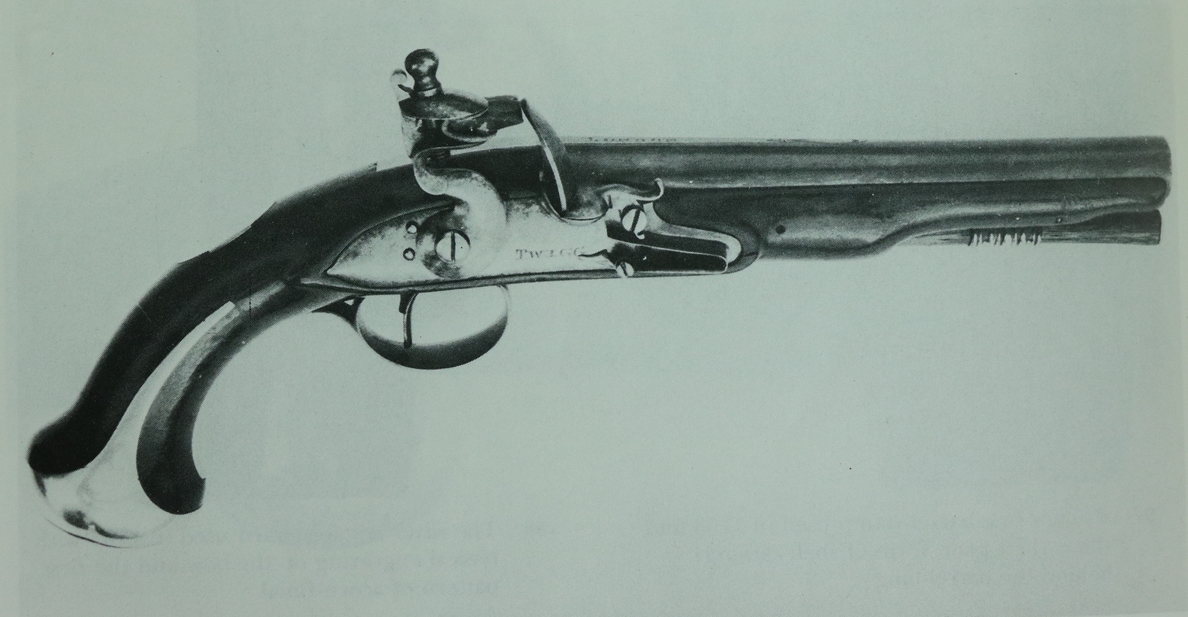
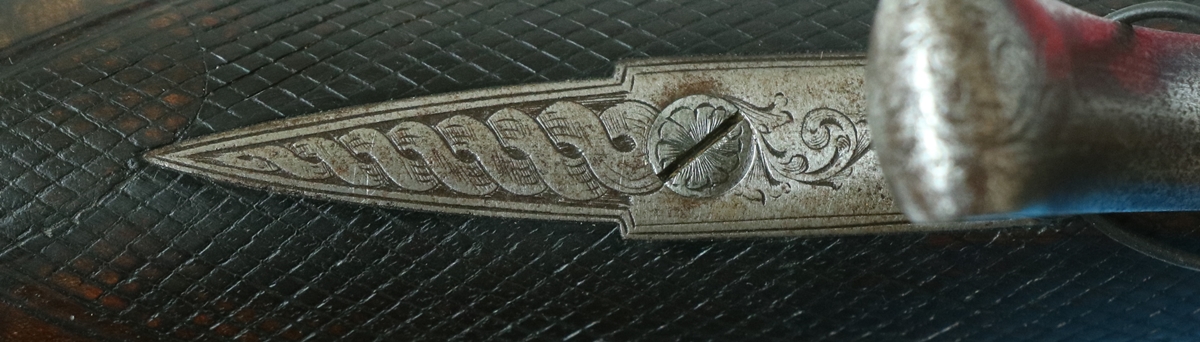
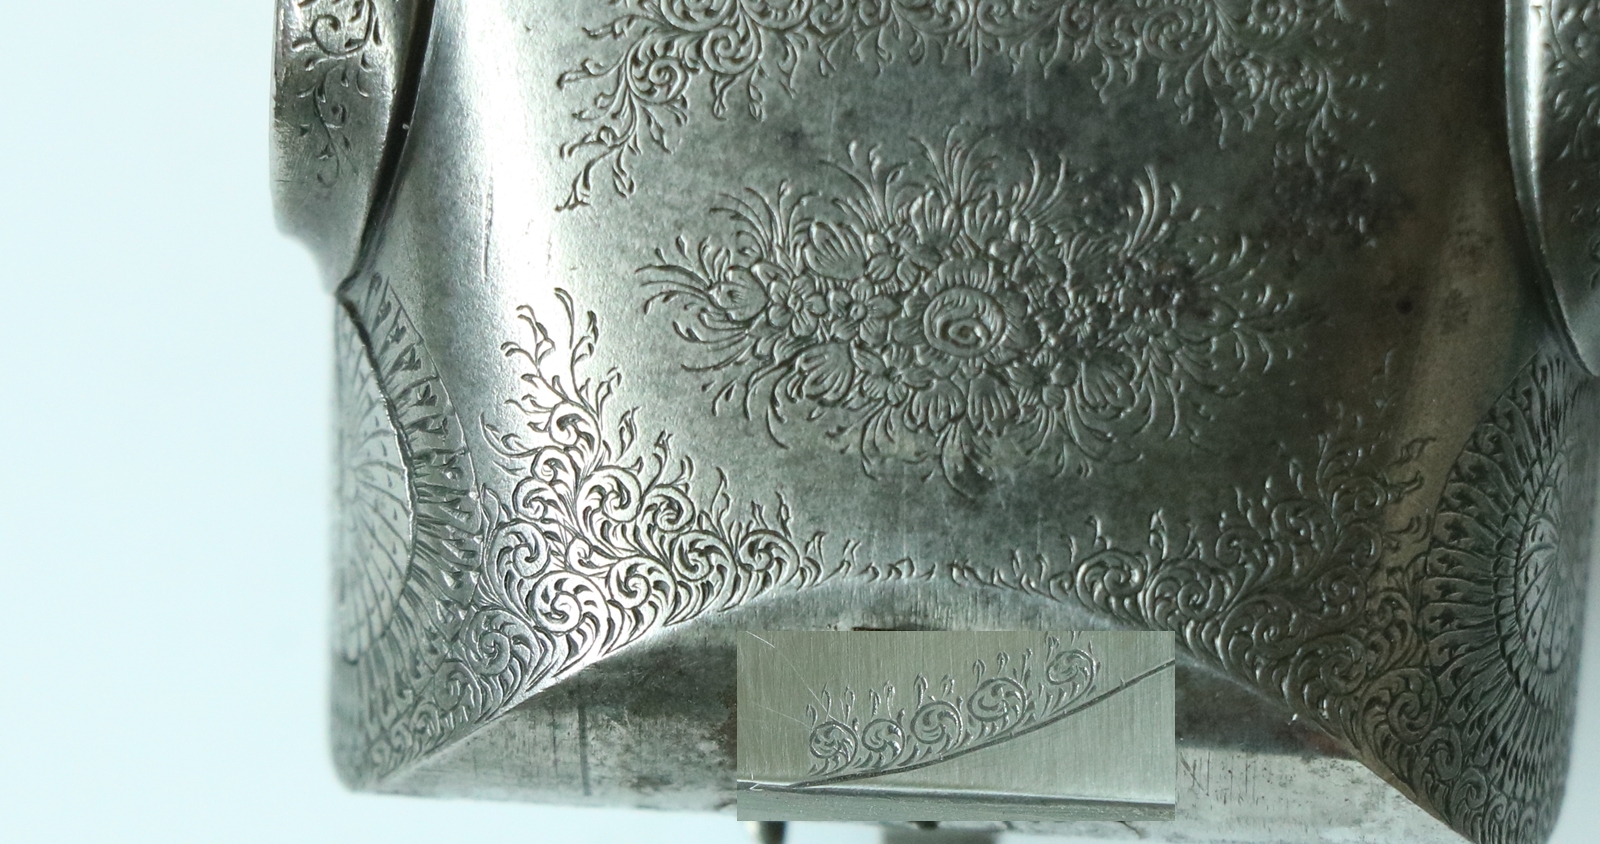
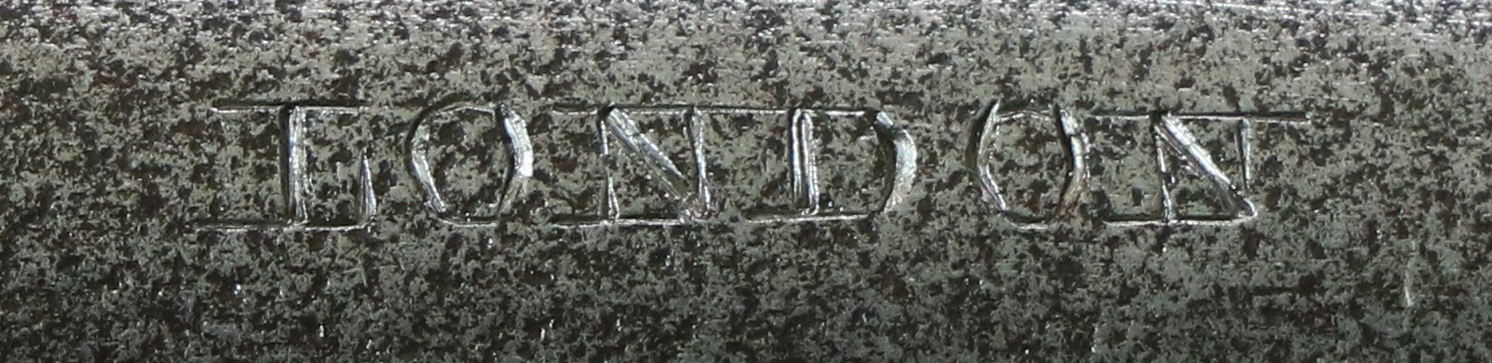
11th October – More renovation – started first fixing the kitchen electrics, it all seems very slow but we are counting on it speeding up when the floor and walls are done and we can move on to fitting the units etc., hopefully by the end of the week if we put in a few extra hours. I had a call from Dick, who has been working on the Hawkes and Mosley for me – he says that the quality is excellent, and the engraving very good – he has struck up the barrel and is pleased with the way the browning is going and the dents and marks have come out of the stock. Unusually the finial of this pistol is clearly poorer quality engraving than the rest of the pistol – this part is usually better engraved than the rest – I always think that it was given to a journeyman to demonstrate his skill, while the rest was banged out on an engraving production line! I will go and photograph it shortly, or bring it back if it is finished – I’ll have to touch up the engraving on the cock where the crack was welded. It promises to be a very fine London gentleman’s pistol – a cross between an overcoat and a horse pistol – I’m never quite sure what to call them – I don’t think they would have been carried about the person but kept in the home or possibly taken on a coach journey – a pretty deadly weapon at close range if you were a good shot – I did try a pair of quality percussion target pistols at man sized targets at about 11 paces ( a typical duelling distance) and while I could hit the area of vital organs (burst a balloon!) reliably after half a dozen shots, four or five experienced rifle shooters who were not used to pistols failed to hit the ‘man’ at all on their first shot – so my guess is that to be of use as anything other than a deterrent one needed to practice occasionally with the actual pistol you intended to use for defence. I feel its time for a bit of pistol shooting, but I have to keep my nose to the grindstone for a bit!
10th October – Doing my duty as a school governor this morning and Giles’s flat this afternoon – struggling to work out waste pipes and plumbing with the awkward IKEA base units – now I see there is the gas pipe in the way too! I had a correspondence with a new recruit to the blog about a ‘rash’ that he had on a barrel he had browned, which I suggested was probably caused by using copper sulphate to etch the barrel in an aluminium container ( the electrochemical voltage between iron & copper is 0.8 Volts, between aluminium and iron its 2 Volts – so plenty of potential for trouble (pun intended)). Copper sulphate is quite aggressive stuff – I tend not to use it as I have had copper plating out onto barrels before and its a pain to get off. I do sometimes use old printed circuit etching solution as a browning, and that is pretty loaded with iron and copper, being based on acidified ferric chloride. French barrels with fine damascus are sometimes deeply etched and left like that, but I suspect they acid etch them. I had a moment this evening to deal with the birds I bought back from the shoot yesterday – they didn’t have any way of selling them so we took as many as we wanted – I took 4 partridges and the cock pheasant I shot (the only one shot), and have crowned them and put them in the freezer – I’d have taken more but its full to brimming now!
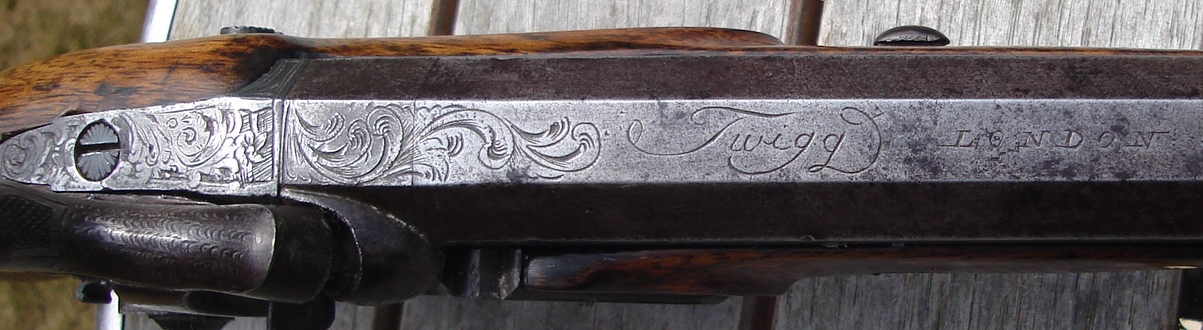
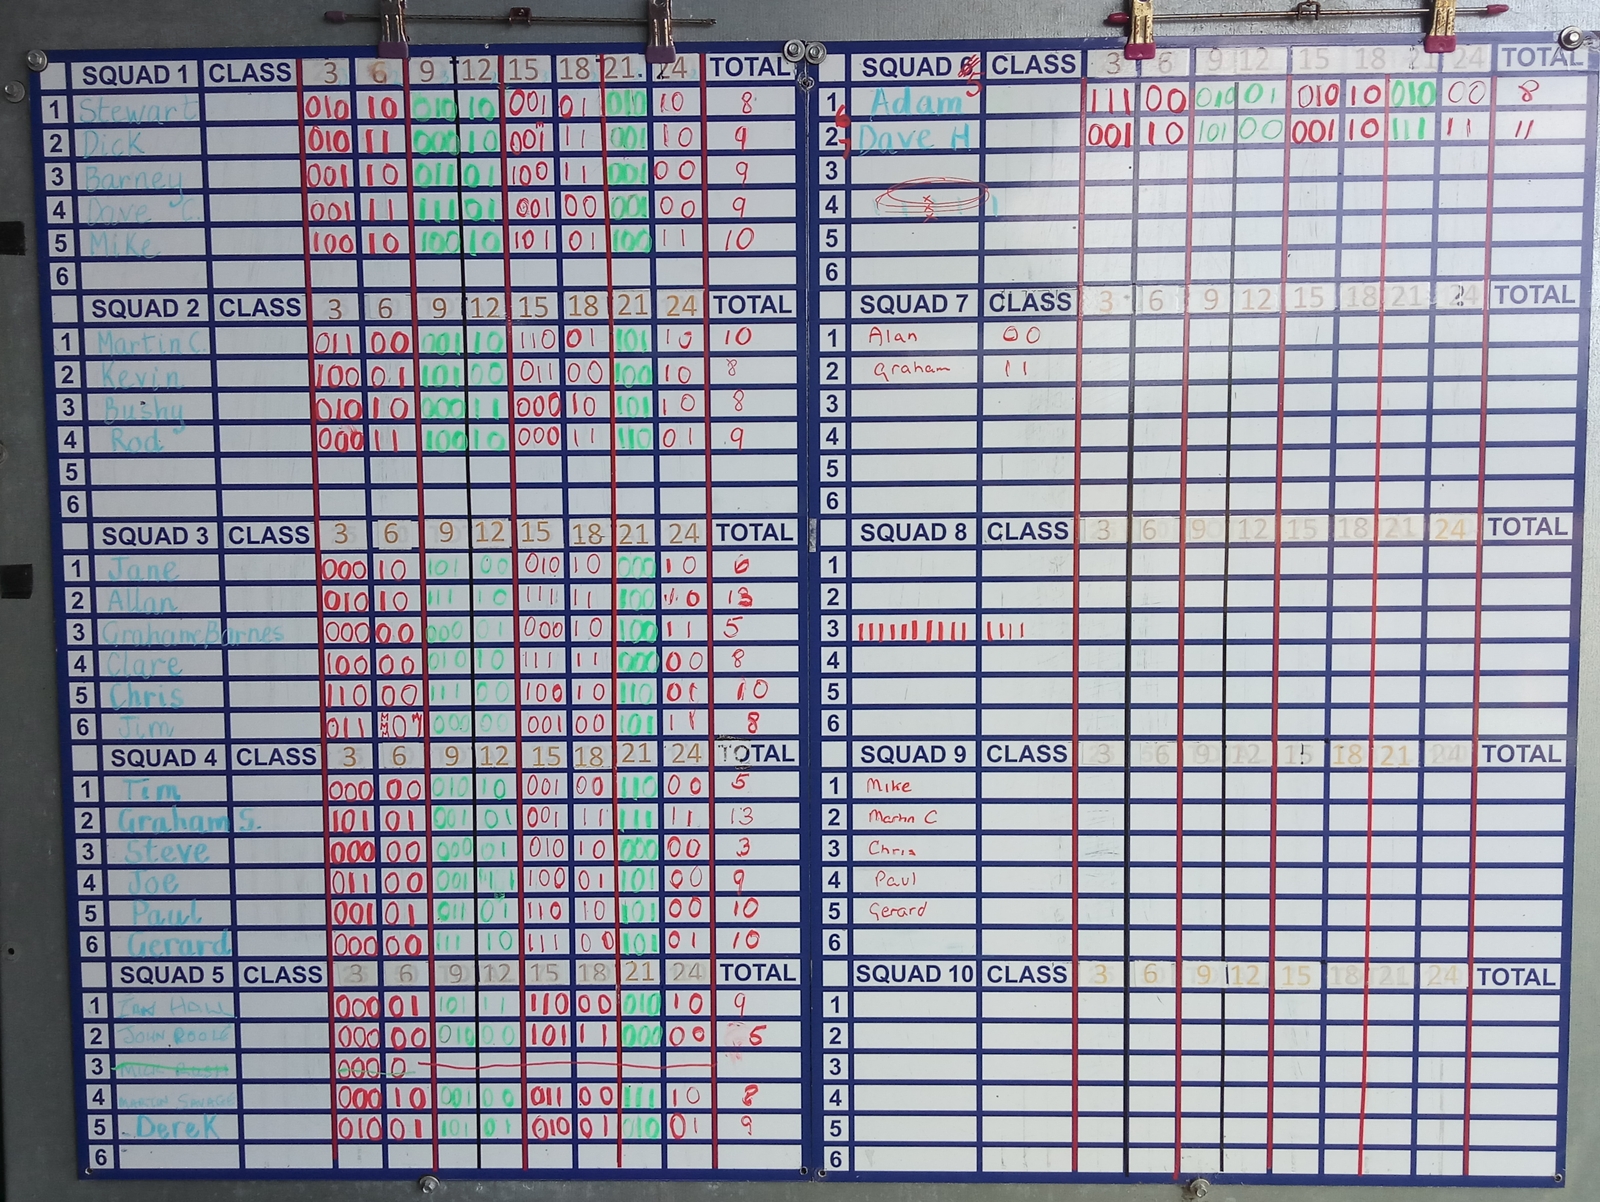
9th October – Fantastic day at Bareham Hall on a muzzle loading Partridge shoot – the bag was 190 for 400 shots and very few runners etc. The beaters were amazed at the performance, which they said was much better than the breech loader’s manage. Probably because we shoot all year round, and also you know how much bother it is to reload and you don’t want to be reloading when the best birds come over – so you let the dodgy shots go! Anyway there were some fantastic drives and I had plenty of good clean shots, and my average wasn’t that much different from the overall – so a good day out! I suspect we may have made some converts to the muzzle loading cause – trouble is it puts up the demand for shootable antiques! I managed to clean my percussion gun in about 30 minutes, and got to thinking about how people clean their flintlocks – I know someone who shoots high quality original flintlocks who takes the locks out each time and immerses them in boiling water, and I usually take out the lock of my ‘Twigg’ and give it a spray with cleaner and a wipe and then a light spray with lube – if it looks too dirty I pour boiling water over it and dry it on the AGA before oiling it. Manton cases for sporting guns were designed to hold the locks separate from the stocks – I guess that was because they were normally removed for cleaning. Nowadays I tend to use Napier cleaner quite liberally as it contains VP90 corrosion inhibitor that works as a vapor – I also put a sachet of VP90 in each of my gun cabinets – I noticed that Purdy used it in the (many) gun cabinets at Sandringham so I figured it must be effective as they were not obsessive about oiling the guns.
Giles spent part of today putting together an IKEA base unit for the kitchen – there is a BIG problem with these units – whereas all the previous units I’ve bought have a space behind the back panels deep enough to house a 1 1/2 inch drain pipe etc, the IKEA units only have about 1 cm behind the back panel so they will either have to be spaced off the wall or have the pipework run inside the cabinets – I can’t think why they would make them in such a stupid way, I’m pretty sure that other units have about 2 inches dead space for pipes – I bought one such from B&Q in April. We might be able to space them 1 inch off the walls, but it is going to be tight! We spent some time trying to find out how deep the space behind the cabinet was before we bought them but couldn’t find the answer. Anyway its yet another problem to overcome, or else we’ll have to take them all back for a refund, which will be a monumental pain – life is like that, no job is straightforward!
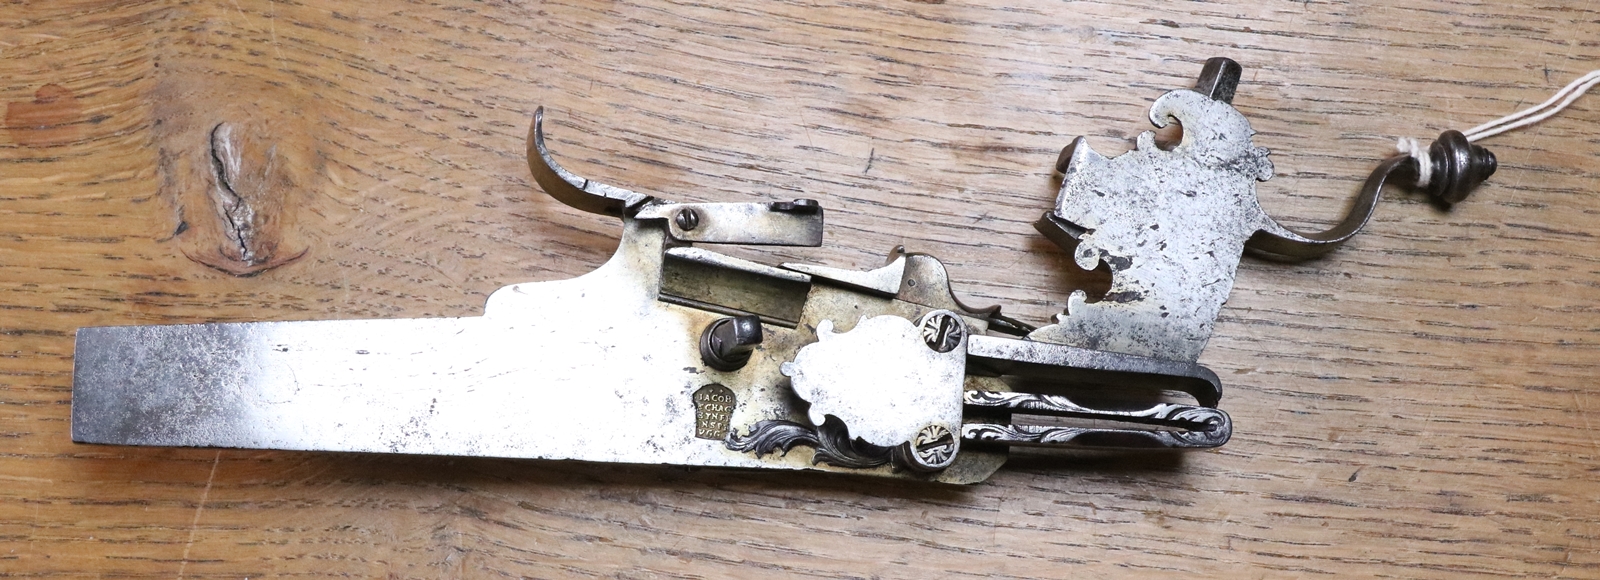
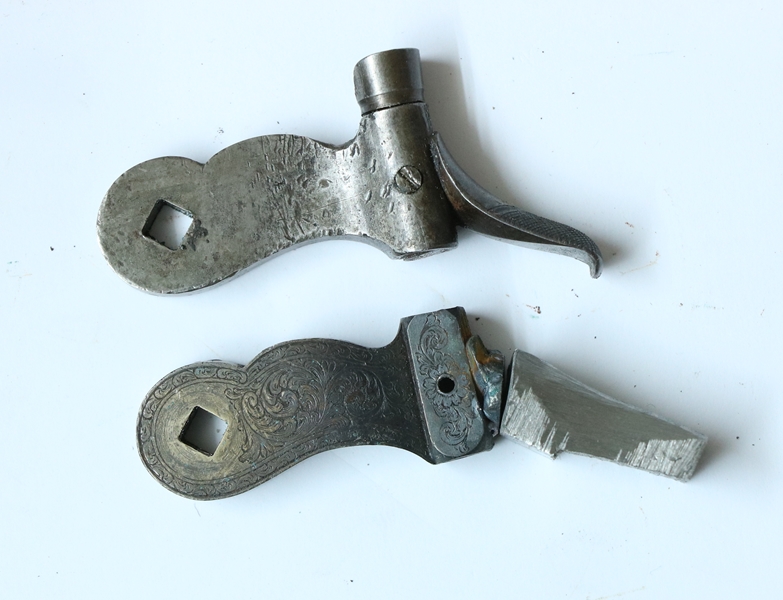
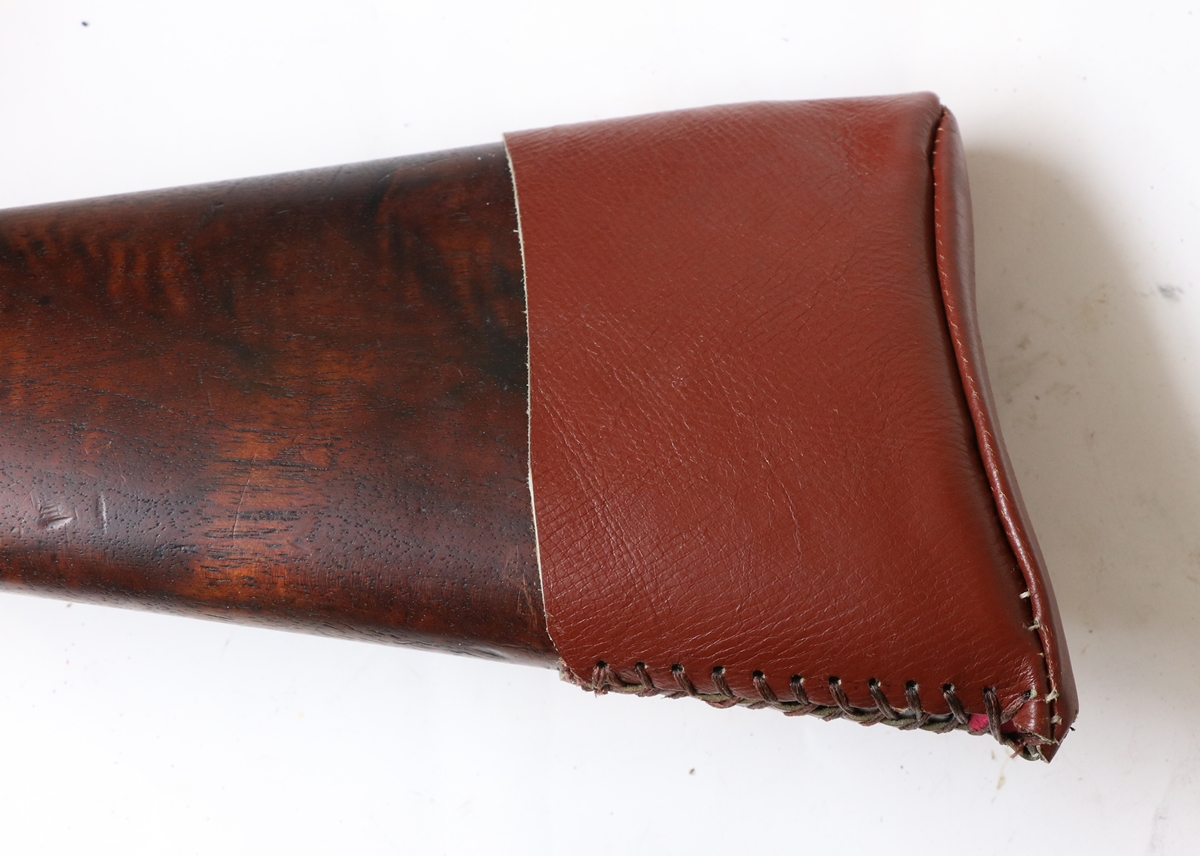
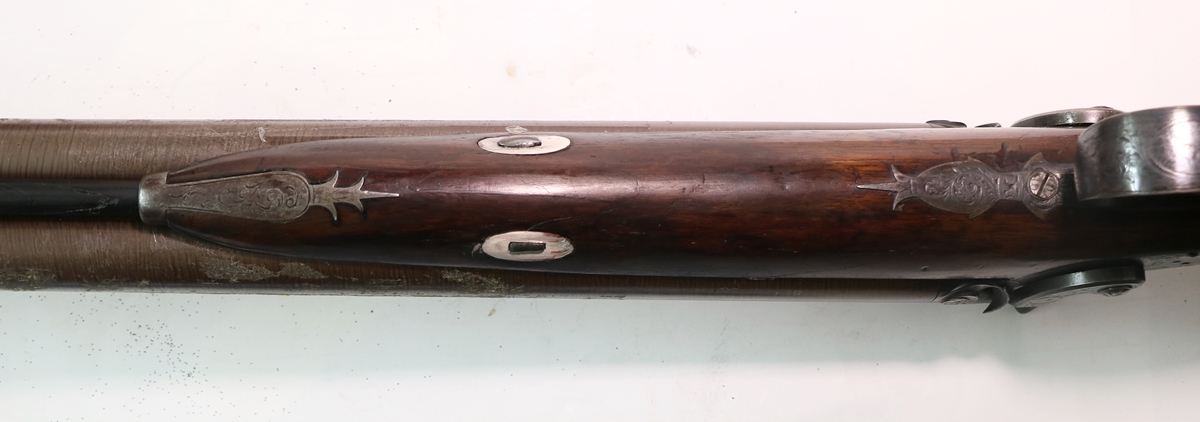
8th October – A day catching up with domestic duties like fixing the mower and mowing the lawns! I went over to Dick’s for the first time in a couple of weeks to collect the Stephen Grant that we had repaired the cock of some time ago as I need to return it tomorrow. I took the Hawkes and Mosley flintlock pistol to get his view, and he offered to restore it for my client – there is a small crack in the back limb of the French cock that will need a touch of weld from Jason, and the barrel needs browning and a few dings in the wood need raising and the spring on the safety is missing, but it will make a very nice pistol – its basically sound and genuine – nothing to hide or fudge here! Dick will make a very good job of it – I’ll get it back at some point to touch up the engraving on the breech block a bit. I’ll try and put up some progress photos but it may be a bit difficult. I’m off to a driven game shoot tomorrow so I got out my shoot gear – I am trying to minimise the stuff I take to the peg as it often involves a trudge across a muddy field and the less one carries the better. Like most (more) experienced muzzle loading driven game shooters I have a spiked tube that holds my loading rood that can be stuck into the ground so the loading rod can be to hand and keeps clean. I had a bin attached to the tube that held my shot and powder flasks, but they tended to fall out if I left them in while carrying the tube – I have now attached a piece of 1 1/2 inch plastic tube to hold my sectional unloading rod with worm, and changed the bin for a smaller, deeper one so the powder flask doesn’t fallout. It all looks a bit Heath Robinson, but it will do for a trial! I am expecting mostly partridges on this shoot, so I’m in two minds as to whether I should use No 6 or No 8 shot – I guess I’ll take a flask of both and take a straw poll amongst the more experienced shots! I got out my usual double, the back action Egg 16 bore, and as backup I’ll take my little 16 bore single Henry Nock percussion conversion. It’s very convenient that all the guns I use regularly are 16 bore as the wads and cards are common to them all. Converting the Nock back to flint has been on my agenda for a long time, and now that I think I can hit clays with a flinter, the conversion of the Nock seems an attractive prospect – my only reservation is that the barrel is short – around 26 inches – and I’m not sure that is long enough for the slower powder burn of flint ignition to take full effect – I’ll have to ask Bev as our flint guru! Giles was off buying stuff for the flat- he wants to get painting! The flat is just 5 minutes walk from the Cambridge Farrow and Ball paint shop – there can’t be many flats that close to an actual F & B outlet, so I guess the temptation is strong.
7th October – All the renovation has been leaving me with little energy or time for this blog, I’m very sorry to say! It is quite amazing how much of the time is spent shopping for bits, and then going back for more – I guess that is the trouble with being an amateur – you don’t have a big stock of materials and have to work things out as you go along… At a guess we are spending about 25% or more of the time getting stuff and shifting it from vehicle to flat. Yesterday morning was a trip to Ikea ( 4 1/2 hours) to buy all the base units and bits for the kitchen and today we bought a stair climbing sack barrow and shifted almost half a ton of the Ikea stuff (2 hours) to the flat- there is a lift but it only serves alternative floors and so we have one flight of stairs. Anyway its coming on, and I’ve got the positions of most of the kitchen wiring sorted – so the plasterboard will go on shortly. We spent some time trying to find suitable black electrical fittings – the ones we liked didn’t have a small 45 Amp cooker switch which we need, but in the end we found that we could stick the front plate from a 20 Amp one we liked onto a not so nice 45 Amp one – job done, or rather fudged…… I’m going to have to concentrate on getting myself into shooting mode tomorrow as I have the first shoot of the season on Monday – we are all using muzzle loaders and for this shoot will be doubling up on the pegs to give ourselves time to reload. One feature of double pegging is that you shoot one barrel and then hand over to your peg mate, so you have to reload with one barrel already loaded – to do this safely you need to take the cap off the loaded barrel (unless you get a left and right) – so I plan to make a few more de-cappers for sale. I’m also going to try out the idea of a plastic collar that fits round the cap and is held by the cock so that there is no possiblity of the cock hitting the cap and firing the gun – I’m not sure the idea will get universal approval, but I’ll test it out myself. I managed to sell the Passat on Ebay for a reasonable price, and it should go tomorrow. The flashy red Mazda that replaced it is much enjoyed, although apart from fetching it I haven’t had a chance to drive it! Tomorrow I’ll take the Hawkes and Mosely pistol (see below) to Dick for his opinion – he might like to do the work too.
4th October – Still working at destroying the kitchen! All the units have gone and the inside of the flimsy studwork outside wall has been stripped and the rather skimpy insulation removed. We removed the old window and have ordered a new UPVC one – the price for supply only was very reasonable, so we’ll fit it ourselves, which will enable us to move the opening slightly and lower the top of the window so we can get an outlet for the cooker fan above the window. The old floor tiles were stuck down with incredibly sticky glue – we tried wearing latex gloves but they got stuck to the tiles – we did eventually get the tiles off after getting through half a dozen pairs of gloves – the floor underneath is rather friable chipboard that has suffered from damp in places but I think it will serve as a base for the new laminate floor – we would have put down ceramic tiles but didn’t trust the sub-floor to be stable enough. We couldn’t face carrying all the bits of the old cabinets and plasterboard down 4 flights of stairs, so got a rope and lowered them from the external stair tower in about 10 loads. Giles stood at the bottom wearing a hard hat and high viz jacket, on the principle that probably someone would object if they thought a resident was doing it, but no-one ever questions a workman wearing a hard hat, as every criminal knows! We still have the old window to get down!
2nd October Busy today wreaking havoc in the kitchen of Giles’s flat! The units are on the way out, the tiles gone and the wiring has been carefully removed from the unsightly trunking running in sight, and will be put back in trunking behind the units where it can’t be seen – In my books that doesn’t count as rewiring, merely slightly re-arranging the existing wiring. I will get it checked when we have finished and I will consult the latest IEE regs as my understanding may be a bit out of date. All the wiring is in red and black T & E so is somewhat dated, but looks perfectly good. I tried to buy some special plaster for skimming all surfaces but found that no-one stocked it so I’ll have to use a P.V.A. layer to cut the absorption and use Multifinish. I think we are making progress on ordering things – we ordered two 3 meter x 650 mm worktops in 38 mm walnut but realised that getting them up 4 flights of stairs was going to be somewhat tricky as each weighed 75 Kg and they won’t fit in the lift – anyway we have got the supplier to cut each into the bits we want, so the largest is 50 Kg and will fit in the lift. It is a bit of a pain working on the forth floor and at the opposite end of the building to the lift! We also have reasonable quote for replacing the windows – I didn’t much like the quote for £3500 for four UPVC windows that you can buy for about £250 each including V.A.T. – I would fit them myself but we are pushed for time and can’t get at the outside so the windowns have to be installed from the inside – this way someone else carries them up 4 flights and takes the old ones away! We have 3 old storage heaters to dispose of – I’m tempted to throw the bricks out of the window, or more responsibly, lower them on a rope. Anyway as you might guess, no time for starting the pistol yet, although I might just nip into the workshop for half an hour tonight……….
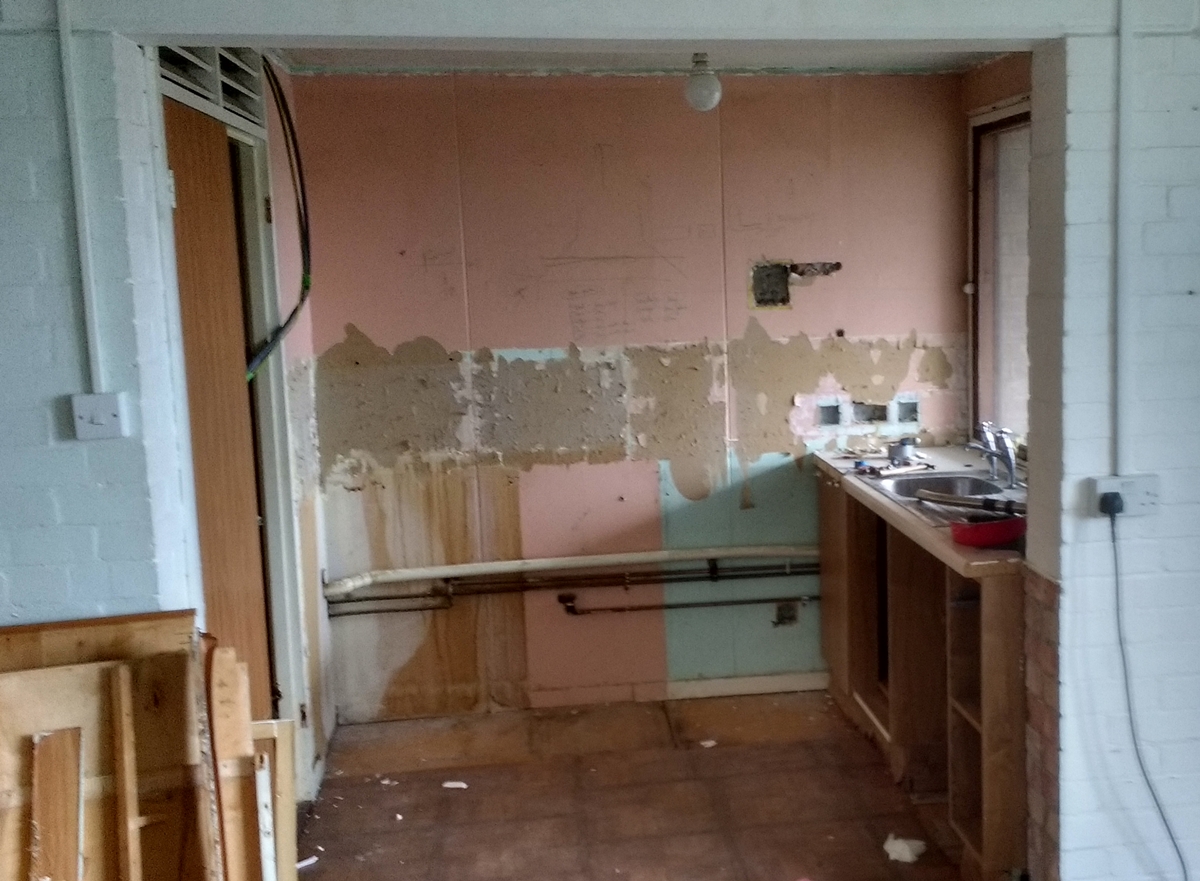
Fuzzy photo of partially destroyed kitchen.
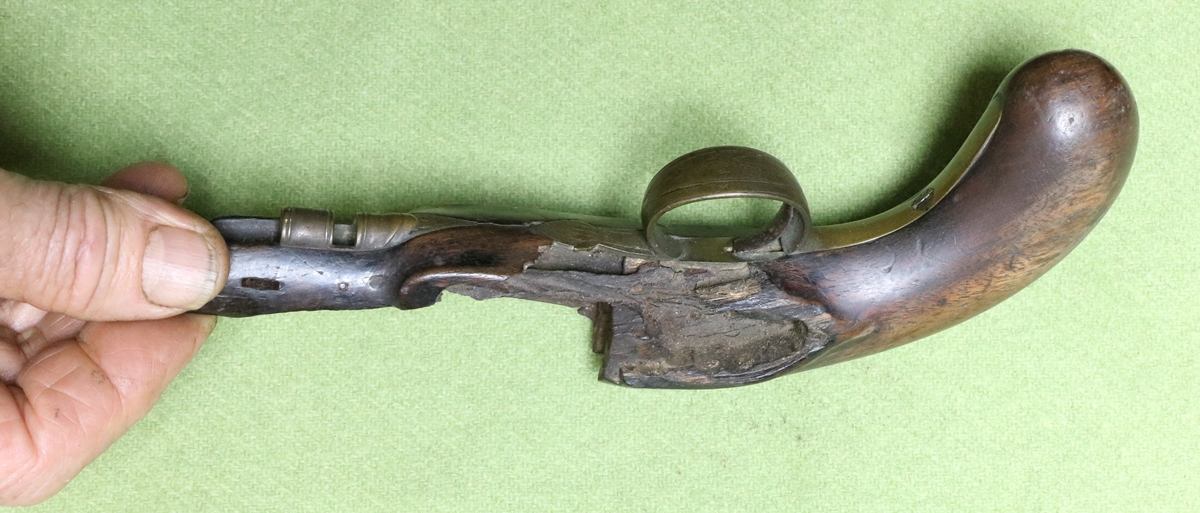
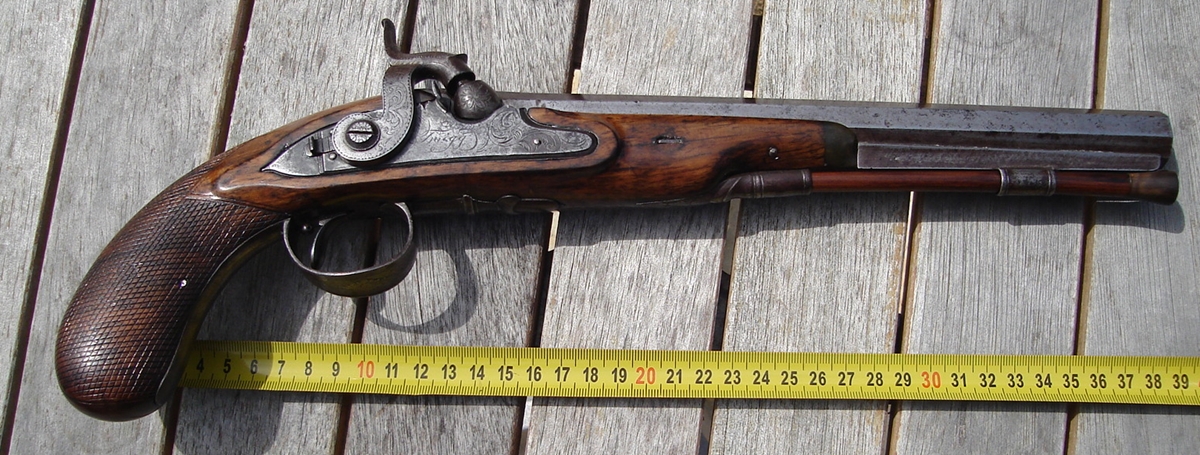
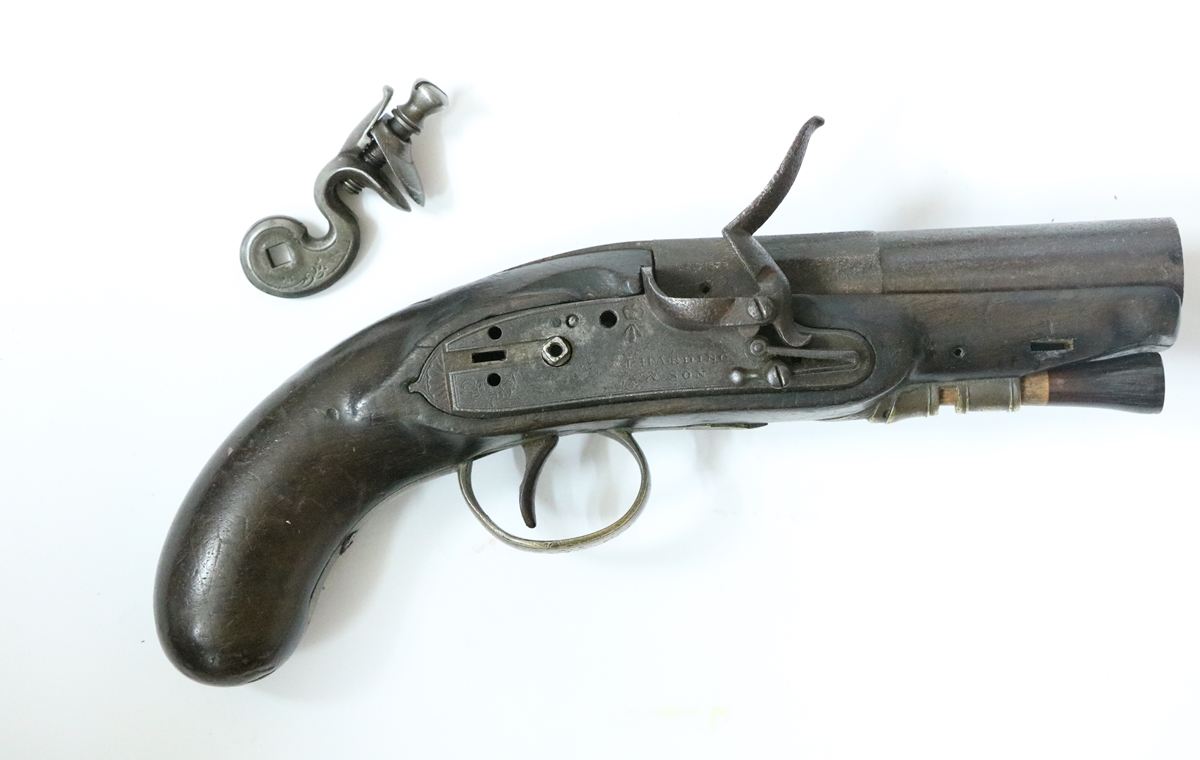
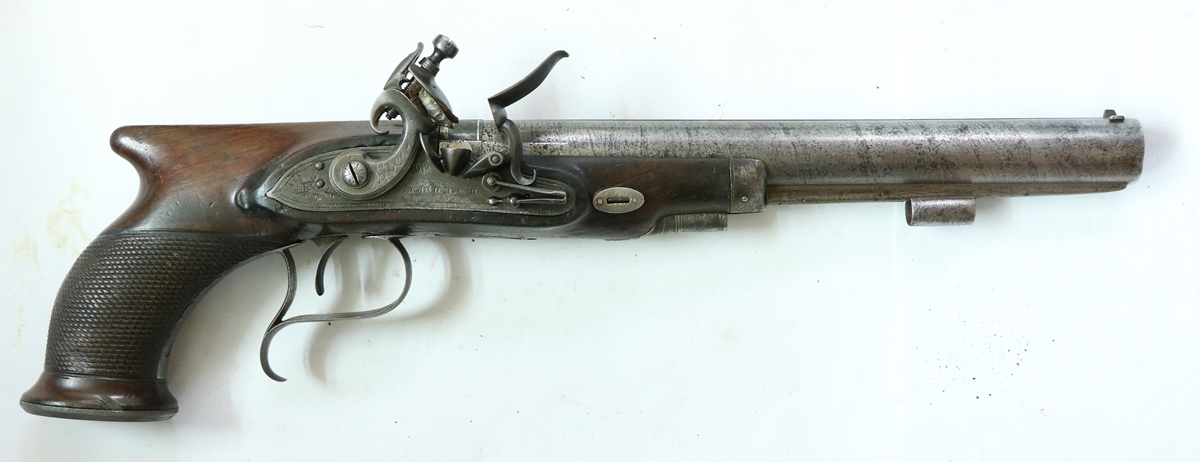
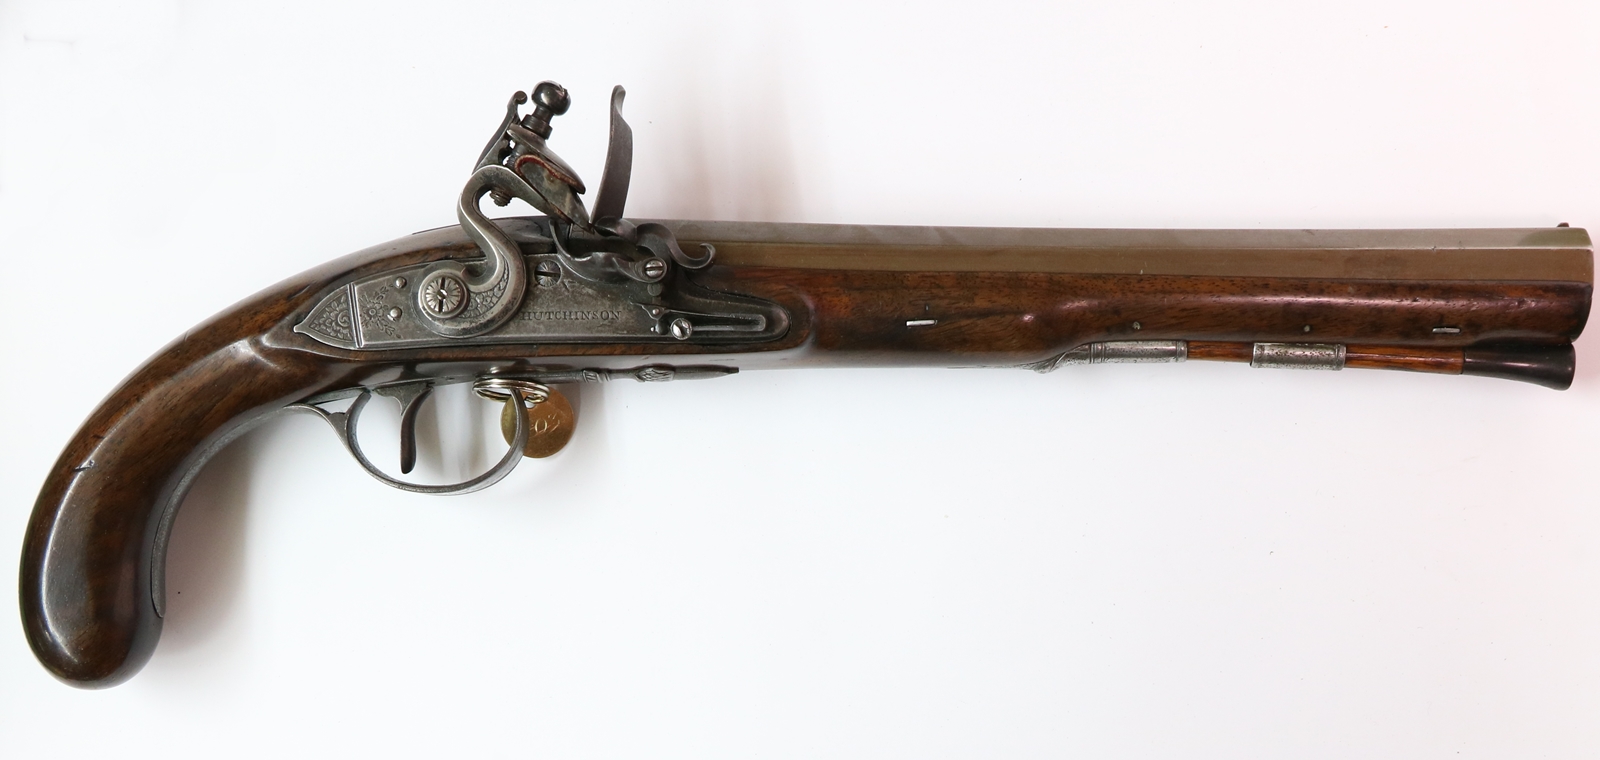
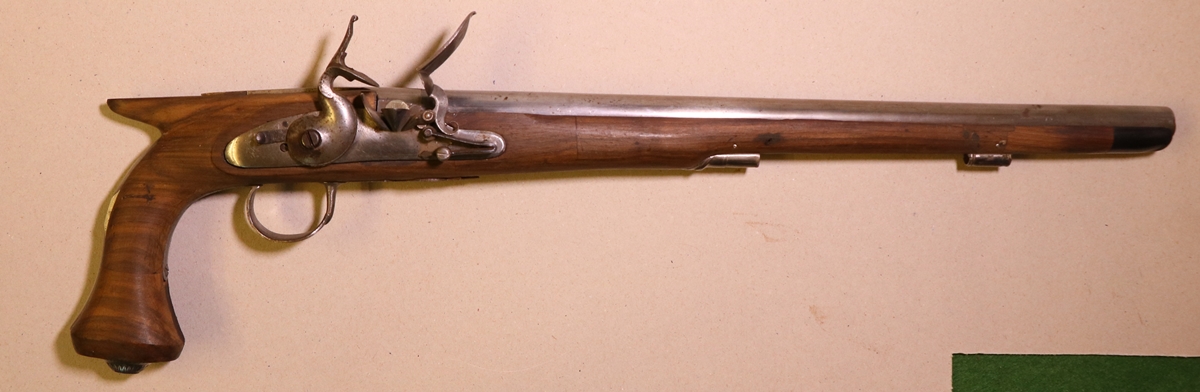
1st October – Here is the promised photo of the Hawkes and Mosley pistol I have to restore, the main obvious issues are the crack in the cock and the replacement cock screw. The lock appears to have been painted with silver paint, which is mostly removed but the residue may be hiding secrets! At the moment it looks original, although the spur on the cock looks a bit short? There are some nasty marks in the woodwork opposite the lock, and a few stains. The barrel is not too bad, but needs a little attention before re-browning. The action works well. I’ll show it to Dick and we can have a good look at it together. The lock needs paint stripper and then de-rusting and the cock welded and the cock screw replaced. Getting rid of the finish on the wood and steaming it will reveal how deep the marks are. I have started a new post for it, Hawkes & Mosley, with the original photos.

Three of us spent the day at Giles’s flat finishing the preliminary clean so we can see what we are dealing with – Some of the details need sorting, and I’m trying to understand the wiring. It looks as if a foam cornice was put round the ceiling edge then the flat was completely re-wired in surface mounted trunking including trunking skirting boards, and then a new floor was laid in the living room, butted up to the skirting, then a strip of coving glued on to cover the joint between floor and skirting. I now need to replace the trunking skirting as I want to skim the walls, and can’t get more sockets to fit that trunking. All a bit involved – the existing arrangement looks a bit of a mess, as does a lot of the plastic trunking! I don’t want to rewire the flat, but I think a bit of re-arrangement of the trunking is going to be essential to improve the look of the place. See post Hanover Court.
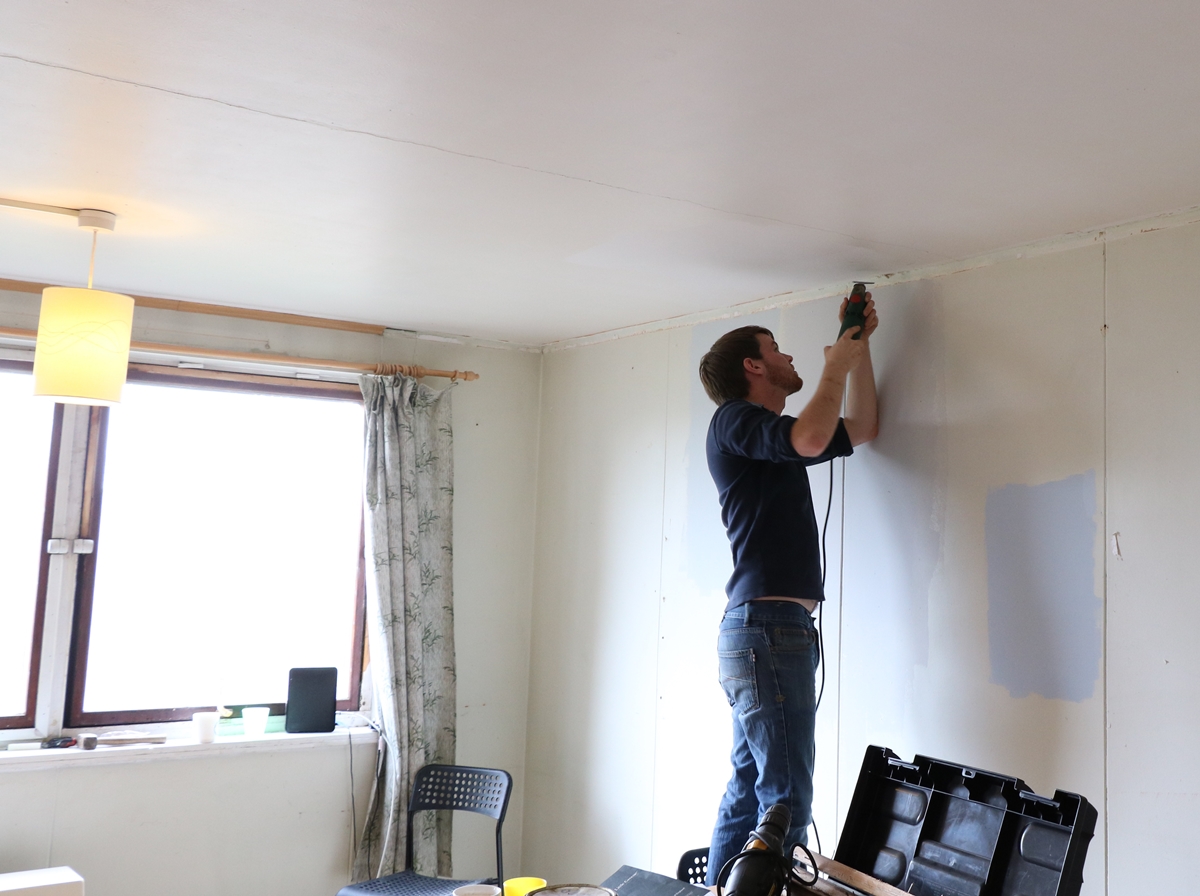
Giles removing the foam cornice.
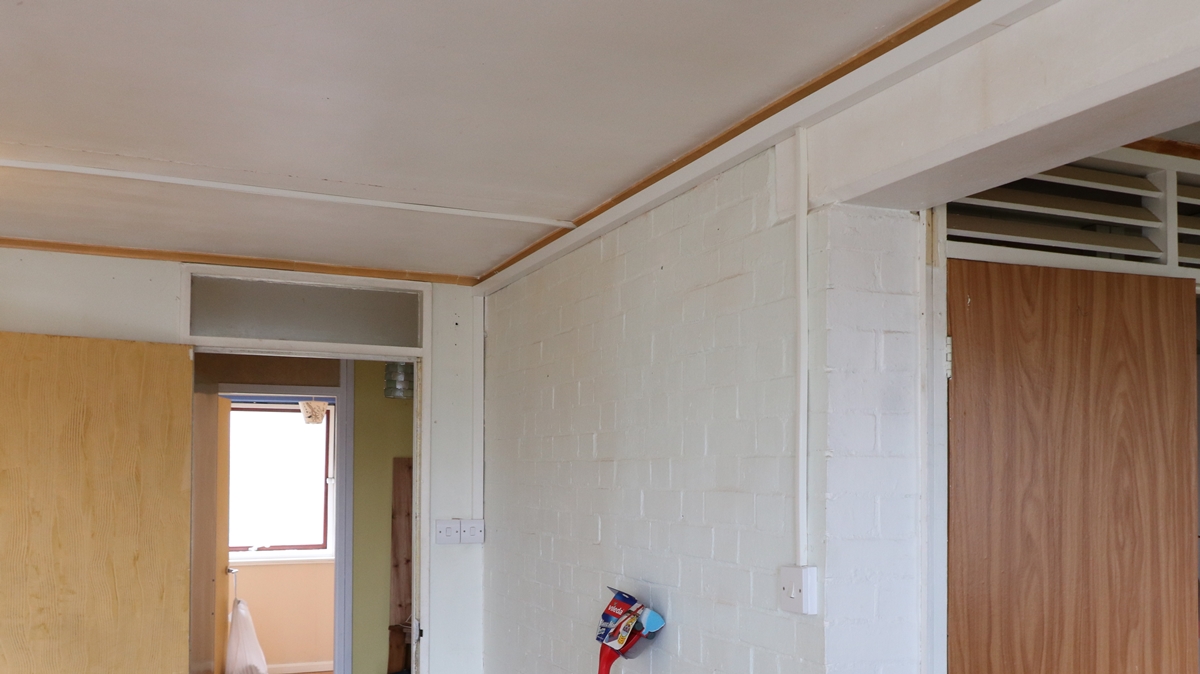
Elegant wiring in surface trunking!
30th September – Back from the AML shoot where I exercised my ‘Twigg’ single 16 bore flintlock. Its the first time I’ve shot flintlock in a scored AML shoot, and I’ve only ever hit a couple of clays with one, so I wasn’t expecting much! I didn’t hit any for the first half dozen shots, and I made what for me is a capital mistake, which is to try too hard and shoot ‘gun up’ ( gun in the shoulder ready to pull the trigger as soon as its aiming properly) – the extra thinking time just spoils the flow for me, although about half of the group shoot this way, or at least nearly up. About half way through I had hit a couple of clays and began to think positively and reverted to ‘gun down’ where you don’t mount the gun until beginning your swing. At that point I got a bit more relaxed and hit a few more. The clays were not easy for flintlocks, which are more difficult to get kills with than percussion, which in turn are more difficult than breech loaders, but I did manage 10/30 and came joint second out of half a dozen flint shooters, so a very good result by my usual standard – I think I may stick with the flintlock for a while as its more fun. I managed most of the shoot on an old flint that looked so bad that I got teased about it – it carried on working for a good few shots before bits cracked off and I had to replace it. After lunch we had a breech loader shoot so I used my 1955 Beretta 20 bore hammer gun with reasonable results – both barrels are fully choked so it shoots a very tight pattern, and ‘kills’ well at longish ranges, but it calls for accurate shooting. At the shoot I got asked if I could renovate a flintlock 16 bore overcoat/horse pistol signed Hawkes and Mosley – who were apparently London outfitters, so presumably it was made elsewhere. At some point it has been silver painted, and that obscures some details. Photos will appear when I’m not being pressed to change ready to go out………..
29th September – At last, after six months and 2 days Giles’s flat purchase completed! So the ‘Great Renovation’ has begun with a clean – the flat has been unoccupied for 18 months and was looking very dirty and scruffy, but we’ve removed the worst of the grime from the living room and started to plan in detail. It looks as if the electrics will suffice with the addition of a few more sockets – its all in a plastic skirting board trunking with built in sockets, so its a matter of trying to find the same system now – under the current regulations its possible to extend existing ring mains without having it certified, so I’ll do that. The plumbing will mostly be redone as the kitchen and bathroom will be ripped out and re-fitted, but I can do that, and I’ll put in lots of service valves – there are none at the moment and there are several leaks so the water has to be turned on and off at the incoming main. We wanted American Walnut worktops and had to measure up and order them as there was a 17% off offer that expires on 30th Sept – so 6 meters x 650 mm of 38mm thick American walnut in what is incorrectly called ‘butcher block’ is on order. We spent some time yesterday looking at paint colours and collecting cards and samples, but ended up at the local Farrow and Ball outlet. One of life’s mysteries is why the F&B colours look so much more natural and agreeable than most other paint colours – I’m fairly sure its because almost all other paints are made from only 7 to 9 synthetic pigments mixed to (theoretically) give any shade under the sun, whereas the F&B colours use a much wider range of more basic natural pigments. Certainly if you get one of the F&B colour fakers to mix you a F&B colour from their 9 or so pigments it is just sufficiently ‘off’ and unnatural looking to make you want to spend at least twice as much money on the real thing. Fortunately Giles and I agree about colours so no discord, although its his place so I would defer to his judgement in the end! I also picked up Penny’s nice shiny red Mazda from Milton Keynes – I thought it was much more fun to drive than the rather boring Passat, and I’m rather jealous – plus its a much more sensuous shape! I can’t believe it is only £20 per year in Road Fund Licence – it is supposed to be capable of around 60 + mpg but I got the feeling from watching the figures on the dashboard that you need to take full advantage of the 6 speed gearbox and always be in the highest gear possible – the engine pulls well from about 1400 rpm so its not really necessary to go much above 2000 rpm unless being a ‘boy racer’ – as I normally drive an automatic I often forget to change gear, so don’t do very well on the mpg front in a manual car. Tomorrow is an Anglian Muzzle Loaders shoot at Cambridge Gun Club and, I believe, the flintlock competition so I’ll continue my new found enthusiasm for shooting clays with a flintlock – there are not many of us although more are joining all the time – those who shoot flintlocks tend to be the best percussion shots anyway ( except me). I’m resigned to my usual place among the back markers – but someone has to come last! Anyway the old ‘Twigg’ will be fired up, and I might treat it to a new flint as I had two ‘no spark’s last time………
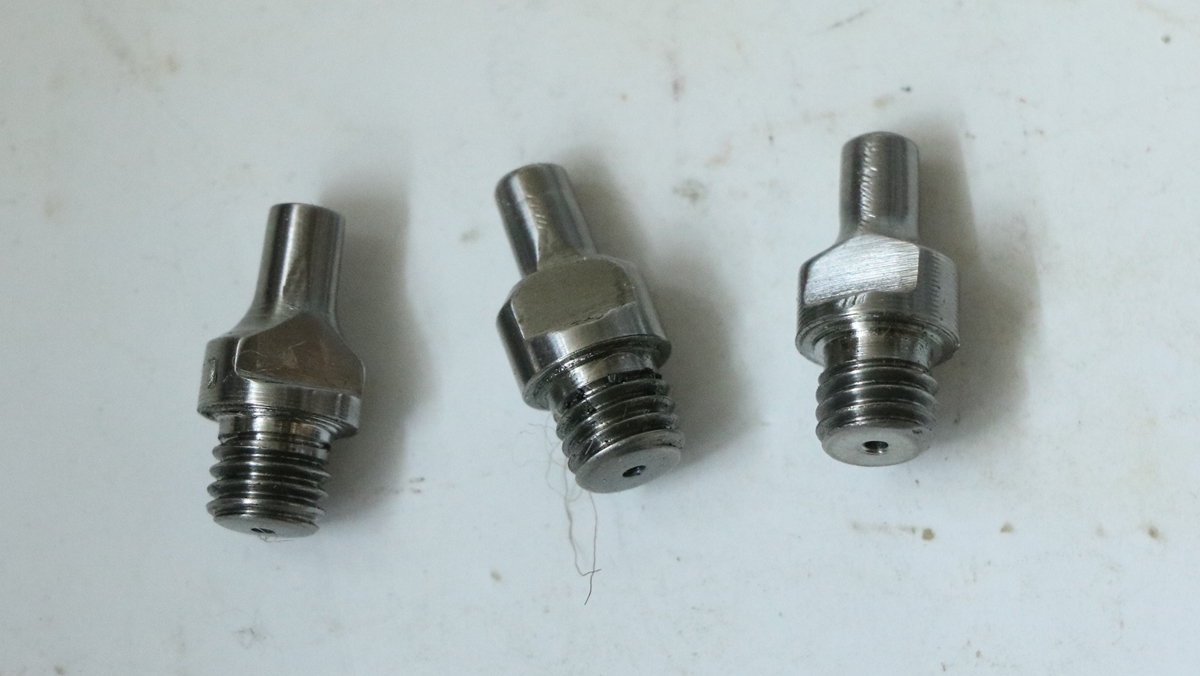
28th September – I put the Volkswagen on an Ebay auction this morning for repair or spares and within 30 minutes had 8 contacts offering to buy it – I didn’t take it off auction and its now bid over £1000 so I am glad I just let it run. Tomorrow is set to be an exciting day as I collect the Mazda in the morning and Giles expects to collect the keys of his new flat sometime during the day – then ‘The Great Renovation’ begins. I got my copy of Black Powder magazine today and was reading Fred Flintlock’s article on nipples. He is mostly dealing with revolver nipples so my experience of long guns is not the same, but he advocates nipples with the small hole at the bottom which is also the preferred long gun configuration. Interestingly ‘Stonehenge’ in his book (18 82) also favours them, rather than the opposite configuration as found on most old guns I have encountered. I have some guns with original nipples that have a larger opening at the bottom that almost never misfire, but if an original gun does misfire often it is almost always cured by making a nipple that is narrower at the bottom. I have found that original caps by Joyce and Eley seem to make a much louder bang than normal modern caps, so I assume they were stronger, which may explain why original nipples often misfire with modern caps. Fred discussed ‘blowback’ and the consequences of the hammer lifting, (which a video of a percussion gun going off will reveal as a common phenomenon) in terms of the Venturi effect, but that probably doesn’t apply in the case of nipples as its essentially a steady state effect and the impulse from a nipple exploding is a pressure pulse. The best way to illustrate the differences is to look at the bulge in a barrel that has ‘ringed’ as the result of a blockage – its purely a wave phenomenon caused by the reflection of the shock wave by the obstruction ( which doubles the pressure) and can’t be modelled by any quasi steady state physics, which would bulge much more of the barrel than a tiny ring. One difference between a revolver nipple and a long gun nipple is that while the former opens directly into the main charge, in a long gun there is a secondary volume next to the nipple. The Venturi effect is interesting, its actually one aspect of the Bernoulli principle – basically says that if a stream of fluid is accelerating the pressure is lower as the stream goes faster – so forcing a stream of gas into a reducing space causes the pressure to drop in the constriction. An interesting further effect is the cooling of a gas as it expands after being forced through a jet. Count Rumford exploited the effect in the design of chimneys at the end of the 18th century to stop firelaces smoking into the room, – his chimney design incorporated the throat leading into the chimney so that the smoke was accelerating through the constriction so the pressure dropped and the smoke was sucked up the chimney instead of escaping into the room. When I uncovered an inglenook fireplace in this room, it smoked so badly that it was unusable, so I applied the Rumford/Venturi principle to make sure that the smoke above the fire was always accelerating until it got past the narrow throat and by then it couldn’t get back. I built a streamlined shell of chicken wire plastered with lime mortar linking the top of the fireplace opening to the chimney with a movable flap to control the throat – the secret is to avoid any dead spaces where an eddy can form and spill out into the room – its now pretty smoke free unless you mismanage the fire. This blog continues to attract more and more viewers, but alas, I think many of them are not interested in the contents, just in hacking the site – luckily I have good software that defends it, touch wood!.
27th September – Wearing my school governor hat I had a governor meeting at school on ‘Safeguarding’ – I do have to bite my tongue at times – its quite sore at the moment. We seem to be rearing each generation less robust than the last and the layers of cotton wool we wrap them in get thicker and thicker until they can’t feel the world! The latest news filtering through to me is that students starting University in Cambridge are being brought by their parents ( as is usual), but the parents are staying around for a few days to ‘help the student settle in’ or some such nonsense- Ye gods, if my parents had come anywhere near Manchester when I went to university there I would have died of mortification – I only went there because it was about as far from them as I could find a suitable course! I trundled up the A6 etc from Colchester on my 50cc NSU Quickly – which was anything but with all my kit on the back and left home well and truly behind – I think I went back once after that. Our tame mechanic told me today that the Volkswagen clutch was nearly dead – its making a horrible racket. I’ll try to sell it ( openly) with a duff clutch as its quite an expensive job to repair as its a ‘dual mass’ clutch/flywheel assembly – the dual mass flywheel is a complex device that has become necessary with engines that are producing more power from fewer cylinders at lower revs to give the very high m.p.g. figures needed to cut emissions. The basic idea is that the flywheel is in two parts, one part attached to the crankshaft and one to the clutch assembly, the two parts being linked by springs so that the pulses in rotation caused by the cylinders firing compress the springs which then give back the energy before the next pulse – its a very complex spring system and is carefully tuned to smooth out resonances and reduce stress in the drive components. Anyway I don’t think I’ll be going anywhere in the VW from now onwards so I’m without a car until we pick up the Mazda and I can get my Land Cruiser back from Penny. I realised that there are two basic ways to buy a used car – you either go to a few garages and see what takes your fancy, or like me you spend hours researching different vehicles until you have a clear idea of what is ‘best’, then you go and test drive one and if it goes OK you then look carefully at all the adverts on the internet etc and try to buy the best of the bunch. There is a lot of information on the web – reviews, price guides, reliability figures from Warranty Direct etc, but I always get an up to date copy of Parker’s Guide to used car prices as it has all the models listed and you can work out depreciation rates etc and see how much ownership is going to cost you. I’m not sure which method is the best way to buy, the first method is certainly more relaxing and probably involves less travel. At the end of the day a car is just a box with a wheel at each corner! I did read more on East Africa, but this bit is not so interesting, being about the behaviour of the individual animals, which is just a repeat of comments made in the narrative part. He is very dismissive of the lion, and the Rhino, which he says is always half asleep and only wakes up in response to approaching hunters because the bird that habitually perches on it and cleans off parasites gives the alarm. The Rhino has a reputation for charging the hunter if wounded, but Jackson says that it isn’t a charge, its just running off and the hunter happens to get in the way very occasionally! Ah well, that’s OK then…..
26th September – My education into organising a big game expedition in British East Africa 1890’s style continues, although I feel I may just have left it too late – Jackson writes that between 1891 and 1893 the vast herds of buffalo were struck down with a form of anthrax, and the elephants also suffered from indiscriminate hunting, and all forms of game were getting more difficult to find – he cautions that hunters should only take the males of the species, but that there is still good hunting to be had with a little effort – he argues that its not the skilled hunter after trophy animals that is doing the damage, but seems to realise that the writing is on the wall for that form of sport. One aspect of his advice that I found interesting was his analysis of the relative dangers of the animals to humans – he rates elephants and buffalo as particularly likely to charge – but thinks that the buffalo is the more dangerous because it is not so easily spotted and so may take the hunter by surprise. The lion doesn’t seem to him to be so bad beacause it often slinks off if it can, and usually gives a low growl that gives its presence away. The very worst is a buffalo that is wounded, which will track down the hunter with great determination. Interestingly he thinks that his 4 bore rifle is not effective at 70 yards, and that he needs to be closer than 50 yds with dangerous game – some authorities would say that there is not much difference between a rifle and a smoothbore gun at that range…. I managed to buy a car for Penny today that met my targets exactly – a very nice shiny ex-lease 14 reg. red Mazda 6 with 83000 on the clock – should be good for another 100000 miles, by which time it will have suffered from our normal level of abuse and be on its way. I’ll pick it up in a few days when its had its first MOT test … job done, except for disposing of the tatty 09 reg VW Passat. I’m quite envious – my turn next! Now I need to sort out tools and stuff to take to the flat for the ‘Great Renovation’, which will probably begin on Sunday.
25th September – Rushing about a bit today. I’m trying to find a car for Penny – the VW Passat estate is on its last legs – it gets a hard life one way or another, and I’m a bit fed up with the constant drain on the battery that no-one has been able to sort out, so its time for a change! I’m a fan of Japanese cars, my Land Cruiser having done 10 years without problems (except those caused by garages!). We do at times carry a lot of junk about so a decent estate is called for and it will do around 15000 miles p.a. plus so has to be economical to run – Prime suspect at the moment is the Mazda 6 Tourer, which seems like a decent vehicle. I hate the thought of the £10K depreciation in the first couple of years, and I’m not afraid of cars that have done a high mileage, but as fuel economy has improved dramatically in recent years its better to get a newish car – my preference is therefore to let someone else take the edge off the price. Most of the cars in our sights are ex-lease cars with about 100K on the clock (the mileage at which the lease companies dispose of them) and around 4 years old, at about 1/3 of the new price – that takes in many of these cars on Autotrader so lots of choice. This time I’ll try not to ‘reshape’ bits of the bodywork on gateposts etc…………. I continue to prepare for an 1880s style expedition by reading the Badminton Library ‘Big Game Shooting’. Instructions for organising a ‘caravan’ for an expedition in the North East of Africa are interesting – The porters, of which there are many, were divided into teams of 10 and here carry the loads as wagons cannot not used as there are no suitable tracks or fodder for the oxen. Each porter has to carry his designated load of 65 lbs, plus his bedroll, his own staple food for 10 days (rice, beans – 10 to 15 lbs) and his water for the day ( 3 lbs?) and some had a Snider Carbine and 10 rounds in a belt (my grotty 1871 Enfield Snider conversion weighs 6 1/2 lb). The loads must have been difficult to manage – for instance, a crate of fowls. On the subject of arming the porters Jackson says that normally 25 armed porters (plus many unarmed ones) was enough for a trip as far north as Kimangelia, but a more extended trip to the Nijiri plains it would be better to take 50. He thinks the Masai warrior is a much over-rated individual but the porters fear them. For a trip to Suk country he would take 80 to 100 armed men. ” If the trip should be extended further North into the Somalia country, it would not be worth while running the risk of entering the country of such grasping, treacherous, religious fanatics as the southern Somalis are with fewer than 150 rifles“. So, a veritable army – some things never change………………. I begin to think that organising such an expedition may be beyond my means – maybe I’ll just stick to buying a car…..
24th September – More lawn mowing and hedge cutting! The Badminton Library ‘Big Game Shooting’ has now got on to F J Jackson’s 1880s recommendations for equipping an expedition ‘up country’ in Africa, which makes interesting reading. he doesn’t set much store by a .450 or .500 Express rifle for dangerous game, his preferred ‘battery is as follows;- A 4 bore single rifle sighted for 100 yds firing a spherical ball with 12 drams of powder and weighing 21 pounds, a double 8 bore rifle sighted for 100 yds weighing 15 lbs again firing a spherical ball with 12 drams of powder (I assume these are breech loaders, it isn’t specified), a double .577 Express rifle shooting magnum cartridges with 6 dram loads and 3 different bullet types, sighted 100 and 200 yds, a .500 Express, a 12 or 20 bore Holland Paradox and a .295 rook rifle – that ought to be enough? He recommends taking food from England and adds;- No expedition should be undertaken without a few pint bottles of really good champagne, to be used medicinally, as few things are more efficacious in pulling a man together in cases of extreme prostration after fever, or when thoroughly exhausted and knocked out of time from long and violent exertion…… of course they should not be taken until the sun is down ( which, this being the tropics happens swiftly and early) – one wonders about ‘pint bottles’ and ‘a few’. My mother used to recommend Lucozade for that, I prefer Jackson’s idea. He also includes brandy, wine and whiskey in his grocery list and suggests a teaspoon full of brandy stirred into a cup of champagne to revive a lost appetite. I was impressed by the following too;- (after recommending mosquito nets) .. Before having the mosquito curtains removed in the morning it is a good thing to take a cup of coffee or cocoa before getting out of bed ( at 4 or 5 a.m.), as I believe when so fortified a man is less liable to the influences of miasma, which, if floating about at all is worse just when getting up. (miasma or night air was thought to carry infectious diseases and germs in Victorian and earlier times) Although I don’t habitually sleep in mosquito curtains, or have a ‘tent boy’ to remove them, I do have a cup of tea before getting up, although sadly I have to get it myself – I’d never realised that my insistence upon this custom was to ward off the effects of miasma but henceforth I shall attend to the habit with renewed enthusiasm…….. but since its now evening and the sun is down and I’m exhausted, could you pass me a cup of really good champagne, with or without the teaspoon of brandy? Thanks………………………..
23rd September – Trying to get the lawn in some kind of order today – it has been ridiculously wet of late and this is about the only day it has been dry enough to cut. It was so lush that I had to go ever the lawns with the mower on its highest setting and with the grass-box fitted ( I normally self mulch) – the grass was just like an early spring flush, not a tired August/September parched lawn. I’ll have to go over it all again with a lower setting as soon as I get another dry day – I need to fix the mower sometime as the belt that drives the wheels has worn loose and there doesn’t appear to be any adjustment. I’ll have to do an internet search, there is bound to be a Youtube on it. I read more from my Badminton Library book on big game shooting over my coffee this evening -W Frank Oswell’s account of his African expedition. Some of the logic behind his slaughter of the game becomes clear as I read more, although to modern readers it sounds diabolical! In his journeys across Africa he does offer to feed whole communities in return for guides and helpers. In one place he offered to feed them but refused to give them ‘presents’ so got no help but at the next community the 600 inhabitants were starving to death so he offered to take them all (men women and children) on his expedition and feed them, which he did – on just one day shooting 6 elephants to dry into biltong for them to take back to their kraal. He claims that he sent back more than 60,000 lbs of biltong with them – they had to make several trips to carry it all. He of course was only interested in the Ivory which then fetched about 5/- per pound in Africa. A later writer (1880) in the same book wondered where all the game had gone, speculating that it might have gone elsewhere, or, just possibly, been shot to extinction! I wonder how much habitat loss there had been by 1890?
22nd September – Sorry for missing entries! I spent three days at the Cavendish lab at Cambridge University doing ‘Physics at Work’ presentations. I give 12 each day, of about 20 minutes each with a bit of time between each to allow the students to swap presentations. Its very intense as you have to get them interested and involved and participating – its not too difficult for those groups that are lively, but you still need to put a lot of energy into it to keep their enthusiasm up. The worst groups are those that appear dead from the neck up – you really have to work hard to get through to them! We get groups from far and wide, and all sorts of schools, state and independent and academies. Interestingly there isn’t any consistent pattern as to which schools will have the most buzz and be the most fun, although I always enjoy those from London and Birmingham that have very mixed classes. I think my deadest groups were from an independent girl’s school not a million miles from Cambridge. Anyway by the time I got home in the evenings I was well past blogging and just fell asleep on the sofa! Today a couple of loads of logs arrived and had to be stacked, so no playing, but I did manage to post a few parcels of camera bits I’d sold on Ebay. The good news for us was that at last, after yet another last minute hitch, Giles has exchanged contracts on the flat – completion is scheduled for next Friday so from then I’ll be up to my ears in plaster, wiring, plumbing and kitchen fitting for a few weeks ( or months!) – I’ll try and keep a blog going on the progress as I don’t expect there will be much time for playing with guns. I have been reading one of my old books in the ‘Badminton’ series on big game hunting – this one on hunting in Africa in about 1845 by the first hunters to venture into much of the country. Its interesting to see their attitude to killing the game – if they didn’t present a challenge then they were shot to feed the many people who were essential to support the camp as it moved by wagons and ox teams for months on end, or at least that was the pretext – referring to rhinoceros, the old hunter said the most he ever shot at one time was 6 as he needed that much meat for food! I would have thought one rhino would have kept a supermarket in meat for longer that it would keep fresh, although it is possible that the the bargain with the local people was that they would be provided with meat while the hunters were in their territory as a sort of ‘visitor tax’. The hunter used a double 10 bore smoothbore percussion gun weighting 10 lbs with a round ball closely patched by rolling it in the hands and cutting off folds, without any wad, with 5 or 6 drams of fine powder – as he often shot from horseback and reloaded there too, he found capping the gun the most difficult part – even on the ground I sometimes find it very tricky when standing in a windy field on a cold day in winter! He didn’t hunt in the way that a modern hunter would, using a rifle at ranges of 100 to 200 meters, but got within less than 50 meters, often much less, at times riding his game down for many miles until he could get alongside them – although many game animals are faster than a horse, the horse can outrun most animals over long distances. That reminds me of some recent research that showed that women can sustain their running performance significantly longer than men, and can compete equally in extreme endurance events! This blog is nothing if not a source of obscure ‘facts’…………….
18th September – I was at the Cavendish Labs today setting up my demonstration for the 13 & 14 year old school students who are coming over the next three days to find out what scientists & engineers do with their lives – well, leaving out the bits about shooting! I have a colleague from my school STEM club coming to help on Wednesday, so I won’t have to do all 36 talks on my own. I have finished the book on Wyatt Earp and his ‘Buntline Special’ Colt ’45 with a 12 inch barrel. The book ‘He carried a Six Shooter’ is supposed to be a factual account and uses a lot of historical sources to try to unravel the truth about his exploits. I found it interesting because, although he had a reputation as the fastest gun etc… he depended on careful observation and an understanding of the psychology of his adversaries to avoid too many shootouts – often disarming them or occasionally wounding them to control and sometimes to humiliate them. He and his brothers made many enemies among the bad men, brother Virgil was badly wounded and brother Morgan was assassinated, after which he was probably less generous towards the gang involved. The book, of course, has detailed account from witnesses of the famous shootout at OK Coral. The book was set in the 1870s to 1890s and covered the driving of the railways across the West to support the great cattle ranches and the associated massive cattle drives to the railheads, and then the rush to mine silver. The guns by then were all breechloaders, basically the Colt ’45, the 1873 Winchester carbine and sawn-off double barreled shotguns – presumably 12 bore, loaded with 9 buckshot per shell, with the wads split, which was claimed to spread the shot – the implication being that putting the slit vertically caused a horizontal spread, although that isn’t explicit in the book – Wells Fargo favoured these shotguns for the guards on stagecoaches – thus using them exactly as earlier coach drivers used blunderbusses . I have a Winchester 44-40 of later date but basically the same – my grandfather is reputed to have brought it back from the First World War but as he died and was buried in France I’m not sure about that. I do know that for a very short time the observers in the first, unarmed, planes were issued with Winchester Carbines to try to shoot down enemy planes, or rather the pilots and observers – possibly it was one of those. I guess in the very early days no-one had really addressed the need for armaments on planes as they were used exclusively for spotting and it was a little while before they worked out how to syncronise a machine gun to fire through the propeller without shooting off the blades. I seem to recall that the first guns just had steel deflector plates on the prop to deflect the bullet, but I may be making that up………………………….. Any way the Winchester is a fantastic example of perfect fitness for purpose – tough, simple and handy – its difficult to imagine a better suited gun for either of those situations. One day I must convert mine from a Trophy of War on my certificate to Sect 1. so I can shoot it.
17th September – to celebrate Penny’s birthday we visited Oxborough Hall – a fine National Trust property in Norfolk built in 1482 and subsequently altered and ‘improved’ by the family that has lived there for many generations and still does. I’m quite an old buildings nut, so I enjoy that sort of place although I am rather conscious of things that don’t seem right – a lot of the windows were added or altered in the late 19th century in brick that doesn’t match the old structure and most of the large windows have fairly recently had their leaded glass removed and plain, modern glass put as single panes into the frames. I always look to see what the National Trust does about the display of firearms, which of course would have been a major part of almost any grand house, from the personal sporting guns and pistols of the owner and family plus those of his guests to the matching sets of muskets that would have been provided for the militia – most wealthy families had guns from famous manufacturers and kept them for generations. At Oxborough Hall the ‘gun room’ near the entrance had but 4 guns on the wall very high up where you couldn’t see them, and looking neglected – a blunderbus, an Austrian military air gun, an English musket and a foreign musket. In the ‘King’s Room’ things are even sadder – there is a a pretty poor pair of nonedescript percussion pistols that look like something cheap from Liege but were supposed to be Venetian ( I wasn’t sure they weren’t repros! – I could have made more convincing pistols myself), and a more fancy but still fairly uninspired flintlock pistol from France or Italy, it was so unremarkable I can’t even remember what the steward said, but she was quite amused when I said they were pretty poor examples of anything! I should have taken a photo but I’m sure its forbidden. Its a real problem that bodies like the NT think anything to do with guns is politically incorrect or anti-social, whereas in reality it was a big part of life in times past and has a rightful place in any true representation of how things were. Part of my ‘trouble’ is that I say what I think about guns, although I have given up commenting on guns for sale as it was getting a bit embarrassing telling dodgy dealers what had been done to their guns! Which reminds me, I forgot it was the Birmingham Arms Fair today and I can’t make it to the viewing at Holts so I am safe from buying any more guns at the moment! I still have a few to shift, must put them on this site.
16th September – I was busy clearing up the house and sorting piles of old papers and came across an old loose page catalogue from my father’s things. There is no indication of the firm’s name but a page with a letter to customers is signed Kit Ravenshead, Framlingham 1969. It offers a wide range of parts for restoring flintlock and percussion guns, more or less a combination of Kranks and Dysons or Blackleys, including castings for all parts, barrels, reproduction flintlocks, and restocking of all pistols and guns. With it are two separate price lists, one dated 1968 and one dated 1969. As you would expect the prices are very different from present day prices, but interestingly the factor between now and then differs enormously for the different items and for labour. It is also interesting to note that some prices jumped by a lot between the two price lists. I’ll give some prices taken at random compared to Blackley’s website;-
Gunpowder was 11/- a pound in 1968, and 13/6d in 1969 – quite a steep rise, but its now around £20 a pound a rise of about 30 times.
A Repro Queen Anne pistol kit was £12 in 1968 and £15 in 1069 – Blackley’s price £339 but that includes springs and screws, about another x 30
A New Land Pattern lock set was 160/- in 1968 and 200/- in 1969 – Blackley’s is £125 including springs, a price increase of about x 15
A flint cock casting went from 32/6d in 1968 to 70/- in 1969 – Blackley’s price would be £20, a rise of x 12 ish from 1968 or x 6 from 1969!
Browning solution was 7/- but had to go by rail – Blackley’s now £15 an increase of x42
A repro Kentucky flintlock rifle was £55 – I guess depending on what it was like, between £600 & £1000 now – around x 15
The catalogue quotes guide prices for various jobs – £15 – £25 for restocking a shotgun, £2./10/- for a wooden ramrod with screw, 10/- to £2 for making up a spring to a pattern, £3 for relaying ribs and thimbles etc…..
1968 was during Harold Wilson’s premiership and after the pay freeze and the 4 day week – inflation for the year was 4.7% – The Beetles were in vogue! A pound then is worth about 12 pounds now according to the retail price index. I wonder where Kit Ravenshead went and where the castings came from – some of the stuff came from the US. I’m not sure when Ed Blackley started – (I must ask him, he’s a friend of Dicks and lives nearby) – he started not far from Framlingham I wonder if there was a connection? I’m sure someone will tell me…………
I’m still engrossed in the Wyatt Earp book – I used to enjoy Westerns and WWII stories when I was a teenager but my father thought they were just trash and discouraged me from reading them, so I stopped reading fiction of any shape or form, and still don’t. Not the effect he intended, but the law of unintended consequences plagues parental attempts at control – he was never smart enough to realise this.
15th September – Oh dear, I picked up the copy of Wyatt Earps book, ‘He Carried a Six Shooter’ that I bought to take on holiday and couldn’t put it down so its now well past midnight (strictly the 16th) and I haven’t done anything constructive!……..too late now…..
14th September – A grand day out, as they say. I took the ‘Twigg’ flintlock, the John Probin and my O/U 12 to CGC , primarily to have some flintlock fun. I collected the SWISS OB powder that Viking had kindly got for me, plus another 10Kg of shot and bought another 1000 caps (I have no idea where they go – I’m sure it was only a few shoots ago that I bought 500) Be that as it may, I really did manage to get to grips with the flintlock – it was going off acceptably fast, I managed to break a few clays, and only had two misfires out of 2o shots, without even a ‘flash in the pan’ and that was because the flint was pretty knackered, having been in the gun since I got it – and it had done several ‘have a go’ sessions – so altogether for the first time I felt it was fun and worth the effort! A result. The Probin turned out not to be great shakes on the breaking clays front although it went off OK – I used SWISS 2 for a while as I thought that the short barrel needed a fast powder, but didn’t hit much with that or the Nobel No 2 I usually shoot. It will have to go! I did feel that the SWISS No 2 was shaking me up a bit with the flintlock – its quite a light gun. Having got bored with missing clays with the Probin, I reverted to the Miruku 12 bore using 21 gram cartridges, which as its a 7 1/4 lb gun is therefore quite nice and comfortable with 21 grams – I was gratified to discover that I managed to knock down a decent proportion of the clays. On the drive home I was trying to work out how much it costs to shoot a muzzle loader – you get about 200 shots per Kg. of powder, and 35 shots per Kg of shot, so at around £50 a Kg for percussion powder and £3.50 per Kg for shot that is 25p + 10p + 6 p for a cap for percussion, plus the wads and card (might be home made), so that is around 40p – 45p per percussion shot – flint is more as the powder is more expensive – probably around 50 – 55p per shot. That compares with about 30p for a 12 bore cartridge – so its a lot more expensive to shoot a muzzle loader, although I don’t expect that will come as a surprise to anyone who does it regularly. Mind you, it takes at least twice or three times as long to shoot muzzle loaders in a group as it does breech loaders, so it probably averages out at a similar hourly rate! – and you use less clays so it is cheaper – Phew, thank goodness I’ve managed to justify that then! I always feel at the end of an exhausting days shooting clays that the cost of the clays and all the on-site facilities is a real bargain – something less than 30p a clay at CGC – where else can you have a ‘grand day out’ with food and drinks and have change from £30 (conveniently forgetting the powder and shot etc…. ) 30th Sept is our flintlock competition with Anglian Muzzle Loaders – I’ll take part for the first time! I suddenly remembered that school term had started and there would be loads of Governor meeting – I always forget to log onto the secure email server for govenors, but when I did there were the calls to action ( or inaction!)………. bother. Now I need to order 1000 No 16 bore wads – luckily both the ‘Twigg’ and the Egg double percussion I usually use are the same bore – I think its now time to pass on the Probin, and also my Pedesoli Mortimer single barreled flinter to make a bit more room.
13th September – Life is rushing by! Giles’s flat looms in a couple of weeks – the buying has taken 6 months so far – incredible. I’m still sorting out the holiday stuff and putting the boat to bed for the winter and putting more stuff on ebay. Now there is just time to dig into my shooting supplies to sort out what I need to take to CGC tomorrow – I’ll take the old ‘twigg’ flintlock as I’m beginning to like it and it isn’t a good idea to chop and change too often – there is a saying amongst our group – watch out for the shooter with only one gun. Having said that, I do want to try out the little Probin double I bought a couple of years back at the Birmingham Arms Fair and decided it was a mistake so put it away. It actually looks quite useful, although it has a very short barrel – a barely legal 24 1/4 inches long! Not sure if I have wads etc for it, and I’m definitely getting short of cards. Anyway I will take it and see what it shoots like – if its not a good fit for me I’ll sell it – I think its probably a £550 gun……
12th September – gradually getting back to normal – holidays are always so stressful, one wonders why one takes them! I am continuing my clearout policy by listing a load of camera stuff on ebay. Back in the swing Viking has acquired some SWISS OB priming powder for me so I can have another go at flintlock shooting at clays on Thursday with some of the lads. I need to get in training for percussion too as I have a number of game shoots this side of Christmas and it would be a bonus if my hit to shot ratio got above 1:2 1/2 ! Reading Bosworth (1848) again tonight he had the idea that after about 100 yards balls have lost 1/7th of their initial velocity and thereafter don’t loose any more – he maintains that what they loose in air friction they make up for in falling under gravity, which is a pretty far fetched idea unless he is shooting up at an angle – I guess it might be (almost) true if you shoot vertically upwards – If there wasn’t any air friction the ball would convert all its kinetic energy to potential energy on the way up to the peak, and then convert all that potential energy to kinetic energy on the way down, so IF there were no losses it would arrive back at the muzzle height with exactly muzzle velocity – taking air friction into account it will, of course, always land slower than that. He develops this argument and then attempts to prove that very short barrels are as effective as long ones and that one can effectively ‘do execution’ with a 40 bore pistol with a 10 inch barrel at 300 to 400 yards if one can get round the problem of a very short sighing base. All this with balls not shaped bullets, which are of course much better at long ranges because they can carry more energy due to their higher weight, but don’t, in general loose as much as a ball due to drag. Anyway, I feel a flintlock riffle is called for – or maybe I’ll shoot the Charleville musket some time?
11th September – Today was pretty chilly so I decided that the AGA had to go back on, and the woodburning stove had to be cleaned out ready for winter. The AGA is a bit of a pain since regulations brought in low sulphur fuel oil – they have the most primitive burner system imaginable, consisting of two wicks sitting in a puddle of oil that is connected by a pipe to a pool of oil whose level is controlled by a float and needle valve. Controlling the heat is entirely manual on mine – just tweaking the needle valve to raise of lower the oil level – fancy AGAs have a motor controlled needle valve that is connected to a temperature sensor to give a constant heat. The problem with the low sulphur fuel is that ash and hard carbon gradually block the part of the burner where the oil flows in, until it finally goes out, at which point you have to take the burner out and dig out the gunk and run a 10 inch long x 1/8th inch drill down the feed pipe to the burner and then put the burner back and fiddle the wicks and flame deflectors into place. The filter by the tank also blocks up from time to time due to fine black particles – it happens every time the tank is refilled as that shakes up the dirt in the tank. The only plus point is that it only involves time and doesn’t cost anything except a replacement wick every few times. Anyway that should keep it running for a month or two. Reading Bosworth’s book again this evening I came across his take on the accuracy of rifled against smoothbore firearms. He was sure there was no difference until he tried a precise experiment with a carefully made smoothbore gun that was subsequently rifled so everything else was the same and got a 3 inch group with the smoothbore and all the rifle balls through the same hole at a range of about 80 yards. He made the interesting observation that if the barrel of a smoothbore musket is very slightly bent to the right the ball will curve in the opposite direction to the left – the argument being that in passing through the barrel the ball experiences more friction on the left side, which slows that side and causes the ball to spin around a vertical axis – he claims that the effect of this rotation is to cause the ball to deflect to the left, contrary to expectation. Basic physics tells you that once it left the barrel the ball would travel in a straight line in the horizontal plane if it wasn’t rotating, so any curve must be due to rotation. My guess is that the air on the left side of the ball is accelerated by the spin, which has the effect of reducing the pressure on that side (the Bernoulli effect), with the opposite effect on the right side, thus curving the ball left. Obviously rifling would spin the ball about the barrel axis and remove any net deflection due to the friction spin. He was also adamant that a smoothbore must be shot with a light powder charge – he recommends about 1/8th of the ball weight maximum – I’ll have to check how that corresponds to what we use now – its always a fiddle as I use different units for ball and powder ……… it turns out to be what I reckoned I should be using with the Nock 16 bore rifle – 365 grain ball and about 1.65 drams (45 grains) of powder ( He was writing about smoothbores, I am referring to a rifle, but the numbers correspond). Part of his argument for small charges was that with large powder charges the wad came out and tried to overtake the ball and knocked it off course! Is that a thing?
10th September – trying to tidy up all the holiday stuff! Ran the outboard motor to flush it with fresh water and get rid of any salt left in the engine, but puzzled that after about 10 minutes running the stream of cooling water coming from the engine was still cold, but steam was rising from the engine casting and it was quite hot to the touch – earlier in the year I did have to replace the water pump and remove solidified salt from the bottom of the leg, so I’m a bit concerned that the waterways in the engine are similarly blocked with just a bypass somehow letting the water through – I’ll need to sort it out before next year – I’ll have to phone the very helpful parts shop in the Isle of Man who helped me sort the water pump. – another job to do! I haven’t yet dug my copy of the infantry tactics from the heap of holiday luggage, so my lessons are temporarily halted! I don’t have any English military flintlock or matchlock muskets to practice with – the nearest I have is a nice Russian version of the Charleville musket made around 1830 in the factory at ISCH that became the Kalashnikov factory – so I guess it counts as my Kalashnikov in a way – I haven’t been able to find a bayonet for it yet, so my practice will be less than realistic….. I was troubled to realise how few of the books I took to Cornwall got read ( 1/4 of 1) – its amazing how tiring being on holiday is, even (or especially) when you are doing nothing – it confirms my belief that holidays are intrinsically bad for you – our family can just about manage 10 days before things begin to unravel………..
9th September – back in Cambridge after a somewhat tiresome drive with some torrential rain and a couple of stupid artic. drivers playing blocking games on the M25 – they stopped after we drove alongside and photographed the drivers and numberplates! The Sensitive plant suffered the indignity of another car journey – probably set it back again. It was dark and raining when we got back so haven’t been to see the chickens yet. I picked up my repro copy of Bosworth on the Rifle (1848) to read over coffee – I particularly liked his assertion that the hardening of steel by quenching was due to electricity, and his statement that ‘It is highly probable that our knowledge of carbon may be very limited’. Science was beginning to be applied to metallurgy but was in the very early stages – it was not long before he wrote that diamond had been identified as a form of carbon! By the time of his book cast steel was becoming available in America, and he was extremely dismissive of the properties of English wrought iron…… This is going to be a busy Autumn for me – I have to do presentations to GCSE students at the Cavendish Labs as part of the University’s outreach project – I’ve done it every year for the last 21 years and really enjoy it, although its tiring doing it 36 times in 3 days – I am usually loosing my voice by the end! I have to sort out and run my STEM club for primary kids at the local school – also fun, and Giles is about to complete on his flat in Cambridge that I have nobly/stupidly offered to do up for/with him – its a complete mess and needs a new kitchen, new plumbing and heating and skim plastering before it is completely redecorated and carpeted, plus we want to sort out some up to date LED lighting with remote controls. We might also need to put some internal insulation on a couple of walls – we need to check the existing construction and do some thermal calculations – I’m thinking of plasterboard backed with 1 inch of Celotex – there isn’t room for more. A nice little project – hopefully completed before Christmas! – So if I am a bit remiss in my attention to antique firearms and this blog, please forgive me!
8th September – Took the boat out of the water today in preparation for our return home. There were 3 square rigged ships in Mounts Bay today, and Tom & Giles took the boat out for a last trip to look at one, the Earl of Pembroke registered in Bristol. My training in infantry tactics goes slowly but I now understand the limititions of platoon firing that left chunks of the front line unloaded and vulnerable. It was replaced in the early 18th century by a new drill – the firings – that divided the regiments into 15 platoons and had a complex firing system that distributed the fire more evenly along the front, It was organised and controlled very carefully using flags and drums to signal which platoon was to fire, and when required the each platoon was divided into two firings to distribute the firepower more evenly in both time and space. Unforunately there is very little written about the precise signals used, so if I find myself in charge of a regiment of infantry I guess I’ll just have to make it up as I go along – which, to be honest is what I usually do anyway! The firings probably originated with the Dutch Army, and were used by Marlborough against the French with some success.

The Earl of Pembroke at anchor off Newlyn Harbour (photo courtesy Tom)
7th September – managed to pull ourselves out of our dozy state to visit a couple of local iron age villages from the Romano-British period (AD43 – 400) at Chysauster and Carn Euny. We all get quite deeply involved in what it would have been like living there at the time they were inhabited – Our view of that is much influenced by the weather at the time of our visit – today it was overcast with light rain at times so our view was that it would have been pretty damp – but who knows, maybe they had long hot summers like I remember when I was a child – and maybe enough snow in the winters to need tyre chains for the car – although snow and frost was pretty rare in Cornwall even then.

Entrance to the ‘courtyard’ of one of the houses at Chysauster of around 200 A.D.
7th September. Slow start to the day following a superb meal and some interesting wine at Ben’s Cornish Kitchen. It was clear why Ben’s is ranked third best restaurant in Cornwall – if you want to go there you’ll need to book a long time in advance, we were very lucky to get the last table at a few days notice. I’m still reading up on early infantry tactics in case I find myself having to organise an infantry battalion using flintlocks against infantry or cavalry. The first uses of platoon firing ( see earlier post) occurred when infantry regiments were still composed of musketeers and pikemen armed with iron tipped 5 metre long pikes that were considered the prime defense against cavalry in the ratio of about 2 musketeers to 1 pikeman. A minor improvement in platoon firing at the end of the 17th century was the drill of ‘locked-in’ shooting where the 3 ranks were slightly staggered so that the back rank fired over the right shoulders of the second rank, thus saving the second rank having to stoop to shoot when the three ranks fired. At this stage not all regiments had upgraded from matchlock to firelock. The next major change in organisation came with the introduction of the plug bayonet for musketeers that enabled the pikemen to be armed instead with muskets, thus increasing the available firepower by about 50%. The major disadvantage of the plug bayonet was that once fitted by ramming the handle into the muzzle the musket could no longer be fired, and it occasionally got knocked out. This could be a problem when the line was defending against a cavalry charge as it meant that fire could not be withheld until the last moment because of the time taken to fit the plug bayonet. It was not long before the plug bayonet was replaced by one that fitted round the outside of the muzzle so that it could be in place during firing if necessary, although presumably it got in the way when reloading. With these improvements the Dutch were able to drive off French Cavalry charges by withholding firing until the last moment, which thoroughly shocked the cavalry. From the drill books there is a suggestion that the musketeers were actually drilled to present their arms in a firing position and not fire, so that they could intimidate the approaching forces. In one battle indeed the cavalry were so scared by this tactic that they baulked at attacking. Anyway, I’m feeling better prepared for the eventuality that I find myself in command of musketeers – by this time the command function had become much more important as tactics got more complex. Still, by learning what I have so far and with improved weapons etc, I’ve probably advanced to being able to deliver 5 times the firepower that was normal during the English Civil Wars.
6th September Giles and I went sailing today as it looked like a nice breezy day – we set off from Newlyn heading south down the coast heading for Lamorna Cove, but the further South we got the bigger the waves got, and after we had entertained a substantial amount of the English Channel inside the boat we decided that it would be somewhat less wet going in the other direction, so we headed off to visit St Michael’s Mount from the sea – something I have always wanted to do. We anchored off to have a bite to eat and make the obligatory cup of tea – a ceremony made possible by the amazing design of the ‘flat’ camping stove. Unfortunately the tide was too low to let us into the Harbour. Then back to Newlyn and a look at the Lady of Avenal – a square rigged charter boat. On entering the harbour at Newlyn the outboard motor ran out of fuel – how they know to do it just when its awkward I don’t know. Tonight off to Ben’s Cornish Kitchen for a birthday meal for Penny.

Filling the kettle for tea at anchor off St Michael’s Mount in a slight chop.
5th September Blowing half a gale today so no sailing – I replaced the hinges of the double glazed PVC window in the bathroom with a pair bought from Screwfix – they didn’t include new screws and as the – old ones were mostly rusted beyond use I had to search my boat fixing kit for stainless self tappers , fortunately finding enough to do the job. In the afternoon we did our annual scour of the galleries in Marazion but didn’t see anything we felt compelled to buy! It is, however, cheering to see pictures by artists whose work we bought in previous visits increasing in price! Now anything by Fred Yates fetches a mint, even a few square inches of quick watercolour, and the quirky artist Siobhan Purdy we liked on a previous visit is getting something of a cult following! Anyway, apart from the news that the Sensitive plant is looking better by the day, and the cockerel at home hasn’t attacked our house sitters, that is enough news for now! I’ve been reading up on my infantry tactics in case I find myself in command of a company of musketeers. As you will recall, in the English Civil Wars the armies discovered the shock power of mass firing at close range, but in any situation that didn’t immediately lead to direct contact with the enemy, it left the whole battalion unloaded and thus unable to return fire. There were several schemes for maintaining a sustained fire, a couple of which I have already covered, and one in which the musketeers in six ranks fired from the back rank while the front five knelt, then the fifth rank stood and fired, then the fourth etc until the front rank had stood and fired, the only problem then being that as you had to stand to reload, the firing couldn’t restart until the front rank had reloaded. One way or another all the drills for sustained fire across the whole battalion had disadvantages and slowed the firing down to less than 2/3 of the theoretical maximum rate based on how long it took a soldier to fire and reload – typically about 1:4 for a firelock using cartridges (as in powder and ball in a paper wrapper, in case you haven’t been attending!). By around 1689 a solution had been worked out that gave much greater all round flexibility – platoon firing. In this drill the battalion was divided into platoons of around 24 to 36 musketeers and lined up on the front with 8 or 12 platoons, each 3 or 6 ranks deep depending on how long a front was expedient. The size of the platoon was based on the ability of its platoon commander to communicate effectively with the entire platoon. If sustained fire was required from the battalion then one in four of the platoons would fire and immediately reload while the three other platoons fired in sequence. This arrangement gave the ability to produce the shock mass firing if needed in the event of a cavalry charge. Ok, that’s got that straight – anyone care for a bit of practice?

St Michael’s Mount, Cornwall, in a fresh breeze.

Here is our picture ‘Dear Friends’ by Siobhan Purdy – an artist who is going places!
4th September Pretty wet this morning, but we went and moved the dinghy from Mylor to Penryn Harbour (near Penzance) so that we could sail a new bit of coast, but the weather tomorrow looks a bit hairy with 25 knot winds. I read a bit more on the infantry tactics – of course by around 1680 the matchlock was a bit old fashioned and the military began to introduce both the snaphaunch and the true flintlock – then called the firelock. The distinguishing feature of the snaphaunch was that the ‘hammer’ – or ‘steel’ was separate from the pan cover whereas the true flintlock – a French invention – had the frizzen as we know it, integrating the pan cover and the steel. Amazingly the flintlock appeared in more or less its final form – the only real developments of significance was the change from a vertically pivotted sear acting through the lockplate to a horizontally pivoted sear, the abandonment of the ‘dog catch’ that gave rise to the name ‘doglock’ and acted as an external safety catch, and the change from the tumbler shaft forming part of the cock, with a separate tumbler pinned on the shaft to a tumbler with integral shaft held in the cock with the ‘cock nail’ (cock screw). Further refinements included the provision of a ‘bridle’ to support the inner end of the tumbler shaft, and of a bracket to hold the outboard end of the frizzen pivot. Alongside the introduction of the the snaphaunch and firelock and the continued use of the matchlock as the changeover proceeded, there was a changeover from the use of bandoliers of wooden chargers containing the powder for a single shot, with the balls kept separately, to the use of cartridges – paper tubes containing the powder necessary for the priming and the main charge plus the ball – the soldier taking the cartridge, biting off the paper end opposite the ball, putting a little of the powder in the pan and the rest in the barrel, then either dropping the bare ball down the barrel and following it with the screwed up paper, or dropping the ball and paper down the barrel. It should be noted that in smoothbore military muskets the ball was always smaller than the bore with enough ‘windage’ (clearance) so that the ball was a rolling fit and could be dropped in, even when the barrel had begun to foul after a few shots. To require the loading rod to ram down the ball would have significantly slowed the rate of fire – which was one reason why rifles were not introduced before the American War of Independence, when we took a bit of a battering from American irregular hunters who were used to accurate shooting with their rifles. Until the mid 18th century it should be noted that the powder supplied to the English troops was inferior to most of that used by the European armies – if you think of the very fine and expensive priming powder that we use to shoot clays with a flintlock so that we get fast ignition you can imagine how long the typical 17th century musket took to go off once the trigger was pulled! In passing its interesting to note that the basic flintlock mechanism lasted with only minor developments for around 200 years. The matchlock probably had a similar lifetime in one form or another, but the percussion era, including all the variations from ‘scentbottle’, pellet lock, tubelock, Maynard primer etc lasted barely 60 years before the breechloading cartridge era, which has now clocked up some 150 years.
3rd September Very windy this morning, and lots of rain, but this evening its quiet. Anyway, a bit of time to read up mid 17 century infantry tactics. Around 1648 the musketeers stopped being issued rests for their muskets, presumably because if they were shooting 3 ranks deep, only the standing rank could use the rest. It’s not clear if shorter barrels were used, or if they just had to support the long heavy barrels. The English Civil War kept us out of European Wars while the Thirty Years War went on there, but eventually we got drawn into the battles of France, Spain and Portugal. After a brief time when the Parliamentarians and expat. Royalists fought on opposite sides in Europe, the Restoration put Charles II on the throne and a small body of English troops, including many from the New Mode Army of Cromwell fought on the side of the Portuguese trying to secure independence from Spain. This highlighted the difference between the Continental infantry tactics, unchanged for 30 years, and those of the English. At the battle of the Dunes the English held their fire while cheering, until the Spanish were within a pike’s length before firing 3 deep twice (they were formed up in files of 6) and setting too with the butts of their muskets to devastating effect. The Spanish Generals watching the battle were reported as thinking that the English were going to defect to the Spanish side because they didn’t fire at range! As you might expect, a few battles like that and the continental armies followed our example and to some extent our advantage, particularly the surprise element of it, was lost. Reading accounts of the period make me want to try a matchlock rifle!

The coast at Godrevy looking towards the lighthouse – not a place to try to land by boat!
2nd Sept. A lazy day as its my birthday – we visited Charlestown Harbour where there are a number of square rigged ships that are used in films, thegging is incredible – I guess it takes a while to know which is which, I don’t know how volunteers get the hang of it. We are off to dinner at the Gurnard’s Head at Zennor, the nicest restaurant we know in Cornwall.

1st September Another fantastic sail – good breeze and warm and sunny. Sailed across Falmouth Roads to St Just in Roseland and then across and up through Falmouth Harbour to Flushing Town Quay where we landed for a walk and a Cornish cream tea with clotted cream ( put on the scone before the jam, not the heathen way) then back to Mylor and home for a Barbecue in the garden. If I can now stay awake I’ll figure out more about early infantry tactics, but please forgive me if I fall asleep before writing it up! As promised here is a photo of the sensitive plant – I have no recent photos of the cockerel as I don’t feel I can ask our house sitters to risk life and limb.
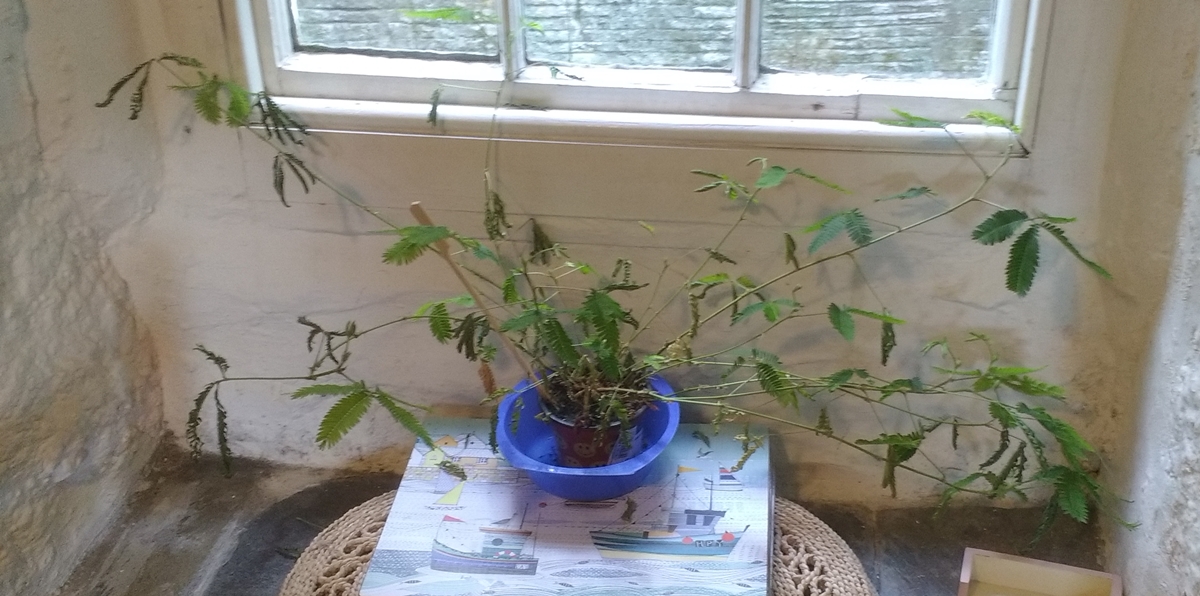
Some of the leaves are quite dead, but there are enough to keep it alive, I hope.
31st August We had a good sail yesterday although it was on the verge of raining a couple of times and there was a bit of breeze so we had occasional spray on board. We have the dinghy on a pontoon at Mylor Marina, a bit of an extravagance but this is a holiday. Followers will know that the Sensitive plant is in intensive care – it is probably going to survive – I plan to take a photo tomorrow. I hear from our house-sitters that the cockerel is in good form! From the sublime to the ridiculous( or v.v), on a historical front, the battle of Edgehill in 1642 at the start of the English Civil Wars showed that the tactic used by the infantry on both sides of a single rank of musketeers firing while the rest of the battalion was either waiting or reloading produced very inconclusive battles and was not effective against cavalry charges. Thereafter both the Parliamentarians and the Royalists changed to a much more decisive drill that involved the front three ranks firing at once, the front rank kneeling, the next rank crouching and the rearmost of the firing ranks consisting of the tallest soldiers standing. In addition they held their fire until the enemy was within less than two pike lengths – at most 32 feet away. Even a hyped up soldier with a fairly inaccurate weapon would stand a good chance of doing harm to the attackers at that range. The musketeers in the three ranks fired together when the enemy came within range and then immediately set about them with the butts of their guns, joined by the pikemen who were usually part of the infantry battalions – although some were exclusively composed of musketeers. The effect of the initial heavy fusilade at very close range was usually devestating, especially when followed up so rapidly by a direct onslaught. Even cavalry could rarely break this defensive tactic, especially since the cavalry relies upon the speed of its charge, and once stopped is vulnerable. In addition to the heavy close firing, the infantry retained the ability to revert to a continuous firing regime when necessary to pin down parts of an enemy army. In the North of England battles took place in areas where there were a lot of hedges and obstructions, so that direct charges across a long front were not possible, and so different tactics were used, although there are no records of what those tactics were!
30th August It’s raining – this is a mistake, its supposed to be a perfect fortnight! I noticed that my recent posts have had the odd word displaced – sorry, its because I’m using my laptop and if I occasionally touch the touchpad by accident it jumps and starts typing somewhere unexepected and I don’t find where it has put the spurious text. ON the subject of the mechanics of this blog, I still get almost as many attempts to hack the site as I do genuine visitors! Hackers use networks of other computers around the world that they have infiltrated to launch their attacks – called botnets. I can look at the IP addresses of every hacker who visits the site and what they are trying to do, and it is fairly easy to identify particular networks of bots under a single control as they follow a pattern – some networks only use each computer once, but some repeat attacks from the same IP address. I can sometimes pick out one member of the net that visits more frequency from the same IP address – if I see that that an address is attacking often I check out the IP address with ‘whoisit’ and send an email to the service provider complaining of abuse – so far I have made two abuse complaints and killed two botnets! But it’s an ongoing problem – today another one has emerged! Anyway the news from our house-sitter is that the cockerel is behaving – the chickens are currently shut up so that contractors can fix the roof of the neighbour’s barn without being attacked!
29th August We decided not to go sailing today to give ourselves a break – 10 hours of being out in the fresh air having been too much for some of the party – . anyway we needed to stock up with food (and wine). We went for a walk at Lamorna Cove in the afternoon, and looked at the remains of the old quay that collapsed in a storm a couple of years ago and will now never be repaired. No change in the situation of either the Sensitive Plant or the cockerel! To return to the English Civil Wars, the problem for the musketeers was that it took somewhere around 6 to ten times as long to load a matchlock musket as it did to stand, blow on their match to get rid of the ash and make it glow well, aim and fire it. It was therefore necessary to devise a formation and a drill that allowed the battalion to keep up a steady rate of fire. Obviously you don’t want a front line that is only one soldier deep, with 9 out of ten reloading, so you organise them in ranks and files, ranks being the lines parallel to the front and files being the lines formed behind each soldier on the front rank. The basic principle would be along the lines of the front rank firing, then turning and marching to the back of their file to reload while the new front rank marched forward one pace to occupy the place of the departed man, thus maintaining the position of the front, at the expense of the men reloading having continually to move.; An alternative method had the men reload where they fired, and the back man of the file marching forward to take up a position one pace in front of the previous firing position, thus producing a gradual advance. either technique required a 6 feet spacing along the ranks to allow the men to march through – remember that they each has a lighted match and those loading were likely to be exposing powder. In a nutshell, the issue of keeping up a steady rate of fire was the infantry problem as long as battles were fought by armies drawn up facing each other in ‘open’ combat, and it only changed with the introduction of the rifle in the American war of Independence and the use of long range targeting. Up to then it was considered advantageous to hold your fire until the enemy had advanced to within around 20 meters or less of your position – hence ‘wait ’til you can see the whites of their eyes’ . Hence the need for very strict discipline and a strong sense of duty in your infantrymen! With the introduction of the flintlock musket reloading was faster and a typical time to reload might be 4 times that allowed to fire, so if the if using the previously mentioned formations, the files might be 4 deep instead of the previous eight or ten deep. In fact as time passed many different schemes of firing were tried in an attempt to create the optimum fire pattern, sometimes organised so that if necessary more than 1/4 of the available muskets could be brought to bear in one volley, for instance against a cavalry charge when it would be all over in the time it took to reload.

Typical Cornish engine house from the 19th century – usually associated with the tin mines, although this one at Baker’s pit may have been associated with china clay workings.
28th August Yet another beautiful day – what has happened to Cornish weather? We launched the boat at Mylor and spent the day gently wafting about in the breeze soaking up the sun – we even managed a short swim, although the water was a bit chilly. We felt quite intrepid until we saw all the kids immersed for hours! Regular viewers of this blog will be pleased to hear that the Sensitive Plant is still with us, and reports from home indicate that the cockerel has not savaged anyone (yet). I started to read up my military tactics – starting with the formation of the first English Standing army at the beginning of the English Civil wars. The first battle at Edgehill was fought in October 1642 and since we didn’t have any established military infantry formations, the Parliamentarian forces adopted the Dutch formation, and the Royalists adopted the Swedish , although only decided on the morning of the battle, so they can hardly have been well rehearsed. Both sides fired away at each other all day without gaining advantage until nightfall and ammunition supply problems brought the battle to a halt. The rate of firing must have been slow because the drill for shooting the matchlocks was complex due to the hazard of having a permanently glowing match in hand while reloading from one of the 12 wooden tubes of powder in the infantryman’s bandolier – balls were kept in the mouth in the heat of battle. The danger of the glowing match led to accidents – a soldier at Edgehill went to get powder from a barrel with a glowing match between his fingers and set off the whole barrel, killing several nearby…….

Just lying in the boat looking at the sails……… be envious!
27th August Another beautiful day – we went to the Young Farmers Annual Show at Swithians Showground where we saw a demonstration by the Ferrgie Fillies (a group of country women) who did a splendid demonstration of formation driving of vintage T20 Ferguson tractors – the commentary was hilarious – for a formation of the 8 tractors as an arrowhead we were told that although it didn’t look particularly impressive from ground level, it looked much better from directly above! The sheave tossing involved pitching a bundle of straw over a high bar on a sort of rugby post – I misheard and thought originally that it was sheep tossing, which would be a bit much for a public display! We did a round of places to launch the boat, Mylor was full of cars and people, and Loe Beach was its usual delightful slightly scruffy self. Here is a view of the beach at Hayle:-

Low tide – this is the channel into Hayle Harbour – a tricky entrance at anything other than high tide.
27th August – resting in the garden in brilliant sunshine this morning after a rather tedious drive to Cornwall towing the dinghy – bound to be slow on a sunny bank holiday, although its past the peak as the schools go back soon. Penny is a bit concerned because the Sensitive plant we brought with us is looking a bit the worse for the journey in a hot car – we brought it because she doesn’t quite trust our house guests to look after the it (hope they don’t find this blog!) – we do seem to bring strange things on holiday with us – last time we brought a dinghy to Cornwall on holiday years ago we had to bring a cage full of young ferrets that we couldn’t find a sitter for, so I put the cage in the boat. When we got to Cornwall we had to call at Tesco to get milk and someone saw the cage of ferrets and asked what they were doing, so not really knowing what they expected me to say, I explained that they had never been sailing before so we had brought them so they could try it. The chap looked at me strangely and then ran away… It takes all sorts!
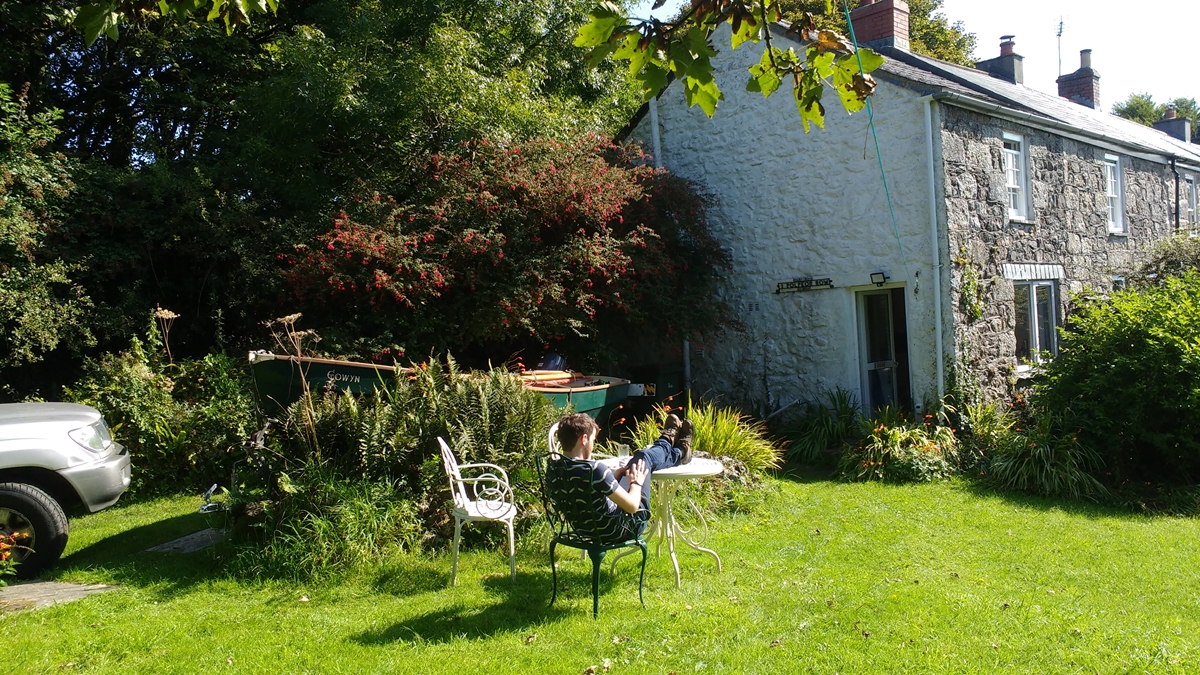
25th August – not sure what happened to yesterday! One way or another I’m afraid that the next couple of weeks is going to be a bit gunless on my blog! We usually charter a boat on the West coast of Scotland about this time of year, but we need one or both of our sons to crew a 43 ft sailing boat and this year they couldn’t be sure that they would be able to come, work possibly getting in the way, so we are going to our cottage in Cornwall and taking our 16 ft dinghy to do a bit of pottering about around the south coast – we have been through every size of sailing boat, so this is more or less back to the beginning when we sailed a Wayfarer with a couple of young children – not the ideal boat for safe and gentle pottering. Our Cornish Coble is a pleasantly staid boat but still manages to get along reasonably. Anyway we’ve got friends coming to stay in our house so they can visit Cambridge – and look after our rather vicious (and noisy) cockerel. I did post a picture of him last winter – I’ll see if I can find it. He is magnificent and struts about the garden king of all he surveys – I think I have got him to remove me from his list of creatures to threaten – when I went near him in the garden he used to turn side on and edge towards me, twitching his near leg – he has pretty formidable spurs and was clearly preparing to use them – my ‘defence’ was to lunge at him so he backed off, which he did – he now doesn’t threaten. Anyway I’ll expect almost daily reports from them on his conduct. I had an amusing conversation with a neighbour, who is a farmer and keeps chickens – he was telling me that he had hatched 5 cockerels last year and that they were making a terrible noise at 4 in the morning – presumably he was being polite in not including ours in the number – anyway he did say he was going to move them to another part of the farm as there were neighbours there who might ‘appreciate’ the noise! I am taking a few things to do in the evenings as I sit by the woodburning stove (see Cornish Cottage) – I’m trying to get my head round the Mindstorms robotic programming so that I can keep up with the 9 year olds in my Science and Technology club! I’ve also packed a couple of gun books – Crudingtons books on the British Shotgun, and a book on infantry tactics in the Brown Bess era, when massed ranks of soldiers in brightly coloured uniforms stood facing each other and the side that kept its head and had the best disciplined firing plan won. It is called ‘Destructive and Formidable’ by David Blackmore and cover the period 1664 to 1746 – I hope it will give me some interesting insights to pass on through this blog. I also packed the typescript book on William Palmer, Master Engraver as I want to go through the data and summarise it.

23rd August – I had an email recently from a collector who I’d done some work for asking if I knew anyone who had a Lancaster cartridge pistol with 2 or 4 barrels. As he is a section 7(1) collector I got to thinking about possibly extending my own collection from the percussion era and a few obsolete calibres – .32 and .41 rimfire pistols that I got from my father’s estate. Section 7(1) lets you keep what would otherwise be Section 5 pistols. Section 5 pistols require the Home Secretary to authorise possession and is very restricted, but Section 7(1) is available with the normal firearms authorisation – it is still quite restrictive – you cannot shoot them or have ammunition for them, and the pistols have to meet one of four of strict criteria – historically important, aesthetic quality, technical interest or particular rarity – it also helps if they are part of a serious and relevant collection, but you can keep them at home. Full details are in the relevant home office guide, see LINKS or LEGAL, I put them on both. My interest in pistols is spreading out from my flint and percussion pistols – I am interested in the transition from the individually fettled guns of the 18th century to the mechanised production of the mid to late 19th. It’s the transition from forging and filing to machining to final size that I find fascinating – what happened to the thousands of outworkers who made the individual parts of the guns – each person more or less specialising on one operations on one part of the gun!
22nd August – Pete came today to collect the repaired ejector nib on his hammergun – I hope it will do for another 100 years use! He was interested in finding a gun to restore in some form or another, so I dug out an old Witton single barrelled gun – originally a rifle but now with a very rusty and battered smoothbore barrel of around 14 bore. I’d had it for years and it wasn’t doing anything for me, except reminding me all the time of the jobs I still had to do so I passed it on to a good home. It would make a passable rifle with the right barrrel, which I don’t have, and if I did I’d want to make a flintlock not a percussion. I found another little facimile book today, its title is ‘Suggestions for the Cleaning and Management of Percussion Arms’ by George Lovell, ‘ Inspector of Small Arms for her Majestie’s Service – Published by Authority of the Master General and Board of Ordinace etc.. – Lovell was a well respected figure in the development of military arms. I don’t know when the facimile was printed, but the original by Lovell was printed in 1842 and describes in detail each part of the service musket of the time and how to clean and maintain it in some considerable detail with lots of line drawings – one day I’ll scan it and put it on this blog. Dick rang to say he had a very fine pistol to fix with a beautifully stock inlaid with silver wire and would I like to go and see it? as my car was away having the bushes on the anti-roll bar fixed, the answer was not today! Its not back tonight, so I assume the parts were difficult to come by. Vehicles are a constant pain – we tend to buy good, often high mileage cars and run them into the ground, having done a little ‘reshaping’ of the bodywork in the meantime. We try to buy reasonable quality medium to large cars, and aim for a depreciation plus all costs except fuel of well less than £2K p.a. on average, which we usually achieve – I’m conscious of this as its coming up to vehicle replacement time which requires a bit of research online to make the right choices.
21st August – A number of irrelevant struggles today! Last night I read an interesting bit in Bosworth’s 1848 book (see yesterday) concerning the construction of ordinance and the strengths of various metals. Interestingly he says brass, which he specifies as an alloy of tin and copper that we would now call bronze, brass being the name we now give to predominantly copper – zinc alloys, is twice as strong as wrought iron or cast steel! Talking of ordinance (cannon) he says that wrought iron is seldom used as it is not very strong, and that cast steel forms large, weak crystals when used in large masses as it cools slowly (can be true but is not the full story). Its quite interesting to see how a lack of understanding of the crystal structure of iron/carbon solutions with face or body centered carbon atoms and cementine led them to ‘invent ‘ all sorts of explanations for the hardening and tempering processes. One piece of information that was completely new to me concerned very large ordinance – cannon with bore over 2 feet – used in Constantinople (now Istanbul) overlooking the Bosporus waterway against ships passing through or attacking the city. It was virtually impossible to hit the ships by judging the trajectory – presumably the powder was not consistent enough to get repeatability – and the breech pressures with iron balls was too high for any barrel material known at the time, so as in very ancient times they used carefully worked stone balls. The use of such a relatively light ball enabled them to fire the cannons more or less parallel to the water surface and let them bounce along the water like a skimming stone thrown on the beach, thus relieving them of the necessity to get the elevation right – they just had to point the guns in the right horizontal direction! Apparently this led to high kill rates – it must have been terrifying watching a massive ball skimming across the water towards your ship. Shades of Barnes Wallis and the Dam Busters, only 100 years earlier – I don’t suppose he had read Bosworth’s book! I’m tempted to find a nice pond and try firing marbles along the surface- I wonder if I have a suitable marble-bore smoothbore gun – A couple of wads and a very light powder charge might work – I would of course need a model ship to make the experiment realistic ( and put the gun on a Sect 1 firearms certificate)!
This blog is getting a steady stream of visitors – around 220 per day quite consistently – which is gratifying, and I get a number of appreciative emails, usually with an interesting question attached – like the recent one asking if it was possible to resurrect a fine deactivated shotgun as an obsolete calibre rifle – I think the answer was that it would in all probability strictly speaking end up as a section 1 firearm, although if all the parts used were pre 1939 it might possibly qualify as a section 58(2) obsolete calibre. Even if it was initially it was a Section 1 by virtue of the re-modelling, if it was indistinguishable from an original and essentially pre 1939 it is difficult to see how it couldn’t subsequently revert to Section 58, possibly via a Registered Firearms Dealer. I did discover that you can take any gun to the proof house and bring it back as a section 58 firearm – i.e. without it being on a firearms certificate. In truth a lot of the aspects of firearms law are a bit woolly where antiques are concerned – the difference between say a .577 Enfield rifle kept as an ‘ornament’ or ‘curio’ and one kept with the ‘intention’ to shoot is clearly all in the mind – the first is section 58(2) and can be freely kept and displayed (as long as I don’t have a criminal conviction) but the second is a section 1 firearm and I can get a mandatory prison sentence for having it without putting it on my certificate, and it has to be locked away! What is more, I think I can swap it back and forth, and in theory leave the slot for it on my certificate even when I’ve reverted it to my collection at section 58 as long as I notify them each time, although I don’t think that would make me very popular. What about intending ‘one day’ to shoot my section 58(2) Gibbs-Farquerson falling block rifle (Obsolete calibre – Gibbs No 2)? It all points to the need for us to join both the MLAGB and BASC, who work hard to protect our sport.
20th August – In the course of redecorating I had to move a bookcase full of miscellaneous books and as part of an ongoing de-cluttering process I have been sorting out some of the old books I have acquired from my father and other places and taking carrier bags full to Oxfam. I am building a pretty comprehensive library of gun books – some inherited but a lot purchased at considerable expense and am always on the lookout for anything original. As you can see from the picture above, one of my treasures is an original hand coloured copy of Ezakail Baker’s handbook for the rifle at about the time of the first rifle regiments (see post Ezakail Baker’s Practice &c ….). In my hunting upstairs earlier today I came across a copy of the ‘Text Book for Officers at Schools of Musketry’ revised in 1868, which covers theory of rifling and trajectory as known at that date plus how the ordinance made gunpowder – it appears to be concerned only with military muzzle loaders – mainly the Enfield. A similar and slightly earlier book that I have in an old facsimile copy is ‘A Treatise on The Rifle, Musket, Pistol and Fowling Pieces’ by N Bosworth, originally published in 1848 – it is a pretty comprehensive treatise on almost random aspects of guns, from refraction of light to the strengths of different kinds of tin – another interesting read…… While taking the books to Oxfam I stopped to browse their stock of old books and picked up a copy of ‘He Carried a Six Shooter’ by Stuart N Lake – the biography of Wyatt Earp – it cost me £7.99 so it better be good – I’m saving it for holiday reading! On the subject of books I am currently reading an original copy of ‘Field,Cover and Trap Shooting’ by A.H.Bogardus – the champion wing shot of the world (and originator of the glass ball trap) – as he described himself. Published in 1878 it covers the transition from muzzle loader to breech loader. The bags he shot, almost none of which were driven shoots, are mind boggling to us now and he did it daily for years! Another old book that is from a different age I am also reading is ‘The Sportsman’s Handbook of Practical Collecting Preserving and Artistic Setting Up … by Roland Ward – one of the most famous taxidermists ever, published in 1890! Again it is so out of kilter with the modern age, although not as much as some of the older hunting books that describe Africa before loss of habitat and over hunting destroyed most of the big game. Having written this paragraph I’m struck by how long book non-fiction titles were in the 19th century – almost an essay in themselves. Just to show that I’m not stuck in some Victorian swamp, I am also reading, or to be honest, struggling to read a very recent book – ‘Gun Culture in Early Modern England’ by Lois G Schwoerer, which SHOULD be an interesting book. Unfortunately reading it is a bit like wading through treacle- English is not Schwoerer’s first language and he doesn’t know much about guns, neither of which are conducive to an easy read. Add the fact that it was clearly originally a thesis ( You can tell by the title – Early Modern is a term exclusively used in the history trade!) and seems to have dispensed with the services of a copy editor, or indeed any kind of editor. Shame really as I’m sure there is a lot of good work if only I could see through the lack of logical order and the repetition. I might have another try, it should at least be good for sending me to sleep, not that that is a problem I normally have, if only I didn’t find it so annoying………….
19th August – I’m not sure what I had in mind for tonight, but I got sidetracked by an email asking about a complex problem related to deactivated guns and obsolete calibres that had me reading through the Home Office Guidance on Firearms Licensing 2016, which effectively filled the hour I set aside. It makes fascinating reading, particularly some of the illogicalities of the law – for instance the occupier of land, including those who have shooting rights, can lend a shotgun to a non-certificate holder to shoot in his presence on the occupied land but only in person, whereas in the case of a rifle he or his servant can lend the rifle! Anyway I found the information I was looking for – obsolete calibre firearms must have been made before 1939 to count for section 58(2). The Acts are full of assorted cut off dates that probably have logical relationships to gun development, but they are not always obvious – as another example, you can make an inert gun with only relatively simple safeguards against making it shootable as long as its a replica of a gun made before 1870. And then there is the section 7 cutoff of 1918, or so I believe – I must look into that……. I have put the two most useful Home Office Guides on the bottom of the LINKS page, Guidance on Firearms Licensing, and Firearms Security Handbook – they are both the definitive guidance issued to police and trump anything else you are told – until it changes! see LINK tab at the top of this page.
18th August – Finished the decorating – I tried to get a local firm that matches paint colours to do me a Farrow and Ball colour but they didn’t get anywhere near so I left them with 2 litres of a failed attempt and went and bought the real thing at exorbitant price! I always used to mix my own colours but I’ve got lazy and want to use colours out of a tin – the only trouble is that I don’t actually like the result that much! I have dozens of tins that are not the colour on the label but are never the colour one wants now, or if its the right colour its not the right type of paint…. I did a little bit of engraving – literally! I had another go at engraving round the edge of a 1p coin – its quite a big space – have a look at one. I might try getting two rows of lettering on the edge next time but the copper is a bit soft for the finest work. I’ll try to get some photos but it will involve setting up my microscope camera and I’ve probably forgotten all its little foibles!
17th August – Distempered the landing ceiling and walls – so my shoulders ache! I had another gun to repair today – another 12 bore hammer gun that had a broken spur that pushes the extractors out then the gun is opened – on this gun it was filed up as part of the action flat so not a replaceable part. As in so many of these repairs, this was a re-repair of a brazed or hard soldered repair from the past. They are always more of a pain than a straight weld of a fracture because you have to get rid of all the foreign material before you can weld, and that invariably means that the close fit between the parts is lost and you have to make a guess at the exact alignment and find a way of holding it in place. I tried holding the parts together with Plasticine but it had to be too close to the heat and didn’t work – its a difficult weld because the action flat side of the break is a massive heat sink, and the bit has no thermal inertia, so the bit gets red hot almost instantly at least until it has some weld connection to the main part. Anyway I managed to jig it up and put on a bit of weld – I was using piano wire as a rod, to get a bit of carbon into the weld, but the danger is that you will let it cool too quickly and then it is too hard to file. – Anyway after a bit of fiddling I got enough weld around it to look strong enough for the job and managed to tame the hard bit – it was then a case of filing it to fit and checking that it moved the extractor but also let it go right back in as the barrels came to the face. That was all working nicely, but the fore – end didn’t fit and needed a bit more taken off the sides of the spur and general tidying up of the hinge area before the gun would open and close easily – I guess in total it took a couple of hours to get right – mostly because I am not a very expert welder and haven’t done that job before…… Here are some pics;-
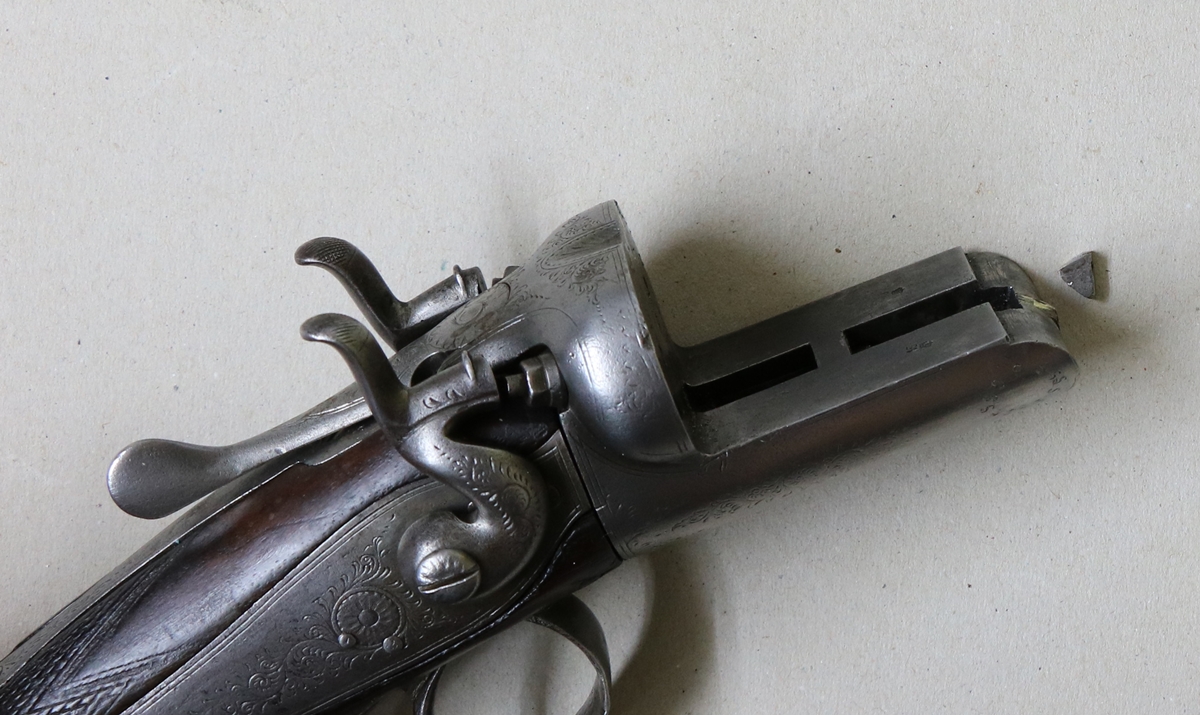
The ‘spur’ had been brazed on but failed, so the joint had to be cleaned of brazing.
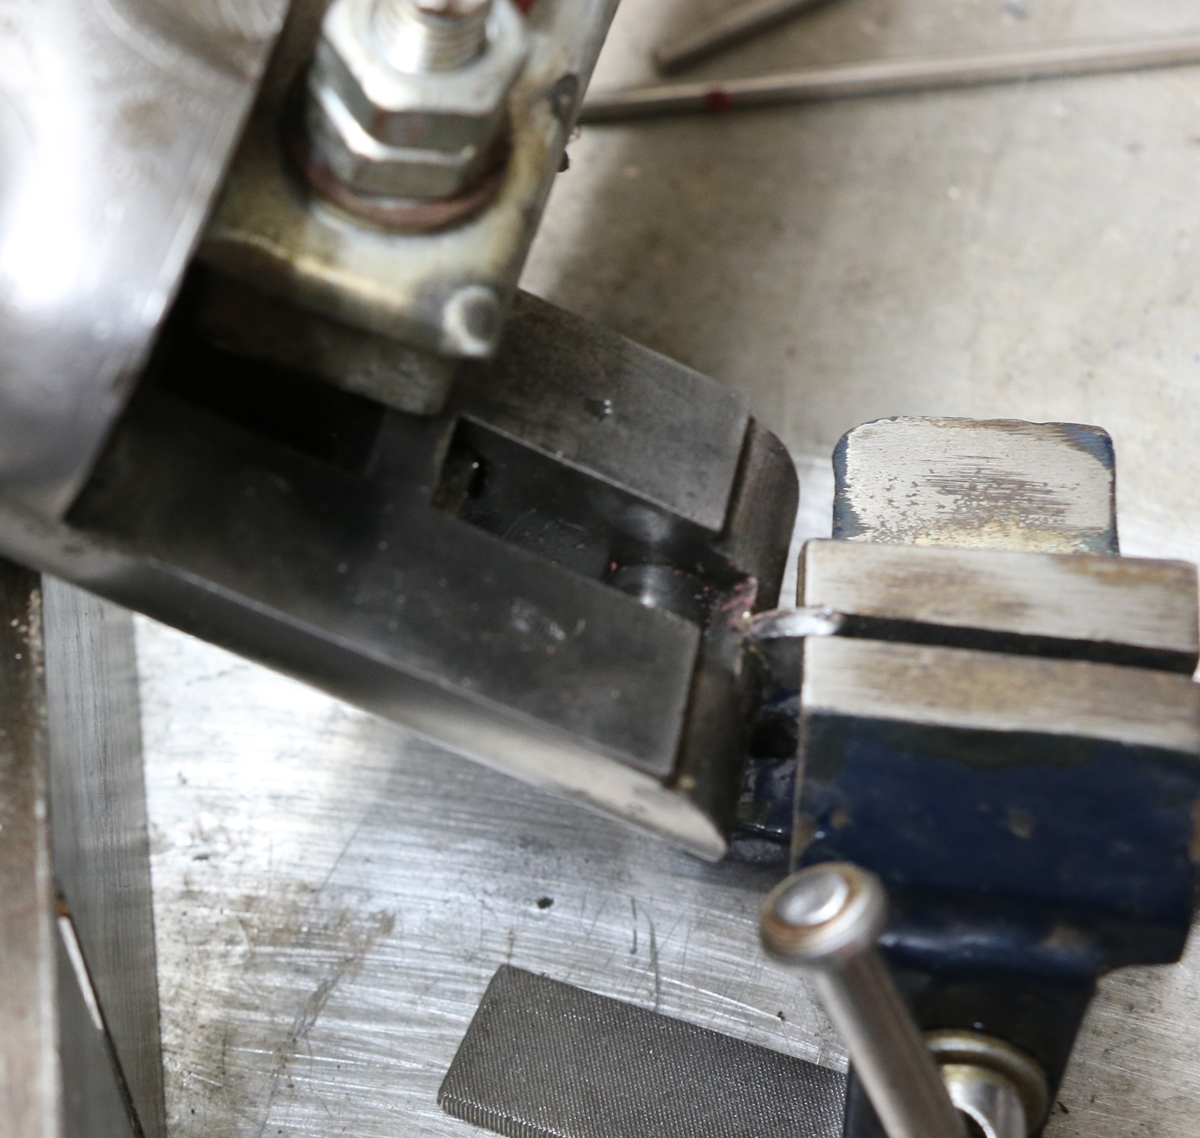
Finding a way of holding the parts in the correct alignment was a bit of a fiddle, but worked in the end…
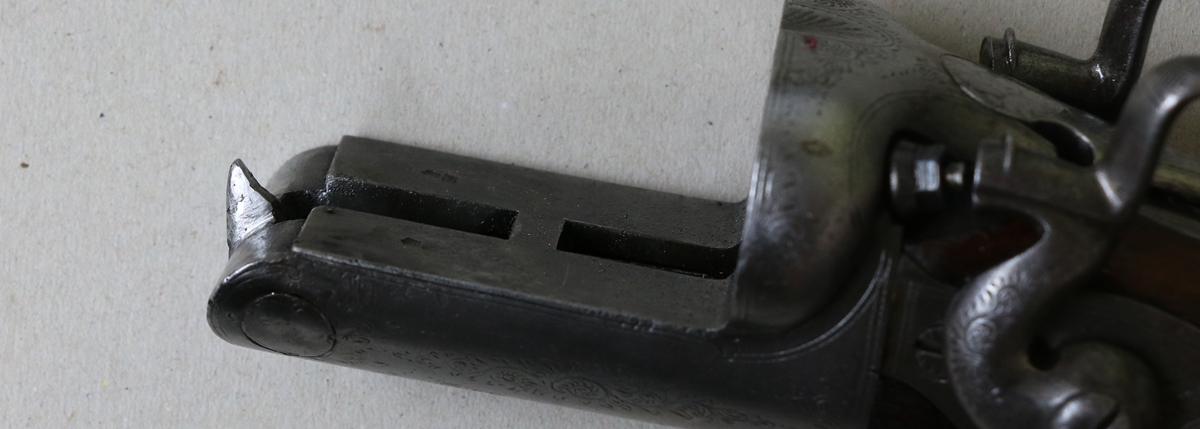
I should point out that this is a fairly basic but decent working gun – I wouldn’t trust myself to do the same on a quality gun – I’d leave it to Jason..!
It’s nice to have photos coming out without the pink tinge!
16th August. Just got back from a trip into deepest Norfolk for a North Norfolk Music Festival performance of Walton’s Facade at South Creake Church – Brilliant, one of my favourite pieces of music – a good friend was playing trumpet. That’s our bit of culture for the summer! I went to see Dick today to give him the Steven Grant to store until collection. He was giving me a lesson on ejector mechanisms, including a neat little box of tricks designed by Westley Richards, a genius a slightly off beat inventions. He is working on a Purdy style ejector on a pretty little double .410 – I’ll take my camera over next week and get s few pictures.
15th August. I had a visit from a fellow AML shooter with a 12 bore hammer gun (rebounding Stanton patent of 1866 locks, triple bite top lever action) with the rear trigger snapped off, with the bit in a bag. I prefer not to keep other people’s breech loaders for longer than necessary, and then I take them to an RFD for storage as I’m not one myself, although as things are going that may become necessary. In this case I figured I should be able to do a ‘ while you wait’ repair myself, and only keep the gun if I failed! I stripped out the broken trigger blade and clamped it to a slab of steel and positioned the broken bit with Plasticine while I tacked the sides of the break, then filed a deep ‘V’ across the face and fill welded it with piano wire as the welding rod. All very satisfactory and not too much metal to file off and it didn’t get hardened too much to file down and polish on the fibre wheel. A quick flash with the fine oxygas flame to put a bit of colour into it and pop it all together, removing the caked grease and cleaning the rust off the trigger guard back and recess in the stock – all done in an hour or so and ready to go. Plasticine is, as I may have mentioned, the precision welder’s best friend – it holds bits in position and doesn’t move when it gets hot – it is more or less a mixture of dried clay and Vaseline or something like that, and if it gets very hot the Vaseline evaporates and the clay remains in position, but usually the tack welding has been done by then. As promised, I did take the locks off the LePage pistol to investigate the single trigger mechanism, but unfortunately I couldn’t get a stud out without damaging it and so couldn’t expose the mechanism well enough to photograph fully, so you will have to make do with a verbal description… The trigger has a vertical axle sticking out of the top. pivoting on this axle is a blade the longer back part of which forms the trigger blade – It sits below the conventional sears and can swing to be under either the left or the right sear. a spring biases it to sit under the left sear. An extension of the blade in front of the axle carries a stud that sticks out on the right hand side of the blade. A cam slope on the tumbler of the right hand lock pushes the stud when the right hand lock is fully cocked, causing the blade to swing its front to the left and its back section to the right so that it sits under the right hand sear, at which point pulling the trigger fires the right hand lock which fires the front charge. If the right hand lock is not on full cock the blade always sits under the left hand sear and that lock will fire if it is cocked. I noticed that if both cocks are on half cock the left cock will fire if the trigger is pulled – the half cock bent does not appear to be of re-entrant shape as you can see from the photograph.
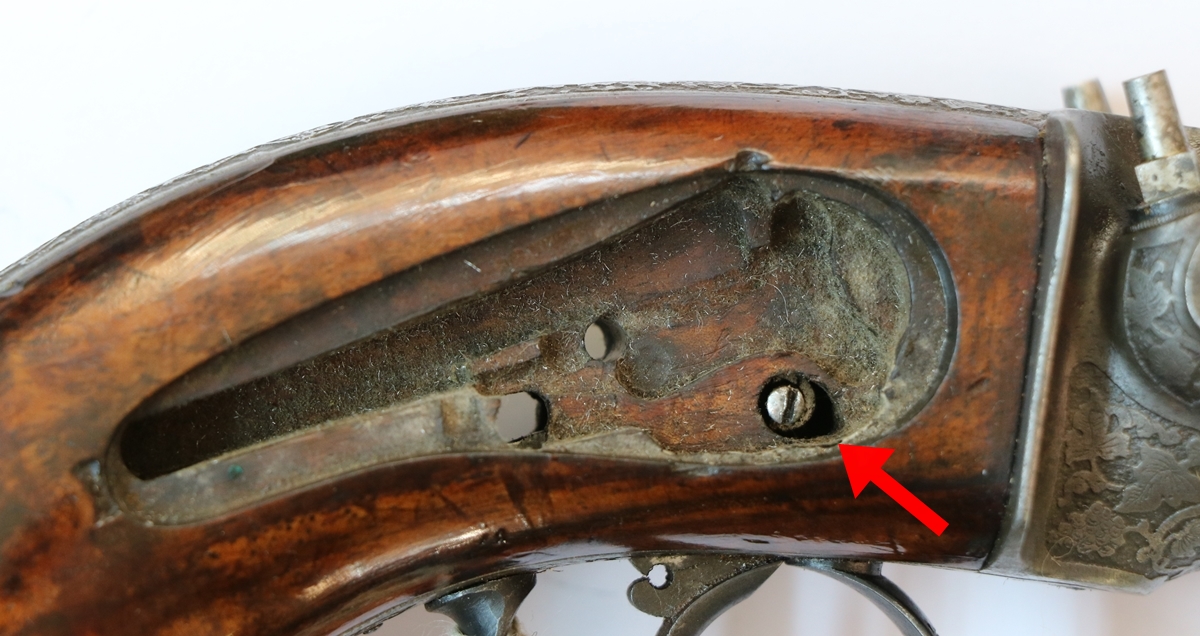
Showing the stud in the blade in front of the pivot.

The ramp on the tumbler that acts on the stud is arrowed. Notice that the half cock bent is not designed to resist a trigger pull – ergo it is not safe! You’ll also notice if you look on this site regularly that I have got rid of most of the colour cast in these two photos – I changed 3 flourescent tubes near my photographic station to daylight tubes – no expense spared in making your experience better! I did buy a 50W daylight flat panel to put above the station, but left it in the shop, so that is another trip to Cambridge!
14th – I felt for the regular followers of this blog, having put up with my ramblings for far too long (do I hear faint cried of Hear hear?) so I dug out an interesting pistol from the recesses of the collection I inherited from my father. It’s French, by the well known Paris gunmaker Le Page and is a large bore percussion pistol firing superimposed charges – it has two cocks and a single bore into which two loads are placed, one after the other. The right hand nipple leads to the front charge, and the left hand nipple leads directly to the rear charge. It has a single trigger that releases one cock at a time – if both cocks are at full cock, the first pull fires the front charge, and the second pull the rear charge, but if only the left cock is at full cock it fires that one (corresponding to the rear charge, so it would be a bit unfortunate if it was double loaded and you accidentally cocked the left cock and didn’t cock the right! Maybe I will take the locks out and have a look at the mechanism that achieves this and put it on the site- I’d like to see how it shoots one day, its a big bore (a 20 bore cartridge just fits into the muzzle) for a relatively light pistol and must have used a pretty small charge. Obviously you need to get the loading dead right to make sure the flame channels line up with the charges – I can feel a dummy loading coming on………
Anyway here it is – more in the new post ‘LePage pistol’
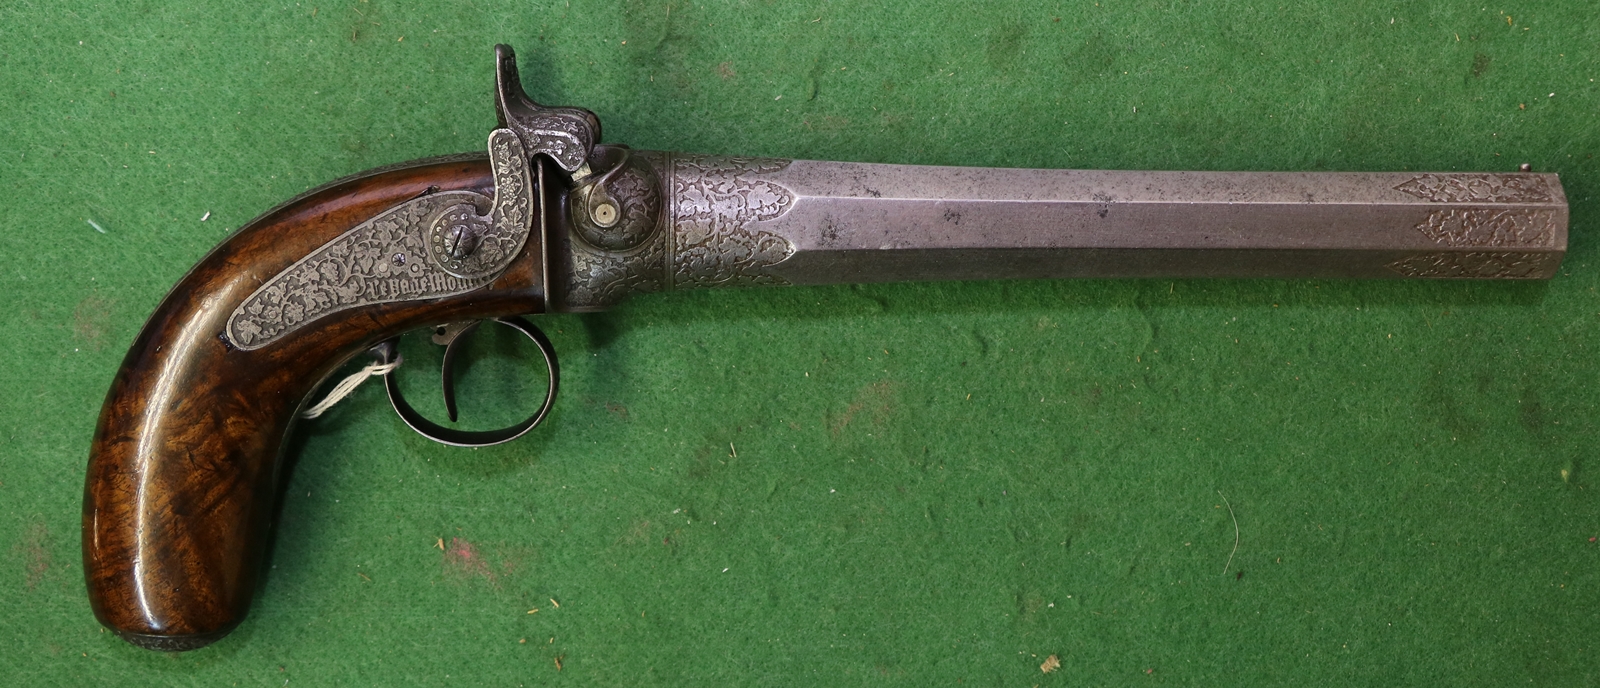
13TH – Sorry, no time for guns today. Up at 5:30 to start the car boot at 6:30 – madness! Anyway I did get rid of a fair bit of junk from the attic, and made a bit of pocket money, but still loads to go. One booter explained to me that my cameras and lenses were too good and should be on Ebay in September when the courses in photography and art begin as they all use film cameras. So next target is to bite the bullet and do a bit of ebaying after the holidays – to that end I got out all the kit I used for 1 hour for making an underwater video of the reaction of fish to seismic surveying in Mexico and getting it working so I could sell it – its a bit old but good and it still works…..
12th August – Quiet day – I’m doing another car boot sale tomorrow in the hope of clearing some more space in the attic – I seem to have loads of camera stuff to get rid of – including a camera from a Spitfire – a 12 Volt electric cine camera that ran at the same frame rate as the guns fired – by coincidence there was a Spitfire parked in the middle of Newmarket today – on display. It was a non-flying one without a Merlin engine, but it had apparently taken someone 30 years to make and it did look pretty convincing inside and out. I packed up a few gun related bits to send off – part of my current plan to get rid of all the things I don’t want to keep – my trouble is usually that as soon as I have reluctantly parted with anything, a sudden and urgent demand drops, metaphorically speaking, through the letterbox. A couple of years ago I dumped a load of plastic parts I’d had made for a seabed system over 10 years before, that I thought had gone out of use years ago, The bins went at 10 o’clock in the morning and an email asking if I still had any came at 4 p.m. the same day out of the blue! – that bit of clearing out cost me a few hundred pounds. Similarly I dumped 2 large boxes of patent reprints from about 15 years before, only to get a query re similar patents 2 days later. My current policy is ‘ If you can easily buy another one or its junk it goes, if not , keep it).
11th August – Looking further at the theoretical loads for black powder muzzle loaders, since by Newtons law force = mass x acceleration, to keep the acceleration constant as we increase the shot load, we need to increase the force in proportion to the shot weight, so 1 1/2 oz shot load needs 1 1/2 times the powder used for a 1 oz load and so on. Simple really – more or less the same powder charge for the same shot load whatever the bore size (within sensible limits – probably works for 16 to 12 bore?). That at least is the simple theory – but we all know life is not quite like that. The hammer of the Steven Grant of a few days ago has now been expertly welded and filed up and I got it back to engrave. The previous botched repair had had some re-engraving done to a similar botched standard, and some of it was still extant – we didn’t file it all off as the spur of the repaired hammer was already slightly slimmer than the original – anyway, I re-engraved it as best I could in the circumstances and it now looks a reasonable match for the right hand hammer – its a real fiddle doing hammers because of the compound curves, and some cuts are almost impossible – I used my lining graver as a sort of scraper to put lines down the middle of the hammer where the spur joins the body as you can’t get a conventional graver to the correct angle to cut. I’m happy that it looks a lot better than it did, and it is now strong enough to stand any normal use. Its all back together now and ready to go.
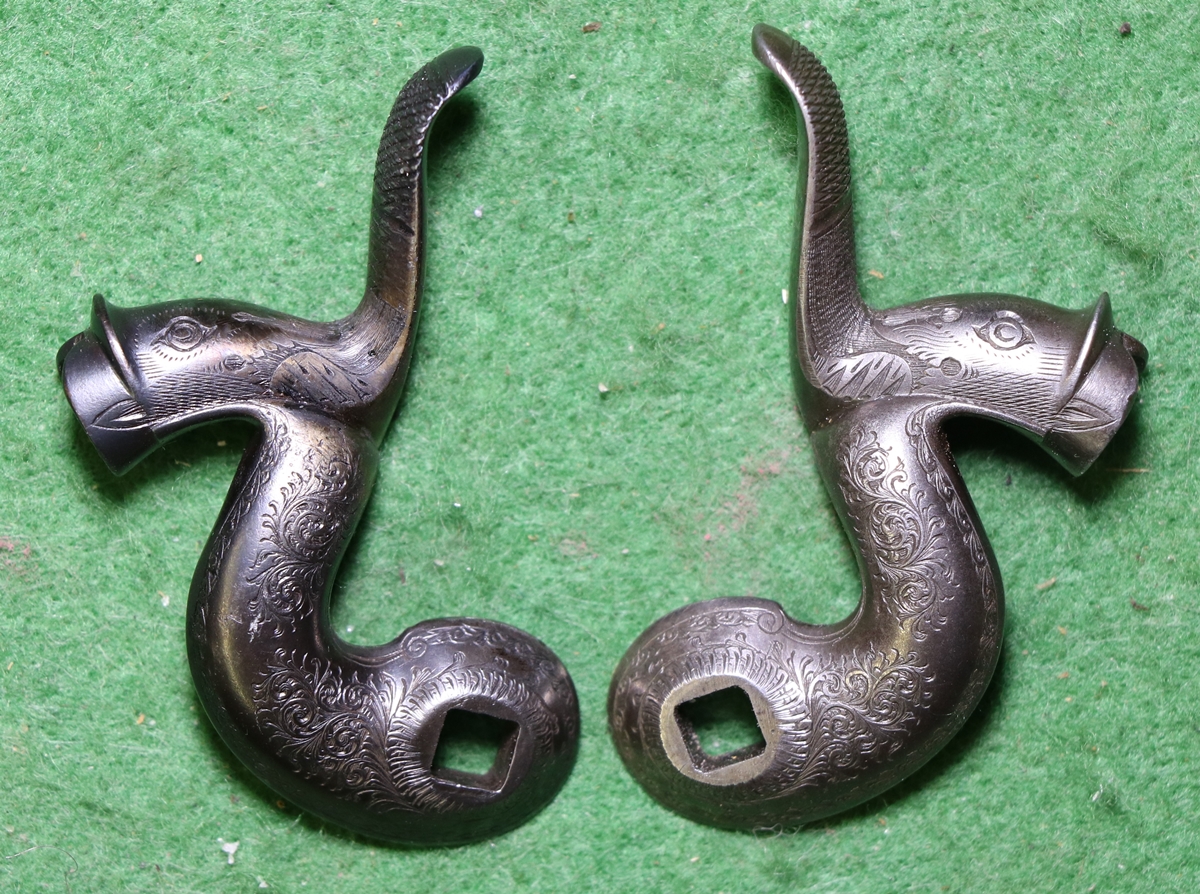
10th August – Went for an ‘informal’ shoot at Eriswell with half a dozen of the AML gang – I decided that I was going to get to the bottom of my failure to get any of my flintlocks to go off properly fast when others could load them and get them to work well! I took my Twigg (see Twigg puzzle) which doesn’t have a link on the mainspring or a roller frizzen but should still be reasonable, and it has always given very few misfires. I had tried various priming powders I had, including some OB ( the AML preferred primer) that I had bought at great expense so today I tried the OB again, expecting good results, but disappointment again – then I compared my ‘OB’ with Viking’s and we realised that mine was a lot coarser, in fact not OB at all! I don’t know how that happened, but somewhere in the supply chain I had been given the wrong stuff – probably Swiss No 1. Anyway Viking very kindly lent me a small flask of ‘proper’ OB and lo and behold I managed to break a few clays with a flintlock – quite a breakthrough for me. While wandering from stand to stand I got to thinking about charge sizes, as muzzle loading folk use a variety of bore sizes from 6 to 20 or so, although mostly in the range 10 to 16 bore. We seem to more or less ignore bore size in discussing what powder charge we are using, although most of us use quite similar shot loads and, for percussion guns, similar barrel lengths. Anyway I thought I’d try to work out a theoretical optimum based on some simple physics (that being the only sort I can do while wandering about!). Basically, a given weight of black powder converts to a given amount of gas, so to accelerate a similar shot load to a given velocity through a similar distance the force on the wad needs to be the same. The fixed amount of powder converts to a fixed volume of gas, which generates a pressure that is inversely proportional to the volume – and for a fixed length of barrel that is proportional to bore area. But the force driving the fixed weight of shot down the barrel is generated by the pressure acting on the wad, and for a given velocity and shot weight the force must be the same – the force is given by the pressure times the area. So for a fixed powder and shot load we have pressure proportional to 1/area and force proportional to pressure times area – so the area of the bore disappears from the calculation – so theoretically we should use the same powder charge for the same shot load irrespective of bore size. which is somewhat counter intuitive! It does ignore practical considerations like the friction of the wad on the barrel walls, and speed of burning and the buildup of pressure etc. but in principle it explains why we can all talk about that powder charge we use without specifying too carefully what bore our guns are.
9th August – A visit from a Yorkshire muzzle loader down south to visit Holts – we had a very pleasant few hours looking at some of my collection and a few he had brought with him – He had brought a cased Beaumont Adams revolver in 54 bore so I showed him my almost identical one – I have an empty case I was going to put it in so I photographed his case and label to give me something to work on. He had a bullet mould with his that didn’t have the spiggot on the base that holds the wad on the original Adams revolvers – I don’t know when it was dropped. I have a rather beaten up early Adams stamped 56 bore that is unusual in that the action is the mirror image of the normal action – the cylinder rotates anticlockwise and when you remove the pin it drops out on the left side – a few were made like that by Tranter – I am not sure why, possibly for left handed shooters, although it seems it would be only a slight advantage to the shooter, and a significant trouble to reverse all the parts. My visitor brought a nice 16 bore percussion rifle with a fairly authentic looking peep sight on the back, although like my Samuel Nock rifle, the pinhole in its lowest position is much higher than the bead of the foresight, so it won’t sight at shorter ranges. I suspect that the peep sight had been adapted to fit the gun, but whether the foresight was meant to be replaced, as I have done, or it was only shot at longer ranges isn’t clear. I think, as I’ve said eleswhere, that these rifles were shot with quite light powder charges (1 1/2 dr) so the velocity was quite low and the drop at range would have been considerable – even so I’d think that the sights would not be much use below about 200 yards or more. When I get our a few of my guns I always end up realising how many still have things to attend to – like finishing the locks on the Lancaster double rifle! And stripping and documenting and repairing the enclosed lock J R Cooper patent percussion gun. I did venture into the workshop and made a nipple for the New Land Hanovarian conversion – it turned out that the nipple hole was a good fit for 9/32 B.S.F. for which I have taps and dies. I always turn the nipple thread end and cut the thread and drill the bottom bit of the hole, then rough down the nipple area and part it off, then put a tapped block in the chuck and screw in the nipple and finish it off. I stood the nipple up in the vice with lead on the jaws and filed the square – normally my filing is a bit wonky, but this one was good! I hardened it with Blackley’s colour case hardening powder to colour it down – I probably ought to temper it a bit- I usually take them to a purple-blue if I’m going to shoot them, so they don’t fracture – I’m using EN8 steel. It could be a bit longer and a bit fatter to hold the nipple better and so that it doesn’t come off when the cock is on the bolt, but it will do for the time being…. I don’t intend to shoot it…….
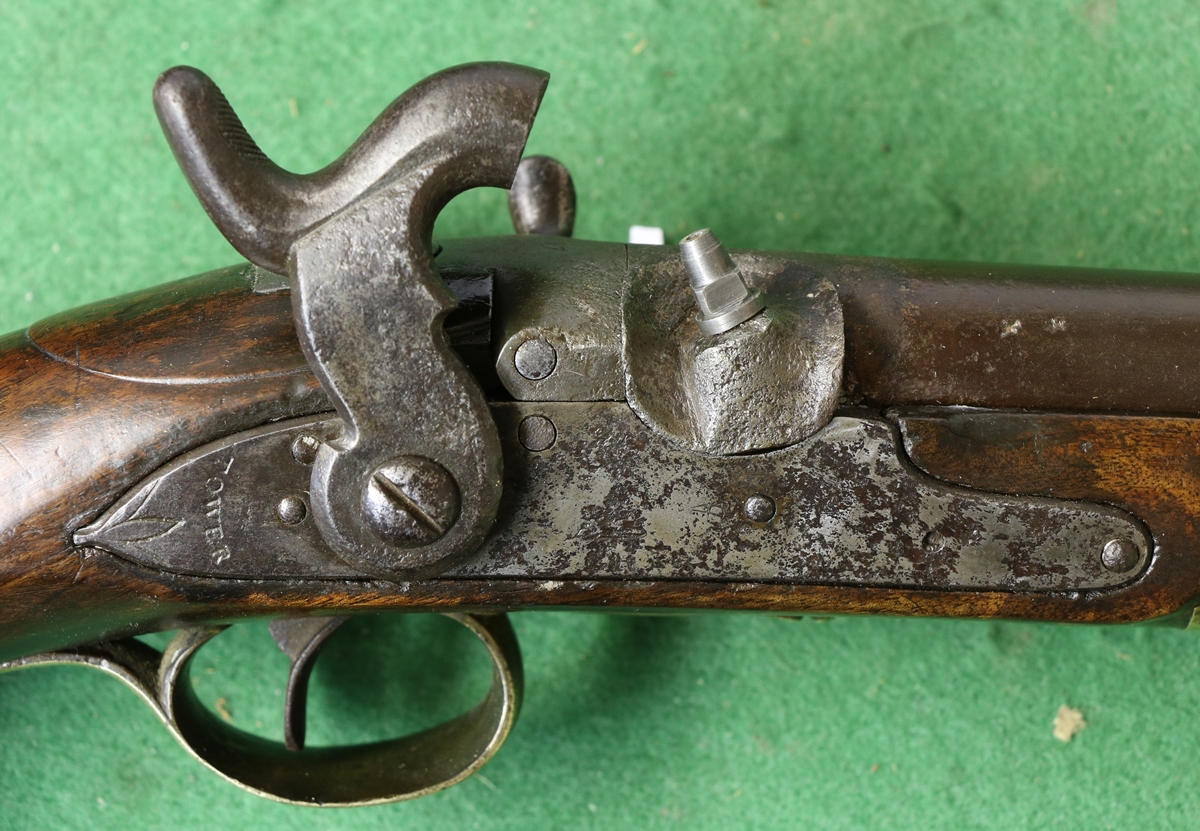
Could probably do with a bit of rusting etc! It looks a bit new.
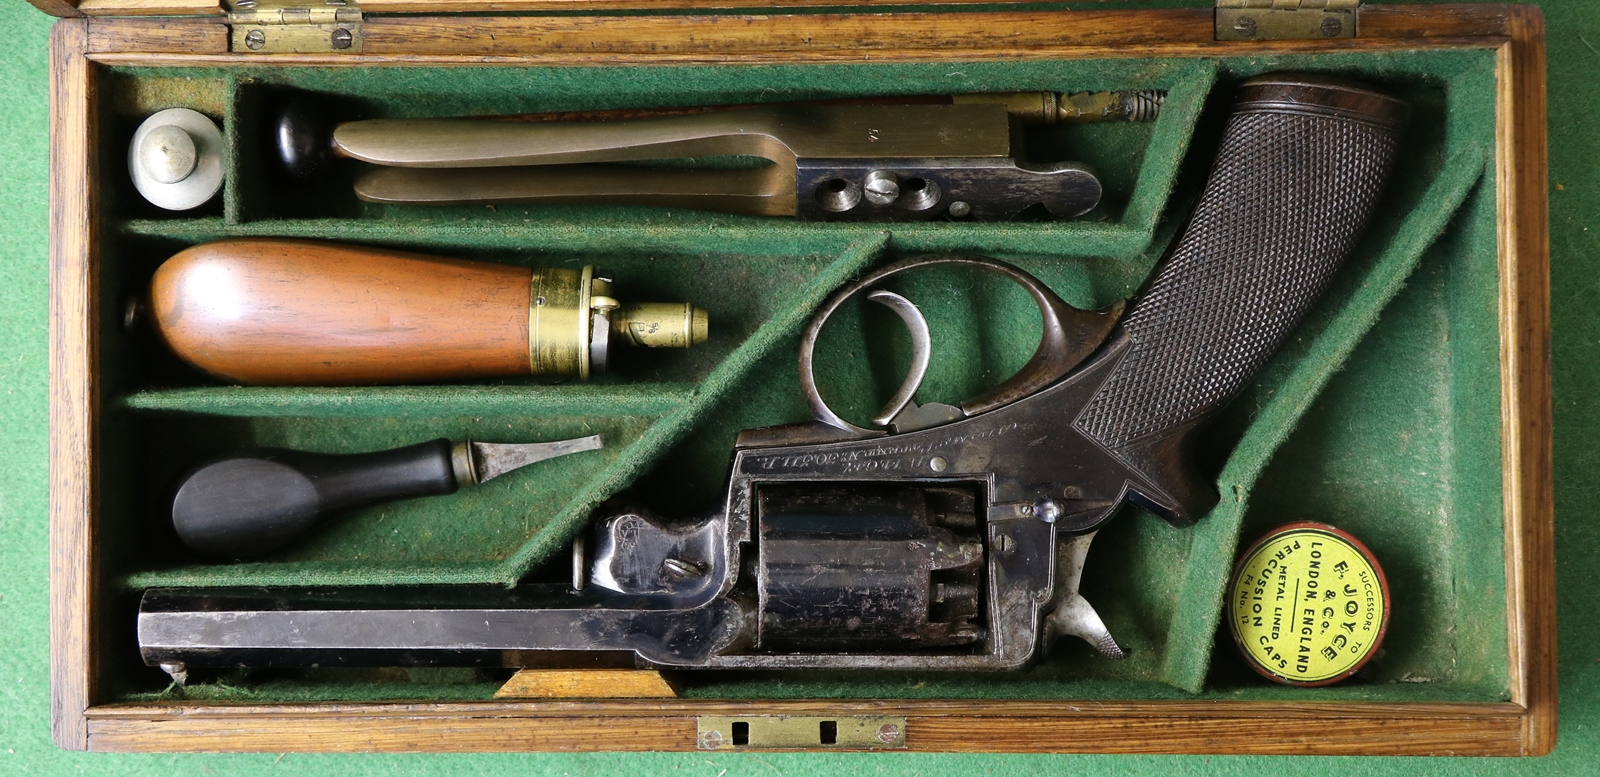
Cased Beaumont Adams 54 bore revolver
8th August – Had a couple of chaps from ‘Green Deal’ here insulating my roof for free, courtesy HM government, with 12 inches of glass wool. When they first came to do it a couple of weeks ago they couldn’t get through the 10 inch square loft opening so they sent a different team today who made me a nice hatch into the loft, which I had been meaning to do for years – in fact for 23 years since we moved in – and then laid the insulation! And all free! The only downside is that clearing the landing of books, pictures and ‘treasures’ like an original ticker tape machine and an old railway ‘train on line’ single line working indicator so they wouldn’t get covered in dust just showed up how much the decoration had got tatty since it was done about 20 years ago. So I suppose that is a job to be done now the place is empty…………better see if I still have the original can of paint handy! I really think decoration should last 50 years, but it was done with distemper which is a bit fragile……… Dick had a go at sorting the hammer of the Stephen Grant (see a couple of days ago) and it became clear that it had at some point in the past had the spur completely broken off and very badly welded back on without any penetration – hence it was so weak it eventually broke on the impact of the hammer on the firing pin. It will be fixed properly this time!
7th August – I took some photos of a relic I saw in someone’s collection of bits and pieces on the way to be destroyed so that I could put one on this website – its an early centrefire double 12 bore to Joseph Needham’s patent 1544 of 1862 with what Cruddington describes as Rotating single bolt snap action. The lever pivots on a shaft near the top of the action face and works a bolt that moves out from just below the action face, giving it an advantageous leverage. The unusual feature of Needham’s patent is that the lever has an ‘elbow’ that moves the hammer to half cock as it is depressed. A similar ‘elbow’ fixed to the other end of the shaft cocks the left hammer to half cock. The date of Needham’s patent indicates that it may have been made from 1862, although the gun and variations of it sold well, and the patent was also taken up by Holland and Westley Richards. The locks are missing, but could be from before or after rebounding locks were invented around 1867….. although it hardly needs rebounding locks as the hammers are lifted out of the way before the gun is finally opened. Shame this is all that is left of the gun…. On the subject of patents, I looked again at the Stephen Grant illustrated below with the cracked cock and noticed the action face was stamped E.C. Hodges Patent 257, the 257 being a serialisation not the patent number. The patent is No 3113 of 1865 for a firing pin that is in line with the axis of the bore – achieved by a rather indirect coupling between the firing pin hit by the hammer, and a separate bit that fires the cap – you can’t see anything from outside. The Grant gun does not have rebounding locks so probably dates between 1865 and about 1870 . I gather that the hammer failed due to the shock of it stopping when it hit the firing pin and the nut around it, and that it was known to have a fault. I has now gone to be very carefully welded by our expert Jason at Speciality Welders in Haverhill. The fun thing about these early breech loaders is that there were so many patents and variations, and examples of many of them still exist.
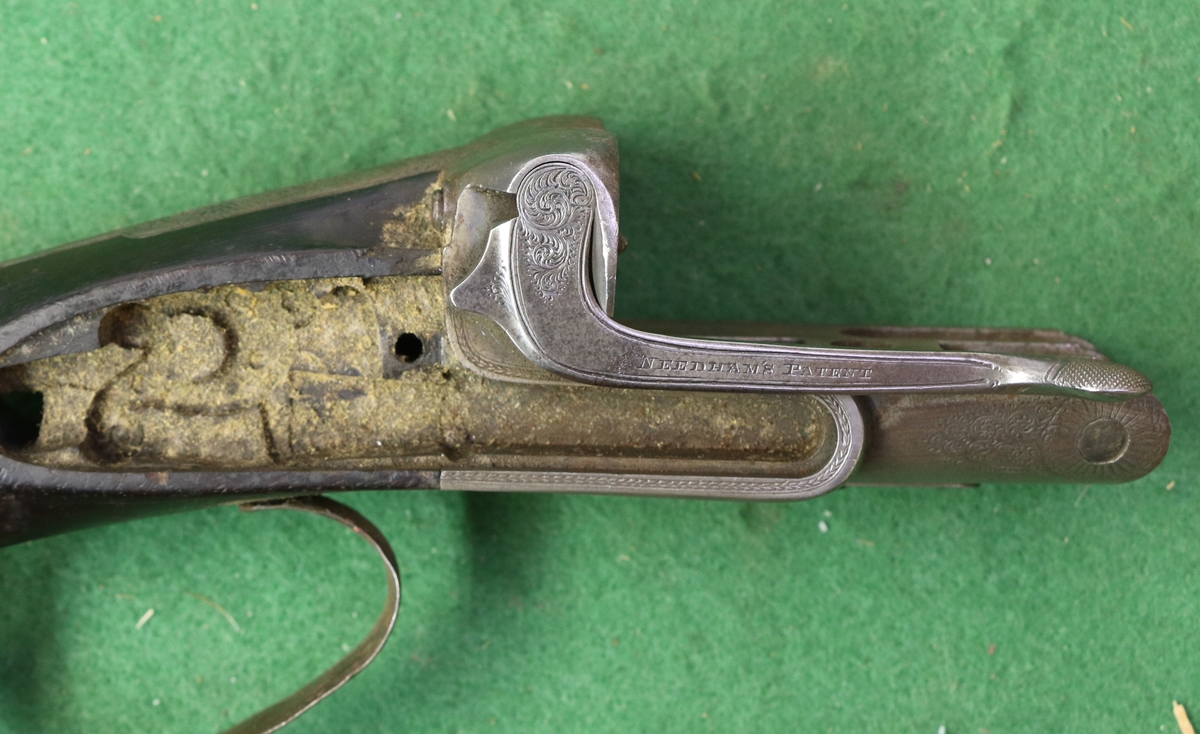
Needham’s patent 3113 of 1865 – The ‘elbow’ that lifts the breast of the hammer to half cock position can be seen on the back of the lever. A similar elbow is fixed on the other end of the cross shaft.
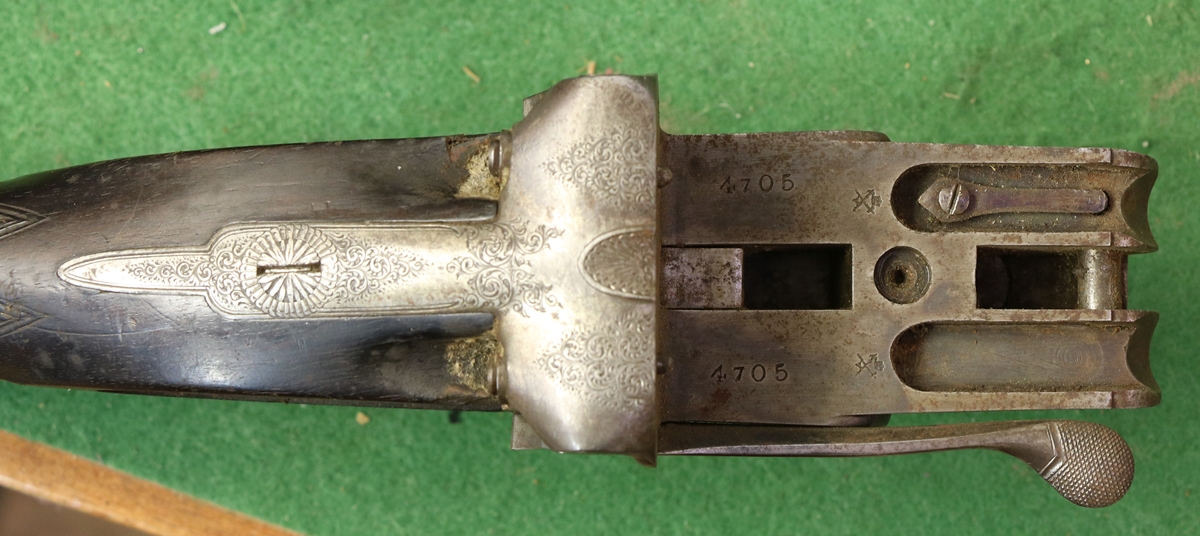
The bolt is close to the action face – I’m not sure of the function of the little spring near the hinge pin.
6th August – I picked up one gun to play with at CGC yesterday – an early Stephen Grant hammer gun with Jones underlever and non rebounding locks that had a cracked cock. The owner wanted the cock replaced with a casting because he was not convinced that a welding job would be strong enough. The crack is at the back of the spur and so must have been caused by the gun being dropped butt first and the spur catching on something pretty solid – or some similar action, but not over enthusiastic cocking which would crack it from the front. (p.s. it cracked from the shock of hitting the firing pin and surrounding nut as there was a fault in the metal almost fully across the spur). In order to replace the cock with a casting, the existing cock would need to be repaired carefully to match its opposite number exactly, which would probably involve welding it back in position. A silicone resin cast would then be made to form a mould for a wax to be cast, the wax would then be mounted on a ‘tree’ with lots of other wax castings of other moulds, dipped repeatedly in suspensions of fireclay and sand to form a composite mould, then dried out carefully and finally heated in a furness to melt out the wax – molten steel is then poured into the near white hot ceramic mould to make the steel casting. Some detail is inevitably lost in the three transfers ( part to mould, mould to wax, steel to ceramic mould), and there is some shrinkage in the wax and in the steel so that the final casting is some 2 to 5% smaller than the original. Looking at the cracked cock I am sure it can be repaired as strong as it was originally, although I would get Jason to do the welding rather than attempt it myself to be on the safe side. I’ll take it to Dicks when I get a chance to get his opinion, but I don’t think a casting will match the right hand cock particularly well, even if I re-engrave it carefully.
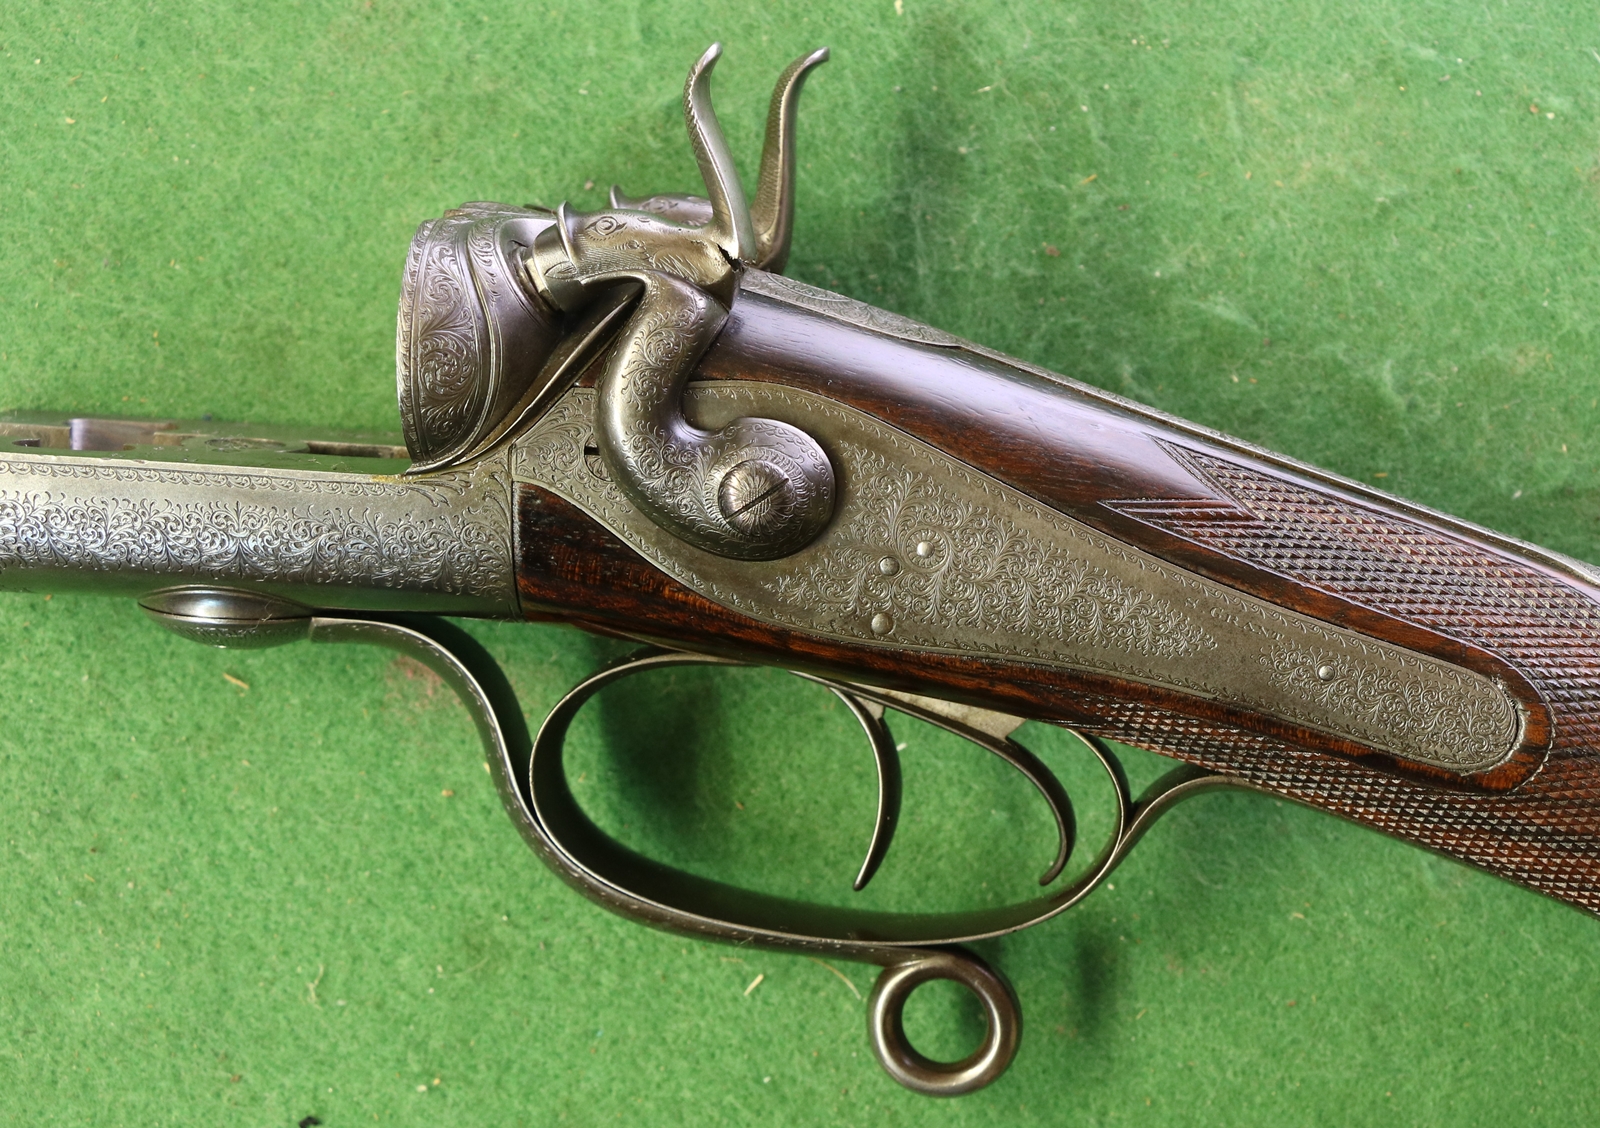
Pretty gun – It must have been quite a blow on the back of the cock, or else there was a bad defect in the metal. – Under the microscope it looks like the latter – there wasn’t much good metal holding it on, just a thin skin at the back, the rest of the break is an old fault.
5th August – One benefit of keeping this blog up to date is that when I got to CGC today to shoot I was handed a plastic bag of 16 bore cards in response to my blog that I had run out! Thanks Bev! I did the competition in the morning with my trusty Egg muzzle loader with mixed results, but I felt that my lesson had got me back on track as most of my misses were at tricky clays. In the afternoon I used the Beretta hammer 20 bore, which I didn’t do too badly with, although I did realise, prompted by some recollections from Viking, that it had a pretty tight choke in both barrels (at least half choke or nearly full ) – apparently typical of Beretta hammer guns from the 1950s. Anyway it seems to throw a pretty tight pattern compared to the typical modern 12 bore so I’ll use that as an excuse for not hitting more clays! I think it does need the trigger pull regulated – possibly just the sear spring taken down a bit and a bit of polishing on the nose of the sear – I will consult Dick, who is much more used to modern guns than I am. I had another look at the Lees 8 bore percussion gun that I described earlier as a wildfowling gun, but we decided that it wasn’t heavy enough – wildfowl guns were meant to shoot large shot loads and were pretty heavy to control the resultant recoil – this was only about 7 to 8 lbs, so was probably a live pigeon gun. Anyway the consensus was that 3 to 3 1/2 drams of Czech powder (2 3/4 of Swiss) was plenty enough, with 1 1/8 to 1 1/2 oz. of shot. A 12 lb wildfowling 8 to 6 bore might shoot 5 to 6 drams and 2 or 2 1/2 ox of shot if one felt brave enough.
4th August – Off at Cambridge Gun Cub all day – Martin was kindly giving me a lesson, which certainly highlighted where I was going wrong – I now need to get that embedded in my reflexes so I don’t shoot with my conscious brain! Difficult for someone who likes to think about everything and is prone to analyse. Very well worth it, and my little 20 bore suits me well, although Clare thought the trigger pull was a bit heavy – I’ll check it out when I can find some 20 bore snap caps. After my lesson we entertained a party of newcomers to muzzle loading to give them a chance to try both percussion and flint – I think I used up my entire supply of 16 bore cards so I may have to scrounge some for the regular Anglian Muzzle Loaders’ shoot tomorrow – or make some if I have time after cleaning my guns from today and making bread ( not, I hope, gunpowder or oil flavoured!). I need to take some 1/4 BSF nipples for a fellow M/L shooter if I can find some. I could actually do with some more myself as the nipples in my ‘working’ muzzle loading double are getting a bit mushroomed and the caps don’t fit properly – I did try to grind them a little on my fine diamond hone, so I think that will act as a holding operation! I might have a go at making some more titanium nipples – the last ones were good, although its early days yet as they have only fired 30 or 40 shots so far.
3rd August – I had a very pleasant day cruising on the Thames on a narrow boat, and came across an amazing sight at Caversham Lock – we came up behind a convoy of amphibious vehicles waiting to go down the lock. There was every kind of amphibious vehicle you could wish to see, from a Citroen estate car with a big outboard on the back to a number of military amphibians, in a rally from all over Europe that apparently attracted some 55 entrants. The military vehicles included a couple of amphibious U.S. army Jeeps circa 1939 and a couple of US Personel Carriers that looked really interesting – they had apparently been designed and made in 3 months for the Normandy landings and were intended to have an operational life of 3 weeks! And here they were more than 70 yeas later, still in very good condition and fully functional – amazing. I had a very interesting conversation with the organiser (from UK) about a book I remembered reading some 50 years ago called Half Safe about a chap who crossed the Atlantic in an amphibious Jeep ( in the 1950s?) with his newly acquired wife – according to my informant she left him as soon as her feet touched dry land, but he knew much more of the story and indeed he had the manuscripts of two further books describing his continuation round the world, which apparently have been published – I must follow them up! I didn’t see a British DUWK amphibious vehicle amonst those waiting, but most of the vehicles/boats had already gone through the lock. On the shooting front, which after all is what this blog is supposed to be about, I’m off to Cambridge Gun club tomorrow for a shooting lesson to see if I can get a bit more consistency into my shooting – I’ll take my usual muzzle loader, the D Egg double with back action locks, plus my Miruku 12 bore and the Beretta 20 bore hammer gun I bought recently. So we shall see if lessons do me any good! I’ll report back, unless I turn out to be so bad that I want to keep quiet about it!
1st August – The year rushes on! And I spent most of the day on the telephone with the service department trying to sort out a friend’s alarm system – I think in the end I got there…. I just had time to get back to micro-engraving this evening, so I thought I’d see how I got on with curved letters at the 1/2 mm scale… Finding words that only have curved caps in them is difficult – you only have 2 vowels to play with , U & O, which limits vocabulary somewhat! there are several that end in ..USS or ..OSS but I couldn’t come up with a complete sentence! Anyway engraving curved letters is an order of magnitude more difficult than the straight line caps and I had to revert to EN8 steel to get it right – I also need a tool with an almost non-existent heel or it drags round the bends and spoils the shape. I can just about do 1/3 mm (13 thou) but a bit ragged! In the end I started to engrave round the edge of a 1 p piece, which worked out well… Today was almost a record for visits to the site 270 so far today and 37 referrals from search engines.. I can usually see from the search words why they got to this site, but today I was left wondering how a search for ‘ oil field Bator’ on Bing directed someone to this site, maybe I’ll try myself! – I just did and I’m none the wiser! I am sorry that I’ll probably not be posting until Friday as I have a very busy few days and evenings…. I’ll have to think of something appropriate to engrave round the edge of my 1 p piece – a good use for what is becoming a completely useless coin.
30th July – I left at 6 a.m. to go to the car boot sale at Fulbourn- I only do them when I feel that I must clear some space in the attic – it has to be pretty desperate for me to raise the energy, but it was, so I did! I actually got rid of a lot of stuff in to the ‘zombies’ in the first ten minutes at the prices I wanted, and ended up taking very little home with me in the way of bulky things. So successful was it, in fact that I might have another go before long and clear out some more stuff…….. I even had a wildfowler on the stand who had a muzzle loader at home – I suggested he might look at this website, so welcome if you do! Having another look at the New Land, I think it would improve things if I did de-rust the lockplate and the cock – I probably won’t strip the lock first – we’ll see what happens!
29th July – Today there were 5 times as many visitors attempting to hack this site as there were legitimate users! They probably represent a few hundred warped individuals using botnets hosted on the computers (or routers) of unsuspecting owners – there are tens of thousands of routers in use that have a shocking vulnerability that makes them very easy to load with rogue software. Most of them get permanently blocked from accessing this site, but it all makes work! I finished off the New Land as far as I planned to go, but I’m now wondering if it would look better if I derusted the cock and lockplate – I will contemplate the issue! I spent the afternoon filling the Land Cruiser with ‘stuff’ to take to a car boot sale tomorrow – not so much to make money as to get rid of clutter – I’ll probably give most of it away for a few pence rather than bring it home! I love the ‘zombies’ at car boot sales who descend on you the moment you arrive and want to see what you have so that they can buy anything they think they will be able to sell on for more – they almost climb into the car in their rush to uncover supposed treasures – I contemplate just having an auction on the spot and getting rid of the whole car contents in one go and leaving – the chap in the buchers’ shop suggested I might throw in my car as well, but I wouldn’t want to put potential buyers off! So that is most of tomorrow written off! Anyway, here is the Hanoverian New Land as of today…….
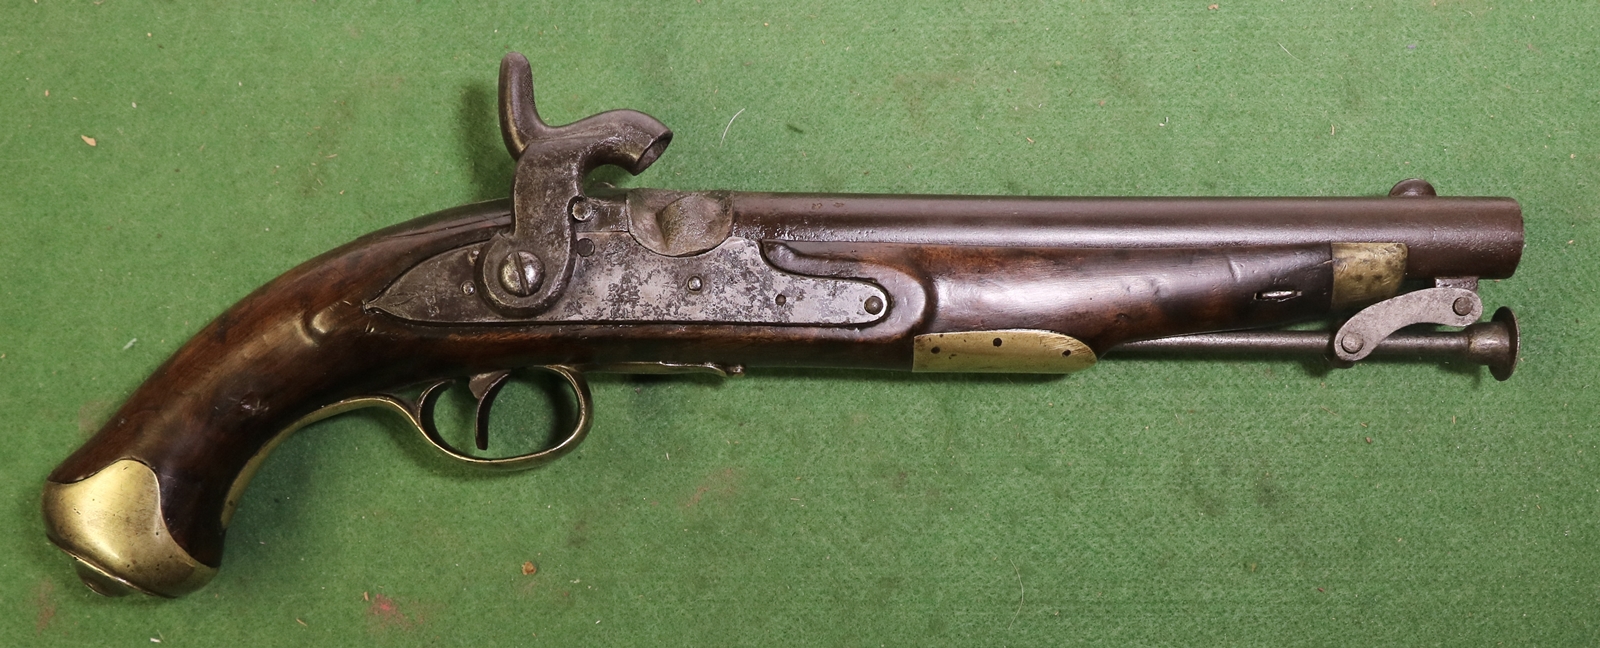
I probably ought to recover the background board! More pics in the New Land post.
28th July – Where has the summer gone? I lit the woodburner this evening for a bit of cheer! The New Land is almost done – a nice sticky layer of ‘slakum’ ( linseed oil & beeswax & driers ) is just setting up on the stock at the moment, and the barrel looks OK so I should have the finished photos tomorrow. I spent the day struggling to get a control system to talk to the internet – frustrating… So I reverted to the mind numbing activity of trying to engrave smaller and smaller writing! I decided that my EN8 steel is a bit soft so I changed to hard brass – usually a pig to engrave, but good for very small things. It is difficult to do letters with curves in them, especially ‘S’s and ‘B’s so I tried a short sentence that only had straight letters – WE ALL LIVE IN A HAZE – which just about sums life up. When I have mastered the straight line letters I’ll have a go at the curved ones, but I think I will have to come up with a more suitably shaped graver. Here is my test piece – the scale is in 1/2 mm divisions (20 thou) so the letter heights from the top line are about 2/3 m.m. (26 thou), 1/2 mm (20 thou) , 1/3 mm ( 13 thou) , 1/4 mm (10 thou) and 1/6th mm (6 thou). By the time I got to 1/6th mm I had to stop putting serifs on the letters as I was running out of magnification on the microscope (max x 25) and I didn’t have an arm steady for my right arm. My aim is to get to 1/4 mm including curved letters but it is quite challenging! Why bother, I hear you ask – there is no answer!

Click on the photo for a clearer view.
27th July – I went with Dick to deepest Norfolk to visit a fellow collector – as usual we took a few choice pieces to show and looked at some interesting guns including a little single barrel hammer shotgun with Jones underlever engraved below the knuckle with the words ‘converted by Richards Norwich’. We spent some time trying to work out what the conversion had been from. It could not have been from percussion as the breech had integral lumps etc, there was no sign of a notch for a pinfire, and the cock would have been funny if it had reached the pin, and the firing pin was obviously part of the original design. It couldn’t have been from a rifle as there was no sign of a rear sight mount, so we were left with a change of calibre – the barrel seemed too light for good balance, and the breech seemed too thin. We surmised that it was now a 24 bore ( there were once cartridges in that size) from the 25 stamped under the barrel between two Birmingham proof marks – we didn’t have a bore gauge. What gauge it was before ‘conversion’ we couldn’t guess – possibly 28 bore? Anyway it kept us amused for a while. We also saw a fine Blunderbuss with a Forsythe scent bottle lock that had come from a Bonham’s sale – it was in near perfect condition, but not looking quite like a perfect sleeper – it had apparently been in the Holland and Holland collection in the past and I thought that it had probably ‘gone through the works’ at Holland’s at some point. The trouble with extensive refinishing of a gun is that it leaves you wondering if it could be a complete fabrication, although in this case I think not. I took the New Land pattern to show as it has the clever safety bolt – the main purpose of the bolt is that it blocks the cock very securely from hitting the nipple but holds it fairly close so that a cap on the nipple cannot come off but cannot be fired, even if the pistol is dropped on the cock, until the pistol is put on half cock – some way back from the bolted position – and the bolt withdrawn. The bolt has a spring fixed within the false breech acting in one of two grooves in the underside of the bolt so that it is firmly held in the lock or the free position. This means the pistol can be carried with a cap on the nipple and the cock let down onto the bolt in complete safety – it can then be fired without having to fumble for a cap – put it on half cock, move bolt to left, full cock fire…… Clever and safe! Unfortunately my pistol got banged on the butt cap, which dislodged one of my repairs that I’d stuck on with superglue that had not for some reason done its job properly – I have now glued a new piece in using Araldite and used an Araldite walnut dust mix to fill in any gaps. The barrel is still rusting but the tang nail is finished – 20 minutes in the derusting tank with the voltage reversed so it acts as a rusting tank dulled it down enough to look OK. It had had a going over with Blackley’s colour case hardening compound which basically makes everything look greyish.
26th July – After a morning spent struggling with websites I thought to make the tang nail for the New Land Pattern – making screws being one of my favourite things (Julie Andrews singing in the background…….). Having established that it was about 1 B.A., and having a 1 B.A. die I went out to the outside workshop where my lathe is, to begin turning a piece of 10 mm rod to size – BUT turning the handwheel on the saddle didn’t move it, so no nail without first stripping the saddle which is a pain and I’d forgotten how it came apart… Anyway it was a 5 m.m. roll pin that had come out or sheared – I didn’t find the parts but I had some spares so it is now fixed and the screw made – first a blank with a false head as below, then make it fit and mark the lower flange with the slot alignment, cut off the top and put in the slot and finish the head ( on a grindwheel and a 240 diamond hone and a fibre wheel. Having done that I’m not sure if the military pistols would have bothered to align the slots. I would put up a photo of it finished but its in the cellar being rusted…. along with the breech end of the barrel – here is an out of focus photo of the nail start – I don’t often get photos out of focus – I use manual focus, and because my camera is up high so that I can put things on the bench to photograph, I use the camera screen and magnify to get a dead sharp focus where I want it. I almost always use around f6.3 aperture as it gives a compromise between image sharpness and depth of field, and lets me use the room lighting, or sometimes with a white LED panel handheld to show some particular feature. Using the screen to focus means that the reflex mirror is already up when the shutter is released, thus minimising any camera shake in case the tripod isn’t steady enough.
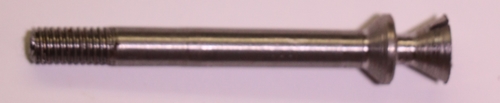
I had to grind the thread end a bit, as it was too long.
26th July – Had a bit of a battle with the website as I couldn’t log on due to my having changed a file to try to stop people logging on to disrupt the site – so I suppose it served me right – but then I tied to sort it and made the site so that no-one could even look at it! Oops…. Anyway I spent some time moving files from my other WordPress websites and generally fiddling in a desperate attempt to regain entry – a case of thrashing about like a headless chicken… Anyway, as you might gather from the fact that you and I are here now, I succeeded! I’m getting on with the New Land pattern – the stock is looking good – I’m pretty happy that it is now finished. I made new pins to hold the trigger guard and trigger in place using lengths of an old steel knitting needle, so that leaves getting the browning on the barrel sorted where I stupidly derusted the breech area some time ago, and making a nipple for top hat military caps. I am unsure what thread they are – since the breech block was made in Germany, it could be anything. The metric system was first realised in France in 1799, abandoned in 1812, and readopted in 1837, but didn’t become a true international standard until 1875. The thread looks like 26 or 28 t.p.i – anyway finer that the 20 t.p.i. of an Enfield musket. I think 9/32 x 26 t.p.i. will fit if I make it a bit oversize and swage it in the hole! The only problem is that I have a plug tap in 9/32 x 26 but no die! I keep buying odd taps and dies but never have the size I want apart from my set of UNF & UNC up to No 8.
25th July – I now know the origin of the converted New Land pattern thanks to a German follower of the blog – it was converted in Hanover for the Hanoverian Artillery around 1844. see http://www.waffensammler-kuratorium.de/HannArtillerie/hannArtillerieti.html see also on the post on this blog…. Thank you Joerg! So now I know its an interesting pistol, not just a boring conversion I had better sort it out! At some time I started to repair it by gluing in a new bit of wood on the butt, and re-gluing a chip the other side – but I think it was before I had much idea about these things and I got the chip a bit displaced. There was a ragged chunk missing around the barrel bolt on the muzzle end of stock, and when I came to dig it out I found that quite a lot of the ‘wood’ was pretty weak filler – one thing I have learnt is that it is easier to repair things if you cut back to a clean surfaces with the minimum number of faces, all flat… see teh New Land Hanovarian conversion post for more photos..

The break down the back face of the cutout bit is from the pin that held the bolt in – I guess someone pulled the bolt out too far and broke off a chunk of wood with the pin and bolt – they tried to use filler, but most fell out……. I’ve cut it all away.
24th Off to King’s Lynn to listen to 17 yr old nephew Ben’s composition played as part of the King’s Lynn music festival by a professional string quartet – amazing what the young can achieve given the opportunity. That is why I run my club for primary school children – left completely to their own devices they (mostly aged 8 & 9) planned and put on a presentation to parents with comperes, computer presentations and live displays of their Lego Mindstorms robotic devices. A big problem of today’s education system is that the kids are not given the opportunity to screw something up without it being labelled as failure! While in that part of Norfolk we visited Castle Rising castle – a splendid castle of 1140 with the usual changes and additions – mostly sadly a ruin but with a couple of rooms in the forebuilding – I always come away from places like that dreaming of reconstructing them – strictly a dream as any messing about with historic ruins is definitely a no-no in the heritage trade! …. All that by way of saying I didn’t have time to do anything with guns! However, my contacts in the muzzle loading shooting game continue to multiply – I had a call from someone who wants a shootable double 10 bore – but not a heavy wildfowl gun of 12 lbs – email me if you have one for sale – see CONTACT. Talking of lbs and inches, I guess after Brexit we will no longer be allowed to use Kg and metric measures – I bought a metric ruler today in case they become unavailable…………………………………………………..
23rd July – very heavy rain – ‘fun’ unblocking overflowing gutters! I flashed up my furnace as I thought I’d see about a bit of aluminium casting but the element was broken so I had to stretch and install the spare which means partially disassembling the insulation bricks – still it wasn’t too bad to do and its up and running now. In the process of finding the break I discovered that I’d got the live and neutral wires swapped at the main switch (unlike in the US, our power lines are not balanced about earth) so I put that right, it didn’t make any difference but is inelegant. I also added a switch so I can use the P.I.D. controller to monitor the cooling temperature with its output disconnected from the heater, to save having to reset the temperature to room temp.
The number of visitors to the site, the number of visits within the site and the number of search engine hits is rising slowly but hasn’t quite reached the heady heights of last winter! The site gets a lot of spurious visits from ‘bots’ trying to log in – the blog is supposed to be protected from them and they can’t do anything as they can’t find the real login entry – I’m sure the site is safe from them, but I think they may be added to the visitors count and I’m trying to work out how to avoid this.
22nd July – photo of the tap wrench below as promised. Casting around for some thing to post, I picked up an old New Land pistol that has been converted to percussion – its on my list of things to love,but hasn’t got there yet. BUT it has a nifty safety catch that I haven’t come across before, and as I’m sure someone ‘out there’ will tell me all about it, I decided to put a some photos on the site – for more see Post ‘New Land Pistol Conversion’
Magic tap wrench – the top part swivels +/- 90 degrees for unscrewing or screwing taps in awkward places – it will shift the toughest fittings! Top jaw is sprung. It latches onto the nut and can be used as a ratchet with care.
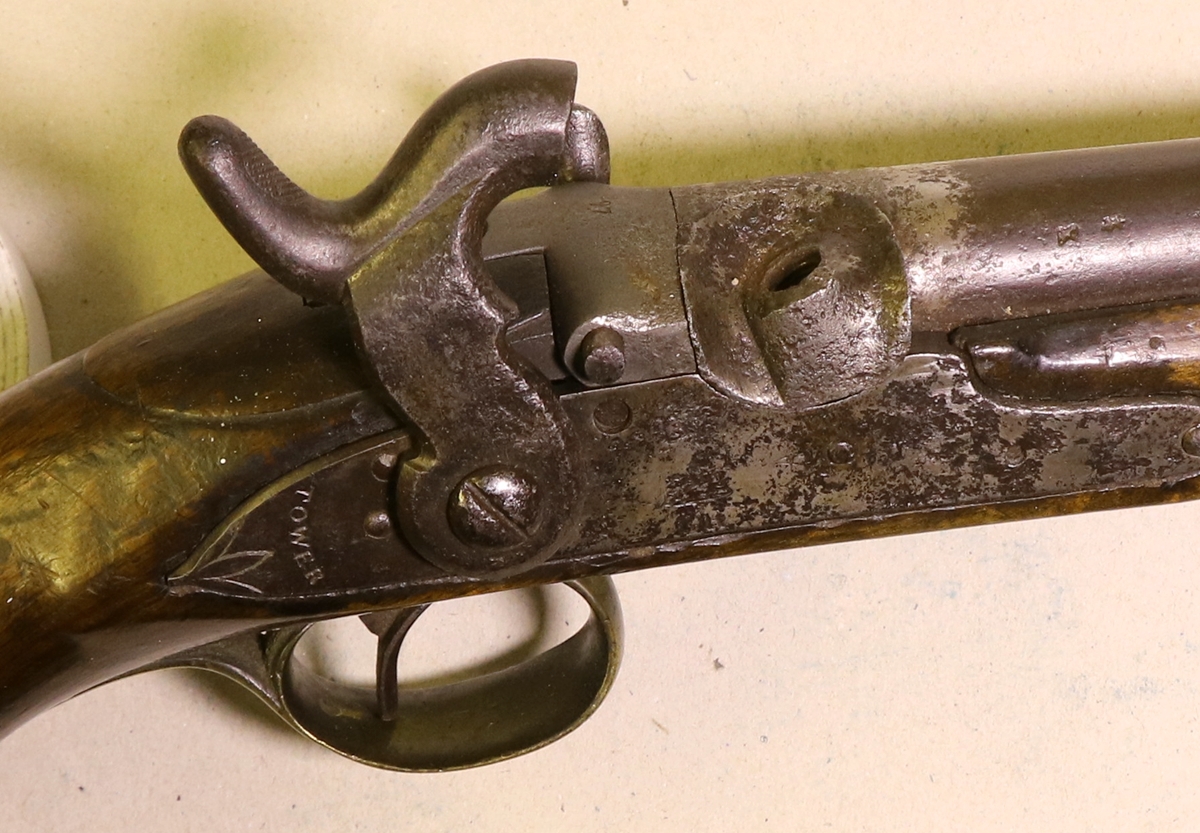
New Land with plain New Land pattern lock converted to percussion with new breech block with cross bolt safety shown in ‘safe’ position
21st July -Turns out I hadn’t finished work so I missed yesterday, except that I did pop down to Dick’s with the funny pistol I had engraved – he was pleased, which is just as well as there is no going back! Bit like being a brain surgeon or a bomb disposal expert, but with somewhat less critical outcomes! Actually I’ve always thought I would have been temperamentally suited to either career – probably not so, but one can always fantasize. Anyway, enough nonsense…. I got round to fitting a new kitchen tap today – I was reminded what a fantastic tool the tap wrench is – I’ll post a picture in case anyone hasn’t met one yet. But I did a bit of engraving too – I got back to playing with tiny engraving which involves grinding up some very small tools and trying to cut lettering in smaller and smaller sizes – I polished the tools on half micron diamond paste on a ceramic lap (horribly expensive – around £180 I seem to remember) but the finish still isn’t fantastic. I tried engraving the EN8 plate I had annealed but it is a bit soft and the unannealed plate is better as it provides a bit more resistance to the tool. It is relatively easy to engrave readable lettering 1/2 mm tall, and 1/3 mm is OK too – I did manage to get down to 1/4 mm – I am thinking of changing my name to get rid of the O in my surname as its the only curved letter in my usual short name, and curves are much more difficult to cut at that scale than straight lines. No photos of that as its a bit difficult to take them. I did manage to photograph the last of the guns I borrowed from Dick to put on the site. Its an 1853(?) French ‘ Le Faucheux a Paris’ 16 bore pinfire converted to centrefire – photo here, I’d be interested in any more info anyone has on similar guns. (More on Post ‘French 16 bore’)

19th July Almost finished my recent gainful employment so I can retire again! I’ll have to un-retire when I do Gile’s flat, although that is taking forever to get completed as there are 7 parties in the transaction – a company selling on behalf of the executors of the previous owner, the executors, the vendor’s solicitors, Giles’s solicitors, the leaseholder and the selling agents, plus Giles! So each iteration takes about a month to sort! Anyway I did manage to steal the odd hour to go and finish Dick’s pistol – I’ll have to take it to him tomorrow, and see what delights he has to offer. I have one more gun to photograph and put here when I get a moment.
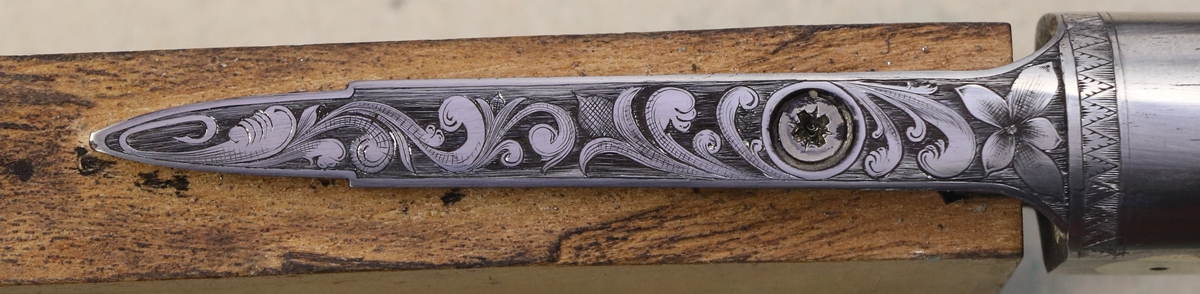
I can see a few bits that need touching up! Always the same when you photograph anything – you look at it with different eyes!
It does look different in the flesh as the metal is shiny and the contrast is greater.
17th July – I put up a full post on the furnace for info……………….See ‘Heat Treatment Furnace’
I have almost finished the tang of ‘another one of Dick’s funny pistols’ – just got to put some structure on the raised bits, but it looks better than I expected so far….. A few things I would do differently if I did it again, but life is like that!
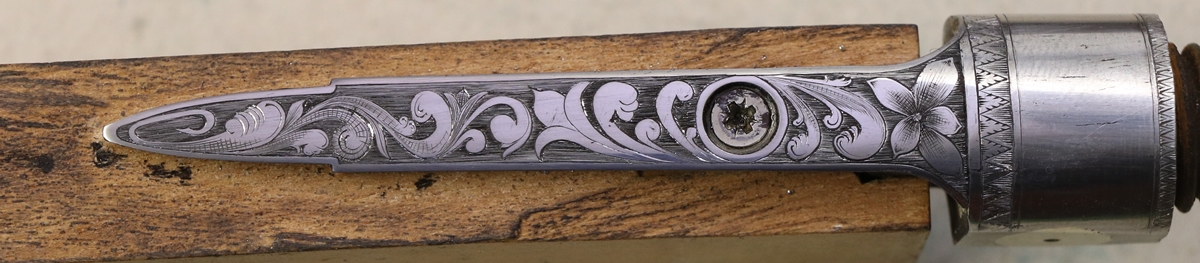
16th July Lawns today! I did a bit more on the tang of Dick’s second funny pistol – I dread to think how many cuts it takes to do the backgrounds but I guess when its finished there will be well over 1000 cuts in the engraving – judging by the rate at which I’m having to sharpen gravers, I’ll have done about 60 and re-ground about 15 of those with broken points! I have swapped to using the gravermax for the background lines as it keeps its edge better and is easier to avoid over-running into the raised areas. Not sure I’ll have much time tomorrow………
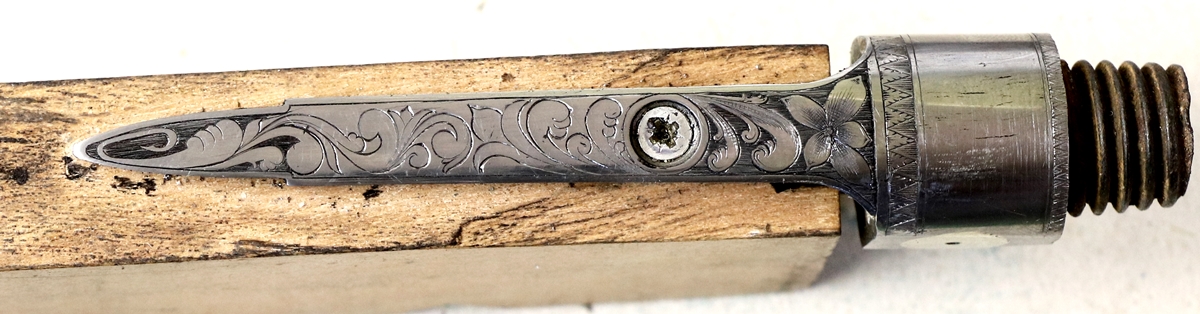
15th July – I used the furnace for the first time, annealing a piece of EN8 steel for an engraving test piece at about 900 degrees C. I got the PID controller and wired it in and checked it – using a decent voltmeter and the tables for a K type thermocouple I reckon the controller under -reads by about 30 degrees at high temperature, and it doesn’t seem to get up to the set temperature but starts to cycle while still below it – still, with the voltmeter and tables I can set the PID controller to a temperature that gives the result I want. Anyway it worked! I had the piece of steel in an envelope made from stainless & titanium foil from Brownells & crimped tightly to exclude air so that I didn’t have to deal with any scale on the surface after the heat treatment – that was a great success, there was a very light colouration on the surface of the metal – as with tempering it, but no loss of metal – definitely recommended for heat treatments above about 5 or 600 degrees C. I wasn’t absolutely sure if the metal in the envelope really got as hot as the furnace, but it took almost on hour to get up to temperature, and I held it there for at least 20 minutes and cooled if very slowly, so I guess it did. I must put another switch on the panel to disconnect the PID output so I can just use it as a temperature readout while it cools. I also have a cooker control on the panel I can switch in to control the rate of cooling if necessary. Its a really neat design – well done to the young lad who designed it – he’ll go far!
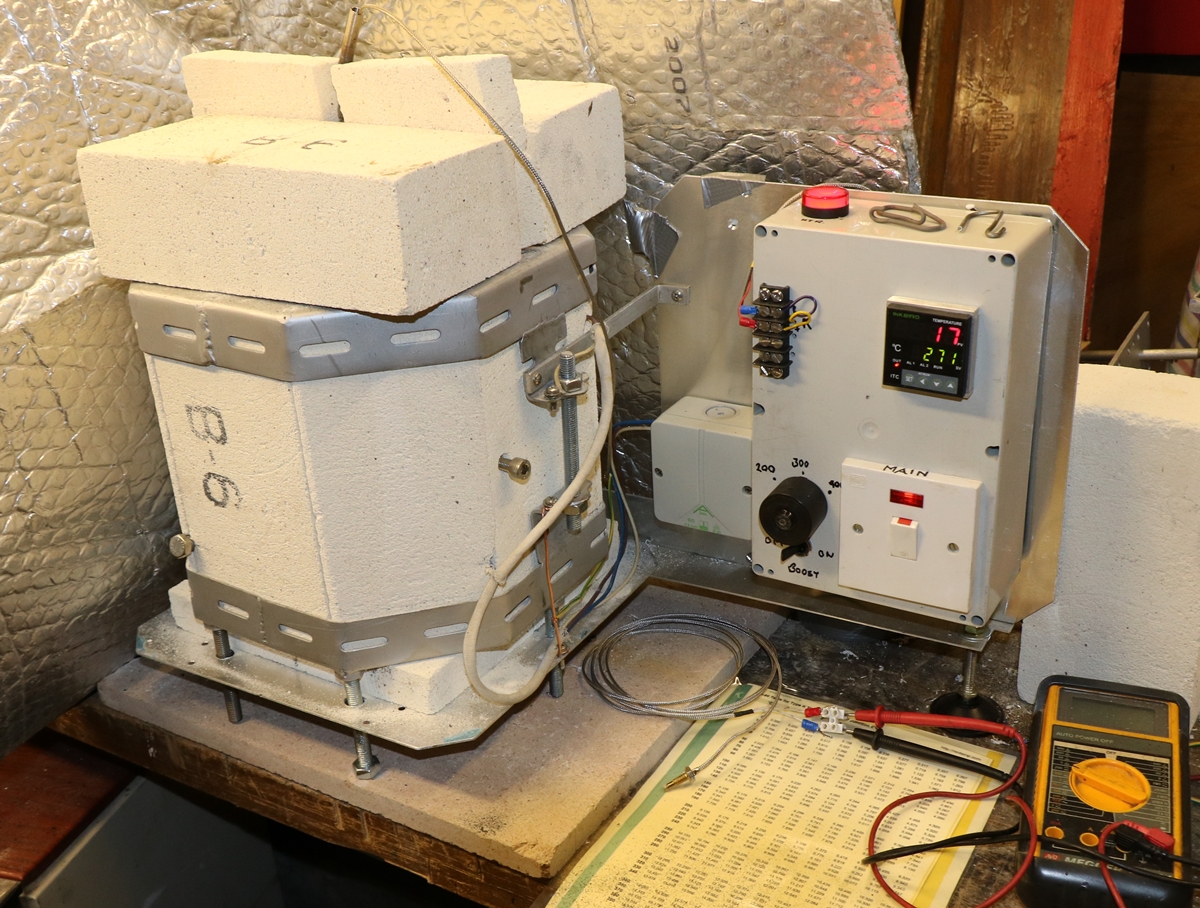
The two bolts sticking in the furnace bricks are blocking alternative holes for the thermocouple probe.
I carried on with Dick’s ‘other funny gun – engraving the tang – I decided I’d experiment with a cut out background, so I came up with a design and started at the top – stages are ;- black the metal, scribe a rough design, cut outlines with a push graver, remembering that with cut backgrounds you need to make the raised bits slightly oversize and bold, then go round all the edges of the areas that will be cut out with the gravermax canted over so that you cut an almost vertical edge to the raised areas and a sloping edge to the cut areas – these cuts should be fairly deep. Then cut out the background using closely spaced parallel cuts with a push graver – the skill is in starting close to an edge and NOT running into the raised area at the end of the cut, and keeping the cuts even. As the graver wears down it will cut deeper and take more force to cut so you are more likely to slip at the end of the cut – getting through the stages below needed 3 sharpenings of the gravermax graver, and 10 of the hand gravers. I made a couple of small slips but fortunately nothing that couldn’t be burnished out with a polished carbide tool.
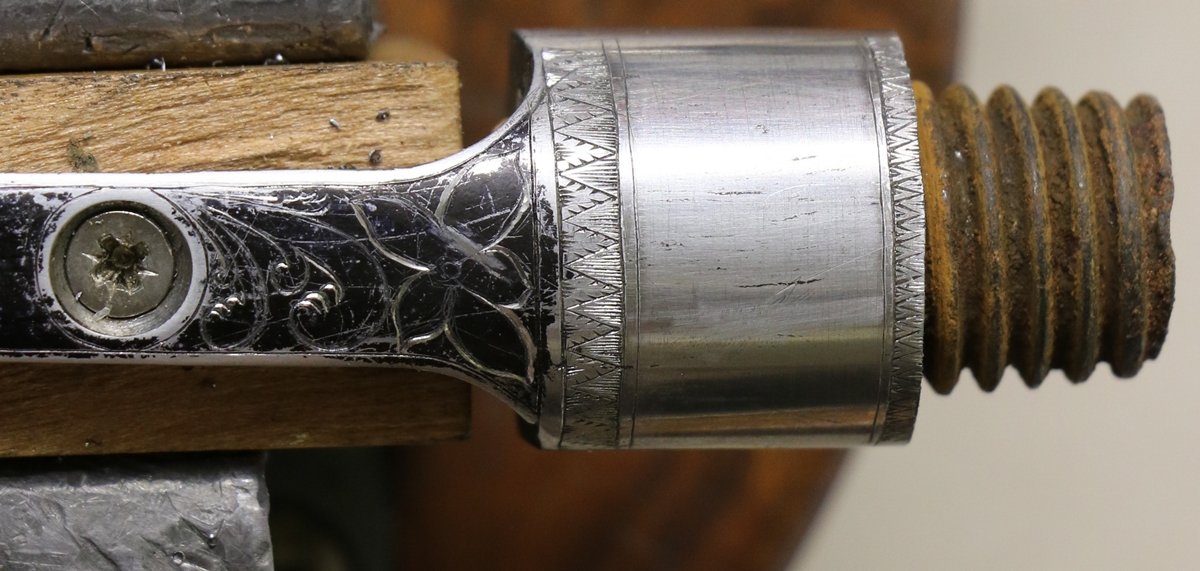
Outline design.
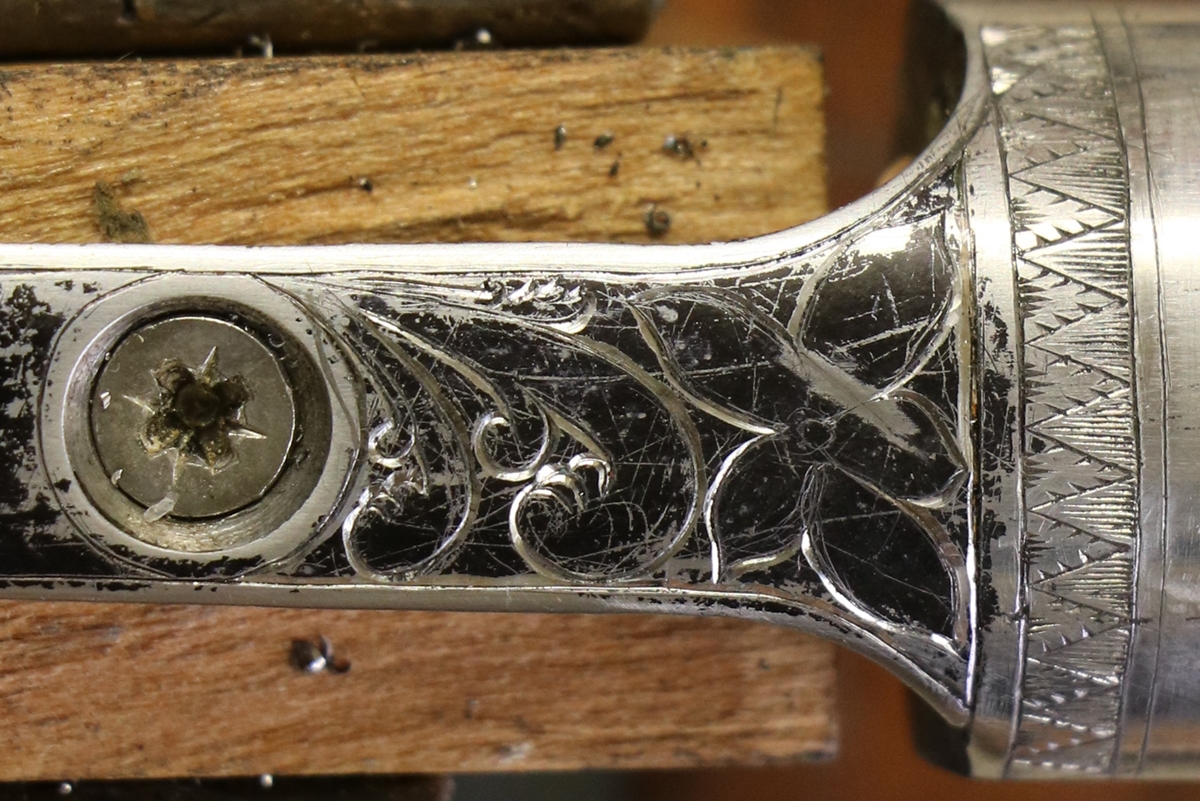
Cut edges of raised part more or less vertical

Cut background with closely spaced parallel lines – keep them as even and parallel as possible. That leaves the internal detail to be done.
14th July More grappling with ‘Prior Art’ and suchlike. I started to do the barrel and tang of Dick’s ‘funny gun No2’. I got the rings round the breechblock done in traditional ‘fir tree’ design and put a plain border round the tang and screw hole- its a very narrow and long tang which presents a bit of a problem – its too narrow to put the ‘wiggly line and tadpoles’ on as it would leave a silly strip in the middle. I had half an idea for the filling the space, but it involved lots of curves and I wasn’t sure if I could get the breechblock out – curves means rotating the part and with an 18 inch barrel that’s a pain – anyway I did manage to get the breech out without using heat so that frees up the design a bit. I have to do a practice for new designs, or if I haven’t done old ones for a while to refresh my muscle memory, and all the bits of plate I have are EN8 and not free cutting so they are difficult to cut and play havoc with the gravers – I will have to source some nice ‘soft as butter’ mild steel – most bits of the guns are better than my practice plates! I’m sure the ones I learnt on were better or I’d never have got anywhere! Will do some photography at the weekend and put up another gun – I have one sitting here, although its not a particularly puzzling one.
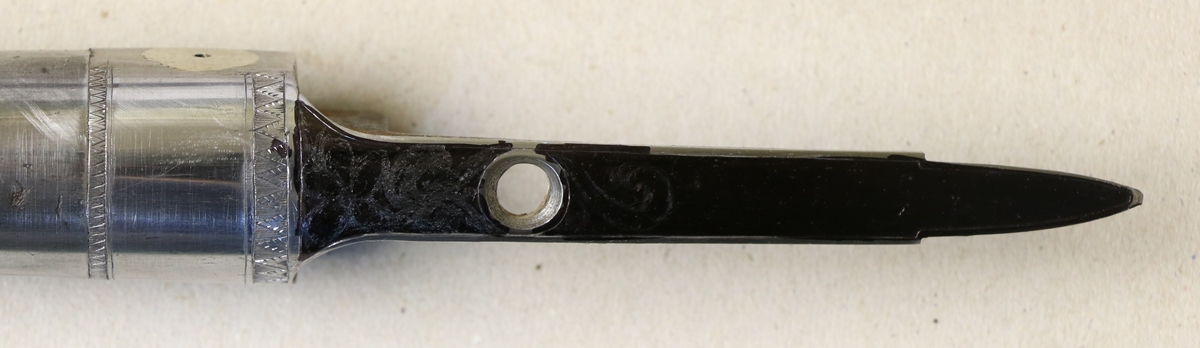
13th July As a break from hunting patents and publications on the web I engraved the lock of ‘another funny gun’ of Dick’s to match the other borders, and invented a small motif for the tail as ordered, something a bit unusual was the order. So the border is the wiggle with ‘tadpoles’ and I did a wreath for the motif – I did start to cross hatch it but that went wrong so I cut the surface back a bit and stippled it with the gravemaster and a slightly rounded point – it worked fairly well after a few tries – the wreath may need a cut or two to even it up, but it works OK. We decided against putting a spurious name on the lackplate in a fit of moral rectitude, despite the fact that its a Blackley casting! Talking of which, I have been trying to persuade Dick that its wrong to put conjectural bits on the 1630 blunderbuss just because the owner asked him to make it look good – I was telling him that he ought to be awkward, like me. I’m afraid I haven’t got round to photographing the next puzzle, so you will have to make do with the JR Cooper patent (or not a patent as I believe is the case) for tonight’s puzzle gun. With luck there will be a gun tomorrow – I was planning to go to Dick’s so I’ll try to hunt some more out – I don’t know how long I’ll be able to keep this up !

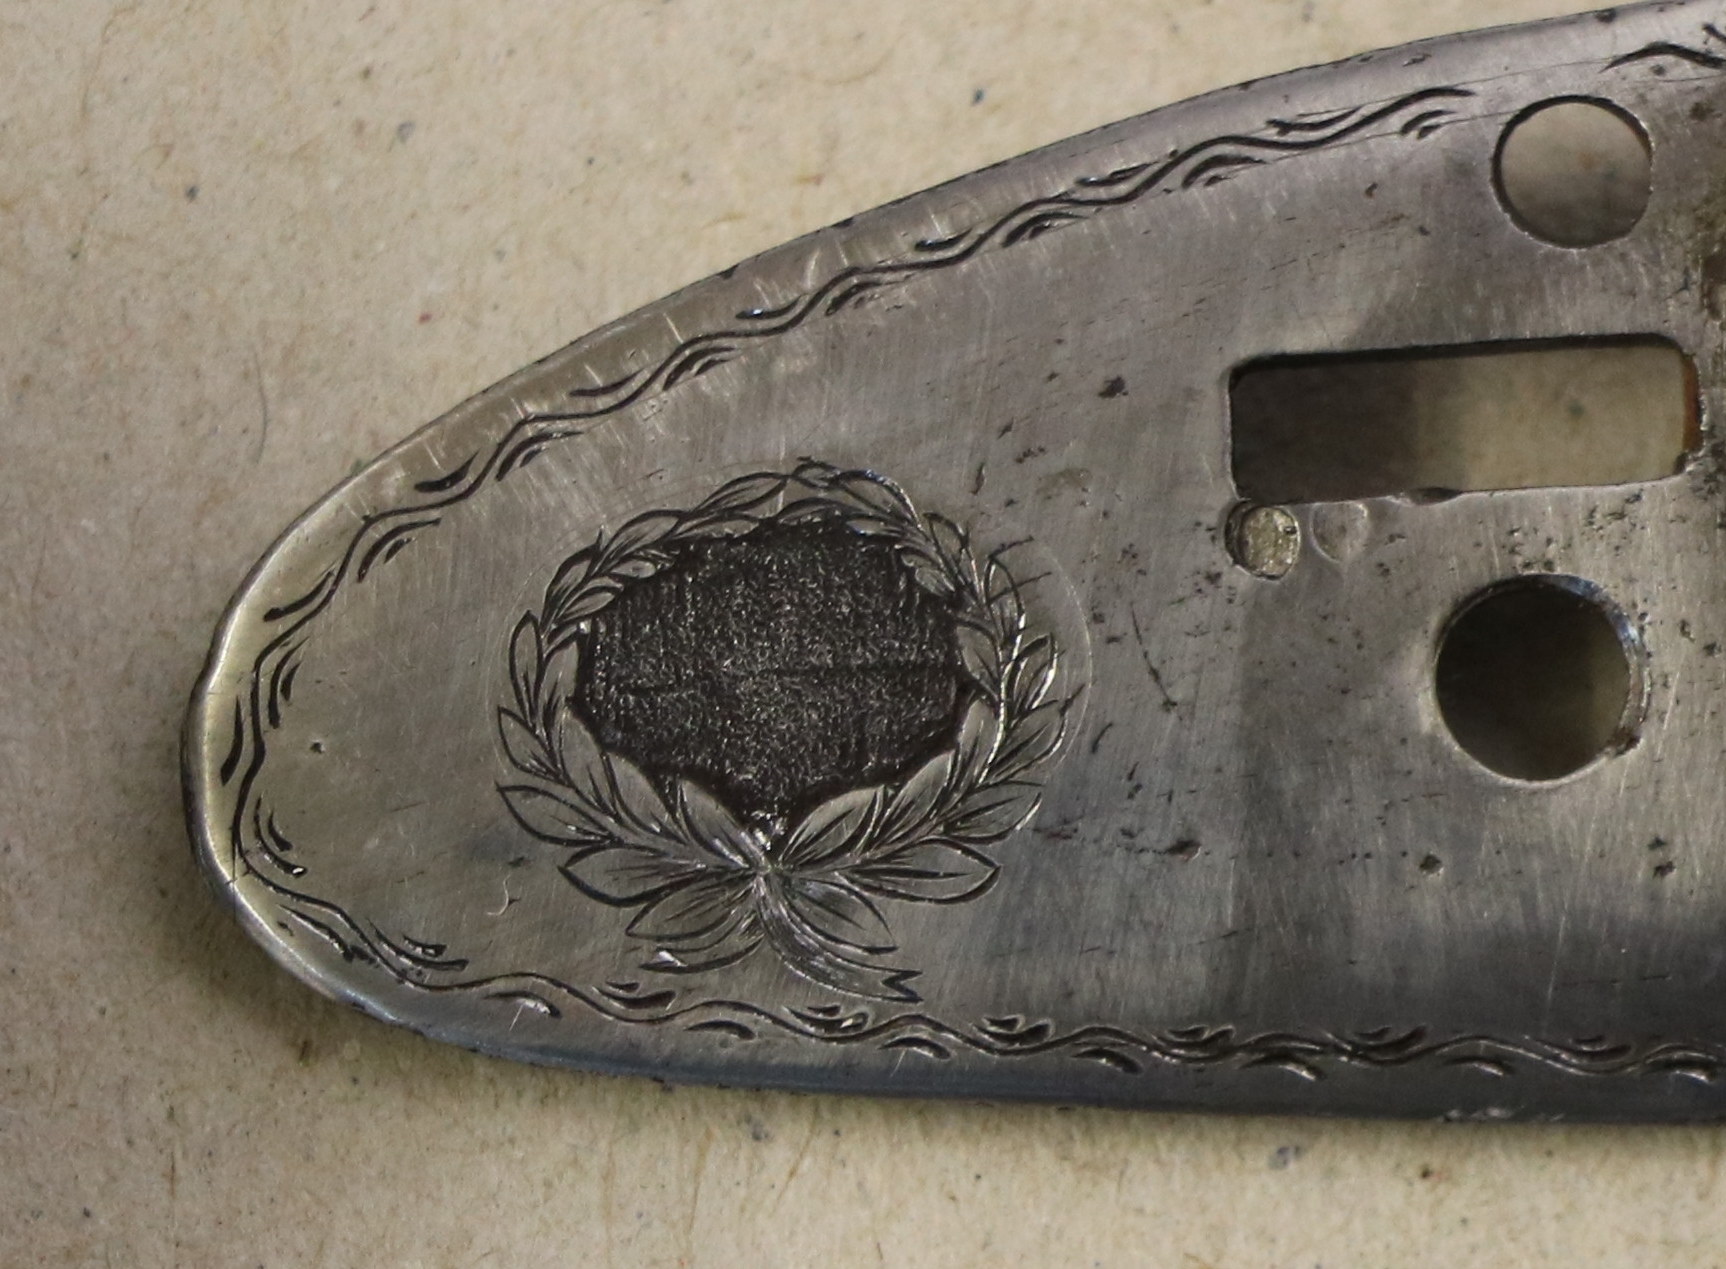
I haven’t tried stippling before and it took a while to get the effect even when I inked it – it probably still needs more done to it. .
13th July Again the puzzle has been solved by Joerg who may just have an advantage since the last two were German guns – its to a Franz Jaeger patent of 1909 or a slight variation of it and again is a known design – see post still called Weird gun. I’ll have to try to find an English gun as a puzzle – can I suggest a look at the so far unsolved puzzle of the ‘J R Cooper patent hammerless percussion shotgun’ ? see ‘latest updates’ – I’ve bumped it up so you can find it! The puzzle is – is this the only one made? was it ever patented? did it work?
12th July Yesterday’s puzzle gun was solved very quickly and turned out to be a reasonably well known German pre 1914 design – in fact when I went back to Dick’s this afternoon and said it’s a Collath gun he dived into his junk cupboard and produced another Collath that had been sleeved and re-chambered as a 20 bore! He also brought out about 10 other junk guns of various degrees of interest and I looked them all over with a view to giving you something more challenging – and I found an amazing gun – almost unbelievably complex and so intriguing that I bought it back to photograph. So this is tonight’s challenge – its a double 16 bore toplever opened boxlock non ejector, with a Deeley forend catch and steel barrels without any maker’s marks or names, with the number 2812 on it. From the outside it looks quite normal although two pins rise from the top of the action body to signify that it is cocked. See the post ‘Weird Gun’ for what is weird about it, and drop me a comment if you can throw any light on it! ( I hope the post name will change when I know what it is! Here is the side view, which is fairly normal…… Oh, and the proof marks look like post 1950 East German Suhl marks…..

Apart from the cocking indicators it could be any hammerless boxlock – but see post ‘Weird gun’ to explore the weirdness!
12th July It turns out that my ‘French 16 Bore’ is in fact a German Collath gun – thanks to Joerg who came back pretty quickly to my post. I conveniently found an auction description (Holts Dec 2013 Lot 965) that confirms Collard chambered guns as antiques if kept as an ornament or curiosity – which it certainly is – so no certificate needed! It is difficult to exaggerate the power of the internet as a source of information! He also pointed me to a website with a host of information on Collath shotguns , rifles and drillings and their special cartridges.
11th July The STEM club children came good and did a really smooth presentation, so that was great and justifies our ‘hands off’ approach. I was on school matters most of the day so everything else rather went by the board! But duty calls, so I found another treat for you – a French breechloader without any identification. Its a 16 bore hammerless double gun with damasus barrels with an underlever that initially moves the barrels forward away from the breech faces while leaving the extractors behind. Once the underlever has opened 90 degrees, further motion moves the barrel further and causes the bolt that is attached to the underside of the barrel flat to disengage from the slot beneath the breech face, allowing the barrels to fall on a small hingepin at the front of the fore-end. Dropping the barrels disengages the pin that has been holding the extractors in the backward position. The process of opening the gun also cocks it. There is a strange safety catch in the form of a butterfly nut on the top of the breech – when it is aligned fore and aft it is in the safe position and it obstructs the sight line down the barrel – when in the fire position at right angles to the sight line you can see across the middle of it, so it is immediately obvious when you come to shoot that the safety is still on – although it would be difficult to move it from one position to the other while it was anywhere near mounted. It has the usual continental decoration of raised design against a punched background – possibly etched before punching – rather fine when viewed under the microscope. I would be very interested in any suggestions of a maker or patent. The gun has sling swivels as was common on continental shotguns, and the chambers appear to be highly tapered for the first 1.5 cm, loosing at least .5mm in diameter – I don’t have a 16 bore snap cap or cartridges to try. As before I have started a new Post with all the pictures on it ( French 16 bore ).
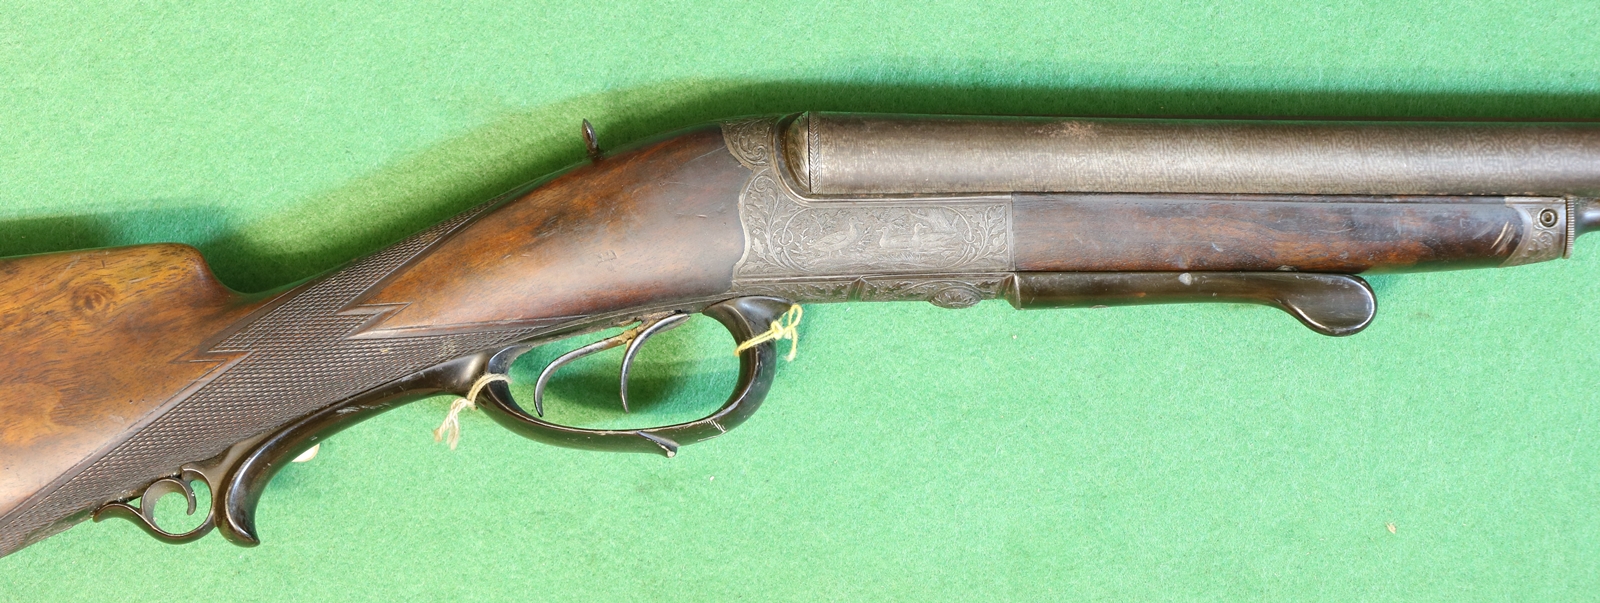
10th July – Meeting in School this morning – its going to be a very schoolful week! Tomorrow my science and technology club ( AKA the cardboard box club, after its favourite making material) is giving a presentation to the parents of the creations they have made using Lego Mindstorms – its going to be exciting as I leave it all to them to organise and do – there is usually a bit of chaos and confusion on the day, but my take is that its all part of the learning process! Its really not because I’m too lazy to help – honest! Anyway I finished recutting the casting for the triggerguard for Dicks other funny pistol – I noticed when I looked at the photo that there were still a few cuts to add.
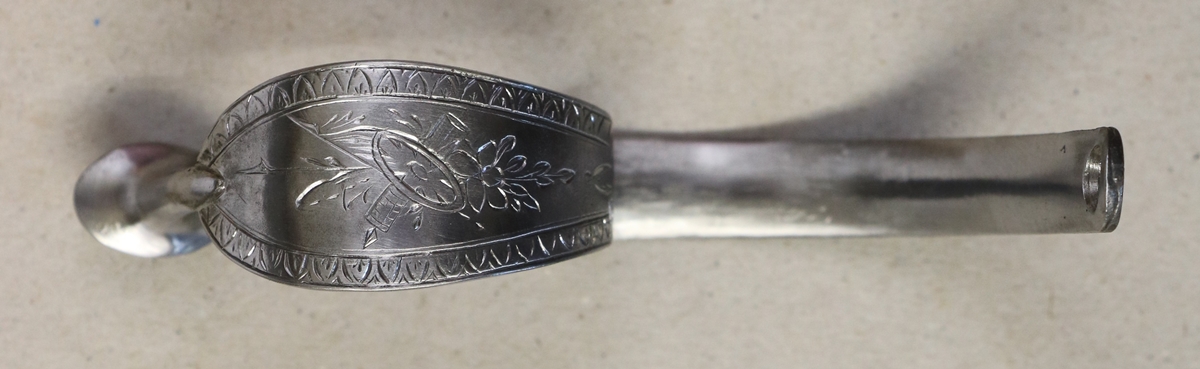
9th July – Splendid day’s sailing on the Orwell in the Cornish Coble – the wind was just perfect , not too strong but pretty steady and it was hot enough to be pleasant to be out in the breeze. I’ve done a bit more engraving on Dick’s extraordinary pistol – the butt strap is now finished and I’m starting to recut the trigger guard which is a Blackley casting – the metal is pretty tough so I’m having to use the gravermax to cut it efficiently – I can cut it with a push graver, but gravers wear and loose tips much quicker with hand engraving than with the gravermax, its not clear to me why that should be – at least the wear bit, I can understand the points surviving on the gravermax as it doesn’t put such strains on the tip at the end of cuts.


The Trigger guard casting will need quite a lot of work on the surface to get it right – but its usually best to recut the engraving once, before any other action, so that you can still decifer it before it gets a nasty layer of oxide on the surface. and you can just see where the lines went.
8th July – a day away from reading patents! Got the boat ready for sailing tomorrow, we are missing out on our Hebridian charter this year as our crew is unavailable so are taking every opportunity to sail the dinghy. When I was at Dick’s last week he had got out a pistol that he started restoring many years ago from a wreck someone found in a garden shed – it turned into one of Dick’s famous flights of imagination but never got finished – we’ve all been there, haven’t we? He had got as far as to get Geoff Moore to engrave the trigger plate but the rest was a work in progress – only without the progress! Anyway he got it out and asked me to complete the engraving – lock, barrel and tang, trigger guard and the butt strap with a fitting for a stock. So here is the pistol – I got started on the butt strap tonight, I have had to keep the same borders as Geoff Moore started – not one I’ve seen before but it will do nicely, and is quick to do – its a wiggle line with tapered cuts in the wiggles – the line is cut in one go with the gravermax (cheating!) and the side cuts by hand. I realised how nice it was to engrave a free cutting mild steel – its like butter compared to the bit of steel I was practicing on – no wonder I break so many points off gravers.

There IS a real antique buried somewhere inside this – quite a bit of the original wood is there but with a lot of additions!

I wish I had Dick’s eye for shapes – its a totally bizarre pistol- but so elegant in a French sort of way!
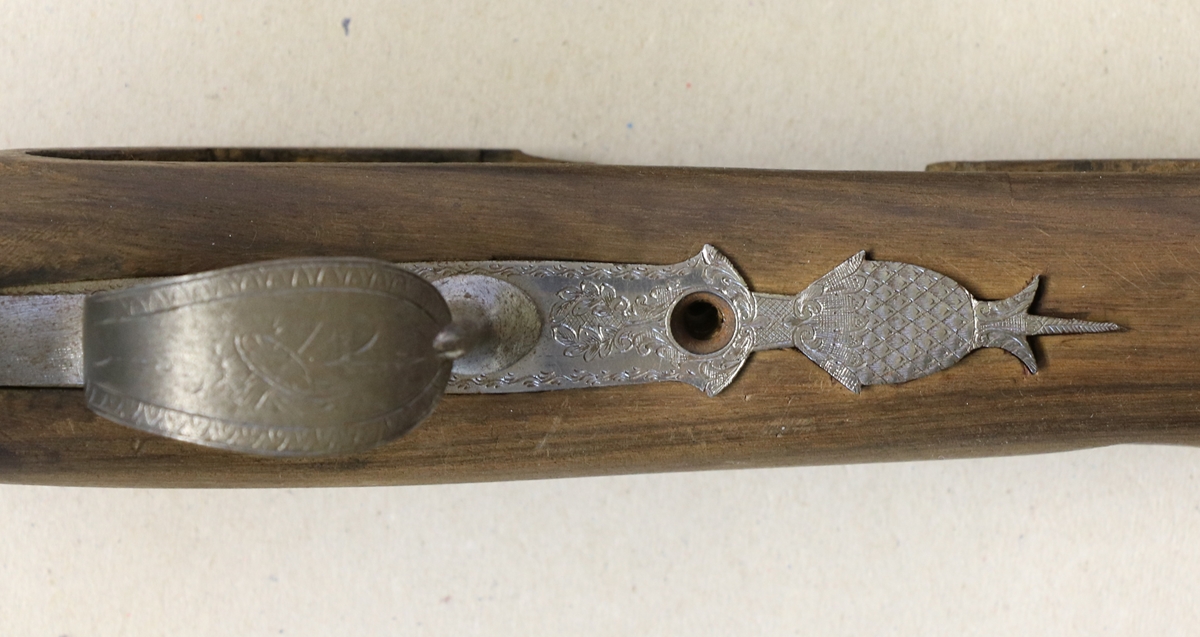
Geoff doesn’t do the traditional English style, but its quite continental and suitably elaborate – quite a challenge to put my work alongside his!.
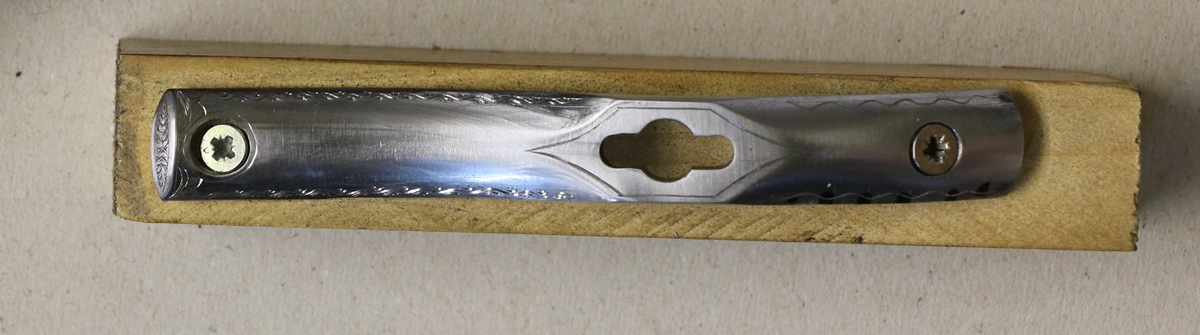
The wiggles on the right haven’t had their separate cuts added yet. I’ll leave the rest of it plain as its part of the grip.
7th July – I’ve got a lovely gun for you tonight in my run of early breech loaders – this one is a bit later than the Joseph Lang guns of the last two posts – it is more or less the second hammerless breechloader design to reach any market after the Murcott patent 1003 of 1871. Its made to patent No 284 of Gibbs and Pitt of 1873, and has an underlever that opens the gun and cocks the tumblers (if fired) and snaps shut. It is a double bite closure with a spring driven bolt into the lump, and has a triggerplate action. See post for more details of this lovely gun which is in very good condition, having been lapped and reproofed at some point. I am a bit confused – the gun is engraved ‘Gibbs & Pitt Patent 204 Bristol’ but the patent cited by Cridington & Baker is actually No 284 – I guess the engraver got it wrong.. Anyway I’ll put the rest on the post…..

6th July – I did my 9 hours work today so I can have a few minutes for the blog! I’ll put up the other Joseph Lang photos in a new post – its a 14 bore double centrefire gun with his second pattern closing – the bolt has got a bit further from the hinge and the lever is now wrapped round the trigger guard instead of pointing forwards – its still a single bite inert bolting system. When I get some spare time I’ve got an engraving job to do for Dick – another of his ‘funny’ pistols he is recovering from a rather sad antique – I had a little practice of the border that Geoff Moore cut on the finial – I need to keep more or less the same border on all the bits – I have the lockplate, the backstrap to engrave and the trigger guard to freshen as its a raw casting. I’ll put up some photos when I get a mo……..
5th July – I should be beavering away, but I escaped to see Dick and he pulled out a stream of interesting old breech loaders for me to look at – he has lots of the ones illustrated in Cruddington and Baker’s books. I was particularly looking for Joseph Lang guns as pictures are sought, and I found on in addition to my own. Looking through his old guns I found a number of interesting guns in odd bore sizes – I decided that I’d borrow three that were obselete calibre – a 14 bore Lang double centrefire, a really fine Gibbs & Hill hammerless 10 bore and a little French 14 bore. I’ll picture them all on separate posts for simplicity – J Lang Pinfire 16 bore (mine), J Lang 14 bore double and Gibbs and Hill 10 bore. so far I’ve done my own Lang ;

5th July Work has kept me a bit busy the last day or two, but I haven’t forgotten my responsibilities! I emailed a MLAGB Black Powder contributor about a 16 bore Lang pinfire I have and he would like photos for a book he is writing on Lang – so that’s another job! I fixed the furnace but haven’t had time to use it yet. I have now resolved to thin out my gun collection a bit, so watch the GUNS FOR SALE tag in the next few months when I get a chance to take a few photos.
2nd July – Reading papers and patents today – boring so I went and cleaned and sanded the gunwales of the boat and fixed up the graphite crucible in my furnace, but the element broke and I had to take it to pieces to fix it. I was hoping to melt some metal for fun.
1 July – In a rare spare moment I drifted back to the engraving – the test plate I have is slightly hard – EN8 or somesuch – and is a bit difficult to work with hand tools so I tried the Gravermax pneumatic graver – it would be much easier if I could control it better, but at times it decides its going to cut very deep lines and at other times it behaves better – practice, practice, practice……. One good feature is that it isn’t so prone to breaking off the points – I find that cutting out the background is a sure way to take the tips off the hand gravers!ocks
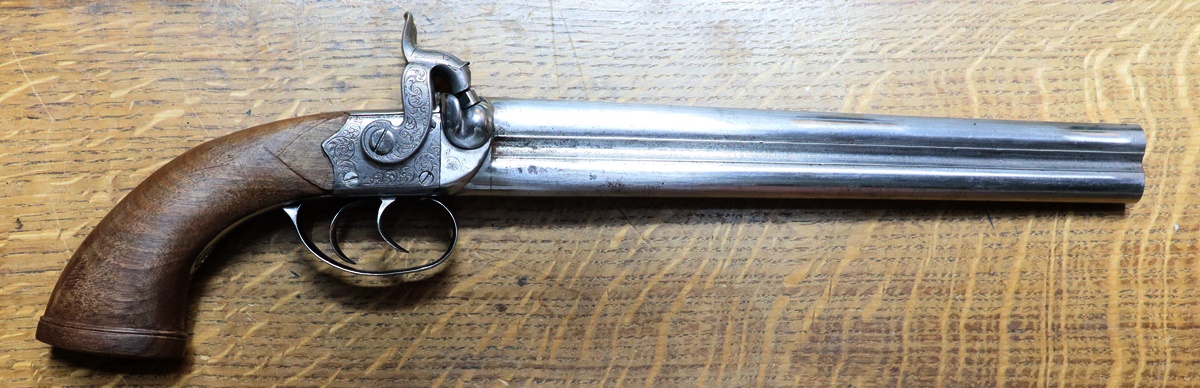 14th September – While we were sailing I asked Giles’s friend, a metallurgist, about brass and how to make a pale brass as used in 18th & 19th century guns. Brass is basically an alloy of copper and zinc, in different ratios for different purposes, with a melting point of 930 degrees C plus or minus 20 degrees depending on composition. It is relatively easy to heat brass to melting point for casting but changing the composition is not so straightforward. Copper melts at 1084 C so you need to get the brass to that temperature in order to up the copper content and make it a redder brass – I tried this but couldn’t get the temperature high enough and the copper stayed in clumps within the brass. Going the other way and trying to add zinc is much more difficult for although the zinc melts at 419 C, well below brass, it unfortunately has a boiling point of 913 C so dropping zinc into molten brass just boils off the zinc at great hazard to anyone near. One suggestion was to add tin rather than zinc, which would make a form of bronze (a tin/copper alloy) – tin has a very low melting point of 232 C but doesn’t boil until 2720 C so adding it to molten brass should be OK, but I’m not sure what that would do for the colour. There are a number of alloys of copper, zinc and tin – its the basis of Admiralty or Naval brass. Nickel was also suggested but that melts at 1455 C so is beyond my furnace. Perhaps just melting old brass is the answer! 13th September – I bought back a’rat tailed’ pistol from Sandringham to be repaired- its quite an elaborate, well made brass bodied Miquelet pistol, almost certainly of Albanian origin, that would go to half and full cock but wouldn’t release by pulling the trigger. I stripped out the lock to see what was wrong, and as I expected it was simply a bit of wear on the trigger where it contacted the sear, so a dab of weld along the edge of the top hung trigger fixed it – a quick and easy job. The lock was in reasonable condition so I just gently wire brushed its exposed parts and oiled it rather than a more thorough derusting which would have disturbed the patina. One of the hot topics at Sandringham was Semolina – yes, the stuff you used to get for pudding at school? But not in the pudding context here, more serious use! Our team shooting in Hungary had discovered that some Hungarian team members were using fine ground semolina instead of wads between powder and shot – just put the powder in, then a scoop of semolina, then the shot, then the overshot card. It sounds improbable but if people were using it in International competition they must be pretty confident it works. Some of our shooters tried it a Sandringham and couldn’t tell the difference. I wondered if the fouling would be worse and cleaning more difficult because there was no lubrication from the wad, but was told that if anything the barrels were easier to clean out after semolina. So there is a thing. I can see it being a convenient technique at clays, but I’m not sure about using it on a game shoot or in a strong wind, although perhaps if made up into paper packets it might work. Something to try….. Oh, & it does need to be the fine ground semolina – I think the stuff we endured at school was coarse – and you must omit the jam in guns…………………………
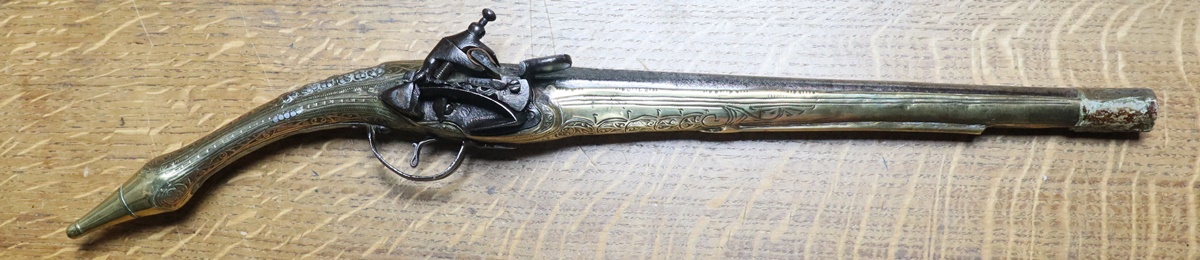
 The red arrow points to the blade on the cock, the green arrow points to a button that pops out under spring pressure. it has a notch to capture the blade. The full cock detent is a flat plate hidden above the button. Both plate and button are pulled back against the spring when the trigger is pulled.
 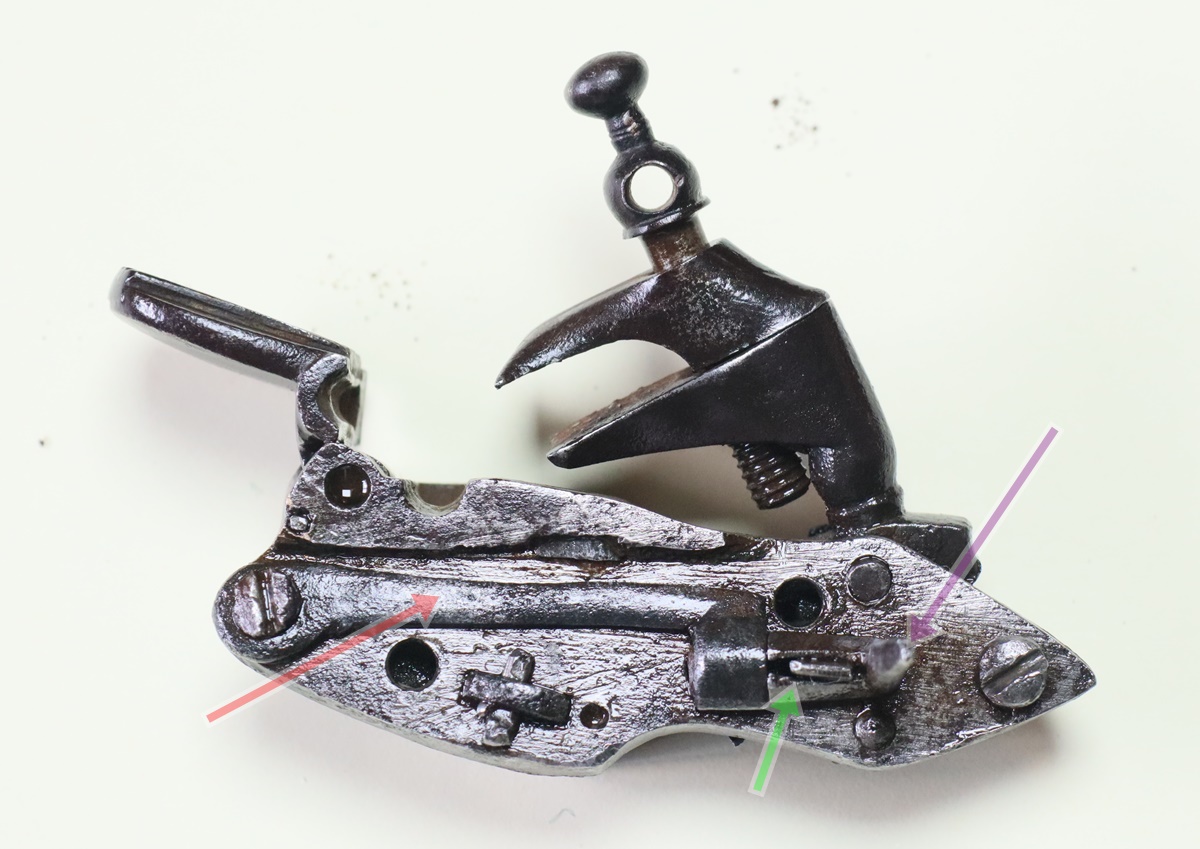 The red arrow points to the sear spring, the green arrow to the sear and the purple arrow to the arm of the sear that is towards you. When the top hung trigger is pressed the sear arm moves backwards and tilts the sear and withdraws the button and blade. The sear pivots on its rear edge and is located by the tongue that is through it. 2th September – A chance I might get things under control again and find a bit of time for the blog! I had a couple of weeks sailing round the Hebrides in a Jeanneau 419 during which time our home part of the UK was in a heatwave, while Scotland was wet and windy – it was ever thus! A fair amount of motoring as the wind was always ‘on the nose’ and we had a series of drop offs and pick-ups planned that didn’t leave much leeway for waiting for the wind to change. I got back from that and the next day set off for the Sandringham Game fair where I did an engraving display/demonstration to almost nobody! The MLAGB stand that I’m part of was located in a backwater well out of any passing trade, so although the dedicated muzzle loader shooters found it, they were only interested in that. Still I picked up a couple of small jobs – a ‘rat-tailed flintlock from ?Turkey? that wouldn’t fire when cocked, and an old double percussion gun that will probably clean up into something presentable. Back from that on Sunday evening and off on Monday morning with the older children from ‘my’ school for their adventure camp in Norfolk – as the school has no male staff I go in charge of the boy’s dorm – I had 15 boys and the two staff had 5 girls between them! Anyway I I should have a few days before I do a couple of days at the Cavendish Labs in the University talking to groups of 14 & 15 year old would -be scientists – 12 groups a day – come October things should have settled down a bit, although I’m threatened with having to finish and replaster a bedroom that has been used as a junk store for 20 years – it was lathe and plaster but has had the plaster stripped off so I have to make good the lathes and then do it out in lime plaster – easier than gypsum plaster as its setting time is hours not minutes! All this with the shooting season starting…………………………………..
  Rather nice charter boat, new this year.
 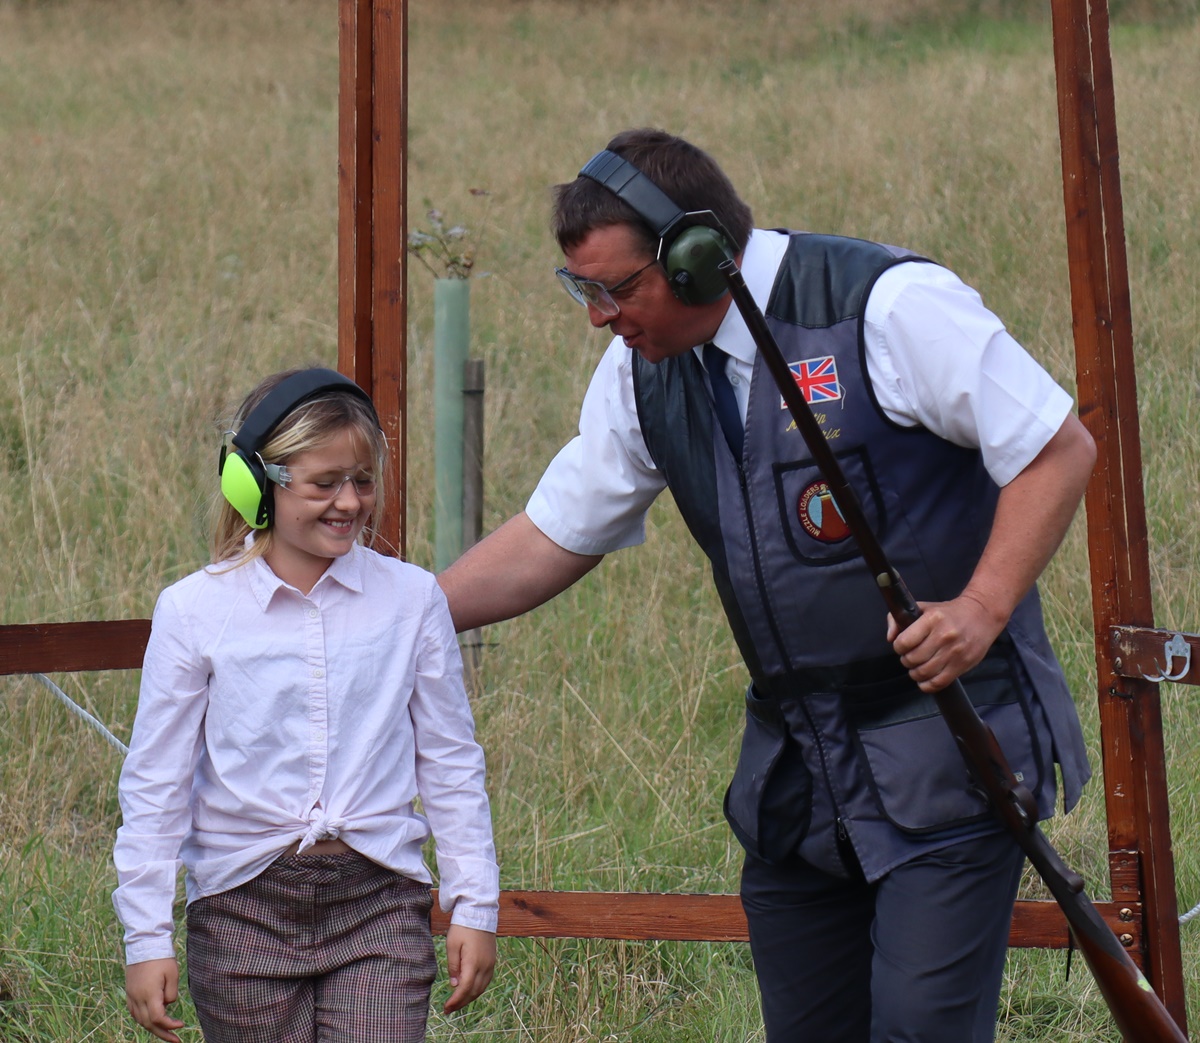 Martin Crix and a very pleased young shot, Molly, at Sandringham. 21st August – Things have got a bit manic on the commercial work front so I have had to put off any more playing guns for a bit, but I hope to get a day or two off sometime to play! Maybe I ought to retire. I do have to get in trim for my engraving demonstration at Sandringham – I can’t do engraving ‘cold’, I need to get my hand/eye in for a day or two beforehand. Oh and I made a discovery today watching a YouTube of making a Holland and Holland gun – their engravers use chasing, ie hammering chisels, or much to my horror, pneumatic gravers, probably GRS Gravermax like the one I have but hardly use. There goes my illusion that they did it by push engraving………. 19th August – The last two days have been spent struggling with my internet – one or two devices were loosing the internet while still having connections to the local network while others are perfectly OK. I got a new router but I am minded to send it back – the cord from the power adaptor is just over a meter and the LAN cable supplied is 2 feet long – not sure why they think that it is a good idea to require users to rewire their houses to accommodate the router! Anyway work in progress. Following my visit to the Open prison, I’m pleased to tell you that my name has been put down for a rather nice room should I need it! I did sneak a moment to do a few little jobs on the Fishenden to keep myself sane – I cut up a piece of 2 m.m spring steel for a turnscrew and found a chunk of ebony for the handle and turned up a brass ferule – The handle was turned and then flattened each side on the big disk sander – doesn’t look bad and fits the intended compartment perfectly – needs more coats of sanding sealer…… I ‘economised’ and used a bit of Indian Ebony instead of my real black Ebony so it isn’t quite as dark and has a much more open grain but I didn’t want to cut 4 inches off my ramrod stock length. I also made a brass ring for the lid – it is probably the ‘right’ thing, although maybe my boss shape is wrong? The wire could be a bit thicker but there was nothing between 1 m.m and 1.6 m.m on offer.
  I think maybe the knurled ring is a bit prominent – I don’t have a straight knurling tool so its skewed
 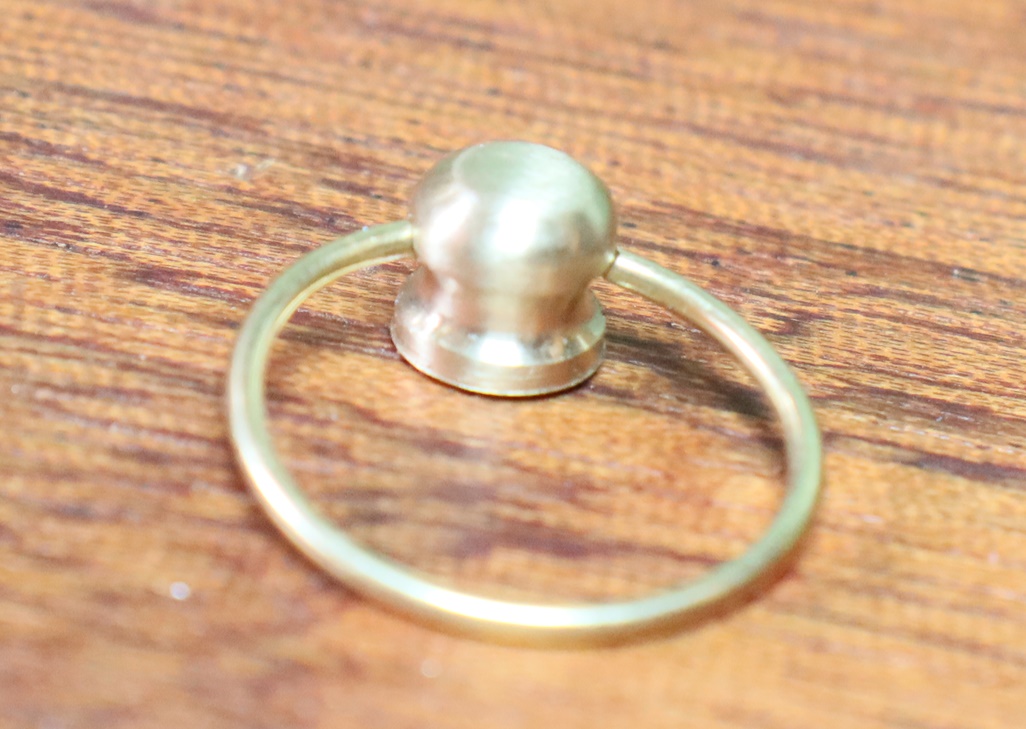 Needs holding down tighter – how I got a 1.2 m.m. hole through the centre is a mystery!
 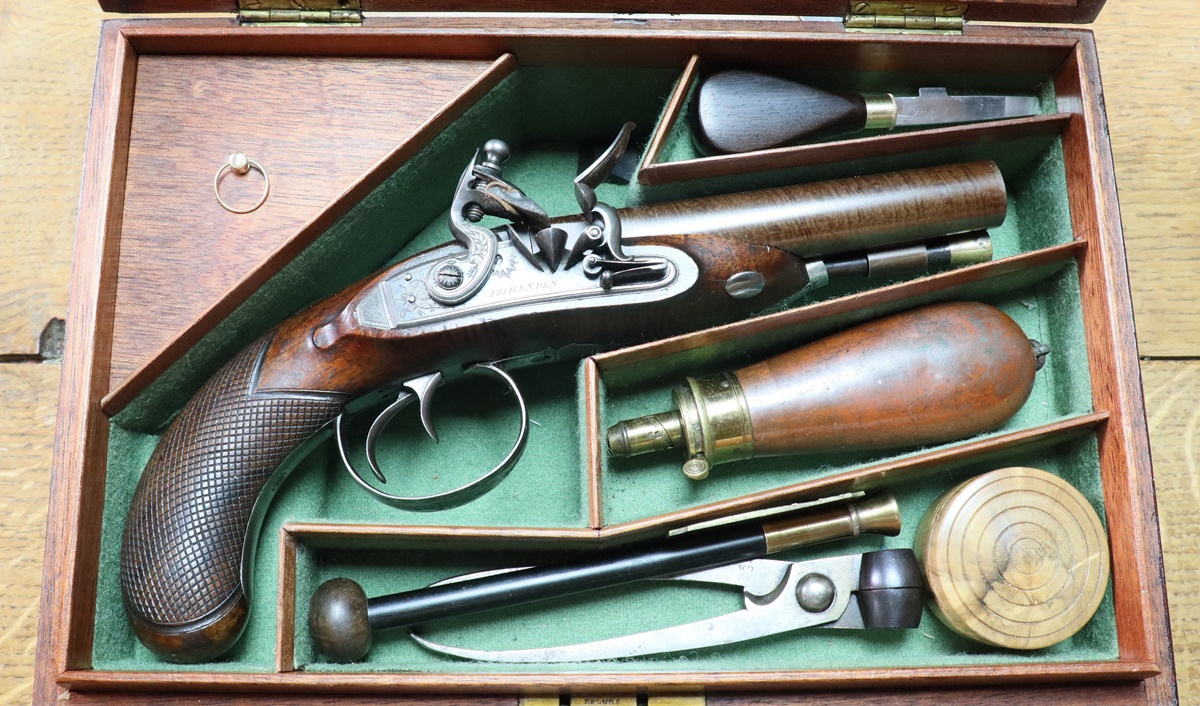 The only thing wrong is that the bullet mould is 30 bore and the pistol is 16 bore – I have to look out for one the right size. One might almost think it all fitted together by design! 15th August – Day out today on a visit to an Open Prison – since my time as an Independent Prison Monitor I’ve been interested in what goes on in prisons – I have to say that this catagory 4 prison is a pretty good place – 300 acres of estate, massive greenhouses and immaculate gardens and lots of the prisoners working in the voluntary sector and commercially outside the prison, and many of the rest working within the prison – all working towards release and rehabilitiation. Although I’m not planning to commit an offence in the near future I can think of worse places to be – like the old people’s home my father ended up in, about which I still have nightmares! I did crack Fusion 360’s toolpath generation but still haven’t cracked is zero reference positioning so although I can make the miller follow the correct path its still displaced about 5 mm from where I think it should, so it partially misses the piece of brass I’m trying to shape – I WILL crack it……………………. 14th August – Busy with clearing out another space.. But I did spend a little while on the Fishenden case – I had made a case label in A4 size on the assumption that by the time I had reduced it any imperfections wouldn’t show. I was wrong! So this morning I had another go at drawing one in A4 but being a lot more precise. I photographed it and printed it out and it looks much better than the first effort, although I probably ought to steer clear of script ….. I had a bit of trouble getting the exposure right as most of it is white, and in the end it came out slightly shaded, which doesn’t look bad. Note that this isn’t a fake label, its for information, and has my name in small letters on the corner.
 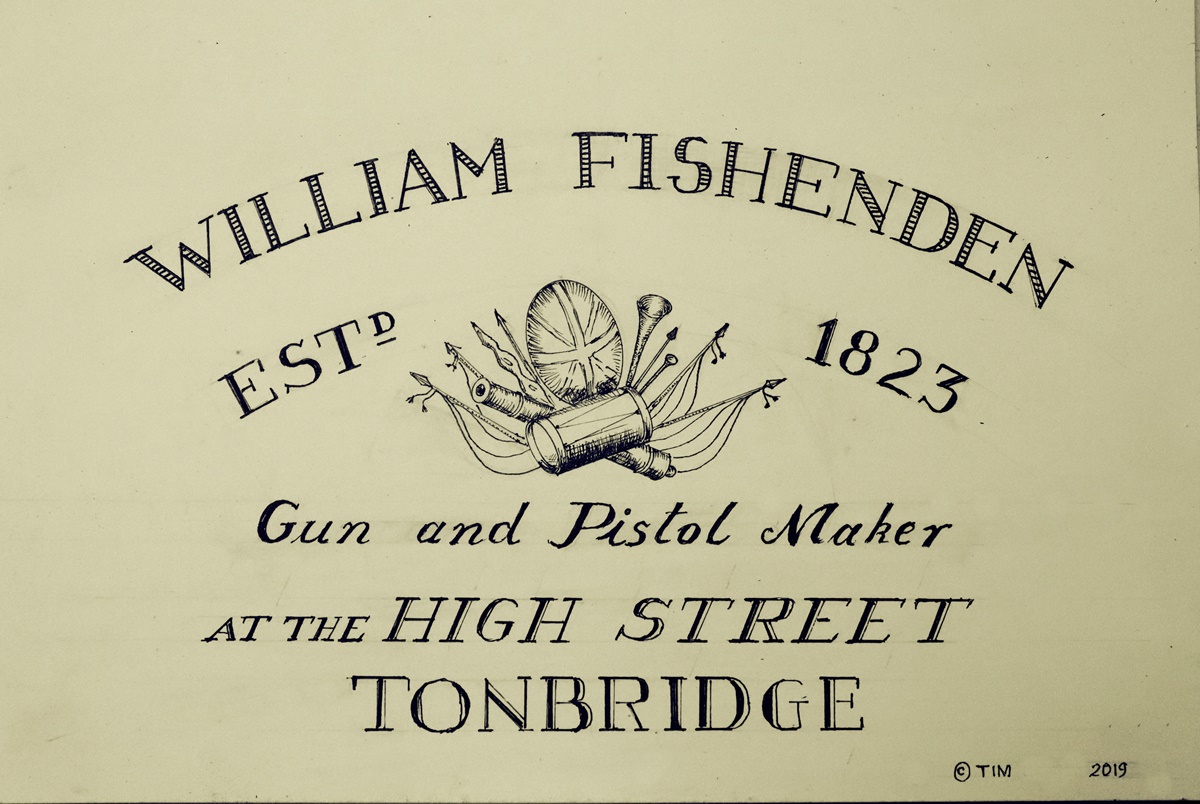 This is about the size I’ll use it. 13th August – More clearing out – generated the best part of a full load for the dump! In the course of clearing out I’ve generated at least another car boot sales worth! I just bought a derelict Mortimer duelling pistol in need of some serious restoration that will become an autumn project, after finishing the pinfire double 12 bore and a client’s percussion pistol…… And put the finishing touches to the Fishenden case – Each time I pass it I rub on another coat of sanding sealer with a touch of darkish brown spirit dye to tone down the colour a bit. I have been trying to pursuade my cnc miller to profile out an escutcheon with scalloped corners for it, but so far I haven’t mastered the Fusion 360 software toolpath generation – it is the most awkward piece of software ever written, but its very powerful and free for startups. Went climbing tonight- did manage a few good climbs – a bit tired after an hour of it………. 12th August -Clearing out the attics today – very dusty, although I only got about 1/4 done – I’ll have to go to the dump tomorrow! I collected the pinfire that Dick has tightened up for me – it is now very good in the bite and and ‘on the face’ – I guess there is now no excuse for not getting on with it, except that I have a lot of ‘serious’ work on over the next month or so, so my playing with guns will be curtailed, as will my postings on this blog – I’m afraid a Non Disclosure Agreement prevents me from revealing what I’m doing – I’ll try to find time for a few gun bits on the blog, and I do want to wrap up a youtube video I’m trying to do on making springs – always too many things to do,……….. and I thought retirement would be restful, although I suppose in all honesty I don’t really want it that way!. I hope to fit in a climbing session tomorrow evening – I am getting a bit rusty. 11th August – Did a car boot sale this morning to get rid of some junk – fairly successful but still have too much. I was selling a couple of brass candesticks, and realised that one pair was a somewhat paler brass than the other – the pale pair looking genuine and the others obviously being modernish (Indian?) repros. That got me thinking about ‘lemon brass’ for old gun parts, and wondering if most 18th/early 19th century brass was paler than modern brass. I made an escutcheon for the Fishended box from modern ‘engravers’ brass’ and then found one stripped from an old box with a genuine Chippendale handle that was a whole lot paler – you can see in the photo, even though the surface of the original is pretty rough. Checking out details of modern brasses, I can’t find any reference to the colour of the resulting brass – I’d like to get hold of a couple of feet or so of 1/2 inch ‘lemon brass’ for making ramrod fittings. I’ll have to consult Kevin Blackley as I know he uses it for antique brass castings. I presume it is high in zinc, does it also have nickel ( which takes it Towards being German silver)? I might have to sacrifice my candlesticks to cast a rod! Maybe a helpful correspondent can help? One such did enlighten me about the hole in the bottom of patch boxes (blog passim) – its to push out the patches, especially if they are oiled or greased. I’ll have to see if I can put a hole in the bottom – I keep learning from this blog! Anyway thanks – see comment….
 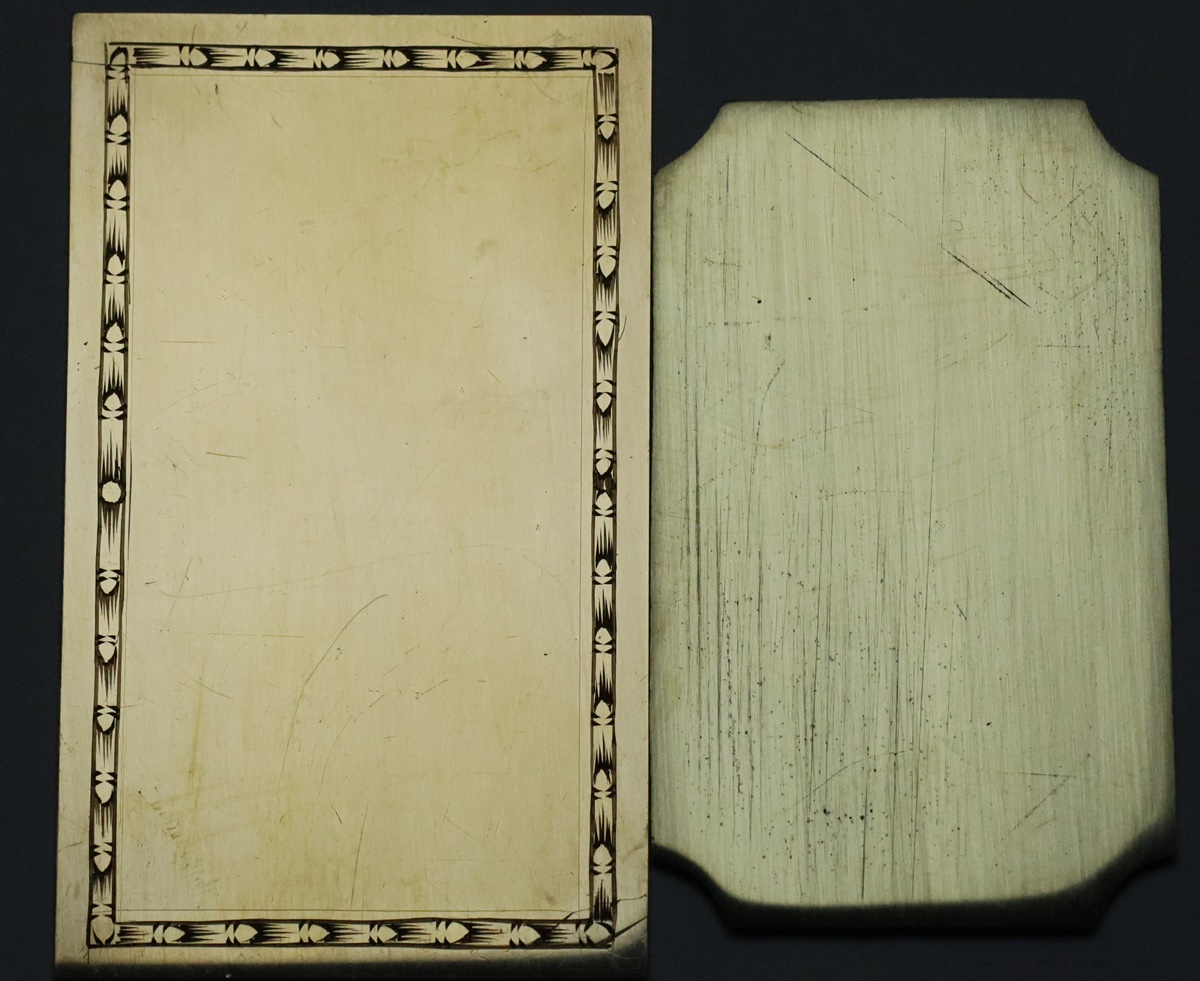 The photo is taken in reflected white (LED) light on a white background! 9th August – My making treat for today was a quick box for the Fishenden for 1 1/2 inch patches – occasionally found in pistol and rifle cases, Keith Neil and Back say that the ones for patches had a hole in the bottom (why?) but the ones -later – for percussion caps obviously didn’t. Anyway the thing to make boxes out of is clearly Box (the wood) – and I happen to have a branch of rather manky Box just big enough so I cut off a 6 inch length some distance from the split end and chucked it and rough turned it until it was a full cylinder, which fortunately turned out to be just big enough to make the box with about 51 m..m outside diameter. I turned a bevel on the end to rechuck it the other way round with better grip and marked out the lid and body parts. I filled the small crack that ran along one side with instant glue and activated it. I cheated on this box – normally I would put a bevel on both ends of the blank so that I could work on the hollowed sides of lid and box so as to keep the body and lid as one continuous grain so the lid grain matched the body grain ( except for the bit missing from the overlap of lid and body). In this case I was a bit short of length so I made the lid on the same blank as the body – meaning that the grain doesn’t match up across the joint – the lid being effectively reversed – but box has very little figure so it doesn’t show. The top of the lid was turned by pushing it onto the finished box while that was still chucked (with a bit of tape to make it tight). Anyway here it is – looks very good in the box, but I found I’d made the loading rod too long to share the space – luckily I had only pushed the knob on the rod, so I could redo the end 20 mm shorter – still long enough to load but now fits! I bit the bullet and cut a bit of decent mahogany for the compartment lid and planed it down to about 5 m.m. Its a bit fraught as you push the bit of wood into the thicknesser and then put a strip of ply in to drive it through – it worked although I did get a bit of a groove on what is now the underside of the lid. I had a 25 m.m. scrap of fake ivory that was going to make a knob for the lid, but its made of polyester and if you don’t turn it right it starts to chip out big concoidal fractures – so I destroyed it pretty thoroughly – Ive just ordered some more (£2.99 for a 150 m.m. length of 25 m.m bar) so it will be a day of two before that is done. (too many boxes in that paragraph!)
 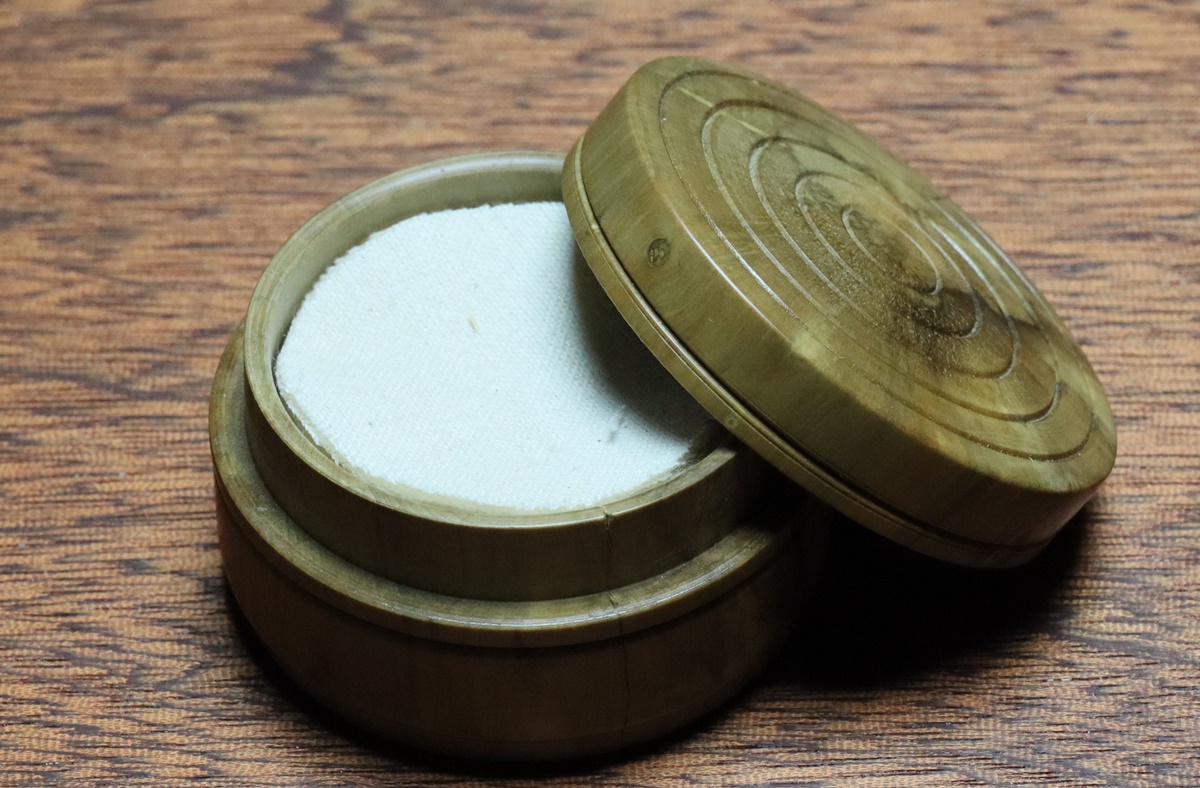 The Box box – 1 1/2 inch patches are a perfect fit.
 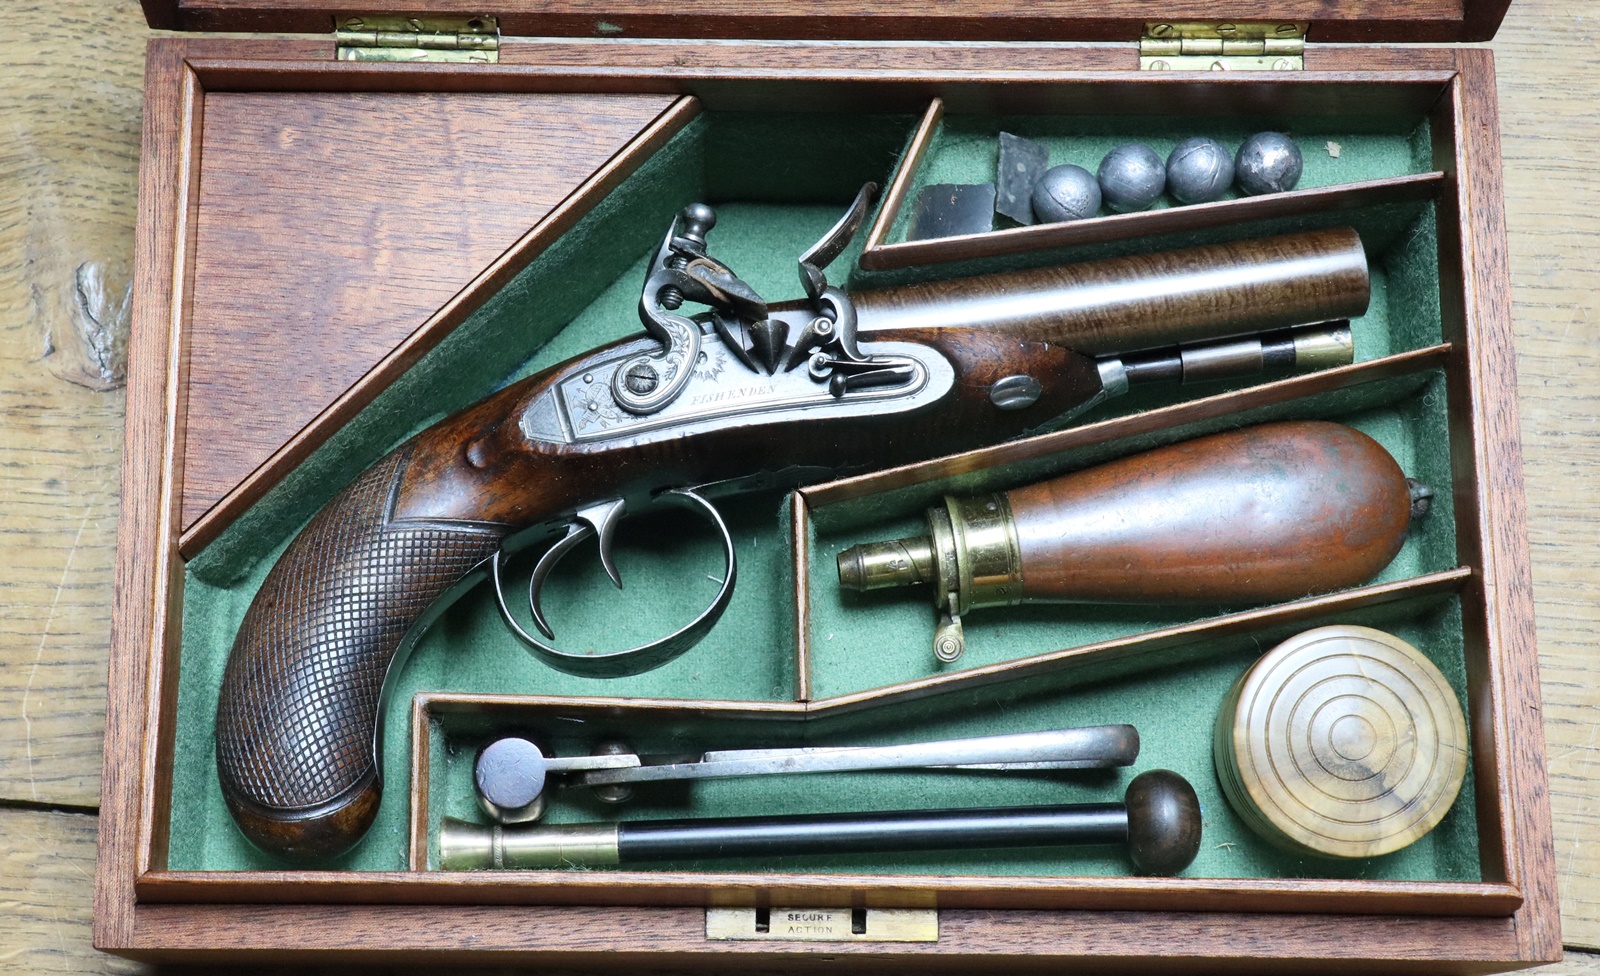 The top right compartment might just a take a turnscrew with a ‘flag’ on the side for the cock screw – we shall see!
 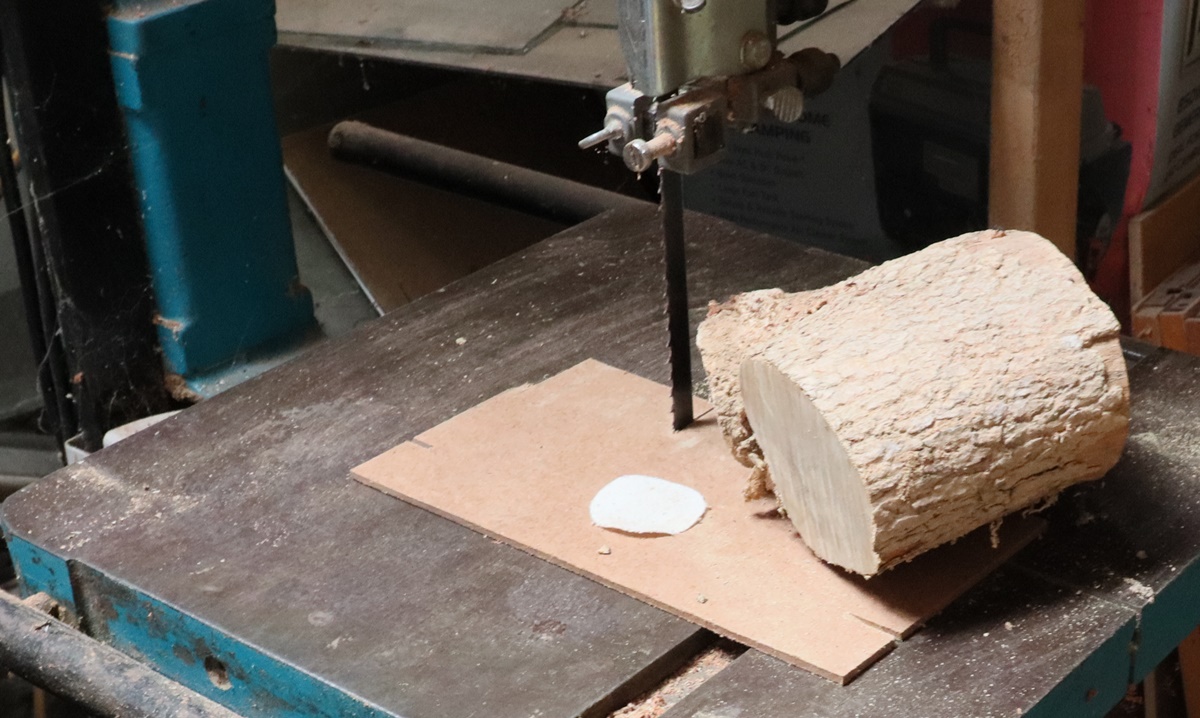 I picked up a couple of branches of Box during a walk along the Devil’s Dyke – someone had planted some bushes years ago. Woodturning is a good way of producing waste – you start with a decent sized piece of log and end with a little box!
 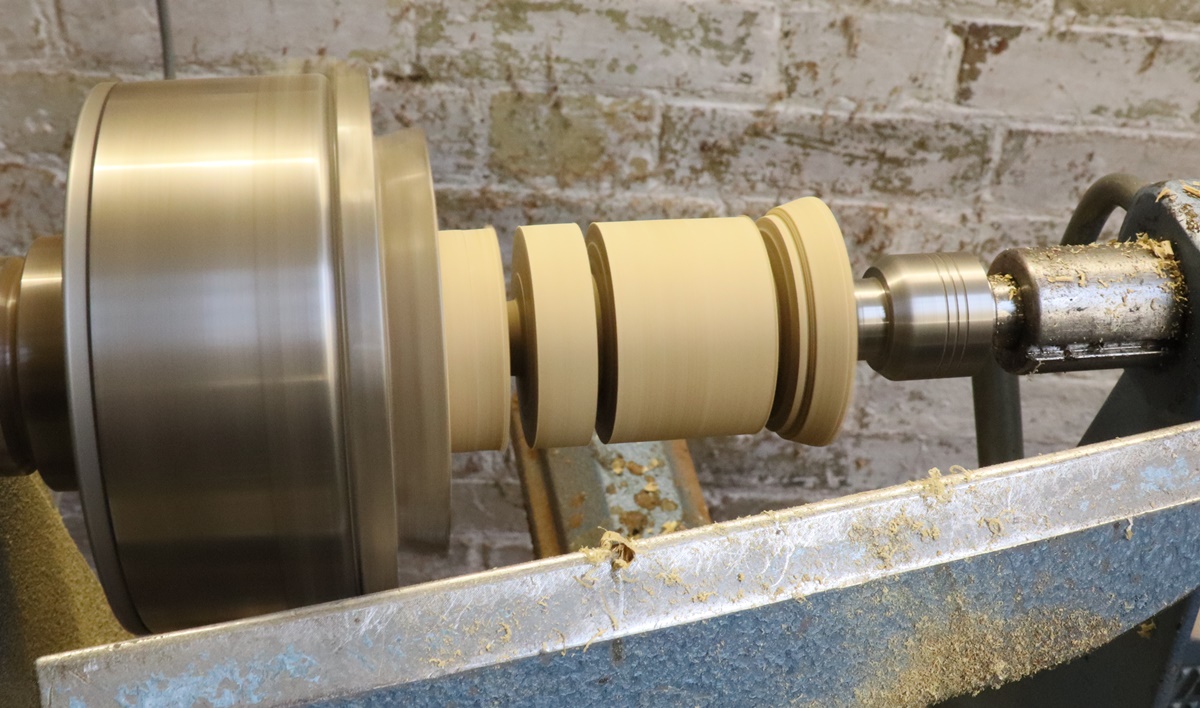 As shown its chucked on the log, which is not particularly good as it can’t be put back true and it needs the tailstock centre – the bevel on the tailstock end will let it be chucked and rechucked if necessary. The body and lid were parted off near the chuck and chucked on the beveled end- the lid hollowed and parted off, then the box hollowed and finished and the lid put on and taped in place while its top was turned and rings marked. 8th August – Most of today I was clearing out the rubbish from various glory holes about the house – a mere 5 bags of rubbish and a half a Land Cruiser full of recyclables plus a couple of boxes for stuff for a car boot sale. I was clearing my tools from the casemaking and happened to look in the oil soaked instruction book that came with the aforementioned Record No 50 plane and saw that it could be used to plane dowels with its fancy cutters – well I had to try it out on a loading rod for the Fishenden – as I had a roughly correct sized ebony square already the plane didn’t turn out to be ideal, but I ran the square a few times through the thicknesser to get it the right size and got some way with the No 50, then reverted to a small low angle plane and eye. Then it went in the lathe for 10 minutes treatment with hard 80 grit paper and it came out perfect – a few minutes with finer grade papers, burnish with a handful of shavings and a quick once over with friction polish and it looked perfect so I had to turn up a knob from figured walnut and a brass end with screw. I am very suspicious of the highly tapered screws that are used in ramrods etc when used for ball as the expand the ball against the barrel walls as they are driven in, making it harder to get it out. Anyway my loading rod wasn’t meant to be a fake so I sorted out a modern woodscrew with a vicious point and not much taper. I do have a number of ramrod ends, but none suitable for a pistol loading rod. I mentioned yesterday that I’d made the case with the pistol the unconventional way round – I did check ‘The Book’ and knew which way round it should be, but when I drew out the partitions on a sheet of card in the case I forgot to mark front and back, and it just got made the ‘wrong’ way. I think I would probably have done it this way if I’d thought about it anyway as the main function of the case is to display the gun, and it does that much better this way round!
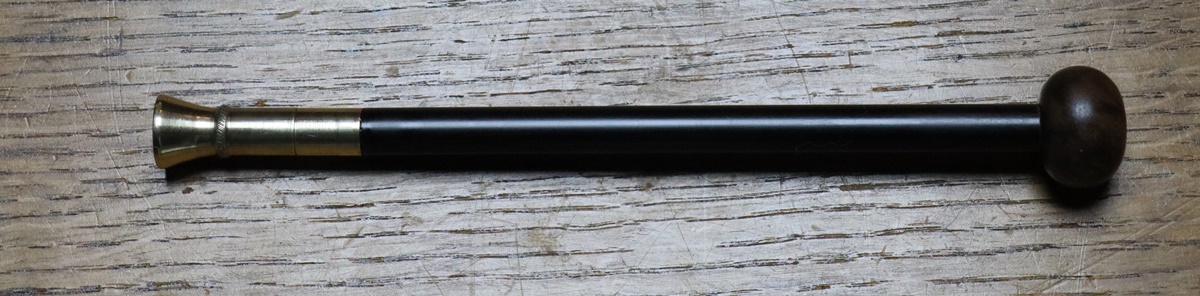
 7th August – Almost there with the case – internal lid and escutcheon and a few more coats of oil/shellac on the outside still to do but it is OK for the time being. I anguished about the finish – in fact I still am. I got the ‘Dark Brown’ suede dye but it gave a bright ginger colour. I tried the traditional colourant for mahogany – a solution of potasium permanganate – it looks violent purple but soon goes dark brown, but I didn’t really like it. In the end I put on a coat of diluted ‘Slacum’ (linseed, beeswax and turps) – it will probably go darker with time. I was going to make a lid for the triangular compartment but the thin mahogany I had was too light and open grained ( it was a piece of a punt). I am very mean with nice wood and reducing stuff to 5 mm thickness is wasteful as my thicknesser likes quite big bits of wood or they don’t come out of the other side! I will find something better in time, probably by sacrificing larger pieces of better mahogany.
 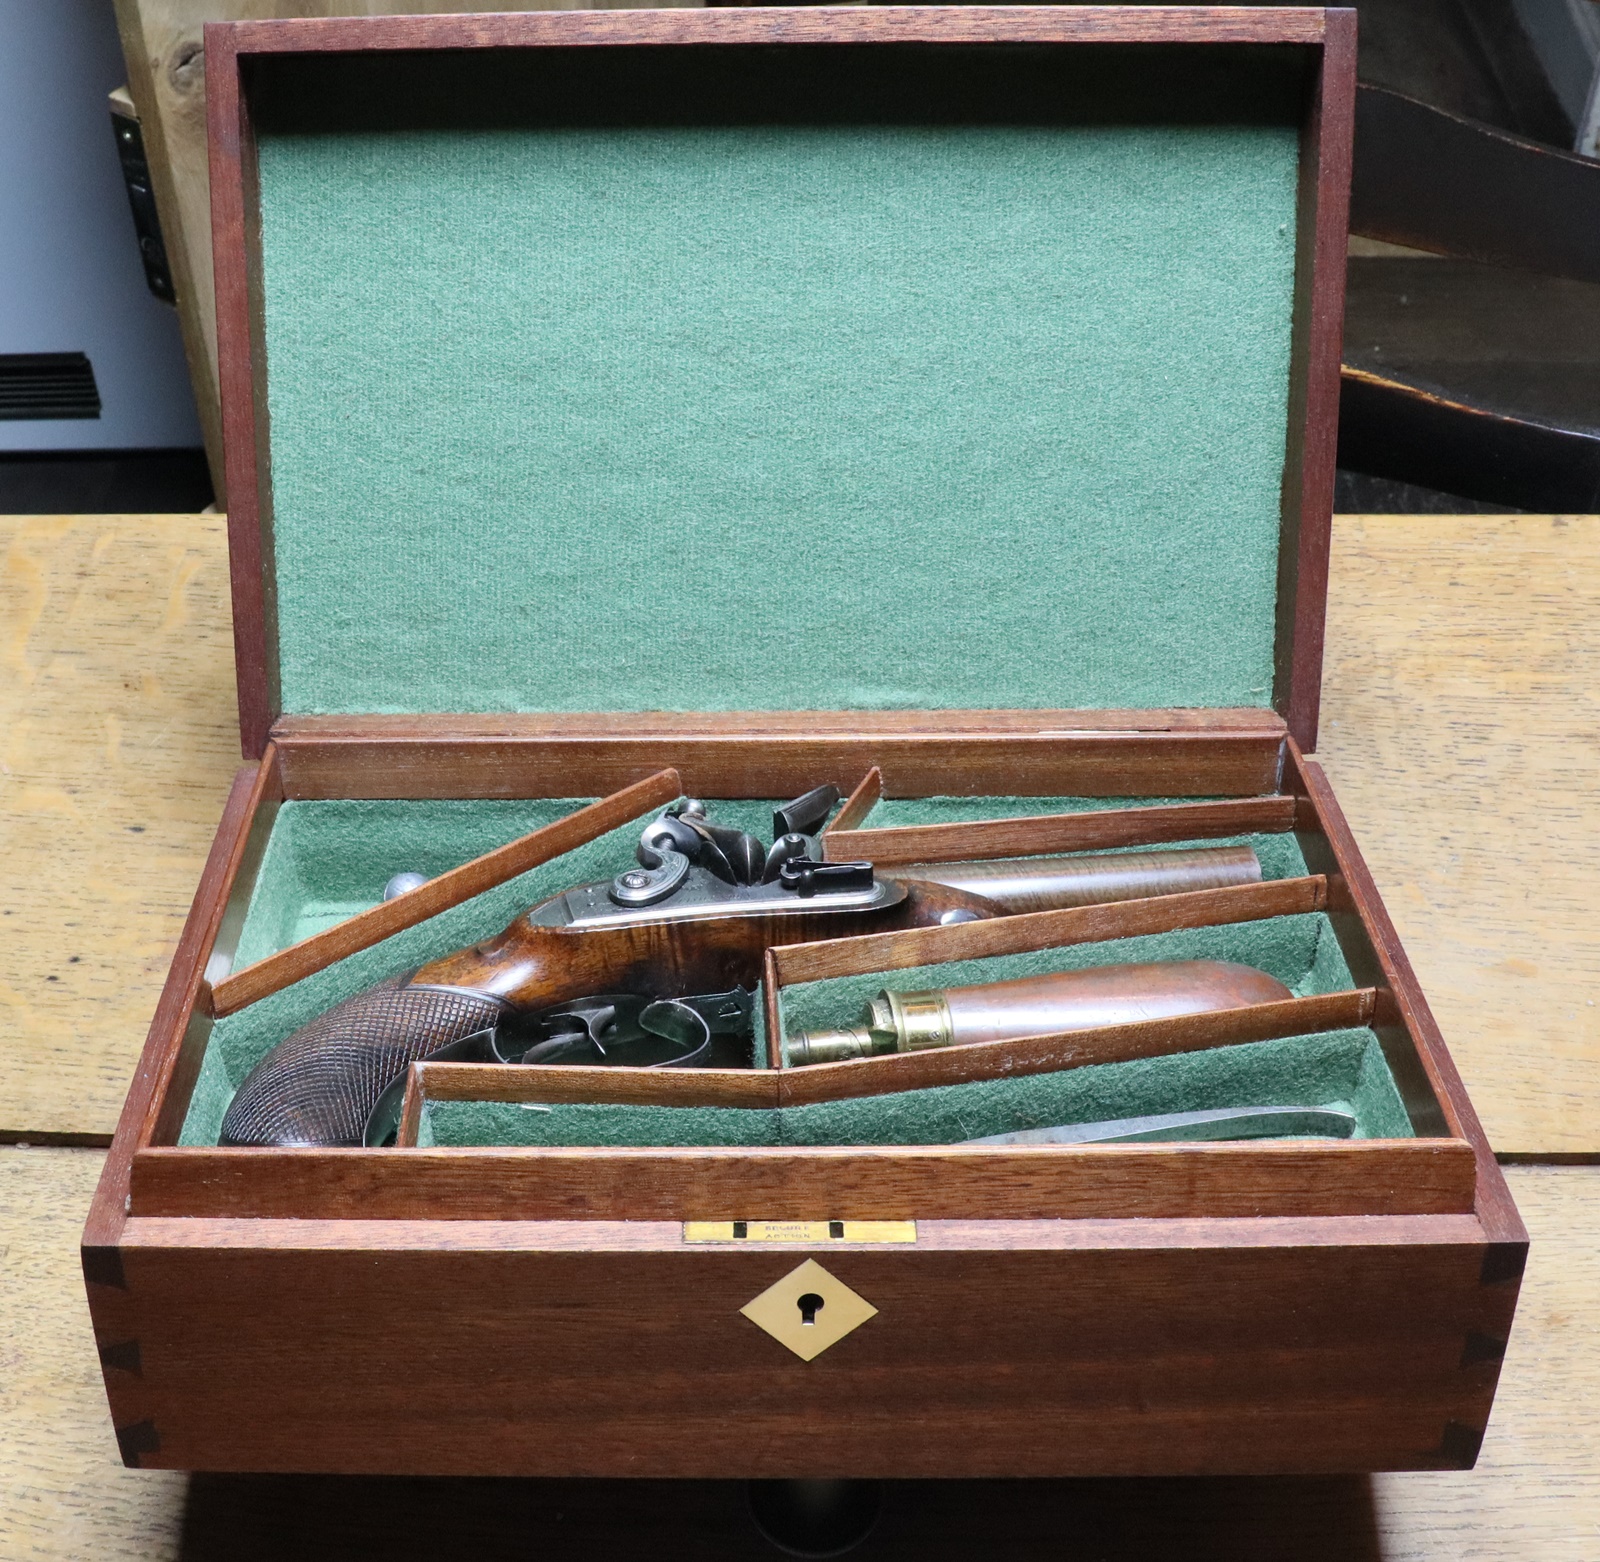 I can see a couple of bits that need attention – one see things in photos that escape the naked eye! Case experts will immediately recognise that I’ve made this one the unconventional way round – normally the top of the pistol is nearest to the front of the case – i.e. the whole thing 180 degrees rotated. It is normal to case single barreled pistols and guns with the lock up and I guess if the pistol is the conventional way round you can open the case and pick up the pistol with your right hand in a ‘shooting’ grip. Having said that I have seen a number that break the rule.
 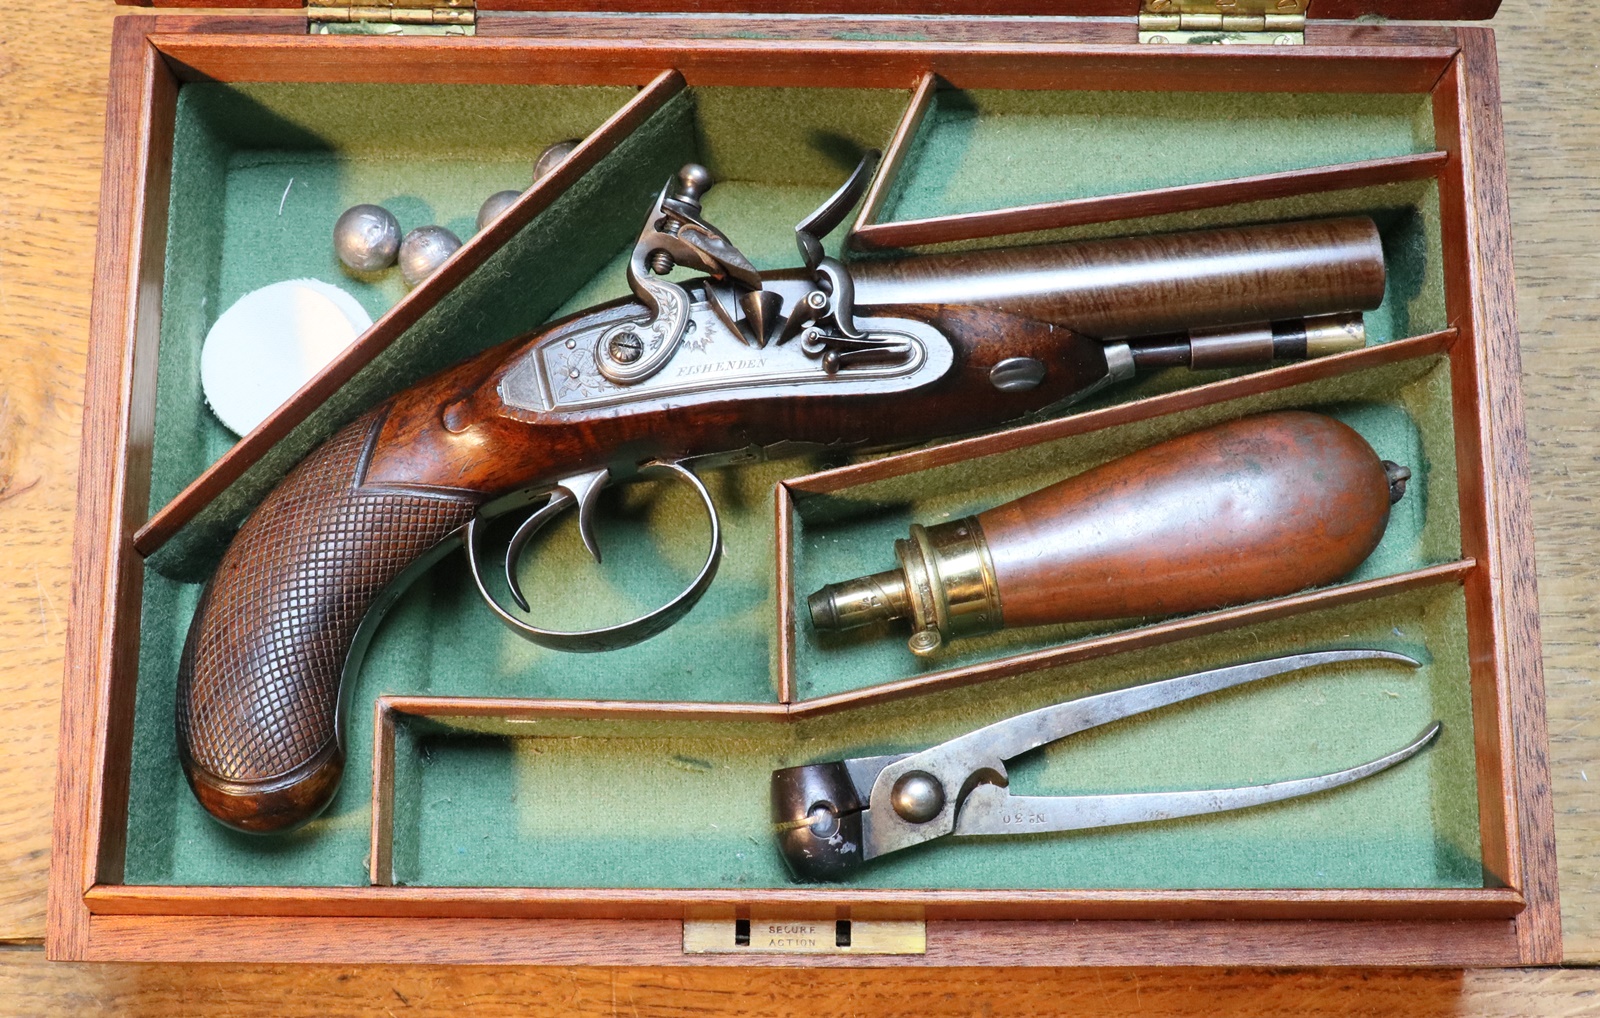 Its crying out for a loading rod, a round box for wads and a pan brush, plus some spare flints in a leather pouch. 6th August – one of the mysteries of this blog is who looks at it – every day it gets between about 120 and 180 visitors, and only very occasionally gets to either limit – given there must be many tens of thousands of people round the world who might be interested, why does the number not fluctuate in a more random way? Or are most of them regular viewers? Between 20 and 45 each day come via a search engine, still not a lot of random variation. I suppose I could put software on the site that would tell me how many returning visitors there are each day, but given the GDPR regulations that might be difficult. Incidentally almost half the visitors are from the US, twice as many as from the UK. Africa and Greenland are poorly represented! The case making occupied most of the day – AGAIN! We used to have a motto at the lab when things got complex or our equipment had to be fixed in zero time on board ship with 50 crew waiting – ‘ Had I known what was involved I wouldn’t have started!’ – that probably applies to this case. If you decide to make a case, start with a nice simple one all one depth and with fabric over the dividers – it is much easier. Having said that, it is looking quite fancy, and coming together fairly well – I will prefabricate the compartments and part cover them before fixing them in place – I’m still waiting for the suede dye before I can finally put it together, but I did hinge the lid on today – at which point I discovered that the two hinges I had salvaged from a box were of different widths ( back to front). I had already made cutouts on the assumption that both hinges were the same and couldn’t remember which I’d used as a template – but a bit of jiggling and a bit of screw hole filling got it there in the end… …I’m having second thoughts about the escutcheon with the running leaf border – watch this space.
 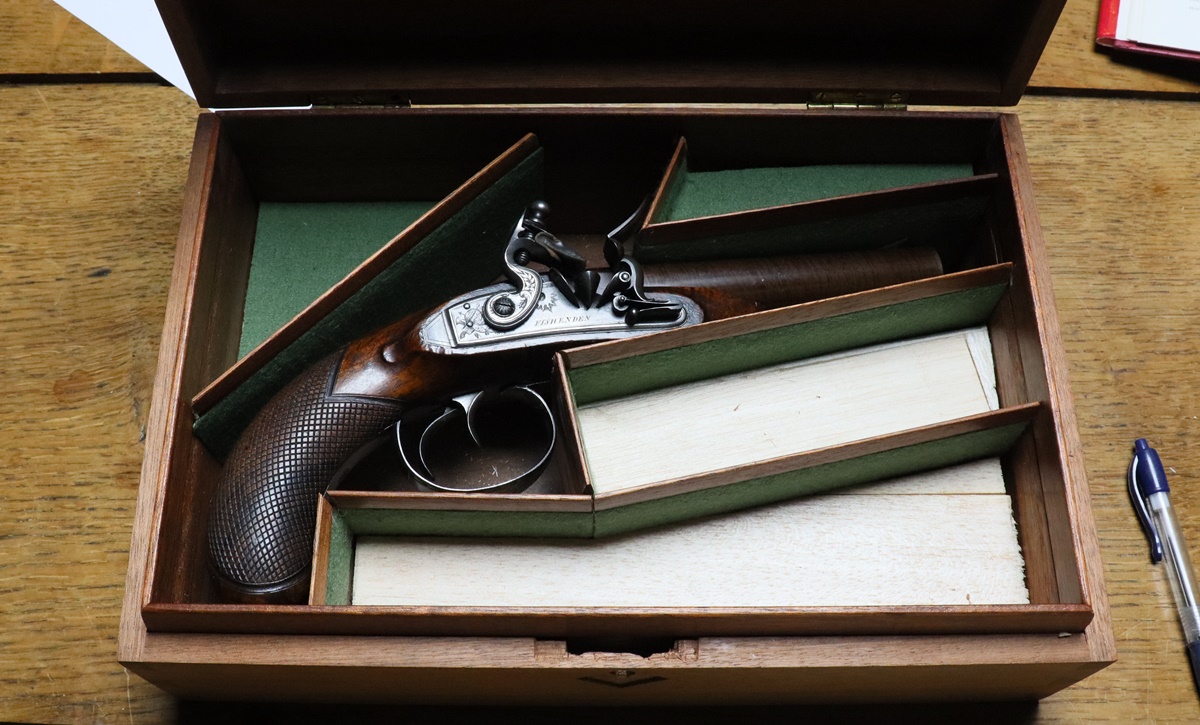 I had planned to use the red baise, but when I made up some sample partitions it didn’t contrast enough and the paler green that we had initially rejected came out as favourite. The upper left compartment will have a lid, the upper right is for a brush that I will have to make! The rectangular one is for the flask – its a bit big. All the rest of the junk will go in the lower compartment. Compartments not fixed. 5th August – still playing with the case – made a small brass escutcheon for the keyhole and inlet it, fitted the lock and cutouts for hinges and made up some of the partitions. The Fishenden double pistol is very wide so the case has to be around 100mm deep to accomodate the widest part but that makes the rest of it far to deep to be practical so most of it will have to have the base raised with packing by around 40 mm. I found a box of pieces of balsa wood that we had bought for making things years ago – lots of different thicknesses, so that will be ideal for packing as it won’t add significantly to the weight – I guess there is some merit in not throwing anything away! I made an escutcheon to put on the lid and felt like doing some engraving so I put a ‘running leaf’ border as on 1800 locks round it. I might just feel the need to put a ‘stand of arms’ engraving in the middle there is one on the tails of the locks of the pistol. I’m now waiting for Amazon to deliver a bottle of dark brown suede shoe dye – it is by far the best way to colour wood if you want to go for a significantly darker colour – my bottle is almost empty.
  Probably ought to be mounted the other way up? 4th August – Bit more work on the case – preparing stock for the partitions – I decided that as its not meant to be a ‘fake’ old box I could do what I liked, so I’ve started to make partitions that show a strip of mahogany at the top rather than fold the cloth over the top – more work but more fun. I have 4 different biases for lining cases – all dyed in original military colours from Bernie the Bolt – I got Penny to help me decide which went best – to be revealed later….
  3rd August – Got the basics of the box done – the ‘lining’ round the inside of the box that stands proud of the base to form a lip is a tricky machining job – the outside needs to be chamfered at about 15 degrees so the lid closes. I managed to do that on my table router. The inside surface is less easy – the biase only comes up to the level of the sides of the box and ends in a recess that needs to be tapered – I spent a long time trying to work out how to do it with a router, before I realised that I had a very fancy old Record plane that did all sorts of ploughing jobs somewhere in a box – I tend to forget that often hand tools are much easier for some jobs than trying to fudge things with machine tools. In a similar vein I made the traditional bead round the bottom of the lid using a simple scratch plane with a blade I filed up for the job. Anyway it is now looking like a box – a few more jobs to do – fit hinges, make internal partitions, make keyhole escutcheon, make lid escutcheon/handle, plus all the finishing – colour it down, sanding seal it, varnish//wax it and line it etc etc. In the end it will represent almost a week’s work – no way an economic proposition but I’ve wanted to have a go at casemaking for some time, and I can rest on my laurels when that is finished. I didn’t put hooks on the front as I wasn’t confident I’d get them right, so presumably I should not really put a handle on the top – I do have a lock for it, but no key If I were doing it again I’d try to get my cnc machine to make the pockets for the hooks before I assembled the box, and also get it to machine the hooks themselves from brass. Maybe I’ll fit hooks after all – by hand…………
 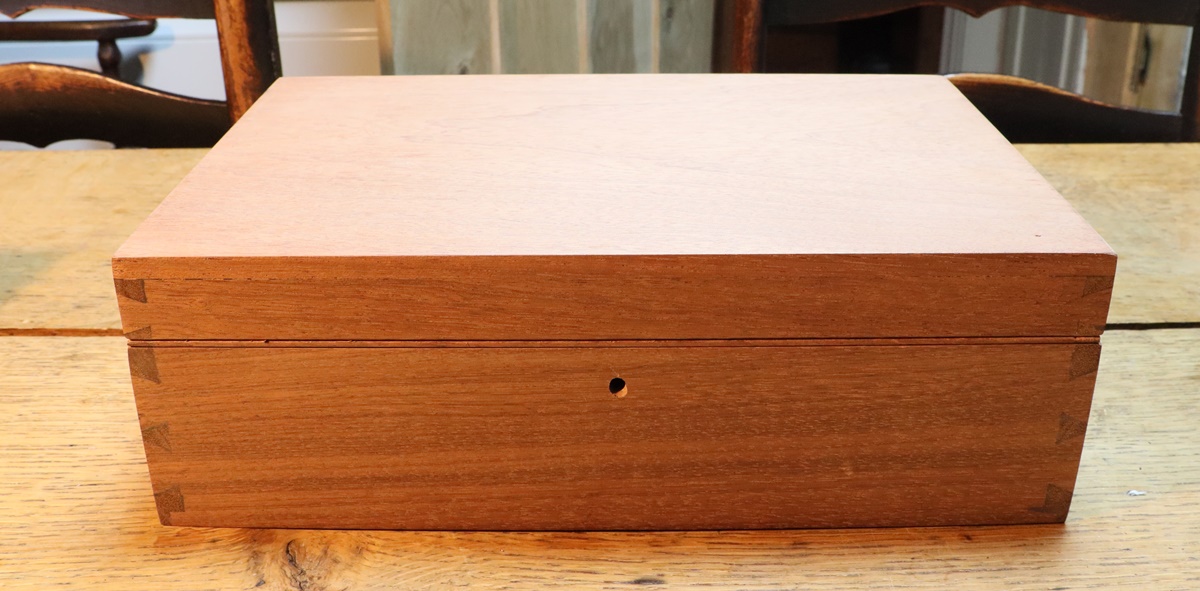 Thinking about the typical construction of cases, I reckon that the bead round the edge of the lid (sometimes round the box instead) is there to hide any misalignment in the two parts, which it does rather well! 2nd August – Bit more work on the pistol box for the Fishenden and on discovering how the cnc software and hardware interact – I could be getting there but I can’t get the hang of the z axis – the tool raising and lowering – I think I have got it sorted, and then it goes and digs a hole in the piece of wood I’ve put on the bed to protect it from just such events – I will get to understand what it thinks it is doing – at least with computers I’ve learnt that everything that goes wrong does so for a reason – almost always human error or misunderstanding. One little quirk of the free software I am using is that every time something goes a bit wrong I have to restart the whole shooting match. I went over to Dicks – he has just fitted new frizzens on a pair of locks that had lost theirs, and they really look as if they have always been there – he also found a perfect matching top jaw in his box of old parts – great to have a workshop absolutely packed with the pickings of 30 years in the game! Dick is now sorting out the Sturman pinfire – tightening up the action and getting it back on the face – that involves putting a bit of weld on the breech hook to move the barrels back a bit, and putting some on the rotary catch to pull them down onto the action flat. I probably ought to learn to weld properly as our specialist has now started charging a high price for his expertise! I did manage to weld a pin on the side of a small mainspring for the Harding pistol so maybe there is hope for me yet! 31st July – Trapped at home waiting for a delivery that didn’t come so a repeat tomorrow! I was going over to Dick’s to see how he is getting on with pair of locks that he is conjuring up frizzens for – I need to take the Sturman to get him to tighten the action – too modern for me. I also need to sift through his collection of percussion cocks to see if I can find a better pair for a double barreled pistol I’m restoring for another client – both cocks are replacements and don’t match, one doesn’t strike the nipple and neither are anywhere near the right half and full cock positions. When I think about it at least half of the antique guns that pass through my workshop have had the cocks replaced – flint as well as percussion. Most are modern replacements – by modern I mean in the last hundred years – I had one replacement flint cock that was dated 1969 on the back – I think people, including Blackleys, have been selling casting since the 1950s. It would appear that quite often replacement percussion cocks are recycled old ones, maybe from the recoversion of percussion to flint, and they often have their squares in the wrong alignment. Actually gunmakers from about 1830 ish seem to have had a standard square alignment that many followed, especially for sporting guns. I have been able to swap cocks with perfect alignment – in one example I put John Manton cocks on a Samuel Nock double gun and the were perfect – they were even a decent tight fit. I’m still using them regularly! My ‘playing’ today took the form of making a case for my double flint coach pistol by Fishenden. There are two photos of cases in the Keith Niel and Back Case book , and I am more or less copying the one for a John Manton pistol as the pistol looks similar. My first task was serious timber conversion to get enough strips of 10mm wide mahogany for the sides, and a sheet 8 mm thick for the top. I’ve done the dovetails and glued up the bottom of the case – I made the sides 10mm tahick but I had a bit of a job chasing round to find a small enough lock and hinges. Hinges for gun cases can be a problem as gun always had ‘stop hinges’ that allowed the lid to be opened just over the right angle. Stop hinges are difficult to buy and can be horribly expensive if you can find any. They do come oon old boxes from time to time, but take some tracking down. The best proper antique stop hinges were made from solid brass but I’ve found two alternative constructions – cheap stop hinges made of folded brass sheet are like normal cheap hinges, except that the brass is folded back from the ‘inside’ edge of the hinge and carried back under the hinge to protrude at the back and form the stop. The other ‘cheat’ is very useful – just cut a piece of brass sheet to go under each side of the hinge and let it stick out the back and file bevels to act as the stop – they are drilled to match the hinge and could be soldered on for added security – that means you can turn any cheap hinges into stop hinges. I was trying to look at some adverts for guns on Gunstar to see if it was worth putting any on there. The thing that struck me most was how awful a lot of the photos are – it may be that Gunstar cuts the resolution down to save space although that would be both silly and unnecessary. I think it is that in spite of mobile phones being perfectly adequate cameras, people just point them in the general direction of the chosen gun and never look at the result – failing to notice that the framing was all over the place so it doesn’t show what they want, the lighting is terrible and the focus is like looking through thin soup! Some of the correspondents to this site send me similarly awful phots – some are OK, a few good, but mostly its difficult to say anything constructive about a brown blurr, or worse, half a dozen brown blurrs. I do take a lot of trouble to get good photos for this blog, although sometimes I can’t get the optimal lighting and occasionally I don’t remember to manually focus perfectly – I probably take 6 photos for every one that gets on the blog. I am awaiting delivery of another Canon lens for my M50 – I managed to find a good second hand one with a year’s guarantee for half the price of a new one – lenses are far and away the most expensive part of serious photo kit.
 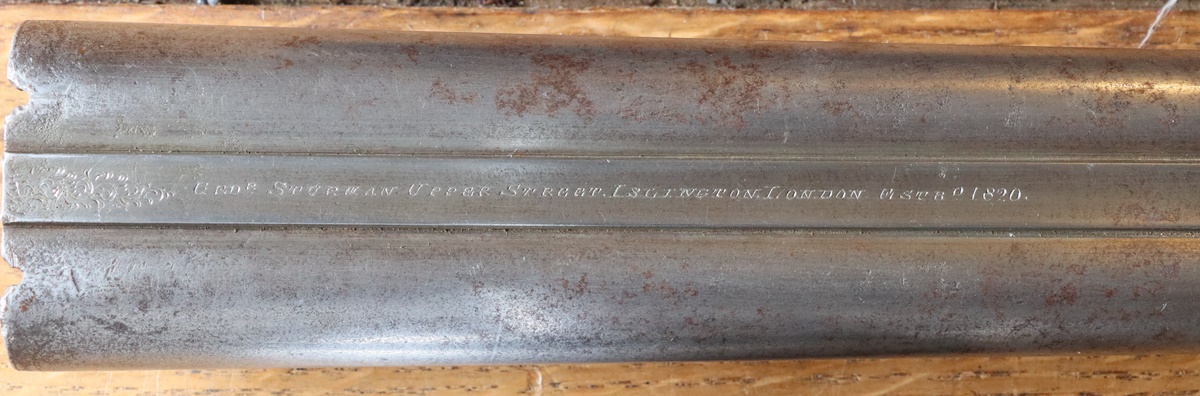 Sturman;- Recut engraving – first iteration. The barrel will be ‘struck off’ ready for browning and I’ll then go back over any lettering that has disappeared and recut as necessary. 30th July – I got a coarse diamond disk for my hone and tried grinding flints with a view to reusing worn ones – it works to an extent, in that it does grind down the flint, but the grinding chips off the edge in a way that doesn’t leave a sharp edge – so you need to grind down to a suitable angle and then tap along it as you would to refresh a blunt flint, and take off a series of very small chips – the flints then spark well. I managed to make a mini flint for the Harding pistol by putting a larger flint in the lead covered jaws of my 4 inch vice and using a pin punch and a tack hammer to take off the back and edge and then grind down the thickness a bit – works and looks OK. I spent this evening recutting the engraving on the Sturman pinfire barrel – it is presumably an 1860s gun so its quite old – it has a fairly simple single bite action of the early form – well back from the action face- the action flat is signed EMME – as with most of those early single bite actions this one is quite loose and ‘off the face’ so I’ll get Dick to tighten it up when the barrel is done. Pinfires had a very short period of popularity before Daw’s centrefire rendered them old fashioned, although they went on being used for many years. Anyway it is now ready to be struck off and then re-browned. I came across an article in a 1995 copy of Gun Review (There used to be lots of mags for us then!) about a magic gun cleaning solution – so I checked it out on the ‘interweb’ as its known locally. Found a firm selling it for lab purposes and had a chat with their technical people, and I have a sample on its way – I will report back when/if I get it….. Oh and I read the Home Office consultation on firearms licensing and filled in the online questionnaire _ I’m afraid we are moving towards a more tightly controlled system, but the arrangements for medical checks are very dodgy and may make it very hard for some people to who have uncooperative GPs to get licenses – plus undefined fees for the medical records check. The main problem is the discretion it gives to Chief Constables to make decisions about the significance of mental health issues and ‘intemperate behavior’ while the aim is OK we are putting far too much power in the hands of the police – which mostly they don’t abuse but there are enough cases where they do for it to be a matter of concern.. I heard of one case where a person was refused because they went to the pub regularly – irrespective of what they consumed there. Find the survey here;- https://www.homeofficesurveys.homeoffice.gov.uk/s/T7L6I/ For the guidance here;- https://www.gov.uk/government/consultations/statutory-guidance-to-police-on-firearms-licensing]
  29th July – Now that the Harding pistols are done and dispatched I had a chance to get rid of some of the clutter from the workshop and take it to the loft ( or in the case of a depressingly small amount, bin it). In the process I found my little cnc machine that had been moldering for 4 years since I bent the spindle shaft – so I thought I’d better replace it and try again to use it as I want to make the stocks for a pair of duelling pistols and it would just be big and powerful enough – watch this space. I also uncovered 20 gravers waiting to be sharpened – so I’m some way through that. Before I get distracted into doing any other projects though, I must finish off the video on making a mainspring, including film of the flaming tempering. I have at the back of my mind the fact that I am scheduled to take my engraving demonstration to the Sandringham Country Fair at the beginning of September and, this being the summer and distractions many, I ought to think about what I’ll need to take – to that end I took the dramatic step of ordering business cards instead of endlessly printing them and cutting them up myself with pretty second rate results – you get 250 cards for £25, which seems OK compared with the time it would take me to make that many, and the ink for my printer isn’t free either – people seem keen to take them when I’m doing demonsrations. It was a day of extravagance on account of getting paid for a job – I found a good cheap secondhand 18 -135 lens for my Canon M50 so I don’t have to carry round the big old EF-S 18 – 135 lens and adapter from my old 760D! Spent out now so I can rest. Out of curiosity I was searching the web for pictures of other similar Harding Post Office pistols – they are certainly rare – I located one that was sold in an American auction, and one in the UK Postal Museum in poor condition, plus Dom Garth Vincent sold a very similar pair by Mortimer that were supposed to be the design patterns for Harding when he got the PO contract. Anyway the Postal Museum specimen is a bit rusty and missing the top jaw and screw, so I offered to fix it up for them, pro bono. 28th July – Most of the Harding stuff is now on its own post. I finished the Harding – pinned the brass ‘bolt’ to the slider with a piece of 0.8 mm diameter rod tapered slightly and driven in and hardened the tumbler and sear, so now its finished! I had made a spare spring blank so I thought I’d replace the spring in the first (PO) Harding that had a cut down main from something else. I was doing a video of bending the spring, and got so carried away that I bent it the wrong way, so the tab for the pin was on the wrong side. I didn’t fancy straightening it and starting again so I filed off the tab and welded a small pip for the peg on the correct side – I managed to get a blob of the right size in the right place and it filed down into a 1.8mm peg perfectly. I hardened the spring in oil and the used the traditional method of tempering springs in burning oil – I made a video of that too. Anyway that seemed to work – at least the spring is in and working and hasn’t gone ‘ping’ yet. The spring and the metal container I fired it in are both pretty black! The process looked a bit like a firework display – I thought it was because of the light rain but it persisted when I held a slate over the top. Anyway both Harding pistols are now done and look fantastic, especially when compared to the starting point. They are quite special – I might even make a box for them one day, its a shame they are not an exact pair! Anyway its now time to move on to the next project! Nick suggested the pinfire I got from him might make a good project – so I’ll see what I can do! My first job was to get rid of the absurdly highly polished finish to the case which looked completely over the top. It would appear to be French polish as fine wire wool and meths ( alcohol) broke the surface. here are some photos – the main jobs are:- tighten the underlever catch and put the breeches firmly ‘on the face’ ( a job for Dick), recut the engraving on the barrel and strike it down and rebrown SLOWLY. Engrave the right hand cock which is s replacement. get the dings out of the stock. recut the chequering, inlet the barrel bolt escutcheons as they are proud of the old chequering. Make a new horn bit for the foreend. Then sell it! Perhaps keep the case as it would do for the Venables, which deserves a good case! Talking of which I need to sort out the barrel again(!) as the ramrod pipes came off!
 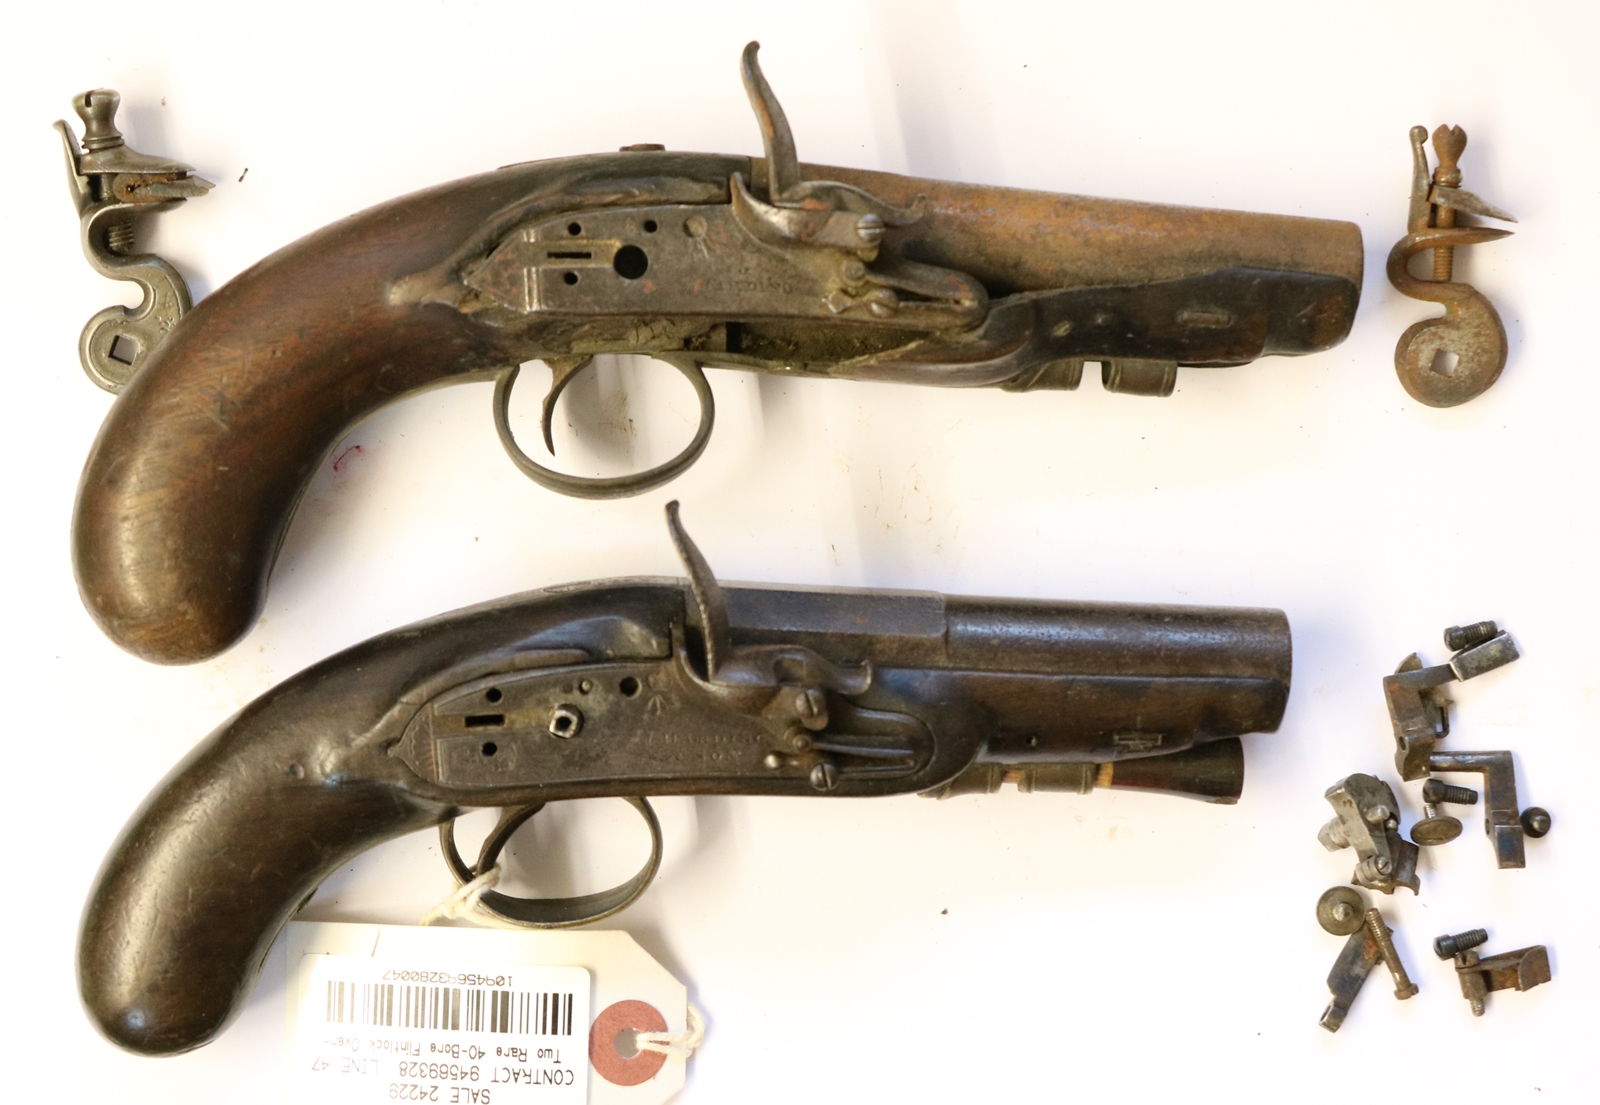 Before: What a depressing sight!
 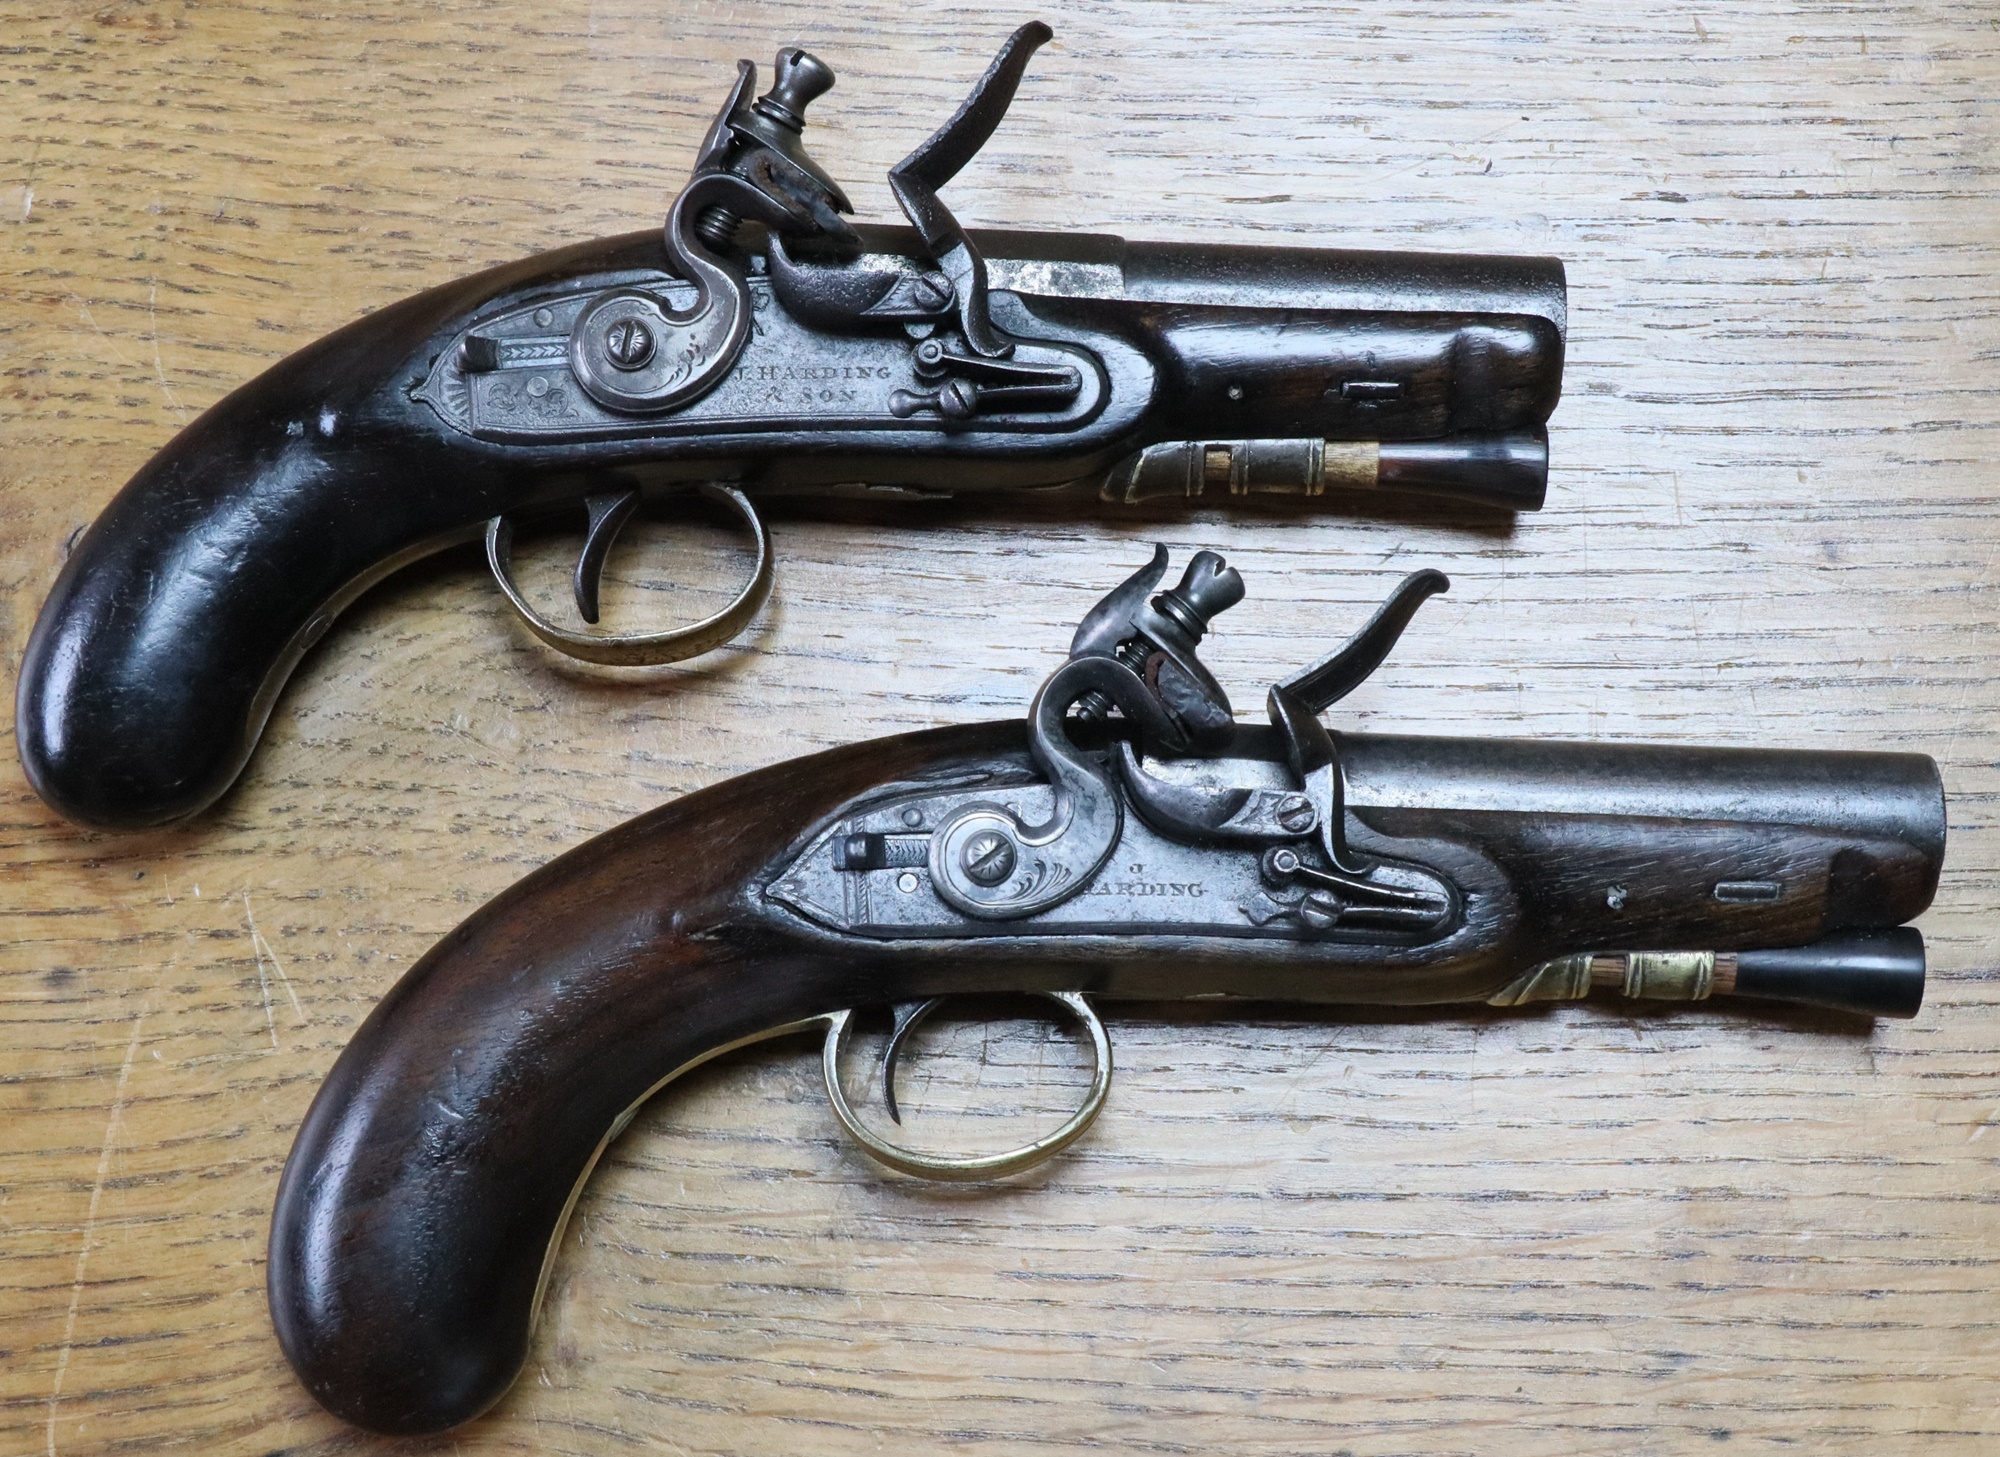 I’m really pleased with the way they have turned out – it almost justifies what I paid for the bits. And the next project;-
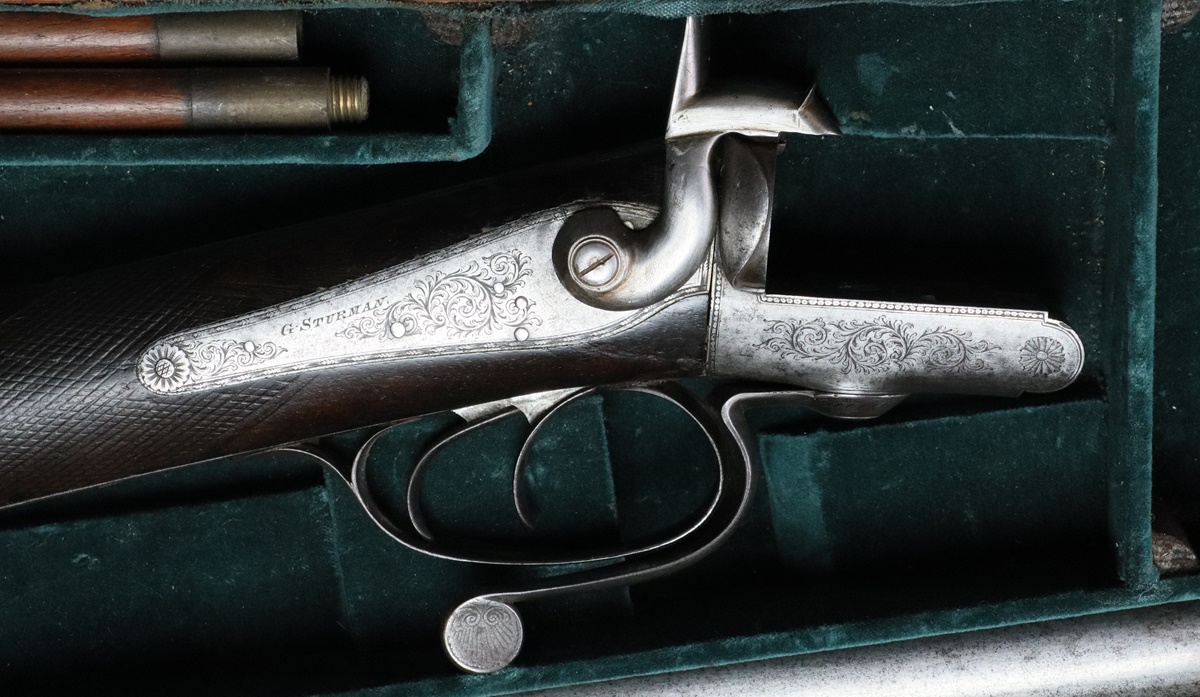
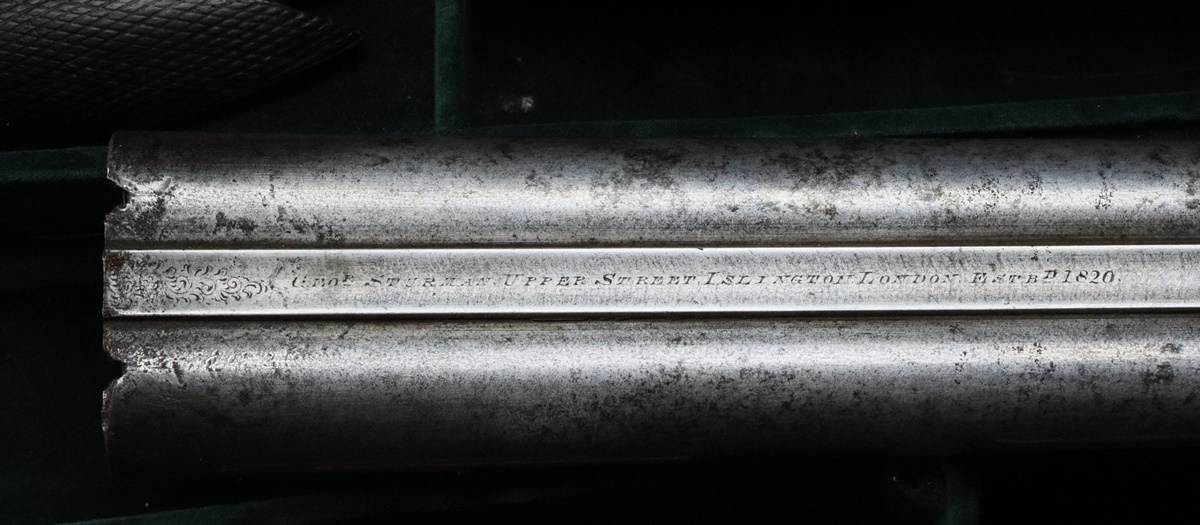
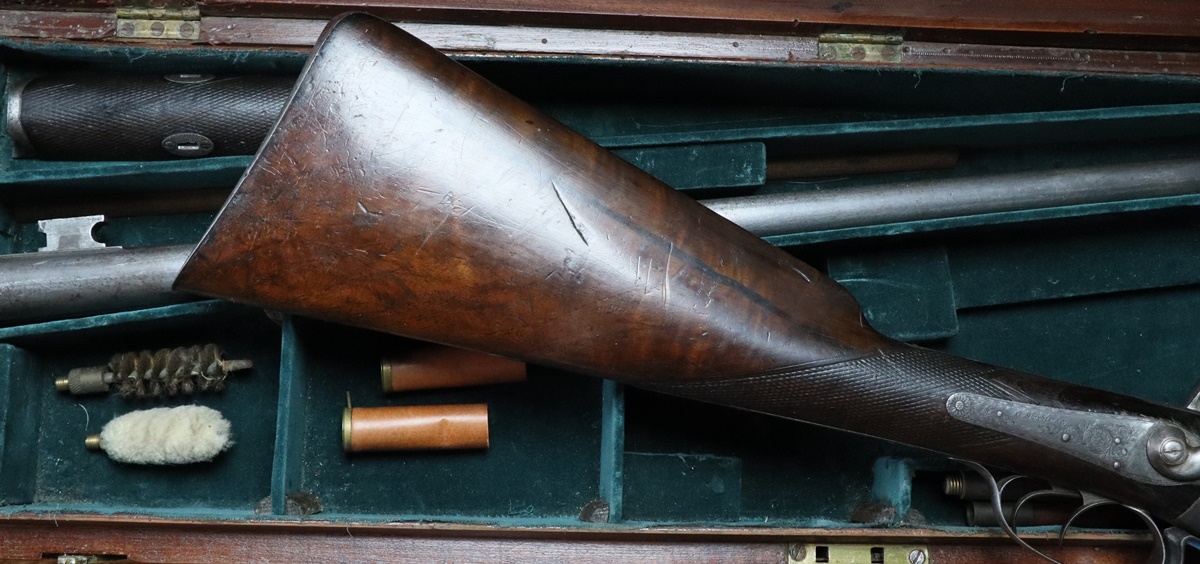 27th July – bit cooler and wetter today! Had a visit from a regular client to collect some pistols – I swapped some work for a little 1860s pistol case and a cased double pinfire 12 by Geo Sturman that need a little tidying – the barrel needs striking up and rebrowning – I need to have another go at browning as I am keen to improve my technique – basically slow it all down… I did a bit more fiddly work on the sliding safety of the second Harding pistol – this one turns out to be a bit different in its internals from the first, which was conventional. here there wasn’t a lot of space so I modified the mechanism so that the slider itself actually bolted the tumbler, the slider being retained by a small brass ‘bolt’ that had the ramp on its tail that engaged with a pip on a small spring retained by the sear spring screw. I found that this time the bridle had a slot that aligned with the slider, so I left a pip on the slider to engage in the slot – actually that’s not true – I’d already filed off the slider when I realised that the slot lined up, so I had to weld a tiny blob in the right place…..
 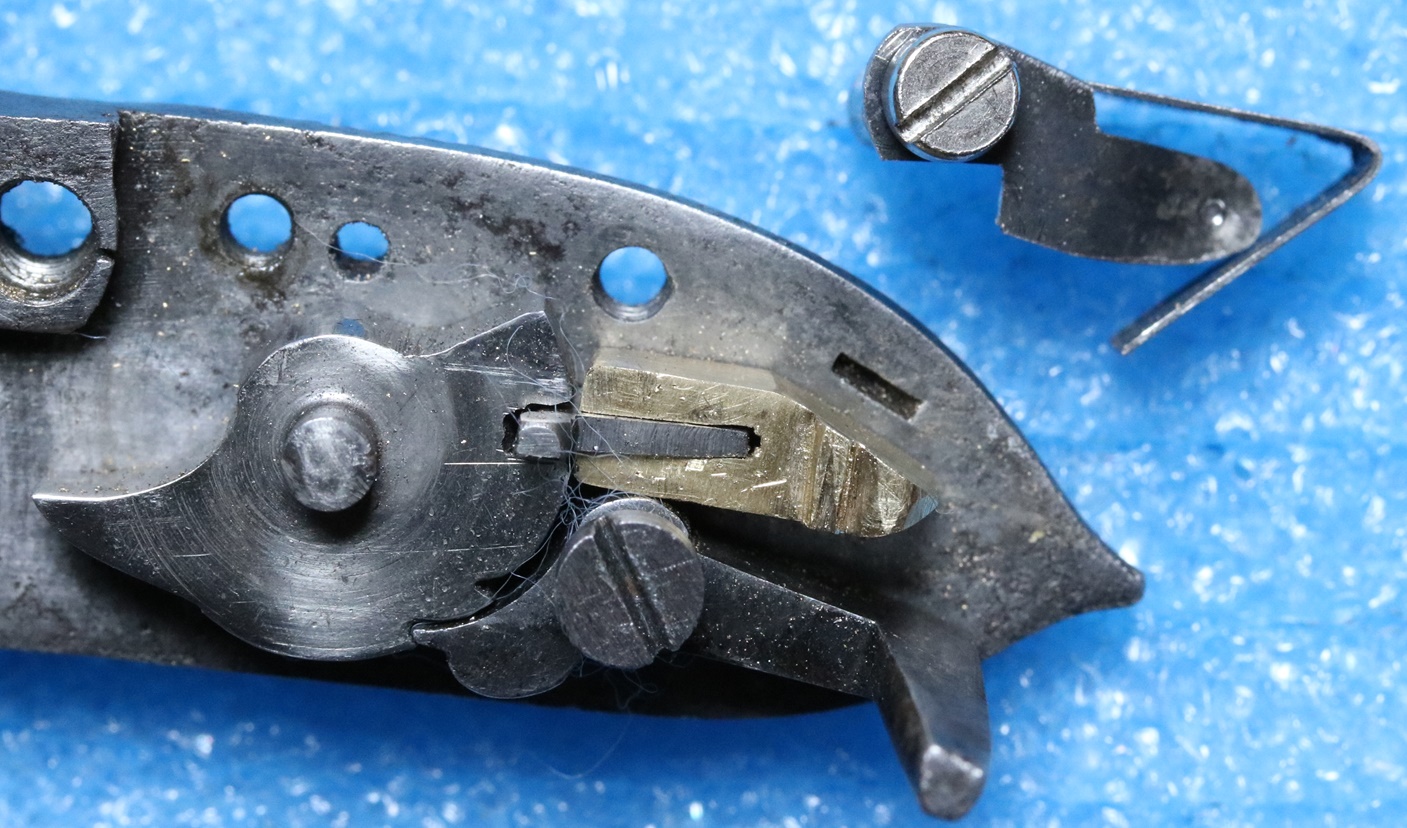 Slider and its brass retainer – ramp on the tail, plus sear and slider springs – slider spring has dimple to engage ramp. ( bridle removed) All very fiddly as its a very small pistol. 25th July Predictably the pool got a lot of use today from friends and neighbours -seemed to be full of children all day! I sheltered from the heat in my ‘machine shop’ which keeps a reasonable temperature, so I was able to finish a couple of jobs on the Harding – I glued up a piece of dowel with a turned end into a horn blank – Araldite went off rapidly in the heat, and turned it all down together – looks fine and fits perfectly. I also turned up a side screw – I was going to cut off the thread portion and weld on a new head but found that an M3.5 thread would just do, so made a new screw – I had a very cheap non adjustable die for M 3.5 which worked well enough. I filed up the slider for the safety catch from the blank I machined yesterday – it must be one of the fiddliest jobs – especially for such a small pistol – anyway its almost done. Not quite sure how to do the mechanism inside – there is precious little room for the bolt to intersect the tumbler so I might just make a slot in the tumbler to take the blade of the slider, then make a dummy bolt to stop the slider falling out…. I’ll see what is possible. I gather we have a small group for the ‘Have a go’ tomorrow, and I’ll take a breech loader for some lazy shooting afterwards – not sure which – I’m not sure the Beretta I bought fits terribly well, so I might take something else.
 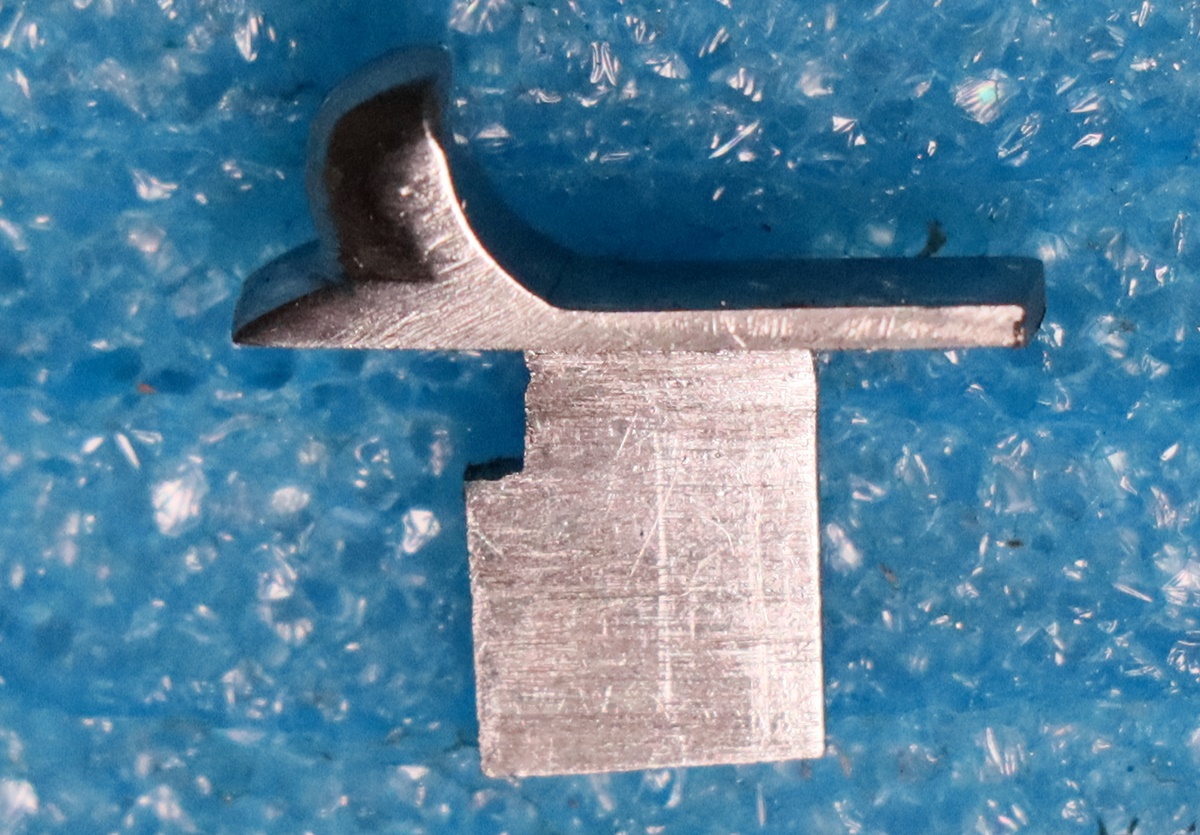 24th July – rather warm today – when I got in my car to go to Dick’s it said 38 degrees (C) – that went down to 33 when I was moving! By 4 oclock I was ready for a swim in the giant bag of water – I reckon I’m up to 700m a session and am aiming for I km – that’s a lot of turning as its only 10m long- I think I’m going to have to make something to keep track of how many lengths I swim!. A good day on the tinkering front – I machined blanks for the top jaw and slide safety, and turned a top jaw screw and a better cock screw, and filed up the top jaw and gave them a once over with Blackley’s case hardening powder to colour them down a bit – they actually look quite good now. I ‘spiked up’ the bottom of the top jaw with a 45 degree graver without the heels, mounted in a metal rod and tapped with a small hammer – it throws up really vicious little hooks that are just like the originals must have been – its always a give away that a cock has been replaced by a casting as very few people bother to file off the cast ‘teeth’ and replace them with nice sharp ones. It only takes a few minutes! Anyway the little pistol is beginning to look really good – the photo has a nasty bit of flint I broke off a larger on as I don’t have any micro flints in stock – it does actually spark up although probably not reliable enough to set off priming consistently – anyway better than a repro Scottish Pistol I was looking at with Dick that would not spark except very occasionally one feeble little spark. I didn’t have any perfect flints with me – most had been used but you can usually persuade a few sparks out of the lock if you tap a new edge on the flint. It was sold as a working repro with proof marks so presumably was intended to shoot but I think its going to need some work on the frizzen, either some heat treatment or facing with a bit of old saw blade or whatever – I’ve never had any problems using Blackley’s frizzen casting – they spark OK – and I’ve never worn a frizzen to the point when it needed refacing. I don’t shoot flintlock that much – I have enough of a job hitting things with a percussion! Having said that I’m doing another corporate ‘have a go with a muzzle loader day’ on Friday for Cambridge Gun Club and I have to take both a flintlock and a percussion.
 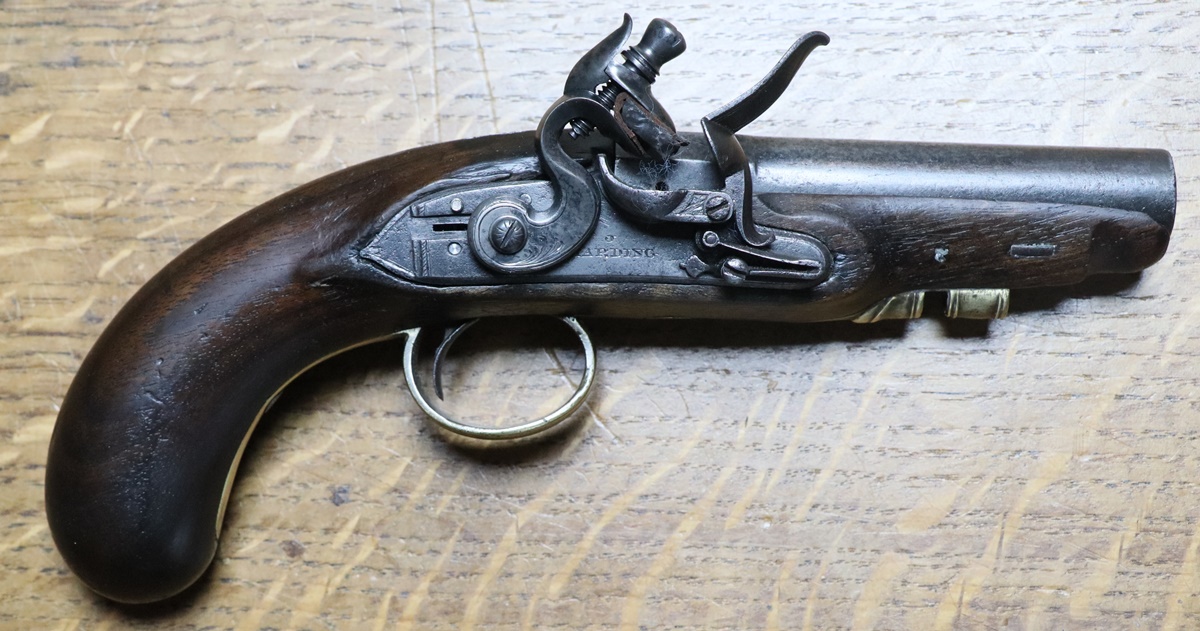 Slide safety and ramrod to do and it can join its ‘almost’ pair, the P.O. pistol 23rd July – I went into ‘my’ school for the ‘Leaver’s Assembly’ to say goodbye to the year 6 pupils who are moving on to secondary school – a few tears amonst them, but they will do well – their teachers have been so caring. More tinkering with the Harding – I used a chunk of thick tubing as a heat reservoir to temper the spring and it worked just fine with the radiant thermometer and got a good uniform blue towards the bright end of he spectrum – the spring fits, so I adjusted the full cock bent on the tumbler – very carefully in stages as I didn’t want to loose any more cock swing than necessary. Once that was done I case hardened the tumbler – it was made out of mild steel – and made a ‘cut price’ sear spring from a bit of spring steel sheet – works fine but looks a bit naff! might have to revisit. Anyway so far so good, the lock fits, the spring, trigger and sear work fine – I’ve filed up the cock to a slightly better shape and put a bit of engraving on it – I now need to tap the hole for the cock screw that holds the top jaw, and make a top jaw, plus the safety slider and internal bits – I realise that I case hardened the tumbler and haven’t put in the notch for the safety bolt, but I’m sure I can file through the case. I reckon the restoration of this pistol has already cost far more than it could possibly be worth and it isn’t finished yet – a true labour of love – but at least it all goes on the blog!
 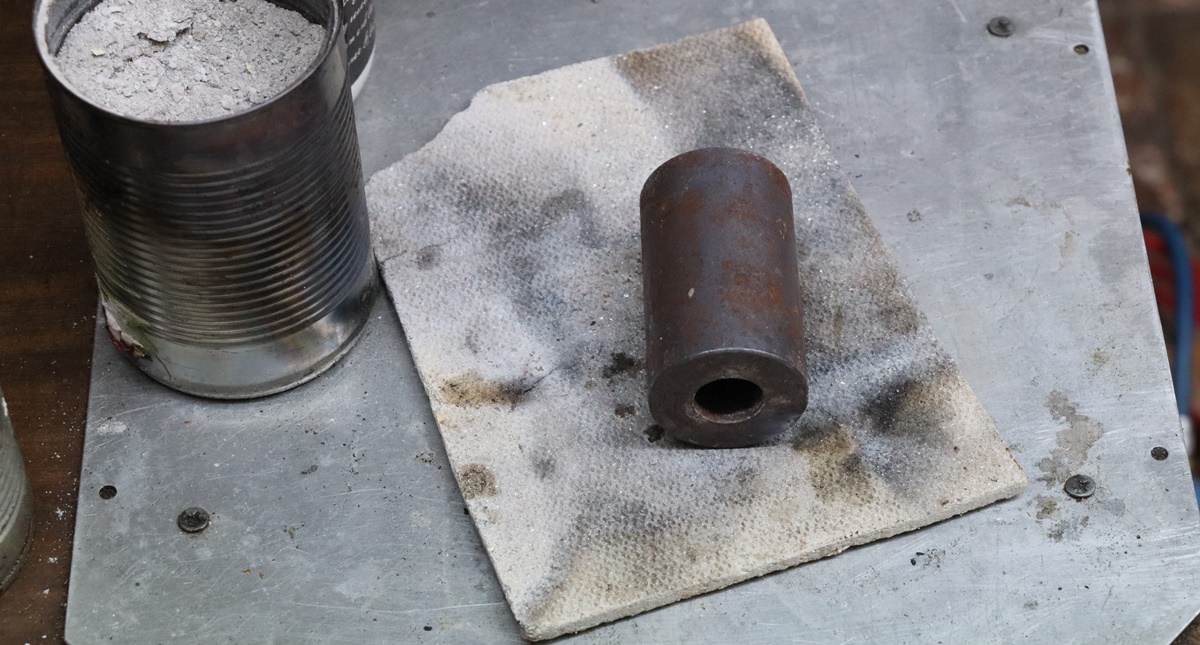 Thick tube as heat sink for tempering springs etc. Bean can holds wood ash insulation so parts cool slowly to avoid hardening them.
 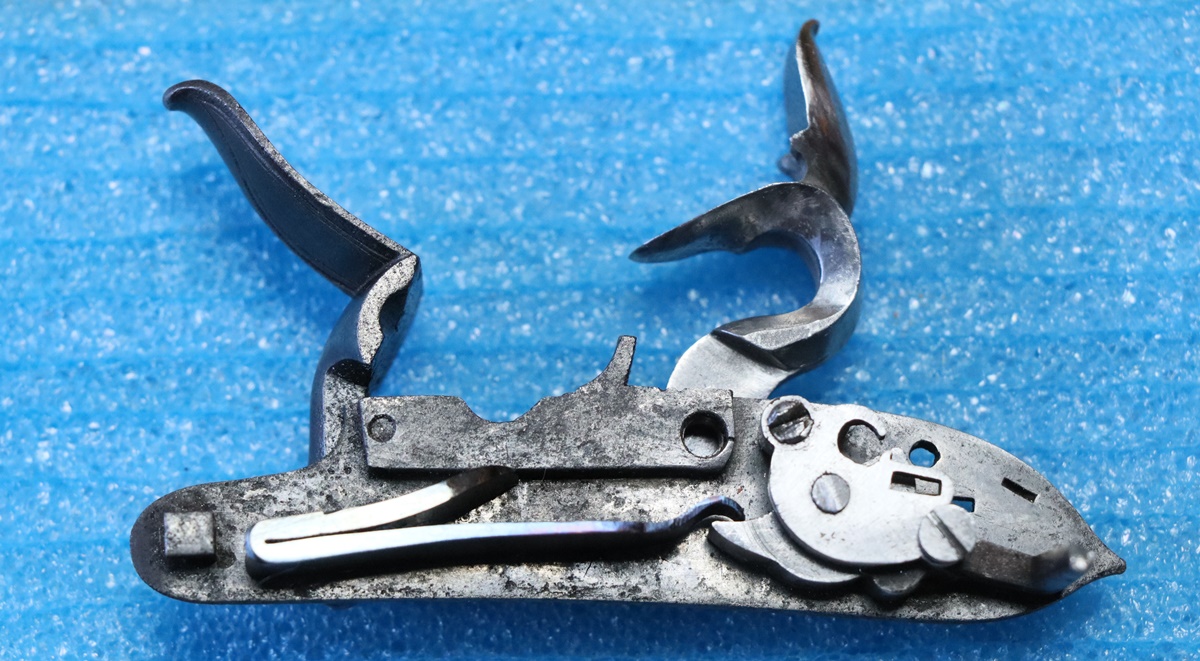 22nd July – Went into Cambridge to do some work on the Bullard Archive but ended up towing a giant skip with my Landcruiser and sorting some junk. I made one of the springs for the Harding pistols. This one looks a bit more convincing than the last one. I’ve hardened it with an oil quenching and its now glass hard so I’m being very careful not to break it – I suspect dropping it on a hard surface might even do it. Now I have to decide how to temper it, since I screwed up on that stage last time. I normally find a spot on the hotplate of the AGA which is the right temperature, using a remote temp probe and pop it on there with a couple of layers of aluminium foil over it and shut the lid down for ten minutes, but the AGA is out for the summer. The traditional method is to put the spring in a pool of oil in a tobacco tin (now a historic item!) and burn it off, after which the spring will have got to the right temper as if by magic. There is always a discussion about what oil to use – used engine oil is often quoted, but whether its the engine oil or the used bit that’s critical isn’t revealed. I think I’ll probably heat a thick walled tube in my furnace to 300C, check it with the radiant thermometer and then pop the spring in and leave it to cool down. – a lot more trouble than the burning oil, but at least measurable! As I wrote yesterday, the spring feels different now its fully hard, even when its just resting in my hand – mysterious or imaginary?
  I can never decide if the two arms should touch along the joint – I think most original springs don’t so I’ve left this one slightly open – you can get a piece of thin card in the joint. I think this spring is a better shape than the last one. We shall see!