Here are the diary entries from June to the end of August 2019 24th September – A day at the Kentwell Hall Elizabethan Re-enactment with ‘my’ class of 9/10 year olds and their teachers. The reconstruction was set in the year 1588, which was a momentous year – in July the Spanish Armada arrived off Plymouth giving rise to the apocryphal(?) story of Drake and the game of bowls. The English fleet harried the Spanish but would not close engage, denying the heavily soldiered ships of Phillip the opportunity for hand to hand combat. The Spanish needed to rendezvous with the Duke of Parma in Calais to pick up the main body of the invading army, but the wind was unfavourable and blew them into the harbour, which enabled the English to send in fireships and cause havoc. Most of the surviving Spanish cut their anchors and fled north, eventually going round the north of Scotland and into the Irish sea, most being wrecked on the way. Only the gentry talked of the great sea victory on our visit. The whole of that period was one of religious upheaval following Henry VIII’s break with Rome, Mary’s Catholic revival and Elizabeth’s return to Protestantism all pursued in a mightily brutal fashion. The rise of Puritanism was smouldering around 1588 with the satirical Martin Tracts, although Elizabeth succeeded in keeping the lid on it during her reign, but of course it burst forth during Cromwell’s Commonwealth and then petered out. The Clopton family of Kentwell Hall were, one presumes, safe Protestants, so the Hall presumably has no priest holes for recusants! The children had a great time and two small boys left the Alchemist’s demonstration hell bent on making gunpowder. I found it difficult to discourage them as that is exactly what I did at that age – and I’m still playing with the stuff – mysteriously I still have all my fingers, eyes, hair etc although I might once or twice have had rather singed eyebrows. Wonderful time was had by all – they are a lovely bunch of kids. My only reservation was that the woodmen were cutting up Sycamore, although it had only been introduced into England in the last hundred years of so as a park tree. 22nd September – Another few days of hectic activity – a couple of days interviewing job candidates and a fantastic shoot on Saturday down on the Essex coast after Partridges. We were expecting lots of English but in the end the bag was almost entirely Frenchies. The whole shoot was on dead flat terrain and there was a steady breeze of around 15 m.p.h or so and all the drives were downwind so the birds were going at a fair speed – there were some massive flushes – with that wind its difficult to pick and stick to one target when there are several nearby, and I find it almost impossible to pick up and hold a second bird by the time they are on top of me. Anyway it was a great first of the year. I always live in fear of accidentally shooting a pheasant before the season for pheasants opens, but this was not natural pheasant country and I only saw one in the whole of the shoot. Ours was the first muzzle loading shoot on that estate – an experiment that I hope will be repeated. Things should calm down next week – just the start of my STEM club at school and I put myself down for the school trip to Kentwell Manor, where the children will be taking part in an Elizabethan activity day – the only condition is that I go in some sort of period costume – I’m working on it but I don’t think I’ll be putting a photo on the webside! 17th September – Spent the day talking to a dozen groups of 14 year olds about seismics – its great fun and they are, for the most part, engaged and interested although I did have one group that was so badly behaved that I threatened to throw them out – and the ‘teacher’ sat there and did nothing… Its the first time in 20 years I’ve had to do that! I’ve got another day of it tomorrow and then a couple of days of interviews, so no time to even think about guns, although Friday night I’ll have to get ready for a partridge shoot on Saturday ( 6:45 a:m start). I did manage to get fine semolina from ‘Daily Bread’, a wholelfood supplier in Cambridge – at £1:87 per Kg. it is a lot cheaper than wads so I’ll see how it works some time. 15th September – There is still a large pile of sailing stuff in the living room and I didn’t want to put it back in the bedroom that I have to renovate soon, so I spent most of the day making a cupboard in a void over the stairs to put it in – now got to make doors etc….. I went to Dick’s yesterday and brought back a strange percussion over and under pistol that he has been renovating as it needed a couple of bits of engraving 0n the tang of the breech and on the tang of the trigger guard – the breech one I can do easily but I hate trying to put lines on a very curved trigger guard tang as I can never get sufficient room to maneuver the tool. anyway it’s done – the rest of the engraving is very poor – its a low value job so I did mine to match rather than go over the whole thing and tart it up. I have to confess I used the Gravemaster to do it. I failed to find fine Semolina in Waitrose today……………….. 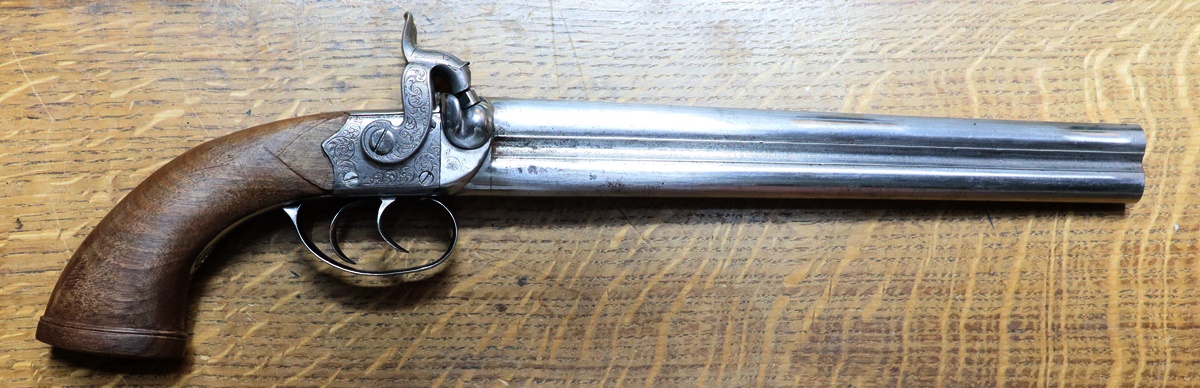 14th September – While we were sailing I asked Giles’s friend, a metallurgist, about brass and how to make a pale brass as used in 18th & 19th century guns. Brass is basically an alloy of copper and zinc, in different ratios for different purposes, with a melting point of 930 degrees C plus or minus 20 degrees depending on composition. It is relatively easy to heat brass to melting point for casting but changing the composition is not so straightforward. Copper melts at 1084 C so you need to get the brass to that temperature in order to up the copper content and make it a redder brass – I tried this but couldn’t get the temperature high enough and the copper stayed in clumps within the brass. Going the other way and trying to add zinc is much more difficult for although the zinc melts at 419 C, well below brass, it unfortunately has a boiling point of 913 C so dropping zinc into molten brass just boils off the zinc at great hazard to anyone near. One suggestion was to add tin rather than zinc, which would make a form of bronze (a tin/copper alloy) – tin has a very low melting point of 232 C but doesn’t boil until 2720 C so adding it to molten brass should be OK, but I’m not sure what that would do for the colour. There are a number of alloys of copper, zinc and tin – its the basis of Admiralty or Naval brass. Nickel was also suggested but that melts at 1455 C so is beyond my furnace. Perhaps just melting old brass is the answer! 13th September – I bought back a’rat tailed’ pistol from Sandringham to be repaired- its quite an elaborate, well made brass bodied Miquelet pistol, almost certainly of Albanian origin, that would go to half and full cock but wouldn’t release by pulling the trigger. I stripped out the lock to see what was wrong, and as I expected it was simply a bit of wear on the trigger where it contacted the sear, so a dab of weld along the edge of the top hung trigger fixed it – a quick and easy job. The lock was in reasonable condition so I just gently wire brushed its exposed parts and oiled it rather than a more thorough derusting which would have disturbed the patina. One of the hot topics at Sandringham was Semolina – yes, the stuff you used to get for pudding at school? But not in the pudding context here, more serious use! Our team shooting in Hungary had discovered that some Hungarian team members were using fine ground semolina instead of wads between powder and shot – just put the powder in, then a scoop of semolina, then the shot, then the overshot card. It sounds improbable but if people were using it in International competition they must be pretty confident it works. Some of our shooters tried it a Sandringham and couldn’t tell the difference. I wondered if the fouling would be worse and cleaning more difficult because there was no lubrication from the wad, but was told that if anything the barrels were easier to clean out after semolina. So there is a thing. I can see it being a convenient technique at clays, but I’m not sure about using it on a game shoot or in a strong wind, although perhaps if made up into paper packets it might work. Something to try….. Oh, & it does need to be the fine ground semolina – I think the stuff we endured at school was coarse – and you must omit the jam in guns…………………………
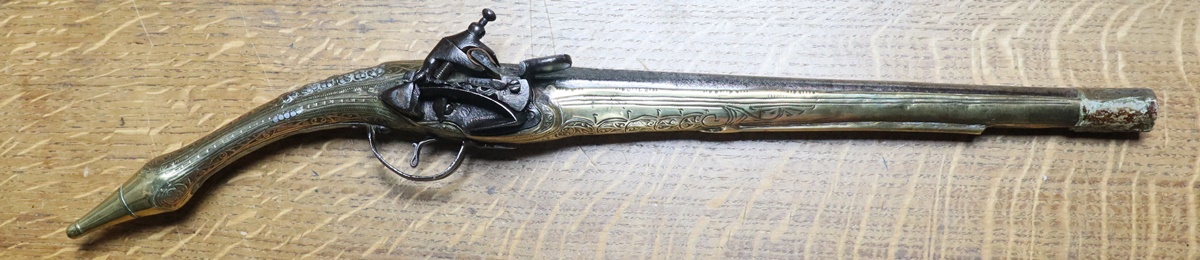
 The red arrow points to the blade on the cock, the green arrow points to a button that pops out under spring pressure. it has a notch to capture the blade. The full cock detent is a flat plate hidden above the button. Both plate and button are pulled back against the spring when the trigger is pulled.
 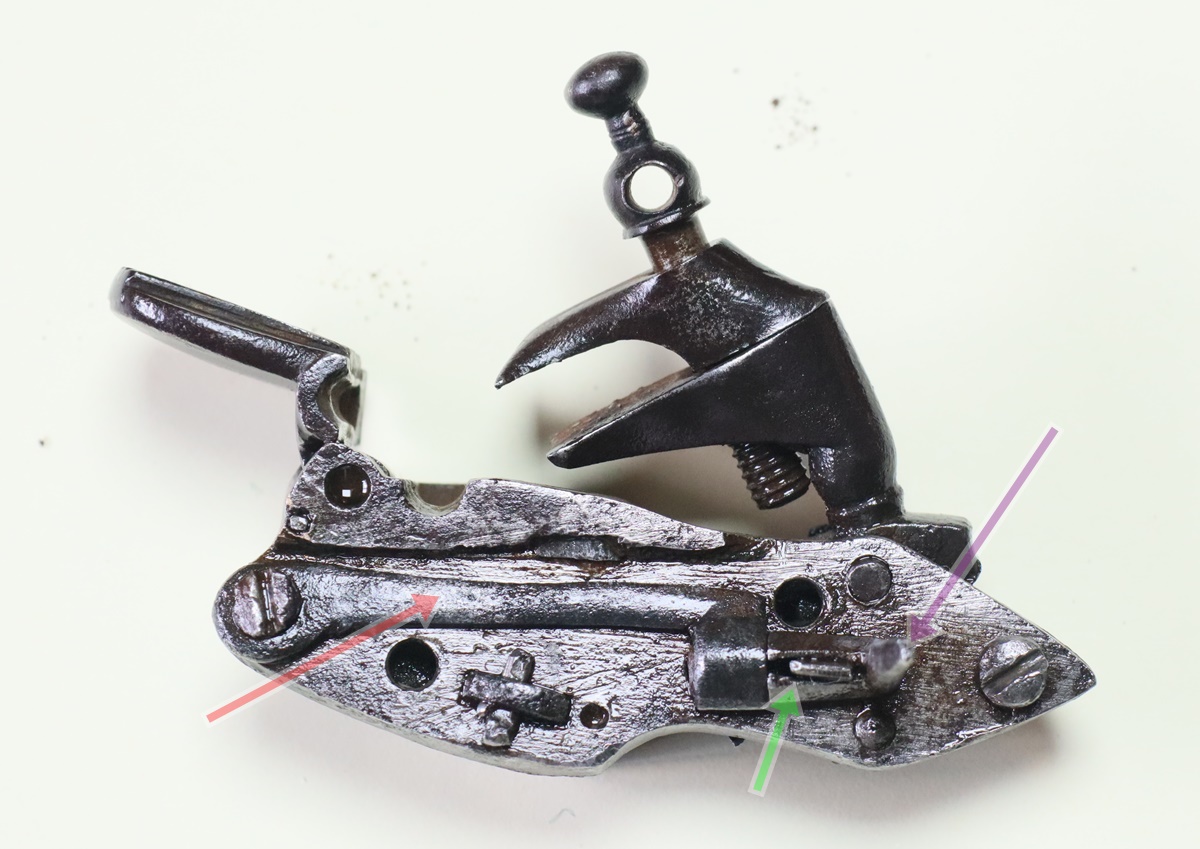 The red arrow points to the sear spring, the green arrow to the sear and the purple arrow to the arm of the sear that is towards you. When the top hung trigger is pressed the sear arm moves backwards and tilts the sear and withdraws the button and blade. The sear pivots on its rear edge and is located by the tongue that is through it. 2th September – A chance I might get things under control again and find a bit of time for the blog! I had a couple of weeks sailing round the Hebrides in a Jeanneau 419 during which time our home part of the UK was in a heatwave, while Scotland was wet and windy – it was ever thus! A fair amount of motoring as the wind was always ‘on the nose’ and we had a series of drop offs and pick-ups planned that didn’t leave much leeway for waiting for the wind to change. I got back from that and the next day set off for the Sandringham Game fair where I did an engraving display/demonstration to almost nobody! The MLAGB stand that I’m part of was located in a backwater well out of any passing trade, so although the dedicated muzzle loader shooters found it, they were only interested in that. Still I picked up a couple of small jobs – a ‘rat-tailed flintlock from ?Turkey? that wouldn’t fire when cocked, and an old double percussion gun that will probably clean up into something presentable. Back from that on Sunday evening and off on Monday morning with the older children from ‘my’ school for their adventure camp in Norfolk – as the school has no male staff I go in charge of the boy’s dorm – I had 15 boys and the two staff had 5 girls between them! Anyway I I should have a few days before I do a couple of days at the Cavendish Labs in the University talking to groups of 14 & 15 year old would -be scientists – 12 groups a day – come October things should have settled down a bit, although I’m threatened with having to finish and replaster a bedroom that has been used as a junk store for 20 years – it was lathe and plaster but has had the plaster stripped off so I have to make good the lathes and then do it out in lime plaster – easier than gypsum plaster as its setting time is hours not minutes! All this with the shooting season starting…………………………………..
 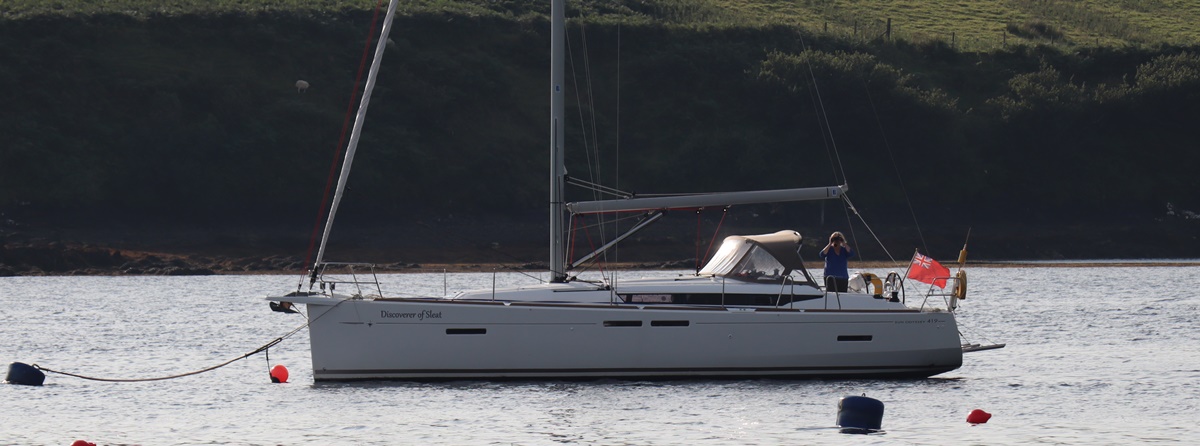 Rather nice charter boat, new this year.
 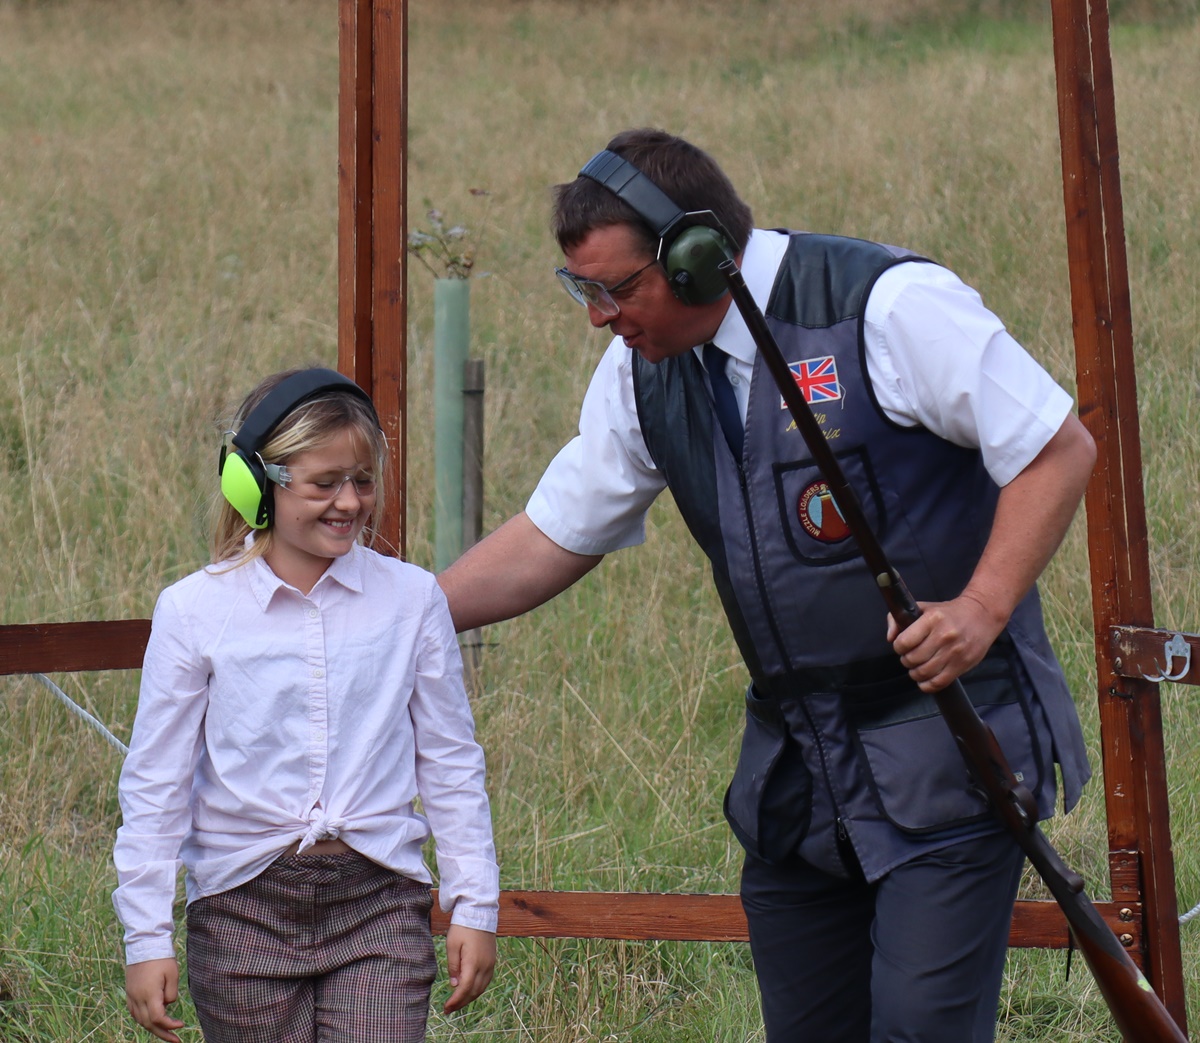 Martin Crix and a very pleased young shot, Molly, at Sandringham. 21st August – Things have got a bit manic on the commercial work front so I have had to put off any more playing guns for a bit, but I hope to get a day or two off sometime to play! Maybe I ought to retire. I do have to get in trim for my engraving demonstration at Sandringham – I can’t do engraving ‘cold’, I need to get my hand/eye in for a day or two beforehand. Oh and I made a discovery today watching a YouTube of making a Holland and Holland gun – their engravers use chasing, ie hammering chisels, or much to my horror, pneumatic gravers, probably GRS Gravermax like the one I have but hardly use. There goes my illusion that they did it by push engraving………. 19th August – The last two days have been spent struggling with my internet – one or two devices were loosing the internet while still having connections to the local network while others are perfectly OK. I got a new router but I am minded to send it back – the cord from the power adaptor is just over a meter and the LAN cable supplied is 2 feet long – not sure why they think that it is a good idea to require users to rewire their houses to accommodate the router! Anyway work in progress. Following my visit to the Open prison, I’m pleased to tell you that my name has been put down for a rather nice room should I need it! I did sneak a moment to do a few little jobs on the Fishenden to keep myself sane – I cut up a piece of 2 m.m spring steel for a turnscrew and found a chunk of ebony for the handle and turned up a brass ferule – The handle was turned and then flattened each side on the big disk sander – doesn’t look bad and fits the intended compartment perfectly – needs more coats of sanding sealer…… I ‘economised’ and used a bit of Indian Ebony instead of my real black Ebony so it isn’t quite as dark and has a much more open grain but I didn’t want to cut 4 inches off my ramrod stock length. I also made a brass ring for the lid – it is probably the ‘right’ thing, although maybe my boss shape is wrong? The wire could be a bit thicker but there was nothing between 1 m.m and 1.6 m.m on offer.
  I think maybe the knurled ring is a bit prominent – I don’t have a straight knurling tool so its skewed
 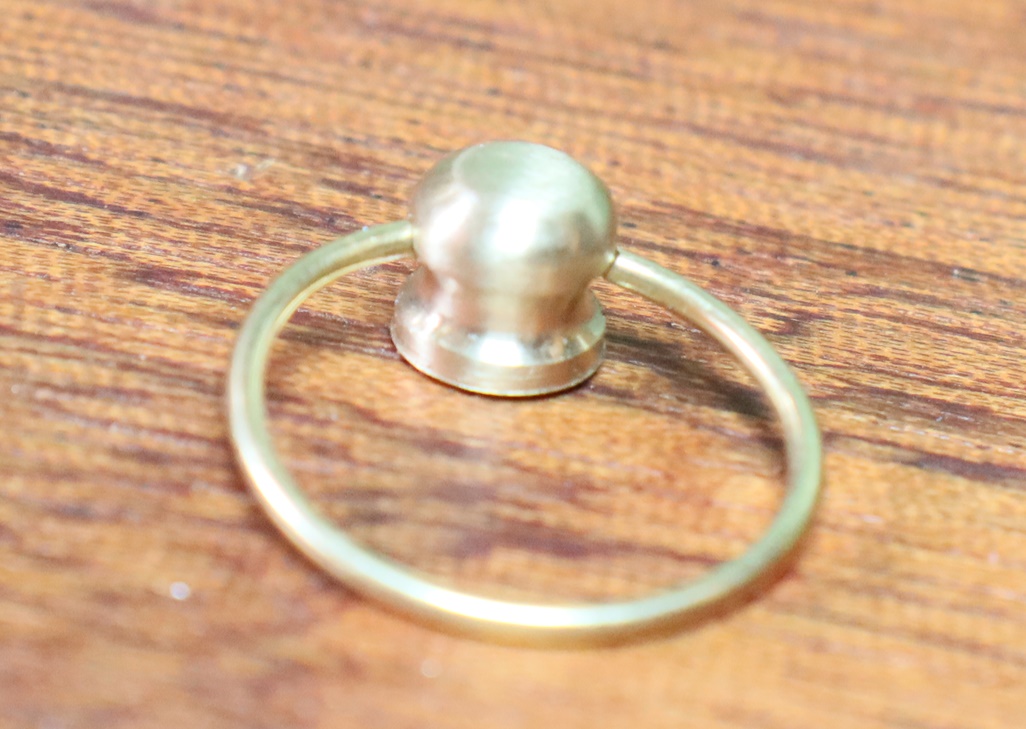 Needs holding down tighter – how I got a 1.2 m.m. hole through the centre is a mystery!
 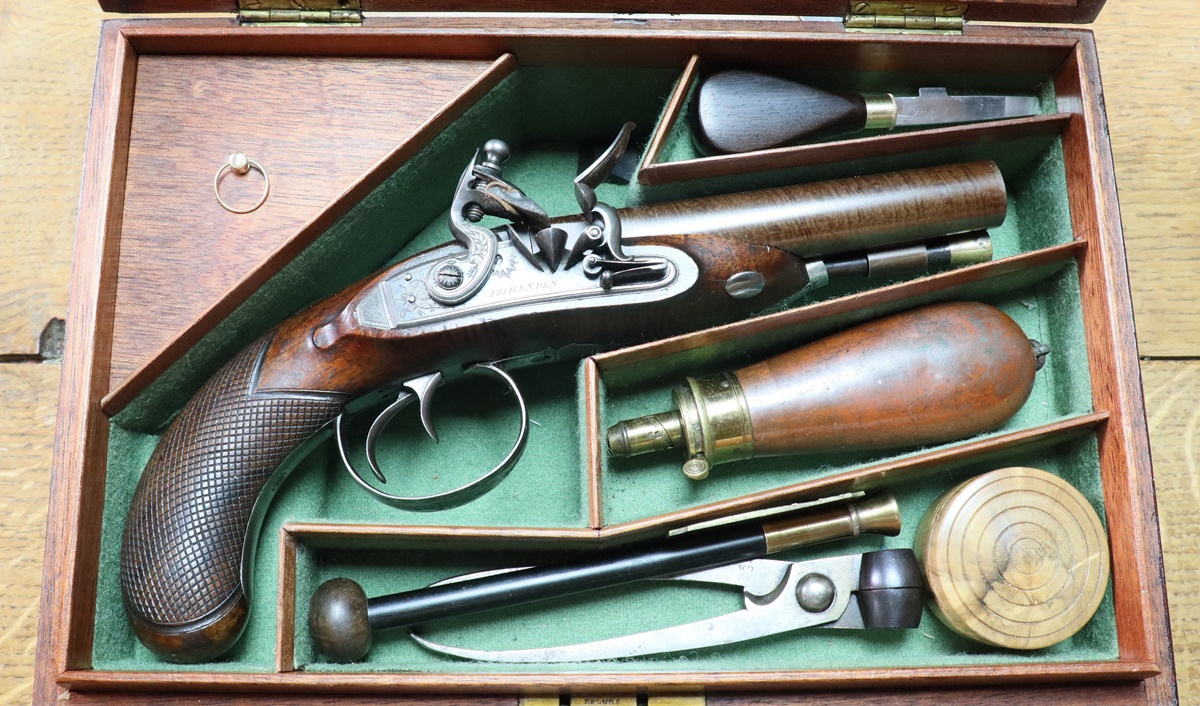 The only thing wrong is that the bullet mould is 30 bore and the pistol is 16 bore – I have to look out for one the right size. One might almost think it all fitted together by design! 15th August – Day out today on a visit to an Open Prison – since my time as an Independent Prison Monitor I’ve been interested in what goes on in prisons – I have to say that this catagory 4 prison is a pretty good place – 300 acres of estate, massive greenhouses and immaculate gardens and lots of the prisoners working in the voluntary sector and commercially outside the prison, and many of the rest working within the prison – all working towards release and rehabilitiation. Although I’m not planning to commit an offence in the near future I can think of worse places to be – like the old people’s home my father ended up in, about which I still have nightmares! I did crack Fusion 360’s toolpath generation but still haven’t cracked is zero reference positioning so although I can make the miller follow the correct path its still displaced about 5 mm from where I think it should, so it partially misses the piece of brass I’m trying to shape – I WILL crack it……………………. 14th August – Busy with clearing out another space.. But I did spend a little while on the Fishenden case – I had made a case label in A4 size on the assumption that by the time I had reduced it any imperfections wouldn’t show. I was wrong! So this morning I had another go at drawing one in A4 but being a lot more precise. I photographed it and printed it out and it looks much better than the first effort, although I probably ought to steer clear of script ….. I had a bit of trouble getting the exposure right as most of it is white, and in the end it came out slightly shaded, which doesn’t look bad. Note that this isn’t a fake label, its for information, and has my name in small letters on the corner.
 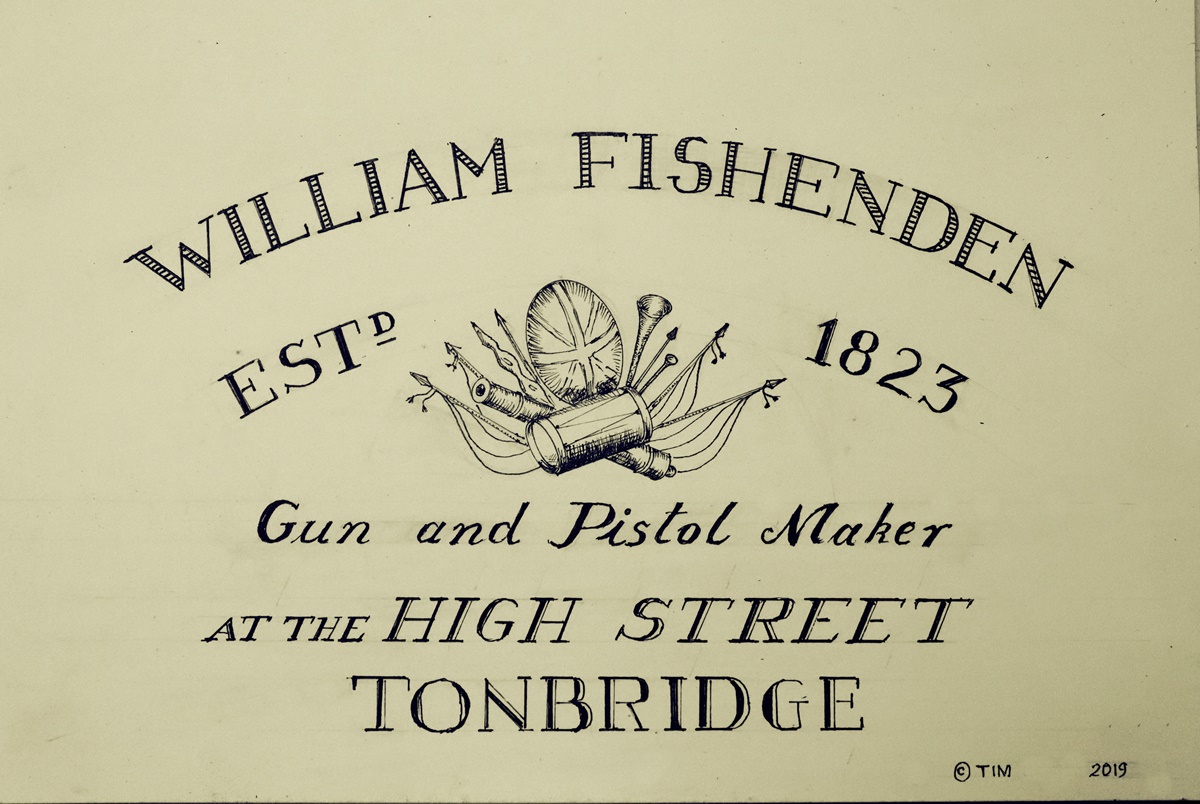 This is about the size I’ll use it. 13th August – More clearing out – generated the best part of a full load for the dump! In the course of clearing out I’ve generated at least another car boot sales worth! I just bought a derelict Mortimer duelling pistol in need of some serious restoration that will become an autumn project, after finishing the pinfire double 12 bore and a client’s percussion pistol…… And put the finishing touches to the Fishenden case – Each time I pass it I rub on another coat of sanding sealer with a touch of darkish brown spirit dye to tone down the colour a bit. I have been trying to pursuade my cnc miller to profile out an escutcheon with scalloped corners for it, but so far I haven’t mastered the Fusion 360 software toolpath generation – it is the most awkward piece of software ever written, but its very powerful and free for startups. Went climbing tonight- did manage a few good climbs – a bit tired after an hour of it………. 12th August -Clearing out the attics today – very dusty, although I only got about 1/4 done – I’ll have to go to the dump tomorrow! I collected the pinfire that Dick has tightened up for me – it is now very good in the bite and and ‘on the face’ – I guess there is now no excuse for not getting on with it, except that I have a lot of ‘serious’ work on over the next month or so, so my playing with guns will be curtailed, as will my postings on this blog – I’m afraid a Non Disclosure Agreement prevents me from revealing what I’m doing – I’ll try to find time for a few gun bits on the blog, and I do want to wrap up a youtube video I’m trying to do on making springs – always too many things to do,……….. and I thought retirement would be restful, although I suppose in all honesty I don’t really want it that way!. I hope to fit in a climbing session tomorrow evening – I am getting a bit rusty. 11th August – Did a car boot sale this morning to get rid of some junk – fairly successful but still have too much. I was selling a couple of brass candesticks, and realised that one pair was a somewhat paler brass than the other – the pale pair looking genuine and the others obviously being modernish (Indian?) repros. That got me thinking about ‘lemon brass’ for old gun parts, and wondering if most 18th/early 19th century brass was paler than modern brass. I made an escutcheon for the Fishended box from modern ‘engravers’ brass’ and then found one stripped from an old box with a genuine Chippendale handle that was a whole lot paler – you can see in the photo, even though the surface of the original is pretty rough. Checking out details of modern brasses, I can’t find any reference to the colour of the resulting brass – I’d like to get hold of a couple of feet or so of 1/2 inch ‘lemon brass’ for making ramrod fittings. I’ll have to consult Kevin Blackley as I know he uses it for antique brass castings. I presume it is high in zinc, does it also have nickel ( which takes it Towards being German silver)? I might have to sacrifice my candlesticks to cast a rod! Maybe a helpful correspondent can help? One such did enlighten me about the hole in the bottom of patch boxes (blog passim) – its to push out the patches, especially if they are oiled or greased. I’ll have to see if I can put a hole in the bottom – I keep learning from this blog! Anyway thanks – see comment….
 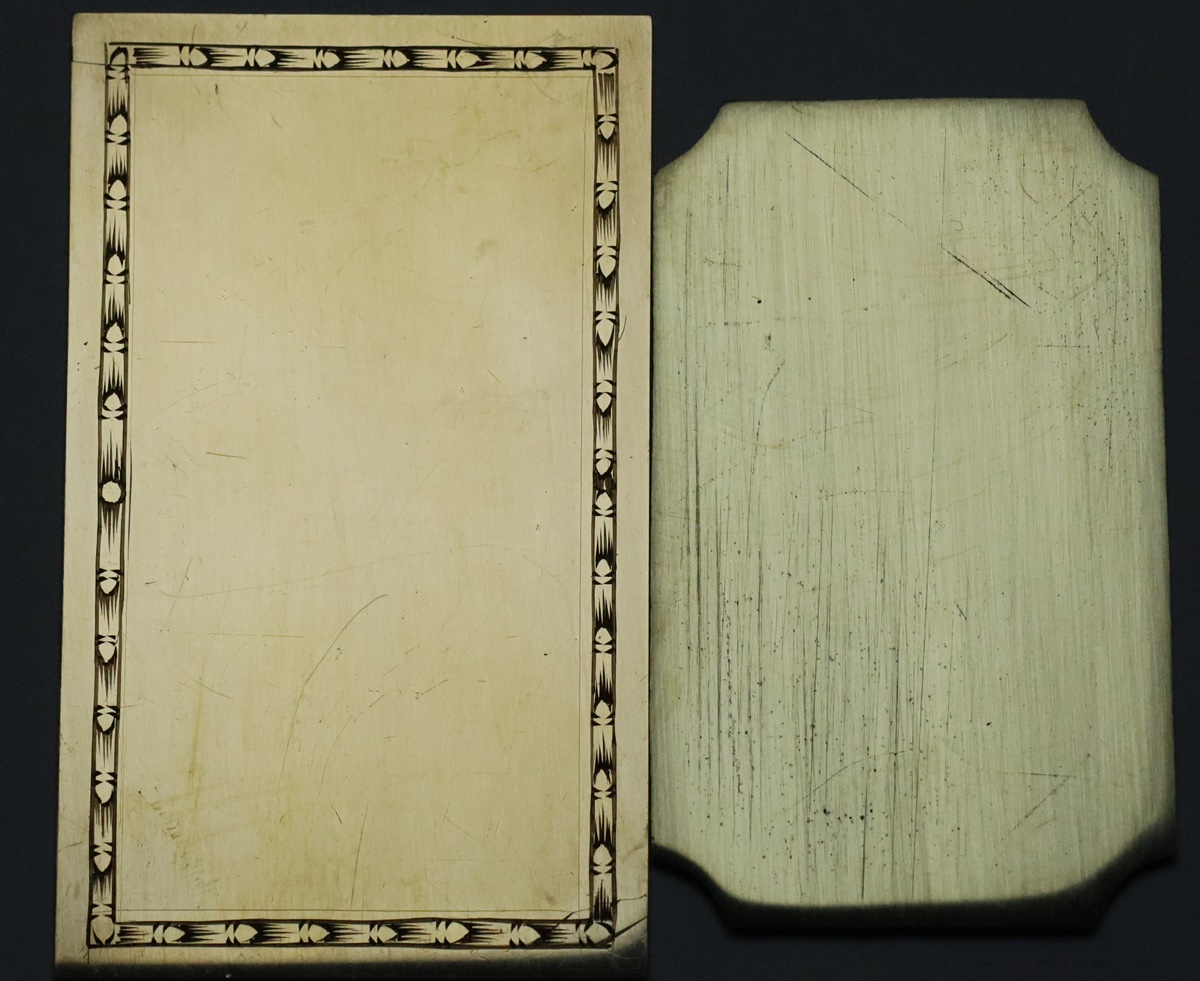 The photo is taken in reflected white (LED) light on a white background! 9th August – My making treat for today was a quick box for the Fishenden for 1 1/2 inch patches – occasionally found in pistol and rifle cases, Keith Neil and Back say that the ones for patches had a hole in the bottom (why?) but the ones -later – for percussion caps obviously didn’t. Anyway the thing to make boxes out of is clearly Box (the wood) – and I happen to have a branch of rather manky Box just big enough so I cut off a 6 inch length some distance from the split end and chucked it and rough turned it until it was a full cylinder, which fortunately turned out to be just big enough to make the box with about 51 m..m outside diameter. I turned a bevel on the end to rechuck it the other way round with better grip and marked out the lid and body parts. I filled the small crack that ran along one side with instant glue and activated it. I cheated on this box – normally I would put a bevel on both ends of the blank so that I could work on the hollowed sides of lid and box so as to keep the body and lid as one continuous grain so the lid grain matched the body grain ( except for the bit missing from the overlap of lid and body). In this case I was a bit short of length so I made the lid on the same blank as the body – meaning that the grain doesn’t match up across the joint – the lid being effectively reversed – but box has very little figure so it doesn’t show. The top of the lid was turned by pushing it onto the finished box while that was still chucked (with a bit of tape to make it tight). Anyway here it is – looks very good in the box, but I found I’d made the loading rod too long to share the space – luckily I had only pushed the knob on the rod, so I could redo the end 20 mm shorter – still long enough to load but now fits! I bit the bullet and cut a bit of decent mahogany for the compartment lid and planed it down to about 5 m.m. Its a bit fraught as you push the bit of wood into the thicknesser and then put a strip of ply in to drive it through – it worked although I did get a bit of a groove on what is now the underside of the lid. I had a 25 m.m. scrap of fake ivory that was going to make a knob for the lid, but its made of polyester and if you don’t turn it right it starts to chip out big concoidal fractures – so I destroyed it pretty thoroughly – Ive just ordered some more (£2.99 for a 150 m.m. length of 25 m.m bar) so it will be a day of two before that is done. (too many boxes in that paragraph!)
 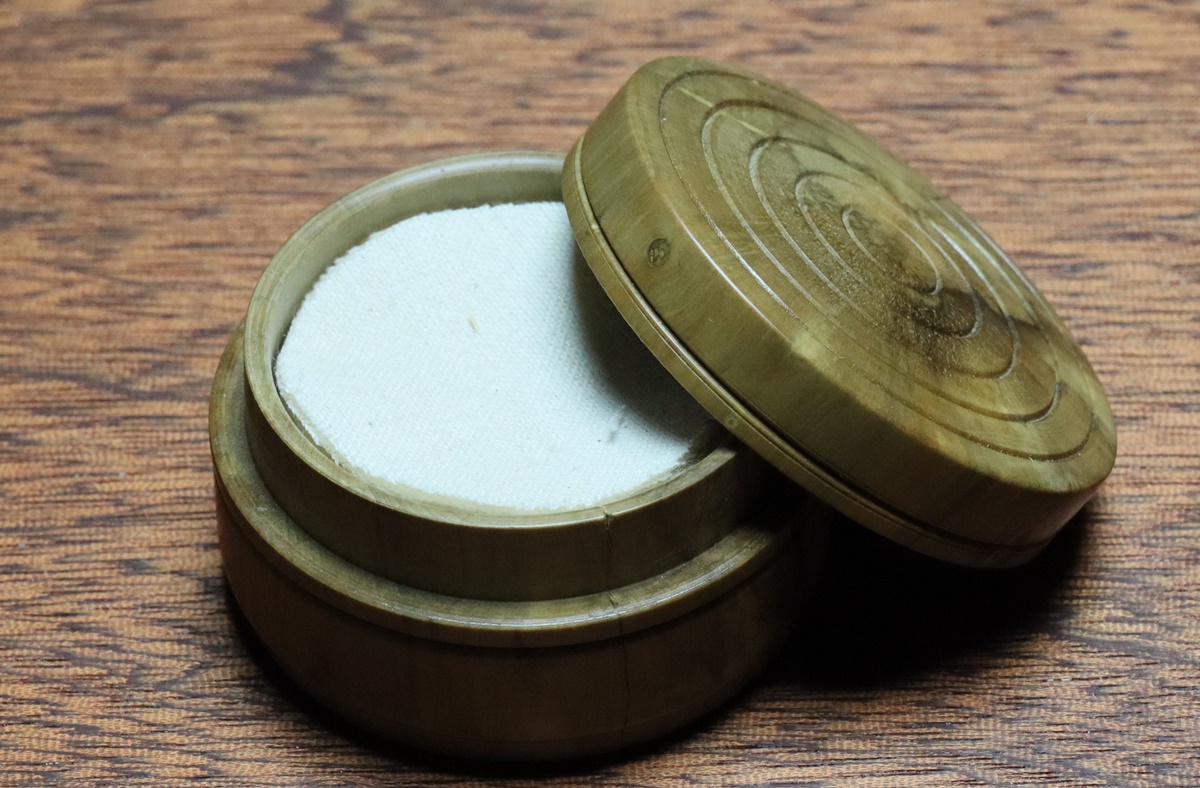 The Box box – 1 1/2 inch patches are a perfect fit.
 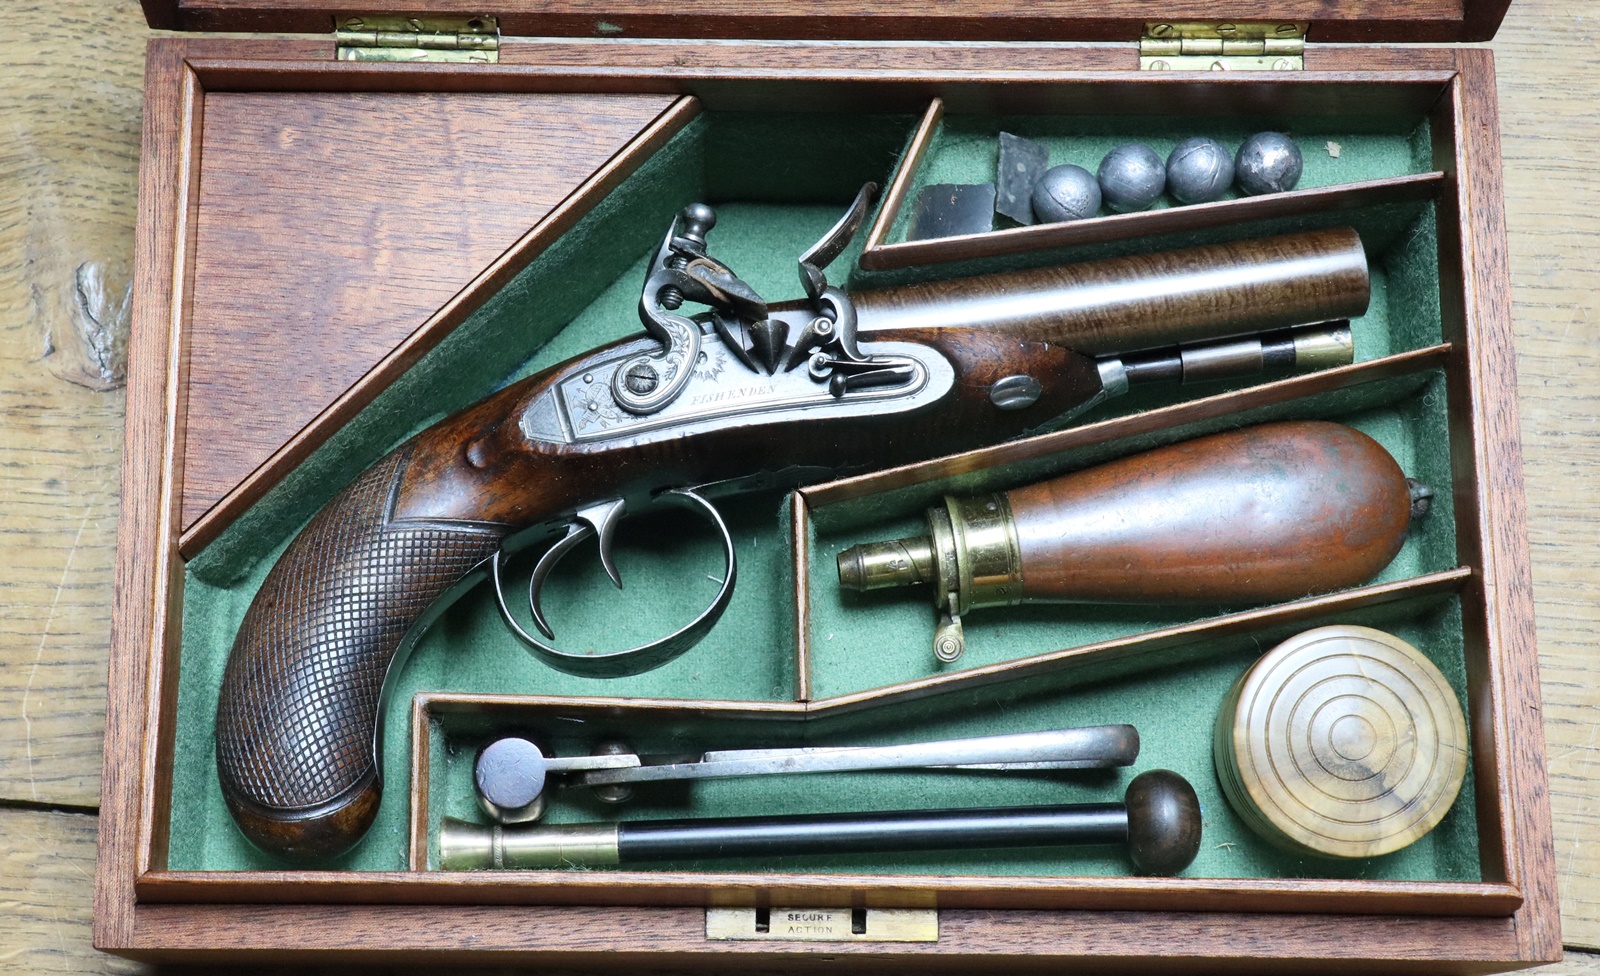 The top right compartment might just a take a turnscrew with a ‘flag’ on the side for the cock screw – we shall see!
 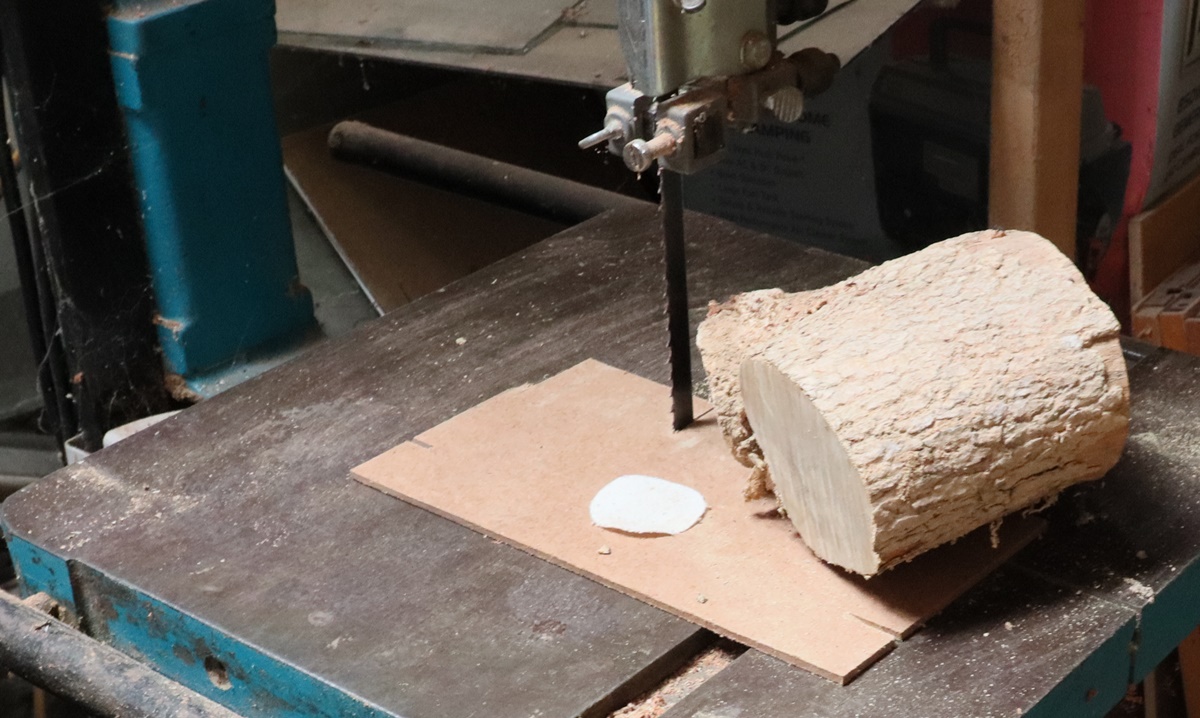 I picked up a couple of branches of Box during a walk along the Devil’s Dyke – someone had planted some bushes years ago. Woodturning is a good way of producing waste – you start with a decent sized piece of log and end with a little box!
 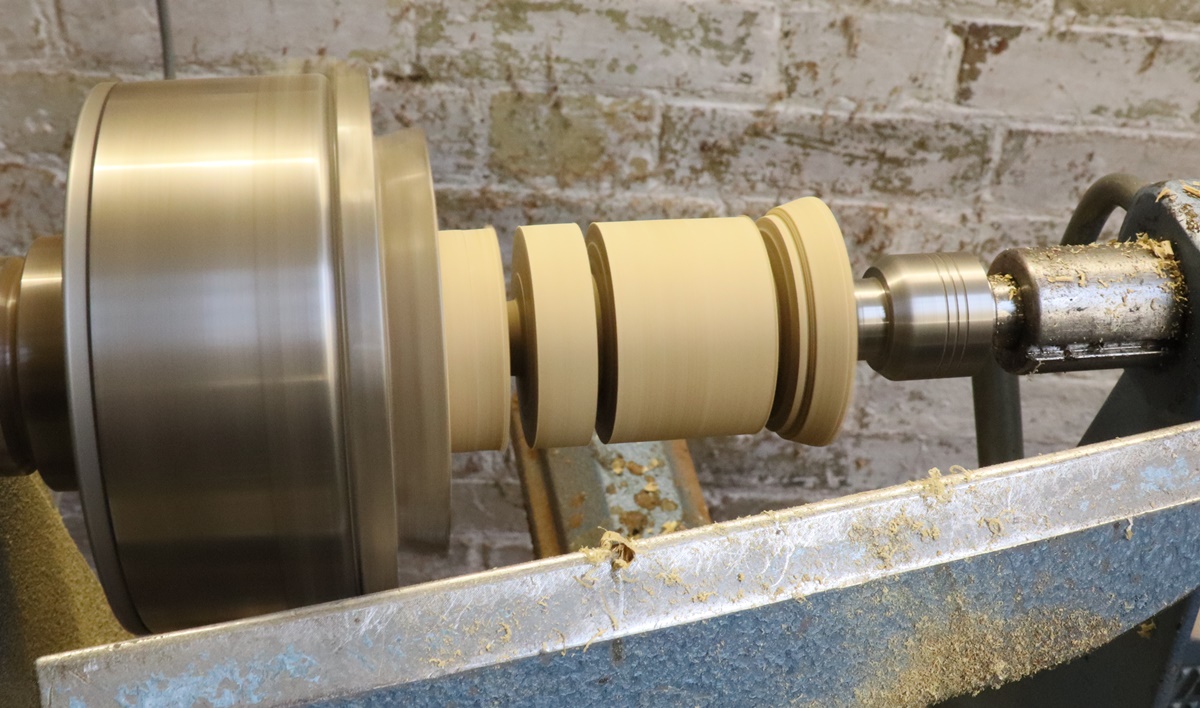 As shown its chucked on the log, which is not particularly good as it can’t be put back true and it needs the tailstock centre – the bevel on the tailstock end will let it be chucked and rechucked if necessary. The body and lid were parted off near the chuck and chucked on the beveled end- the lid hollowed and parted off, then the box hollowed and finished and the lid put on and taped in place while its top was turned and rings marked. 8th August – Most of today I was clearing out the rubbish from various glory holes about the house – a mere 5 bags of rubbish and a half a Land Cruiser full of recyclables plus a couple of boxes for stuff for a car boot sale. I was clearing my tools from the casemaking and happened to look in the oil soaked instruction book that came with the aforementioned Record No 50 plane and saw that it could be used to plane dowels with its fancy cutters – well I had to try it out on a loading rod for the Fishenden – as I had a roughly correct sized ebony square already the plane didn’t turn out to be ideal, but I ran the square a few times through the thicknesser to get it the right size and got some way with the No 50, then reverted to a small low angle plane and eye. Then it went in the lathe for 10 minutes treatment with hard 80 grit paper and it came out perfect – a few minutes with finer grade papers, burnish with a handful of shavings and a quick once over with friction polish and it looked perfect so I had to turn up a knob from figured walnut and a brass end with screw. I am very suspicious of the highly tapered screws that are used in ramrods etc when used for ball as the expand the ball against the barrel walls as they are driven in, making it harder to get it out. Anyway my loading rod wasn’t meant to be a fake so I sorted out a modern woodscrew with a vicious point and not much taper. I do have a number of ramrod ends, but none suitable for a pistol loading rod. I mentioned yesterday that I’d made the case with the pistol the unconventional way round – I did check ‘The Book’ and knew which way round it should be, but when I drew out the partitions on a sheet of card in the case I forgot to mark front and back, and it just got made the ‘wrong’ way. I think I would probably have done it this way if I’d thought about it anyway as the main function of the case is to display the gun, and it does that much better this way round!
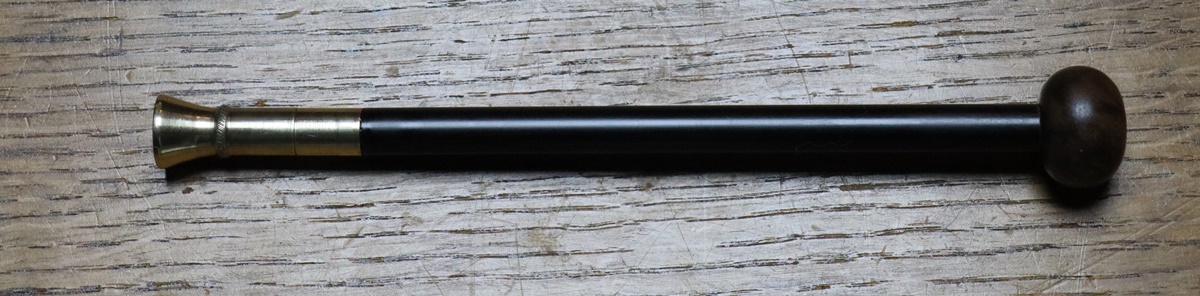
 7th August – Almost there with the case – internal lid and escutcheon and a few more coats of oil/shellac on the outside still to do but it is OK for the time being. I anguished about the finish – in fact I still am. I got the ‘Dark Brown’ suede dye but it gave a bright ginger colour. I tried the traditional colourant for mahogany – a solution of potasium permanganate – it looks violent purple but soon goes dark brown, but I didn’t really like it. In the end I put on a coat of diluted ‘Slacum’ (linseed, beeswax and turps) – it will probably go darker with time. I was going to make a lid for the triangular compartment but the thin mahogany I had was too light and open grained ( it was a piece of a punt). I am very mean with nice wood and reducing stuff to 5 mm thickness is wasteful as my thicknesser likes quite big bits of wood or they don’t come out of the other side! I will find something better in time, probably by sacrificing larger pieces of better mahogany.
 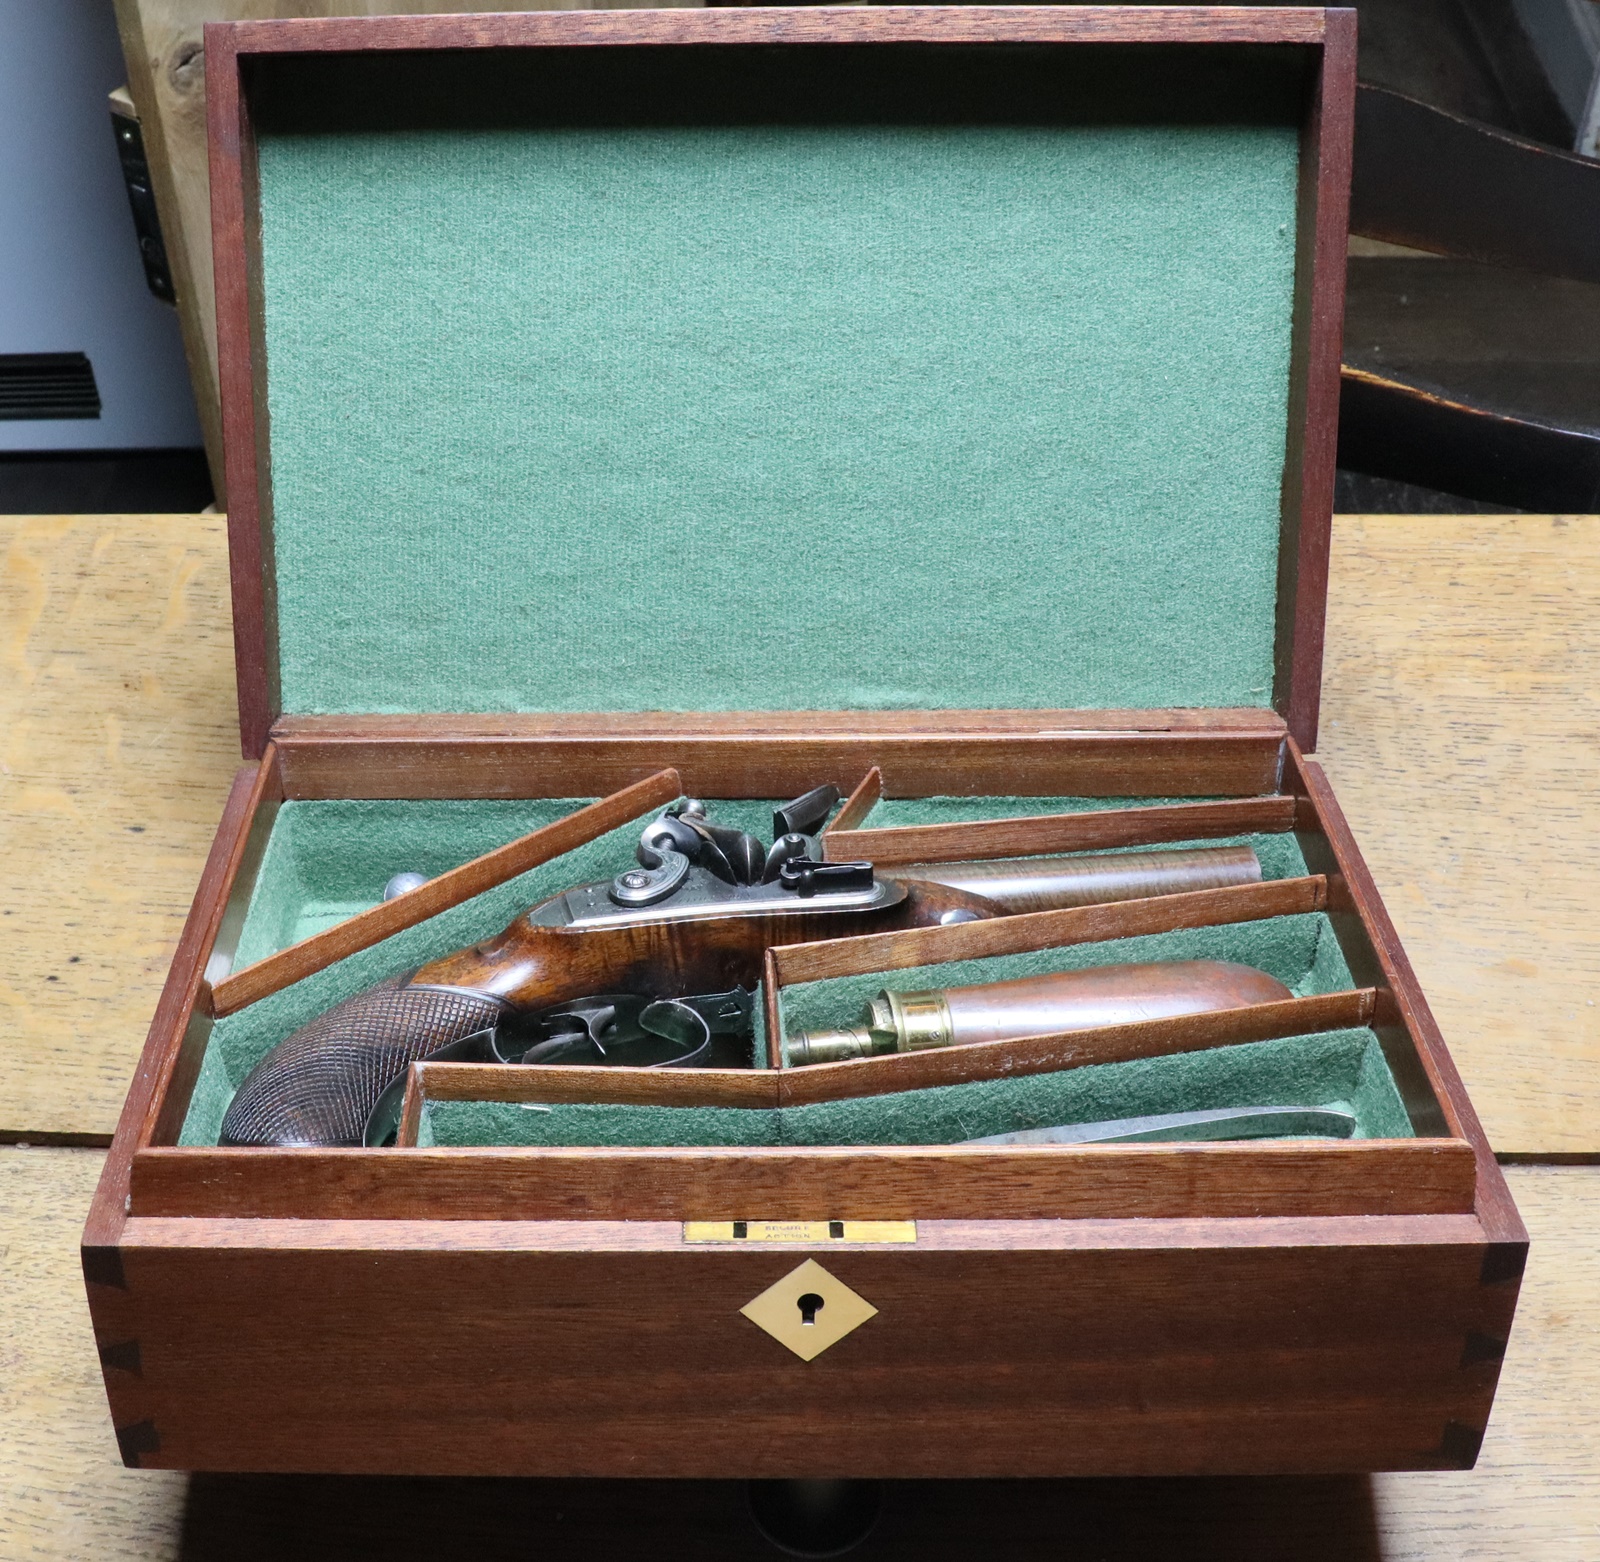 I can see a couple of bits that need attention – one see things in photos that escape the naked eye! Case experts will immediately recognise that I’ve made this one the unconventional way round – normally the top of the pistol is nearest to the front of the case – i.e. the whole thing 180 degrees rotated. It is normal to case single barreled pistols and guns with the lock up and I guess if the pistol is the conventional way round you can open the case and pick up the pistol with your right hand in a ‘shooting’ grip. Having said that I have seen a number that break the rule.
 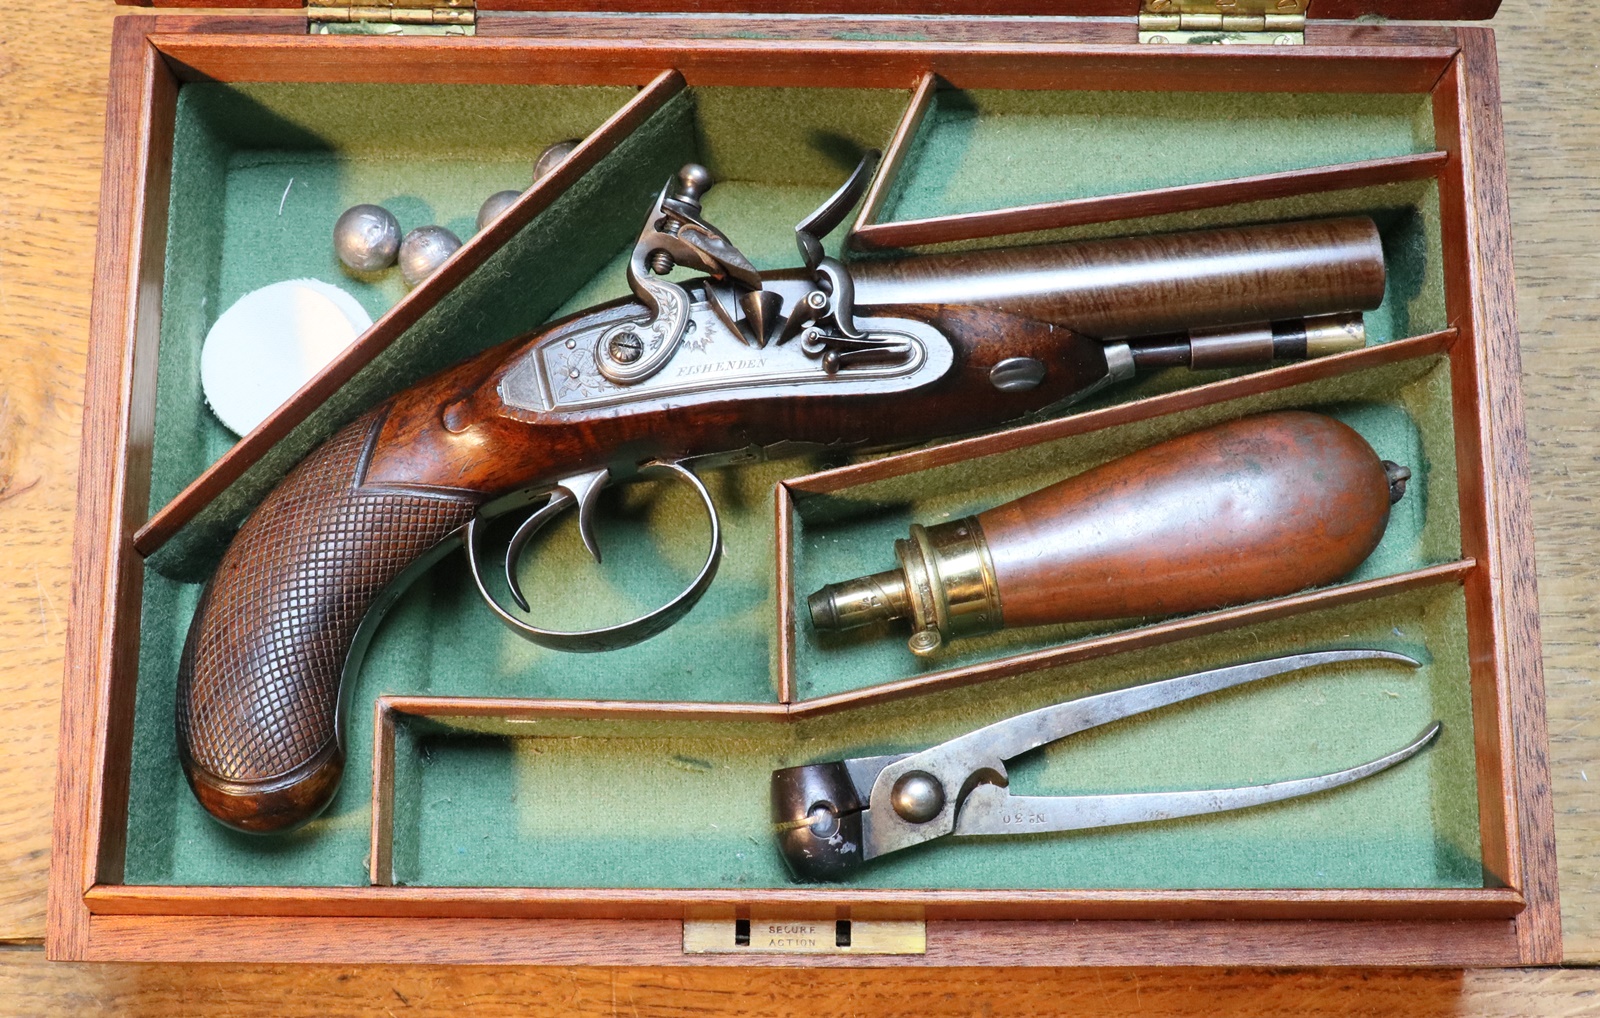 Its crying out for a loading rod, a round box for wads and a pan brush, plus some spare flints in a leather pouch. 6th August – one of the mysteries of this blog is who looks at it – every day it gets between about 120 and 180 visitors, and only very occasionally gets to either limit – given there must be many tens of thousands of people round the world who might be interested, why does the number not fluctuate in a more random way? Or are most of them regular viewers? Between 20 and 45 each day come via a search engine, still not a lot of random variation. I suppose I could put software on the site that would tell me how many returning visitors there are each day, but given the GDPR regulations that might be difficult. Incidentally almost half the visitors are from the US, twice as many as from the UK. Africa and Greenland are poorly represented! The case making occupied most of the day – AGAIN! We used to have a motto at the lab when things got complex or our equipment had to be fixed in zero time on board ship with 50 crew waiting – ‘ Had I known what was involved I wouldn’t have started!’ – that probably applies to this case. If you decide to make a case, start with a nice simple one all one depth and with fabric over the dividers – it is much easier. Having said that, it is looking quite fancy, and coming together fairly well – I will prefabricate the compartments and part cover them before fixing them in place – I’m still waiting for the suede dye before I can finally put it together, but I did hinge the lid on today – at which point I discovered that the two hinges I had salvaged from a box were of different widths ( back to front). I had already made cutouts on the assumption that both hinges were the same and couldn’t remember which I’d used as a template – but a bit of jiggling and a bit of screw hole filling got it there in the end… …I’m having second thoughts about the escutcheon with the running leaf border – watch this space.
 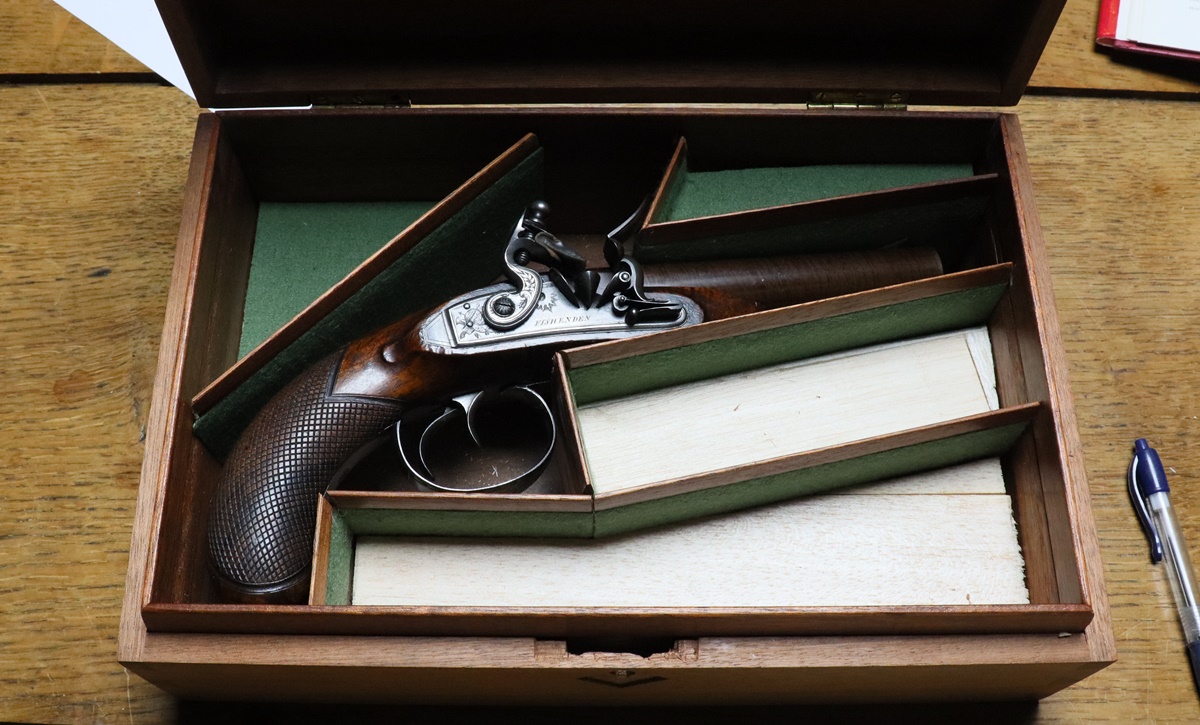 I had planned to use the red baise, but when I made up some sample partitions it didn’t contrast enough and the paler green that we had initially rejected came out as favourite. The upper left compartment will have a lid, the upper right is for a brush that I will have to make! The rectangular one is for the flask – its a bit big. All the rest of the junk will go in the lower compartment. Compartments not fixed. 5th August – still playing with the case – made a small brass escutcheon for the keyhole and inlet it, fitted the lock and cutouts for hinges and made up some of the partitions. The Fishenden double pistol is very wide so the case has to be around 100mm deep to accomodate the widest part but that makes the rest of it far to deep to be practical so most of it will have to have the base raised with packing by around 40 mm. I found a box of pieces of balsa wood that we had bought for making things years ago – lots of different thicknesses, so that will be ideal for packing as it won’t add significantly to the weight – I guess there is some merit in not throwing anything away! I made an escutcheon to put on the lid and felt like doing some engraving so I put a ‘running leaf’ border as on 1800 locks round it. I might just feel the need to put a ‘stand of arms’ engraving in the middle there is one on the tails of the locks of the pistol. I’m now waiting for Amazon to deliver a bottle of dark brown suede shoe dye – it is by far the best way to colour wood if you want to go for a significantly darker colour – my bottle is almost empty.
 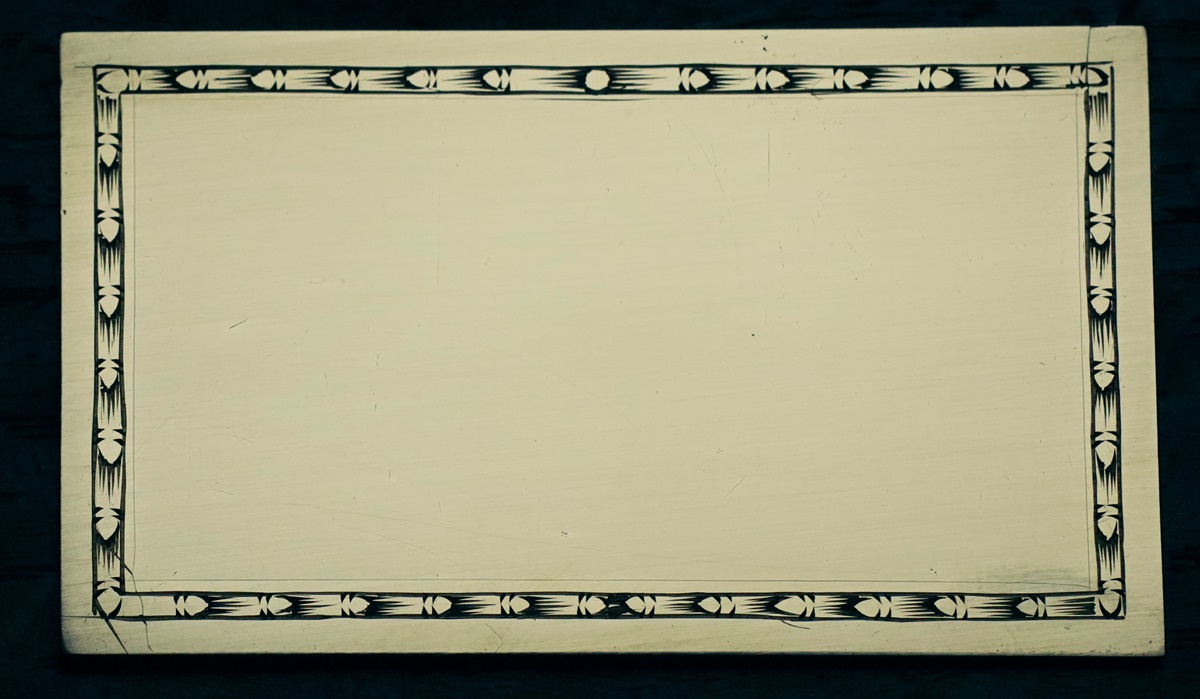 Probably ought to be mounted the other way up? 4th August – Bit more work on the case – preparing stock for the partitions – I decided that as its not meant to be a ‘fake’ old box I could do what I liked, so I’ve started to make partitions that show a strip of mahogany at the top rather than fold the cloth over the top – more work but more fun. I have 4 different biases for lining cases – all dyed in original military colours from Bernie the Bolt – I got Penny to help me decide which went best – to be revealed later….
  3rd August – Got the basics of the box done – the ‘lining’ round the inside of the box that stands proud of the base to form a lip is a tricky machining job – the outside needs to be chamfered at about 15 degrees so the lid closes. I managed to do that on my table router. The inside surface is less easy – the biase only comes up to the level of the sides of the box and ends in a recess that needs to be tapered – I spent a long time trying to work out how to do it with a router, before I realised that I had a very fancy old Record plane that did all sorts of ploughing jobs somewhere in a box – I tend to forget that often hand tools are much easier for some jobs than trying to fudge things with machine tools. In a similar vein I made the traditional bead round the bottom of the lid using a simple scratch plane with a blade I filed up for the job. Anyway it is now looking like a box – a few more jobs to do – fit hinges, make internal partitions, make keyhole escutcheon, make lid escutcheon/handle, plus all the finishing – colour it down, sanding seal it, varnish//wax it and line it etc etc. In the end it will represent almost a week’s work – no way an economic proposition but I’ve wanted to have a go at casemaking for some time, and I can rest on my laurels when that is finished. I didn’t put hooks on the front as I wasn’t confident I’d get them right, so presumably I should not really put a handle on the top – I do have a lock for it, but no key If I were doing it again I’d try to get my cnc machine to make the pockets for the hooks before I assembled the box, and also get it to machine the hooks themselves from brass. Maybe I’ll fit hooks after all – by hand…………
 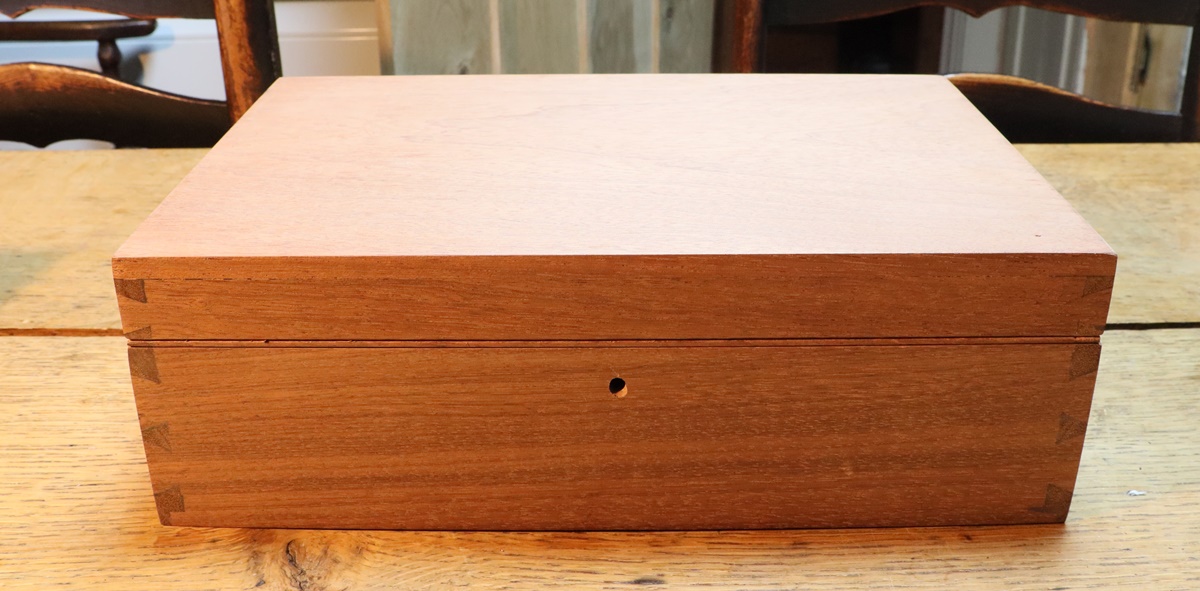 Thinking about the typical construction of cases, I reckon that the bead round the edge of the lid (sometimes round the box instead) is there to hide any misalignment in the two parts, which it does rather well! 2nd August – Bit more work on the pistol box for the Fishenden and on discovering how the cnc software and hardware interact – I could be getting there but I can’t get the hang of the z axis – the tool raising and lowering – I think I have got it sorted, and then it goes and digs a hole in the piece of wood I’ve put on the bed to protect it from just such events – I will get to understand what it thinks it is doing – at least with computers I’ve learnt that everything that goes wrong does so for a reason – almost always human error or misunderstanding. One little quirk of the free software I am using is that every time something goes a bit wrong I have to restart the whole shooting match. I went over to Dicks – he has just fitted new frizzens on a pair of locks that had lost theirs, and they really look as if they have always been there – he also found a perfect matching top jaw in his box of old parts – great to have a workshop absolutely packed with the pickings of 30 years in the game! Dick is now sorting out the Sturman pinfire – tightening up the action and getting it back on the face – that involves putting a bit of weld on the breech hook to move the barrels back a bit, and putting some on the rotary catch to pull them down onto the action flat. I probably ought to learn to weld properly as our specialist has now started charging a high price for his expertise! I did manage to weld a pin on the side of a small mainspring for the Harding pistol so maybe there is hope for me yet! 31st July – Trapped at home waiting for a delivery that didn’t come so a repeat tomorrow! I was going over to Dick’s to see how he is getting on with pair of locks that he is conjuring up frizzens for – I need to take the Sturman to get him to tighten the action – too modern for me. I also need to sift through his collection of percussion cocks to see if I can find a better pair for a double barreled pistol I’m restoring for another client – both cocks are replacements and don’t match, one doesn’t strike the nipple and neither are anywhere near the right half and full cock positions. When I think about it at least half of the antique guns that pass through my workshop have had the cocks replaced – flint as well as percussion. Most are modern replacements – by modern I mean in the last hundred years – I had one replacement flint cock that was dated 1969 on the back – I think people, including Blackleys, have been selling casting since the 1950s. It would appear that quite often replacement percussion cocks are recycled old ones, maybe from the recoversion of percussion to flint, and they often have their squares in the wrong alignment. Actually gunmakers from about 1830 ish seem to have had a standard square alignment that many followed, especially for sporting guns. I have been able to swap cocks with perfect alignment – in one example I put John Manton cocks on a Samuel Nock double gun and the were perfect – they were even a decent tight fit. I’m still using them regularly! My ‘playing’ today took the form of making a case for my double flint coach pistol by Fishenden. There are two photos of cases in the Keith Niel and Back Case book , and I am more or less copying the one for a John Manton pistol as the pistol looks similar. My first task was serious timber conversion to get enough strips of 10mm wide mahogany for the sides, and a sheet 8 mm thick for the top. I’ve done the dovetails and glued up the bottom of the case – I made the sides 10mm tahick but I had a bit of a job chasing round to find a small enough lock and hinges. Hinges for gun cases can be a problem as gun always had ‘stop hinges’ that allowed the lid to be opened just over the right angle. Stop hinges are difficult to buy and can be horribly expensive if you can find any. They do come oon old boxes from time to time, but take some tracking down. The best proper antique stop hinges were made from solid brass but I’ve found two alternative constructions – cheap stop hinges made of folded brass sheet are like normal cheap hinges, except that the brass is folded back from the ‘inside’ edge of the hinge and carried back under the hinge to protrude at the back and form the stop. The other ‘cheat’ is very useful – just cut a piece of brass sheet to go under each side of the hinge and let it stick out the back and file bevels to act as the stop – they are drilled to match the hinge and could be soldered on for added security – that means you can turn any cheap hinges into stop hinges. I was trying to look at some adverts for guns on Gunstar to see if it was worth putting any on there. The thing that struck me most was how awful a lot of the photos are – it may be that Gunstar cuts the resolution down to save space although that would be both silly and unnecessary. I think it is that in spite of mobile phones being perfectly adequate cameras, people just point them in the general direction of the chosen gun and never look at the result – failing to notice that the framing was all over the place so it doesn’t show what they want, the lighting is terrible and the focus is like looking through thin soup! Some of the correspondents to this site send me similarly awful phots – some are OK, a few good, but mostly its difficult to say anything constructive about a brown blurr, or worse, half a dozen brown blurrs. I do take a lot of trouble to get good photos for this blog, although sometimes I can’t get the optimal lighting and occasionally I don’t remember to manually focus perfectly – I probably take 6 photos for every one that gets on the blog. I am awaiting delivery of another Canon lens for my M50 – I managed to find a good second hand one with a year’s guarantee for half the price of a new one – lenses are far and away the most expensive part of serious photo kit.
 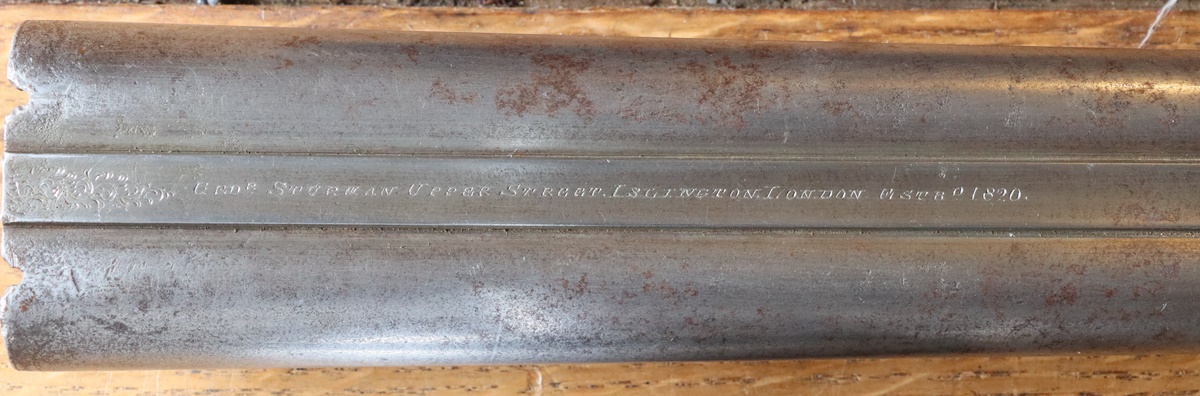 Sturman;- Recut engraving – first iteration. The barrel will be ‘struck off’ ready for browning and I’ll then go back over any lettering that has disappeared and recut as necessary. 30th July – I got a coarse diamond disk for my hone and tried grinding flints with a view to reusing worn ones – it works to an extent, in that it does grind down the flint, but the grinding chips off the edge in a way that doesn’t leave a sharp edge – so you need to grind down to a suitable angle and then tap along it as you would to refresh a blunt flint, and take off a series of very small chips – the flints then spark well. I managed to make a mini flint for the Harding pistol by putting a larger flint in the lead covered jaws of my 4 inch vice and using a pin punch and a tack hammer to take off the back and edge and then grind down the thickness a bit – works and looks OK. I spent this evening recutting the engraving on the Sturman pinfire barrel – it is presumably an 1860s gun so its quite old – it has a fairly simple single bite action of the early form – well back from the action face- the action flat is signed EMME – as with most of those early single bite actions this one is quite loose and ‘off the face’ so I’ll get Dick to tighten it up when the barrel is done. Pinfires had a very short period of popularity before Daw’s centrefire rendered them old fashioned, although they went on being used for many years. Anyway it is now ready to be struck off and then re-browned. I came across an article in a 1995 copy of Gun Review (There used to be lots of mags for us then!) about a magic gun cleaning solution – so I checked it out on the ‘interweb’ as its known locally. Found a firm selling it for lab purposes and had a chat with their technical people, and I have a sample on its way – I will report back when/if I get it….. Oh and I read the Home Office consultation on firearms licensing and filled in the online questionnaire _ I’m afraid we are moving towards a more tightly controlled system, but the arrangements for medical checks are very dodgy and may make it very hard for some people to who have uncooperative GPs to get licenses – plus undefined fees for the medical records check. The main problem is the discretion it gives to Chief Constables to make decisions about the significance of mental health issues and ‘intemperate behavior’ while the aim is OK we are putting far too much power in the hands of the police – which mostly they don’t abuse but there are enough cases where they do for it to be a matter of concern.. I heard of one case where a person was refused because they went to the pub regularly – irrespective of what they consumed there. Find the survey here;- https://www.homeofficesurveys.homeoffice.gov.uk/s/T7L6I/ For the guidance here;- https://www.gov.uk/government/consultations/statutory-guidance-to-police-on-firearms-licensing]
  29th July – Now that the Harding pistols are done and dispatched I had a chance to get rid of some of the clutter from the workshop and take it to the loft ( or in the case of a depressingly small amount, bin it). In the process I found my little cnc machine that had been moldering for 4 years since I bent the spindle shaft – so I thought I’d better replace it and try again to use it as I want to make the stocks for a pair of duelling pistols and it would just be big and powerful enough – watch this space. I also uncovered 20 gravers waiting to be sharpened – so I’m some way through that. Before I get distracted into doing any other projects though, I must finish off the video on making a mainspring, including film of the flaming tempering. I have at the back of my mind the fact that I am scheduled to take my engraving demonstration to the Sandringham Country Fair at the beginning of September and, this being the summer and distractions many, I ought to think about what I’ll need to take – to that end I took the dramatic step of ordering business cards instead of endlessly printing them and cutting them up myself with pretty second rate results – you get 250 cards for £25, which seems OK compared with the time it would take me to make that many, and the ink for my printer isn’t free either – people seem keen to take them when I’m doing demonsrations. It was a day of extravagance on account of getting paid for a job – I found a good cheap secondhand 18 -135 lens for my Canon M50 so I don’t have to carry round the big old EF-S 18 – 135 lens and adapter from my old 760D! Spent out now so I can rest. Out of curiosity I was searching the web for pictures of other similar Harding Post Office pistols – they are certainly rare – I located one that was sold in an American auction, and one in the UK Postal Museum in poor condition, plus Dom Garth Vincent sold a very similar pair by Mortimer that were supposed to be the design patterns for Harding when he got the PO contract. Anyway the Postal Museum specimen is a bit rusty and missing the top jaw and screw, so I offered to fix it up for them, pro bono. 28th July – Most of the Harding stuff is now on its own post. I finished the Harding – pinned the brass ‘bolt’ to the slider with a piece of 0.8 mm diameter rod tapered slightly and driven in and hardened the tumbler and sear, so now its finished! I had made a spare spring blank so I thought I’d replace the spring in the first (PO) Harding that had a cut down main from something else. I was doing a video of bending the spring, and got so carried away that I bent it the wrong way, so the tab for the pin was on the wrong side. I didn’t fancy straightening it and starting again so I filed off the tab and welded a small pip for the peg on the correct side – I managed to get a blob of the right size in the right place and it filed down into a 1.8mm peg perfectly. I hardened the spring in oil and the used the traditional method of tempering springs in burning oil – I made a video of that too. Anyway that seemed to work – at least the spring is in and working and hasn’t gone ‘ping’ yet. The spring and the metal container I fired it in are both pretty black! The process looked a bit like a firework display – I thought it was because of the light rain but it persisted when I held a slate over the top. Anyway both Harding pistols are now done and look fantastic, especially when compared to the starting point. They are quite special – I might even make a box for them one day, its a shame they are not an exact pair! Anyway its now time to move on to the next project! Nick suggested the pinfire I got from him might make a good project – so I’ll see what I can do! My first job was to get rid of the absurdly highly polished finish to the case which looked completely over the top. It would appear to be French polish as fine wire wool and meths ( alcohol) broke the surface. here are some photos – the main jobs are:- tighten the underlever catch and put the breeches firmly ‘on the face’ ( a job for Dick), recut the engraving on the barrel and strike it down and rebrown SLOWLY. Engrave the right hand cock which is s replacement. get the dings out of the stock. recut the chequering, inlet the barrel bolt escutcheons as they are proud of the old chequering. Make a new horn bit for the foreend. Then sell it! Perhaps keep the case as it would do for the Venables, which deserves a good case! Talking of which I need to sort out the barrel again(!) as the ramrod pipes came off!
 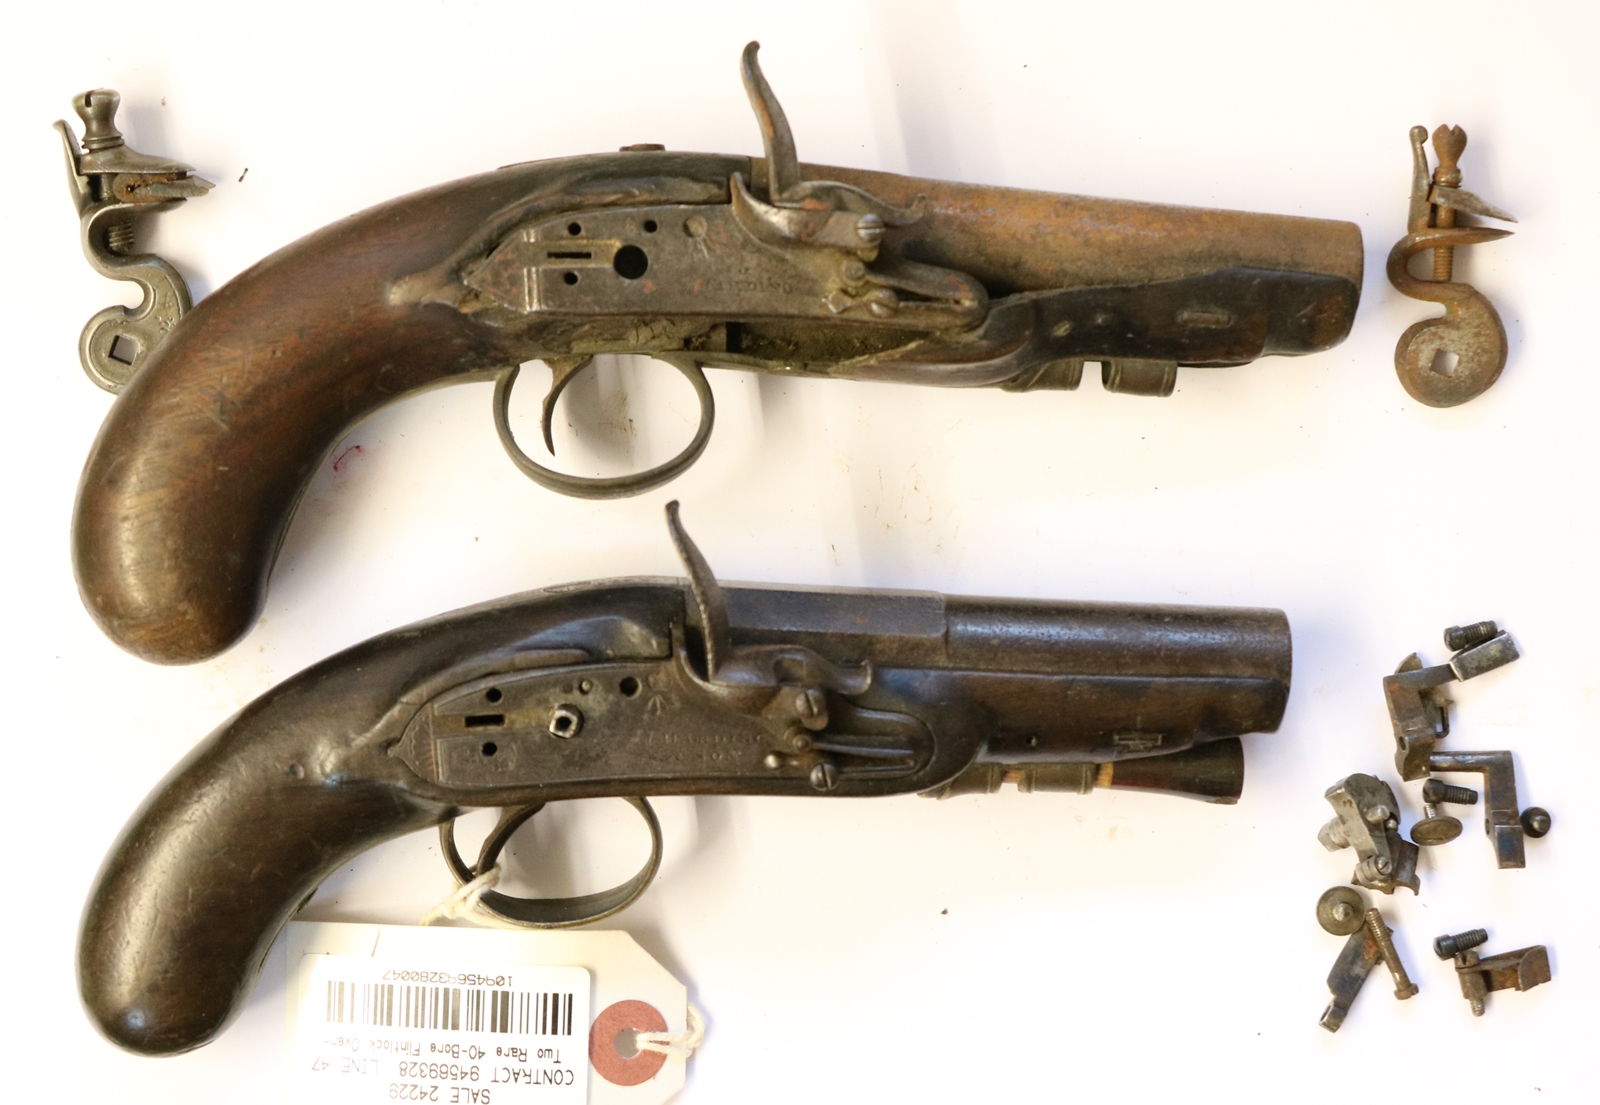 Before: What a depressing sight!
 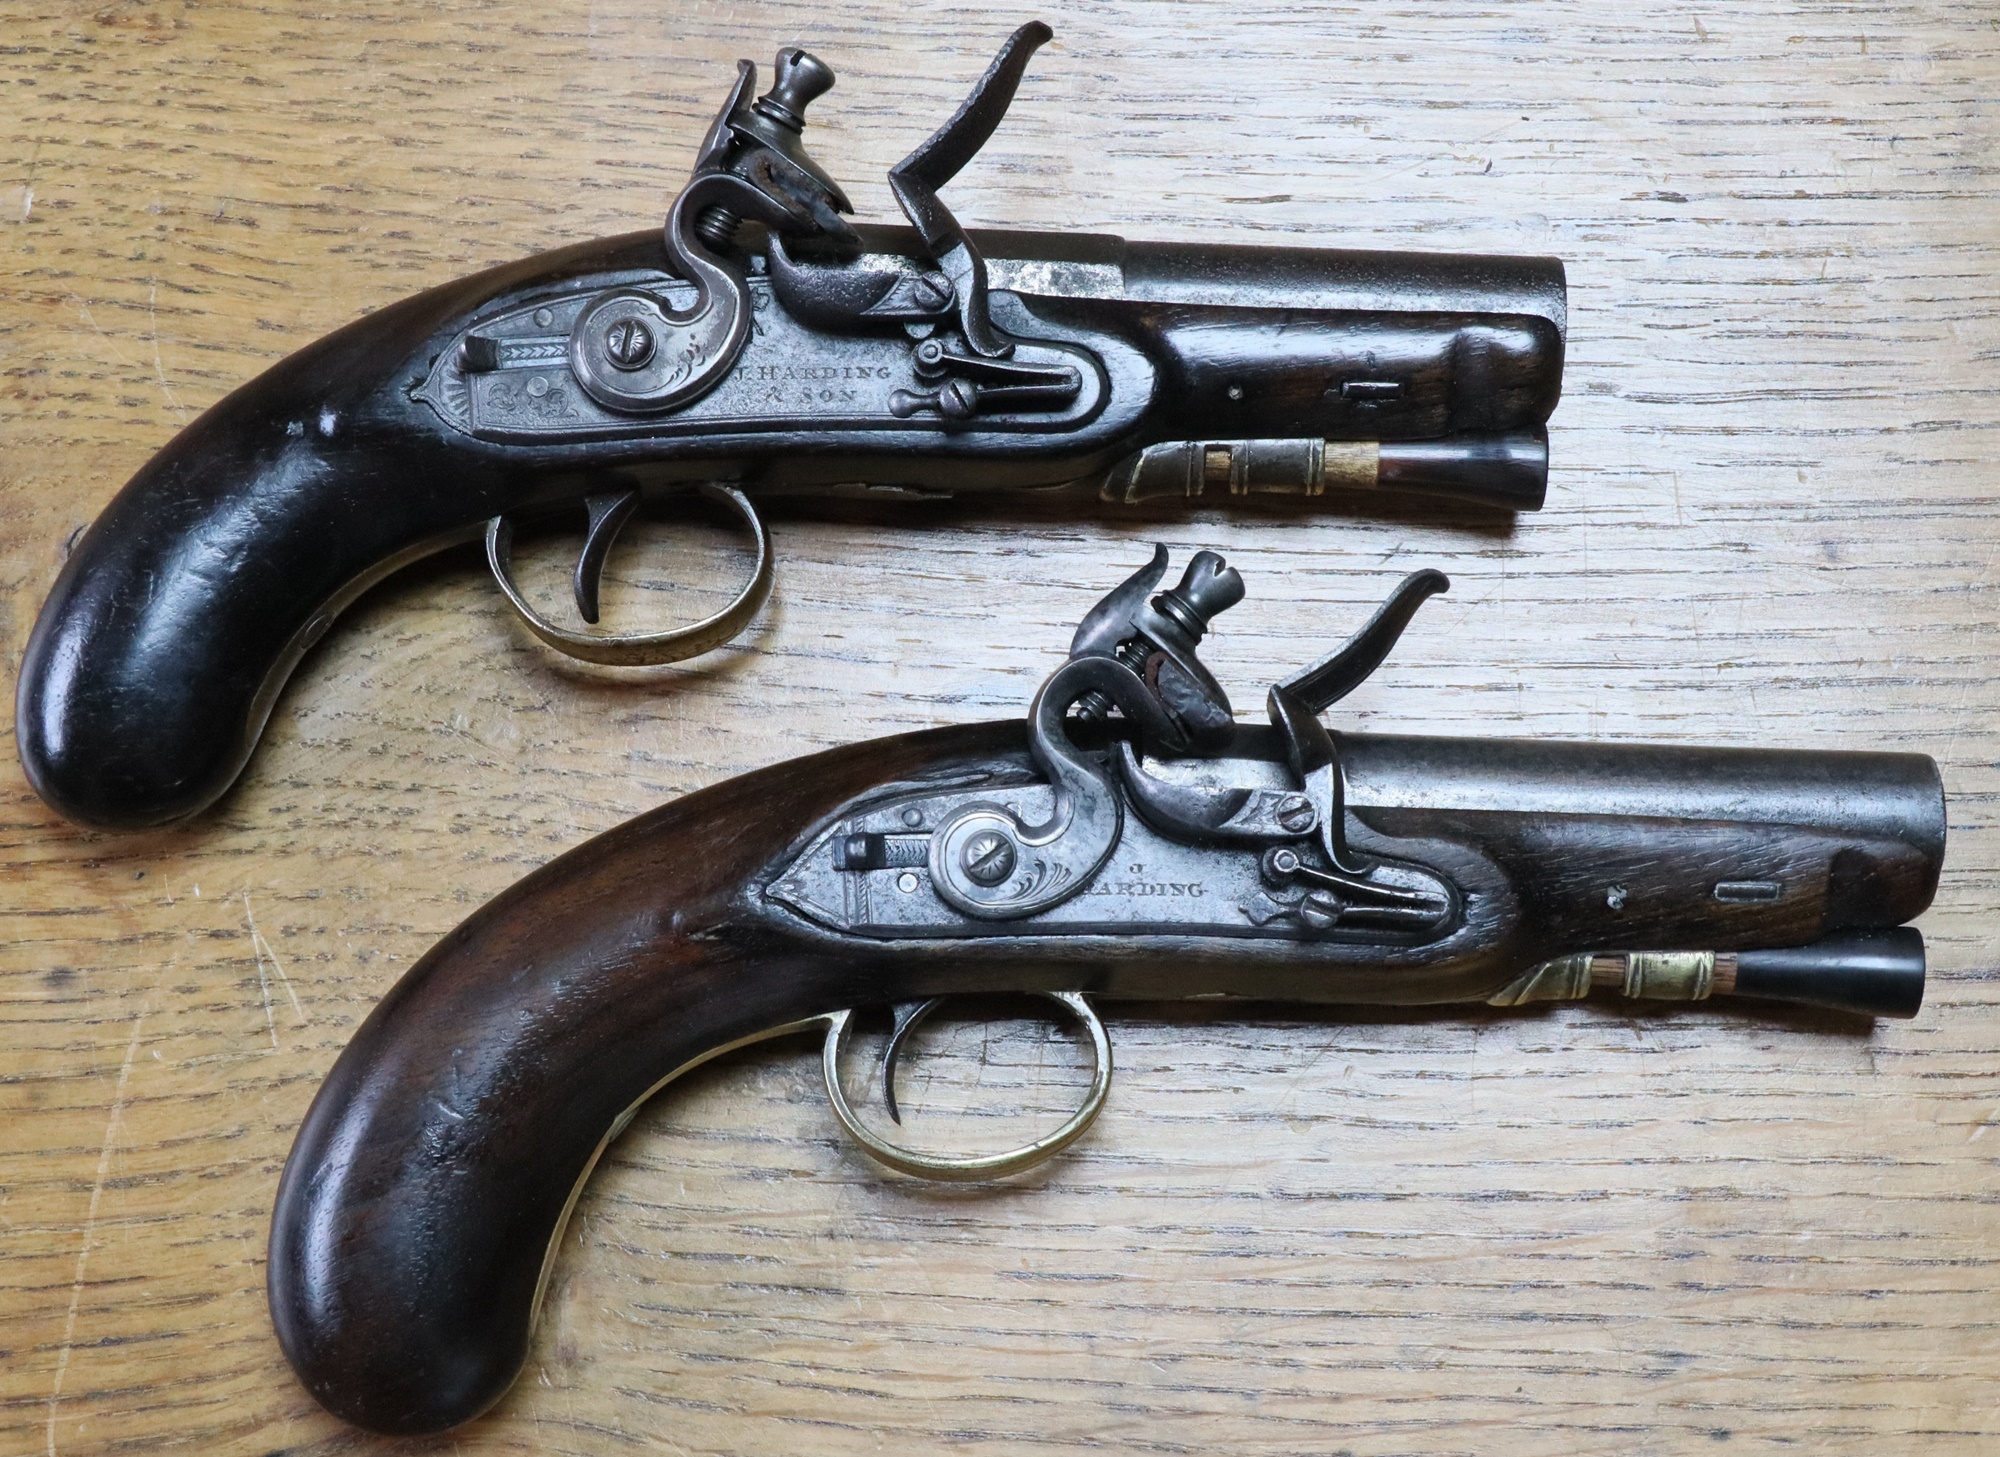 I’m really pleased with the way they have turned out – it almost justifies what I paid for the bits. And the next project;-
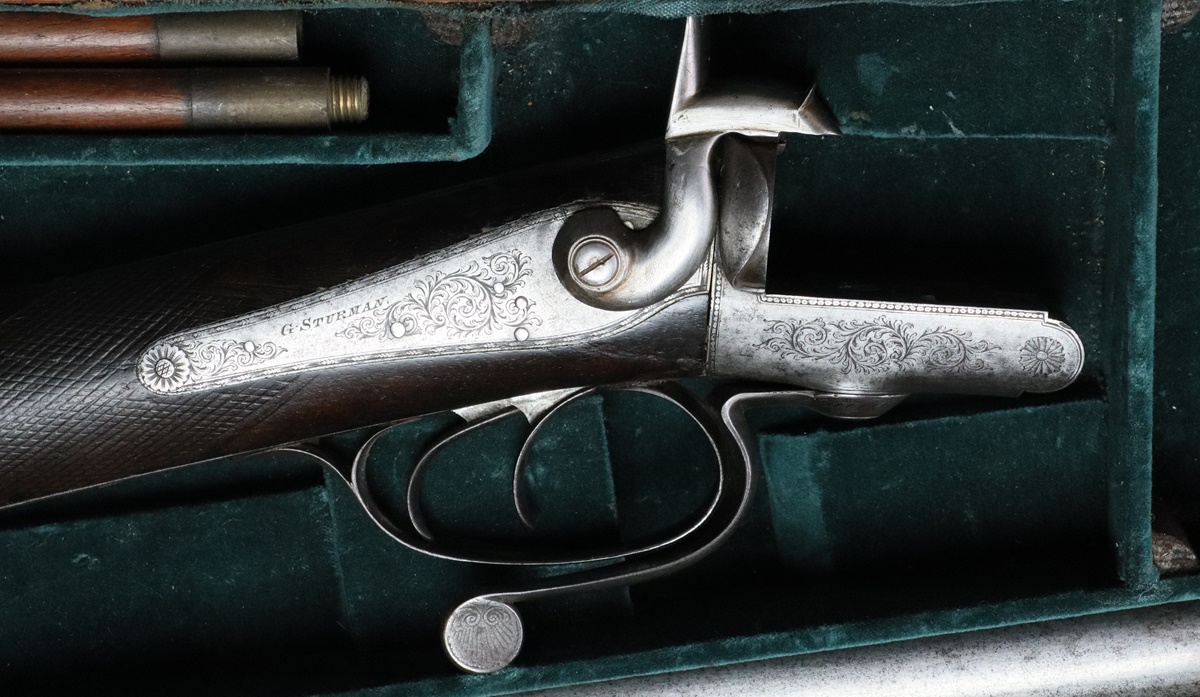
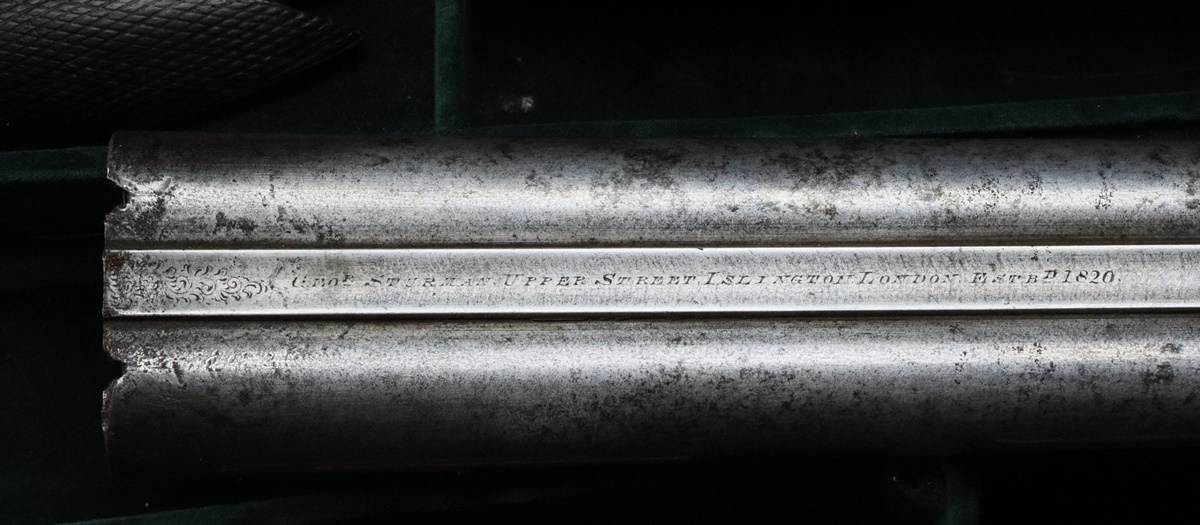
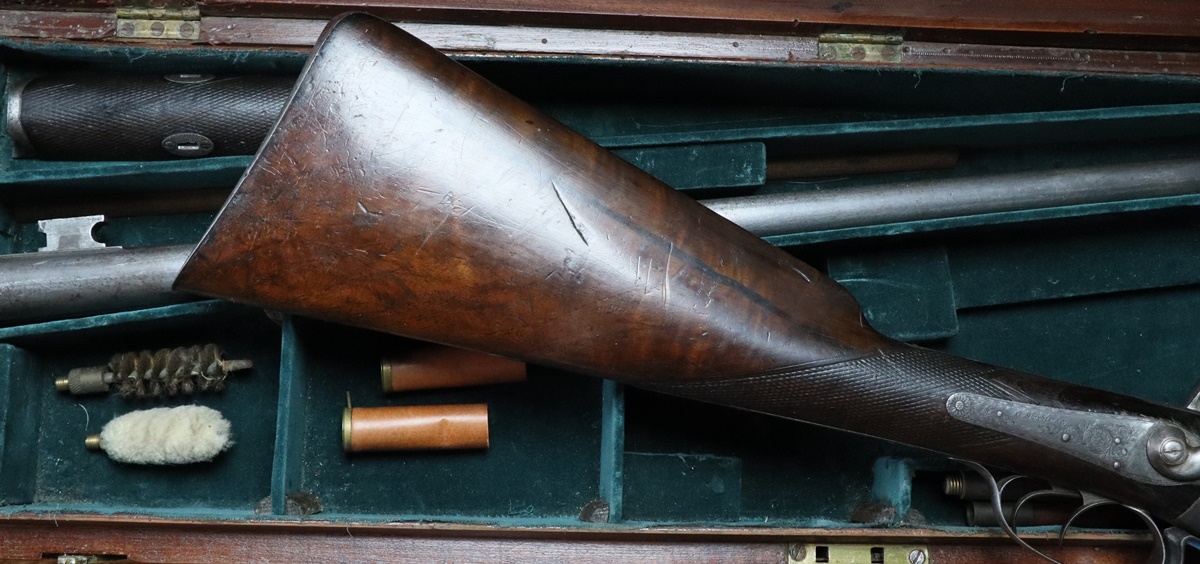 27th July – bit cooler and wetter today! Had a visit from a regular client to collect some pistols – I swapped some work for a little 1860s pistol case and a cased double pinfire 12 by Geo Sturman that need a little tidying – the barrel needs striking up and rebrowning – I need to have another go at browning as I am keen to improve my technique – basically slow it all down… I did a bit more fiddly work on the sliding safety of the second Harding pistol – this one turns out to be a bit different in its internals from the first, which was conventional. here there wasn’t a lot of space so I modified the mechanism so that the slider itself actually bolted the tumbler, the slider being retained by a small brass ‘bolt’ that had the ramp on its tail that engaged with a pip on a small spring retained by the sear spring screw. I found that this time the bridle had a slot that aligned with the slider, so I left a pip on the slider to engage in the slot – actually that’s not true – I’d already filed off the slider when I realised that the slot lined up, so I had to weld a tiny blob in the right place…..
 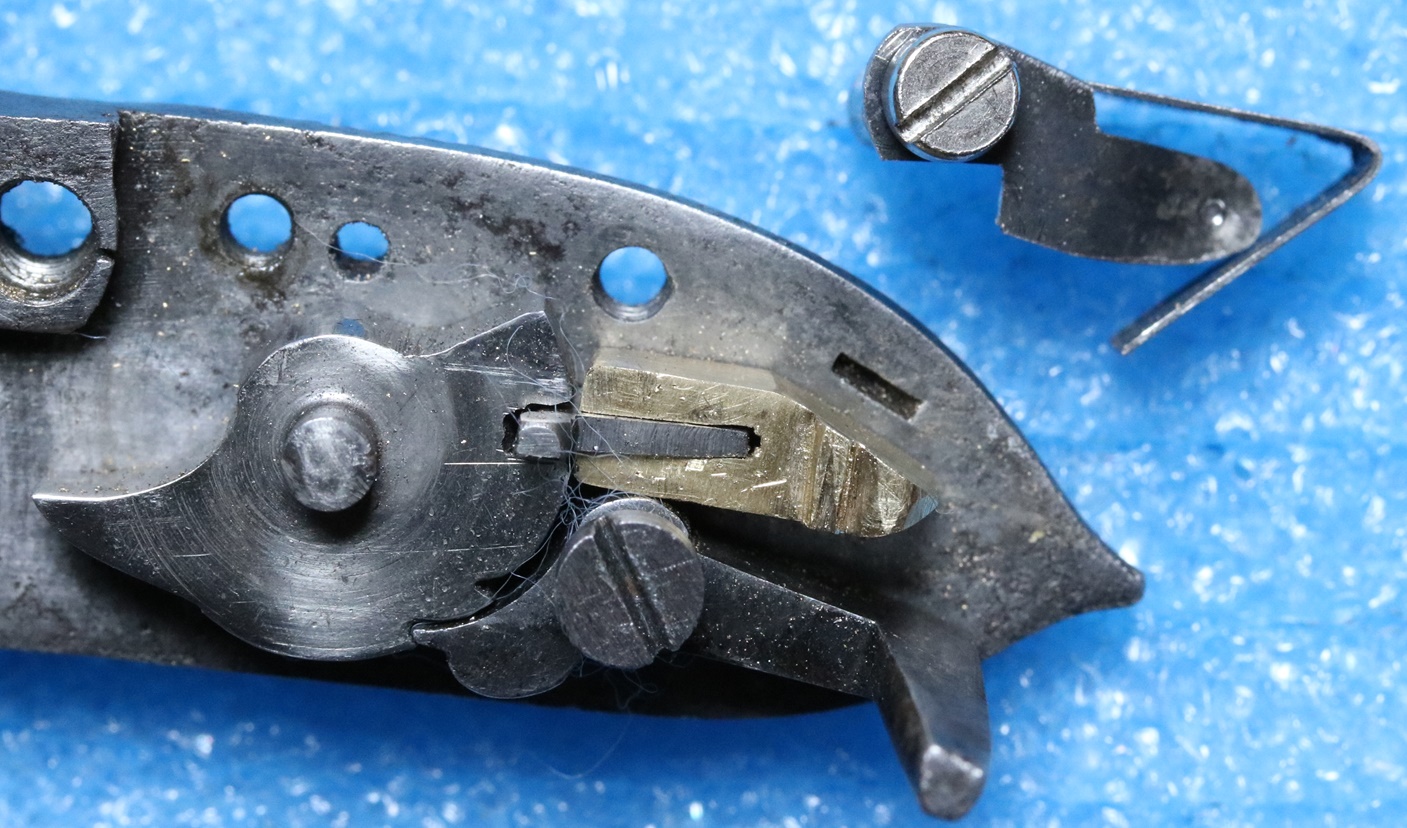 Slider and its brass retainer – ramp on the tail, plus sear and slider springs – slider spring has dimple to engage ramp. ( bridle removed) All very fiddly as its a very small pistol. 25th July Predictably the pool got a lot of use today from friends and neighbours -seemed to be full of children all day! I sheltered from the heat in my ‘machine shop’ which keeps a reasonable temperature, so I was able to finish a couple of jobs on the Harding – I glued up a piece of dowel with a turned end into a horn blank – Araldite went off rapidly in the heat, and turned it all down together – looks fine and fits perfectly. I also turned up a side screw – I was going to cut off the thread portion and weld on a new head but found that an M3.5 thread would just do, so made a new screw – I had a very cheap non adjustable die for M 3.5 which worked well enough. I filed up the slider for the safety catch from the blank I machined yesterday – it must be one of the fiddliest jobs – especially for such a small pistol – anyway its almost done. Not quite sure how to do the mechanism inside – there is precious little room for the bolt to intersect the tumbler so I might just make a slot in the tumbler to take the blade of the slider, then make a dummy bolt to stop the slider falling out…. I’ll see what is possible. I gather we have a small group for the ‘Have a go’ tomorrow, and I’ll take a breech loader for some lazy shooting afterwards – not sure which – I’m not sure the Beretta I bought fits terribly well, so I might take something else.
 ![]()
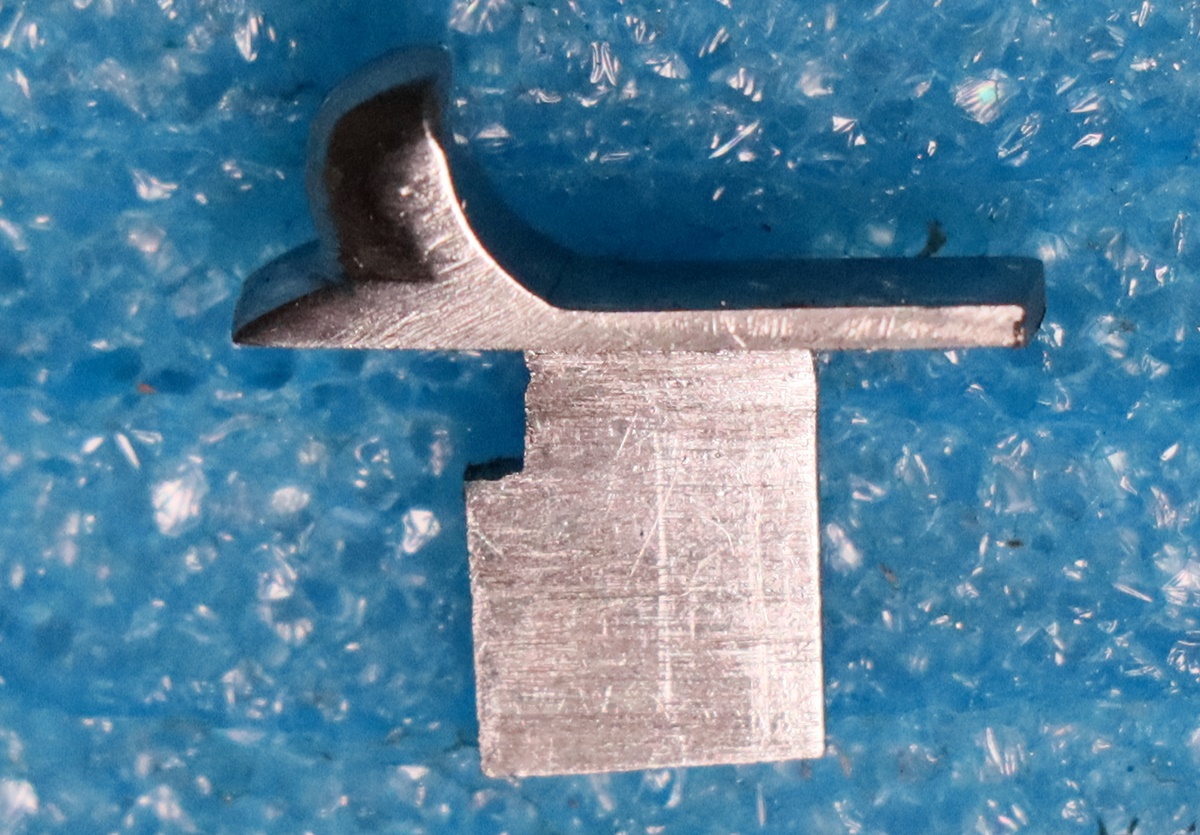 24th July – rather warm today – when I got in my car to go to Dick’s it said 38 degrees (C) – that went down to 33 when I was moving! By 4 oclock I was ready for a swim in the giant bag of water – I reckon I’m up to 700m a session and am aiming for I km – that’s a lot of turning as its only 10m long- I think I’m going to have to make something to keep track of how many lengths I swim!. A good day on the tinkering front – I machined blanks for the top jaw and slide safety, and turned a top jaw screw and a better cock screw, and filed up the top jaw and gave them a once over with Blackley’s case hardening powder to colour them down a bit – they actually look quite good now. I ‘spiked up’ the bottom of the top jaw with a 45 degree graver without the heels, mounted in a metal rod and tapped with a small hammer – it throws up really vicious little hooks that are just like the originals must have been – its always a give away that a cock has been replaced by a casting as very few people bother to file off the cast ‘teeth’ and replace them with nice sharp ones. It only takes a few minutes! Anyway the little pistol is beginning to look really good – the photo has a nasty bit of flint I broke off a larger on as I don’t have any micro flints in stock – it does actually spark up although probably not reliable enough to set off priming consistently – anyway better than a repro Scottish Pistol I was looking at with Dick that would not spark except very occasionally one feeble little spark. I didn’t have any perfect flints with me – most had been used but you can usually persuade a few sparks out of the lock if you tap a new edge on the flint. It was sold as a working repro with proof marks so presumably was intended to shoot but I think its going to need some work on the frizzen, either some heat treatment or facing with a bit of old saw blade or whatever – I’ve never had any problems using Blackley’s frizzen casting – they spark OK – and I’ve never worn a frizzen to the point when it needed refacing. I don’t shoot flintlock that much – I have enough of a job hitting things with a percussion! Having said that I’m doing another corporate ‘have a go with a muzzle loader day’ on Friday for Cambridge Gun Club and I have to take both a flintlock and a percussion.
 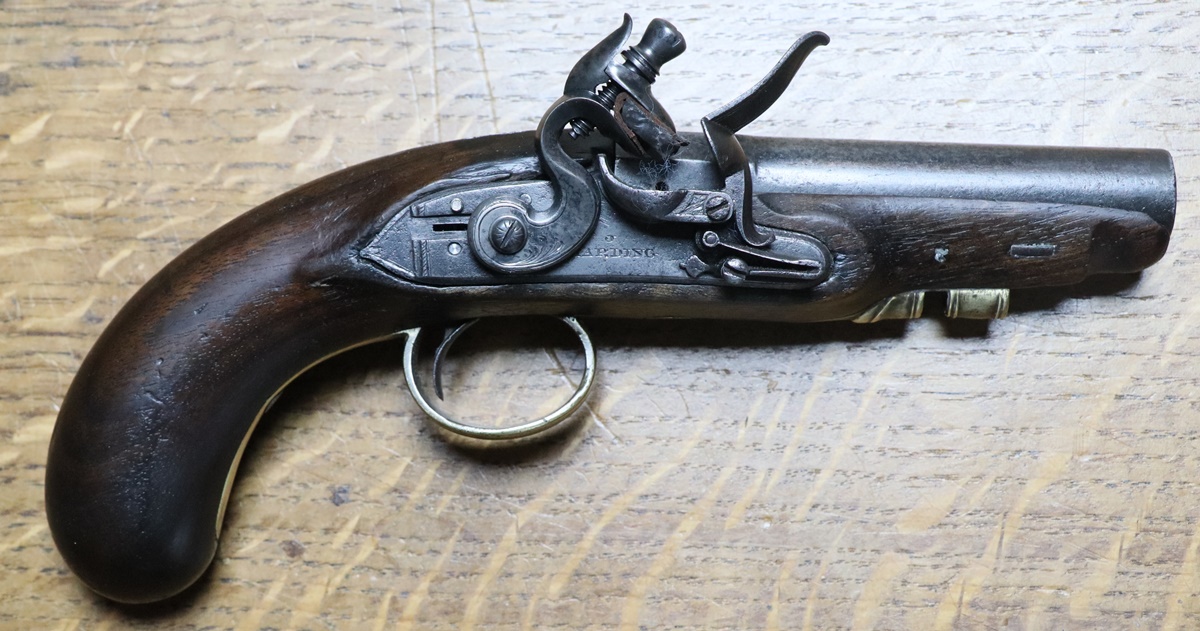 Slide safety and ramrod to do and it can join its ‘almost’ pair, the P.O. pistol 23rd July – I went into ‘my’ school for the ‘Leaver’s Assembly’ to say goodbye to the year 6 pupils who are moving on to secondary school – a few tears amonst them, but they will do well – their teachers have been so caring. More tinkering with the Harding – I used a chunk of thick tubing as a heat reservoir to temper the spring and it worked just fine with the radiant thermometer and got a good uniform blue towards the bright end of he spectrum – the spring fits, so I adjusted the full cock bent on the tumbler – very carefully in stages as I didn’t want to loose any more cock swing than necessary. Once that was done I case hardened the tumbler – it was made out of mild steel – and made a ‘cut price’ sear spring from a bit of spring steel sheet – works fine but looks a bit naff! might have to revisit. Anyway so far so good, the lock fits, the spring, trigger and sear work fine – I’ve filed up the cock to a slightly better shape and put a bit of engraving on it – I now need to tap the hole for the cock screw that holds the top jaw, and make a top jaw, plus the safety slider and internal bits – I realise that I case hardened the tumbler and haven’t put in the notch for the safety bolt, but I’m sure I can file through the case. I reckon the restoration of this pistol has already cost far more than it could possibly be worth and it isn’t finished yet – a true labour of love – but at least it all goes on the blog!
  Thick tube as heat sink for tempering springs etc. Bean can holds wood ash insulation so parts cool slowly to avoid hardening them.
  22nd July – Went into Cambridge to do some work on the Bullard Archive but ended up towing a giant skip with my Landcruiser and sorting some junk. I made one of the springs for the Harding pistols. This one looks a bit more convincing than the last one. I’ve hardened it with an oil quenching and its now glass hard so I’m being very careful not to break it – I suspect dropping it on a hard surface might even do it. Now I have to decide how to temper it, since I screwed up on that stage last time. I normally find a spot on the hotplate of the AGA which is the right temperature, using a remote temp probe and pop it on there with a couple of layers of aluminium foil over it and shut the lid down for ten minutes, but the AGA is out for the summer. The traditional method is to put the spring in a pool of oil in a tobacco tin (now a historic item!) and burn it off, after which the spring will have got to the right temper as if by magic. There is always a discussion about what oil to use – used engine oil is often quoted, but whether its the engine oil or the used bit that’s critical isn’t revealed. I think I’ll probably heat a thick walled tube in my furnace to 300C, check it with the radiant thermometer and then pop the spring in and leave it to cool down. – a lot more trouble than the burning oil, but at least measurable! As I wrote yesterday, the spring feels different now its fully hard, even when its just resting in my hand – mysterious or imaginary?
  I can never decide if the two arms should touch along the joint – I think most original springs don’t so I’ve left this one slightly open – you can get a piece of thin card in the joint. I think this spring is a better shape than the last one. We shall see!
21st July – What a lovely day sailing in the dinghy on the Orwell! Yesterday I made a couple of blanks for new springs – This time I did the thicknessing of the blank on my medium soft grindwheel (after flattening it with a diamond tool) rather than the linisher and it worked much better. I had a look at the broken spring – it was fairly clear that I hadn’t tempered it sufficiently as I could barely mark it with a file – a spring properly tempered should just be fileable. Thinking about hardening, I sometimes think when I handle the occasional metal component that I can tell if they are soft or fully hard just by the feel of them – and not by trying to flex them either. It sounds pretty improbably, but I guess the elastic properties are quite different and maybe this affects the internal damping of vibrations so they do feel different? Or maybe its just a vivid imagination…….
19th July – Tragedy – my new spring broke when I tried to put it in the pistol! I had hardened it and tried to temper it in my furnace, the AGA being out for the summer, but its not good at controlling temperatures as low as 300 C and I don’t think it was taken to spring temper. Anyway it seemed a bit strong, and pinged when I compressed it – I think maybe it should have been thinned a bit more, and I need to be more careful to compress it at the ends to allow more of the spring to flex. Anyway its busted, so I can have the excitement of making another one – I’ll probably make two whle I’m about it as the other little pistol has a fudged spring…. Oh well, I’m going sailing on Sunday and will be busy tomorrow so it will just have to wait – at least I should be much quicker this time.
18th July – yet more tinkering with the little pistol! I worked on the tumbler and spring to get the combination working – its an iterative process – check, file, check as you converge on what looks like a satisfactory arrangement. I filed a square on the tumbler shaft and drilled and filed a matching hole in the cock so that I could see how that fitted at the same time. It all went together quite well as far as I can test at the moment. I found a sear that will probably do although I might have to bend the arm a bit as it threatens to foul the edge of the lock pocket – so now I’ll need to file the bents in the tumbler for half and full cock – the half cock is more difficult as it has to resist firing by letting the sear nose enter a slot. I’ll have to make a cock screw to keep the cock in place – although its not loose it still comes off, and also a screw for the sear pivot. The cock screw is 5 UNC ( I made the tumbler) but the sear pivot seems to accept an M2.5 thread, and I don’t have a die for that one – for the moment I can use an existing screw. That just leaves making hardening and tempering the spring and any other bits, and making the sliding safety catch and spring, oh and the sear spring…. not much to do then!
The shape of the end of the spring, the ‘spur of the tumbler and the orientation of the cock on its square all have to be right – its a slow job if you haven’t done it very often.
17th July Bit more tinkering with the little pistol – I made a new mainspring and also made a video of the operation – difficult to concentrate on two things at once – tryiing to bend the spring into a ‘hairpin’ while juggling an oxy/gas torch and talking to the camera is fun. I can’t put it down without turning it off, by which time the spring is cold. I got it in the end though. Anyway it is almost there – just got to alter the bend a little to make it more even and slightly less open, and shape the end that bears on teh tumbler. Very satisfying making springs! Much more so than struggleing with editing documents in Word – I’ll have grey hair if I have to do it much more – making springs etc is a doddle compared to struggling with Bill Gates’s constructions. I think I got the bridle to fit as well, so progress!
The bend has a face with a slight angle so it looks dark – its fine!
16th July I did some work on a gun case – I bought a set of ‘furniture pens and crayons’ from Amazon for a few pounds – they are meant for touching in scratches on furniture but they might be useful on guns and cases – I’ve aleady deployed the mahogany one – it helps but I really need darker shades. In my ‘spare’ time I’m still tinkering with the little Harding pistol. I put the proto tumbler in the miller and got a bit more metal off it, and have now filed it to an approximate shape. I found a sear that looks as if it will fit so I’ll have to sort out the bridle and fixing screws – I think I can use the bridle out of the box of bits if I weld up the hole for the tumbler extension shaft and re-drill it in the right place. Then its just a case of making the mainspring, the sear spring, and the sliding safety catch, bolt and spring – nothing really!!!!!
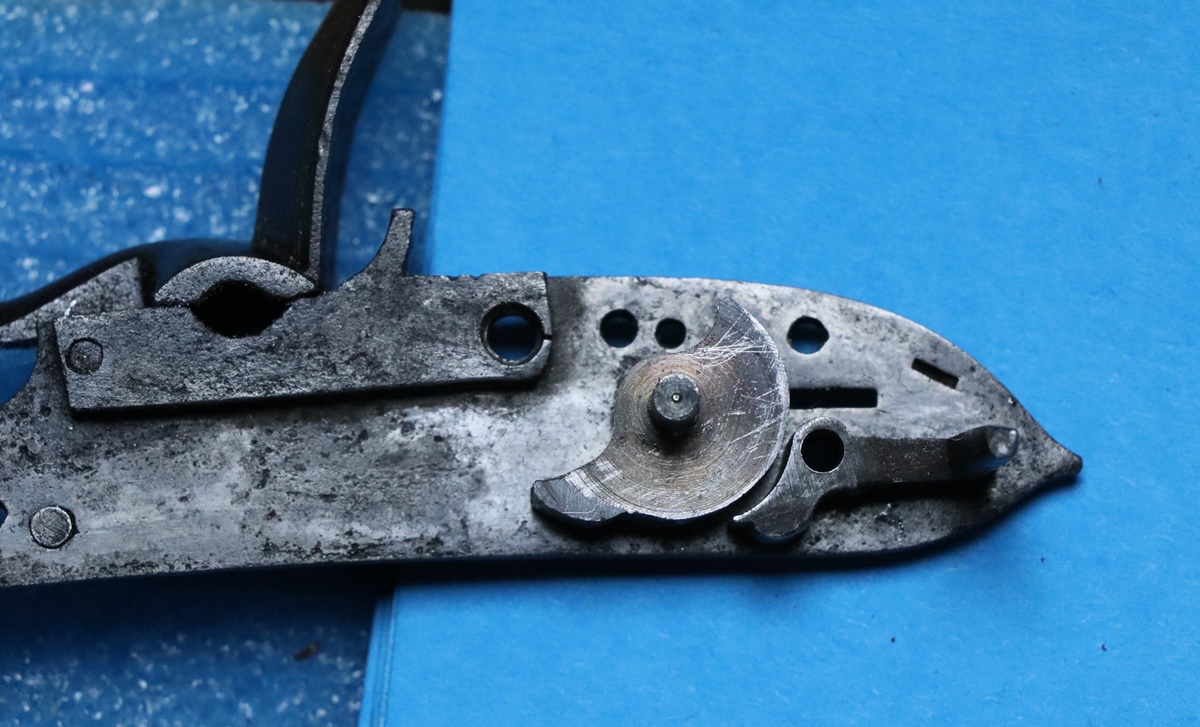
Part way there with the tumbler. not sure about the sear?
15th July – Looking through my Manton book yesterday I realised that whoever botched the single NOCK barrel to have a recessed breach didn’t need to recess the side opposite the lock – Joseph never did on single guns….
I bought back a pair of continental locks sans frizzens to see if we could find replacements for the owner – and indeed we found a pair of matching frizzens with pan lids exactly the right size – the tails need extending to reach the pivot position but that can be done…. a result.
My ‘office’ table is now covered with nautical charts as we begin to plan our summer trip to the NW of Scotland – we have a new charter yacht from Skye and will head out to the Outer Hebrides – we are a bit light on crew this year, so a bit more work for me, although the boat has in-mast reefing on the mainsail so not so much deck work needed – its 43 ft long so it will be interesting to see how we get on with just 3 of us. It’s the coming alongside in marinas that’s tricky, although we don’t do that very often. The last few years we’ve had the same boat so I knew how it handled under power – its going astern that is always tricky – most boats just won’t steer until they are moving so you never know quite how they will set off backwards so there will be a learning curve with this one.
The table is also covered with the bits of a pistol case that I am remaking – fortunately was just held together with animal glue – or indeed no glue at all! Anyway its all in pieces now.
I’ve had a couple of conversations with experts on gun browning in the last few days – one, supposed to be the best in England says it can take up to a month to get a good browning on some barrels, and he stops if the weather gets too hot. The other friend says he reckons up to 16 days and thinks that if you brown them faster than one rusting a day the browning wears off very quickly – so maybe I need to slow down as I had been aiming to get at least two brownings a day……..
14th July – Holts shoot at Cambridge Gun Club. Not my best day – but I did manage to hit one of every different clay except one – at least that shows something! Derek brought the owner of the Joseph Manton 22 bore featured in the posts and the gun for Nick Holt to have a look at – I was able to assist him in unravelling the gun as I’d done a blog on it. He was shown another gun that was a bit of a mystery – a very late Jo Manton flint lock on a single barreled gun signed H Nock on the barrel – its difficult to appraise a gun without my list of dates and references etc, but the gun had the patent Jo Manton recessed breech C1810(?), while the barrel and trigger guard looked older. My suspicions were confirmed when I noticed that the breech blocks had been machined down from a normal width to the recessed width to take the late lock, and not particularly carefully. The lock fitted quite well. Nothing on the bottom of the barrel made a lot of sense – no HN maker’s stamp as I would expect, or a number (Henry Nock was amonst the first to number his guns around 1790). In the absence of any further info I thought it was maybe a Nock gun of maybe 1790ish with the ‘wrong’ lock. Possibly a spuriously engraved NOCK? The left side of the breech plug had also been recessed – I didn’t see if the stock had had a bit glued on to fill the gap where the barrel was milled away. If not I’d have to suspect that it had been restocked – the lock was very well inletted so a possibility. I’m afraid the jury is out on that one! I was hoping for a valuation on the Post Office pistol – I know what its worth as a little pistol but not what the rarity value of the P.O. connection is – but it wasn’t fair to expect Nick to guess that. I actually found a reference to one similar being sold at Bonhams in 2015 for $2800 – so obviously some rarity value there….
13th July – bit more tinkering with the pistol below – I had to make a replacement screw ( I had to grind it out) for the tang of the trigger guard – I don’t like just using a woodscrew as the heads are never right and in this case they don’t work well into the endgrain of the plug I had to glue in, so I turned up a countersunk screw with a No 5 UNC thread and an extra false head. I slotted the false head and screwed it in, then marked the fore and aft line, cut off the false head, put in the aligned slot and filed it to conform to the curved shape, then engraved a few lines on it and used Blackley’s case hardening powder to colour it down (and incidentally harden it). Jobs left include all the works of the lock, some reshaping of the cock casting I have, to reduce the prominent breast it has and scale down the spur, and make a ramrod. Tomorrow is the Holts Shoot at the Cambridge Gun Club – I am, of course, going and will hope to exceed my 50% target – I didn’t quite make it at the Helice shoot – I was on target but missed all of the last 4 ‘easy’ birds! I’ve finished a batch of de-cappers to take to CGC – they make good engraving practice so I did a little stand of arms, and a stand of music and a sunburst and a scroll plus some borders. Quite interestingly (at least for me!), the strip I was using that I said was as soft as butter turned out to be pretty tough down the other end – just goes to show what cold rolling does to the grain structure near the surface.
11th July I more or less finished the woodwork for the second Harding pistol, at least in so far as anything is ever finished in this game! I’ve given it an initial coat of stain to darken it down and match the wood repairs in – a coat of Van Dyke solution first, that didn’t do much, then a coat of Jacobean Oak stain. The problem with stains that are supposed to be black is that there is no effective black stain – so they mostly contain black solids, which in this case I had to rub off, which leaves a decent dark brown colour that matches the original colour pretty well. The various joints are still visible but not too bad – I’ll work on them a bit as I apply finish – probable a couple of coats of sanding sealer, then alkonet root coloured oil finish to give a deep rich colour and finish off with a very hard wax finish. Any recalcitrant joints will probably get blended in with a black Sharpie pen and smeared with a finger! – it works a treat. One trick that does help if you want to disappear a joint is to take a very sharp modelling knife and create some ‘grain’ across the joint matching that around it – do this early on in the process so they get treated the same as real grain! Oh dear, maybe I shouldn’t reveal trade secrets here but anything that is continuous across the joint hides it from attention! On this pistol the main joint runs with the grain, so that technique is of marginal benefit!
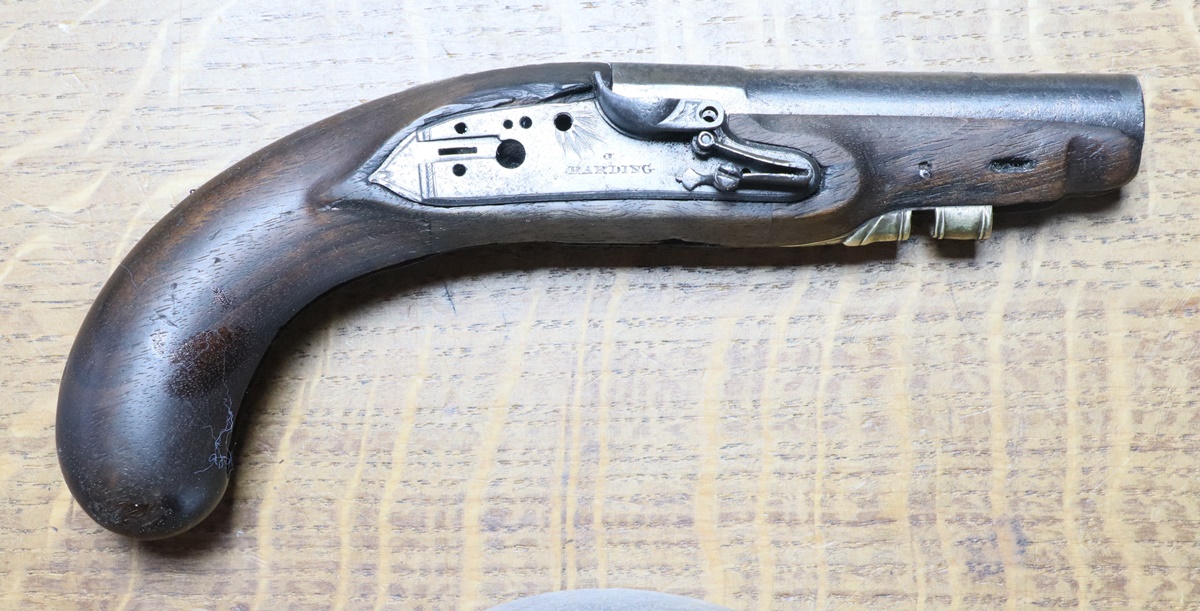
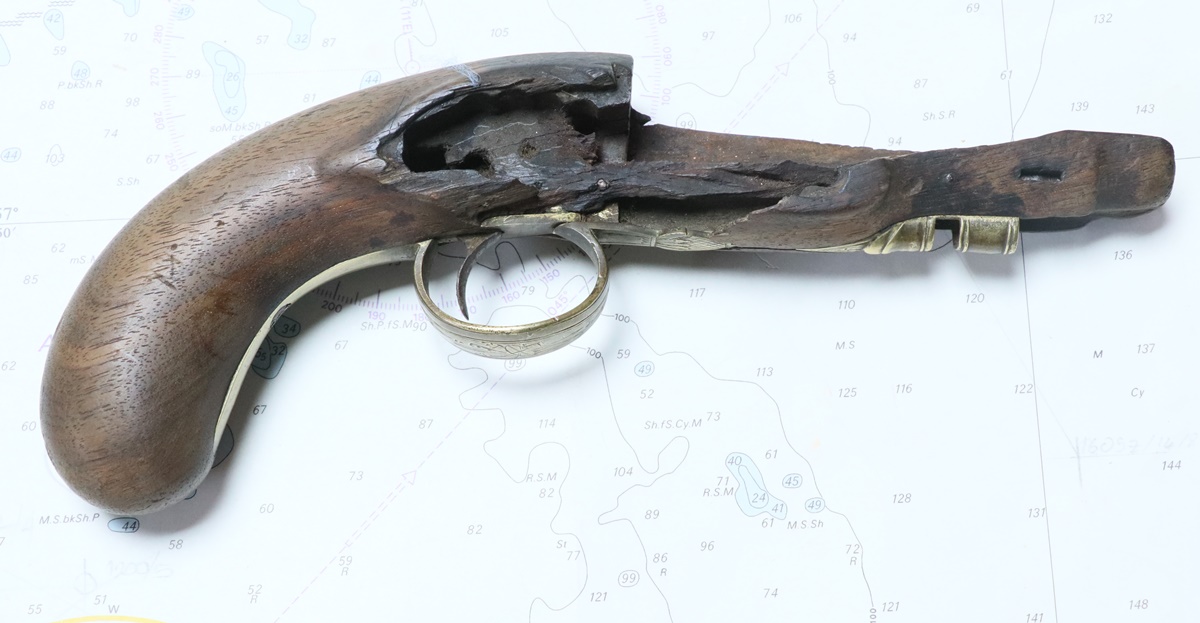
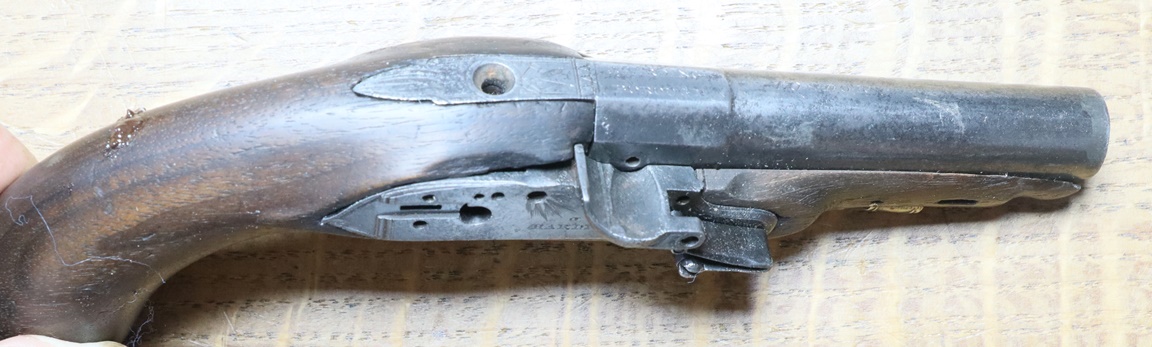

10th July – I seem to have got landed with compiling a document for the school governors – I am thinking of enrolling for ‘Say No‘ lessons! It rather got in the way of my gun activities. I finished the blank for the tumbler for the Harding pistol and unglued it (heat) and then glued it onto a piece of scrap plate to put it centered on the turntable in my miller so I could reduce the diameter over most of the circumference – I did get some way, but the strain was too much for the glue, so I’ll have to finish it by hand. I’m made some progress on with the woodwork – I now have sundry bits of wood stuck onto the pistol and tonight I managed to inlet the barrel – I think its now just a matter of filing/sanding everything to shape and inletting the lock. I put some oxalic aid on the existing wood which got rid of most of the black stains – I should have done it before selecting the wood for the repairs as its now a bit darker than the original – but the other little Harding pistol is almost black so I can colour this one down – it will help to hide the repairs too. In the course of sanding down blocks of wood for the repairs I managed to sand the end of my thumb on the 12 inch disk sander – painfull still!
Tumbler blank on a scrap plate – the glue failed!
Clingfilm on a dowel to locate the repair in place – self amalgamating tape as an elastic binder. see earlier photo for the ‘before’ state.
9th July – several jobs on the go, which is handy when there is adhesive setting time involved. I started the new tumbler for the little pistol – I turned the axle that bears in the lockplate plus a bit for the square and tapped it No 4 UNC, and faced a 22mm diameter disk to make the actual tumbler out of, I then parted off the disk and axle, leaving a bit for the bearing in the bridle, faced off the bar left in the lathe and drilled a hole that is a good fit on the lock axle and Araldited the proto tumbler to the bar so I could finish the other side of the tumbler – its still in the lathe hardening off. I milled some of the broken wood from the pistol lock area and glued in a piece of walnut – there is still quite a lot of wood to be fitted in, but its starting to look less bad. I also decided to make another batch of de-cappers in case I get orders from the Holt’s shoot participants – I know Martin is keen for everyone to have one on safety grounds. And I got the new screen for my PC so that had to be set up…….
8th July – I got a request for a couple of my personalised decappers – I had run out of my original supply of metal and bought some 15m.m wide strip but it is a bit wide to fit round the nipples of some guns, so I picked up a length of scrap 1/2 x 1/8 from my old lab and made two decappers – when I came to engrave the names etc on them it was a bit of a revelation – they cut like butter, and it made me realise how horrible most of the metal I engrave is! I guess the scrap was mild steel but it didn’t have the cold rolled crust that most mild steel strip has. Anyway a pleasure to work with. I did some more on teh little pistol woodwork. It was fairly riddles with cracks as well as having chunks of wood missing, – the first job is to find all the cracks and see which move if you gently flex the wood. If they are wide or full of muck they need clearing out with the back of a modelling knife blade – these I fill with liquid epoxy, mixing in a bit of walnut dust to fill the surface. As you put the epoxy in, flex the wood to open the joint more and suck the glue in. You may need to clamp or bind the wood to close up cracks while the epoxy sets – I find self amlgamating tape is ideal for quick elastic binding of parts while glue sets – a couple of turns and it will stick to itself and hold things in place. For small cracks I use an instant isocyanate glue and again work the joint to get the glue in – I keep a spray can of activator handy to start the polymerisation. I also put walnut dust in the top of these cracks and drop a little instant glue on it and set it with the activator. I’ve done all that for the Harding pistol and the next step is to work out how to do the replacements and what needs milling out, and find a bit of matching walnut from my offcut box, or go over to Dick’s as he has a much bigger box of offcuts.
7th July – I started to strip the little Harding pistol so that I could sort the woodwork, but the woodscrew holding the tail of the triggerguard proved to be a major problem – first, the slot had got worn into a ramp and wouldn’t shift even with heat, then it turned out to be dead hard and I couldn’t drill it with any of my drills. I ended up grinding off the head and digging out bits of it with the GRS graver – that released the guard. That left the stub of the screw very firmly embedded – I tried cutting a slot in it with a small disk but the screw broke when I put a screwdriver on it! Only solution was to core out the remains of the screw so I made a corer from 8 mm silver steel with a 4 mm hole in the centre and a 5.5 mm outside diameter and filed up some teeth and hardened it – at least that got it out and I could glue in a wooden plug for the next screw! A lot of work to get one screw out – lucky I enjoy making tools! I derusted the lock and the barrel, which is in good condition – I lightly recut the barrel engraving. I will have to make a new tumbler as the one with the pistol is completely wrong, but I might get away with the existing bridle – I think it might have been the right one, but it had been broken and rewelded with the parts not quite aligned – I will make the tumbler and see if the sear is right before I decide whether to make a new bridle or fudge that one.
Corer for removing headless screw.

A bit of pitting but not too bad!
6th July – Dick got the pair of hammer gun hammers welded and filed up – they are a pretty good match in shape, but without the gun to try them on its difficult to be certain. Photo below. I was looking round for another project to do – apart from the documents I offered to edit for the School – I decided it was time to tackle the wrecked Harding flintlock pistol. I bought a box of junk that purported to contain two rare small post office pistols by Harding. I paid good money for them, heaven knows why. Anyway one was actually stamped for the Post Office and was more or less complete so I’ve done that one up (see diary past) and it is a very pretty little pistol even if a bit corroded on the barrel. The second set of parts is more problematical as these photos will show – the wood is badly broken with large missing bits and cracks, it has no mainspring , no cock or topjaw or screws, the bridle is a bit wrong, the tumbler is completely wrong, I’m not sure about the sear either, and so on…. I will strip it down and derust it (for a short while so as not to disintegrate any faulty metal) then mill away the broken wood so I can match in new wood to clean flat surfaces -As you can see, there is quite a lot of work in reshaping the inserted wood to match – I usually leave such woodwork to Dick, but I will do this one – I need to up my woodwork skills – I can make a reasonable job of it but Dick usually manages to find better matching wood and grain, and make tighter joints.
There are slight differences in the overall shape of the cocks – the one on the left has a less rounded breast. possibly one was a replacement, or more likely they never matched fully.

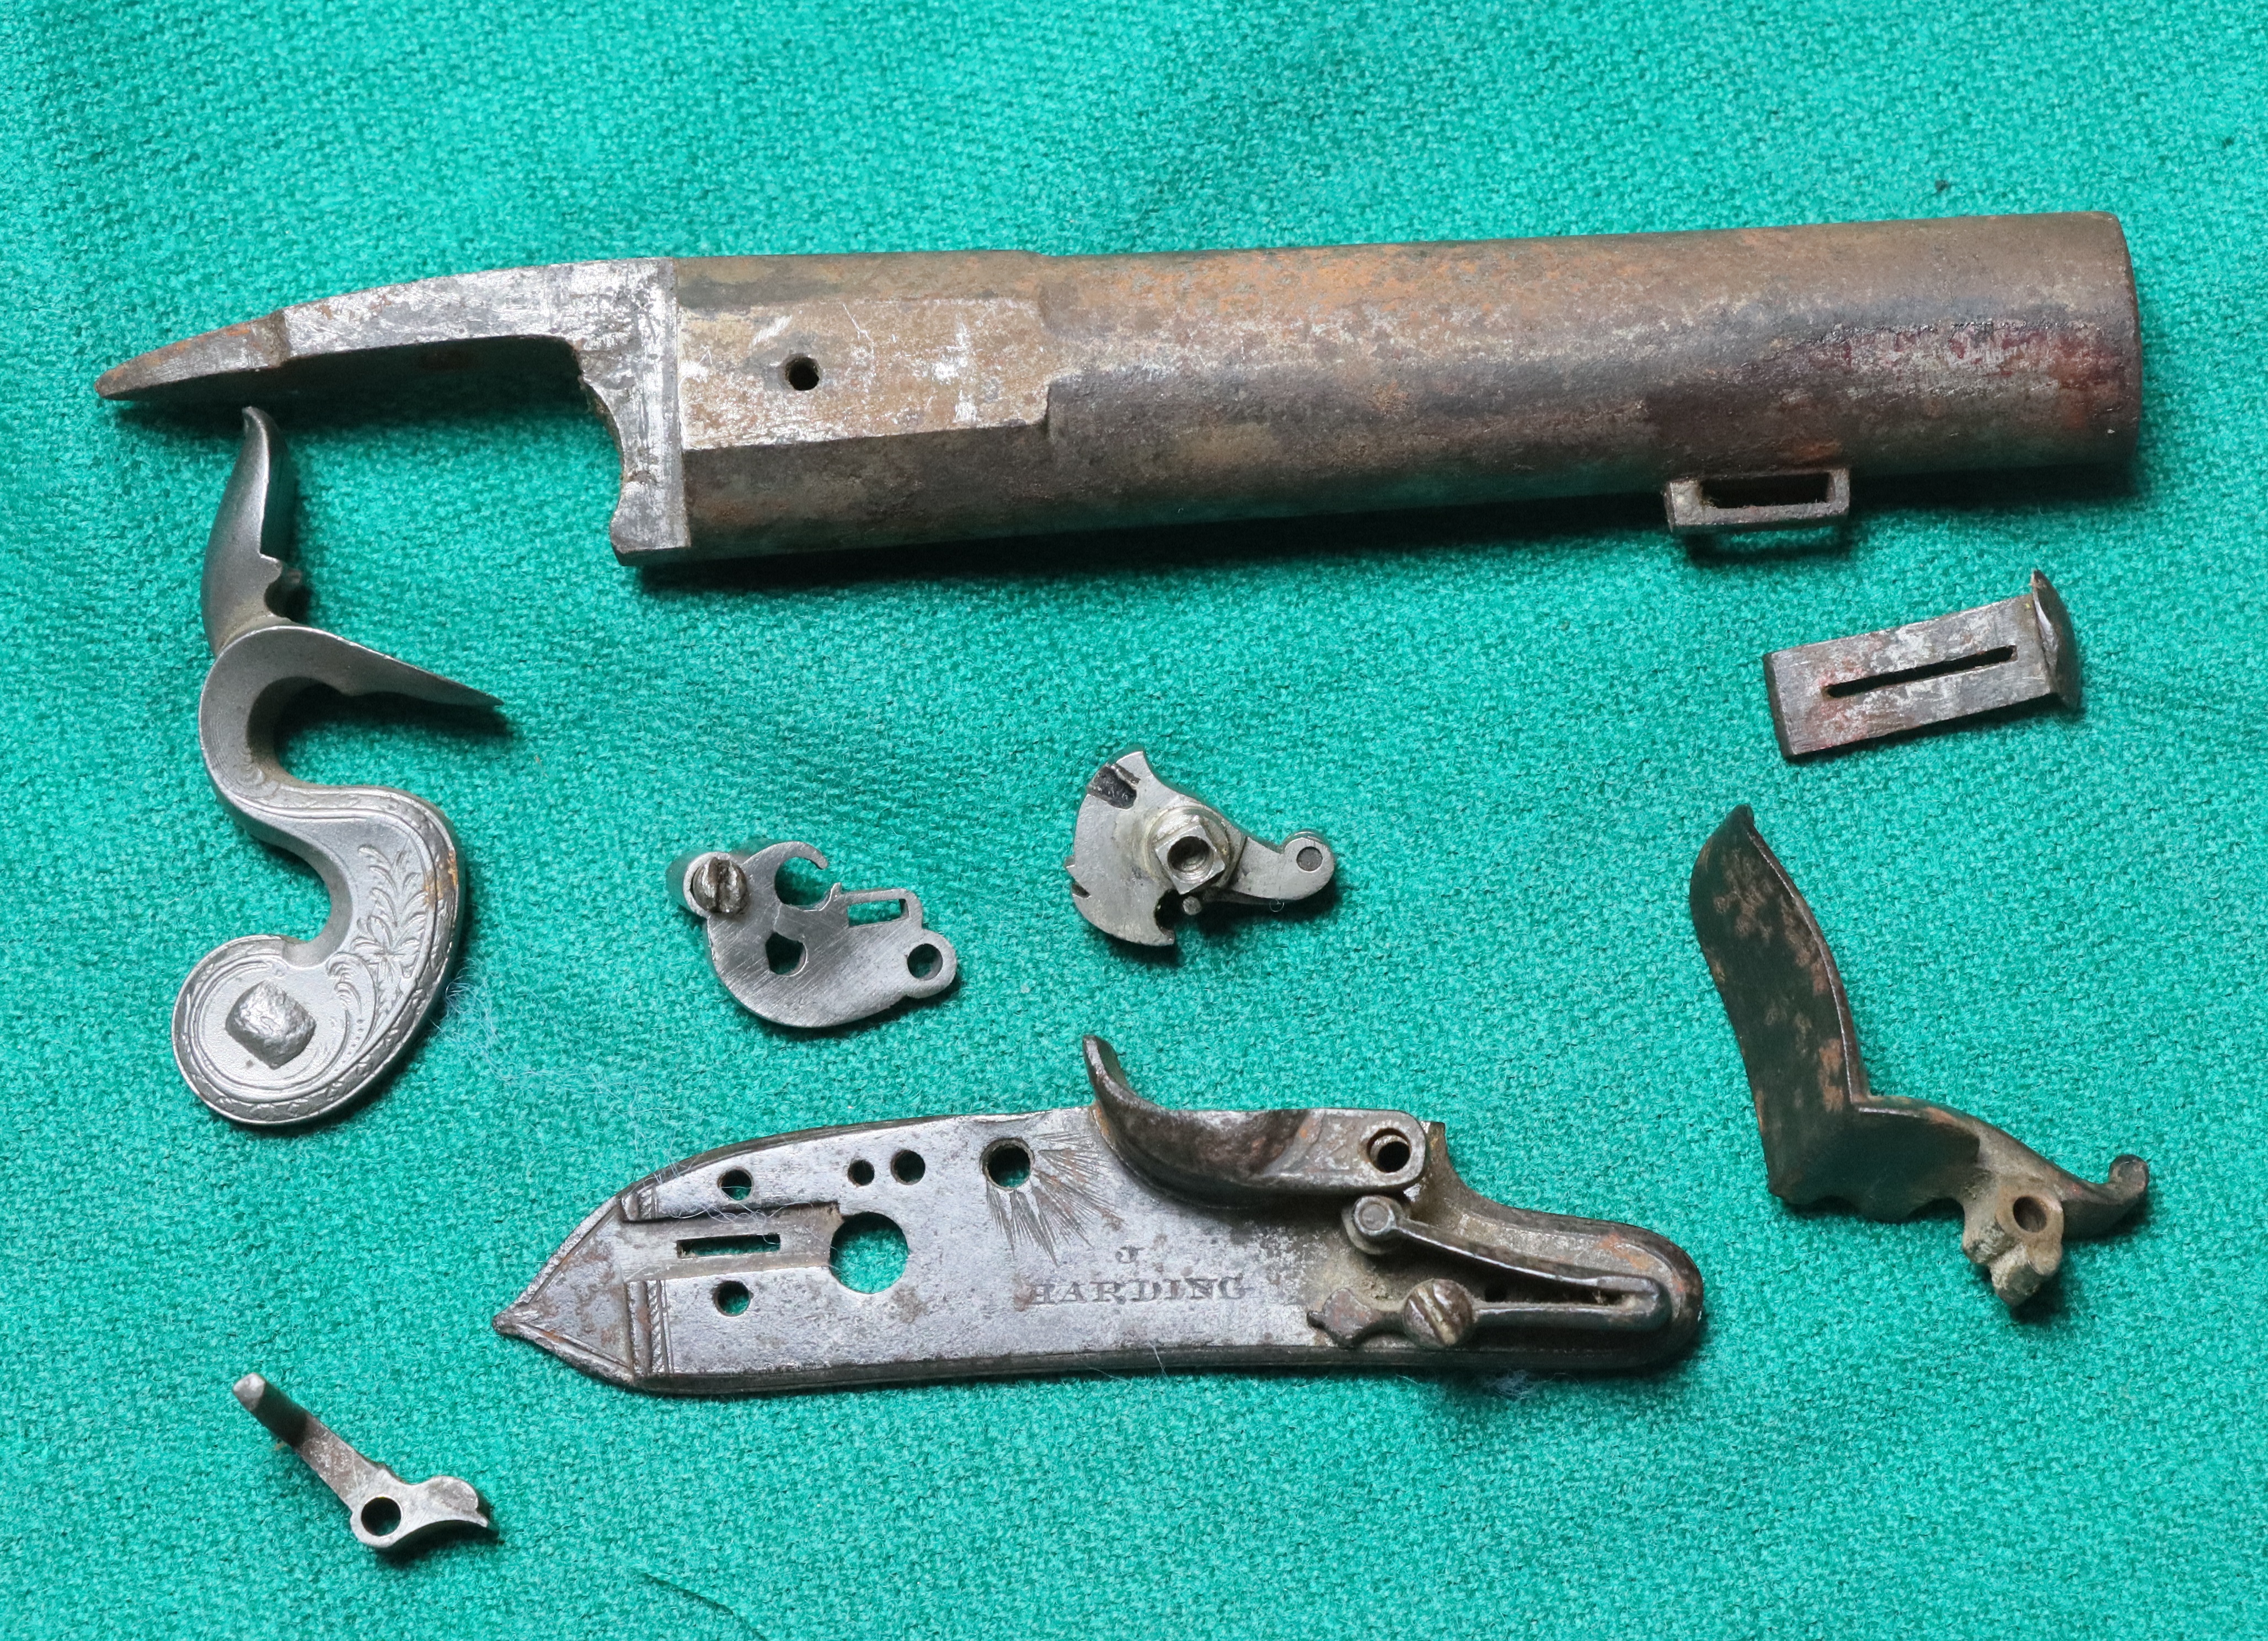
Pistol has very nice brass furniture
The barrel, lockplate, frizzen and frizzen spring and barrel bolt are the only parts of the original pistol – the tumbler,bridle and sear don’t fit and will need replacing.
4th July – I tried out the CZ120 brass to see how good it was for engraving – its a ‘free cutting’ brass with about 2% lead, 60% copper and the rest zinc. Its better than most brass that one comes across for hand engraving, but still not as ‘steady’ as copper, silver, gold or well prepared steel. I did a quick trial freehand to see what it was like – I’m sure if I used it for any length of time I’d adapt my technique to work better, possibly even sharpen my tools differently. I found it more difficult than steel to cut long straight lines of uniform width – it was more difficult to maintain a uniform depth and the resistance of the metal seemed to be more variable. I found it had two modes of cutting – in one it cut in a series of small jerks that were visible in the cuts under the microscope, in the other mode it cut smoothly – it wasn’t always easy to predict which would prevail. I did get a couple of skids, and the tool had a tendency to dive deep and it wasn’t easy to drive the cut back up – cutting ‘O’ s I had to stop half way through the down loop and come back from the bottom. The $64,000 question – would I recommend someone learns hand encraving using CZ120 brass? It requires a good deal less force to cut than steel and is much kinder on the gravers, both of which are advantages for the beginner. Its not a pushover so you’ll learn most of the basic skills, although it will take you a while to adapt to steel if you ultimately want to be able to do that. On the other hand if you have reasonably strong hands I’d probably say go straight in with the steel. Here is my test piece, skids and all….
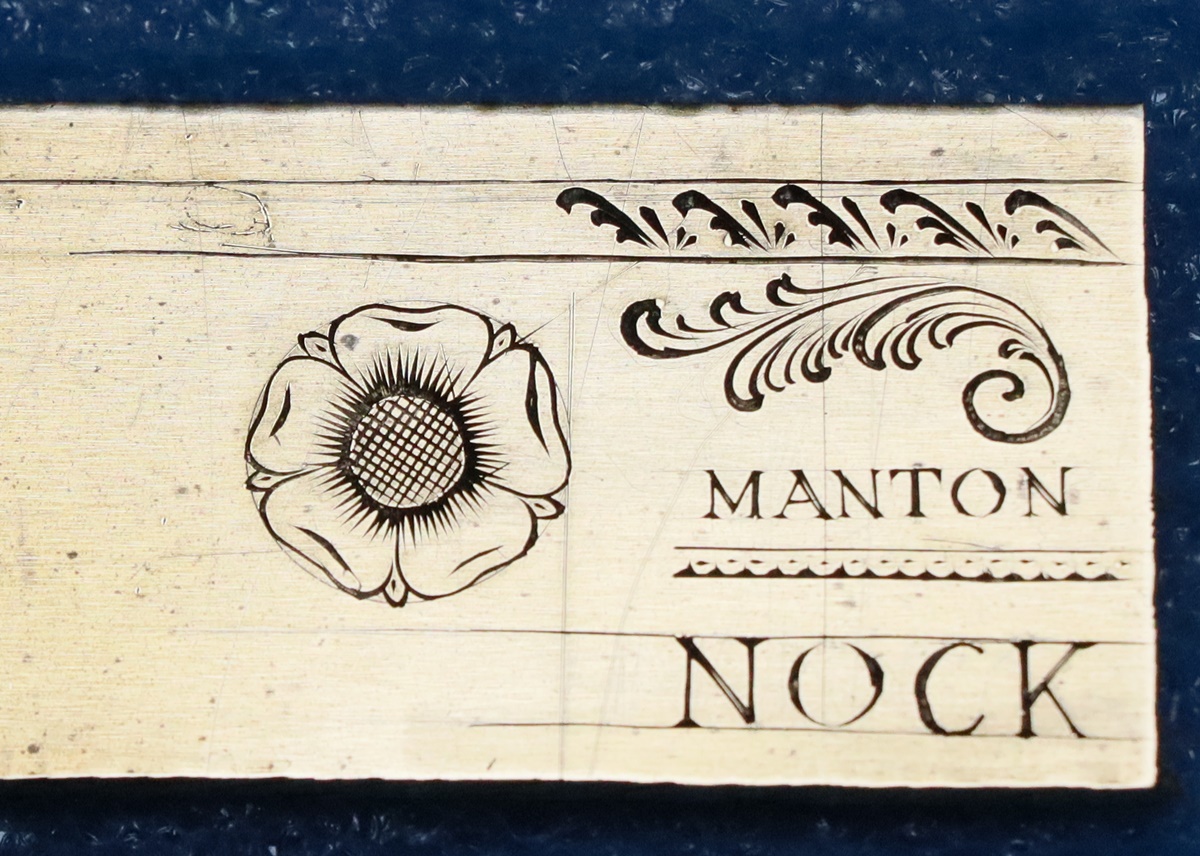
The brass is 22 m.m.high – a very quick & dirty test….
4th July – bit the bullet and bent the 38 bore Adams spring – I’d filed up both ends while it was flat, so the bend had to go in the right place – difficult to change if you get it wrong! Anyway it all bent & went together just fine, I haven’t hardened and tempered it yet, but it all works and I suppose I could just leave it – the thought is tempting as the cock tension is just about OK and it all functions as it should and it was a bit of a b***** to assemble……… It even looks the same shape as the original although the bend is not quite as tight – there is no point in stressing the metal any more than necessary! I really enjoy making springs although I have had my share of failures!
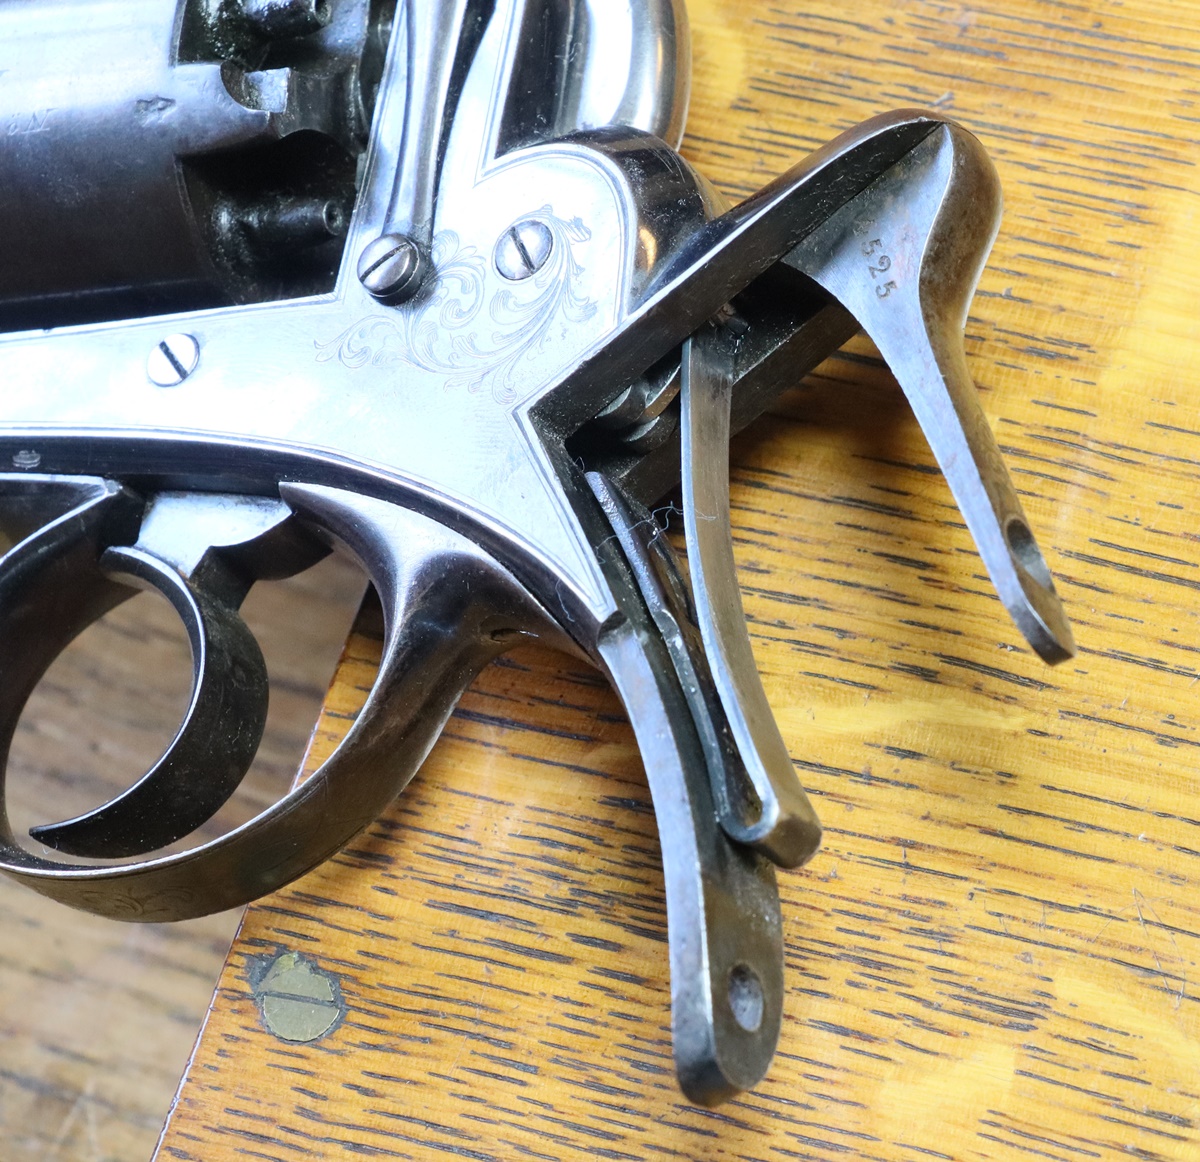
The Adams patent is a very simple self cocking mechanism.
3rd July – more work on repairing the Adams revolver – Tom has now left for St Andrews so I have to do my own filing! I never served a proper workshop apprenticeship so my filing is not so hot. Anyway I finished off the link and started making the new spring from a piece of 15 mm x 2.5 m.m. spring steel. I first annealed the steel at 950C for half an hour and cooled it over an hour or so as it was a bit hard to file. First job was to build a ridge of weld across one end so I could file the claws that hold the link when the rest of the spring was shaped. ( I should have done that before annealing the metal, as I had to anneal the weld anyway.) There was quite a lot of thickness reduction to do – the business end of the original spring was 1 mm thick, tapering to around 1.4 at the other end – most of the removal was done on the linisher, both flat on the platform and over the end roller, but eventually I got there. The width had been roughly cut with a 1 mm cutting disk, and I filed up the claw to fit the link – the next problem is bending the spring to shape and hardening it.
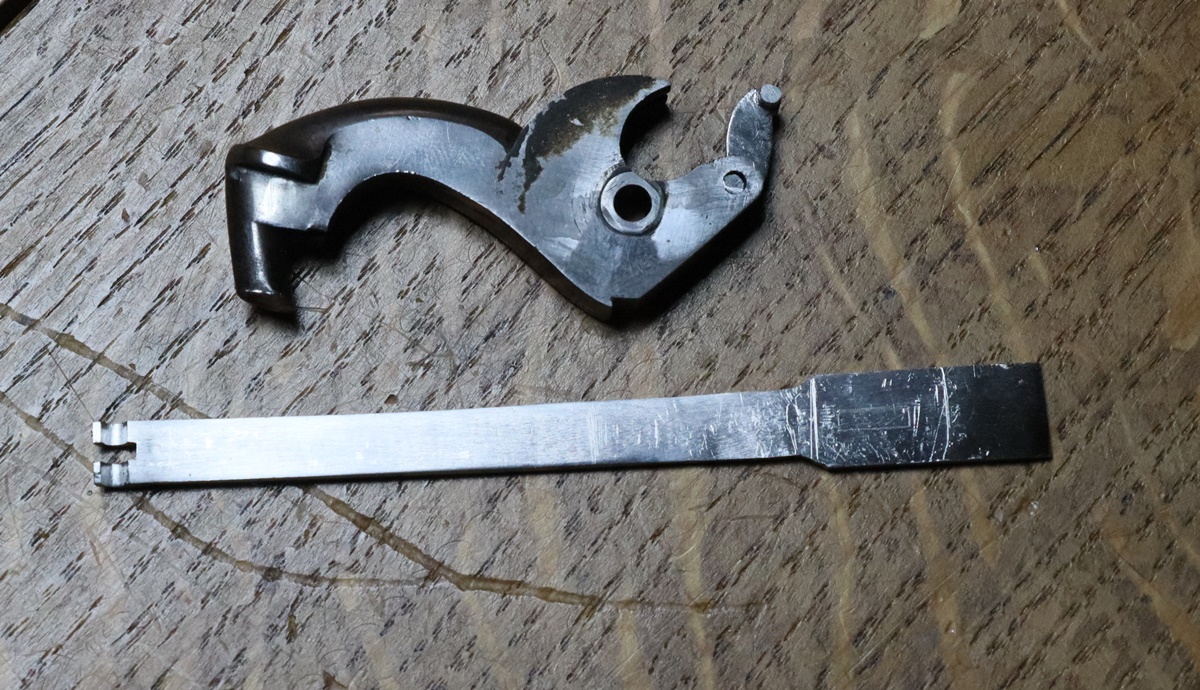
Link and flat spring without the slot to hold it to the frame
A lot of people ask me about engraving and want to start off engraving brass. Most brass is a pain to engrave because its very hard and the tool chips rather than cuts cleanly – its very prone to slip etc. I checked a couple of websites and found the spec of engraver’s brass, which is what its name implies. Brass is the usual copper /zinc mixture but some had lead added to soften it up – engraver’s brass should have between 1 and 3 % lead and around 60% – the type numbers seem to be CZ120 or CW612N or C35600 – all thses are classed as engravers brass. I have ordered a sample of CZ120 to try out and will keep you posted with how I get on.
Here is a summary of the countries that visit the site most often over the last three years;-
| Rank | Flag | Country | Visitor Count |
| 1 | United States | 70,644 | |
| 2 | United Kingdom | 48,099 | |
| 3 | China | 27,032 | |
| 4 | Germany | 14,004 | |
| 5 | Canada | 13,931 | |
| 6 | France | 12,545 | |
| 7 | Russian Federation | 11,212 | |
| 8 | India | 7,121 | |
| 9 | Ukraine | 6,330 | |
| 10 | Australia | 5,828 |
2nd July – In the end I milled the blank for the link as it was easy to make several in case they went wrong. Luckily I left the ‘pins’ oversize as I did have a problem matching the milling on the top and bottom in spite of having a clear index hole. Tom has done the bulk of the filing and it is looking good – a little finishing at the spring end, and then its making a new spring……….

part filed link and blank for a spare.
1st July again… A small problem – Tom was looking at my Adams 38 bore revolver and was testing the action when the mainspring stopped functioning – I don’t think he did anything wrong as its difficult to see what that could have been, but it seems the link broke and the mainspring then broke as it ‘dry fired’. So that has to be fixed! We have drawn up the link and one possibility is to turn up a blank from which to cut the link – the plan is to turn up a disk with one pin at the centre and a rim that will yield the other pin, then part it off and glue it onto a boss and repeat on the other side. Its rather a longwinded method but I have done it before. An alternative would be to mill the shape with square pins – but turning it over to mill the back and ensure register would be a little difficult, although I guess it too could be glued into registered holes. not sure there is much in it! The easiest way to measure such things is to photograph them with a ruler and print it out A4 and scale from there – you need a good mm ruler graduated in 1/2 mm as in this pic, and a micrometer to check the pin diameters. Anyway its another job to keep me busy….
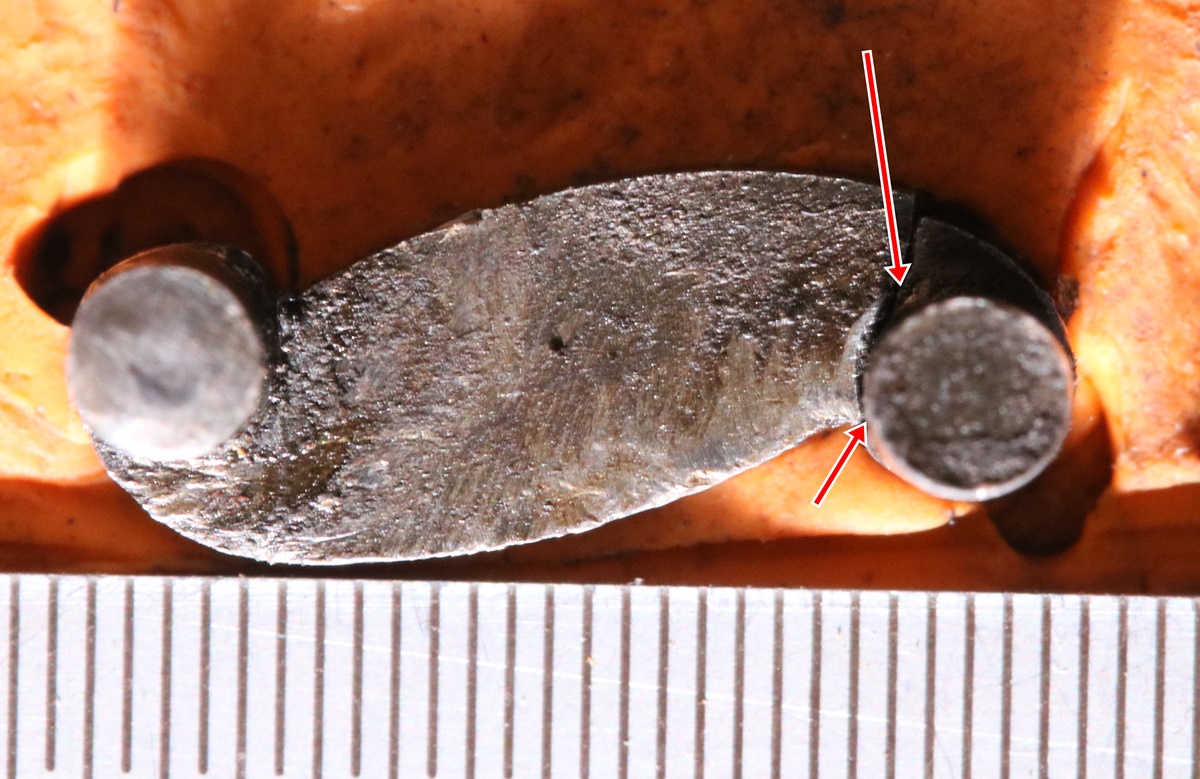
The break is just visible at the arrow tip.
1st July – half way through the year! Here is the promised pic of the finished trophy – off to cut the hedge now…..
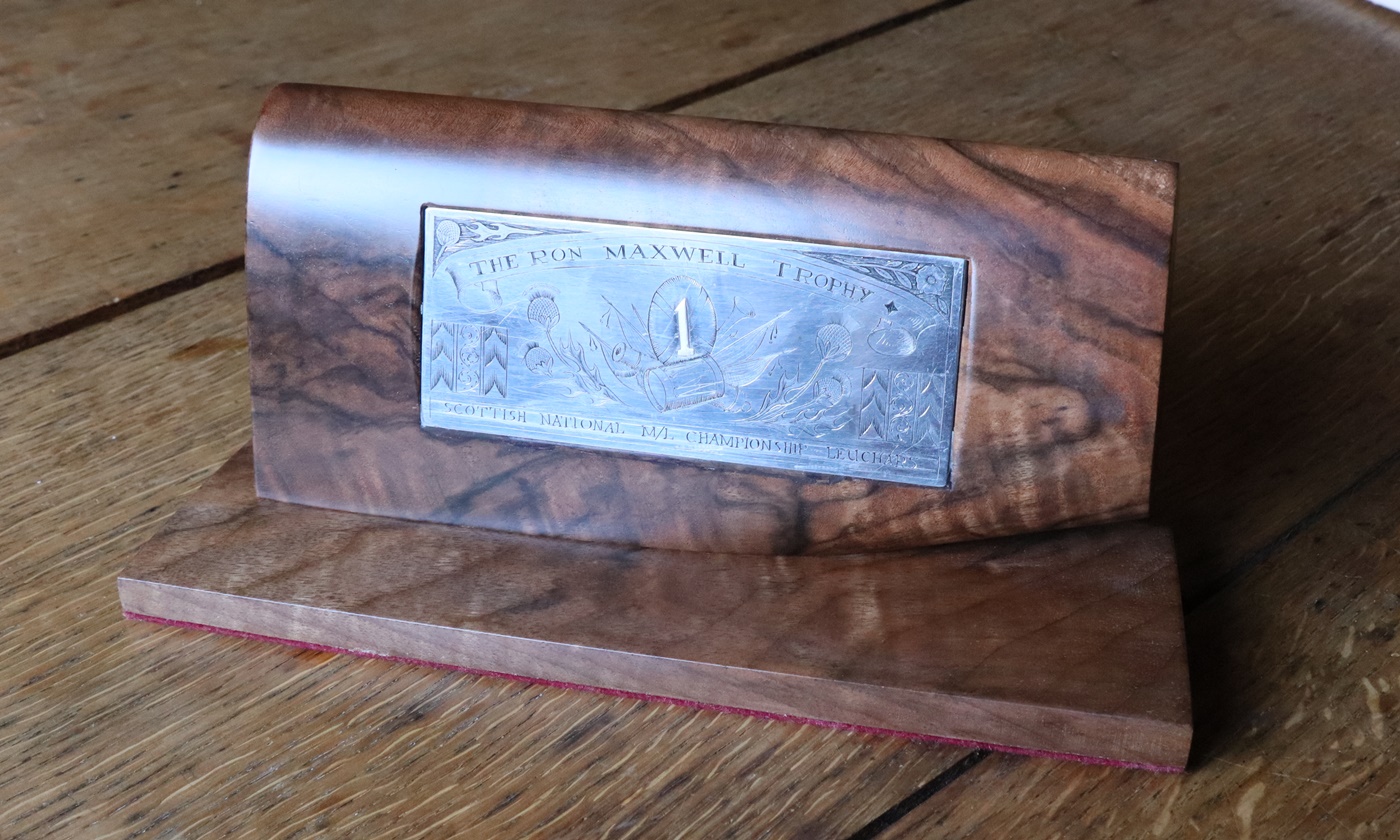
beautiful piece of old stock and offcut for base – but not very good photo!