This site contains details of what I do – it does not mean that it is safe or legal for you to do the same, and I accept no responsibility if you do. You are responsible for ensuring that what you do is within your capabilities and is safe and legal in your country. Guns, even antiques, can be dangerous and if you don’t know what you are doing get expert help. Many antique guns are of historic and/or financial value, and its your responsibility to find out if what you want to do will damage their value. Remember, leaving them as they are won’t diminish their value but inappropriate repair might well make them worth less, maybe much less! If in doubt don’t do it.
______________________________________________________
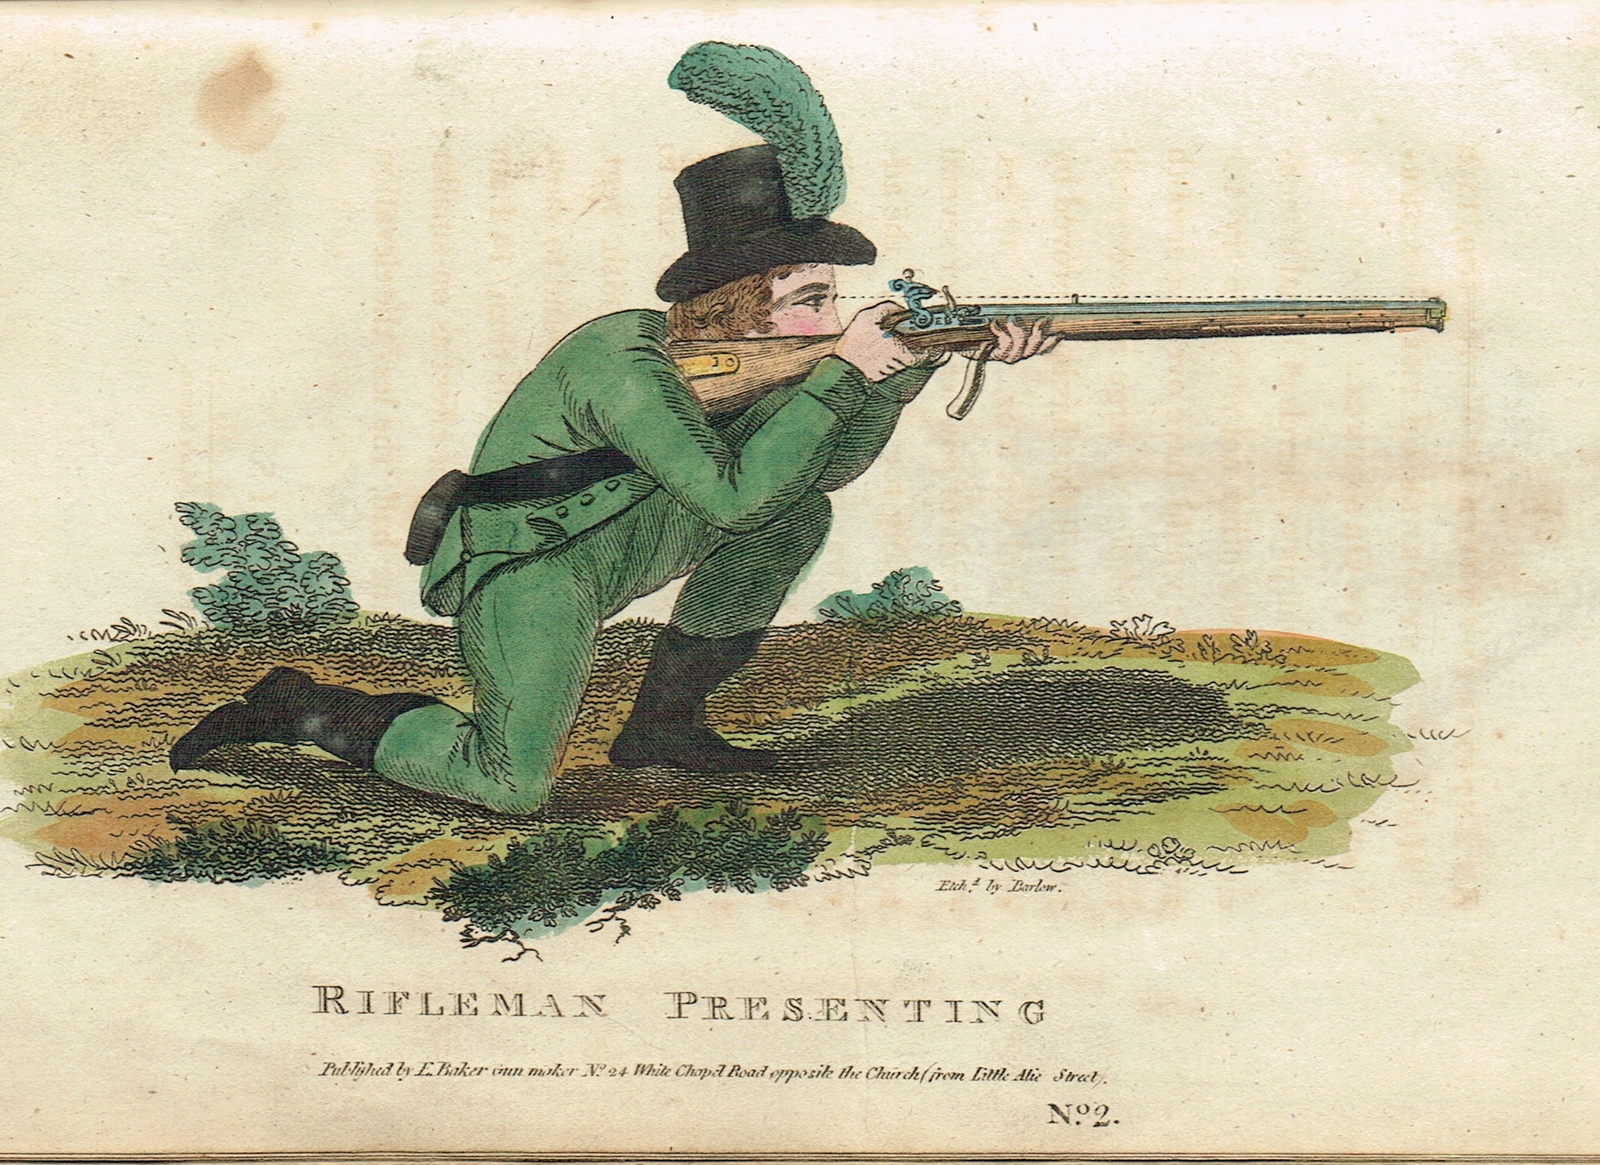
I assume he is holding the sling out of the way with his left hand? from Ezakial Baker’s Practice etc..
Find your way around – There is a MENU of PAGES used for fixed items along the top of the screen.
All the regular POSTS are in the HOME page – use the menus on the right to jump to whichever POST you want, or the MENU below the header will show you POSTS that are relevant to the given subject and the top menu on the right will keep you up to date with changes…
Welcome to my site – you’ll find this post is a sort of diary where I put things I’m doing that are (almost) relevant to the subject – they ‘fall off the bottom’ after a few weeks – bits from the diary may get put into existing or new posts when they fall off. Please feel free to contact me via the comments box in each post or by my email as per the CONTACT tab at the top. If I can I will respond – email will usually get a quicker response. I am fond of obscure English sayings which are marked* – you can look them up on Google if you need to interpret them.
(Photos on this site are copyright unless attributed)
___________________ DIARY ______________________
9th May – I’m back now, so can get back to keeping the blog up to date and doing a bit of gun play! Sunday at the Northern Shooting Show is more of a family day out – Saturday is for the serious shooters, so I had a steady stream of spectators but no so much involvement, although I did run out of screws to engrave and give away! It was mighty chilly again, but I snook off to a hotel for Sunday night before going to visit the Royal Armouries at Leeds at the invitation of an Emeritus curator who had come across this blog. I had a tour of the incredible museum with my expert guide, but the highlight was a visit to the store room where the full collection is held, where my host highlighted some incredible guns – the collection has everything, but is a bit light on the purely presentational stuff, which suits me as I prefer antiques that were made for use. It really made me revise my ideas about the standard of workmanship possible – some of the fine engraving and steel carving of the European gunmakers is staggering, and made me realise how crude most of the stuff I do is. Being able to handle some of them (with cotton gloves!) was awsome. I would love to put together a book on gun engraving, which would in reality have to be a picture book with fantastic photos – its been a long term ambition of mine to do it – I had better learn to take better photographs and chat up the armouries and a few museums! Anyway I’m inspired to try harder with my engraving – I hadn’t done much in the months before the show, and it took me all Saturday to get back into the swing of it – when I haven’t done any for a while I always end up breaking the tips off gravers – on Saturday morning I had a dump of half a dozen broken tips by half way through the morning, and it wasn’t until Sunday morning that I had the knack of sharpening the gravers to cut sweetly. One interesting aspect of engraving I shared with a couple of engravers who visited the stand was that they too found that a freshly sharpened graver needed to wear down a little before it was cutting at its best, which explains why I don’t often use my very hard Glensteel gravers as they don’t seem to get to the sweet spot. I think they are much more popular with the GRS and Lindsay users where the feel of the cut is masked by the powered cutting – another point that was made to me was how different the engraving from these machines, and from chasing, look compared to that done by simple push engraving – as readers of this blog will be aware, it’s a point I feel strongly about. I can tell at a glance which technique was used to cut a design.
Along with my visit to the Royal Armouries I got to visit the National Firearms Collection which is near the Armouries – its the formal national collection of arms, particularly military arms, including modern arms from all nations, and arms kept for forensic purposes – as at the Armouries, most of the military stuff is in quantities that would arm a platoon or two, so its a massive warehouse. I was very privileged to visit as its normally out of bounds through three sets of security doors – but I was able to handle the 1864 Warner Carbine, and see how the breech block was configured so I can think about making one for mine – unfortunately I had to hand over my phone at the entrance so couldn’t photograph it. I’d thoroughly recommend a visit to the Armouries – entrance is free and its awsome – go before trendy new museum folk get rid of all the guns from the displays because its not politically correct!
6th May – Very busy day at the Northern Shooting Show with lots of interest in gun engraving. I gave away lots of engraved screws to children and several to adults. I had visits from several people who have visited this website, which was very satisfying, including a couple of engravers who were also re-enactors – one who even knew what ‘narlbending’ was! (It’s the Viking answer to knitting and is how they made their socks – don’t say this website doesn’t educate you in directions you never thought possible). Anyway its pretty chilly here but we are looking forward to another busy day tomorrow. The popularity of the show is put down to the reasonable entrance price compared to many (£10). Anyway, I’m looking forward to welcoming more website visitors tomorrow.
4th May – I went with Dick to see a firearms dealer in the south of England, and saw amongst his many hundreds of old guns one that would qualify for my collection of curious firearms inventions. It was a percussion double shotgun with back action locks, well made and signed Firearms Manufactory (?) on the barrel, the locks unsigned. Its special feature was a framework pivoted either side on the front lower corner of the lockplates that carried a bridge that in the backward position introduced 2 pads in the way of the cocks to prevent them hitting the nipples. The bridge was moved by a spring loaded sliding member under the fore end with a trigger shaped frame sticking down at the front of the fore end. To fire the gun the ‘trigger’ had to be pulled back by the left hand while it was supporting the gun, against the fairly strong spring, in order to swing the pads out of the path of the cocks. It seemed a very difficult maneuver to operate the trigger at the same time as shooting the gun. It was quite a decently made gun but totally impractical – a relic of a short period when percussion guns were thought more dangerous than flintlocks and some odd safety devices were patented. I am sorry to say I didn’t get a photo, but I did express an interest and I will follow it up. I’m more or less ready to set off for Harrogate – my contact at the Royal Armories tells me the good news that there are one or more Warner’s patent carbines to view. If you are at the Northern Shooting show be sure to visit the Artisans and Classics pavilion opposite Hall 1 and introduce yourself to me – I’ll be behind my microscope!
3rd May – The number of attacks on this site dropped quite dramatically a few days ago – from about 100 a day to about 25 – there seem to have been a network of ‘bots’ installed on hacked computers that was actively targeting all WordPress sites (this one uses wordpress) under the control a a hacker controlled computer that stayed hidden. It looks as if the network has more or less stopped its activities – we hope permanently but who knows? Maybe one of the security services has taken it out? There is a whole dirty world out there!
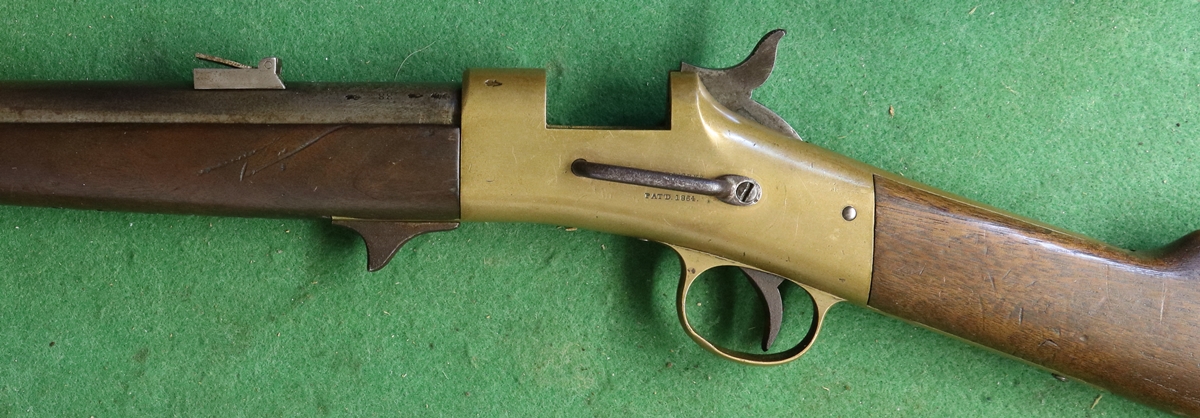
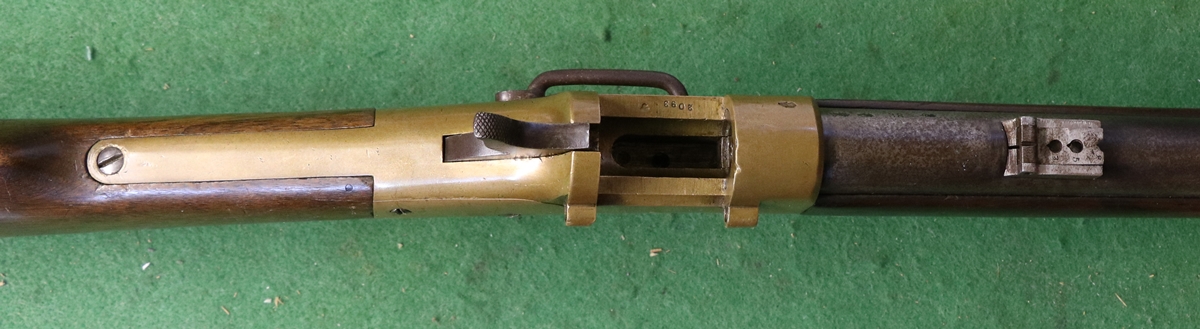
3rd May – Still sorting out what to take of interest to display at the show this w/e. I’ll gather all the military flint and percussion pistols I can lay hands on as they are popular. One of my objectives in visiting the Royal Armouries is to see the Warner’s Patent carbine I believe they have. I have one that is missing its breech block, and if I could get a really good look at a similar one, I’d have a go at making a new one – I have a piece of brass that is about the right colour that I rough cast into a block some time ago – I think its enough for two goes… The Warner carbine was one of many carbine designs rushed out for the American Civil war in 1864 – like many of the other designs, the military was so desperate that they ordered some of each, and about 4001 Warners were made by Warner and later by Greene Rifle Works in Worcester mass. Most of these were never issue and were sold off in 1866 at the end of hostilities – many ending up in France. Some appear to have ended up in England and have London proof marks – they are .50 calibre, although many were made for 56-56 Spencer cartridges. The breech mechanism is similar to the Snider, except that it has a separate slider in front of the trigger to move the extractor claw. Presumably the gun then had to be turned over to drop the case out as it would be too hot to handle for a minute or so. It will go to the show, and I’ll take my rough old Snider 1853 carbine conversion as a comparison.

2nd May – It being Giles’s birthday we went out for a meal instead of concentrating on this blog – disgraceful! Today I began to sort out stuff to take up to Harrogate for the Northern Shooting Show, and making labels for the guns and pistols I’ll take. I’m looking forward to going to the Royal Armouries after the show – somehow York seems miles away, whereas its only about 3 hours drive, so I should have gone ages ago! I had a battle with the printer trying to get it to print a batch of business cards to take – sometimes I think technology is taking its revenge for the 40 odd years I spent pushing it around to achieve my evil ways (or something like that)! If anyone reading this wants to see any particular guns at Harrogate, let me know!
1st May I decided to clean out some of the workshop to celebrate the bank holiday, but didn’t get far. I did sharpen about 20 gravers, but then blunted or chipped half a dozen engraving a barrel for Martin – engraving barrels is always difficult because you can’t rotate the workpiece to do curves – you have to do it all with the tool and as I am limited as to where I can point the barrel some cuts are quite awkward and you end up cutting curves the ‘un-natural’ way – clockwise is more difficult for a right handed person. This barrel still had a fairly crisp coating of rust/browning that made it more difficult still as the metal underneath was softer than the surface layer – anyway its got done! I wiped it over with G96 gun blue that turned it dark and made it look as if it had always been there….
30th April – Went to North Norfolk for lunch with friends followed by a long walk so nothing much to report. As often happens the number of visitors to this site goes down at weekends, but only by a little – it now gets over 200 visitors a day on average, and each visitor looks at an average of from 5 to 15 different posts. Add to that around 60 visitors a day who get stopped from visiting the site because they are up to no good, and it makes the site quite popular, given its specialist nature! It is difficult to ascertain exactly how many of those visits are from regulars, but it looks as if up to half of the visitors have visited the site before. Around 20 visits to the site come from searches, almost all through Google. Most of the visits come from the UK and the US, but the list of countries that have visited since the site went live a couple of years ago totaled 182 when I last looked – I didn’t know there were that many countries! I suppose that almost all the visits from obscure countries like Papua New Guinea and Ulan Bator are actually the hackers in other countries using hacked computers in those countries to attempt logins, and all of those will have been blocked by the software. I have some difficulty in knowing which statistics include the blocked visits, and which exclude them. There is a long blacklist of visitors who have tried to hack into the site, and they are permanently blocked from any access to the site. Keeping the site interesting and safe is quite a labour, but its gratifying when I get appreciative emails and comments, which I do quite often, usually tied to questions about guns they have recently acquired and want to know what they are and if we will repair them – I’ve made a number of interesting acquaintances that way!
29 April – Derusted Dick’s bits and pieces – I had to clean out the old washing-up bowl I use for electrolysis as it was getting a bit full of rust – the process effectively takes the rust off the objects and puts it on the piece of scrap steel that is used as the other (+ve) electrode – if course it doesn’t actually do that, its just looks like that! In fact the electric current splits water molecules into hydrogen that is released at the object, and oxygen at the scrap electrode. The hydrogen and oxygen are in a very reactive state (nascent) so the oxygen rusts the electrode and the hydrogen reduces the rust (iron oxide) on the object to a different form that doesn’t adhere and becomes a dark powder that is easily removed. The caustic soda in the solution is just so that current will flow through the water, but it has the added advantage that it attacks any oil and grease on the parts. See the article in ARTICLES page for how to do it. The parts of the Witton and Daw (see photo below) were done in two batches, each for about an hour, at a constant current of about 2.5 Amps with the voltage around 10 volts. Doing all the small parts is tedious, but I have a number of wires with miniature crocodile clips to hold screws etc They were then dried and fine wire brushed and lightly sprayed with Napier cleaner that contains a vapour phase inhibitor VP 90. When I went up to look at the Sandringham gun collection Purdey’s were there checking the guns, they didn’t oil any of the guns – just put a fresh VP 90 sachet or two in each display case – I keep a sachet in each gun cabinet or cupboard – if its good enough for Purdey and the Royal guns, its good enough for me!.
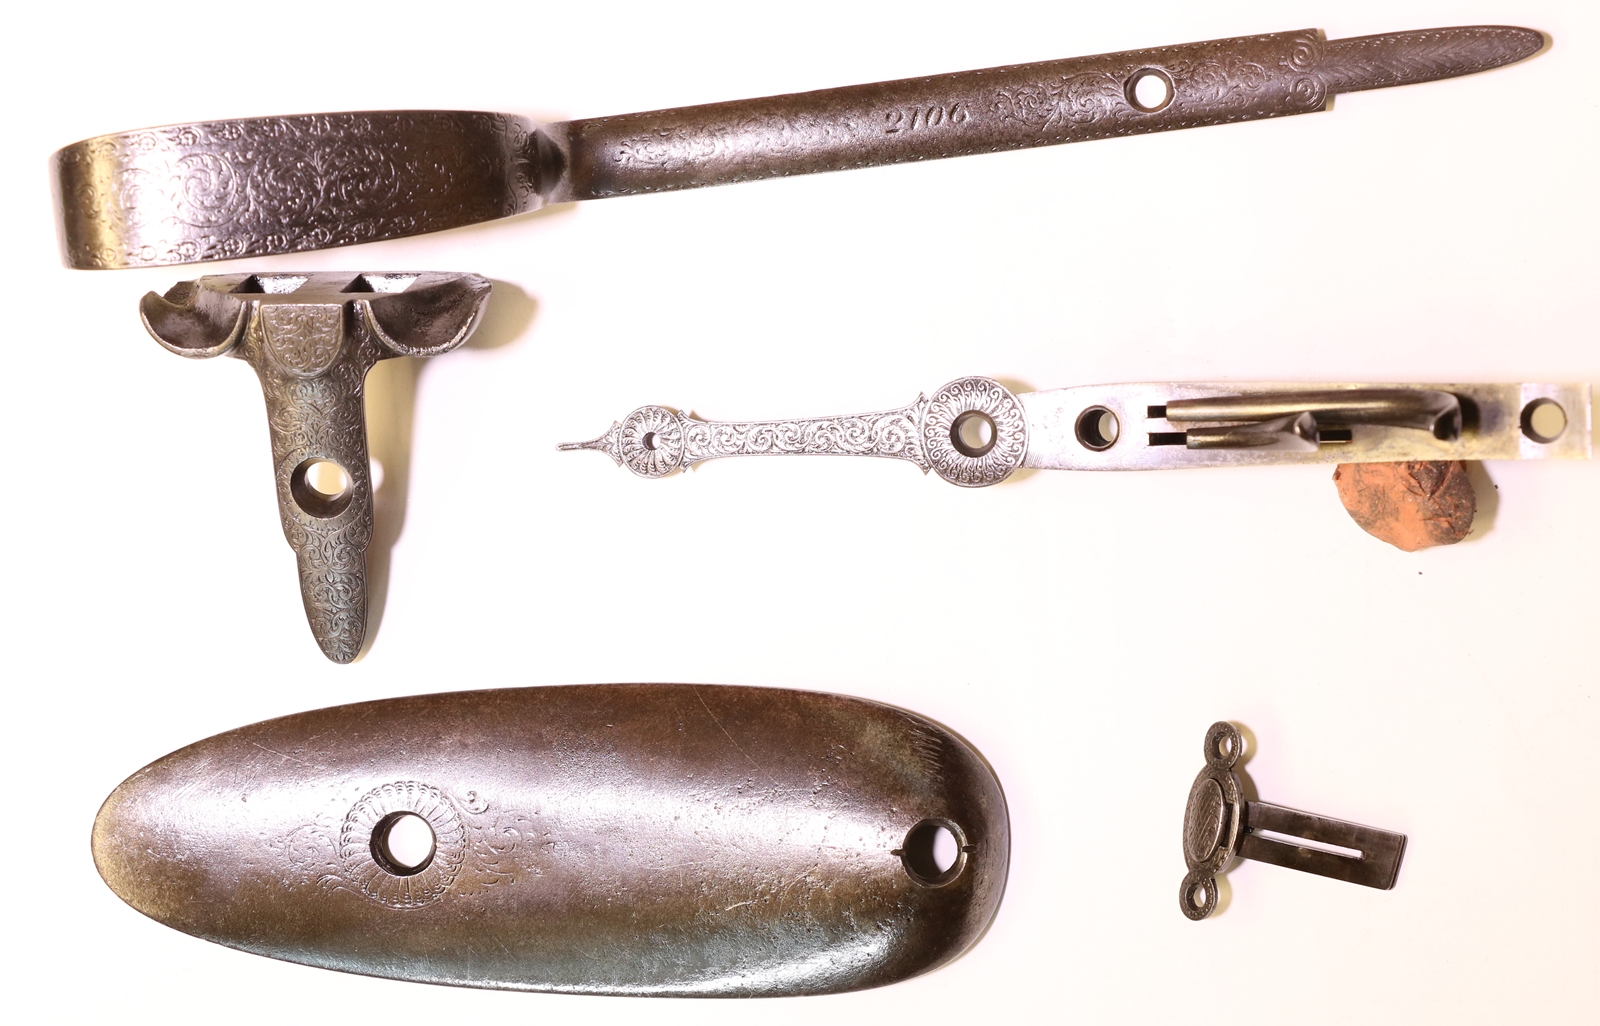
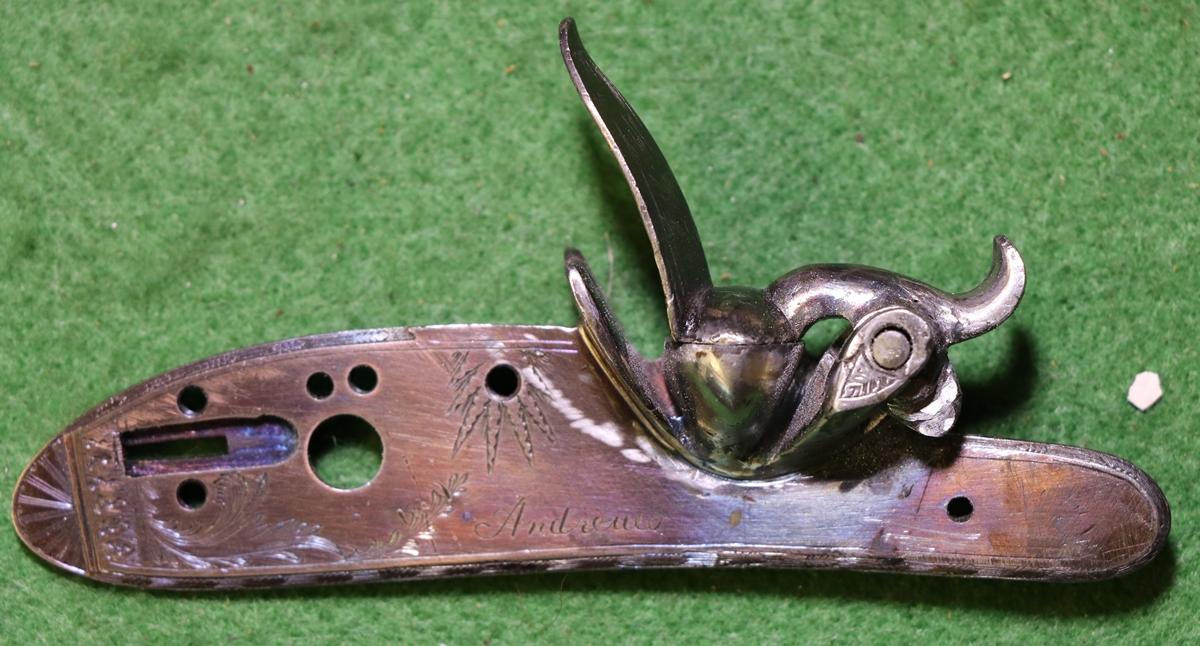
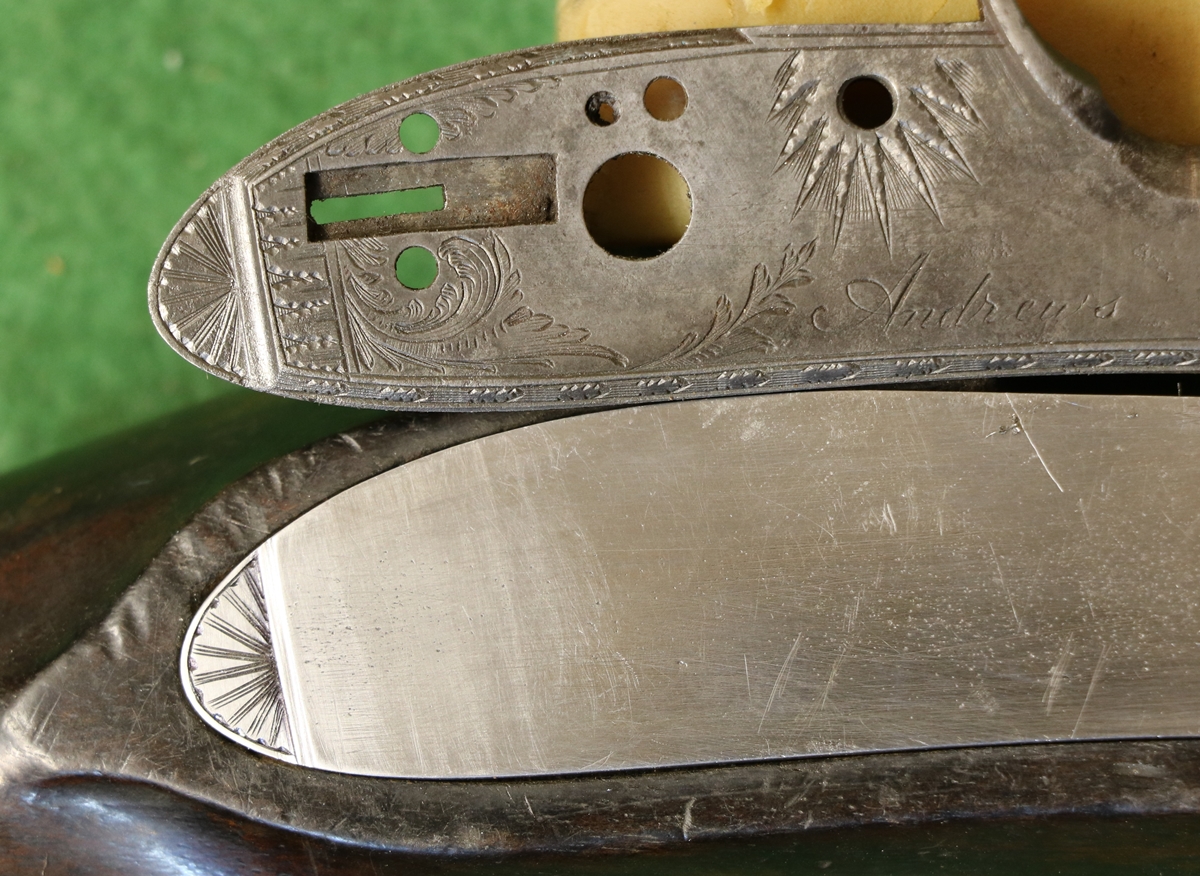
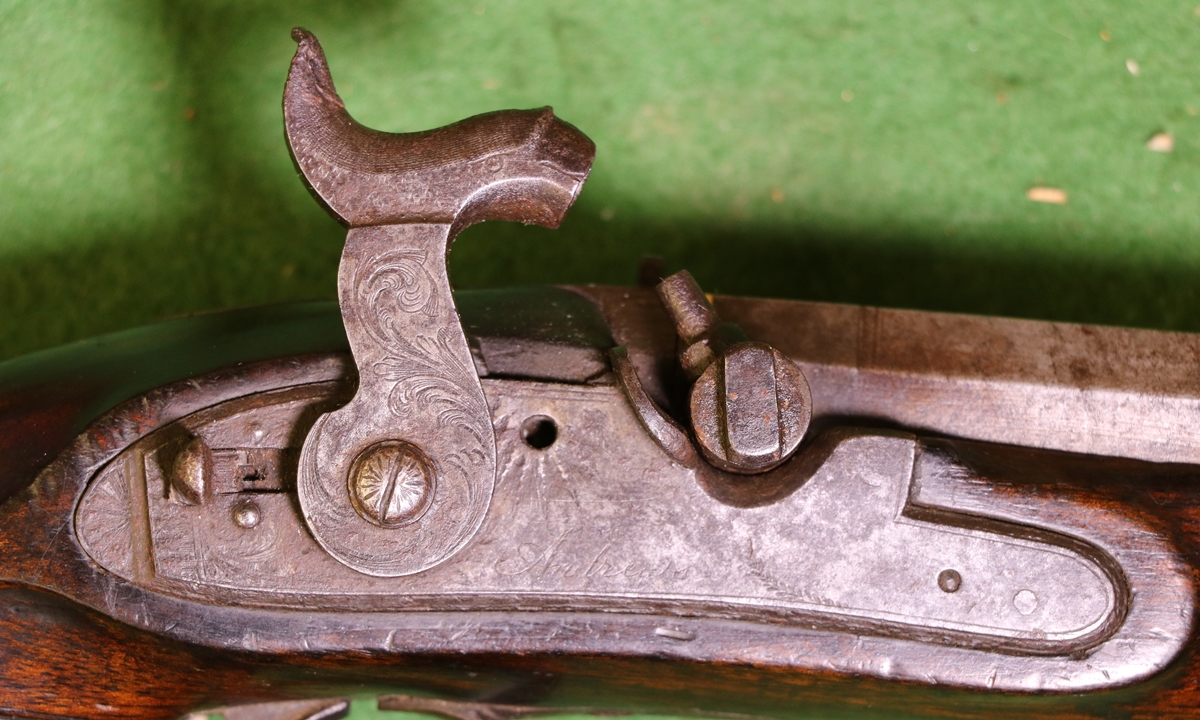
Fine scroll engraving, the finial on the triggerplate is particularly fine and in perfect condition. There are some deep corrosion pits in the flash guards – it might be worth welding and reshaping the inner surfaces as the rest of it is perfect.
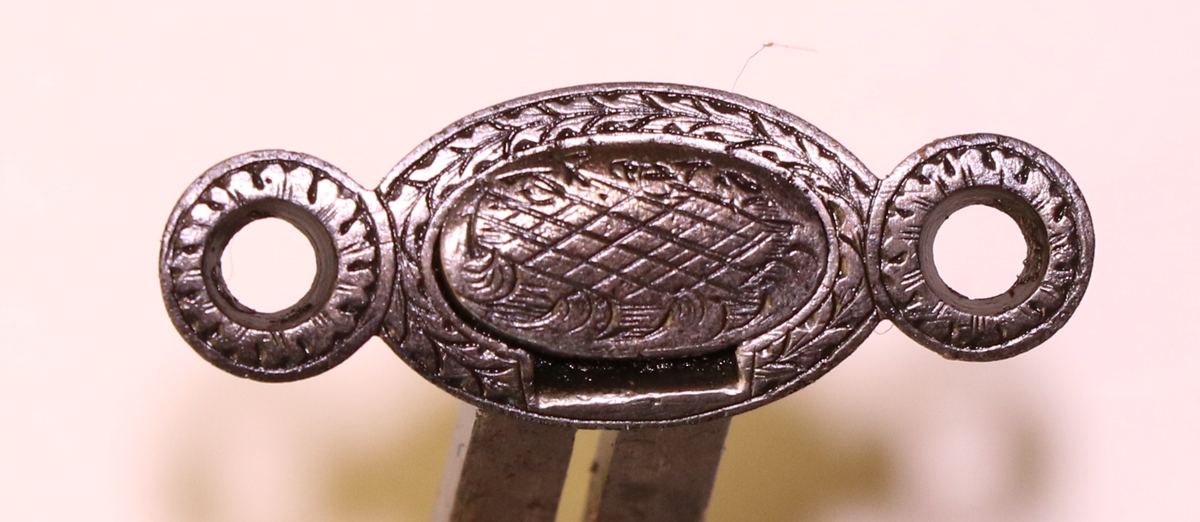
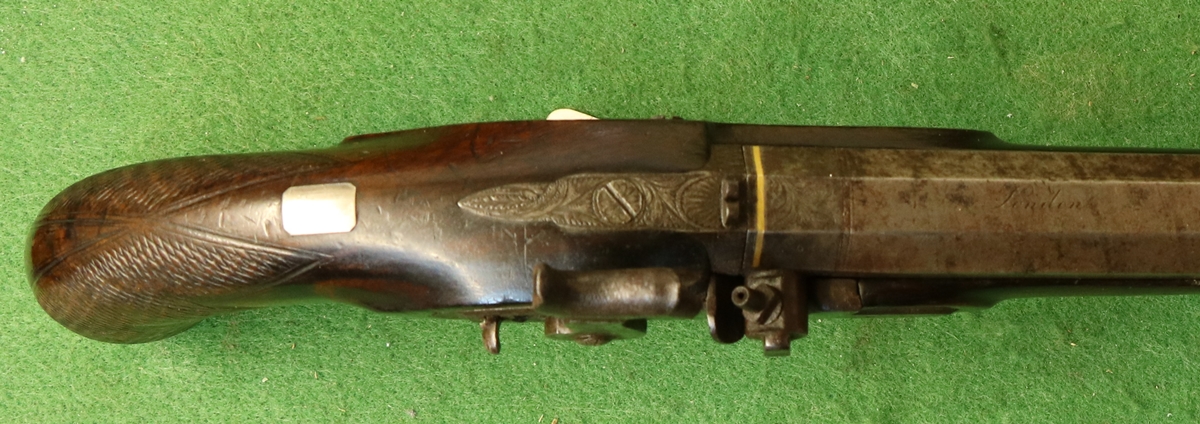
The escutcheon of the bolt is unusually good – it is a substantial steel piece with the head of the bolt recessed flush and a slot under the head for a screwdriver to get it out.
28th April – Dick brought over the furniture of the Witton & Daw to be derusted – its not in bad shape but the caustic gets rid of all the old grease and muck and the electrolysis gets rid of the rust, leaving it much easier to see what needs doing, and means that the fit to the wood is not spoilt by rust.
Emails have started to arrive about preparations for the Northern Shooting Show at Harrogate next weekend – I started to sort out a few bits to engrave while I talk to people – its no good trying to do a ‘proper’ job as I can’t keep up enough concentration and still interact. I have made a batch of Percussion decapping tools that I can engrave in my sleep, more or less, and also the usual supply of blank screw heads so that I can engrave flowers and give them to the young children – the girls in particular love small, intricate things and take a lot of interest in engraving, it must be boring for them being dragged round a gun show so I make a point of engaging with them. I might take my electric hone this time as there is power and I ran out of gravers last time – sharpening them by hand is tedious when you are used to a motor driven hone! If you are coming to the show be sure to introduce yourself! I’ll bring the New Land Hussar’s pistol and the Heavy Dragoon with me in case anyone wants to have a look at them.
Parts of the Witton and Daw to derust – not in bad condition!
28th April – I’ve put post on Giles’s woodturning Shou Sugi Ban …… see it on recent posts menu to the right….
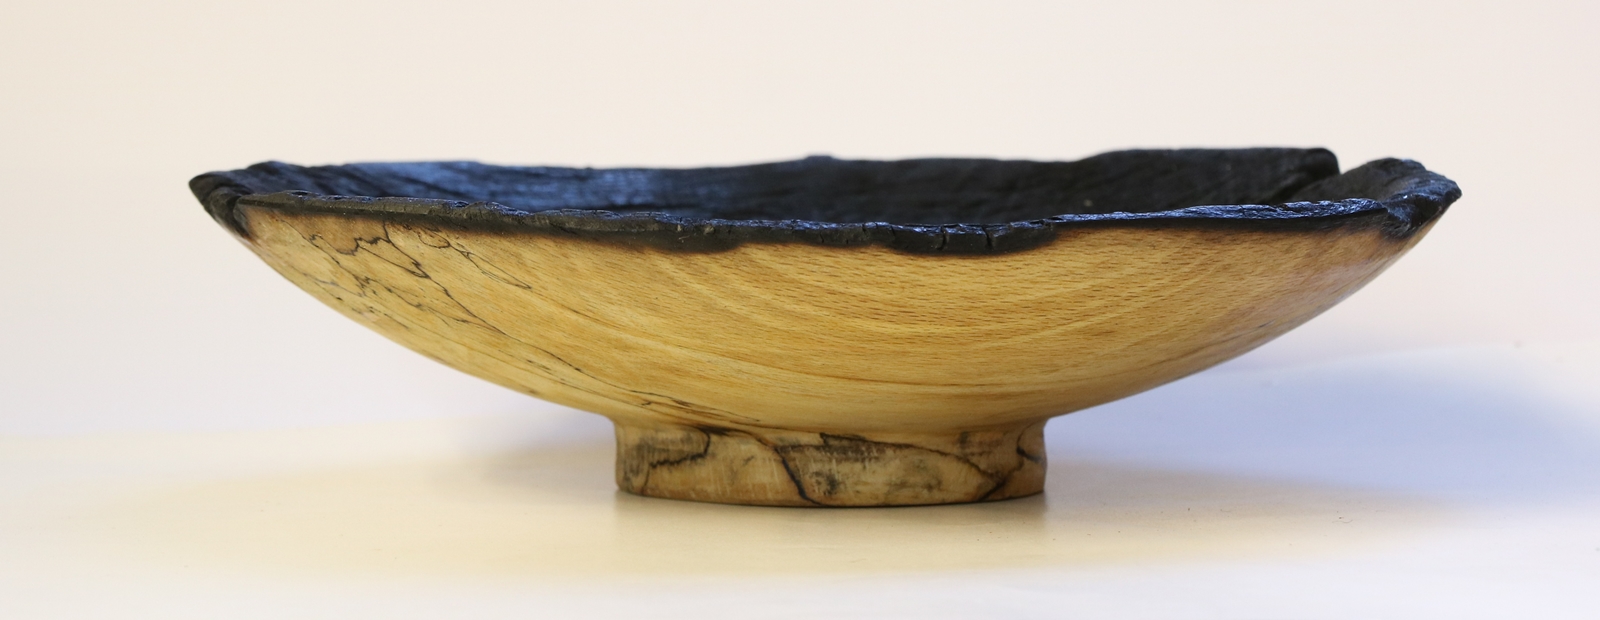
27th April – I went to Dick’s and took a couple of nice military pistols he has fettled to put on this site for sale – there is a very nice New Land pattern Officer’s Pistol signed to the 1 st Hussars and a nice Heavy Dragoon pistol by Henry Nock with the number 14 on the trigger guard – presumably one of a number issued to a privately raised unit. I have to say both look stunning and the New Land is particularly fine because of its provenance. See GUNS FOR SALE for photos. We sat down and had a discussion about prices – we want to avoid the excesses of some well known dealers and offer guns that people will want to own at sensible prices so that they are a reasonable option for those beginning a collection. They have all been expertly restored and mostly any serious work is recorded on this website so there should be no hidden nasties ! – we will always consider offers but be warned that we have already tried to keep them low. I will be adding a post on a bowl that Giles turned at the weekend as its a trendy and interesting technique, if not immensly practical – not that that ever bothered Giles……. (the technique is called Shou Sugi Ban – japanese burnt wood)
New Land Pistol of 1st Hussars ( Kings German Legion) with bolted Paget pattern lock – see for sale page…

Henry Nock private Heavy Dragoon pistol – see for sale page….
26th April – My battles with technology continued unabated! I struggled to get my powerpoint stuff working for my talk to the children at the Bill Tutte club and as soon as I had it working the projector went so dim that none of the slides could be read anyway – so I had to do it all on a whiteboard, which I really prefer anyway, being a bit of a Luddite. Now I just have to get the Microbit computer program running for tomorrow at 9, so I’m sorry, no gun waffle tonight……. Except reading Lister’s book I noticed that he thought guns with a false breech or a lock fixed with one screw and a hook on the front were unusual – he must have mainly dealt with flinlocks.
25th April Computers really bug me! I spent an hour sorting out a powerpoint presentation when my Windows 10 computer decided to shut down to install upgrades and lost the work – Microsoft decided to include uncontrolled upgrades in Windows 10 and made it almost impossible to circumvent them. Grrrrr…….. By the evening I was in need of a little soothing so got out my all time favourite book “Antique Firearms – their care repair and restoration” by Ronald Lister which is a wonderful example of a 1960’s ‘gun restoration for dummies’. Among others, there is a chapter on the ideal workshop and one on tools – the workshop chapter has a full paragraph describing his cupboard, with all the dimensions and what it was made of and what you can put in it! Oh for the days of a simple life…. My second favourite book is called ‘Foundry Irons’ by Kirk and lists all the types of iron a 1911 American foundry might make, complete with recipes – even in the face of terrible insomnia it is guaranteed to send me to sleep within minutes – I’ve never got past the first chapter….. Serious guns are going to have to wait until Friday as I was reminded that I said I would go into school on Thursday and help the children with some new Microbit computers – I did play with them once for half an hour, so I suppose that makes me an expert! I hope the children are on the ball! Children and computers is turning into a bit of a thing… taking over life…. I did manage to derust the Witton and Daw locks today (see below), and Dick and I had a further discussion about the 4 barreled pistol – We have been puzzled as to how it can hold together when fired as the single powder chamber is large enough to hold around 5 drams of powder, but the screw threads don’t fit very securely and the barrels are just soldered in, plus the barrel alignment finishes up rather out of line. I did think that maybe the thread and alignment were because the barrels got swapped for another similar pistol, but now we think that actually the barrels are an inferior Indian? replacement and not at all of the quality of the action body – we have doubts as to whether they would stand anything other than a minute charge, and would also explain the very poor fit of the thread, and the misalignment. If you shot the pistol as it is, the barrels would become the projectile! Probably the original barrels would be cast brass in one piece?
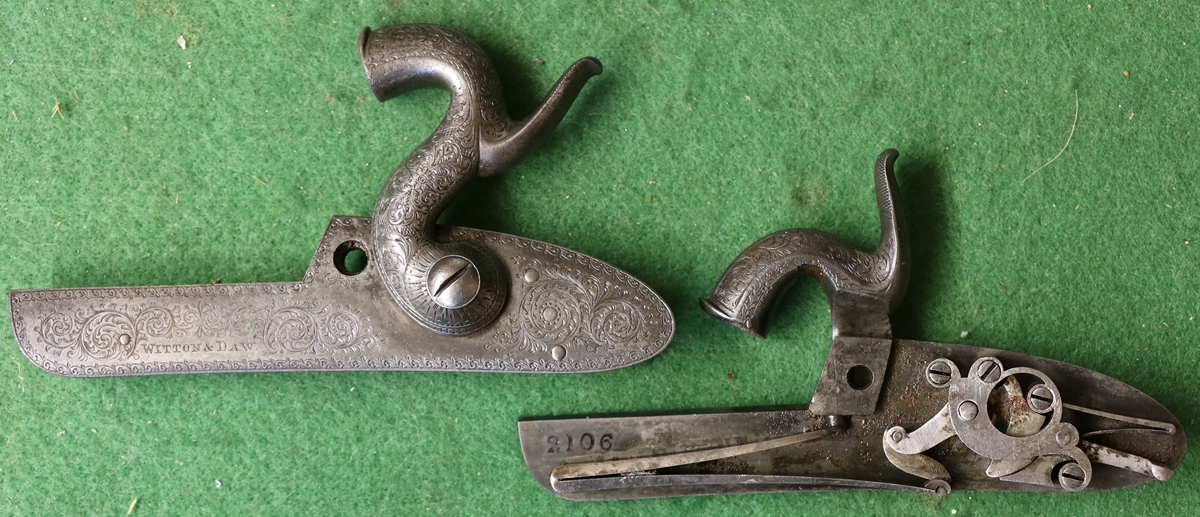
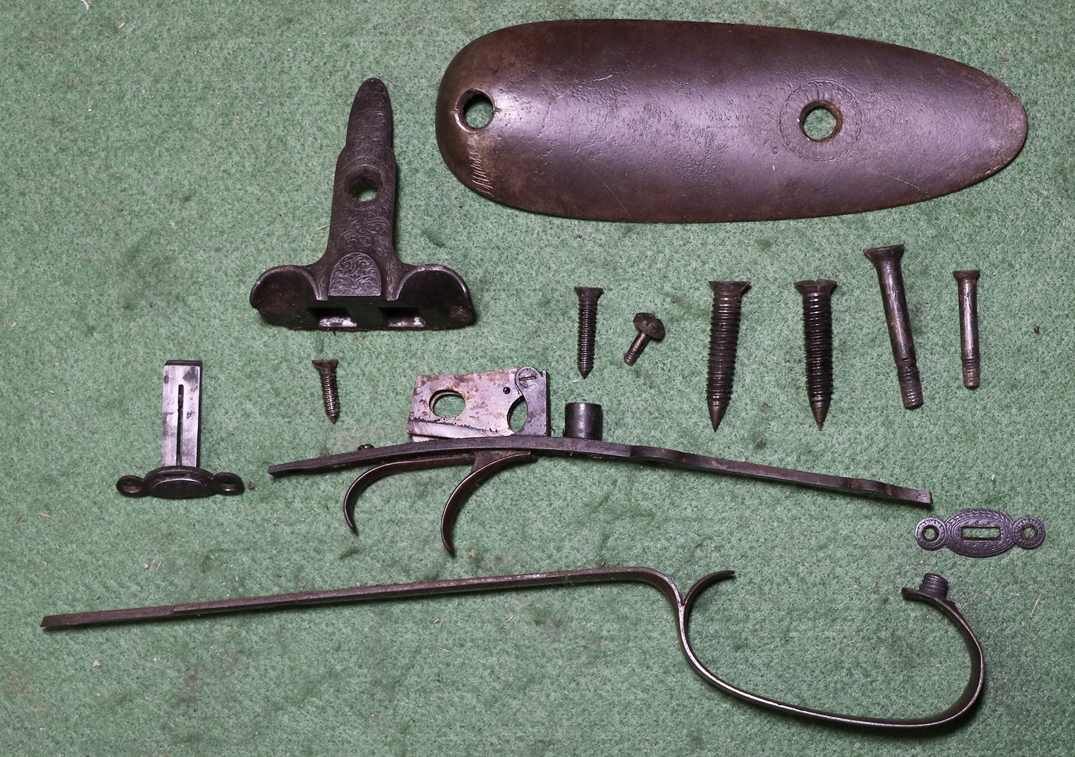
The Witton and Daw locks (here derusted) are unusual in that they fit a percussion round bodied gun – the bottom edge of the locks is rounded, although it doesn’t show in this photo. Its a good quality gun – its a shame that the barrels are not better or I would have bought it myself to shoot. The plain cock screw is wrong – I don’t think I’ve ever seen a highly engraved lock and cocks with a dead plain screw! No doubt ithey will come under my graver at some point.
24th April – Busy sorting out my talk to the children at the Bill Tutte club on Wednesday – I was trying to scan some slides into a powerpoint but the scanner would not connect to any of my computers, even the old XP one that is contemporary with the scanner – technology marches on , mostly leaving me in its wake…… Dick came over to collect the stuff I did last night and brought the pistols to which the cock belonged – but I forgot to photograph them. They are pretty interesting – a pair of smallish bore long barreled pistols with very tapered barrels engraved TOW and GRIFFIN LONDON with diagonal silver cross at the foresight but, apart from the barrels they look very French in the locks, cocks, highly carved stock with wavy silver wire decoration and continental style furniture – they are percussion, which of course isn’t right for Tow and Griffin who used the joint name for a few years before Griffin gave way to Tow, who was originally Griffin’s barrel maker ( G & T was approx 177x – 1778 ). In fact the usual naming had the two names the other way round. Anyway I’m not sure what was going on – I suspect that the pistols were made as percussion pistols in France using a pair of old T & G barrels, and that none of the rest of the original flintlock was incorporated. It could I suppose be that they were made in France as flintlocks and converted there.I have a French Long gun with almost identical cocks and similar locks made in Lyon, so I’m pretty sure that it was made in France, at least in its final incarnation. I’ll try to get a photo before they disappear…….Dick is anxious to get his hands on the Andrews lock and finish it off as he doesn’t think much of my filing on the final shaping (in that I think he is quite justified!). Anyway its a swap for my engraving and welding – I had better touch up a few welding faults on the lock before I hand it over. He bought me a pair of locks from the Witton and Daw from Holts last sale that need the derusting treatment – maybe I’ll do that tomorrow, although I have STEM club in the afternoon to sort out….. How do I come to have so many things to do? (answers on a postcard please!)
23rd April – The weather got pleasant to be outside so the boat got all the attention until evening! I got a call from Dick asking when I was intending to do the welding and engraving so I figured I had better do it there and then, which I did. I put a little extra weld on the spur of the cock as it was a bit thin compared to its mate on the other gun of the pair – I will leave it to Dick to file up, I did a rough shaping just to make sure I had put on enough metal. I also engraved the false breech – a 10 minute job.


22nd April – Back from the Arms Fair, which was not exactly teeming with buyers! I formed the conclusion that the volume of sales is not high and that dealers are keeping their turnover up by increasing their prices – but then I am known to be a a cynic! A few very nice guns were on show – including the inevitable cased pairs of Manton flintlock duelling pistols – but now they carry price tickets of £40,000 or so. There is a lot of overpriced mediocre stuff and I was a bit surprised at the price labels on Colt percussion revolvers – but I guess the main market is set by prices in the US and the fall in the pound pushes our prices up. I did see a few choice pieces on the Bonham’s stand that will be in the auction on 17th May – I had a look at the online catalogue and it struck me that Bonham’s estimates are about 50% less than Holt’s estimates for similar lots – but I bet that isn’t reflected in the actual hammer prices! Having said that, my rule of thumb is buy at Bonhams, sell at Holts! Anyway I’ll be viewing the Bonhams sale in due course. The C & T auction tomorrow has a few guns at very low estimates – I questioned this and was told that it was deliberate and they were expected to fetch at least twice or 3 times the top estimate – you have been warned. I did find the usual rogue guns – my old unknown friend had been busy with his graver on his trademark ‘Twigg’ signature….. One thing I noticed is that as the supply of good flintlocks at reasonable prices has dried up, the price of percussion pistols and long guns has climbed, and good cased percussion duelling and target pistols are well into 5 figures. All good fun, but I didn’t buy anything – I do, however, meet an increasing number of people I know as I get more into the hobby. One last observation – the average age of those at this and similar events is going up a year for each passing year….. that just isn’t sustainable ……………………………………………….
21st April – I started on the Andrew’s frizzen spring today – first turning up the boss for the end and tapping it 9 B.A. then welding it to a thinned down piece if spring steel, then bending it, then I got distracted! I got a phone call asking if I was going to the London Antique Arms fair tomorrow as if so I could collect a case I’d left with a friend to see if it fitted his pistols. I’d forgotten that it was this weekend, but I do need to go, if for no other reason than to try and get a handle on current prices. My ideas of prices seem way out when compared with a lot of dealer’s ideas, so I’ll try to ‘recalibrate’ myself! Also I like to play ‘ spot the fake’ – there is usually enough to keep me amused, although there are a couple of dealers who sheepishly close the boxes on one or two cased pistols if they see me coming – can’t think why! I went over to Dicks to have a look at the very impressive collection of pistols he has been playing with, and brought away a couple of small jobs – a gouge in a cock to be welded over, and a bit of border engraving on a false breech from a Nock pistol where it had been rebuilt as part of a re-conversion to flintlock. So I didn’t get far with the spring……
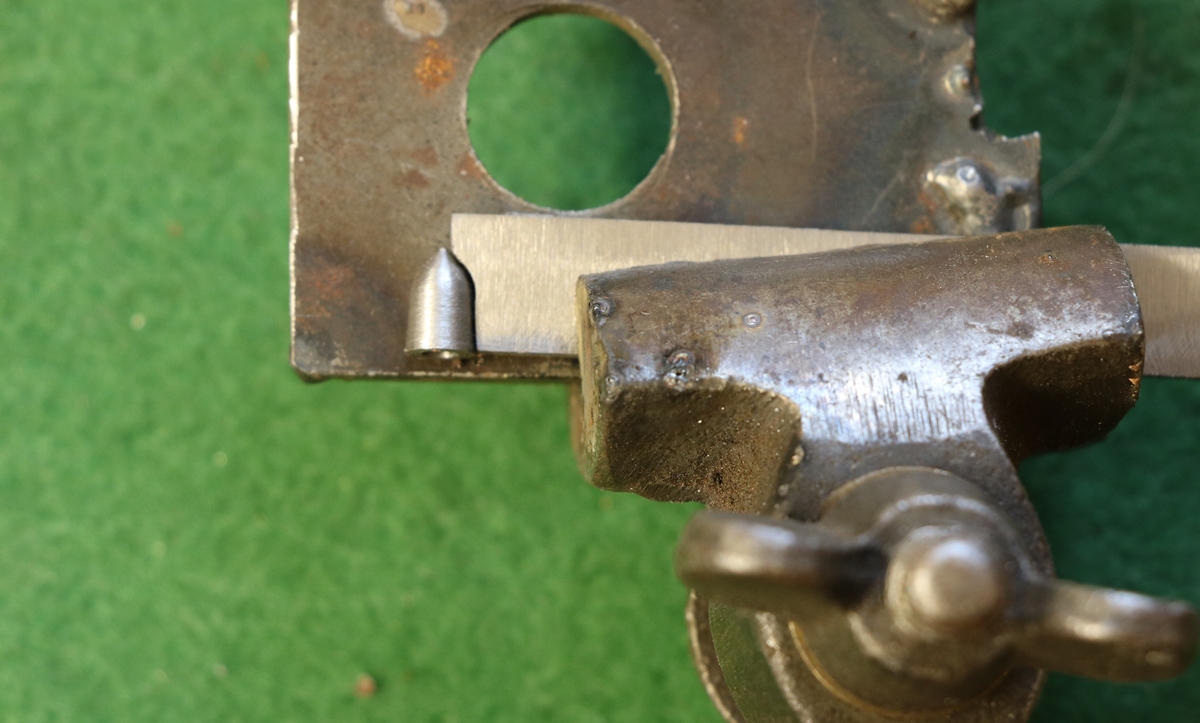
The turned boss in position on the spring blank – a small piece of Plasticine (modelling clay), not yet in place, held the boss in place while I tack welded it – it really does work very well , unlikely as it may seem!
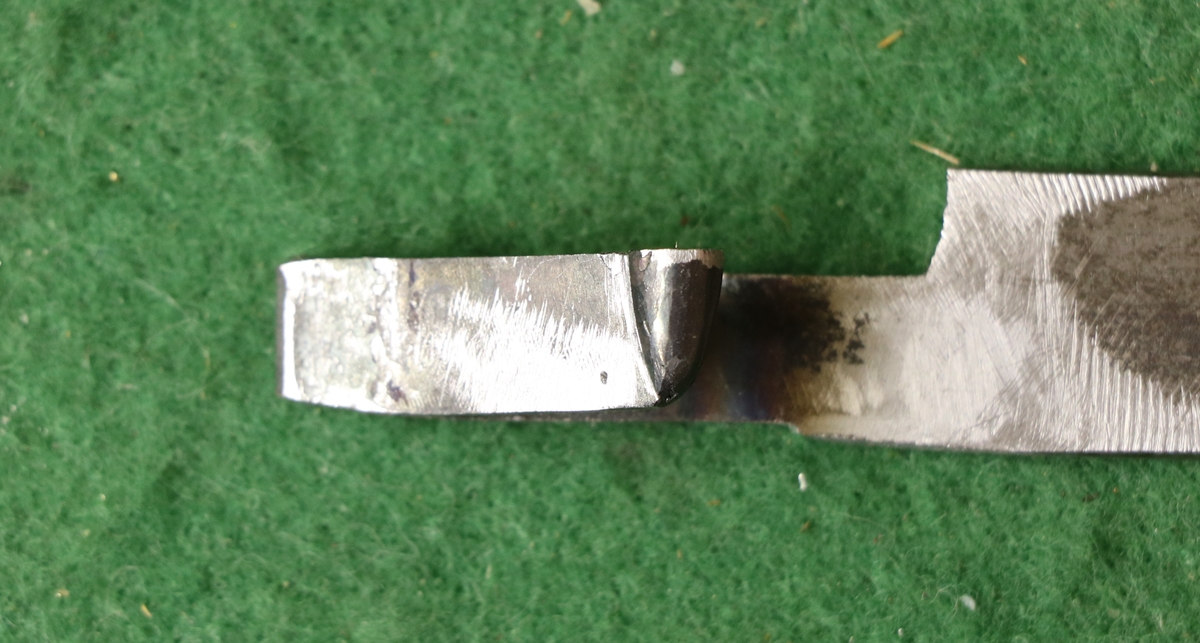
Bit more filing up required, then weld a pip on the side for the location and possibly a ramp for the tail of the frizzen. It really pays to leave a ‘handle’ on the part for as long as possible!
Nock False Breech to have the border carried round the new surface.
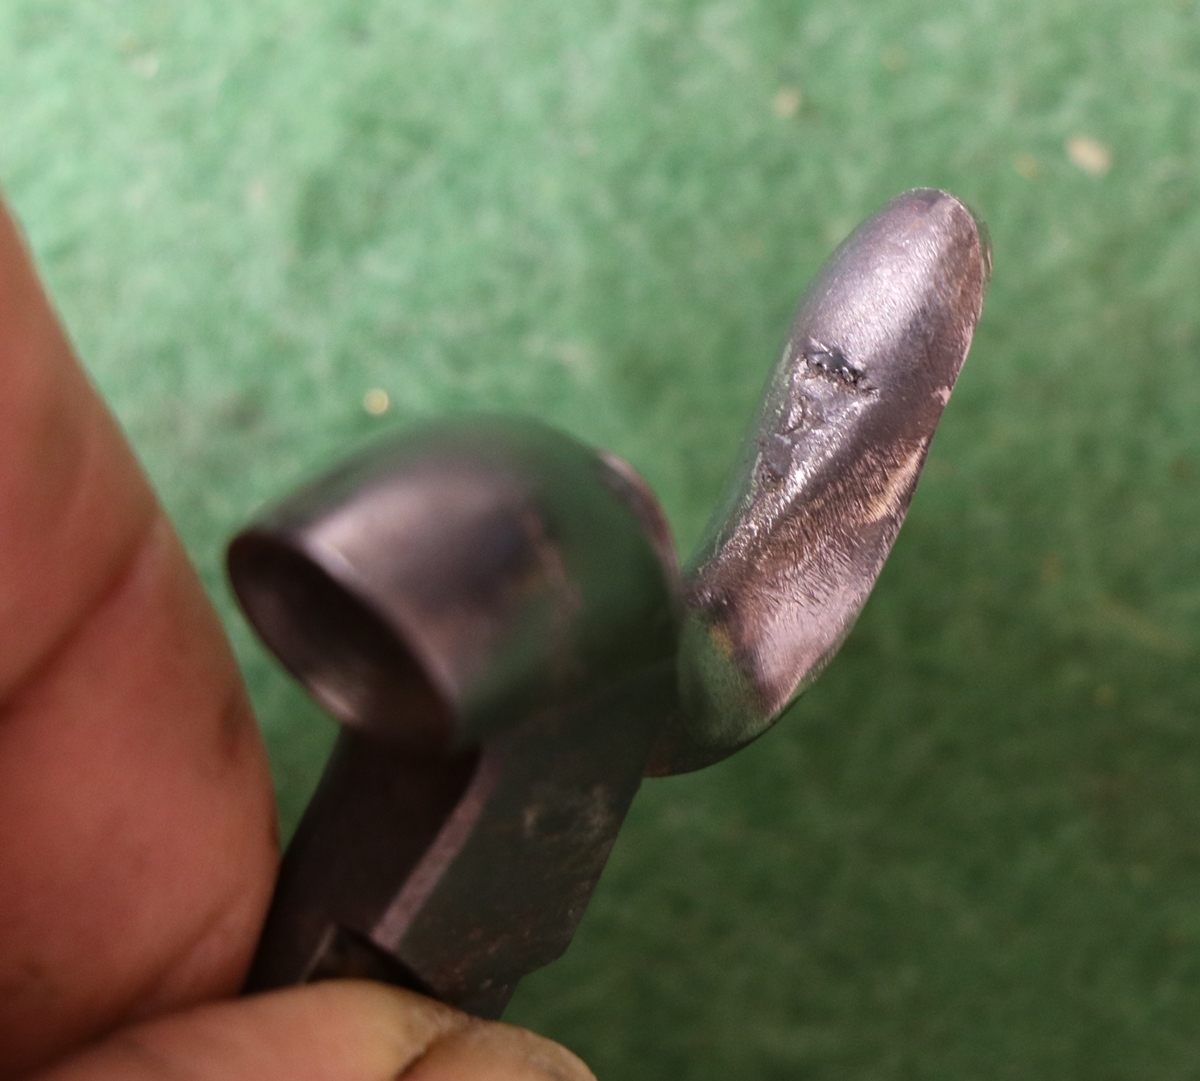
Damaged cock – it really needs some reshaping too as it looks a bit mean!
20th April – Very chilly and uninviting today so I didn’t feel drawn to boat fiddling! I determined to make some progress with the Andrews lock as its bugging me- I did some more welding to put the cam that contacts the ramp on the frizzen spring into a better place and widened the bearing surfaces into a smoother shape and made a shaft for a pivot – at the moment I can’t see how the original was fixed as the bearings both have clear holes through them the same size – I guess i may be horribly non traditional and just peen an axle in place – otherwise I will have to weld up the outside bearing hole and tap it M3 – but that risks loosing the alignment, which is critical. One problem that arises from the frizzen not really matching the pan section is that it is a bit tricky positioning the frizzen spring and the matching cam on the frizzen – the shape of the pan section limits the pan opening angle as the cam can’t go forward much because it hits the bearing arm…. Anyway I think I have just about got a compromise – it seems to open enough to clear the cock, so the next step is probably to make a frizzen spring – I have a couple of castings but neither has a short enough arm to fit the nose of the lockplate. I feel at the end of this rather frustrating process I might have a working lock (after a fashion) but I should have a much better understanding of the geometry of frizzens and pans! So the next problem is to make a frizzen spring – I will probably cut a blank from spring steel, then build up a boss to take the fixing screw with weld, and also build up the peg on the back then shape and bend the spring and finally weld on the top of the spring for the lump on the frizzen to engage with. I’ll post some pics while I do it. Here is today’s work;-
The outer hole for the frizzen bearing is a bit oval – it has been welded at some time in the past. Maybe I should weld and tap it M3 – the shaft is 3.3 mm diameter The pretty purple colour comes from putting it in the top oven of the Aga to weaken the Araldite.
At the moment this is as far as the frizzen will open, but I’m reluctant to take any more off until I get a frizzen spring working and can see how it functions.
19th April – Another lovely day but a bit chilly. Sat in the sun and planned my session at the Bill Tutte club with a group of would-be scientists aged 9 to 14 next week. I need to assemble a number of props as I have to keep their attention for 2 hours! I did a bit more on the Andrew’s lock – I’ll put up some photos shortly but it is shaping up – I drilled the frizzen pivot and filed up the frizzen to a first approximation. It is going to be difficult to position the frizzen spring so that it opens the frizzen fully – I think I’ll have to do a bit more welding to shift the lump into a better place to catch on the spring. I don’t think this one will have a roller on either the frizzen or the spring. I get a lot of visitors to this site who are looking for information on a couple of the spurious posts on the site – both ‘ putting a foot pedal on a welder’ & ‘ land cruiser steering lock problem’ get found quite often – When I was trying desperately to make a bit of room in my shed I came across a box of parts for the steering lock – since Toyota screwed up the repair I have a full set of parts to fix any problems that I no longer need. I think my patent finder at the British Library is back from holiday so I will try to get the next couple of J R Cooper patents to try and track down the covered lock gun.
18th April – Beautiful morning – I just had to be outside playing with the boat! I got back to the Andrews lock in the afternoon when it got decidedly chilly outside and put the lock in the Aga top oven to break down the epoxy bond, then had to clean it up before welding the bearing face to make it a bit wider. The main reason I’m playing around with the lock in spite of the difficulty of getting the pan section and frizzen to mate is that I need the practice in TIG welding, and this job is certainly giving me plenty of that. Anyway I made a decent fist of this bit of welding so that when I filed it flat for the bearing surface there were no voids and it all fitted. I’ll now drill through for the frizzen pivot and file up the frizzen and see if I need any weld ‘patches’. I’m also gearing up to engrave Martin’s barrel – I need a bit of practice as I haven’t engraved for weeks (actually months).
17th April – I was all set to share some really interesting pearls of gun wisdom on the blog last night at 10:30 when all the power failed and my computer and the internet with it…. It still hadn’t been restored by midnight, so I went to bed early for a change and now that the power is back ( it came on around 1 in the morning) I have completely forgotten what the pearls of wisdom were, and it is as if my brain has been wiped in some sort of computer crash! Anyway I spent much of yesterday and this morning sorting out bits of the boat so that when the weather warms up we can sail it. ( for those not in the UK, the last few days have seen winds from the North and daytime air temperatures around 13 degrees C., although some nice sunshine appeared from time to time. The rudder was horribly chewed up as it hits the propeller of the outboard if one isn’t careful, and whoever worked on the boat during its previous life clearly didn’t know the difference between stainless steel screws and the rusting sort – which in the way of things are now so rusted in that they can’t be removed. Some car body filler and a bit of work on the lathe turning reinforcing sleeves for the pivot and a couple of coats of white one-pot polyurethane paint will see a marked improvement. Normal gun related service should be resumed tomorrow…..
15th April – Catching up on shopping and rampant nature in the garden today, but I did manage a little engraving tonight. I have now fudged my wordpress files so I can download all the IP addresses of visitors and over time see how many regular visitors there are and which country they come from – I don’t get any identification of individuals, so your privacy isn’t compromised! Of the 200 odd visitors a day I think about 50 seem to come back on more than one day, and often visit more than once in a day, but so far I’ve only looked at 3 days of data. Most of the remaining visitors are casual visitors, although probably 20 or 30 are hackers trying to get into the site – many of the hackers try almost every day although they are blocked from actually getting onto the server. The worst countries for hackers are Ukraine and the US, with some from China and Russia, but a lot of hacking attempts use ‘bots’ on computers in many small, obscure places like Ulan Bator.
14th April – I went over to Dicks to look at the 4 barreled pistol he is restocking – it is around 1760 ish so I took Keith Neil & Back’s book on Great British Gunmakers 1740 – 1790 to check out the butt shape. Looking at examples in the book I suggested slight reshaping of the butt to better fit the period of the pistol –

The line is not quite right, but the outer edge needs to come in a bit and the ‘beak’ to go!
We then had a discussion about the alignment of the barrels when screwed home – at the moment they end up at an odd angle – its neither a single barrel or a pair of barrels on top, but an intermediate angle with about 30 degrees to go before a single barrel is uppermost. The screw thread is intact and nothing seems to have been altered (the barrels were made separate and soldered to the ring piece that screws to the action). We thought that a pair of barrels ought to be uppermost but sighting along the pistol we realised that the barrels were slightly inclined to one side. At this point we noticed that the ring with the barrels attached had a noticeable built-in angle – which must have added significantly to the manufacturing difficulty. Based on the assumption that the angle must have been intended to incline the barrels either upward or downward but not sideways we concluded that the alignment must be with a single barrel uppermost and the barrel group slightly downwardly inclined – since pistols usually kick up on firing. This means that the barrel assembly was designed to be screwed a further 30 degrees round from its current tight position. Another one of life’s little mysteries! Here is a picture of teh underside that shows the taper on the ring ;-
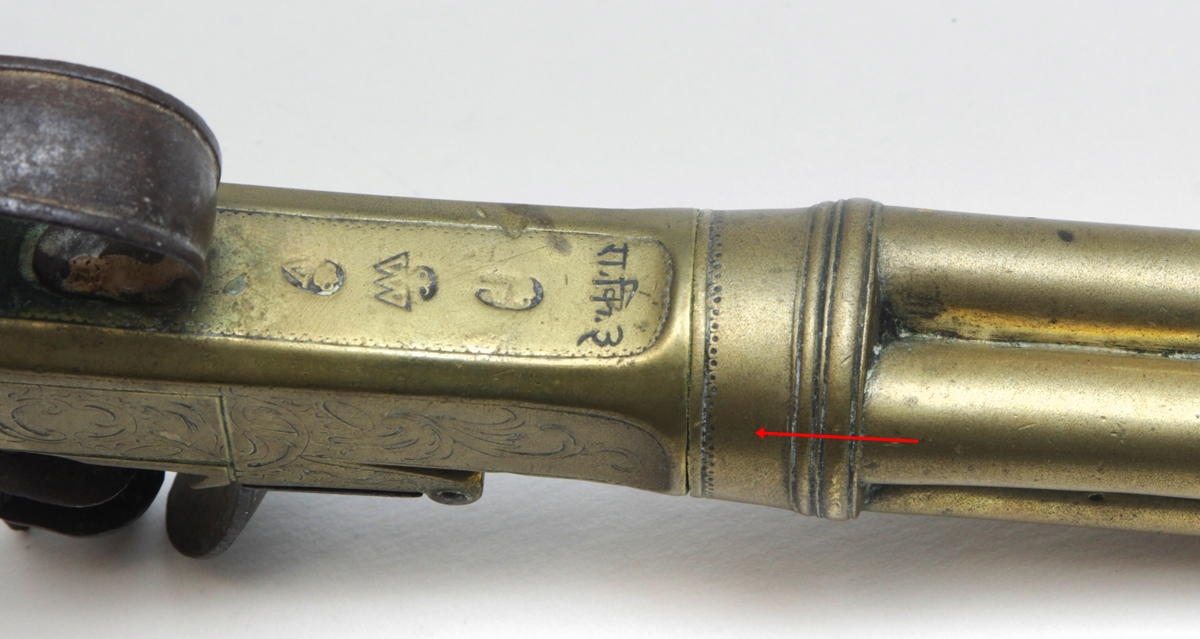
The red arrow shows the narrowest point of the ring – it should align with the middle of the bottom of the action.
The writing at the breech end is apparently in Hindi and is thought to be 3 initials – R.K.K
13th April – An extra days shoot at Eriswell for a small subset of AML – very informal and pleasant. I started with my ‘Twigg’ flintlock to see if lightening the trigger pull had improved my hit rate, but unfortunately I didn’t have any very fine Swiss OB for priming the pan due to an oversight, and so it was going off very slowly – so I didn’t have much luck. I then went back to my old D Egg back action percussion standby and managed around 50% hits with that, so about par for the course for me. After lunch I used my Miruku 12 Bore O/U that I hadn’t shot for a while. I needed more cartridges and without thinking bought 21 gram X Comps instead of the 28 gram I normally use, but I still did pretty well (for me!) . I swapped 4 for 28 gram loads for a couple of distant clays – which I missed – and was surprised at the extra recoil. By the end of the afternoon and after 50 cartridges I was glad I’d shot the lighter load – some of my companions looked a bit beaten up! Apropos of the Andrews lock – I realised that it was stupid to try to reposition the outer bracket for the frizzen pivot to reduce the width – much better just to thicken up the hub of the frizzen to fit – so I’ll have to unglue it (heat it up) and weld the hub and file it to fit the slot and then re glue it and drill for the pivot…….
Off to Dick’s tomorrow as he is wondering what to do to the butt of the 4 barreled pistol – I vetoed the idea of a plain oval silver escutcheon as being far to modern for a 1760 pistol – it should be a cast silver or brass one with relief decoration or none at all – or possibly a ‘grotesque’ – I’ll stick a couple of books in the car so we can look up an appropriate shape for the butt etc. One problem is that we can’t find a suitable brass casting for a butt plate………
12 April later – I steeled myself to tackle the Andrews lock – the frizzen is beginning to get into shape, but was offset rather a lot to the outside of the lock – the face of the lockplate was raised into a platform about 1.5 mm high in the contact area with the frizzen bearing – on most locks it would be flush, and so I decided to file the platform off to move the frizzen over by enough to put it in the correct alignment with the cock. This of course means that the gap for the frizzen is too wide, and the outside bracket will have to be shifted over – i.e. cut off and rewelded. It is all getting to be a bit of a saga. and by this stage I’m only doing it because its a good exercise in fudging! Each time I file a new bit of the pan section or frizzen I discover that it’s been badly welded and reshaped before – so it is really just a mess – which makes me glad that I made a new lockplate to start with – I’d be feeling pretty desperate if it was the original I was messing about with! Anyway here are some photos – I got to the stage of fitting the frizzen into the correct place and Aralditing it so that I can drill the pivot before I redo the outside bracket. We are hoping to sail the boat we bought last year over Easter so I’ve got to sort that out over the next couple of days…. and then it looks as if I will have a kitchen and bathroom to refit for Giles over the summer….. and I still need to get on top of programming the Mindstorms…. and the engraving jobs I picked up at the last AML shoot are waiting… and I need to get a slightly bigger ball mould for the Nock……. no peace for the wicked then……….
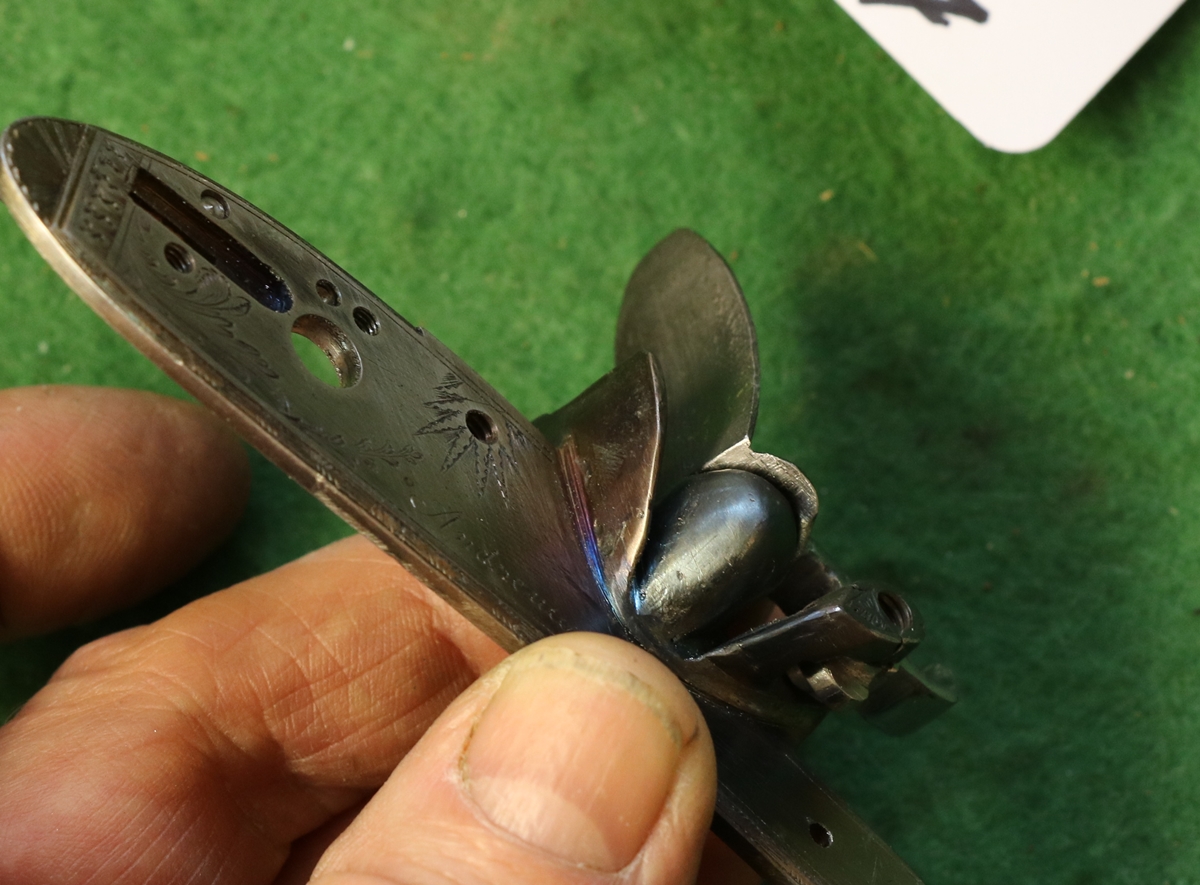
The frizzen as it was offset
The raised platform to be filed off – much easier to work on if you screw it to a block of wood!
Glued and ready to drill – the outer bracket will need moving!
12th April I did a bit more on the Andrews lock, but it is going to be a bit of a fudge as the frizzen isn’t really right – I may have to do major surgery on it again! I got a couple more J R Cooper patents from the British Library, but nothing that matches my gun – there are a couple more I could get but I’ll have to wait til next week. It got me interested in the beginnings of the percussion/pinfire/centrefire revolution – It begins to look as if Cooper was desperate to adapt the percussion cap to the breech loader in any way possible. The development of percussion ignition in England was severely constrained by Forsyth’s 1807 patent that was held at law to be a master patent and effectively stopped almost all development in England during its life. France had been ahead of England in gun development in the middle and early 18th century and French gunmakers took advantage of the fact that Forsyth didn’t patent percussion ignition abroad to recover the initiative. By the time Forsyth’s patent expired in 1823, just after he won a case against Joseph Manton over the Manton Tubelock patent, Pauly in France had effectively invented the cartridge as we know it today and the stage was set for the development of many of the features we are familiar with when we pick up a modern shotgun. It took a few years for the new inventions to ‘shake down’ – for instance all cartridges now depend on the ability of the case to expand on firing and provide the gas seal to prevent gas escape at the breech but the metallurgy involved took time to be developed. Similarly the placing of a pellet of fulminate in the exposed head of the cartridge in Pauly’s design created possible dangers and escape of gas on firing, so the pinfire cartridge was an interim solution until the copper cap was used to avoid the problem. All this time, and even as late as the 1860’s Cooper was busy patenting breech loading mechanisms using conventional percussion caps. It all makes for an interesting study – its the most febrile period of gun development of all time, the flintlock era dragged on for several hundred years, but from Forsyth’s patent to a gun that we would feel at home with was a mere 50 years or so – or maybe a few more if you want to include hammerless boxlocks with single triggers – most of it in little more than the working life of a gunmaker! It is a fascinating time to study – while there is a lot of published material on the early breechloading cartridge guns ( e.g. Cruddington & Baker ‘The British Shotgun’ Vol 1), there doesn’t seem to be much covering the ‘dinosaurs’ like JR Cooper who seem to have been struggling to keep the old ignition system going while loading from the breech, for whatever reason. Room for more study here!
11th April – back in the land of the living. I followed up a reference in De Witt Baileys and Douglas Nye’s book on English gunmakers that said J R Cooper had a patent No 7610 dated 1838 for an enclosed percussion lock so I got a copy from the British Library – fantastic service, it took less than an hour! It is a breechloader, but still has an external ‘hammer’ for cocking it and no magazine. So the book lists a few more possible patents he took out – I’ll get those too – I’m not sure how many I can get from the British Library on my Reader’s ticket – I have put a link to the .pdf of the patent on the J R Cooper post – you can see the beginnings of the idea – so it will be interesting to follow it up and see how far he patented things……..
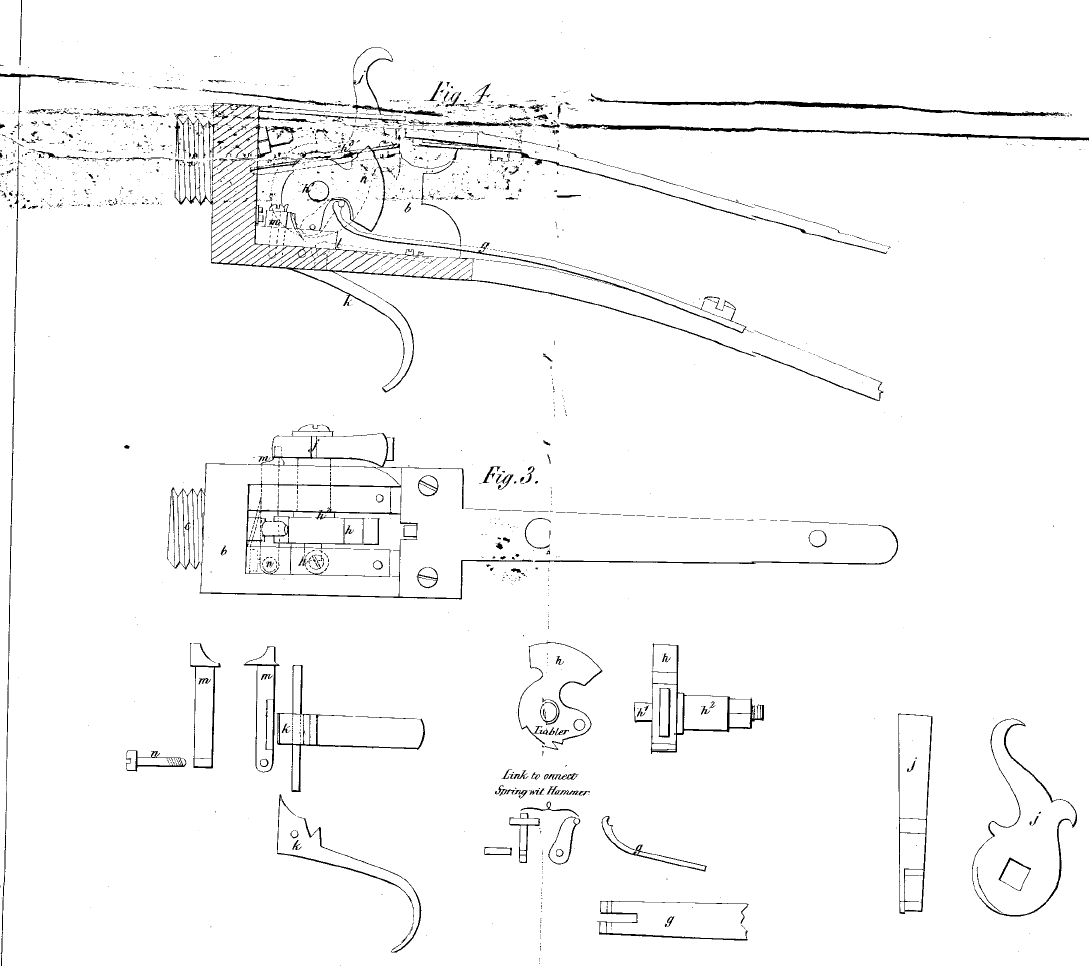
J R Cooper’s patent 7610 of 1838 – part of the way to my gun….he had obviously started thinking about it in 1838
There is another drawing on the 1838 patent that is a boxlock percussion shotgun.
9th April Last of the fixing – vents for the double glazed windows in the kitchen and bathroom to increase ventilation levels which have never been quite adequate for the Cornish weather. Then a bit of hacking in the garden – not the internet kind, so now just tidy up and load the car and off home tomorrow. Paid our visit to ‘The Gurnard’s Head’ restaurant tonight – still good but I was a bit underwhelmed by my main dish – Ray wing with a very tasty heap of lardrons, lentils and hazel nuts as the poor ray wing was tiny and overwhelmed by the heap on top of it. Anyway we always enjoy going there, and the large picture of an old couple having a meal by Kells (?) has returned and keeps us guessing about what is going on…..
8th April Still in Cornwall and still fixing things – a bunker to hold logs, a new curtain rail, fixed a fire guard and made a heat resistant area to protect the worktop. Almost time to go home so I can resume playing with restoration. I’ve had an email about a pinfire gun and was wondering what the market for shootable double pinfire shotguns was? I do know a couple of people who shoot them, including a 28 bore, and they make quite convincing black powder cartridges based on breech loading cartridge cases with a standard percussion cap as the detonator. You need to swage out the rim of the case as pinfire cartridges were rimless, and insert a pin that strikes the detonating compound in the cap.
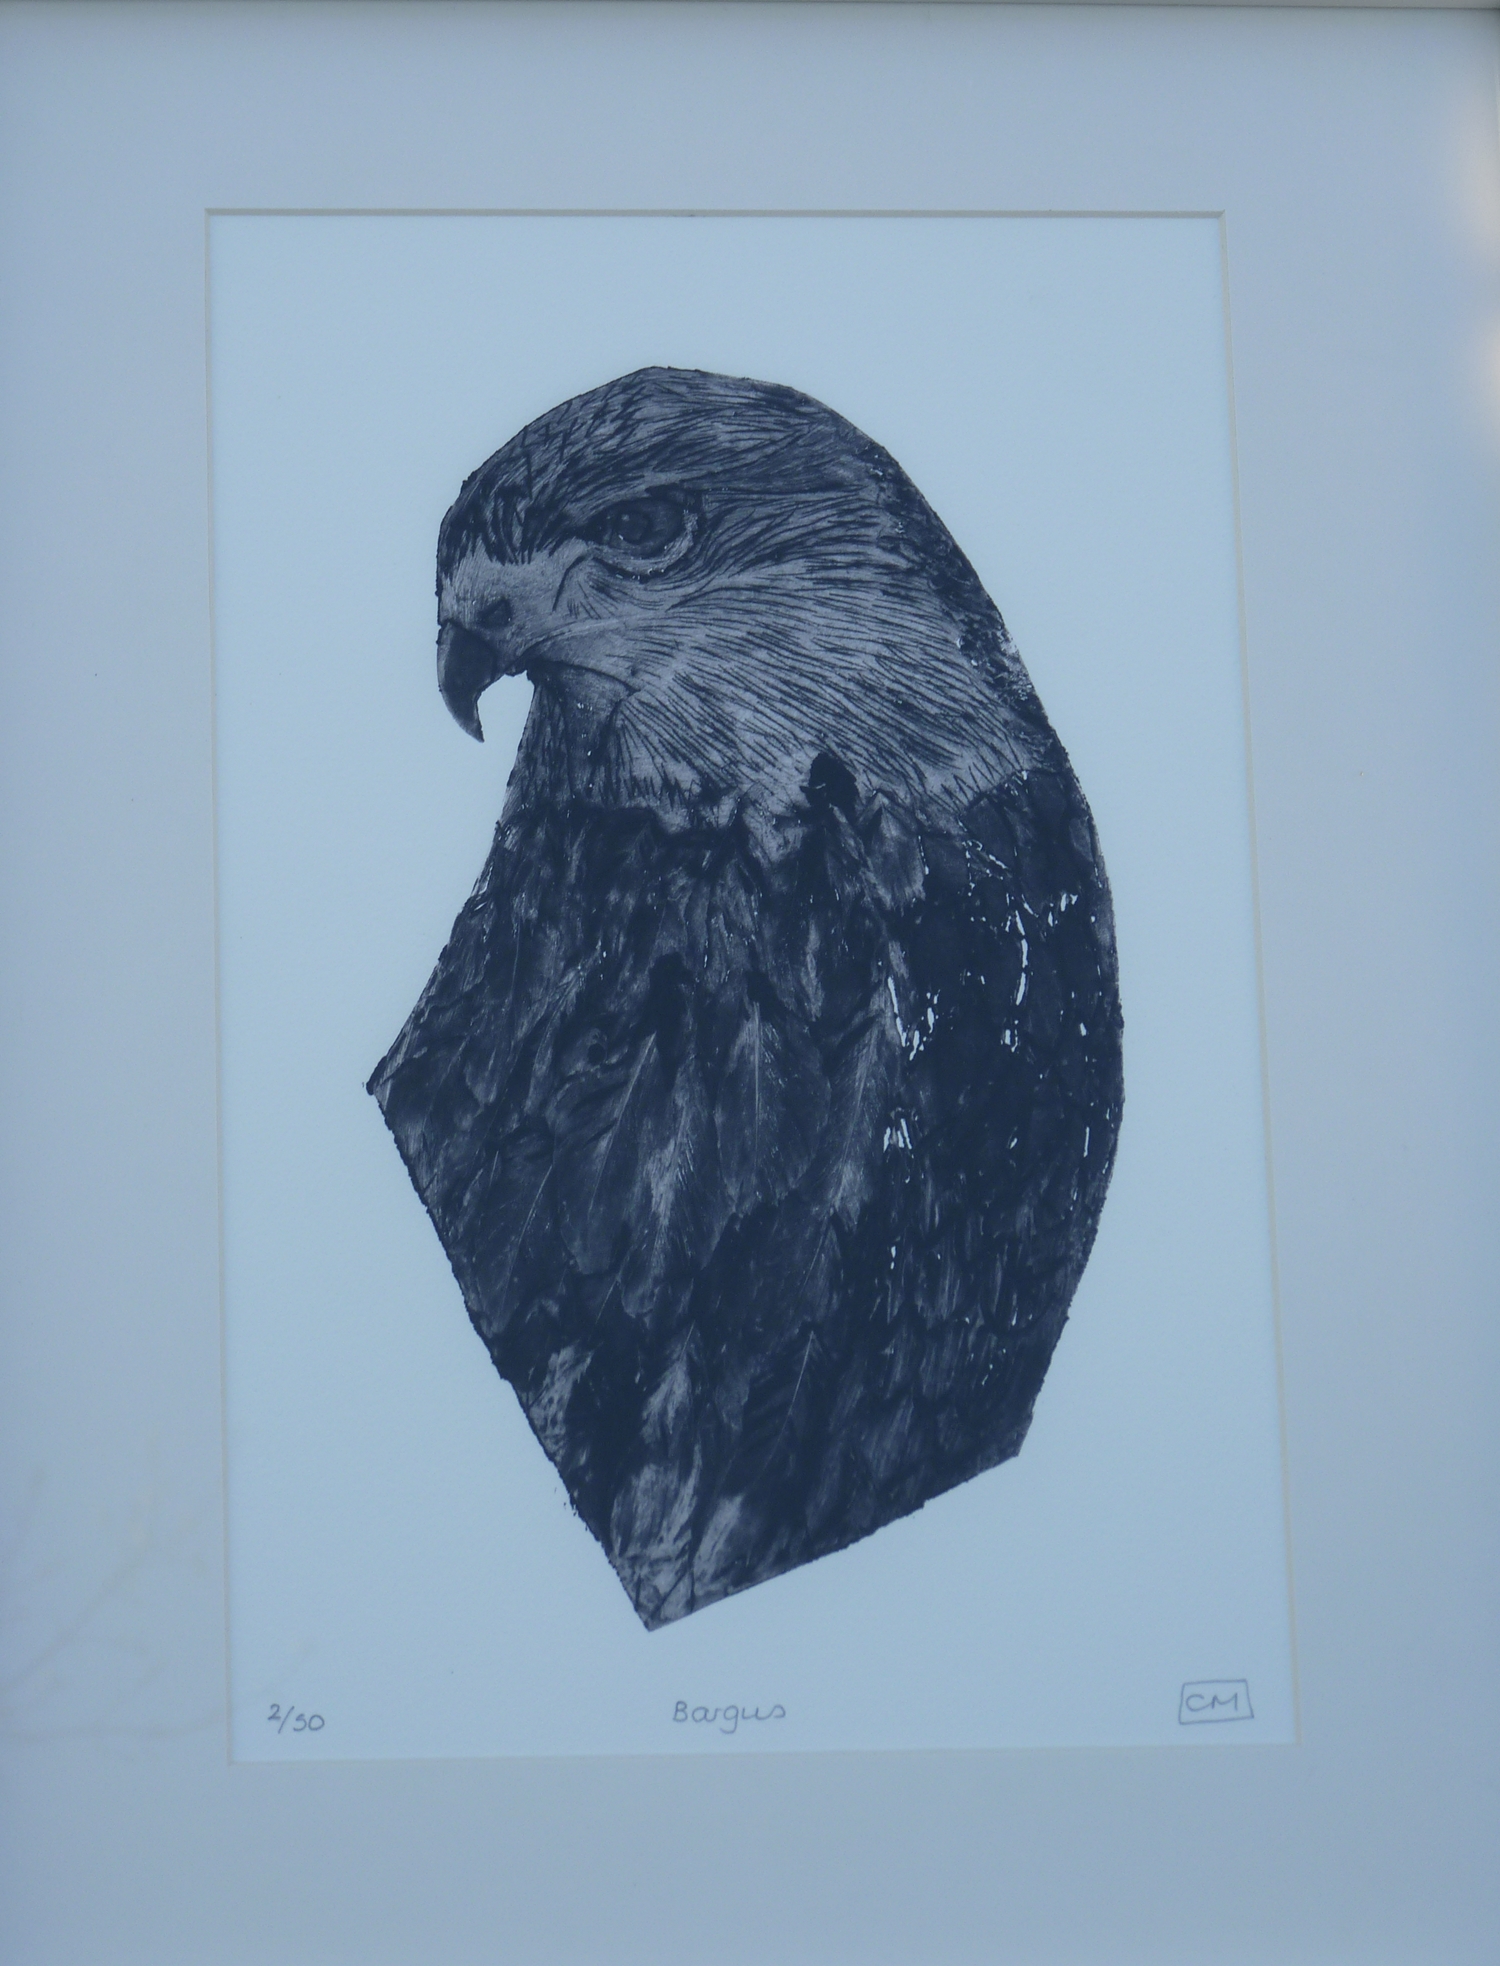
We had a short trip out to Penzance and Lamorna Cove this afternoon and called in at Scarlets in Lelant near Hayle (one of our favourite eating places – handy while the kitchen was in chaos) – they have a display of pictures by local artists including a series of ‘collographs’ of birds. I’m still not sure what the technique involves, but it is a form of print making – anyway we bought one of a buzzard that was rather fine. We currently have 3 favourite eating places – Salts in Hayle, a restaurant cum pub, Scarlets in Lelant – a restaurant/cafe and delicatessen and wine shop that has the great advantage that you can buy a bottle of wine from their vast selection and have it with your meal at the wine shop price, and take the remains (if any) home. Our third and poshest place is ‘The Gurnard’s Head’ in Zennor – special treat once per holiday meal for many years!
7th April I put a new top on the other worksurface in the kitchen, fixed the bathroom fan and put a new security light outside – the old type with a halogen tube bulb last about 2 years and the bulb blows and they are by then so rusty and horrible that its not worth replacing the bulb – anyway I replaced it with an LED security light in the hope that it might survive – this one appears to have stainless steel screws so I’m hoping it will do for 4 or 5 years. The wire to the old light was not long enough to reach the cable gland on the new one, so the whole wire had to be removed back to the switch- I didn’t have any more 1 mm t&e cable so used a gash piece of 3 core 13A flexible power cord which is probably better of the final connection anyway, but 13A is overkill – its just what I had – perpetually going out to Screwfix or B&Q or wherever eats into work time as either involve at least an hour.
This blog is now getting around 200 visitors a day – not counting the 50 or 60 idiots per day who try to log on to the site by guessing both the user name and password – since not one of them has even found the correct login page its rather pathetic = but I assume it all done by bots running on computers controlled by a small number of hackers. As the site is set up at the moment you have three tries at the password before you get blocked for a day, and anyway I check and permanently block anyone who tries to log on. Most of the attacks come from the Ukraine, followed by the US. Some of the attackers have been doing it for months and clock up hundreds of blocked attacks – all these things are logged on the site and I check them regularly so keep an eye on what is going on.
6th April Finished installing the washing machine and rebuilding the kitchen units around it. I realised how much the design of kitchens had changed since I did this on e originally – then the normal sink unit took the place of the worktop, now they are all designed to be inset into the worktop. I bought a cheap new worktop from B&Q – its OK but when cut it looks just like the ‘logs’ made of compressed woodchips that we are burning on the woodburning stove at the mohent – £3 a bag from Poundland -we are big spenders. Come to think of it, the ‘logs’ are probably about one third of the price of the melamine coated worktop weight for weight! I’ll post a picture of the kitchen and then settle down to read Keith Neil and Backs book on gun cases etc..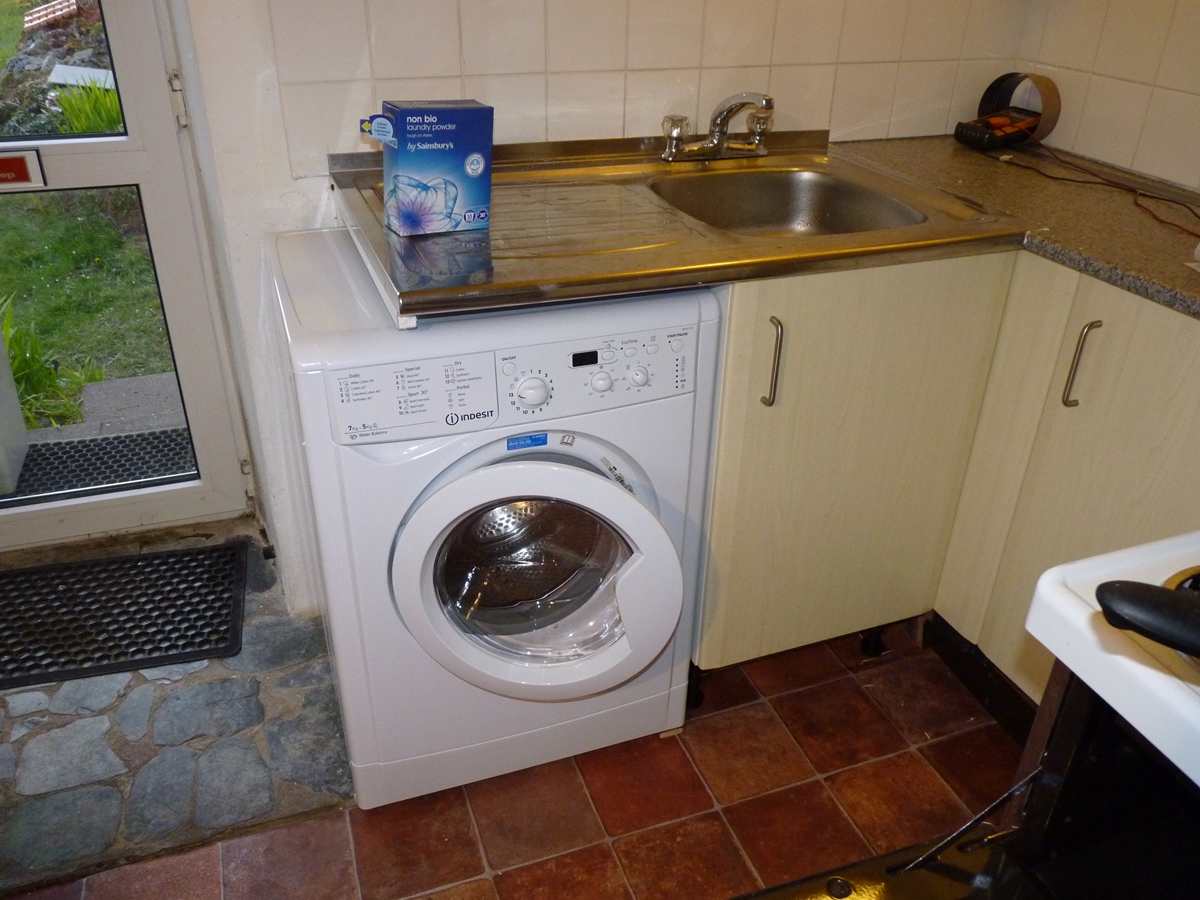
5th April. The book on cases is fascinating – I’m surprised how late the ‘normal’ gun and pistol case arrived. The first fitted cases – as distinct from utilitarian packing cases – seemed to have appeared around 1763 and were made of tinplate (produced from about 1723), follow by oak around 10 years later, with mahogany coming on the scene about 5 years after that. Early cases would have had a simple ‘rectangular’ brass handle planted on the lid. Around 1795 the inset circular handle began to appear – initially with the centre filled with a brass plate, and later with the ‘classic’ round handle showing wood in the centre. More tomorrow – and some pictures of progress on the kitchen – I got everything sorted today – the waste fittings are a pain to sort out as there are about half a dozen different types of pipe and fitting, and they are not interchangeable. I have a sack of fittings left over from previous jobs but couldn’t find what I wanted so had to buy more.. I started fitted the new worktop but found that the standard top I bought is half an inch narrower than the standard top bought 30 years ago, which meant a bit of bodging to fill a gap – its also a couple of mm thinner, but I can cope with that.
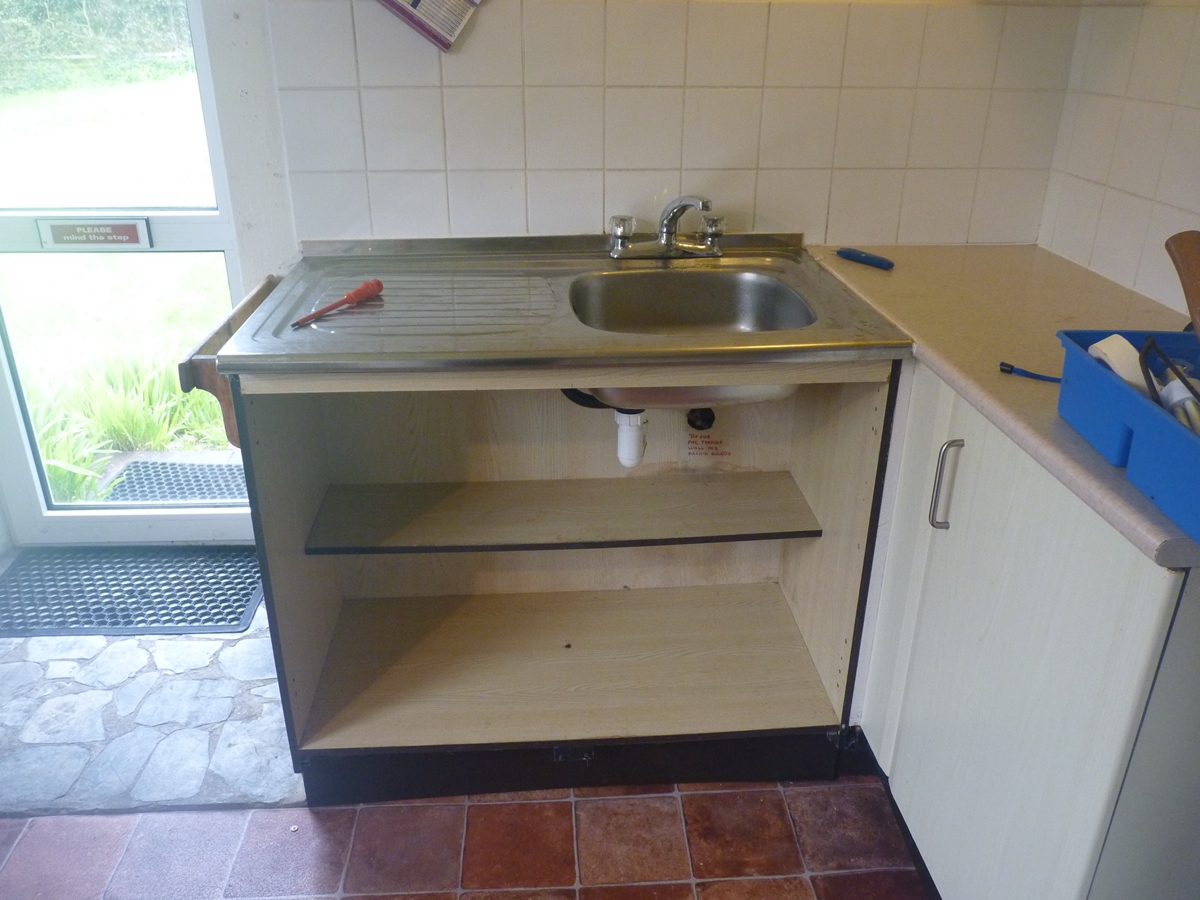
4th Mar. My gun related activity today was limited to reading Keith Neal and Back’s book ‘British Gunmakers Their Trade Cards, Cases and Equipment’ which was published in 1980 and is difficult to come by – I had to fork out £130 for a mint copy – luckily it was more of a swap as I traded a set of 19th century books on insects that I had inherited but had no interest in. I wish I had had a copy before I started casing guns and pistols! Like every book published by the pair it is THE definitive work on the subject. My main activity was stripping o ut the kitchen sink and re-doing a bit of plumbing to accommodate a washing machine and put in a few shut off valves – the cottage was converted in the 1950s and when mains water was installed it was done with NO stopcocks or shut off valves – not even a stopcock on the incoming main which is buried under the bath and its impossible to fit one now! To shut off the water I have to go into the road and dig up the external stopcock from under the dirt.
Just for fun, here are a couple of photos;
As it was, minus the cupboard doors (I think cupboard is such a medieval word)!
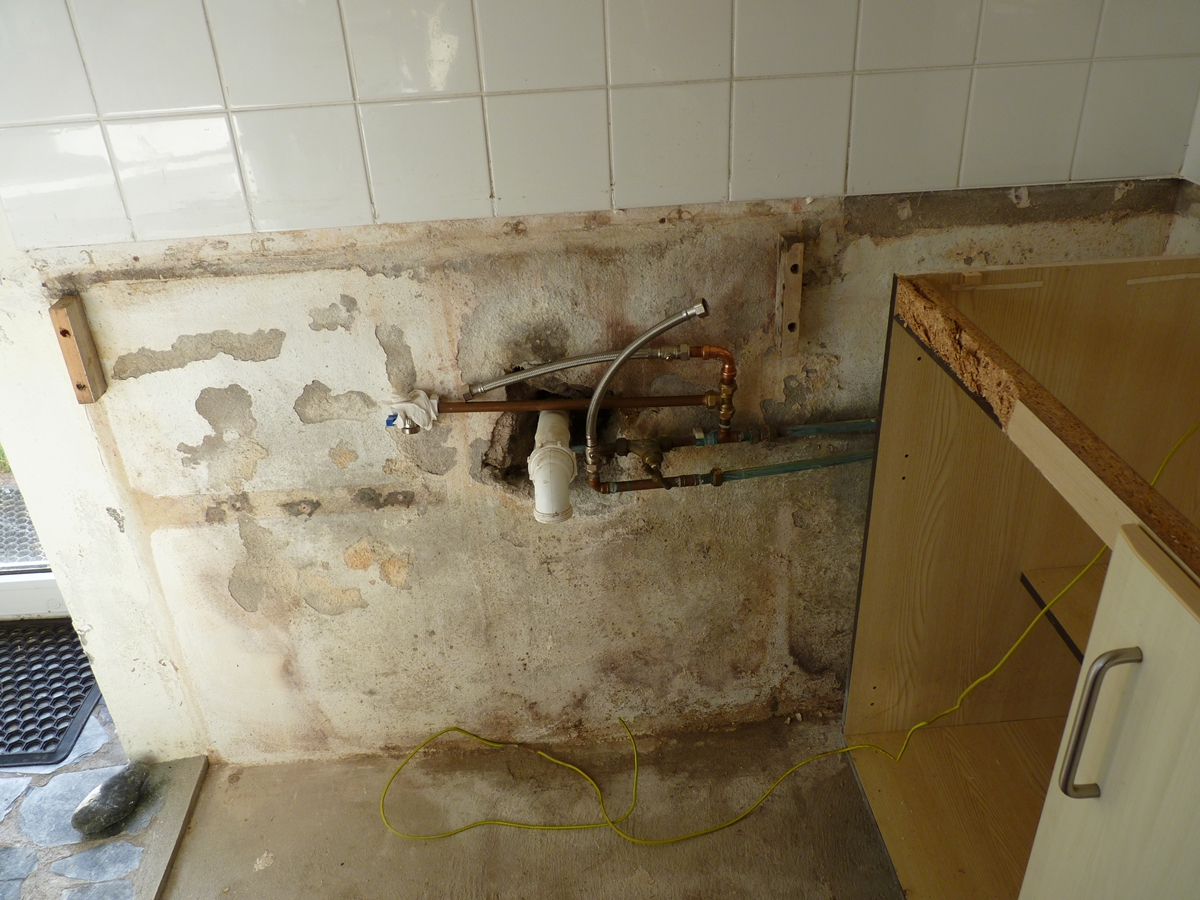
Destruction phase: A couple of flexible tap connectors/shut offs added. I don’t know what happened but it must be the first time I’ve done half a dozen compression joints and not had a single drop of water!
3rd April. Now in Cornwall contemplating destroying the kitchen to make space for the washing machine. I had an email from my friend serving in Sinai who has asked an Iranian about the script on the 4 barreled pistol and established that its not Farsi, or, probably Arabic, and that its most likely Sanscrit or Hindi which aligns with my thoughts. He thinks that he can get a translation, which would be great, and might throw some light on whether the silver wire inlay is likely to be foreign or from Birmingham like the brassware.
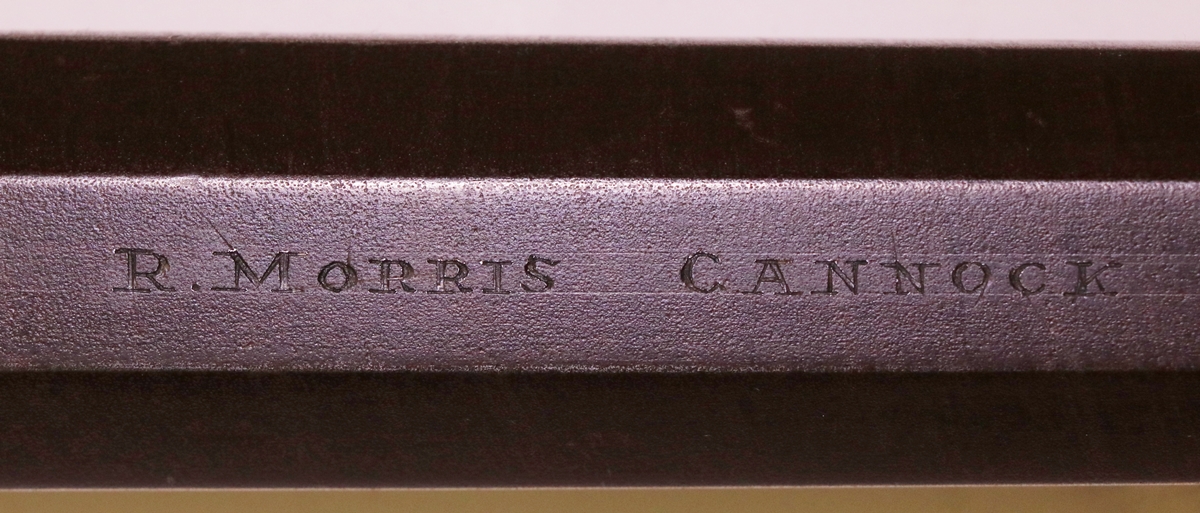
1 April Fate’s April fools joke on me was to make me miss the first 10 clays on the AML shoot in a row! Thereafter I was back to normal – miss one, hit one. My feeling that muzzle loading shooting is getting more popular is amply demonstrated in the number of people turning out for our monthly shoots – we now have 3 squads – around 30 shooters – we’ll soon be swamped by our own success. I shot the Jackson Improved Central Fire 14 bore percussion double – it is a nice gun, and the breech is very neat and slim as the cocks are in about the position they are in a hammer gun, but there is nothing ‘improved’ about my shooting today. I finished the afternoon shoot with my Beretta o/u and got about the same result – but I did hit more of the ‘driven’ clays. I realised today at the shoot that one of the weird things about this blog is that some people know more about what I’ve been up to than I do, on account of the fact that I hardly have any memory for past events! I picked up a couple of jobs – both fairly low key – an old lock to see if I could decipher the name and the recut it – its a fairly cheap lock so no problems. The other job is to recut the name on a lock by Morris that is in Olde English script, and engrave the name on the barrel. (Actually, having looked at the lock, I realise that the name on it is different and I am to erase it and start over, so no need for the Olde English). The jobs will have to wait until I get back from Cornwall where we are going to sort out the holiday cottage for the season – this includes fitting a washing machine in place of part of a kitchen cupboard – apparently necessary in order to let it successfully on airbnb & www.tinminerscottage.co.uk. I will take some gun books so I can at least put some snippets of information here. My evening activity is to do my homework on the Lego Mindstorms computers so I can keep one step ahead of my STEM club children – school and STEM (Science Technology Engineering and Maths) seem to be taking up increasing amounts of my time as I am getting roped in to help in daytime school activities – I can’t say I mind as its very rewarding – see www.kettlefields.club . I’ve also got to prepare 2 hours of talk and fun for the children of the Bill Tutte club in Newmarket – I’m not sure what the work ‘retirement’ means, but life was a lot more peaceful when I only worked about 50 hours a week! Our treat in Cornwall will be to slope off to The Gurnard’s Head at Zennor for a meal – one of the nicest places we know in Cornwall. At least this time we don’t have to find someone to chicken sit as Giles will still be living in the house – getting in a full time chicken sitter at the new living wage would be a bit expensive – cheaper just to eat the chickens and replace them when we got back!
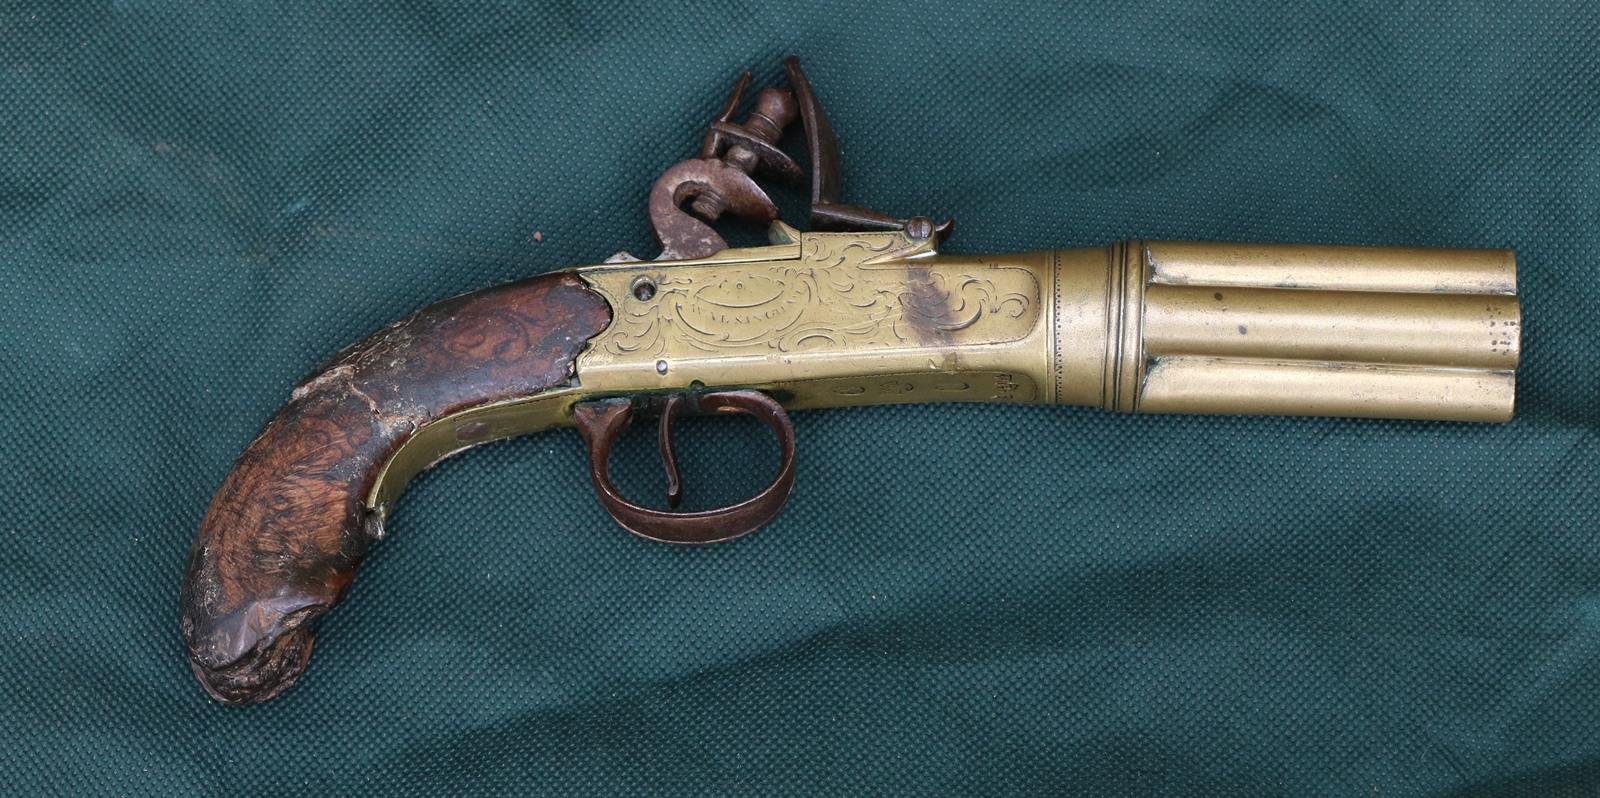
31 March Another month gone! I went to Dick’s today to photograph a few guns that are coming up for sale soon – and the odd 4 barrelled pistol by Walsingham of about 1763 – here is a photo, the rest are in the post 4-BARRELLED PISTOL. I took some more photos of the Griffin as Dick has tidied up the stock under the lock aperture – its now looking fantastic. There is also a nice flintlock pistol by Henry Nock – probably an officer’s pistol, and a military issue pistol. They will eventually appear on the for-sale page when we have an idea of a sensible price.
See 4 BARRELLED PISTOL Post for more pictures

See Griffin Pistol Post for more…
30th Mar. I had to finish and test a couple of electronic temperature regulator boards for a client who wanted them urgently – I wasted half an hour because I’d swapped two resistors in assembling one of them and finding the fault took time. I came back to the Andrews lock/frizzen problem – the frizzen is not the right shape for the pan section and I’m struggling to build it up enough to reshape it so it fits – at the moment it just looks a mess but I hope with a lot of filing and another iteration of welding it will come together. Visitors who leave this sort of mess to people like me can feel smug!

At least if I can’t get it to work I can revert to the original percussion setup and nothing of the original gun will be lost or damaged – the advantage of making a new lockplate!
29th Mar I went to Dick’s today and had a look at a little flintlock pistol he has for restoration. I’ll get some photos of it later – its by Wm Walsingham of Birmingham, about 1760. A 4 brass barreled volley pistol with all the barrels opening into a single chamber that connects to the pan – the barrels unscrew as a group (they are made as a single casting) and powder is put in the chamber – it looks as if it would hold quite a lot – and the barrels screwed back on. Its worn but nicely engraved all over the brass. The stock is badly damaged – partly eaten away and the butt cap gone with it – the rest appears to have been filed down – it was clearly originally inlaid with silver wire in a very elaborate way – all that remains are marks where the silver was before it was all filed off. I don’t know how unusual it is as a design, but I treat anything of that vintage as a bit special – pre 1780 stuff doesn’t grow on trees! I think there is no option but to make a new stock and a new buttcap but I don’t think it is going to be possible to make a convincing reproduction of the original, and I certainly don’t think it would be economical – anyway I think it would be wrong – so I would make a plain butt and cap. The rest of the pistol only needs careful cleaning – I would resist any temptation to recut the engraving – it is perfectly readable as it is and the untouched nature of the pistol metalwork shows clearly. Once you start recutting it makes people wonder just how much is genuine!
8th Mar. A VERY frustrating morning at the range! The sights I put on the Nock are good and I am confident that I can aim quite well with them – certainly well enough to get a sub 4 inch group at 25 yards without too much effort – but try as I could, I failed to get a group of any reasonable size – I had a sheet of A3 paper as a target and I even had a few shots off both sides of it. I tried several combinations of patch, and also tried both 1.7 drams and 2.25 drams of Swiss No 4, all to no avail – I just could not get any consistency in the shots – I think I could have done better with a shotgun firing ball! The 12 groove rifled bore is good, with lands narrower than the deep grooves, and I was using two 10 thou patches or one ten and one fifteen to give a tighter fit – I guess that it still wasn’t enough to grip the ball and maybe the ball sheds the patches and rattles around? Anyway I need to consult the experts! As an interim measure I’ll get the ball mould reworked to about 20 or 25 thou bigger diameter so I can go back to using 1 patch. I had a couple of misfires – but always it went on the second cap – I think I’ll have to change the nipple – its currently narrow at the top, wide at the bottom but I find the opposite is much more reliable, so I’ll make a new nipple – I hope the thread is one I have a die for! I took the .17 HMR just to convince myself that I am not completely useless and got some reasonable groups. Frustration apart it was a nice morning with a small but friendly gathering at the ITSC range. To my STEM club this afternoon – the children were so excited by the weather being good enough to be outside that it took a while to get them to concentrate – so I over-ran as usual…. The school has unearthed another 3 of an older generation of Lego computers so there will be enough to move to more, smaller groups with less friction!
Clay shooting sequence – range about 25 m

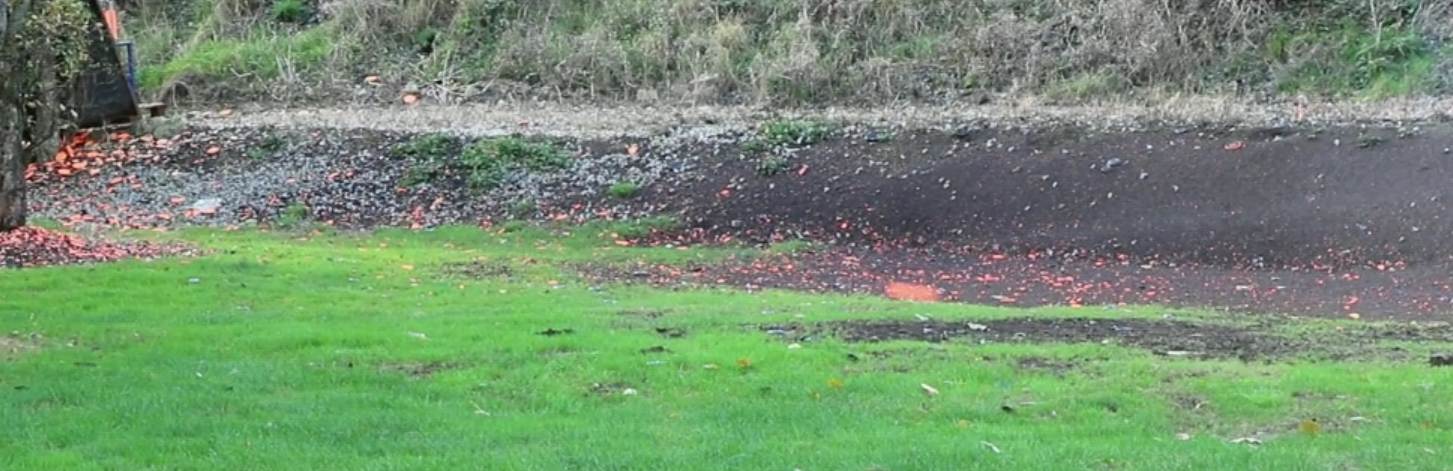
the top frame probably coincides with pulling the trigger, the second the sound of the shot, the third shows the shot as it misses the clay!
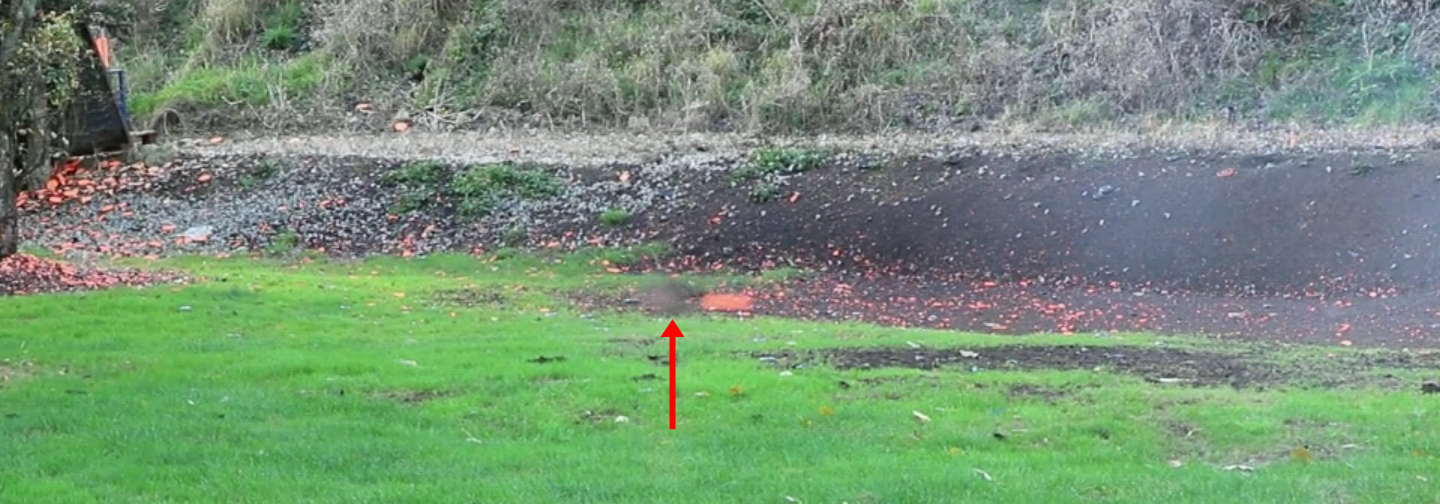
The entire sequence is 0.2 of a second. In the second frame you can see a faint trail heading for the impact point – I guess that is the shot column – the shot travels at near the speed of sound and the microphone was about 8 – 10 feet from the muzzle. Using the audio trace this frame is when the sound arrived at the camera.
It shows how far ahead you need to aim if you are snap shooting, and shows the slight changes in direction due to bounces.
(I think this sequence was shot with a .410 with a 2 1/2 inch cartridge, which would account for the fact that the shot cloud looks a bit small?)
27th Mar. In Cambridge running a historical reconstruction of gravity measurement with pendula – using a video recorder and lasers – not very authentic but effective. I did have a few moments to contemplate the Andrews pistol and drill the hole and cut the slot for the mainspring – I have gone back to thinking the smaller cock is right as, with a flint in the jaws, the top will end up aligned with the middle of the pan – I had to do my STEM club programs so that was all I managed, apart from getting out a few bits for shooting the Nock rifle tomorrow with the aperture rear sight and the enclosed foresight. Last time I got to the range after everyone had left, so tomorrow I will try to hit the ground running! I might take the .17 HML to sight it in, but I’m running out of ammo. I tried looking at a video I had taken of shooting a ‘rabbit’ clay with a muzzle loading shotgun in frame by frame mode at 50 f.p.s. Its quite interesting as you can see when the gun fired, then 4 frames later the shot is just visible in front of the clay and in the next frame hits the ground immediately in front of the clay but exactly aligned. Its amazing (to me anyway) how far the ‘rabbit’ travelled between the smoke appearing in the video and the shot hitting the ground – probably a good 6 feet, and that is without allowing for the time delay between brain and finger, and trigger and ignition. It was a very near miss in front! I’ll take the camera next Saturday when the AML shoots a Cambridge Gun Club, and try to get some more film……….. You would think retirement would be relaxing, but its far more hectic than working for a living – although I suppose I do get to choose – at least to some extent!
26th Mar. I made new screws to hold the bridle etc – 4 UNF threads, and the side nail, 6 UNC and cut the slot for the tab on the sear spring with a flat graver. The cock I was going to use is a bit too small I think, so I found a slightly larger one – I might go and take advice from Dick as he has done a lot more of these jobs than I. I did get the grass cut and the apple trees pruned, so it wasn’t a bad day, considering that we lost an hour due to the clocks changing to BST – we’ll have to wait ’til autumn to get it back. Robbery! I’ve got to write some programs for my STEM club some time before Tuesday, and I find I carelessly agree to talk to another children’s Science and Maths club in Newmarket in April, which will need quite a lot of preparation if I am to do them justice.
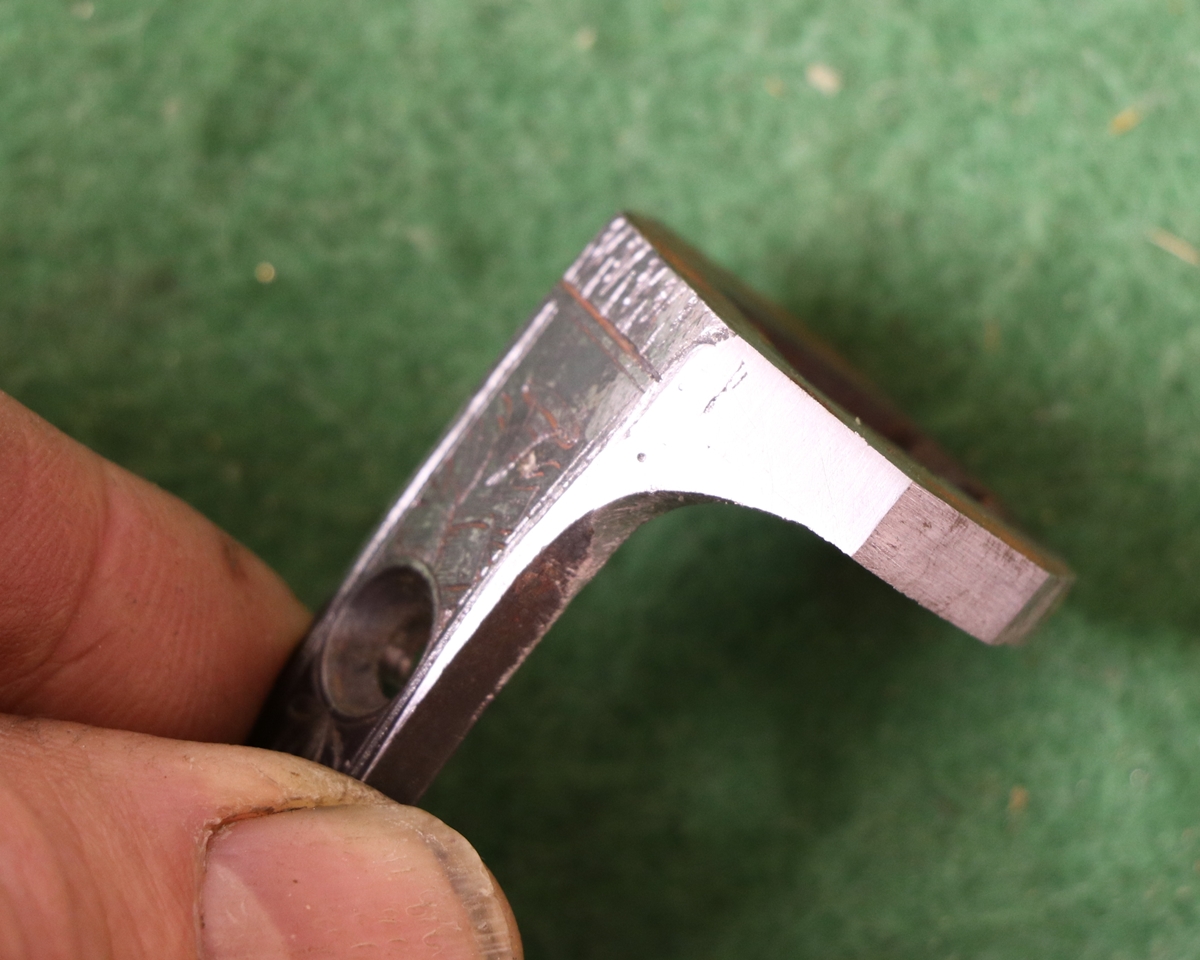
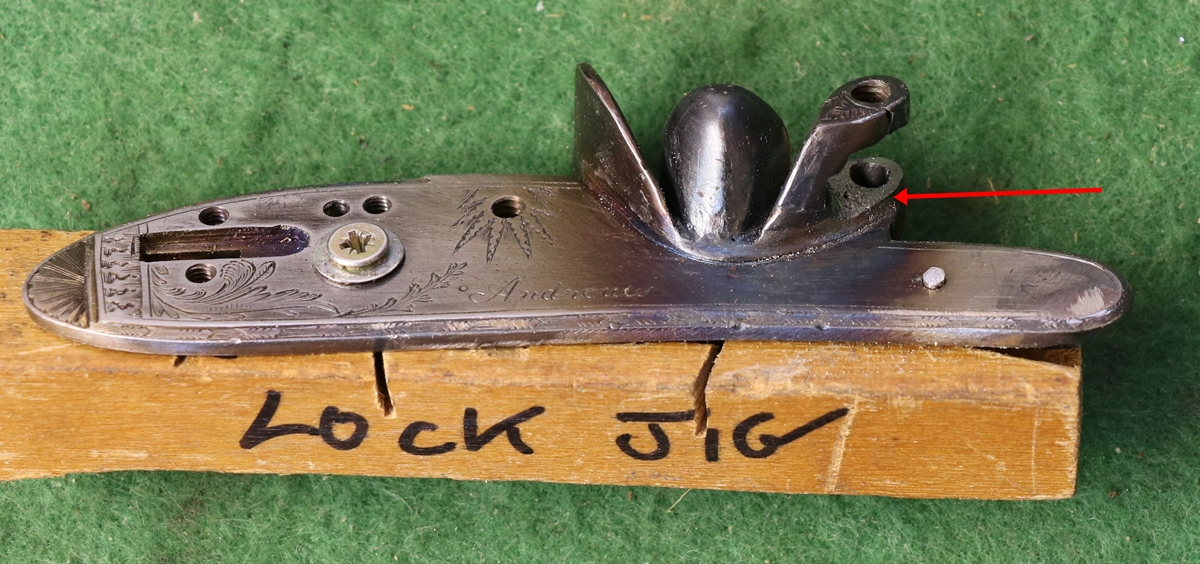
I’m not sure how to tackle the hole for the frizzen axle as it is bored out both ends and so won’t take a screw thread without more welding – its already been welded and moved once – the pan section is a bit of a mess, which is why its giving me more problems to get it in place than I would normally expect.- the same goes for the frizzen! I’ll finish the back of the lock where it touches the barrel when I do the final fitting with the touchhole in place.
25th Mar. I’m still struggling to get the pan casting into the lockplate neatly! So frustrated did I become that I resorted to cleaning the house for a couple of hours! So I’m afraid there is little progress worth showing ( except in respect of our domestic environment!)… I will make a few nails/screws tomorrow and try to get the frizzen into shape – I don’t know where it came from, but it seems to have been welded in a number of places, as was the pan section.
24th Mar. Went to Jason’s to get the lock welded and have spent most of the rest of the day struggling to get it filed up in a reasonable way – unfortunately it seems to need files of a shape as yet uninvented! I was very glad its only a lock I made myself as its taking a bit of a bashing – I’d be worried if it was the original. I found a better frizzen – the problem with the pan section is that the pivot for the frizzen is very high compared to most others – anyway I had to weld up and reposition the pivot on the frizzen and will have to reshape the tail with weld and add the tab to catch on the roller. The configuation of pan and frizzen pivot is odd, and it will need a very short frizzen spring – I’m not sure if it would have had a roller for that pan section or not.

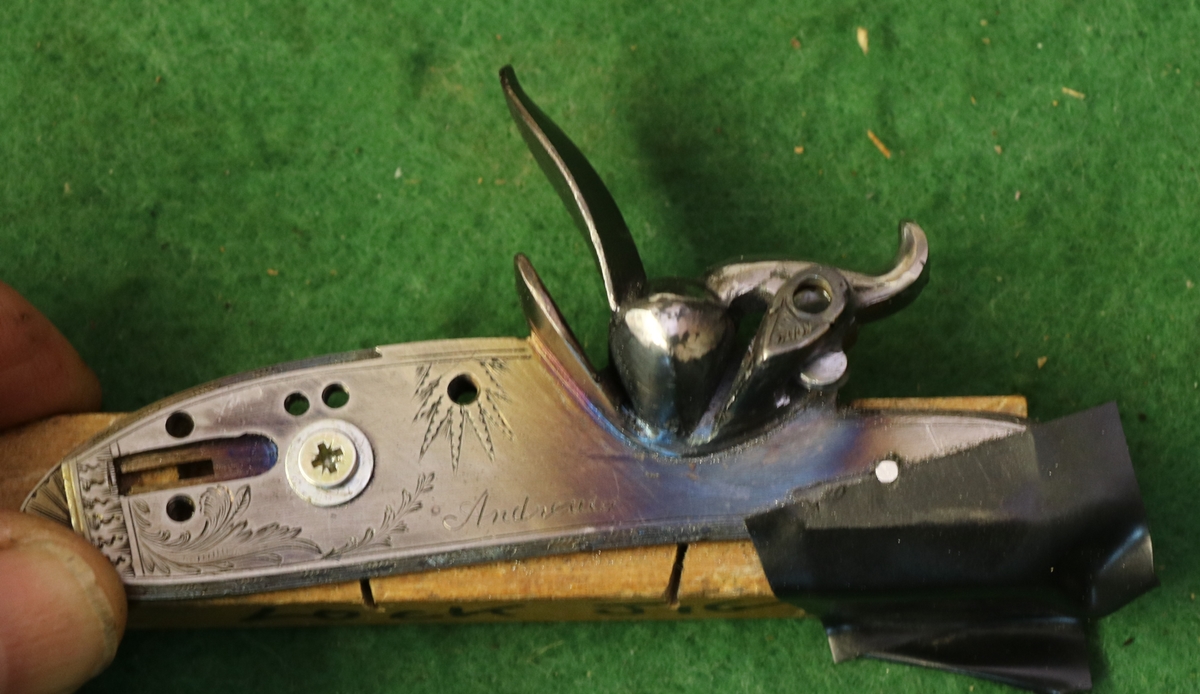
23rd Mar. Progress on the Andrews – a bit slow as I had a meeting about computing in schools – I was in the middle of welding the hook when my lift rang the doorbell – miles away….! Anyway I plucked up the courage to do the script engraving – not my best effort, and tacked the pan section in place so that tomorrow I can get Jason to weld it in – I don’t trust my welding. I did manage to weld the hook on the front of the lock that holds it in although I did get the front of the lock rather hot and oxidised it rather more than I wanted – I just built up the hook with filler rod – I got a good approximation to the shape with weld then filed it – I need to do the final lock fitting but I’ll wait til the pan is fully welded as the lock plate may need flattening.

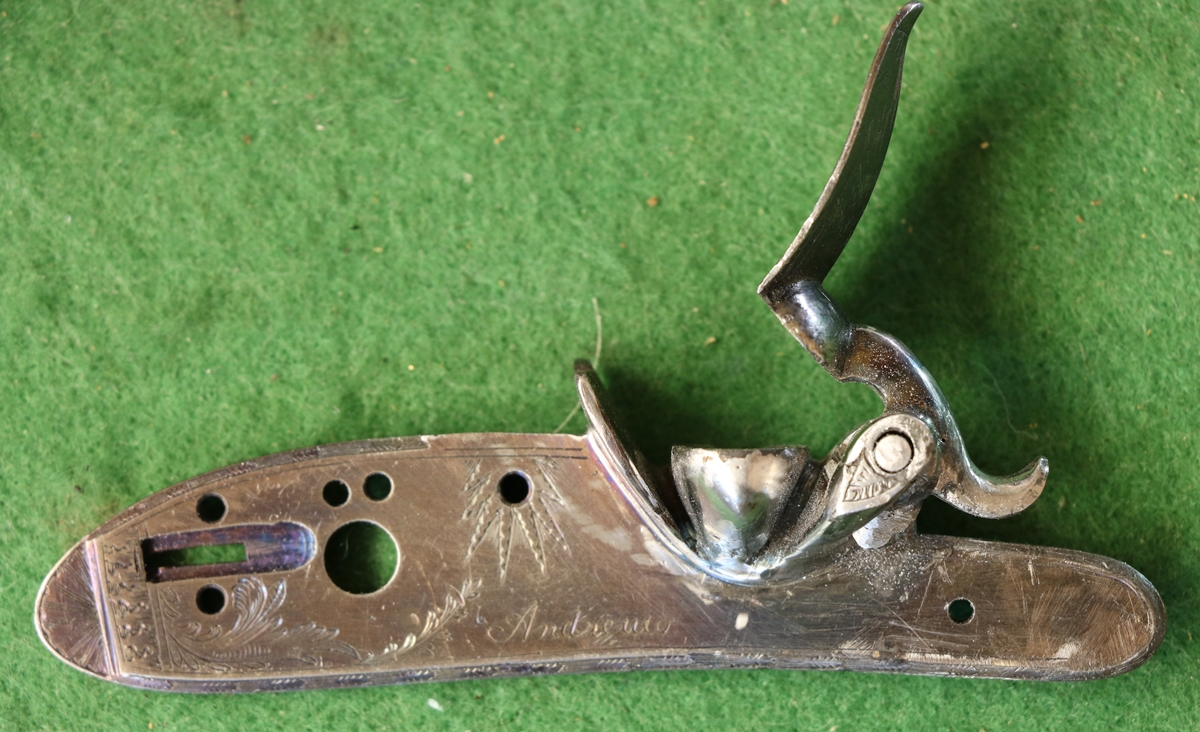
The script is not perfect, but will tone in when the plate is case hardened with Blackley’s stuff at the end.

The mess around the pan is modelling clay I used to hold the pan in the correct position while I tack welded it. It works long enough to hold until the tacking is done, and doesn’t tend to run or move at all. I use it often – its just firm enough and stays in the position you put it. I think the heat just drives the petroleum jelly out of it and leaves the clay!
22nd Mar. The Andrews pistol is coming along – I cut the aperture to fit the pan but haven’t welded it in place yet. I filed the chamfer round the lock – it’s not at 45 degrees, but around 35 to the flat surface, then had the excitement of engraving lines at the top and bottom of the chamfer surface which was quite tricky, particularly round the curves – that done I then engraved a running leaf motif down the middle of the remaining surface – the whole chamfer surface is about 2 1/2 mm wide, so by the time the two lines are engraved the leaf motif is probably less than 1.5 mm wide. Anyway, it looks better than I expected. I’ve done some of the decoration and foliage work – so now I only have to tackle the script name, which is a terrifying prospect – I’ll have to have a few goes on a scrap of metal. Doing the chamfer and the pattern across the tail got through all my gravers again, so I had another sharpening session before I could tackle the foliage.

A few differences, but recognisably the same pattern! I couldn’t decide if I wanted the ‘leaves’ round the sear spring screw.
21st Mar. – proper day playing with the Andrews pistol – I copied the holes from the original lock plate by fixing the old on top of the new, with suitable hardboard spacer, using superglue – one of my ‘must have’ items is a small pump of Locktite 7455 Activator that takes all the uncertainty out of using superglue, even if there are gaps. I then used my little Seig mill as a drill, locating each hole in the original plate with a sharpened rod of the appropriate diameter ( make sure it runs true) and then substituting a drill and drilling right through the new plate. I think with care I can get to about 0.1 mm. I drilled a series of 1.5 mm holes through the middle of the safety slot and cut out the slot with a fine fretsaw and filed it with a No 6 file, and milled the 4 mm slot with a 3 mm cutter. I’ve now tapped all the holes – I couldn’t find a taps that replicated the original threads so I used No 4 UNF for the bridle screws and No 6 UNC for the side nail – that means I’ll have to make new screws etc. UNC & F are my favourite threads – probably because I have the best selection of taps and dies and it matches more often than not. Next job is to file the bevel on the outer edge of the lock so that it can be engraved – Putting the engraved bevel around a lock is a first for me, so I hope it works out! I’m not sure how easy it will be to file a constant width bevel – I don’t have the filing skills of a classic gunmaker! I’ll run round with dividers first to mark a line to file to, and just try to keep a constant angle – fingers crossed. At some point I also have to fix on the hook that secures the front of the lock in place – in the past I have just built it up with weld, including the hook bit – so I’ll try that as its quick……………. And I had my STEM club this afternoon, and a School Governing Body meeting in the evening and a meeting at the school at 8.00 a.m. tomorrow…………….


The hole for the mainspring peg can wait until I am ready to put the frizzen spring on.
20th Mar – The browning is coming along nicely but slow – its called Blackley’s Slow Brown, so I suppose I should expect it! anyway I think 1 or two more goes and it will be OK. Tomorrow I need to tackle the problem of transferring the positions of the holes from the old lockplate to the new, complicated by the fact that both have bits on the back and can’t be put close together, plus there are no straight edges to measure from. I think I’ll have to clamp them together with spacers and mark with points of the right size to fit each hole using the miller to push the points in vertically. I figure that the holes need to be right to within about .1 of a mm – particularly the alignment of the bridle fixing holes with the tumbler hole – I have got that slightly wrong before and the tumbler is slightly misaligned and jams, and the only solution is to make a bigger tumbler hole, which is not a good thing. The other way is to mark and drill the tumbler hole, then use the tumbler to position the bridle and mark that, but its quite tricky to do that. Once I have the holes drilled I will cut out for the pan section so that I finish with the ‘heavy’ metalwork, and get on with engraving the lock to match the original, except that the foliage on the nose of the lockplate was put on for the conversion. After that is a matter of welding the pan section and cleaning up and case hardening the lock and fettling the cock and frizzen – not much then?

The lighting wasn’t very even, but the browning is. The twist stands out very well but not artificially so.
1 9th Mar I decided that I couldn’t bring myself to cut up the nice original lock to re-convert it to flint -its against my principles ( I do have a few!) to do that to good guns, OK for junk or if a lot of the pistol is missing. Anyway that meant I had to make a new lock plate from scratch and put the pan in that – I will reuse all the internals of the lock because they can be put back if necessary. It took me most of today to mill up a strip of 6 x 50 mm mild steel as a blank and then cut it out and fit it to the lock pocket – it is a bit slimmer than the original plate as I really needed 1/4 inch (6.4 mm) plate but don’t have any. I am also browning the barrel – first go with Blackleys didn’t touch the metal, I thought I’d try immersing it in copper sulphate to etch the barrel a bit, but that just copper plated most of it and I had to clean it all off. Blackley’s still didn’t touch most of the metal so I reverted to my used printed circuit board etchant and that got it going. Making a new lock means I’ll have to make a new side nail as I can’t match up the thread – its halfway between 6 UNC and 8 UNC, but I’ll do a 6 UNC nail as the hole in the lock is a bit near the edge of the bolster. I’ll probably have to make a couple of screws to hold the bridle as I don’t expect I’ll find a tap that works with the existing threads. I lined up the barrel and lock plate to find where the touch-hole will go and it seems to go together perfectly – the pan section is just right – I don’t know where it came from, it doesn’t look like a casting, more like an original cut out. I put the step on the back of the lock, and couldn’t resist engraving it – which meant spending over an hour sharpening 15 gravers that had piled up blunt or chipped. I usually leave them til I run out, then do them all together as its quicker that way.
I’ll have to mill out the slot for the safety,,. which will be fiddly, and then square off the end – even more tricky. I did it for the Lancaster (twice) so I guess I can do it again! My milling machine is pretty crude and has backlash in the leadscrews and vibrates so it is always exciting using small cutters!
18th Mar – The restoration of the Andrews pistol continues – I’ll make a separate post as I have a lot of photos. I have stripped it down, so I’ll include a few notes on what you need to know to take antique flint and percussion guns apart. I have all the parts to do a back conversion – and I think I’ll probably do one using the original lock plate as it will make a good demonstration of what to look out for in deciding if a flintlock is a re-conversion, and the percussion conversion is not a particularly nice one. So – see the beginnings of the ANDREWS RESTORATION post.
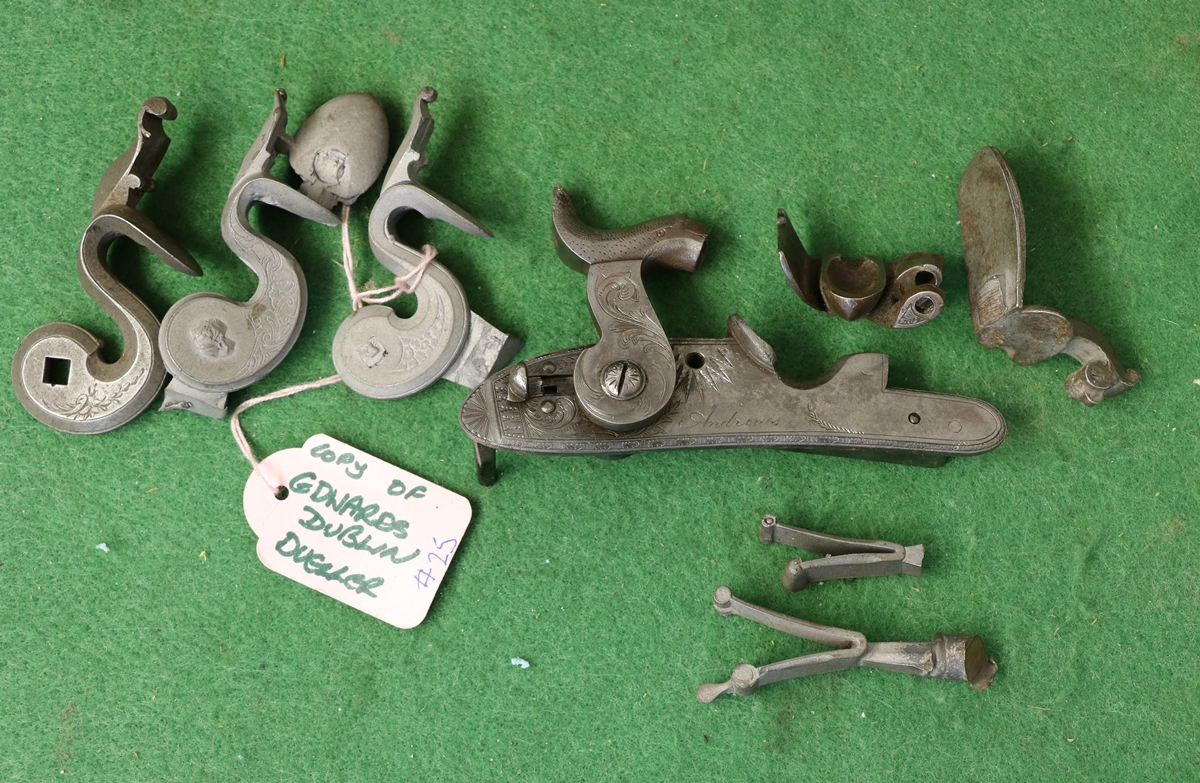
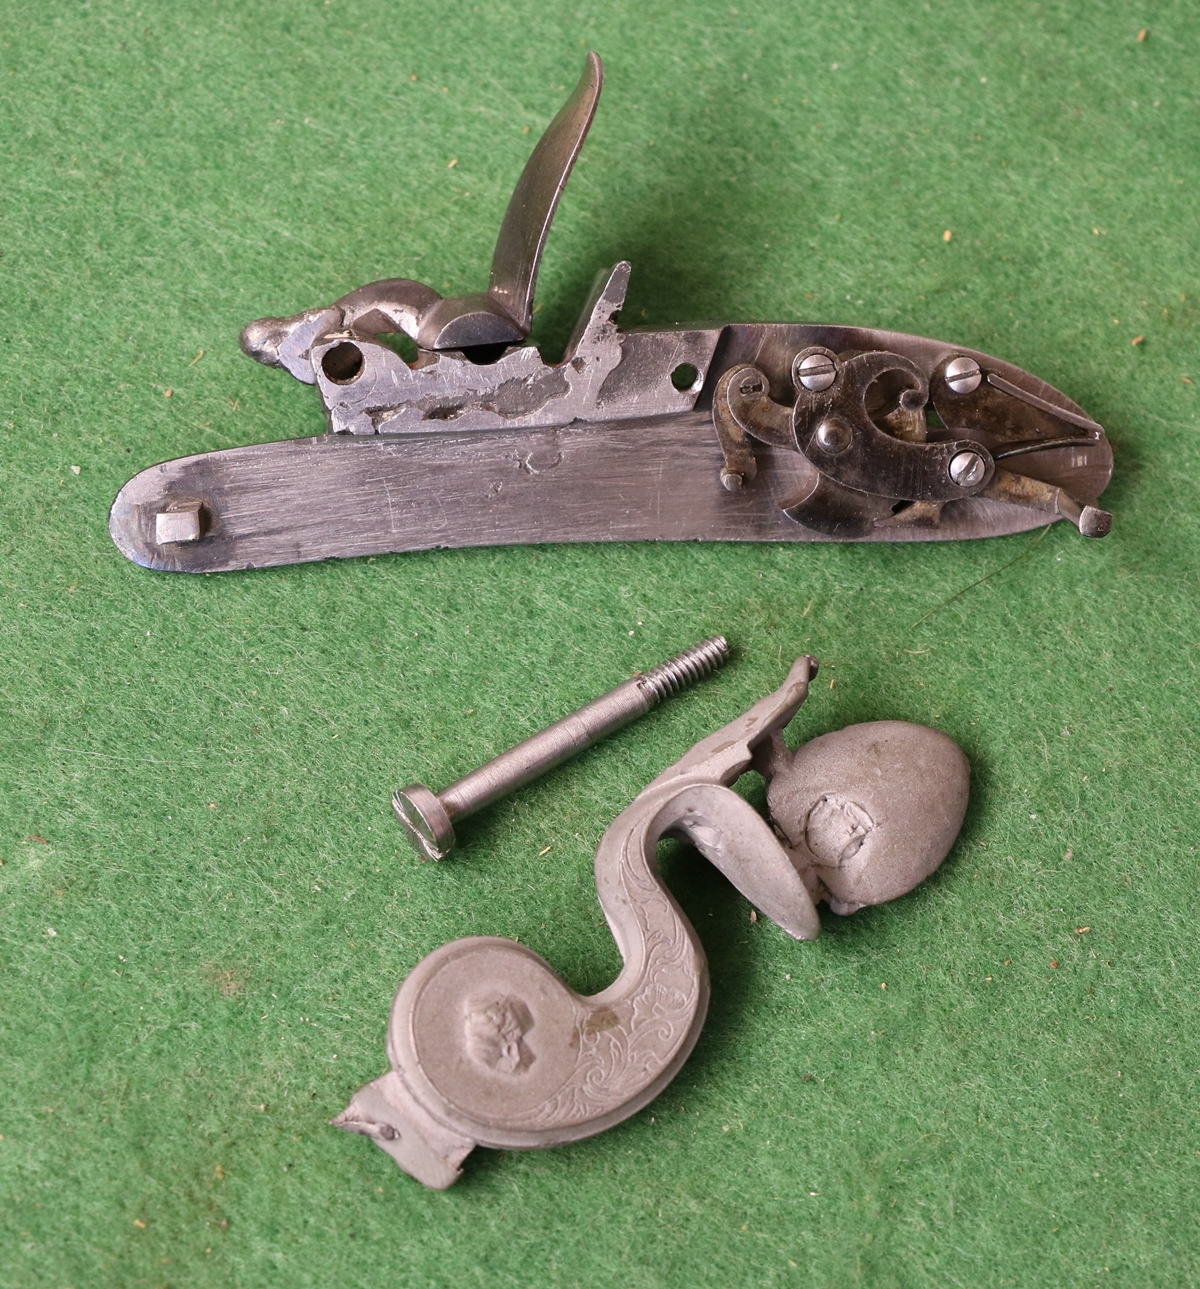
Selection of castings for Andews re-conversion – the cocks and frizzen spring will need to be sorted when the rest is in place.
I am temped to make a new lockplate!
17th Mar – I had a visit this morning from a chap who had a couple of antique guns – one he thought might be a shooter, but I’m afraid I didn’t think that was a good idea as it was too far gone to be worth teh considerable work in restoring it, and anyway I suspect the barrel was not recoverable. Anyway he is keen on taking up muzzle loading shooting and will come along to the Anglian Muzzle Loaders shoot on 1st April and join teh growing number of people shooting muzzle loaders. i suggested that if he likes it he might find a modern reproduction a good way in as they are still affordable at auction. I did a bit of work on the Andrews Pistol – running the bits through the de-rusting – its in pretty fair condition. I had a look at a couple of photos on Andrews pistols on the web – Google images – Andrews pistols, and found two different flint lock designs in use – an older version with a stepped,rounded tail to the lock and a traditional English serpentine cock and a semi rainproof pan, and later design with a square tail to the lock and a French cock and a full rainproof pan. The former matches the lock shape on my pistol. I went to Dicks and we hunted around for bits to make a flintlock for it – I had found most of the bits but we found a frizzen spring casting that is (probably) the right size – it won’t be clear until the lockplate and pan section are in place. I now need to decide whether to use the original lock plate or make a new one…… difficult! The Griffin pistol I showed earlier before repair is now finished and Dick has been asked by a friend living abroad to sell it for him, and I offered to put it on this site. You can see the photos in the Post Griffin Pistol and some in the GUNS & BITS FOR SALE page at the top – here is a preview;

This is a Griffin Officer’s pistol from around 1760 – a number are found in America from English officers fighting in the French and Indian wars – see post Griffin Officer’s Pistol for more pics – click on the photo for more details. It is No. 1 of a pair, no longer together.
16th Mar – It was interesting to watch, from time to time during the day, how the Holts Auction was going – there was so much stuff that it ran from 10 oclock to about 7 p.m. Many of the lots struggled to make the reserves – but there were so many guns that were much of a muchness that you wonder who was buying it – most of the lots went to either bidders in the room or on the telephone, a few lots went to internet sales (it costs an additional 3% to bid via the internet!). The percussion guns I picked as being worth buying – the Bond (1800 hammer price) and the Greener (3900 hammer price) shotguns – made good money and the ones I thought were a bit rough, like the Nock 7 barreled gun that I thought rather rough and the Witton and Daw just scraped over the bottom reserve (700) as did the horribly badly ‘restored’/abused Manton breech loading flintlock. Mostly I thought the bottom estimates were on the high side – Holts seldom sell below the bottom estimate . By the time you add the buyer’s premium and VAT to the hammer price, the Greener was a shade under £5000 – I would have happily paid £4000 for it, but 5K is a bit inflationary. There will inevitably be some inflation in antique and modern gun prices because a fair number end up in the US and the dollar now buys more gun in England than before, or put another way, it means that Americans can afford to bid higher. The Witton and Daw was a reasonable buy at the selling price as it was unusual – it was bought by a friend and will probably pass through Dick and my hands on its way to its eventual home. I look forward to including it in the blog. I was sorry to see that the East India Company rampart gun lock had been taken out of the sale as I have one that has been converted to percussion that I’d like to return to flintlock – I am chasing the lock via my contacts………. I was hoping that it would form my next project as I’ve finished all the jobs on hand, but I found a pistol by Andrews buried under the junk on my bench (yes, really! – its been there for months and months…) that definitely needs a bit of TLC – It would make a good target for re-conversion to flint s I could make a new lock and remove the drum and nipple conversion, but I have no confidence at the moment that I can get the necessary castings, and although I do have some odd castings in stock, I don’t think I have a pan section, a frizzen and a cock that will go together – maybe I can get something from Dick….. Anyway I will start by cleaning it all up and see where we go from there…….. the obvious first step is to dump the whole lot in the de-rusting tank for an hour or so and then lightly brush off the soft black powder that hard brown rust gets turned into when it goes from ferrous to ferric oxide………magic!
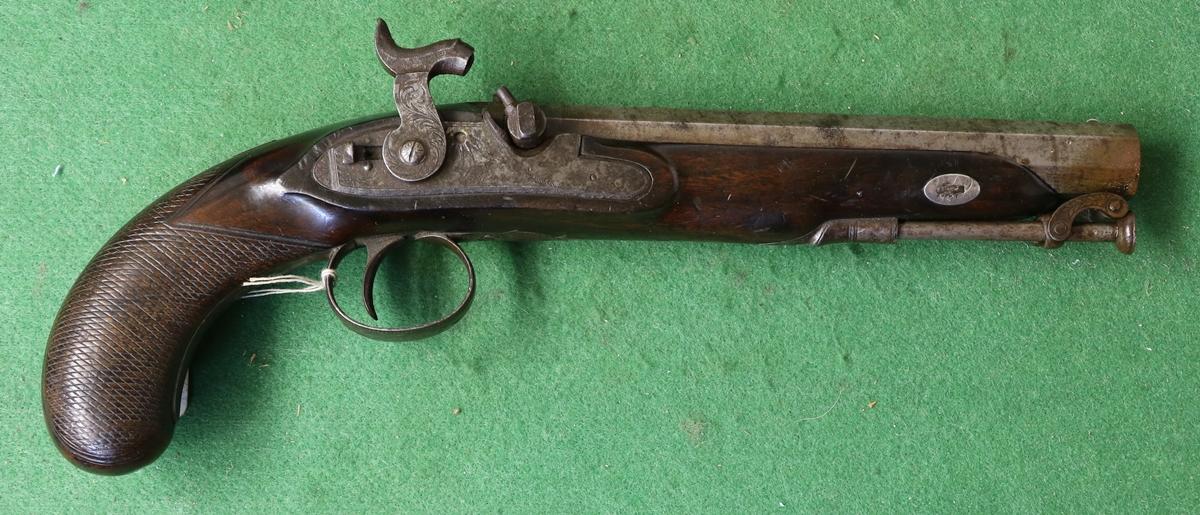
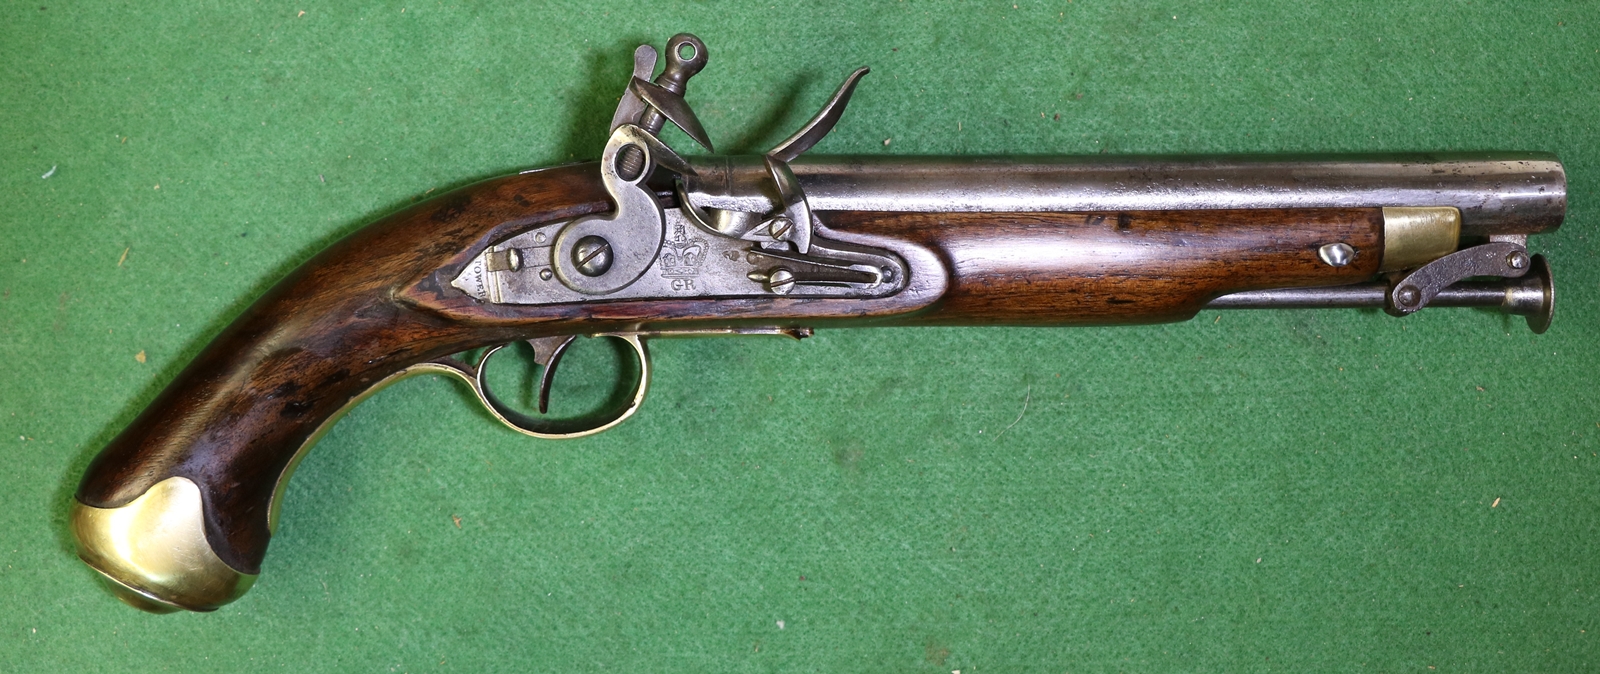
Its all a bit sad, nothing serious but a bit of surface rust and worn woodwork – the percussion conversion is rather poor quality but the basic pistol was good – one reason to want to convert it back to flintlock.
The safety catch is broken – a fiddly part to repair and a lot of the lock plate has been filed away in the conversion and would need to be built up if it is re-converted and we didn’t make a new lock.
A reasonably good quality lock on the inside – not top quality but perfectly good, and it will clean up just fine.
The barrel is not too bad – it hasn’t had a lot of wear, only a bit of patchy rust – teh ‘London’ is clearly visible and not unduly worn.
15th Mar – To Holts viewing today, which turned out to be a bit of a social occasion – I seem to have made a fair number of friends in the business, especially among the keen muzzle loading game and rifle shooters. I sense that game and clay shooting with muzzle loaders is becoming more popular, which would account for the rising prices of decent percussion shotguns – there were a few in this auction that I had a look at, including a W Greener in pristine condition that will get a lot of attention tomorrow. One or two of the other muzzle loading shotguns were worthy of attention but really they were a bit thin on the ground – I might have been interested in a couple if I wanted one to shoot, but not the Witton and Daw, a cased gun with an unusual round body that would almost qualify for my new collection criterion – guns must get the response -” I’ve never seen one like that before”, or “you don’t see guns like that often” if the viewer is very experienced! Unusual as it was, it was a bit grubby and had moderate surface corrosion in a tired case, which would have been sortable, but the muzzles were paper thin and the bore rusted so I’m not sure that I’d want to shoot it, – a no no for me.
There was a flintlock breech loading rifle signed Manton – a bit like the Ferguson but with the screw plug in the side – it would have been a front runner for my collection except that someone had struck the barrel off ( trade term for filed ) so thoroughly that on first look it seemed that it had been replaced by new one. All the surface had been filed to remove every trace of corrosion (plus along the way most of the proof marks etc.) including round the lug for the breech plug – a prime example of THE most horrible vandalism it is possible to imagine. The estimate was £2000 to £3000 – a lot less than if it had been in original condition! I didn’t look to see if I thought it really was by John Manton as I really found it so distasteful to look at! The sale was mainly taken up with the Harold Bull collection, which was primarily of pistols, a whole lot of section 5 semi automatics and a vast collection of revolvers of all types, section 5, obsolete calibre and percussion. Taken as a whole it represented a massive collection, of which a few percent were special and most were good examples of their types, but it left me feeling as if I’d eaten far too much of a not particularly exciting meal! I did see one or two things in the sealed bid sale that I might be tempted by – I’ll have to go through the catalogue again and tally up the total to see if I dare bid on a few. It is becoming expensive to buy at auction, particularly imported stuff that carries 5% VAT on the hammer price. plus pay 30% buyer’s premium (25% + VAT), i.e. you pay 35% and the seller pays 10% sellers fee, so in the end the seller gets £900 and you pay £1350 on a £1000 bid, a total markup of 50% on what the seller gets. Eyewatering!
I get the feeling that I need to make up another gun – I guess it might be time to see if I can get together the parts to make a flintlock for my Henry Nock single barreled shotgun – I’ve been toying with the idea a back converting it since I bought it as it has a drum conversion and I would make a complete new lock and a screw-in touch hole so I could swap back and forth……..
14th Mar – Science day at school has left me exhausted! Off to Holts early as I have to meet a couple of friends there and return a pair of pistols to their owner and take a possible case for them. I’m looking for a nice leather case for my William Powell hammer gun, and a couple of percussion gun cases as I enjoy working on them. I wish it was easier to make them from scratch – I might give pistol cases a try as there is very little furniture and the woodwork is simple. Back on line tomorrow wit report from the viewing!
13th Mar – I was busy today getting prepared for a science day at school on earthquakes and volcanos – we had a large box like table containing an animated display of an earthquake wave to take into school – although it should have been a 5 minute job, it turned out that someone had cleverly built it so that it was 1/4 of an inch wider than a standard door and one side of the french doors into the classroom was stuck….. Not sure my Swiss army knife will ever be the same again, but it sorted the problem – I will leave the ‘how’ to your imagination. I’m off on Wednesday to Holts to view – I had my eye on one item in the printed catalogue that has not appeared in the on-line catalogue so I suspect doesn’t exist – shame! I have a few percussion guns to look at, including the Greener percussion that everyone seems to like, but I won’t be going for those for myself. I’d really like some of the revolvers – but it will depend on the demand and whether the market gets saturated or if there are lots of hungry buyers – its a matter of playing it by ear and best done by being there on Thursday. I’m tempted by the thought of a nice Brown Bess, but I am not sure about the ones in the sale. I also have to take a pair of pistols up to hand them over to their owner. Not sure I’ll have time to touch a gun tonight – but I feel a bit of engraving coming on! I did have another look at the pair of pistols and I can clearly see them as having longer barrels when they were flintlocks- they would probably have had the proportions of the PARR – see post, but maybe a bit smaller overall.
12th Mar. I’m feeling guilty because I didn’t do my blog last night – I was at a ‘Race Night’ in aid of ‘my’ school and didn’t get back until very late, by which point I just needed to sit and read Private Eye (nothing to do with the wine)!
10th Mar. More playing! I made the new nipple key I needed for the Nock – the nipple screws into a flat with a right angle edge and only just enough clearance for the base of the nipple – about 8.75mm diameter – all my nipple keys have a bigger outside diameter and jam – so I needed to make one with a maximum diameter a bit less than that. I had a nice 40 mm square of Indian ebony I got from a woodturning supplier which turned down into a fine handle – I made two while I was about it – almost matching but I did it by eye! I turned the nipple from 14 mm silver steel rod and drilled a 5 mm hole up the middle & filed a 5 mm slot. Then just a matter of filing a square on the tang and hardening it ( quench in oil in this case) and temper on the AGA in a part of the hotplate showing 285 degrees C. Finally make a brass ferrule to fit the end of the handle with a band of knurling for aethetics and Araldited it all together. I used the spare handle to make a traditional pattern turnscrew to fit the lock nail of the Nock – I didn’t get the blade ( made from spring steel) quite even as I was in a hurry to finish it, having spent long enough on the job. Again quenched in oil and 285 degree C temper. I ought to put a nipple pricker in the top of the nipple wrench handle as is traditional – maybe later! The handles were finished by wiping over with shellac a couple of times and then using wax polish. Quick and dirty!
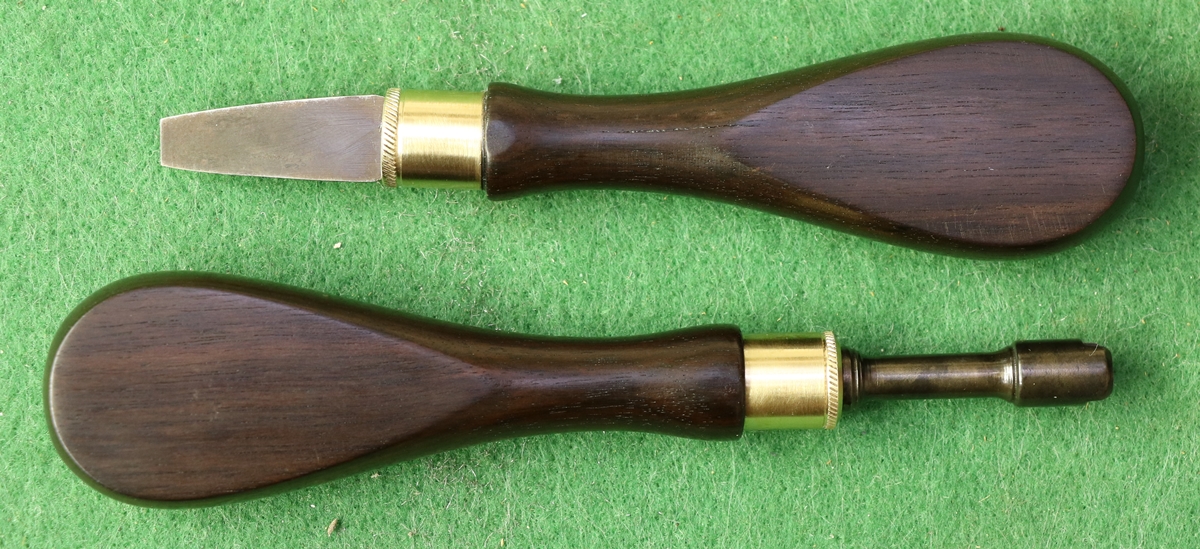
If I’d been prepared to spend a bit longer I could have made them match!
9th March More or less a complete day spent playing with guns -as a hobby it is quite time consuming! I’ve been browning the barrels – they are beginning to show some figure, see picture. At the same time I’m keeping up the slackum on the stocks, which must now be nearing completion. I tackled a couple of jobs I’ve had around for a while – a friend has a nice percussion gun that I covet – it needed a cap on the fore-end, it has a lot of big bold inlaid gold lettering on the barrel – Sturman of Barnsley (the lock says Bradley in equally bold gold lettering – discrete its not!). The cap should probably be of German silver but I decided that the gun was a bit of ‘Barnsley Bling’ so I made a gold one – at least I made one out of a bit of 22 mm copper water pipe and gold plated it – I think it looks rather good, although I have to admit that it isn’t quite the right shape! Oh, and I also soldered a pipe onto the rib of a flintlock and started a new website for my STEM club……
Replacement fore-end cap Sturman/ Bradley;-
Copper pipe annealed and shaped round a mandrel
Gold plated using SPA brush plating stuff
Finished cap – it should really be shaped round the ramrod opening but I like the ‘Barnsley Bling’!
Here is the lock of the ‘Barnsley Bling’
To give you some idea of what is involved in restoration, here are a couple of photos of the stuff I used in working on the pistols – there is more not shown – like the bench wire brush, vice, sandpaper and steel wool etc etc. I think everything in the photos got used!
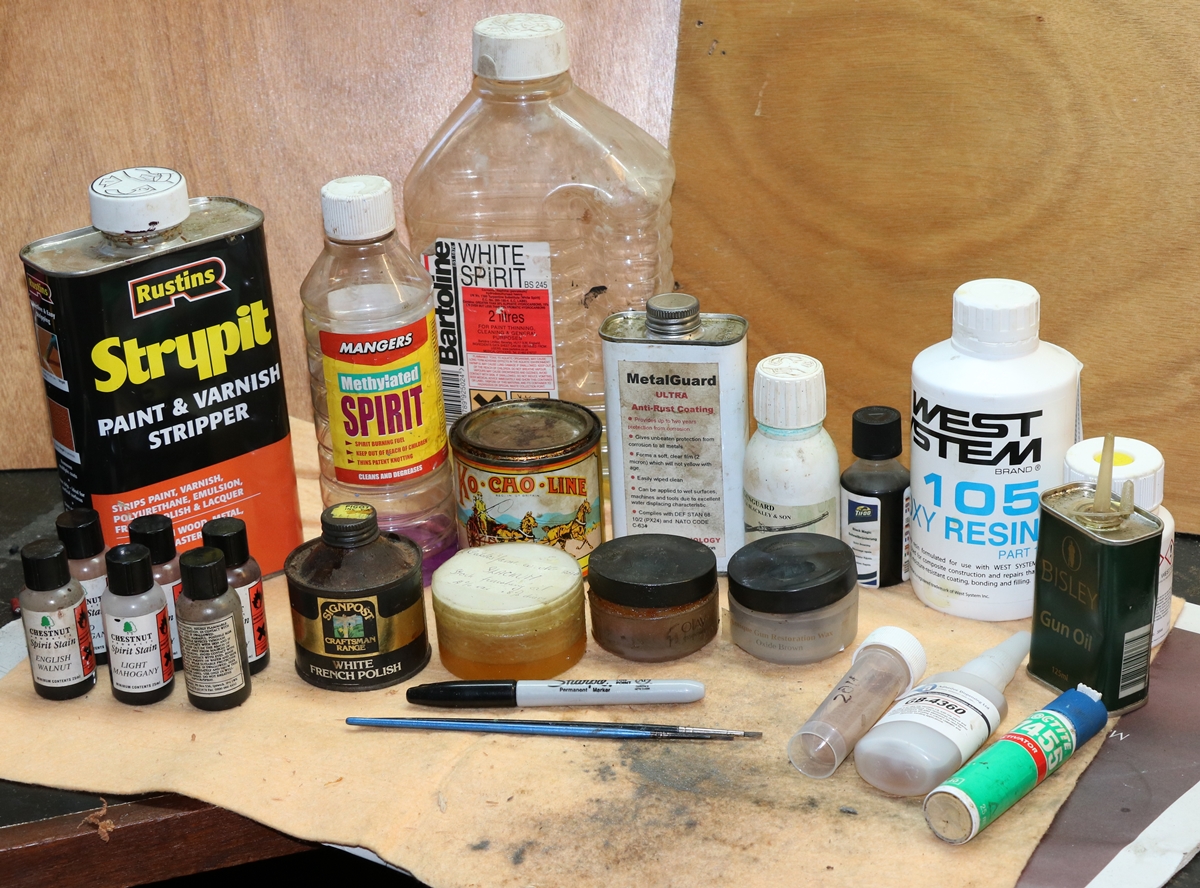
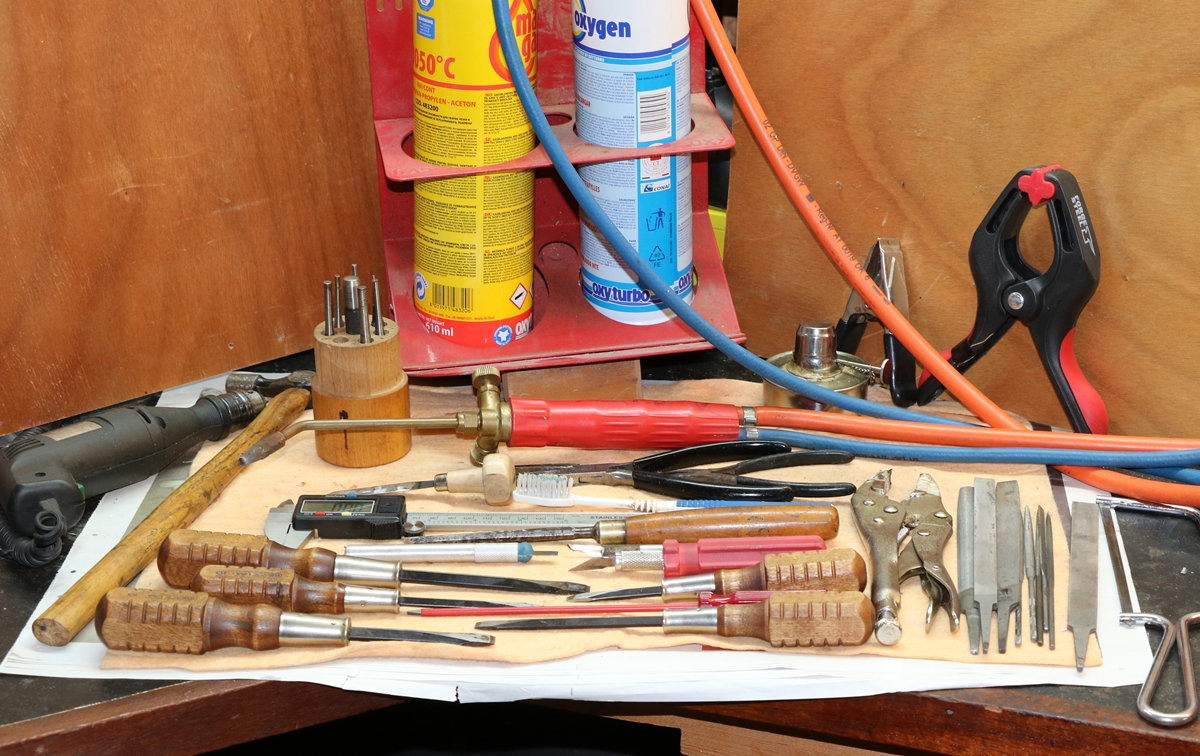
8th later Dick has a couple of pistols he restored for a friend who now wants to sell them – one is the Griffin I included a few pictures of below – a nice early pistol by a very good maker – I will go to Dicks tomorrow with my proper photography setup and take pictures to put on the FOR SALE section of this blog.
8th Mar. Trying to get some gun jobs out of the way! I spent some time fiddling with the frizzen springs of a pair of pistols I’m fixing – they were a bit slack so I re-hardened the first in water and tempered it in burning oil and finished on top of the AGA for good measure and its fine – I measure the opening with digital calipers before I start and decide how open it should be and the either open it that much if its softish or anneal it and then open it if not. The second frizzen spring was also slack but it was still soft at the end of the process and closed back to its original size when I intalled it – so repeat, only I’ll stick to the AGA and go for a measured 305 degrees annealing – now to see if it works…..it did! I’ve stated browning the pistl barrels after the chalk degreasing treatment. I couldn’t get the rusting to start (in the cellar), so I suspended the barrels on a large tub over a jug of warm water and they behaved! First rusting is Blackley’s solution , second is my old p.c.b. solution much diluted – I want it to be a bit blackish as I don’t want it to look like a re-browning job. I’m continuing the finishing of the pistol stocks – at the moment just putting on Alkonet stained slackum oil until it stays on the surface. The locks now look a lot more similar after I coloured one up a bit, but the main difference in the photo is caused by the light, although one has a near perfect surface finish and the other has got slight rust pitting – there is really no way to get rid of that difference without being too violent!
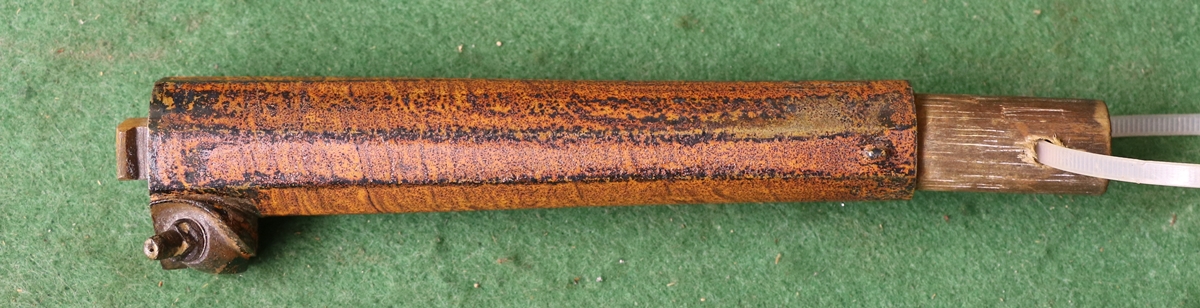
The twist begins to show up as soon as I put the used p.c.b solution on – its looking promising – the copper in the ferric chloride gives a darker, geyish to blackish colour.
Pistols receiving red oil finish – the clip is holding a split closed while the glue sets..
7th Mar I missed the range today as I got held up in traffic and was too late – everyone had gone! I worked on the pistols when I wasn’t going to the range or showing my STEM club how to write computer programs for robots. I’ve done the crack repair, although when I photographed it for the blog I saw that there were a couple of depressions that need filling. I lightly coloured the wood with red mahogany spirit dye wiped on and off as it had lost its nice reddish colour in the steaming etc. It then got a wipe on coat of dilute shellac, and then another, and the crack was coloured down so that it blended in using a paintbrush and spirit dyes and a Sharpie black pen quickly wiped off with a finger – it gets taken off by spirit stain or oil finish or shellac, but you can build up the colour with care. I realised when I looked at the pair together taht the spur we had welded on teh cock of one wasn’t at the same angle as the unbroken one. The broken bit fitted exactly, so it must have been at a different angle to start with, or it was broken bending it. Anyway I heated it to red heat and bent it to match – which it does reasonably well;-
The cocks match reasonably well, and the crack repair is not really visible, but I might need to do a better job matching the colour of the lock plate and cocks.
6th Mar. Archive day at Bullard.
I’m hoping to take the Nock rifle to the range tomorrow morning to check out the sight – but I have a committee meeting at 8.30 so lets hope it doesn’t last too long! I cast up 30 balls this morning – out of doors as last time I did it in the workshop and it was not pleasant. I’m amazed that the little flat camping stove will melt the lead and then keep it hot outside when turned right down – I’m getting the hang of casting, but the balls still come out with several different weights……. In the afternoon I have my STEM club at school so no hanging about…
5th March – I missed last night as I was at a black tie dinner and didn’t get home until too late to blog, even for me! I was constructing a circuit to charge all my STEM club’s Mindstorms computers at once – now done, although it gets a bit warm & I might have to boost the heatsinks. I set to work on sorting the sights of the Nock – Dick gave me a handful of old tubular front sights to try and I found a nice old BSA one with a built in choice of dot or ring by a lever on the side. My peep sight won’t go very low, so I had to put the sight line about 8 mm above the barrel which meant that conveniently the BSA sight would sit on the barrel and I’d just have to silver solder a suitably shaped bit of 1.5 mm steel onto the bottom. I filed up a bit of steel to fit the dovetail on the barrel and silver soldered it on – its not perfect as the silver solder didn’t pull the metal down properly so its not quite level fore and aft, and the wedge isn’t quite tight enough to be reliable, and as its covered by the sight body I can’t use a punch to fix it in place. Anyway ( there are lots of ‘anyways’ on this blog!) I sighted it with the laser tube and its not too bad – it will certainly get something on an A3 sheet of paper at 25 yards next Tuesday. I had a look at the set trigger – it doesn’t have much adjustment left, but I gave it a slight tweak and I think it is marginally better. Now I just have to cast up 20 or so balls to a high spec and see how it shoots – I do need to do something about the nipple, but that is a less urgent problem. Of course the downside to fixing the tube foresight is that the beautifully fitted case will need modifying and won’t be as neat as it was before – If it works I am tempted to fix a flat base to the barrel and fix the sight into it with lateral adjustment so it can also be removed.
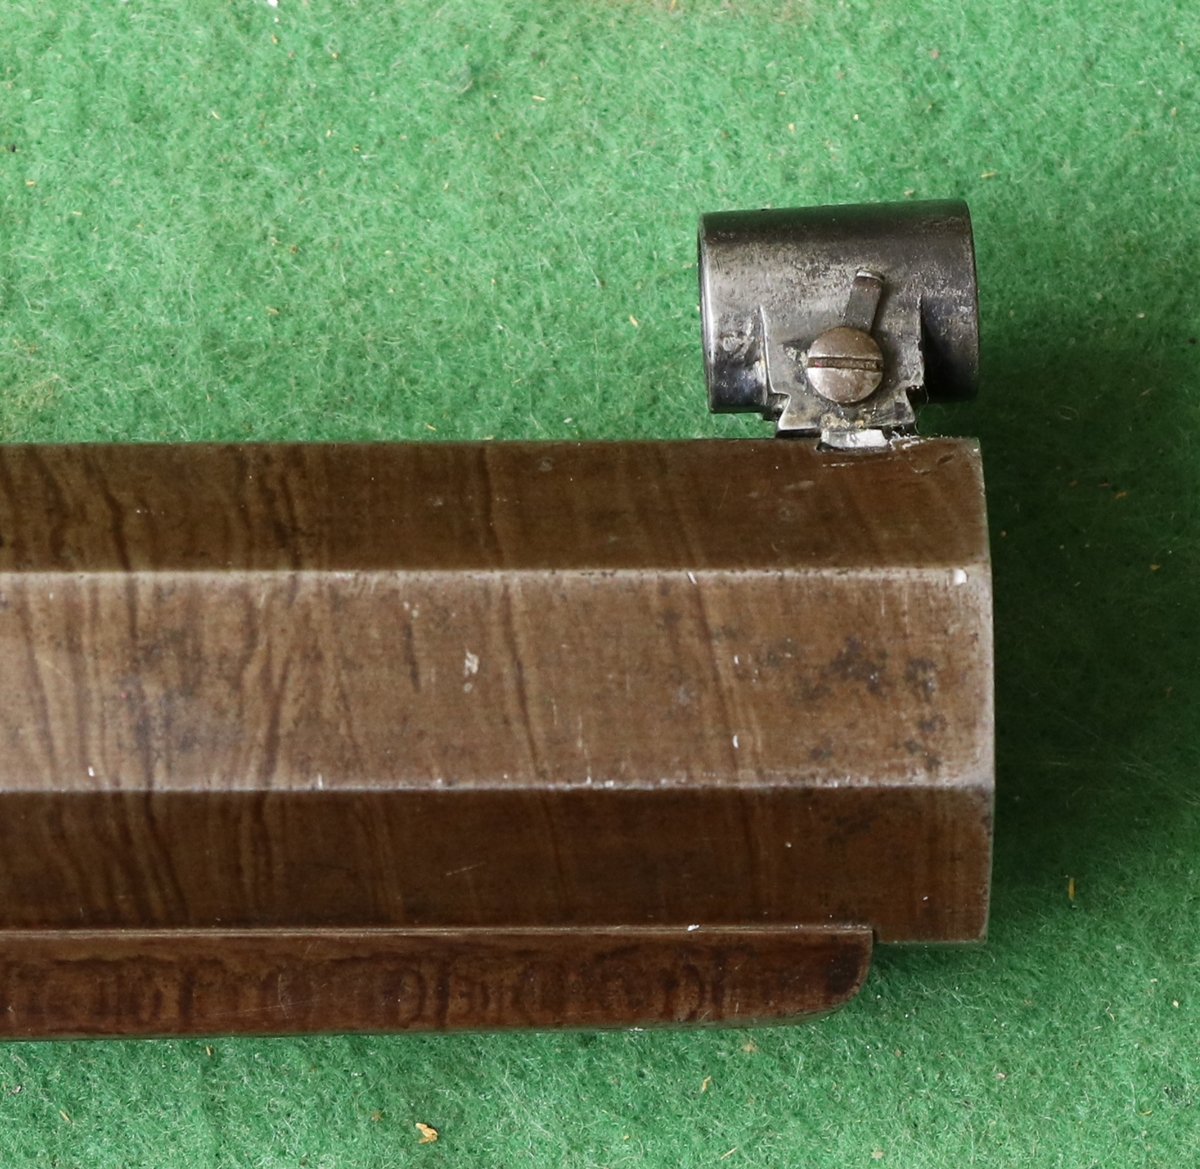
My additional wedge fixing didn’t work as I intended – its a bit tipped up and not tight enough but it will do for ‘proof of concept’ next time I shoot it – I can fix it properly if it works for me. The lever changes the sight from post and bead to ring.
Saturday was the Anglian Muzzle Loaders shoot at Cambridge Gun Club – extremely well attended too! I shot the Jackson Improved Central Fire gun I mentioned before – it was much admired and handled beautifully – I was quite pleased with the way it shot – I hit almost all the clays I would have hoped to, and missed all the difficult ones – so I was happy with the Jackson, and it is likely to become my first choice for a percussion double, pushing the Egg to one side. The only issue that I’ll sort when I get time is that one of the nipples is a fraction undersize and doesn’t hold the cap when you cap it with a capper – so you have to pinch the nipple a bit first, which isn’t idea and even less so when game shooting!” I thought I had paid over the odds for it but looking at the prices in the upcoming Holts auction I’m not so sure. (most of the stuff in this sale has 5% VAT as its from Alderney, so the total premium is around 35% ). I will go to the viewing, and may go to the actual sale too – I’ve never been to an actual Holts auction although I have bought too many guns there – I go to the viewing beforehand and usually bid on the phone, but this time there are so many goodies from Harold Bull’s collection that I’d like to be there! I have been asked by a couple of dealer friends to check out some of the percussion shotguns – obviously someone trusts my judgement! I suspect they will go at well over the estimates – coming from a known collection always gives bidders confidence! I’m not sure I’m in the market for anything in particular, but if something catches my eye but passes others by I might find the temptation too much!
3rd Mar Tommorow is an Anglian Muzzle Loader’s shoot so I will take the Jackson as its now on my certificate – I used the proper form downloaded from the web and emailed it – shame whoever did the form didn’t make the date box writable! But its a lot easier than posting.
2nd March – Dick has a steel barreled and brass mounted pistol by Griffin to restore – its early – Griffin became Griffin and Tow in 1773 so its before then, he was apprenticed in 1741 so would have finished as a journeyman around 10 or 12 years later, so that brackets the date between 1753 and 1773 – maybe I’d put this one around 1760 ish? I brought the barrel back to derust and get rid of the varnish on it – I’ve done that and its is now clean – its quite pitted but looks OK – it would not have been browned originally, and it would not be sensible to strike it up as too much would be lost, so it will stay. He also had a pair of brass barreled flintlock pistols by Brander and Potts of 70 The Minories that he is renovating – correcting a couple of bodges, like extra screw holes in the trigger guard that needed blocking – Brander joined Potts in 1825 (?) so they are quite late, although they don’t look fully up to date for that time- right at the very end of the flintlock era. They do have silver mounts which I believe were dated for 1763, which is a mystery as, apart from the name, the frizzen has a roller (introduced in 1775) and its a semi-rainproof pan. They are rather well made and appear to have originally had the barrels gold plated. I brought the trigger guard back to touch up the engraving where the screw holes were blocked. I have offered to renew the gold plating on the barrels – The client is being consulted on the price! I guess they are basically what we call a ‘bitsa’ – made from bits of this and bits of that, although in this case definitely contemporary and genuine- a rather classy bitsa, and therefore adding interest to the pistols.
‘I came across a nice quote from a law report in Keith Neil and Backs ‘Great British Gunmakers of 1540 to 1740’ that I thought was worth bearing in mind when you look at some utilitarian pocket pistol with ‘H Nock’ on the side…. It was a case in 1747 of someone making guns without having served an approved apprenticeship or being a member of the Guild ;-
“It appears that the gunmakers business in and about London is divided into twenty one different branches: viz barrel forger, brick forger (?), barrel filer, barrel polisher, barrel loop maker, lock forger, lock filer, lock polisher, lock hardener, trigger and nail maker, trigger and nail filer, stock maker, furniture forger or founder, furniture filer and cutter, tip and pipe maker, side piece and thumb piece repairer (?), polisher, engraver, bluer, stick maker, flint maker, and mounter or screwer together, and all that the master gunmaker do in London, after they receive the several parts, is only to screw those parts together in which very little skill or art is required.” He got off on the grounds that he had made a very fine gun – entirely by himself. Of course in time almost all those subsidiary activities migrated to Birmingham where the cost of labour was less.
That was in 1747 – by the time the double barreled gun arrived you can add a few more trades, and given my belief that by the mid 19th century the engraving on sporting guns was farmed out within the engraver’s shop so maybe three engravers worked on the bits of one gun I reckon upwards of 30 people had a direct hand in making a gun!

The Griffin pistol barrel:- Classic mid 18th century shape and engraving.
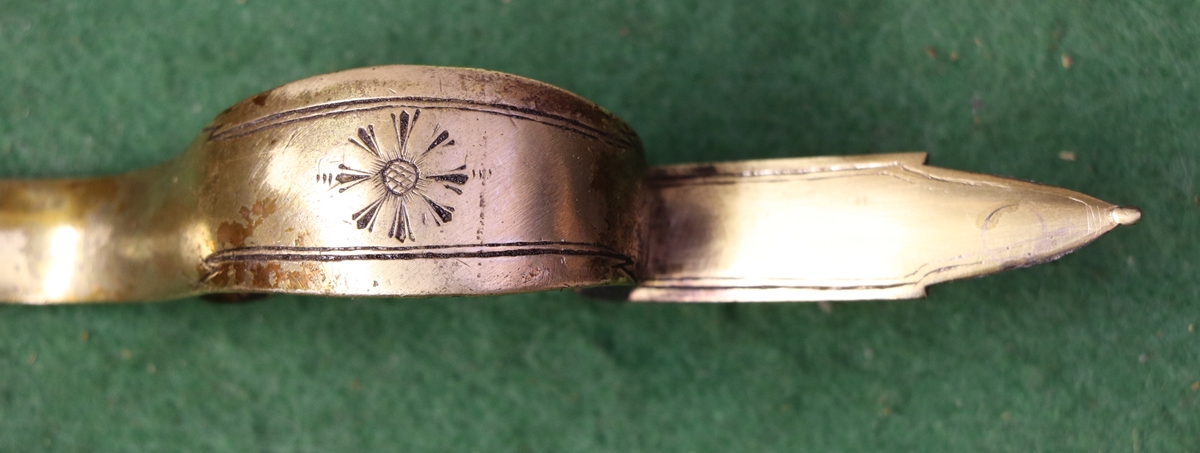
The trigger guard of the Griffin needs the tip re-engraving – as you can see the lines are a bit wavy so not too difficult to copy!
1 March -Busy day trying to sort out some electronics – banging head against wall! This evening I decided it was time to do a bit of engraving of lettering on a test plate so that I didn’t loose the skill altogether – I don’t understand how the brain (or at least mine) disconnects from the words when you are engraving, particularly through the microscope – I happily engraved ‘DUULLINGHAM’ and didn’t see anything wrong until I looked at it without the microscope – and I had marked it out carefully too , although I did notice that my spacing seemed to have slipped! As a punishment I made myself redo it in letters 0.8 mm high and get it right! I’ll try to make time for some gun work tomorrow – de-rust the pistols and maybe start on the fore-end tip for the Bradley gun – I was thinking to try making it from a bit of 1 inch copper pipe and then silver plate it……
28th Feb I took the Nock rifle to the range this morning and found a number of muzzle loading pistols being shot, which was handy. My sighting laser worked well – it shows up at 25 m on a reflective strip – luckily there were a couple in the butts to check the sighting on. I decided to try 1.7 dr of Swiss No 4 as compromise between the 1.5 mentioned in old books, and the 2 or 2.5 that had been mentioned. The balls from my .632 mould were a steady lightish push fit with 15 thou lubricated (WD 40) wads, but perhaps not quite as tight as I would have liked. My first shot was a couple of inches at 3 oclock to the mark, and my first 5 shots were about within a tea plate, but I’m afraid it was downhill from there! I did the first 5 without setting the set trigger, but was worse with it set as it was so sensitive that I couldn’t even feel the trigger on my finger before the gun went off ! Anyway itgot worse – I’m not quite sure why – except that the gun was getting a bit fouled, and I was having some difficulty in seeing the sights and lining them up. The rear sight has hardly any v in it, only a gold inlay on the back face as a mark that you can’t see under the roof of the hut, and the foresight is not very visible. At one point I was distracted and put the patched ball down the barrel without any powder – at that point I found out that all my nipple keys were too big on their outside diameter to fit in the space around the nipple ( not sure how I got the nipple out and back when working on it, but I know I did!). Luckily someone had a little revolver nipple key that worked fine and a bit of fine powder in the nipple hole blew the ball out and it landed a couple of meters from the muzzle. I also had a couple of misfires – another cap got it going in both cases. What did I learn? 1) the .632 + 15 thou balls are a tiny bit small and might not be gripping the rifling – I don’t think they would stand a chance at 2 or 2 1/2 drams of powder. I might have to get another ball mould or try two 10 thou patches together. 2) I need to adjust the set trigger a bit so I can actually feel it before it goes off. 3) My eyesight is not really good enough for open sights, and certainly not with an invisible rear notch. I need to use the peep sight, perhaps with a smaller hole, which will mean raising the foresight as the peepsight won’t go low enough on its mount – since it won’t be traditional I might put it in a short tube, or modify a modern one. 4) misfires should not happen, certainly not twice in 20 shots or so – the nipple is the original one and flares out from the top to about 2 to 3 mm. – our experience with M/L shotguns is that the hole at the bottom needs to be quite small – around 1.3 mm diameter, to fire reliably. So I’ll have to bite the bullet and make a new one – I hope its 26 t.p.i. 5) I need to think about a ball puller or a gas ejector! 6) I ended up using some balls I had marked as rejects because of surface flaws or weight discrepances – they did (not surprisingly) shoot more erratically than the better ones. Anyway, it was an enjoyable shoot with several M/L enthusiasts, so I’ve established a good place to go on a Tuesday morning if I have time! I had my first of the new STEM (Science Technology, Engineering and Maths) clubs at Kettlefields school in teh afternoon – everyone was very excited because the letters the children had written to local businesses had elicited a cheque for £1000 from one kind sponsor, which paid for the 3 sets of Lego Mindstorms I had already ordered on a gamble. Anyway they all dived in undoing the boxes and were soon busy thinking of projects – their theme is Pets.
27th Feb Clare of Anglian Muzzle Loaders sent me the link to the notice for the Northern Shooting Show – you can see what I got up to with my engraving and display of photos of work I have done. https://www.northernshootingshow.co.uk/whats-on/artisans-classics/ . It is approaching fast, at least in comparison to the rate I’m getting things done! I’ll have to find a good project to take….. I am off to the club 25m range tomorrow to sight in the Samuel Nock 16 bore rifle, having now learnt how to get the right size of ball, and got the right powder – I’ll try my laser tube. I ought to make an unloading rod in case I have to get a ball out – I did try a vicious modern 5 mm screw that seemed to work just fine, so I’ll just have to mount it in a suitable rod with a cover – I did buy a tap and die of the size most commonly used on old cleaning rods – 9/32 BSF so that I could do the job properly but haven’t got round to it – like so many things. I’m just wondering if I might take my Colt Army to shoot on the range – it is on my FAC and I have shot it and it is quite a beast – with slugs the chamber is full of powder and the slug is flush with the end, or just looses its tip. I did manage to get a few shots in the target last time I shot it! The flask is a cheap repro, I think the case is also late. I do prefer the Navy, but I don’t have a shootable one, although years ago my father used to shoot mine without problems.
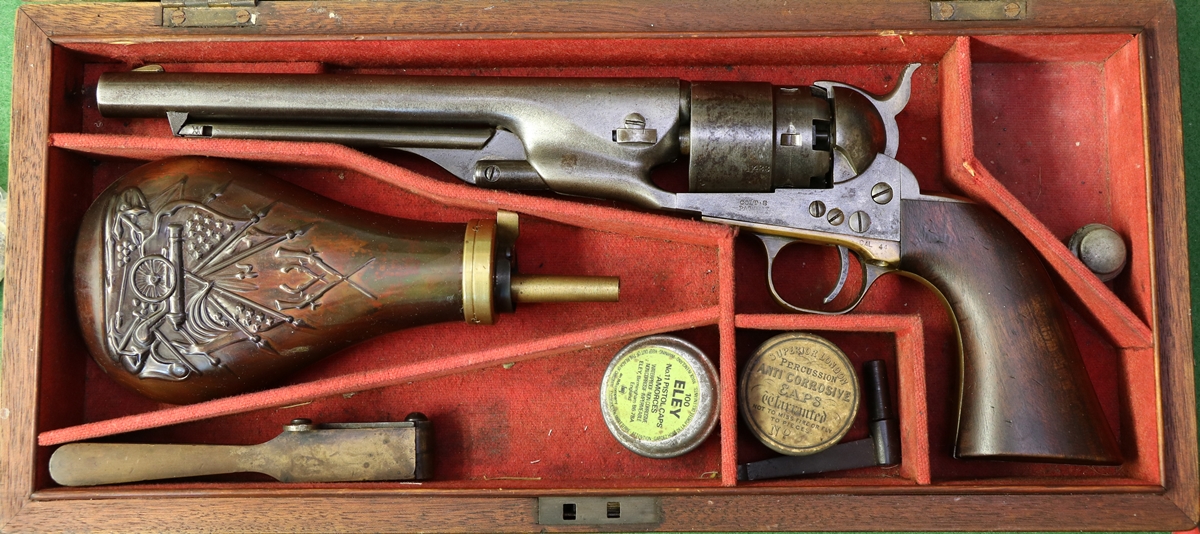
This is in very fine mechanical order- its only problem is slightly messed up barrel lettering where someone has tried to ‘improve’ it.
26th Feb. I do seem to find myself doing strange things – today making a new drumstick used to strike the gong to announce formal dinners at Homerton College as the steward had been a little too vigorous with the old one – fortunately it wasn’t a very ancient item of historic importance. I copied the old one but had to spend some time finding a suitable covering for the head of the stick – too hard and it excited too many high frequency resonances in the copper dish I was using as I didn’t have the gong itself, too soft and it sounded dead! I used two layers of scraps of felt left over from lining a gun case wrapped round the ball shaped head and sewn on! I am incidentally invited to a formal dinner on Tuesday so I’ll hear how it sounds! I got a fierce letter from the VAT man yesterday because I’d forgotten to put in my return – slap over the wrist for me! So unfortunately no guns this evening! Thinking about the pistols, they do look quite early in the percussion era – They have two side nails but no side plates, and the back tip of the lockplate is a bit dated, and the flats on the butt are typical late flintlock features – also no escutcheons round the barrel bolt. The locks and breech plug were clearly made as percussion, but I have a feeling that the rest of the pistols might be from a flintlock – the percussion bits don’t quite fit in style or quality with the rest? I’ll do a bit more careful examination when I strip them down to clean – but its a nice speculation to work on, and would certainly make them more interesting.
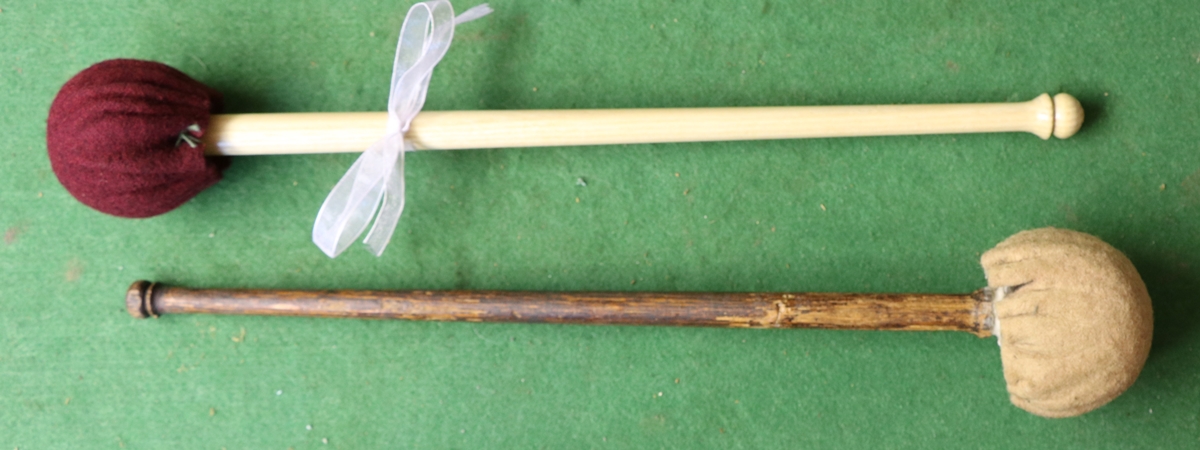
My good deed for the day!
24th Feb I spent a lot of today wearing my school governor hat, or rather badge. Governors are supposed to have an oversight of what goes on in the school so that we can hold the head to account, but probably more importantly, so that we can impress the school inspectors that we are doing our job (unpaid of course) so that they will give the school a good rating. Anyway as the governor with special responsibility for children with special educational needs I need to know what is done in the school to help them, and how effective any interventions are. It is interesting to see the way schools are changing – having gone down the route of extreme risk reduction and more or less wrapping the children in cotton wool, the buzzword is now ‘resilience’, which means make them think for themselves and take some responsibility for their lives as they go through the school. About time too! I’m quite excited about the way things are going in education at primary level – and particularly the way that schools are opening up to the outside world and encouraging industrial contacts. All good stuff. All that waffle is just by way of an excuse for not having touched a gun all day – apart from realising that keeping my (FAC) Percussion Nock Rifle in its case wouldn’t really cut the mustard* with the firearms department, so the barrel has been taken out and put in the cabinet.
23rd Feb. I went out to the Cambridge Gun Club for a few clays with Bev and Viking but it was blowing a gale and I couldn’t see any prospect of my hitting anything – if I was a better shot it might have been fun but clays with a 50 to 60 mph gusting wind behind them are not something I really expect to do very well at. The others stayed and braved it, but I headed home clutching my kilogram of Swiss No 4. Its unfortunate that the black powder we buy – all from the continent – comes in 1 Kg bottles, whereas for legal storage we have to keep it in containers of a maximum of 500 gm. I’m sure someone had a good reason for changing it, but that is one area where a bit of European joined up thinking would have been useful to the poor punter! On the way back home I found the road blocked by a fallen tree, so I had fun towing it out of the way with my Land Cruiser- luckily I can tie knots in rope that I can undo afterwards. I had meant to throw the chainsaw in the back before I set off but didn’t. This evening I was reading a copy of Howard L Blackmore’s book ‘Guns and Rifles of the World’ as I bought a copy at the re-enactment fair – its a deceptive book because it looks as if it is a casual coffee table book – the title suggests it, but Blackmore is an authority on almost every aspect of the history of firearms and the book is an excellent introduction to the history of firearms and the enormous variety of guns that have been made – even if the average collector only sees a few percent of that. If you only have one book on antique guns this would be a good choice. When I got it home I found I already had a copy, so if anyone wants one I’ll sell it for the £20 I paid plus postage.
22nd Feb Not very gun orientated today I’m afraid! Dave and I met to discuss our next STEM (science technology engineering maths) club activities and decided to set up a website to encourage others. My enthusiasm for another website is based on this blog, which has grown steadily over the last couple of years without any real pushing from me. The blog gets around 180 to 200 visitors a day, who look at around 1000 to 2000 different items. It is found by around 20 Google and other searches ( 95% Google, 5 % other ) per day, which means that about 150 people who already know about the site visit every day! Because it has new stuff most days and gets a lot of clicks per visitor it is ranked high by Google and comes up well in searches, especially in Google Images. It also gets around 40 attacks a day – mostly people trying to log in through the ‘front door’ which is bricked up. So far the blog has had over half a million separate clicks on items, 400 thousand in the last year. It gets visitors from all over the world on a regular basis – most from the UK but many from the US and Europe but a pretty good coverage;-

This map shows in blue where today’s 180 visitors came from ( dark blue = lots) – clearly we lack penetration in Africa generally ( although we do have 3, Ghana, Nigeria and Kenya ) and the Middle East including Kazahkstan and Iran and I don’t think we have ever had visitors from Greenland! This is only today, as I’ve only just put the facility to identify countries on the website. Some of the visits from other countries may be via vpn networks that disguise the true country of origin – I don’t have a way of checking that yet.
21st Feb Spent a disproportionate part of the day making three titanium nipples for the Jackson and a spare – don’t ask why it took so long! getting the threads right is the time consuming bit – even with a new die it is a struggle to put a 1/4 x 28 thread on them – its not so bad if you take a decent cut but when you are just taking a little off to get the nipples to go in, the die doesn’t really cut, just swages. I had to use the chuck key in the 6 inch chuck to turn the work against the die stock, cutting and backing off, and I think the die is the worse for wear now even though it was new this morning. I ground off the face of the die by around 1/2 a mm so that it cut better up to the face as the nipple holes are not chamfered. Anyway they are now fine, and fit pretty well. The cock noses just about miss the top of the nipple, but of course as soon as there is a cap on the nipple, the cock just catches on the edge of it – not a good idea. I found a small (4 mm diameter) cylindrical grind wheel for my pretend dremel and gently reworked the edge of the cock noses where they where hitting so that it now clears the cap. You can hardly see the alterations from above or the side – a quick dab of Tipoo blacking ( Ebay) and you wouldn’t know it had been done! I snapped off a couple of caps to make sure it was OK. I’ll shoot the Jackson on Thursday, all being well, so I can see if it is indeed an Improved Central Fire, or just another attempt to find a unique selling proposition 19th century style. I am getting neared to shooting the Nock Rifle – I got my FAC back today, and I made another dozen balls. I melted the lead in an old saucepan on one of those flat camping stoves – I thought it might struggle to give enough heat, but in fact it had to be turned right down. I made a dipper to fill the mould as per Jeff Tanner’s website and I have to say it is brilliant – an old small CO2 cylinder with a bit cut out of the end and a 6 inch nail silver soldered on for a handle – it just holds enough for one 16 bore ball. The balls I made today all came out at 361 or 362 gr – I didn’t have any 365 ones – still not sure about the bullit casting process, but my tools are now fit for purpose.

The inline nipples certainly make for a more compact and neater breech – looks like an early hammergun, which is what I thought it was when I first saw it at a distance.
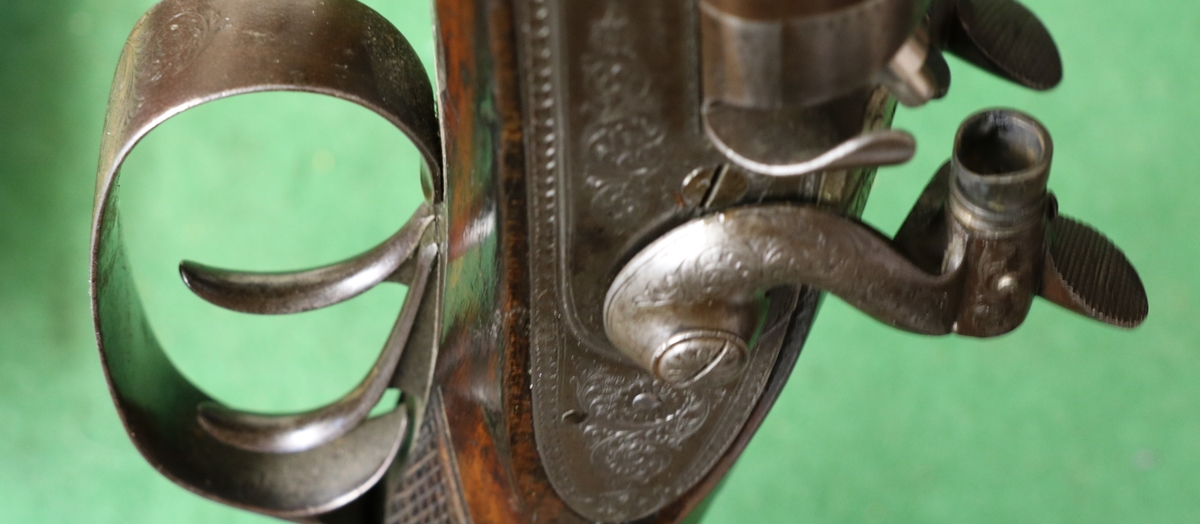
A bit of a fuzzy photo – I needed three hands and only had two – only a minor re-shape but actually a lot more clearance
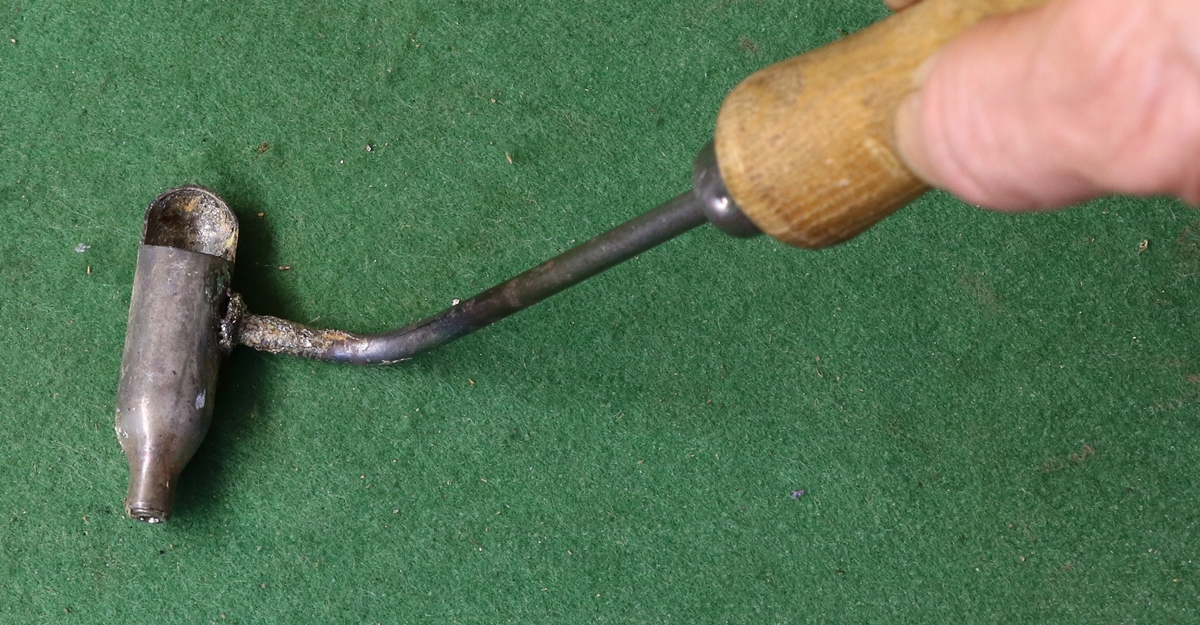
Dipper, to a design by Jeff Tanner – see www.jt-bullet-moulds.co.uk/
20th Feb – In Cambridge most of the day.. I get a few emails asking me questions most days, which is nice, and I get to find out what interests the people who visit this site, and I’ve made some friends that way too. Today I got asked if I used my Gravermax – here is the relevant bit of my reply in case its of interest to others;
The Gravermax doesn’t get a lot of use for a number of reasons –
1) – as I don’t use it very often I am not really tuned in to it.
2) – the style of most 19th century engraving rather depends on the limitations of hand engraving – take those away and you don’t have 19th century engraving, as all the Americans who try to imitate old English engraving with a Lindsay should realise but don’t!
3) – My belief is that for very fine work you are relying on the resistance of the tool in the metal to give you precision you can’t get freehand – I’m not shaky, but the trickiest part of engraving lettering 1/3 mm high is the initial placement of the tool on the metal! Once cutting I’m essentially controlling force not position. With either air system you eliminate most if not all of the resistance. One (main) element of control is lost!
4) – Having said that, I use the Gravermax in some particular situations – on hard brass where slip is entirely unpredictable so eliminating force is useful, and on convex surfaces where it is often difficult to judge the curvature and if you don’t get it right you slip. The same is true in long straight cuts where the angle of your hand changes – 19th century engravers cut them in shortish sections anyway. In those and a few other situations its an advantage to eliminate most of the resistance.
I haven’t used a Lindsay or a palm controlled Gravermax – mine has a pedal control. I don’t know any professional gun engravers in the UK with either, although I don’t actually know what equipment they do have – mine was owned by one, Geoff Moore, who only used it for stippling and even then got fed up with it and sold it to me! I think if I did deep relief work it would probably be worth persevering with it – they shift metal fast, sometimes too fast.
I think one possible advantage of the Lindsay is that it doesn’t need tuning, whereas the Gravermax system sits just one side of resonance and is pulled into reonance to cut – mine is quite critical to tune up, although it doesn’t get out of tune very often.
19th Feb Not much today – Giles started to get our small cnc router going but ran into a software brick wall and will I hope come back to it later! I went to the Wood Green re-enactment fair to see Bernie the Bolt to get more cloth for re-lining gun cases. Unfortunately he didn’t have any more of the nice green I used for the Nock case ( I do have enough for one more case) so I got a fine purple cloth instead. I also met a historian of battles and we discussed a letter home I have from a soldier serving in the 43rd regiment in the Peninsular war in 1809 – 1814 that tells of several battles he was involved in – I was able to identify the last battle he described when the French were finally pushed out of Portugal on 3rd April 1811 – I guess they were using the India pattern Brown Bess then, and the 95th had Baker rifle-muskets. I’ll do a post on it some time. I just started a post on the gold plating, but I did the calculations of the amount of gold deposited with a given amount of current and got results that were different from the figures I got when I used the Wiki calculations – I need to look into it a bit more as I think I understand the electrochemistry OK – I just can’t get sensible numbers!
18th Feb I got my piece of Ebony today 58 1/2 inches long by 1 1/2 x about 2 (outside edge) and very dark, heavy and straight grained, so now I have to convert it into blanks – I can do narrow cuts with the bandsaw but they may wander, or I can use the radial arm saw which has a 3mm kerf. The blade in the saw is pretty blunt and I think will burn this timber, and I was looking at replacing it, so I might try to get a narrow blade with a 2mm or 1.6 mm kerf although they will be more fragile. ( I found an old one with a 2mm kerf but its got a positive rake angle so might be a bit tricky to use on a radial arm saw, which should have a negative angle) The length should give 2 ramrods if they are not too long ( the brass ends account for at least 1 1/4 inches), and anyway if long the bit will do for a couple of pistols. With careful cutting I should get 7 double rods, or more if I can split the wood 3 ways…. A quick check on ramrods on guns lying around show from about 10 mm for shotguns to about 13 mm or more for rifles I need to get as many as possible to defray the expense of the timber! Then its a matter of working out how to round it perfectly! I also got my titanium, so can now make the nipples – I’ll set up a production line and make some ‘standard’ 1/4 BSF ones as well as the 1/4 UNF for the Jackson. I made a ‘dipper’ for pouring lead into the bullet mould as per Jeff Tanner’s website – although at the £5 he charges it was hardly worth the effort! Off for a trip to Wood Green Animal Shelter tomorrow for the re-enactment fair to get some more fabric for lining guncases from Bernie the Bolt. I don’t need any but would like a deep red or purple.
17th Feb A sudden increase in visitors to the site today – almost 50% up to around 300, the extras are mostly attacks I guess. Thinking about the Jackson Central Fire gun, I’m certain that somewhere along the line someone ‘restored’ the noses to the cocks and got it wrong, so instead of doing it right just took out the nipples and sold it on – very lazy and bad form and now the old noses are lost and probably their shape is unknown! Anyway fortunately I can guess what they must have been like and either modify the existing noses or make new ones – we’ll see which when I get the titanium rod to make the nipples – I’m quite hooked on tehe machining qualities of Titanium, and I’ve ordered a couple more dies from Tracy Tools ( £3 each) as I’m sure its tough on them – I also ordered a couple of 1/4 UNF taps ( £2 each) to make a block to hold the half finished nipples in the chuck. My main task of the day has been experimenting with casting balls for the Nock rifle using the .623 diameter ball mould from Jeff Tanner. I have moulded balls and bullets before, mostly from the original steel moulds, but this was the first time I have used one of these ball moulds, which are pretty substantial chunks of brass. It took me a while to get the hang of heating the mould up enough to get a full ball before the lead froze in the entrance to the mould. I’m using pure lead, at least I think I am, its modern roofing lead so I think it should be unalloyed. I eventually got balls cast, but some had small shrinkage pits and in some the sprue broke off with a crystalline surface – in the end I did get some good balls – at least I hope they are good. I weighed them and got some weighing 361/362 grains and some weighing 364/365 grains after I had cleaned off the sprue. Oddly there didn’t seem to be a spread of weights, just about half light and half heavy – not sure what is going on here! I was heating the lead in a small metal cup using a calor blow torch that I also had to use to heat the mould up, so my heat input wasn’t great, and I was pouring straight out of the cup into the mould – anyway I need to sort out my heating/melting arrangements and use some flux – I didn’t use any then. The good news is that the balls came out at .623 as intended, and fit nicely with a 15 thou patch as far as I can tell ( I put a 250mm chunk of 1/2 inch brass rod down the barrel before pushing the ball down so I could ‘hammer’ it out again). The Firearms Licensing authority clerk said my variation is in the post – we had a nice conversation about what you did with a 16 bore rifle, which was a new concept for them, and I explained that it was used for shooting lions, tigers and elephants, although not recently and I wasn’t intending to shoot any either! Anyway, the time for shooting it gets closer – I just need to get my hands on the Swiss No 4 powder I have bought…. and that’s all I seem to have done today, apart from going to listen to the Vice Chancellor of the University of Cambridge explaining what lies ahead for it – brexit ( 80% of UK research funding and 20% of research staff and 8% of students come from the EU), vilification of experts. disaffected populace, Trump , alternative facts……. etc etc.. A bit depressing, although if you can survive for 800 years a few little things like those are not going to derail you! ………
16th Feb One of those frustrating days when you struggle to get anything to go as you wanted! I did, however, manage to order a piece of ebony that I am promised is straight grained and mostly black and will make a number of gun and pistol ramrods – it cost a fortune, so I hope it lives up to expectations – if it does I’ll put some lengths up for sale. My main battle was with the nipples for the Jackson Central Fire gun, see below. I realised that when firing the gun one’s head was right in line with the nipple holes, and there was not the usual convoluted path for the explosion to maybe lower the impulse on the nipple. So I figure that it is not a bad idea to have a very well fitting and strong nipple! Fortunately the thread in the breech is good and clean, so I just had to make a well fitting nipple. I picked a nipple from the pot of nipples I’d made previously and it seemed to fit the thread although a bit oversize to go far, so I carelessly assumed that the breech thread was the almost standard 1/4 BSF (1/4″ x 26 tpi). I had bought a small piece of 10 mm diameter titanium on Ebay, so I thought I’d just try and make a titanium nipple for fun. I was really surprised at how nicely it cut with a standard H2 steel tool – a really good surface finish and nice clean swarf ( with a bit of top rake on the tool). (SAFETY WARNING – titanium swarf will burn and is difficult to extinguish – CO2 or water make matters worse – use a special foam or dry sand) I had a bit of a struggle cutting the thread with a die – it was almost as tight backing off the die as cutting, but I got a serviceable thread in the end – filing it was tough too. That’s when I discovered, not without some messing about with modelling clay, that the thread isn’t 26 tpi, its 28 tpi, which fortunately corresponds to 1/4 UNF, a die for which I also have. So start over, as they say in Trumpland, and make a new one. Now there is a stop on the cocks of the gun that limits their travel, and its about at the point that a normal nipple would reach, so I thought I’d be clever and make on a bit longer than normal – say about 11mm sticking out. So I made it and then I discovered that the cocks are quite tiny and of course the cock swings in an arc, and if you make the nipple that long the edge of the flash guard round the nose of the cock clips the top of the nipple ( even without a cap on it!) I can’t shorten the nipple because I don’t have a 1/4 UNF tap to make a jig to hold it in the lathe…… So that was the end of my little piece of titanium and I had to revert to EN 8 which cuts horribly and I lost heart… ( see caption to the photo for more on this)….
I have ordered a decent length of 10 mm diameter titanium (at £5 for a foot on Ebay) as I’m determined to try it out as it was so nice to work…… I paid a visit to Dick’s to show him the gold pans, which mightily impressed him and to look at all the guns he has in pieces – he usually has three or four antiques on the go. I was interested the other day to learn in a discussion where all the cheap old 12 bores from Holts and places end up – shipped to France in lots of up to 100 guns at around £30 to £50 each! We live and learn.
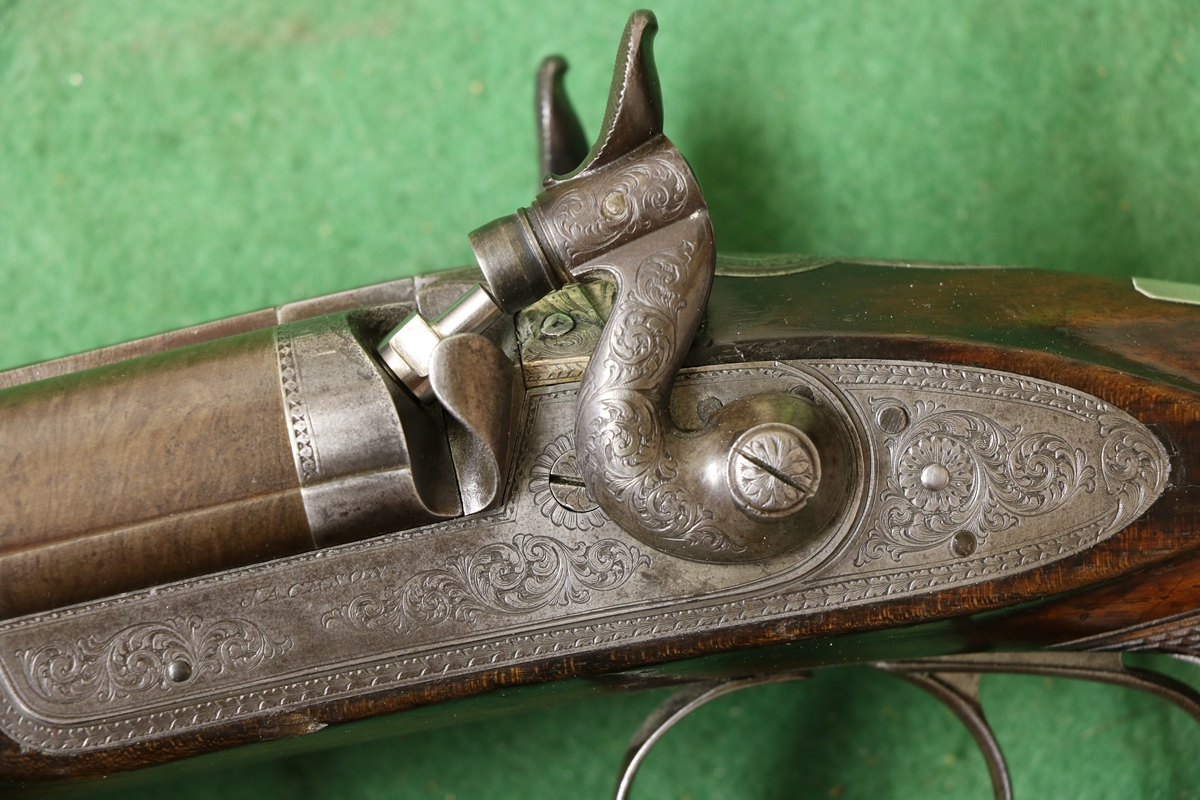
Here is the Jackson nipple problem – too short and the cocks don’t fire the cap, too long and the edge of the flashguard fouls the nipple, even without the cap. The hammer and flashguard are replaceable so I suppose I could make ones with a cutout to clear the nipple, but I’m hoping that if I get it right it will work – The gun came without any nipples in – that sort of omission always makes me a bit suspicious – has someone had that problem before – the hammer heads and flashguards are removable – are the hammers and flashguards actually replacements that never worked? They look a bit too good to be original. What were the originals like? We shall have to find out – I will (probably) eventually shoot the gun, but I think a proof test without my head in the direct line of the nipples is called for!
15TH (JUST) I managed one more job this evening – a couple of gold pans in a pair of pistols Dick and I have been working our magic on under the radar* – the SPA Plating stuff is just so easy and effective – it took about an hour to get a high polish on the pans and clean them very carefully and then plate them.
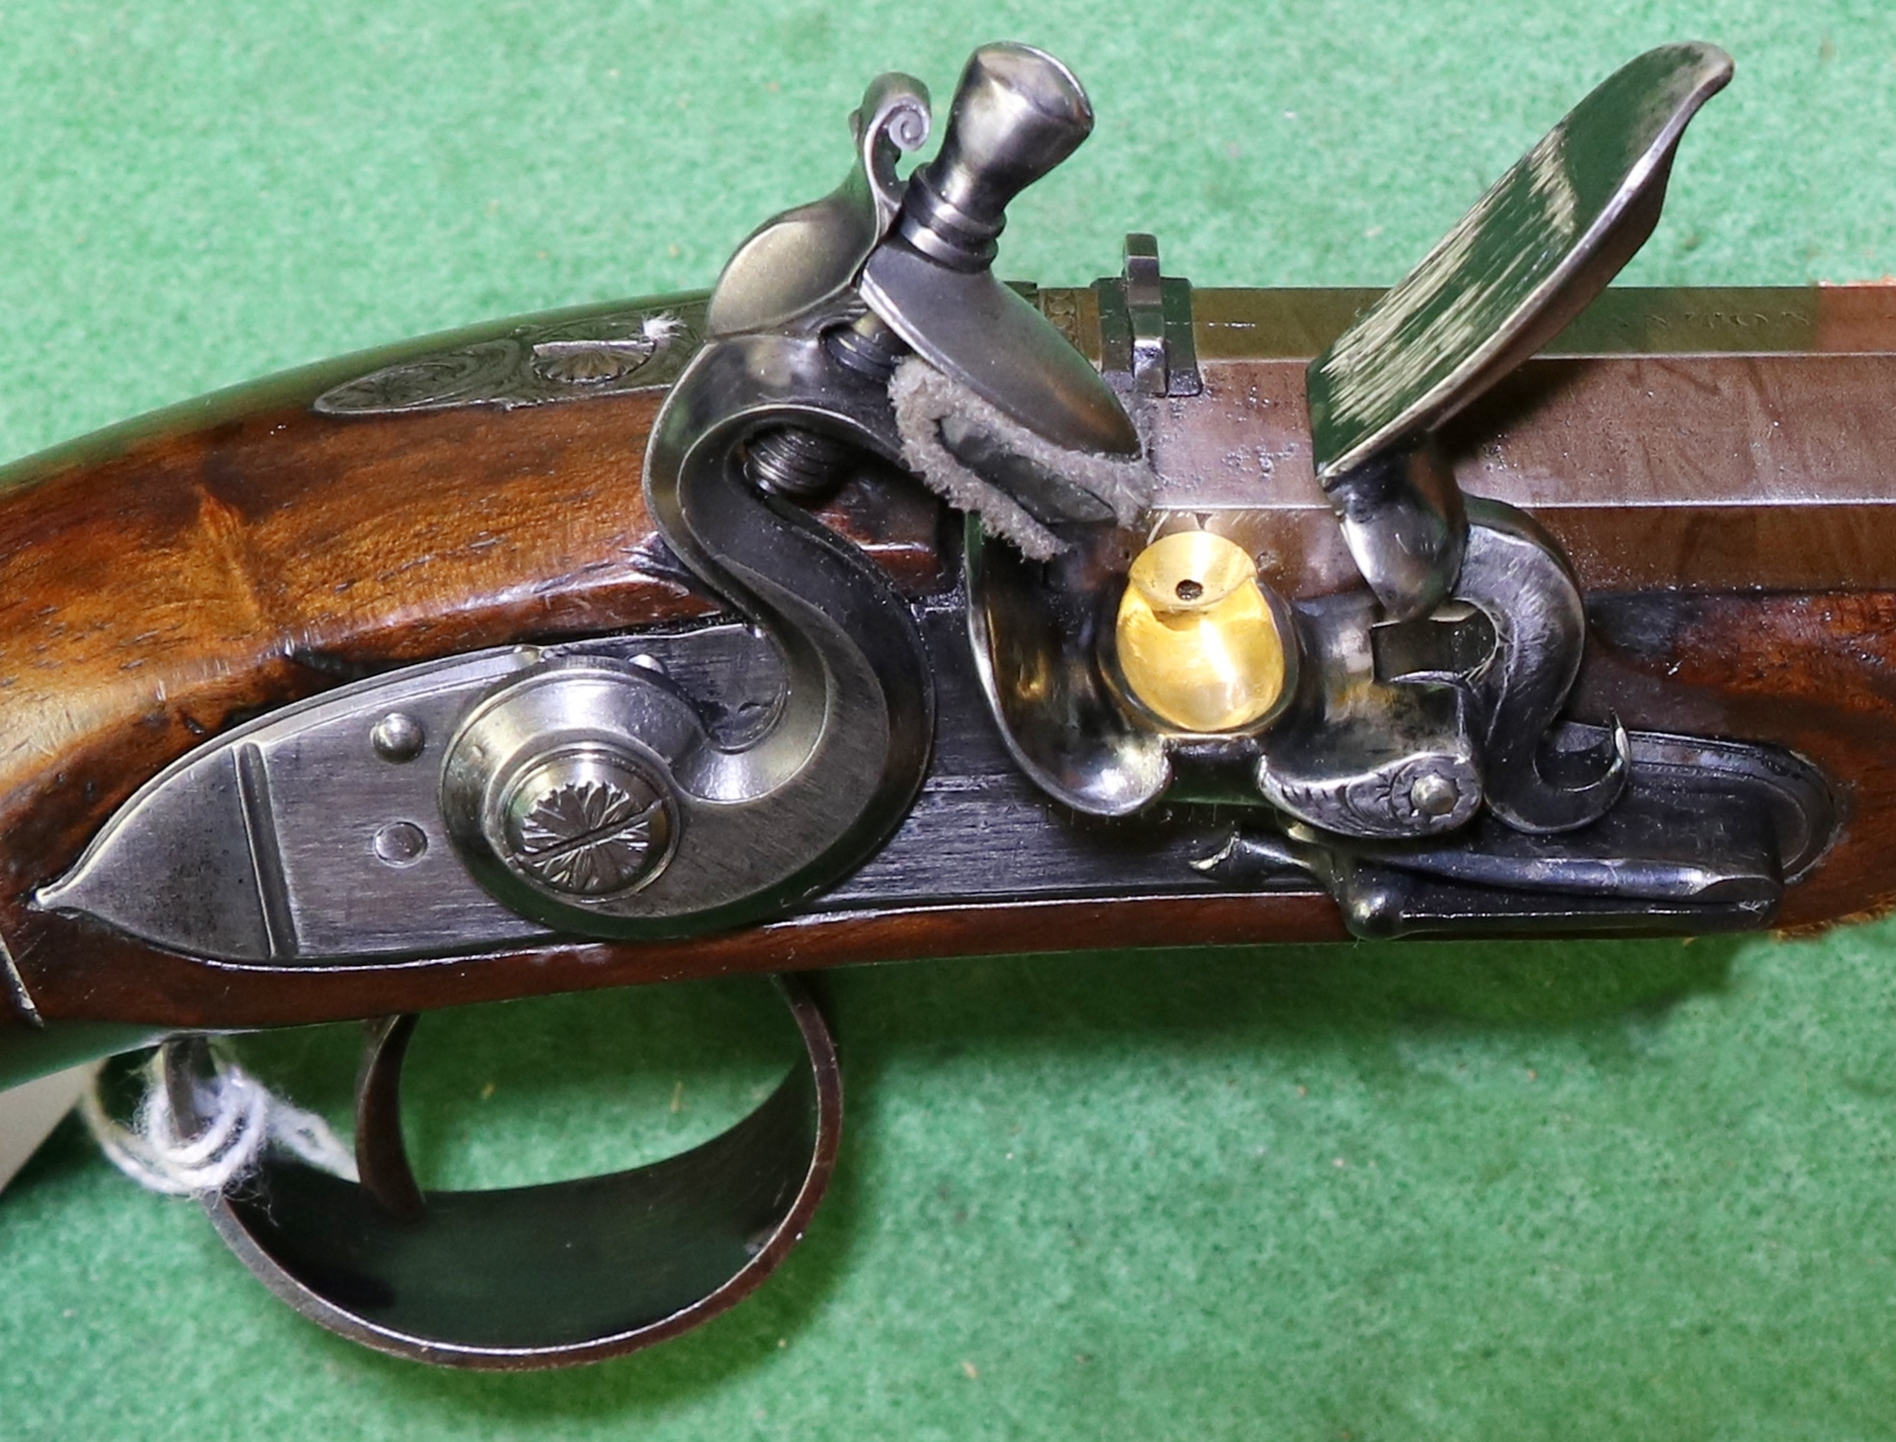
15th Feb The roses I bought yesterday afternoon for Penny as a Valentine’s Day present had wilted completely by this morning. I am in the process of suing Waitrose for damages for the breakdown of my marriage (1/4 million sound right?). I’d be pleased to hear from any lawyers prepared to work pro bono! Leigh Day were usually a good bet for defending the underdog but rather blotted their copybook* recently. I did the outstanding jobs on the 1777 pistols – Hope that is now all wrapped up*, but it may get a revisit later to check. I decided to drill and tap the remains of the butt cap screw as my tube was too small to make a core drill. I made a large head with No 8 UNC thread which fits just fine. I turned the ramrods out of 10 mm bar – I decided that given the tight fit against the barrel I would use a gradual flare like the one in the Royal Armouries as that shape will lie along the barrel better than the button shape. Even with a 5 mm diameter ramrod rod it is still forced against one side of its hole due to the barrel ( see pic). I stuck a sliver of wood in the gap between the wood and the barrel on teh left side of one pistol and have polished the stocks. There are very faint letters and numbers on the right hand side near the butt cap – one has ‘R . JL . V . A83 on it ( I think) and the other ? JL . V . C?? The ramrods and butt cap screw got the reverse derusting treatment to give them some texture. Next job is a foreend cap for the strange percussion shotgun with a raised rib ( see earlier post) – either silver or horn, not sure which yet…. I also have a pipe to solder to the rib of a flintlock and a couple of nipples for the Jackson Improved Central Fire gun. I think I have found a source of black ebony for long gun ramrods – but at a price – around £600 per cube! I might get a decent supply and put it in my shop. I have one to make for a Purdey rifle and one of my shooting muzzle loaders has a fibreglass one. I did manage to find Dick a 12 inch length for a pistol ramrod this morning – I think the dust has settled* over the Brown Bess!
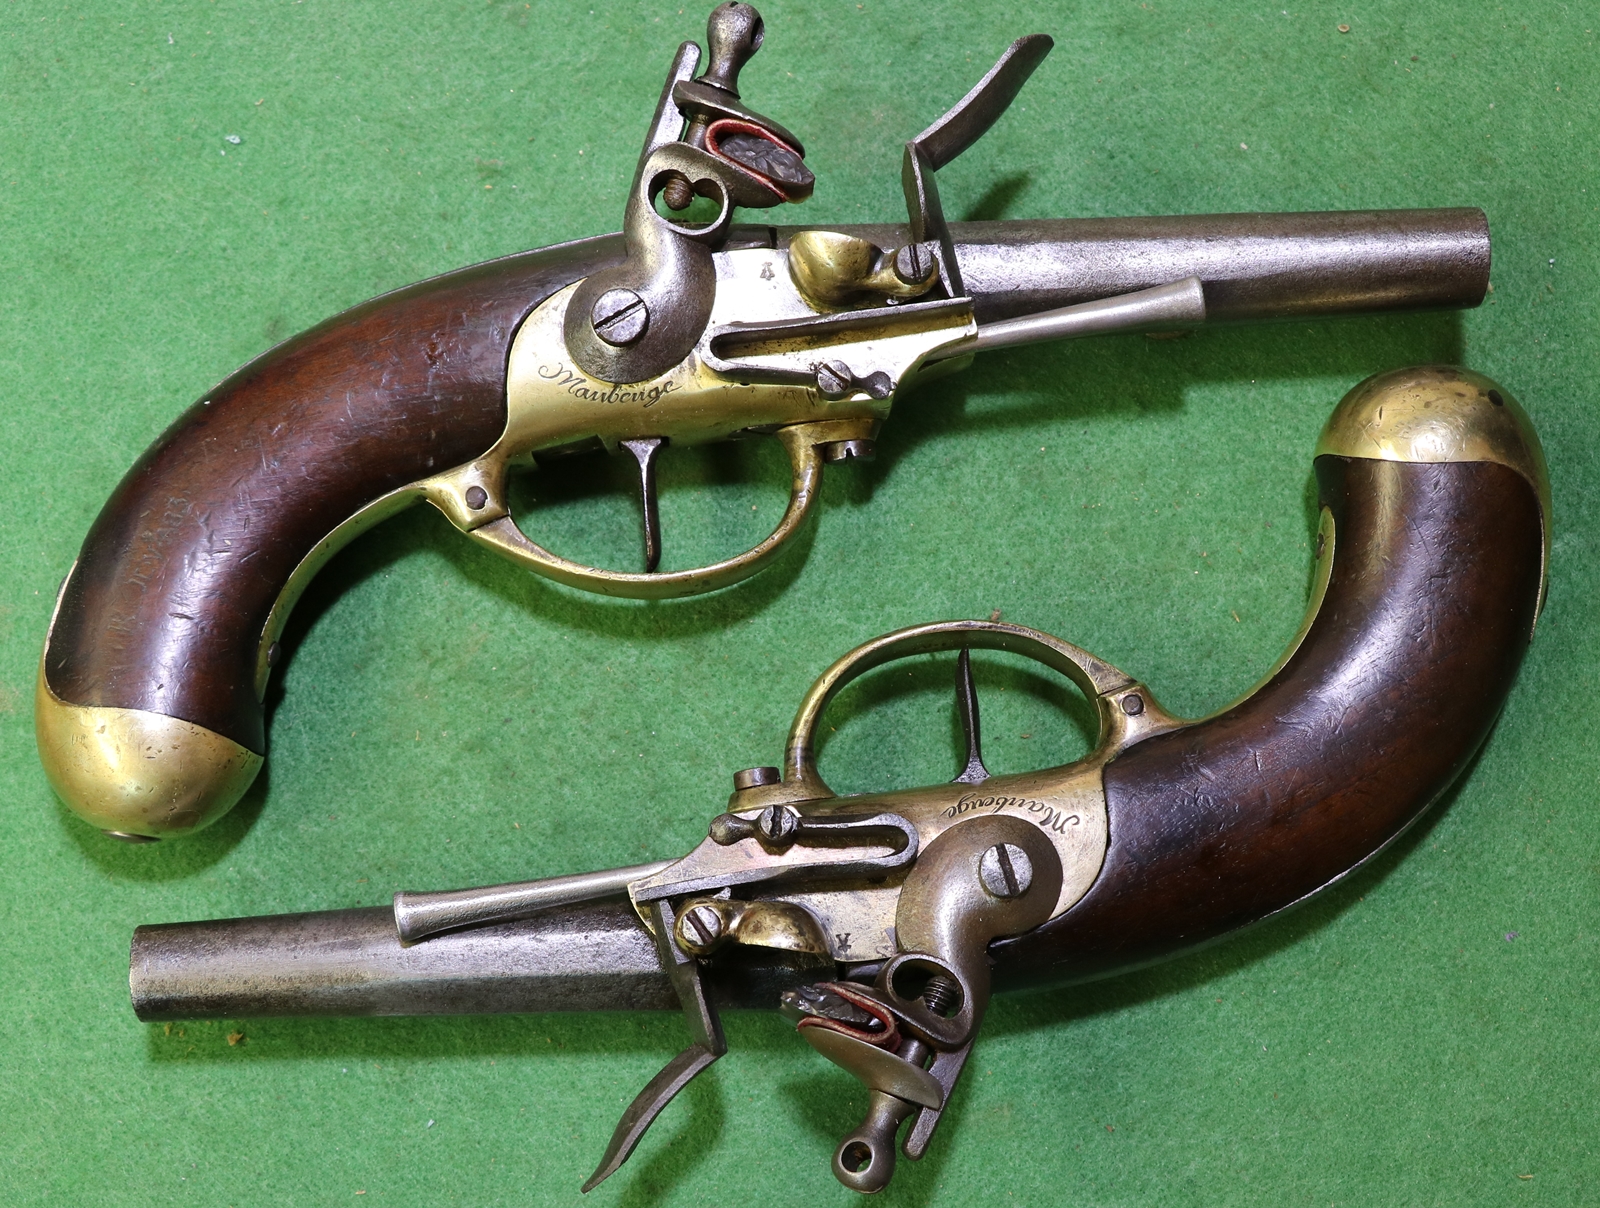
I think that shape of ramrod works, and it ends at the point where the flats on the barrel blend into the round.
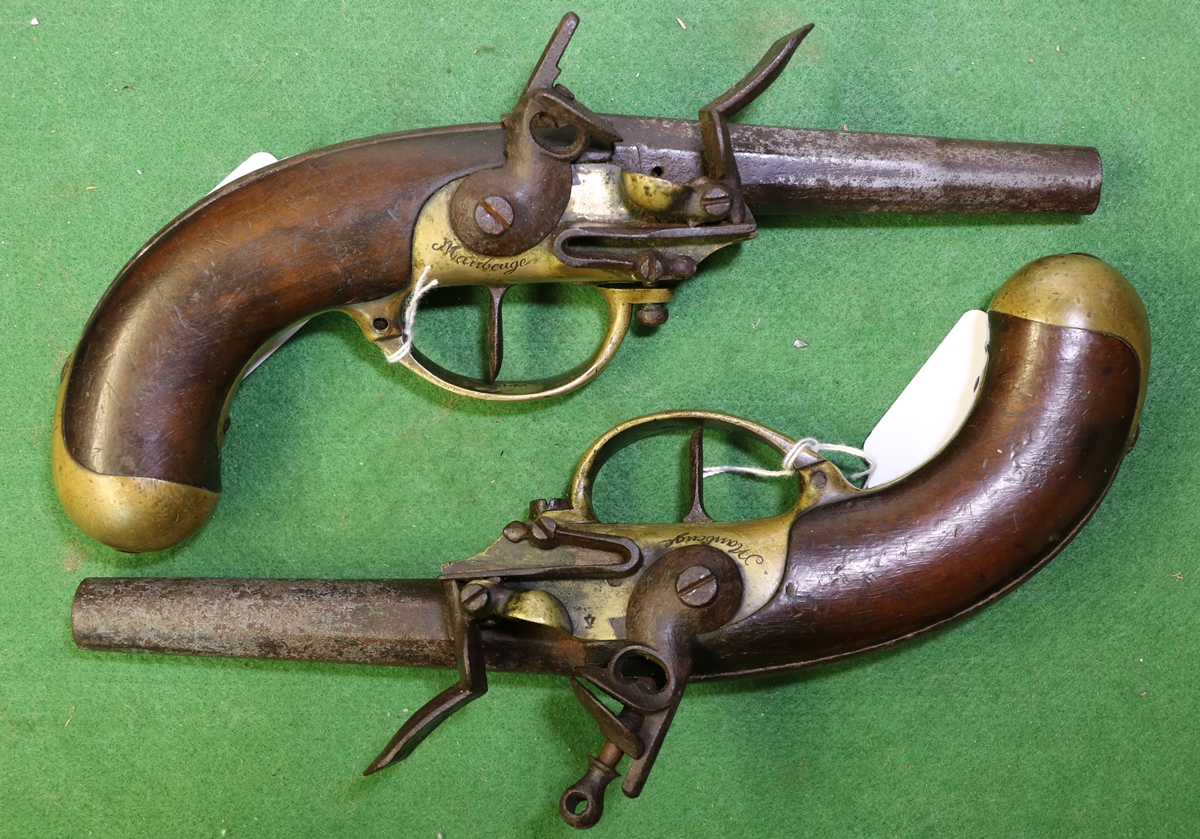
This was the starting point.
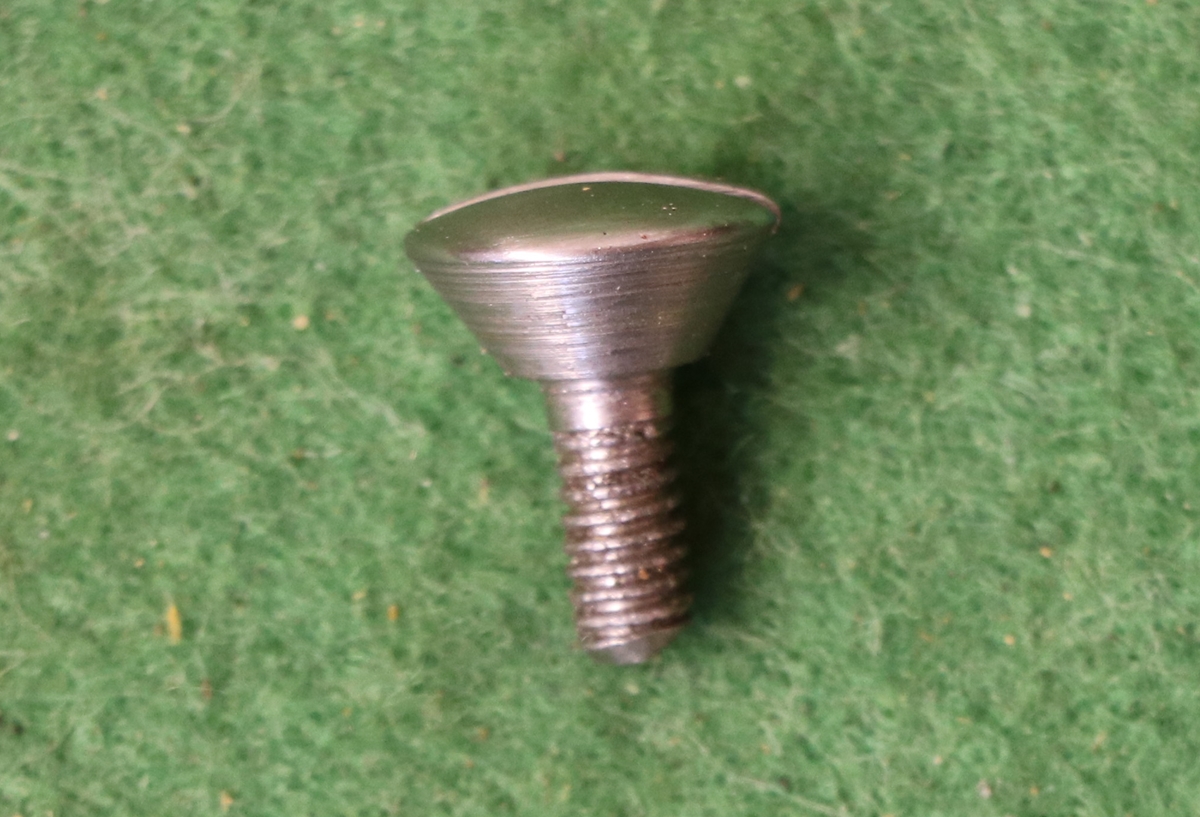
Butt cap screw – No 8 UNC

The ramrod is pushed hard against the outer side of its hole by the barrel
14th Feb Happy Valentine’s day – I hope you all remembered to give your partners a gift! Luckily for me Dick’s wife asked me in the morning what I had given Penny, so I was able to correct my negligence in time for her return from work – thanks Sue! I went down to Dicks because he had a dealer friend come to look at a couple of guns, and he had an interesting gun to sell ( more later). He was interested in the Brown Bess musket that I mentioned a couple of days ago that I wasn’t happy about on account of the 42 inch barrel in an otherwise fine India pattern (39 inch barrel) musket plus a vague feeling that something was not quite right – one of the ramrod pipes looked too new – so we were looking at it closely and I spottted a splice in the fore end where another piece had been joined on to take the longer barrel – so my concerns were justified although the splice seemed to be pinned as well as glued, so was probably fairly old , at least before the use of epoxy glue, or faked to look like an old repair, who knows? Anyway that put a damper on proceedings as it is no longer worth around £1200 and will probably go for half that – I’m probably not the most popular inhabitant of toytown* today! It would make an ideal musket for a re-enactor, which is what I think it was recently, as it would pass for a New Land Pattern and has been cleaned up and shined with a white sling and bayonet to look the part on parade – I don’t know if it will spark up and fire and its not for sale as a shooter, and I haven’t tested the frizzen for sparks- anyway the owner – who bought it by phone from an auction – needs to assimilate the news and maybe I’ll put it on this website with an honest description. Buy unseen at auctions at your own not inconsiderable risk – it took a very detailed look in good daylight to pick out the splice under the shiny varnish and it was only through have purchased Goldstein and Mowbray’s excellent book on the Brown Bess on the suggestion of a blog friend that I was looking so carefully to justify my general unease. The moral is knowledge plus looking carefully plus follow your instincts when you buy!
The gun I went to look at turned out to be exactly within my criteria for my collection – a gun that fellow collectors would pick up and say ‘I’ve never seen one like that before’ – although I think there were a number made like this, I have never come across one. Its a 14 bore double percussion shotgun to Jackson’s Improved Central Fire design, with the nipples firing directly into the ends of the chambers – a nice quality gun in good condition. I like the little ears on the insides of the cocks – necessary as shields for the eyes, I wouldn’t want to shoot it without good glasses – I have a pair of big round prescription glasses from ‘The Old Glasses Shop’ that fit very close to my face and are about 44 mm diameter that I feel very secure in, and they look good – almost all glasses now have polycarbonate lenses so I reckon there is no need for special safety glasses ( you should use proper safety glasses and NOT copy me) Anyway here is the Jackson Improved Central Fire gun (as inscribed on the barrel) ;-

Nice wood and overall good condition
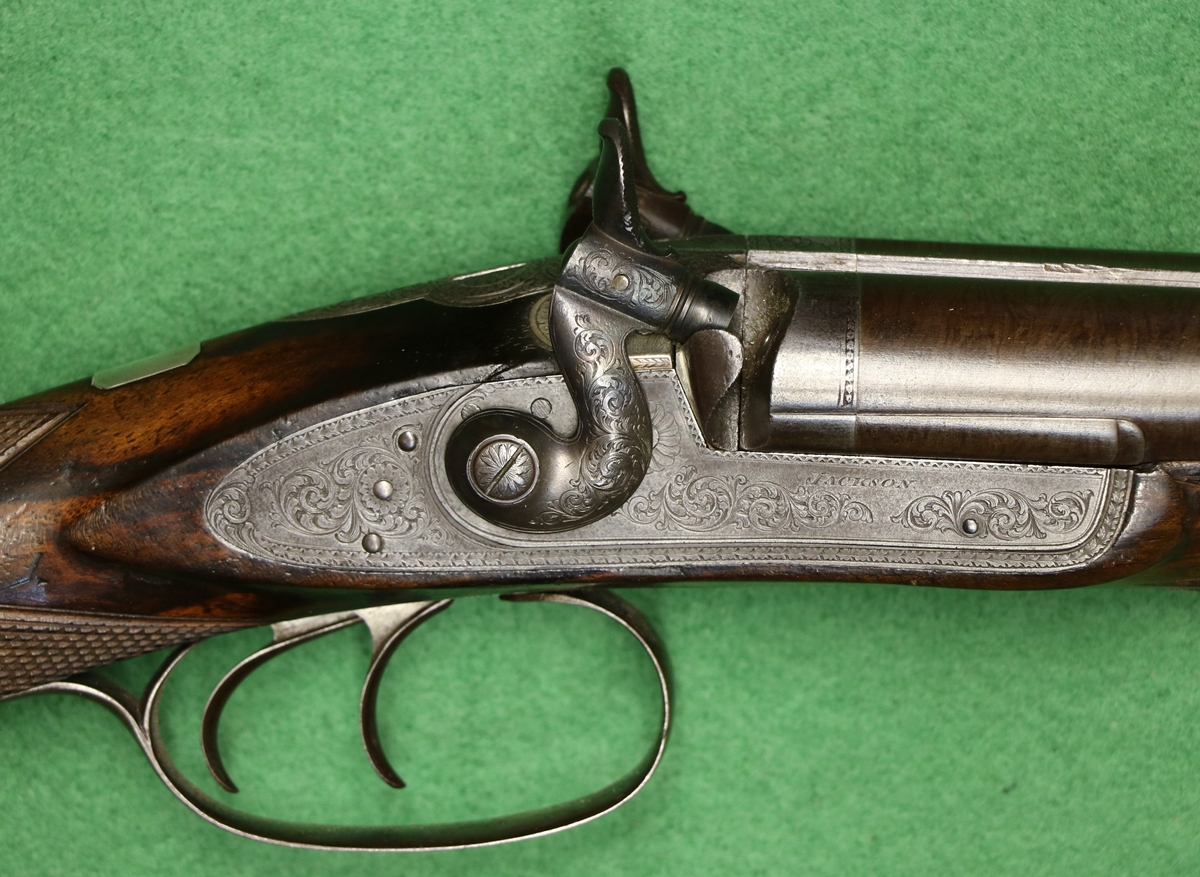
Looks like a breechloading hammer gun – so much so that I almost wondered at first glance if it was a back conversion!
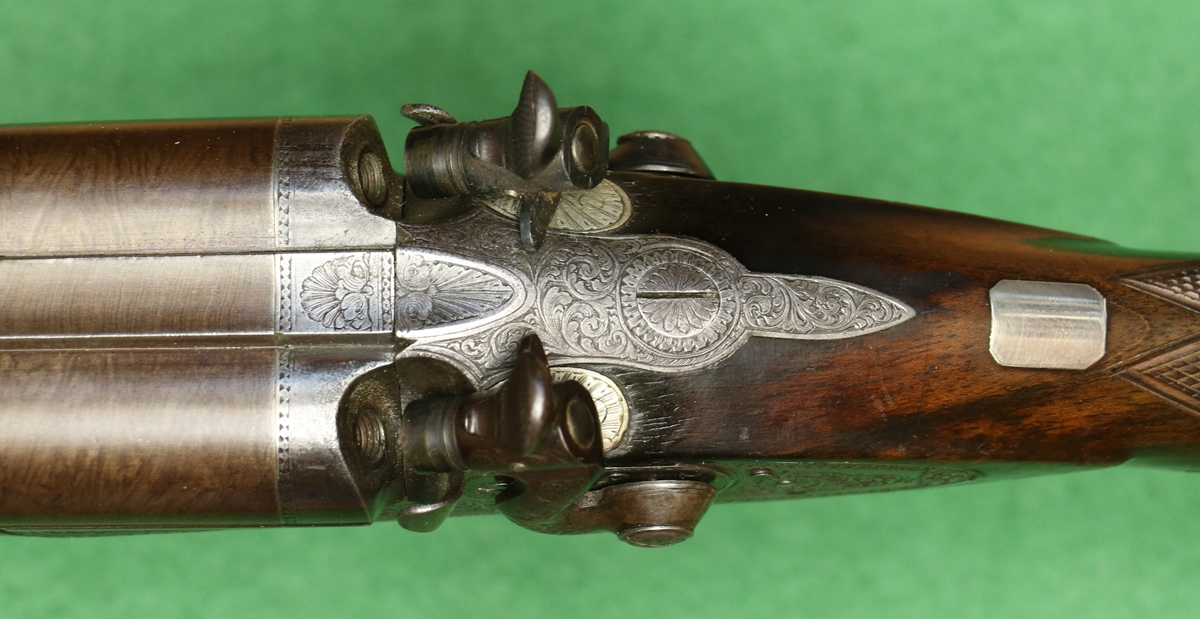
Little ‘rabbit ear’ spark guards/deflectors for bits of caps – it needs nipples made.
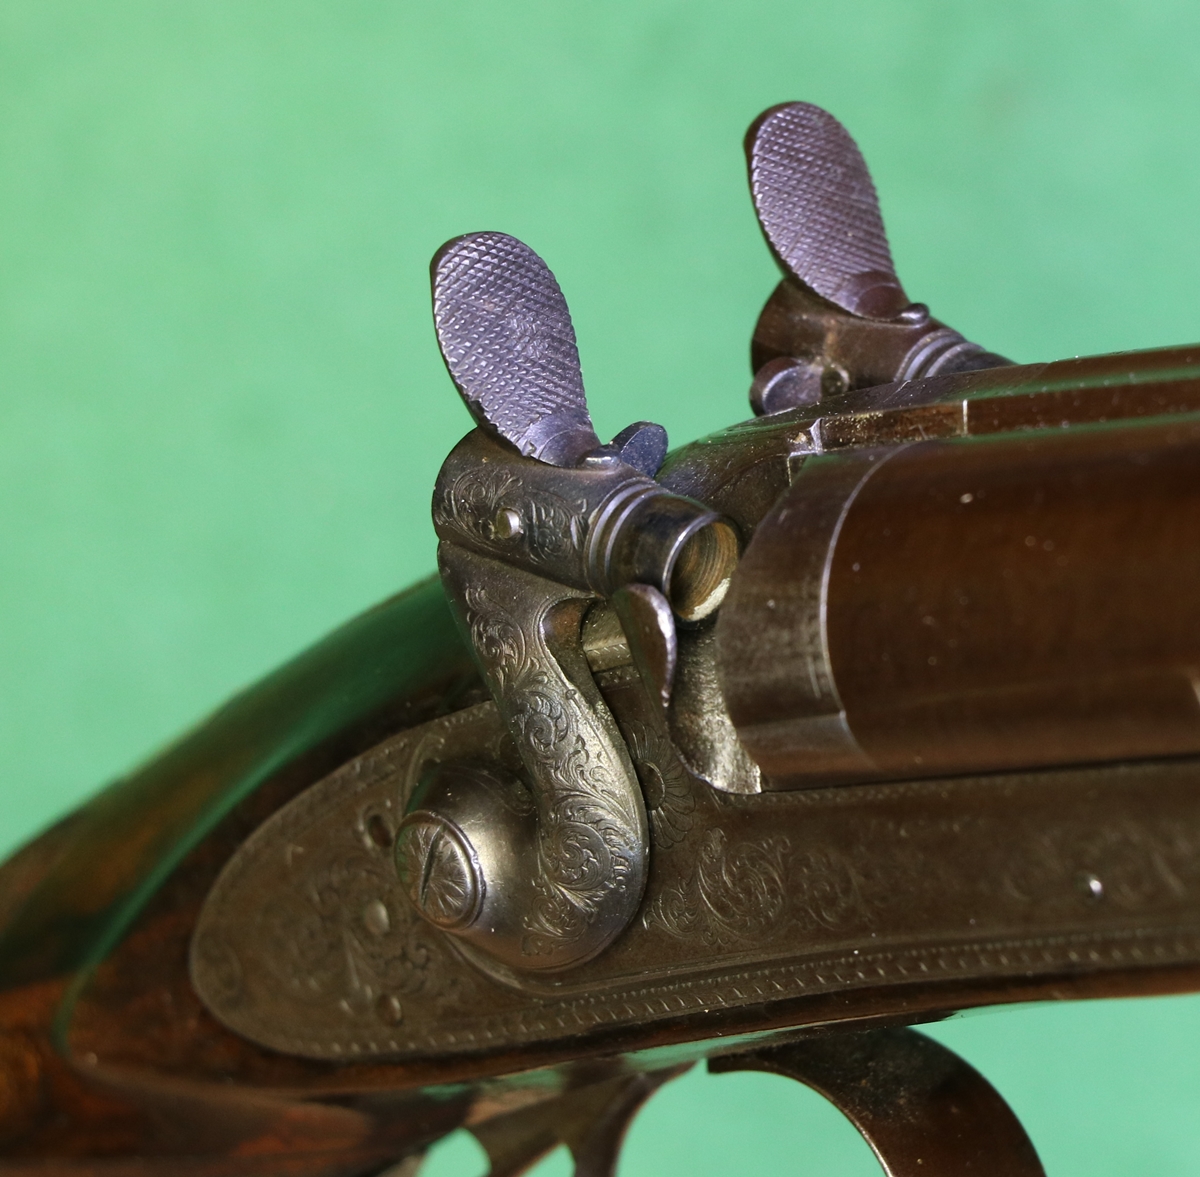
I did a bit of proper gun work today as well as putting the cat amongst the pigeons* over eh Brown Bess (*foreign followers of this website may need to consult Google for the meaning of the British expressions I sometimes use – when working in Spain my colleagues used to insist on one a day – took some effort to oblige!) Anyway I cleaned up and finished putting together the second 1777 Cavalry Pistol, except that I still have to make a new butt cap screw and the ramrods – which are an ongoing subject of correspondence with a number of helpful suggestions from followers of this blog. I think the only way to decide is to make a trial ramrod and see what works. When I came to put the second together I realised that the inside of the brass casting where the barrel rests is clearly octagonal, but the bottom of the barrel is rounded so there is a mismatch here. I also noticed that with the barrel screwed fully down into the body the touch-hole is about level with the bottom of the pan, or even slightly below it. It looks as if the casting was made for a barrel with an octagonal barrel – so either the barrel is of a different design or for some reason it had been rounded underneath at a later date? I noticed in some photos that some long 1777s seem to have the breech end of the barrel on top becoming octagonal, some are more obviously completely round. Does the ‘normal’ long 1777 have a round or octagonal base for the barrel in the body casting? There is a gap to be filled alongside the barrel in one pistol that need filling, and both have a roughly filed patch on the left side behind the barrel – my inclination is to leave it as it shows that the woodwork was reshaped at some time, presumably when the belt hook was dispensed with.
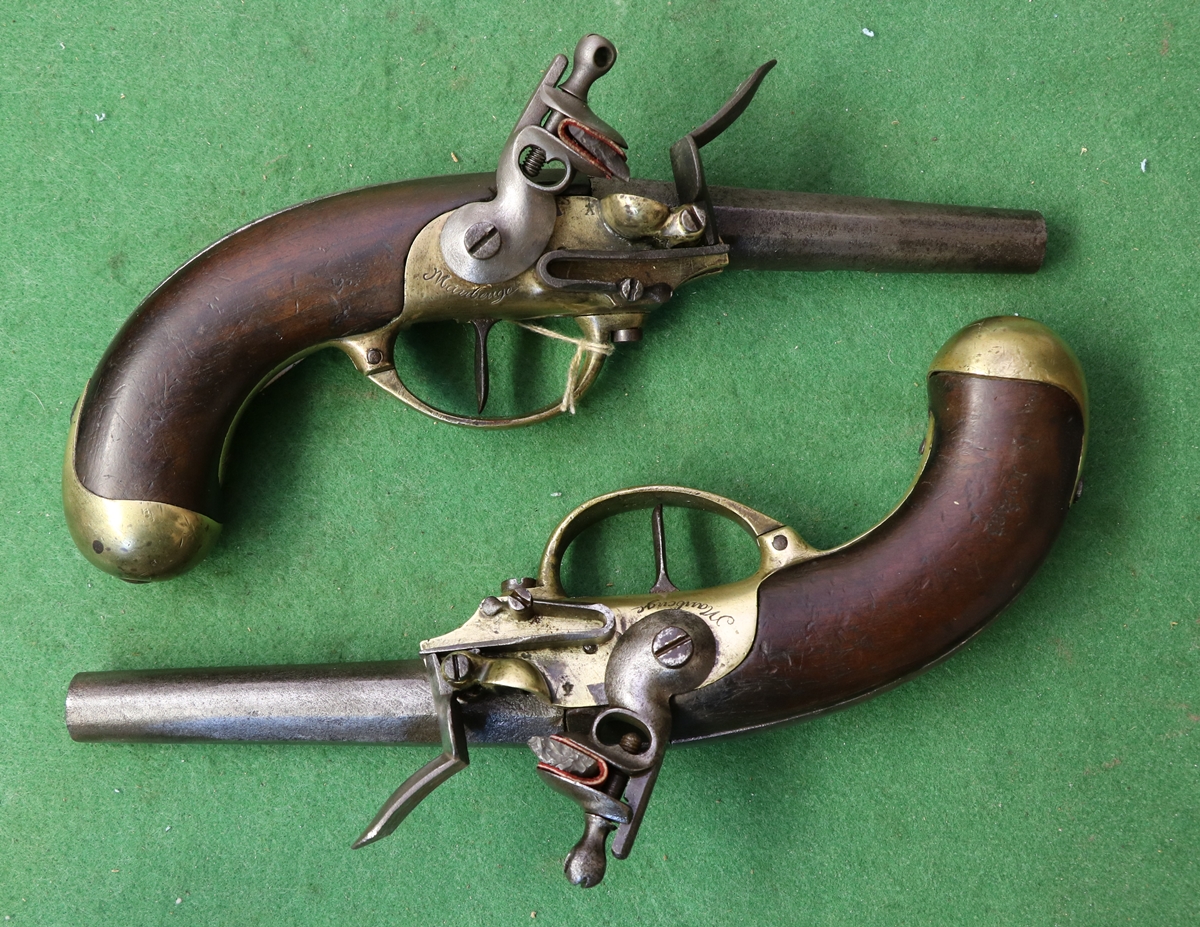
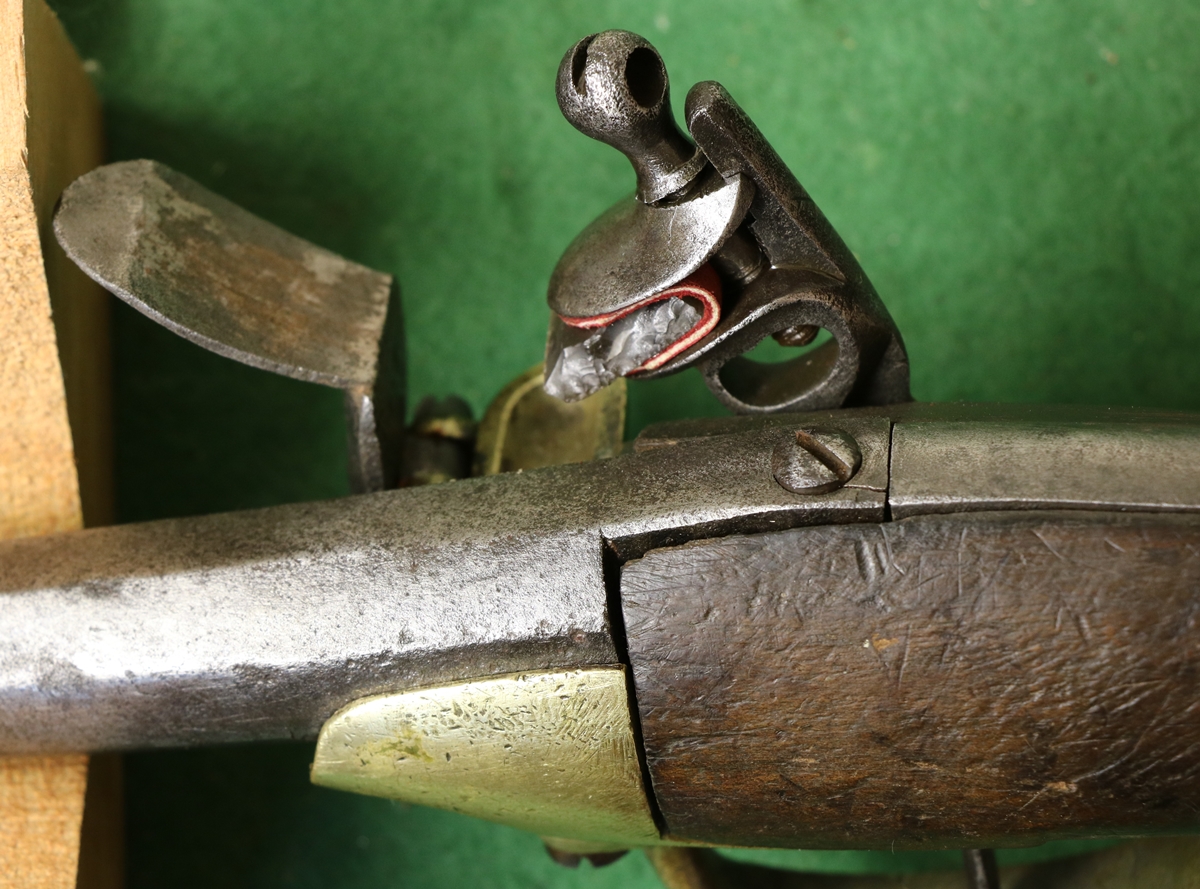
The file marks on the woodwork carry their own message and are part of the gun’s history, but the top gap could be filled.
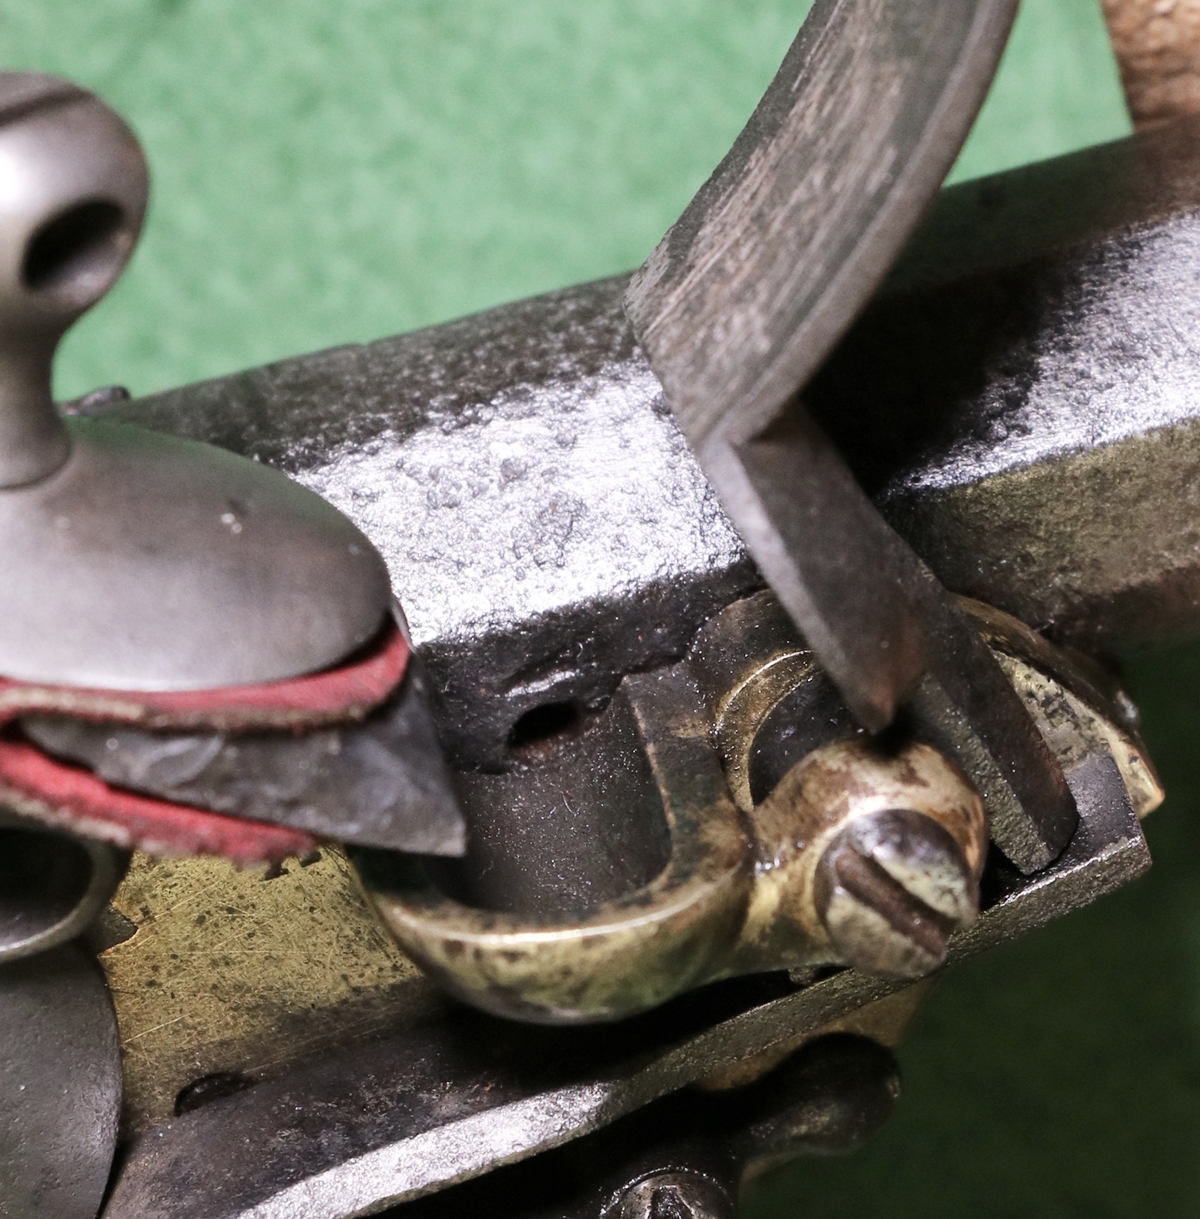
The touch hole has all but disappeared below the pan! A recipe for a flash in the pan*

Talk about a round peg in a square hole*! ( *Apologies for the Valentine’s day puns)
13th Feb Busy day – trying to sort out with the licensing dept where my FAC had gone when I sent it in for a variation for the Nock – it keeps being found and then lost and then someone is on holiday and may have it………… Then more playing with the gravimeter in Cambridge – I think we may be able to measure gravity soon in the 1920’s way! I finished Archie’s barrel yesterday evening, and this evening I tackled the recalcitrant screw in the butt of the 1777 pistol – I’ve drilled out the head and the rest of the screw is still in place – I can either drill it right out and put in a wooden plug for a new screw with a Whitworth thread, or possibly just drill and tap the remains of the screw and make a head with a smaller thread to match the tapped hole – probably No 6 UNF – not sure which to do – it will be a job drilling out the screw – p.s. actually I just thought it might be easy to do it by making a plug cutter out of a piece of tube to go over the screw … if I can find a piece of tube – I did bring a 3m length of hydraulic tube back from the scrap bin at the lab – have to see if it is the right size, it was originally used in a deep sea heat flow probe we designed in the 1980s. I am now contemplating making the ramrods for these pistols, but they are a short variant and Google doesn’t have any images of that model, so I can’t see how far out they should stick. The rods ideally need to be a bit over 5 mm diameter, and would have originally had the head forged as part of the rod – so I’ll either have to start with 10mm stock and turn it down in stages or weld a head onto 5 mm rod if I can find some – the only 5mm rod I have at the moment is hardened steel shafts out of an old printer! I solved the mystery of the lost posts on this blog – somewhere out of the blue some part of the great digital universe that exists everywhere decided to cache (store) the website to save having to fetch it from its server every time I wanted to look at it – so it saves a version and then when I ask next time it finds an old version and gives it to me instead of asking my server for the latest version. Its never been a problem in all the time I’ve been doing the blog so something has changed grrrrrr…….. Has heaven gone digital yet, or is it only hell? Off to Dick’s tomorrow to have a look at a strange double gun with inline nipples – I’ll take my good camera to get some pictures.
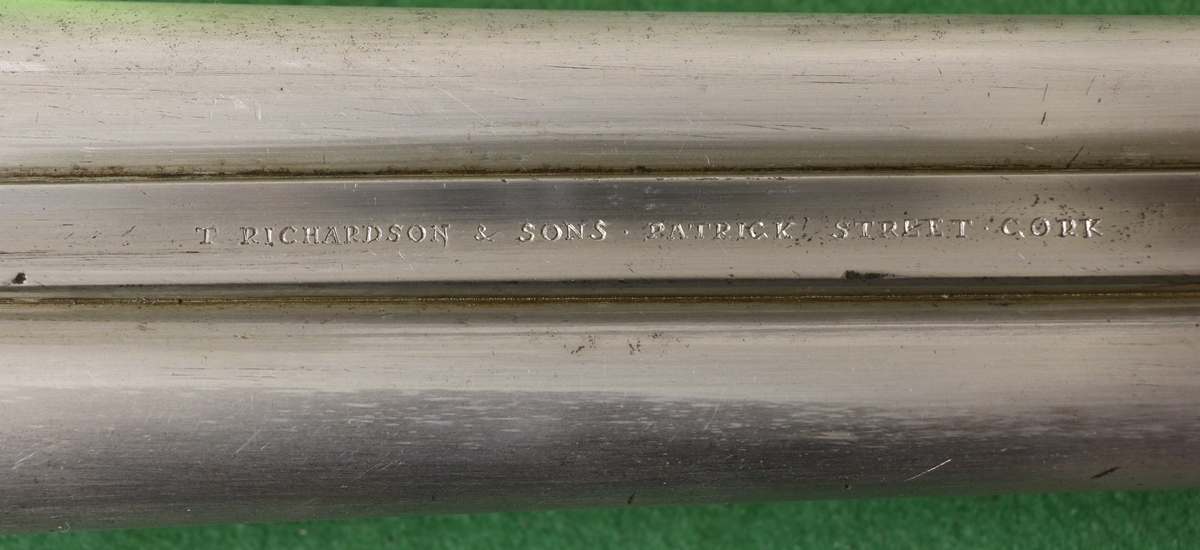
13th Feb again – the same thing just happened – I posted the last bit and then it disappeared when I looked 20 minutes later – I had to fish it out again!
13th Feb – Weird – I posted on here on the 11th, see below, but it had disappeared today and I had to get it back from the archive that WordPress keeps of all changes. I don’t know if someone had been messing about with the website – I’ll see if I can find any clues later. Anyway I started on the 8 bore barrel – first step, clearing enough space around my bench to swing the barrel. The rib I have to engrave has quite a few pits and defects, so it will be a bit hit and miss!
![]()
I’ll move the carousel of gravers, and I have a portable stand that I can put close beside me to give me a wider range of angles to work at – I can get away without taking the shelves with the gravermax away, thank goodness!
11th Feb – I did manage to get the test gold plating to look a bit more gold like by polishing it with a small buff, but of course the plating was very thin ( I was too mean to use much gold on the trial) so I couldn’t be too vigorous. I think I can now tackle the proper job when I get time! Since I got the 8 bore barrel back, it is now pretty near the top of the queue, and I want to do some engraving before I forget how, so I welded the rib up at the breech. It seemed to go OK – I got a decent penetration and it doesn’t seem to have been too messed up by the solder that was left over from the original rib finishing. I do know its a bit of a fudge, but the barrel and rib are pretty bad under the rib all the way along and the alternative to welding the end would have been to do a ‘proper job’ and take off the rib and strike a good deal of metal off the barrel and rib to get a sound surface for a joint, and that job was a bit more than the project could carry. I filed off most of the excess weld from the rib and breech face but left it for Archie to do the final dressing of the breech face. I now have to engrave T Richardson Patrick Street Cork on the barrel. It is a heavy old thing and 29 inches long, so I’ll have to clear everything off my engraving bench so I can rotate the barrel to cut from different angles…… I am in the process of sharpening up my set of about 14 identically ground gravers – in a whole spectrum of lengths, which makes changing from one to the next a bit taxing! I guess I’ll probably have to sharpen the whole set a couple of times before the job is done – 2 sharpenings per graver mean that each letter effectively blunts one graver! – it depends on how narrow I want to make the lines – to get good narrow lines involves a lot more sharpening than crashing on with lines of increasing thickness! I sometimes/often get to the end of a line of engraving and realise that the fine strokes have got progressively wider as I go along – they don’t get deeper, because the tool is just getting rounder at the point. At that point I usually go back along the letters to even them up, but if you have to sharpen the tool, you loose the rounding when you sharpen them and its almost impossible to round them artificially! I do have some very hard steel tools that keep their shape better, but somehow they are not as ‘sympathetic’ to work with……. – and they chip just as much or more.
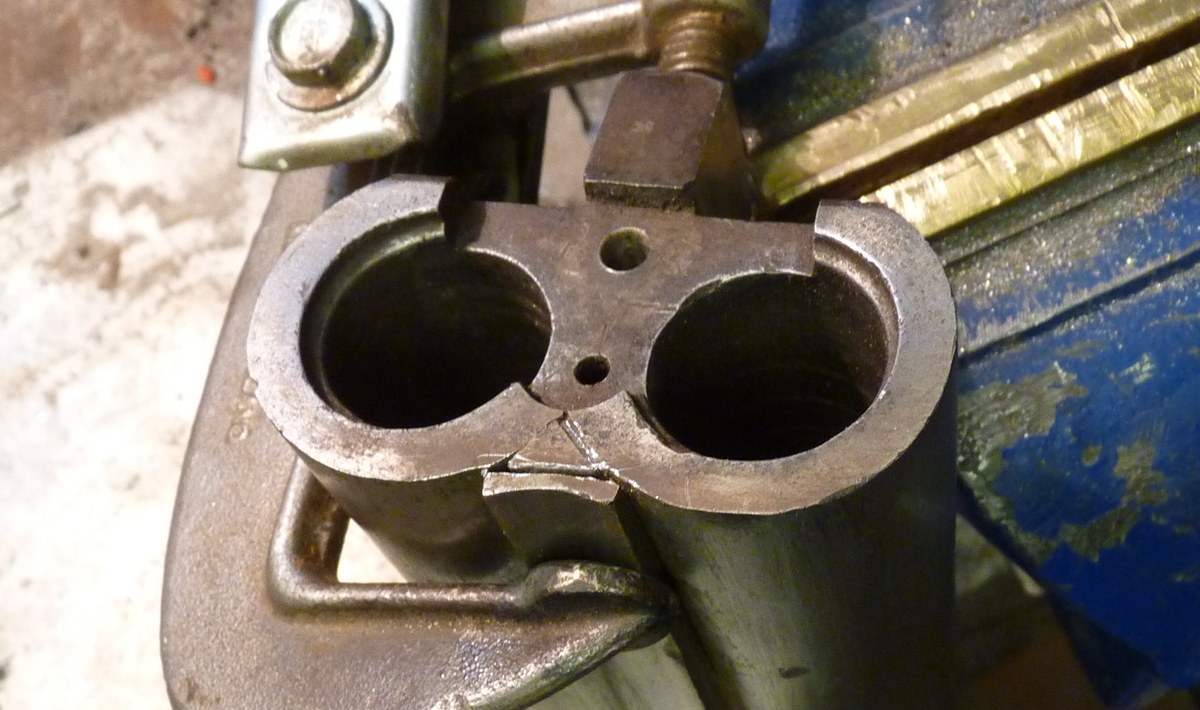
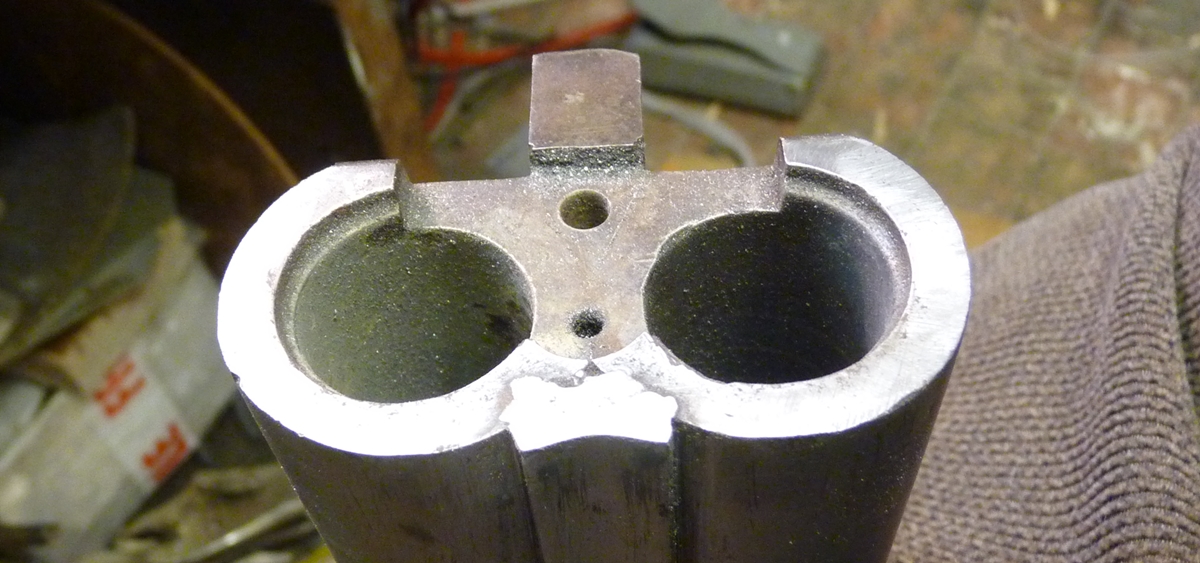
I’ve left the final striking up of the breechface to Archie as I don’t want to take it back too far and he has the rest of the gun.
10th Feb – I had a trial of gold plating a pan on a gash lock casting I had, using the SPA plating solution. I didn’t get a very good finish on the pan – its actually quite difficult – but I did polish it quite carefully with an impregnated rubber polisher in my ‘Dremel’ substitute = an old motor that hangs from the ceiling with a flexible drive and a pedal control – very 70s I guess! Anyway I did clean it and then messed up the plating because I got the polarity wrong ( should be -ve to the object to be plated and +ve to the platinum electrode) but after that false start the gold went on very smoothly and I soon had a gold pan – I turned up the voltage a bit much (to 6 volts) and the gold started to blacken so I reverted to 4 volts and I soon got a nice coating of gold that I polished with a small amount of jeweller’s rouge – The gold is a little towards the rose gold colour, but that may be because the underlying finish isn’t as good as it might be, due to idleness on my part…….. I had another go with my home made screwdriver on the butt cap of the 1777 – I managed to move it back and forth by a couple of degrees but no more however much I heated it or forced it so its a drill job!
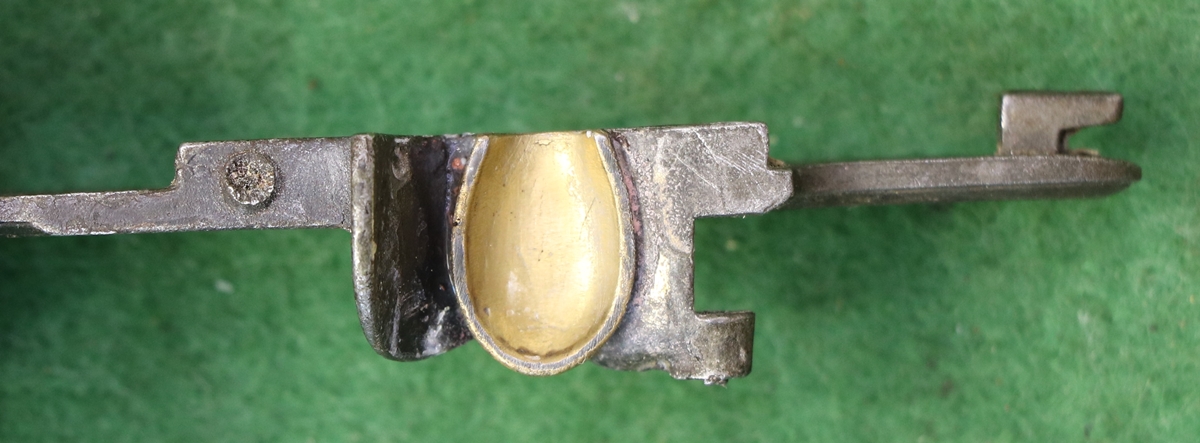
Its only a thin layer because the solution is expensive – about £1 per ml, most of which is the price of the gold in solution.
The gold isn’t as shiny and yellow as I’d hoped surface prep not good enough!
10 Feb (just) – had another struggle with the screw on the butt cap of the 1777 pistol – I made a screwdriver blade out of a piece of 12 x 3 mm spring steel and hardened and tempered it but managed to snap it – not hot enough temper! Re ground and tempered it to blue – that was OK but still couldn’t shift the screw even with a molegrip on the ‘screwdriver’ Given that the screwdriver is a very good fit in the slot – think I’m going to have to drill out the screw – I can’t leave it in place as a lot of scale has accumulated under the backstrap and will stop it lying flush. That means I’ll have to make a new screw etc – more work! I tried to get some of the loose rust off the rest of it before putting it on the wire wheel but it was still pretty messy!
9th Feb I derusted the 1777 pistol ironwork – I need to wire brush it now – its quite a lot rustier than the first one and the wire brushing will create a lot of nasty dust everywhere, so I’m putting it off! I haven’t made the wide screwdriver to take of the butt cap yet – Dick had a nice one I was tempted to borrow but I don’t like the responsibility of borrowing other people’s tools, especially screwdrivers – they are too easy to graunch. I did a bit of tuning on a pistol frizzen spring – I think I got it sorted, Dick was having trouble getting it hard enough – I managed to get it dead hard ( by the feel of it- I don’t know why but you can tell just holding a piece of steel in your hand if it is dead hard or soft) but I may have softened it a bit too much (on the AGA as usual) – that may have been the trouble Dick was having. Anyway that job is nearing completion – I have ordered the necessary materials to gold plate the pans from SPA Plating – I used their stuff for silver plating and it worked fine – not cheap, but gold is an expensive material! The chap at SPA said that lots of gunsmiths used their kit to gold plate directly onto steel – and I bet you thought it was all inlaid! Now I have a confession to make – I was very rude about a bit of recutting on a Purdey barrel – I didn’t like it and thought it was pretty poor, but I have just come across a Purdey with equally erratic engraving that is probably original, so my apologies to whoever did the recutting – I’m still pretty surprised to see the indifferent quality of engraving on a Purdey it looks to me as if the engraver didn’t move around in relation to the barrel but did it all from two positions?
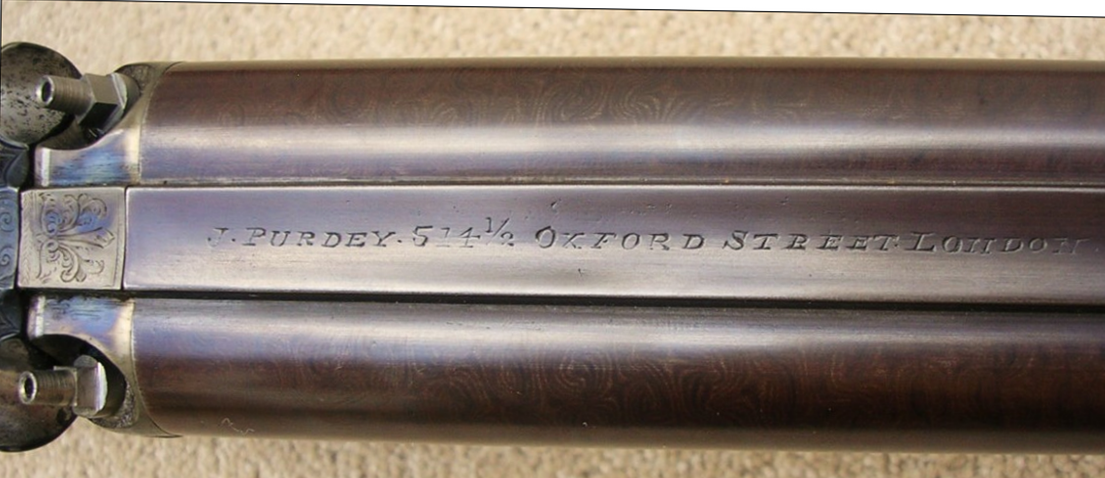

If anything the recut (lower) one is better, but obviously originally by the same engraver. Not sure where the 200 discrepancy comes from! It’s the top one that looks original (?) that is wrong, and its not ambiguous – so maybe that is a recutting too. I don’t want to worry you, but we antique gun collectors live in a world of smoke and mirrors – nothing is what it seems! If you look at the top gun on Mick’s Guns website you will see that the false breech is very poorly let into the stock – much worse that the inletting of the locks for instance despite there being no reason ever to remove it – you might also note that the breech and false breech don’t fit snugly together – what that means I leave you to speculate! The top barrel is stamped underneath with JP for James Purdey so would seem genuine….. There are always more questions than answers in this game!
8th Feb Most of the day spent on school things, and I missed going over to collect some Swiss No 4 powder from Bev at Eriswell because of it. This evening I tackled stripping the second 1777 French Cavalry pistol – not as easy as the first and I still haven’t shifted the large woodscrew in the butt cap that I need to release to remove the backstrap to derust the underside of it – I think I’ll have to custom make a screwdriver to fit as its so well rusted into the wood. The trigger pivot was broken half way through the trigger at some time long ago – I got the outside bit out but the inner bit is holding the trigger in and I can’t knock it out with a punch as it won’t go any further in – maybe drill it out or leave it? This gun is a lot rustier inside than the other but will probably clean up OK. This one had the remains of a wooden ramrod inside the lock area – the ramrod pokes right through the lock – and I realised that the spring that I thought was to provide friction to the cock was actually to retain the ramrod – don’t know why I didn’t see what it was! The ramrod is steel and pushes into teh butt area so it only sticks out a short way – I’ll have to work out how far when I come to make the replacements. I did have a picture of the rusty inside of the lock, but when I saved it it went somewhere that I can’t track down!
7th Feb – another busy day – preparing to get my STEM club to write to local businesses for sponsorship for some robotics kits – interesting exercise getting 8 & 9 year olds to write proper letters! They did well. I put the old revolver of Dick’s in the derusting bath for about 9 hours at 3 amps (without the woodwork) and it is quite interesting to see what is revealed under the rust – amazingly I suppose you could accurately say ‘retains some original finish’ although that might get an auctioneer into trouble – the ball pocket in the butt, however, is almost mint! I went down to Dick’s to see how the pistols are progressing and also to cast my eye over a ‘brown bess’ musket that he has for sale on behalf of a client as I’d like a nice one. This one is a typical India pattern but with a 42 1/2 inch barrel and woodwork to match ( should be 39″ ?). All the furniture is India pattern in every detail. The India pattern was the most common of the ‘brown bess’ muskets – about 3 million were made. This one has been used in re-enactments and is polished bright with a highly varnished stock so its a little difficult to see the quality of the stock. It comes with a bayonet – it looks right, and a spare lock that has been re-panned. One lock has a ring cock, the other a swan neck. I’m tempted, but I am not entirely sure about it – looking at Skinner’s website in the US I don’t think they fetch anything like the Long Land pattern does, or the New Land pattern. I’ll mull it over a bit longer – I need more guns like a hole in the head. I did say I was only going to buy unusual guns, and this is about the most mass produced flintlock you could find, apart from the French ‘Charleville’ and derivatives ( ?7 million?). Ah well – what price consistency!
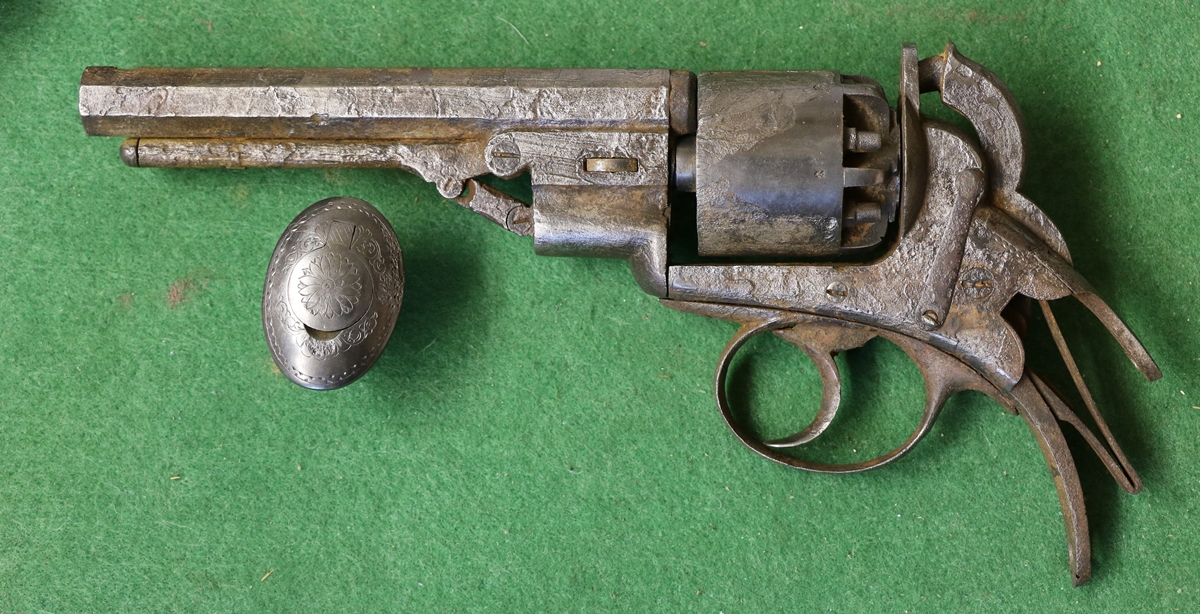
That is a perfect patch of the original finish on the cylinder, including the number 2, and the butt box is good too, the rest is awful.
It could probably be made to fire as everything functions, except the loading rammer is still stuck – I won’t be trying though!
6th Feb – Off playing with the pendulum gravimeter in Cambridge – we got the optics working with the aid of three laser pens and 5 retort stands. The principle is that the pendulums – there are two that swing and one static compensator – have mirrors on the top that deflect the light beams as the pendula swing and there is a one second time mark laser from a mirror that is deflected by a relay. The pendula have periods just over 1/2 second so they go in and out of phase with the clock laser – timing how many seconds it takes to go from one coincidence to the next gives you the period of the pendula, which in turn translates to the value of gravity, provided your clock is accurate enough – but to get a usefully accurate measurement you need to run the experiment for many hours – we don’t intend to push our historical reconstruction that far – and anyway laser pens are hardly historically accurate – but good value at £4.99 for three! All that account of playing with gravity is just a cover for the fact that I haven’t touched any gun stuff today and I’m now of to bed!
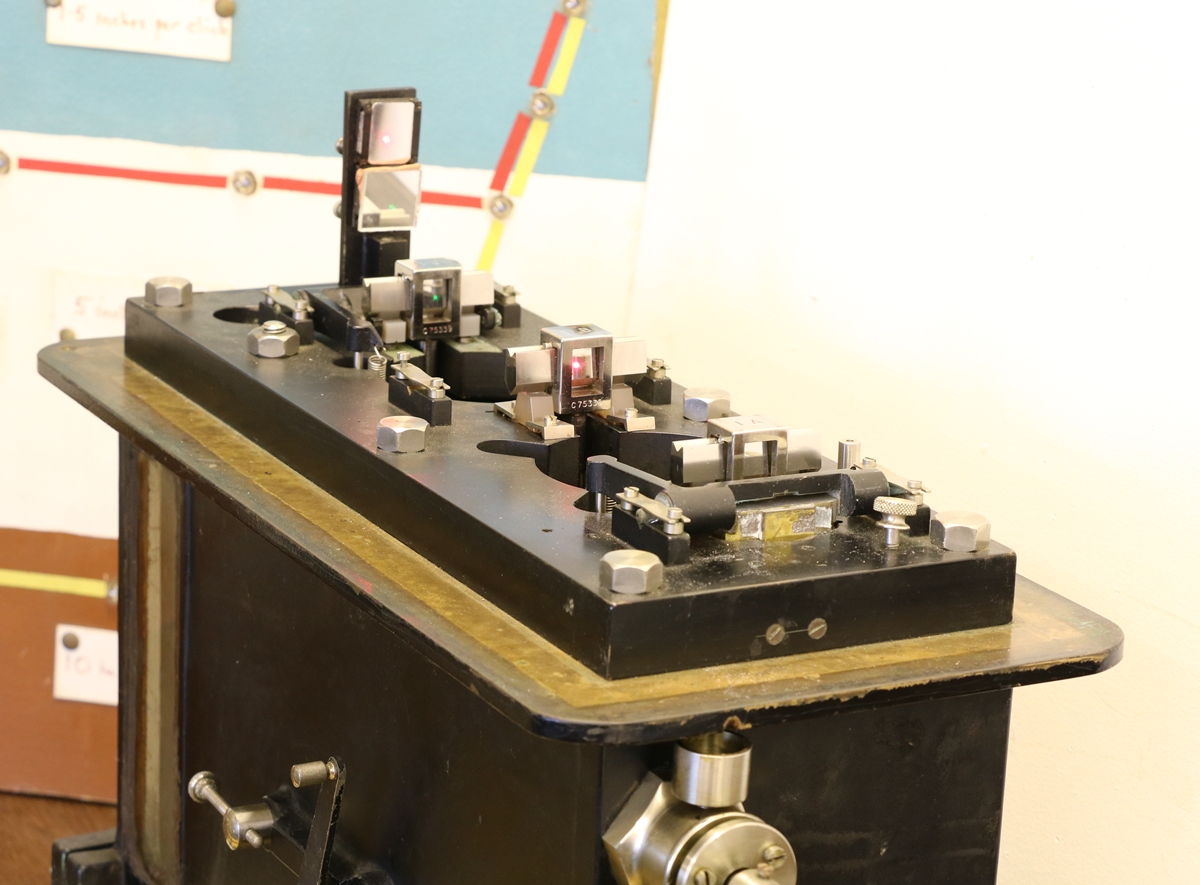
When working properly in a vacuum it measures g to something like 1 part in 10 million
If you look carefully you can see the green laser on the top of the far pendulum and the red laser on the middle one
4th & 5th – I missed yesterdays’s contribution as I was cleaning my Egg following the CGC clay shoot , at which I did worse than usual, but not by much! Today I finished the 1777 Cavalry pistol that I am doing first – the one that needed most work, and I also made a mallet for a bullet started for my Nock – mainly because there is a mallet shaped compartment in the case with nothing in it – I made the head of box, and the handle is a rod of some dark wood I had that had nicely turned ends – it looks a bit raw and new, but I’ll find some authentic dirt – there is usually plenty about the house! I’m pretty happy with the pistol – I went over the brassware with my fine 8 thou rotary wire brush and then very lightly with a buffing wheel – I didn’t want a full shine, and I think its OK – I deliberately left some dirt/corrosion in the crevices as I think that gives a better overall effect. I am pretty happy with the top jaw and top jaw screw – they were far too shiny to look right, so I gave them about 10 minutes at 1 amp in the derusting tank running in reverse, so they got slightly rusted, then used Blackley’s case hardening powder at dull red heat and quenched them, then polished them lightly with 0000 wire wool, and then gave them a quick dab with very dilute TIPOO blacking solution (1:5) to colour them down a bit more. The overall effect is quite convincing – see photos. I’m leaving the ramrods til I’ve finished the rest.
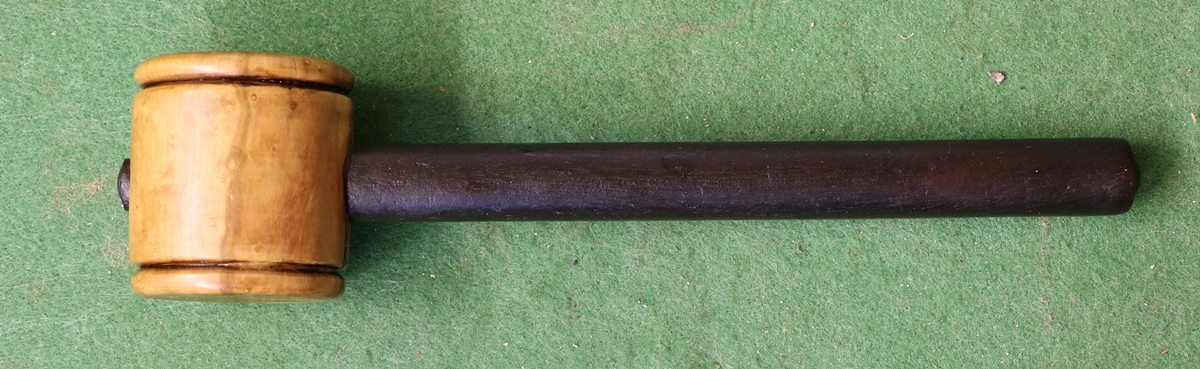

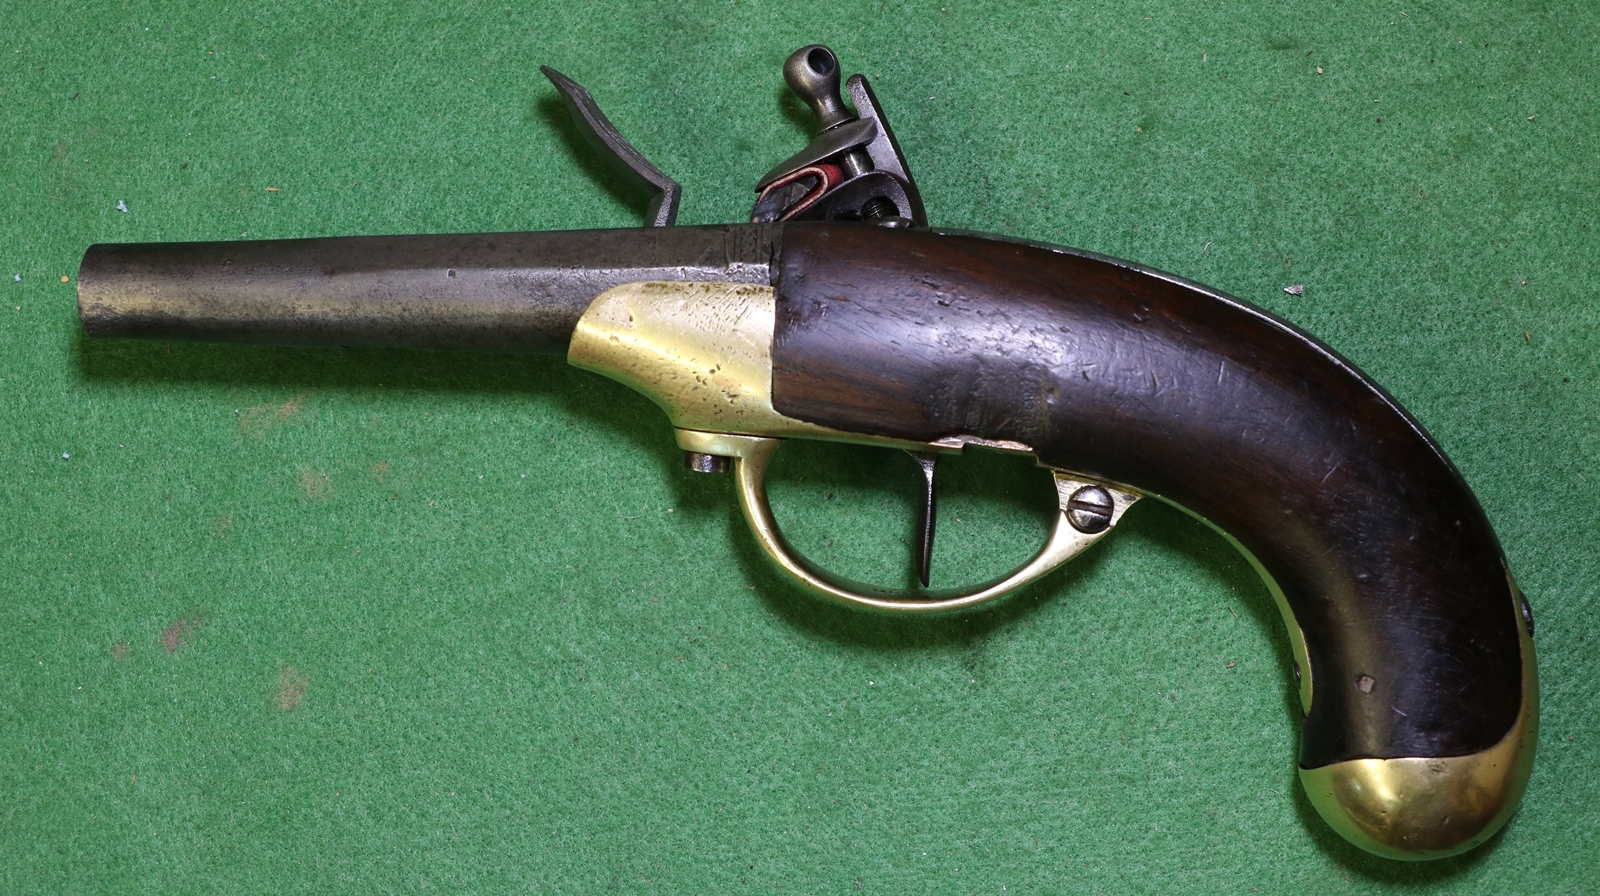
You can just make out the new patch of wood as its too perfect – need distressing! I did put some extra ‘grain’ on with a modelling knife but it might need a bit more work… The colour is right, though – the left side of the pistol is rougher and a slightly different colour from the right, as it gets hardly any hand contact.

You can see the effect of reverse derusting clearly on the stem of the top jaw screw – 240 years of rusting in 10 minutes!
3rd Feb Spent a lot of time in the car today! Dick and I went to visit a collector in Norfolk and looked at an extensive collection of flintlocks of all descriptions, and took him a couple of pistols he wanted, After lunch a slog across to Holts where Nick showed us the Baker collection that is due for the March auction – apparently they had to charter a plane to bring it all over from the Channel Islands! I’m very tempted by some of the cased Adams variations, but the buyer’s premium is off-putting! I’ll probably go down to London for another look…… I’m beginning to see how I want to focus my collection, which is a bit haphazard and not very impressive – in fact mostly junk! – I’d like it to be the sort of collection where knowledgeable visitors say ‘now that looks interesting, I haven’t seen one like that before’. It’s obviously going to be difficult to collect that sort of gun – I do have a couple or three that come into the category, but I’ll keep my eye open for more! One is the JR Cooper mystery gun, I took it to Holts today ( NOT to sell) but they have never seen anything like it – so maybe it is unique. Another is the Baker bolt action 12 bore, but they do come up from time to time.
2nd Feb Pleasant day doing the woodwork on the 1777 pistol and finishing the top jaw and doing some more cleaning of the parts, so that one just needs a few screws derusted and that one can go back together again – that was the one that required repairs – the other one just needs derusting I’m not quite sure how much refinishing of the wood to do – the butt is a nice patina but the side around where I have repaired is very rough on both guns as if someone had rasped off part of the wood – possibly to do with removing the belt hook – it also isn’t the same colour as the butt so I may try to match it all in a bit better – I’ve got to match in my repair anyway. The top jaw and screw look very new compared to the rest of the iron so I might try ‘reverse derusting’ in the electrolytic bath to etch the surface slightly to tone it down a bit. I have to make up ramrods for both. I went to Dick’s to see what he is doing to the pistol locks he is working on – superb.. He’s given me a percussion revolver that is extremely rusted to put in the deruster – I’ll take off the wooden grips and dump the whole lot in the bath for a day or so and see what comes out! We are off to Norfolk tomorrow to see a collector and visit Holts, and Saturday is the Anglian Muzzle Loaders shoot at CGC so not much will get done – I picked up Archie’s 8 bore barrel as our welder is still swanning about on holiday, so I’ll do it myself, then I can get on with the engraving – do it yourself if you want it done!
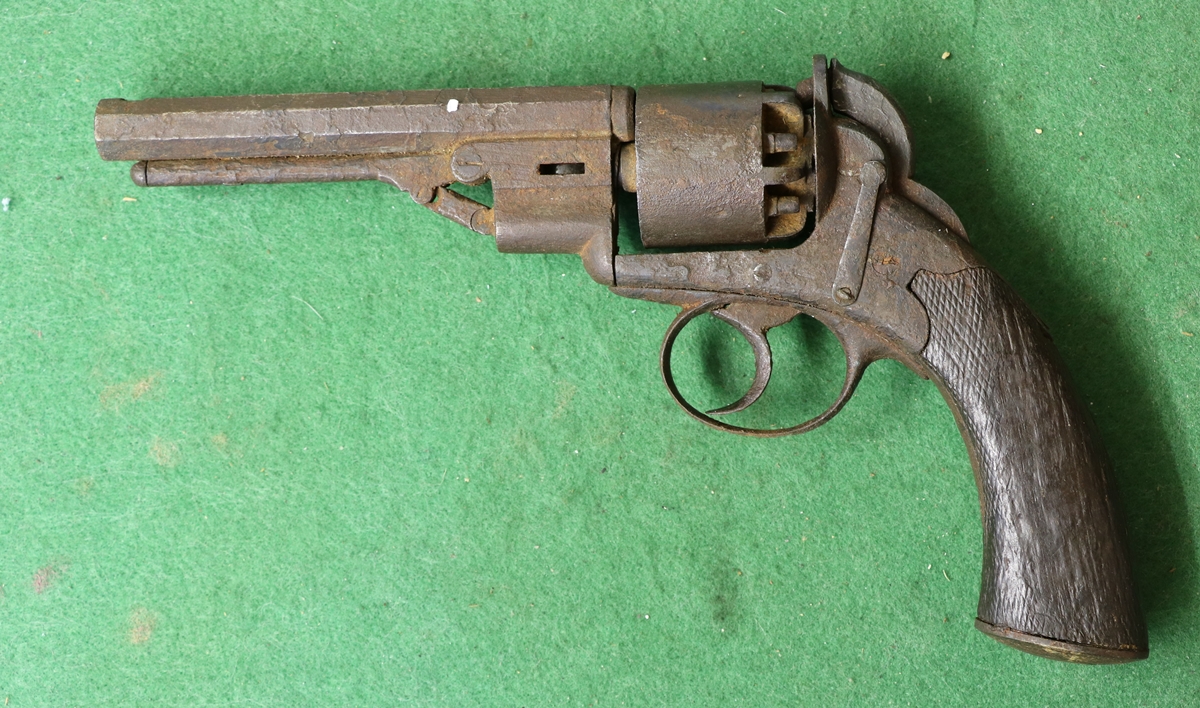

1 Feb I started the French 1777 Cavalry pistols yesterday and put up some stuff here, but then I forgot to press the ‘update’ key and it all got lost. The pistols are very substantially built, and quite a complex design – rather impressive – you have to remember that 1777 was just before London took over as the home of the best guns in the world! I managed to strip one of them – I only do one at a time so I don’t mix parts – and I got all the screws out without damaging the heads. The secret for screws you can’t turn is to play a very fine oxy-gas flame on the head to get it hot before you try! All screws get an initial treatment with a mixture of 50% acetone and 50% Plusgas – it penetrates much better than straight Plusgas. Looking at my bench after I’d shifted all the screws made me realise the most important secret – I ended up using half a dozen different sized screwdrivers – more or less a different one for each screw! Anyway the parts of that one have now done time in the electrolytic derusting bath and have been brushed with a very fine rotary brush to a nice even finish ( pictures tomorrow).
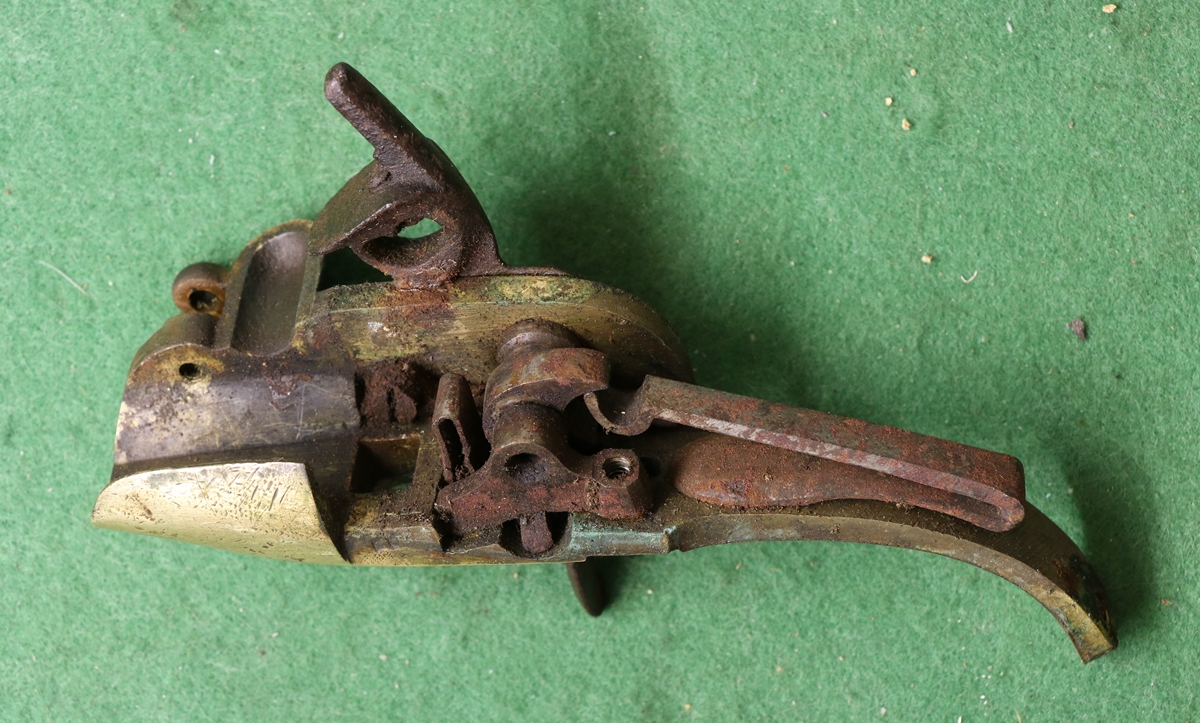
The end of the tumbler is held in a very substantial bearing

I need to mill out a bit of the wood and put in a patch in place of the woodwormy bit!
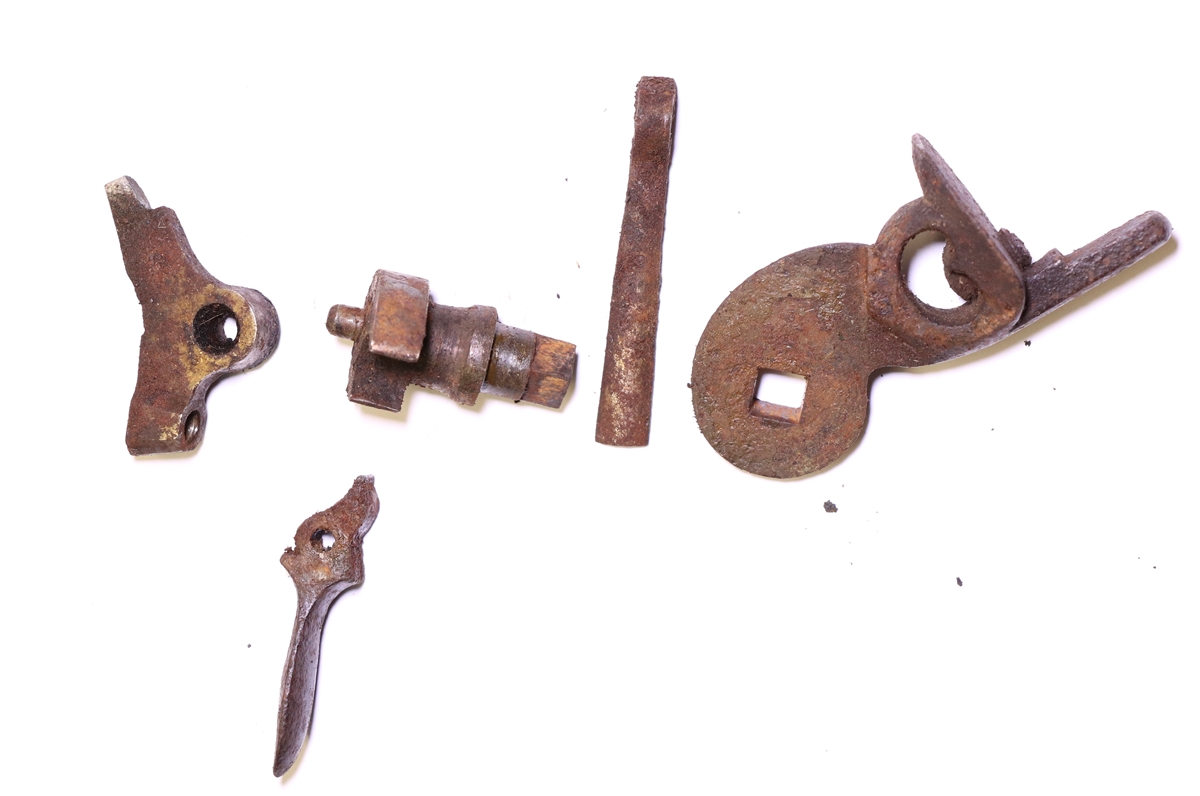
Before derusting – the long spring works in the groove on the tumbler to act as a friction brake.
I made a new cocknail today – out of some pretty tough steel but I did get a tool that cut it cleanly in the end. I’m also some way into making a new topjaw.
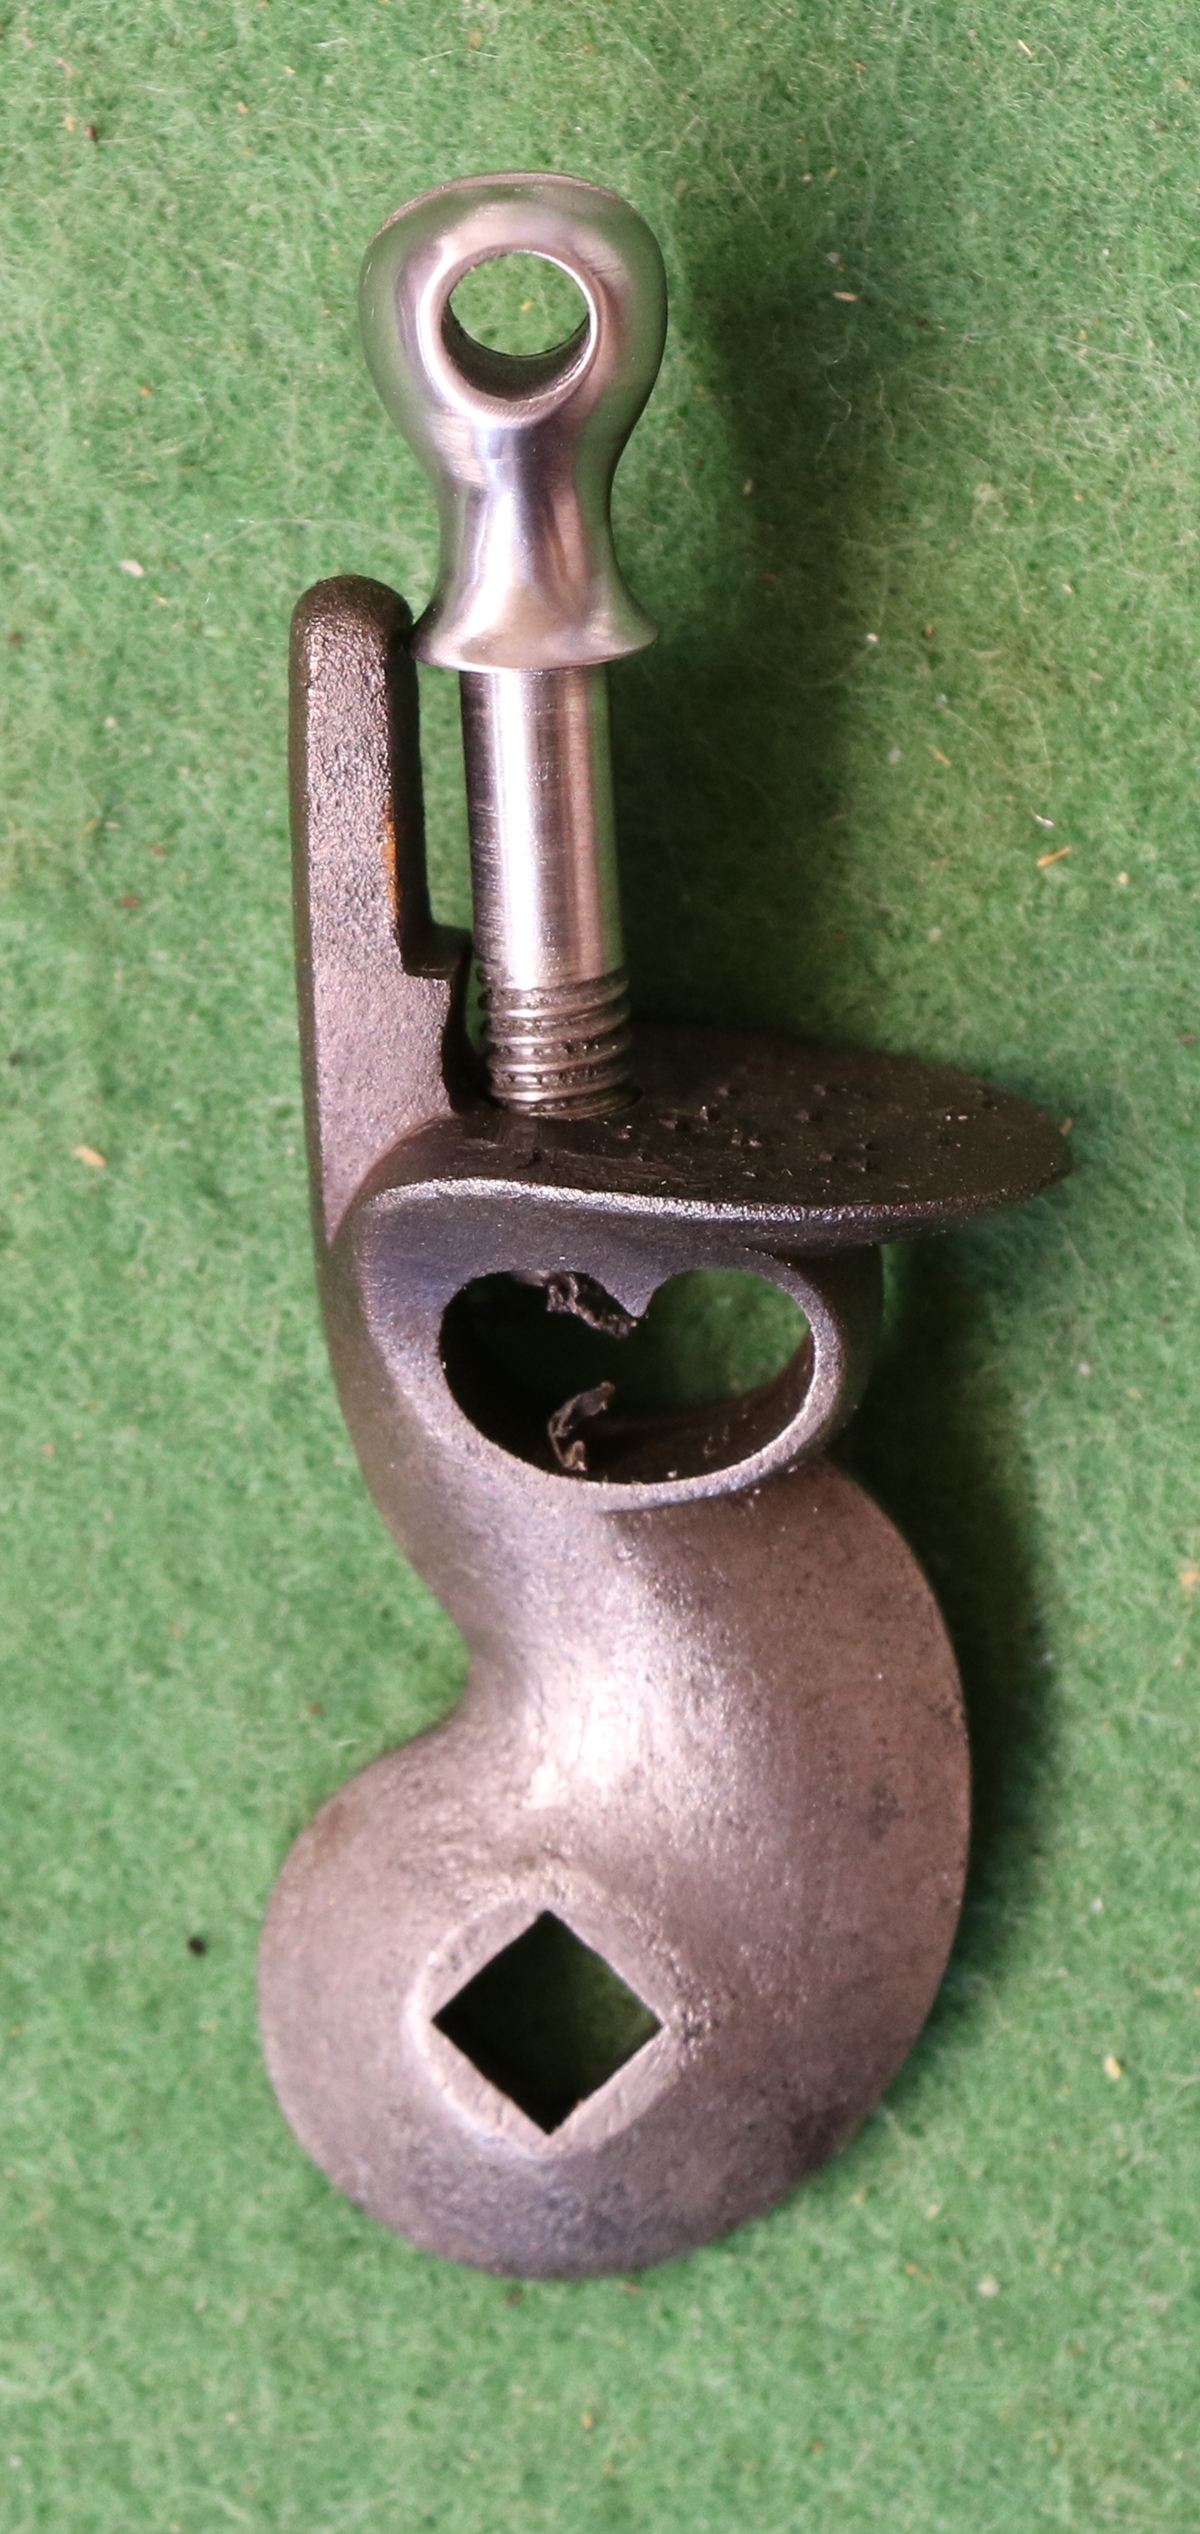
The derusted cock has cleaned up very nicely! The thread was 24 t.p.i but about 30 thou bigger than 12 UNC so I fiddled my die by running the TIG torch along the side opposite the split while the die was clamped in lead as a heat sink to unharden it a bit so I could force the die open without cracking it. It worked perfectly and cut just the right diameter thread! In the past I’ve tried opening dies without the application of the welder and broken them – you can often use them even if broken, but its not elegant! Interesting that it definitely wasn’t a metric thread – it was spot on 24 t.p.i.


Being lazy I did some of the shaping with the angle grinder cutting disk
31st Jan – I spent some time preparing for my STEM club – we had fun ‘running’ computer programs using children instead of computers! I went to Dicks to have a look at the reconverted flintlocks he is working on – they are looking good. I finished the Nock fore end tip and that looks good, so I can now put the Nock to bed until I’m ready to shoot it – I’m still unsure what powder charge is appropriate as all the old books say 1 1/2 to 2 drams, which is less than I’m told by current muzzle loading rifle experts.
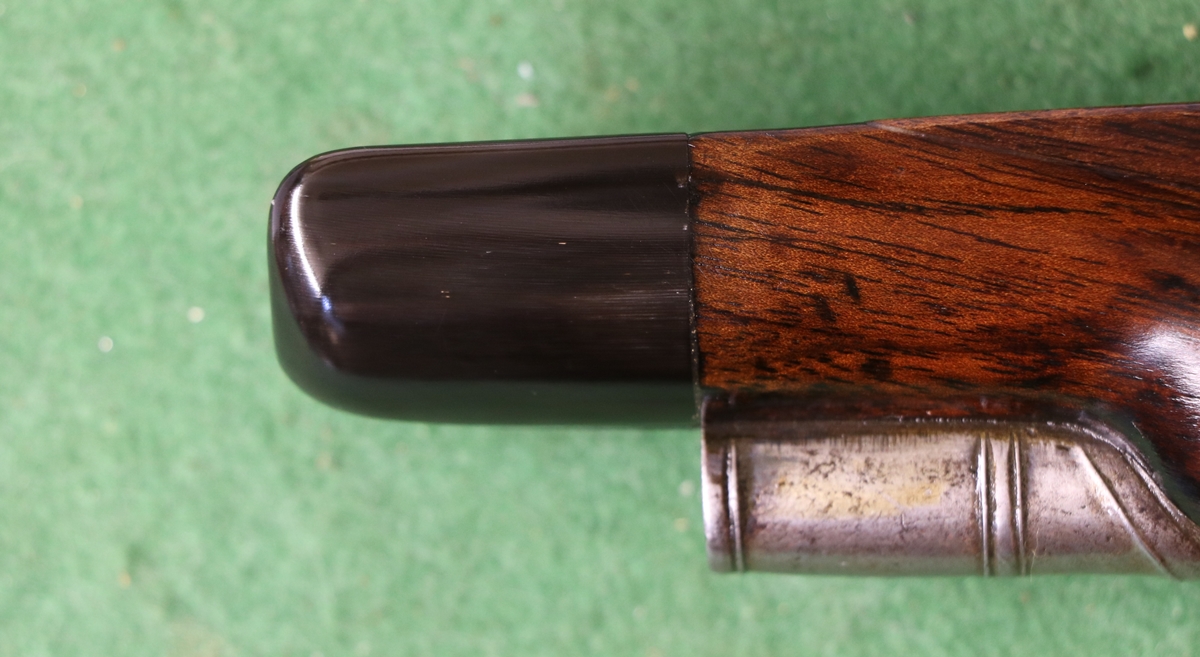
30th JAn – I spent today sorting out the geophysical archive – we have a project to get a 1930s Pendulum Gravimeter working again – they were the absolute way of measuring gravity up to about 1950 – in fact our gravimeter was used in the mid 1950s to measure gravity round the world for the US military in order to calculate satellite orbits. Its a very precise and absolute measurement that depends on the fact that the swing rate of a pendulum depends on the local value of gravity – the apparatus has two pendula that swing in antiphase and the measurements are made using beams of light onto photographic paper – of course you do need a clock or radio time signal that is as accurate as the result you want.- all good clean fun! I also had to sort out some computer stuff for my STEM children’s club – www.kettlefields.club . I did manage a little filing around the Nock horn tip – I had to concede in the end that there was no way to avoid fairing the wood and horn together, and in the process taking the finish off the wood – so be it……. I don’t really like looking at it in its present state, so no photos!
29th Jan I spent the day at the Isle Target Sporting Club getting my NRA rifle certificate so that I can shoot at Bisley and local military ranges – it was pretty cold – being outside for most of the day. Anyway I did manage to shoot over open sights, which I had doubts about, and I did manage to get passable groups with most of the rifles on offer. We did cover muzzle loading rifles fairly well, so I feel confident to turn up with one. It was so nice to be by a warm fire that I’m afraid the evening passed rather quickly and I don’t have any gun playing to show for it apart from a photo of the horn tip of the Nock in position – It has gone on reasonably well, although I didn’t have a way of pushing it hard horizontally and there is a slight gap to be filled with epoxy. I think I almost got away with fairing it in, but for a really good result I’ll fair it in after I have attended to the gap. I also need to enlarge the recess for the ramrod slightly – the for-end iron takes up some of the space, but it needs a little enlargement………
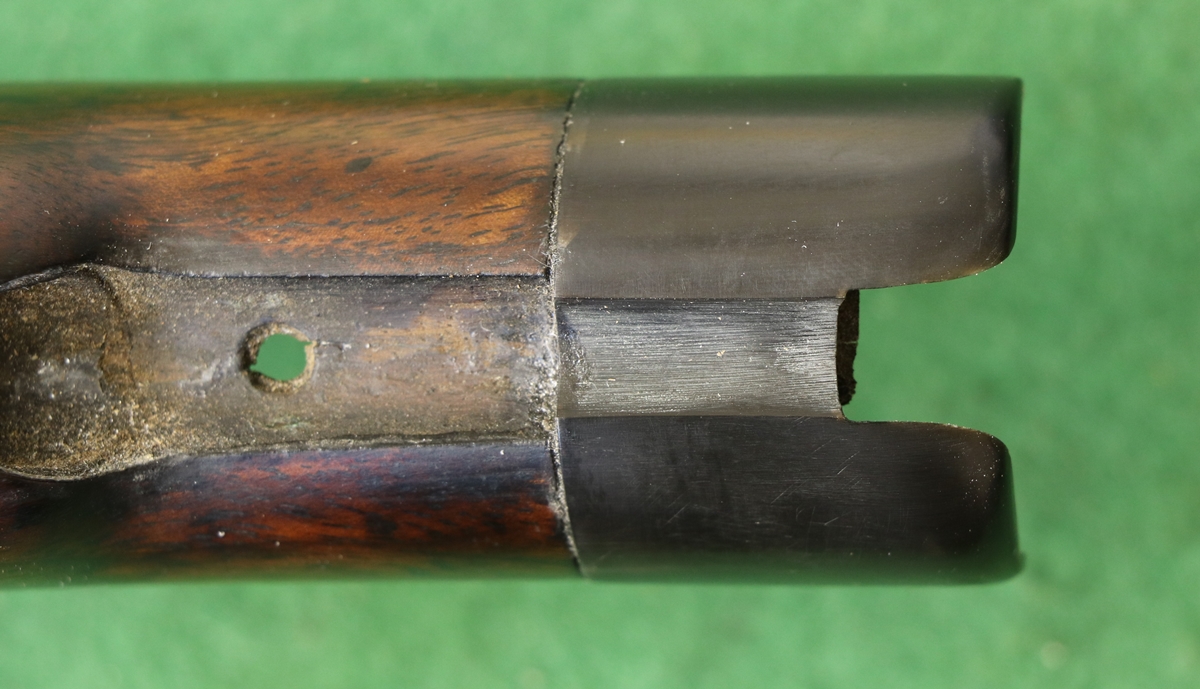
28th Jan. more fettling of the horn tip for the Nock – buffalo horn is fairly easy to work with, and takes a good finish, the only problem is there are streaks where there are weak or void lines that appear lighter in colour – I put a dab of super low viscosity instant glue on them and gave it a spray with ‘accelerator’. You have to be careful holding it in a vice as it can start a crack – again a touch of superglue fixes things. I filed, then sanded the horn and got it to fit almost perfectly without fairing the woodwork – I’ll see when the epoxy has set if I need to do a little blending in. It finished well with 1000 grit paper then 0000 steel wool and then on a buffing wheel with a cotton mop with whatever compound was left on it from the last job. I glued it with epoxy – I use liquid West system 105/205 – and mixed in a bit of horn dust, but it was a bit coarse, probably a mistake…. I rubbed the barrel with release wax and put on a layer of cling film before glueing on the tip, then held it in place with my favourite method – self vulcanising (sometimes called self amalgamating) tape that is stretched before application and then shrinks in situ to form a high pressure binding.
Tomorrow I’m off to the rifle club to do my NRA range training – all day, so I presume I’ll come away knowing a lot more than I do now. I found a very good website for ball moulds and patches and have some on order for the Nock – http://www.jt-bullet-moulds.co.uk

The horn has quite a fine grain that needs to be taken into account when cutting the shape out. ( the marks in the groove are file marks)
One hint – don’t round off the corners/edges until everything else is done – always work ‘in the square’ as long as possible, however tempting it is to see what it will look like when it is shaped!
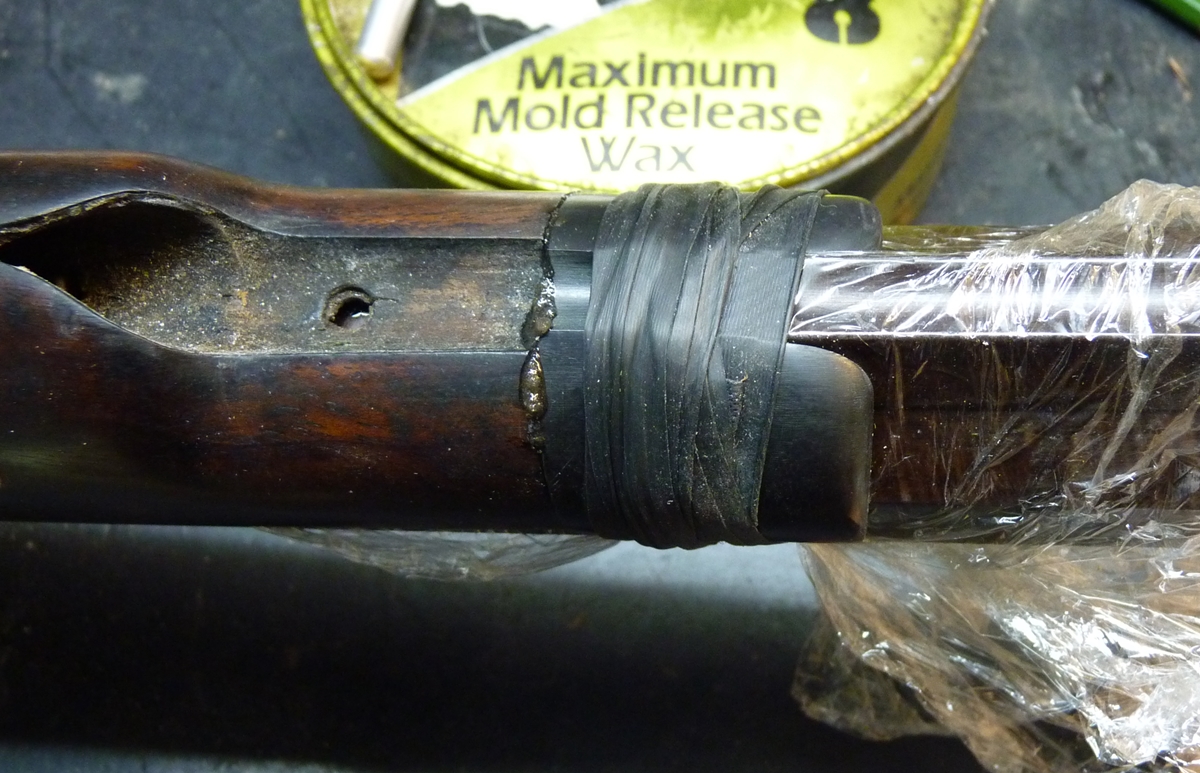
It’s always a of a risk putting pictures on the web in ‘real time’ as I never know how well its going to work out……
27th almost 28th, Evening spent fitting the horn tip to the Nock – still some way to go, I think it will all fit together – if for no other reason than that you can heat up the horn and bend it to shape! But its one of those jobs that takes forever. It was very traumatic taking a file to the existing fore-end and I’m not looking forward to fairing it all in and taking the finish off the existing wood – but it will have to be done!
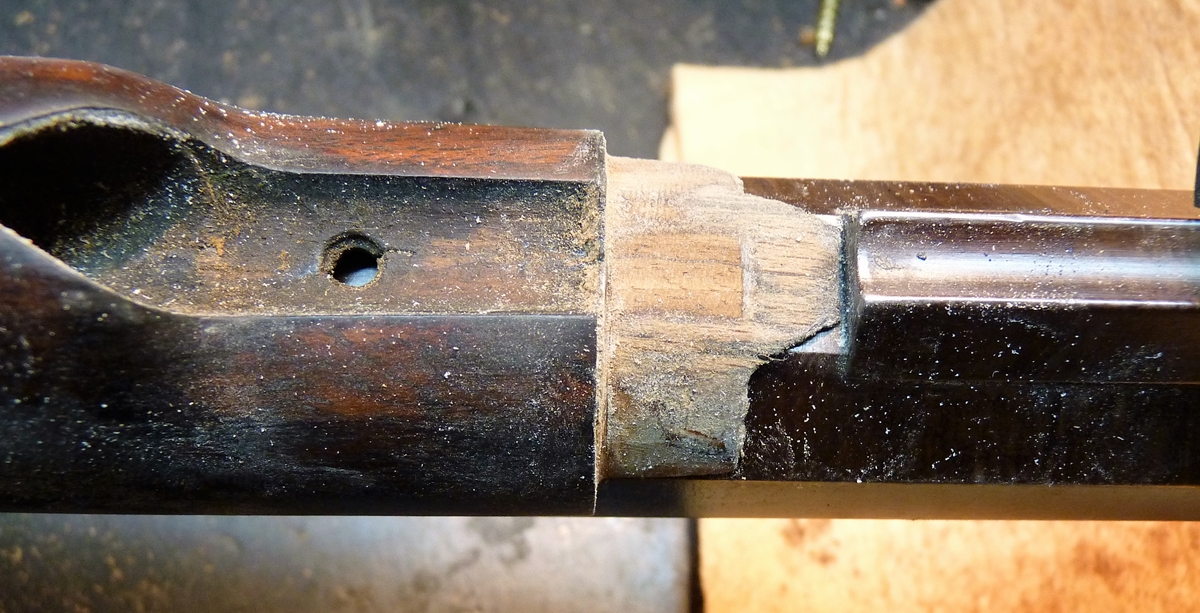
I could see the junction of the stock and the wooden tip in an epoxy layer so I’ll work to that.
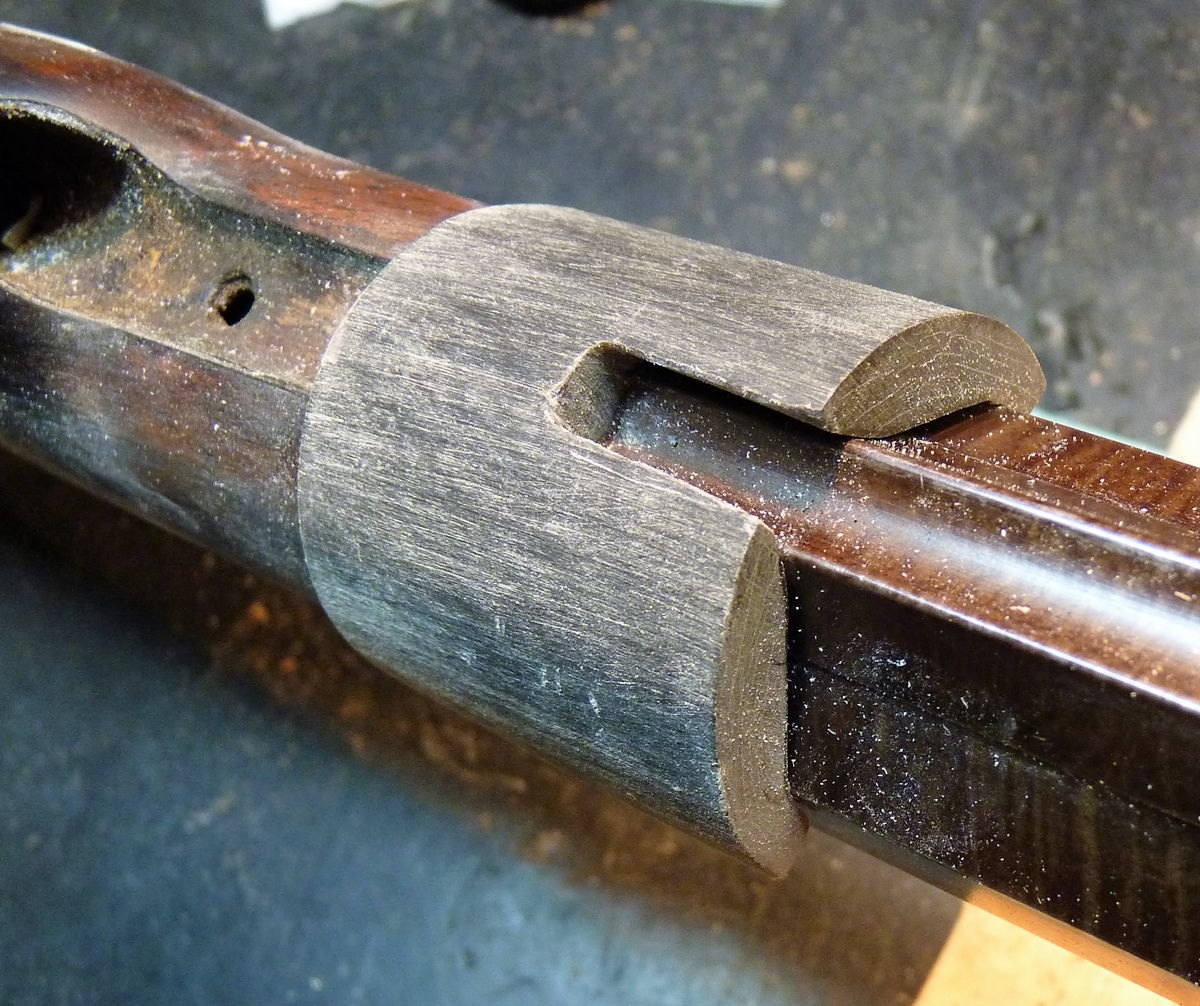
Still some way to go – the horn needs to come about 1 mm lower. I’m resisting smoking the horn to fit it as I don’t like the soot over everything and as the horn is black it won’t be so effective – maybe chalk would work?
27th Jan A visit from a fellow enthusiast/client, Nick, so a very pleasant morning looking at and talking about guns. He brought a number of guns for possible restoration, and we agreed to start with a pair of French 1777 Cavalry pistols, this is still a pair, and unusually have short barrels that seem to be original – it is known that 83 were made with short barrels. Unusually the breech end of the barrel is octagonal on top rather than round as most of these pistols are. They are in a moderately corroded state, one top jaw is missing and there is a part of the butt where woodworm have weakened the wood so that a piece has broken off and both ramrods are missing. Apart from derusting, fixing the top jaw, making two ramrods, the woodwork repair and a general overall clean up, there are no major repairs to do, so the finished pistols will be an interesting variation on the regular long barreled 1777 pistols, and being a matching pair will enhance their value. So the first step is to strip off the ironwork so it can be de-rusted- I don’t think I want to put the brass body of the pistol in the caustic bath. This is a nice website project – watch this space…..
small,

I showed Nick my Egg percussion Duelling pistols and the cases I have for them, and he persuaded that I should take them out of the nice big ‘proper’ antique Egg case in which all the accessories fit, and put them back in the smaller box and tatty that I found in my father’s stuff that has the crest of the Earls of Sefton that matches the crest on the pistol escutcheons. That is more work to do to reline the case etc……………..
26th Jan (later) At last, a whole day playing guns! I spent a happy morning with a friend who had come to collect the barrel with refitted nipple, and who is an experienced muzzle loading rifle shot – he brought a collection of various sized ball and various thickness patches to find the ideal combination for the Nock. I hadn’t realised in my ignorance what an exact science it was – I just thought that if you could get a ball down the barrel somehow it would then come out and hit the target! It is just as well I had a proper lesson or I would have had no luck at all. To engage with the rifling the ball, with its patch needs to be a comfortable push fit – and that apparently means that the size of the ball plus 2 thicknesses of patch must be within a thousanth of an inch or so of the correct diameter – particularly if you want to hit a target at 100 m rather than 25 or 50 metres. And if that wasn’t enough, I’ve got to feed the beast on Swiss No 4 powder at some horrendous cost – so that is 3 grades of powder to stock………. So I now have even more things to find/buy/sort out before I can shoot the beast, and I’m still waiting for a slot on my FAC for it – they ‘lost’ my FAC when I sent it in for a variation a fortnight ago, but found it today! My friend also bought me a couple more jobs to do – a ramrod pipe to refix to a flintlock by Theophilous Richards – a founder of the Westley Richards clan, and a very interesting single percussion from pellet lock with a lock signed Bradley and a barrel signed Sturman Barnsley, both in matching script with gold inlay so made as one gun – it has a very fine raised rib – most unusual. Joseph Manton patented his raised rib in Sept. 1806 No 2966, but it was specifically for double guns and was raised at the breech end but tapered to the muzzle – this is a single gun and the raised rib is more or less the same height all the way to the muzzle – I have never seen one like it. Anyway it is in need of a foreend tip and I’ll try to make one in silver if possible, or horn if that doesn’t work! On the subject of horn fore-end tips I have faced up to the job of fitting the horn tip to the Nock, it will take some time but I’ve made a start – fortunately horn files quite nicely so its a matter of patient work and trial and error.
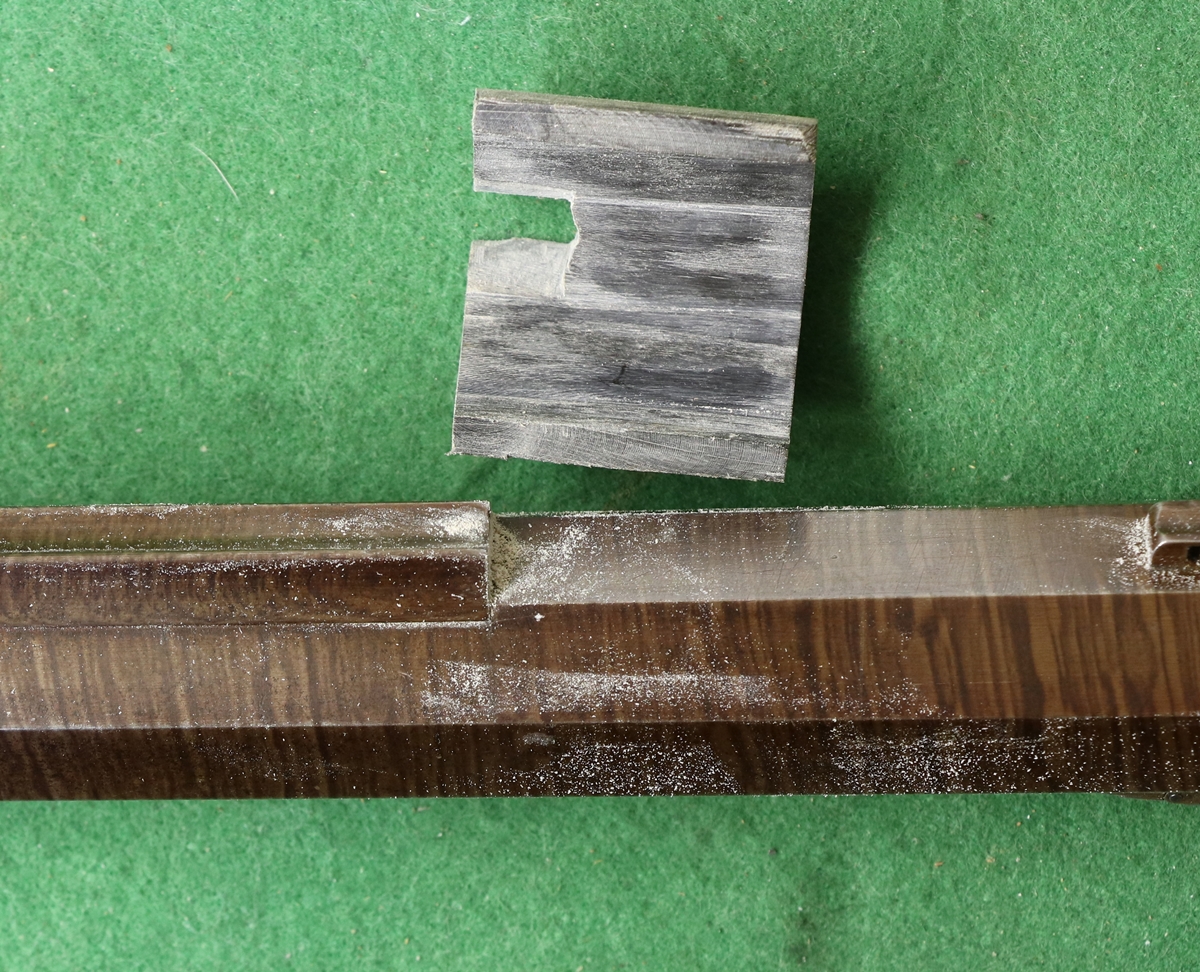
Horn fore-end tip for the Nock – first stage is to get it to fit the barrel, then fit the inside to the projection on the stock and finally shape the outside, which will unfortunately mean refinishing the fore end of the stock.
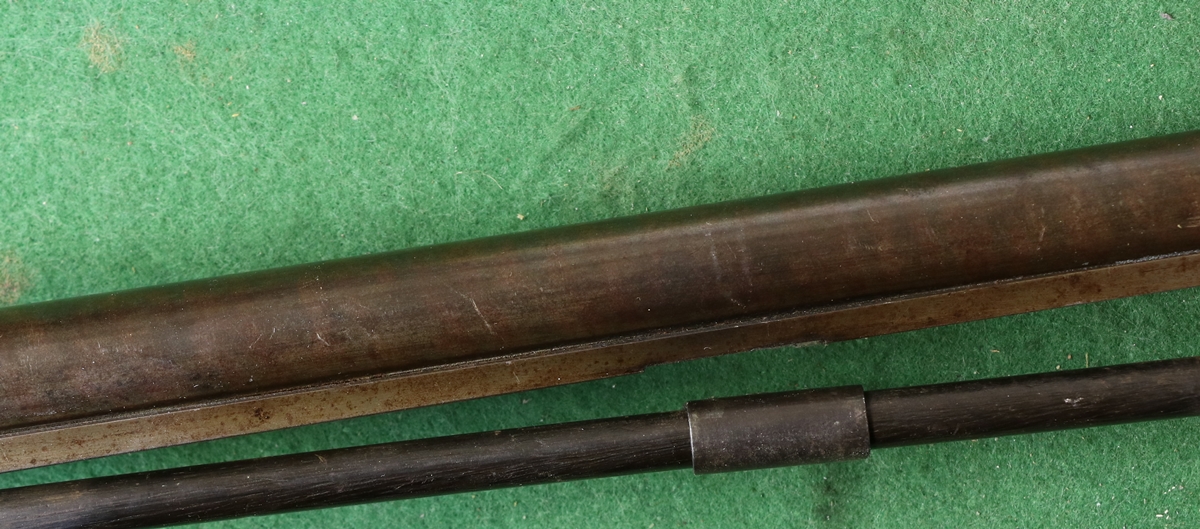
Pipe needs re-soldering – not too difficult but I need to be careful not to spring the rib
This is a nice and an interesting gun – it has the original cock from the pellet lock, which would put it in the early 1820s or a bit before. It has a very distinctive raised rib – it has had a bit of a dent just above the front part of the lock, as you can see. It is the first old single gun I’ve seen with a top rib, but then there must be millions I haven’t seen!
26 th Jan – Missed a whole day of the blog as I had a meeting in the evening. The case of the Nock is now complete – I made a couple of horn knobs for the wooden lids – I’ll put up a photo – and now I’ve just got to finish the horn fore-end tip. In making the brass catches (see pic. below) I got tired of filing, being essentially lazy, and remembered I had bought a 13mm wide belt electric ‘file’ that I thought I’d use for shaping stocks but turned out to be much less good than a rasp. Mounted in a vice it turned out to be excellent for filing the outline of the catches as a small linisher – in fact I was so impressed that I will probably get a bench mounted 2 inch linisher – it will have to go into the (freezing) shed as it will generate too much dust in the ‘house’ workshop. Anyway, the cased Nock now looks absolutely fantastic, even though I say it myself, and the built up edge to the case looks entirely intentional. The fabric I brought from ‘Mike the Bolt’ – re-enactment cloth specialist – is completely ‘right’ for the job – I wish I had brought more, although I have enough for a couple of cases in green, and a couple in red, although the red cloth is a bit thicker.
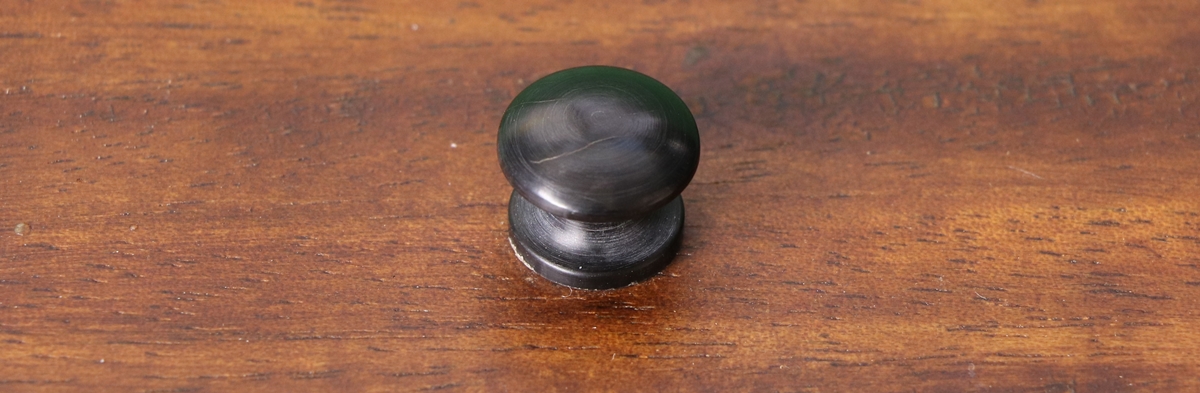
24th Jan – not much time -again! My STEM club did a great job of presenting their work to parents etc. Managed to finish one catch on the Nock case….
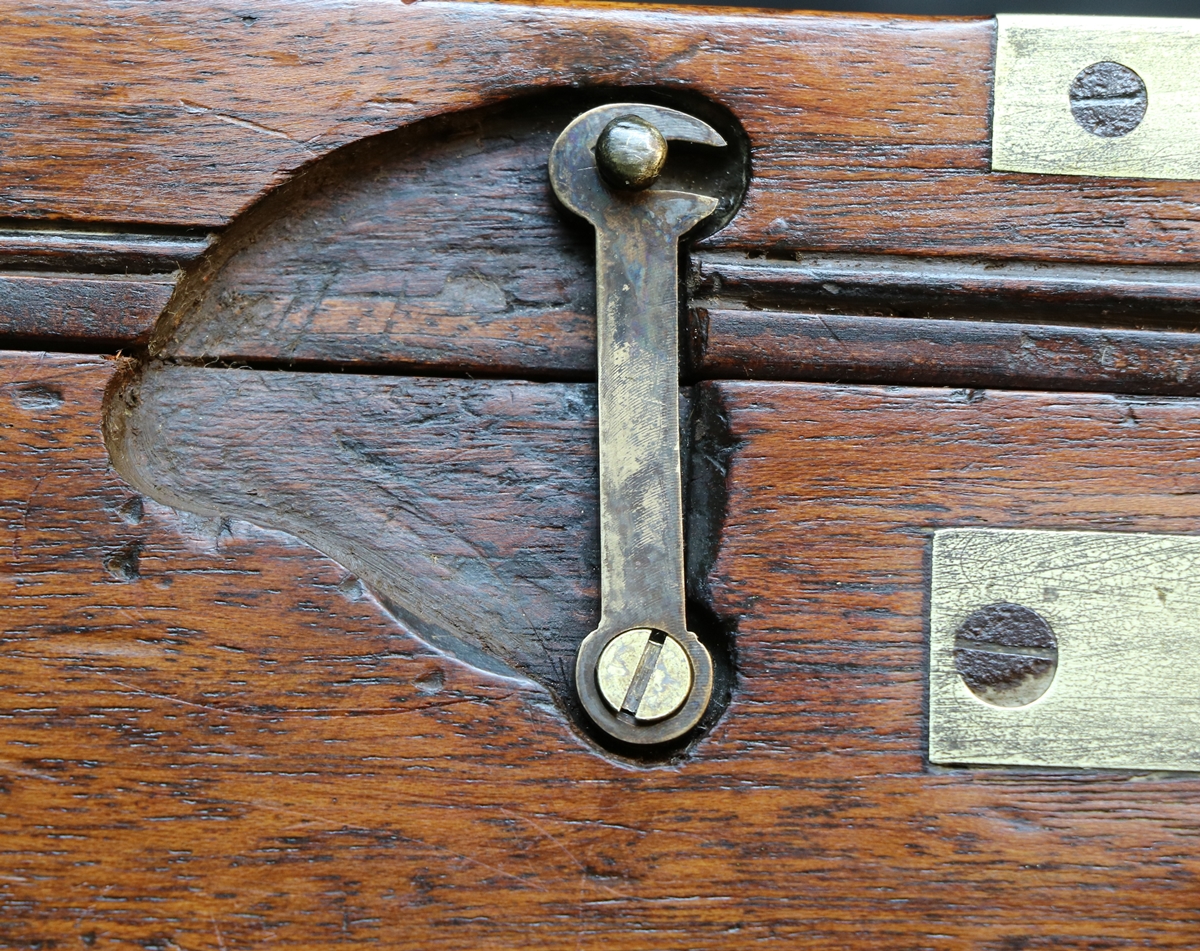
The brass catch is toned down with Blackley’s brass browning solution but the screw looks a bit too modern! ( slot in the middle and too wide and needs toning down too, as well as needing a bit deeper countersink. Its surprising how important the small details can be in creating a sympathetic whole – its not faking, just respecting the patina of age so it doesn’t shout at you!
23rd Jan – At school today – tomorrow my STEM club is putting on a presentation to parents, so great excitement! I almost finished off the Nock case – why is it always ‘almost’? One day I’ll actually finish finish something! That’s why I like doing work for other people, because it does end when you deliver it! Anyway, the additional 5 mm strip I put round the lid to give the case enough height to clear the gun looks pretty good now its coloured to match and the hinges and lock are all fitted. The brass hook catches are of course now 5 mm too short – I did think about moving the pivots or the pins they hook over, but then the recess would be the wrong shape, so I’ve opted to make new brass hooks 5 mm longer and slightly enlarge the recesses. I found a bit of brass the right thickness so now I’ll have to cut out the hooks. I also need to turn up a couple of horn knobs for the lids and make the horn fore-end tip……………. (re yesterday – it turned out that we had been missed off the oil delivery, so an urgent fill is on hand)
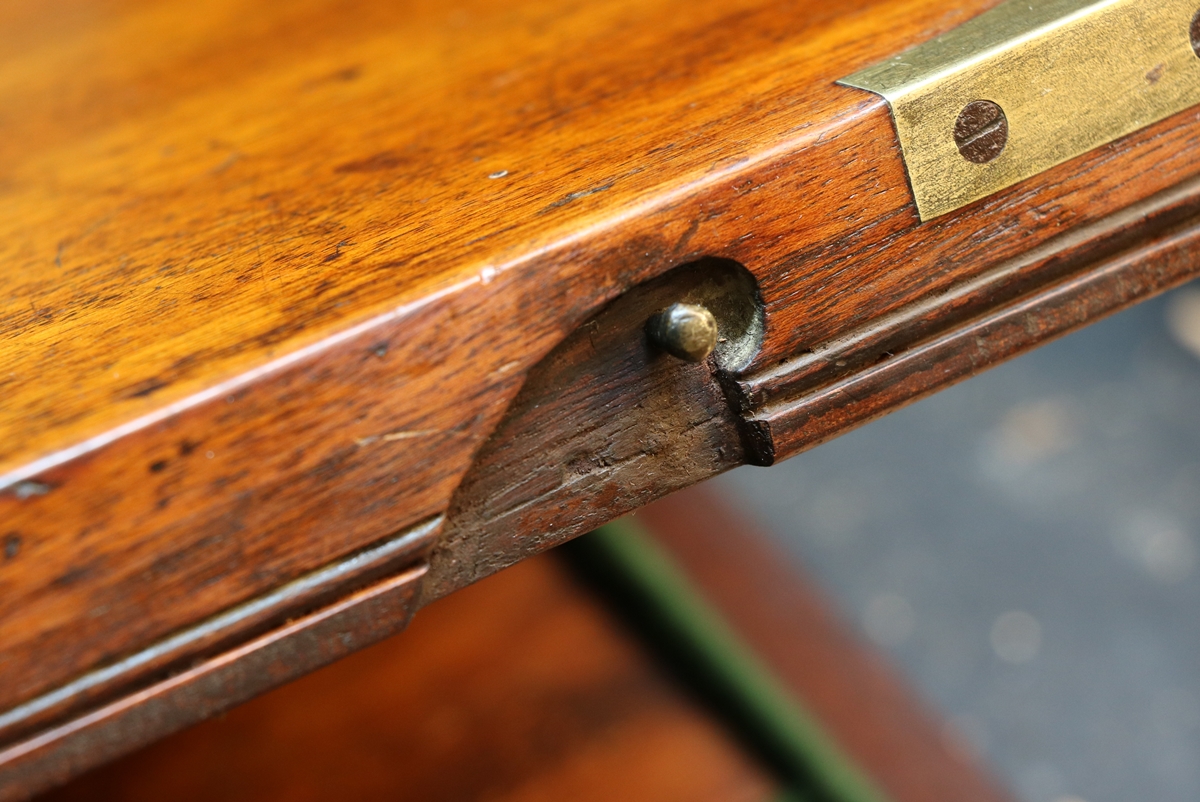
I’m quite pleased at how the additional strips look as if they belong, I thought they might look a bit odd. The recess for the hook will need a bit more shaping when I have made the new hooks.
22nd (almost 23rd) Out most of today, and when I came back the AGA was dead – tried various remedies that usually work, but then realised that there was no oil in the tank – I’d put in an order in late Nov. to our usually reliable supplier so either it was not delivered or someone had half hitched it in the interim – anyway the house is a little chilly and I’ll have to sort it in the morning – I have borrowed a 20 litre can and a 12 volt oil pump so it the worst comes to the worst I can go and beg some from a friend! I did start to fit the hinges to the Nock lid before I went out – I am not very quick at that sort of thing so I didn’t get far with the first hinge! Another flurry of visitors to the site from Yanadex – the favoured search engine in Russia, so its back to 200 visitors a day after a dip of a few days.
22nd (just) – I started to build up the lid of the Nock case with some 5mm thick strips of mahogany so that it shuts properly as the gun is really a bit wide for the case – even cutting depressions for the cock screw and patch box didn’t quite do it, pictures when it gets a bit less of a mess!
20th Jan To a shoot on Windolphs Farm near Sudbury courtesy of Derek – mostly breech loaders but 4 of us antediluvian types with a mix of percussion and flint guns, all original. An excellent time was had by all – the gun placements were complex and the drives quite different from the usual ‘line of guns – line of beaters’ setup, and I thought it made for a more interesting day, although for several drives I only got a couple of shots – still, what would be frustrating if one was shooting a breechloader is all good fun for us ‘powder burners’. I took my trusty Egg double percussion and shot a bit better than usual, so my hit ratio was about 1 : 2.5, which is acceptable. I did take my lovely black powder William Powell hammer gun on the last drive but only got one shot with it ( a miss) so had to clean it for no score – that will teach me to leave these ‘modern’ guns alone! While standing on my peg having fired one barrel and debating whether to take the cap off the unfired nipple and load the empty barrel so I had two loaded barrels I came up with an idea for how to avoid having to prize the cap off, which is a bore, even using my decapper, so I thought a bit of tubing that fitted over the nipple and cap and located into the hammer which could be let down onto it, might allow one safely to reload without removing the cap. It would need to fit properly and be secured on a bit of chain to the gun – and I wouldn’t use it when other people might be at risk – i.e. if double pegging, but when solo I might be inclined to try the idea……. We had a bit of a conversation about how we cleaned our muzzle loaders, and how, whatever method you use, when put a clean white tissue on a jagg down the barrel it comes out black – except for barrels that have been lapped to a mirror finish, which do come up clean. Steam cleaners seem to be used by some of us – and I might just have to investigate – I flush with boiling water and a bronze brush with the nipples in, then remove the nipples and scrub and with more boiling water and ‘303 cleaner’ (Oil emulsion) and then use a jagg with a strip of polyester wadding to make a piston – then leave the barrel to drain and dry and give it a good squirt of Napier gun cleaner ( which has VP 90 corrosion inhibitor in it), and clean with tissues on the jagg, and finally oil with a clean tissue. I have started putting sachets of Napier VP90 corrosion protection in my gun cabinet after seeing the guys from Purdeys putting them in all the cases in the Royal Gunroom at Sandringham – if its good enough for Purdey its good enough for me!
19th Jan – I turned a housing for the .308 laser boresighter to fit the piece of tube I had, but I didn’t have the right tools to make an accurate bore and I wasn’t sure how accurately it would all align so I put 6 M3 screws around the boresighter so that I could adjust it. I put a piece of clear tape across the end of the tube (which is 6 inches longer than the Nock barrel ) so that I could see the position of the beam, but still have a spot on the wall. I epoxied the housing into the tube and mounted the boresighter into the housing and aligned the boresighter using the 6 screws to put the beam into the middle of the clear window. Once positioned I ran instant glue into 3 holes I had put in the housing and round the rim of the borelighter so that it is all held rigidly in position and later removed teh screws. I figured that it was better to have the whole shebang rigid and fixed, even if it was out by a few tenths of a millimeter at the muzzle end of my tube – as long as I can bring the laser point within about 6 inches of the actual impact point at 25 yards I will be able to zero the rifle ( it should be better than this laterally). The whole sighting tube fits in the bore of the Nock ( its 6 inches longer than the barrel) with a single layer of tape on each end to protect the bore, and the laser appears to point to the same place as the sights, whereas if it was sighted parallel to the bore it should sight about 20 mm above the laser beam (the height of the sights above the centre of the bore). I now need to do a few calculations concerning the drop of the bullet with range, which depends on a guess of the muzzle velocity – it looks like the drop at 100m is going to be substantial – anywhere from about 10 inches to around a couple of feet, so consistency of loading is going to be paramount . The peep sight won’t go very low so I may have to make a taller foresight – the sight base is about 650mm for the peep, so a 15 inch drop needs the sight raised 0.1 inches – we shall see- all new to me! The boresighter takes three little LR41 which have now run out – they last about 20 minutes which is quite enough to sight in. I did get as far as taking the hinges off the Nock case – a struggle as they were long steel screws and well rusted in – so when I can face an hour in the freezing workshop I’ll machine up the necessary strips of wood to raise the lid so that it will close!
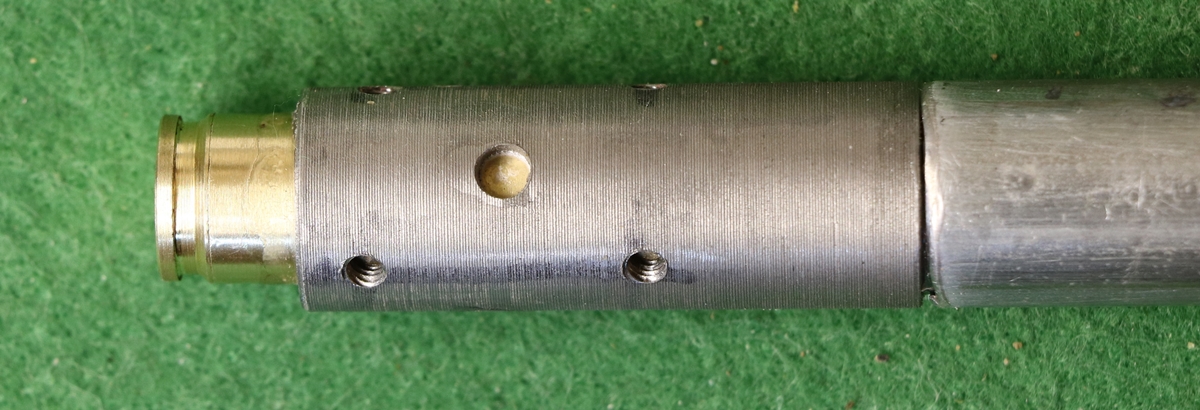
Boresighter instant glued in place and adjusting screws removed. 1 layer of tape at the end makes it a snug fit in the bore.
18th later – I decided that paying a massive rental on an big Argon cylinder that I haven’t refilled in 5 years was a mug’s game, so I swapped it for a one off purchase and more expensive refills of a smaller cylinder – the initial cost will be about the same as my annual rental, but thereafter much less. With my newfound interest in shooting the Nock I got to thinking about the initial stages of sighting it in – I bought a small laser boresighter in a .308 case and very fortuitously I found a piece of steel tube that just fits down the Nock barrel (its about .66 in. diameter) with about 1/2 mm of clearance – I apologise for the mixed units that appear in this website – the Imperial system was in use during my childhood and for most practical things into my adult life, and my first engineering designs were in imperial measurements, but always using metric units for scientific purposes – then I moved over to metric engineering – so I have always been ‘ambidextrous’. All the readouts on my machines are in metric, so at the ‘coalface’ I always use them. Anyway I now have to turn up an adaptor to fit the .308 shape to the end of the tube , making sure that its accurately in line. I can put a mask at the muzzle to make sure that it stays central. I’ll try making it tomorrow. I reviewed all my own jobs that have piled up recently and think I had better get on with some, before the next ‘proper’ job comes in at the end of next week. I have to finish fixing the cocks tot he Lancaster locks, and finish the case and foreend tip for the Nock. I have a last game shoot on Friday – I’ll use my Egg 14 bore double as I am certainly not confident enought to take a flintlock, much as I would love to!

.308 boresighter and tube for Nock barrel
18th jan Not quite sure what happened to the 17th! Visited Dick to take some bits for him to sort – a couple of top jaw screws to reshape and a new tumbler/cock screw to make ( his lathe is in his heated workshop, mine is in a freezing shed!) and collected another broken mainspring from a pistol – this one had snapped in two places – by the ‘hinge’, and the hook had broken off – I’ve welded them but I can never tell if they will work – I managed to file off the peg carelessly so I’ve put a blob of weld in its place! The weld technique for the main break was as I described before – tack, weld on a jig, cut out the break with a 1 mm disk and fill with weld – the hook was a bit tricky and it still needs to be filed down fully, but I have left it so that Dick only removes the necessary material when fitting it – the joint isn’t a part of the spring so doesn’t need to be flexible ( I hope!) – here are some pictures;- ( P.S. it did work and is still working…)


The modelling clay really works for long enough to get a weld started! I know it sounds implausible!

The hook still needs filing to fit and then it needs hardening and tempering (to around 310 C ?)
16th Jan Bit of a mystery – I’ve been working on a couple of locks and frizzens that are from good castings and mechanically interchangeable but not identical – bits are different thicknesses, but more than can be accounted for by shrinkage. I guess they may be filed differently from original pairs of castings, but they don’t look as if that is possible – anyway they are beginning to look similar…… I’m beginning to think that I’ll have to carpet my workshop to stop things bouncing around the floor when I drop them – I spent 10 minutes looking for a frizzen I dropped, and the workshop isn’t that bad ( at the moment!) – it had just gone a long way!
16th Jan – Still getting lots of attempts to log in to the site to hack it – fortunately not from very sophisticated hackers so my defences work – touch wood – I do send the odd email to the relevant ISP complaining of the abuse as most have a clause in their agreements with customers that stop them abusing other sites..but I only bother with countries that are likely to take action, certainly not Ukraine or Russia..!
I didn’t have long to play today, but I have managed a bit of work on a couple of locks that need to be tidied up. I got the invoice for my Argon cylinder rental today – £150 per annum and I only use a small amount each year, so its time to turn in the bottle and go to one of the suppliers that sells you a bottle and the gas separately – a smaller bottle costs about £60 and the gas £45 (ish) so even this year when I have to buy the bottle it will be cheaper – in subsequent years about 1/3 of the cost if I use a full cylinder, which is unlikely. This means I’ll have to lug the very heavy cylinder out of the workshop and into the Landcruiser, and my son, who usually supplements my muscles, is working in Singapore this week. I’m not sure lugging hefty cylinders is Penny’s thing, although she did do a good job of helping me get the new gun cabinet in!
15th Jan – visited the splendid range at Cambridge Gun Club for my initiation and managed to shoot a sub 1 inch group at 100 yds with the 1.7 HMR within 1/2 inch of the centre without touching the sights or having shot the gun for 12 months and only shooting 2 groups, so I was a happy bunny! I have to confess that it took me the first 5 shots to remember that I wasn’t shooting a shotgun and therefore needed to pay a bit of attention to how I squeezed the trigger – I’d like to get that down to a 1/2 inch group next time – the CZ .17 HMR is as accurate as any cheap rifle is likely to be, although a better trigger assembely might be worth fitting. I came back and carefully welded the sear spring of the Twigg along the bend where it had neatly come in two, not really expecting it to work – but I decided to try it without going through the hardening and tempering stages, and without any further playing with the tumbler I got around 4 lbs pull (measured near the end of the trigger) so that will do at least for the next trial, although I don’t really know what state of temper etc the spring is. Two tips out of that exercise – measure the opening of a spring before you start messing with it, I knew exactly what the opening of the sear spring should be – 8.5 mm – so I could hold it in that position while I welded it – second tip – hold small parts to be welded in position with modelling clay (Plasticine etc) – it withstands a certain amount of heat and dries out but stays where you want it and keeps things in position. So now I might get on with the Nock case again…….
15th Jan (just) – the number of visitors is back to its constant level 182/day after a couple of increases due to visitors from various odd countries – Russia and Ukraine for instance – trying to hack into the site. I run software that stops them, and I can then block them permanently from the site, which I do if anyone tries anything that looks even vaguely suspicious. I don’t know if these are automated attacks or individuals playing about – I know there are some well known sites in Ukraine that are causing a lot of trouble to websites, but its not entirely clear who is behind them, although they are in the part of Ukraine that is under Russian control. Blocks on some of these hacking sites are even built into the website software by the suppliers! I’m off tomorrow for my safer shooting training at CGC – might take a rifle.
14th Later – I annealed it, closed it a bit and then hardened and tempered it but didn’t temper it enough and it snapped at the apex! I’ll have to try and weld it or make a new one – I think my AGA tempering will have to be replaced by burning off in oil – it seem s more reliable! 1 step forward, two steps back……..Bother!
14th Jan I got back to the problem of the heavy trigger pull on the Twigg because I got my stones – a couple of ‘Degussit’ synthetic stones from Cousins – they are expensive, so I got very small ones – triangular 2 mm x 2 mm x 50 mm . they are really too small to handle and quite brittle so I made a mount out of a bit of 1/2 in x 1/8 in steel about 80 mm long – filed it down to less than 2 mm and stuck the stone on with very low viscosity instant glue – I used a couple of bits of modelling clay to hold it in place while I put the glue on with a needle – worked just fine – see below. I decided to test the trigger pull with weights to see what its heavy pull measured, and found that it was somewhere between 7 and 9 lbs! A bit more than the desirable 3 to 5 lbs! So I stripped the lock and did a bit of work on the bent with my new stone and it looked OK, although the trigger pull looked to be quite long. Put it together and it didn’t seem any better! anyway I thougth the sear spring seemed a bit strong, so I tested the trigger pull when the hammer was down and there was no tumbler load on the sear – answer; it needs about 4 lbs just to overcome the sear spring, so no hope of getting the overall trigger pull to that sort of value without sorting the sear spring – so at the moment its cooling after annealing so I can close it a bit and try again – nothing is straightforward!
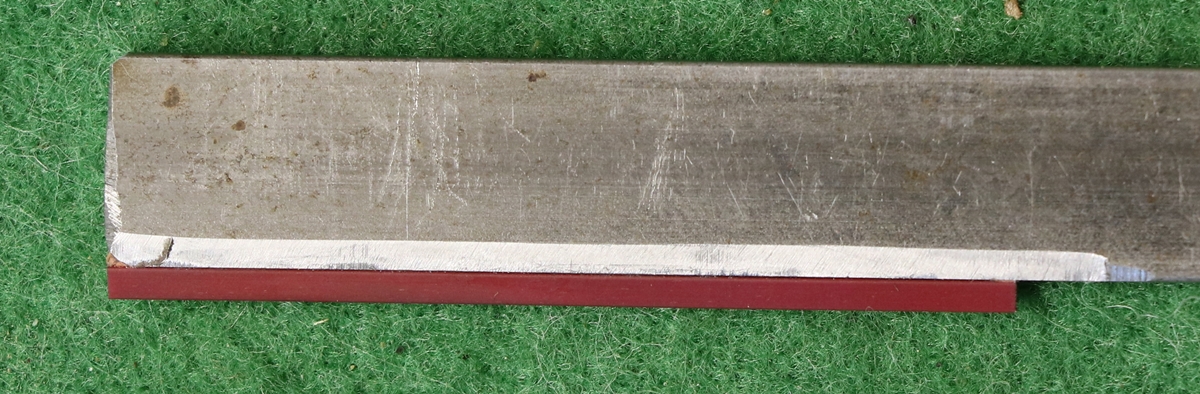
13th Jan The gun cabinet I ordered from J S Ramsbottom 2 days ago arrived today, much to my surprise as they said up to 2 to 3 weeks! Now I have to try to shoehorn it in. I had an interesting surprise today – I was annealing a flintlock lockplate to do some work on it ( not all my clients want their work aired on the site!) and then put it in the electrolytic derusting tank to get rid of the scale. I then brushed it with a fine rotary wire brush and got a very nice shiny steel finish – however, when I took a file to it I realised that it was a layer of shiny metal on top of a black layer of scale. I did an experiment to check that my new steel wire brush wasn’t depositing metal – it wasn’t – so I figure that the scale, being mostly black FeO. is loosing the O which is captured by the hydrogen released in the electrolysis (to make water), leaving pure iron on the surface . I thought when I did the electrolysis before it removed the scale, so it was a bit of a disappointment…… I’ll try to fix the cabinet tomorrow as I have my range safety training on Sunday – I don’t seem able to hit clays, so maybe I’ll do better if the targets done move and I use a nice muzzle loading rifle…………
12 later… Had a go at polishing the tumbler and sear but its still too heavy – the sear spring is pretty strong, but I guess all the springs on this gun are high on the strength scale – the mainspring is one step in speeding up ignition, although the frizzen spring doesn’t need to be quite as strong as it is, and the sear spring doesn’t contribute to the speed at all. As I can’t find any nice triangular slips to modify the bent I’ll put that on one side til I have the right tool for the job! ( 2mmx2mmx50 mm triangular slip now on order from Cousins – I’ll have to glue it to something as they are quite fragile when that small, but very expensive when larger – I think its some form of synthetic agate)
12th Jan A very pleasant day shooting AT clays with Bev and Viking, both of whom WERE shooting clays! Not much more to say about my shooting. The Pedisoli worked well, but the balance isn’t brilliant, and the stock is a bit high for me (&most people) so I put a leather pad on the stock to push the gun away from the shoulder so I could get my head down more. I will persist with it and eventually get more than a couple of ‘rabbits’. I shot my Twigg flintlock (see post) that I had shot before but not got to go off well. This time it was going off reasonably fast and reliably, but my companions pointed out that I was pulling violently to the right when I fired, and when I tried not to do that I pulled down. Bev borrowed it for half a dozen clays and hit all of them and remarked that the trigger pull was a bit heavy. when I came to clean the gun I tried snapping it off and was quite surprised at how heavy the trigger was, and more so that I hadn’t really registered it while shooting. Anyway as part of cleaning flintlocks I usually take the lock off (the Pedisoli lock had quite a lot of soot and residue inside) so I had a look at the sear and tumbler of the Twigg. You can see that it has a bit of a hill to climb before the sear lets the tumbler rotate, so that will have to be very gently ‘fettled’ before the lock goes back on. I did buy an minute agate ‘3 square’ for honing bents, but now can’t find it – I think then I ground down the edge of a very fine diamond sharpener – I’ll have to find that…..
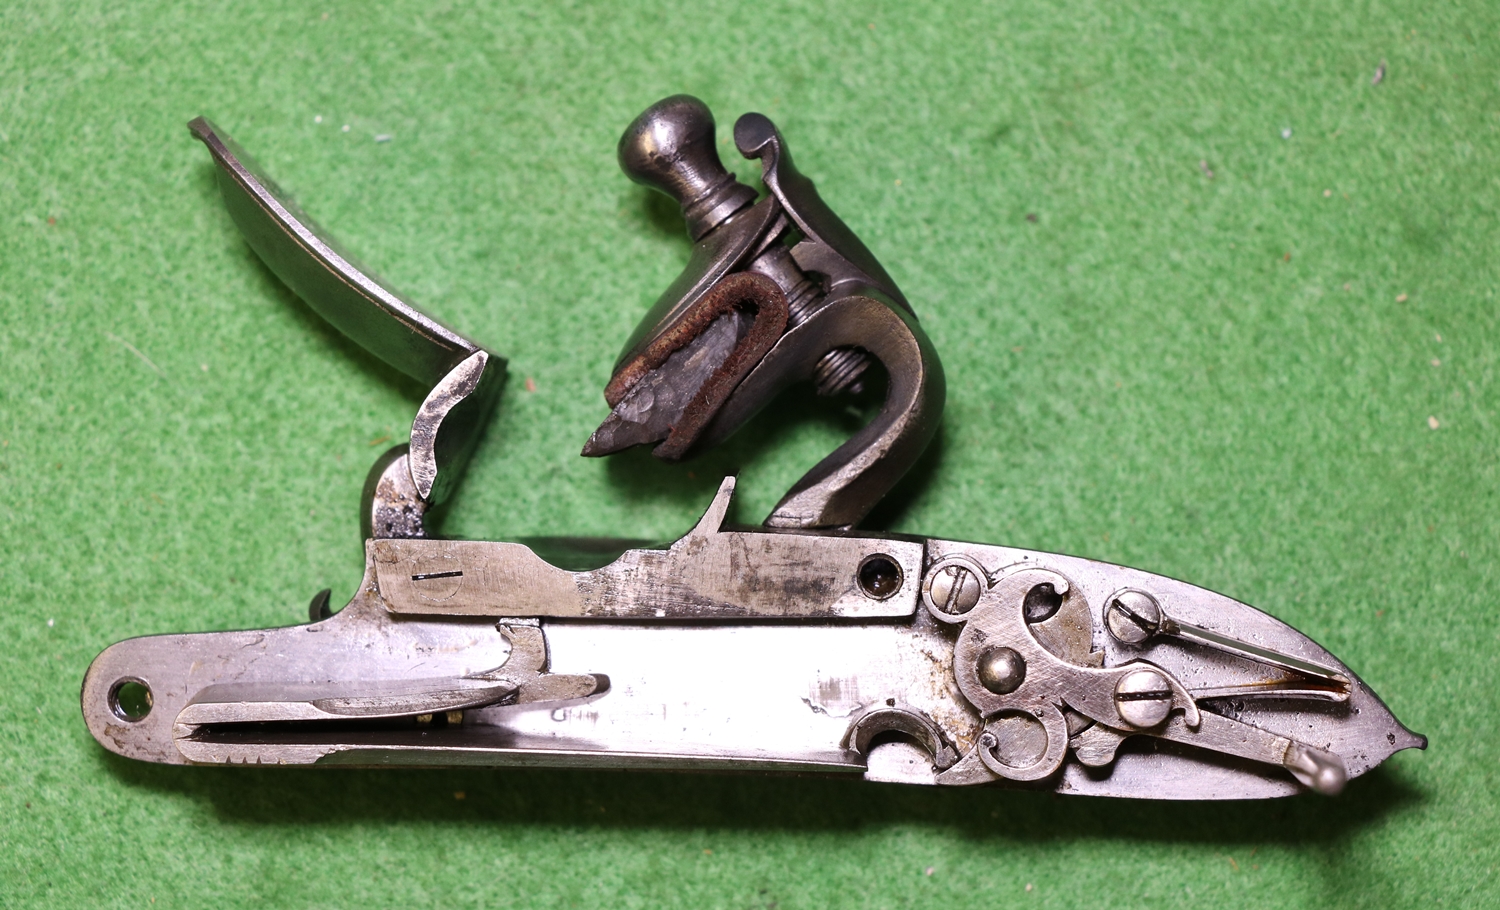
An original lock in nice condition – now I’ve sorted myself out about camera lenses I can use the 18 -135 at f5.6 as it makes setting things up a bit easier as I can zoom to an ideal size.
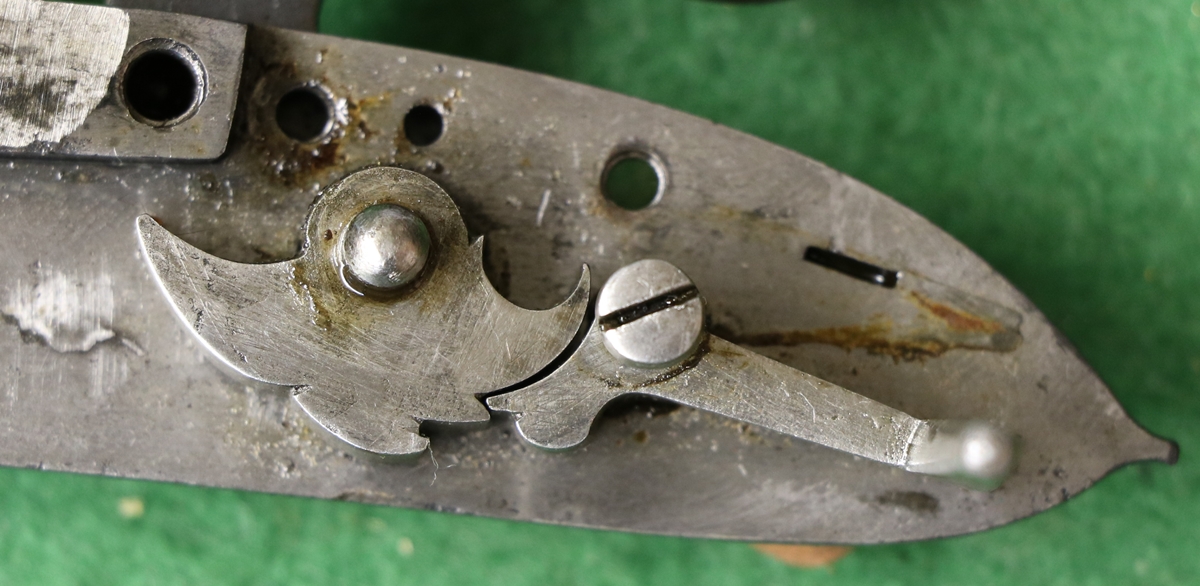
Feeling the tumbler as you move the sear gives you a feel for the engagement – in this case the angle of the bent is not quite right and pulling the trigger very slightly rotates the tumbler AGAINST the mainspring – hence the excessive pull weight. very light stoning of the bent is called for- possibly no more than a bit of polishing – too light a trigger pull is worse than too heavy as its dangerous.
11th Jan I could hardly move in the workshop – things got dumped in there over Christmas while clearing the house for a big party – so instead of doing any gun work I started to clear it out – what my father used to refer to as ‘handle polishing’ – I call it ‘walking round the job’ – anyway it is looking a bit better and I found a few interesting bits and pieces I didn’t know I had – including a tube that turned out to be a 12 bore to .410 insert. When I was at Holts in London I had a chat with their photographer, and when I went up last week to collect my ill-gotten gains I called in to have a look at his setup and see if I could improve mine. I decided that it was time to have another look at the resolution of my lenses as I had trouble getting really sharp photos out of my new 18 – 135 Canon lens – and I was also having doubts about my Canon 60mm f2.8 Macro which is supposed to be a superb lens (at about £400 new so it should be – I bought it second hand) any way I had another go tonight and then re-read all the reviews and realised that I was using the lenses at much too high an aperture number because I thought that I would need the depth of field – the reviews tell me that I should be using them at somewhere between f4 and f 6 for best resolution, and by f22 they are getting a bit soft focussed. Another set of experiments to check…. Off for my flintfest tomorrow – the weather forecast isn’t perfect but Friday forecasts 40 mph winds – not conducive to flintlock shooting of clays!
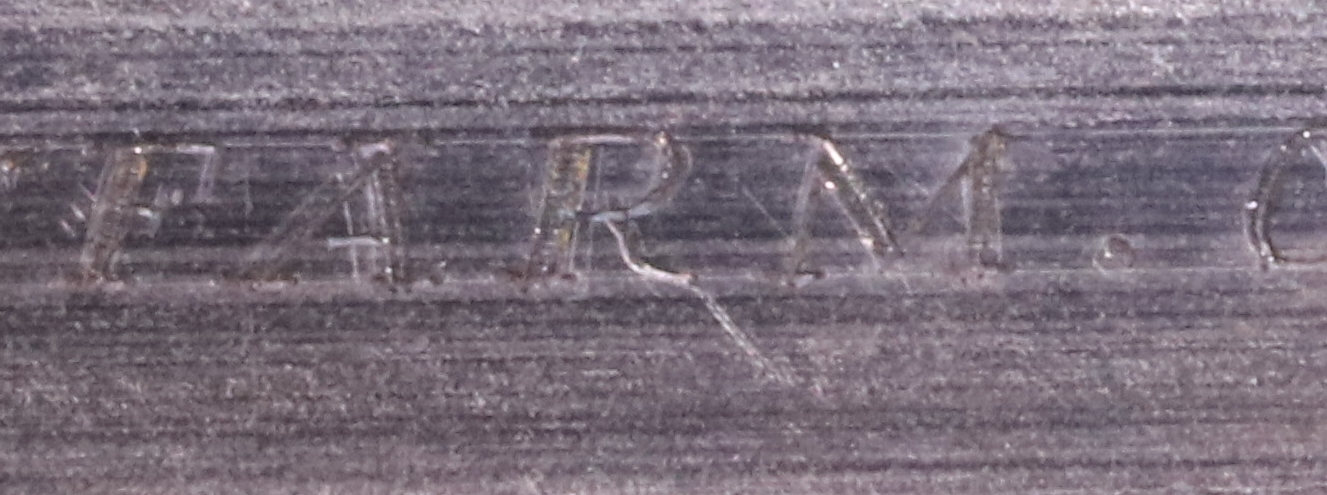 This is taken with my best Macro lens at f22 ISO 1600 and quite carefully focussed using the screen on x10 – this and the photo below are enlarged to the same extent – the full image would be about 5 times wider. The lettering is 2.5 mm high
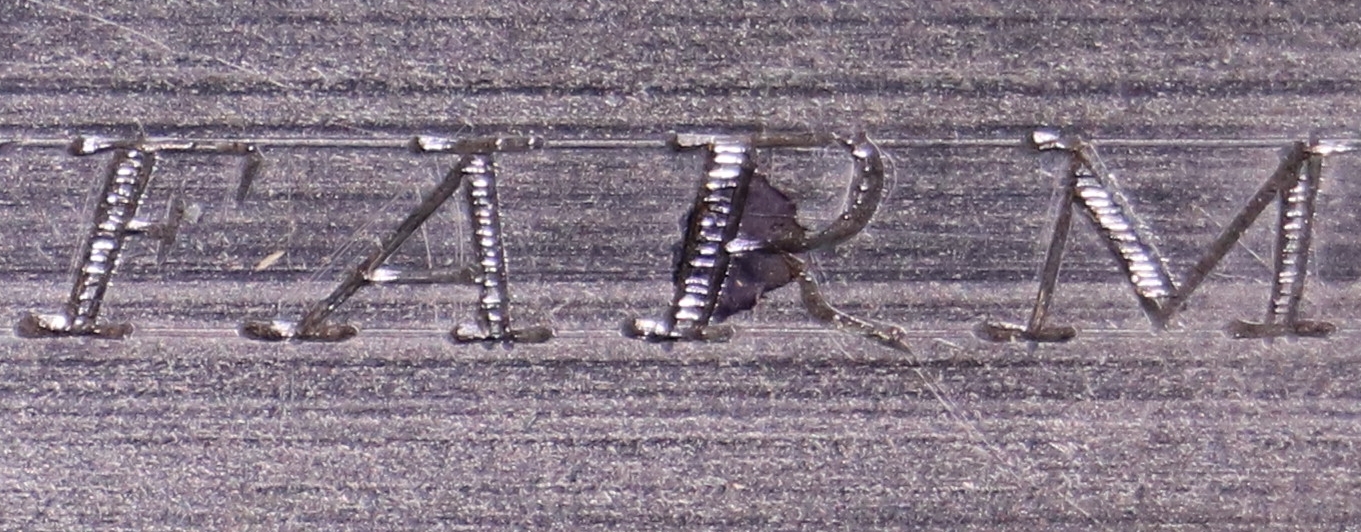
This is the 18 – 135mm lens at f5.6 ISO 800 – again carefully focussed – the difference appears to be due to the aperture, although it such a marked effect I wonder if I got the focus perfect – anyway I can now think about going back to the this lens for photographing larger objects where the fixed 60mm lens is a pain – I can’t get far enough away from a long gun in the cellar! Anyway I won’t be using big f numbers again!
10th Jan More or less finished my tax and done a session of my school STEM club and written a few simple programs for the Lego Mindstorms for thh next session of the club so now I have a day to play! On Friday I am off with a select band of flintlock shooters to Cambridge Gun Club to try out my new Pedisoli Mortimer flintlock 12 bore- actually we all own Mortimers of various vintages so it will be a Mortimer fest, although I may take along my single barreled ‘Twigg’ (if it is a Twigg) as well – or perhaps the Blair and Sutherland double 18 bore, for which I now have the barrels back ? Anyway its time I got on top of flintlock shooting ! The experts on Friday should put me on the right lines!
I’m still amazed by how steady the flow of visitors is to this site – I have a simple statistical add-on that gives me some information but I was looking for something that told me how many visitors were new and how many were regular visitors – but I couldn’t find anything that didn’t mess with the website! Dick and I were trying to work out how to estimate a price for a restoration on the basis of a couple of photos – the problem is that, unless its a simple repair/replacement its very difficult to guess how far its worth taking a restoration. Largely it is a matter of how much work you can justify in terms of what value you are adding to the gun. It makes an enormous difference whether the gun will be worth say £400 or £900 when finished, and that may depend as much on its rarity and value as on its condition. In the first case you probably wouldn’t want to do more than £200 worth of work unless the gun had particular value to the owner, whereas a more expensive gun might justify twice that much work. There is also the consideration of how much you can do without reducing its historical integrity. On occasions with a valuable and rare gun you have to say that anything you do will be detrimental to its value. Then of course until you get your hands on it you can’t really see any hidden problems – woodworm can excavate stocks – I saw an old wheellock in Holts store once that was standing in a pile of dust from the stock having more or less totally disintegrated – you could make out that the it had had a nice shiny shell of wood and varnish and it had been accepted, handled, photographed and probably taken to London and back without arousing suspicion – the staff were quite shocked – often starting to repair a small defect reveals ‘something nasty in the woodshed’ to quote from Aunt Ada Doom in ‘Cold Comfort Farm’.
9th Jan Another possible restoration in view to join the queue, so I will have to knock a few out or I’ll submerge! I’m waiting to get the 8 bore barrels back so that I can engrave them, so I had a bit of lettering practice for it over the last few days as I need to keep my hand in – and to escape from paperwork occasionally. The statistics for people visiting this site are uncanny – for the last few days its been 182 visitors per day + or – 1 – given the millions of people out there and the high position this site gets in google searches for relevant stuff its amazing that there isn’t more random variation – I don’t believe there are just people out there who look every day and no casual visitors – but then statistics is never what you expect!

The smallest line is about 1.1 mm high, the others about 1.8 to 2 mm They are done rather haphazardly to get my hand in, I don’t always pay enough attention to the spacing when ‘playing’ as I come into the workshop and do a few letters when the mood takes me. Also the letters have far too many cuts making them up for genuine 19th century engraving on guns.
8th Jan Clays this morning at Cambridge Gun Club – I shot half with the Navy Arms and half with my old EGG 16 bore. Viking was interest in the Navy so will get it when he gets his certificate back – turns out that the Holts description and their entry in my certificate as a 10 bore is wrong – its a 12 bore – the serial number is correct so I think they misread the 12 on the barrel as a 10 – its not very clear. Anyway something else to sort out with Firearms Licensing before I get into trouble – maybe I’ll ring Holts in the morning! I had a look at the new 100 m range at the club – its a fantastic facility, most impressive – I must get into rifle shooting again! I’m booked next week for a rifle safety training session there, after which I’ll be OK to use the range – all I need now is a 25 m range for initial sighting of muzzle loaders (you can’t see through the barrel so initial settings are a gamble – I might try a bore light and a spotting scope – not sure what the approved method is). I suggested they might stock percussion caps as AML must use about 10,000 caps a year there, and they seemed keen. I didn’t shoot the flintlock – it was identified as an older version of the Pedisoli Mortimer with a brazed on rib – I’ll take it next week for a quieter session …….. Now back to cleaning the muzzle loaders……. Not to mention Tax……
7th Jan Just about managed to sort out the necessary for shooting tomorrow and reload a powder flask with Swiss No 2 powder for the flintlock and change over the shot flasks from No 6 shot for game to no 8 shot for clays. I don’t have a real first hand feel for the differences that different powders make to the shooting of guns – I mostly use an unspecified Nobel powder I bought in a big paper sack for my percussion guns – I gave some of it to another AML member who said it was rubbish, but it seems to work fine for me, and I can’t tell the difference between it and the Czech powder that the rest of AML use in their percussion guns. I can see that things are more critical with a flintlock as you don’t have the sharp explosion of the cap to ignite the main charge – it has to be done by the slower spread of the flame front. There seems to be general agreement that for effective shooting of clays with a flintlock you need the Swiss powder, and when experts have tried my powder in a flintlock it is pronounced very ‘soft’. Given that it appears all powders from whatever source available today are inferior to almost any normal 19th century powder I wonder about it all! I wish, as always, that there was a simple objective way of assessing it. I do know, however, that everyone uses a fine Swiss priming powder for flintlock pans, and I do know that it is horribly expensive – about £80 per Kg – 3 times the price of Czech powder. Anyway tomorrow evening I’ll hope to report back on the 10 bore Navy and maybe the Mortimer flintlock, although I may funk it and wait until I can go with Bev and Pete to have a flintfest next week.
6th Jan – Thinking about the J R Cooper gun as I drove to Holts, I realised one terrible flaw in the design – there is no easy way of knowing if it is loaded, or more accurately of seeing that it is safe, and it has no safety catch. You can’t see the hammer, and have to look at the position of the front trigger to see if it is cocked, and you can’t see whether there is a cap on the nipple or not. I don’t know how you make it safe to load as the cap is presumably loaded automatically when the hammer moves forward? The idea of loading the barrel while there is a cap on the nipple is frightening – whether or not its cocked. I revised my opinion of the date on stylistic grounds – the wrist is very long and looks not unlike the older broomstick design. So it might be any date! I can see that the design wouldn’t have been very satisfactory and would have had to be severely modified to gain acceptance, as people were quite sensitive to the safety issue when the hammers started to disappear – that’s why we (should) all carry our breech loaders open when not in a slip.
6th Jan – quick trip over to Holts to avoid doing my tax! The Mortimer flintlock seems like it has never been shot – just sparked off a couple of times to scratch the surface of the frizzen – also no dings and dents – that won’t last long – and the bore is clean & perfect! The Navy Arms 10 Bore, although not a thing of great beauty, has done little work and is good value for money. Just sorted out suitable wads for both – fortunately the 12 bore wads I have for reloading fit the 10 bore and my 13 bore wads fit the Mortimer. The Mortimer is a bit high in the comb for me, but it has a quite bulky cheek pad that can probably be slimmed down to make it fit without looking too messed about – it might even improve the look. Anyway both should be tried at the AML shoot on Sunday. I’m sorry I didn’t get more of the 12 bore repros as there is a market… but the Navy 10 was probably in the better condition. I got half a dozen good plain walnut stocks that will make nice pistols – mostly dense and straight grained.
5th Jan – I did get a couple of things at Holts but I didn’t get the boxlock William Powell breechloader I coveted – it went for £380 – almost twice the top estimate, but it was in very good condition and a pretty gun – still its quite a hefty price for a boxlock non-ejector – I’ll have to wait for a Powell hammer gun that is Nitro proofed! I think he has a bit of a cult following. I also missed out on a couple of old cases that would have been handy – they are obviously more in demand that I thought, plus a couple of other repro shotguns that I put very low bid on. But I did get the repro flintlock Mortimer 12 bore that I wanted – I bid quite high for it as I’d been on the verge of buying a new one and this one seemed virtually new – so I will end up paying half the price of a new one, which is reasonable. I also got a Navy Arms double 10 bore percussion that I’ll probably sell quite quickly (£125 hammer price). Plus I got half a dozen stock blanks as I can feel another (inert?) pistol coming on! Other than that, today was just boring old tax…….. I’ll probably sneak over to Holts tomorrow so that I can shoot the flinter on the Sunday AML monthly shoot at Cambridge Gun Club – I also want to have a look at the CGC rifle range as I’ll ask for the Nock to be put on my certificate if it look OK. Looking at the prices fetched at the auction I get the feeling that there is a bit more interest in old side by side guns, hammer guns seem to sell quite well, particularly with a recognisable name, a few years back you couldn’t give them away. Now a half decent old gun with a ‘top ten’ name might fetch more than a basic used Berretta o/u in reasonable nick.
4th Jan. Just had the annual reminder from my accountant saying I had to get my tax sorted by the Wednesday next week – so I’ll have to wrap my head in a towel and knuckle down to some nasty paperwork – bother, just when I was ready for finishing the Nock case. I just put a load of bids on guns in Holt’s sealed bid sale tomorrow – I put a bid on a repro rifle as I’m hoping to do some rifle shooting now the Cambridge Gun Club has a 100 m range – we shall see what transpires. Most of the repro guns, particularly the Section 1 (firearms) seem to be very cheap compared to the new price – I guess most people who want them buy them new? Anyway I’ll report back tomorrow night on how I did with my 9 bids (all low bids on cheap things!).
4th Jan. Finished off the 9/32 nipple for the single barrel – it now has a very secure thread – I made the nipple thread quite long to get the full advantage of the good new tread at the bottom. I don’t know why I hadn’t latched onto the 9/32 BSF 26 tpi thread for recutting poor 1/4 BSF 26 tpi nipple holes – the pitch is the same – 26t.p.i. and there is usually enough metal round the nipple hole to take it. In this case, because the tread in the breechblock was a bit messed up I turned a taper on the blank and opened up the die as I cut. Its much easier to die cut the nipple thread than to try and cut it on the lathe – Anyone who has done it will confirm!
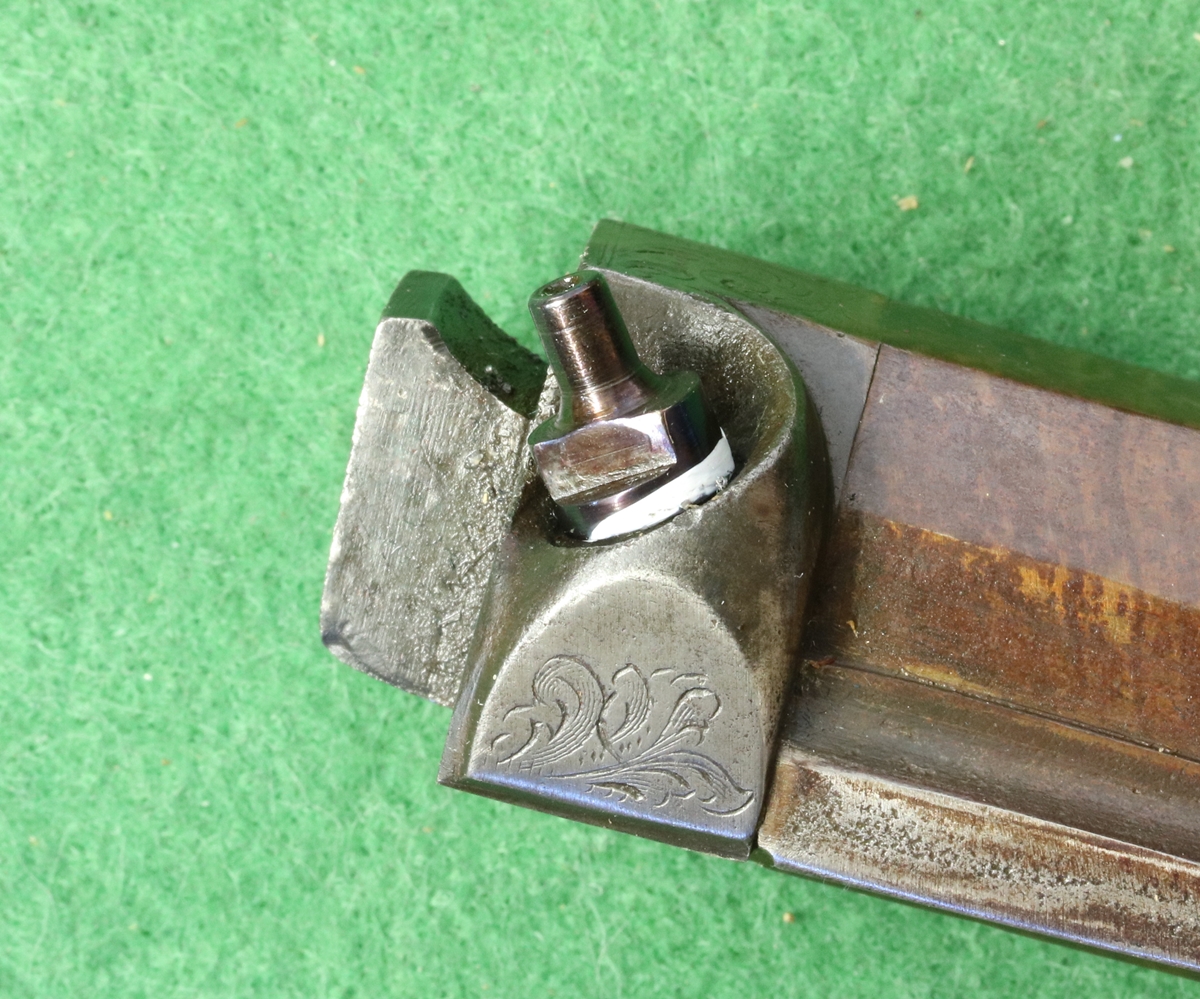

Nipple machined from case hardening steel, hardened and tempered purple and fitted with ptfe pipe tape – the nipple is now secure. I turn the thread blank and boss first and cut the thread with the diestock held against the tailstock chuck to align it, then rough the nipple oversize and cut it off and chuck it by the boss and finish the nipple so I can try it with a cap as I go. The 1.4 hole is put in right through when I turn the screw blank and then drilled out to 1.7 for most of its length from the nipple side.
3rd Jan I’m back to gun related activities – thank goodness, I hear you say! Went to see Dick today and took the 8 bore barrel with the sprung rib to have Jason weld it as there is really not much that can be done without taking it all apart and removing a whole lot of rust from the surfaces. I started to make a 9/32 BSF nipple but got distracted, and I also managed to collect the barrels of my Blair and Sutherland flintlock that Langton & Ladbrooks sent back as they hadn’t managed to get them lapped in 8 months. I’m still not sure about the gun – the frizzens are certainly wrong and don’t quite fit, and the locks are positioned slightly differently on each side, which is odd. I might have a go at lapping the barrels myself – Dick lent me a kit of laps etc, but they are so rudimentary that I’ll probably make myself a better set. I did spend a while trying to sort out an electrical ‘fault?’ on my wife’s 09 Passat – I’ll put it in a separate post in case anyone has the same problem and is searching google!
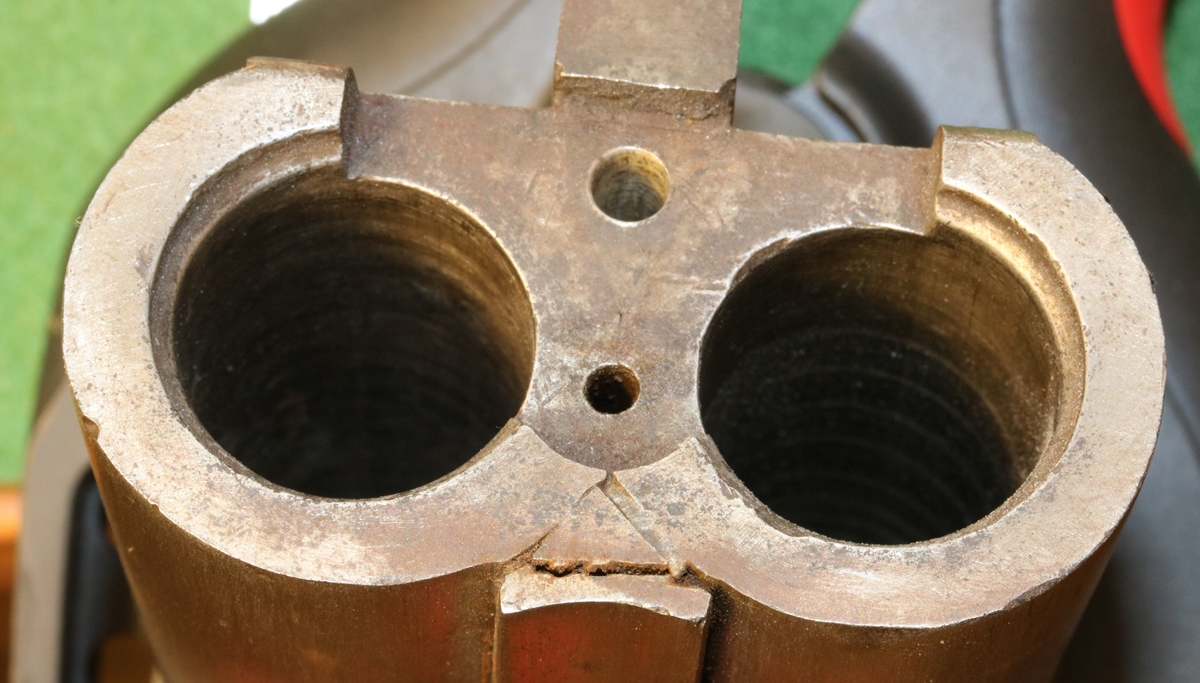
It will be quite tricky to weld this as there is a lot of solder about and the fill triangle isn’t part of the barrel
1st Jan 2017 – just seen in the New Year – My best wishes to everyone and may the collecting, restoring, shooting and engraving go well in 2017, not to forget the visitors to this website looking for information on Land Cruiser steeering and fitting a foot pedal to a welder – a steady trickle of non-gun visitors – I hope they find something useful.
29th Dec Update on visitor numbers – The number of people visiting this site over the Christmas period has held up well – I can only conclude that it provided a necessary escape from wall to wall family life for those lucky enough to be in the bosom of theirs!
29th Dec – Lightening visit to Wales to see in-laws – that’s my excuse for not having anything to say about guns today! I’ll shortly have to think about bidding on the Holts online auction, but probably best not to post too many details of what I want! I’m still looking for a nice nitro proofed side by side 12 bore (or I suppose a 16 bore if I felt like spending a lot on cartridges) – preferably a hammer gun with rebounding locks – I might go up to Wolfenden to poke around the guns in the sale if I get a spare day, which at the moment looks unlikely…. There are a couple of cases that would be handy to have in reserve if they were cheap enough. The prices guns and antiques fetch is a lottery – the big auctions charge 30% buyer’s premium which usually moves things from apparently good value to marginal, and some dealers also pile on the price, although others seem to add a more reasonable 20% to their buying price. Private sales, if you can come across any, represent the best opportunity to acquire good guns at reasonable prices.
25th Dec. Somehow we managed to keep starvation at bay – probably too successfully for our own good – at one point in the late afternoon I woke up to find a person asleep in a chair in every ground floor room…………… I got Vol 3 of Crudington’s ‘British Shotguns’ as a present from Tom & Giles and from Penny a fascinating book ‘The man who Ate the Zoo’ about a Victorian eccentric Frank Buckland that will keep me away from the guns for a bit….
24th Dec. No gun playing today – I got sent out on a mission to get more food – apparently we were in grave danger of starving over the next three days – although it has to be said that when I got back I couldn’t find room in the fridges or larder to stow it. Anyway I seem to remember reading that as long as you had plenty to drink you could survive happily for a couple of weeks, so I made sure that aspect of our survival was taken care of…… Have a good Christmas!
23rd Dec. Christmas panic has set in at the Cablesfarm household… busy stacking a load of logs that was dumped in the drive this morning. I did set aside an hour to do my Christmas present shopping, but it took me about 45 minutes to get into the car park, so not quite as long for the shopping as I had hoped… My gun related activities were, I’m afraid, limited to sharpening the 15 gravers I had blunted or chipped last night – some are now so short that I’ve had to get a new one from stock. I did manage to order a fine wire brush from hollisonsupply.co.uk – 127mm diameter and .08 dia wire that will fit the arbor on my bench grinder – Bev asked where to get them from, I’m not sure if this is like the one I have, I think it’s ‘bristles’ are much longer, we shall see…… I guess that the rest of the world is feeling the holiday pressure, because the number of people visiting this site has declined a bit in the last few days – it is normally remarkably consistent, although its been increasing steadily on a month by month timescale.
22nd Dec At Eriswell for a few clays – my supply of caps was kindly augmented so Tom and I shot percussion before lunch and U/O s after including a 25 shot flurry to round it all off – great fun although neither of us shot particularly brilliantly! I think I shoot better with the William Powell hammergun than with anything else – if it was nitro proofed I’d use it in preference to the O/U! I picked up another job to do a.s.a.p – Archie’s 8 bore breechloader has sprung a bit of rib at the breech, and he would like the rib engraved. I got the 9/32 BSF taps and die I ordered and ran the taps into the nipple hole of the barrel with a messed up thread – I think it has cut enough threads to hold it safely but I’ll have to make sure that when I make the nipples they are long enough to go right to the bottom of the hole because that is where the good threads are – I figure there are about 2 1/2 to 3 very good threads, and a few less good ones – I will probably have to open up the hole in my diestock so that I can open the die to the full extent to cut an oversize thread on the nipple – or try to cut a tapered thread. It would have been much better if I’d used the 9/32 B.S.F tap straight away instead of messing with the oversize 1/4 UNF – one lives and learns… I’ll have to work out a suitable way to proof test it with the nipple in place – if it stands 4 dr and 2 oz I reckon its OK. I cut a bit more engraving on spring steel – a border – and got through my entire stock of sharpened gravers – so that’s another job to sort! And the case for the Nock rifle needs sorting out……And a loading mallet and starter rod made….. And I got the rod of horn for the knobs …… And a stack of acetal rods to make loading rods with a worm for unloading…. And I have the locks on a pair of duelling pistols to refinish …. And all the Christmas chores and shopping and etc are descending upon me….. Happy Christmas!
21st Dec. Tried to engrave some scrolls on a piece of the spring steel I use for the cappers – I had just about got used to cutting letters on them without busting too many points off the gravers, but the scrolls almost beat me! To do the traditional scrolls alternative loops curve in the opposite direction, and to get the foliage inside the loops looking right you need to cut the clockwise curves by turning the curve away from your body, and that is not a very easy move in such tough steel and results in lots of broken tips! Tom is down from Scotland, and we’ll both go off to Eriswell for an informal pre-Christmas shoot with AML friends – I’m almost out of caps, so I’ll either have to scrounge some or we’ll have to stick to those strange guns that load at the wrong end……
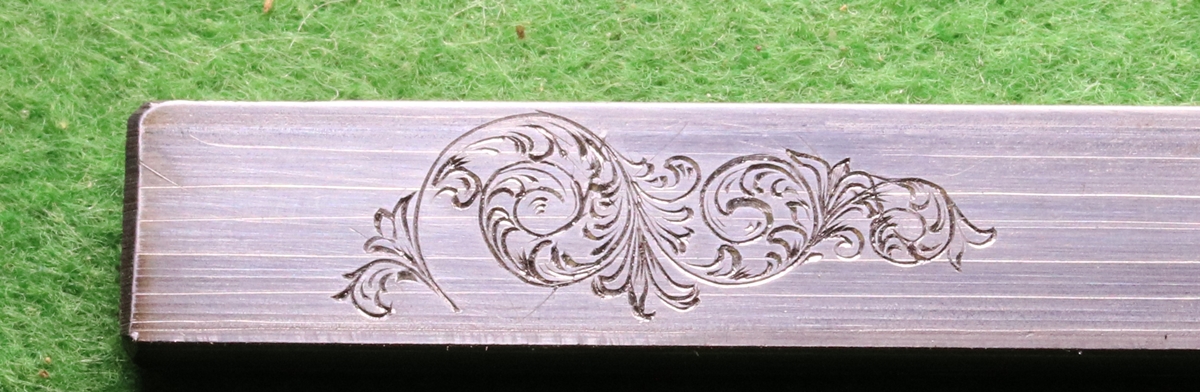
The offending scrolls; needs one more loop at the left end! I hadn’t done freehand scrolls for a long while, so these are not quite right.
21st Dec. Having played with it, I’ve come to the conclusion that the Nock case is too difficult to shut and it is straining the lid, so I am going to take off the hinges & lock latch and glue a strip of mahogany about 3 to 4mm thick round the face edge of the lid so that it all shuts properly – I should have done it at the start, but I thought I could just get away with it – the layer of cloth (about 1.2mm) in the base was the straw that broke the camel’s back. I should glue it round the base edge, but I can’t get at the back of the lock to remove it, so that option is not available…… If I make it so that I don’t need the recess in the centre of the lid for the cock screw I might get a label……
20th Dec. Got the bits and finished the lining of the case – all done except for one little job – there is always one thing that holds you up, in this case its the knobs for the wooden lids on the compartments – probably should be ivory, but it would be a sin to shoot an elephant for two small knobs, or indeed at all! I intend to make them from horn, but I am waiting for a 3/4 inch x 6 inch cylinder of horn from ebay as it will be easier to chuck and turn than a bit of my buffalo. I guess it could be horn from a deer, which would be whitish, but I don’t have such a thing to hand – my bits of antler are too thin. I did a bit of milling on the horn fore-end tip, to make the barrel groove, but I now need a 45 degree endmill – a cheap one is on order.
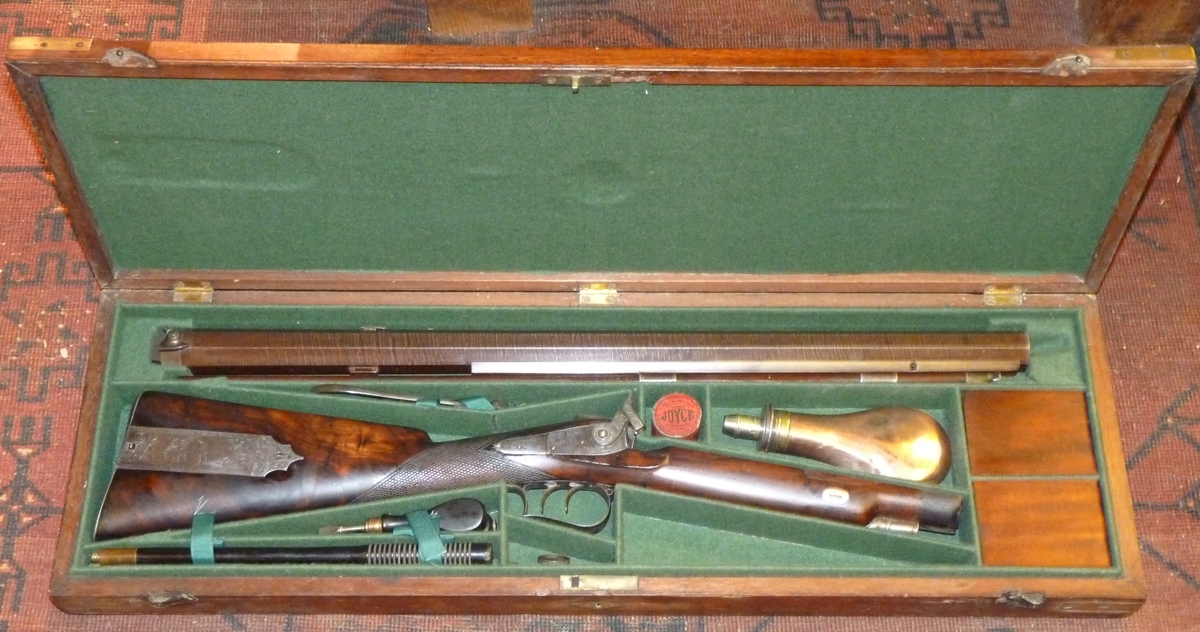
The case is really about 5 mm too shallow – the cock screw and the catch on the patch box and part of the patch box cover need recesses in the lid, which is unfortunate, but the case must have been for a single barreled smoothbore, and not a heavy rifle like this one. Still it makes a nice outfit. I might make a mallet and bullet starter to fit in the empty compartment, and I suppose it needs a punch for patches. Also I ‘stole’ the turnscrew and nipple wrench that I had made for the Lancaster, so I ought to make another pair for this rifle.
20th Dec. Looking for infomation on ball sizes for the Nock, I found a reference to ‘slugging’ to get an accurate way of measuring the required size – it appears that you acquire a length of brass rod that fits into the barrel and is say half of its length – you drop this down the barrel and then hammer a lead plug into the barrel to make a close fitting bung, which you then get out of the barrel using the brass rod as an internal hammer – you then have a ‘slug’ to measure. There is then some argument about what diameter ball you should use and what thickness patch. One version says that the patch should be twice the thickness of the ‘windage’ (the difference between diameter inside rifling and ball diameter)… An experiment is called for!
19th Dec – lots of people have had trouble with ‘page not found’ errors with the picture of the Nock rifle (fin-rt-side.jpg) – I have found the pic and fixed the problem – I had copied it as fin-rt-side.JPG – that’s how fussy computers are!
19th Dec. One of the advantages of keeping this blog up to date is that I can look back and see all the unfinished jobs in my to-do list, or, come to think of it, maybe that is a disadvantage! I tried to finish off the barrel with the damaged thread, and turned up a 28 t.p.i. nipple, but it didn’t fit safely as the thread in the barrel really isn’t up to scratch even after recutting it oversize, so another plan is called for – maybe tapping it 9/32 B.S.F and making a nipple of that size, or drilling out the hole and welding a sleeve in – something else to think about….anything that doesn’t involve cutting screw threads in silver steel on the lathe. The renovated powder flask for the Nock had lost most of its bronzed finish and I tried to replace it with some of Blackley’s brass browning but it looked a mess so I had no alternative but to take it down to bare copper. I also did a bit of work on the case – making lids and the corner supports for the two compartments. I need some more Copydex to glue down the cloth (and I’m waiting for green tape) – I know it should be rabbit skin glue, and I have some and have used it in repairs, but this is just a functional case! I started on the horn fore-end tip – I roughed out a piece for horn from the bit of buffalo I bought, but I realise its going to be challenging because the shell needs to be quite thin – its more difficult than a tip on a breechloader because the ramrod almost bificates it – I’ll have to cut away the wooden one and see what the fitting surface is like. Oh and I found time to make a start on my wife’s Christmas present ( I know she will never read this but even so I’m not going to tell you what it is!)
![]()
A small piece of a buffalo – I discovered during web a search that the main outlet for buffalo horn is pet shops – I had a bit of a problem with the idea of people keeping a buffalo horn as a pet, although undoubtedly less trouble than keeping a complete buffalo, but then it transpired that they were sold as dog chews – presumably to remind dogs of their wild hunting ancestors…… I can now fantisise about vast herds of hornless buffalo roaming the prairies for the benefit of our pets – except that it turns out to be water buffalo not bison.
18th Dec. I found an original ball mould amongst my junk that says its 24 bore but is actually about .650 – just a bit small maybe – I’ll have to cast up a ball or two and try – I hope it fits as its a nice mould and fits the space I’ve made for one in the case, which is coming along – I am now waiting for some green ribbon to make the ‘lift-outs to get the cleaning rods and turnscrew etc out of the pockets in the case – £1.99 for 3 m with free delivery on ebay, don’t ask me how or why anyone does it… I got the spout and the top off the flask – the Plusgas overnight didn’t shift it but a drop of oil followed by a generous swabbing with acetone did free it enough to undo – the lesson is that very volatile solvents penetrate much better and can carry the oil into the joints – Plusgas doesn’t cut the mustard ( for international visitors;- an English saying the origin of which is obscure – it means not coming up to scratch, which means…… and so on!). Then I’ve got to tackle the horn fore end tip….
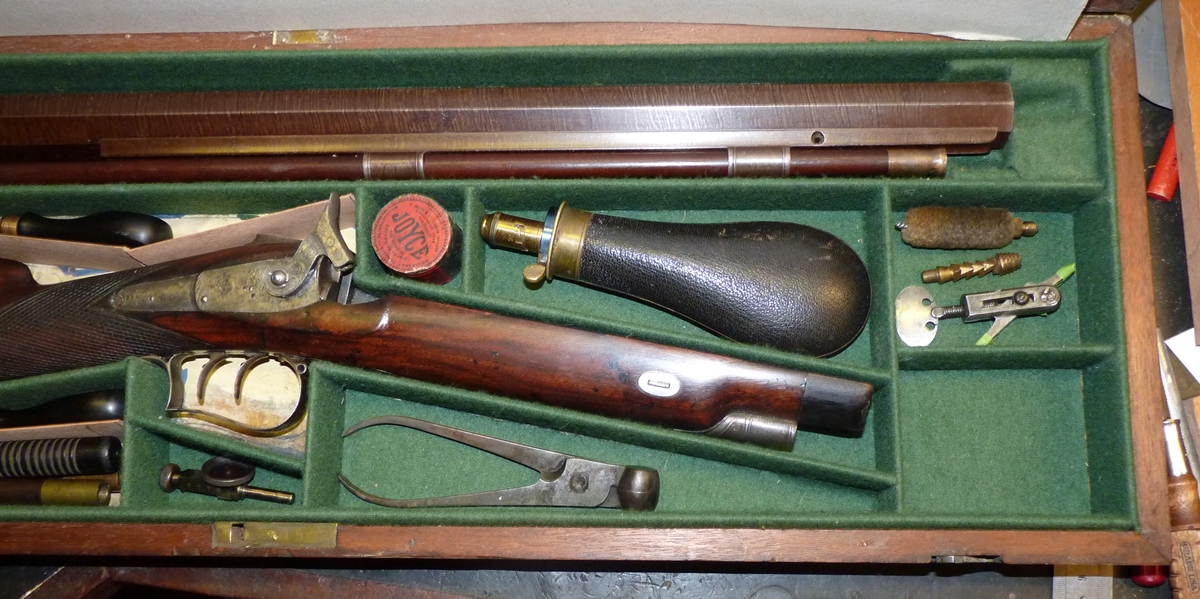
Still a couple more compartments to do, plus the lid. That isn’t the intended flask – its too nice to modify. Now I need a punch for patches!
18th Dec. Having got this far with the Nock, I am going to have to get a ball mould for the ball, which means that I’ll either have to get an original ball mould of exactly the right size, or have one made by ballmoulds.com for £30 to fit modern handles, of which I have a couple. In either case I need to find out what size ball fits the rifling in the gun and how much ‘windage’ to leave – a bit of research needed…..
17th later – I did manage to sneak off to the workshop and do a bit more on the Nock case – I also looked for a flask that fittted the space I’ve made for it and had what I think is the correct charge for the gun – the books say that those early percussion rifles firing a 1 oz ball used as little as 1 1/2 drams of powder – any more and the ball wouldn’t follow the rifling but stripped. All my flasks that fit throw a charge more suited to a smoothbore shotgun, where typically the flask would throw 2 1/4, 2 1/2 and 2 3/4 drams or within about 1/2 a dram of that range for a 1 oz shot load. I do have an old Sykes German silver flask that has a few dents and doesn’t have the charge stamped onto the nozzle, so I thought I might make a sleeve to reduce the charge to 1 1/2, 1 3/4 and 2 drams on the grounds that even the best modern powders are quite a bit less potent than even mediocre contemporary ones. Anyway at the moment the flask nozzle etc is soaking in Plusgas overnight ( Plusgas isn’t as effective as acetone and oil mix at penetrating, but it doesn’t evaporate as quickly).
17th Dec. With Christmas house sorting and preparations going on all round me, its difficult to concentrate on the really important things like playing with the Nock case etc! I got half a buffalo through the post today – at least a decent chunk of one in the form of one of its horns. The Nock Rifle has had the forend cap replaced with one made from rather poor wood at some time in the past, and I thought it would be good to make a new tip in black horn. I found Highland Horn on the web and emailed them with the size I needed. They said that they had found just the piece, big enough for several tips and other bits for £19 + VAT including postage, which seemed fair enough – I wasn’t expecting a complete horn, but at least I’m grateful that they detached the rest of the buffalo before posting it. The wide end has an indent for a couple of cm that will be lost in the barrel groove – otherwise its all solid and a nice dark colour. I don’t look forward to the smell of bandsawing it. I can see several tips and innumerable ramrod ends.
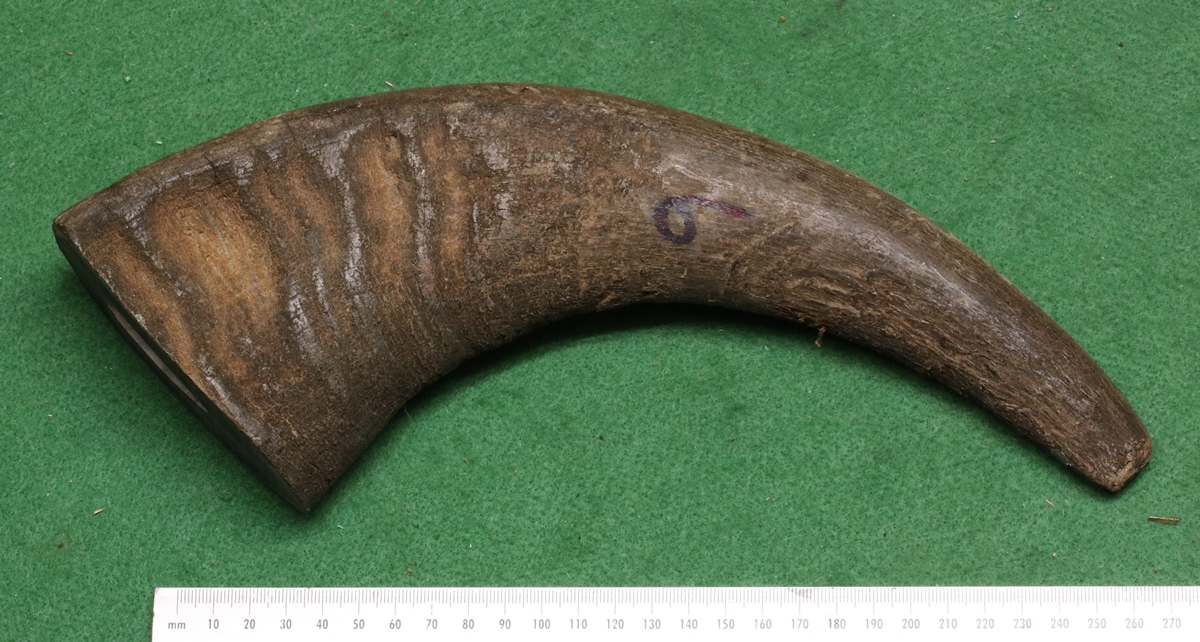

Rather nasty wooden fore-end tip in coarse grained wood
16 Dec. Into school at 9 to see some of my STEM club children put on an assembly demonstrating their club project – they’ve done the project and the assembly themselves – really heartwarming to see their enthusiasm and competence! Back to the Nock case – I decided that with such a heavy gun strength was vital, so I decided to line the case in an unconventional way taking advantage of modern epoxy – I’m not trying to fake an old case, just make the look right, so I can take liberties. I decided that the partitions needed to be glued to the base of the box, so I’ve covered them and then stuck them down in position – this means that the base cloth will be cut as individual bits for each pocket, instead of covering the whole base and having the partitions stuck to the cloth, which I think is the normal way ( I’ve not looked carefully at lots of cases so perhaps someone will correct me if I’m wrong?) I guess I’ll make paper patterns for the cloth floor. Of course I didn’t make enough strip, its difficult to believe how much goes into making all the dividers! I discovered that when I closed the lid the little catch on the patch pocket on the butt sticks into the lid – the case is just a couple of millimeters too low for the gun, but it can be fudged! Quite often you see old guncases with a hole or a worn bit in the lining of the lid so it won’t be too odd. It is possible to buy repro. labels from Peter Dyson to match the address on the barrel etc. I’ll have to think about it – they do look good but is that level of fakery OK? It can’t go in the middle of the lid as the cock screw has to have a recess, so it will be to one side and maybe that will spoil any appearance value – so maybe I’ll save my £20! The cloth I got from ‘Mike the Bolt’ at the re-enactors fair is just the job – I also have some red but its a bit thicker – the green is about as thick as you would want.
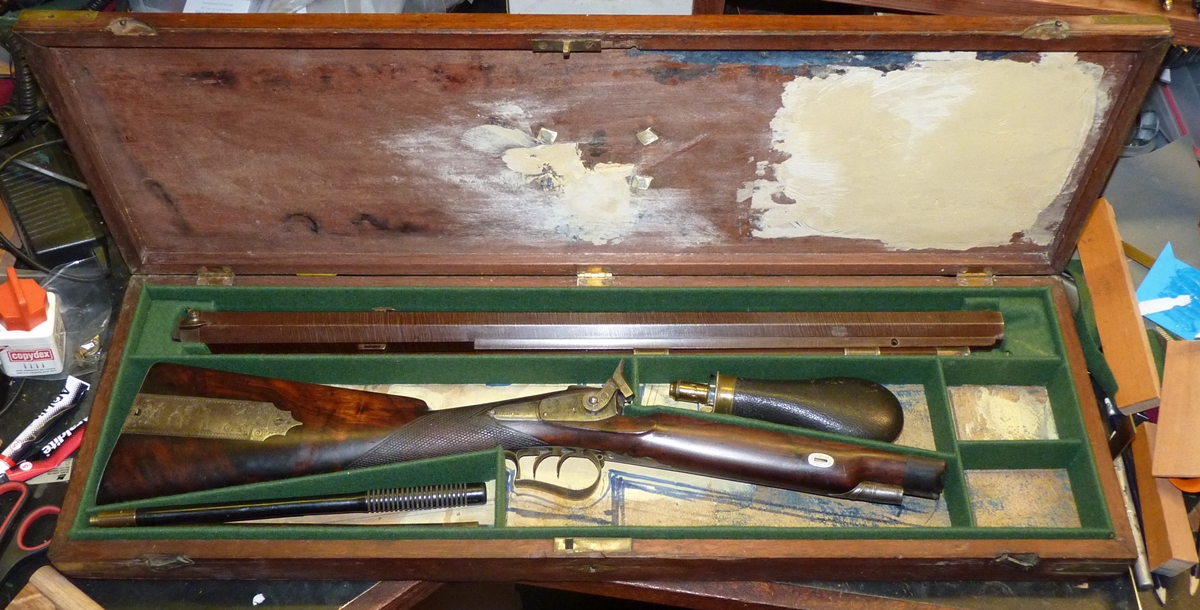
15th Dec. Busy today with School Christmas Lunch and their Carol Service, and tomorrow the children in my STEM club are presenting their project in assembly so I’ll have to go and watch! I did a bit of work on the case for the Nock – I machined up a couple of blocks to support the ends of the barrel and covered them in green fabric – not sure its right yet but I won’t fix them in until the end so that I can have another go if they don’t come up to standard ;-
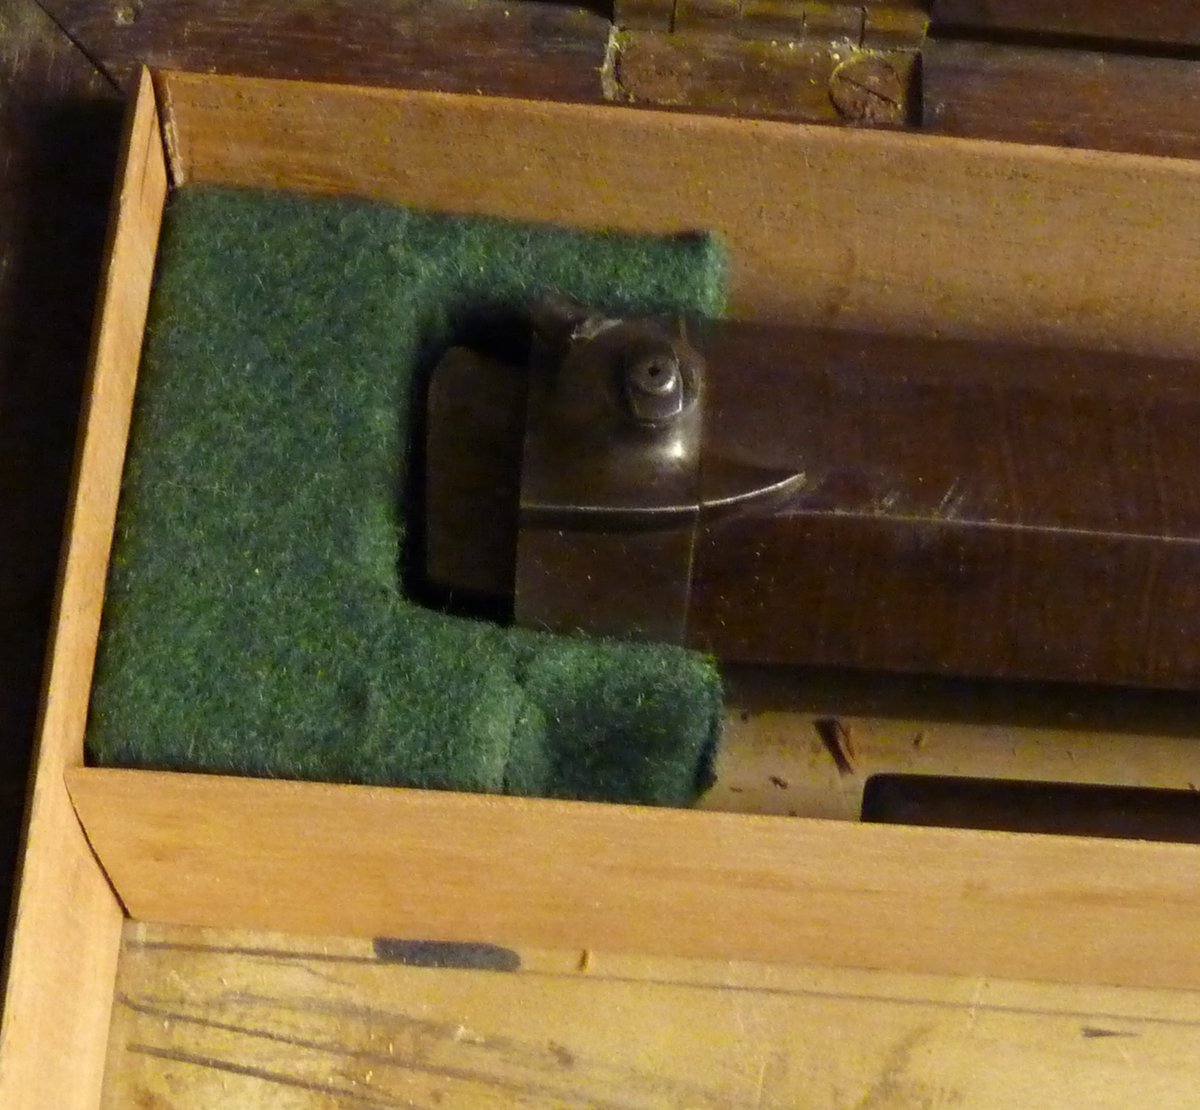

The groove at the end is for a finger to lift the barrel – its too heavy for a couple of tapes!
14th Dec We hardened and tempered the spring I welded yesterday and it seems to work just fine – here are some photos taken on my phone of the pistol – when Dick has worked his magic on the woodwork and made a ramrod it will be a very nice genuine early (?1750s) pistol by a well known maker – desirable. Dick is restoring this for a client who will then sell it – I think it went at auction for about £600 total, I’m not sure what it will sell for, but in a private sale I’d guess between £1300 and £1500, maybe a bit more?

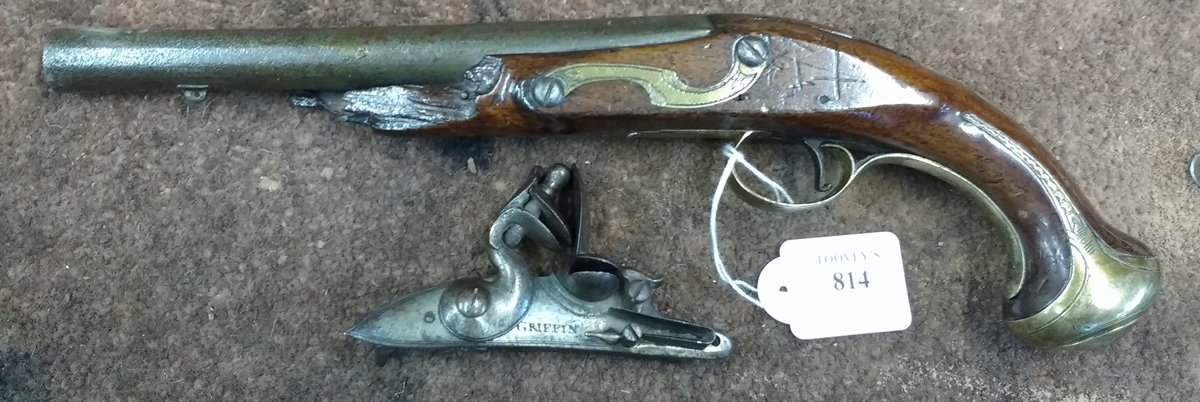
Fair bit of work needed on the fore end!
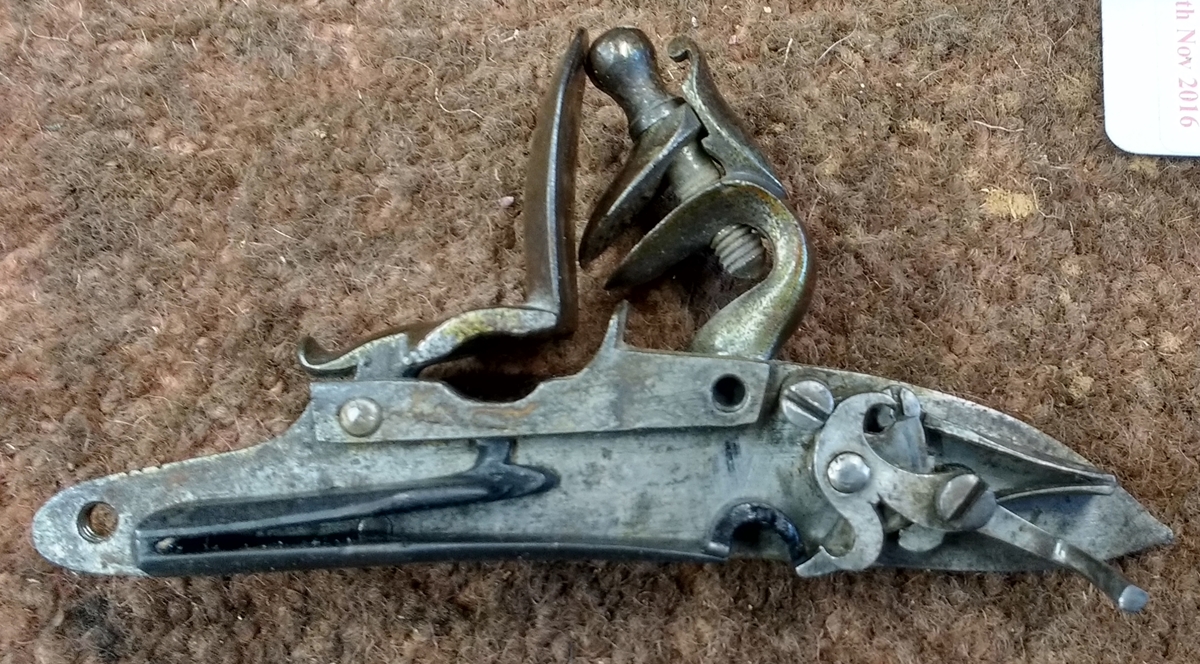
Welded spring in place – we slightly ‘eased it as it was a hellishly powerful spring originally !
( if the pistol is not going to be fired then I usually weaken the spring a little if its strong, as its possible that it will be dry fired with the frizzen open – this can snap the cock if the spring is strong.
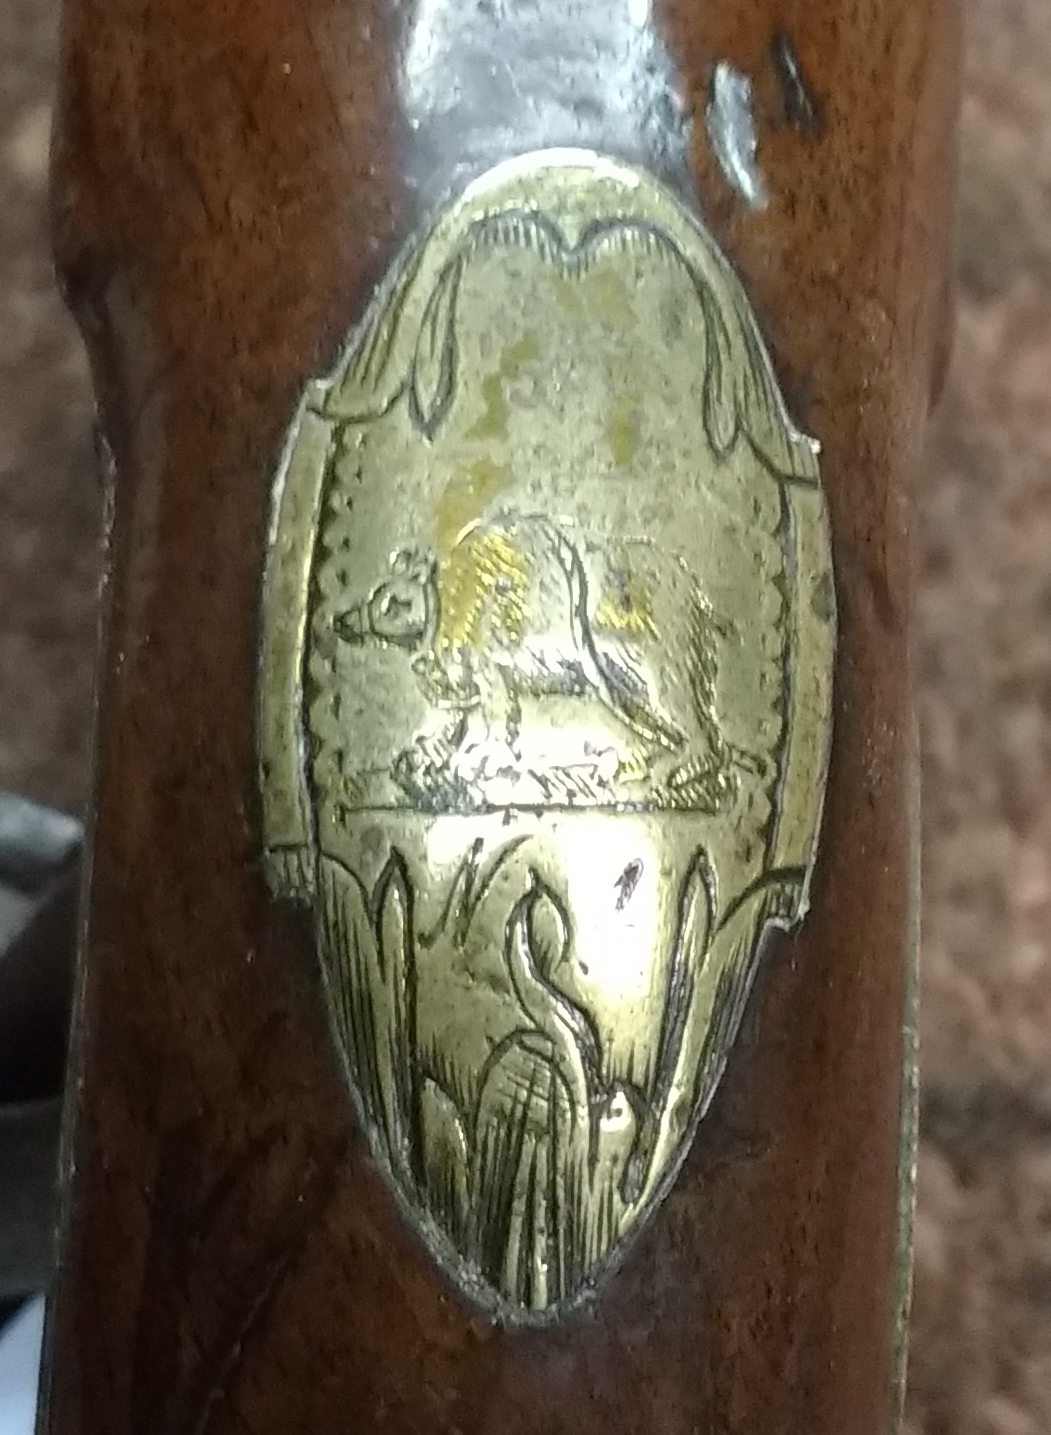
Escutcheon of a bear tethered and muzzled – I can’t remember the heraldic terms for the position!
13th Dec – Last STEM club of the term at ‘my’ school – the children are now completely immersed in their projects and I’m mostly a spectator! Dick had a 1750 pistol by GRIFFIN ( later Griffin and Tow) to repair, and I offered to weld the mainspring, which I have now done – I haven’t hardened and tempered it yet as it needs to be checked in the pistol beforehand. Its a somewhat dodgy operation and until its finished I won’t know if it is actually strong enough to function – we don’t need to get the full strength, just reasonably functional. Anyway here is it’s process;-
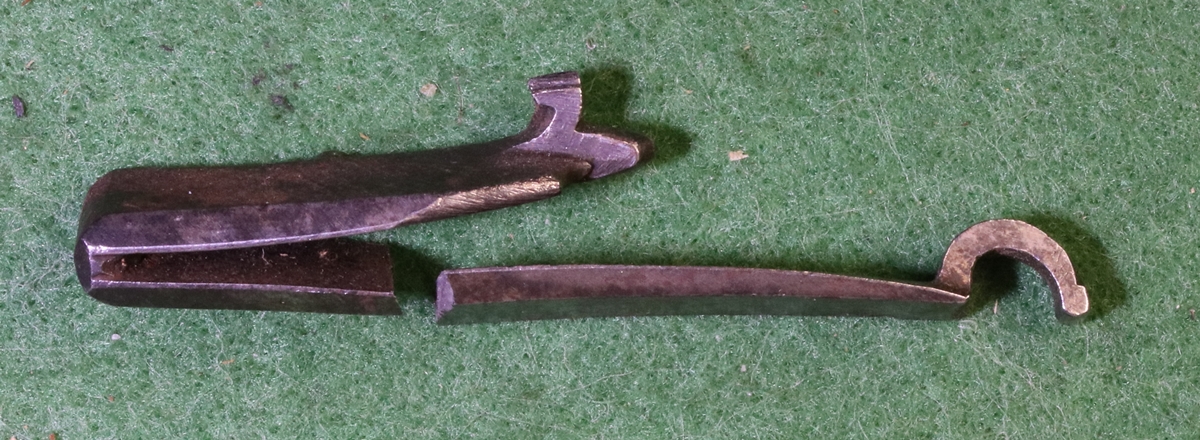
clean break in crucial stress area!
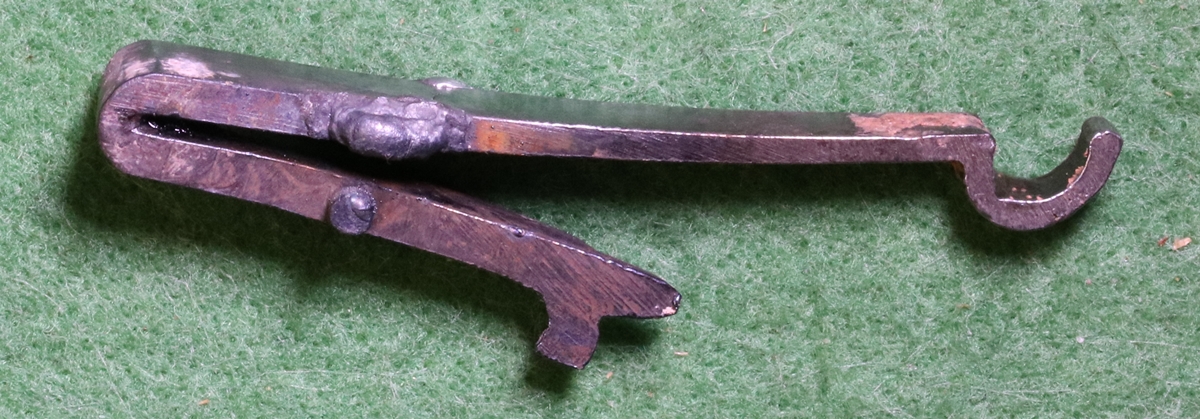
Held with modelling clay and ends of break tacked
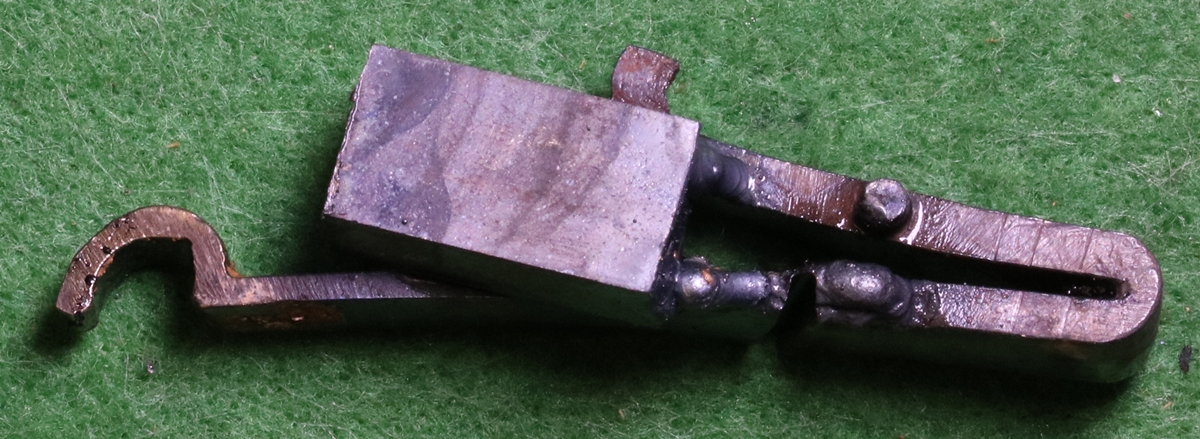
block tacked to hold two parts
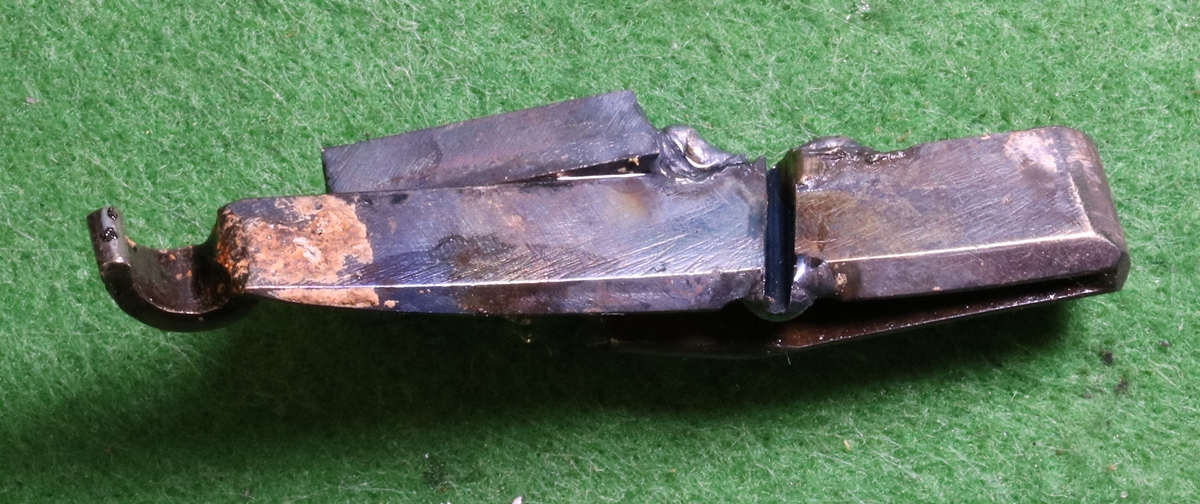
spring cut almost through with 1 mm cutting disk
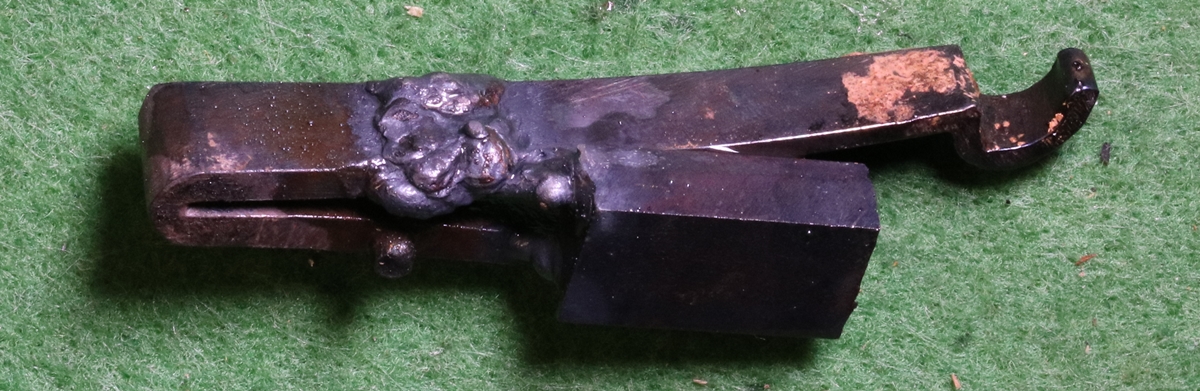
break welded using piano wire as welding rod.
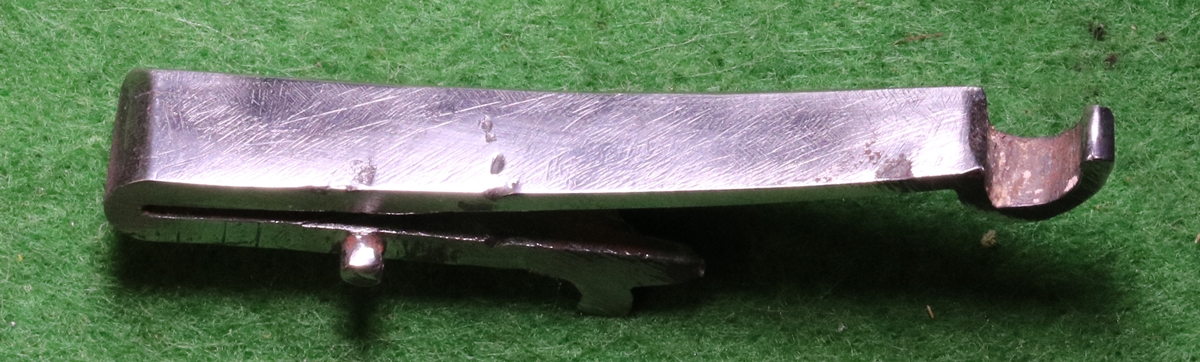
Annealed, jig removed and filed up, ready to reharden and temper after checking pre-bend, as usual there are a few shrinkage pits on the edges of the weld, but they should be small enough not to affect the strength. The unknown is whether I managed to get the weld to penetrate right through the spring as its not possible to see the inside face clearly- but at least the inside face is the compression side. The proof of the pudding is in the eating! (It worked, see above – but it isn’t meant as a shooting gun.)
I also recut the other brass pistol for Dick ( mostly using the GRS Gravermax as I hate cutting brass), so those jobs are all finished – I also glued up the case for the Nock Rifle where the base was coming adrift – the case needs to be as strong as possible given the load it has to carry!
12 Dec. – I decided to pull together the stuff on re-engraving barrels into a new post and put it up as a category – triggered by a Google search today by a visitor for barrel re-engraving that pulled up this website – so that took up my usual ‘blog time’… sorry, boring I know……!
11th Dec – Christmas approaches and myriad household chores ( and parties!) take the place of playing guns! I did manage to get a few moments to try to address a little problem with the barrel with the worn nipple hole – I had borrowed an oversized tap that I thought was oversize B.S.F, i.e. 26 threads per inch, but after I had recut the hole I was discussing with Bev who lent me the tap where to get oversize nipples and it emerged that the tap was oversize U.N.F and therefore 28 t.p.i.(he had actually told me it was UNF but that’s age for you!) I had already set the lathe up for 26 t.p.i and cut most of the thread, so back to the beginning and change the gears in the gearbox back again to cut 28 t.p.i. I was trying to cut silver steel – I did get a thread, and it does go most of the way in, but I think I will need to have another go, and possibly cut the thread onto a slightly tapered boss. I might try a different steel, the silver steel is a trifle difficult – you need to be taking metal off all the time or it just polishes the surface and then rips it up…….. I got the other brass pistol from Dick to recut so that is another job in the queue………
10th Dec – I thought you might like to see an example of bad re cutting of lettering on a barrel – I do, because it makes me feel better about my own attempts – here is a barrel from a Purdey Rifle lot 515 in Holt’s Dec 8th sale that didn’t sell, together with a rather poor photo of a real Purdey lock of the period! Among the basic faults you can see are;- The slope of the uprights is inconsistent – compare for example the F & R of Oxford, and the ‘O’s are mostly too small – they need to go well to the (imaginary) line or a little over it to look right – the spacing is dodgy to say the least – look at the ST and TR of Street. I even find it difficult to believe that it was recut over an original Purdey engraving its so poor, and that is without the stylistic errors outlined below! ( I can see I shall shortly be accused of being ‘Disgusted of Dullingham’)
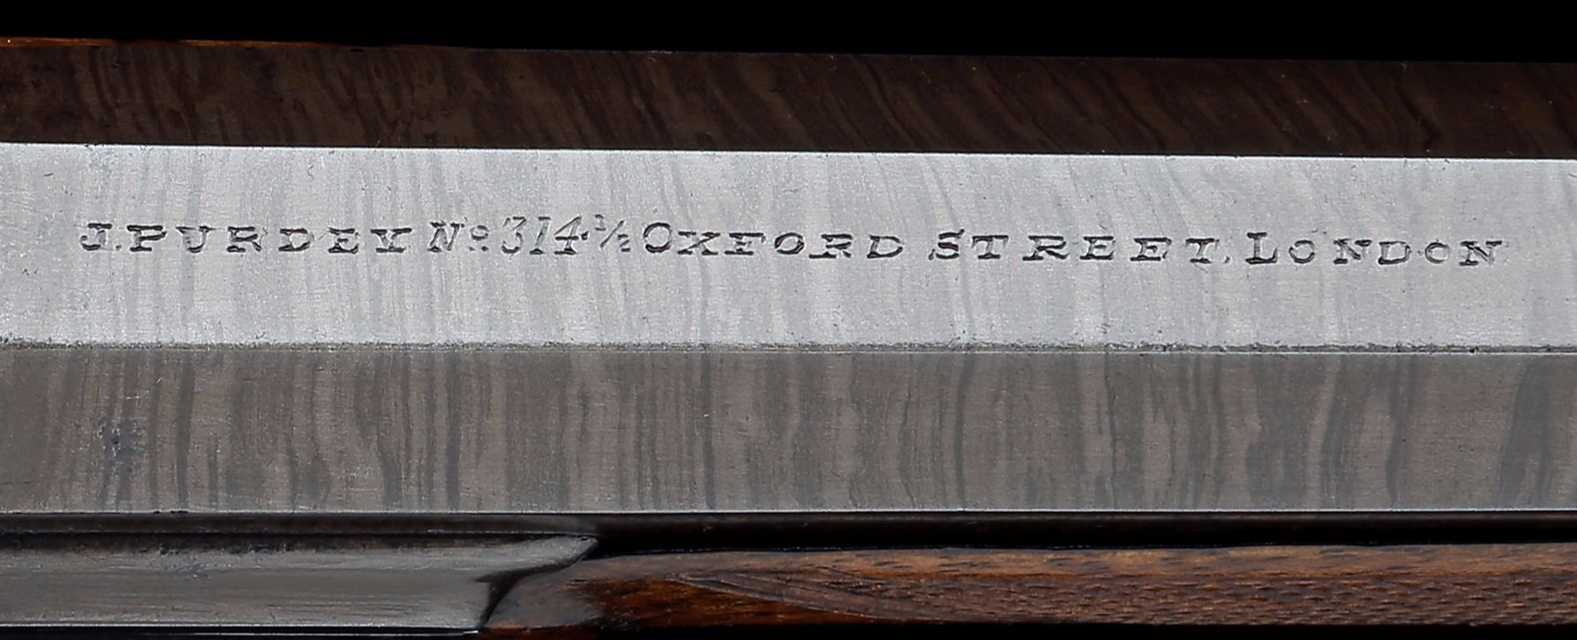
This just goes to show how easy it is to botch a good quality gun – it was presumably done by an engraver who hadn’t looked at many original Purdeys! Most Purdeys I have looked at have very fine serifs, as in the lettering below, and the letters are much better formed. Almost all the engraving of the period had single deep ‘fingernail’ cuts for the curved parts of ‘O’s and ‘D’s ‘P’s and ‘R’s etc.. It makes one wonder how much that little job knocked off the value of the gun, besides making me a bit suspicious that it wasn’t the original barrel although in this case I have no other reason to doubt that it is a Purdey barrel – I didn’t look at the gun. ( I could enlarge it a bit more, but I think you can get the idea, and its horrible enough without – see Beginners Guide No 1 for how to pull pictures off the web)
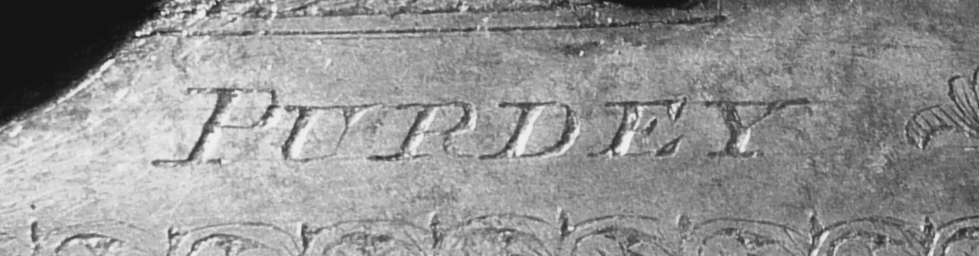
10th Dec – Today was the Anglian Muzzle Loaders monthly shoot and Christmas Lunch – I shot my usual 50% score, which is what I now expect! A thoroughly good time was had by all, and the Cambridge Gun Club laid on a very impressive lunch for 22 of us. The AML goes from strength to strength, muzzle loading is definitely a rising hobby. I just got invited to my 5th Muzzle loading game shoot of the season in January, which I am looking forward to. The Cambridge Gun Club has now got its 100m rifle range up and running and I’m being jogged to get a couple of muzzle loading rifles on my Firearms certificate – I’ll have to look and see what to take off, or pay the add on fee. I’ll have to get a couple of bullet moulds (new or antique) for the 16 bore Samuel Nock and possibly for my Purdey park rifle. I’ll have to have an induction to the range – I am a Range control Officer for one club, but you seem to need to pass on each range.
Yesterday I recut the engraving on the brass turnoff pistol body – it was very crude, so I limited my recutting to just sharpening up the main lines and lettering;-
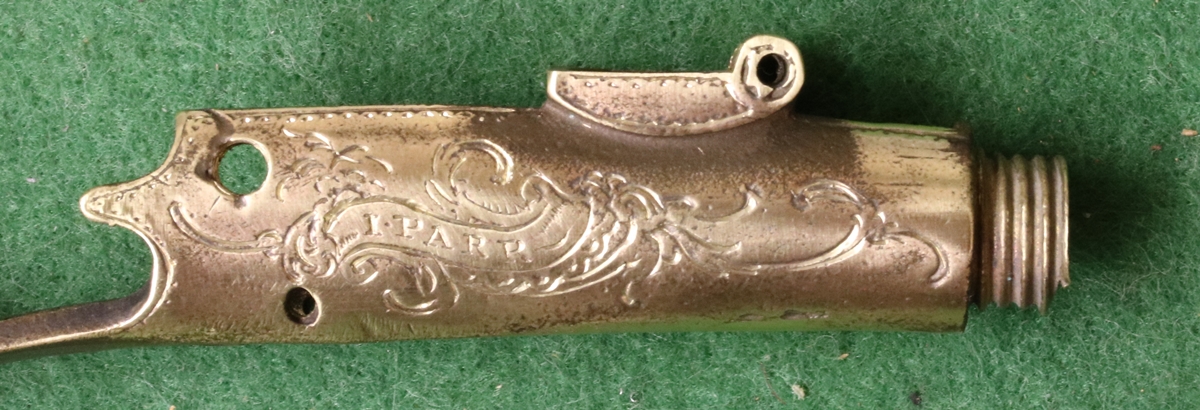
9th Dec – Two small jobs from Dick today – to recut the engraving on a brass turn-off pistol body (one of a pair – the other still being worked on) and another to repair a mainspring that belongs to a very beaten up little pocket pistol by Griffin of around 1750 with much broken wood – the mainspring has cracked right through the main limb – I will try to TIG weld it – the last time I tried the steel grain size was enormous and it was difficult – this looks more normal. Dick will make a good job of the wood and it will be a nice pistol – guns from 1750s are not that common and it is worth salvaging anything reasonable. I borrowed a 15 thou oversize 1/4 BSF tap that I’ve used to recut the thread of the barrel shown below – I thought I would turn a new nipple and cut the thread to 26 t.p.i in the lathe but it took so long to sort out the gearbox for 26 t.p.i and then find out why the leadscrew wasn’t properly engaged that I didn’t manage to finish the job so its set up in the lathe. As the index doesn’t work on imperial threads I have to leave the leadscrew engaged and drive the saddle backwards and forwards each cut – a job to finish when I get time – I will probably cut a bit more on the lathe and then open out a 1/4 BSF die and try that . Tomorrow is an Anglian Muzzle Loader’s shoot for a single barreled trophy followed by our Christmas lunch at the Cambridge Gun Club – I had better get my stuff ready- its an opportunity to shoot my sweet little Henry Nock ex flintlock covert gun – it will be interesting to see if I can hit anything with it! The Holts Auction yesterday produced no surprises – as I expected I didn’t get my cleaning rods – they went for £280 and 300 for 5 each plus the iniquitous 30% buyer’s premium – almost twice my bid! A fair number of unsold lots including rather surprisingly a percussion target rifle made recently by Purdey (estimate £4000 – it didn’t appear in the unsold lots). It was a rather thin sale (except for breechloading shotguns) and there were not so many people at the viewing on Wednesday.
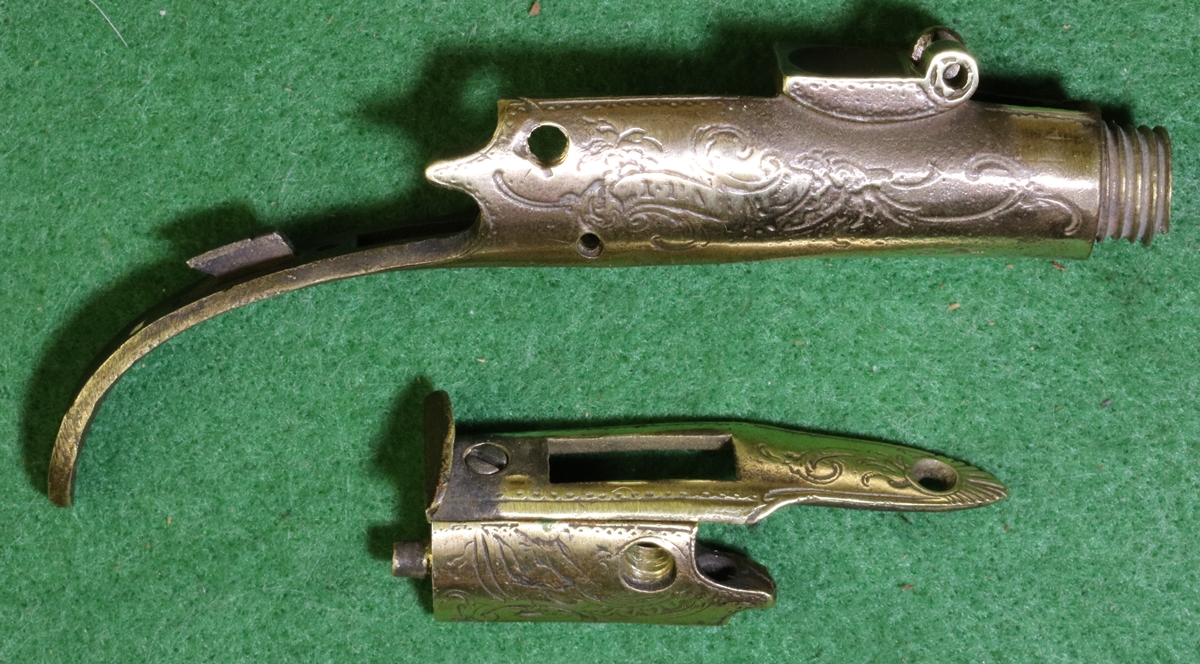

8th Dec A fantastic day! I was invited to Sandringham to view the Royal gun collection while Purdey’s were cleaning and checking them – I will never see such a collection again – it was mind blowing. I saw the ‘moth gun’ built by Purdeys for Edward VII’s Silver Jubilee – a perfect minature pair of his favourite game guns only about 6 inches long overall, and taking cartridges of about 1.5 mm bore – all fully functional, that the King used to shoot moths attracted to a candle, using a bent piece of wire to pull the trigger. How anyone could have made the lockwork at that scale (the locks are probably around 8mm long) is beyond understanding, and I’m used to working under a microscope – I wish I’d had my microscope with me, come to think of it! that was enough for one day!
7th Dec. One of my regular correspondents pointed out that when I describe stock finishing etc. I use lots of materials that I don’t explain, which is a very fair comment, and I have been meaning to do a post on stock finishing for some time – so I have started one…..
7th Dec At Holts sale preview in London today – not a lot to interest me – but a nice pair of cased Joseph Lang percussion guns at £ 3000 – 5000 caught my eye. There were very few flintlock long guns and not that many percussion either – a rather thin sale, but my informant tells me that the March sale will be much better. I left a bid on a couple of bundles of cleaning rods, but I’m sure they will go for more than my bid and I am busy tomorrow so can’t have a phone bid. The January sealed bid sale had a few things that I might bid on – I need a couple of cases for stock as I have guns I’d like to case and have now used all my available cases. There is an ideal case for the Nock Rifle – oak as it should be at that date, rather than mahogany, but I’m not sure I want to wait for January before finishing that job and anyway I might not get it. I might also pick up a couple of cheap percussion shotguns if the prices are right for members of the Anglian Muzzle Loaders. I’m looking for a nice side by side 12 or 20 bore hammer gun that is Nitro proofed, and a .410 double would be fun……… Oh dear, better come back down to earth! While at Holts I had a long technical chat with their photographer, who decamps to London with the rest of them when there is a sale and sets up a studio in the back room. He uses a fairly wide angle lens for long guns and a black background and uses entirely reflected light from a large sheet of polystyrene foam. I will re-double my efforts to get good photos……….. Tomorrow Dick and I are going to Sandringham to take back the Blunderbuss Dick and I restored and have a look at the Royal gun collection, which should be interesting. And then I might get round to some gun work!
6th Dec Today was my last shoot of the year, unless I manage to find a peg somewhere for a muzzle loader! Very misty/foggy at the start – it was difficult to see the guns on the next stand but one! – although it did clear up later. I had an enjoyable and successful shoot and some good drives and excellent company, but I could do without the owner behaving like a cross between Basil Fawlty and I know not what! Anyway, tomorrow I’m off to London to view the Holts Auction – they are selling a number of Purdey percussion guns in excellent condition – it seems to me that the name on the gun has become disproportionately important, so that guns by famous makers fetch silly prices. I suspect its because they are seen as a good investment in times of low interest, and are bought for that purpose. Anyway I’m looking for things that can be restored for the blog, so probably I’ll concentrate on the items in the sealed bid sale – I have been through the catalogue once and tagged a number of items, so I need to refresh my mind tonight after I have cleaned my gun. I am hatching a plot to fire the Samuel Nock Rifle with Kevin – I’ll need to put it on my firearms certificate if I want to – but first I need to find a bullet mould – I think it is just a 1 oz ( 16 bore) ball. Bev kindly lent me a couple of oversize 1/4 BSF taps to see if they would fix the nipple problem in the barrel I’ve got to sort.
5th Dec. I’m slowly working out the jigsaw of laying out the partitions of the case for the Samuel Nock rifle – the case I have is none too wide and the barrel on its side with its ramrod pipes and ramrod takes up a fair bit of space. The case is not really deep enough to pile the three cleaning rods on top of each other so they will have to go in a pyramid and take up precious room. So far I’ve managed a space for the barrel and ramrod, the stock, a powder flask (although I need to sort out one with the right sized measure – 1 1/2 drams), the peep sight, turnscrew, nipple wrench and boxes for ball and patch and caps and an oil bottle. ….. There are rather a lot of lines drawn on the inside of the case and its all got a bit confusing! I’m off early tomorrow to a muzzle loading shoot with AML friends near Norwich – the forecast has fog in the morning so I’ll have to leave plenty of time to get there – breakfast is at 8.15 at the shoot…. an early start! I am not sure about shooting in the fog – I wonder if you just aim at the noise the birds make flying- probably stand as much chance of a hit as if I could see them! Trusty Egg 16 bore ready, and the single barreled Henry Nock as backup. I’m taking a pile of de-cappers as its a shared peg shoot, so lots of capping and uncapping each time the guns change over and you reload the one barrel you have fired.
5th Dec. I had a look at the duelling pistols under the microscope – both locks are complete reconstructions, except possibly for the internal bits – tumbler, bridle, sear and sear and main springs – they must be the least convincing reconversions of a basically decent pistol I have ever seen, so, much work to do! I’ll take them to Dick’s this afternoon and we can confer.
4th Dec. I got distracted playing with the Lego Mindstorms computer and catching up with household chores after a week of playing! Here is the barrel I brought back from shooting – a nice single with a decent bore somewhat spoilt by the pretty hideous browning. Anyway the nipple hole thread is badly worn and not safe to shoot, although as usual the nipple itself looks fine. The nipple is, as near as I can tell, 26 t.p.i which is right for 1/4 B.S.F but the diameter is oversize at about .265″ – its not big enough to be 9/32 BSF which is .281 and 26 t.p.i so I guess the nipple hole has already been re-tapped oversize and worn again, which would explain why it doesn’t appear to have a lot of metal round it. I think that eliminates the possibility of retapping it out and making an even bigger nipple, so I will drill out the thread and make a plug tapped 1/4 B.S.F., and get it welded in very carefully, or possibly silver soldered to make sure there are no gaps – depends how good the hole is. I’ll probably need to take out the breech plug.
The existing nipple is, by our reckoning ( us being the AML!) the wrong way round, in that it has a small hole at the top tapering to a very large hole at the bottom – we swear by a bigger hole at the top about 2mm diameter or more, with a small hole at the bottom – around 1.2 mm diameter or a bit less – it doesn’t seem to matter what the shape between the two is – I usually run a 2.2 mm drill down to within about one mm of the bottom and then finish with a 1.2 mm drill. (See ‘Beginners Guide No 5 post for more details) My Egg back lock 16 bore has probably fired the best part of 1000 shots, never less than 40 in a session between cleaning, and I have yet to have a single misfire (forgetting to put powder in, or pulling the wrong trigger etc. excepted). When I clean the gun I always pump hot water vigorously through before I take out the nipples, and again after removing them. I have found that the thin polyester wadding from multifoil insulation or similar makes a perfect piston on the ‘jag’ on the cleaning rod – a strip about 1 1/2 inches wide and 10 inches long wound tightly on the jag fits a 16 bore and has the advantages that it is quite resilient and so fits perfectly, holds lots of water so it makes a good seal, and binds to itself so there is little tendency to unwind in use so you can pump vigorously – beats paper towel roll and ‘2×4’ hands down!
Here is a picture;-
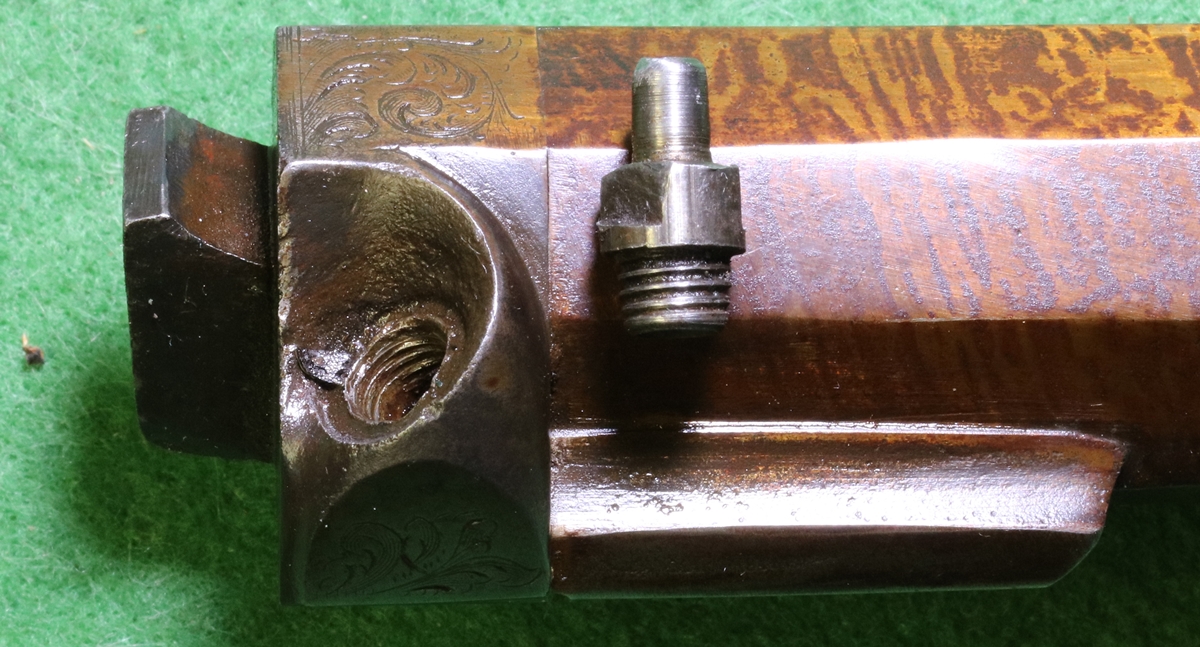
Part of the problem with the browning is that it was done with the breech in place, but in any case the ginger colour is my bete noir!
3rd Dec. Had an excellent day’s shooting at Centuries – as usual it was very well run for muzzle loaders with pauses to reload after flushes, and I did much better than on the last shoot – again I was lucky and got on good pegs on most of the drives. I have another shoot on Tuesday so I hope my luck holds – that is my last for the season. I took along the Nock Rifle – I have to transport it in parts because the barrel is so heavy it makes the stock seem very vulnerable if it falls or is banged. Anyway it was admired and I’m inspired to finish it – I do need a decent ramrod for it though. There was some discussion around what it was used for, but I’m pretty sure the engraved animals – deer, tiger and elephant wouldn’t have been on a rifle intended for competition shooting . I picked up a couple of jobs for Dick and I to do – a percussion barrel with the nipple thole thread badly worn and a nice pair of flintlock duelling pistols that had had one lock replaced with one with a rather heavy copy of the pan and frizzen – Its interesting because its obviously not from a casting from the other one, because casings get smaller and thinner, not heavier looking, so I don’t know if it was machined and filed by hand, or if the original was scanned digitally and used to mill copies on a N C (numerically controlled) milling machine – but if scanned why isnt it a better match? I haven’t put it under the microscope yet. I had another customer for a de-capper – I’ll take the rest to Banhams.
2nd Dec I was hoping to get the case for the Nock Rifle a bit further on as I am shooting at Centuries Shoot tomorrow and promised several people that I’d take the gun along, but its still a work in progress – I’m afraid like most of the things going on in my workshop! I was distracted as I took delivery of the Mindstorms Educational Robotics kit I ordered for an early Christmas present for myself – I want to add Robotics and computing to the school’s STEM club, and the Lego Mindstorms seemed like a good way to go as the children are a bit young for an poorly supported entry to the subject – so I can now evaluate it – then I’ll need to find funding for a couple more sets if it seems like the best solution. I also ordered a book on how to hack it, since I can never leave things alone!

I’ve filled up the deep gouged areas with bodyfiller and cut, planed and sanded mahogany to fit round the sides The green biase will be wrapped over the lip of the lining strip – I was going to leave the strips visible but couldn’t work out how to shape the strips with the tools at my disposal. The lid is being lined with think card so that the 4 nuts that hold the handle are flush with it. The hole in the middle is unfortunately necessary to provide space for teh cock nut.
1 Dec – Very enjoyable day of clays at Eriswell with some of the Anglian Muzzle Loaders. I did my usual patchy shooting, but had great fun at the end of the day with a flurry – 4 guns shooting at half a dozen or so clays released more or less simultaneously, then reload and repeat – the object being to shoot as many as you can and stop any clays reaching the ground – continue until you have used 25 cartridges. I was shooting my beautiful black powder William Powell, the others were shooting nitro – I wish I always hit as many as I did in the flurry! Anyway that took up all the day, what with cleaning the muzzle loader and the Powell, but I did have time to engrave a couple of de-cappers – including an order for a personalised one. We had an interesting discussion on the intricacies of the law relating to antiques and shotguns and the transition between being a section 58 antique and a section 2 shotgun. Its relevant to me because if someone passes a antique shotgun to me to re-engrave etc. then to me its an antique, but it may be on their shotgun certificate, in which case to their firearms officer its a section 2 and should either have been taken off their certificate by stating it has returned to being an ‘ornament or curiosity’, or put on mine if I have it for more than 72 hours. It is, of course, much more complicated if the gun is a section 1 firearm. I’ll try and sort out something to put on this site when I get copies of the documents we looked at.
30th Nov. A good gun work day – Sorted out a few more cappers, and made the proper screw to lock the peepsight post in place, and then converted a bit of the side of an old St John’s punt into 50 x 25 mahogany strip and the into 46 x 5 mm strip for putting inside the case for the Nock. I don’t know what I would do if I didn’t have a bandsaw, radial arm saw and planer/thicknesser to convert timber – its so expensive to buy and very difficult to get the hardwoods you need – and the carriage is expensive. Those machines must have saved me their cost many times over, especially since they were second hand and still run perfectly years down the line.
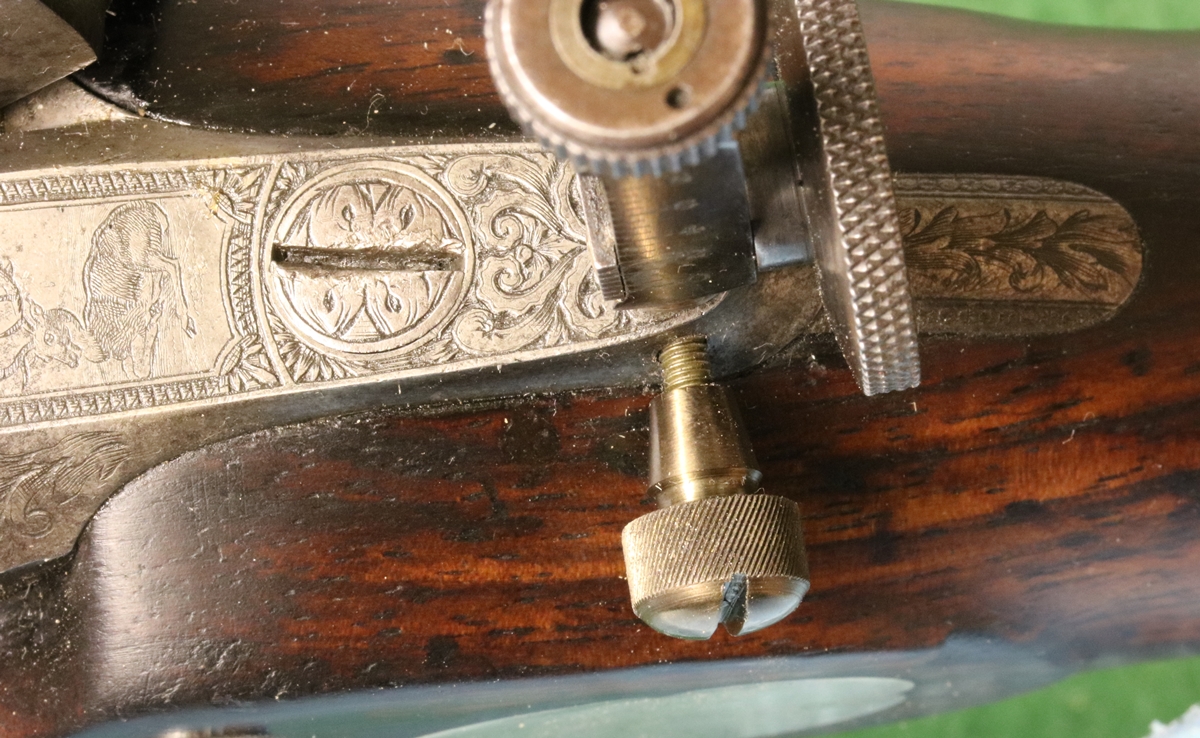
It would probably be improved by trimming a bit off the thread.
29th Nov – I was shocked this morning to find our cockerel having a crafty fag when he thought I wasn’t looking. He would be for the pot, but I do enjoy the noise he makes! Did a bit of patching of the case for the Nock using polyester resin wood filler. I have taken the softwood strips out from the edges of the case – they stand up inside the lid and are generally chamfered on the outside, as I want to replace them with mahogany strips that match the case – I was tempted to stain the softwood, but couldn’t bring myself to descend to that! The internal partitions can be softwood as they are covered. I think the only suitable mahogany I have is in the sides of an old punt I cut up, and that has ribs attached, so it will be a lot of work in my freezing outside workshop to machine them……..
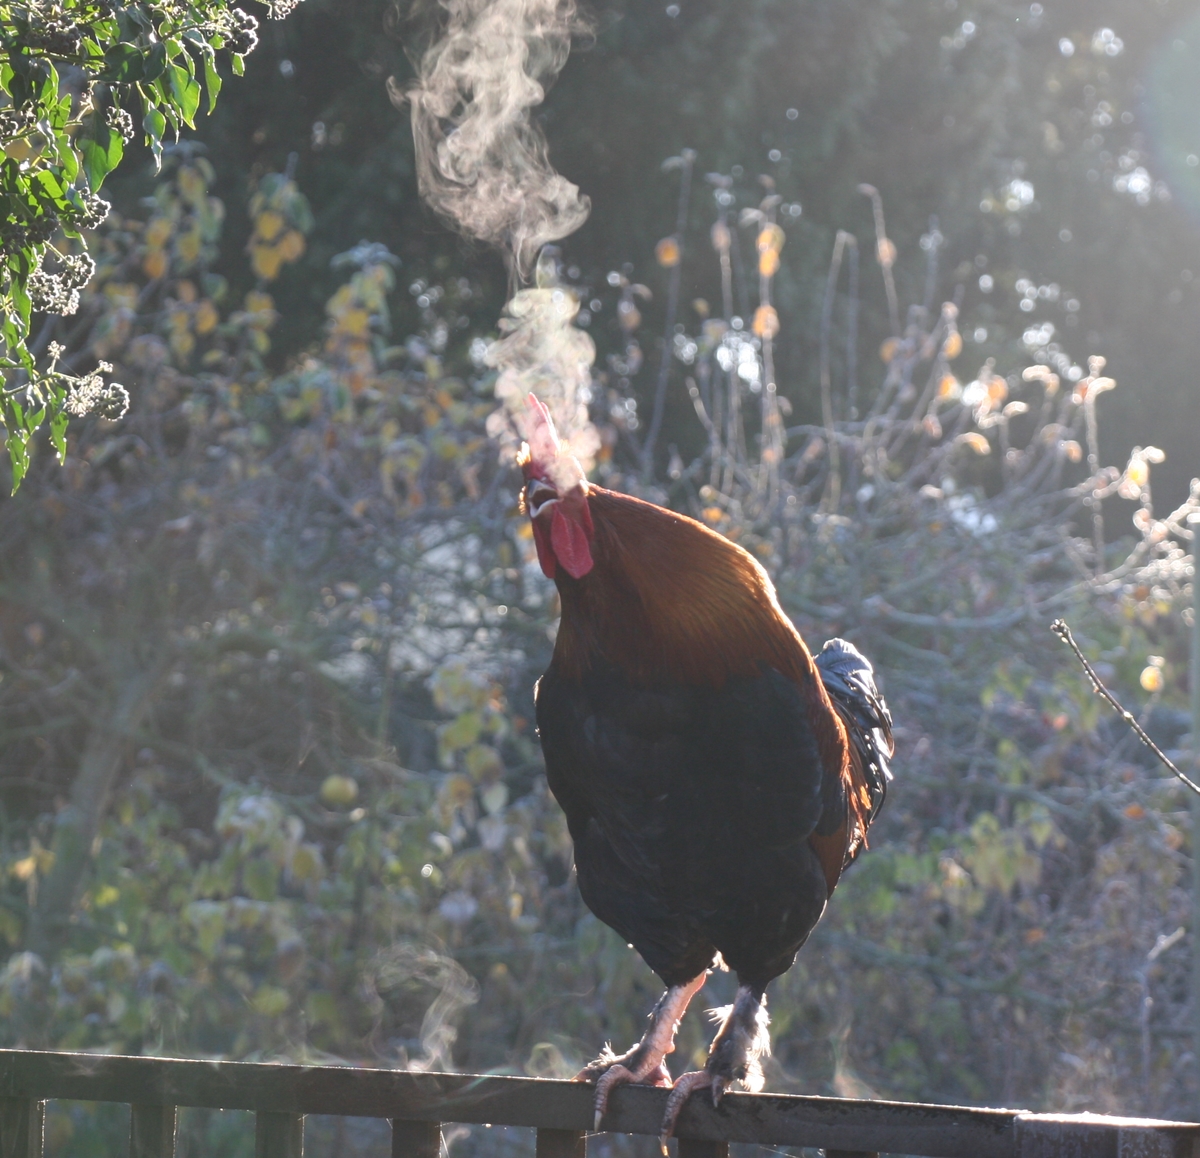
I know its not got anything to do with guns, but he is rather fine…..
28th – Out all day working on the Cambridge archive and getting my Land Cruiser fixed- I’ve been doing some experimenting with the batches of ‘Slackum’ stockoil I made up at the weekend – They vary from a soft wax ( which seems to leave a dark mark) to a more familiar oil depending on the ratio of wax to oil – more work will be needed before I can say anything useful! The AML lads are planning an impromptu clay shoot on Thursday at Eriswell – I might just go, its time I got out a flintlock and had another go, although my nice Blair and Sutherland flint double is STILL waiting for Langtons to hone the barrels – I must chase them….! Too cold in the workshop to do much and not really time to get a fug up with the woodburner.
27th I was looking at the empty hole on the false breech of the Nock Rifle which must have been for a peep sight – anyway a hunt through some of the old junk from my father’s specimen drawers produced a BSA peep sight with a saddle to fit the stock, and a horizontal windage adjuster beneath the peep hole. I wanted it to fit in the hole, not on the saddle, and there isn’t enough height for a windage adjuster, so I sawed off the whole of the bottom of the sight including the saddle and windage adjuster. That just left the vertical slide and the range adjuster screw. I turned up a post to fit the hole in the false breech and silver soldered it into the bottom of the sight. and it fits just fine. I fiddled around trying to find what screw thread had been used for the locking screw for the post – nothing fitted exactly but M3 was the nearest, the pitch seemed to be pretty exactly 0.5mm as measured on a matchstick screwed into the hole, but the profile was a bit wrong, so I just ran an M3 tap through and must now make a screw to fit – unfortunately metric dies are the only threads I don’t have a full set of, so I’ll have to buy one. The sight looks reasonable and workable – although of course its not an antique, but that is obvious. At its lowest setting it is just higher than the lowest leaf of the fixed rear sights, but lower than the next one. I was reading Richard Akehurst’s book ‘Game Guns and Rifles’ as I sat by the fire tonight, and that has a brief summary of percussion rifles – he says that 16 bore rifles ( like this one) were used on medium game and deer with a 1 oz ball and 1 1/2 drams of powder – the ball didn’t grip the rifling if used with bigger charges. As he says, they came early in the percussion era before the rifles of Lancaster, Jacobs/Daw and Whitworth and before Purdey introduced the Express rifle with smaller bore, better rifling and higher charges – typically a .5 inch bore with 4.5 drams of powder and a heavy conical bullet.
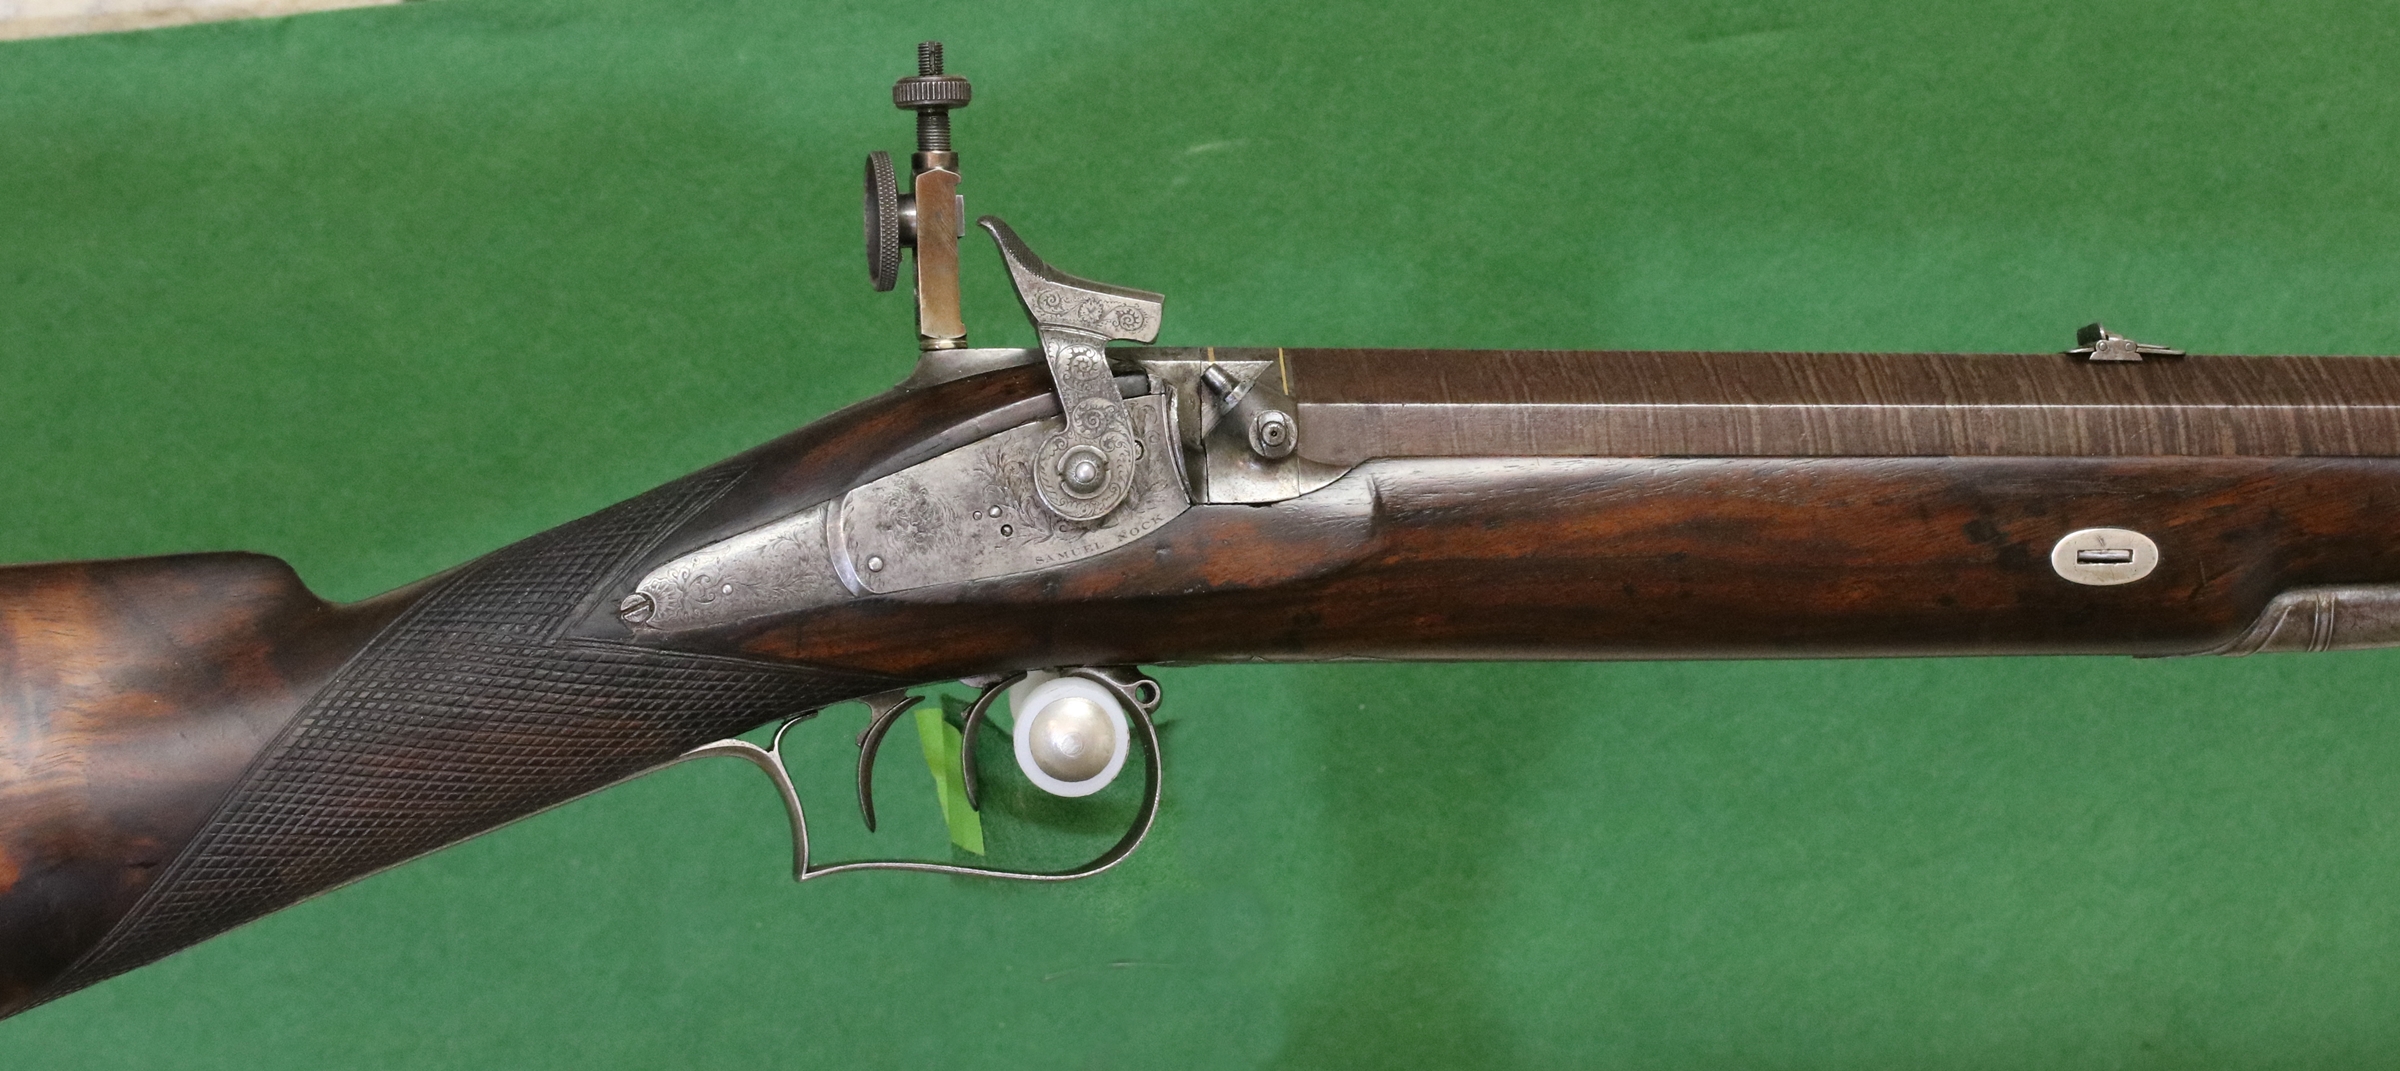
This is a higher resolution photo – 2400 pixels wide – I’m now using my 60 mm macro lens again
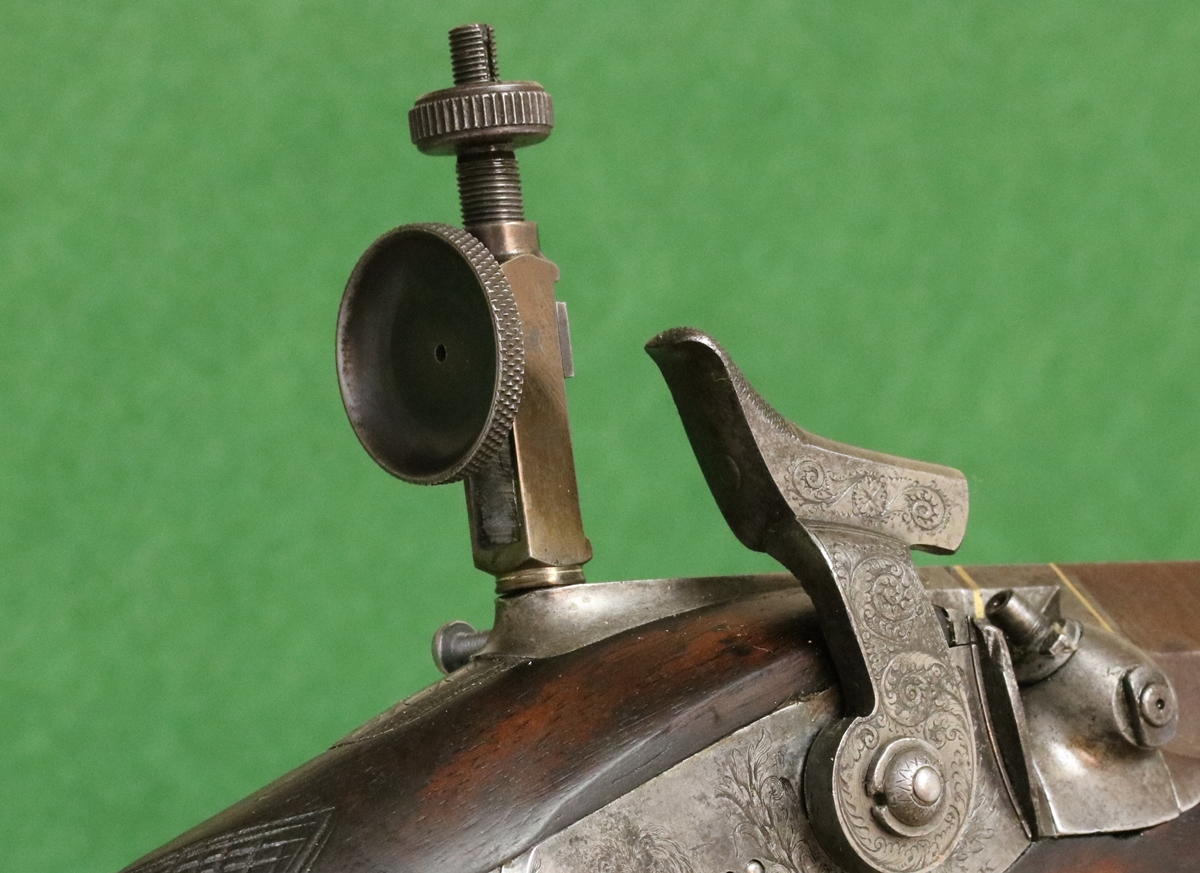
modified modern BSA peep sight – the perspective makes it look tilted – its straight!
The sight has an ingenious screw for elevation that uses the difference in pitch between two threads to give very fine adjustment – the clamp arrangement on my DIY engravers vice has a similar system.
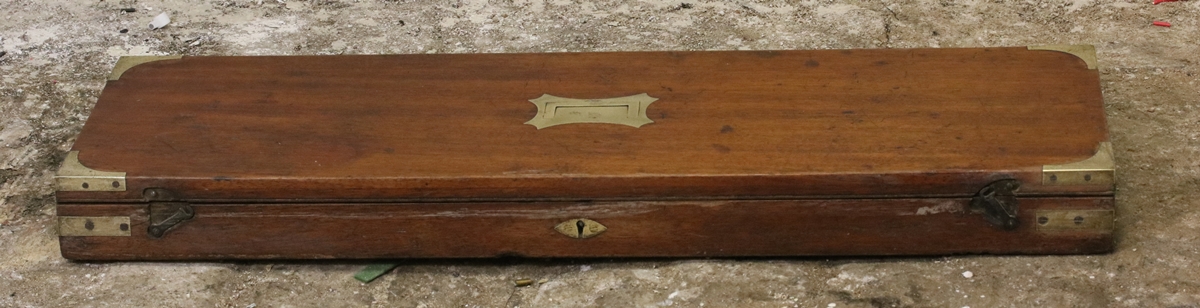
This is the case I found for it – I’ve cleaned up the brassware a bit – not too much!
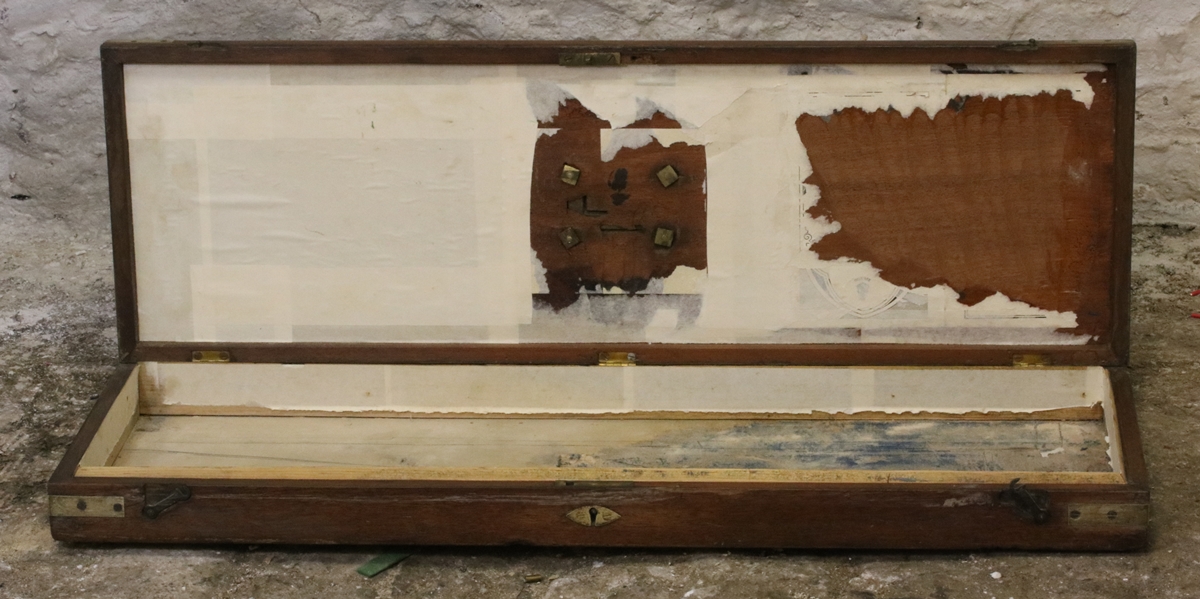
The lid has been gouged away to clear something in the centre and to the right, but it will be filled and covered.
26th – It looks as if several people were trying to download the picture of the finished Nock Rifle without success – I don’t know what is wrong but anyway its not a very good photo so I’ll take a sharper one tomorrow and we’ll see if I can get it to work. I’m happy for photos that I have taken to be used with acknowledgement where appropriate – they are all at reduced resolution to save space and speed up internet times but if you want the original high resolution photos email me or use the comments and I’ll try and help!
26th – I started cleaning up the old gun case – I think it had been fitted crudely for a butterfly collection ( probably by my father who was a naturalist as well as a gun collector and tended to do things a bit crudely!) as the base was lined with cork cut from table mats and all covered in white paper. Its just about big enough, although only just deep enough – I may need to make a small recess in the lid to house the nut on the cock screw – we’ll see when its lined. I found a 3 section cleaning rod, and I might pinch the almost mint leather covered German silver Dixon flask from my Lancaster and replace that with something else. I have a choice of fairly thick woollen cloth in deep red or dark green, or a thin green felt (if there is enough). I ought to buy a job lot of oil bottles in an auction some time. I’ll post some pictures tomorrow – I did a bit of checking up last night and found that the new lens I got with the Canon (18 – 135mm ) doesn’t give sharp images, possibly because I dropped it when I got it! But I get perfect photos from my old 60mm macro lens so the camera is OK. I’ll just use the old lens – its more time consuming as it isn’t a zoom lens so I have to get the distance right by moving things around instead of zooming – but its worth it for sharp photos.
25th later…. Seeing how vulnerable the Nock is in transport etc I remembered I had a mahogany gun case under the bench waiting for a gun to go into it…… maybe this is the gun? I did buy a load of woolen cloth for lining cases – a nice project on the horizon here! Wonder where I can get an old bullet mould to fit a .65 diameter barrel? I can probably rake up a flask if I knew what charge it liked! Sectional cleaning rod? Oil botttle? spring clamp? Have to make a nipple key and turnscrew for the lock nail…….
25th – Finished putting together the Samuel Nock rifle – its no wonder the stock got damaged as its a massive barrel to be waving about on a relatively small piece of wood – if it fell in the wrong way the force would be enormous! Anyway the repair is sound and the whole thing looks really good – I haven’t touched the metalwork, apart from a normal clean, as it appears to be completely original and doesn’t need any cosmetic fiddling. I had the nipple and the cross screw out and cleaned out the innards… The barrel script would be a bit clearer if it was recut, but it isn’t necessary in order to read it so I have left it – I prefer it not to have too many signs of ‘restoration’ – save that for things that are a bit worse. I’m not sure about the ramrod – it may have been a replacement without an end, as it has a centre mark from being turned. I might see if I can fake up a peep sight. Anyway I will take it along to the next muzzle loading shoot on 3rd December to show to interested parties – I just need to sort out a price for it, but I can’t find any other examples except the one in the post – it is quite unusual and will make a good target rifle for someone as the bore is pretty well perfect! I noticed that my photos are not as sharp as the new camera should produce – some investigation is needed!
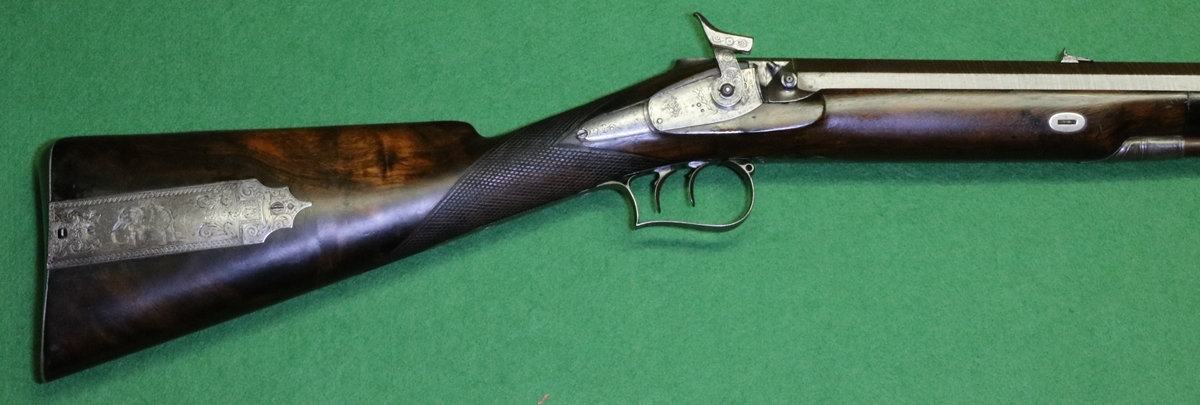
The wood is now an even colour and the repairs blend in better, with the cracks repaired.
24th – good day at Wood hall in Hertfordshire. Some of the drives were a bit patchy as they were into the brisk wind, but I was lucky and mostly under the main flight lines. I could shoot better, but did have some very satisfying shots. A couple of the people on the shoot were interested in the Nock so I’ll have to get it put together – I need to make or get a new end for the ramrod as it ends at the wood and is too short – it must have lost its brass end with the extractor screw…….
24th Nov I’m off on a muzzle Loading shoot in Essex today (actually it was Hertfordshire – luckily my phone and google maps took me there seamlessly!) – its a lovely small shoot and was great fun last year – I’ll see if I can do better than I did on the last game shoot! I was reading an account by a top competition archer who said that when he shoots he has to concentrate on anything BUT what he’s doing – i.e. on the shopping or some other trivia so that he shoots by instinct without his conscious mind getting in the way – sometimes I feel its the same with my shooting! I can’t decide whether to shoot my Egg double or the Samuel Nock that I used to use before I got the Egg – I’ll take both and decide on the way! I’ll take a handful of decappers too – I ordered 2m of chain to hang them on but it turned out to be far too fine to use – back to square one……
23rd Nov – I went to Dick’s to have a look at the second 3 barrelled 20 bore – a thing of great beauty (josephmantonlondon.com) – and to take a few pictures of the BOSS single trigger mechanism as it fascinates me. I’m not sure that I got the description of the faults with this one correct – and I haven’t had time to get my head round it fully – Dick offered to let me take it and see if I could fix it, but its very fine gun of about 1898 and I wouldn’t want to mess it up! Since acquiring my William Powell breech loader I have got more interested in these old guns and one day I might feel confident enough to work on them – maybe by Friday! Anyway here are some photos;-
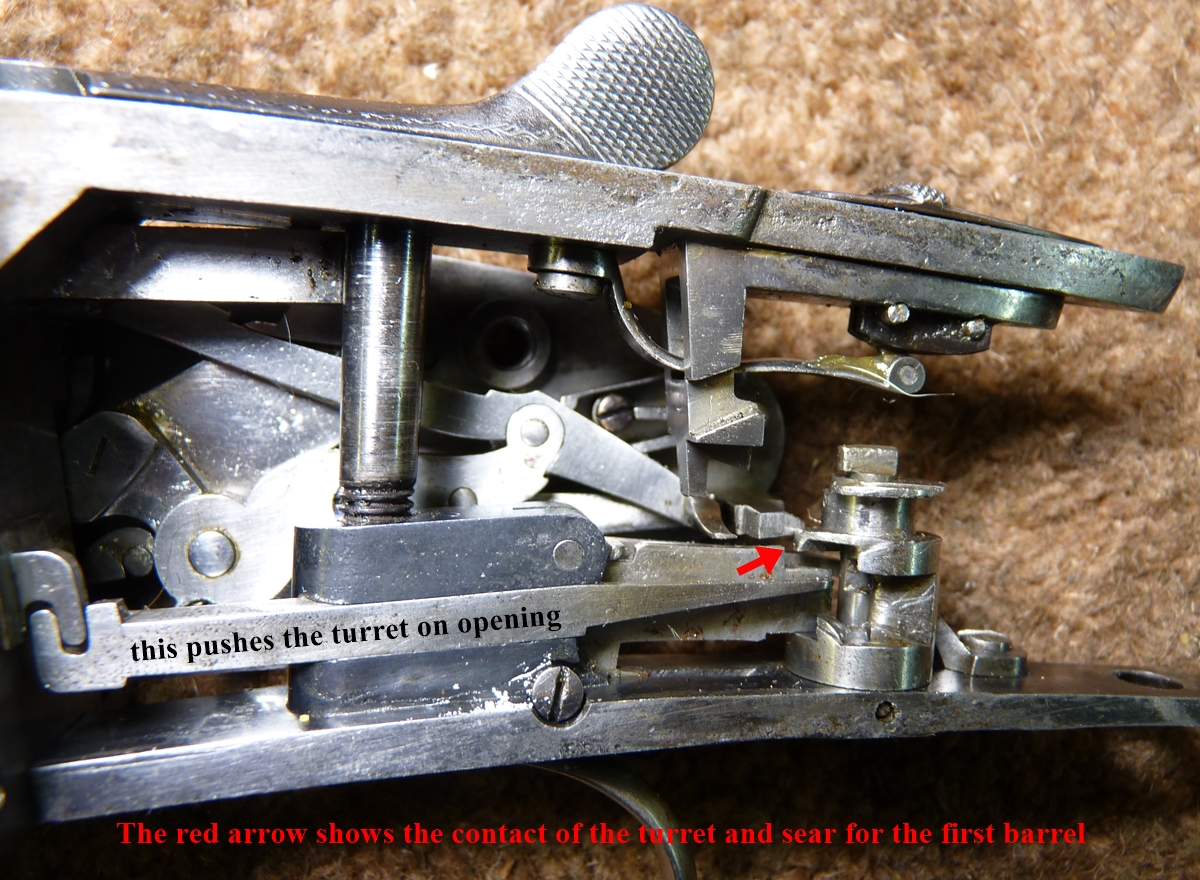
The trigger mechanism and right hand lock of the Boss – the contact between the arm on turret and the sear is marginal, and they probably miss each other when its all mounted properly in the gun.
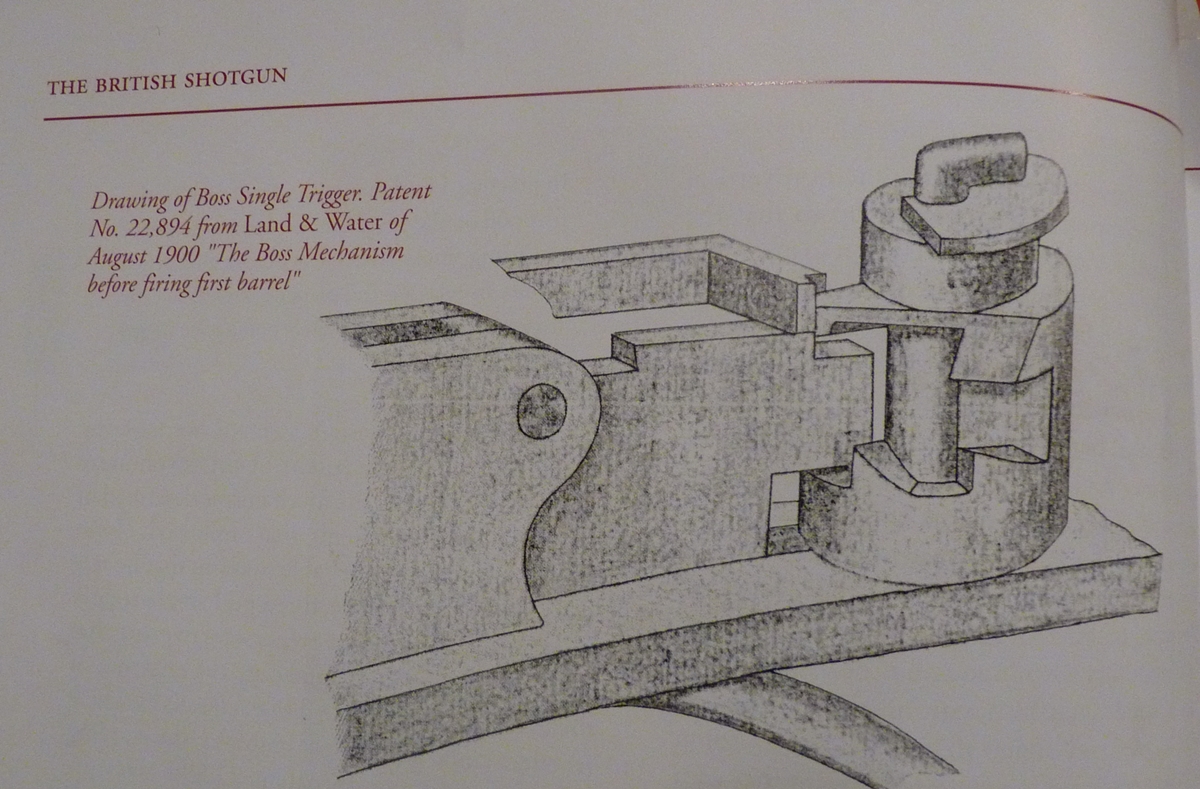
Picture from Crudington ‘The British Shotgun’ vol 3 of Robertosn patent 22,894 of 1900

Boss Lock with secondary safety sear
23rd – I just put an extra photo on the post on how to add a footpedal to my welder – it is actually one of the most visited pages from Google! I guess there are a lot more people out there with small TIG welders than antique firearms.
22nd Nov. Busy day – long phone call from the regional manager of the garage that messed up my Landcruiser, which was promising. My school club – colloquially known as the cardboard box club from the fun the kids get from cutting up boxes and sticking them together with masking tape – went well and they will soon be putting stuff on their website. I went over to Dick’s and took the Nock stock – had repaired the tip of the fore-end with wood as the horn (or German silver) had at some time been replaced with wood. Dick’s view was that I had got the finish on the stock right, and that if I did any more it would look as if it had been refinished – I’d probably have done another couple of coats, but I’m more than happy to stop!
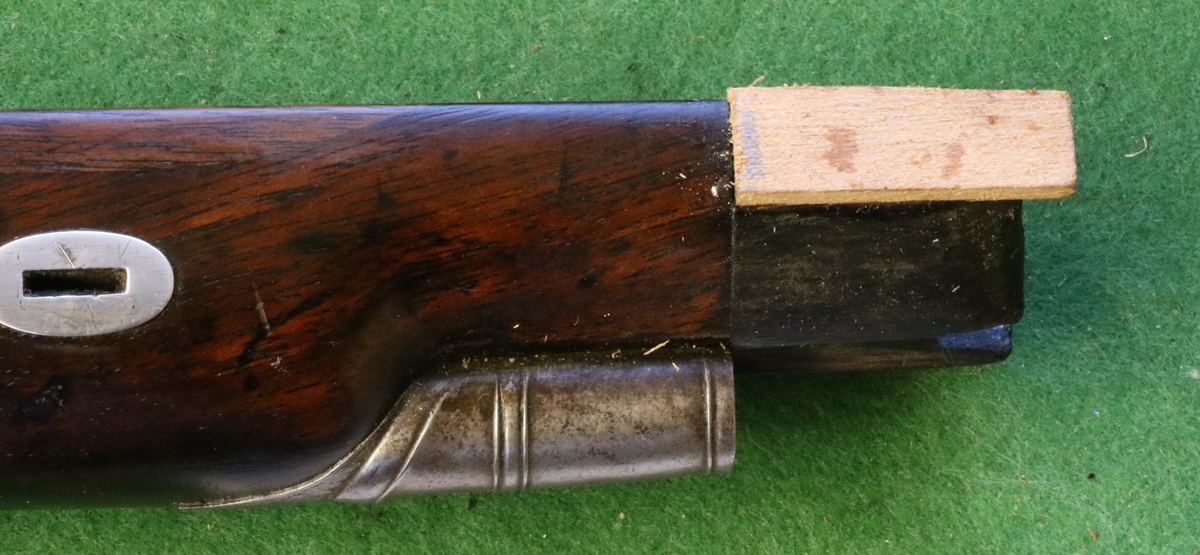
Fore-end repair – bit of a cop-out to avoid making a new horn fore-end!
I had a look at a very nice BOSS double that he had in for repair – its a single trigger gun, but the second barrel wouldn’t fire. Its a very interesting subject – single trigger doubles. They started to become popular in the 1890s and there were literally dozens of patents. The problem, which wasn’t discovered for some time, is that after pulling the trigger once to fire the gun there is an involuntary second pull over which the shooter has no control, and doesn’t perceive. If you don’t know this exists and design a mechanism that changes barrels after the first trigger pull then the involuntary trigger pull fires the second barrel to give a double discharge with a very short interval between them. Crudinton’s book, ‘ The British Shotgun Vol 3’ goes into it in great detail and describes a number of mechanisms designed to beat the ‘second pull’ problem. One such was a patent by Robertson (of BOSS) in 1906(?) for a mechanism that had a sprung loaded rotary turret on a vertical axis behind the trigger blade with ramps, that rotates on firing the first barrel and then lets the trigger plate rise on the involuntary pull without firing a barrel, and then fire the second barrel on the third pull ( if you are still following me, well done!) Anyway we sat down over a cup of tea with the breech and locks and Crudington open at the drawing from the patent and tried to work out what was wrong. In the end we concluded that someone had filed off a small notch on the right hand lock sear that should have held the turret in its proper starting position, so it was starting in the second pull position and firing the first barrel in what should have been the second pull, thus the third pull gets used by the involuntary pull leaving nothing for the pull that should fire the second barrel (pour yourself a stiff drink if you managed to follow that). We shall see when the notch is replaced as per the patent drawing from 1906 if we were right! I didn’t realise at the time that it might make diary post, so I don’t have photos and I left the book at Dick’s. I’ll rectify tomorrow if I can… By the way, most single trigger doubles today use an inertial system and change over barrels on the recoil, which delays things long enough to eat the involuntary second pull – you can tell because if you put two snap caps in the gun a recoil gun won’t fire the second barrel unless you bang the butt on the ground to simulate recoil and then pull the trigger for the second barrel.
21st Nov later – The stock was OK! I have been making more decappers – Mike gave me a big plug on the Anglian Muzzle Loading website (maybe on account of he won one I donated!) so I guess I might get a flurry of custom, especially as I’ve got a couple of muzzle loading shoots coming up – 3 in fact – and that is what they are really aimed at. I only bought enough spring steel for 20 and I’ve already sold/donated 4 so I’ll have to order another couple of meters of 1/2 x 1/8. The annealed spring steel is the right material for the tools – not hard enough to damage the nipples but pretty strong. The stuff I got was a bit on the rough side, and the surface seems quite variable – I just engraved ANGLIANMUZZLELOADERS.COM on one at a cost of two blunt gravers, but turned it over and broke 6 tips off engraving a name of just a dozen letters – I’m pretty sure my technique doesn’t vary that much! I might try another source of strip, but some are very expensive – Blackleys are 3 times the price, although they are better quality. Thinking of the Nock and its stock, I’ve been musing on how one decides what the desired endpoint is for a restoration, and how it evolves during the work – I feel a new post coming on!
I’m encouraged that this website is getting a steady flow of visitors – between 100 and 130 per day – and that they typically look at a number of different things on the site. I put the statistics automatically on the at the top on the right so you can see each day how may are visitng. Visitors and visits and the fact that I add to the site every day seems to push the site up Google’s ranking system so that it appears near the top of any search that is relevant. If you look for Google Images of any maker that occurs on this site you’ll find an embarrassing number of photos taken from the site – unfortunately mostly irrelevant. The site gets between about 20 and 40 visitors a day from Google searches. I’m very grateful to all the regular visitors for your support.
21st Nov – missed the diary last night as I was at a concert – Penny and Giles and nephew Ben were all playing – I just sell tickets and serve drinks! It was in support of ‘Sing Inside’, a charity run by students at Cambridge that takes singing into prisons. I’m convinced from previous voluntary work of the importance of anything that humanises prisoners, so I’m pleased that it got plenty of support. Just as I was about to go out I realised that I’d put a coat of ‘Slackum’ on the Nock stock and it had gelled and was getting to the point of no return, where you can no longer rub it off with a cloth and linseed oil, but need to resort to fine wire wool and take most of the previous coats off too. I think I got it all rubbed off with the cloth – I’m about to go and find out! That hiccup apart, I think it is looking good – I’m not sure I want too perfect a finish as that would be out of keeping with the age and general condition of the gun.
19th Nov. – More of the same really ! I realised that the cap on the end of the fore-end of the Nock will need attention and that it is likely to spoil the finish locally if I make a new horn one – I also had a careful look at the stock after my wife asked what the faint stripes were, and came to the conclusion that they may be an old attempt to ‘figure’ the stock by burning a piece of string wrapped round the stock – an old technique for making stripy maple-effect stocks – there is one place where it looks a bit like a burn mark, so I may have to revisit that area too – I think I’ll stop work on the oil finish til I have resolved those issues! I’ve been looking at other Samuel Nock guns – there is a pair of pistols in the upcoming Holt’s auction (8 Dec). He seems to have used a distinctive nut in place of a tumbler ‘nail’, and to have used a similar head on a plug into the breech block on all his guns and pistols. I saw a Purdey percussion pistol ( I think that is what it was) in the auction that said the engraving on the barrel had been recut – looking at it in detail made me realise how NOT to recut engraving ! It justifies my conservative and painstakingly slow approach.
17th November I posted a couple of photos of the Nock stock on its post – it will be a long job getting a really good finish, but its coming on well. I put it on the back of the AGA when its been oiled – the temperature is about 35C so it probably sppeds things up a bit? I’ve put the de-capping tools in the SHOP – I’ll bring some to the next AML shoot. I should shortly have chains and lanyards for them too.
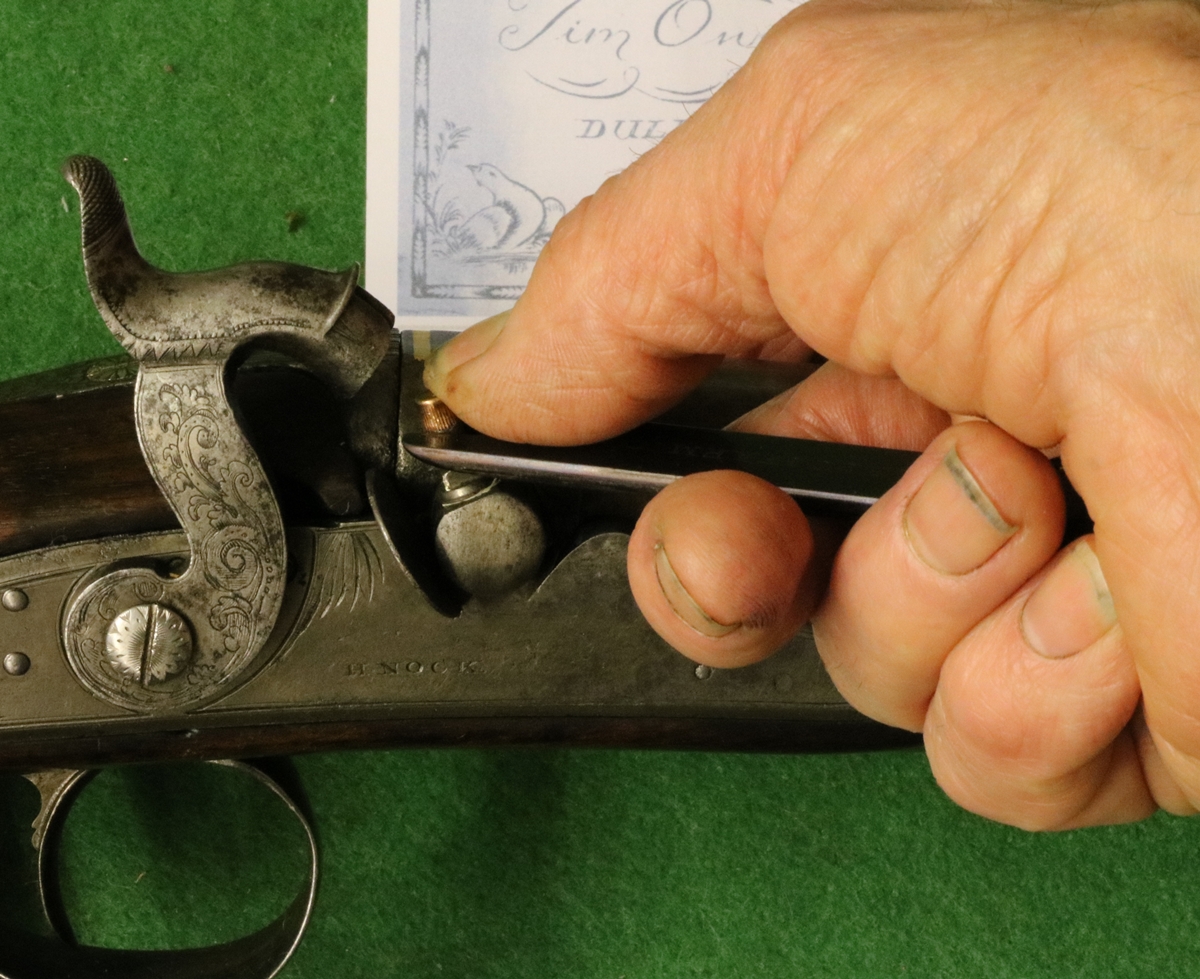
De-capping tool in use.
17th Nov. I have been trying to engrave my de-cappers quickly and with minimum cuts as that was how the old engravers used to approach their work on most guns – but in the course of so doing I managed to get out of sync and engrave a ‘B’ where it should have been an ‘L’ so I thought it was a good opportunity to test how easy it was to weld over a mistake and re-engrave it. My welding isn’t that good, so I got a few hollows round the edge, but here is the result – the ‘L’ in ‘Cables’ was the mistake. Not too bad for a beginner! The engraving hasn’t been touched up, its the first pass.

One of the joys of having an AGA range in the kitchen, apart from keeping warm, is that the hotplates are a good temperature for colouring steel – with an infra red thermometer you can even choose a place on the hotplate that has the right temperature for the desired colour. Putting a couple of layers of aluminium foil on top of the item before closing the lid ensures it comes out right……………
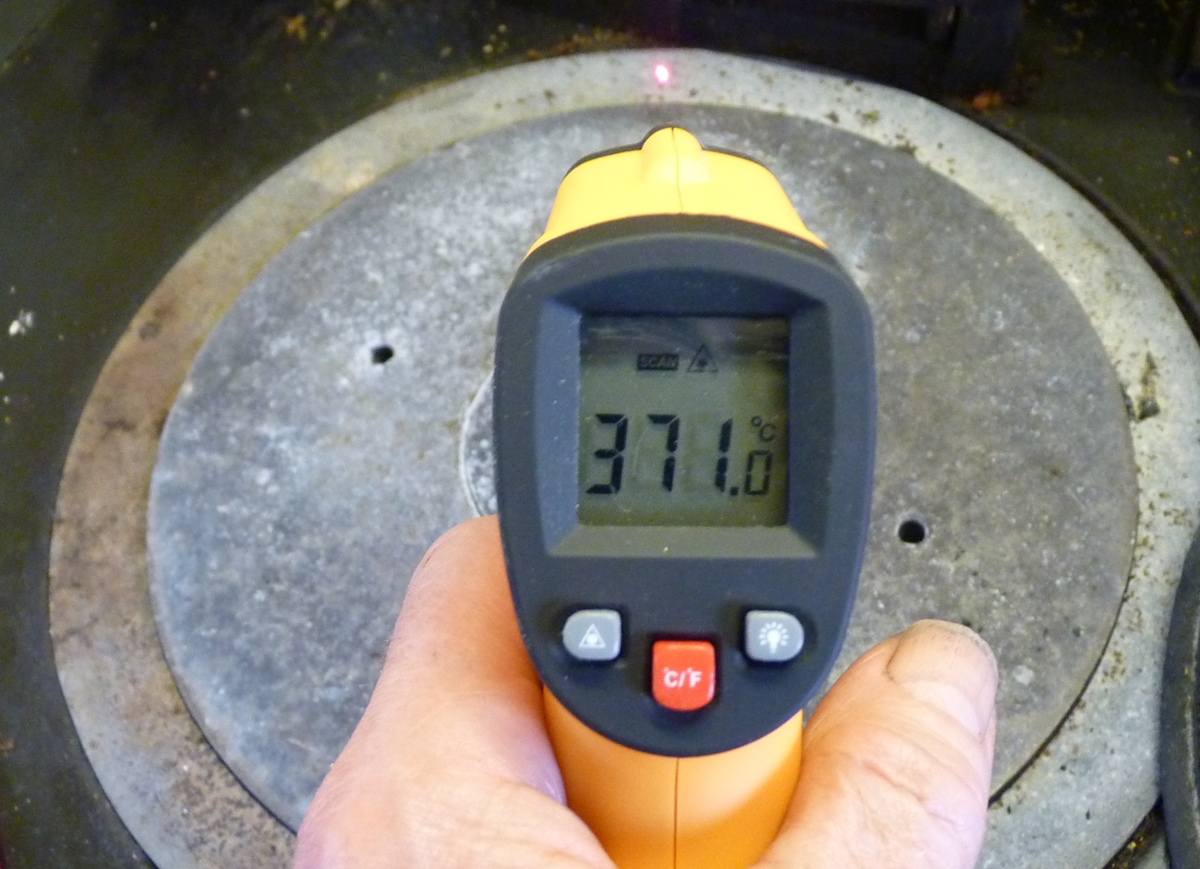
This is the hot plate, the cooler plate covers about 270 to 325 C
16th – a bit more playing with the stock oil on the Nock – its beginning to look passable! I have found that a black felt pen (Sharpie) used very gently helps to blur out the lines where bits are inset – I found that you can buy whole sets of hard wax and tools and marker pens for faking grain for furniture wood repairs, presumably sold to professionals for retouching damaged furniture – a kit costs almost £100 and a set of waxes about £30 so obviously not for poor gun restorers! One tip for colouring in repairs etc is to rub over any applied stain or felt pen with a finger to soften the edges and blend it in – if you don’t, the colour will migrate to the edges of the liquid and make a hard line – its better to almost rub it all off than to have too much! Putting the next coat of stock oil on will take some but not all of the stain out so its a process of little by little! I got a load of 100 ml pots today as I’m planning to make up batches of Slackum and ‘red oil’. I’ll put photos of the rifle stock on the post tomorrow. One technique for grain filling a stock is to rub it with rottenstone, which fills up the grain by getting incorporated into the oil trapped therein – might give it a try. Tonight I am going to engrave a couple more de-cappers if I can find a graver that is long enough – mine are getting shorter by the minute – I’ll have to make some more or take some from stock.
16th November – Sorry, I didn’t get round to posting yesterday, but I got caried away setting up a new WordPress website for the school club, and discovered that the WordPress wrapper that I use on my existing sites has been deleted from the list of available themes, so I had to find a new one, which meant a lot of searching around for information from the web. In between various other activities I’ve been applying ‘red oil’ to the Nock stock and rubbing it off with 0000 grade steel wool to get a good base for the oil finish – I should probably have gone down a grade in paper before starting with the oil, as I saw a few marks when I started with the oil – its amazing how much defects show up when tehesurface reflectivity increases. I also managed to make another 3 de-cappers – I have ordered some chains and lanyards so that they can be offered ready to go! Soon be in the SHOP on this site!
14th November I was doing my Geophysical Archive work today – we are building an online archive of all the equipment used in Cambridge for Geophysics from the 1930s. – mostly at the moment marine seismics. I sorted out some crimpers for a interested Australian, and did a bit more on the Nock stock – trying to get the colour down and stop the patches standing out like a sore thumb! I will shortly start the oil finish as it will be easier to see the effect when its oiled – I mixed up some boiled linseed oil that was coloured with Alkonet with some old slackum and a little terbine driers, and I’ll dilute the first coat with pure turpentine. then move to the same with some talc, and then on to straight slackum with alkonet colour if that looks the right thing! I put a couple more photos on the Samuel Nock post.
13th November – I did a little work on the Nock today – there is a lot of oil or varnish and stain in the outer layers of fore-end that would require a lot of sanding to remove and would alter the fitting of the furniture etc, so I am happy to stick with the finish that is there and just tone down the new bits to match. I got the suggestion from a correspondent that the peep sight we all assume fitted into the empty hole in the false breech was for long ranges and so didn’t need to be very low, and wouldn’t conflict with the fixed blade rear sight. I will definitely try to make on – maybe if I can find a suitable range I’ll shoot it when I’ve finished – but it will have to be with the peep sight as my eyes won’t accommodate open sights and the target together. I made another small batch of de-cappers this afternoon as I sold several at the shoot on Saturday and gave one as a prise – I didn’t win it, I got a bottle of wine! I’ll put them in the ‘shop’ on this site shortly – I’ve ordered a few chains and lanyards for them too, and they have a nipple pricker on the ring. I must also order some pots so I can make up Slackum etc to sell…. Always more to do than time to do it in – sometimes I dream of being bored………..
12th November – Anglian Muzzle Loading shoot at Cambridge Gun Club today – our annual hammer gun competition and a new flintlock competition in parallel. I shot my lovely William Powell in cold, drizzle and wind, but fortunately all the stands were covered, although the last was still pretty bleak with rain blowing in – most of the time I struggled to see through my glasses, but that must have been an advantage because I finished joint third – almost a record for me! Probably fair to say that some of the best shots were otherwise engaged with their flintlocks, and that at the first stand it was a long time before anyone hit anything – in fact I think I was the only person to hit a particularly sneaky ‘rabbit’. I think I must have a perverse shooting ability, because when it came to the last 4 shots I was cold and wet and had frankly had enough and just wanted to get to the cafe for a cup of tea, but still managed to get all 4 clays that I would normally have missed – I wish I understood my psychology! Anyway, its amazing what passes for enjoyment in the shooting community. I got back and after a bit of gun cleaning ( the Powell has perfect bores so cleaning after black powder shooting is a doddle) had a go at the epoxy and walnut dust mix that I had put in the hollows of the Samuel Nock rifle stock – in some places it doesn’t show but in other places it’s not quite the right colour – but that will change when the stock is oiled. I do two phases of touching in colour, after sanding with fine (600) strip I go over bits with a water based stain and then 0000 steel wool and possibly more water based stain (Van Dyke crystals mostly) to get the general tone right, then I will start the finishing a coat of boiled linseed oil followed with ‘Slacum’ that I make to a recipe that I’m told comes from Purdeys, using talc mixed in as a filler for the first coats. Talc has the property that the minute particles are actually transparent and so in a matrix of oil they become transparent – or so I’m told – anyway mixed with Slacum it makes a good grain filler and doesn’t make the wood look ‘cloudy’. I use boiled linseed oil to make the Slacum, and I keep Alkonet root in the jar with the oil so that it takes on a reddish colour. The Slacum is put on generously with a finger and left until it goes jellified, at which point it is rubbed off with a rag lubricated with linseed oil and the process repeated many many times… Depending on the temperature it usually takes 4 to 8 hours for the Slacum to jellify – DON’T leave it beyond the jelly stage or you’ll end up having to take all the finish back to the wood.. During the oil finishing process I do a bit of colouring with spirit stains painted on with a small brush after the jellified Slacum has been rubbed off – Its difficult to reverse the process so you need to be very sparing with the colour – I bought a set of 10 different colour spirit wood stains from Axminster Tools ( I think), You have so many coats to put on that you can afford to take the colouring very slowly! Photos of the bare stock tomorrow all being well!
11th later – more work on the rifle – I repaired the bad patch on the left side but didn’t get the joints as tight as I would have liked – still it’s much better and will colour up OK & the grain is right. I have put more photos in the Post – I had one suggestion for the hole in the false breech – that it might be a mount for the back end of a long tube sight with the front end mount replacing the foresight – that sound possible as it could then be sufficiently far above the stock that you could reliably get your eye to it. It is probably a bit early for the tube sight to be common, but it is a possiblity. I’m intrigued by the grub screw and blanking plug in the back of the cock – so that is my current quiz – why the grub screw and why the plug? The plug would be consistent with it being a pellet lock conversion except there is no retaining spring hole and the cock isn’t the same shape as the pellet lock one and doesn’t look cut down. I suppose it could be a conversion with a cock made from a forging for a pellet lock or one of the other transition percussion systems. Lots more photos on the Samuel Nock Rfle Post.
11th Nov – The glueing of the Nock went really well – I am sure its now as strong as it was originally. I removed the shellac before glueing, and I’m now cleaning up the woodwork – I’ve steamed it thoroughly to raise dents, and I’m going over all the bits where someone had used dark epoxy filler (without raising the dents first). I have a minature controllable heat gun for surface mount electronics that I can set at a temperature that softens the epoxy without charring the wood – I used 165C. I use a suede brush to left the soft epoxy. To my eyes it looks better already with the dents and dings unfilled – when I’ve finished that I’ll steam again to see how much more I can raise, then maybe either glue in wood or use epoxy with loads of walnut dust as a filler, or just leave the small ones – I filled a gap in the crack this way and its almost undetectable if you don’t know its there. I now need to replace the poor wood repairs on the barrel groove. It’s all slow and painstaking work, but the gun merits it. More photos will follow!
10th – More on the Samuel Nock, including a frightening photo! See Samuel Nock Rifle post. I’ve just found a similar Samuel Nock rifle ( a pellet lock) on the web from a 2011 US auction – its dated 1825 and has a very similar lock and other details, so if that date is right, my date of 1828 is about right. I’ll put the auction details on the post….
9th later – I took the Nock rifle over to Dick’s and we spent a happy half hour over tea looking at it and speculating on its history – see the post ‘Samuel Nock Rifle’ for our thoughts – any thought you have would be gratefully received!
9th Nov – I decided to put the Samuel Nock Rifle in a new post as I had a lot of pictures – I’ll take it to Dick’s this afternoon to review the way to go with the stock work.
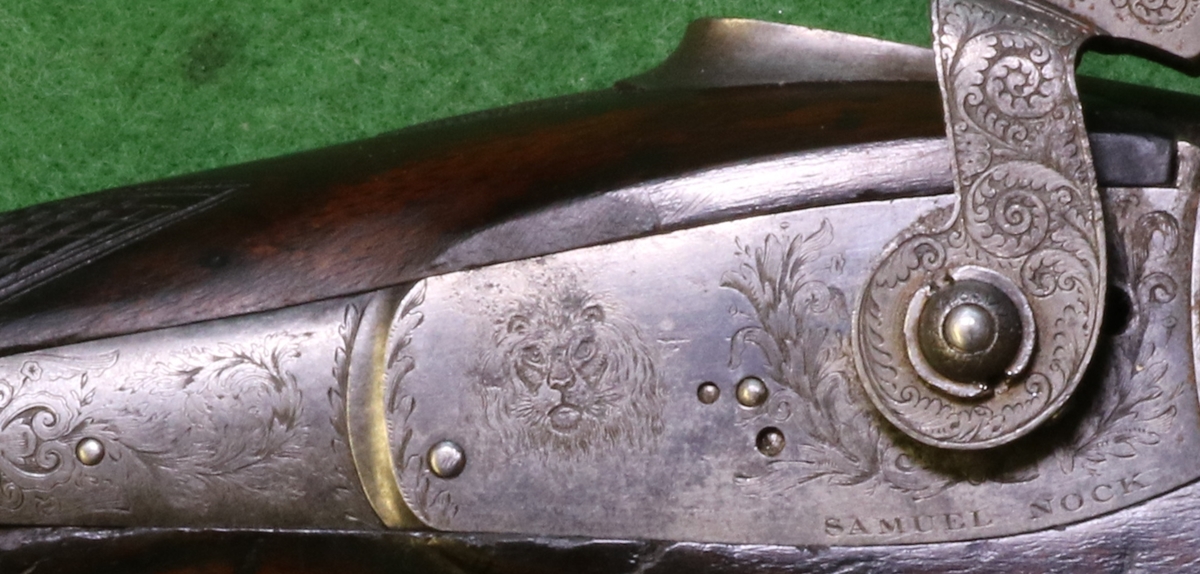
Quite a natural looking tiger – must have been made for Indian big game! See Samuel Nock Rifle post
8th Nov. Busy running my science club and then a governor’s meeting but I was determined to do something firearms related today so I got out the Samuel Nock rifle that I bought at the Quy country fair….
Here is a QUIZ; – It is an unusual rifle – I’ll put up some photos tomorrow when I have a bit of time and its light enough to photograph outside. Samuel Nock on lock and Samuel Nock Regent Circus London Gunmaker to His Majesty on the barrel with a gold poinson – he was at Regent Circus from 1823, and the lowest serial numbers at that address were about 6600. and he seems to have made on average 70 guns a year so that would put it -6916 – around 1828 ish – in 1850 by the time he stopped making guns he had produced about 2000. .Anyway its percussion back action lock with a very heavy barrel ( 9 lbs for the barrel alone) and big game scenes on the lock and trigger guard etc. it has the serial number 6916 but no other marks under the barrel – no proof marks etc. The straight octagonal barrel has a very low bead foresight and folding leaf backsight that is correspondingly low, with a limited elevation for the tallest leaf. The QUIZ element is the false breech – as shown it has a straight platform that lines up with the top flat of the barrel going back an inch and a half or so with a deep hole ( approx 1/4 inch diameter) and a tapped hole into the side of it. What goes in the hole? presumably its for a peep sight, but the puzzle is that the sight line must be not more than about 1/4 inch above the false breech platform and I can’t see what the sight would look like if it was tight onto the face of the breech. Presumably it would need a windage screw as well as an elevation screw although the latter would be above the peephole. I can almost see how it could be made, but I can’t find any pictures of such a sight – or is it for something else? Or is it likely to be a peepsight without windage adjustment? And is the rifle a target or a big game rifle? It doesn’t have peg holes in the muzzle for a bullet starter as it presumably would if it was a late percussion target rifle and it has a patch pocket in the butt. I’ll put it all together again and post photos tomorrow, but here is the false breech;-
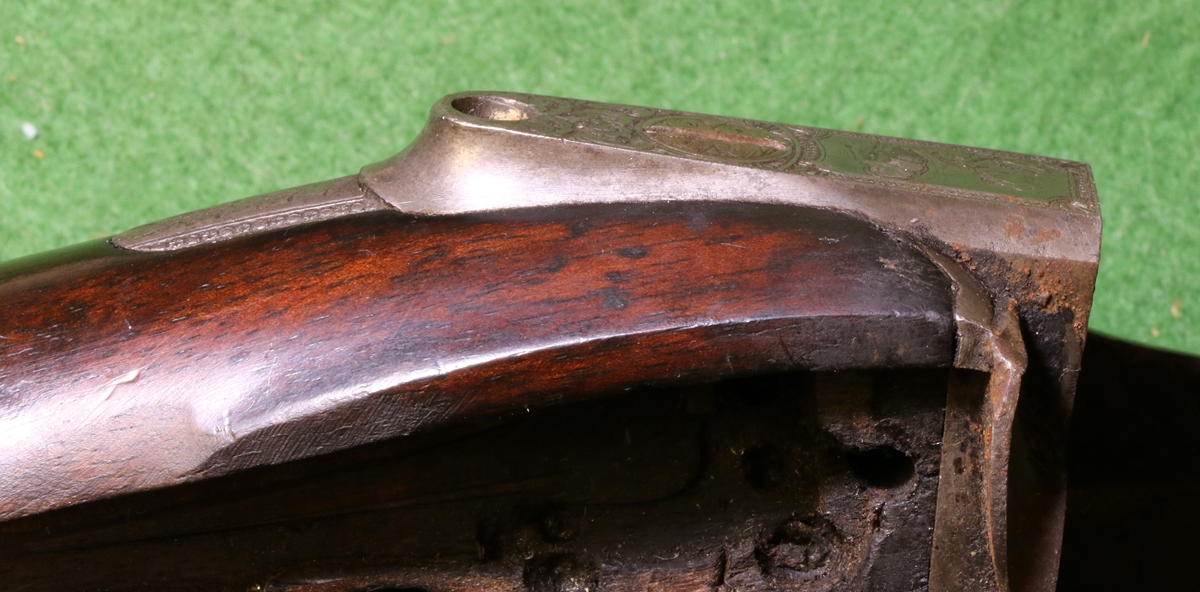
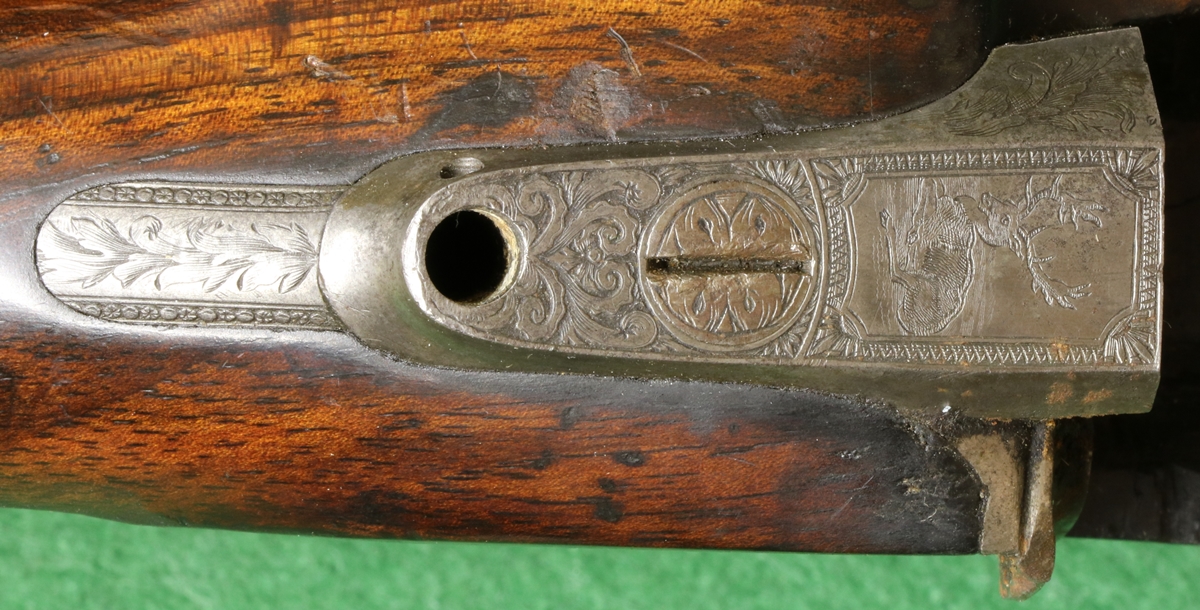
You would think it might be a mount for a peep sight, but what did it look like? You can see that the gun needs a bit of TLC!
It was being used for target shooting by the previous owner who dies recently – maybe someone knows this gun?
7th Nov. I’m afraid I spent most of the day on the Bullard Archive, so no gun stuff today – I might go and do a few minutes engraving before turning in………..
6th November I spent a good part of the morning trying to sort the brake lights on Dick’s Freelander. Given that I spent a lot of my career playing with circuits of every description it should have been straightforward, but the wiring in modern cars is a law unto itself – first one brake light went, then the other side followed, leaving the central light – bulbs OK, Fuse OK, brake pedal switch OK, visible connectors OK, wiring looks OK . I could find various posts on the web telling of similar problems but none offering a solution. There has to be another bit of circuitry/junction somewhere in the front of the car that senses the load current, and the wiring also changes colour and splits somewhere hidden! Anyway I fudged it by linking the working brake light to the non working ones and it now works but thinks it has a trailer connected when you brake ( presumably sensing extra current in one wire?) !
I did manage to finish another two decappers – resulting in another half dozen broken tips to gravers ( but I did get a lot of use from a Glensteel graver before it too chipped…) – this time I checked the temperatures of the AGA hotplates with an infra red sensor gun – the hotter one is 385C ( a bit hot for a good colour) and the cooler is 295C , so I used the cooler plate to colour them and got a very nice plum colour that I rubbed with beeswax as it cooled. I also managed to load another 50 black powder 12 bore cartridges with No 8 shot for next week’s hammergun shoot.
5th November – Gunpowder, Treason and Plot – may it never be forgot – an appropriate reminder of the supremacy of Parliament over the executive and its spurious claim to exercise the royal prerogative! I suppose it is appropriate that I spent the evening of Guy Fawkes day playing with gunpowder! Anyway I loaded a batch of 25 black powder cartridges for the next AML shoot, where I’ll get the chance to shoot my beautiful William Powell ( 2 3/4 drams and 1 oz of No 8 in a 2 1/2 inch case). I finished off Dick’s Nock Lock casting repair – I think its OK – there is one ‘mistake’ where the end of the tungsten electrode got stuck in the weld, but its always behind the cock so not a problem. I haven’t attempted to finish the back properly as I don’t have the pistol to fit it to. I tackled the pile of damaged gravers left over from engraving the spring steel of the decappers, which took a couple of hours to sort a dozen badly chipped points and half a dozen not so bad ones – anyway I now have almost all my stock of gravers ready to use. Most of them are getting pretty short from repeated sharpenings and several will have to be retired and new ones made using the old handles.
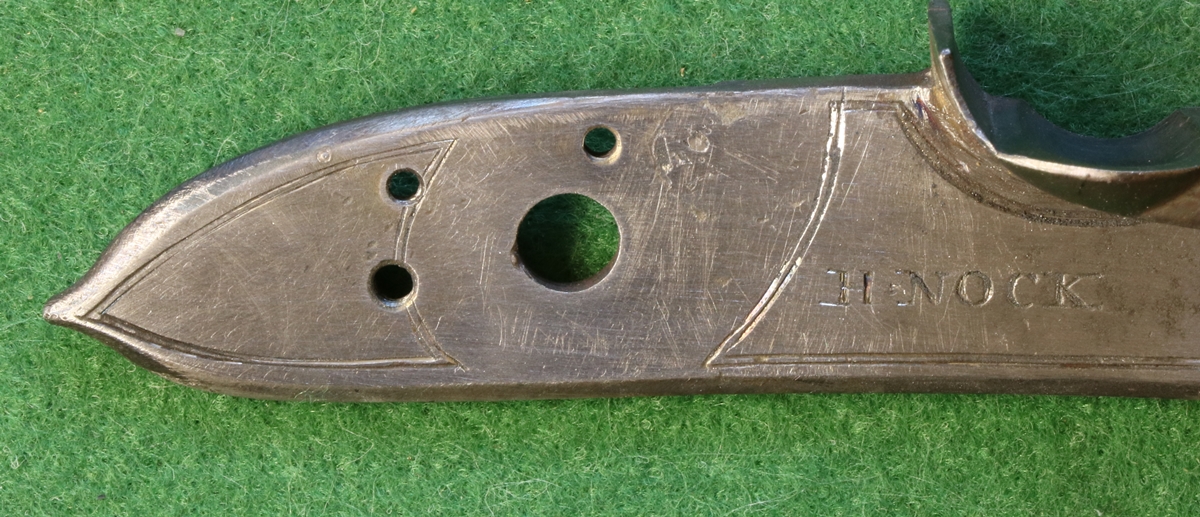
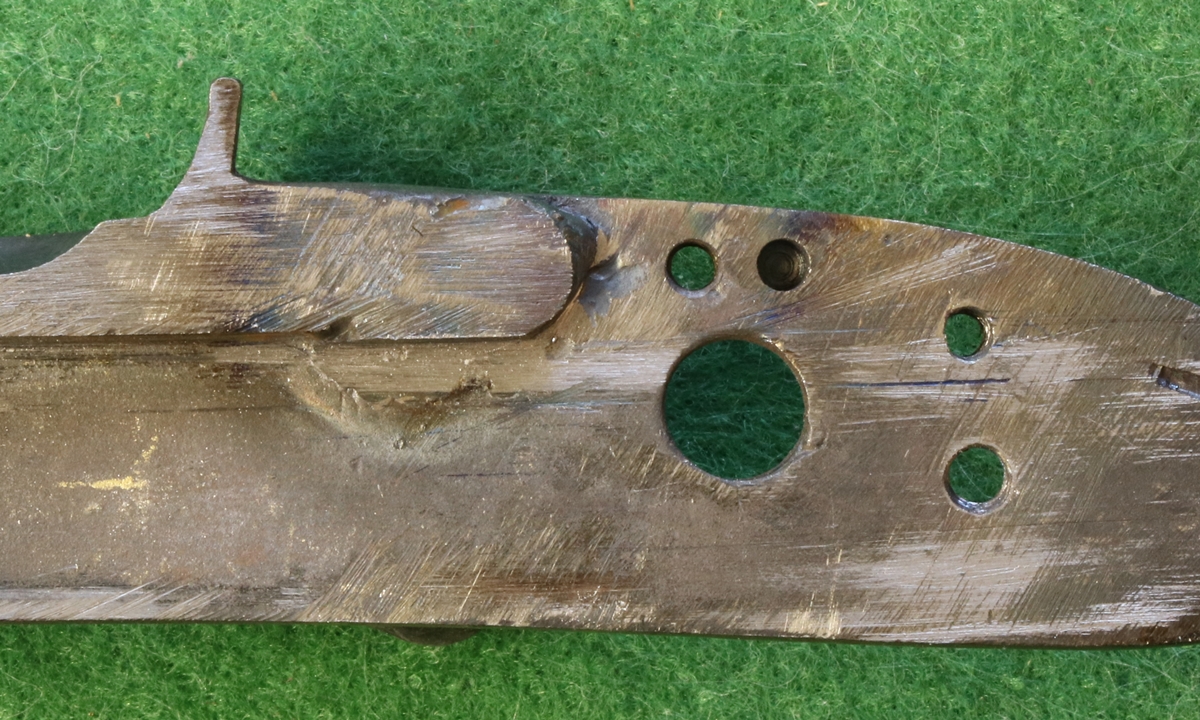
I can’t do any more as I don’t know where the side nail goes – Dick can now sort ti.
4th November Pleasant morning at Eriswell Lodge Clay Ground with some of the Anglian Muzzle Loaders who were ‘taking a day off’ like me and shooting breech loaders – except Bev who was shooting flintlock and made some good kills. Viking was shooting a ‘new’ old u/o of Austrian origin with a plastic stock – fairly unprepossessing but boy did he shoot well with it, which at the beginning and end of the day is what matters. We had a sub plot going shooting simultaneous pairs, which we don’t usually do – I like it – for one thing I’m comparatively better at it than at ‘considered’ shots, and for another its fun, but neither Paul nor I could match Viking! I can’t get over how little it costs to have 2 or three hours of fun in good company – including lunch, 45 clays and cartridges – less than £30!
I did manage a bit of gunwork today – I started a small batch of my new decapping tools – I took the prototype to Eriswell and one or two people wanted one – its pretty simple and basic, but it fulfills a real need – especially game shooting in pairs. I have engraved a couple – its something to practice on, although they are made of annealed spring steel so its pretty tough on the gravers – I now have a bit of a pile in the workshop with the points broken off – they will have to be ground down on the 240 grit hone before sharpening on the 1200 one. I also drilled and plugged Dick’s Nock lock and I think its now OK – I stupidly caught the tip of the tungsten electrode in the weld pool which makes it impossible to file, so I had to touch it on the grindwheel to get rid of it – anyway I think its now OK but I need to check that I haven’t still got any pits in the face of the lock when it cools down – I had to reweld one small area.
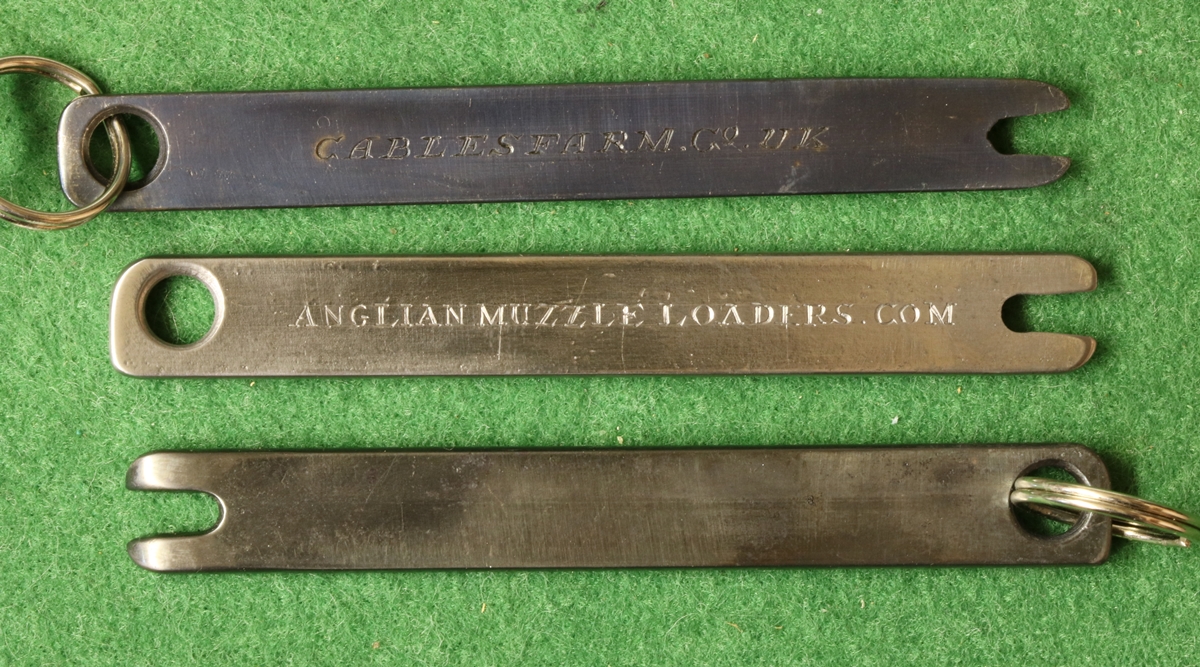
The top one is a good ‘AGA’ blue – around 300C on the hotplate for 20 minutes, the middle one is uncoloured and the bottom one was given the AGA treatment, but probably I took it off too soon (actually it was probably because it was too hot) … The off centre hole is sort of deliberate, but I should have shaped the steel around the hole better……..
3rd Nov Another day of no time to do any gun work I did go down o Dick’s but we spent the time trying to sort out the brake lights on his Freelander TD4 – it turns out from the web that they give trouble – some or all of them failing, it would appear from connector problems or the switch – anyway I didn’t manage to get far in the dark…. But I did bring back a small job – Dick was fixing up one of a pair of pistols using a casting of a H Nock lock and got the hole for the side nail in the wrong place and then wrecked the thread, so I will drop a drill through the hole, plug it and weld the plug on the front, then do a bit of shaping on the back and weld that…… Some of the AML ers are going to Eriswell tomorrow for a bit of ML shooting, so I do need to get in some practice before the next game shoot! I’ll probably take along a breech loader (Tom’s Beretta) as I feel like a bit of effortless shooting! Our next proper shoot is the hammer gun shoot, so I’ll need to load another 50 or 60 black powder cartridges before then – I use new primed plastic cases as they are almost the same price as the primers themselves, and it makes a better job.
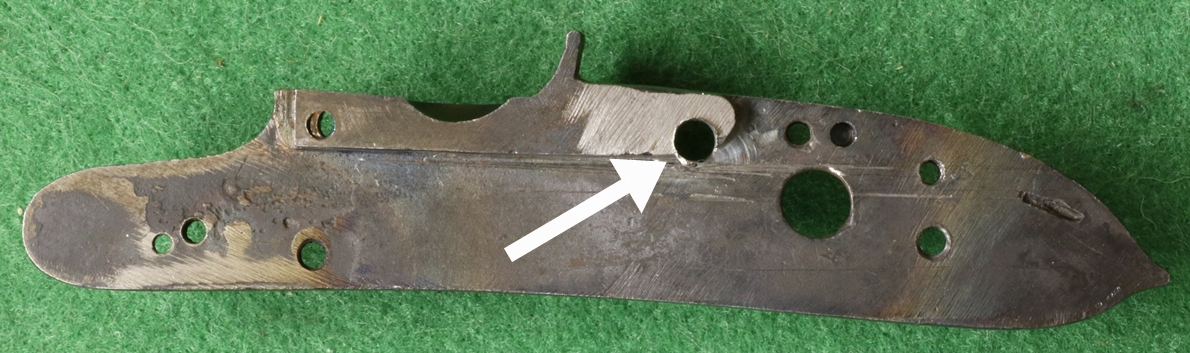
There is a problem with clearance for the tumbler arm so it may be that he will have to make a smaller sized thread on the nail to clear the tumbler – I’ll just weld in the plug and leave the rest to him to sort out!
2nd more… Had a very pleasant day at Cambridge Gun Club and Anna and Tad broke a couple of clays – both were adamant that they would come back for more, and I will get Tosh along as a coach as I’m not very good at seeing where the misses go. I took along a camera and did one video of a shot at a ‘rabbit’ which shows that the shot must have missed it in front by a whisker! Anna was much taken with the ‘Rat Gun’ but Tad preferred Tom’s Beretta, which I discover is a 1988 model (in superb condition for its age). I had a few shots with both and miraculously didn’t miss! I do prefer the Beretta to my Miroku – I’ll have to borrow it back – as it sits in my gun cabinet that is no problem! I also really enjoy shooting the Rat Gun – its like my .17 HMR rifle – you would think its a toy, but actually its a fine tool within its limits. We didn’t get round to the muzzle loaders.
I got an email asking if my gravers were suitable for engraving scrolls in copper, so remembering the trouble I had with brass before I had discovered that 37 1/2 degrees was better than 45 degrees for the main face, I though I’d better do a little experiment – the answer is that I found the 37 1/2 degree graver just tries to bury itself in the copper and is difficult to control, whereas the 45 degree is much easier – I think the heels were the same length in both – they were quite short so that I could do tight curves.
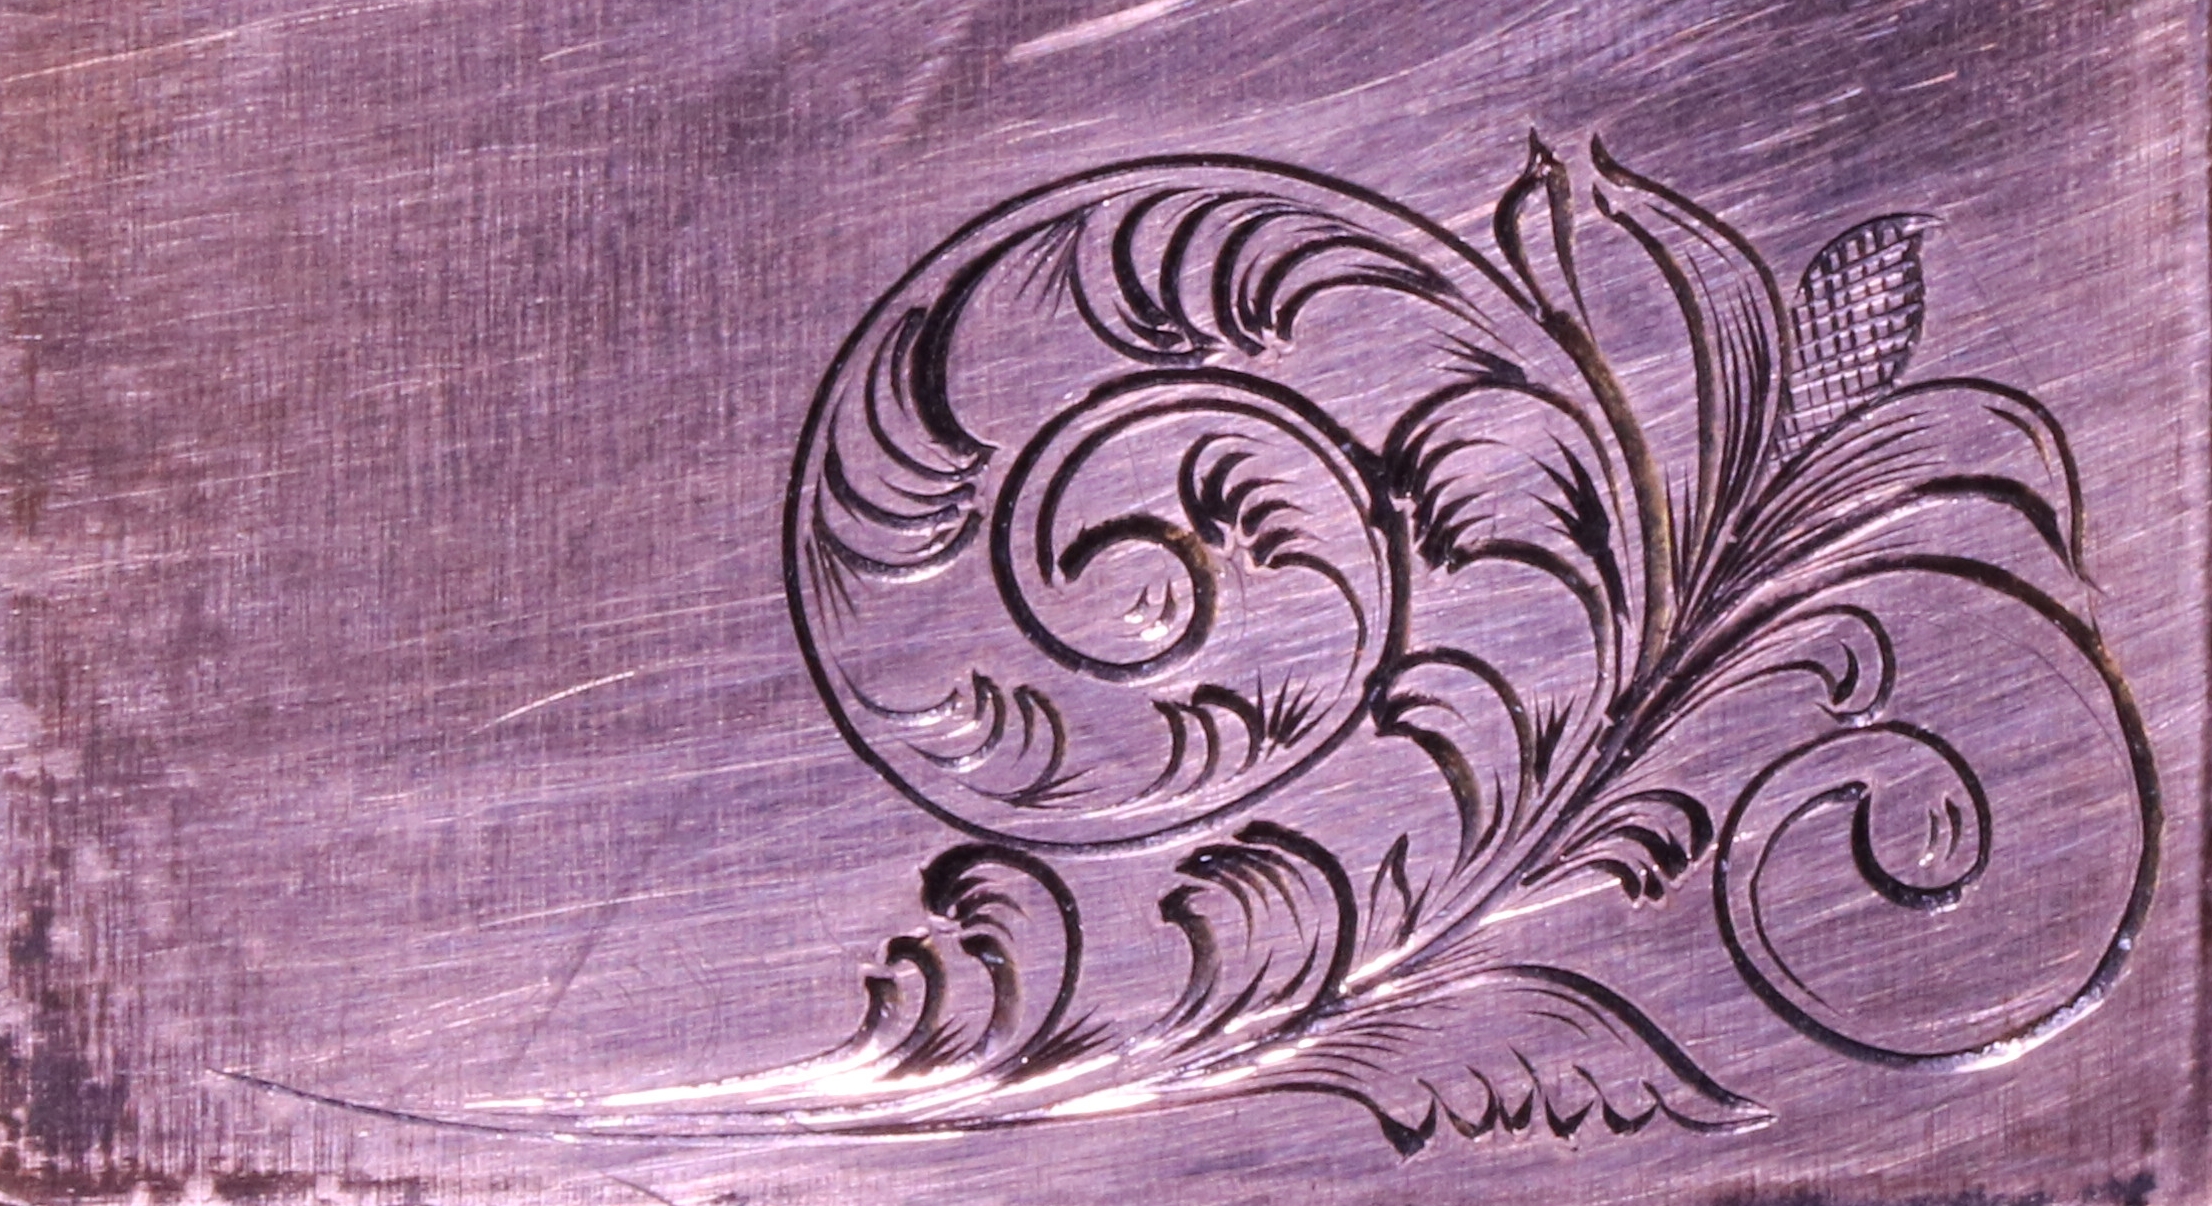
The scroll was done freehand in the style of the Lancaster lock but the bud top right is a bit 1750 ish! – its overall about 15mm high. I started with the 37 1/2 degree graver but it didn’t do sweeping curves too well – the 45 degree was better.
2rd Nov. ( I think I’m loosing track of the date! ) Piling some guns into the car to take daughter and grandson shooting for the first time, and give a bit of exercise to some of my less used guns… so in will go the Rat Gun ( .410 bolt action – I couldnt get 2 1/2 inch No 7 shot so it has to be No 6), the beautiful old Beretta 12 – S 687 that nominally belongs to Tom, my Henry Nock drum converted single 16 bore and my suspect ‘TWIGG’ flinter 16 bore. When I bought it I was aware that it had never seen the hand of Mr Twigg, but since than I’ve seen the almost identical signature on several very new looking locks on guns at auctions and sales – so someone out there is busy faking Twiggs, ( and as far as I can see, the occasional Manton, although mostly Twiggs! – usually the dealers involved swear that they are genuine or just shrug… Caveat Emptor).
2nd November I did a bit of tidying up of the poor seamonster with a decently sharp graver and got rid of some of the more obvious lumps in the lines this morning, then had my school club thinking about ways to organise courier deliveries when one was out, with a view to making a model of a secure box, and finally a dinner in Homerton College to celebrate The Great Gatsby film, with my small collection of late 19th /early 20th century pistols. Anyway here is the ‘corrected’ sea monster = still not perfect, but better……..
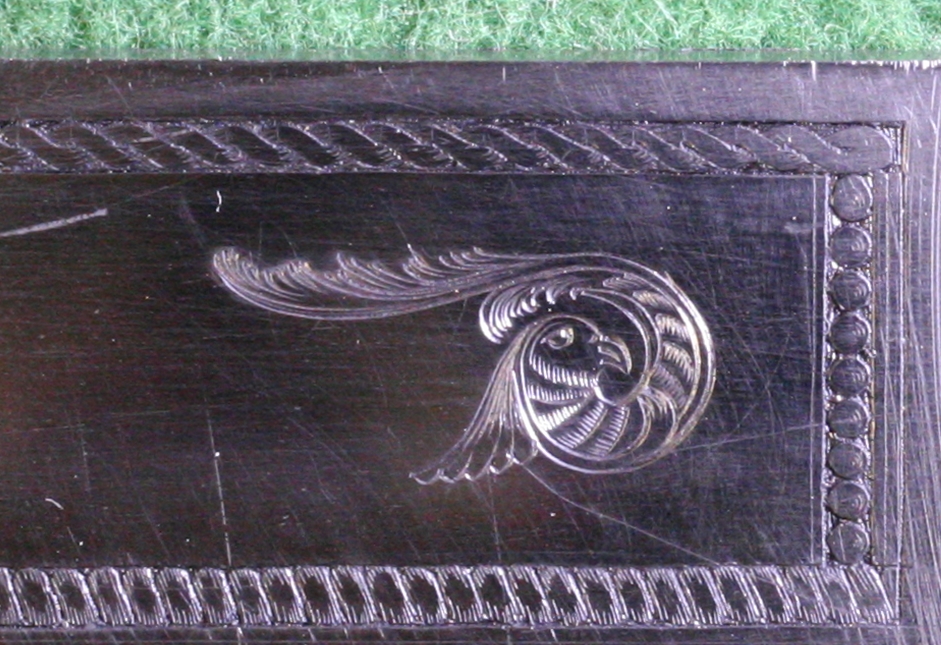
I had to revert to my old camera for this photo as the battery on the new had run down – the lack of focus is because I have to use the viewfinder – the new one lets me use the screen, although I did discover that it runs down the battery fast, so you don’t get many shots if you keep viewing things on the screen – now realise why all the defaults turn the screen off after a couple of seconds!
1st Nov (just) – I managed to fit in a bit of engraving tonight – a Gumbrell style sea monster from my 1823 Joseph Manton tubelock on my test piece that I hope will be a banner on this site when its done…..
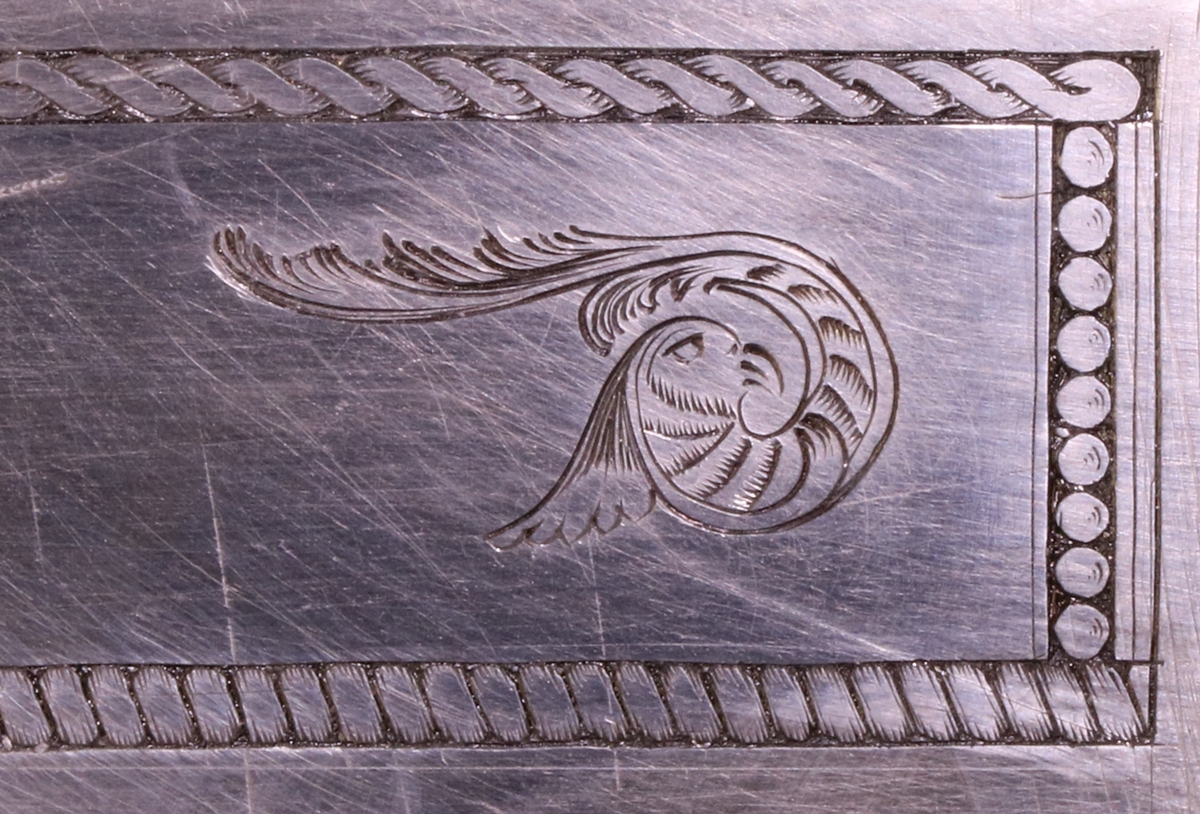
I didn’t get the initial curves very smooth – I should have done a ‘warm-up’ first – the first graver I picked up was a bit uncooperative – it happens sometimes!!
To see diary entries before 1 November 2016 click below;
31st Oct I’m afraid its a busy week this week and I don’t have a lot of time to ‘play’. Today was my day for work on the Geophysical Instrument Archive in the Earth Sciences Department of Cambridge University – (see www.carrackconservation.co.uk) and tomorrow I have a meeting and my primary school science club, and a dinner to celebrate ‘The Great Gatsby’ film of the 1920s – I’m taking a small display of 1920s pistols – Derringers and ladies pocket pistols (S&WE .32 rimfire revolvers). Wednesday I’m taking my nephew to introduce him to guns and clay shooting – Thursday is a ‘play day’ I hope, and maybe I’ll have the metal to finish the first batch of de-cappers. Friday a group of us is planning to go to Eriswell to shoot a few clays! Phew…… another week rushing by, and the Lancaster calling forlornly from the bench and somewhere I have to fit in doing my VAT return…………….
30th October – Back from a super days shooting on Saturday in glorious sunshine – great farm near Beccles and very relaxed and friendly affair, although my shooting left something to be desired – lets pass quickly over that and just enjoy the whole day. I ended the day tired but very happy – when one is used to walking on flat pavements and grass its very tiring walking across cultivated fields. We were shooting with two on each stand, taking turns to shoot, so after one had fired a single barrel, if there were no more birds in range, our partner took over. This means that you reload the fired barrel with the unfired barrel still loaded. To load the fired barrel safely you have to remove the percussion cap from the loaded barrel (remember we are talking percussion guns here) which means taking the cap off the nipple, on which it is in all probability wedged. There have been a number of accidents lately where this wasn’t done and the loaded side had been left on full cock and fired during loading. Martin Crix provided us all with a little pair of pliers on a neckstrap to get the caps off the nipple but although they helped, it wasn’t a particularly elegant operation and the cap that came off usually got lost. The problem with this method is that the pliers have parallel jaws and the nipples taper so the jaws grip the nipple lower down and are slightly open at the level of the cap and so don’t touch its edge unless you cant them. In the car on the drive home I got to designing a better solution and came up with a simple, easy to make design that can be operated in one hand, including usually rescuing the removed cap. Today I made a prototype that works as I expected and makes it easier to save the cap ( 6 pence each). I will order enough material to make a small batch and then take them to the next AML shoot on the 11th and see if anyone is interested – if its a success I’ll have a batch made. It would be good to combine the design with a really good capper – ON and OFF in one tool!
My bit of engraving for today was to recut the barrel of one of my own guns, the Durs Egg back action lock double, and to engrave my cap remover. I was trying to emulate the old engravers who made the absolute minimum of strokes per letter – it actually worked quite well not to keep touching things up over and over again……….
28th Oct – I’m off to a muzzle loading game shoot in Norfolk tomorrow, but as its meet at 7 a.m. I will have to stay in Beccles. Anyway sorting out all my guns and changing over my flasks from No 8 shot to No 6 and fiddling around conspired to take up most of the day – back on Sunday! I was amused to see that my post of the Sartoris gun had made it into Google searches and images within 24 hours. I get consistently high ranking in Google, probably because its a very small field!
27th later – In my enthusiasm for photographing long guns I took my favourite antique gun off the wall and photographed it, and then realised that I’d restored it long before this blog started – I know it seems its been going for ever, judging by the amount of stuff clogging it up, but it only started in this form in early 2014. So I took some photos and decided it deserved its own post – Jeager Rifle. You don’t get the full benefit of my new camera because I reduce the resolution of the pictures to speed up loading and save my storage space as I have so many photos on the site – also WordPress – the (free) software that lets me run this site very simply – used to stop me putting large photos on the site, although today I forgot to reduce the picture below of the Sartoris with its breech open, and it is much bigger than I meant it to be. If you click on the photo you will see a higher resolution, depending on your screen resolution, although I don’t think I got the focus perfect.
27th Oct It turned out that Giles had a couple of light boxes – diffusing white photographic lights, so I made a green felt backdrop and set too! It more or less works although I need to be sure I get the best out of the focussing – I’m not sure I’m getting my money’s worth out of 6000 pixels! Anyway its now a usable system so I can show you my mystery gun! I’ll start a new post for it, but here is a general view;-
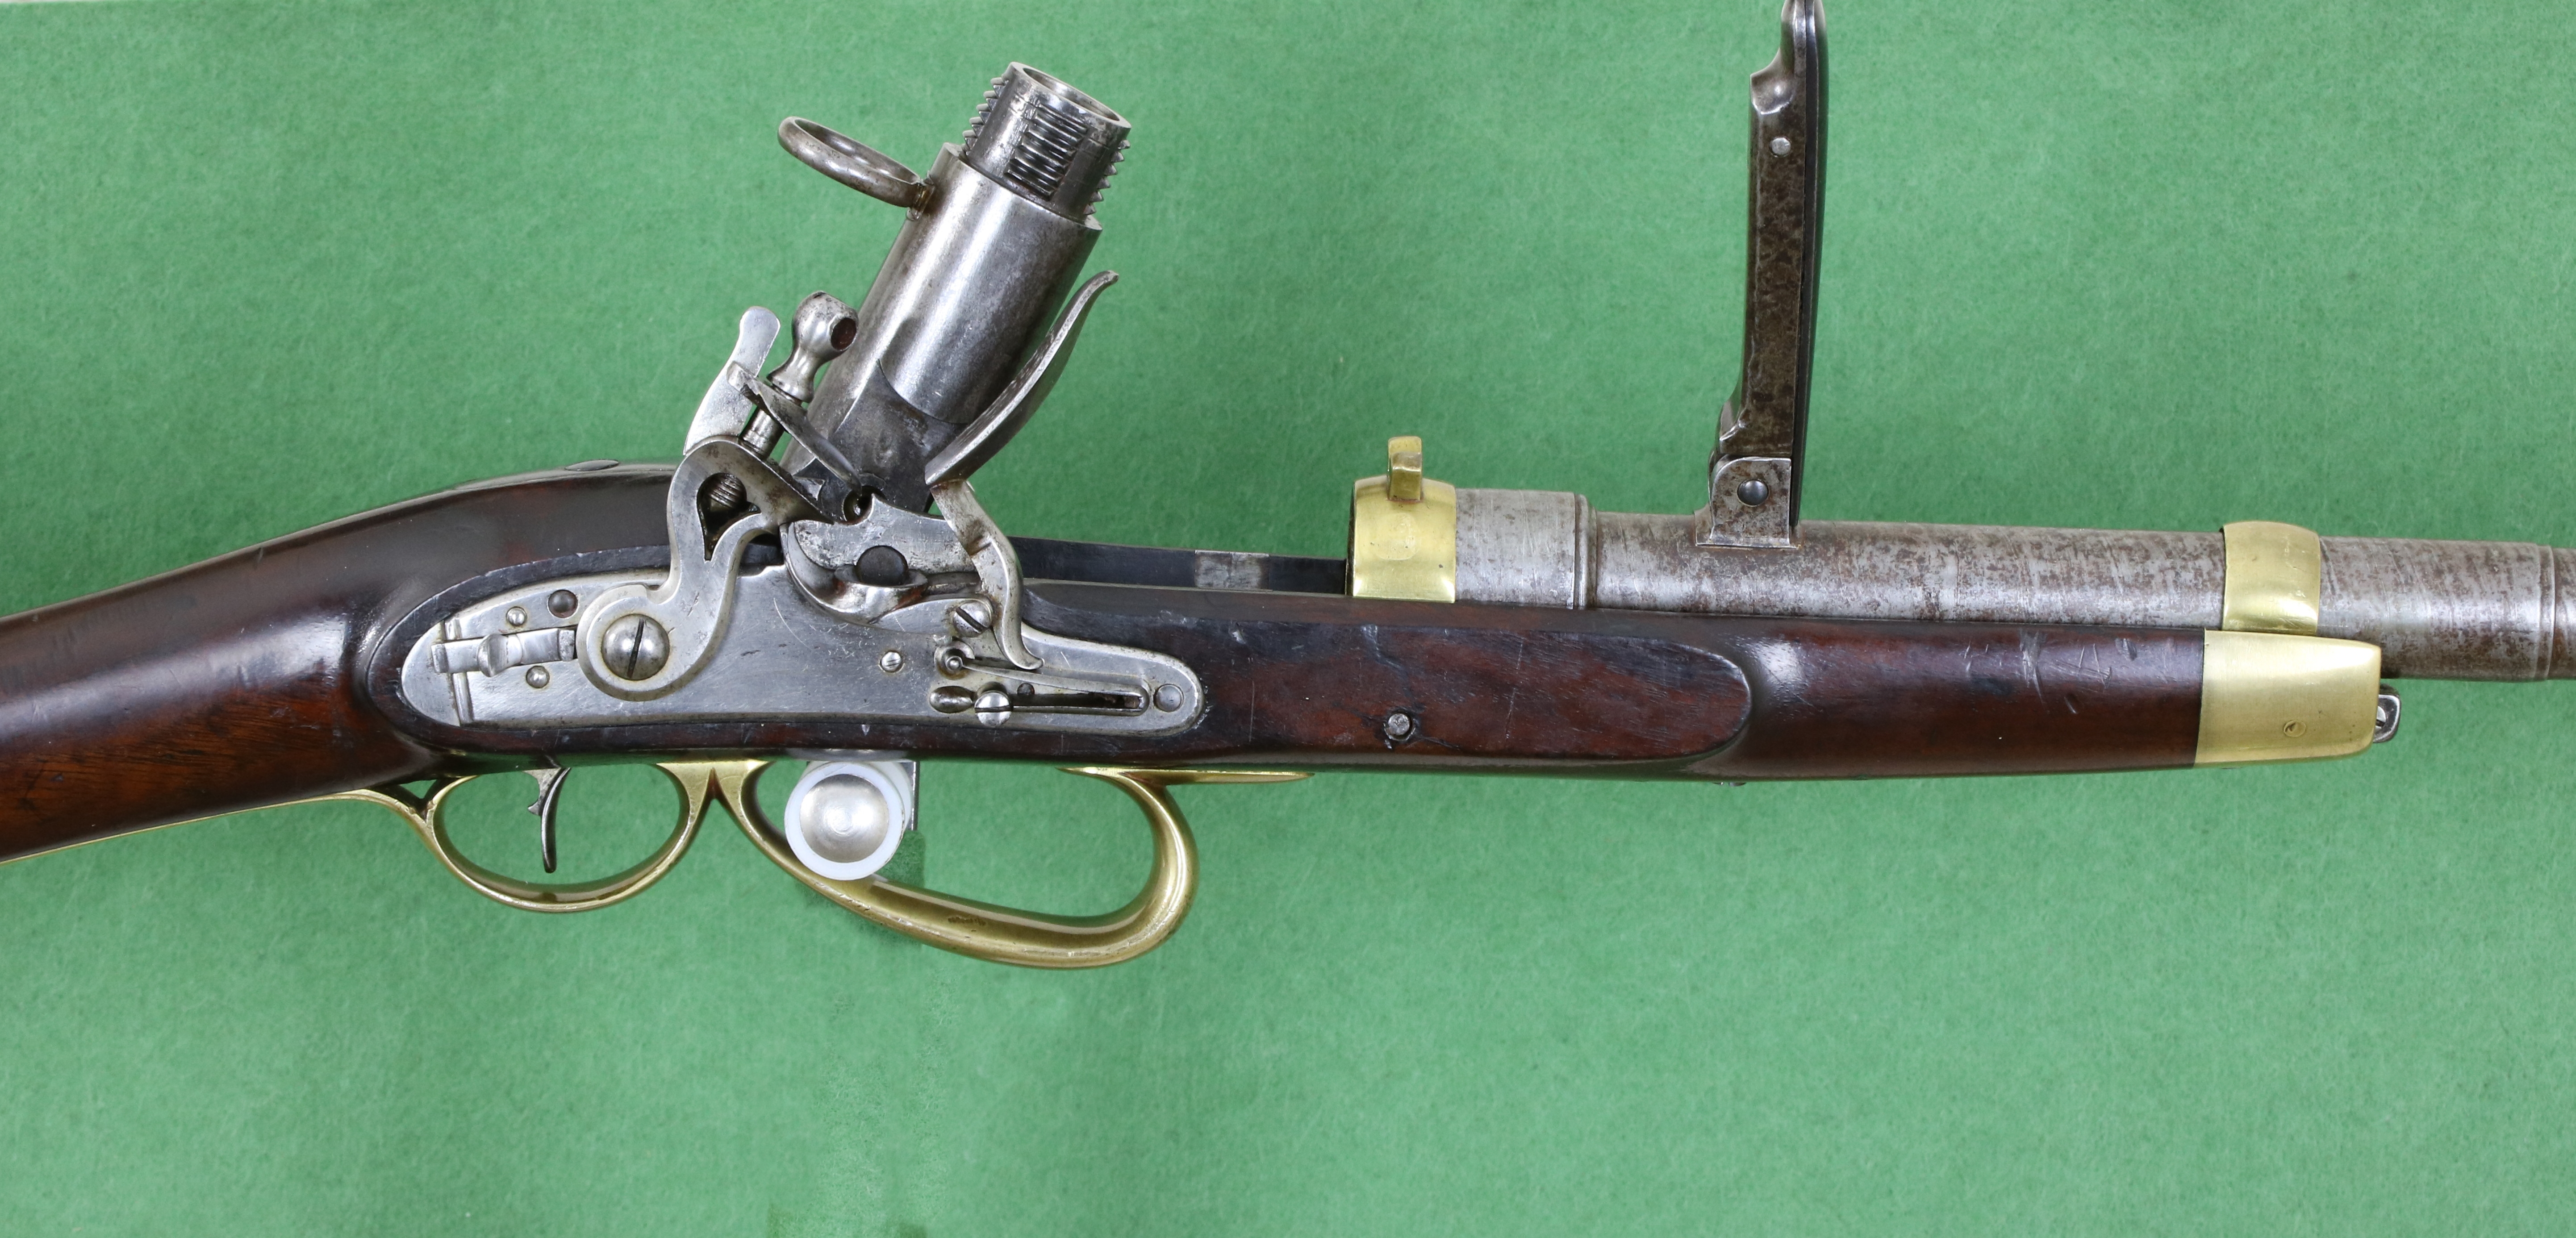
Its a muzzle loading flintlock carbine to Urbanus Satoris’s patents of 1817 and 1819 – a few carbines were made, and also one or two sporting guns on the same principle. Its a clever mechanism, but didn’t catch on because it was too complex for the military and probably got very badly fouled up after a few shots.
My solution to the conspicuous bar holding the trigger support on my gun stand was to cover it in green felt and then ‘photoshop’ it out using ‘Photoscape’, the free pic editing software.
26th Still trying to get a good way to photograph long guns! I wired up a power socket in the cellar to avoid a tangle of extension leads on the floor and built an adjustable stand to hold long guns at a convenient height to photograph – see photo… Now I have to struggle with the lighting ( I’ll need to get all the lights the same colour temperature and diffuse the light more), and sort out a background and tame the camera! The background needs to be OK for black and white photos as the Black Powder magazine only does b&w. I will probably use a green baize for colour photos as I do for pistols. I am now going to go and light the woodburner in the workshop and do a bit more engraving……..
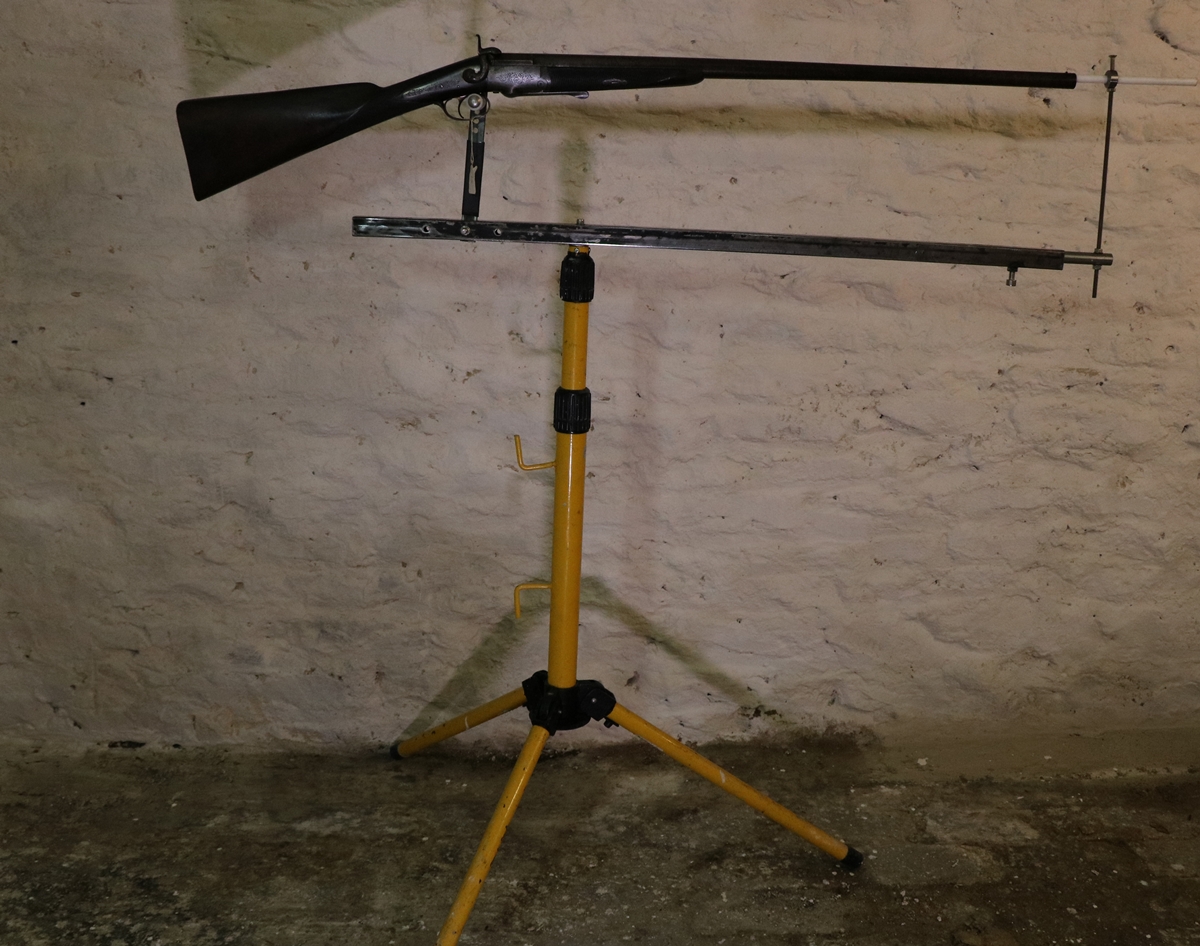
It works, but I need to get a more discreet way of supporting the plastic boss that goes through the trigger guard. This is a Joseph Lang single barreled 16 bore pinfire gun. The directional LED light on the floor is a mistake!
25th Trying to get the cellar ship shape – splashing whitewash about to give diffuse lighting etc… Its amazing how as soon as you look through a camera lens you see how uneven the illumination is, whereas the naked eye compensates wonderfully! Anyway the new camera is neat, although it won’t let me run it in real time from a P.C. although I am supposed to be able to operate it from a smartphone.- probably just lazy programmers! I haven’t done much gun stuff today – a little bit of tinkering with the Lancaster lock and a wee bit of engraving on the banner. Here is a pic of the tumbler of the Lancaster taken with the EOS 760D – a few more pixels to play with!

Now about 2mm from the full cock bent and a pretty safe shape – not a good idea to have a gun that slips out of half cock. There is a slight notch where the rebound bent was in former days but it doesn’t seem to catch the sear so I won’t bother tje weld it up.
24TH Oops – Missed posting last night – I took my mystery gun to Dick’s to show him and we spent a happy half hour taking bits off to try to work out how the mechanism functions – I will shortly post some details! I got the new camera at last and am now trying to work out how to use it. I don’t have a good setup for photographing long guns but the new lens should let me take pics from a sensible distance – my existing macro lens needs to be about 15 feet away to get a long gun in view and my old normal lens is pretty poor. I would like a permanent place like I have for small parts, so possibly might set up a studio in the cellar…… I’ll try to get back to the Lancaster on Tuesday.
23 rd Oct – I left the lock alone and played at a bit of border engraving again – it is very difficult to do a long straight line of engraved border and keep it even( I didn’t manage it this time)! I am doing two patterns, a rope border and one that looks a bit like a tightly twisted rope, I have seen the rope on guns and used it myself ( see Celtic engraving) but I’m not sure where the twist comes from – it is not really very good as a border and takes a lot of cuts to do it, but it is good practice to do the same cuts over and over again………
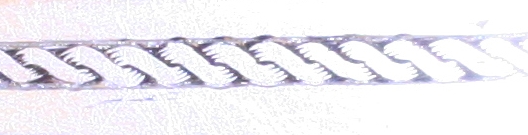
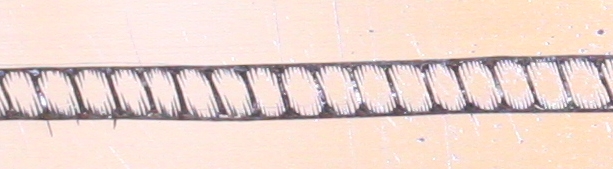
I think I must have wandered when ruling the guide lines as I usually follow lines quite closely!
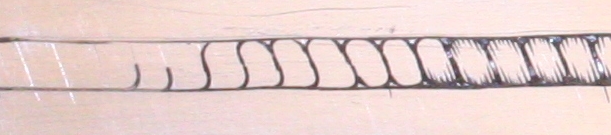
Here are the steps in cutting the twist – hardly economical – there are 16 cuts per repeat plus several tidying cuts. The rope has about 9 plus tidying cuts and is more effective! Keeping the pattern even is tricky as the graver tends to cut deeper and wider as it wears. In all border work the ruling and the marking of spacing and angles that has to be done carefully. When ruling borders I mark and cut one line and then mark the other line of the border with dividers to be a constant width. On curved lock plates that works well, but for long straight lines I’m not so sure!
22nd October – Nothing is simple – I welded some metal ( using fretsaw blades as filler rods for their carbon content) onto the tumbler and filed up the bent again using my ground down file and a 12 inch hacksaw blade ground to a shallow angle and got a very good shape BUT the increased radius of the tumbler didn’t quite clear the sear pivot when the tumbler was fully fired so I did a bit of judicious shaping and it is just about clear now BUT I realised that this is a rifle not a shotgun and the trigger pull used is different in both – in a shotgun you pull the trigger firmly and usually there is an involuntary second pull so that the sear is held off the half cock bent as the tumbler rotates, but in a rifle the trigger pressure is usually lighter and the trigger is gently squeezed, so the sear may not clear the half cock bent – that is why the original Lancaster lock has a detent – a small pivoting part on the tumbler that carries the sear over the half cock bent when the tumbler rotates on firing but lets the sear into the half cock notch when the tumbler rotates in the opposite direction i.e. on cocking – you can see it in the photo of the two locks below. The detent was essential if a hair trigger was fitted as the hair mechanism only taps the sear, but often used in any case on rifles. Here is the welded and filed half cock notch….
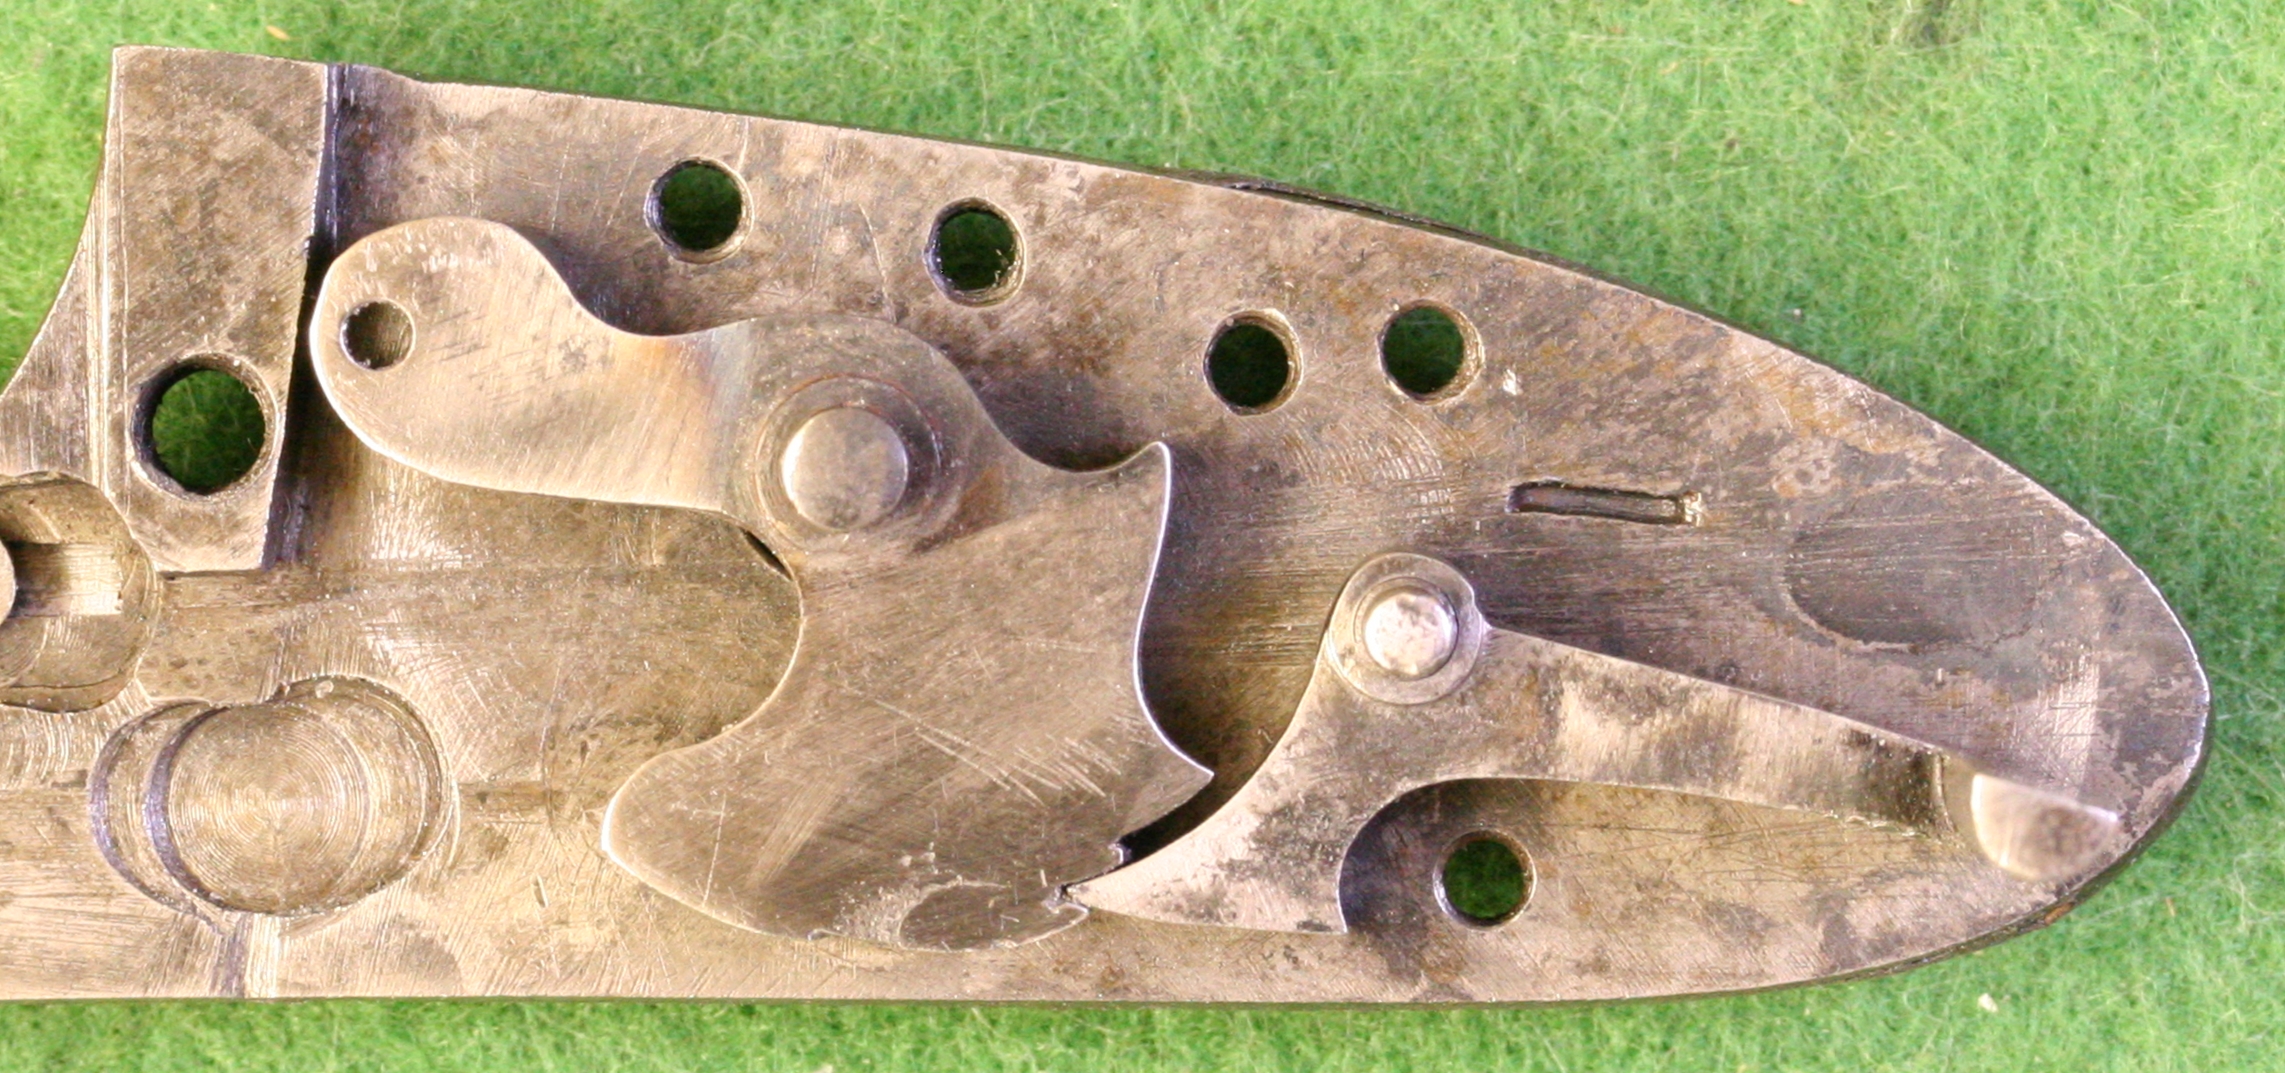
Good half cock bent and the tumbler just about clears the sear, although there could be a bit more distance between full and half cock bents which would allow more metal to be removed from the tumbler radius and help the sear pivot clearance as well as helping the sear to pass over the half cock bent on firing.
I am not planning to shoot the restored Lancaster – it has an internal bulge on one barrel – so I will probably finish the lockwork in the hope that I can get away without a detent – it will be a tricky job to fit one – I’ll have to use Dick’s miller as mine has far too much play to use a 2 or 3 mm cutter!
The engraving for my banner wasn’t too bad, so I’m pressing on with it!
Here is a puzzle for visitors to this site ;- Who was Urbanus Satorius and what did he patent and when? A pot of my magic brown gunge to the best correct answer via the comment box (sorry, but the offer is limited to UK addresses as the postage costs elewhere are excessive!).
21st Oct later.. I think I’m going to have to move the Lancaster stuff to the Lancaster Restoration post as there is likely to be rather too much of it – just the odd highlight here!
Here’s one – I’m trying to put in the half cock bent on the tumbler – I ground down the edge of a No 6 flat needle file ( it hurt, given the price of decent No 6 files!) and cut the start of the bent but there isn’t enough depth without either deepening the full cock notch and risking the sear arm dropping below the edge of the lock plate or building up the tumbler with weld and reshaping it – I think the latter is the way to go…. On the subject of decent tools, I’m forming the opinion that Baiter gravers are just not as strong and sound as Vallorbe ones – I’ll be careful which I buy in future…..
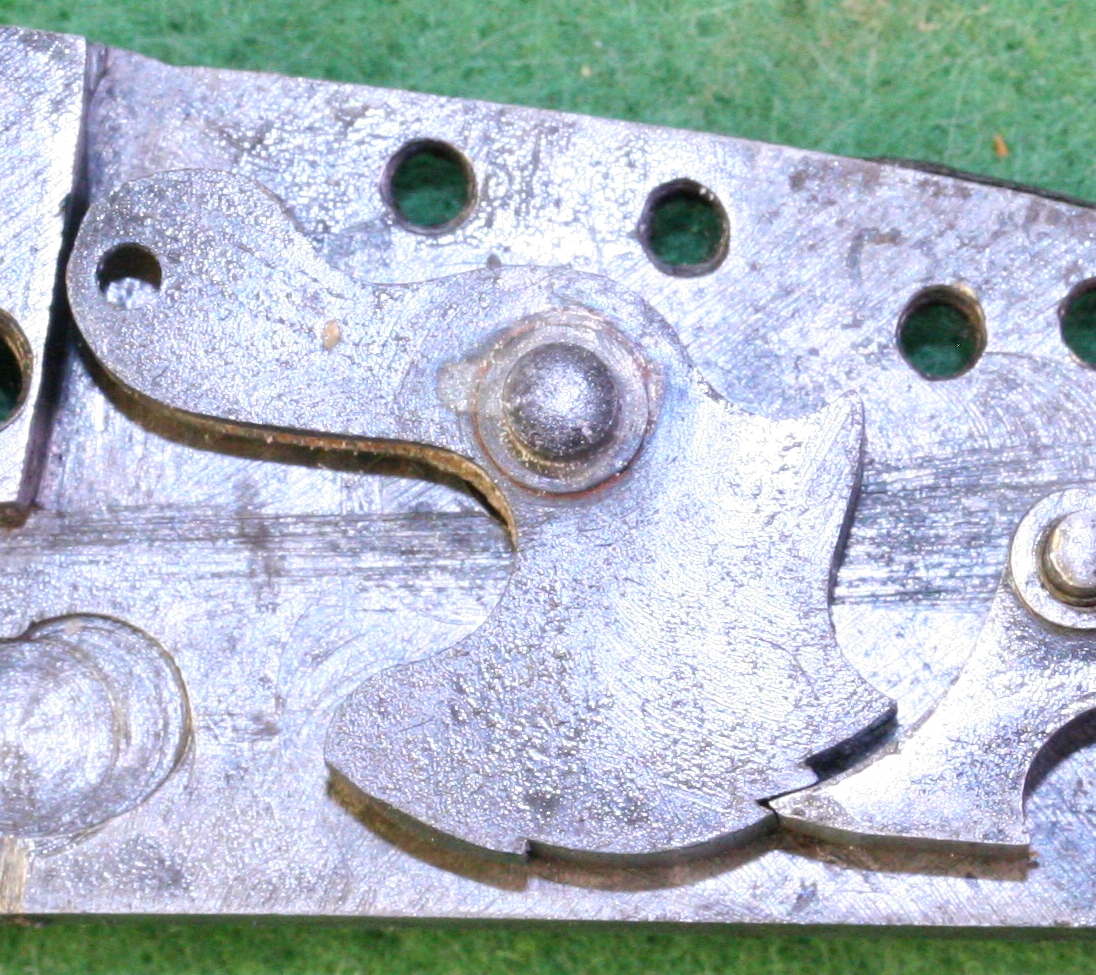
I can’t take any metal off the tip of the sear as its already a decent shape, and there isn’t enough metal to give a safe half cock notch.
21st Oct Some of the folk who patiently follow this blog get a bit fed up when it doesn’t have the proper quota of gun restoration related stuff – I get a bit fed up with all the distractions too! Good news is that I’m now working on the Lancaster restoration again – you may remember that I rebuilt a wreck as a copy of a good Lancaster Oval Bore rifle of very similar date that I had (see Lancaster Restoration post) . The wreck had strange lock plates made from a breech loader with Stanton rebounding locks, and I lifted the mechanism and put it onto a new lock plate and got rid of the extension on the tumbler. If you haven’t got a copy of Cruddington’s Vol 1 on the the British Shotgun you might not know that in the early days of hammer breech loaders there was a problem with the firing pins sticking out if you didn’t put the gun on half cock after firing, and when you closed the gun it fired – bad news! Stanton came up with the idea of an extension of the tumbler arm that hit the extended top limb of the mainspring and caused it to bounce back enough to lift off the firing pins. The sear then engaged a bent much further round that the percussion half cock bent, just off the firing pins – which isn’t a lot of use for a percussion gun as it doesn’t leave enough space to get a cap on the nipple. As you can see below, the lock parts of the original Lancaster (top) and the one I made using the old rebounding locks are pretty much identical except for the half cock bent ( I ground off the rebound bent as it was not in the right place for half cock). So I’ve marked the tumbler for the new bent as you might be able to see, and ‘let down’ (annealed) one of the tumblers to file the bent. I’ve also now got some very low viscosity cyanacrylate adhesive (5 centipoise) and will be fixing the Samuel Nock stock soon – photos when I get the new camera. …and I decided the engraving was just about salvageable!
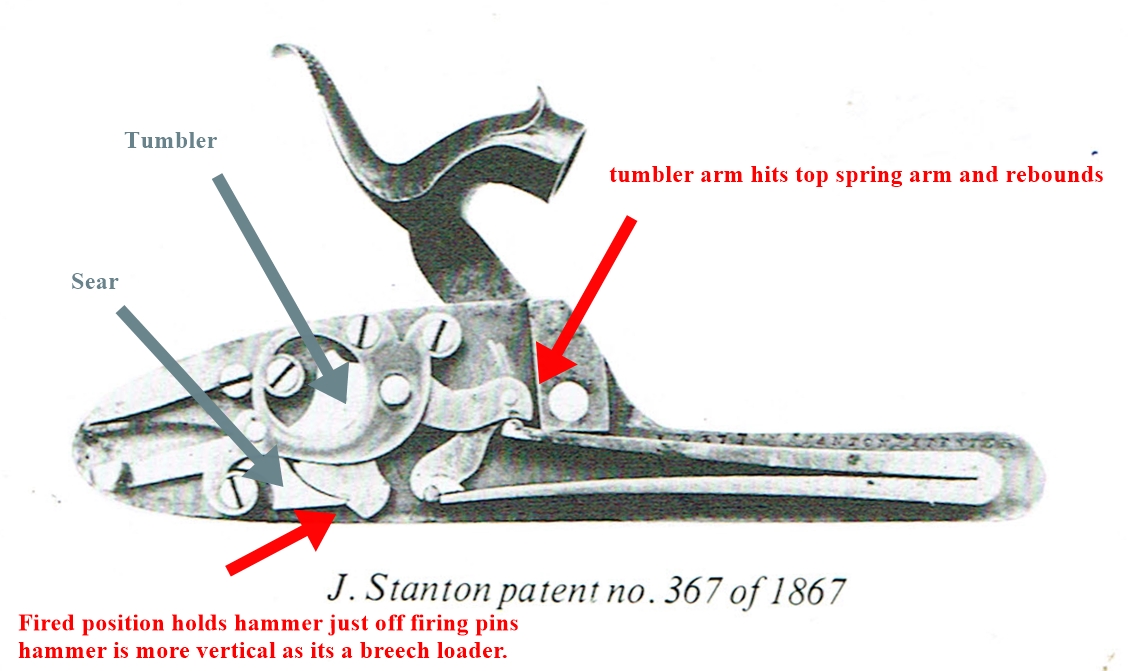
Stanton lock in fired position with hammer rebounded and caught just off the firing pins – not the right place for a percussion cock at half cock.
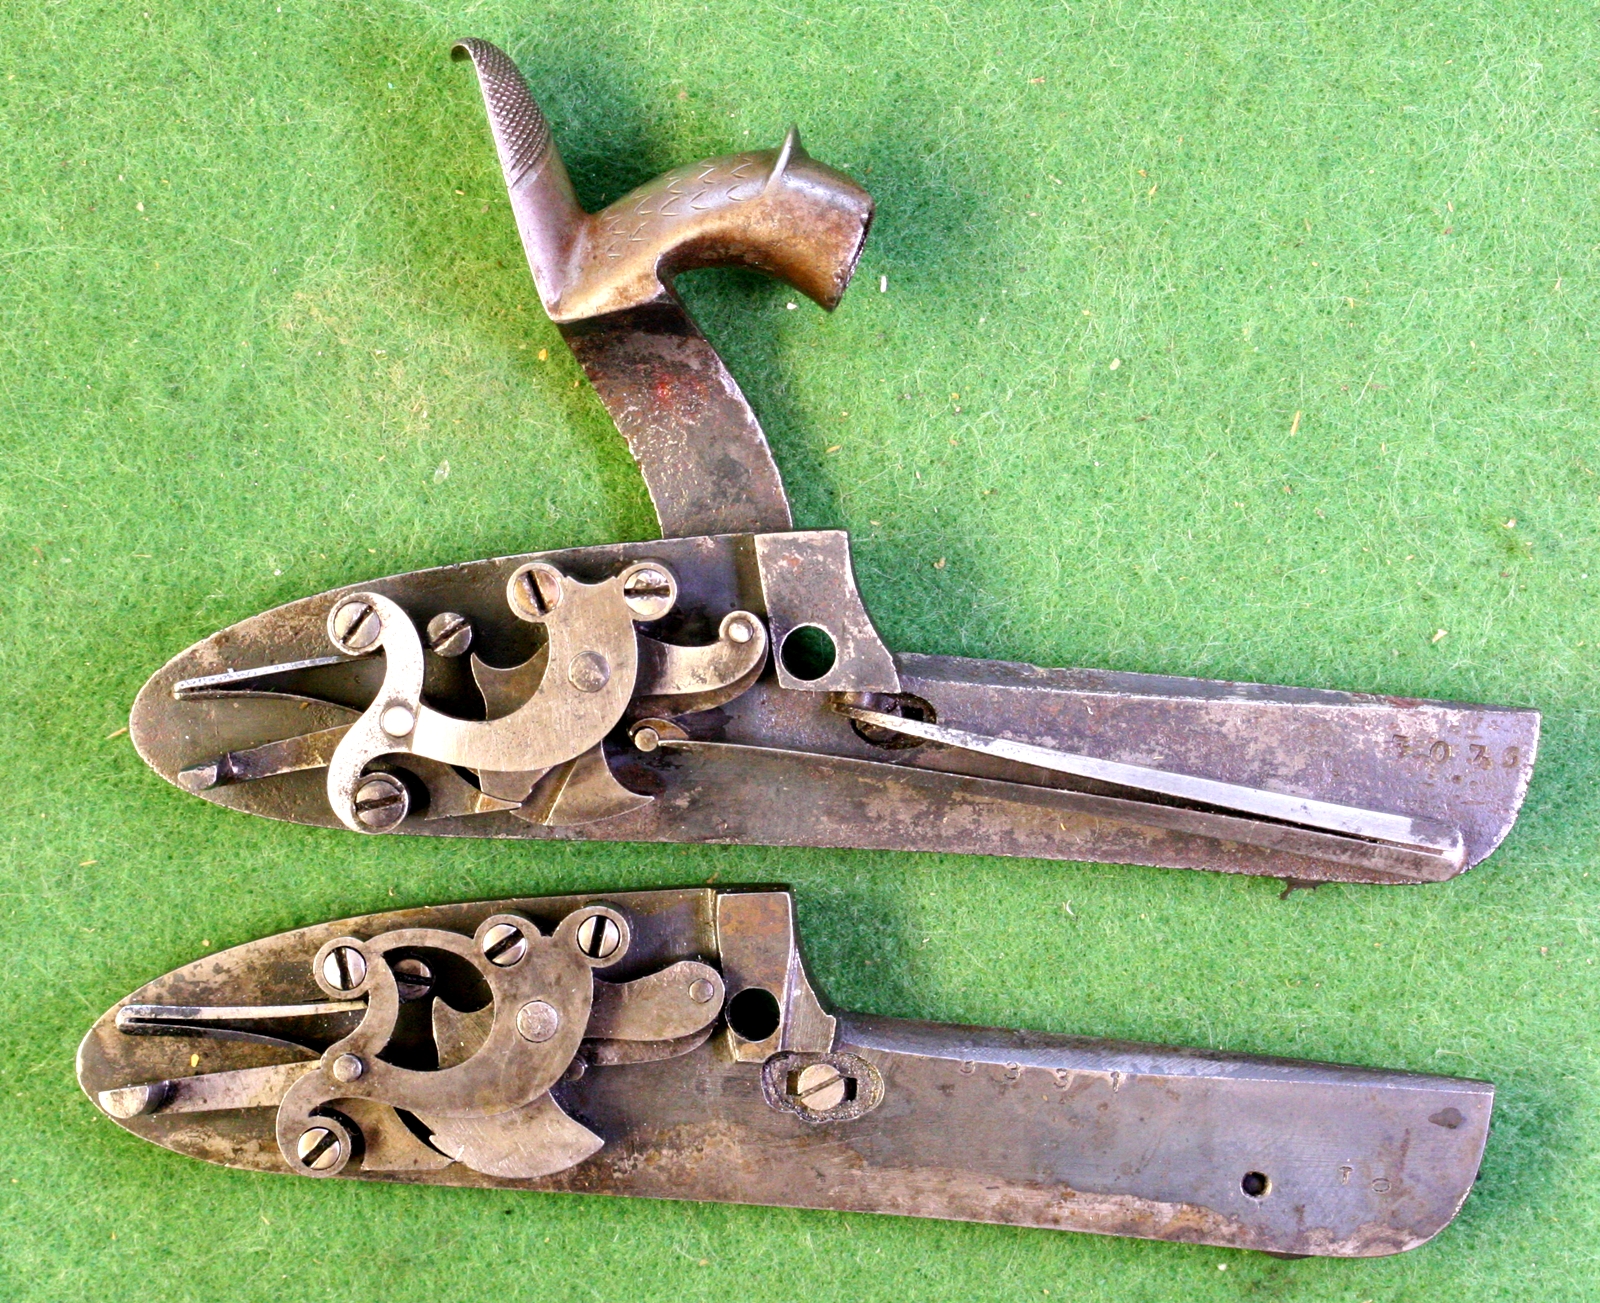
Top is original lock, bottom is my new lock with rebound parts, both in half cock position – original has a detent – mine has no half cock bent , I ground off the rebound extension on the tumbler. The parts I salvaged from the rebound lock are very similar to the original. There is a tiny mark on the (hardened) tumbler for the new half cock bent I’m not sure if I ever made mainsprings for the new locks it was such a long time ago!
20th Oct I spent the morning making a couple of spare parts for my niece’s Autovic printing press that had got lost, it took me three attempts to cut flats on a spacer that were the right distance across flats! Anyway I finished the parts and hardened and tempered them – they come out a lovely deep blue colour from the hotplate of the AGA.. I gave up on the EN 8 steel test piece for engraving and found a bit of ‘normal’ mild steel with only 15% carbon, which is much better to cut and can be burnished to get rid of slips. I started to do a rope border, but somehow my ‘muscle memory’ was playing tricks and the first cuts I made were all wrong – after a few mistakes I got into the swing of it, but I’m afraid that I spoiled the job by then, so I’ll have to start that again! I should learn to try things out on a scrap of steel first. I hadn’t cut long straight lines for a while, and that knack took a while to get back reliably as well – the long lines would be easier with the GRS air graver although you have to be careful not to go too deep if you don’t concentrate. So altogether not a very successful day, and I’m still waiting for my new camera and lens – photos will follow. On the bright side, I came up with a good project for my school ‘inventing’ club after half term – more in due course…..

Awful example of how not to engrave a border! the lines drift about and when I started the loops at the left side it didn’t come together until 3/4 of the way along! I’ll take this down tomorrow but it does show how one can loose it if one doesn’t concentrate and practice first !
19th Oct I just typed in an entry for today and lost it as my login had expired – expletive deleted…… I tidied up the Westley Richards barrels today and toned down the cut surfaces with very dilute TIPOO black ( 10:1) – it now looks good, I don’t think it will need any more recutting. They are now ready for delivery. I have started to think about an engraved banner for this site, and started a test piece, but I realised that the metal I have for test pieces is case hardening grade steel and its very tough – the worst thing is that you can’t burnish out slips with a carbide polisher as you can on soft steel like barrels etc. It also wears tool quite rapidly, so I think I’ll buy a 3m length of 50 x 6mm bright mild steel and see if I can find someone who will grind a fine surface on it for me, as its very tedious finishing test pieces with a file and then 4 grades of paper ! My first muzzle loading game shoot of the season is coming up at the end of the month, so I’ve booked a room nearby so I can be there by 7 and avoid a 1 1/2 hour journey.
18th Oct Finished the Maleham barrel recutting – quite a marathon – at least 10 hours work in total. I did the last half properly – i.e. going through it doing all the cuts from one direction then changing the orientation of the barrel and doing the next cuts on all the letters etc – saved quite a lot of time and probably gets a more uniform result but its easier to forget what you are supposed to be cutting and make a mistake, although I only made one small one and I’m not going to tell you what it is! Here is a picture;-
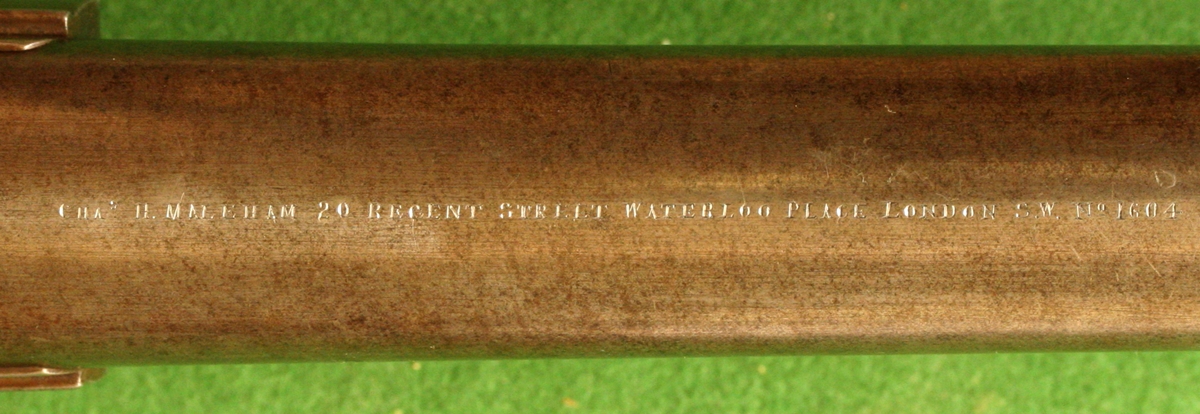
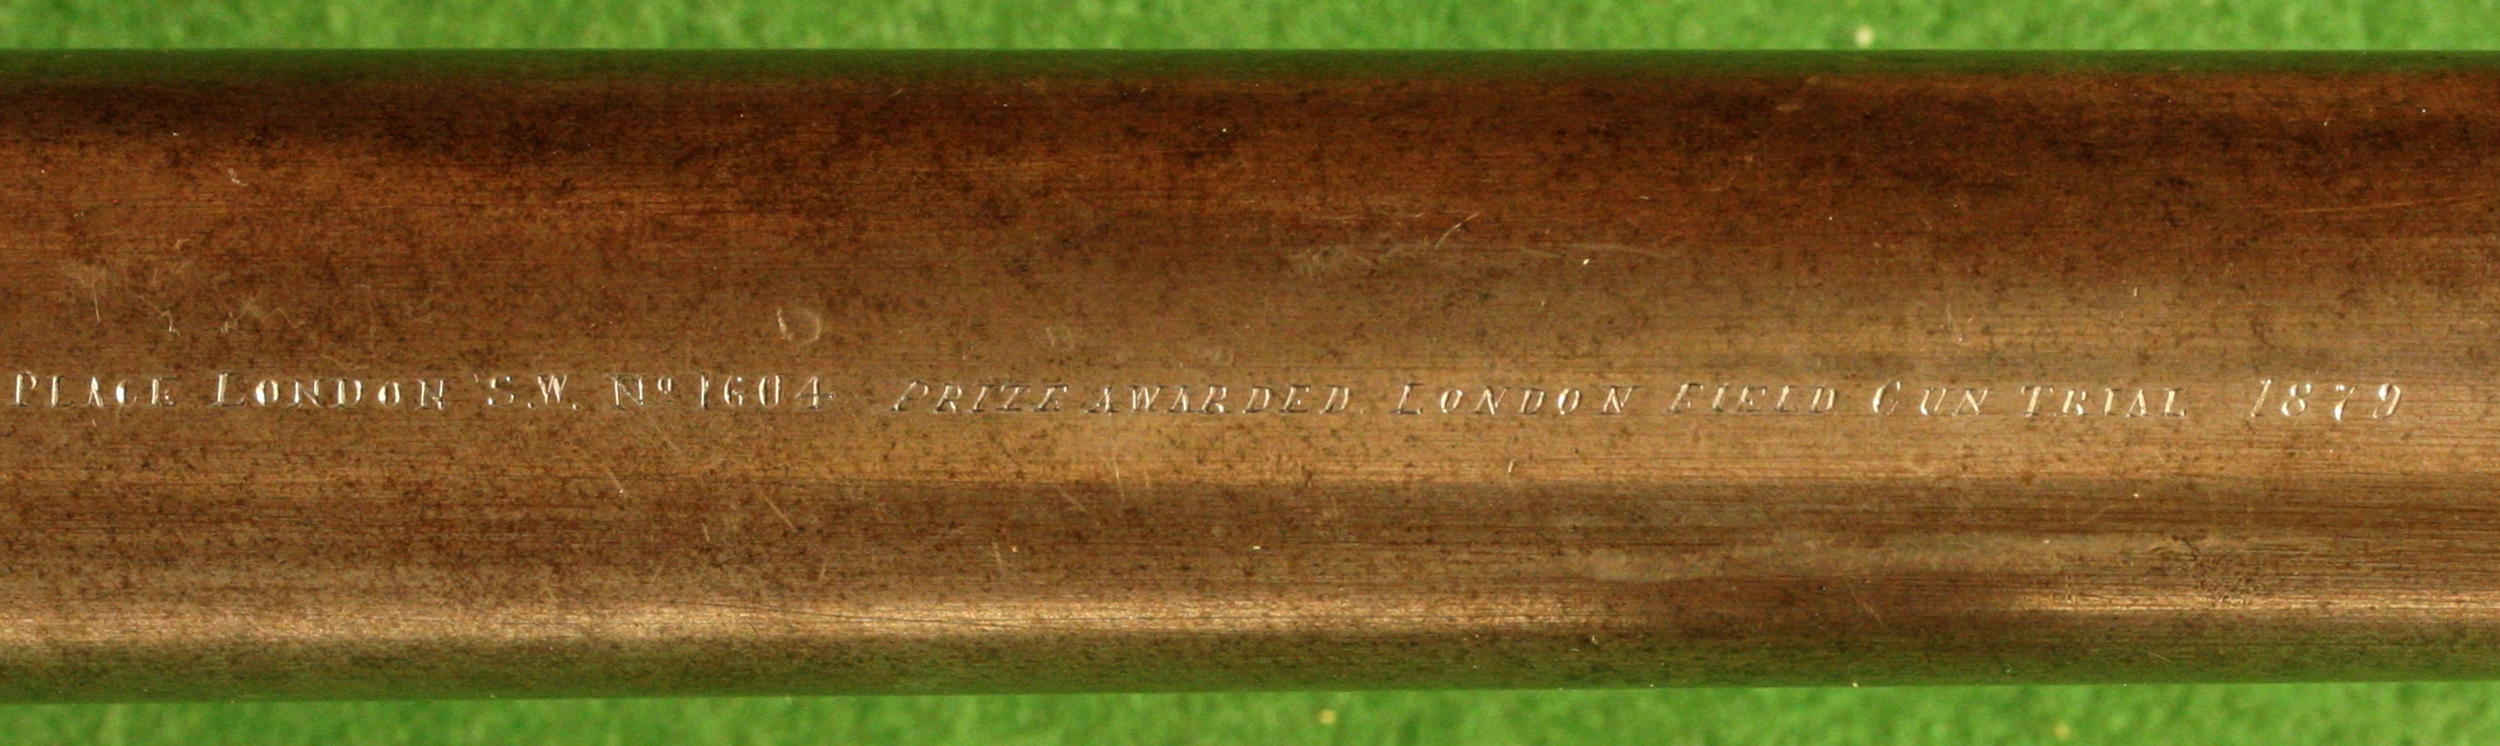
Click on the pics to enlarge, then use the browser ‘back’ button to return to the blog. They look MUCH better that way!
17th Oct Apart from a bit of house painting and sorting out before the scaffold goes, I managed to get more of the Maleham recut done – probably another 4 hours – anyway another 37 letters so its more than half done. It takes me a long time as I like to do each word in turn, so I have to keep changing the angles of the barrel – if it was new work I would probably go through the whole lot doing each kind of cut and only have to make a few position changes, but I find recutting needs to concentrate on getting each word right before moving on – the original engraving was, as far as I can tell, a bit uneven and the ‘O’s seem too small for the other letters, at least in some cases, but its only supposition as its mostly gone now. I should finish it tomorrow and will then put up some more photos…….. I’ll also try to get on with the Lancaster.
16th Oct I have started on the Maleham barrel to recut – its actually 8 bore – and spent a couple of hours doing an initial recutting of the second bit of the engraving, which is actually in italics ( I’ve changed the quote below to show this) . Its best not to start recutting at the beginning because that is the bit everyone looks carefully at, by half way through they stop looking so critically – so you can get your eye in where it is less exposed! Anyway I got about 18 letters recut in around 3 hours, including fiddling around with the microscope camera to take pictures – say 10 letters per hour when I’m going well. It took a while because I have to clear off all of the things around my bench so that I can swing the 39 inch barrel to different angles to accommodate different directions of cut – I used about half a dozen different positions – I need to cut the slant ‘verticals’ and the serifs in both directions and then do the curved letters O, P, R etc and the bits at the ends of the ‘E’ s. It’s slow work – I believe Geoff Moore charges £5 per letter, but he is much quicker than I am! Here are some pictures of the stages of the work;-

This was a fairly good , readable word (LONDON) – some were worse including PRIZE below – the O’s and D’s etc are always clear.
It’s a little tricky to see what gravers were used for what cuts, but I try to use what was used before if I can work it out – in this case I think the heavy uprights were cut with a flat graver, not with several cuts with a square as they often were, and I think the serifs were cut with an ongulette , although I think the ends of the uprights were picked out with a square to start with. I am cutting the heavy uprights with two cuts with a square before finishing with the flat as that way I am less likely to slip.
I start by cutting (partial) serifs & horizontals with a No 4 Ongulet – these letters are 1.2 mm high !
Then put in the uprights, first with a square and then the heavy ones with a No 2 flat – I’ve rubbed over the letters with my finger so they have picked up a bit of dirt! As it happens all the verticals in ‘PRIZE’ are written as downstrokes and therefore heavy.

Finished for the first iteration, I’ll go back over it when I have done all the lettering once – the serifs are cut with the Ongulete and the letters are filled with a marker pen so I can see the shape better. You can see slight burrs thrown up in places. These pictures were taken with a microscope camera put in place of an eyepiece – when seen with the naked eye they will look fine – they always look a bit irregular when viewed at high magnification – depending on your screen size you are probably looking at them at between x10 and x20 magnification ! You probably need to be 20 to 30 feet ( 7 to 10 m ) from the screen to get a better idea of what they look like on the gun.
15th Oct Shooting with the Anglian Muzzle Loaders at Cambridge Gun Club in the morning – our Big Bore shoot – I’m not sure the Gasquoine and Dyson really fits me as I can’t get my head down on the stock fully so it shoots high – having said that, I didn’t do much worst than my usual performance and I was not alone in a mediocre showing!¬ Tom and I both hit 13 out of 30 clays, but only 1 person got more than 20/30 – I didn’t stay for the final count-up as Tom wanted to go to a re-enactment fair at Wood Green Animal Shelter – I bought three lengths of cloth that will be very suitable for lining gun cases in appropriate shades from Bernie the Bolt, who is well known in the re-enactment scene as the best purveyor of woolen cloth in period shades – I got the traditional green, a dark red that was apparently right for Napoleonic troops and a paler green. I do have a couple of cases to make up, and I’m looking for a couple more – it would be good to put the Samuel Nock Rifle I bought at Fenland in a case. Tom bought a ‘proper’ bow in ash as he does archery as a sideline from being a Viking. Giles, for some reason best known to himself, bought a nice bicorn hat of the sort worn by late 18th century naval lieutenants. I took Dave Elvin’s lock nail to him and collected a bottle of wine in return – jolly welcome. I also collected a 10 bore breech loader barrel ( actually 8 bore) to have the engraving recut – it has an inscription running to 78 letters and the barrel is so long I can’t easily manoeuvre it under the microscope so its going to be a real challenge! Fortunately its 10 bore and so an obsolete calibre and can be off certificate as far as I am concerned. The Inscription reads;
CHAS H MALEHAM 20 REGENT ST LONDON S.W NO 1604 PRIZE AWARDED LONDON FIELD GUN TRIAL 1879
I’ll try to take pictures as I do it – the quality of the original engraving, which you can just see traces of is quite high, so I’ll have to be careful. I can see its going to be a long job in all senses or the word!
14th Oct – busy all morning finishing the gutter installation and then starting on the tromp l’oiel window – its a horrid bricked-in opening in the ‘wrong’ bricks and has been annoying me for 22 years, so at last I am going to paint a window onto it! Today I marked it out and did a bit of priming. I got an LED photographic light for ‘studio’ lighting and have been experimenting with it, and for my evening relaxation I had another go at the Bond barrel recutting in the light of my new found boldness in that activity. Tomorrow is the Anglian Muzzle Loaders Big Bore shoot, so I had to make some cards and wads for my 6 bore Gasquoine and Dyson Live Pigeon gun and sort out my Samuel Nock double 16 bore for Tom to shoot on a rare visit home – he did very well with it at the Scottish Nationals, getting into a 3 way shoot off for second place, which considering that he hadn’t touched a gun since the last Scottish Nationals in 2015 wasn’t bad form! I’m sorry there are not any restoration photos today – I’ll try to take a few shooting ones tomorrow – this blog is a bit like a pet monster that has to be fed regularly on photos!
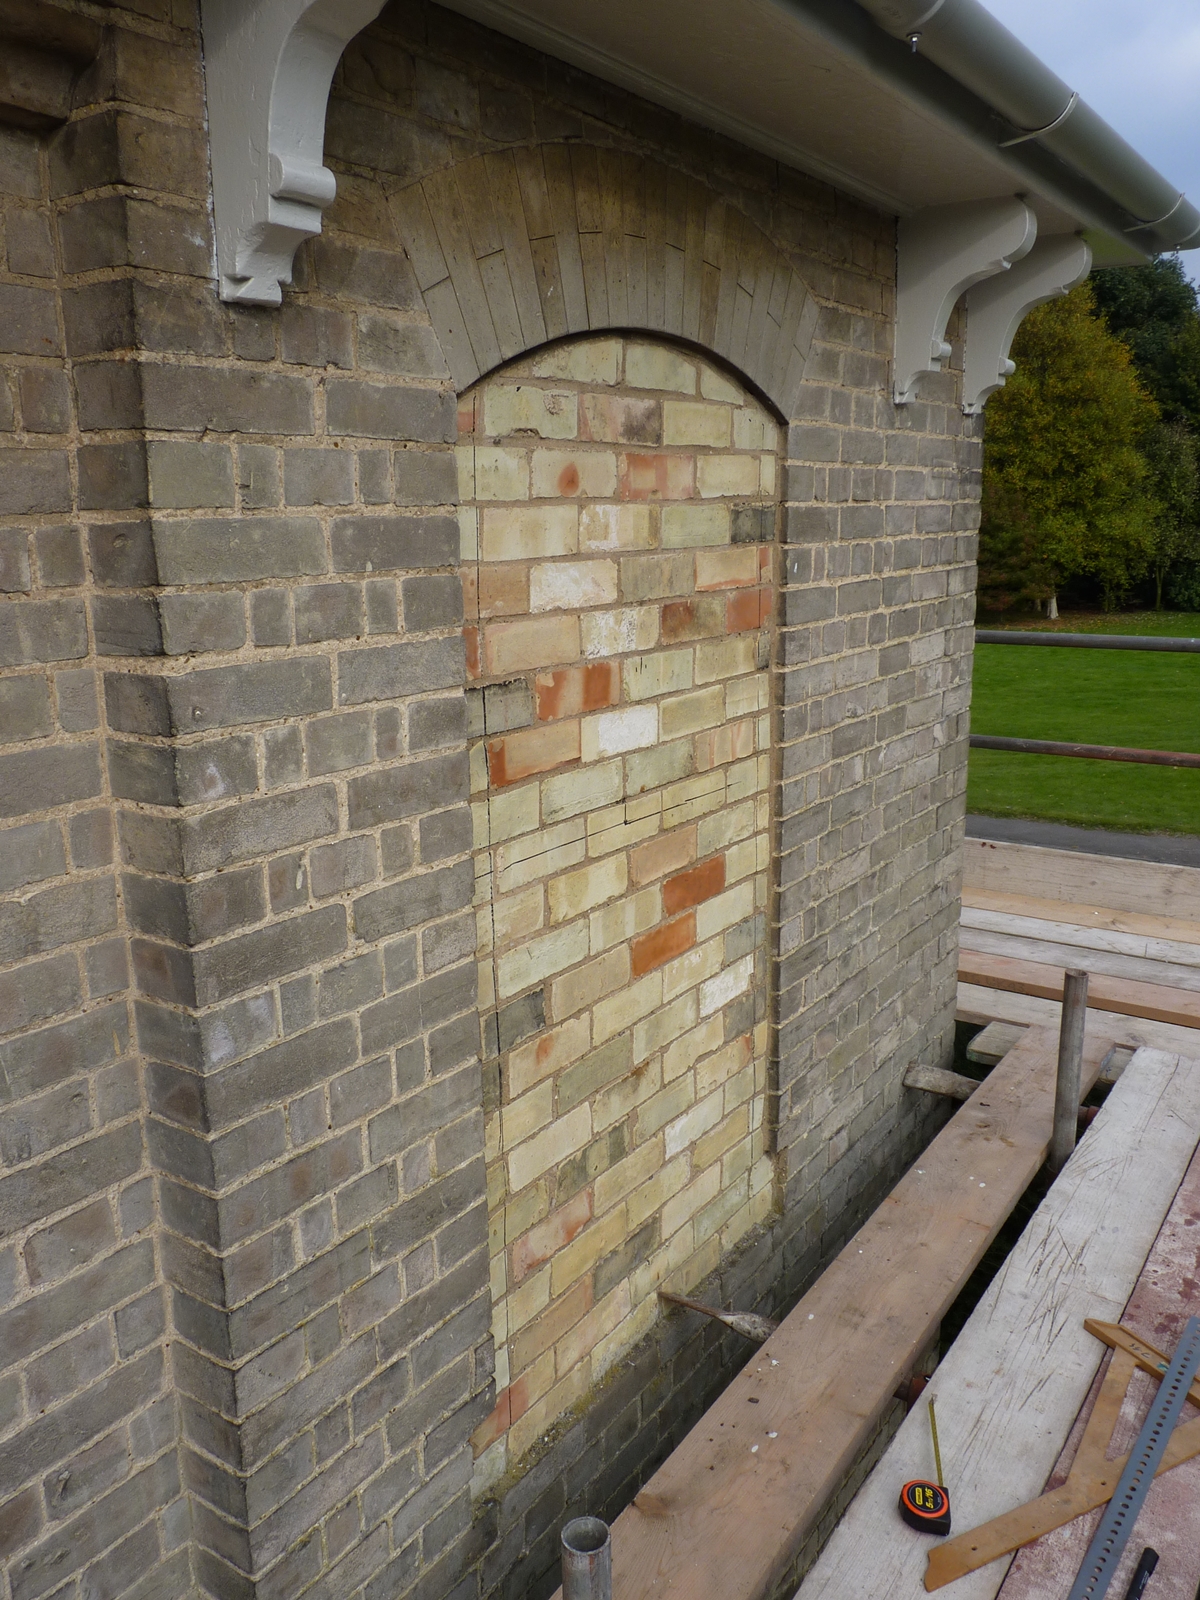
I wonder if it will look better when I’ve finished? It couldn’t look much worse!
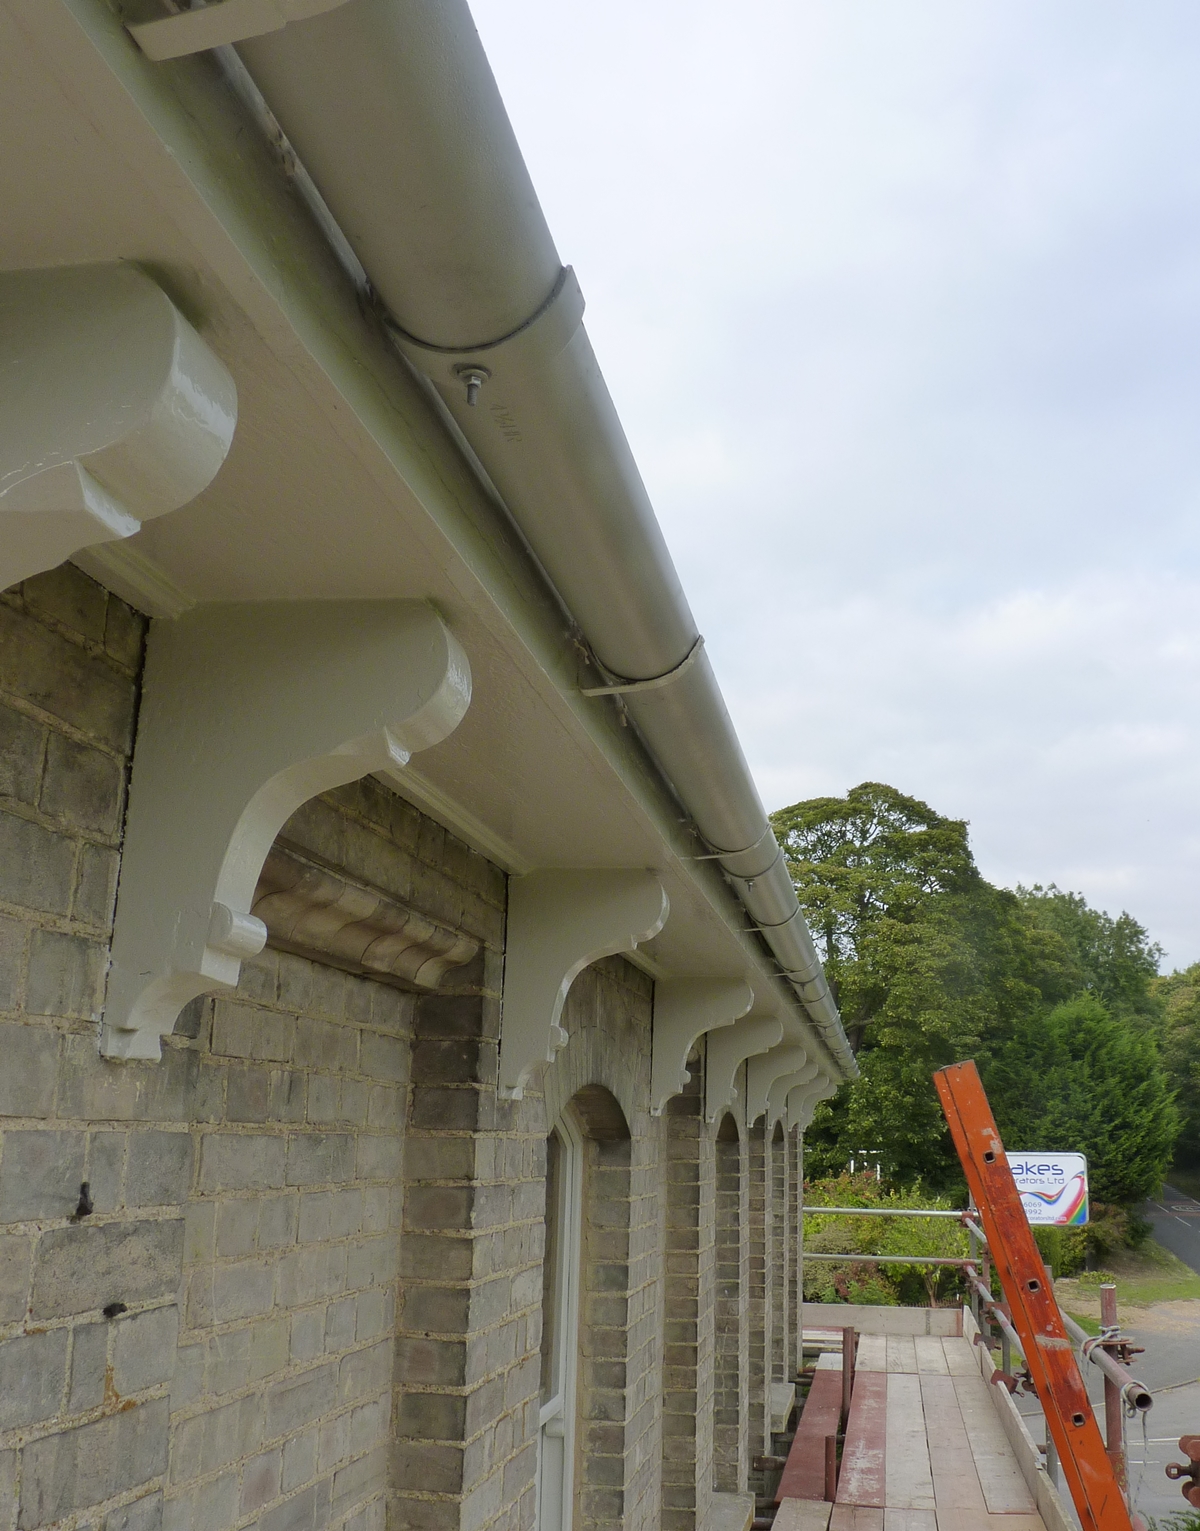
Giles and I managed to get all the cast aluminium guttering on 4 sides fixed in about 6 hours! It would be useful if it rained heavily before the scaffolding came down so that we could see if the levels are right – we didn’t shift the brackets from the previous gutters, which worked OK.
13th Oct Did a bit of work on the cement flashing round the windows and fixed a split in the flashing on a chimney that I’d done in 2000 before I’d read the Lead Association Handbook and learned that you cant’t fix 4 ft wide strips of lead as the thermal movement is too much. Anyway I cut the lead where it split and put an additional covering strip over the joint… & then put topcoat on the dairy window………. Later I took the bits back to Dick and we looked at the other Nock lock that had the hole for the side nail that holds the lock in in slightly the wrong place, breaking through the edge of the step that rests against the barrel. We discussed how to fix it as its not really possible to weld up the 4mm hole hole right through the 6mm plate without melting a lot of the lock plate. My solution was to put an 8mm end mill through the lock and weld a section of 8 mm rod in, it only needs a bit of weld both sides. The new hole (4.3 mm) can then be tapped into the bar. Anyway that is the plan and when Dick has drilled the hole and made a plug I’ll TIG weld it and put a photo.
I’ve resumed work on the Lancaster having got the cocks from Kevin – and very nice they are too ( thank you Kevin!) The first job is to fit the cocks to the tumbler squares and get the safety catches finished so they work. Its needs to be done very accurately so that both cocks are in line on full and half cock. I’m trying a method of marking the tumbler squares on the cocks by tinning the backs of them and then screwing the cocks tightly down so that the tinning carries the impression of the square. I’ve tinned the cocks and now I need to make a couple of cock screws, which turn out to be near enough 5 B.A. I spent an age cleaning out the channels on the back of the cocks that clear and lock the safety as there were a few blobs of metal that shouldn’t be there. I sharpened up a 2.5mm chisel for the GRS Gravemaster and managed to get most of it out, although its not entirely elegant – still , its not visible when in position on the gun……
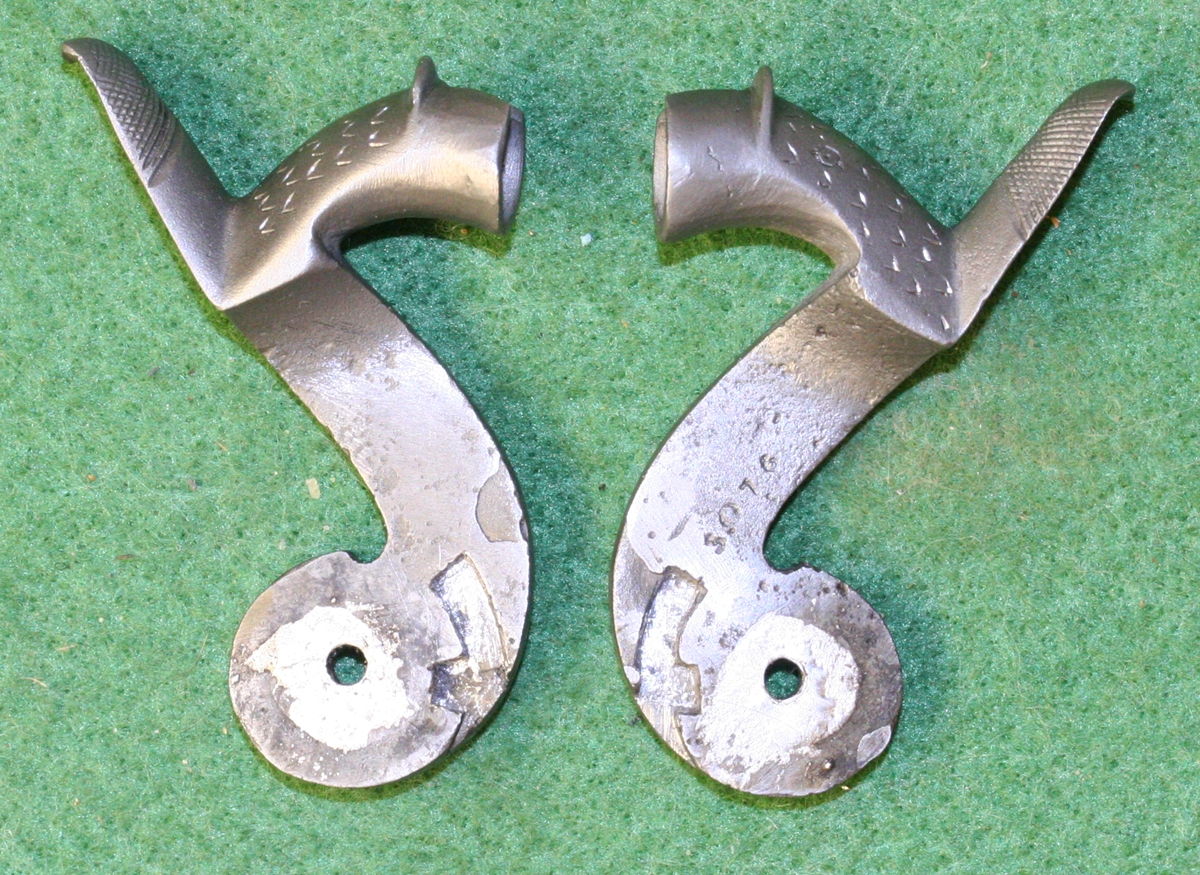
Cocks tinned and channels cleared out
12 Oct – Most of the day on the scaffold putting up new cast aluminium guttering – got about half of it up between rain showers, but at least I managed to get a job for Dick out of the way during the rain – recutting the engraving on a couple of Henry Nock barrels, and tidying up a new cast lock plate that had a spurious hole that needed welding, right next to a necessary hole – I made a pin to go in the hole and left it a little proud and then TIG welded it in place without adding any additional material then cut off the rod and did the same in the back. I also welded up an unwanted mark, although I didn’t want to get too close to another wanted hole so I left a bit of it, and then recut the engraving ;-

Its quite amazing how uneven some of the old engraving is, but it was deep enough that I couldn’t ignore it!
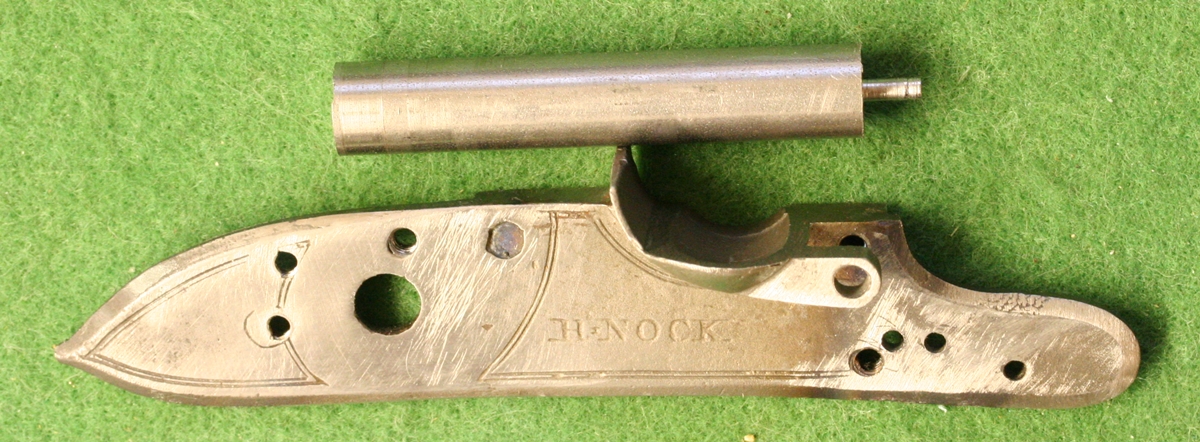
Lock casting and turned pin plug.
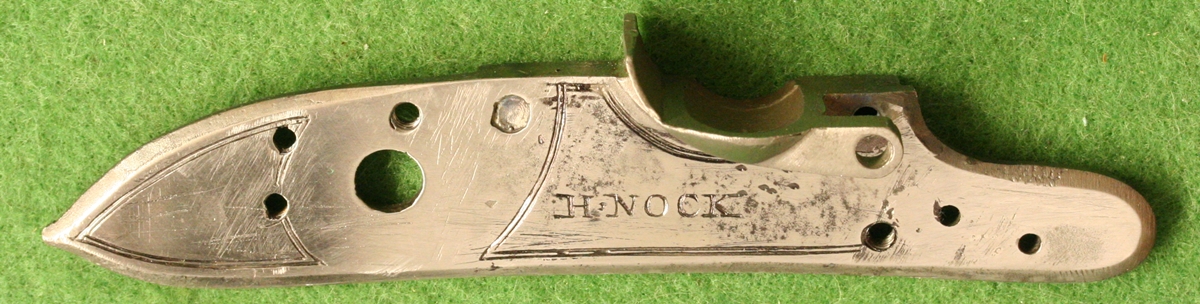
Much better! Once assembled and coloured it will look the part
11th Oct – decided to heat up and pinch the mainspring of the Blunderbuss in the vice to take some of the power out of it and then re-harden and temper it, which I did and got a much gentler action, but of course the frizzen spring was now far too strong, so that has been let down a bit and it all balances nicely and can be snapped off safely – even the tumbler isn’t a problem as long as you pull the trigger firmly – so I’m happy with that – now to engrave the tang – probably best to strip it out of the stock to do it. Done now, plus recut a couple of lines round the cock for emphasis as they got lost in the filing ( with the Gravemaster). I got a bottle of new instant black today from Germany called Tifoo (on ebay as ever) – wierd stuff – it blacks but produces a black precipitate on the surface, and if used in concentrated form it appears to pit the metal slightly – presumably the source of the precipitate – I made up a 1:5 solution that seems to work gently and is enough to take the shine off cut surfaces – I used it in the lines I cut on the cock in order to loose them and it works well – I also used it very dilute to get the tang a little more like the rest of the breech steel. The Tang screw was case hardened after engraving using Blackley’s colour case hardening powder and then tempered in my usual way on the hot plate of the AGA to a nice deep blue. Anyway I declare the Blunderbuss well and truly finished! We decided not to polish or shine the bits we hadn’t worked on as to do so would call into question the genuineness of the gun.
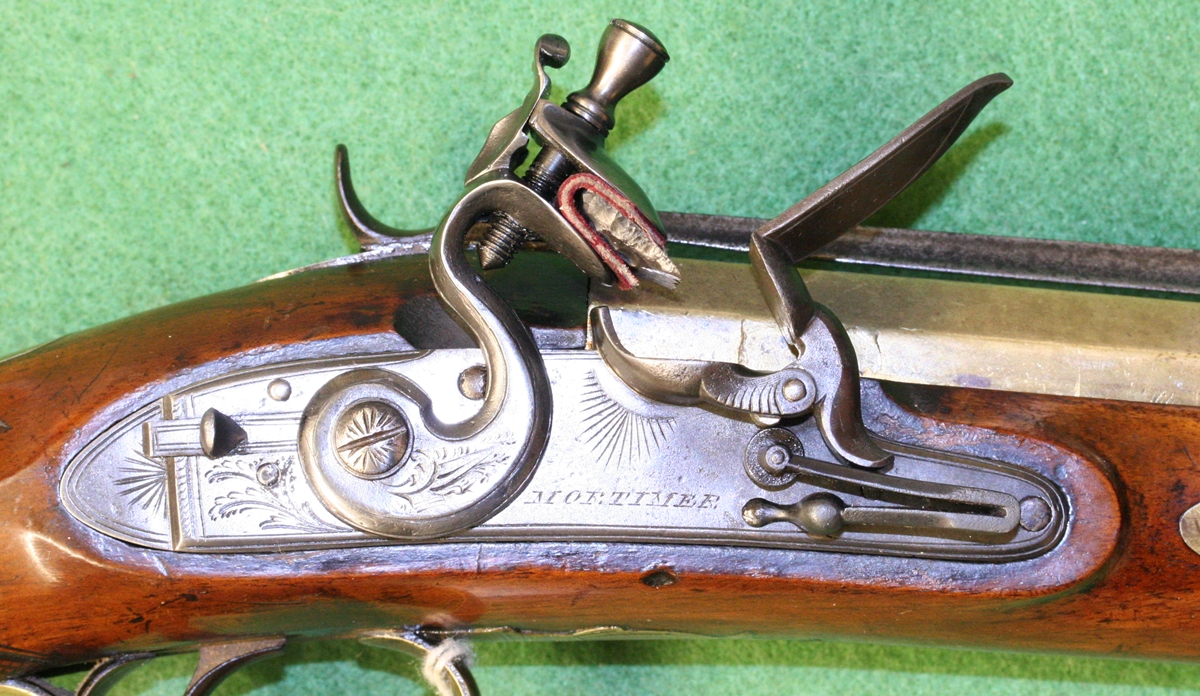
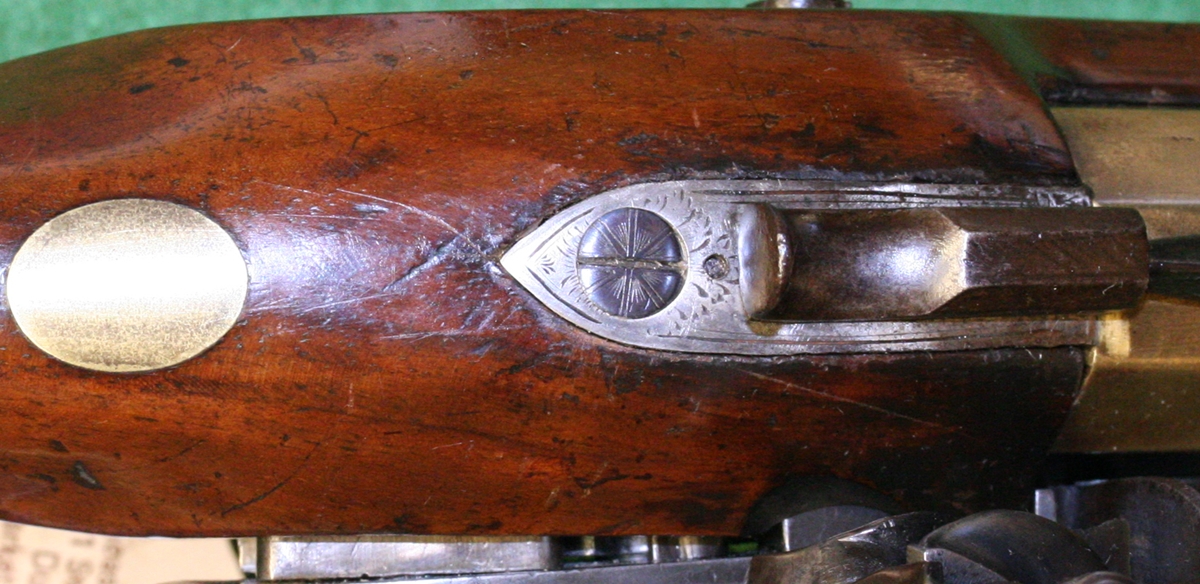
10th Oct – The Mortimer Blunderbuss is now more or less complete and looks fantastic! I just have a bit of engraving to do and a couple of internal adjustments to make – the mainspring is horrendously strong – presumably why the cock broke in the first place and damaged the tumbler shaft – and the full cock bent is a little insecure – neither affects the appearance, but what is the point of having a nice flintlock if you can’t cock it and snap it off occasionally? So I’ll ‘let down’ the spring a little by a bit of judicious tempering, and see about touching up the full cock bent..
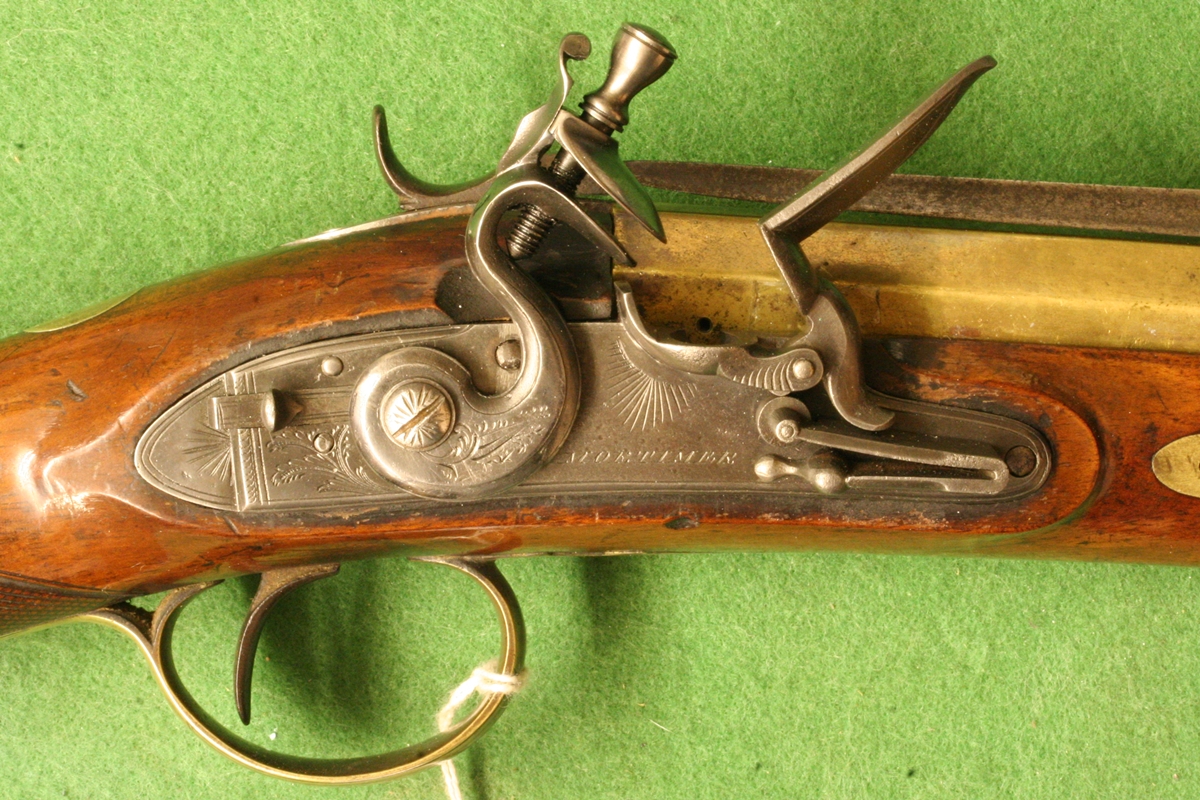
Dick made a great job of the cock, and its now looks quite uniform in colour – must find a flint to finish it off! more photos will follow in daylight…..
I collected a lock plate casting for a Henry Nock lock to tidy up the engraved lines and a barrel to recut – I did its twin lock and barrel earlier. I chased down the gun I was interested in at the London Antique Arms Fair and I’ve done what I said I wouldn’t and bought another gun……. This one is a bit special but I’m keeping it under wraps until I actually get it! And I finished and undercoated the dairy window!
9th Oct – Spent the day working on the house fixing the slats on the dairy/workshop window until it started to rain. Then I recut the Westley Richards barrels again – I think I have now cut them to the original depth – I have some more ‘instant blue’ on order – some German product to try – so when it comes I will darken down the cut surfaces. Dick rang to say he has finished the Blunderbuss – I’ve just got to touch in a couple of bits of engraving and it can be returned to its owner.
After seeing the prices on the labels of some of the bits and pieces at the Arms Fair I had a quick look through my ‘junk’ – I have a a few similar bits and pieces – my price for the pinfire crimper looks fair and I ought to fix the crimper with the loose bearing. I have a couple of 3 way flasks that are quite nice, including an Egg pattern 3 way with a slider that was on offer at an eyewatering price -those I shall keep, but there is a lot of stuff I could shift – I recently put a double ‘leg of mutton’ gun case and a cartridge box in Holts and sold them which was a start – I’m just not very good at getting rid of stuff!
8th Oct – Back from the London Antique Arms Fair, which was interesting. A couple of guns set my blood racing but only one passed my basic test (all parts having commensurate wear) and I’m still negotiating that so no more on it for the moment. I spent a happy couple of hours peering at pistols through my x10 magnifying glass, which is always interesting! I think I now understand how the ‘restored’ and reconverted guns get mixed into the trade – it strikes me that its now at least 30 years since it became something people did, and since decent castings, care of Ed Blackley and others, became available and gun restorers found it profitable to do the work. As a result a number of these guns ( I use the word to include pistols here) have actually passed through several hands since then and when they come into the hands of dealers they are taken at face value and not critically examined, either because the knowledge isn’t there, or they don’t have the time or its not in their interest to dig too deeply – some dealers don’t even clean guns they handle – although some, too many it has to be said, polish the hell out of them – the concept of ‘patina’ being foreign to them. So it seems to me that most of the dealers selling guns and pistols that are not completly original are not being dishonest, they just don’t know. Some of course are doing a bit of restoration, and I dare say a bit of reconversion, but having said that some of the pistols offered just look unbelievable – I don’t know who does the TWIGG engraving on the locks and barrels, but she or he sure does too many, and as I judge it, quite recently, and I suspect that those dealers know, or jolly well ought to know that something isn’t right. (woodwork just doesn’t get beaten up on cased pistols with pristine locks), I can see another article for Black Powder coming up soon entitled ‘Caveat Emptor’ – its just a shame that I can’t really go round the fairs asking dealers if they mind my photographing and publishing their suspect pistols. That’s my rant over for a while – I now have to watch out for assassination attempts at Arms Fair and Auctions!
On a separate, more respectable level, I had a good discussion with the Westley Richards barrel owner and agreed that it was OK to have another go at the barrel lettering – I’m building up my courage to be a bit bolder! I will be putting more guns on this site for sale – when my new camera comes I’ll have a lens to do long guns and will set up a temporary studio.
7th Oct – Quick visit to Dick’s to take the buttons and see how the Mortimer Blunderbuss is progressing – I need to take bits away to engrave before they are refinished, but we are pretty much there – just a matter of shaping up the top jaw and making a cock screw to hold it and drilling the cock to take it. The false breech tang is welded and shaped and the screw made – it just needs a little engraving round the tang – always a few more bits to finish – a whole sequence of jobs that have to be done in the correct order. Should be done by the middle of next week – I have a load of cast aluminium guttering arriving on Wednesday that I have to fix before the scaffolding can come down! I also need to paint a tromp d’oeil window on a blocked up opening that has been bugging me for the last 22 years…. Off to the London Antique Arms Fair tomorrow – I am taking the Westley Richards barrels and meeting their owner there – every time I look at them I start to wonder just how vigorously I should have recut them – its possible that there is still some way to go yet, we shall see…… Now if I had a trinocular microscope it would be easy to show you!
6th (just!) Another little engraving job – Dick was renovating a pair of very fancy foreign pistols with lots of silver wire inlay – they had a button covering a socket where a detachable stock could be fitted, but the buttons were conspicuously plain – possibly a later addition. So I let them down’ (annealed them) and engraved them – I probably should have filed the old surface off as it was a bit uneven and pitted, but I didn’t. Anyway they were a pig to engrave as the steel was variable and quite tough, so the Gravemaster air graver came in handy and I did more or less all of the engraving with it – lots of sharpening along the way – they are not perfect but will suffice!
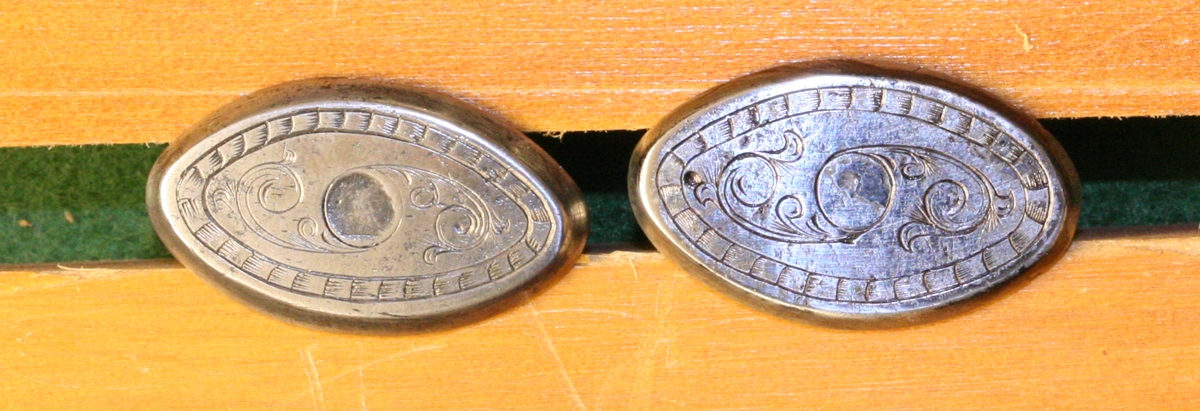
One had a stud in the middle so I ‘used’ it and engraved a matching circle on the other one.
6th later.. I went down to visit Dck and see progress on the blunderbuss and he had the most wonderful pistol – a real treasure that he had purchased for the exorbitant sum of £20, I offered to buy it off him, but he likes it too much! There are more pictures on a new post ‘A Real Treasure’ but here is s taster!
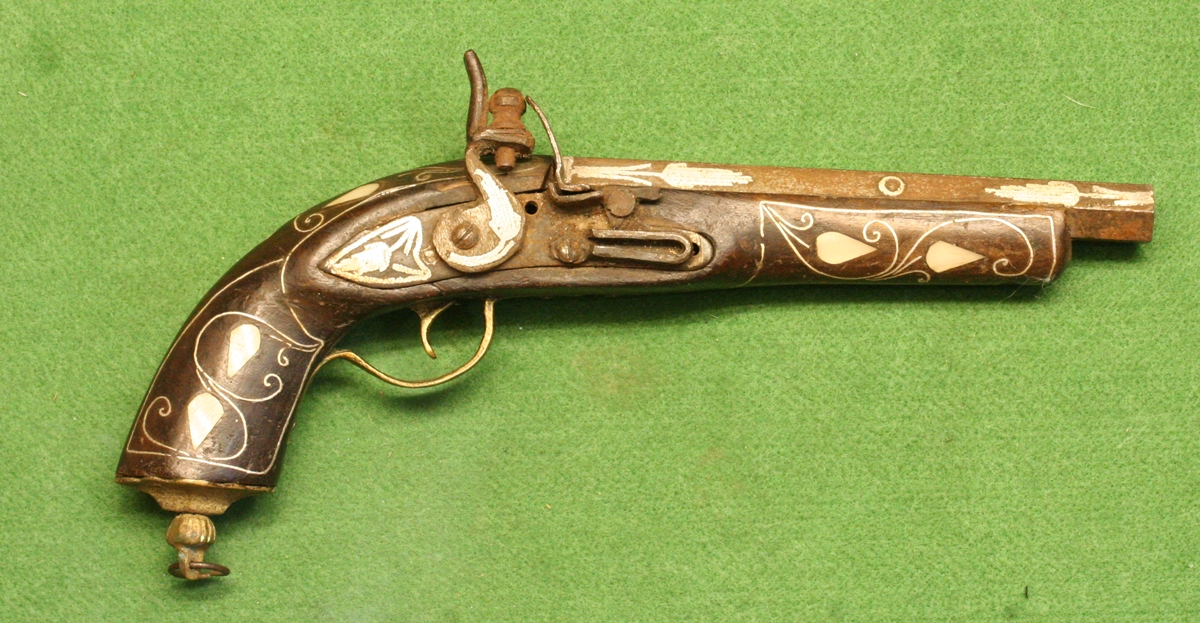
What an amazing pistol – beautifully inlaid with mother of pearl and aluminium wire!
6th Oct – I have now finished all my outstanding engraving jobs – I need to collect the next ones from Dick later, or I’ll have to invent a project! I finally sorted a new camera – the lens I use is good so I’ll keep it for workshop photography and just change the body for another Canon (760D) – I’ll get an 18 -135 telephoto lens with the body for general photography as its a good deal and handy for long guns. Here is the finished Pepperbox lid;-
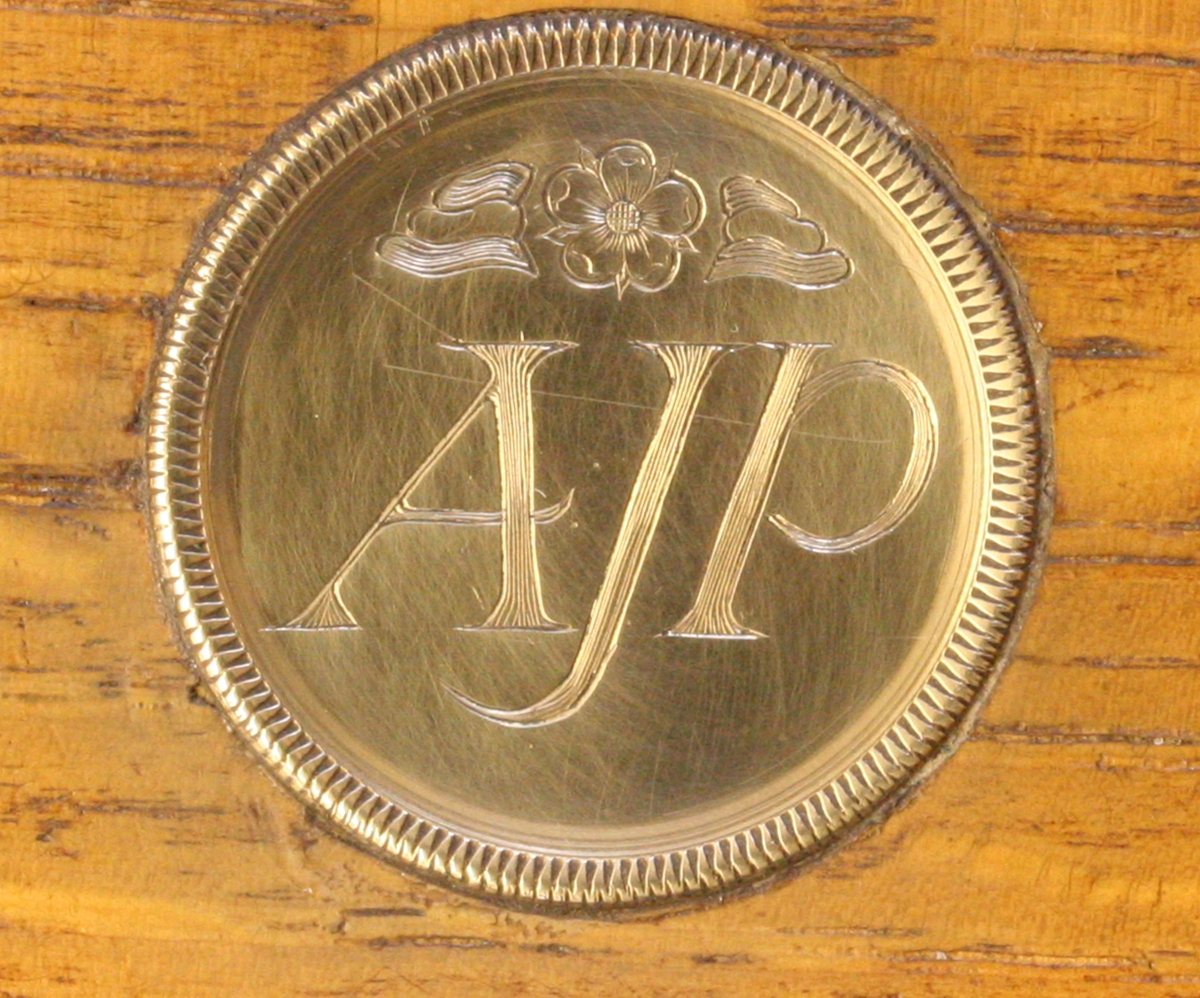
I finished it off with some waves and a bit more emphasis round the petals – I’ll deliver it so it is out of the way!
5th Oct – Busy day engraving! I recut the Westley Richards – I can see why my client wanted me to have another go – my first effort was very tentative and didn’t do the engraving justice – I hope this is now better. The dilute Birchwood Casey Super blue certainly knocks the shiny cuts back and helps the look. I also grasped the nettle and cut the fish on the escutcheon of the pepperbox pistol , and emboldened by that I did the initials on the box – both will pass muster and were executed without any obvious slips. The box brass escutcheon was the usual half hard brass and a bit of a pain but now I’m using 37 1/2 degree sharpened gravers its better, and I’ve realised that they get blunt at least as quickly as when cutting steel, with similar consequences, so I am stopping to sharpen them often ( I only made two 37 1/2 gravers) – to get a fine finish I’m using my ceramic hone with 1/2 micron diamond paste. I started to fix the cocks on the Lancaster, but I realised that the lock parts, including the tumbler, were salvaged from the old, made up, locks that were Stanton’s patent rebounding locks off a breech loading hammer gun and they don’t have a half cock notch in the right place for percussion, its purpose only to catch the hammers just off the firing pins on the rebound. I’ll have to anneal the tumblers and add half cock notches in the correct place nearer the full cock notch – bother!
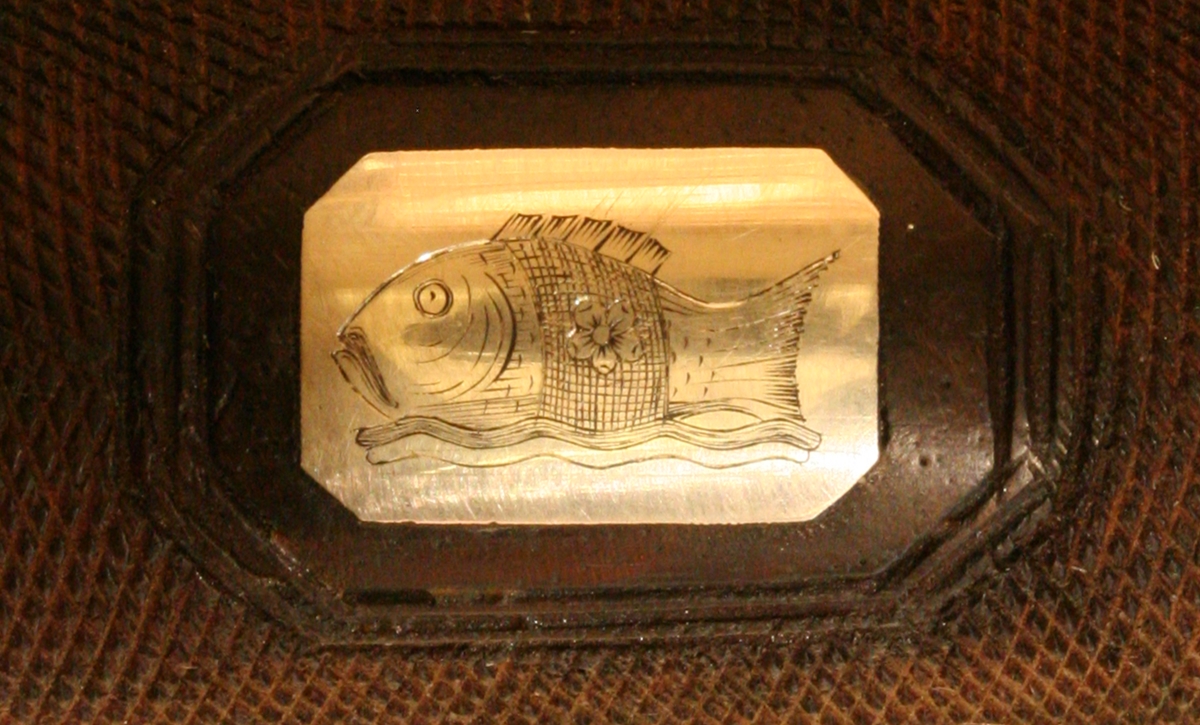
It’s a somewhat obese fish, and doesn’t look exactly joyful, but fish seldom do!
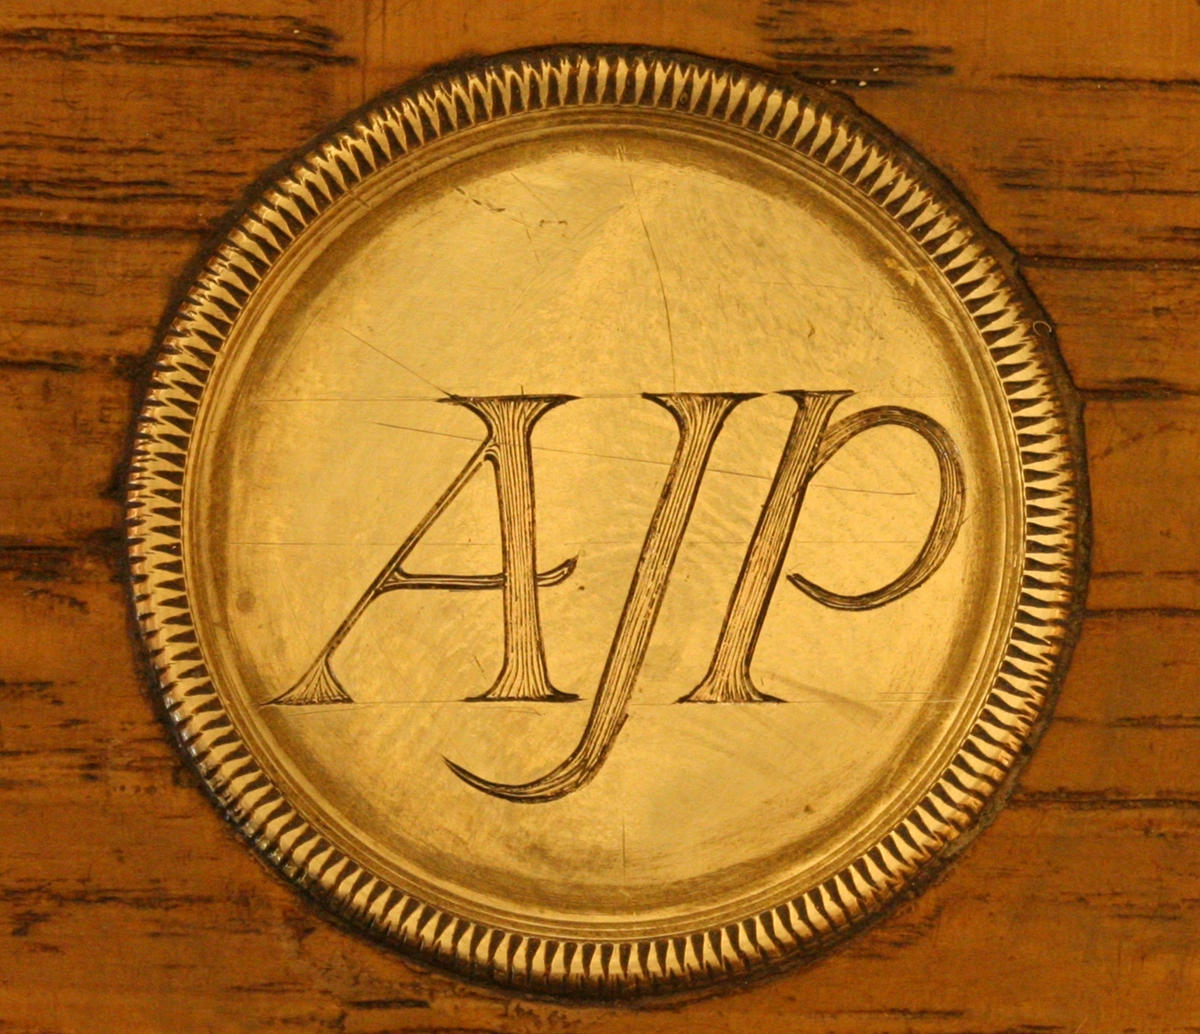
It’s difficult to get sloping lettering like this to sit in the middle of the space, but I’m resonably happy with this.
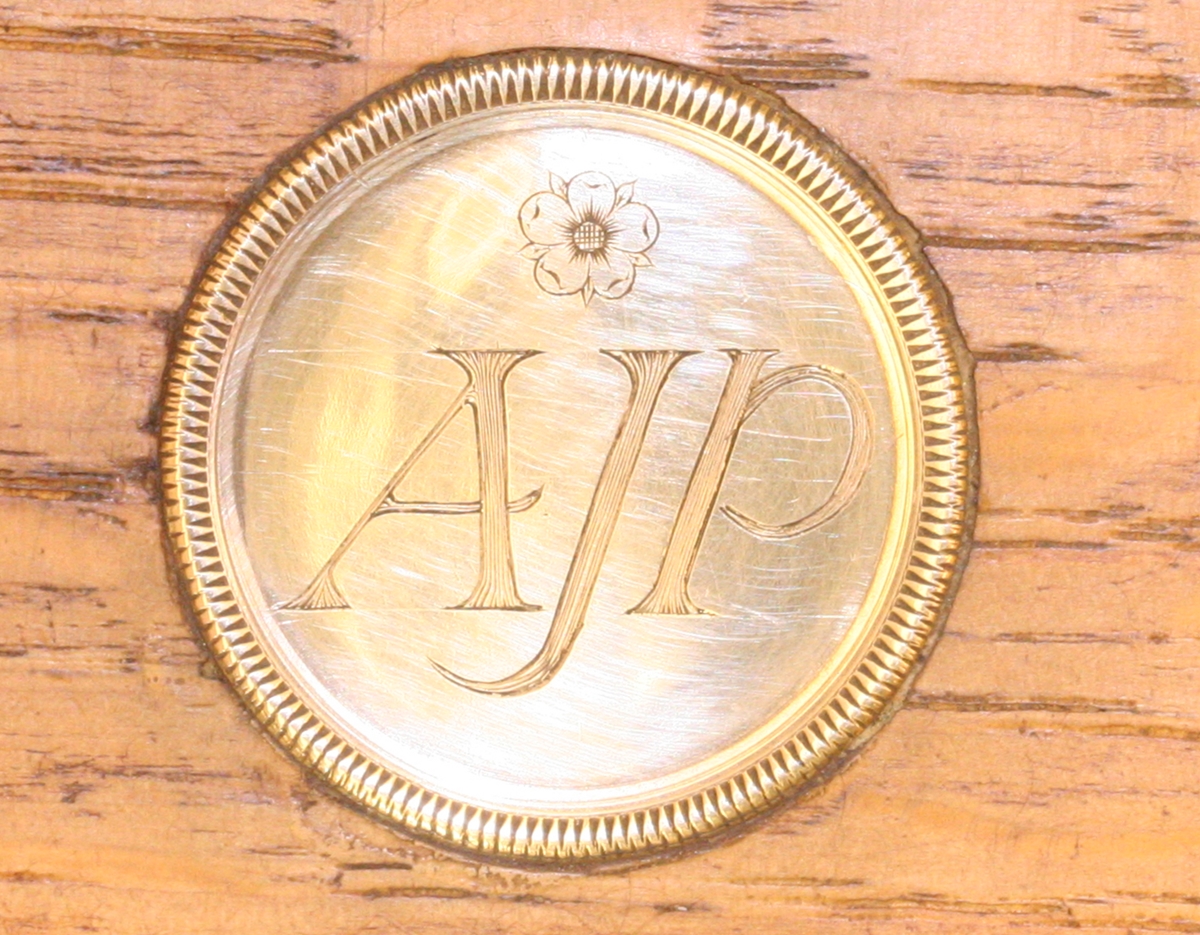
I showed the above to Penny, who said that it needed something at the top as it wasn’t central! Unfortunately I had to agree, so I added the rose – The motto that belongs to the family and goes with the coat of arms is ‘rosa sine spina’ – a rose without thorns , so it had some relevance there! I will probably fiddle about with he rose as it needs to stand out a bit more – maybe ‘brightcut’ the outer edges of the petals.
4th Oct – I have put up a page for useful data – at the moment it only has my table for thread sizes – I find it very useful every time I have to make a screw to fit an existing part. I had a pleasant and productive discussion about recutting, and I looked at a number of rather nice pistols – am now convinced that my very conservative approach doesn’t give the best result – the Moore barrels were good, but I will have another look at the Westley Richards pair. I was reminded that it is the London Antique Arms Fair this Saturday in the IBIS hotel, so I think I’ll go, and possibly take a few pistols to see if I can sell them, or better still trade them! Giles has been trying to convince me that I ought to replace my camera with a more modern version – the one thing I would like to be able to do is to look at the pictures on a laptop before I take them – at the moment I more or less snap blind and take half a dozen and then choose and crop them – my camera was about the last that didn’t have that facility – maybe selling a few pistols would pay for an upgrade!
I’ve put up some more workshop photos on the Photograpy and workshops post for fun, here’s one…….
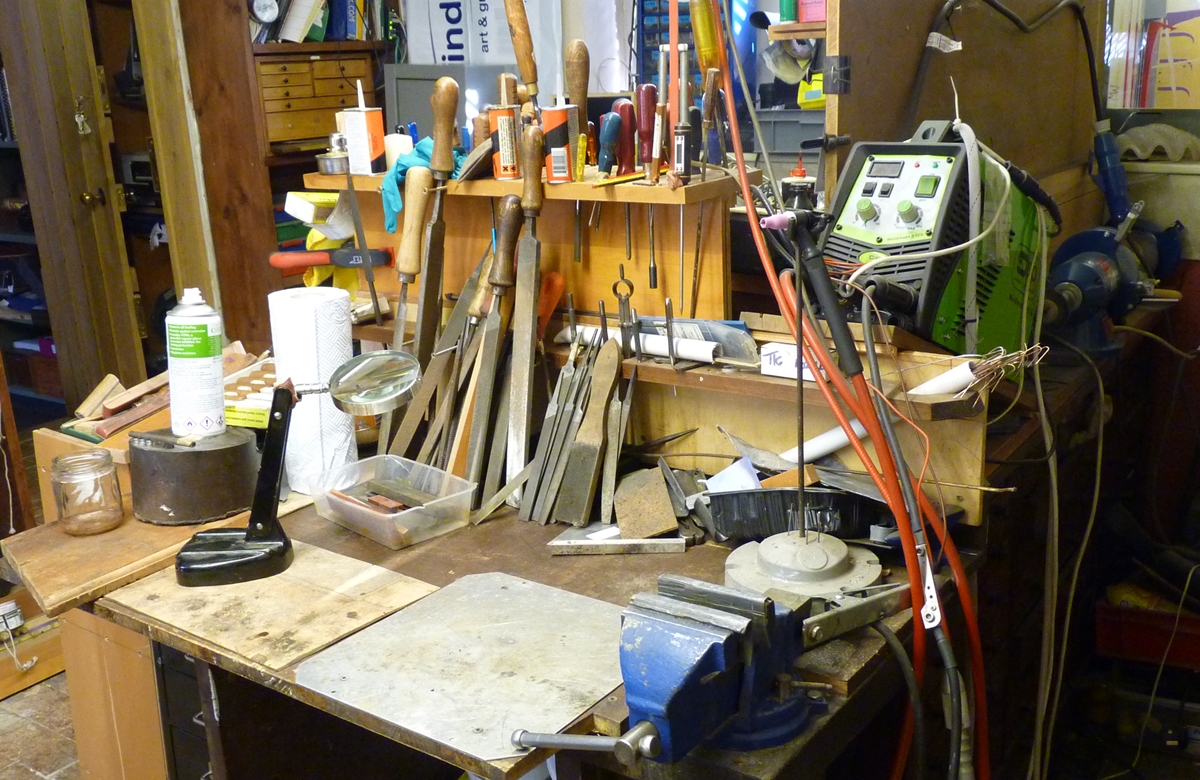
3rd Oct. Working on geophysical archives today, but this evening I was trying to find a way to cut very fine lines in copper – its too easy to end up going deep. I talked to my client for the pepperbox engraving, and he is very happy for me to put whatever I think is best on the pistol and case, so no excuse for not getting on with it! Tomorrow I will meet with the client for the Westley Richards and Chas. Moore work to look at how far it is desirable to take recutting on barrels that are out of kilter with the rest of the pistol.
2nd Oct – A day off from restoring to go sailing with Giles on the Orwell in our little 16 ft Cornish Coble – perfect autumn day it was too! I did sneak in and do another fish engraving tonight. I’m not sure what has happened to this blog, but its suddenly got 50% more visitors – now about 150 a day!
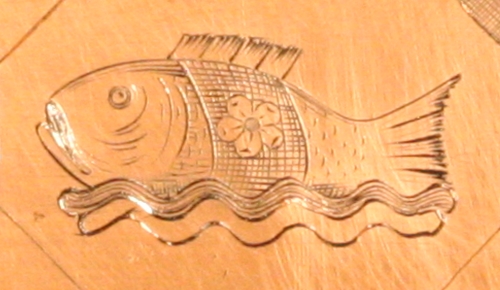
This has to be the last fish before I do the real thing on the silver escutcheon
1 Oct – Completed the browning of the Bales barrels in very short order – just 3 quick rustings, although there was some twist visible from the previous treatment ( electrolytic derusting and 2000 grit paper glued to blocks of wood with spray photo mount adhesive) The first was with my used PCB solution and the next two with Blackley’s . Total time about 15 hours – I was keen not to leave it too long in case the rust bit deeply, so as soon as the surface showed that rusting had started I rubbed it off with 0000 steel wool and steamed it. To my surprise I got a nice grey brown in just 3 rustings and then stopped as I could see further rustings were likely to make it dark and obscure the figure. Overall I’m pleased, although I think it would have been better without the aborted first attempt! . Having rebrowned the barrels I cleaned out the bore ( almost perfect) and refitted the breeches using ‘Dry Molybdenum’ paste and also the foresight dovetails, remembering that things like that usually go in from the left side! I’ve now refreshed both Lancaster Cocks and will shortly fit them to the tumblers – I did a quick check of the tumbler screw thread ( they were re-used lock parts) and found that 5 B.A. was a good fit – I have UNF, UNC, B.A.(even & odd) & Metric taps and dies up to 1/4 inch diameter so that’s OK – its not many threads I can’t get a near match to but it does happen – for example I couldn’t find a 36 t.p.i die for the blunderbuss bayonet spring screw. I have a spreadsheet with all the thread standards in size order to make finding a thread easy – I’ll start a post on screw threads when I get time!
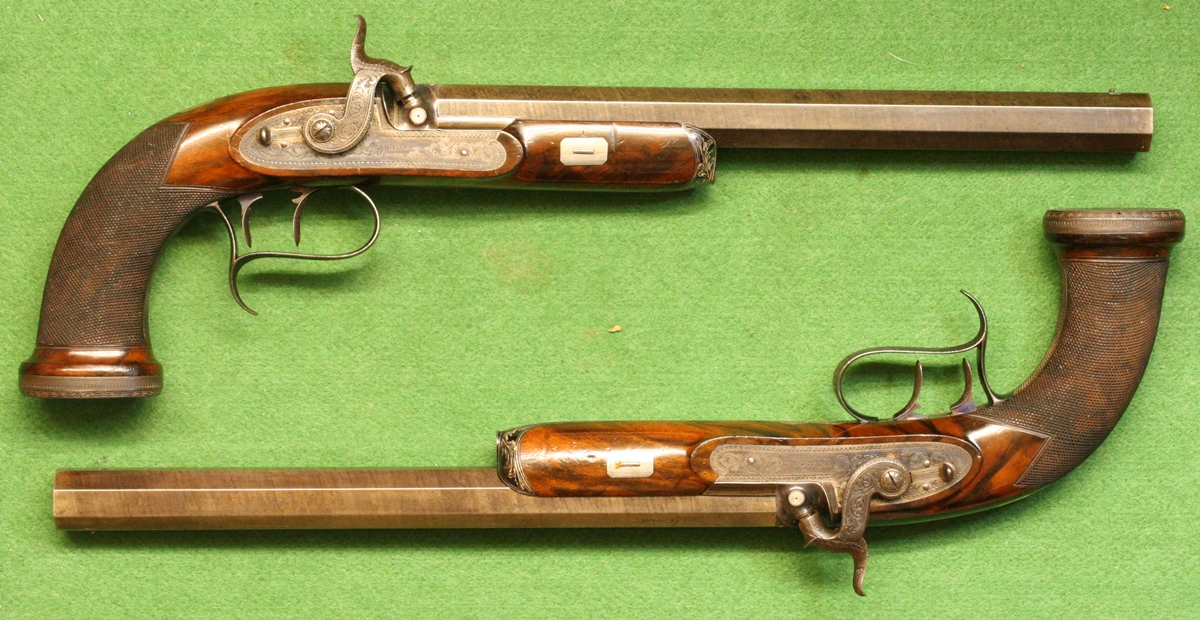
Bales with rebrowned barrels – its easier to see the figure in the bottom pistol, but its pretty similar in both. They are deliberately not polished shiny as I didn’t feel I could strike up the barrels enough to get rid of some remaining rust pits without loosing too much metal, and shiny finish would have made them too obvious.
30th later… Started rebrowning the Bales barrels for the second time – this time I am starting with my used circuit board etching fluid ( copper loaded ferric chloride) and trying not to let too much rusting occur before rubbing it off with 0000 steel wool and putting on more browning – depending on how the colour develops I may switch back to Blackley’s Slow Brown, or I may take to steaming between each rusting if it needs more black/grey tones – I don’t imagine its an exact science, so trial and error rules, probably the latter! The Lancaster cocks are coming along nicely – I’m using a combination of the GRS air graver and push tools – the air graver on long lines like the borders, and on very curved areas. Tonights treat is sharpening a dozen gravers that have got worn or mangled.
30th Sept – quick pic of the latest initials ;-
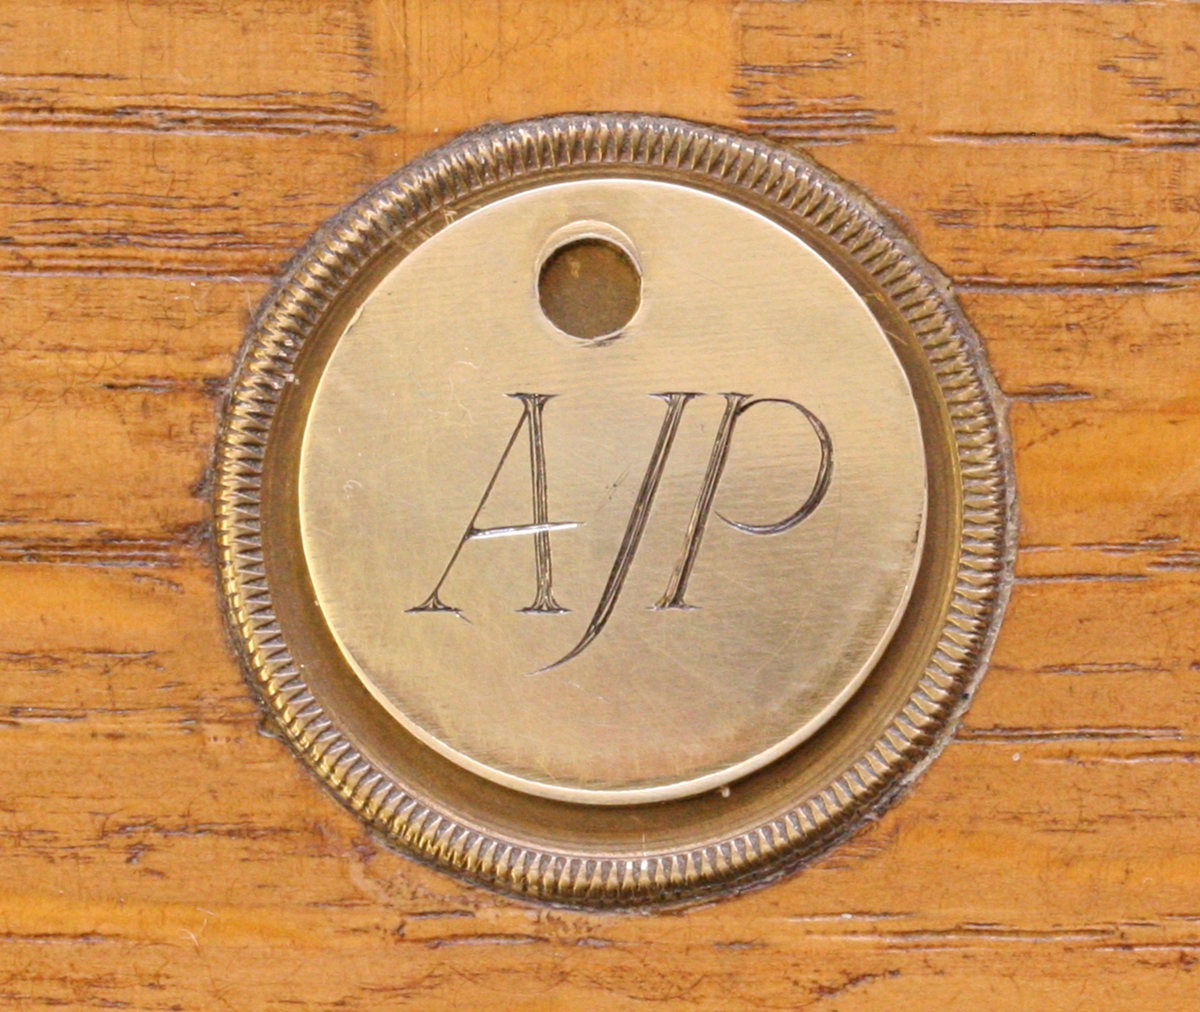
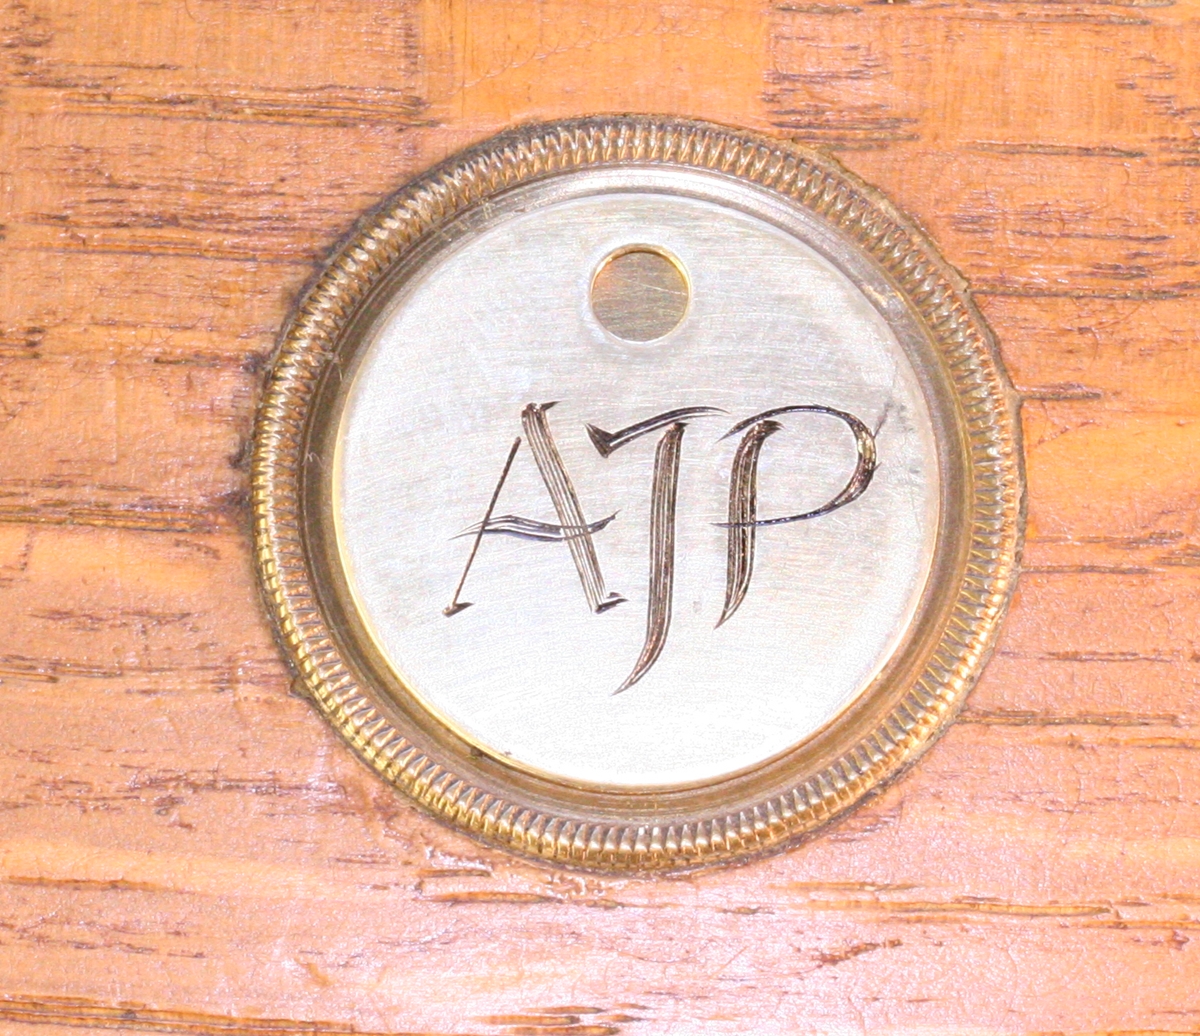
A ‘dog tag’ resting on the box – these are clean and simple designs, the second based on the script used on the coat of arms.
29th Sept – The Mortimer blunderbuss had a broken screw attaching the frizzen spring to the lock – half the head was missing. The thread pitch was 36 t.p.i. ( O.D. 3.4 mm) which doesn’t match any of the tap& die sets I have – most are 40 +, except Whitworth at 32 t.p.i. so I decided to try putting a blob of weld on the head – I then epoxy-ed it into a hole in a bar in the lathe and turned down the head to 4.6mm diameter and faced the end. Removed with a gas torch and slotted with a ground down 12 inch hacksaw blade (just pass the sides of the blade over the grindwheel to get rid of the wavy set and give it a slight taper and it makes a perfect slot). Anyway it fitted perfectly. I took it and the cleaned lock over to Dick’s and photographed the blunderbuss catch ( see post for more). I also picked up the Bales barrels – Dick had been browning them for me but they stubbornly refused to show any figure and looked a very boring dark brown so we decided to start again and I have put them in the electrolytic de-rusting bath – the first one is done now and is a fine gray and shows some figure – I’ll do the second and see where we go from there – maybe leave them gray or put a coat of my browning on them? I’ve continued to work on brass engraving – examples of my lettering below. I had a call from the collector I did the Westley Richards recut for, and am doing the Chas. Moore for and we discussed how much recutting was desirable and what effect was wanted, so I had another look at the Chas Moore and decided to clean out the rest of the traces of rust and get it back to what I anticipated was something like the original depth – I also discovered that a very fine paintbrush and a tiny drop of instant bluing would tone down the bright cut metal- I haven’t put a photo as it doesn’t really show up – funny thing about photos, sometimes you see things that you can’t see by eye, and some times however much you play with the lighting some things just look ‘flat’.! He will bring up the WR barrels and we’ll have another look at them. I started to recut the new cocks for my Lancaster in an idle moment – I got out the original to make sure I got it right.
Maybe I have too many jobs on the go at once!
Today’s jobs; Blunderbus screw, photograph catch & look for use/wear, derust Bales barrels, engrave more initials on brass, recut Chas Moore barrel, start refreshing new Lancaster cocks……
There are lots of photos to show today – I’ll put up a post on my photography some time since it is a major part of keeping this blog going – I pay very little attention to it, so its a wonder that any of the pictures work – a tribute to the modern digital camera!
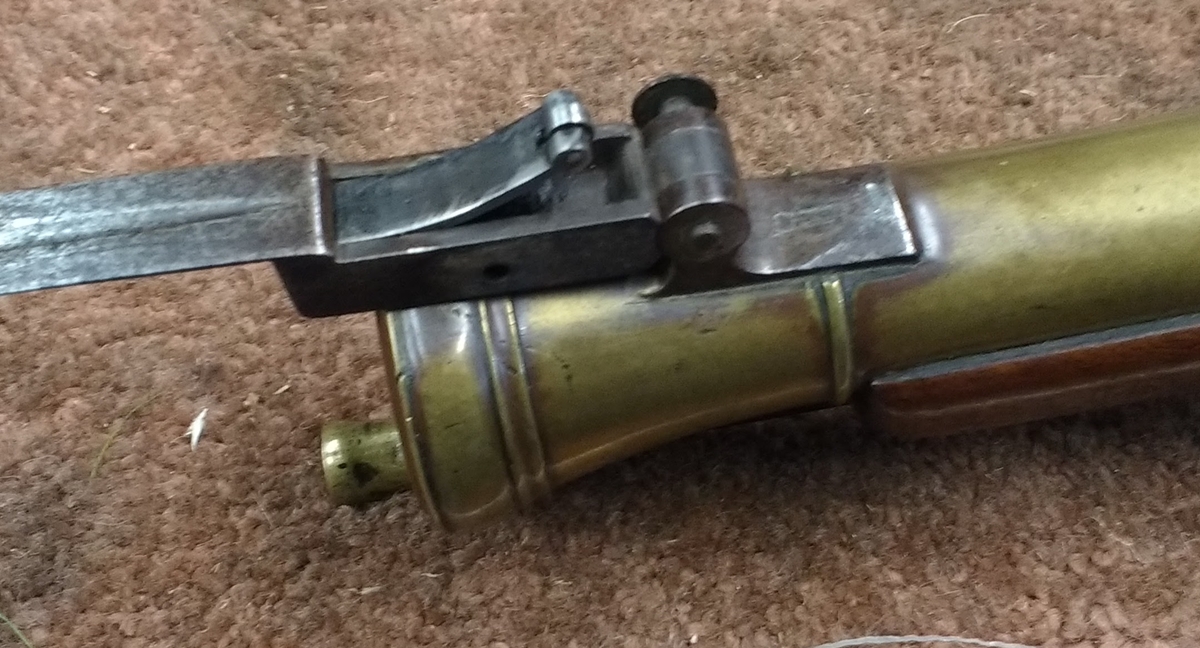
The catch works perfectly – we had a good look at the lock etc and came to the conclusion that the blunderbuss can’t have been fired more than half a dozen times in its life, and was never carried in earnest – it amounts to a ‘sleeper’. ( The photo is a bit poor – I forgot my camera & took this on my phone!)
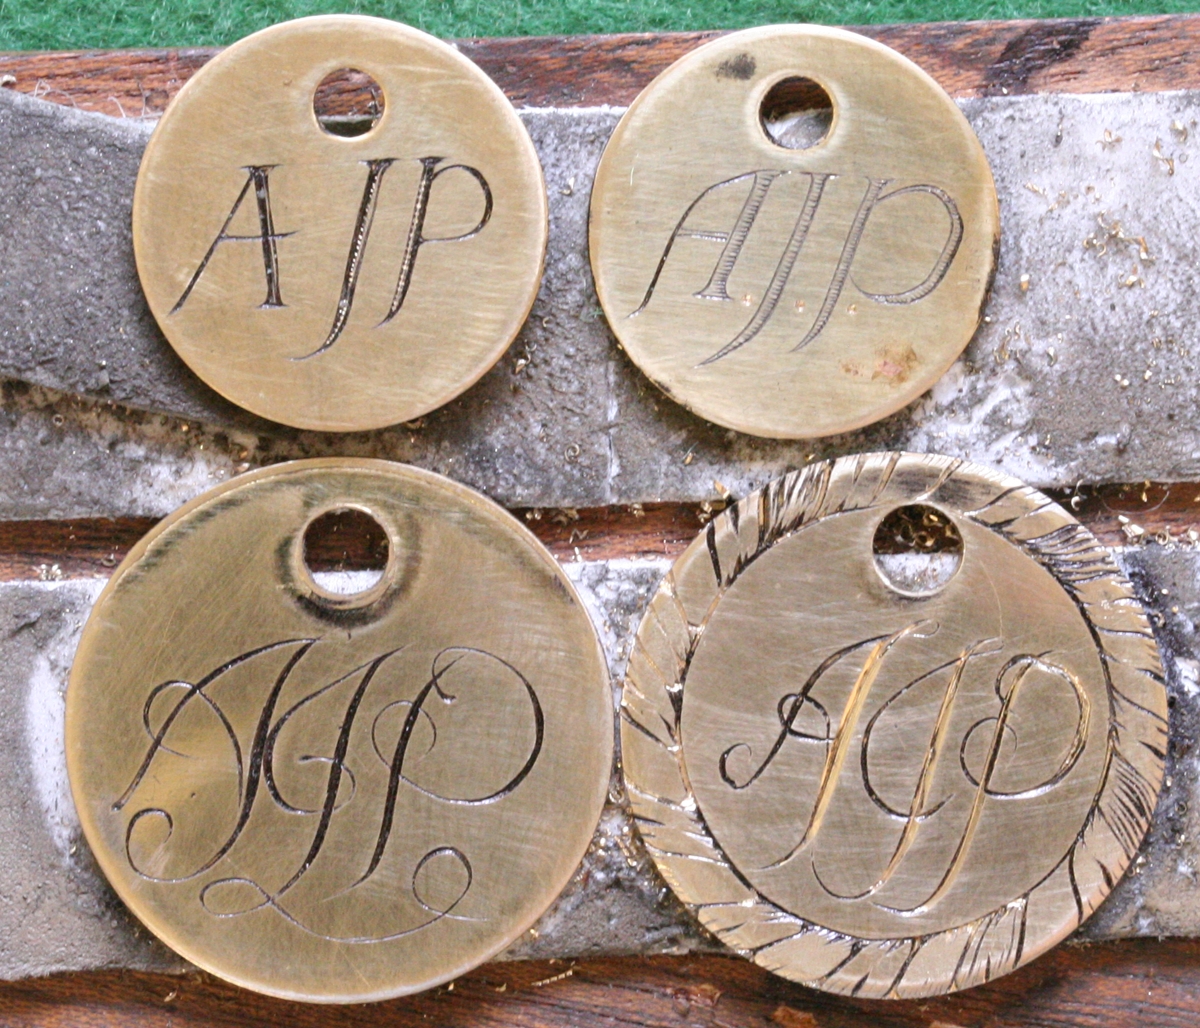
Practice pieces for the pepperbox pistol box – both Dick and I like the top left, but with slight shifting right of the ‘A’
28th Sept – Made a 5.5 mm diameter wheel for the bayonet spring and cut a pivot and took it over to Dick’s where I checked the fit and tapped a No 5 UNC hole for fixing it – the original screw fitted the pitch but was slightly larger diameter so I went through the spring a few times with the tap at a slight angle until it fitted – Dick later hardened and tempered the spring and rang me so I could hear the satisfying click as the bayonet sprung into the locked position! Dick got the parcel from Kevin Blackley with the cock for the Mortimer Blunderbuss we ordered on Friday last AND my long awaited pair of cocks for the Lancaster Oval Bore double – they look perfect, so will have to be fettled, recut and fitted. ( I was so surprised at getting such a quick turnround that I took a bottle of champagne for Dick and Sue!) I did a little light recutting on the blunderbuss cock and filed off the sprue – Dick will fit it as I hate fitting cocks to tumblers, and we need to get the tumbler welded – probably best I don’t mess it up! (my preferred method is not welding, but to anneal the tumbler and drill out the shaft and replace it, setting the cock angle before hard soldering the tumbler axle in place- but its longwinded !). I bought the lock of the blunderbuss back and ran it through the electrolytic derusting prior to stripping it as its SO much easier afterwards – the parts are all now beautifully clean with almost no effort – 10 minutes at most. It will need a new screw to hold the frizzen spring, as the head is split and it doesn’t do its job. I’ll make one tomorrow – or I could try welding the head ? I’ve also been practicing for engraving initials on half hard brass with my 37 1/2 degree graver – I can’t yet get the control to do elegant script lettering, but I can do a semi script that looks OK – more practice to follow – but the fact remains – I hate hard brass, I can do short straight lines OK but controlling sweeping curves is difficult in brass – maybe its time to dig out the GRS air graver – now that is a thought!
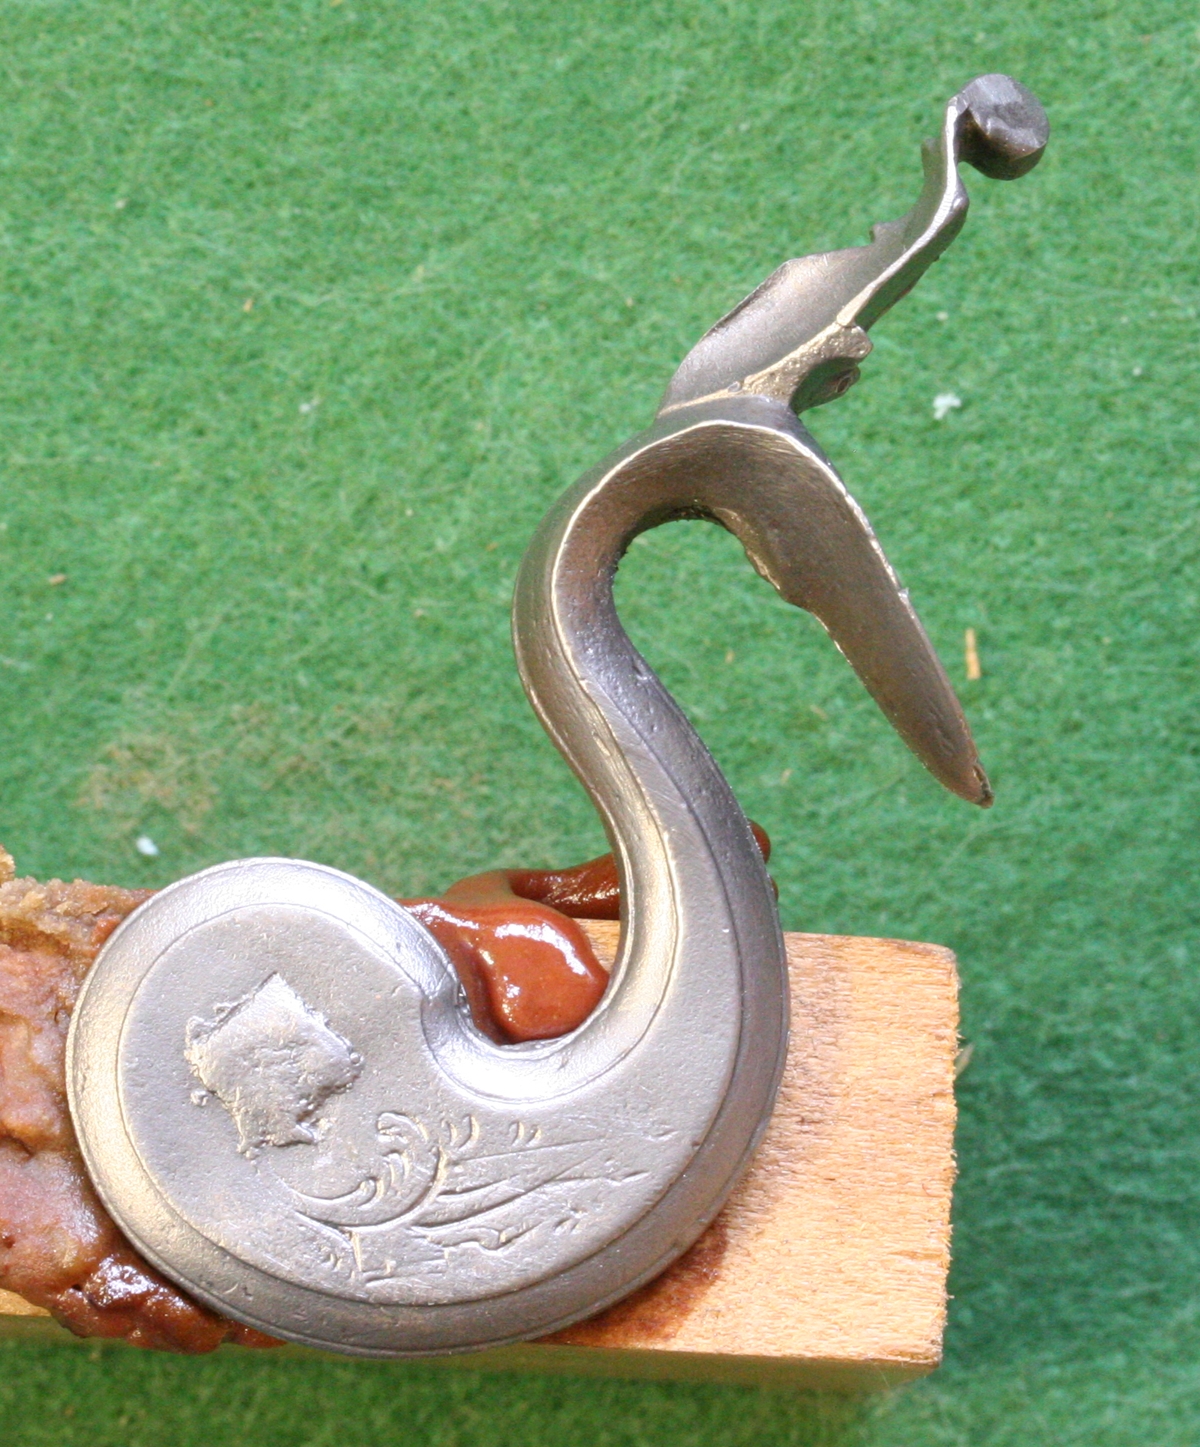
Here is the new blunderbuss cock – it looks right, may need the neck bent out a a bit to get the lower jaw into the pan. It’s stuck to a bit of wood with setting wax so I can hold it in the vice to recut the engraving – this cock is not quite up to Kevin’s usual standard although still perfectly good, but he has been trying external casters lately.
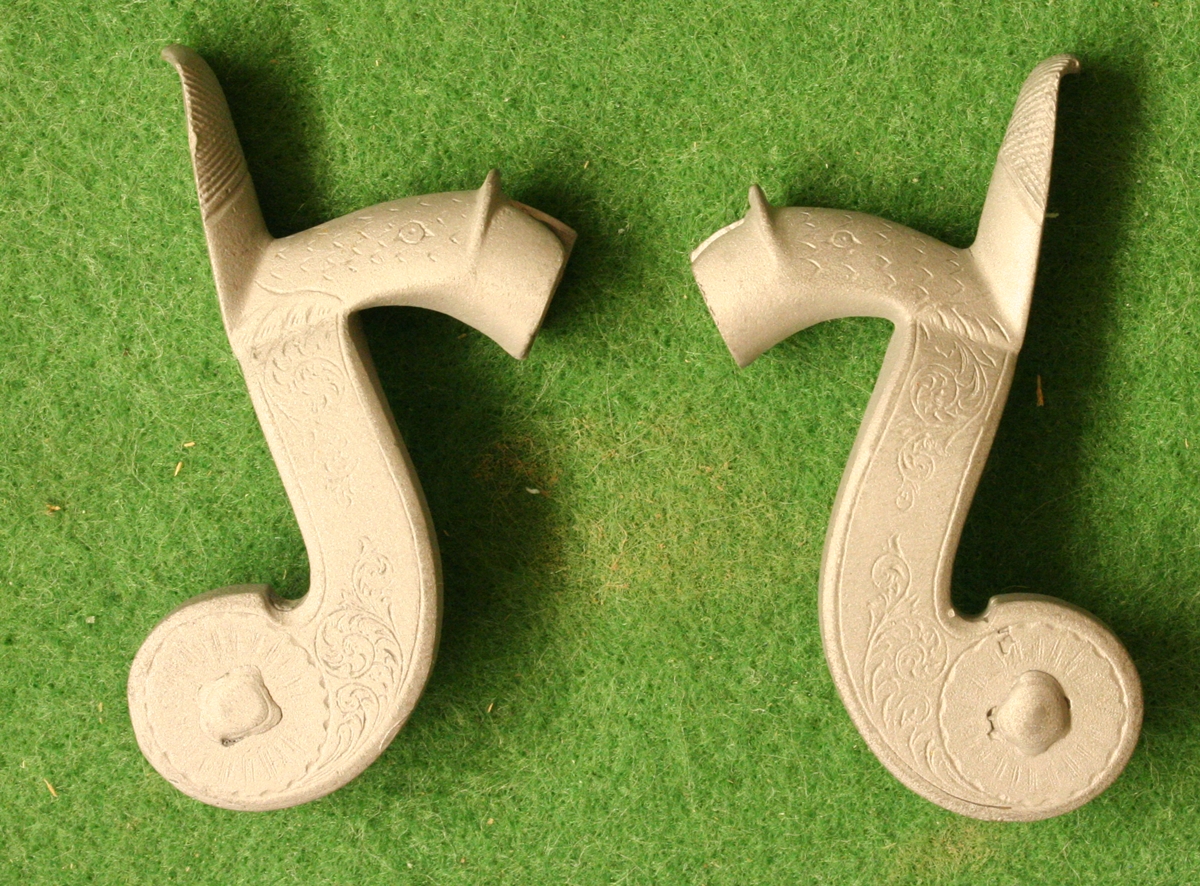
New cocks for the Lancaster ( see post) copied from my good Lancaster – the last piece in that job!
28th Sept – Busy day on all fronts! I decided to experiment with the brown wax/oil concoction as its a very useful restoration aid – it adheres well but is completely removable and can be used to smooth out blemishes in wood and fill small gaps around furniture as well as taking the glint of recut engraving – since its made with an iron oxide pigment it matches browning as well as a bit of rust and also walnut. I think I now have a good formulation for a product so I’ll have to find some pots and make labels and find a name – at the moment its called ‘Brown Gunge’ with the strapline ‘ Covers a multitude of sins’! I was practicing engraving on half-hard brass as I have to put initials on the Pepperpot box – I was experimenting with sharpening gravers at different main face angles to get a more controlled cut – I think that the best controlled angle was 37 1/2 degrees so I’ll probably go with that for brass for the time being. I found that I hadn’t done such a bad job of building up the blunderbuss spring after all, so I did some more shaping – its now ready for its wheel and to be offered up to the barrel, which is at Dick’s. It needs a tapped hole to hold it in place – not sure what the nearest tap is, or make a new screw, then hardened and tempered when its all finished.
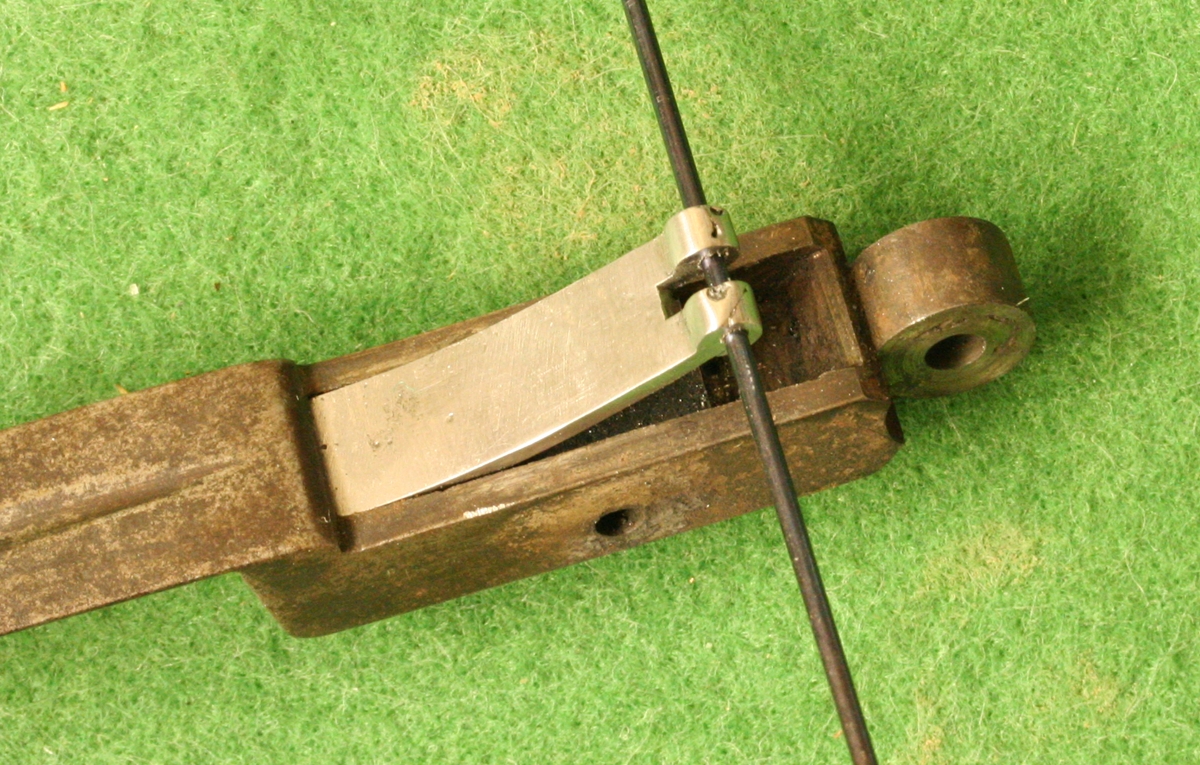
There are a couple of small blemishes in the weld, but they shouldn’t affect the strength and will not show.
27th Sept – I started to make the bayonet spring for the blunderbuss, but didn’t do a very good job of building a bit of weld for the roller pivots so I’ll have to have another go. So instead of finishing that job I decided to recut the Chas. Moore barrel – which fortunately went much better. As with the Westley Richards recut, the lettering was filled with rust with a bit of a skin on top, so I was able to excavate the rust very carefully with a graver and only just skim over the original cut metal surface, so almost no reshaping. It’s often very difficult to see where the line should be, and if you get it wrong it would spoil the lettering, so it takes a lot of concentration & is time consuming. A very light polish with a very fine wire brush on my bench grinder removed any burrs and clean the loose rust from the cuts, then a quick rub over with a bit of oil with some brown wax dissolved in it to cover any newly cut metal shine and its done, as the photo shows;-
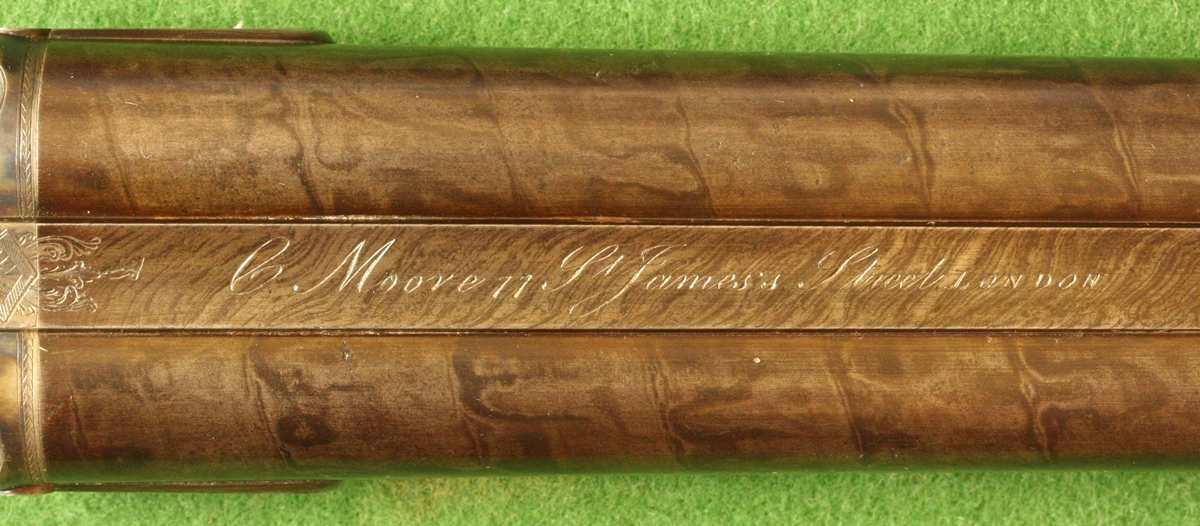
25th Sept – here is the coat of arms I’m taking the fish from… on reflection I think it should be straight, not diagonally within the space – try again…..
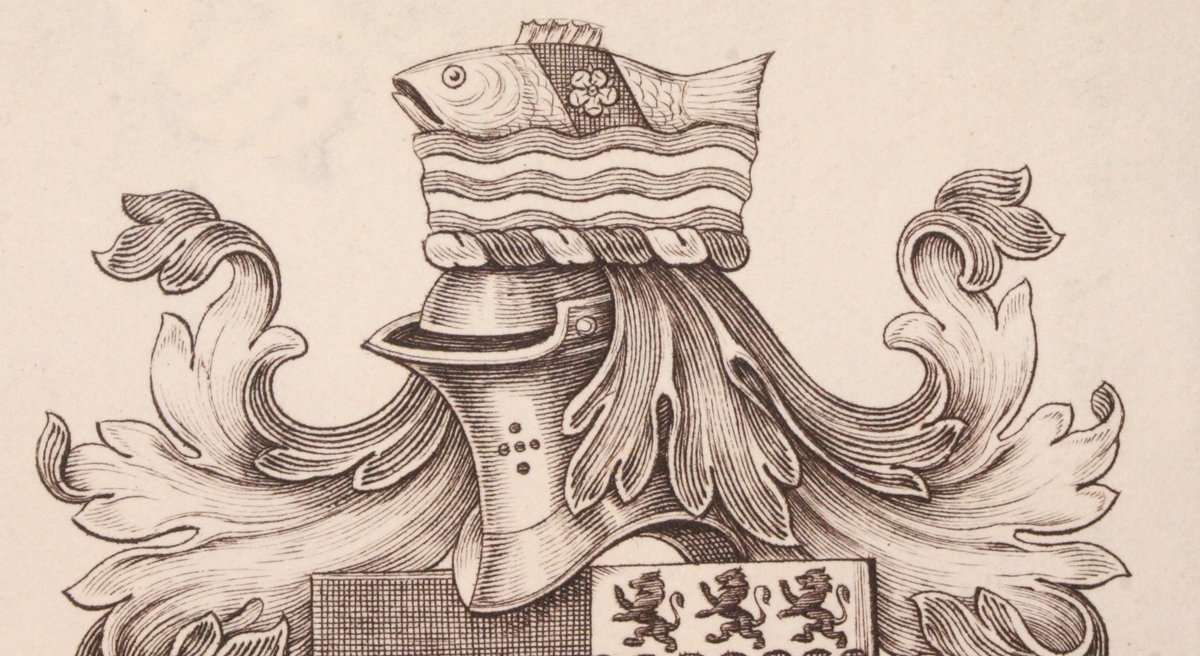
I think at last I’ve got something that looks OK! Its pretty fiddly to do at such a small scale, but very good practice – now to sort out how to mount the pistol as the escutcheon is firmly glued into the butt, so I’ll have to mount it on my turntable -Hmmmmm …………………. ( More work to prep for the painters today – took down all the guttering – cast iron and shot after 20 years – will replace with cast aluminium….)
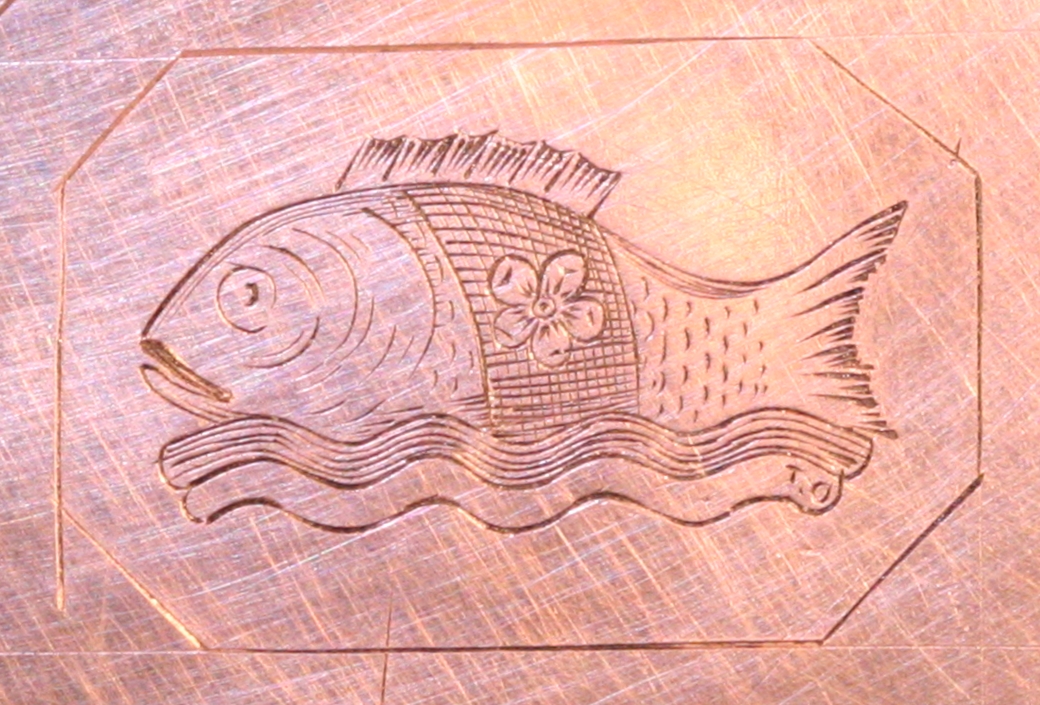
He looks a bit frightened – if the pistol goes off, he will be!
24th Sept – My evening’s relaxation was trying to engrave the fish, whatever species it is meant to be, onto a copper plate and give it a suitable expression – all in a space 10mm x 15 mm;- ………………………………………………. ( I also replaced a rotten window sill and freed the sashes of one window)
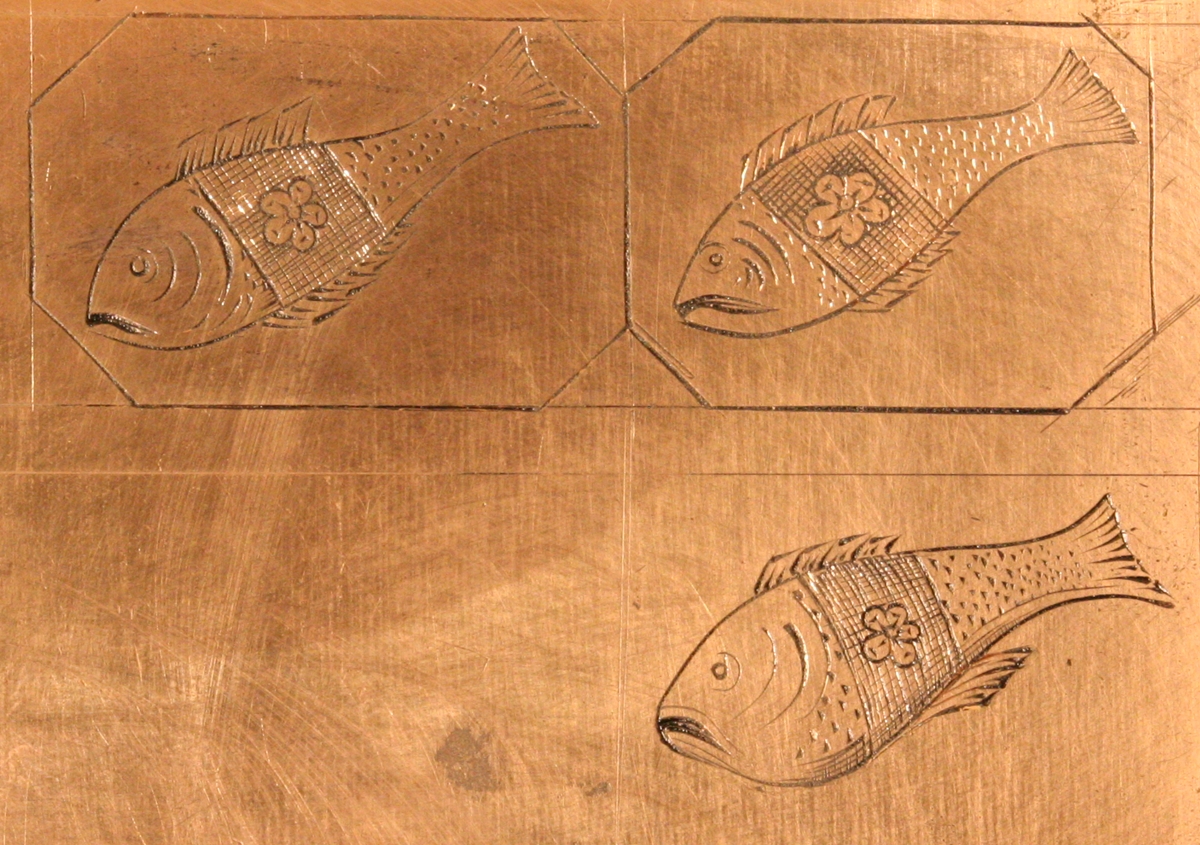
I think I prefer the bottom one – it looks a bit surprised – the band is part of the coat of arms – the band is too flat in the top ones.
23rd Sept – Went over to Dick’s to look at the blunderbuss – the cock I had is too military for a nice Mortimer gun! A quick look through Blackley’s old cataloguse produced several possible cocks and a phone call to Kevin got a promise to put one in the post on Monday plus the hammers for my poor Lancaster double rifle restoration that has been hammerless for a couple of years! A result – maybe. I brought the Blunderbuss bayonet back to make a new spring. I also collected a pristine pepperpot revolver to put the salmon on its silver escutcheon, except that its a trout! Also to put initials in script on a brass escutcheon on its box – I just hope its not like the brass I tried to engrave at Sandringham that snapped off the points of 6 tools! I did a solitary side nail for Dave Elvin tonight – a variation on a daisy theme. Dick also dug out an old casting for a flintlock plate that fits the Bond pistol ( see blunderbuss restoration post) remarkably well, plus a frizzen that nearly fits, and a cock – so it might be possible to restore that after all – I’ll consult the owner. I’ll shortly start the Clarke recutting, but the painters are coming to paint our house windows on Monday and I have to sort out a few problems – like getting them to open. Its quite traumatic for me as they are only the third tradespeople I have let work on the house in 22 years, and the others were friends anyway……except for an architect who I had to ‘let go’ after a couple of weeks ….( I know it should be a profession not a trade!) .
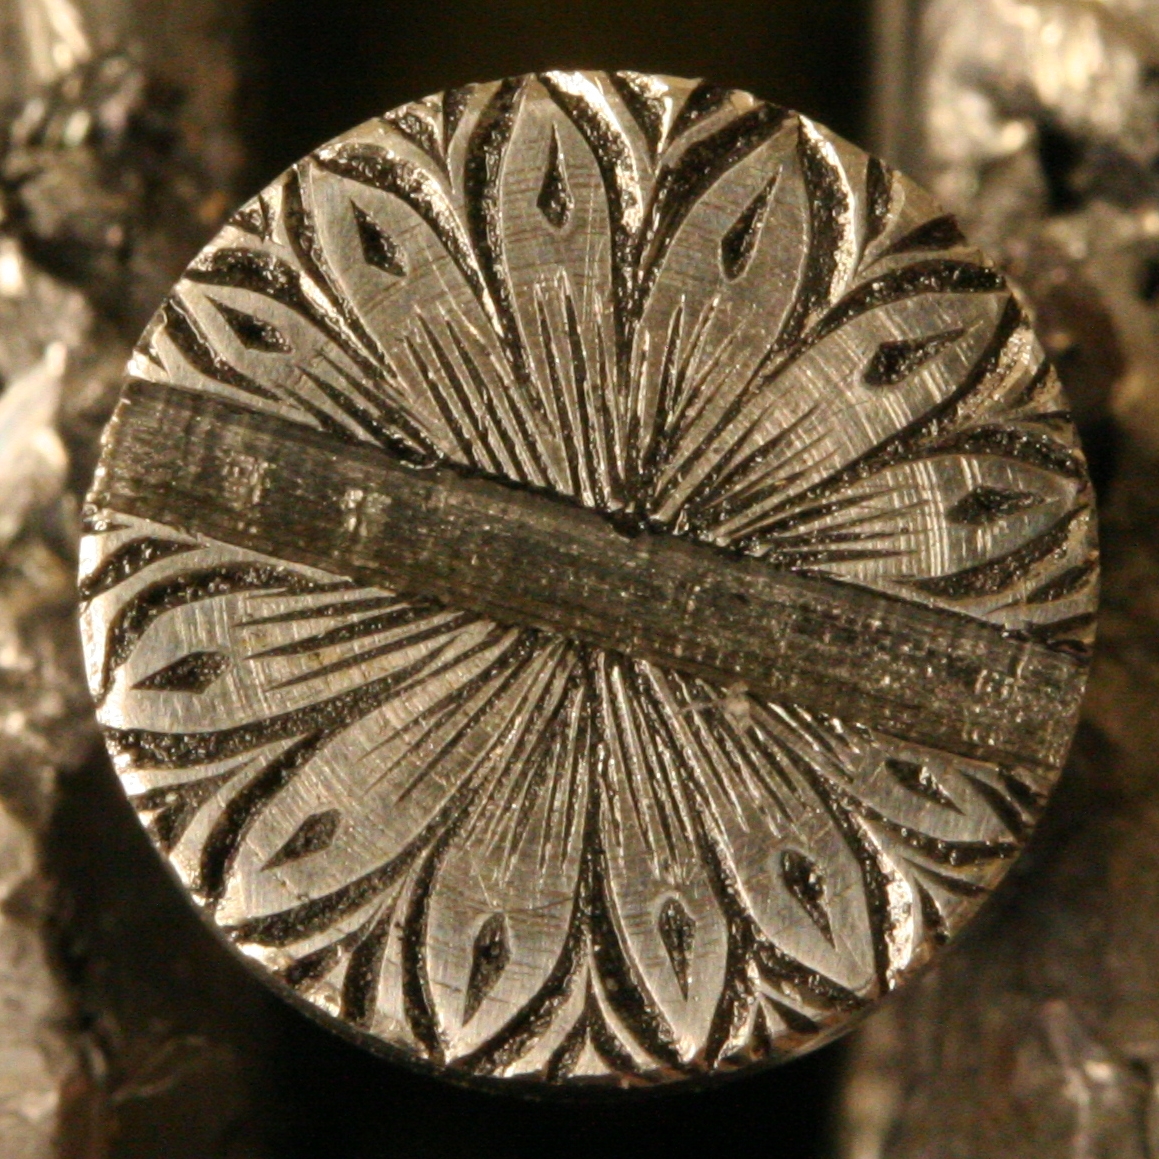
Side Nail head
22st Sept Last day of talks to school students – after 36 repetitions in 3 days I’m talked out! I had a bit of engraving practice last night – Dick had asked me if I would do a salmon on a silver escutcheon but I was hesitant, so I tried a couple on steel and decided I might be able to do it – I’ll post pics shortly, and see if he still wants it done ( the moto is not intended for the escuchion, that was just me playing – I guess it means ‘Second to none’ ………
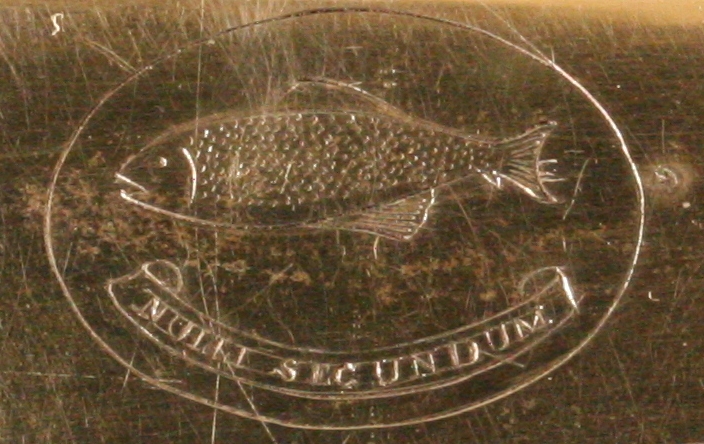
20th – Another ‘Physics at Work’ day at the Cavendish – after doing the same talk for the 10th time in a day I find myself in the middle of it but momentarily unable to remember how far I’ve got – so far I’ve only lost it for a few seconds and no-one has noticed! Here is a picture of the Bond pistol that I recut a very slightly so it could be read a bit better, as its an interesting inscription – I wonder if the pistol was actually supplied to the East India Company, the EIC stamp would have been on the lock, which is missing, if it was anywhere.
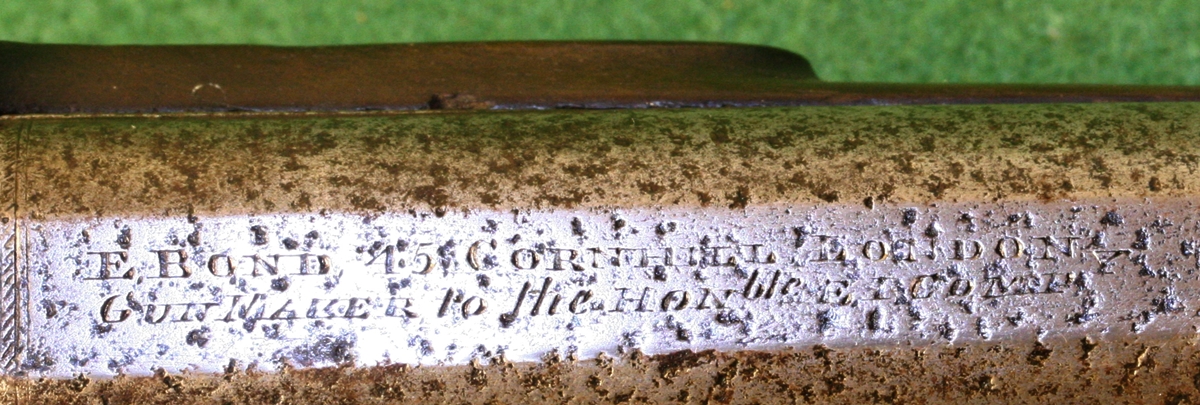
19th – in the Cavendish lab all day doing science presentations to yr 10 & 11 students (ages 14 & 15) – I’ll do 36 presentations of 20 minutes each over 3 days, so by Thursday evening I’ll be hoarse – probably have lost my voice, if not sanity ! I’ll try to do a bit of engraving in the evenings to keep sane. I very gently went over the engraving on the Bond barrel last evening so that it was just readable in case it is ever restored – very relaxing. I’m getting more comfortable doing it now I have had a bit of practice – I don’t find it as stressful as I once did, fortunately. I had a look at some recutting I had had done by a ‘conventional’ engraver some time ago, before I had done much lettering, and I was shocked at how out of character it looked – shouting ‘recut’ very loudly at one – I regret having it done!
18th late…I just realised what the inscription on the Bond barrel ( see below) says – the Honorable was the honorific of the East India Company so it reads E BOND 45 CORNHILL LONDON GUNMAKER to the HON(ble) E I COMP(Y)”. That puzzle solved…. and I got to sharpen the gravers too.
18th Sept – Gradually getting sorted, although so far I haven’t had the odd hour necessary to sharpen all the gravers I blunted and chipped at Sandringham last weekend – about a dozen – might get that done this evening. I went down to Dicks this morning to take the blunderbuss as he is going to do most of the work – We had a hunt around for a cock to replace the broken one without any luck, but when I got back I found I had one that measured about right. I’ve started a new post for the Blunderbuss Restoration. I also took the lockless Bond pistol that belong to my client in case a suitable lock came to hand – it didn’t, so probably won’t be (quite) economical to make a new one – although it would be a nice pistol if a little worn and quite pitted on the barrel surface. I also had a look at the Bales barrels Dick is browning – they seem to have taken a uniform brown and are not showing the twist very strongly – experiments will be made!
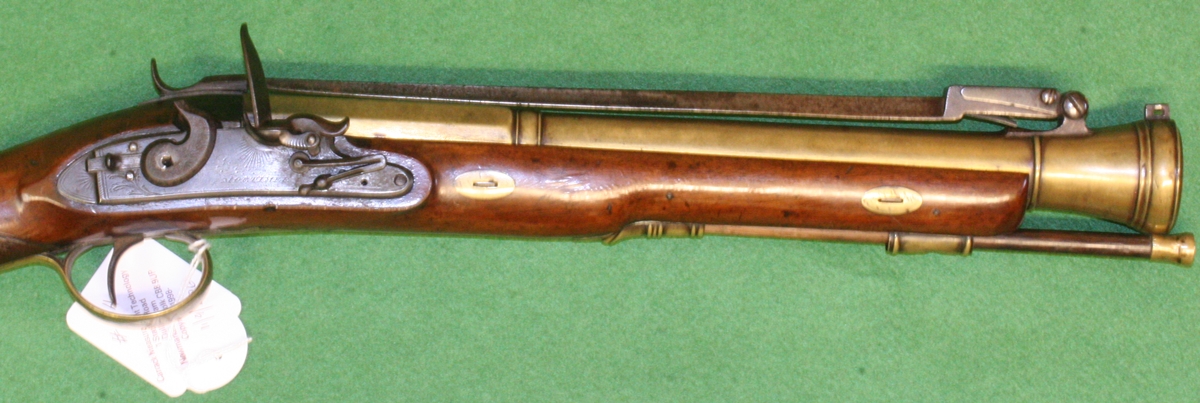
This is a very nice late flintlock blunderbuss with most of the desirable features – good maker, nice 2 stage brass barrel and spring bayonet – what’s not to like!
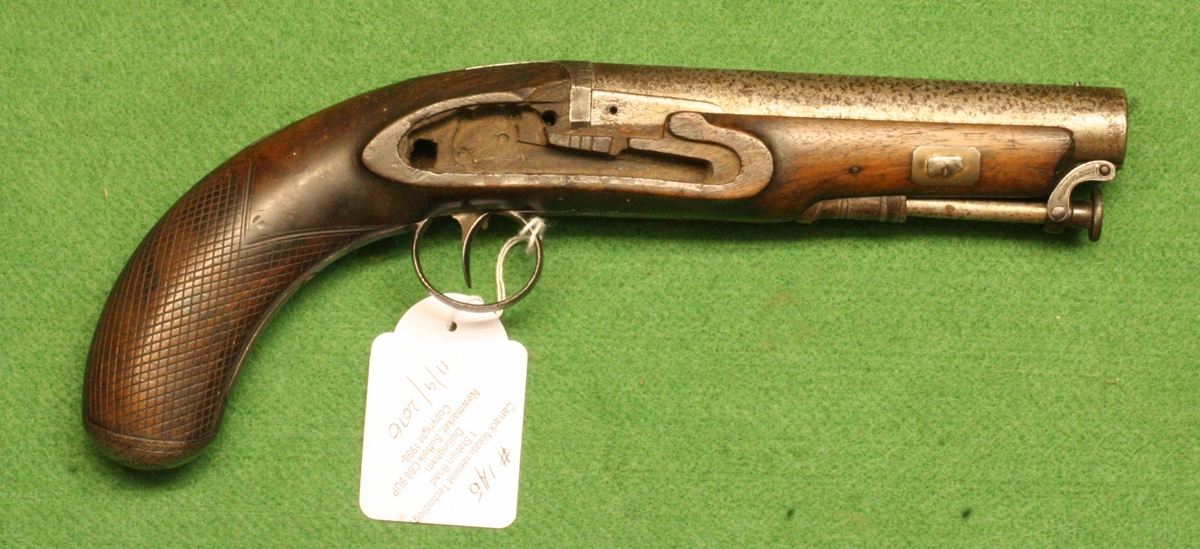
E Bond of London – Shame not to restore this as it would be a nice pistol, but making and fitting a new lock would probably be around £500 and the sums don’t quite add up!
17th Sept – Back home late last night as I didn’t leave the auction in Cornwall til 4 p.m., then rush to get things ready for the Anglia Muzzle Loaders monthly shoot at Cambridge Gun Club this morning (pausing only at midnight to make a – nearly forgotten- birthday card for Penny!) The shoot was typical for me – long runs of not hitting anything and shorter runs of hitting nearly everything! Nett score 14/40 – think that the comb of my Egg needs raising a bit – I’ll try and find a suitable pad. The auction was interesting – there were 4 lots I was interested in – a pair of brass barrelled pistols by Evans converted to percussion with very poor locks that needed to be cheap to cover two new locks – I ducked out at £560 as I don’t need the work that much. There was a plain iron barreled blunderbuss without bayonett that went for £1000 hammer price – it was OK at that, but I want a nicer one. There were two real peaches – a tap action pocket pistol in a box by Clarke in almost perfect mint condition (went for 1000, my limit 850) and a pair of cased overcoat pistols by Westley Richards ( not too sure about the case) which were in extremely good condition – I liked them a lot, but I dropped out at 4500 as that was my limit – they went for one bid more to the room and were a good deal at that. The cased Rigby pair which were pretty ropey went for 5K to a maiden commission bid and nobody in the room offered any bids as they had seen the condition – I can only guess the commission bidder hadn’t! Anyway it was fun – the buyer’s premium was only 15% ( take note Holts!) and Martin Rowse, the auctioneer, sold 700 lots between 10.30 and 3.00 with only one 10 minute break – a rate of over 150 an hour and almost everything sold so it was pretty hectic – not a sale for the casual amateur.
As I don’t have any pictures of the guns in the sale you’ll have to make do with a photo of the new woodburner that we had put into tinminers cottage ;-
15th Sept – Had a look at the auction – Basically a load of junk, most of it priced at Holts prices – I guess they looked at prices online for their estimates. Anyway I might go along to watch for fun, I can’t see anyone turning up to buy a pair of Rigby percussion back action lock duellers in a weird case, the pistols in pretty ropey condition for 5-6K ! I cannot see any way to make them worth that – the implication is that the name is worth 2 -3 K for the pistols wouldn’t be worth 2-3 K without it! Anyway I will report back on Sunday when I next hit the ground.
14th Sept – I’m in Cornwall sorting out our new woodburner, but as luck would have it there is a local auction on Friday that has a few potentially interesting pistols and a blunderbuss so I’m off this afternoon to check them out – I’ve been trying to keep away from auctions lately for fear of becoming addicted – but I will allow myself this indulgence!
11th Sept – Saturday was a bit of a washout at Sandringham Game Fair, although I think us Muzzle Loaders manning the MLAGB stand did better than many of the other stands. Sunday was a fantastic day and we think broke our record for the number of ‘Have a Go’ shooters in a day – I certainly talked myself hoarse at times with the number of people interested in the engraving, and I gave away lots of engraved screws to the younger kids – I feel that quite a lot of the show is a bit boring for them – except of course the Have a go with a Muzzle loader for kids, which is very popular, so I like to concentrate on them rather than their parents – strangely their parents seem to appreciate this! I got the blunderbuss to restore – it’s a nice clean brass barreled example with bayonet , by Mortimer, and as it has a few specific breakages rather than general decrepitude it will, like the Parr restoration, come out as a very desirable gun, and I’m quite jealous of my client! He also left an overcoat pistol by Bond that is in fair condition except that it has no lock – I’m not sure that its economic to make one, but if we can find one to fit it would be good to fix it up – anyway I said that we would contemplate it and see what we could find before doing anything. – I’m trying to fathom out the barrel incsription – beneath the usual name and address it says ‘gunmakers to the HONble and then its unreadable…. I’ll post picures of both, and you can follow the progress – I do check with clients that they are happy for me to do this! I have to go to Cornwall for a day ot three to sort out our cottage ( see www.tinminerscottage.co.uk) as we have just had a woodburner fitted, but things will resume as soon as I’m back.
p.s. despite the car full of stuff I took to Sandringham, I still managed to leave out my stool, and ended up sitting on a plastic box on top of a normal chair – fortunately it worked.
9th Sept – off to Sandringham with a car full of stuff – I always have fun sorting out a few guns and pistols to take – I just wish it didn’t take so much effort to take down and pack my engraving setup!. I have dropped the Bales barrels off with Dick who is kindly going to brown them. The Chas. Moore barrels are on the eponymous post.
8th Sept Getting ready for Sandringham I got out my collection of engraved screw heads as they are always popular with people who are not so keen on the guns themselves, and I came across a little test piece I did on an 8 mm diameter screw head – it was just casual playing so not perfect. I do mean to have a ‘proper’ go sometime, but I found it a bit tricky to draw the circles to engrave between at such a small scale – I probably need to invent a new tool! Also for fun I’ve included a lead test poinson.
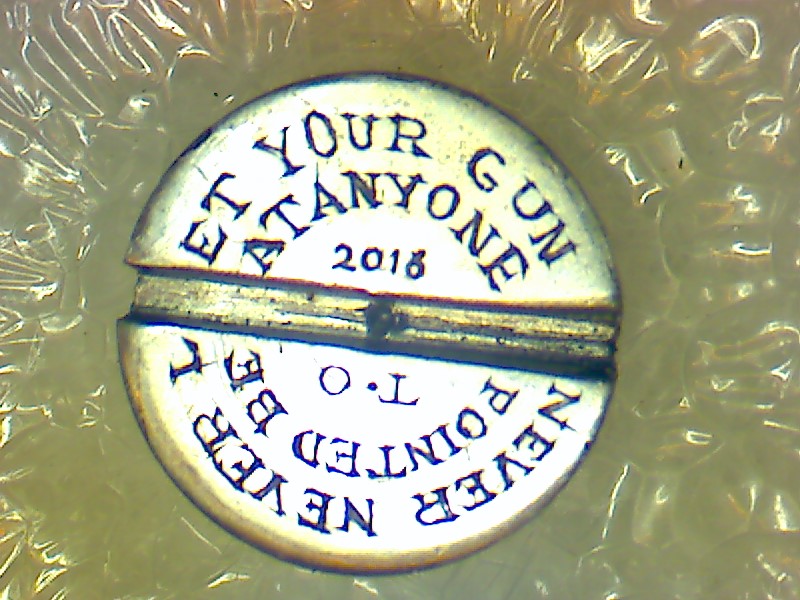
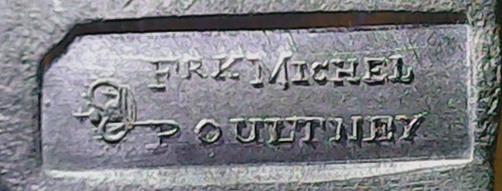
This is made with an engraved punch as used to make poinsons on barrels
8th September – The completed Westley Richards barrels were handed over to their owner this morning and I’ve got another pistol from him to recut – a silver mounted double barreled pistol by Charles Moore of St James, London made around 1833. I don’t think I’ve ever seen such an immaculate antique – it looks as if it has never been out of its box – but somehow the engraving on the barrel has lost its crispness – presumably in the past someone thought the barrel needed rebrowning, and rubbed away with paper and blurred the engraving. Its in script and will need to be VERY lightly recut taking care not to throw up burrs. (see new post)
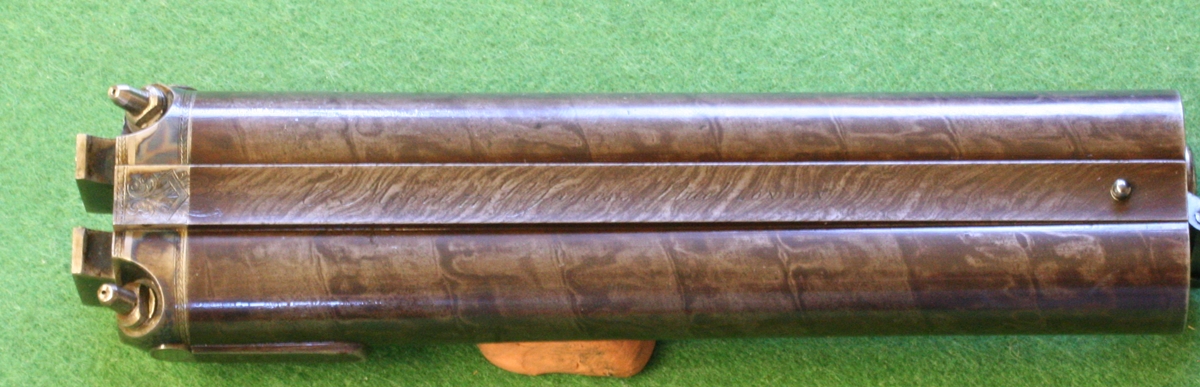
The Chas. Moore barrel/s – it has a captive ramrod – see the new post for a better view of the existing lettering.
7th I’ll be at Sandringham Game Fair on Saturday and Sunday demonstrating gun engraving. I will also pick up a nice blunderbuss that we have offered to restore – more will follow… If you plan to come to the fair, please introduce yourself!
7th – New post – Engraved borders – some fairly bad copies of borders from a range of old guns.
6th – New post ;- A gallery of engraved screw heads – mostly done as demonstrations at country fairs – I now give them to child visitors !
6th – Here are the WR barrels after and before ;
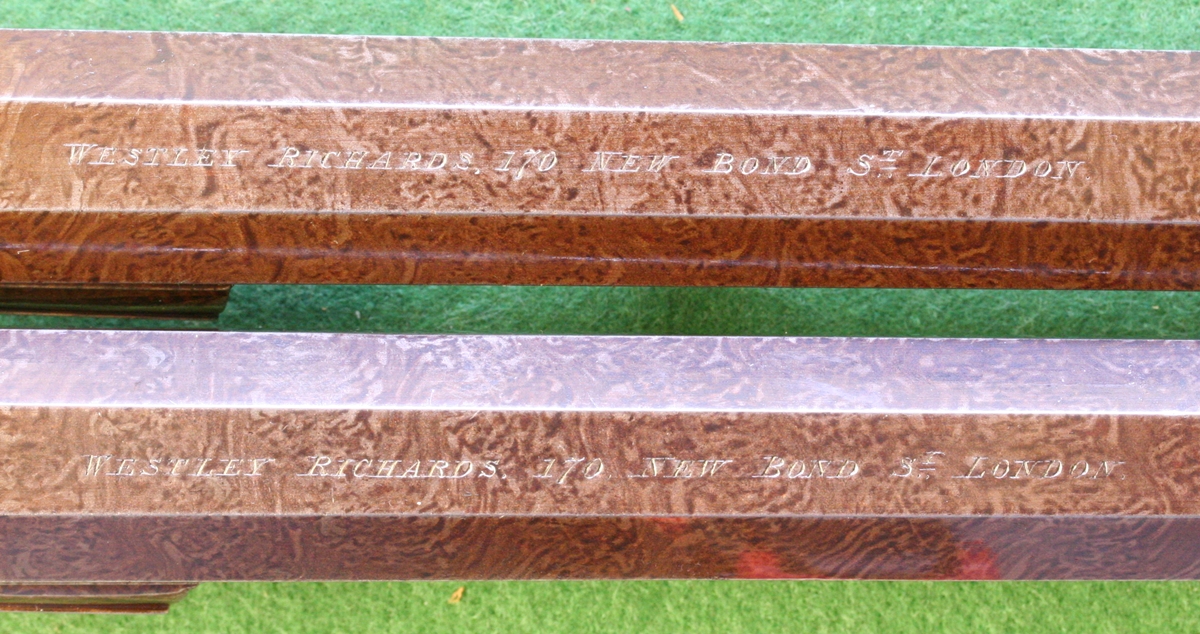
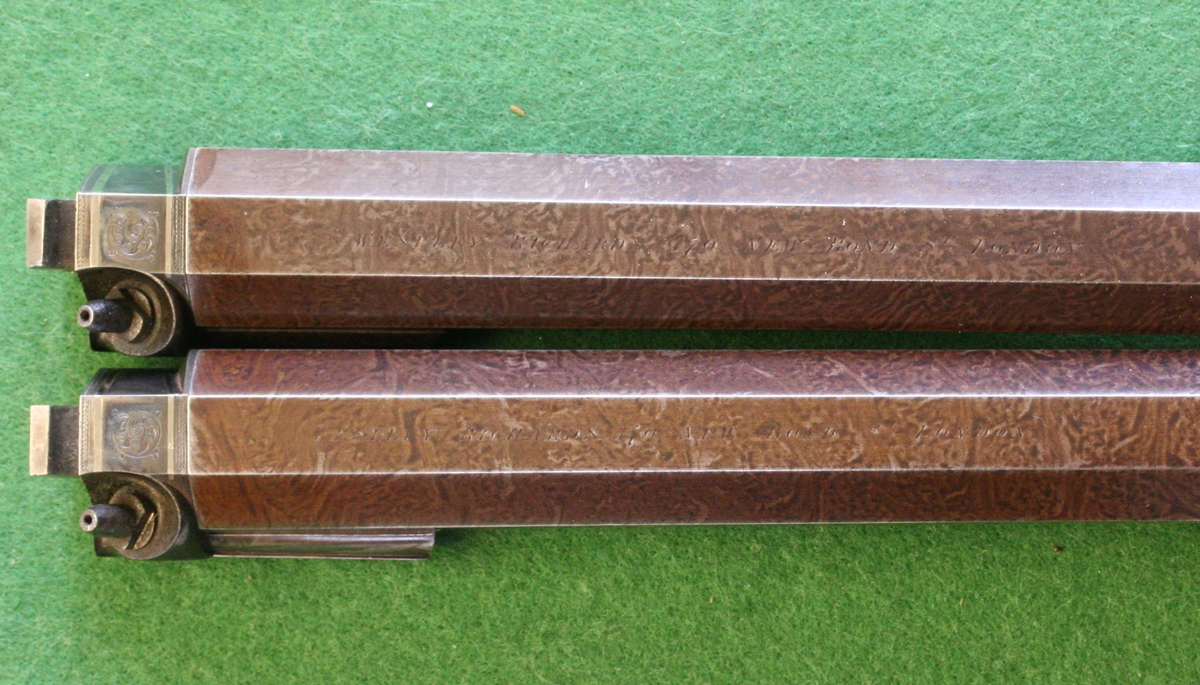
5th – later – Took the WR barrels to Dick’s – he kindly said that they didn’t look as if they had been recut, which was the objective, so job done! Picked up 2 cock screws for a double Joe Manton percussion from flint to sort – not sure at the moment whether I’ll use a pattern from the flint or the percussion Manton era – he changed engravers and styles around 1816. These locks had the later engraving added to the nose on conversion, but the old style fairly primitive engraving on the tail, an excellent illustration of the two styles; ( also picked up a screw from one of Dicks beautifully modern Geof Moore engraved guns that needs engraving – quite intricate – much more involved than an antique one) …….p.s. all screws now done.
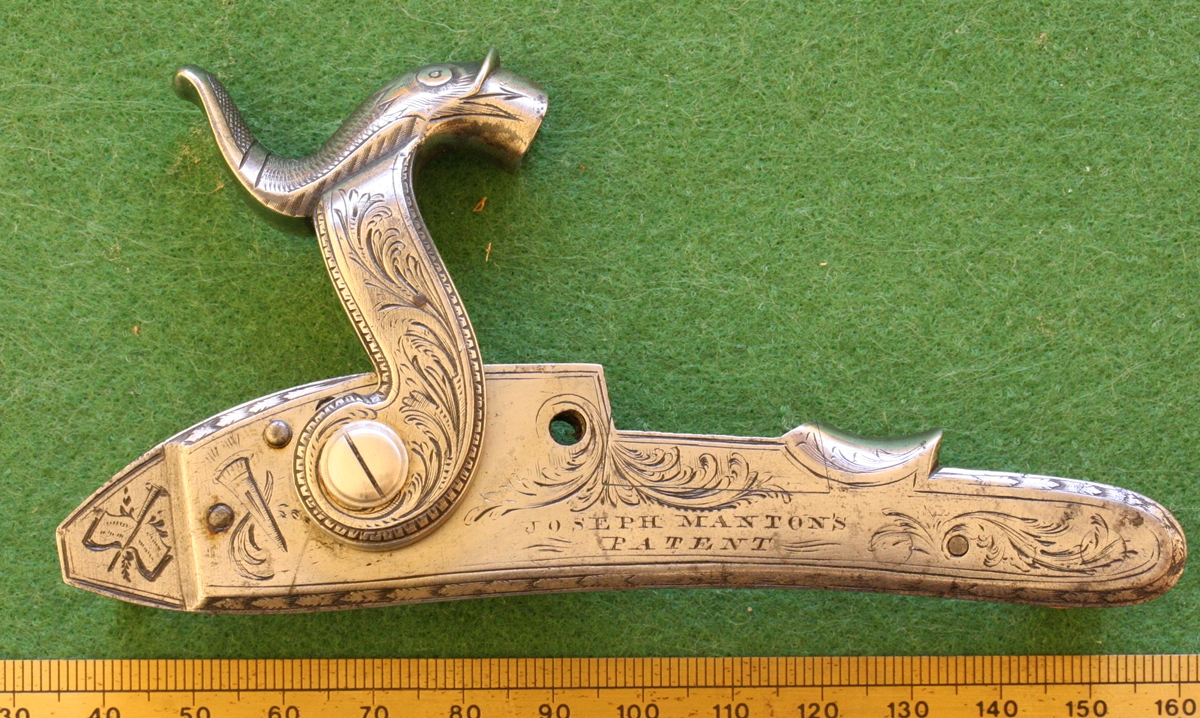
Distinctly confused lock here – The stepped tail, running leaf border, music and quiver are typical late flint era, while the foliate scrolls on the nose and cock didn’t appear on guns until after 1816 – the lettering could belong to either era, probably recut when the conversion was done as the lock would have been annealed. Notice the square inset where the pan was removed. I’ll have to pore over the Manton book to find a suitable pattern for the cock screw……..
Now done………..
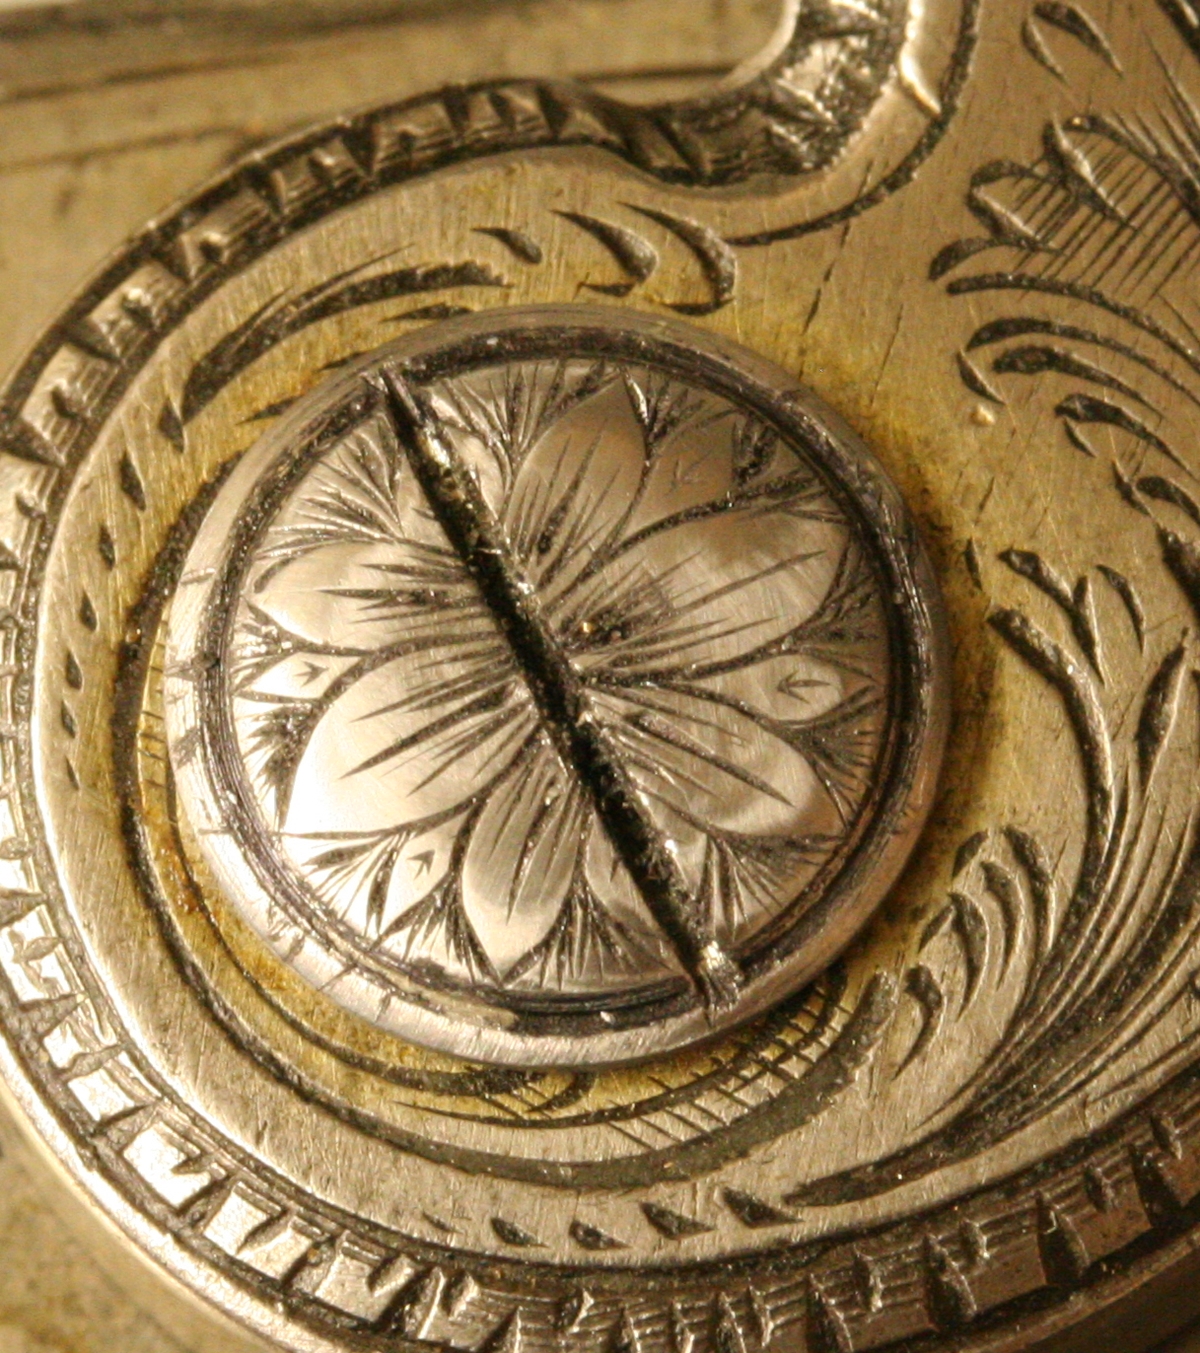
New cock screw for Joseph Manton Percusion

Small screw for Geoff Moore engraved 12 bore
.
5th – I’ve now done all the primary work on both Westley Richards barrels and I’ve put them away so that I can look at them with fresh eyes later – I find that if I have just done a piece of work I can’t see the obvious faults until I’ve let it rest – anyway I’ll take them to Dicks this afternoon for his critical comments. I’m now derusting the second Bales barrel and will start striking that up shortly. I met someone at Fenland who wanted some work on a blunderbuss – he has now sent me photos of a potentially very nice brass barreled blunderbuss with spring bayonet – that may be a project to document.
4th Sept – Boat was good! Now tackling the Westley Richards barrels in earnest – I think it is good, but the final judgement is with the client! I am also working away at the Bales see the relevant blogs for details and photos. Here is a photo of the rust underneath the surface of the WR lettering – actually not serious as it hasn’t done much damage to the lettering, although the strokes will end up a little wider than original.

Westley Richards – It looks a bit scary when you first see that much rust under the skin!
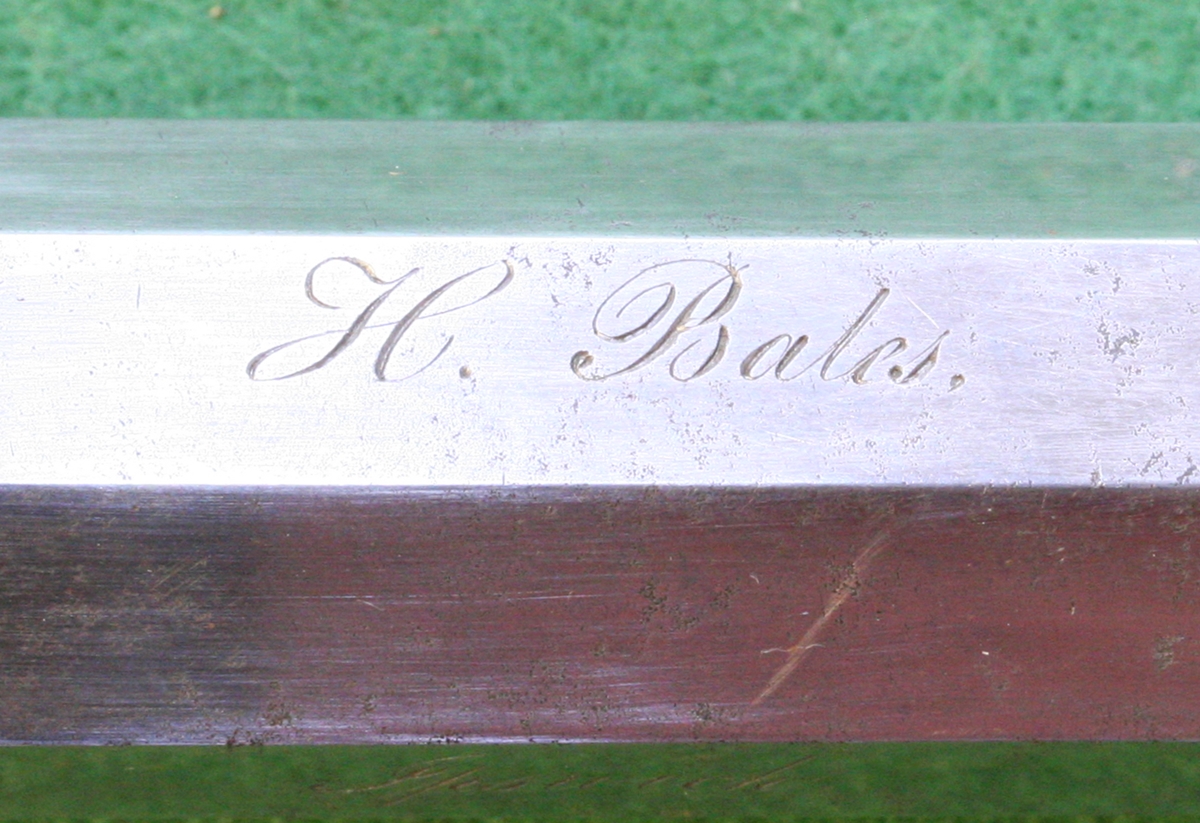
I haven’t got rid of all the rust pitting ( & don’t intend to), but I’m pleased with the recutting.
2nd September – Still working away on the first of the Bales barrels – the recutting looks good and I’ve just about got a good enough finish – I will do the second barrel to the same state and brown them both together so they match – I apologise for not putting any photos of the work – they will come – my excuse is that its my birthday! Tomorow is reserved for trying out the boat.
1st September – in a weak moment I bought a boat yesterday – a Cornish Coble, traditional style 16 ft dinghy from the 1980’s for a bit of fun on the coast, so I didn’t get as much done today as I had hoped, what with playing with my new toy! Its amazing how long these early fibreglass boats last. I’m still experimenting with striking up the Bales barrel – its quite hard work doing it all with stones instead of paper, and I’m not sure how good the result will be. I filed the land with the engraving and did a bit of recutting to make sure the fine script strokes don’t disappear, but using paper does round the corners of the cut lettering more than is ideal. I put a few crimping tools on the FOR SALE page as there was interest at Fenland and I need to make some space.
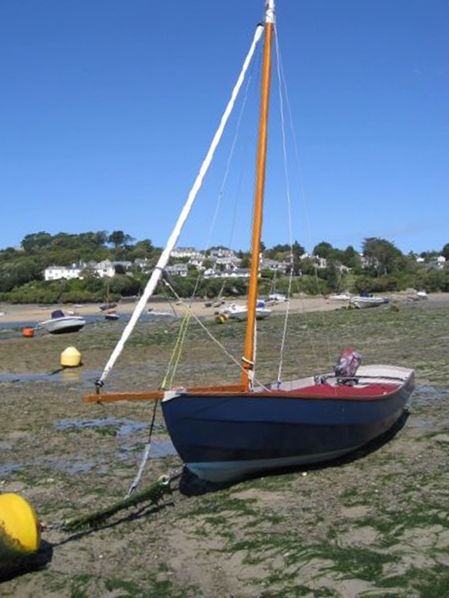
Traditional Cornish Coble – which is a bit of a misnomer as Cobles are North country boats
30th August – a busy time at the Fenland Country Fair! Lots of people wanting to shoot a muzzle loader, plus many interested in my engraving, or wanting to talk about restoration. I had several gun enthusiasts who needed restorations done and also a Firearms Dealer was keen to move a load of stuff the Police had dumped on him from a widow whose husband had been a collector . I wasn’t interested in the reproductions but there was a very unusual Samuel Nock percussion rifle or about 16 bore in nice condition that the previous owner had used as a target rifle, although it looks to me as if it was built around 1830 as a big game rifle. It has a few splits in the stock, possibly from an excessively large charge? but will be a very fine rifle when fixed – I bought it, so at some point I will make it a project. At the moment I have two projects on the go – the Westley Richards recutting of the barrel engraving , and refinishing the barrels of my own Bales of Ipswich Target pistols. Pictures will follow when its daylight………
28th August – I’ve spent the last two days doing my engraving demonstration at the Fenland Country Fair – I’ve met lots of interesting people and had a few discussions with would-be engravers and offered to do several restorations and make bits for people who have guns that need a bit of expert TLC. But the bit I enjoy most is getting the children interested in engraving – they, particularly the girls, love the collection of engraved screw heads I am displaying – they could almost be jewellery. I need something to engrave that requires almost no concentration so that I can interact with people, so I take a handful of bit old fashioned woodscrews with polished heads and put traditional patterns on them, and then give them to the choice of the ones I’ve done that day – I sometimes have a job to keep up with demand! One more day to go, its exhausting! Anyway here is my setup (minus me) and the little display I put on;-
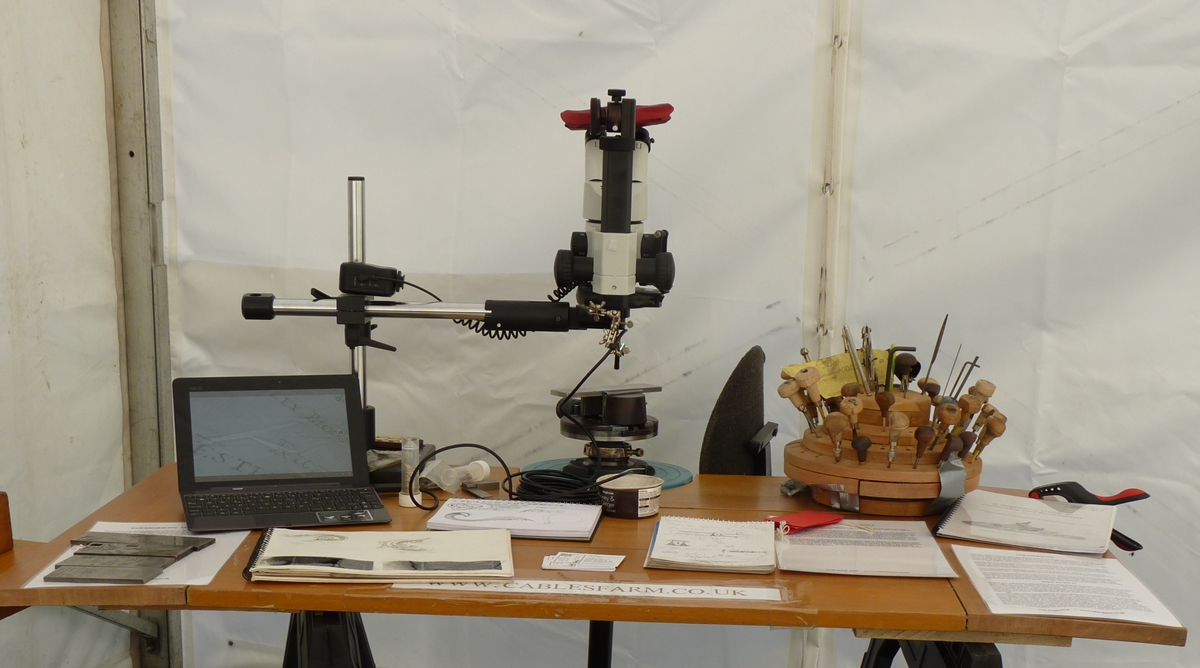
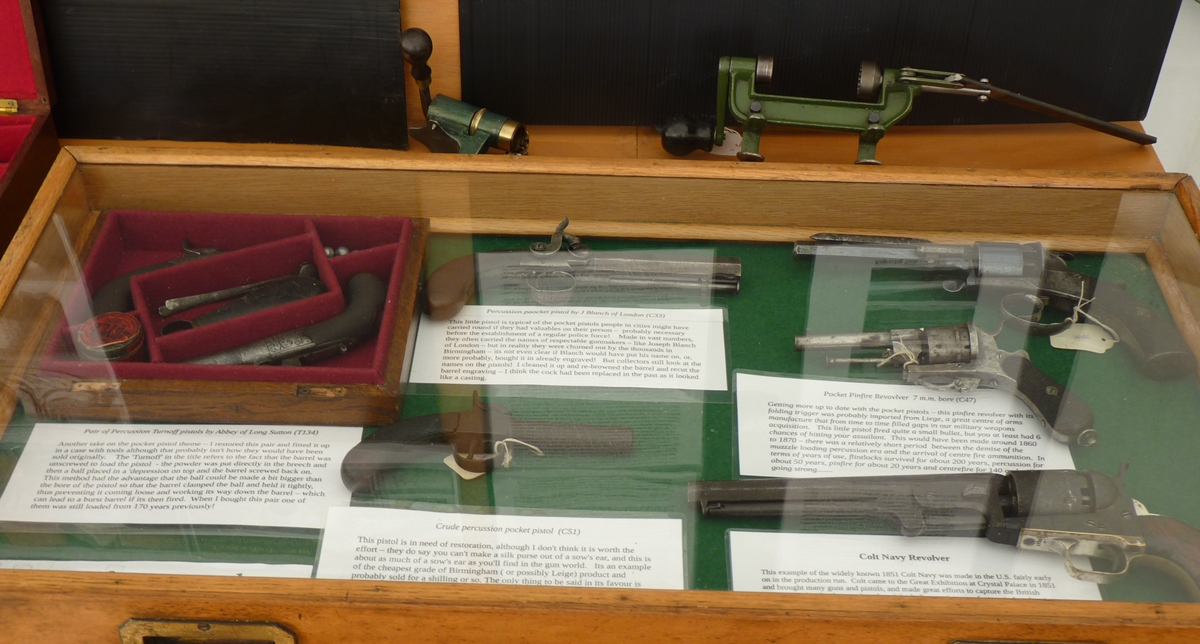
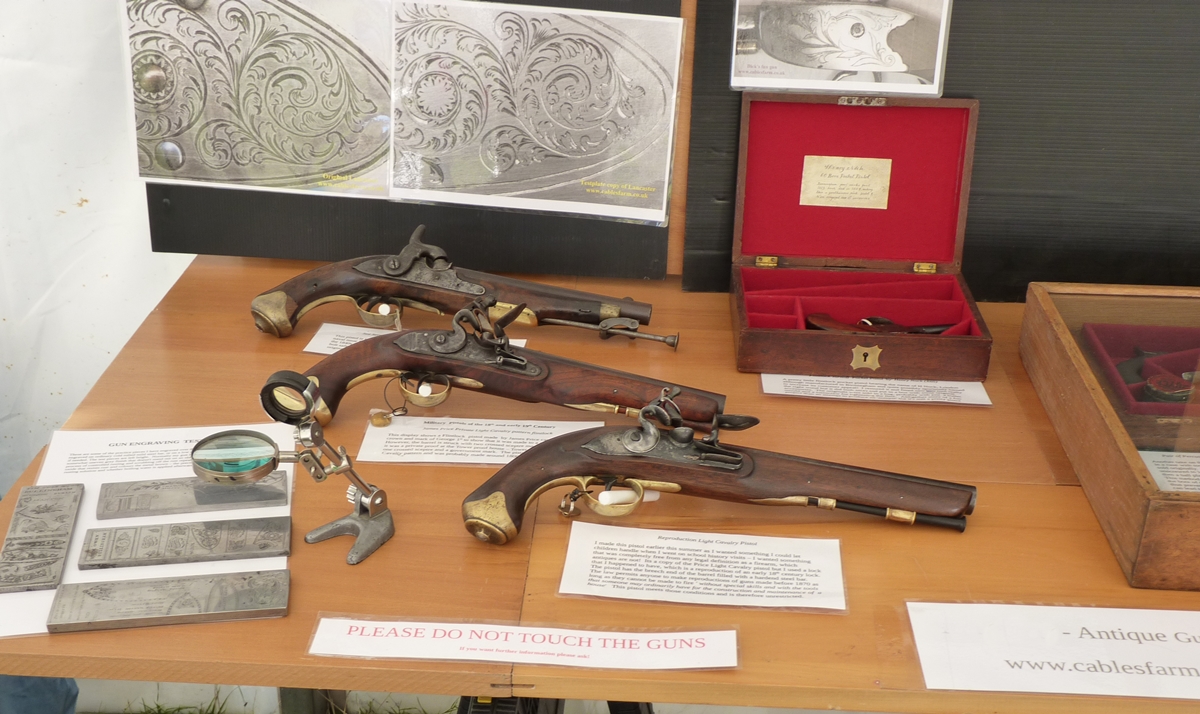
Beaten-up Sea Service pistol, Private Jas. Price New land Pattern, my Inert pistol based on the Jas. Price pistol
25th August – I’m getting ready to set up at the Fenland Country fair tomorrow – that means packing up all my engraving stuff plus my portable bench and display boards, and deciding what guns to take to display – probably this time I’ll concentrate on restoration & engraving and leave the merely interesting behind! I’ve been playing about with trying to copy the WR engraving before I start to recut the barrels as I need to be able to recut the fine lines – I’ve tried using knife and onglette gravers for the fine lines but they are very fragile, and when the point breaks it tends to spall off a long piece of the cutting edge, so I loose a millimeter every time I have to resharpen. Looking at the photos of the WR lettering and what its like after I’ve picked out the muck in the fat strokes I’m not sure if they did use such fine cutters as the fine lines are not very deep – they may have used a 70 degree cutter or even a simple square graver. You can cut very fine lines with a square if its newly sharpened, although it soon gets rounded on the tip and although its OK for normal line widths, it won’t do fine lines.
24th August – I got the digital microscope camera today so that I could get some pictures of the Westley Richards recutting as it progresses – it isn’t that big a deal, but on the other hand it is quite instructive to look in detail at what happens to engraving if a barrel is refinished – I will be looking at ways to refinish without this effect later! The digital microscope camera was pretty cheap, so I didn’t expect a great deal from it, and it is quite variable in the results it gets – it seems to give reasonable pictures on my old ASUS tablet with CameraFi software although the magnification is about 15x that of the optical microscope it is fitted to so I can only use it on the lowest microscope magnification. Is less good on my Windows laptop with the supplied software. Nevertheless, it does show what I wanted to show – the extent to which the sharpness is worn off the lettering – The thick strokes are partly filled with a hard ‘varnish’ of dried oil or whatever, which also hides the lettering – getting rid of it would actually make the lettering more visible – it doesn’t respond to most solvents, or to paint stripper – I’ll keep trying…..
On the plus side all the strokes are still there in good shape – its definitely top quality engraving – you can clearly see how each cut was made, and the better the quality of gun/engraving the more contrast there is between thick and thin strokes, precise and very fine horizontals and serifs need lots of tool sharpening, so tend not to appear on cheaper guns. It is very instructive to spend time looking at engraving through a microscope if you are trying to learn how to do it………..
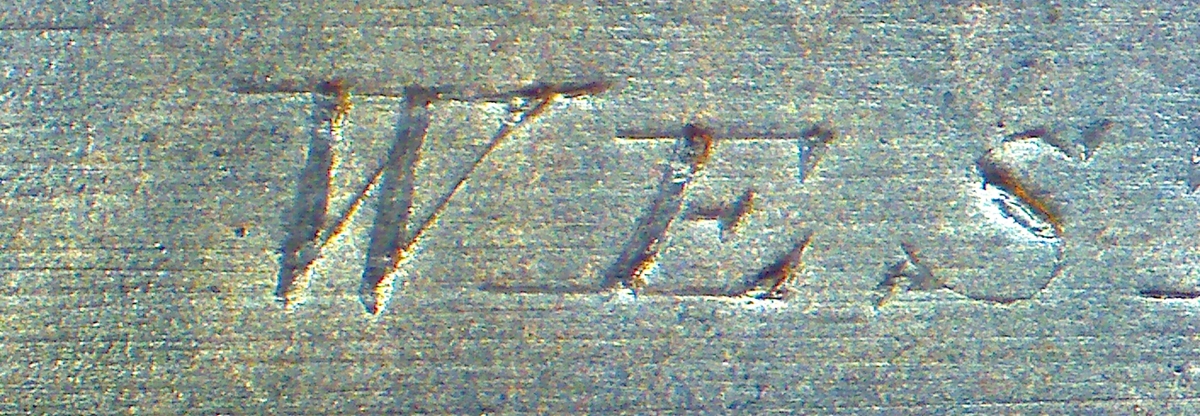
The Large Caps are about 1.8 mm high ( just over 1/16 inch) and the small Caps about 1.4 mm (just under). If you look carefully you can see the faint lines the engraver ruled to lay out his lettering – very often present.
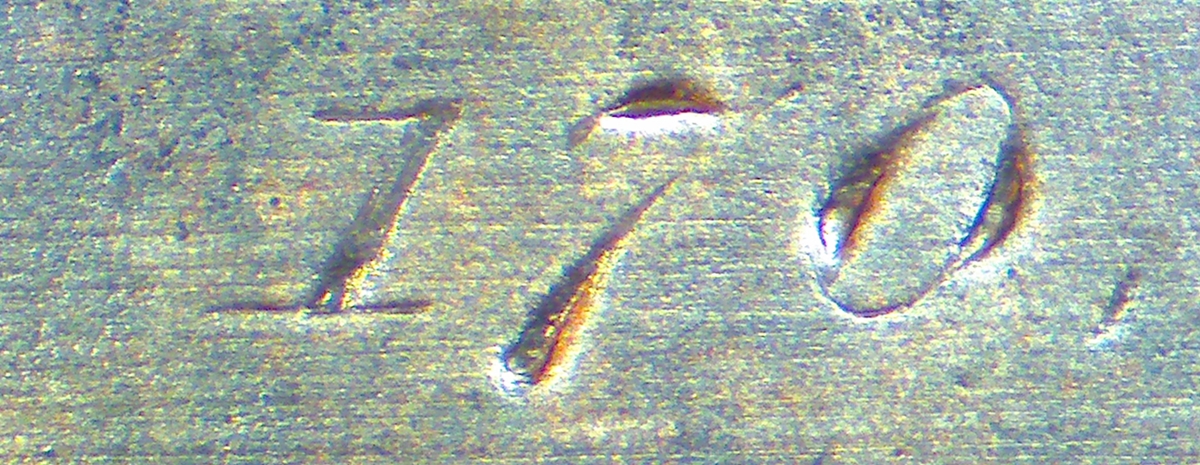
You can see that the sides of the ‘0’ were cut in different directions – the left side downwards and the right side upwards – the clue is that you can’t get that ‘scoop’ effect at the end of the strokes except when you shear the swarf off as you lift out of the cut. The ‘1’ went a bit funny on the main stroke.
Contrast these photos with the engraving a couple of inches away on the breech block that clearly hasn’t been refinished, and was hardened after engraving whilst the barrels are, as always in that era, quite soft (and also quite variable as you cut into the mix of metals used to create the pattern) ;-
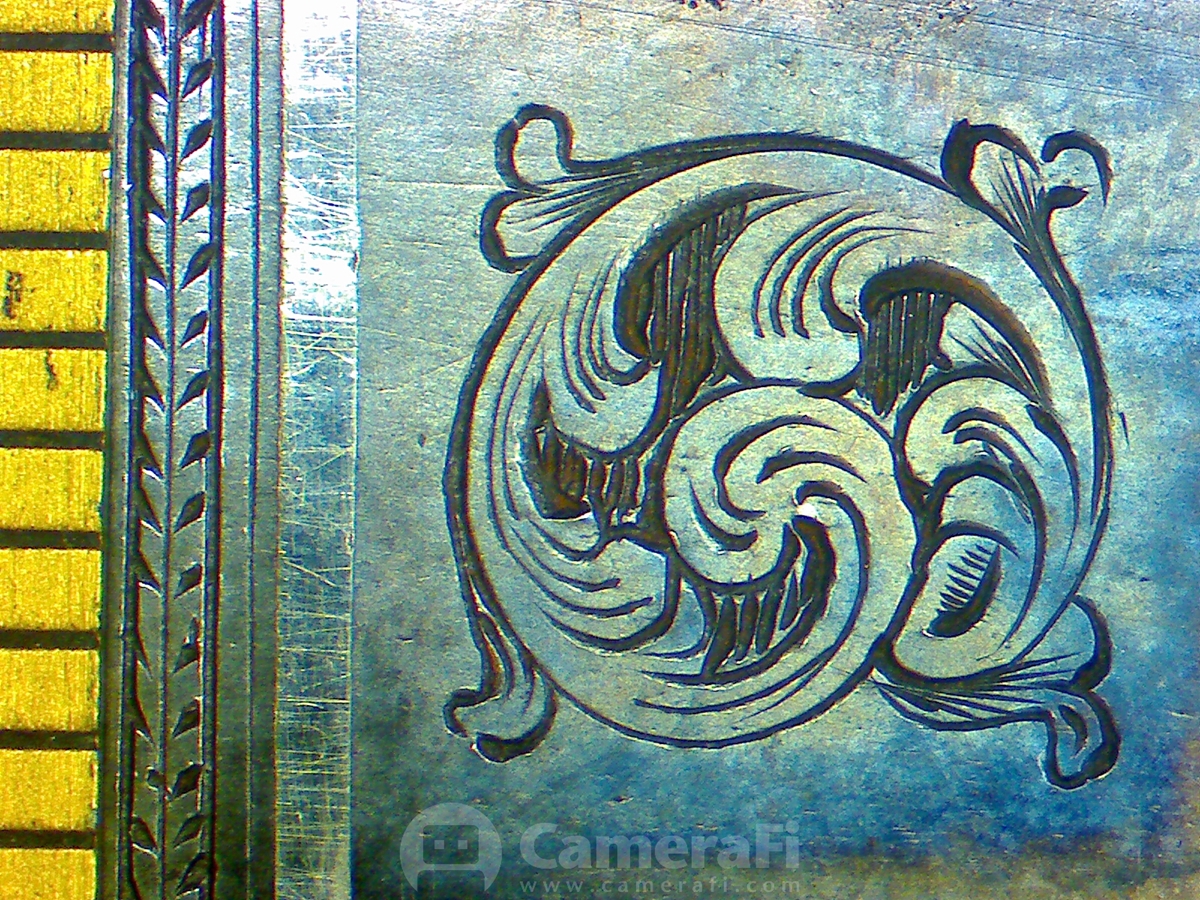
The scale on the left is in millimeters. You can still see the burr thrown up at the ends of the curved deep cuts! There is just a little rounding of the edges – probably the engraver gave it a very light polish when he had finished it.
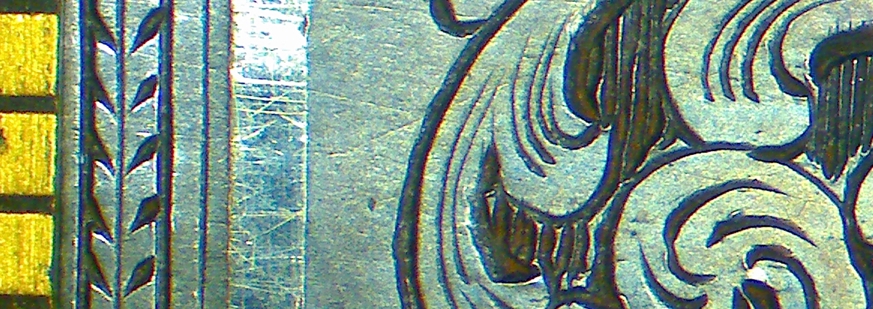
For comparison, this is the same scale as the barrel lettering.
23rd August – I should be doing the Westley Richards barrels today, but its one of those jobs that I have to contemplate before I dive in – and I want to wait for the digital camera for my microscope, and I should order another very fine graver or two from Walshes or Suttons . Anyway as a displacement activity I have been smartening up my cased pair of Bales percussion target pistols ready for the barrels to be refinished when I feel brave enough to take a file to them – actually I’m getting a bit short of decent 6 or 8 inch fine files – I could do with a few more flat needle files in No 6 cut – very very fine. So today I had a session of derusting for the steel bullet mould and making a turnscrew to match the original nipple wrench in the case. I couldn’t work out what wood they used for the handle of the nipple wrench – not ebony, or rosewood, or walnut or box – in truth a not particularly attractive colour – looks a bit like stained beech! I decided to use a conveniently sized chunk of Indian ebony I had around as it is a rather beautiful wood – not as uniformly black as the traditional ebony. I didn’t particularly want to match the existing tool exactly – just make something that would look right – the rest of the bits are original, although I’m not sure about the bullet mould. Anyway spent some time turning the handle on my wood lathe to get a matching shape ( almost matches), and made a reasonable stab at copying the brass ferrule and the blade shape, although I didn’t get that exactly right. Still I think it looks pretty good, you may disagree! At least I made it an exact fit in the slot of the lock screw – courtesy of my 1200 grit hone disk! I did case harden the blade – which is a case hardenable steel, although I didn’t temper it as the Aga is not on- anyway the handle is now Araldited in place.
(I actually ordered the onglette gravers from Cousins & Co as I needed some No 6 cut files and they have the best selection – but Vallorbe files are eyewateringly expensive in 6 cut!)
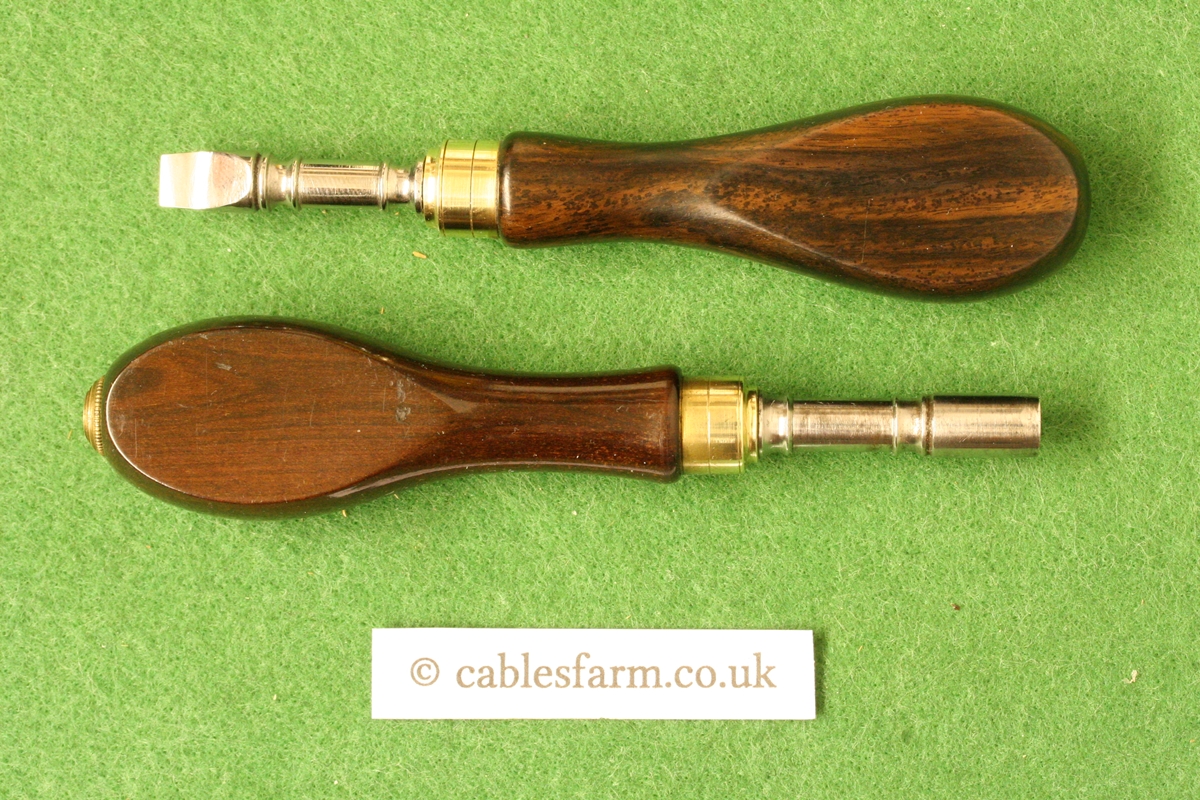
Lower is the original nipple wrench, top is my turnscrew – I think mine looks prettier – I shudder to think how long it took to make!
22nd August – I got the pair of Westley Richards barrels to recut for a client today – they are from a very fine pair of target pistols, presumably late in the percussion era when duelling pistols were no longer used (Queen Victoria is reputed to have finally banished the practice from the military around 1850 – in the last quarter of the 18th century and the first quarter of the 19th an officer could be cashiered out of the army for not accepting a challenge and fighting a duel!). Anyway they ( the barrels, not the officers) had at some time been refinished and rebrowned so that the sharpness had been lost from the lettering on the barrel – in fact under a microscope you can see that all the lettering strokes that run across the barrel ( i.e. most of them) have got rounded edges where the refinishing was done with something ( paper) that flexed into the cuts. It made me think – I have similarly nice pair of cased target pistols by Bales of Ipswich that need their barrels refinishing as the rest of the pistols are like new but the barrels have got fine rust and scratches, and I’m thinking about how to do it without rounding off their barrel engraving, maybe using a fine stone? – that will be a future project. Anyway here are the WR barrels , there is more lettering than shows in the photo, but its not deep enough to throw good shadows – I will start a new post, but I think I might need to buy a proper digital camera for my microscope so that I’ve got pictures to show – the expense I go to to to interest site visitors knows no bounds…..(later..just ordered one !)………..;-
There is lettering there (just) , but the mottled twist pattern and refinishing combine to obscure it in this view!
20th August – Having finished the Parr, Dick is keen to do some more restorations if we can find suitable guns – I do have a couple that we might have a go at – I’ll have to see what I can dig out. A possible client is bringing a couple of very nice duelling pistol barrels on Monday to see if I dare to take on recutting the engraving – I’m always very careful not to bite off more than I can chew, so we will see. Between us, Dick and I are now happy to undertake carefully selected restorations – please email me if you have anything that needs doing ( See CONTACT at top of this page).
19th – A Perrins collector I know has acquired a nice old 14 bore pinfire minus its hammers – I have 3 pairs of pinfire hammers – see GUNS FOR SALE at the top of this page. I’ve sent off the hammers on approval to see if any fit the gun – its quite an interesting 14 bore pinfire gun of about 1866 because it has the classic late 18th, early 19th century weird dog and pheasant engraving I associate with William Palmer. I thought that the advent of the breech loader heralded the arrival of scroll engraving in a big way. This looks like a bit of an anachronism.
19th August – Dick has sold the Parr that we/he restored as per the Post ‘Parr Restoration’ at a fair price to cover the time taken to restore it – it took longer than we had expected, but the result was well worth the time taken – in the end Dick made a new top jaw and had to make a replacement screw as the thread was too worn to hold a flint satisfactorily. I wouldn’t want to undertake jobs like the Parr for a living, but then you wouldn’t find that many really nice pistols in need of fairly minor replacement and repair such that the finished pistol was mostly original. Better find some more projects to do…..
I’m at the Fenland Country Fair at Quy near Cambridge next weekend doing my engraving demonstration and probably showing some restored guns – although probably not the PARR unless I can borrow it back! If you do come to the fair please introduce yourself at the MLAGB tent in the clay shooting section. Later in September I’m at the Sandringham Game Fair doing the same thing….
18th August – Added a few pictures to the Orkney post – wish we had some photos of the bad weather!
17th August – took a couple of hours today to finish the John Blanch of London pocket pistol -see that post – although that name is on the barrel, the proof marks are not London marks – probably Birmingham, or even Liege… These little pistols would have been bought in from specialist producers of basic, utilitarian guns & pistols whose costs were a lot less than London costs! John Blanch had worked for Joseph Manton and was a good London maker – this would have been sold when he was trading as J Blanch & Son ( from 1822).
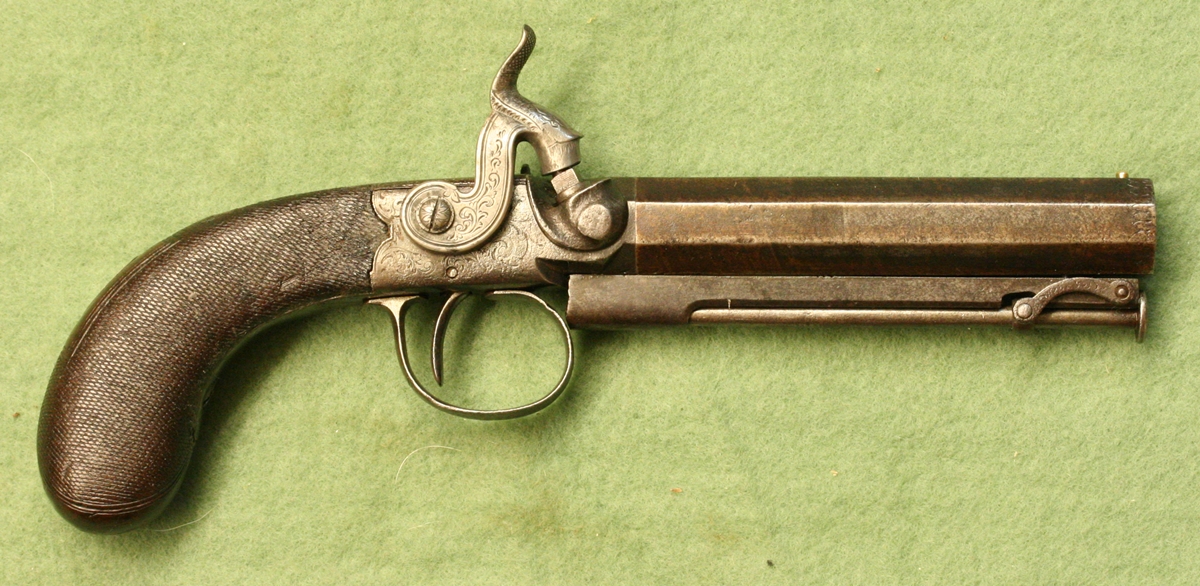
15th August; I’m back in the gun business! Visits to the site fell off a bit over the last couple of weeks, so now I’ll see if they recover! I just spent an interesting couple of weeks sailing around the Orkney Islands – One doesn’t expect fantastic weather that far North (58 degrees N), but I hadn’t expected a force 10 storm AND a F 8 gale in August – still it had compensations in that we spent time on shore looking at some of the fantastic sites of Neolithic and Iron age occupation that are better preserved and more common than anywhere else in the UK. Its a shame that the Vikings didn’t leave their mark more prominently – apart from some graffiti carved within the Neolithic Maes Howe chamber by them when they apparently robbed the tomb, there is nothing very spectacular. I have put up a new post on ‘Sailing Orkney’ for fun – not surprisingly we don’t have photos of the bad weather!
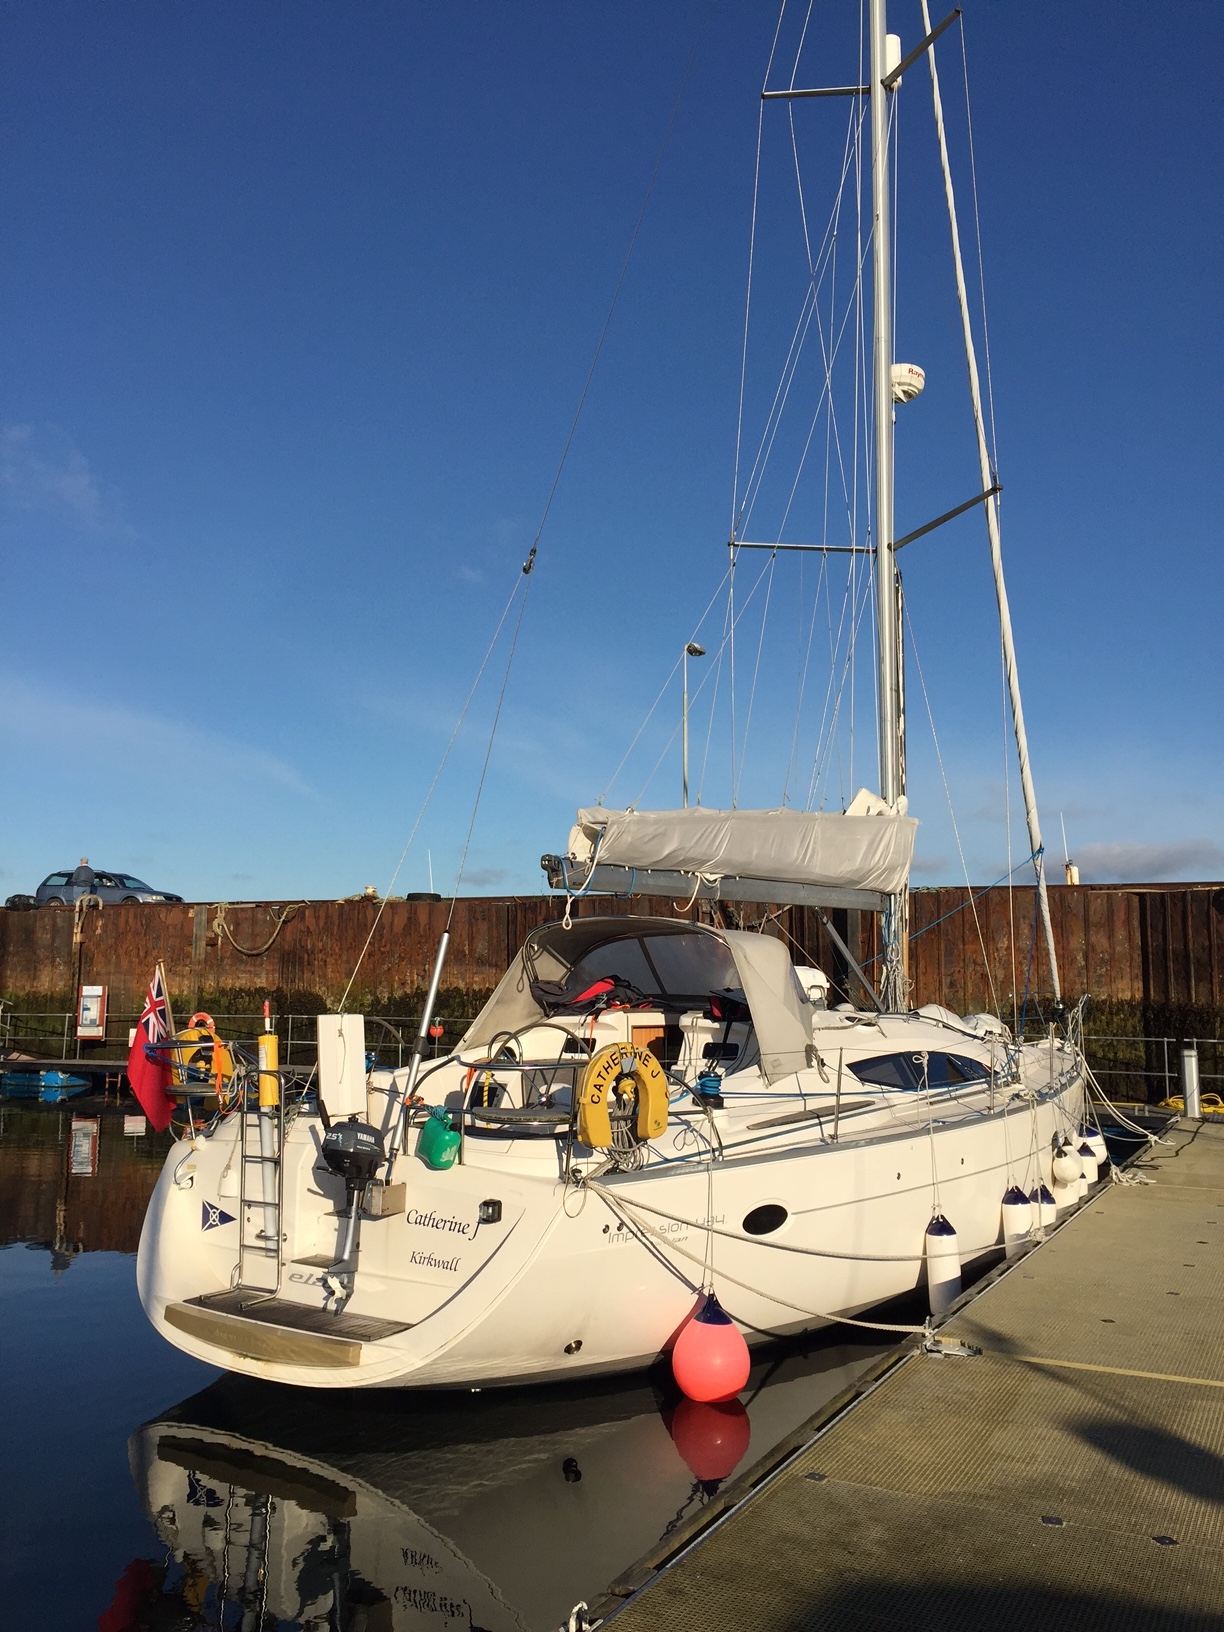
Just to prove we had one patch of blue sky. Catherine J , an Elan 434, at Pierowall harbour on Westray, Orkney
at various times in the holiday we really needed all those fenders ( & more)
Anyway back to playing with the Blanch – its time to put it in the derusting bath for a while, it all came apart easily and is in good working order, so just needs tidying up and may be the barrel rebrowning…..
30th – I’ve put up a new post – Blanch Restoration – I’ll be doing this, not handing it over to Dick to do!
29th July – The Parr is finished, and a lovely job Dick has made of restoring it. It was a nice project because apart from a couple of specific faults it was very clean and crisp and original. So now it’s had the butt repaired – pretty much invisibly- and the frizzen bracket sorted and a new frizzen fitted and a new top jaw made it is a very pretty little pistol – although conventionally it would be called a duelling pistol, I would want something discharging a heavier ball if I was facing an opponent. I think the Parr was a bit light to shoot quickly as it would have a lot of barrel flip and shoot high – I think of it as a gentleman’s plaything – to be taken out on the terrace for the amusement of himself and his guests, and as such its actually far less common than standard calibre duelling pistols. Anyway, it is now for sale – contact me via the comment box or see ‘contact’. I have put a couple more photos on the Parr Restoration post.
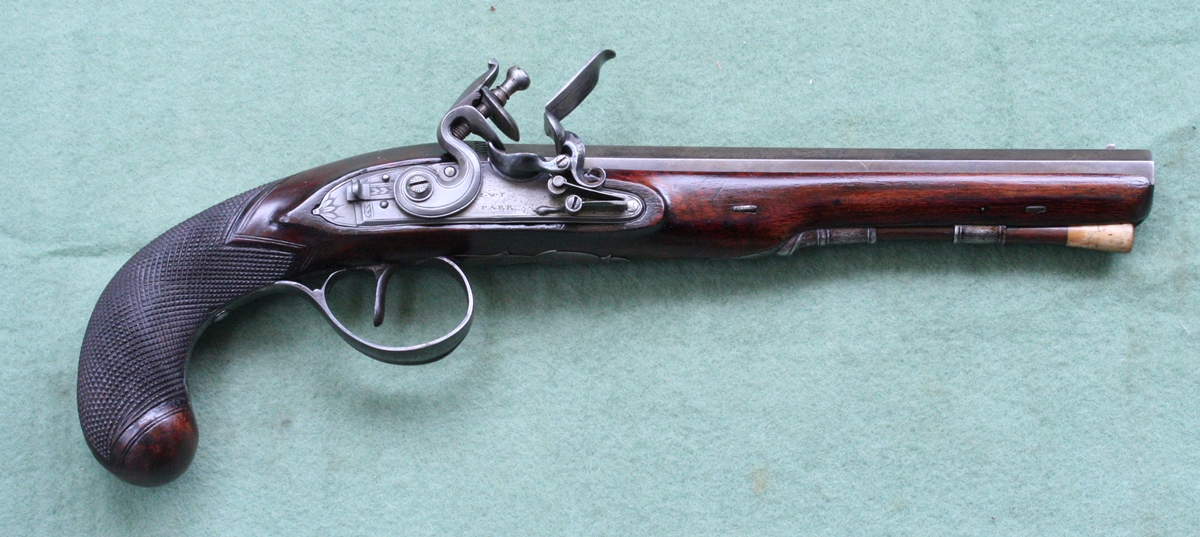
GENTLY RESTORED TO ITS FORMER GLORY!
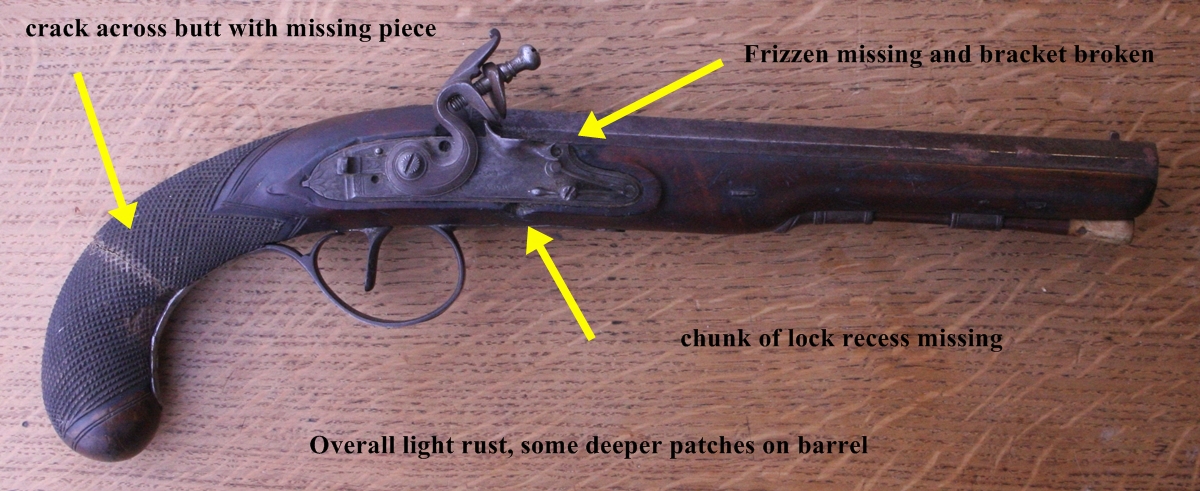
AS WAS, A SORRY SIGHT- BUT THE RUST WAS SUPERFICIAL, SO EASY TO CLEAN UP WITH ELECTROLYTIC DERUSTING.
28th July -busy with doing my VAT return – I presume VAT will survive Brexit, maybe with another name – we live in interesting times as the Chinese curse goes! I found myself refreshing the chequering on the pocket pistol as a way of escaping from paperwork – its very fine and I don’t have any chequering tools with that close a line spacing – anyway its not so much recutting as cleaning out the gunge in the grooves – I couldn’t find any solvent for it. Anyway I’m using a square graver – going over each groove with the heel to find and mark the line and then lifting the tool so that it only cuts the infil – its a bit tricky, to say the least, and its not something I’m good at – I’ll put up some photos later. I had a look at the actual engraving – but apart from the cock and the barrel its all hardened so I’d have to anneal it to refresh the engraving, and then reharden it – not sure its worth it.
26th July – Axminster sent the new shaft and pinion for my lathe apron, so I was able to fix it – fun juggling the bits of the half nuts that run on the leadscrew for screwcutting but its now all working smoothly. I was looking at some of the bits and pieces in my cupboard and came across a percussion pocket pistol by T. Blanch of London that I inherited from my father. I thought I’d see if it could be smartened up a bit as it had a bit of rust and the butt was loose – anyway as a start I looked at the engraving under the microscope to see if it would benefit from a bit of refreshing. I was surprised to see that the cock looks very like a recent casting, and the cock screw looks rather new – my surprise is because I though my father had had these guns around for donkey’s years and that he had acquired them out of dusty attics where they had laid for decades, if not centuries – well well well – what do you know, the restorers get everywhere! I am left wondering if he knew it had a replacement cock or not……. One thing I’m certain of – he didn’t do it – the tools I inherited from his tool drawers were terrible – I threw the turnscrews away, and, as some of you will realise, they must be bad to merit that treatment!
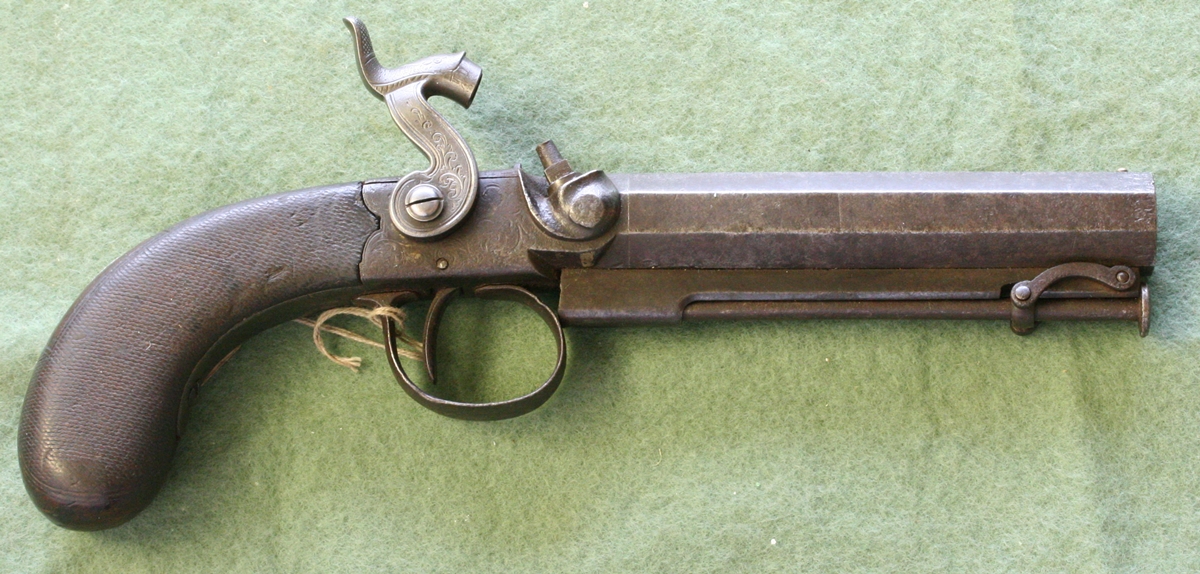
I might make a project out of tidying this up later in the year – at the moment its rather nice being outside!
25th July – Bit of a fiddle fitting the chuck with new D1-4 camlock pins back on the lathe as the bent pins had distorted the camlock boss so the chuck didn’t run true and it took me an hour or so to find the bulge and file it off and get it all reasonably true – it has never run dead true. While I was about it I decided it was time to sort out the rack drive to the apron/saddle that had got a bit erratic since I ran the saddle into the endstop! Turned out to be a bent shaft/ pinion that engages the rack. Axminster said it was no longer available, but they still had the last one in stock for delivery tomorrow. Not sure what I’d do if I couldn’t get one, but lets hope it arrives and fits…. Went to Dicks and saw a very fine cased early Adams revolver of 38 bore retailed by Reilly which surprised me by having fine rifling with 11 groves- It had a shortened barrel and a later fitted Adams patent rammer – but it was a bit out of my price range – and anyway I’m trying to bring a little order to my collecting and shed a few guns, not buy more at random!!
23nd July – Back from a lovely day shooting Helice ZZ at the Rugby club – as usual I did OK in the first half and then went to pieces in the second half! I wasn’t the only one to show erratic performance, so I didn’t feel too bad! One of the pleasures of the Helice shoot is that you have lots of time to sit around and chat to old friends and a few new acquaintances – you always find new connections and interests! I’m sorry that I forgot to pack my camera, so no photos….. But I hope some will soon appear on the Anglian Muzzle Loaders website.
21st – went to use my lathe and the chuck fell off under way ! Giles had changed it for the 4 jaw and put it back… Now needs the D1-4 pins replaced as they got bent – I hope that was all the damage.. Always something! I had another look at the browning results – I need to do another trial using a known copper rich recipe – which I’ll have to make up!
20th Completed test brownings – useful results…. see Barrel Browning post
19th Spent a happy morning stripping the bits of the Toyota steering column with interesting results – see post if you happen to be interested! On and off I’m doing the browning of the test bits – really big differences between the browning solutions! And also quite big differences due to the repeated steamings.
18th Having finished the inert pistol and the Price – they are both sitting happily on the bookcase at the moment – I am starting another project to clarify my understanding of browning barrels by doing a controlled experiment with the length of twist barrel left over from the inert pistol inert – a 2 ft length. I’ve cut it in two and will brown it in 6 different ways – 2 using Blackley’s slow brown alone – two samples, one with steaming each rusting and one without, 2 with my ex PCB solution – one steamed each rusting, the other not, adn two with one or two applications of my solution but mainly Blackleys – one steamed each time and 1 not. For simplicity I’ll just put a blow by blow account in a new post ‘Barrel Browning’. The post ‘Cornish cottage’ is in response to regular searches by Google on this site for something that has never been on the site – so I’ve given in and put it on with a link!
17th – my usual shooting at the CGC today – missed slightly more than half. Its really frustrating because I manage to hit things for the first 20 or so shots, then my concentration goes and I miss almost everything….. I engraved and coloured a side nail for the Parr last night – I was quite pleased at what a good copy it was, not that it was in any way a difficult job! After engraving I heated it to bright red and dipped it in Blakely’s colour case hardening and heated it some more, then quenched it in water, after which its a dull grey, then left it on the hot plate of the AGA for a while ( I forgot it was there!) then took it off and when it had cooled a little I rubbed it on a block of beeswax and wiped off the surplus with tissue… Job done – bit of bashing and it would pass for original. (only joking – the head has been hardened so it will stay as it is!)…
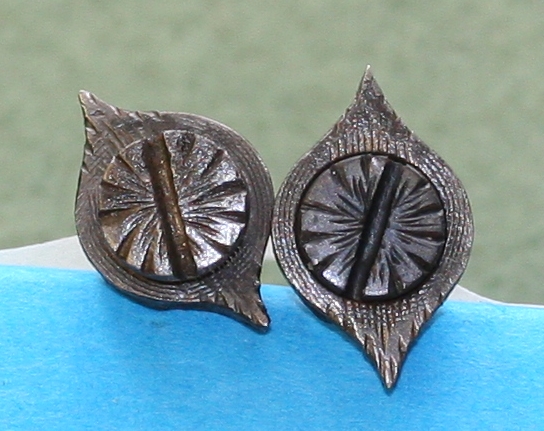
The ‘washers’ are original, my side nail is on the right.
16th – I had an email from a friend suggesting that the William Powell may be a more recent gun than I thought – with a possible date of 1883/4 – I think its possible to get information from William Powell, who still exist, so I’ll ask them. I didn’t do much more on the pistols except a bit of polishing on the stocks, but I was getting ready for a day’s shoot at the Cambridge Gun Club tomorrow.
Sorry, the comment form is closed at this time.