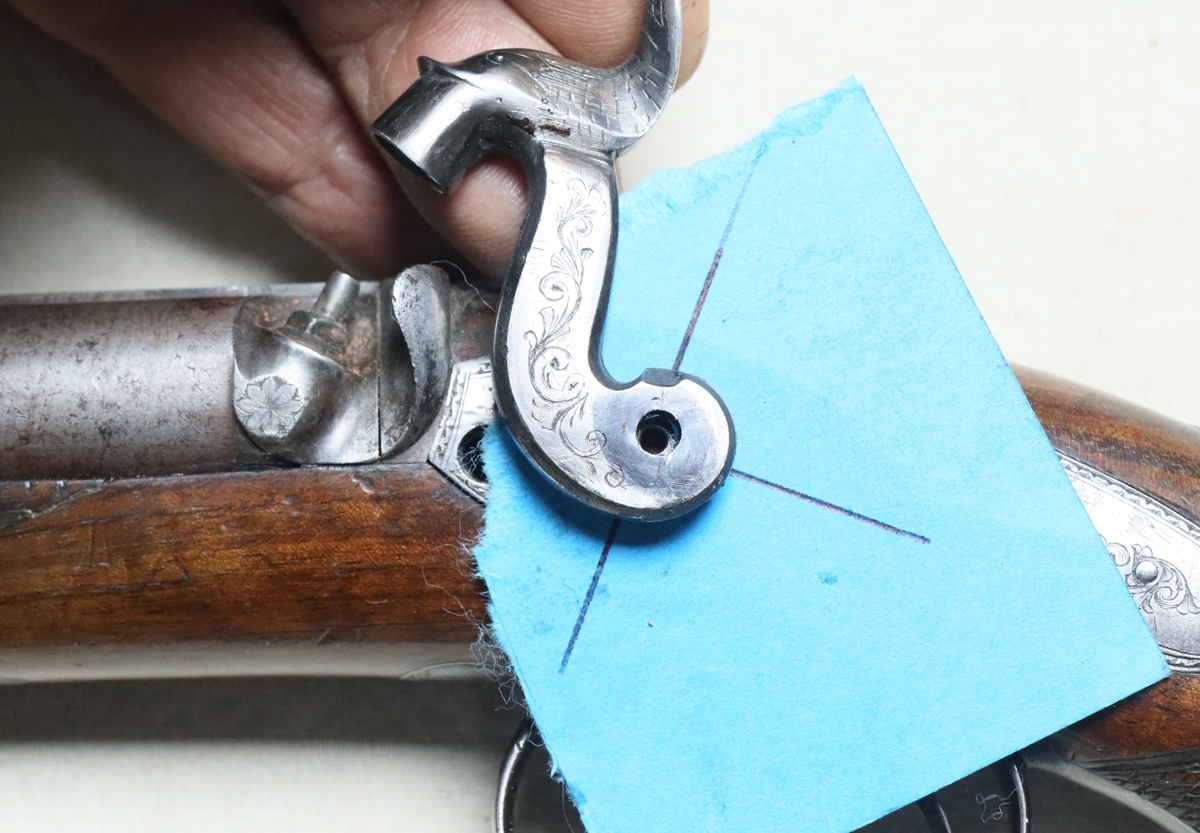
10th Jan – made another nose for the Smiths cock, and another titanium nipple. I have a problem with turning the nipples themselves in titanium as the depth of cut gets quite unpredicatable when you try to take very shallow cuts as you converge on the correct fit for the cap. Sometimes even a sharp tool takes nothing off just pushes metal out of the way, and then another pass will take off more than you wanted – I think my lathe is pretty rigid, its a big heavy machine and will make accurate cuts in steel. Some gun restorers do the final fit with a file, but that doesn’t work particularly well in titanium. Net result it that the nipple I made today has a very slightly loose fit for the cap – OK for the right hand barrel but it would probably jump off the left barrel when the right was fired. I was sorting out my growing collection of taps and dies, so I revised my table of drill sizes etc and put a new pdf download on the USEFUL DATA page. No need for more photos of the nose and nipple – they look remarkably similar to the ones I put on yesterday – I ground up a profile tool for the nose. Both noses were coloured on the second hotplate of the AGA to a sand colour – just placed on the middle of the hotplate (it’s around 300C) and covered with a scrap of aluminium foil and taken off when the right colour and cooled on a block of beeswax. I probably need to replace the loose nipple, but I will move on to a bit of engraving for Bev. I must do my income tax some time – at the moment I’m looking for any excuse to avoid doing it!
9thJanuary – A bit of real work – I got a tap to make a jig to hold the nipple threads for the Smiths Imperial conversion nipples and shaped the top of the titanium nipple I’d started to make before I went to Wales. I also got a tap to make a jig for the replacement cock nose so I could bore that out, and finished both of those parts. They fit ( the cock noses after a bit of judicious filing of my thread) so I have a prototype made. The nipple is about 1 mm shorter than a conventional nipple, and I could probably cut it down by another half mm, at the same time boring the nose out another half mm – that will bring the nose down perpendicular to the nipple, which would be better – but anyway I’m reasonably happy with the look of it all, and I know I can fit to the threads pretty well. I have ordered another 1/4 UNF x 28 die so I have a spare if I open the one I’m using too far, or it gets blunt. I seem to have had a string of orders to Tracy Tools for taps and dies recently and I’m building up a stock of odd sizes along with my sets of B.A., Metric and UN-F & UN-C, plus many old B.S.F and Whitworth (all in smaller sizes – up to 9/32 etc). I just bought half a dozen No 60 drills for the fine holes in nipples – they are about 1 m.m. and 1/3 the price of the metric equivalent! Drilling into the titanium nipples with such a small drill is dodgy – I have a collection of almost finished nipples with a bit of drill sheared off in the end. Having got my prototype nipple and cock nose made, I now have to refine the design slightly and then produce two for Geoff to shoot shortly, and another 4 for the other guns in the trio. I have a bar if 12 m.m titanium on order – an offcut from making bolts, bought on Ebay. I find that lathe tools with carbide tips are not very good for cutting titanium, so I use HSS tools ground with a bit of top rake and kept sharp on a very fine diamond hone – the finish you get on titanium is almost always very good – its much easier to get a smooth finish than on steel. I also got a knurling tool from China – a holder plus 6 wheels for about £8 including postage – the holder was too big to fit my 250-210 tooling so I had to machine the top down, but otherwise it looks OK – I needed one with a fine straight knurl as that is what is used on old gun parts and tools. I do feel slightly guilty about buying cheap tools from China, but it would cost about £50 for a ‘proper’ one, and I couldn’t justify the expense for a few small jobs.
 The cap should probably be a bit looser on the nipple, it is not quite down.
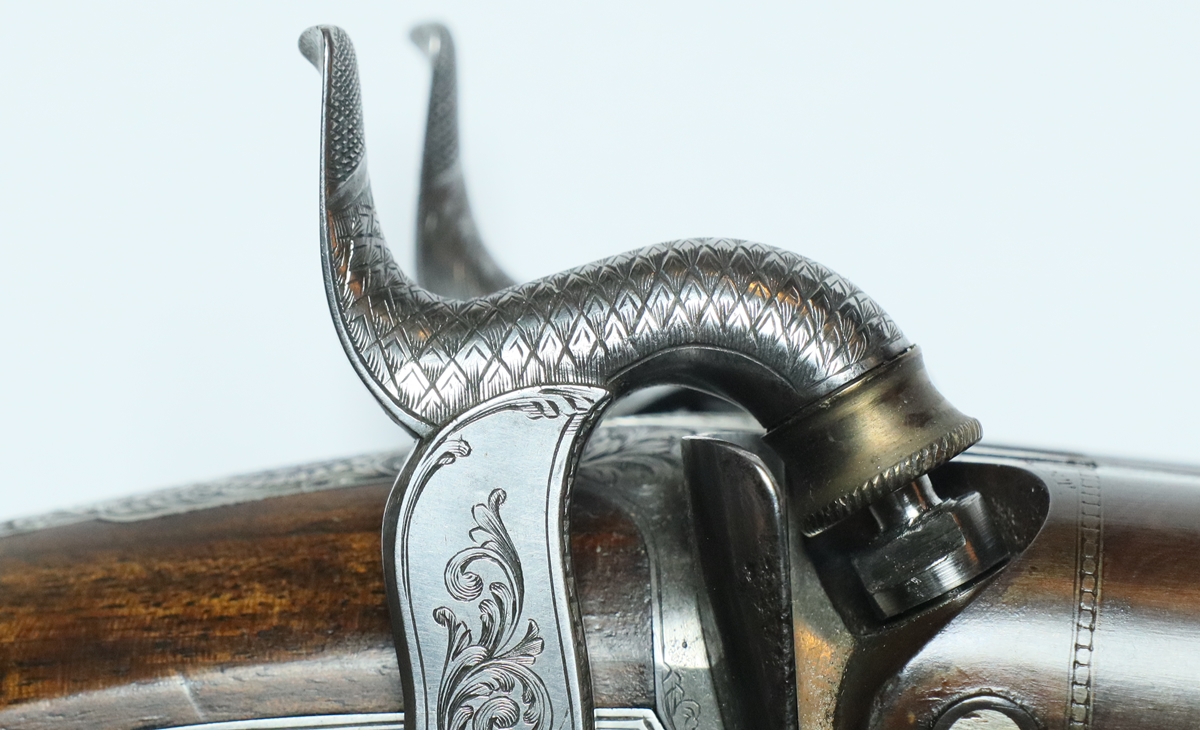
The cock nose is almost perpendicular to the nipple – if I loose another 1/2 mm somewhere it should be perfect.
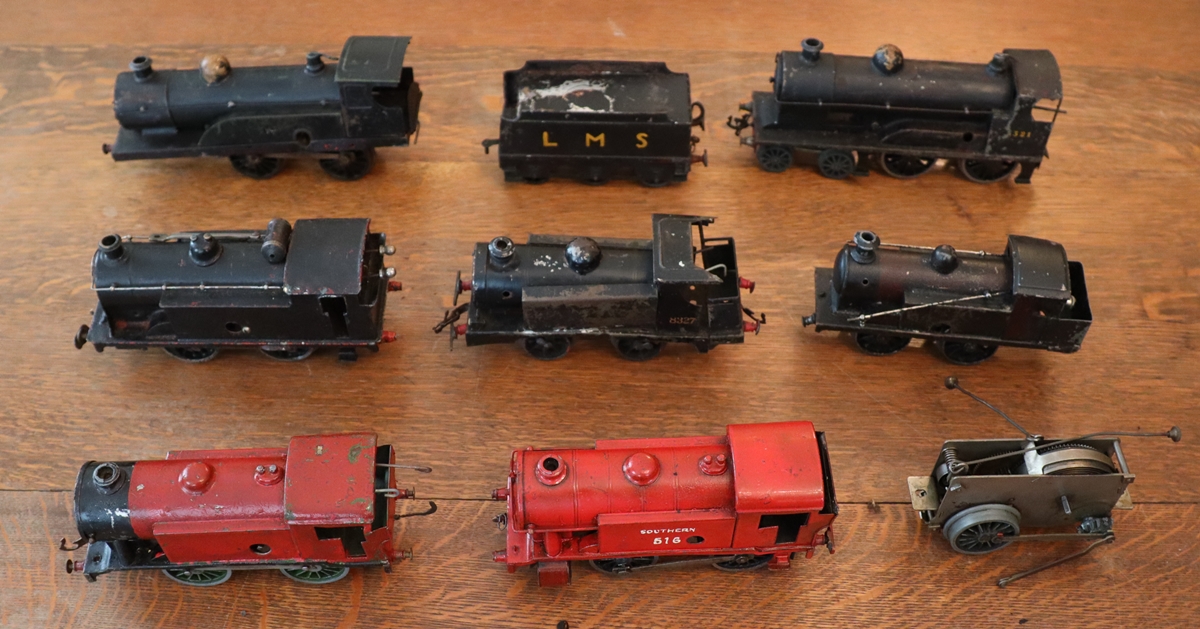
8th January – I’ve been down in Wales helping Penny sort out moving her 90 year old father from the family home to something more suitable – we managed to sort out a suitable house for him (subject to agreeing a price) and got an agent lined up to sell the family house, plus took two loads of stuff to the dump ( a gesture in view of the amount of junk there!) and brought back a load of books and nick-nacs to sort out for charity shops. Among the stuff in the loft were a couple of boxes of ‘O’ gauge clockwork railway ‘stuff’ – I bought it back to see if it could find a good home. I have put it on a POST on this site – ‘Model Trains’ so I can link it to a forum to get information – the locos are not Hornby, and I can’t identify them – if you can, please let me know. The locos were originally standard tinplate models ( maker unidentified) but have been ‘customised’ and have parts missing or broken. There are a lot of goods wagons that mostly appear scratch built or from kits, and similarly a lot of coaches, some of which are clearly from kits as they have printed sheets on the sides. Any information would be gratefully received, and if you want an additional hobby, there is great potential repairing and sorting this lot – oh, and there is an oval of Hornby track and a RH point – and a pile of bits, wheel, bogies etc….

2nd January 2020 – Clearing up from our New Year’s Party yesterday – around 70 guests! I did get a trip to the shed to make a prototype nipple for the Smith’s Imperial gun. The thread is a bit larger diameter than 1/4 inch and the thread is 28 t.p.i , but its not as big as 9/32nd – around 6.46mm diameter over threads with quite a shallow, rounded profile. I turned up a die holder to fit the tailstock chuck with a bigger internal diameter than normal to allow me to spread the 1/4 inch UNF die – I made a test nipple out of silver steel but the thread didn’t cut well and I made the nipple just too small to grip the cap. I wanted to make it similar to the Imperial nipples, so I made the base 8.6 mm diameter and 4 mm thick and put a 2.6mm hole in the side. I fixed my nipple extraction tool by replacing the 2.5 mm peg. Playing around with the fit of the new nipple and the Imperial ones with both the original Smith’s tool and mine I found there was a problem with clearance around the base of the nipple – the flash guards are so close to the base of the nipple that you can only reliably fit the peg on either tool into the hole in the nipple if the hole is aligned with the outside of the barrel where there isn’t a fixed flash guard. A quick check showed that the nipples are not made with the thread aligned with the hole in the nipple base – depending which original nipple I put in which side, I could end up with the hole effectively blanked by the flash guard so that the Smith’s tool couldn’t open enough to get the peg in the hole, and mine had the same problem…. I don’t know if the gun I’m dealing with had a different tool, or what the solution was. It is a problem even when the barrels are out of the gun – in fact I did most of the trials with the barrels out. The solution for my requirements is straightforward as I don’t need a flat top to the base as the cap doesn’t sit on it – I can either drill a couple of holes for a vertical tool, or better still, just file a couple of flats onto the top of the base for a normal nipple key. As I commented a few days ago, nothing connected with old guns is ever straightforward…………………….
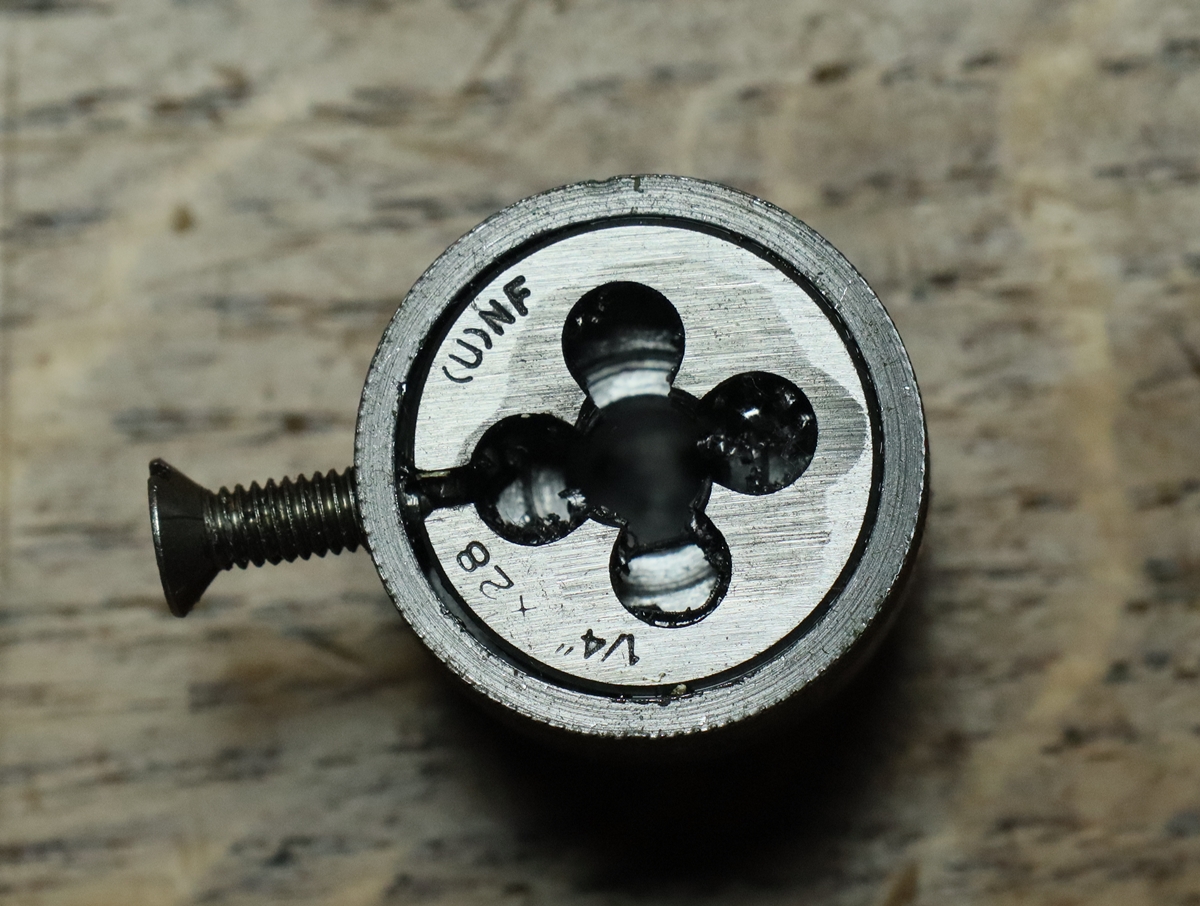
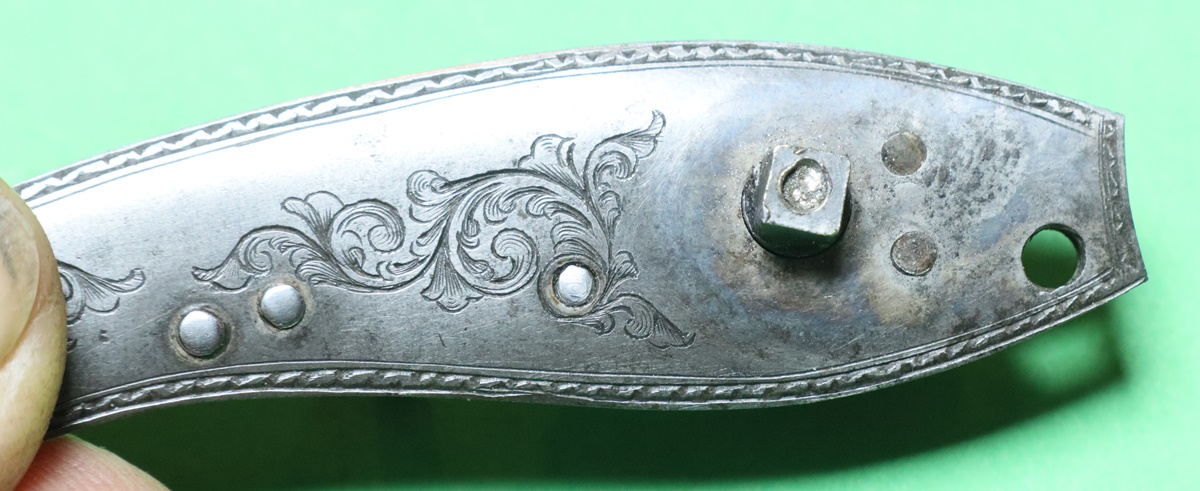
Loose fit die holder – if I need to open it a bit more I’ll probably have to soften the die opposite the screw by running the welder quickly over it or grind it a bit thinner? The grinding on the surface is to let the die cut nearer the shoulder of the nipple.
Looking for patterns to engrave the other day I came across a couple of illustrations that show the basics of a Stand of Arms and are older than the Hogarth illustration I used in the Post on Stand of Arms – I’m interested in the origins of the classic engraving – I don’t think it appeared on guns until the last quarter of the 18th century but I’m sure it goes back a long way;-
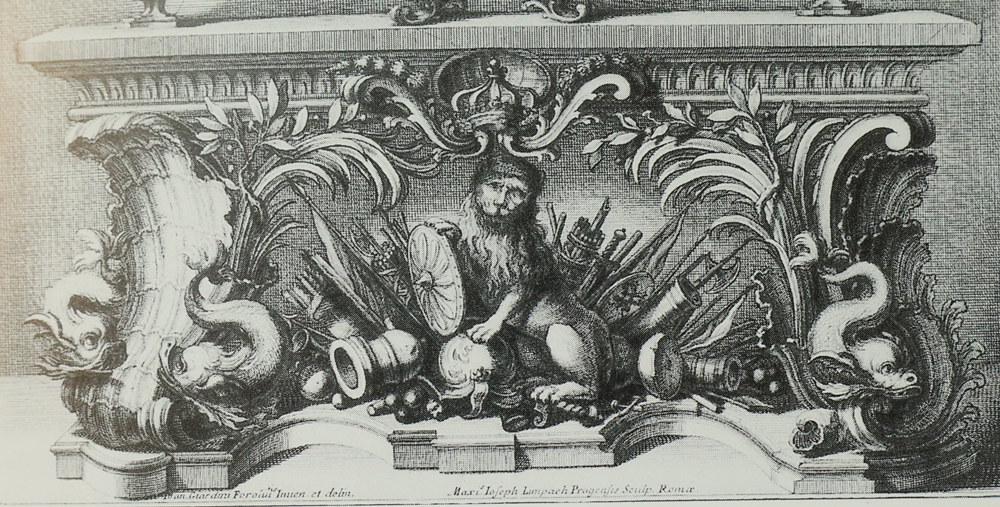
This as an illustration from about 1714
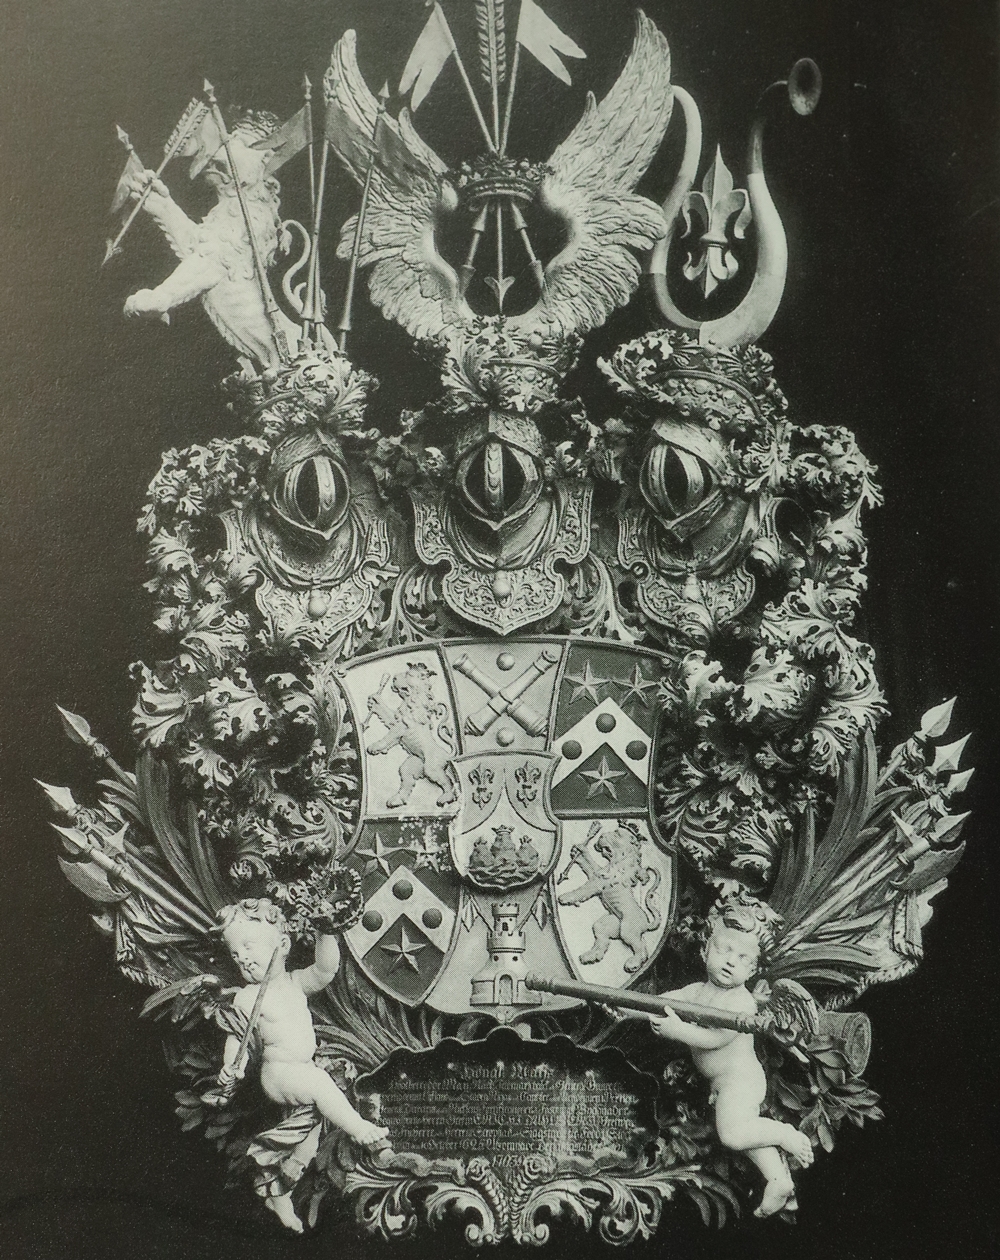
This is a memorial of about 1704
31st December – I took out the other Imperial nipple – I had to grind down the end of the tool a bit to get it to fit right down round the base of the nipple, but it shifted it without any problems, except that when I removed the tool, the peg appeared to be still in the hole in the nipple – it hadn’t come out of the tool, it had neatly sheared off. I guess that the steel rod I’d used for the peg was actually a fairy high carbon steel, and when I cooled the tool in water after silver soldering it, I must have left the peg dead hard – certainly the tool itself wasn’t hard. It was a clean fracture straight across the undistorted rod. Anyway the tool basically works well, and the silver solder seemed to be strong enough, so I’ll silver solder in a new peg and make sure that I temper it (to straw colour?) after any possible hardening…… I am now convinced that the tool is superior to Smith’s original tool for removing recalcitrant nipples without damaging the gun or nipples. I now have to make some substitute nipples for ordinary No 1075 caps on a fat .25 inch diameter and 28 t.p.i. thread.
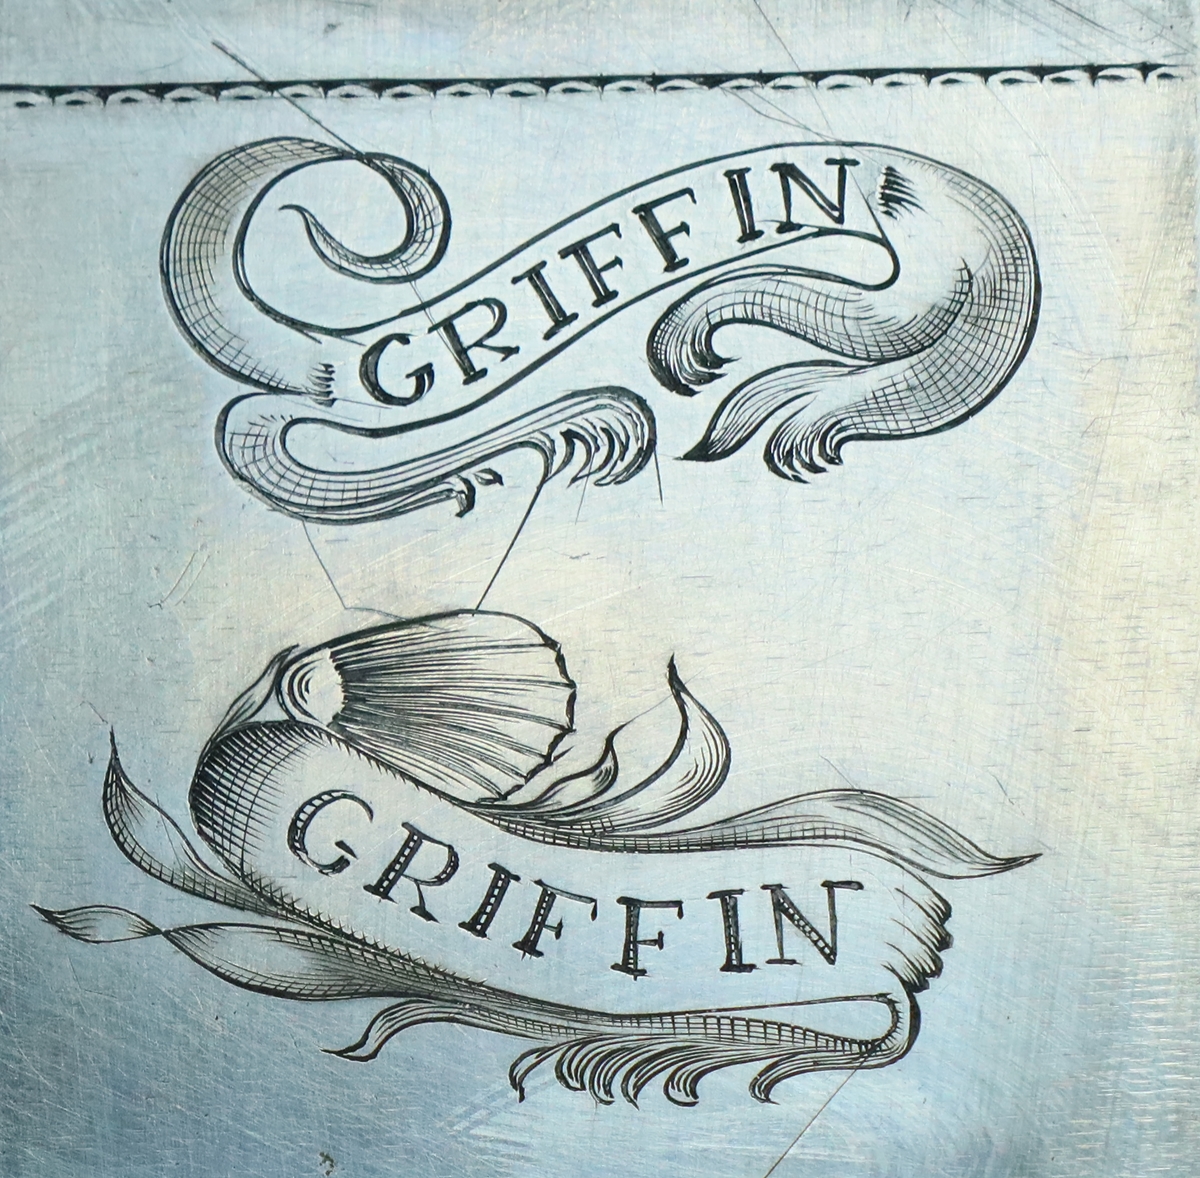
30th December – Yesterday broke the record for the greatest number of visitors to the site – over 400. Gave myself a treat today and just pottered around engraving for fun – I went through a few books looking for something different to copy – I’m gradually regressing to earlier and earlier stuff, so I hit on some Griffin pistols around 1760 that had the name on the lock in a fancy banner – each one was different. Anyway a couple of hours was frittered away playing t engraving, along with tidying up the workshop a bit for our New Year’s Party – there are always some guests who want to penetrate to the core of the house! Anyway here are a couple of the Griffin banners – I only had not very good photos to copy so I had to improvise most of the shading – I wish I could get hold of some originals to photograph – perhaps I ought to try Holts or Bonhams archives…… I’d need to do a few more before I’d dare to put one on a lock!
A few runouts – I get lazy about changing tools when I’m just playing, so end up using tools that I should have discarded!
28th December – Family party for 17 for lunch today so not much gun play! The browning of the d/b pistol barrel has not been a success! Some time ago I sent a shotgun barrel to Paul Stevens – who is reputed to be the best barrel browner in the UK – after several months I rang him to check progress and he explained that the first attempt had not worked and he had started again. At the time I couldn’t really understand what could go wrong except possibly the end colour. However I couldn’t get the bright parts of the twist pattern of the pistol to ‘bite’ – even after 14 brownings, and when I used my browning solution for several goes I just about got the colour right, but at the expense of a lot of roughness on the surface which shouldn’t be the result – The last barrel I did also had the same problem of getting the bright parts of the twist to ‘bite’ even after 10 rustings, although that barrel had started out with considerable surface structure and I judged it OK to have some surface texture at the end. I am not really sure why these barrels are being difficult – I never had those problems before – I usually got an acceptable finish in 8 to 10 rustings. It may be that I’m finishing the barrel too well pre-browning and effectively burnishing the surface, making it difficult for the solution to attack the steel. Or maybe rubbing the rust off with 0000 grade steel wool is a bad idea? I’m going to have to refinish the d/b barrel with 1200 grade paper and possibly 2500, but I think I will give it a couple of minutes in copper sulphate solution to etch the surface slightly and give the browning a chance. What a monumental bore…………………………………………
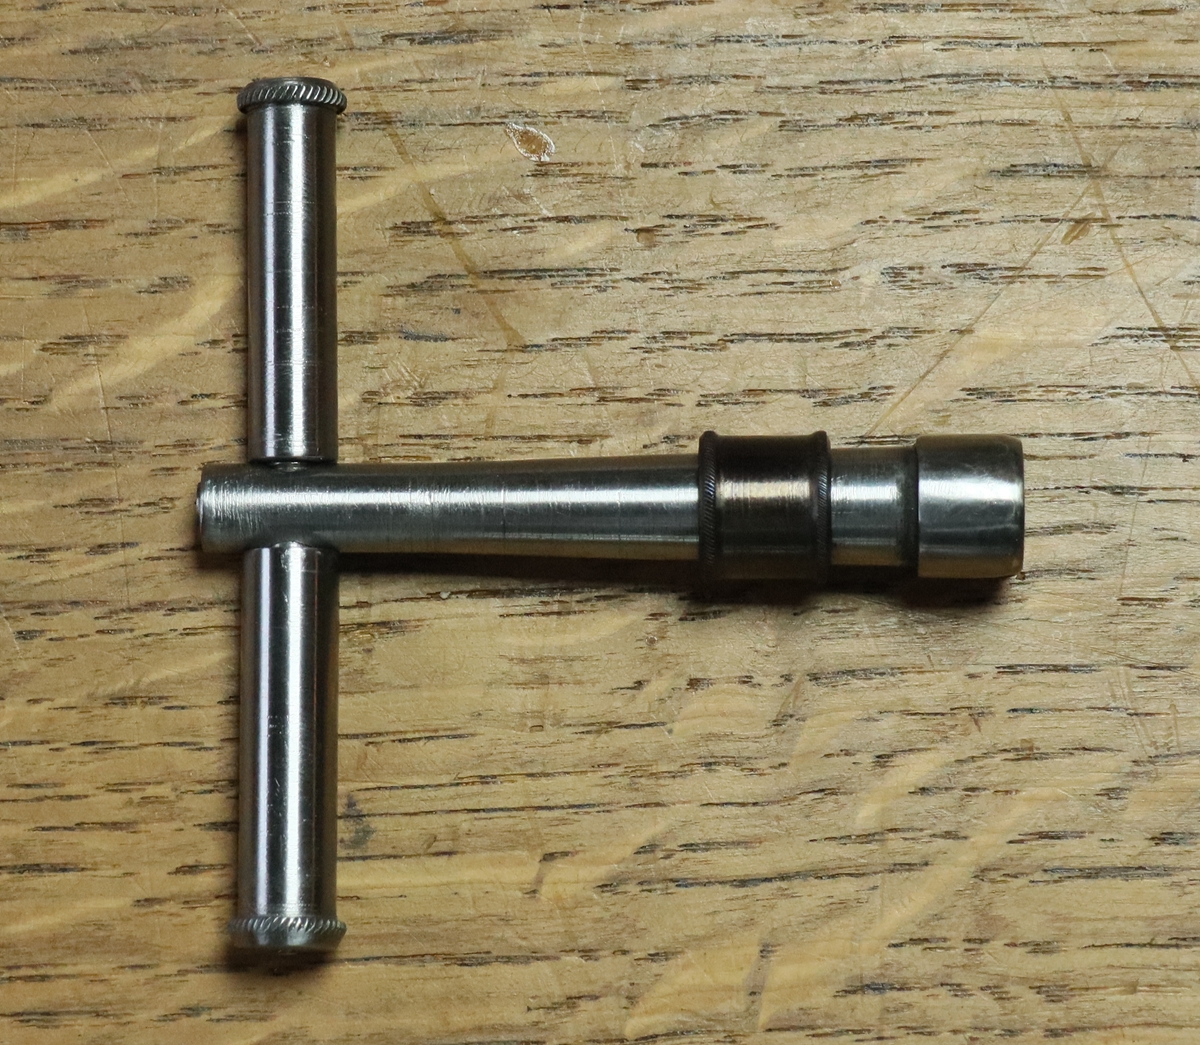
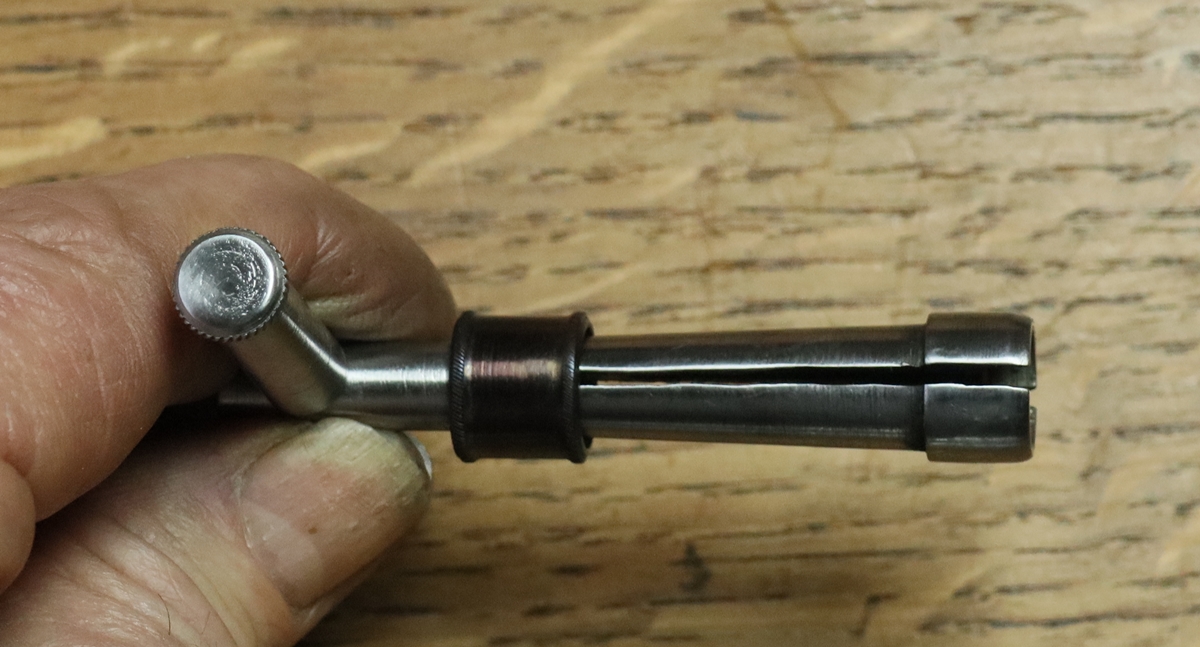
27th December – lest you should think I have devoted all of Christmas to eating, drinking and making merry, here is the tool for Imperial caps I made yesterday;- The ‘original Smiths tool (see a couple of dys ago) didn’t grip the cap well enough as the side hole in the nipples was a little worn, and I didn’t want to damage the rather weak joint between the metal and wood of the tool. I designed a ‘foolproof’ tool that I reckoned would allow me to put much more force on the recalcitrant caps and was ‘more or less’ guaranteed not to disengage in the process. The principle is that the cup for the base of the cap is a good fit over the cap, but the shaft and end is split so that it can be opened and closed to allow a fixed peg on the inside of the cup to slip into the hole in the cap, after which the cup is closed to grip the cap by sliding a tapered collar down the tapered shaft of the tool. I drilled a 2.5 mm hole through the cup and used a piece of hardened steel rod to engage the hole in the nipple – one nipple had the hole facing outward so I could leave the rod sticking out for a trial – it worked, although the thread was pretty stiff even after it had started to turn – too stiff for the original tool to work without holding the sprung loaded catch. I have now silver soldered the peg into the cup and quenched it to harden it all up, and I’ll try the finished tool on the other nipple. The thread on the nipple I have removed seems to be .253 O.D. and as near as I can judge 28 t.p.i. with a very shallow rounded thread as is common on old guns. As far as I can see the best fit would be an oversize 1/4 inch U.N.F thread (28t.p.i.) rather than the 1/4 inch B.S.F thread (26 t.p.i.) I was expecting. I will cut some test threds – I have a UNF die, and if its opened up to the maximum it will probably cut a big enough thread. If not I’ll open out a die holder and run a flame down one side of the die to soften it and open it some more………………………………………………………… nothing to do with old guns is straightforward!
I ought to have put a nipple pricker in one of the arms – …….. next time?
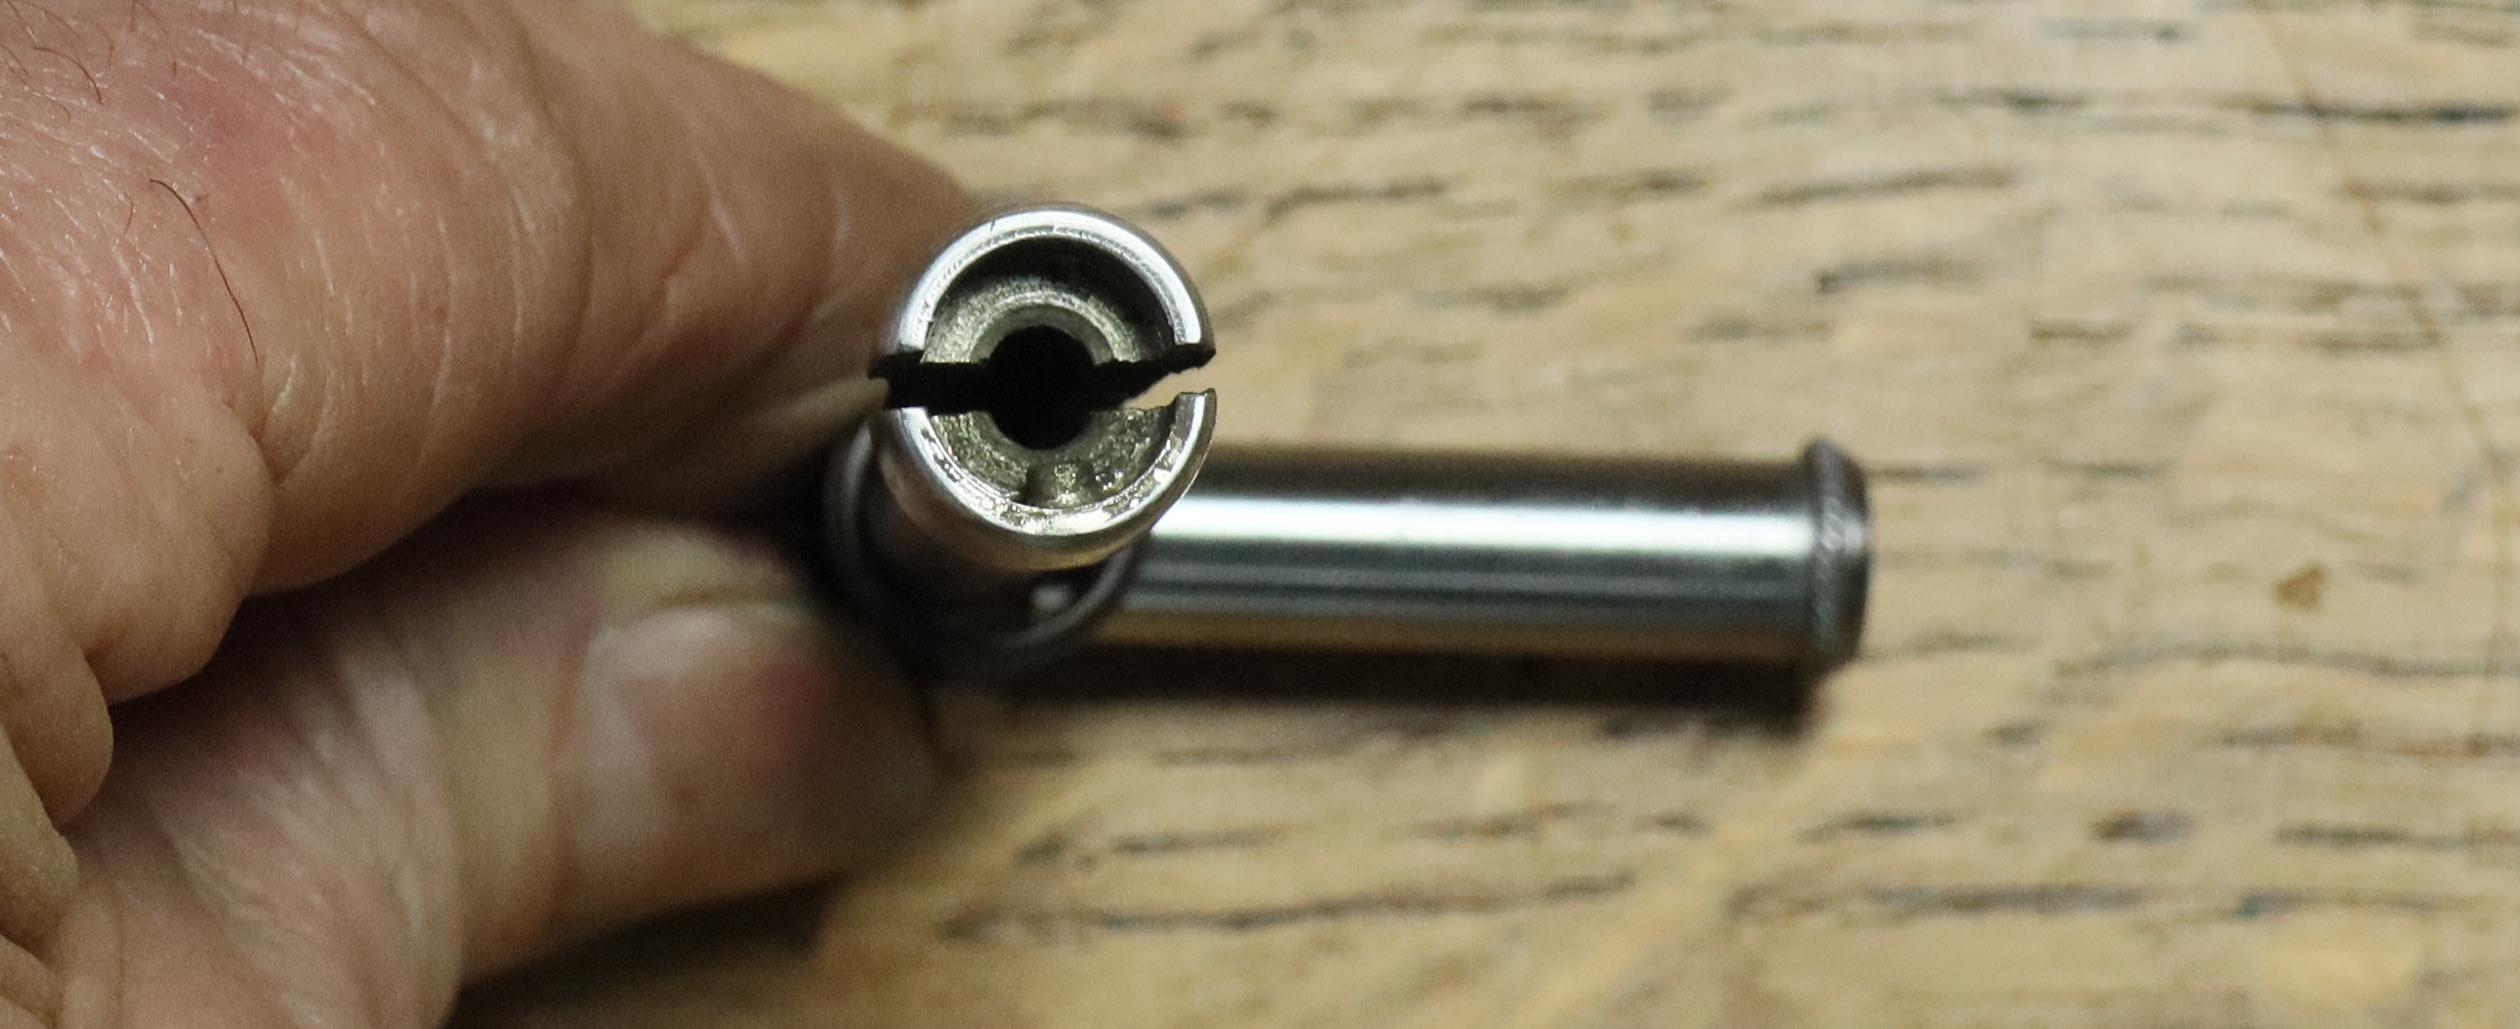
I cut the slot with a hacksaw, hence the wobble – I don’t have a suitable slitting saw. It works!
There is still a bit of silver solder round the pin, it has now been removed.
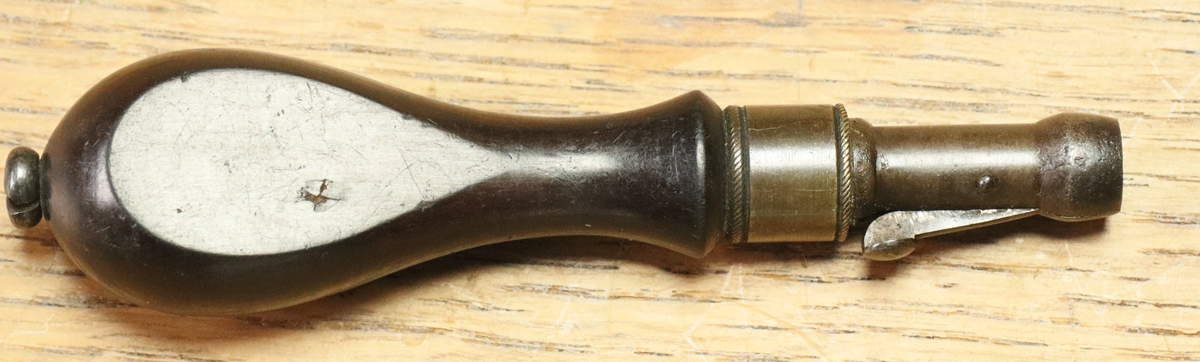
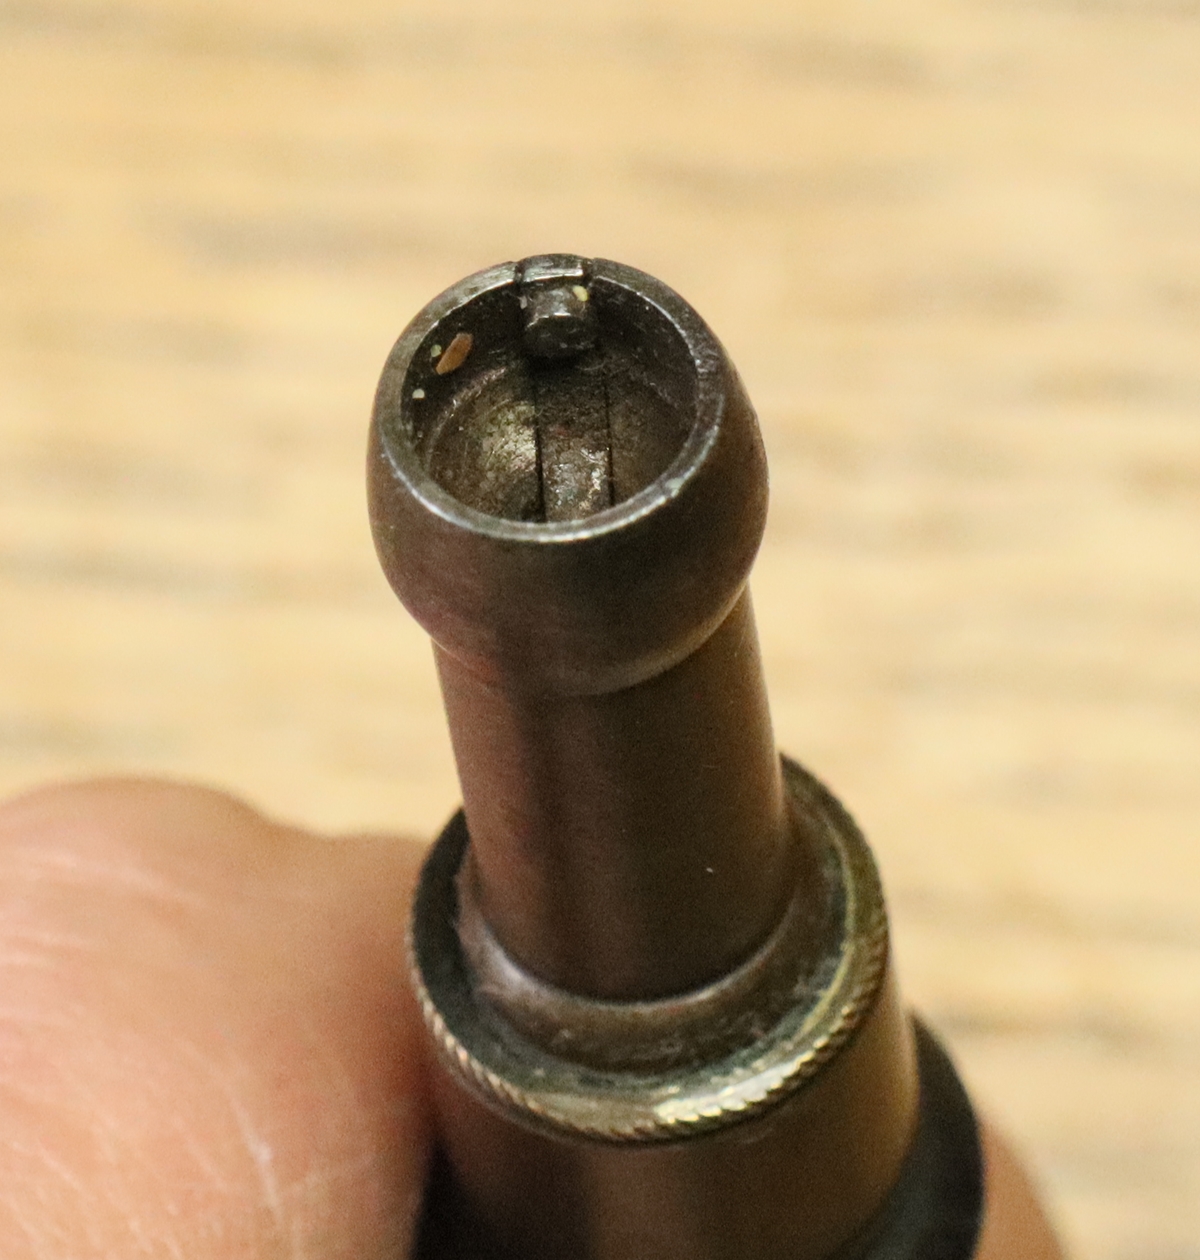
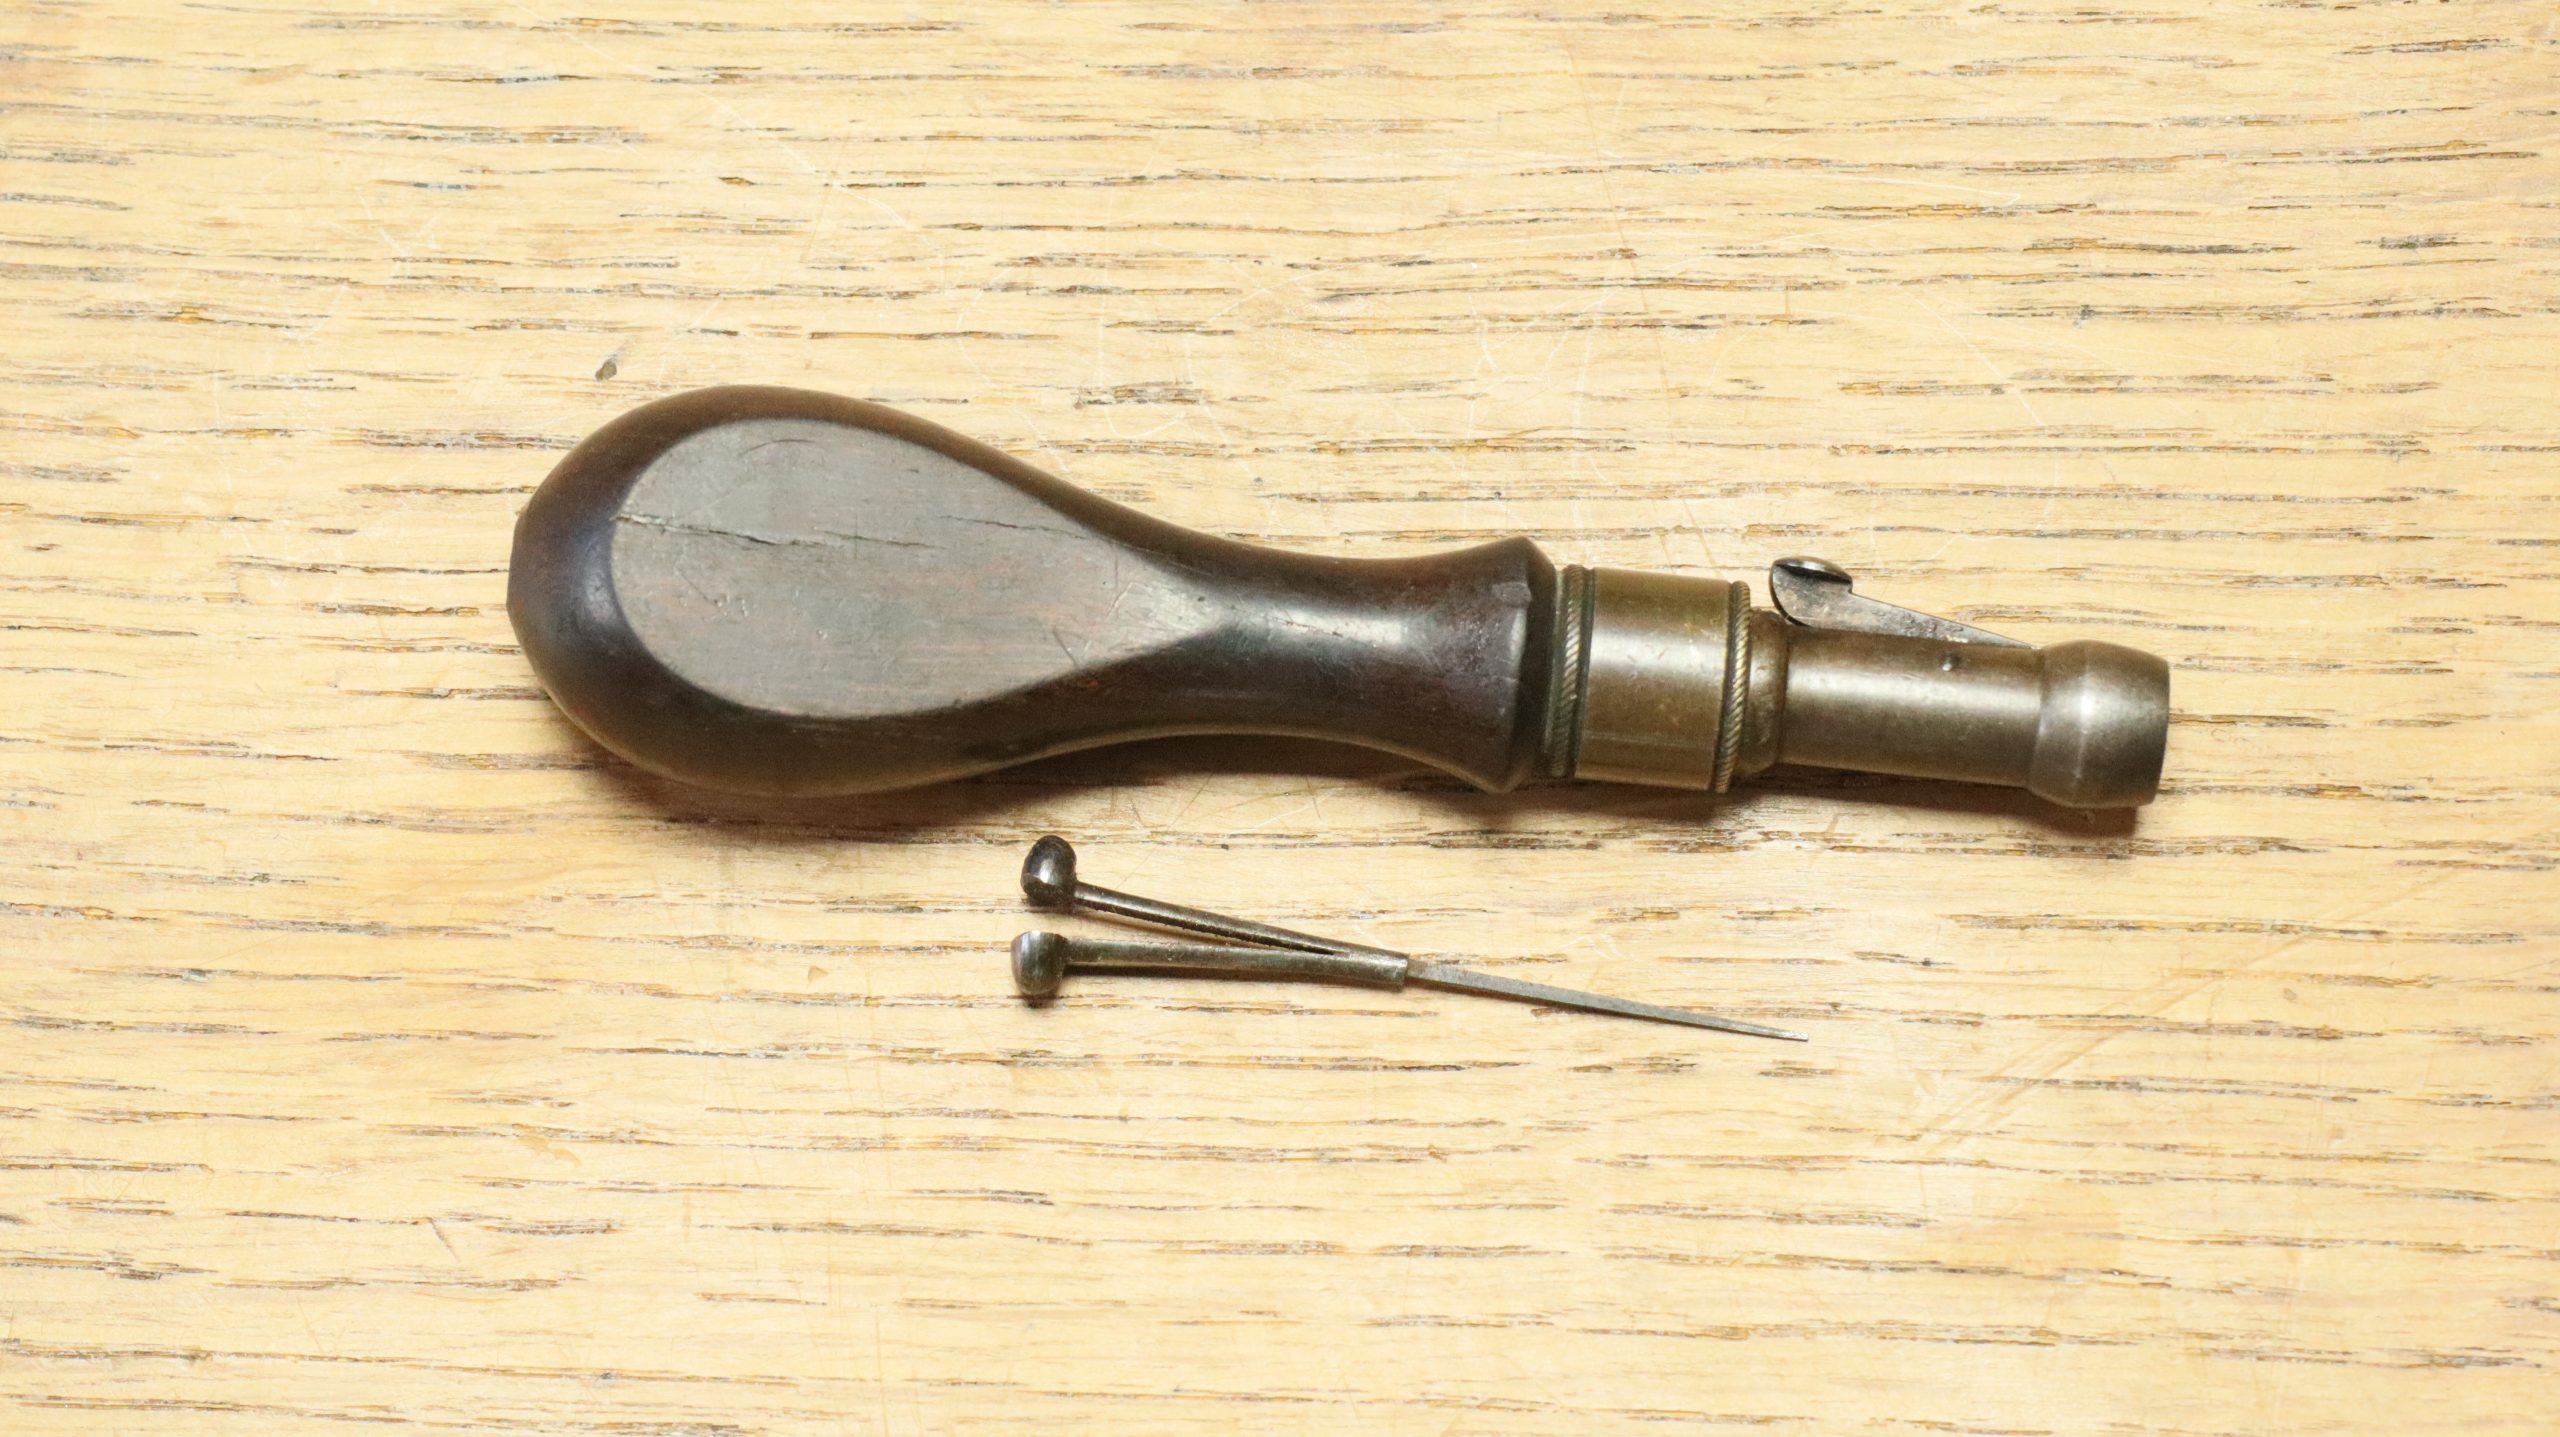
24th December – a certain amount of feverish activity in the house! I got the Imperial cap tool in the post this morning , so immediately went and tried to remove the caps – I was keen to see what thread they had. I tried as hard as I dared with the tool, but as its like the old nipple keys, the handle is ebony and the ‘blade’ is presumably squared and just pushed into the wooden handle so there is a limit to how much force it will stand before being damaged. Neither nipple would budge at what I deemed to be safe force, so at the moment I’m soaking the nipples in Napier cleaner for a bit. I will see it I can make a tool that will work with the barrels out of the gun, and if that doesn’t work I may try a bit of heat on the nipple. The tool is, as I thought, quite complex – the turned end of the tool has a slot cut in it about 2.5mm wide, into which fits a lever with the peg to engage the hole in the nipple at the bottom, and a push button at the top, with a spring underneath. The nipple pricker is unusual – its handle is bifurcated and sprung so it grips in the unlined hole in the wood of the handle.
23rd – still browning the d/b pistol barrel, which is going very slowly – as on the last one I did, there are areas of steel that are not touched after 10 rustings – in desperation I used my copper rich ferric chloride mix (ex pcb etching solution) and put it on wet, rather than almost wiped dry, which did seem to rust over all the surface – see below;- We’ll see how it rubs off with 0000 grade steel wool…….. It looked ok, there was some colour on what had been bright steel pattern areas – mostly grey – I’ve now put on a slightly more generous coat of Blackley’s than usual to see where that takes us…………. I think next time before I start the browning I’ll try putting the barrel in copper sulphate for a minute or two to etch the steel areas…..

21st December – I did the flame test on couscous today and added it to the video and got rid of some glitches, so its now uploading….
20th December – Getting more difficult to steal time from the growing domestic panic occasioned by the rapidly approaching festivities – I’m sure you are all aware of the phenomenon. I can see that the number of visitors to this site, both directly and via Google, has reached record levels, so lots of people are busy seeking dispacement activities! All I could manage today was a few visits to the cellar for further rounds of browning of the little d/b pistol. I got to three without much impact so I did a couple of my ex pcb solution and that got it going so I went back to Blackley’s Slow Brown and its going fine – probably three or four more and it will be ready for the boiling water treatment and a light coat of beeswax. I got the taps and die from Tracy Tools today – life is so easy with the internet now – I guess there are still some big tool shops around – I can think of one about 20 miles away but I bet they don’t have the odd sized taps and dies I needed. Oh and I did manage to collect together all the stuff on Imperial caps and put it in a separate post.
19th December – I finished the Couscous video and its uploaded. It looks as if the couscous is working fine, but I do have slight misgivings about the ability of the flame to penetrate the grains. Tomorrow I’ll try a pile of couscous with the blowtorch as I did for the semolina. I got a straight 1mm knurling tool from Amazon today, but I really need a 0.5 mm wheel and they come from ebay/China so I’ll order one and wait patiently for it to come! I spent today throwing out piles of old papers – I came across about 20 unopened letters that hadn’t looked very interesting at the time they arrived – sometimes I get lucky and find a cheque that is still in date………………..but not this time.
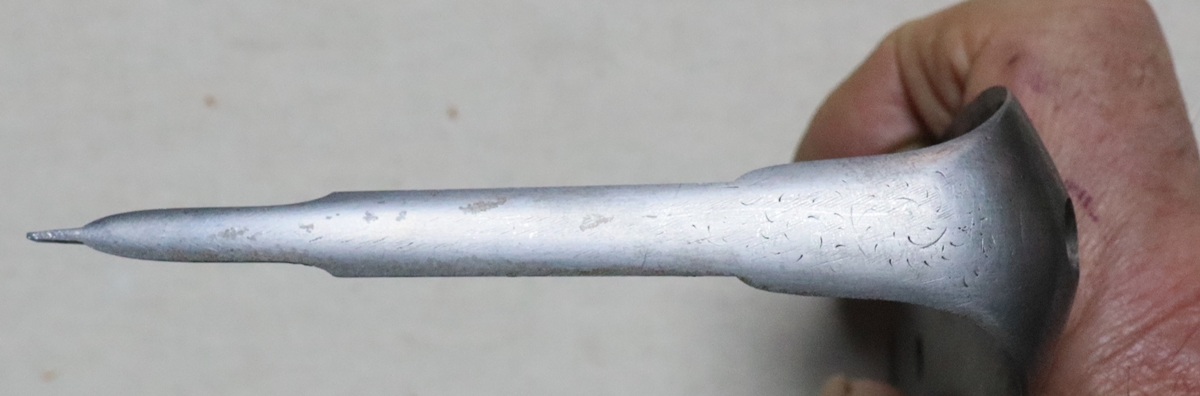
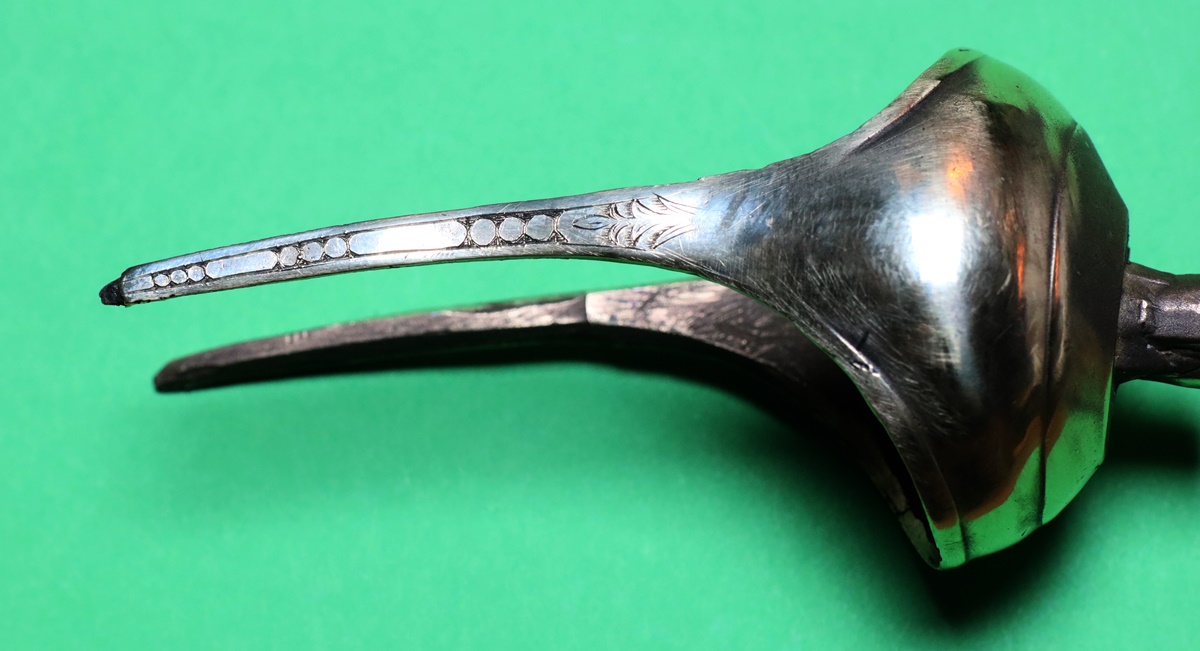
17th December – I did another video of using wheat in various forms instead of wads – this time couscous, which one of the AML shooters swears by. Its certainly easier to handle and from the way the shot dropped into it, I guess its just as good – in fact I think you don’t need quite as much volume in order to keep the shot away from the powder – my only concern would be that the flame can find a way through the grains on firing – I’ll edit the video and upload it later. My client has been offered an original key for unscrewing the Imperial nipples of the S & C Smiths, so that is one thing I don’t need to make- it was promising to be tricky to get the spring loaded peg to function properly. When we get it I’ll take out the nipples and see what the best way to use modern caps is. I am pretty sure I wouldn’t fire the gun using the original Imperial cock noses with ‘ordinary’ nipples as I don’t like being spattered with shards of red hot percussion cap, so I intend to make new ones in the style of the originals, but bored out to accommodate the caps. Anyway I got a special 12 UNEF x 32 die from my friends at Tracy Tools and had a go at making a new nose blank – I finished the outside but will chuck it and bore out the bottom when I have a better idea about nipples. It looks pretty good – I will need to grind up a tool to shape the outsides when I make a batch, and my knurling tool is a lot coarser than the original, and cuts slanting knurls, but that helps to distinguish my noses, so I’m happy with that. Anyway the 12UNEF x32 fitted perfectly ( 12 UN is 7/32th). I now have an original multitool that has lost its pricker to find a thread for that ( 3/16 x 26?) – back to Tracy Tools ( no, I don’t get a commission! they are just good and cheap and quick and have almost any thread in stock) – while I’m about it I will get a 12UNEF x 32 tap so I can mount the blank noses in the lathe without Araldite! I did a bit of editing and split this post in two to get the load time down – so 2/3 is in a separate post now.
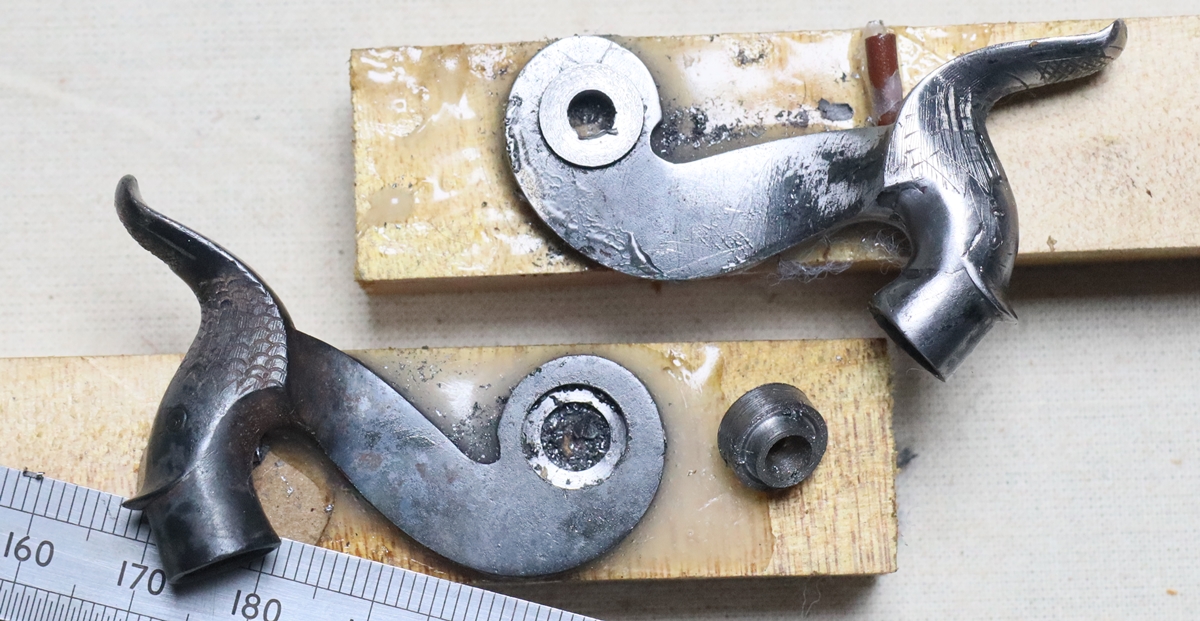
Original nose for Imperial caps.
New nose for ‘normal’ caps ( – right cock only, to be bored out when I make the nipples)
16th December – bit of trouble uploading stuff so I lost the bit I’d put in this morning! I did a bit on the d/b pistol – silver soldered the inserts and filed up the square holes – the l/h one was a pain as the square on the tumbler wasn’t square and the sides were rounded – and there wasn’t enough metal to file it up properly – anyway I made the best job I could – it wouldn’t do if the gun was intended to shoot, but it isn’t! The cocks didn’t quite line up so I melted the silver solder and adjusted the l/h insert slightly – probably 3 or 4 degrees. I welded up the nick in the l/h cock and tidied up the engraving and bent the l/h cock into line with the nipple and finally coloured up both cocks with the gas torch and case hardened the cock screws and its all together – in fact it looks so nice I decided it needed the barrel re-browning, so that is ongoing – its showing a nice twist on the first application of Blackley’s Slow Brown, so things are looking good………
Not sure what happened to the colour balance here!
14th December – Good shoot at the Valley Shoot in Heydon – very professional beating, which for muzzle loaders is a tricky job as there are gaps while we reload that need to be reflected in the progress of the beaters. Anyway a really good shoot and lots of sporting shooting. Chasing information about the Imperial caps I’m trying to change, I emailed a friend for photos of the tool for removing them and he has a spare he is willing to sell, so that may save a job – it is a fiddly tool to make as it has a spring loaded peg going into the side of the Imperial nipple that takes the torque of unscrewing – so it needs to be accurately made. He says that all the ones he has changed use standard nipples and don’t have modified noses on the cocks – but I still think I might make special ones for fun! ( basically I enjoy the engineering!) … now I guess its time to file up the squares on the cocks of the d/b pistol………….
12th December – Silver soldered the inserts into the cocks of the d/b pistol and filed off the surplus so now ready to put in the squares – although it is possible to rotate the inserts later, it is much better to get it right in the first place. Here is my technique;- cut a square hole in a piece of thin card to fit over the square on the lock with the lock on half cock. Mark a cross on the card centered on the square aligned with the sides of the square and glue or tape it to the lock in the correct alignment. Black the centre of the cock and position it over the square and transfer the marks to the cock. With luck the hole you made in the insert will be smaller than the across flats dimension of the square, but larger than the size of your smallest square needle file. Now file the square out aligned with your marks, trying it as you go – Its easiest to get one flat surface almost done and use that to align with the square. Obviously getting the second cock to align with the first one is tricky as it needs to be quite precise – that is where the ability to rotate the insert is useful… Good luck – I won’t be fitting it for a day or two as I’m shooting tomorrow again – last one of the season! An alternative way to mark the square is to tin the back of the cock with solder and press the lock into it in a vice (gently) to leave a mark – I guess some thick soft varnish might do instead… That method is easiest to implement if the hole in the cock insert will just admit a screw that will go into the tumbler to keep it all in alignment – you can then drill it out to accomodate your file………. I’m sure there are lots of other ways too…………………………..
The insert hardly shows on the face of the cock and will be covered by the cock screw. The lines shown are on the diagonals of the square but I realised that it would be much easier to align them with the flats instead so I’ll change it………..
12th December – Another question re the Imperial caps – is it possible. using the proper supplied tool, to remove the caps with the barrel in the gun or do the cocks and flash guard get in the way?
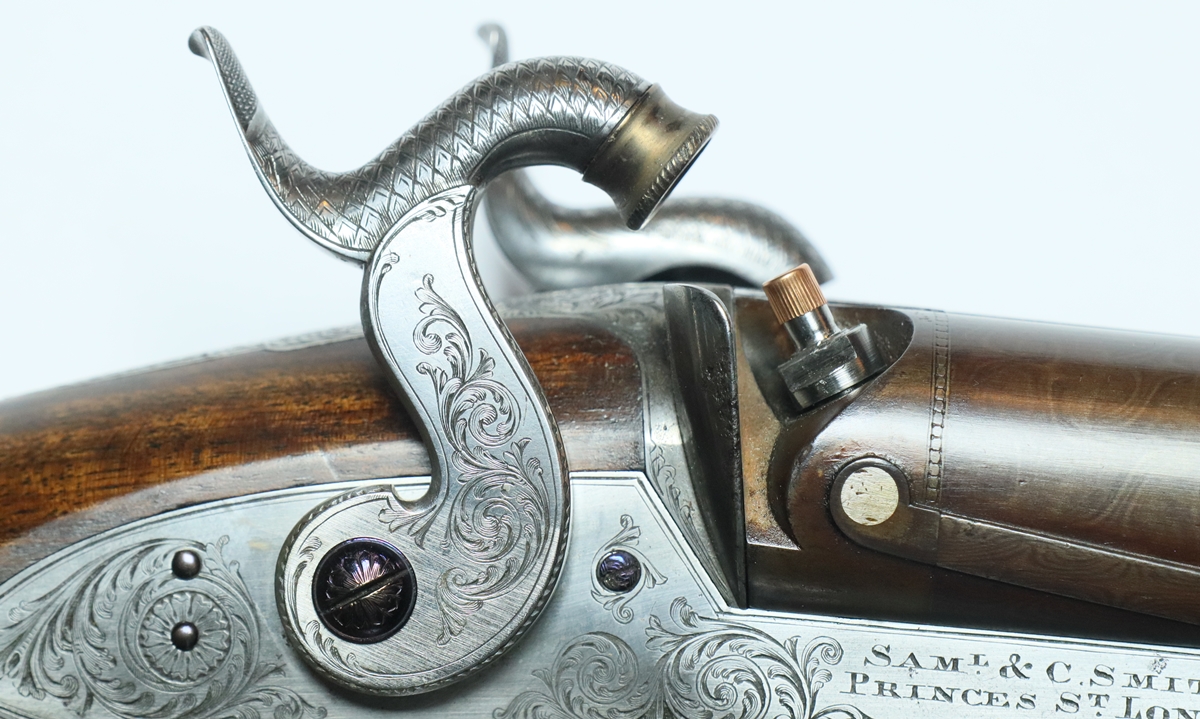
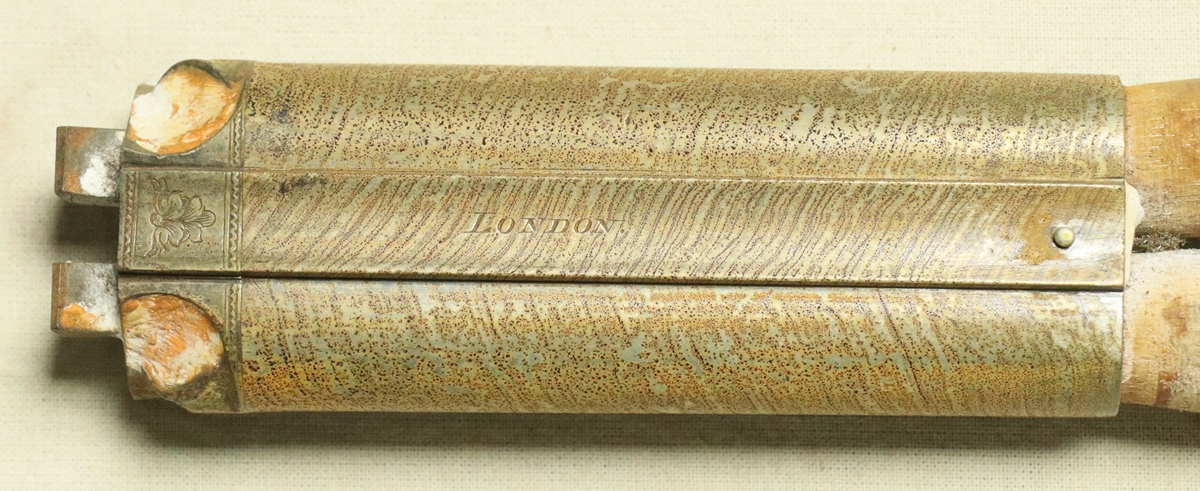
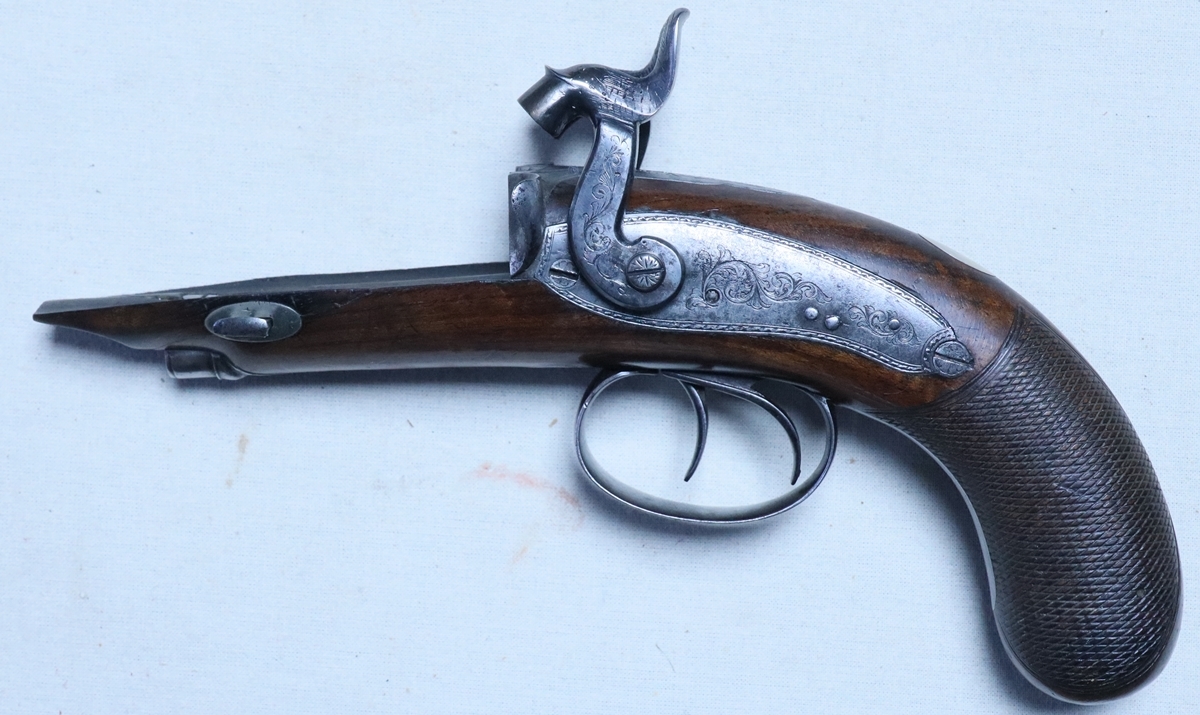
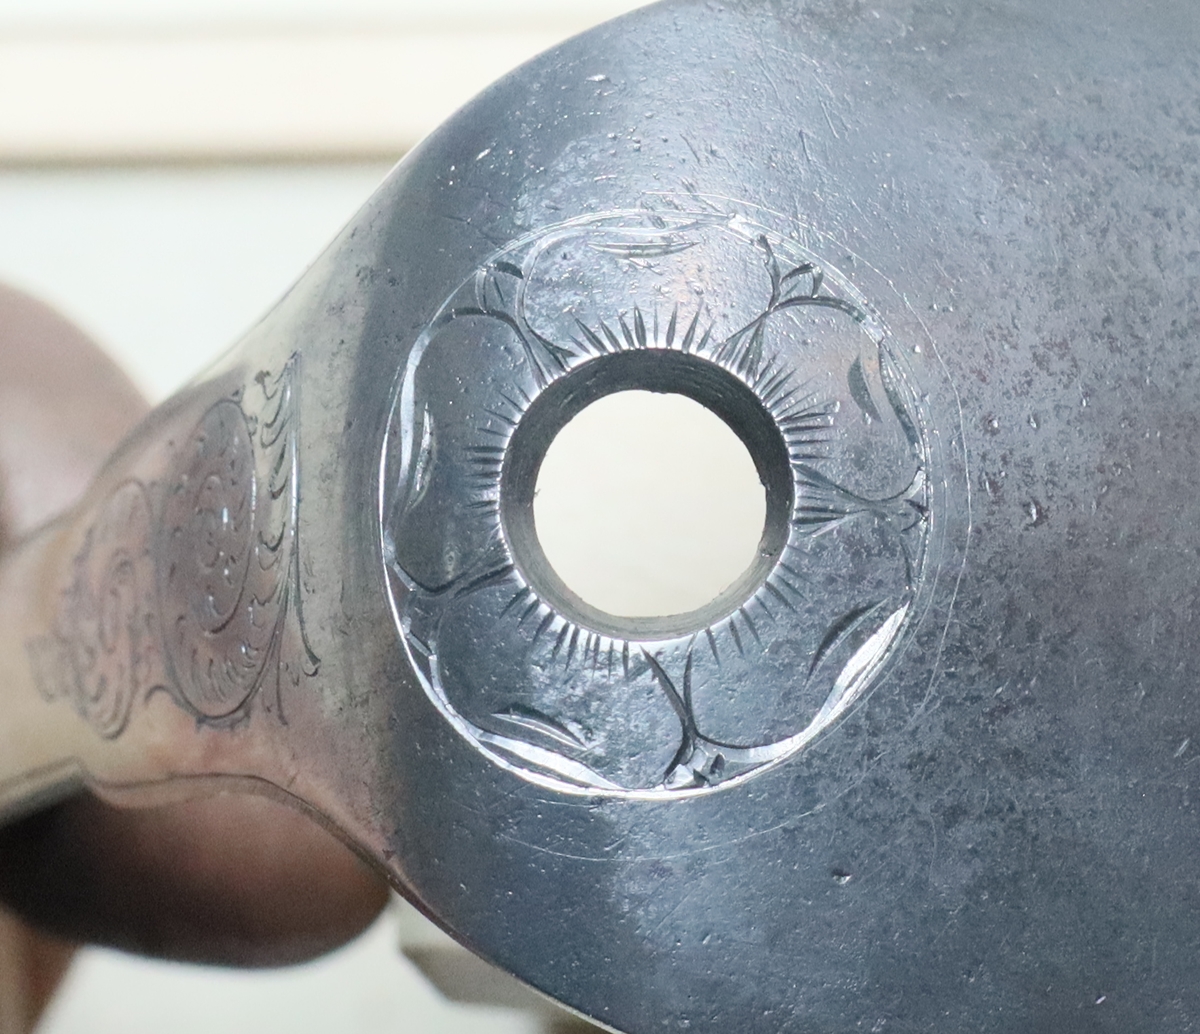
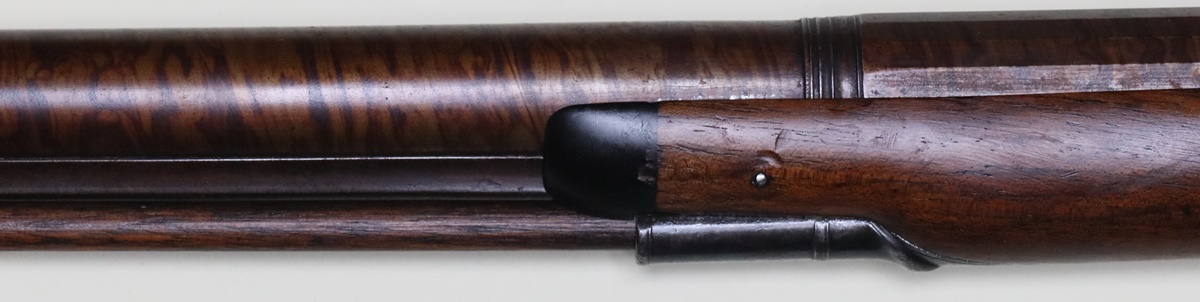
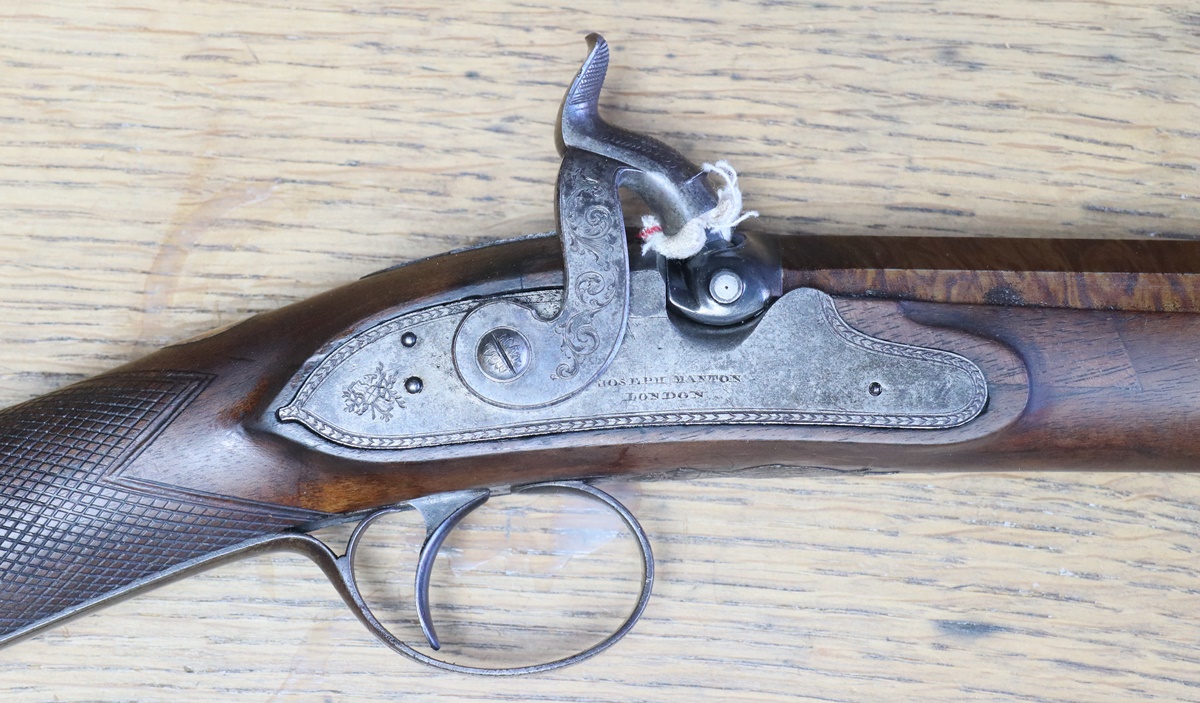
11 December – bit of a lull as I got a nasty bug that laid me out in the evenings, now thankfully gone. Having got my miller working I got on with the cocks of the little pistol – if you remember they needed the square holes remade as the alignment was wrong. I think the miller runs much better now with the good old-fashioned Variac instead of its original electronic controller! I Araldited them onto bits of wood and ran a 6 mm end mill through and then dropped a 9 mm endmill down 2.5 mm into the back and turned up a couple of inserts with 4.2 mm holes and made to fit the milled holes – they will be silver soldered in later and the square hole then put in – if I don’t get the alignment right I can reheat to melt the solder and rotate the insert. Pretty foolproof and better than trying to exactly match a pair of cocks by filing the squares in rewelded metal. This method does leave an indication if you take the cocks off that things are not original, but in this case it is acceptable as both cocks are replacements. I picked up an interesting job today – a friend has a very nice S & C Smith percussion gun with Smith’s patent Imperial caps – these differ from the normal percussion caps in that they are flatish disks of around 10 mm diameter ( I don’t have one to check!) that fit on special nipples and with special noses on the cocks so they won’t in that configuration take normal caps. I’m not sure what the supposed advantage of the Imperial caps was but the Smiths seemed to put them on most/all their guns and pistols so they must have seen something ‘better’ in their design – or perhaps they just liked to be different – they patented the design in 1830 No 7978. One special ( awkward) feature of the nipples is that the body of them is disk shaped and about 4 mm thick with a hole into the side for a peg on a special tool. I don’t have access to a tool so will try to make on, but the mechanism for getting the peg into the side of the disk with very little space around the nipple is a bit challenging – I have emailed another friend to send me a photo of his original disk ‘spanner’. The recess in the nose of the cock is made very shallow – about 1.5 mm, which is OK for the very flat nipples/caps but will not provide any protection from flying bits of normal caps. Fortunately the noses of the cocks are detachable, so I just have to make new noses and new nipples and all will be well – plus the tool for getting the Imperial nipples out. The cock noses are screwed in with 3/16 x 32 threads, and I managed to locate a Unified extra fine die of that size – at a cost of £30 – and the noses should just accommodate a somewhat deeper recess – maybe not as deep as a conventional percussion cock, but I plan to make rather flatter nipples than the normal ones – old percussion caps were always much deeper than our current ones, so conventional nipples are unnecessarily tall. I do realise, before any kind soul tells me, that the thread form of Unified threads is quite different from the old thread forms, the UN is much steeper and sharper at the crest and valley, but the thread doesn’t take any force, just holds the nose on. I’ll screw the thread into the hardened cock before hardening the nose to swage the thread into a better shape. One question I would be grateful for information on;- were the Smith guns supplied with alternative ‘conventional’ nipples and cock noses, and if so what were they like?
Secured for milling the holes.
Milled stepped holes and disks – the holes are concentric even if it doesn’t look likeit!.

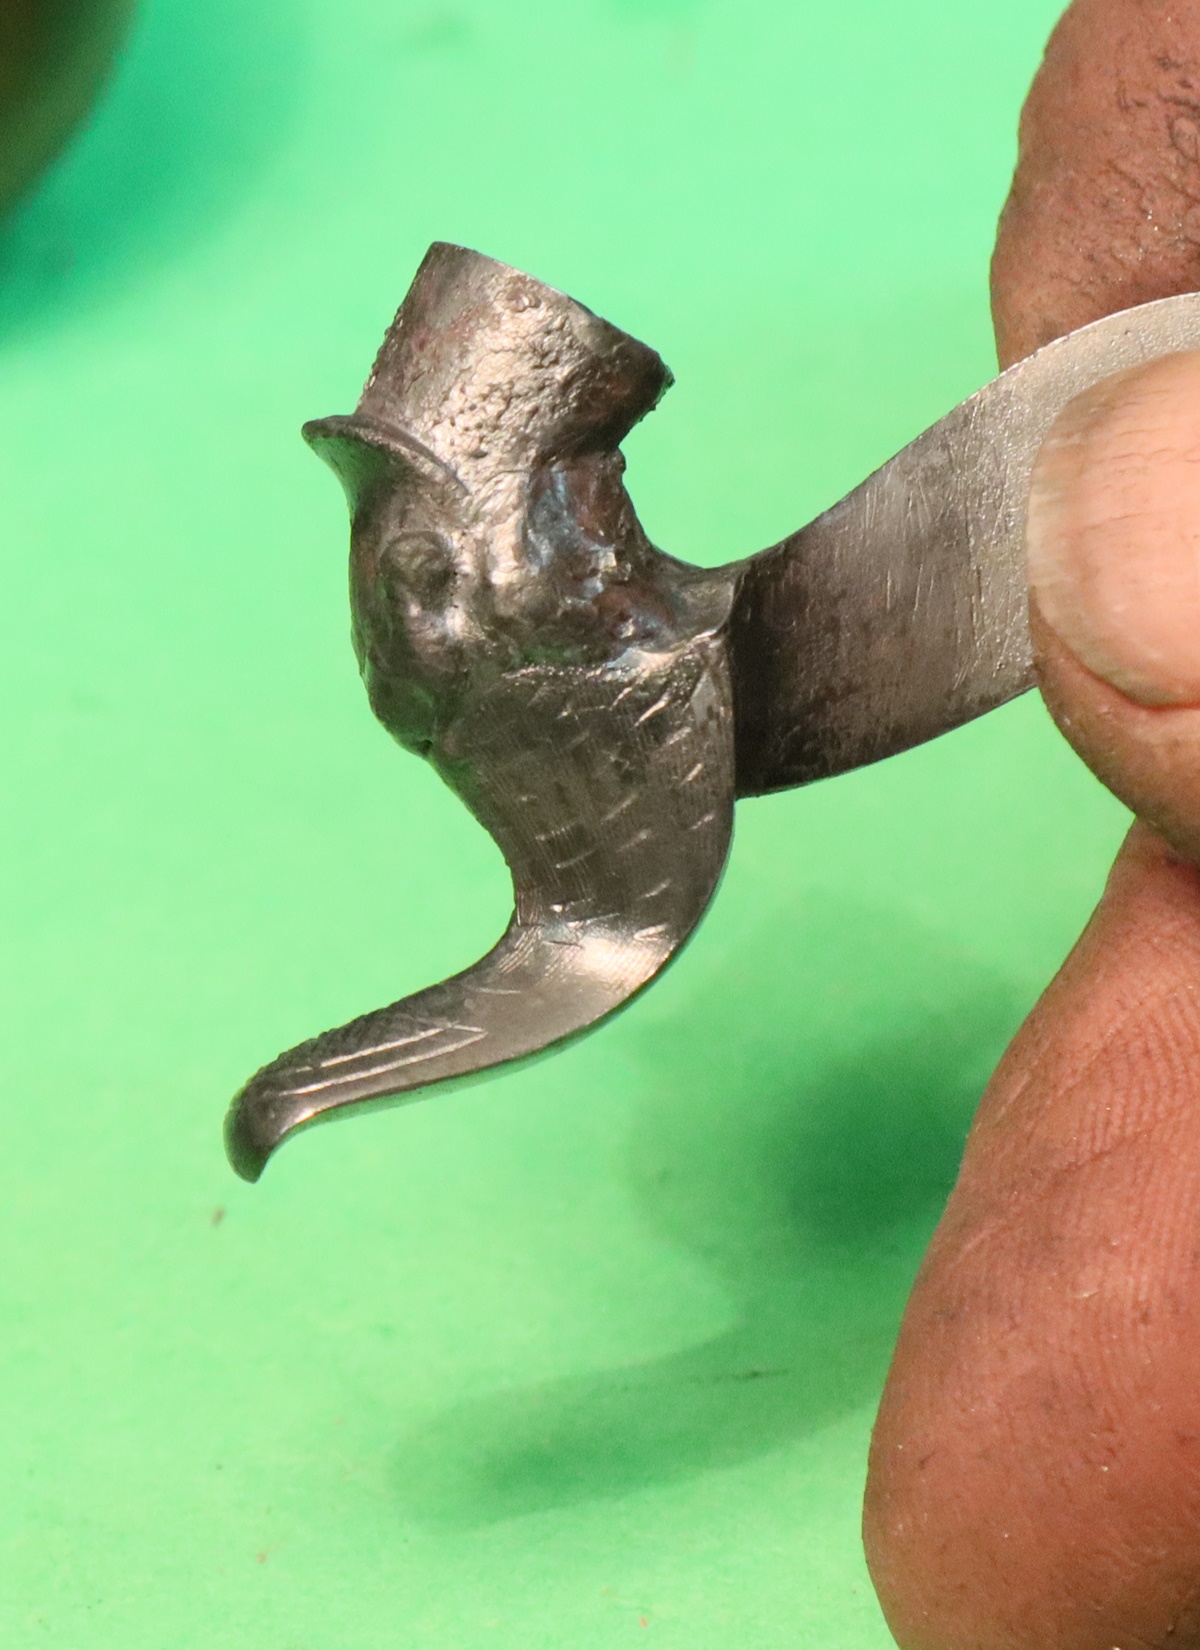
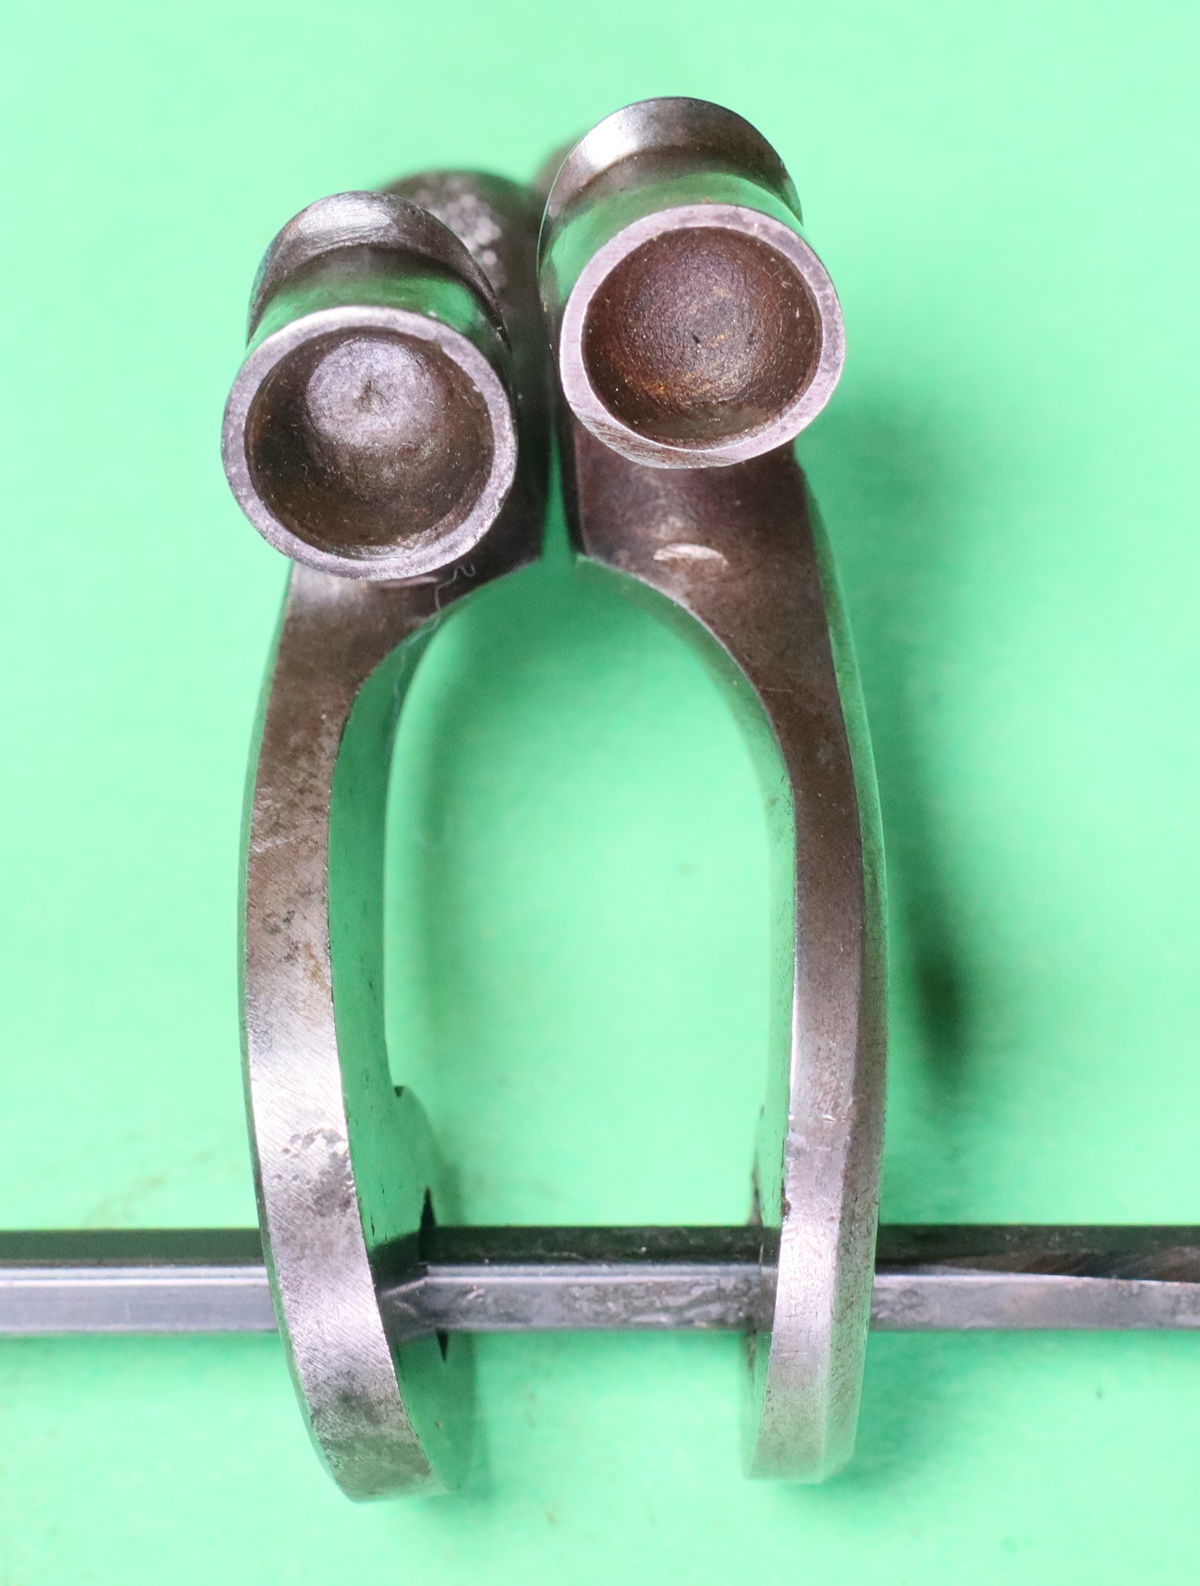
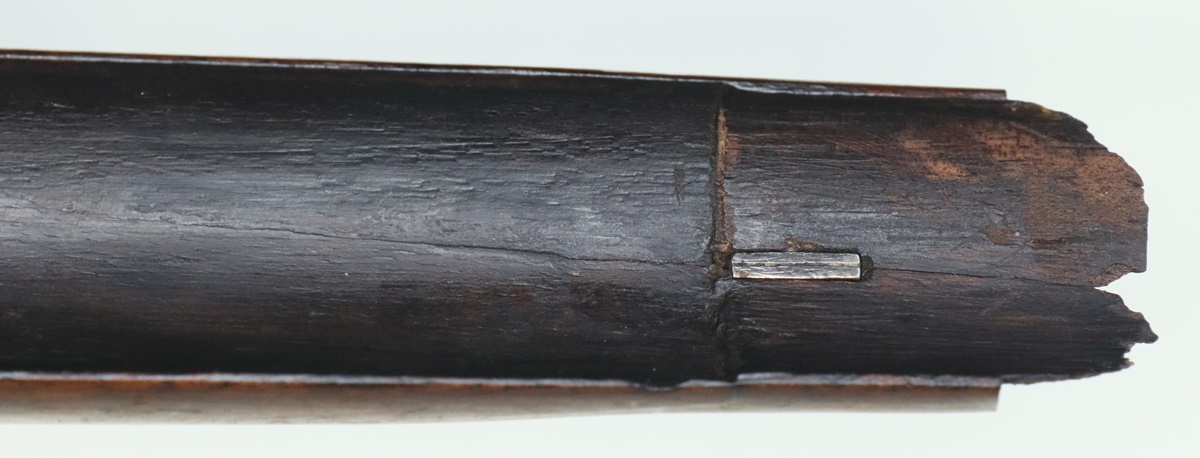
Imperial Nipple on S & C Smith gun – the nipple body is round and has a hole, just visible on the right side, where the peg fits to uncrew it – tricky to make the removal tool!
8th December – The Anglian Muzzle Loaders single barreled shoot and Christmas Lunch today. I had a bit of a revelation last night when getting out my guns for the shoot – as I mounted my usual little Henry Nock single ( as I usually do when I get a gun out) I noticed that my dominant eye seemed to be swapping from my normal right eye to my left eye on occasions – Without shutting my left eye I couldn’t guarantee that the gun would point where I was looking. That might hopefully explain why I was having trouble hitting birds coming straight at me on previous shoots – anyway I took the time honoured solution and stuck a piece of sellotape on the top third of the left lens of my spare glasses, which is just enough to stop the left eye seizing control as you mount! It must have worked because I did my usual score at clays. I still haven’t worked out how my mind or body works when shooting clays – my norm, over many shoots, if I’m using a gun I can shoot with, goes something like this: First stand- 6 clays – miss one, second stand -6 clays – miss 2, third stand – 6 clays – miss 3 or 4 and erratic thereafter! It doesn’t seem to depend on which stands we start on either! Strange. Pete and I had discussed him firing his flintlock upside down as an experiment, but we completely forgot when we got to the shoot. Cambridge Gun Club, with whom we have a close relationship, put on a splendid Christmas Lunch especially for us – we all bring prizes and they are put into a raffle for which we all get a ticket – claiming prizes from what’s left when our number comes up – Pete picked a wrapped bottle, which when he unwrapped it turned out to be a bottle of Cherry Kirch that had been opened and a glass drank! What can one say ? – so we decided that it will become a permanent feature of the raffle – being returned, wrapped each year – possibly minus another glass……..in perpetual memory of whoever put it in….! We now have a new supplier of Czech powder, thank goodness as it was getting tricky to get in the quantities that the club uses – 28 members were shooting today, 30 shots each, so 840 shots in total, at an average powder load of about 2.6 drams amounts to about 4Kg of powder, or if we were shooting 40 shots with doubles, more like 5 Kg. I don’t shoot as much as some of the members, but I probably shoot 3 or 4 Kg a year at least. I managed to get my milling machine running yesterday using a Variac ( variable voltage transformer) and a bridge rectifier – seems to work OK, which indicates that in fact its a DC motor, no AC as on the motor label – anyway its all properly wired up with a switch and fuse etc.
6th December – Oh, I just remembered its my brother’s birthday!! I finished off the trigger guard and butt plate by ‘colouring them down’ – it’s a sticky decision – how to finish work that you have taken down to bare metal. The usual method is to form an oxide layer on the metal by heating it – the colour you get depends critically on the top temperature you reach so it can be difficult to get a uniform colour if you don’t have a big enough furnace/oven and the object has an uneven distribution of metal so some bits heat quicker than others – It is possible with patience to do it with a gas torch. An alternative is to heat to dull red and use a case hardening powder and then quench it in water – that generally gives a slightly mottled grey colour – its what I’d normally do for lock plates and screws which benefit from the case too. Anyway for the trigger guard and butt plate I used a calor gas torch and took them up to just about deep strew colour – around 275 C. You need to keep the torch moving and go slowly so there isn’t a lot of metal that is above the required temperature that will leak out and over colour the smaller bits. I stop the heating by swabbing with an oily tissue and then dunking in water. A brisk brushing on the very fine wire mop tones the colour down nicely and leaves an even greyish finish, ending with a light wipe with gun oil. It is always important to realise that any heating of steel is liable to leave it the surface clean and ready for rusting to start.

Here is the toned down part – its difficult to see the colour, but its a lot more appropriate than bare steel.
5th December – I got to thinking about firing off a flintlock upside down – but I don’t have any measurements to check things against – I might borrow a crude high speed camera that will do 700 f.p.s. but that isn’t great and the resolution is dire. My calculations suggest that the powder will drop around 1/2 a mm in the first 10 mSecs and 50 mm in the first 100 mSecs – I am not sure how far the flash will spread and still fire the charge through the touch-hole, but I guess up to about 10 m.m. which takes 44 mSec. Since I can well imagine that the pan will open and a spark will be generated in that sort of time window – therefore one concludes that firing upside down is not so improbable – more experiments to follow.
4th December – Back from a trip to St Andrews for Tom’s second graduation – after 9 years up there he now has his PhD done and dusted and needs a job! I now have to sort out all the jobs that are waiting for me – A set of electronic Incubator regulator boards to test and deliver, a gun to collect from Geoff, some invitations to do, The Dolep pistol to finish – that involves doing something about the finish on the barrel, ditto the trigger guard below that needs toning down – plus I would like to uresolder the barrels of the Venables. I now have the parts I need to check the speed control of my milling machine, which I need to finish Nick’s pistol cocks……………….. If it sounds like an impossibly long list of jobs to complete in the run-up to Christmas, I fear you might be right! I’ve been chasing the Russian Internet Service provider that is hosting the IP addresses that keeps bombing this website – I’ve tried them 3 times but it achieves nothing except somehow the sender managed to change the indicated country from Russia to Brazil – but from the same IP addresses – I haven’t completely given up hope but it is beginning to look as if the ISP is part of the problem….
30th November – Decided to start the last job first as I felt like a quite few hours engraving – the trigger guard and its tang were nice to cut, the butt plate and its tang a bit less so, but both are now done – the worst bit was putting a pattern round the top screw of the butt plate – the curvature is vicious so I used the GRS pneumaic graver as it lets you hold and move the work by hand since the forces are small. I was trying to get the engraving to be clear and complete but not looking as if it was new – because the underlying material does not look new and I’d have had to refinish it drastically to get it to ‘new’ status – plus I don’t really like that approach! Anyway its now done and I’m reasonably pleased with the outcome. I’m not sure what the client has in mind for the finish – I would probably run a torch over it to give it a bit of an oxide layer, maybe give it a coat or two of browning first to help.
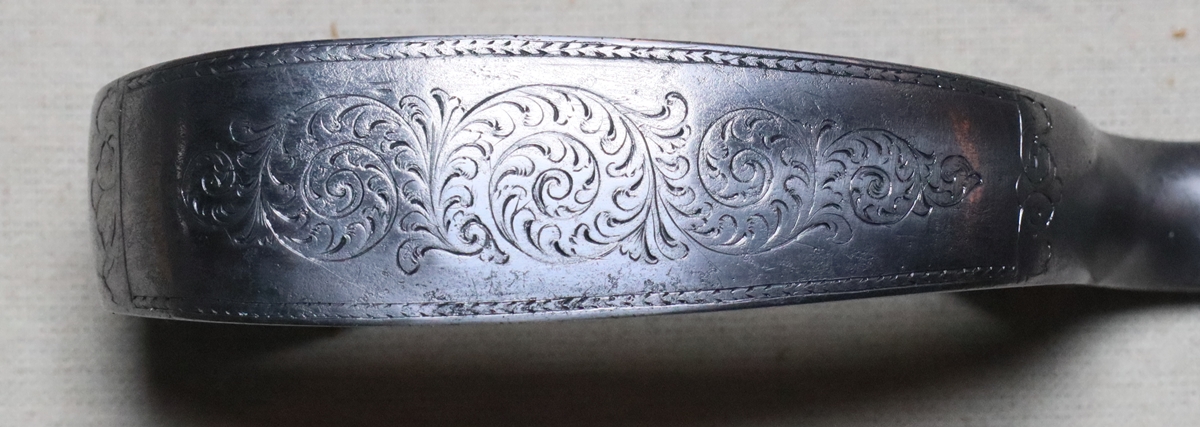


29th November – I was trying to get my milling machine to run – the motor controller had packed up last week, so I decided I ought to be able to put something together to replace the controller – the motor says quite clearly 240V A.C. 400W, and has 2 wires coming from it – but putting an AC motor controller just produced a lot of buzzing and a bit of heat. So I tried it with a Variac – a variable transformer producing good smooth AC from 0V to 240V, but that was the same. Unfortunately I can’t find a suitable bridge rectifier to test it on DC, but I did try it on my 30V D.C 3 Amp power supply and it ran smoothly but fairly slowly. It is a brushed motor, which means it could well be a DC motor in spite of the label, so I’ll now get a bridge rectifier and see if I can get it to run . I got a parcel from a client with a trigger guard and butt plate to be recut/engraved. The trigger guard will be easy to recut exactly as its clearly visible, the butt plate is at the awkward stage – there is enough of the engraving left that you can’t ignore it, but not enough to use as a pattern. My usual method is to recut the bits that I can still see, and then carry on in the same spirit – it usually works fine as you gradually make out more of the original pattern. I guess the alternative is to file off the remaining engraving and start over – but that’s not an approach I usually take.

Quite a decent standard of engraving – a bit of work in the borders on the bow – not sure who the maker was.
Need to have agood look at this under the microscope to ‘see’ the complete design.
Rather unusual cased pair of pocket pistols by Salmond of Perth in pigskin lined case.
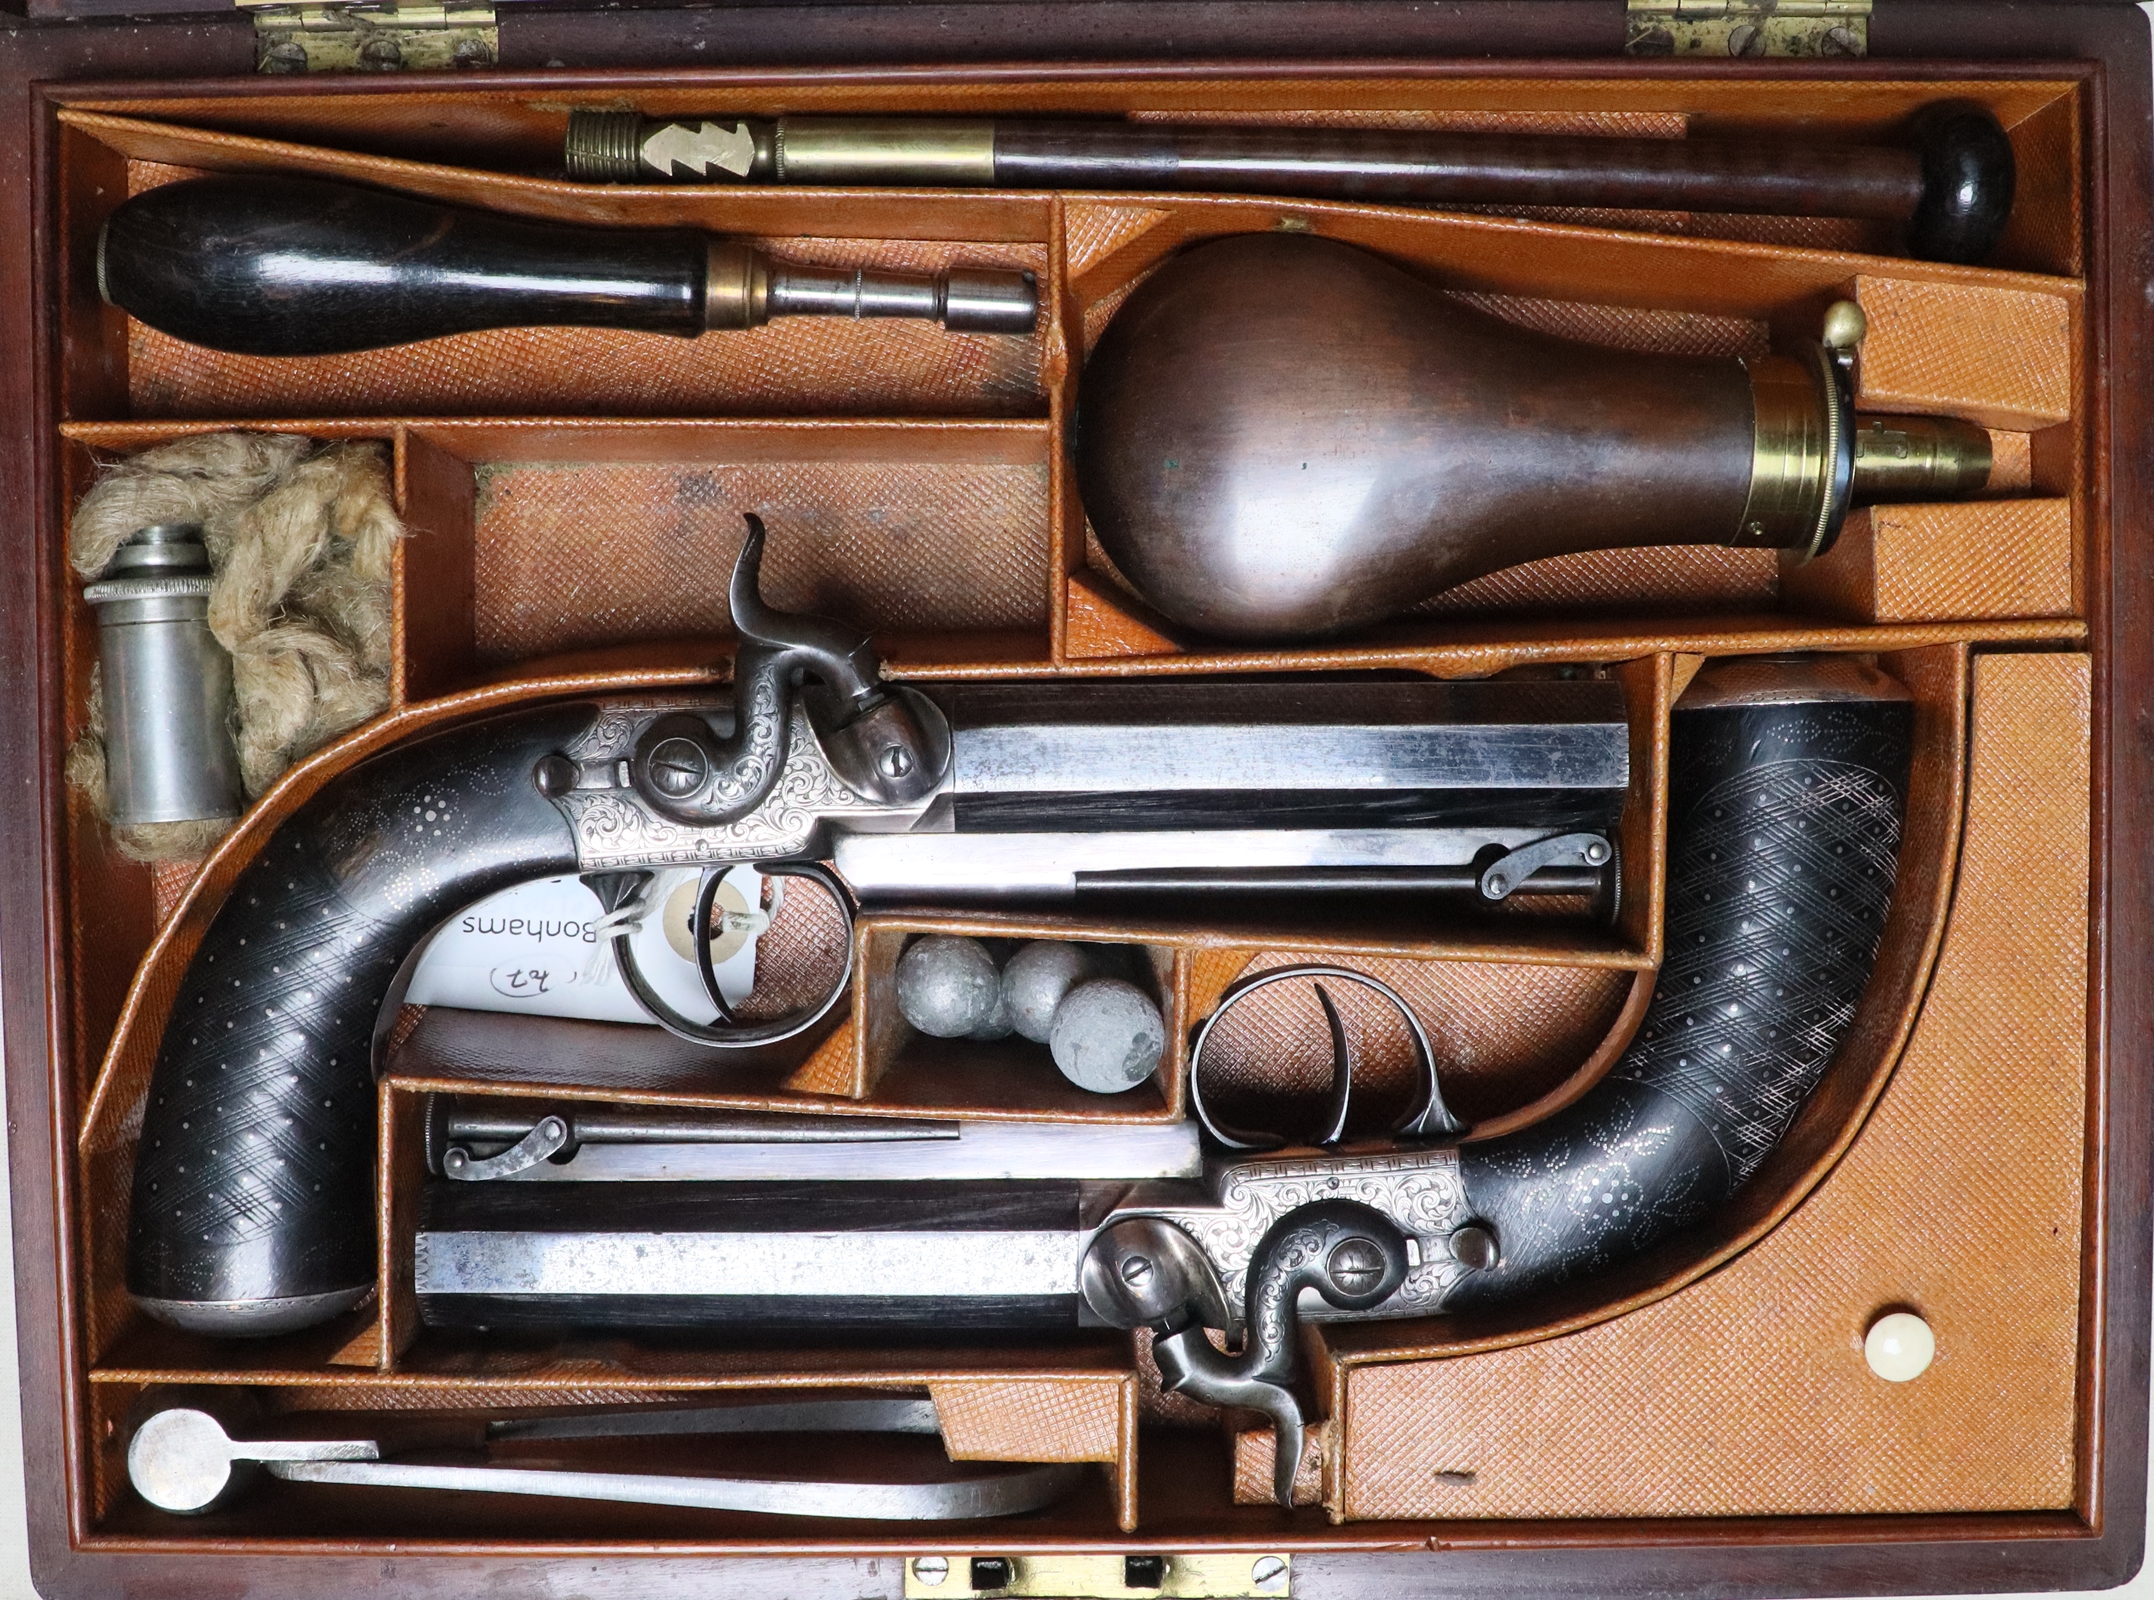
28th November – At the Bonhams Auction yesterday – prices mostly in line with estimates – not many real bargains so I guess the market is not as bad as I thought. The only real surprise was an Ormolu tinderlighter and inkwell that made £15000 against an estimate of £3 – 4K. I think only a couple of lots didn’t make the reserve. The trio of Smith 12 bore muzzle loading sporting guns made £7500, well above the £3-4K estimate, and the silver mounted pair of Clarkson pistols lot 517 made £11000 against an estimate of £5 – 7.5K – bought by a collector from Essex who was very pleased with his purchase, as well he might be. I got the lot I was aiming for – the pair of Public Service Overcoat pistols for the early Police force at Bow Street, at one bid over the bottom estimate, so that was OK. I also got a pair of cased pocket pistols by Salmond of Perth in a pigskin lined case.

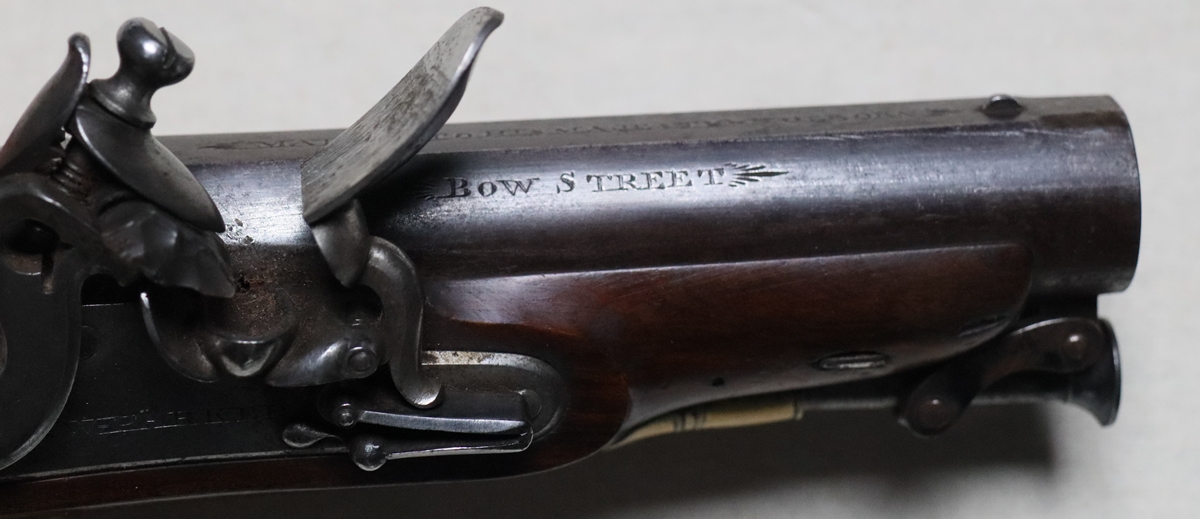
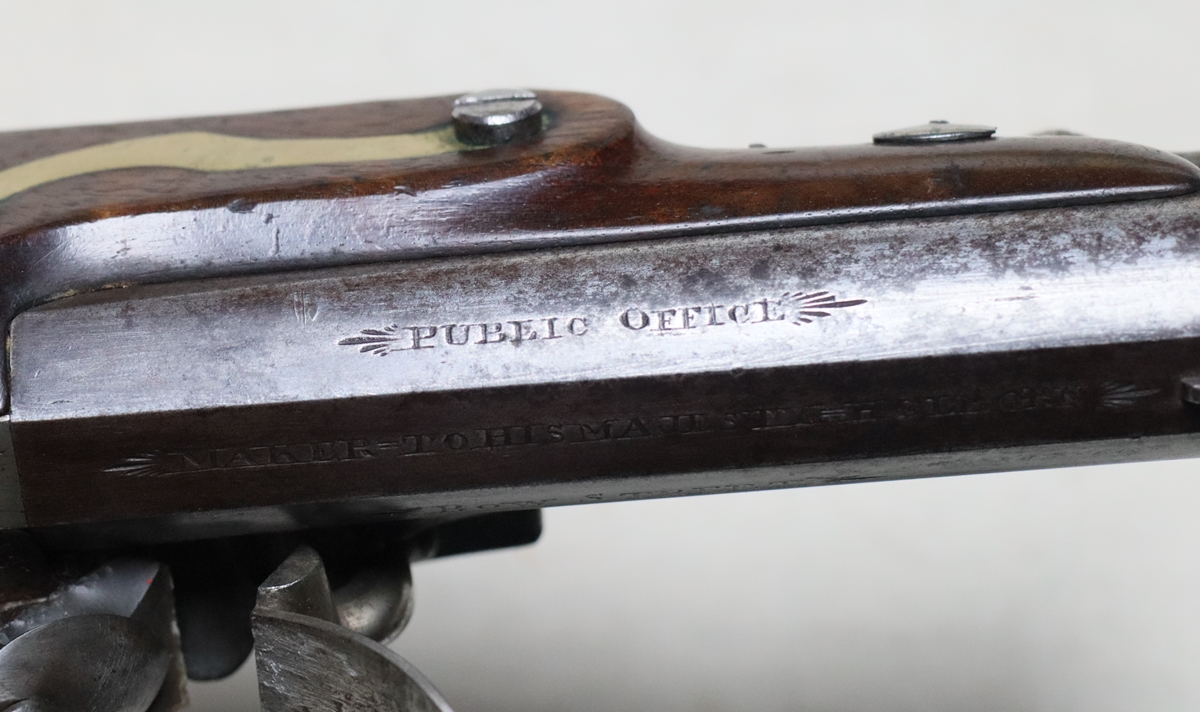
Not only are they very rare – possibly among the 50 pairs that were ordered from Parker in 1829 for the police – See Frederick Wilkinson’s book ‘Those Entrusted with Arms’
– but they are also almost unused – they are numbered 3 and 16 on the brass trigger guard, but I guess they were not issued.
26th November – first an apology – the buyer’s premium on Bonhams is, unfortunately not 20% but 25 or 27 1/2 we couldn’t decide – the figure in the current catalogue is wrong! – but don’t let that stop you buying the Egg for my Chrismas present! Just back from another excellent shoot a Woodhall – possibly the last as its not clear they are continuing next year. Jobs come in thick and fast and another couple of email queries today…. I used my little single barrelled Nock today – a bit frustrating not having a second barrel although not having to make the decision as to whether to reload immediately after the first shot, or wait and discharge the second barrel before reloading is a compensation. My great ‘discovery’ of the day concerns the disposable hand warming heater pads – I bought a packet of toe warmers to see what they were, and opened them on the shoot to put in my pocket, where of course they get lovely and warm but don’t do anything useful. Standing in the light rain my hand began to get a bit cold holding the gun at the wrist, so I got out the ‘toe warmer’ and had a look at it – it turned out to have a self adhesive back, presumably to stick to the sole of your boot – anyway I decided to stick it on the wrist of my gun so that I was holding it by the heating pad – I have to say that the pads don’t give out much heat when exposed and in contact with the gun, but it was definitely better than holding a cold gun!
25th November – a day of disasters – just found my MOT had expired yesterday and my garage hadn’t reminded me although 6 weeks ago the said they would…. bother. And then discovered that the last yacht charter company on the NW coast of Scotland is closing – it is the one we used last year – the one we used this year also closed – so now nothing on the west coast North of Oban – it’s enough to drive one to drink! Now what do we do to escape? I think we had a bit of a reputation for going to some pretty obscure anchorages – your average charterer sticks to the well beaten tracks. I was showing a friend the Dolep pistol of about 1710 that I just finished restoring (see below) and he wondered about firing it – the client had wanted me to ensure that it worked/flashed properly so I put a bit of fine priming in the pan and fired it off – went well. Then I remembered that a well set up flintlock was supposed to be able to fire upside down – i.e the powder ignites before falling out of reach of the touch hole. Given that it’s an established fact that the flash travels faster than the flame front through powder, you don’t need a solid powder trail between pan and touch hole, so it should work. Anyway we flashed off the pistol upside down a couple of times and the flash seemed to originate from the immediate vicinity of the pan, so I think we would have been able to fire it. I will try with my John Manton double flintlock some time for real! In trying the Dolep I found that the full cock notch was only just engaging – a quick check showed there was no play in the trigger, so the sear arm is too low – a quick adjustment in the vice with a pair of pliers added maybe 1/2 or 3/4 mm clearance that was enough to put it right. I’m shooting tomorrow – since my 14 bore Venables is out of commission I’m using the 16 bore single Henry Nock – that unfortunately means changing over my wads and overshot cards! I still like to have wads, although I’m trying to wean myself onto a diet of semolina – I remember semolina puddings from my childhood, without, it has to be said, any great joy, although the splodge of jam was good! We don’t add jam when shooting.
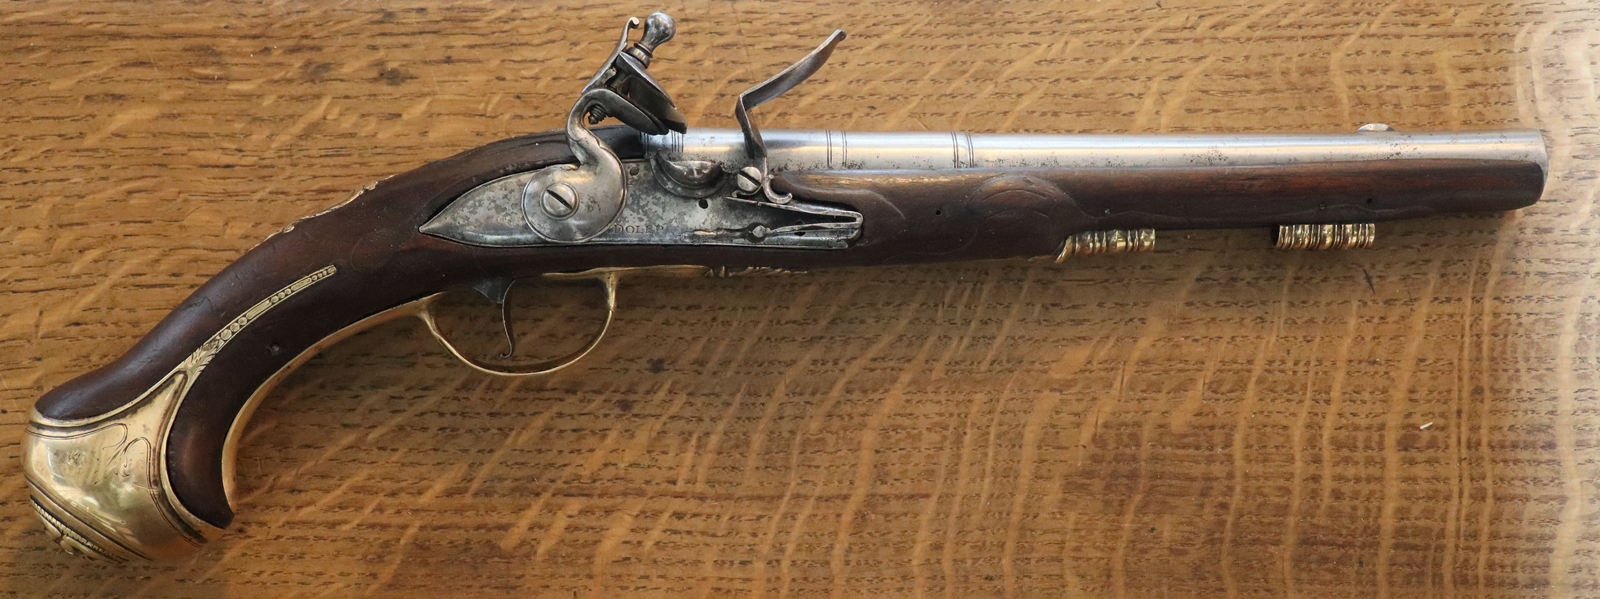
The Dolep – a fine early pistol now working beautifully, and sparking up a treat.
24 th November – Just back from London and the viewing for the Bonhams sale on Wednesday. There was a fair bit of interesting stuff, but it was catalogued all over the place as it was from named collections and I got confused finding stuff – plus there was a vast collection of swords and military bits and pieces that will take up half the sale day – guns don’t begin until 2 p.m. and they will have to motor on to get finished in a reasonable time! I’m not going to splash the few things I might be after, but there were lots of things I covet that I can tell you about! Lot 331 was a nice turnover 18 bore flintlock by Bunney from around 1775 in nice condition if you have a spare 8 – 10K kicking about. I don’t think I’d get interested in lot 389 – a cased pair of pistols that are catalogued as ‘inscribed D.Egg ‘ Auctioneers are very careful of their language and if it doesn’t say ‘by D Egg’ then they are not sure. This pair have had the barrels rebrowned and as the catalogue says ‘inscribed D.Egg London’ – with my eyeglass I can clearly see that the barrel inscription is recut as part of the rebrowning, and the (competent script) engraving on the lock is clearly done after most of the corrosion occurred. None of that proves the pistols were NOT made by Egg, indeed the butts are properly chequered in his style with 4 dots within each large diamond and the rest COULD be his – its just that the restorer has removed any chance of establishing their true maker. One pair I’d like to own were I ridiculously rich were Lot 392 – 15 bore ‘queen Anne’ style superimposed load pistols with turn off barrels – they were exceedingly clever in that the rear powder chamber had a post sticking up so that when the front charge fired, the back ball was forced onto the post, which expanded the ball to a tight fit in the bore and prevented the combustion creeping past into the first powder charge. This effectively trumped Thouverin’s patent by 150 years! And only 12 – 15 K – a snip…. I’m always a bit surprised at the price put on Queen Anne pistols, but I suppose they are early and not as common as the later big hefty full stocked pistols. They did represent a major advance at the time, as it was possible to have a ball that was forced into the barrel by the charge, which had the dual advantage that it would take rifling and let the charge build up pressure before it started moving, thus effectively giving a longer burn time, so emulating a longer barrel – plus the tight fit meant that they could be carried around without fear of loosing the load through shaking – altogether a ‘good idea’ – maybe I should get a pair – Lot 515 is a pair of double turnoff pistols in the Queen Anne style with single triggers by Barbar circa 1740 at 4 – 5K, or Lot 516 – a brass barrelled pair by Harvey est 4.5-5.5K. There were a lot of guns and pistols by the Smiths using their ‘imperial’ caps including 3 guns in a single case. About the worst sin I saw was lot 332, an Adams 5 shot revolving rifle that had been horribly over refinished – I would have been interested but what a disaster – I suppose its possible to unrefinish a gun but I’d prefer not to own it in the first place – will be interesting to see just how the room copes with it – I’m usually more squeamish about these things than most people! A beautiful & unusual pair of 1710 Clarkson silver mounted horse pistols caught my eye – Lot 517 est. 5 – 7.5K, as did a splendid 25 bore double flintlock Covet gun by Egg, probably built for the Prince Regent (Lot 496 est 5 – 7 K..) Top lot was of course the last lot as always – just to keep people in the room – a pair of elaborately inlaid d/b pistols by John Manton for an Indian potentate – estimate a trifling 35 – 45K – well who can resist? I checked over all the Adams revolvers and derivatives, but one or two were possible, I’d only be interested if they didn’t make the reserve. As always if you subtract the price of all the accessories and the case, you get to the real value of the gun itself, Sometimes this turns out to be a bargain, sometimes not. What of the stuff at the cheap end of the market? There are a number of pistols at around 250 bottom estimate, but most I couldn’t get very excited about – I might pick up one for the blog, but I’ll have to be careful to remember which ones are passable! I’ll regret not having made better notes in my catalogue. If I had a fairy godmother offering me a Christmas wish and I wasn’t concerned about the value, I’d settle for the Egg covert gun – lot 517 so if you feel like buying me a Christmas present………. but don’t forget to allow for the buyer’s premium of 20% plus VAT at 20% of that.
2ch3rd November – Out to lunch and then a concert so no gun play! Tomorrow I’m off to London for the Bonhams sale viewing – nothing really grabs me but there are a few possibilities, and I like to keep an eye on the market and what is on offer and meet a few friends. There are several large collections around and most of the owners are getting on a bit – I don’t see the younger collectors in great numbers, and I’m not sure what will happen to the market longer term – I think America will mop up a fair bit, but our own political uncertainty casts a bit of a shadow – could be good or bad for antique firearms, who knows? I’d probably rather have gold bars under the bed than antiques of any sort – sad to say I don’t have much of value either way. On Tuesday I have another shoot at Woodhall – since the barrel of my Venables is adrift I’ll use my little single barreled Henry Nock – I’ll have to put a bit more packing in the Irish shot belt scoop as it currently throws 1.1 oz which might be considered a bit much for a 16 bore weighing just 5 1/4 lbs – I’ll try to get it neared 15/16ths oz and use 2 1/2 drams of Czech powder. I’ll use semolina again as I can’t fault it. I found that my super card dispenser will work equally well for 13,14 and 16 bore cards so that will be in use. My hope that the Russian abuse would stop as unfounded, so I have emailed the abuse address with a printout of the screen showing multiple attacks. we shall see what transpires.
22nd November (2) – Shouldn’t get too excited but my Russian pest seems to have been stopped – fingers crossed – I must go after the rest! Thought I’d nip into the workshop for a bit of recreation – in this case recreating the cock screws for the little d/b pistol – one of my favourite jobs. I managed to get away with No 4 UNF for both the one I tapped out and the original one, which saved a bit of time. I haven’t coloured them down yet, but will do when I sort out the finish on the cocks etc….
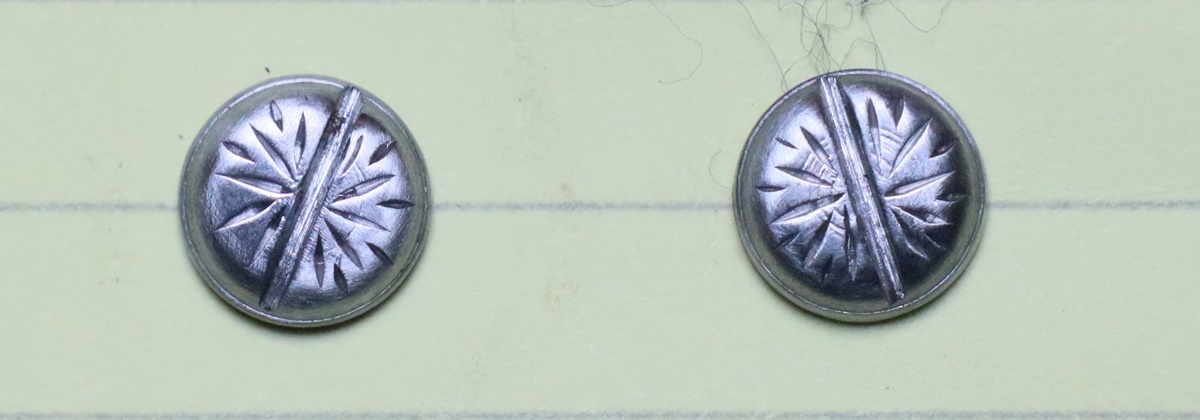
I like the ‘bowler hat’ shaped screws! this is about the most basic engraving – but right for the pistols. They have been polished off on the fibre wheel after engraving to make them look less new.
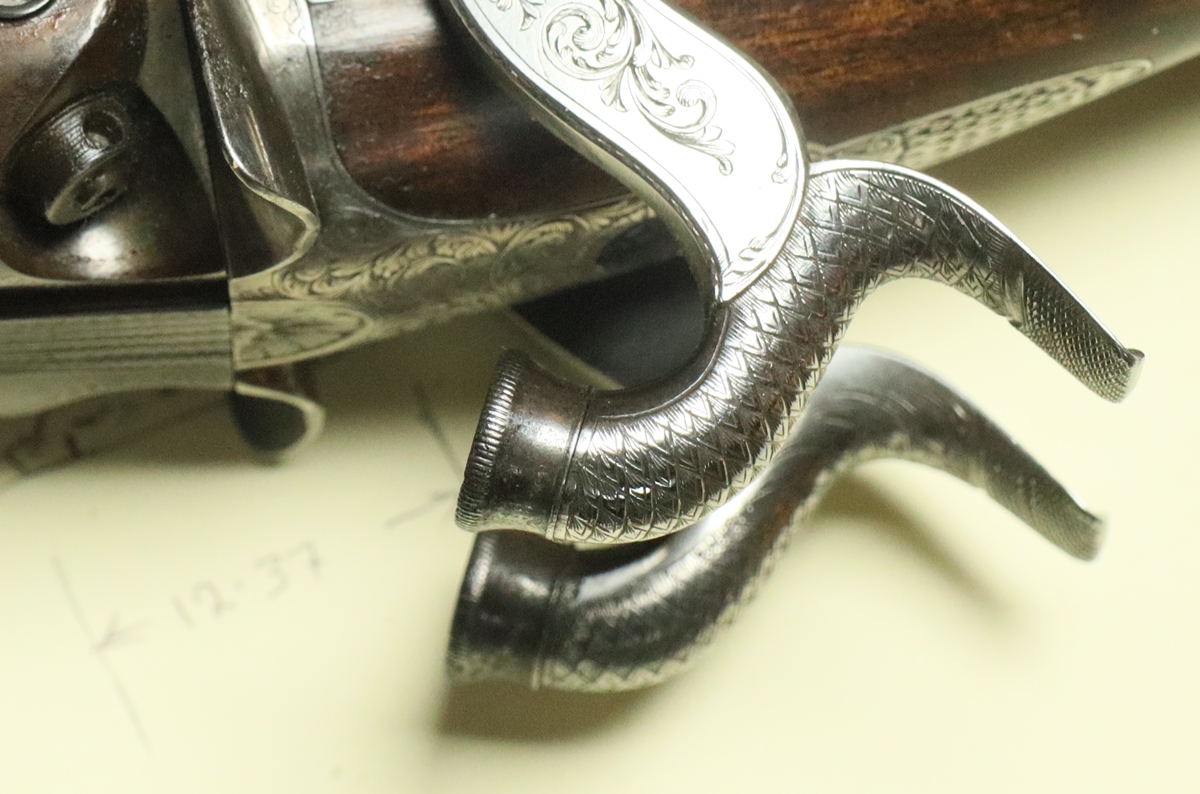
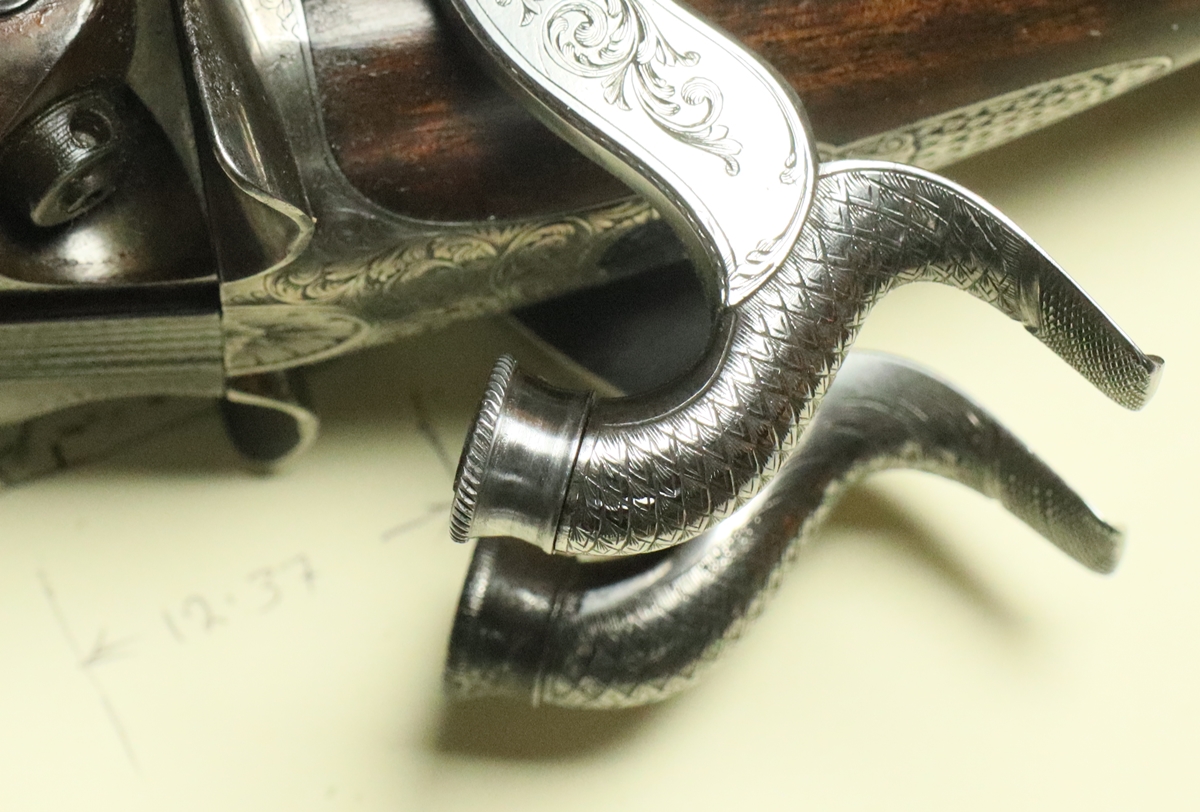
22nd November – This website attracts a number of nutters who set up requests for a particular page that then keep repeating and clogging up the internet – I have one such attack that comes from several different IP addresses in Russia but always tries to download a particular page – after there had been about 26000 requests for that slightly obscure page I blocked the IP addresses, which means they just get back a message saying they are blocked, but attempts continued at a rate of about 200 a day – obviously automated! It just wastes the internet and the resources that it uses – loads of electricity – plus is just a nuisance to everyone. Anyway I have now complained to their IP service provider and they have told the user to desist – we will see if the abuse stops in the next 24 hours. Should have done it ages ago cbut it takes time to monitor what is going on behind the scenes with this blog! For a bit while it is in my mind I’ll go after a few of the other abusers! I’m now going to attempt to reshape the cock of the little pistol…. watch this space!……………….. Its a tense game cutting and re-welding a cock – if you do make a success of the tricky job it just looks as it should have looked all along and no-one notices, if you screw up then it is obvious! Anyway I took a hacksaw to the nose of the cock, wedged it into position with Plasticine and tacked it with the TIG welder – then took it apart and did it again as it wasn’t right – but on the third attempt it was aligned as well as it could be, so I filed out the joint between the two bits, leaving the tack, and welded it as deeply as I could, then filed out the tack and re-welded that – not too bad. The cock was curved inwards a bit at the top, so got the top of the main part red hot and gently bent it outwards by maybe 3 degrees. That was better, but now the spur on the welded cock didn’t line up with the other cock, so another hot bend and its pretty good. It doesn’t go as far down on the nipple as the other side as this cock has a shallower hollow – if my miller was working I might take a bit out, but as you’ll see from the photos it’s a decent improvement. Next job is to get the cock squares sorted, but I need the miller for that……

Cock mouth edge rests on nipple.
The cock is right down on the nipple – it just has a shallow depression. Both cocks are in place so they obviously match reasonably!
21st November – Went to Dicks to show him the pistol I’d been working on – a nice 1760s pistol by Dolep – its almost finished and looking very nice – wish it was mine. We had a look at the two cocks of the little double barreled pistol so see where I could cut the one that doesn’t fit so it could be welded – we discussed for a long time but I couldn’t really see the best place – nothing really works exactly without at least 2 cuts and I don’t want to end up with three bits to weld together. I remembered a friend who is involved in robotic orthopedic surgery and thought I ought to make models of the bits and try them – well at least cut out bits of paper and shuffle them around – think I got something that might work! We’ll see.
Current panic is that I’ve just sold a Spitfire Gun Camera on ebay and now I can’t find it! Oh bother – I know it was on my bench a few months ago as I was trying to see if the motor would still run! Its one of those things that you know will come to you in a revelation after you’ve spent hours and hours searching in totally unlikely places! Apart from that, nothing else, as some child put at the end of an essay.
21st Not sure where yesterday went! I had another go with the semolina yesterday using equal volumes of powder,shot and semolina as that is the recipe that several of my friends use. I used the contents of the handwarmer as a substitute for powder to save having to dispose of a mix of powder and semolina – I got rid of the last lot by throwing it all in a csmall container of water, which I then left on the bench – I have never seen such a splendid crop of mould growing on the top of the liquid – I remember asking someone how to dispose of some unwanted gunpowder and they said ‘put it on the garden, its an ideal fertiliser’, so I now believe them. Anyway I did the same experiment as in the video but with No 6 shot and got more or less exactly the same result as with 7 1/2 shot – most of the shot buried itself in the semlina, around 1/4 was left on top, the furthest shot penetration came within about 6 mm of the powder. I did another video, but its so similar I won’t put it on Youtube to clutter up the planet further. I had a call from Nick the other day and we discussed his little double barreled pistol that I was going to sort out – problems were;- cock screw sheared, cocks not indexed on squares properly (obviously modern replacements straight out of the box) and left cock doesn’t register on the nipple properly. So I thought it was time to do something about the pistol….. I had tried to drill the broken cock screw from the tumbler but the bit of the screw seemed to be dead hard and I couldn’t drill it – so stripped the lock and heated the tumbler to dull red and cooled it slowly to anneal it, then drilled out the screw – fortunately it drilled fairly centrally and I put a UNF No 4 tap into the hole – the taper tap didn’t do anything, but I was able to make a good thread (all 5 turns of it) with the plug. So just need to turn up a new cock screw – it probably needs a matching one on the left too. I have ‘walked around’ the job of the ill fitting cock and the misaligned squares, but now I probably ought to do something – the nose of one cock is too long and almost missed the nipple, the other is OK. Both need ‘re-squaring. My preferred technique for resquaring when I’m not dealing with original cocks is to drop an end mill through the square to just take it out, then cut from the back of the cock with an end mill that is a bit bigger than the across flat dimension of the square leaving a 1mm skin on the outside, then turn up a disc to fit the cavity with a hole through the middle a bit less than the AF dimension of the square as a start for the new square. The disc is then silver soldered into the cock and the square cut as usual The advantage of this method is that you can reheat and adjust until the cock position is perfect. I’ll post progress on that as I do it, but it will have to wait till I manage to get a new speed controller for my little miller – I ordered one from ebay but it blew the house electrics wtith a dead short and I haven’t had any satisfaction from the seller, so I’ve ordered another different one……. The job of reshaping the cock is more of a mess – I’ll have to take the angle grinder to cut off the nose, and either re-weld it myself or take it to Jason…………………………. Oh, and as a quiet relaxation I copied some 17th century gun engraving – not perfect as I got it out of rather poor photos in books.
Mismatched cocks!
Quick and dirty copies out of Keith Neil and Back Great British Gunmakers Dafte is 1690. Unsigned is from a musket.
19th November – On the shoot on Saturday Pete gave me a disposable handwarmer – a small bag of powder that you took out of a sealed plastic bag to activate, after which it heated up most effectively, so standing in a field waiting for action I tried to work out what was in the bag and how it heated for the whole day. It had to be oxygen activated, i.e an oxidation reaction and the only one I could think of that worked that slowly and controllably was rusting of iron, so the next day I cut open the now cold bag and applied a magnet – voila it picked up bits. I later checked on Wikipedia to find if I was right – the ingredients turn out to be finely divided iron, something to hold water, like vermiculite, salt to start the reaction, and sometimes a platinum catalyst – so we spend our time trying to stop rust, but use rusting to warm our hands! I must say that they were a lot more effective than the lighter fuel powered ones, and much much better than the charcoal ones that it is almost impossible to keep alight. I have ordered up a batch – around 70p each – you can even get ones to put in your boots. A small miracle…. I had a small engraving job for Dick – he is restoring a French pistol with silver mounts and a brass lock that was in derelict condition- interesting because apart from a lot more carving on the woodwork it was almost identical to a Dolep pistol made in England – you could almost have swapped the locks over with very little adjuctment, and the touchholes lined up perfectly. Anyway he had replaced the buttcap with a casting from Blackleys and wanted it engraved to match the standard English pattern, which I did.;-
It still needs the casting sprue cut off and possibly a cover plate made?
18th November – I’m still trying to emulate the small scale scrollwork on the Purdey lock – I don’t get cuts that look the same, and also there is a perception problem – I normally do scrollwork and other engraving where the cuts are the thing you focus on, and which define the pattern, but with the Purdey scrolls its the remaining metal that makes the pattern, not the cuts – it may sound like splitting hairs but it is a real difference – in its extreme form I don’t get confused – say a rose left standing in a cutout background, but as the two styles converge its not so clear. Looking as a spectator at the finished engraving you just see the intended pattern and are not aware of the mechanics – but when you try to engrave it, its difficult to force yourself to see the pattern in the metal that is left rather than the cuts you make. Anyway, I’ll struggle on!
17th I was showing someone the little Post Office pistol by Harding and Son and they noticed that the lock wasnt fitting completely – a bit of investigation showed that the spring needed a bit ground off to clear the barrel. In removing the spring I sheared off the peg that goes in the lockplate, I had had to weld on a new peg as it was originally in the wrong place due to an error in manufacture. Anyway from the fracture surface it was clear that the weld hadn’t fused onto the spring properly – in fact hardly at all. Anyway I remembered I’d actually made a spare spring – no sure why – so was able to put it in and off we go. One disaster down. The big disaster came with my Venables when I came to clean it after yesterdays shoot near Beccles – a fine shoot with lots of pheasants and partridges – we were ‘double pegging’ so things go a bit quicker as there is less need to hold up the beating line to allow reloading. I took off the barrel and did the usual wet clean with boiling water and put it on the bench to take out the nipples etc and noticed that it was missing the block under the barrel that takes the through bolt to hold the barrel in place on the stock – I found the missing bit in the water! Its all part of the sad saga of trying to resolder the ribs- I resoldered it all from a stripped state, but the top rib didn’t go down well – I hadn’t filed off enough metal to make it fit – someone had previously filed it a series of waves. anyway I tried to resolder the top rib without doing the whole job again – the top rib went down perfectly, but in the process managed to partially unsolder the bottom rib, which I hadn’t wedged on securely. So there is now no option but to strip the barrels down and redo the whole job – I WILL get the hang of resoldering barrels! Talking to Bev about that particular job we both said that the first one we did (mine was the Perrins) was OK but thereafter we only manage to get it right in about 1 in 4 tries! The Venables is a good quality gun and fits me well – I got it cheap at Holts because the top rib was a mess, but I really want it to be perfect so I can make a case for it with my splendid card dispenser – someone at the shoot suggested I sell them to Purdeys to include with the new muzzle loaders they are threatening to build. I had one hiccough with it on the shoot – when the cards are used, the spring tension reduces and the bayonett cap is no longer as secure as it should be, since it relies on the spring to hold. Since it holds over 100 cards I reckon it doesn’t need to be opened in the field so I’ve put in a small and inconspicuaous grub screw to lock the top on. Anyway it dispensed cards perfectly – thin cards 2 at a time, and thicker ones singly – I might make the next one adjustable for card thickness.
16th November – I didn’t really get going today! So no great thought to share – or even scrappy ones I’m afraid. I did decide that the stove in the living room had to change from wood to coal so it would actually heat the house 24 hours – immediately noticeable improvement in comfort. I was trying to imitate the Purdey engraving of yesterday but I couldn’t get the hand movements right – I think my mild steel is a little too soft for such fine work and the graver seems to plough deep – I might try on a bit of EN 8 with a bit of carbon and see if it is any better. I tried to resharpen my fine graver to make the heels very short to reduce the ploughing round corners, and it did improve it a bit, but not enough – its annoying, because although I don’t particularly like that style of engraving I’d like to be able to reproduce it better. Anyway I think I had better creep off to bed rather than do my usual 12:30 bed time as I have to be up at about 5 to get to the shoot breakfast tomorrow.
15th November – I get a steady correspondence from this blog – several emails a week – often asking for information about guns people own. One of the requests for information that comes up from time to time is about guns that the writer has inherited but they don’t know anything about guns – there is usually a photo attached, often blurred and difficult to make out. They are usually not guns that were on certificate, they are mostly repro pistols that someone has had without a certificate, and are usually functioning firearms – and if made after 1919 (?) should be on a Firearms Certificate as a Section 1 firearm – that, coupled with the fact that they are worth a lot less than the optimistic new owner was expecting it makes for disappointing news I have to deliver! What to do with them? I can’t advise that they are kept without a certificate, or sold without passing through a Registered Firearms Dealer – it is in fact illegal to have them in your possession without a certificate – strictly an offense carrying a mandatory prison sentence for possession of an unlicensed firearm. They can be surrendered to the Police as a last resort, or to a Registered Firearms Dealer, and one or two auctioneers who are registered to deal in firearms may take them and put them in their auction. (e.g. Holts, or Southams who do sell repros.) What you can’t do is put them up for sale on ebay! All of which got me thinking of what happens when a gun owner/collector dies and his descendents are left with a pile of guns that may or may not be legal inert reproductions, antiques, on certificates -section 1 or section 2, or worse, section 7 or strictly illegally owned repros that are functioning firearms. Its obvious from the emails that I get that people are searching for information and not finding anything useful apart from my blog. So I’m contemplating putting up a post with advice, and possibly a draft letter/form to be given to next of kin by gun owners that sets out what they have and what to do with everything. We shall see if thought gives way to action on my part! On the engraving side, here is a photo of the Purdey lock I touched up the tail of – if you click on teh photo you can just see a line of brazing across the tail where all the engraving had been filed off to level the two sides. In the blow-up of a different part you can see how crude the basic cuts are – its all done very quickly and almost automatically!

14th November – Now finished 3 of the jobs on my client list – a couple to go, both jobs that I’m waiting for inspiration for! One is a little double pistol that has one cock that is a bit of a misfit and I can’t decide if I’ll go at it with a grinder and welder or wait for inspiration, the other is a gun that has had a plain and very pedestrian lock fitted that needs it to be engraved, but again I can’t think what is the right thing to do – fortunately both clients are prepared to wait til inspiration comes! The yr 3/4 ( 7/8/9) teacher came into my STEM club on Monday and asked what she needed for the children to make those ‘games’ that require you to move a loop along a twisty wire without setting off the buzzer – she needed 12 sets for her class of 36. It soon became obvious that it would be easier for me to get/make all the parts and set it all up, – oh and which day would it be best for me to come in and ‘help’? So I have been buying 3.2 mm aluminium welding rod as it should make the perfect shapes – you will be surprised how long it took me to find a supply in 1m lengths – most are 330mm. Plus all the other bits (there are lots when you work it out) so that totally unskilled small children can produce a working puzzle in less than 2 hours. And today I got a text asking if I had a breastplate (as in armour) that I could lend for something or other! I didn’t realise when I volunteered to be a school governor just what was involved, particularly in the ‘props’ department. Next term the yr 5/6 s are doing the book ‘The Highwayman’ so that will mean taking in a couple of flintlocks and staging a highway robbery while wearing a tricorn hat and a cloak – no horse though. I carelessly suggested that it would be fun if the yr 3/4s did a Dragon’s Den activity around some project – I did one at another school that went down very well – so I think muggins here has talked himself into helping/setting another one up … – plus I still end up having to do the ‘serious’ governor stuff like checking up on all the catagories of children that need special attention in class (my particular responsibility) and the science teaching and attending boring meetings……… I’ve been doing a bit of engraving practice recently – I have a pile of perfect mild steel test plates waiting to be engraved, so I think I’ll try to capture a range of 19th century patterns. I had a lock with a bit of missing engraving in the Purdy small scroll style, and I did manage to fill in the gap but the range of patterns I can do freehand and without thinking too hard is limited, and if I’m not careful things tend to drift back to a familiar pattern, so I need to do some serious practice. I can see why there were a relatively limited range of patterns, and why it appears that each engraver had a distinct style. I was quite shocked recently to find a copper bangle that I engraved about 60 years ago (when copper bangels were a thing) that had scroll engraving of the basic pattern I revert to now, despite the fact that I didn’t touch a graver for 50 of the intervening years!
Diary 13th November – Finished the horn fore-end tip today. I is quite a complex shape as it has to fit round the end of the ramrod pipe and also accommodate the back end of the rib, but it wasn’t as bad a job as I expected and its now finished – I discovered a couple of small defects in the horn that show up as pale marks, they were not obvious when I started, but until you polish the horn it all looks grey anyway. I don’t think the marks will affect the strength and they only show if you look for them, so I’m happy to leave them – especially as the alternative is to start again! I managed to fair in the horn with just a little removal of the surface finish of the wood next to the joint, but a touch of colour and some slakum and it is back to where it was. Job done. I got an email with another job today – re-cutting a bit of engraving. I failed to notice that the Birmingham Arms fair is next Sunday – I would normally go but I am shooting on Saturday – leaving home at 5:45 to get there for breakfast, so I don’t fancy spending most of Sunday driving to and from Birmingham – anyway I keep telling myself that I’m trying to get rid of guns, not acquire more! I have had a look at the Bonhams catalogue and will probably view on Sunday 27th and go up for the sale – I just like the atmosphere, and there are one or two lots I might be interested in. There is a whole collection’s worth of cased Adams pattern 1854 revolvers and derivatives, but not the one I’m looking for – I nearly bought a ‘mint’ one at Birmingham but was put off by a perfect finish but rounded arises to the engraving – I always carry a hand lens and use it! Of course the vendor swore it was the original finish, and maybe he was right, but its my money! I keep looking at the field articles but its mostly a bit breech loader specific – did see one interesting article on cartridges, showing that both the wads, top cards and cases and primers affect both the velocity and the patterning even if the powder and shot loads are identical – the differences are quite marked – sometimes half as many shot in the 30 inch circle at 40 yds with the ‘worst’ combination.
I haven’t taken out the dings in the wood – its a working gun and will only get more!
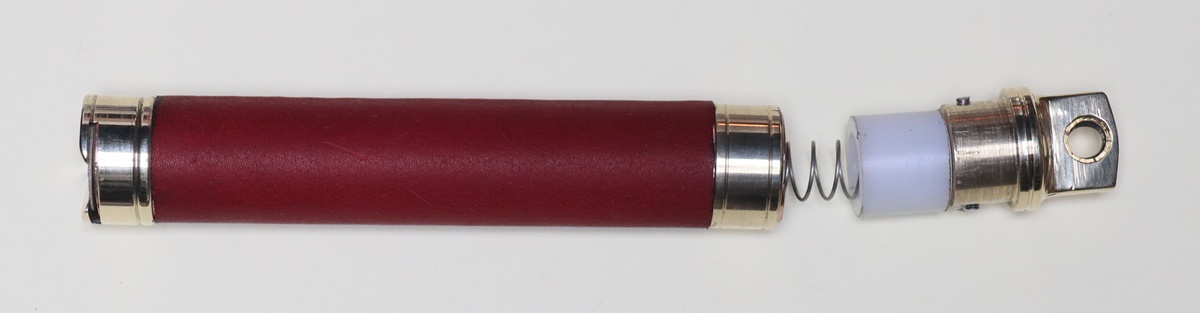
12th November – Went over to see Dick and look at some guns a client wanted sold – he buys stuff unseen at auction and passes it to Dick to restore and sell, but frankly he usually gets some pretty junky stuff and I’m sure he looses money on most of it! Which is a good opportunity to think about what is happening to the prices of antique firearms – although it is not a very encouraging situation for people sitting on a fair sized collection – it seems to me that over the last few years the market for and price of anything that isn’t of good quality in decent condition has dropped quite dramatically – and anything in the ‘junk’ or ‘in need of restoration’catagory even more so. One possible exception is guns fit for sporting shooting or rifle competitions. I’d like to think that cased revolvers of the 1850s are OK but when you add in the value of cases and accessories they are probably not commanding as high a price as a few years ago unless in very fine condition. Anyway I had a look at the guns Dick has on offer, and didn’t feel even slightly tempted at any price. I finished my 14 bore card dispenser today – I made the top for it and put a bayonnet fitting for removing it, and then made a leather sleeve to smarten it all up. If I was doing it again I would make the end pieces out of a larger brass rod so that it overlapped the leather – anyway it looks smart and complements my red leather covered shampoo bottle shot flask. Dick suggested I should sell them, but when I pointed out that I’d have to charge around £150 – 200 each he could see that this wasn’t going to make my fortune! I’m afraid nothing today on the ‘Field’ articles…………….

11th November – In school this afternoon with my STEM club – its lovely watching a dozen children aged 7 to 10 just making things. The consumption of glue sticks for the cool glue gun is impressive, I think they got through 12 today, and the bench tops I made to protect the classroom tables get heavy use. I must make another saw out of a 12 inch hacksaw blade cut down with a dowel handle and a bit of big heat shrink tube. I sorted out the electrical supplies so they can make simple circuits – 9V batteries, buzzers, LEDs and switches. My ‘job’ seems to be to supply a steady stream of interesting materials and offer a bit of help and encouragement where needed. A bit more work in odd moments on the horn foreend tip – all filed by hand at the moment using a couple of those old fashioned files that are tapered half round with included flat handles – if it were a bit warmer in the woodwork shed I’d go and use the disk sander for the outside shape – a bit more and I’ll have to Araldite it onto the stock as its getting too small and fragile to hold reliably. My ‘Field’ contribution today is the proof rules from 1806 for guns of the fourth class (d/b muzzle loaders without chokes). For a 14 bore the provisional proof (V) the load was 11 1/4 drams of black powder and a ball that was an easy fit in the barrel (hence no choke!) – probably a little over 1 oz and the definitive proof (CP) was 6 drams of powder and 1 1/2 oz of shot, with the service load defined as 3 drams and 1 1/8 oz. There was also a supplementary proof that was optional (?) using T.S.2 powder of 4 1/8 drams and 1 1/2 oz. – each proof cost 6d. except the supplementary T.S.2 proof that was 1s. 0d. Other gauge loads on a sliding scale – e.g. 8 bore provisional was 17 1/2 drams and the ball, definitive 9 7/8 drams and 2 5/12 oz. for a service load of 4 15/16 drams and 1 13/16 oz. Interesting that the powder loads were quite hefty but the ball/shot loads were very little more than the service load. – they were obviously all calculated according to some formula based on the bore size and then reduced to spuriously precise fractions! I’m not sure of the significance of the supplementary proof, unless T.S. 2 was more powerful than the ‘normal’ proof powder. – I seem to remember from my visit to the proof house in London that they now use T.S.2 for all proofs of black powder guns.

Its beginning to get a bit fragile and difficult to hold, so soon need to be worked on in situ.
10th November – Bit of gun work today as a relaxation! I bought back a friend’s Jo Manton single barrelled sporting gun from my shoot on Thursday that had the horn fore-end cap missing – – but a broken half was salvaged. So my first action is to place the gun in context – so; its a conversion from flint, the number under the barrel is 1589, which the Manton book gives as a double gun that may not be by Manton as the signing is odd. That number belongs to about 1801, which looks right for the lock engraving on this gun, the engraving probably dates from about 1795 to 1805 . There are no numbers on the inside of the locks – that is also right for that period. The barrel is unsigned, which is a bit unusual for Jo Manton but has it been struck off? And there is no poincon so not a classy gun! The stock is OK for 1801, except it has probably been chequered since then. Anyway it looks like a genuine Manton. When faced with a broken part – in this case the horn fore-end, the first question is why did it break off after sitting there for 218 years and a bit of shooting? Clue, the fore-end pipe is a bit loose. On taking off the barrel its clear that there is a split down the middle of the fore-end through the hole for the pipe lug, about 2 1/2 inches long – obviously the split was too much for the horn and it broke and as it was only held on by animal glue it flew off. So first job is to glue the split up with runny epoxy – work the joint to get it in, then a quick binding with self amalgamating tape. Replacing bits like the horn on old guns is tricky – more so than when it was made, as then a part finished horn would be glued on and shaped along with the finish shaping of the stock. I’ll make the new fore end cap from water buffalo horn ( buy on ebay for dog chews!) and glue it in place with epoxy leaving a bit of finishing to do. A tough layer of tape round the wood will give some protection while its rough shaped, then I’ll have to remove the tape and finally shape it and probably have to refinish the wood locally afterwards. I got a bar of 1 inch brass to make my 14 Bore overshot card dispenser, and found that I could use a piece of 22 mm copper water pipe for the body. Anyway I turned up the brass dispenser end and filed the necessary slots etc. and it now looks as if it will work – still to come are the spring and top cap. One of the ‘gang’ suggested it would be very cold to use on a chilly shoot, so I might make a nice leather sleeve for it! On the ‘Field’ puzzles, looking at the tables I put up on 4th Nov, one might expect a difference in flight time to 40 yards between 5 & 6 shot to be 4.2 mSec and between 6 and 7 to be 6.6 mSec. – this equates to a separation of approximately 3.6 ft and 5.5 ft respective – the difference is due to the greater falloff in speed of the smaller shot sizes. Both effects would be significant compared to the normal shot string length of around 7 ft. so using mixed shot might be noticeable, particularly if shooting in front! Is this Bev’s secret weapon?
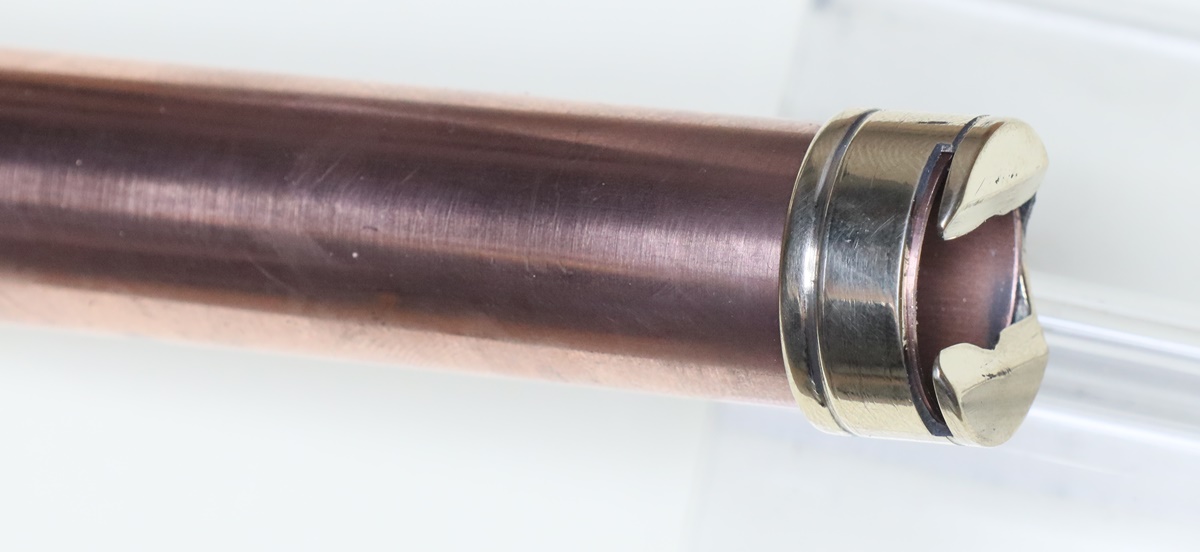
This will work for 14 and 13 bore cards, I hope, not sure about 16 bore. ( not yet finished)
Lock border is right for very late C18 or very early C19 so OK for 1801.
This split broke the horn tip. Still it is over 200 years old!

Never be without self amalgamating / self vulcanising tape!
9th November – Very pleasant shoot today – some good drives after a few barren ones, but that is how the cookie crumbles. My browsing of the ‘Field’ articles and discussions led me to think about the consequences of swinging the gun. A common misconception concerns the idea that swinging while shooting is like playing a hose or firing a machine gun – i’e’ that there will be some sort of sweep of shot. In fact this doesn’t happen as the shot all exits the barrel still in a tight column in a small fraction of a millisecond. There is a Youtube video of a shot fired into water while swinging madly that shows that the pattern is broadly similar to a normal stationary gun pattern. I tried to do some calculations of how much the end of the barrel moves during the time the shot is traversing the barrel – which I take to be around 5 mSec (based on ‘Field’ data – but I need to check that again) . Assuming the pivot for the gun is the shooter’s shoulder and it is 4.5 ft to the muzzle and you are swinging at a bird crossing at 30 yds (90 ft) that is doing 50 mph (75 fps) as a fairly fast crosser with the wind behind it, then the muzzle is moving at (4.5/90 x 75 ) fps = 3.5 fps., so in 5 msec. the muzzle swings just less than 1/4 of an inch. Most of that movement will occur during the initial phase of acceleration of the shot down the barrel, but nevertheless the shot against the ‘upwind’ side of the barrel HAS to follow a curved path, and will be deflected within the barrel, the question is how this affects the shot, not just that in contact with the upwind side of barrel – The Youtube evidence is that it all leaves the barrel as a single column going in the same direction but I don’t know what effect this might have on distortion of the shot or patterning – I would be surprised if the gun patterned the same for a fast swing as for a static shot, in particular it might affect the tail of the shot string more than the main forward part, but I would expect the difference to be small, possibly no more than variations between normal shots?. On another tack, Bev, who is a crack shot, makes his own shot and it is not particularly well sorted in size ( I’m being charitable here!) but it shoots perfectly and he seldom misses. This got me to wondering, based on the tables of fall off in velocity for different shot sizes ( smaller shot sizes fall off in velocity faster than larger sizes) if using mixed shot would increase the length of the shot string at range, and if this could be useful. I’ll try to do some calculations next time……..
8th November – Had my shoot yesterday at Woodhall – a very good day with some super drives and no rain! I was a bit worried as my gun lost its under rib – all but a small length at the muzzle. It’s been on the cards since I resoldered the barrels and didn’t hold the bottom rib in place well enough while I did the top rib – I relaid it, but in a less than perfect way this morning as I need to use the gun for my next shoots and I didn’t want to take the barrels apart and start over. As a point of interest you can just about get away with resoldering the bottom rib if you have it free and start at one end – but once its fixed in two places you can’t heat the bit between them without creating a bulge in the rib as it expands on heating. I had an email from a regular, Robin, who pointed out, re semolina,that the early Eley patent wired shot packets made to Jenour’s 1823 patent (Eley bought the patent) were packed in bone dust to avoid ‘balling’. I was aware that it had been used in that way, and in fact I do have a wired shot packet (probably not an Eley one as there is no maker’s name on it), presumably filled with bone dust under its paper wrapper – see photo. I do know several inveterate shooters who want their ashes disposed of’ in this way – Penny points out that cremation ashes have a higher density than bone dust (some people know some pretty obscure facts, don’t they?). The subject of balling is interesting in itself – Some experiment reported in the Field articles suggested that it was a common phenomenon, even for more or less normal loads although its not something I’ve heard happen nowadays – there was also much discussion of the merits of ‘soft’ or ‘chilled’ shot as a possible issue in ‘balling’ – one of the many such discussions. An afterthought re the bonedust – I did try with a friend making packets of shot to ease loading but it is almost impossible to force a packet of loose shot down a barrel without it locking up – maybe the bone dust actually made loading easier/possible? On the other hand my wired shot is quite distinctly tapered and is meant to be loaded small end down, and the small end is a loose fit in a 14 Gauge barrel – it gets tight about 10mm before it’s right into the barrel……..The excitement of keeping this blog up is that whatever I say, someone will have something interesting to add or correct- Bev said yesterday that my speed for pheasants of about 30 mph was too low, and it should be up to 43 mph, citing a Youtube video as evidence. That raises an interesting further discussion – the measurements made by the Victorians were done very carefully and with considerable precision and accuracy, particularly to indoors tunnel flights, and with a very high degree of consistency – likewise I’m sure that the modern measurements are as good and of greater accuracy. There are two realistic possibilities – either the Victorian birds were flying in such unnatural conditions or under such stress that they flew about 10 mph slower than free ranging birds, or that selective breeding for better sport has pushed up their flying speed by 10 mph. You pays your money and you takes your choice! Just don’t expect me to adjudicate. ……….. Oh and I’d like to excuse the birds I missed yesterday on the grounds that I was given incorrect information as to their speed………………………..
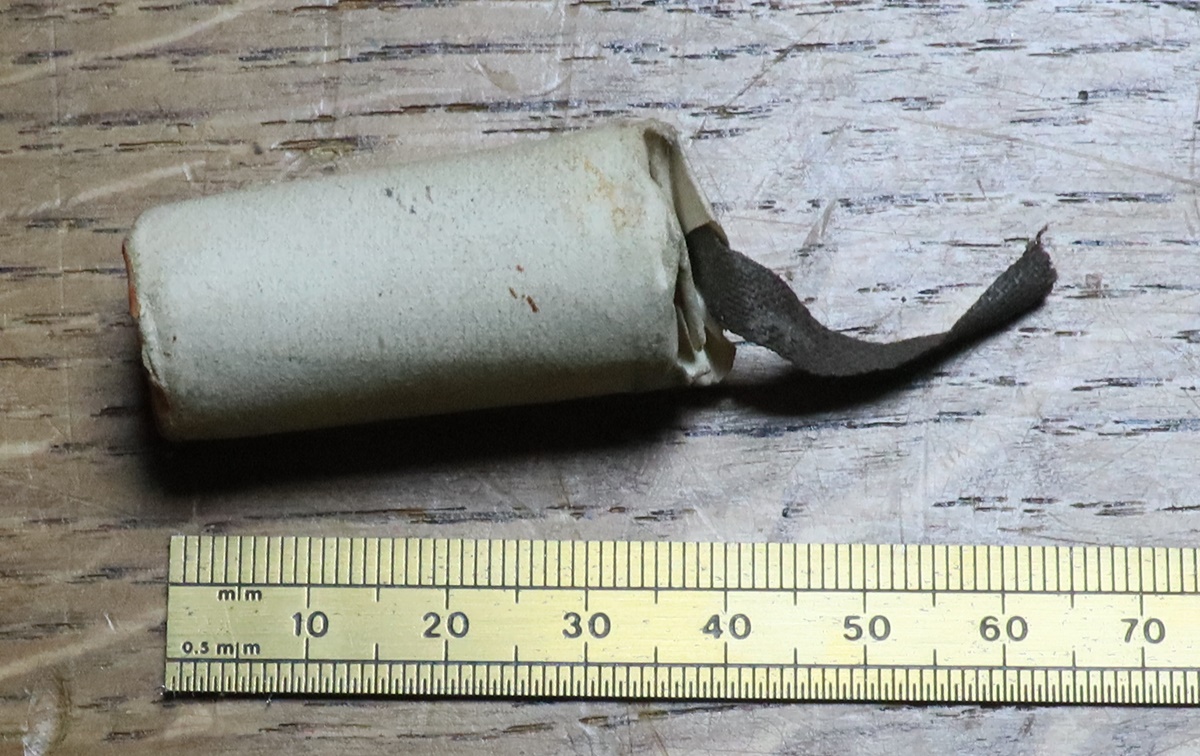
The package is tapered – the small end is labelled ‘bottom’ – presumably you use the tape to open the pack. But do you take the paper right off?
14 Gauge wired shot package – presumably packed in bone dust – overall weight is 1.48 oz.
6th November – In school fixing a guard on a classroom door to stop children’s fingers being trapped this morning (I am now the honorary unpaid caretaker it seems), Sam from year 3 kindly helped me – give the lad a house point, especially if he’s in Churchill House. Whenever I walk round school now I either get accused by small children of being a knight or told of something that is broken – today a leak in the classroom ceiling ( that is firmly above my paygrade)! To return to the Field articles and the crossing bird, I realised that the angle between the sight line and the bird necessary to get a hit in maintained lead is the same for all ranges, and it brought to mind something I vaguely remember seeing somewhere – a device on the end of the barrel with a sight on either side that gave you a scale to judge lead with – in our 30 mph bird the additional sights would need to be about 1 1/2 inches either side of the central sight – I have no idea if the whole thing is a figment of my imagination or has some basis! Combining the data on the length of a typical shot string at 30 yds (somewhere around 7 ft according to Field articles) with the crossing bird speed shows that the bird will travel about 1 foot forward during the passage of the shot string. This means that if the front part of the string just misses behind the bird hit will escape, whereas if the front part just misses in front it will likely be caught by the remainder of the shot string – effectively the shot pattern is effectively 12 inches wider if in front of the bird – given a typical shot pattern of say 3 ft at 30 yds from a cylinder bore you get an extra 30% lateral coverage in front! – seems illogical but that’s what the science says. That leaves one issue to be sorted in another blog – does swinging the gun ‘ spray the shot around’ ? Here the Victorians don’t have anything to offer so I will be on my own! Off tomorrow on a shoot I’ve organised down in Hertfordshire – should be fun now I have established that I can still (occasionally) hit things. It will be my first Semolina game shoot and I’ll be interested to see how it pans out if it rains, which it might. I have a tube for my loading rod that sticks in the ground – it has a container at the top for my powder flask and I’ve now added another for the Semolina flask. My next project is to make a card dispenser for my main shooting gun, the 14 Bore Venables – now pretending to be a live pigeon gun due to having lost its ramrod pipes on account of my poor soldering! Brass bar and tube are ordered……..Maybe a good subject for a video
5th November – I am continuing my reading of the Field articles from before 1900. There is an interesting letter concerning the convergence given to barrels in a double gun or rifle. We all know that they are ‘regulated’ to hit the same spot at the selected distance by being joined converging to the muzzle – but there was a active correspondence about why parallel barrels don’t hit the same spot at all ranges. You can’t invoke the resistance of the shooter’s shoulder because a cross stocked gun still shoots more or less on the mid line. One ingenious suggestion in the Field correspondence was that on firing the active barrel expands in diameter, and correspondingly shortens in length, thus bending the pair in the correct direction. The correspondent claimed to have done experiments to prove his contention. I have to say I’m not convinced by that argument – especially for rifles. I’ve always assumed it was to do with the centre of gravity of the gun itself, the recoil being some distance off the vertical position of the CG so creating a local turning moment that is small and is not much affected by the person holding the gun. I assume the matter has been settled beyond doubt now – so if you know the answer, let me know! Another interesting correspondence was related to shooting flying birds – they had pigeons, partridges and pheasants flying in a tunnel and in the wild and measured their speed, which turned out to be pretty much 30 m.p.h. in still air – which corresponds to 45 ft per second A muzzle loader probably shoots with a velocity averaging about 900 f.p.s. over a 30 yard (90 ft) distance, so takes one tenth of a second from the shot to leave the muzzle until it reaches the bird. A crossing bird will therefore have traveled 4.5 ft while the shot is in the air. The delay between deciding to pull the trigger and ignition could be another 1/10 second ( but very variable between shooters) so if you poke at a crossing bird without swinging you probably need to be 9 ft in front in calm air. If you are swinging with the bird – maintained lead – then you need to be shooting 4 1/2 ft in front. Of course if the bird has a fresh breeze up its tail – say 20 m.ph, then your lead needs to be more like 7 1/2 ft. If you are shooting ‘Churchill’ – coming through the bird and pulling the trigger as you pass it, I’m afraid you are on your own as far as calculations go as I don’t know your personal delay time! Of course its not practical to do the calculations when about to pull the trigger, and my numbers are not precise, and the bird is seldom flying exactly at right angles to the shot direction……….but you get the message.
4th November – At our shoot on Sunday Bev and I were discussing shot strings and what effect swing might have – both having some familiarity with the physics it made for an interesting discussion and got me thinking. I remembered I had two fine volumes from 1900 that consisted mostly of articles and letters from The Field magazine from around 1880 to 1890 ish covering many aspects of shooting – there was a lot of scientific interest – breech loaders were by now well established as was smokeless powder, but past percussion guns were still more or less within memory. The two volumes, beautifully leather bound, are a delight and cover every form of measurement that was within the technology of the time – chronographs and barrel pressure gauges existed, and ingenious mechanical systems were devised to measure the length and shape of shot strings, and the penetrating power of shot. Everything was tabulated very precisely and efforts were made to avoid errors and get meaningful results, and it all stimulated a lively correspondence that yielded more data. Looking through the first volume I came across accounts of what it took to burst steel and damascus 12 bore barrels ( around 12 drams of powder and 12 oz of shot! ) with pictures of the results on 4 barrels. There is a lot on shot strings and patterns, and one experiment looked at the velocities of shot for each of a number of concentric rings in the pattern showing that the shot flies progressively slower the further from the centre of the pattern it is. A further experiment collected shot according to its penetrating power and found that the slow shot was more deformed – This implies that the outer part of the pattern travels slower because it is deformed, presumably through contact with the barrel – which might suggest that the the worse the barrel condition the more deformed shot giving rise to a bigger difference in shot velocity and hence a longer shot string and a wider pattern. This leads to the idea that the shot pattern might be a cone – the nose of the cone undeformed shot and the conical tail the slower, deformed shot. At longer ranges the slower shot will fall further under gravity, thus the cone will droop, maybe by as much as a foot. A further interesting finding was that the guns patterned tighter with a thin card overshot card than with a thicker one – this was for cartridges so how relevant that is I don’t know. But one possibility that it raises is that the slightly tighter patterns reported for semolina might be related to less deformation of the shot? Another relevant finding was in the measurement of a number of flint and percussion bores – almost none of which were cylindrical for more than a short part of the barrel – most converged from the breach, had a foot or so of cylinder and then opened out by at least a few thou.

times for shot of different sizes – not sure if they are the same as modern shot sizes.
3rd November – here at last is the semolina video – don’t know why it took 2 days to get there ;-
Shooting day with Anglian Muzzle Loaders at Cambridge Gun Club – ostensibly a hammer gun/black powder day but I had more important fish to fry so stuck to my percussion muzzle loaders. I took the Westley Richards to see if I could shoot it, and used it for the mornings competition with very little success, although it has to be said in my defense that the birds were pretty challenging and I wasn’t (quite) the worst! Anyway in the afternoon we had an informal shoot and a bit of freedom to choose which of the available targets on the stand we wanted to shoot – as Bev said, a good confidence building exercise…. Anyway I reverted to my good old Venables and got a much more respectable score, which neatly solves the problem of which gun to use for my game shoots this week. I was, of course, using fine semolina throughout ( except for the last few shots when I ran out) and was perfectly happy with the way the gun was shooting, so that settles that argument for me. There is a lot of interest in changing to semolina – either coarse or fine, and discussion of whats and ifs. One big advantage I can see is if you need to pull a charge for any reason – all you have to do is remove the overshot card and shake out the mess. We did realise that it would probably be wise in those circumstances to fire off a cap to clear any semolina from the flame path – particularly essential if you are unloading because you forgot to put any powder in the gun! My card dispenser was excellent, but I now have to find a tube of the right size to hold cards for the 14 bore Venables – always something else to do, which reminds me I bought back a fine Purdy back action lock from a hammer gun that had the tail repaired and needs to be re-engraved on the last inch. Incidentally the Anglian Muzzle Loaders continues to gather members – not all of whom are geriatrics like me, to the point where it is on the verge of becoming unwieldy. We must have made up half of the shooters today, possibly more. I was interested to hear that the Cambridge Gun Club now has a number of muzzle loading pistol shooters and a range for them – must take my Colt Army along……
2nd November – Had an email from Chris who has been patterning the 11 bore Wilkes I restored for him, with the same load ( 3 dr, 1 1/4 Oz, 1 1/4 oz measure of semolina) a I was using for patterning my Westley Richards 11 bore using semolina. He got beautiful patterns at 30 yards – a lucky sparrow might escape through the pattern but nothing bigger. I am shooting tomorrow at Cambridge Gun Club – its the Hammer Gun Competition but I haven’t loaded any Black Powder cartridges for my William Powell and anyway I want to do some more practice with the WR (with semolina as I don’t have any wads for it), or maybe revert to my old gun if I don’t hit anything – I have 3 muzzle loading game shoots in the next two weeks, so need to be on form! I have been cleaning up a big Sykes flask for use for the semolina – its a tin body under leather, and the tin is eaten away in places but the top is in excellent condition – I may try to make a new body for it. I took a Bartram flask top to pieces, but I can’t quite work out how the spring works – its within the top and is a curved piece of round wire, not a flat strip. The top and bottom plates of the flask top are separated by a strip of flat spring bent round and fitted in grooves in the top and bottom with a gap where the ‘handle’ comes out. must look out for a copy of his patent, and check Riling’s book ( it has virtually nothing on him). The flask itself is somewhat unusual in that it has an angled top.
1st November – More semolina stuff – boring – After posting last night I remembered to clean my gun – there is some discussion about whether it leaves the guns cleaner than wads or not – one might expect it to be dirtier as the sweeping action of a lubricated wad isn’t happening – but I didn’t see that – here is my experience;-
I hadn’t shot those barrels before and I’m not sure of their history – I had cleaned them a few times with a steel wire brush in a drill and got out a fair bit of red rust before oiling them.
After shooting 20 ish shots in each barrel with semolina I did get some deposit in the first wash water with bronze brush & detergent – probably charred semolina – not seen when using wads – the water was dark grey as usual – (I just fill the barrels once each to the muzzle with boiling water and a couple of drops of detergent and pump with the bronze brush)
Second scrub with nipples out using wadding as a pump and 303 cleaner didn’t get much dirt on the wad or in the water – water is usually clean but wadding is dirtier with wads
Third scrub with kitchen roll and Napier gun cleaner that usually keeps coming out black with wads was pretty clean – but given that the barrels were probably not leaded before this shoot it may not be indicative.
Pete says that, if anything, his patterns were slightly tighter with semolina – I think he was shooting a 14 bore with 2 1/2 dr. and 1 oz and an equal volume of semolina ( he works on the principle that all volumes should be the same – keeps it simple! He thinks his barrels were a bit dirtier, so no conclusive evidence either way!
31st October – Viking Pete and I had our semolina day at Eriswell! It got off to a bad start when I fired the right barrel with about 4 dr.semolina (powder volume) at the pattern target and shot a great big donut shaped pattern with a hole in the middle. At 15 m there was not a single shot in the centre 4 inches which means a pheasant sized hole at 30 m, and the bulk of the pellets were in a ring extending out to about 24 inches – what I take to be a classic case of too much powder although I wouldn’t have expected that using 3 dr of Czech powder and 1 1/4 oz of shot in an 11 bore. The left barrel shot much better at around 18 – 20 inches . and an even pattern – the same load but the left barrel has around 10 thou of choke (barrel made post 1917 ish.) . I repeated the same loads using tight fitting wads and the right barrel got rid of the hole in the middle and gave a more even pattern a little tighter. The left barrel was pretty much the same as with semolina maybe a smidgen less tight . Pete was firing his 14 bore and there was not much difference between semolina and wad – I’ll check back with him to see if that is true on closer inspection. Anyway I dropped my loads to 2 3/4 dr and 1 oz and as we’d run out of pattern targets went on to shoot clays – I didn’t have any wads for the gun so it was all shot with semolina using about 4 dr. by powder volume – I shot almost 50 shots with the gun and hit every other clay with no particular bias towards one barrel or the other – most of the ones I missed were because I was not on target so I’m happy that it was shooting reasonably well – I probably ought to get in another day’s clays before the next game shoot, but I fear there may not be time. Anyway I think the 11 bore will do nicely for game but I will have another go at patterning some time with the revised load. Might go over to Dick’s and do it in his field with a sheet of polystyrene and brown paper or even newspaper. In the back of my mind is the thought that I may have been overloading my gun at the last few shoots? What do I conclude about semolina vs wads ? Basically not enough evidence to be sure, but it seems to work in practice. I might wonder if semolina is a bit more susceptible to the charge blowing a hole in the middle of the pattern but apart from that, which might just be an anomaly, it might have tightened the left barrel pattern slightly – certainly didn’t open it out. The good news is that my prototype card dispenser worked flawlessly dispensing two cards at a time – I could push down on the card and get only one if I needed to but it didn’t fail once – although it was only loaded with about 40 cards so I ran out at the end. I don’t suppose I’ll get round to going beyond the prototype stage unless I want a different size of card.
30th October – I did a few measurements around the observations about semolina in the video (still processing!) to see how the volumes might work out. I reckon 1 oz of shot has internal spaces of about 4.6 ml, which is the same volume as 4.2 drams of powder (for this volume the semolina weighs about 2.4 drams). So my guess would be that if you use a powder flask to dispense your semolina you need at least a 3 dram flask for 1 oz. of shot. I guess that 1 oz in a 16 bore needs less semolina than the same shot load in a 12 bore since the depth of the semolina layer is what slows the shot. I’d never want to go for a smaller volume of semolina than powder, and to be on the safe side 1 1/4 to 1 1/2 times the powder volume. I can’t see any down side to using slightly more semolina than the above calculations. I might have reservations if my loaded gun was going to be subjected to prolonged shaking as the shot might fall through to the powder – in that case I would feel the need for a card over the powder. As the video shows I think the semolina is probably a good thermal buffer provided the shot doesn’t penetrate to the powder layer. I might try my video experiments with coarse semolina some time.
30th October – I am going to the clay ground tomorrow to try out semolina and see if I can actually hit anything – I need to get my eye in again. I have been meaning to have a look at what happens when you load semolina so I decided it was an ideal opportunity to make a youtube video. I wanted to see if the semolina and powder stayed separate, and if the shot sat on top of the semolina or got buried in it. I also wanted to see what happens to semolina when you apply heat, and I was wondering if the grains more or less locked up into a solid when under breech pressures. I managed the first two experiments and given the results I’m not sure the last objective is particularly relevant. My video explains it all, so I have put it in the VIDEO tab, and there is a link below. I’ll try and see how it goes on a pattern plate tomorrow if I get time, and maybe make another video. Now to see if I can remember how to link youtubes in to the blog – I think it may take some time for youtube to process – I seem to have read somewhere that it takes a while to put them on line ( its now been many hours!). Another little project that, like the semolina experiments, has been hanging around at the back of my mind came to the fore – I’d had in mind to make a card dispenser but hadn’t got round to it (familiar story?) until I saw someone had one at the last shoot, so having an odd half hour and a pile of 11 bore cards I happened across a piece of 1 inch PVC conduit that was the right internal diameter for the cards, so I turned up an end from a scrap of plastic and found a couple of springs and put one together as a prototype. Its a bit Heath Robinson but it (mostly) works and will hold and dispense around 50 cards – The design is pretty basic and could be tidied up and made more attractive, but first it needs field trials – and I need to know what bore of gun I end up shooting most often. Oh and I realised that the tip of the sear of the early 18th century pistol I made the tumbler for was not properly hard so I must do that before I forget.
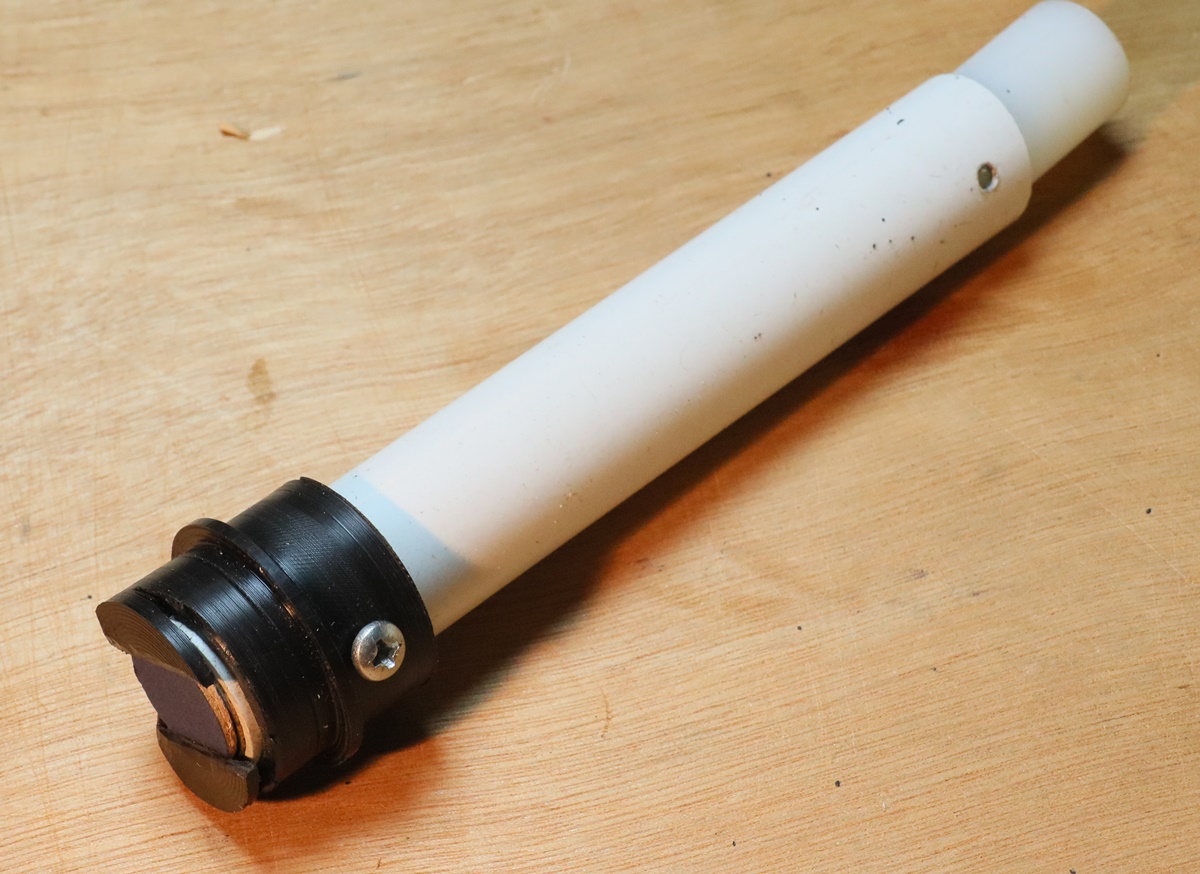
In theory the gap at the end between the white tube and the black end can be adjusted for dispensing one or two cards for greater economy of effort shooting doubles! It needs some form of suspension loop and it could be prettier!

This was a trial run – I used more semolina than powder by volume – probably twice as much, and it went in with quite a slope on top. My flask got stuck and dispensed far too much shot – but even when it only dispensed 1 1/4 oz it mostly buried itself in the semolina. I didn’t have a problem with the black powder forming a level surface, and the semolina didn’t mix in with it. But the semolina usually formed a sloping top surface. For what I thought were reasonable loads most of the shot was buried in the semolina and it almost reached as far as the powder. Shaking and banging the ‘barrel’ caused the semolina to float up through the shot, but left the interface between powder and semolina pretty much undisturbed – although I guess the shot would eventually reach the powder.
29th October – Still no body in the ditch…. I finished off the tumbler and hardened it and made a new cock screw as the old one didn’t fit the new thread I’d cut – I put the trigger back in the stock and the lock all works as sweet as a nut. Someone had painted the whole pistol in some kind of varnish that turned all the brass into copper colour – most of the furniture had been stripped and cleaned but the ramrod pipes were still ‘orange’ – I had hoped to remove them but looking at the pins holding them in, I decided to try to strip off the varnish in situ using paint stripper and various tools and 0000 steel wool and a small polishing mop in my ‘psuedo Dremel’ – it all worked a treat and saved any damage to the stock from knocking out the very rusty pins. Dick now has the wood to patch up a couple of chips. I was intending to try the Westley Richards some time but don’t have a wad punch for it, although I am expecting to be using semolina instead of wads now – still I need a punch for overshot cards, so a chunk of the 1 inch bar was made into a punch, starting off by putting a 3/4 inch drill up the middle for 35 mm (I like mixed units – so soothing) I turned the inside with a slight taper (2 degrees) out from the mouth so that cards free up. I was going to mill the opening in the side but alas the controller on my Axminster milling machine packed up, so I cut the slot with an angle grinder and files – just as good and in truth probably quicker. The cutting mouth got hardened along with the tumbler and cock screw and works fine, although I may have made it a trifle large – the cards will be a tight fit.
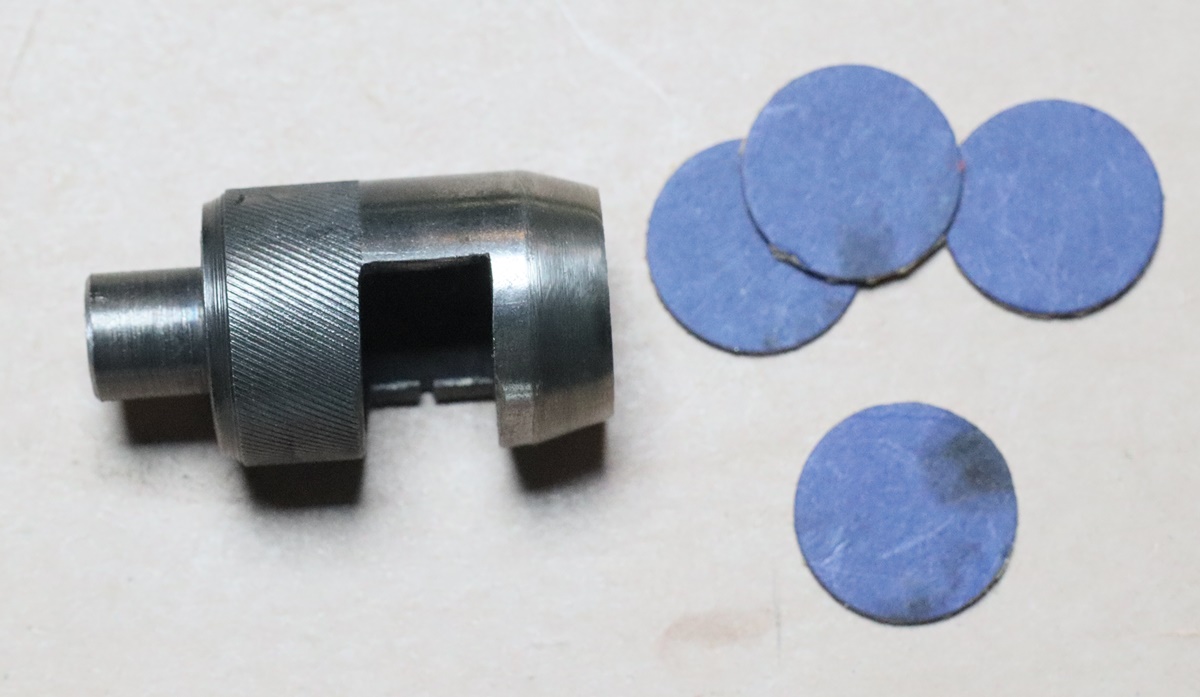
Its designed to be run in a drill press or hit with a club hammer.
28th October – Expecting to find Boris dead in a ditch shortly! Hope its not the one in my garden…. Went into school today to see how many children had taken up my challenge – 3 so far out of 20 ish – more to come. I’ve been making prizes – little wooden boxes (£1 each from the cheap shop) with engraved brass plates. Must be mad… I had some time to attend to the tumbler of the early-mid 18th century pistol. Having made it, I then had to tune up everything to get it so that everything was just right – that means making sure it lets the cock stop on the edge of the lock as it should, making sure the end of the spring rides smoothly on the tumbler arm, working on the bents to put the half cock and full cock positions where they should be, and the sear bar is in the right place in relation to the edge of the lock etc. and the half cock bent is secure but isn’t caught by the sear on firing and everything runs freely without binding… All this has to be done in small steps as the only way to put things right if you take too much off is to apply weld and file it all up – nasty! I think I must have put on and taken off the tumbler, bridle, sear, cock and mainspring about 30 times (minimum!) this evening as I sorted it out. I think its all exactly right now, so I’ll leave it until tomorrow and check it in the cold light of day and if it is OK I’ll harden it – I think the steel has a fair amount of carbon in it, so it should harden nicely. The mainspring is pretty strong and is marking the tumbler arm when you cock and uncock the pistol, so I’ll have to repolish it when I take it out before hardening it. I’m planning to go to Eriswell to shoot on Thursday – its scheduled as a semolina day and I’ll try my guns out on the pattern plate as well as trying to remember how to hit clays!
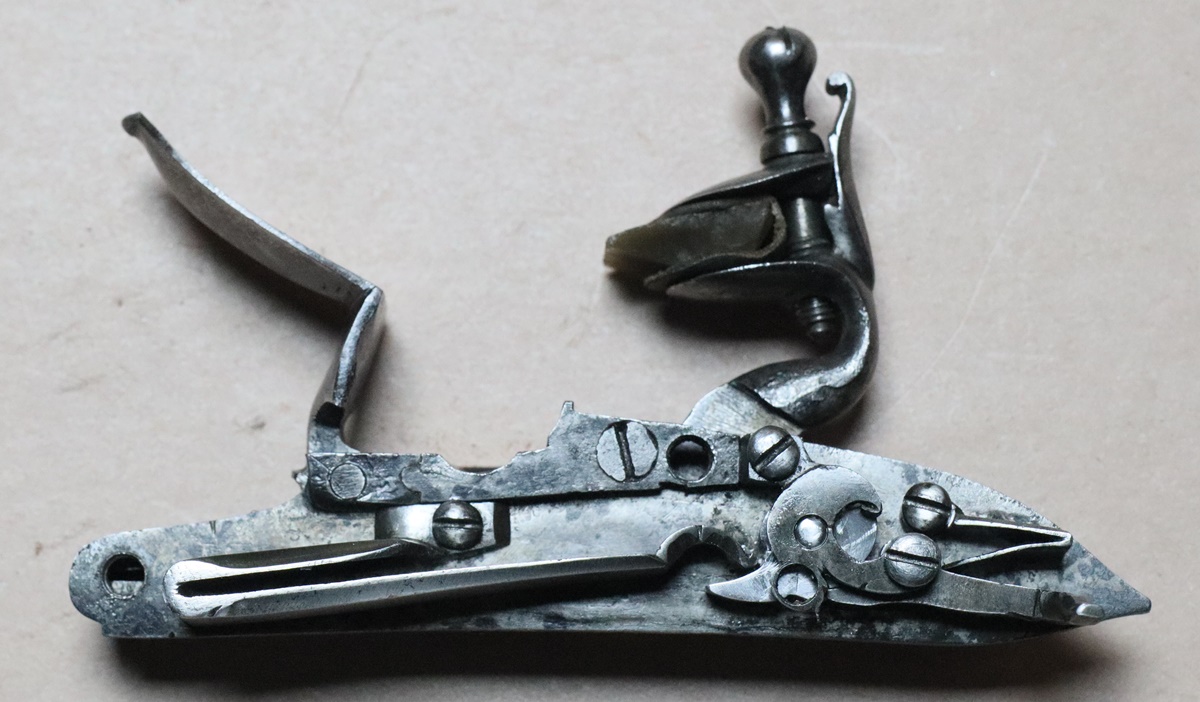
I put a a flint in the lock to check the fired and half cock positions as I tweaked the bents etc. The mainspring end acts quite close to the tumbler pivot, but it works OK.
27th October – Very pleasant sunny day – inspired me to trim the hedges this morning – I spent the entire day being disorientated by the time change but I survived. This afternoon I made the new tumbler for the pistol as I found a 1 inch bar of some very tough steel in the workshop. My usual technique is to turn up a disk with the lock bearing and blank for the square and tap the hole for the cock screw then partially turn the back and part it off and glue it onto the end of the bar (with a hole in it) so I can work on the other face. I used epoxy in the past but this time I was in a hurry and used instant glue which worked just fine – I couldn’t break it off but a bit of heat shifted it. I printed out the photo below on A5 and marked up lines to give a guide to the geometry and hacksawed off most of the spare metal and filed it up – first clear the part of the diameter that goes past the top tumbler mount, then the bit that has to clear the pivot of the sear, then shape the bit where the spring end rests. I then put in the full cock bent some way round from its probable position. At this point I put the square on the shaft by careful comparison with the old one and pressed the cock on – perfect fit! Now it’s possible to fix the full cock bent and start work on the half cock position – while the full has to release, the half cock has to capture the end of the sear and hold it when the trigger is pressed, which calls for a bit of tricky filing. I had to reshape the end of the sear as it was too thick to go into a reasonable half cock bent, but it all seems to work as for as I can tell – I will put the lock together as soon as I get time, and if its OK I’ll harden the tumbler. I may have to do a bit of fiddling with the bents when I can try the gun with the spring in place to make sure the sear doesn’t pop into the half cock bent as it goes past in firing. It all seems to fit reasonably together and I think there is no need to do anything with the bridle – most of the slop in the system has gone with the bearing fit of the new tumbler in the lock plate, and the gun will not be used for shooting, I assume! A good afternoon’s work – with a bit of the evening to put in bents and finish it – say 5 or 6 hours work.
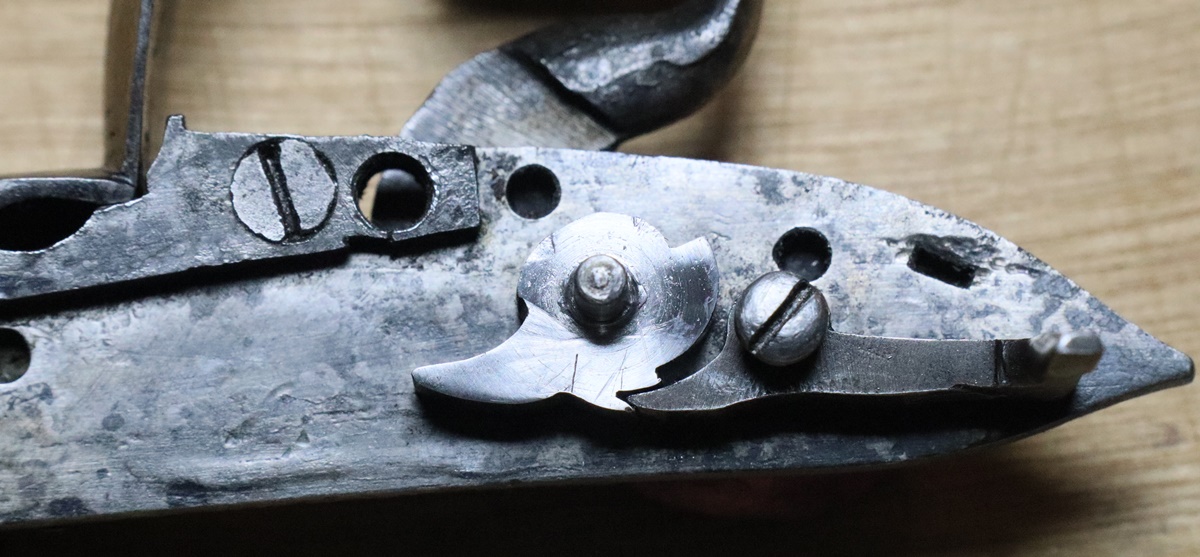
26th October – Had another offer of a muzzle loading shoot yesterday – they seem very popular at the moment! I had a discussion with the owner of the pistol I mentioned yesterday and we decided the best course of action was to make a new tumbler rather than try and mess about with the old one. The first step is to sort out the dimensions for the blank – mostly measure with calipers or a micrometer, but also photograph it against a ruler to get a better clue to the shape. I’ll have a look for a suitable bar of metal when I go into the outside workshop tomorrow. I’m still hoping someone will tell me what the slot across the tumbler is for – it must have been quite difficult to shape the axle in the middle of the slot! I had to make a couple of wooden bench hooks/tops for my STEM club – the kids discovered the hacksaws in out trolley of bits and pieces and decided it was fun to saw up the strips of wood I provide for projects – I have no problem with that except I live in fear of them cutting into the nice classroom tables ( we don’t have a craft room and we always make a mess so I live in fear of the caretaker – I seem to remember that traditionally the caretaker strikes more fear into everyone than the head teacher! – certainly does for me) – hence the wooden bench tops.
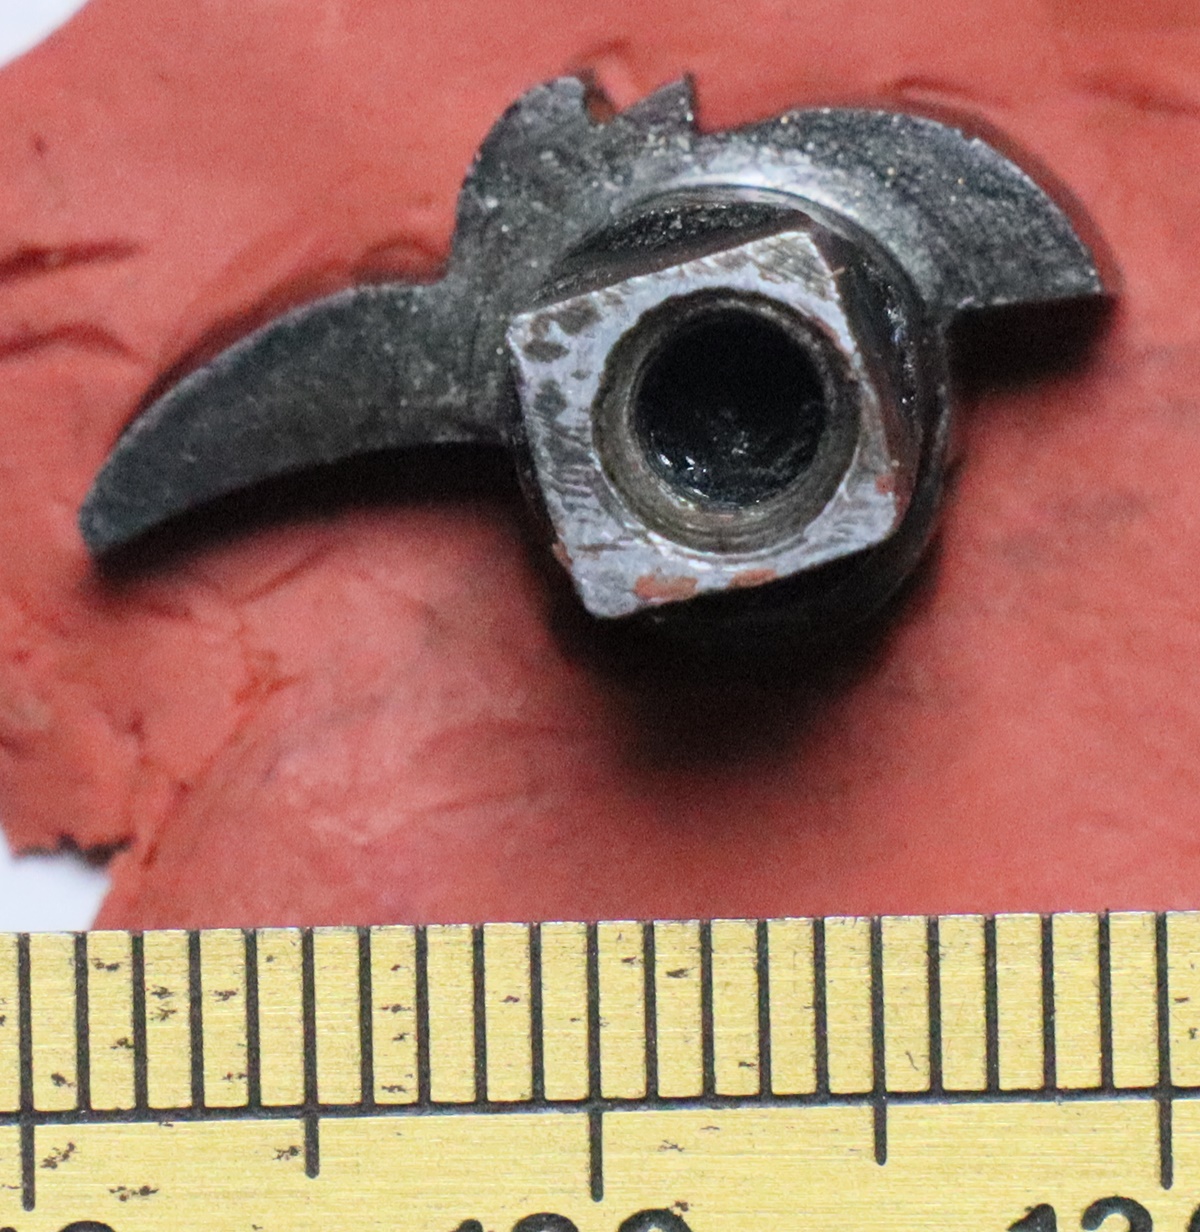
The cock screw hole is well off centre in the square. It looks like 25 mm bar will just do without using a 4 jaw chuck.
25th October – My shoot wasn’t the best I’ve ever been on – I hit an unlucky run of pegs and didn’t see much action, and what I did see I didn’t make much of! The last two drives were shot in pouring rain which with a muzzle loader is a bit more of a bother than with a breech loader. I did feel a bit smug as I’d put on waterproof overtrousers at the start when the rest thought they could get away with it so I was comfortable and dry throughout. I expect my gear will dry out sometime! We had several discussions about the use of semolina instead of wads so I must do some quasi-scientific experiments some time. I had a visit from the owner of the Wilkes 11 bore so that has now left the workshop and another satisfied customer. He brought a single barreled gun to ask me if the nipple ( a new commercial 1/4 BSF one) was a tight enough fit to be safe from blowing out. It was a slightly wobbly fit all the way down although the thread in the breech looked fine – it would probably have been OK, and if it had been my gun I might have used it, but if someone asks me, I feel obliged to ere on the side of caution as they are relying on my judgement. Anyway I was able to find a titanium nipple that I’d made with an oversize thread that was perfect. As I’ve mentioned before, titanium is funny metal to work with as it does not like very fine cuts with a die so I tend to cut just once with the die opened out to make a slightly oversized thread as most nipple holes have worn a bit and when cleaned out with a 1/4 BSF plug tap ground a bit flat at the end come out perfect for them. I got another job in this morning – a nice classic flintlock pistol from the first half of the 18th century – its only unusual feature as far as I am concerned is that it appears to have a detachable pan. Its main problem is that the half and full cocks don’t hold – basically a wear problem that is exacerbated by a bit of messing about at some time. The bents in the tumbler seem to be worn but also reshaped with a file, as has the nose of the sear. The tumbler is loose in its bearing in the lockplate but also in the hole in the tumbler, which has been crudely countersunk on the inside. The tumbler has a fine crack and part is almost broken off. The tumbler also has a groove filed across the middle that I can’t quite work out – my first thought was that it was for a fly – the little arm that steers the sear past the half cock notch when the gun is fired, but it doesn’t correspond to the form of that device that I am familiar with on later guns and I can’t see how it would work as it is. So the question is how to sort it out. The tumbler is straightforward – it needs annealing and flattening – I forgot to mention its a bit warped – and a spot of weld put on the crack. The sear can probably be reshaped, possibly with a spot of weld on the nose. The tumbler has three problems – the lock plate bearing, the tumbler bearing and the bents, so the best solution may be to make a new tumbler with oversize bearing surfaces, or just to forget the poor bearings and pop a bit of weld on the bents and refile them. To be discussed with the owner……….

Red arrows – evidence for detachable pan – green arrow bad sear/bents

What is the slot across the tumbler for? The full cock bent is very deep, and there is no safety element to the half cock bent.

The countersunk bearing for the tumbler shaft is cracked at the thin bit and the large look has lost part of its side, its all also warped a bit.
23rd October – Shoot tomorrow, usual gun so I got the kit ready. Its only just over an hour away so no need to get up at cock crow (ours starts around 4 a.m.). Had a session today replacing duff fluorescent tubes around the workshops – in total I have something like 20 tubes in use, mostly 6 ft ones. I’ve just replaced the first with an LED strip fitting which is very effective. I changed over to white tubes some time ago and the one or two old ‘warm white’ ones look very dim by comparison. The fluorescent LED fittings are pretty expensive, so I don’t think I’ll be doing a wholesale change yet – just the odd one or two. They are not all used very often so there isn’t much saving in power. I’ve been doing a bit of engraving for prizes for the school children’s half term challenge – mostly in CZ120 brass – I can now handle that as well as I can steel. It’s mostly lettering which is good practice – I have got my spacing almost up to scratch! I was looking over the two 11 Bore guns I have in the workshop (finished) at the moment – the Wilkes has a bore of around .751 in both barrels which is bang on for 11 bore, but the ’11 bore’ Westley Richards clocks about .753 in the right barrel and about .740 in the left – i.e. there seems to be a bit of choke in the left barrel. The WR barrel is so late for a percussion gun that I began to think it might be a 32 inch breechloading barrel from a 10 bore with the chambering cut off ( the barrel itself is 29 1/2 o.a.) but the bore is a bit small for that possibility ( 10 bore should be .775 ?). Actually, having had a look at replacements for LED tubes its not too bad – but I can’t find a simple rewired 6 ft tube in daylight, but I’ll keep at it.
22nd October – tried to harden the WR lock plates in my electric furnace but the element kept popping out and shorting – needs a new element – they come for China so a week’s wait. I did it with a couple of gas burners – seems OK . I put the locks together – the mainsprings were a bit of a struggle as my mainspring clamp is a bit worn and the springs were strong and quite open – I got thee eventually without breaking either spring! So now that is all together – there are a couple of small wood repairs that I could make, but I’ll see how it shoots before I get carried away. It promises to be a cracking gun – quite modern in its balance ( there is some lead in the stock for balance, or so it seems) and about the weight of a modern o/u 12 bore. It seems to come up nicely. That leaves me with a dilemma – I have a shoot this Thursday – should I take it, or stick to my regular gun? Probably stick to the regular as I haven’t got any wads for the WR and I haven’t explored the equipment needed to use semolina instead of wads in the field – a jam jar and spoon probably won’t cut it with my fellow guns! I have one small job to finish – I bought what I thought might be an original Spanish military pistol from a photograph but it turned out to be a repro – the buyer was happy sell it to me at the appropriate price as I wanted one as a demonstrator for the through the lock sear. I am tweaking it a little to make it look a bit less like a repro – the screws are a terrible so I’ve made some new ones, and cleaned up the stock and distressed things a bit so it looks more presentable – I do NOT intend to pass it off as an original – the buyer had acquired it on her father’s death so had no inkling that it might be a repro, and had consulted an antiques expert – who of course would not necessarily know about guns.

Very modern semi pistol grip for a percussion gun – the gun is part 1843 part 20th century.
21st October – Quiet day – went up to school to take advantage of half term to try out a bit of soundproofing between classrooms – there is a big gap I was trying to fill with foam sheet to see if it had any effect – just as a test, as obviously foam is not a good sound insulator – anyway playing sea shanties at full blast (ideal as the sound level is pretty constant) I measured the loss through the existing structure as -20 dB and with the foam as about -25 dB so its probably worth replacing the foam with something more solid – it’s wonderful what you can get a phone app to do – think of the cost of a sound level meter! My gun time was spent finishing the re-engraving of the Westley Richards locks – They are not perfect, but I am happy to leave them like this as I don’t want to refinish the lockplates down to clear metal as a) the job isn’t worth it, and b) it won’t add that much to the overall effect when I’ve coloured up the plates and put them in the gun. If I wanted perfect lock plates I’d probably make new ones anyway! I now have to re-harden them and temper them – not sure if I’ll do it in the furnace or just with a gas torch – I’ll need to check the book for the right temperature. There will be the problem of avoiding scale again – more important this time as the engraving will suffer if it scales up.
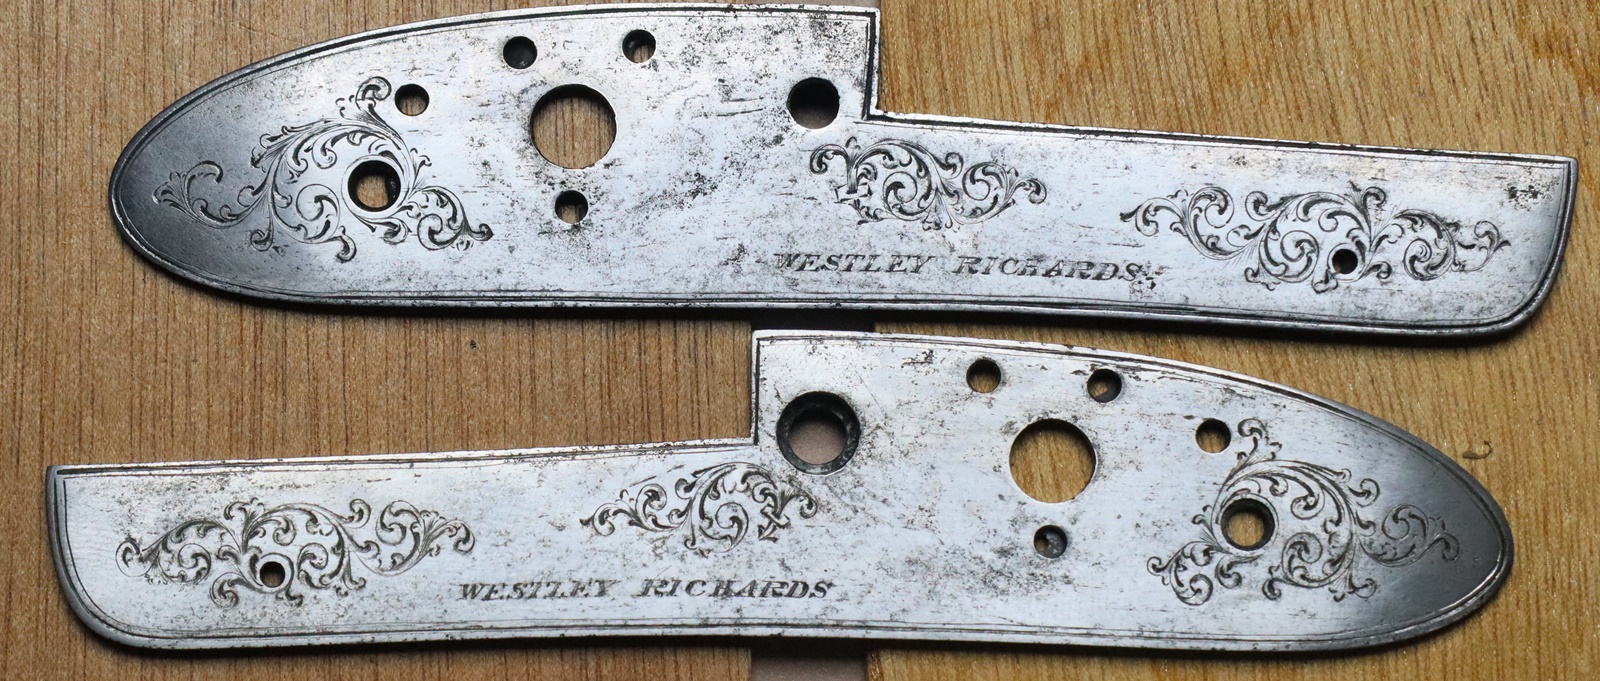
20th October – looking on the Westley Richards website at ‘New Guns’ I saw a picture of a very nice duplicate pair of rifles in a case and a nice leather label saying what they were, with special mention of their Patent Detachable Lock’s (sic) – you would have thought that if you were selling a pair of rifles at, lets say £100K, you would at least proof read your labels and not commit the apostrophe sin! I of course emailed them, troublemaker that I am…. I decided to bite the bullet and re-engrave the Westley Richards locks – One problem is that you have to anneal them or they are as hard as the gravers and you get no-where. To anneal them you have to take them up to about 820 degrees C for 20 minutes or so and then cool them very slowly. If you are not careful this puts a hard oxide layer on the metal that you then have to clean off – I have two ways of defeating this – I have a coating from Brownells that in the past has been almost as difficult to remove as the oxide, and a stainless foil that you can make a supposedly sealed packet from to exclude oxygen – you put a piece of brown paper in the packet to burn up the residual oxygen. On this occasion I painted the goo on the backs of the locks, and put the faces together with chalk between them, wrapped them in brown paper and sealed them in a foil packet (its deadly sharp stuff so you have to handle with great care) – I then put them in my furnace set to 820 C and left them to get up to temperature and soak for a bit, then turned on my graduated cooling heater for 4 hours, after which they had got down to 100 C. When cool I opened the packet and to my surprise the coating all brushed off and there was virtually no scale on the lock faces. A first! I gave the lock faces a rub with 600 grade paper and am re-engraving the first one. It is always interesting re-engraving gun bits as long as there is enough of the original left to get an idea of the pattern. In this case 95% was just visible so I was able to keep to the design – after a bit you get to work out exactly how the engraver did each sort of cut and are able to imitate his cutting, and with a bit more practice you can easily extemprise where there is not enough to go on. I will go over all the engraving including the name as a first go, then look at whether I want to refine the finish on the lock, which will knock the engraving back, so I would have to re-cut a second time over my initial re-cut. Here is the first recut of a bit of the lock – I have just done the W of the name, no more yet.
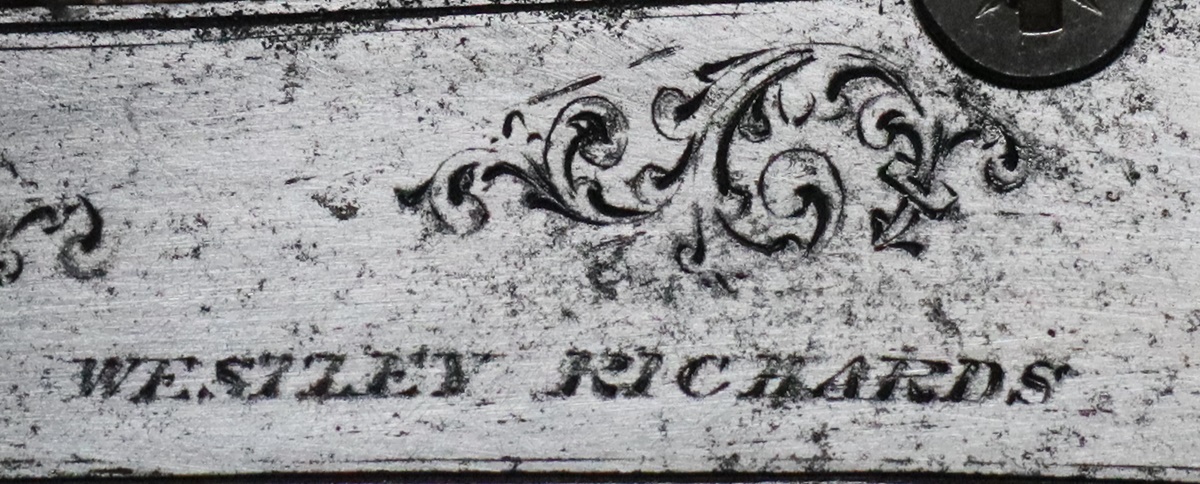
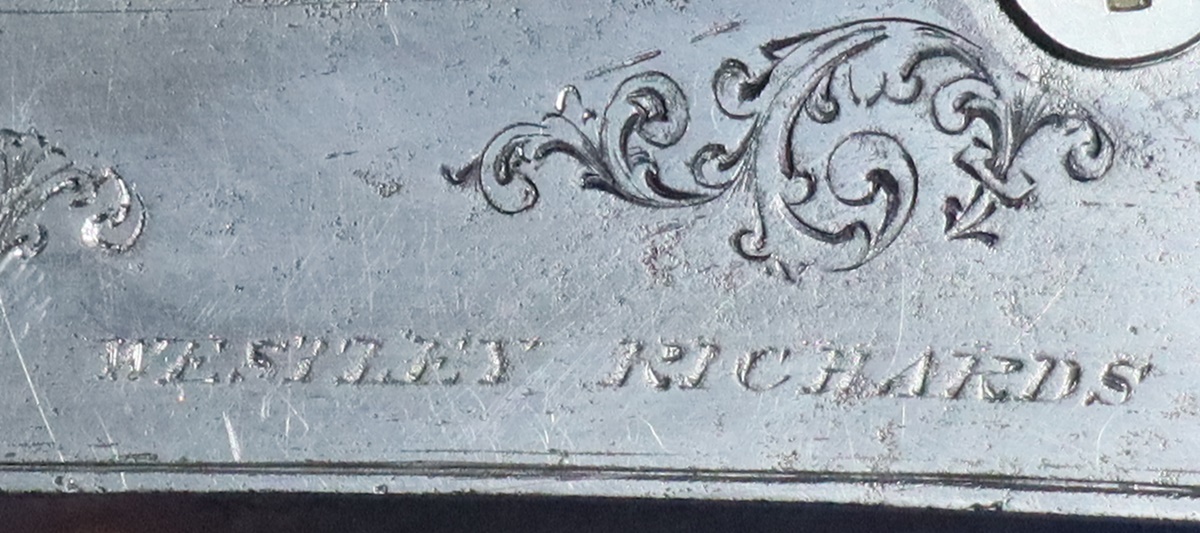
At this stage I’m just re-cutting the bits I can see clearly – in the next iteration I will look at possible missing bits, and do the name. I haven’t recut the fine border line yet but I have cleaned out the main line a bit.
18th October later – Just got back from ‘The Greek Play’ – every 3 years the Arts Theatre, Cambridge puts on a play from ancient Greece all spoken in ancient Greek – mostly performed by students. Its a sort of culture fest – we have been going for many years so its become a regular if infrequent outing – my ancient Greek is no better than it ever was, i.e. non existent, but there are subtitles and its mostly declamatory so quite easy to follow. This year it was ‘Oedipus’ – the chap who murdered his father and married his mother, all ordained by the oracles – very complicated stuff, makes Brexit look like a walk in the park…………..At least this one didn’t have any blood – most are pretty full of gore. The culture infusion will last 3 years! At last the Wilkes barrel can be called finished after 14 rustings – I think probably the early rustings didn’t have enough time to bite, although the ramrod tubes that were made out of a different twist did go much earlier. Anyway its now an acceptable shade of chestnut – its not as shiny as some jobs turn out, but I couldn’t take off enough metal to get rid of the twist texture – the original finish was quite deeply textured. The whole gun now looks so much better – the stock is showing some figure – I deliberately didn’t take out all the dings as it’s not a new gun and shouldn’t pretend to be one. The titanium nipples I made for it do fit and the barrel is not too bad, there is a bit of pitting about 10 inches from the muzzle, but by then the stress is much less – altogether its taken a sad gun worth a couple of hundred pounds to a useful gun worth maybe £700 – not sure what the final bill will be – probably £240 for the barrel browning and new pipes and nipples etc, and £120 for the for the stock and foreend pipe and general cleaning. I usually give a bit of a discount if the owner doesn’t mind the job going on this blog – if they want to keep it off it costs them more! I sometimes do a halfway house where I put a record of the work on the blog but don’t mention the maker’s name and blur it out on locks and barrels so that the work can’t be found by a google search but in general I like to put it all on the web!
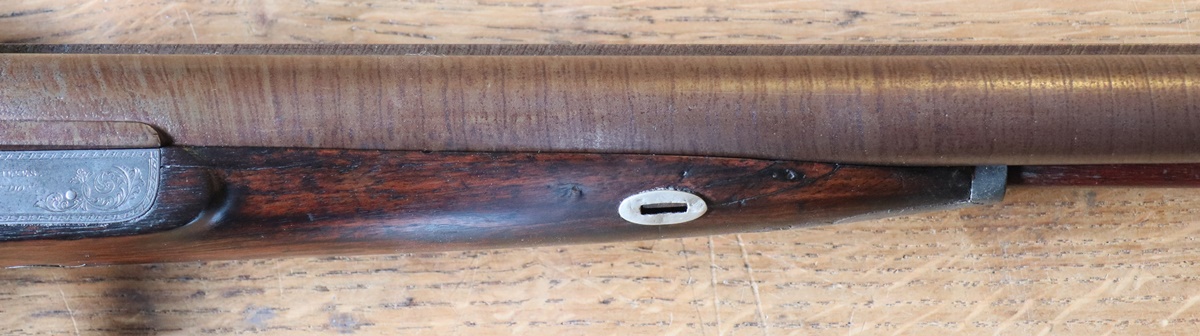

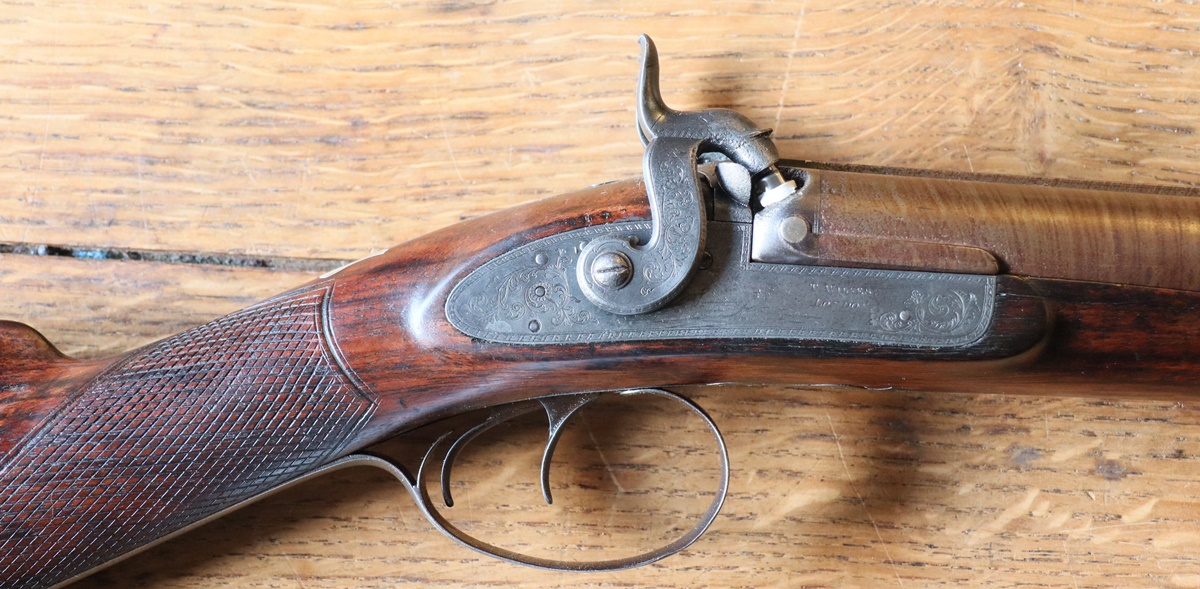
18th October – Looking at the statistics for this blog, I had been puzzled why the post on the New Land conversion had had over 24000 visits – seemed a bit strange that something so obscure should be the second most popular visit after the main page. I discovered that sites in Russia had been visiting that page every 5 or 10 minutes day and night – the Russians were using a block of IP addresses rather then a single address so they didn’t all show up together. I noticed a lot of visits from one site a week ago and spotted other visits from sites with close IP addresses so I blocked the whole block of addresses (easy to do in Wordfence) so now all those visits just get blocked – I can look at blocked visits and they still persist with the futile action – someone must have programmed it into their computer and they must also have access to a whole contiguous block of IP addresses, which is unusual – it has been going on for several years! It’s probably not a solitary amateur. I’m keeping my fingers crossed that the Wilkes barrel browning is getting somewhere – maybe a couple more iterations, maybe only one – photos will follow when this browning with Blackleys following steaming is done. I rang Westley Richards re the 11 bore – they have records for 1917 but they say that if it was rebarreled and in the records it would have had a new number assigned to it and stamped beneath the old number on the barrels. It doesn’t so the assumption has to be that it isn’t in the records – all the original percussion records for the original number 1019 are lost. In all probability it was indeed rebarreled by WR, but how or why is a mystery.
17th October – later – My strong treatment of the browning might just be paying dividends! before rubbing off it was a pretty solid brown overall, see below. After rubbing off there was some coverage over the steel but still some way to go – I’ve given it another go with Blackleys and we’ll see, maybe steam it after that and perhaps another go with my solution – I rather like browning with a blackish tone – anything but the dreaded ginger browning! Dick had got the bridles of the Westley Richards welded for me – a really neat job – I can’t keep my welds anywhere near that neat – it cleaned up in no time on the diamond hone and the hole only needed a couple of strokes with a round needle file to clear it. Dick has more or less pursuaded me that I ought to anneal and re-cut the lock plates of the WR – I am almost convinced. I will ring Westley Richards archivist tomorrow and see what history he can dig out on this gun or general information that might be relevant – The locks are 1843 ish but the barrel has a post 1917 WR address and post 1868 proof marks but the only number on the barrel is the same as the locks – 1019 – an approx 1843 number which implies that it was a replacement barrel from WR numbered for the gun ?
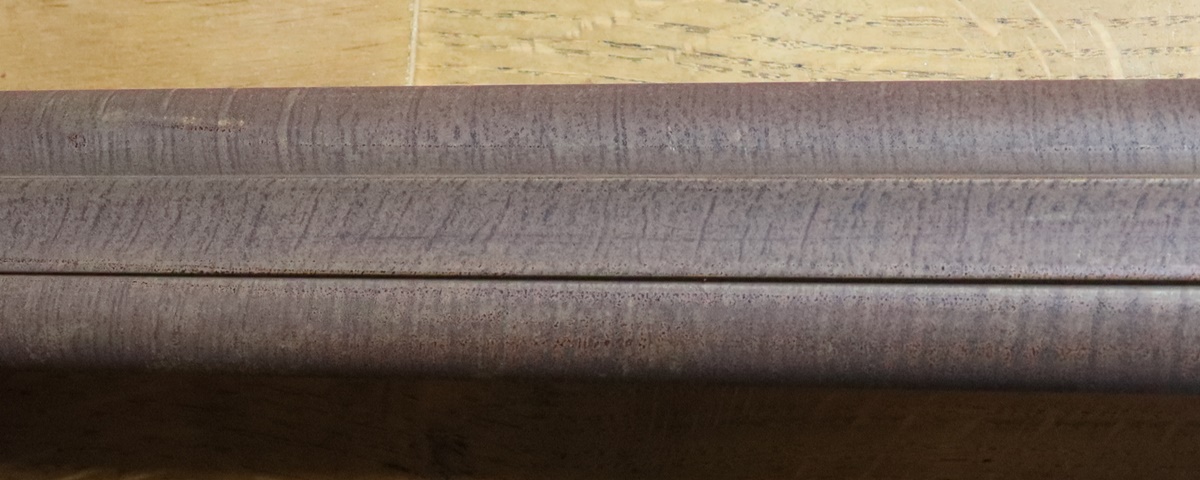
This has gone a bit further than I usually let it but desperate times call for desperate remedies!
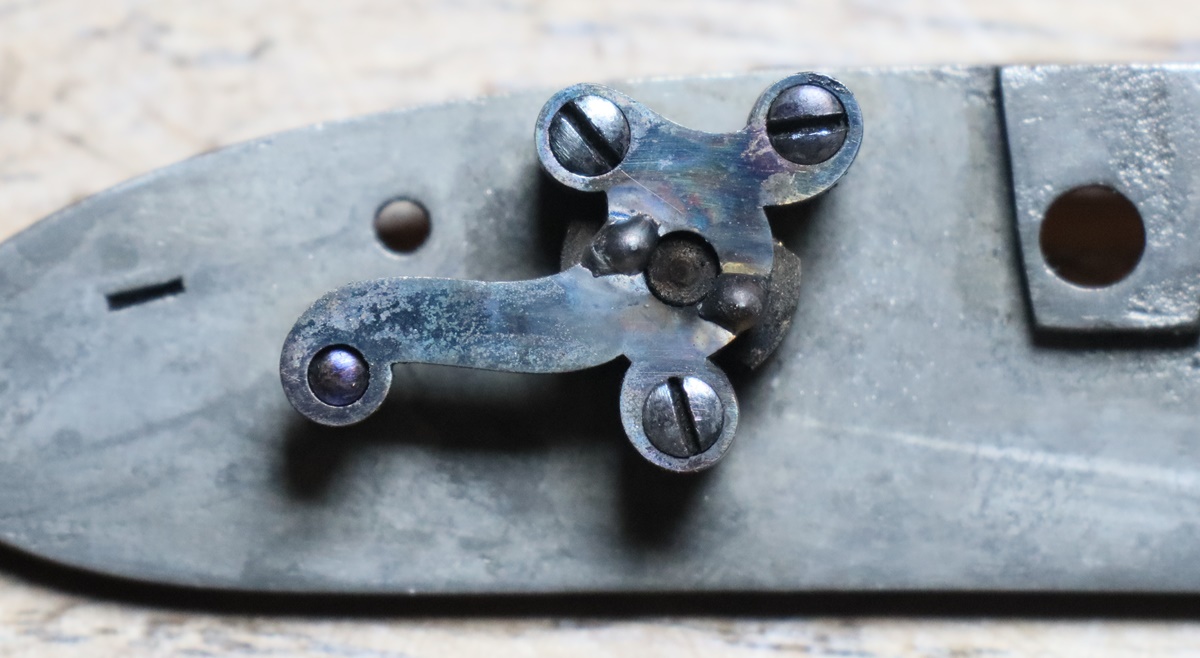
That is a dummy tumbler to support the broken bridle during welding ( and soft in case I needed to drill it out if it got welded) The sear bearing pin is most unusual – it screws in from the outside of the lock plate with the thread in the plate and the head countersunk slightly on the outside – it is a plain bearing in the bridle hole. Niether Dick nor I have seen one like this before.
17th October – Very frustrating – I’ve now clocked up 11 rustings of the Wilkes barrel and so far there is no sign of any browning on the steel elements of the twist – I’m beginning to think that the barrel maker inadvertently invented stainless steel! I’ve now tried Blackley’s and Dysons’s slow brown and my own pretty aggressive used printed circuit etchant, all to no avail, although the iron component is being well etched! This morning in desperation I steamed the barrel pretty thoroughly and then put a coat of my solution on while it was still hot – if that doesn’t get it going I don’t know what will! I am not filled with hope. I am going into school this pm to give the yr 5 & 6 children a challenge for their half term – to decypher some (fictitious) emails relating to a (fictitious) raid on the school – Penny is worried that they won’t realise it is fiction and I’ll scare them! We shall see…………………. I took the locks of the Westley Richards to Dicks and he is going to take the bridles to our speciality welder as they both have small cracks across them. I made up a couple of small dummy tumblers so the bridles could be welded while on the lock plates to ensure they are aligned properly – The dummies are soft so can be drilled out if they are inadvertently welded to the bridle. My welding is not really up to such fine work and if I try to do it I’ll end up spending ages removing all the surplus weld and ruining my best files on bits of the tungsten electrode that get broken off when I touch it in the weld pool, which I do occasionally. Every time I look at the WR lock plates I start to wonder if I should anneal them and re-cut the engraving as they would look so good. The gun is obviously made up from bits of different generations, so I wouldn’t be destroying a straight antique…. I still can’t decide……
14th October – AT the Bullard Archive a.m. and then school this afternoon. I managed to fit in a bit of barrel browning – but still not touched the steel bands after 7 rustings with Blackley’s slow brown. It really is resistant stuff! I’ll keep at it although I think I’ll try some of my solution as its a bit more dynamic! I purchased a small Spanish flintlock pistol stamped for the King’s guard from a correspondent – it looked interesting and is in need of a little, I hope, gentle cleaning and tidying up. It should arrive tomorrow so I’ll put up some photos when it does. Tomorrow I’ll get a load of logs dumped on the drive so my day’s work will be shifting them to the log store… tedious! Not too creaky from the climbing but my right hand had the odd twinge – I guess I don’t usually hang by my fingers so climbing is a bit of a shock for them! Better remember to take the Slacum off the Wilkes stock before bed!
13th October – Climbing (boulderng) this morning has left me a bit creaky – I do feel a bit out of place there as I’m usually the only person over about 25! I am some way into browning the Wilkes barrel and its not going quite as I would hope – I’ve done 6 passes with Blackley’s slow brown and a bit of my ex printed circuit solution but it is quite uneven in its action – it is etching the iron bands quite enthusiastically but has still left the steel more or less unmarked – the twist pattern shows clearly but I wish the shiny bits of steel would start to bite. I guess its the metal, and it would account for the fact that when I first saw the barrel I thought it had been etched – I guess it was just that there is a marked difference in the effect of the rusting on the two components of the twist – more than usual. Patience is the name of the game….I will carry on and see where it gets to – I may move to using my solution as it has a bit more bite than Blackleys. I’m still putting Slackum on the Wilkes stock – that’s up to about about 5 coats and is beginning to have a uniform shine – I’ll probably be able to stop in a few more. This afternoon I decided to try and melt my lemon brass and cast up some rods for making ramrod ends so made a mould and fired up my flower pot furnace with charcoal – I made the furness some time ago from a large flower pot that I set in plastic tub lined with weldmesh and filled the the gap with a mixture of cement and vermiculate ( plastic tub removed when set) – I put an old vacuum cleaner on blow through a hole near the bottom. Last time I used it I managed to melt and cast brass – this time I just couldn’t get it quite hot enough -I packed the crucible in charcoal but the blower didn’t reach round it so it mainly heated from one side and that wasn’t enough so I ended up with a crucible of slush – I’ll have to do better next time! We live and learn… Following my visit to Shuttleworth and meeting up with my old school friend I thought I might learn to fly – not necessarily to get my license but just to find out how. Anyway John kindly offered to take me up in his Auster which has dual controls so I might just do it!
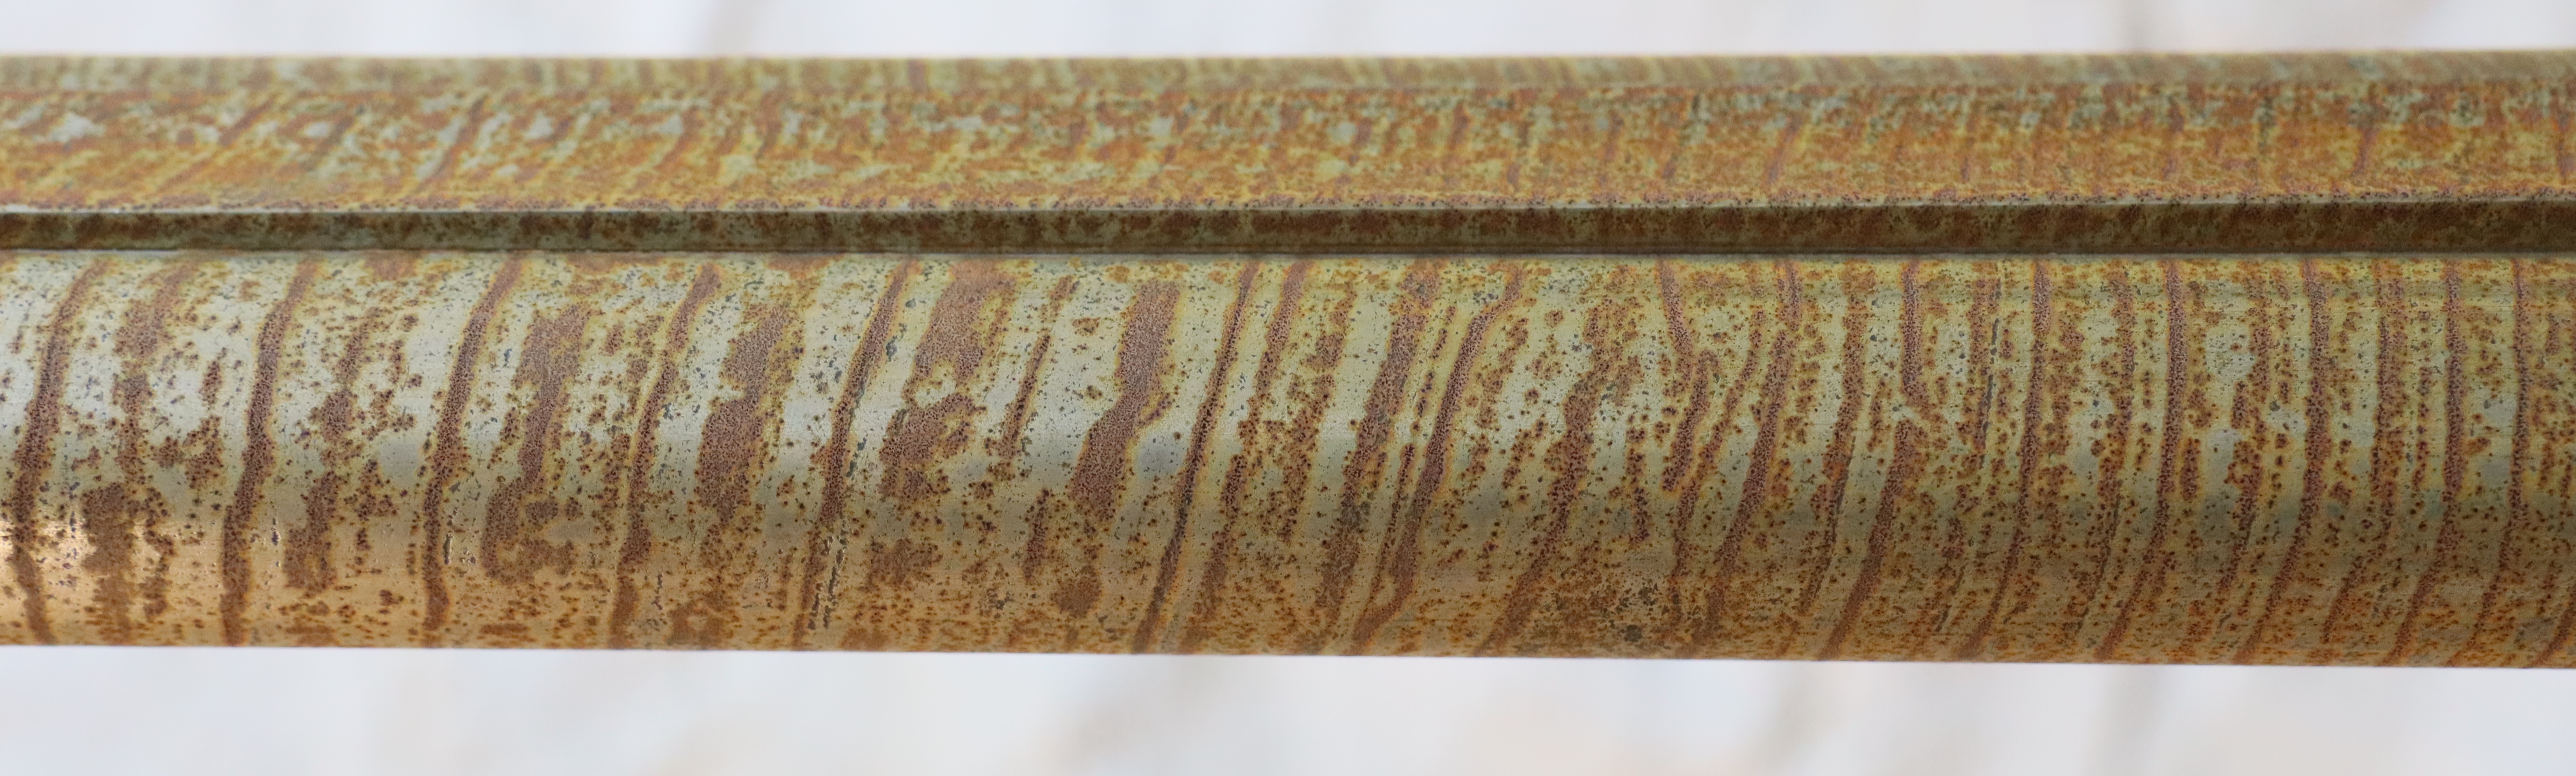
Wilkes 5 rustings in….Not great quality twist here – very different widths on the two sections.
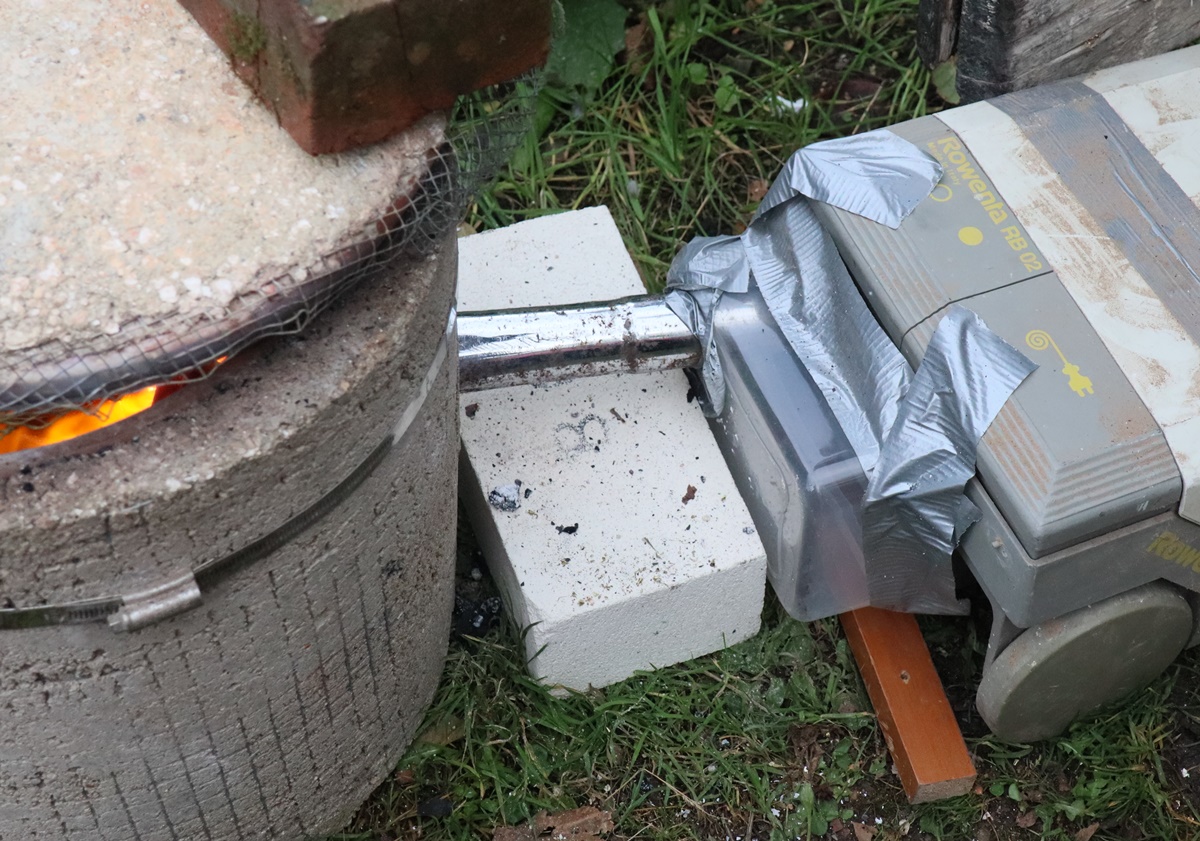
Pot furnace and blower – I need to sort the air path within the pot so it heats all round.
11th October – I have started to brown the Wilkes barrel after scrubbing it with detergent and water and coating it in chalk paste – it’s had a light coat of Blackley’s slow brown and is hanging in the cellar, but I have to say after 10 hours its not showing much sign of any rusting although the pattern is emerging in places. Patience…. I made a couple of titanium nipples for the Wilkes barrel but as its being browned I don’t want to mess about fitting them so I don’t know if the threads will be a good fit – they have a 1.2 mm hole at the bottom about 2 -3 mm long, then 2 mm up to the top – that’s the generally accepted standard for modern caps. Some people use 1 mm for the bottom hole, but I broke the 1 mm drill so its 1.2 mm! I’m still putting coats of Slakum on the Wilkes stock – the workshop isn’t heated and it seems to get to a good tacky/gummy state in about 12 hours so as long as I remember to remove it before bed I will be OK – I have only left Slackum too long once before, and I had to take it off with steel wool and start again, so I am ultra careful.
10th Ocober – I filed up the cast Westley Richards cock to get rid of the casting ‘orange peel’ effect and engraved the tails and colour hardened both and fitted them. It is amazing how exactly they now match – there must have been a limited number of patterns of cock made in whichever suburb of Birmingham made cocks, and the squares must have been put in by the maker/filer against a jig, leaving the lock fitter to put the square on the tumbler. Anyway as you can see, the cock that was on the WR and the cock from Dick’s junk box line up exactly without touching the squares. I keep looking at the locks of the WR, as the outside surface is quite worn/polished down and I did wonder if the lock plates were in fact a modern casting, but further examination at x25 has convinced me that they must be original, with the engraving just worn down and polished almost out. I can’t decide whether to anneal the lock plates and re-engrave them – I probably won’t as its a working gun and from that point of view re-engraving them doesn’t do anything for the gun. I just have to get a spot of weld put on the bridles where they are cracked from being dry fired out of the gun. I bought some 400 grade wet and dry to finish the Wilkes barrel, and took it down to 2500 grit. I managed to extract the remaining nipple without any damage – I got the tip of a square needle file onto the nipple so I could get a sharp bottom corner on the faces that the nipple key works on. Just to make sure I touched the end face of the nipple key on the grindwheel to create a sharp edge with a bit of a burr to bite onto the flat of the nipple. I put a fine hot flame on the nipple for a while. The nipple key gripped well but I had to put a large vicegrip on it to get enough leverage and at one point I thought I was twisting the nipple key shaft! I soldered on a fillet at the muzzle to hold the ramrod in place. So its all ready to go – wash down with hot soapy water, coat with chalk paste and allow to dry, (? dip in copper sulphate – not sure about that) and brown very slowly – the last gun I did was too quick and the browning wore off quite quickly.
Wilkes 11 bore barrel – I can live with that finish as a base for re-browning.
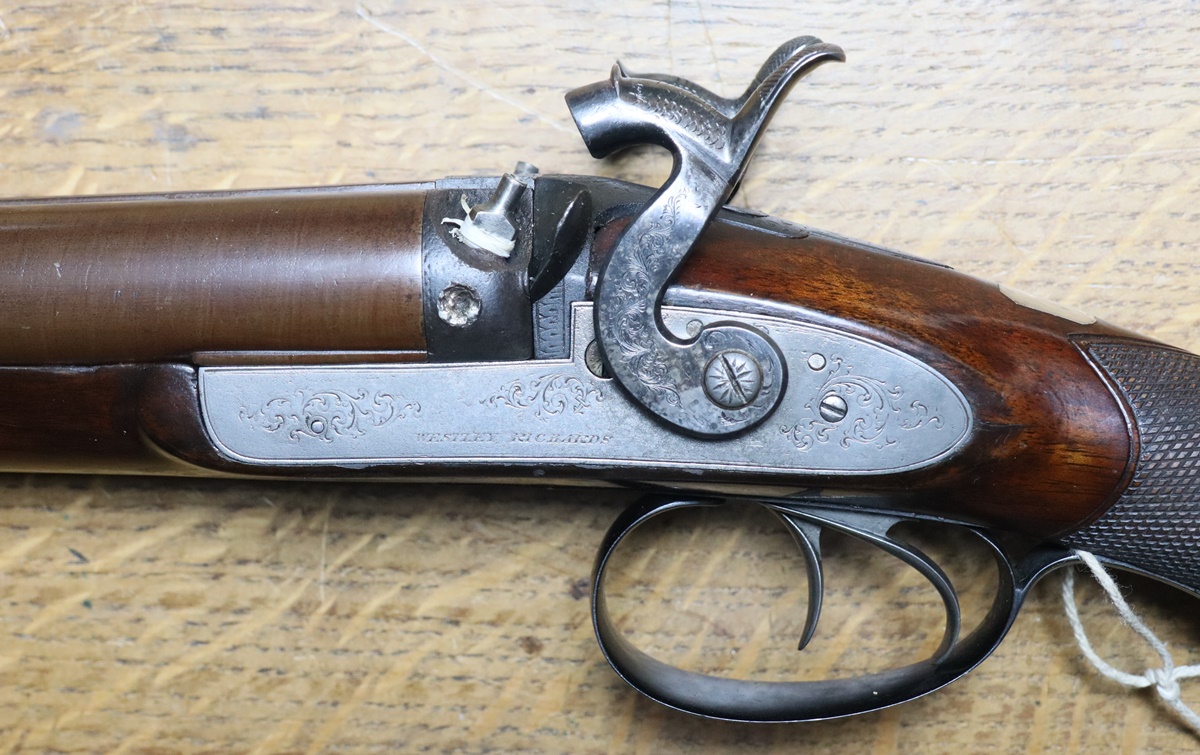
Westley Richards 11 bore – Matching cocks! I will have to do something about the german silver(?) plug in the breech plug – someone has tried to prize it out.
9th October – A couple of school meetings this morning, and then another look at the Wilkes barrel – I found I don’t have any wet & dry between 240 and 600 so I’ve ordered various grades and will wait til it comes. I started on the old cock for the Westley Richards that I got from Dick – the spur was a bit oversize and the engraving was wrong, but fortunately the one I got from Dick was 1/2 mm thicker than the other so I could file off the unwanted engraving. I reshaped the spur to be pretty nearly the same shape and size and recut the chequering with the Gravermax – the advantage of the gravermax, apart from it being less effort and less liable to slip, is that you can hold the cock resting on a surface while you engrave it, which means you can turn it to cut the lines across the curved surface without forever resetting the vice. Having done that I ran it against the fibre wheel to wear the cuts down a bit. Next job was to mount the cock on a piece of wood with setting wax and engrave it. The metal was pretty horrible so I used a mix of hand and Gravermax. It is now done and looks remarkably similar to the other cock – I do find it amazing how much standardisation went on in the gun trade, particularly in Birmingham. Anyone who imagines that every gunmaker lovingly made all the bits of his guns in his own workshop has some serious explaining to do! Looking at the photo, I realise I ought to do some more surface filing on the casting to get rid of the cast surface – nothing is ever finished!
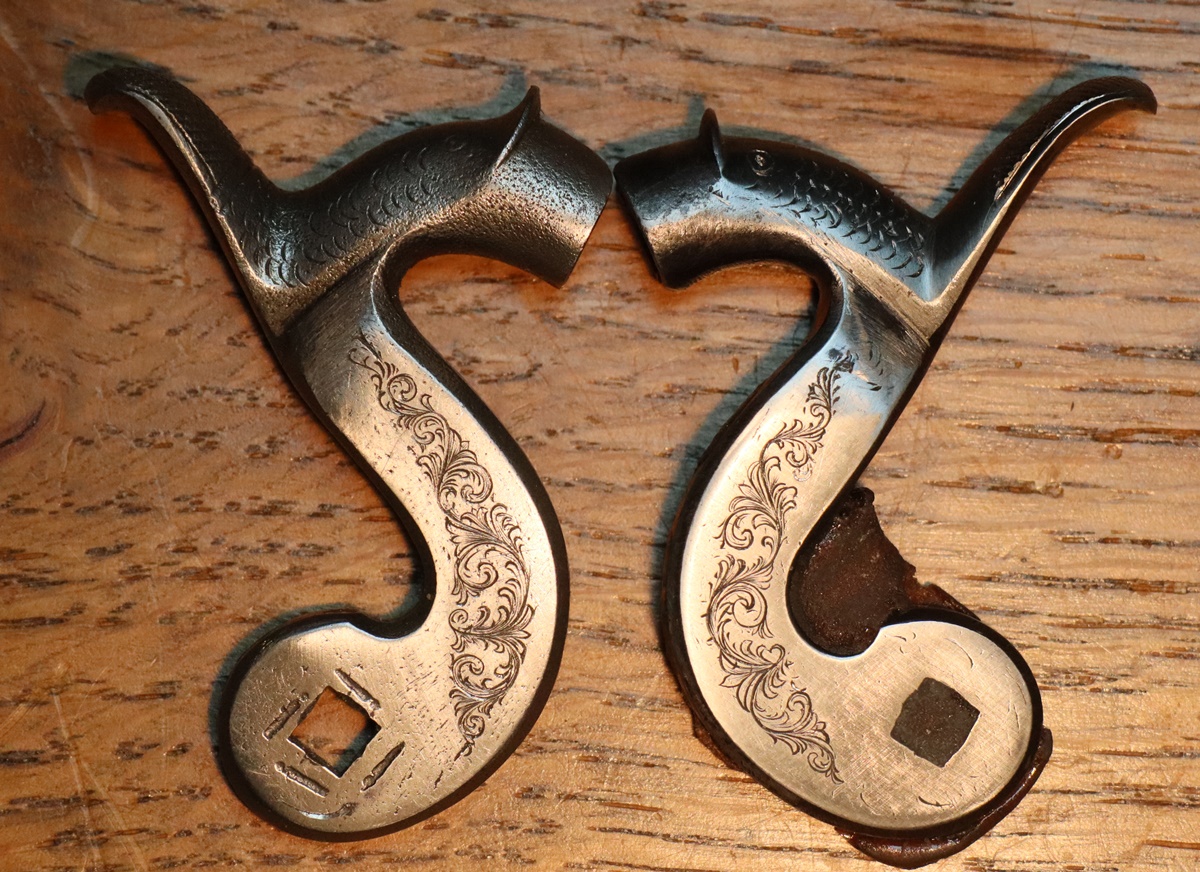
The re-engraved casting is on the left, the re- engraved cock from Dick’s junk box on the right – amazingly good match – even the square is right!
8th October – I spent a dirty couple of hours stiking off the Wilkes barrel – it looks possible although there is really no prospect of getting rid of all the pits etc. I need to get rid of some of the remaining scratches – its distressing how many faults always show up when I photograph things- my photos are always very revealing – most of the photos I get sent to look at are , by comparison, like looking through soup! I keep my Canon M50 with 18 – 150 lens handy and have a 500mm square white LED panel on the ceiling so its very quick to do, and I always use manual focus. I went to Dicks and we has a look at the locks of the Westley Richards 11 bore – the lockplates are castings as are the cocks, although the works look like they were originals. Unfortunately the bridles have both been cracked – probably because the tumblers stop against then instead of being stopped by the cocks hitting the nipples. I will keep the cast lockplates – they need the engraving recut – I managed to get an almost perfect original cock to replace the really bad one from Dick’s box of spare cocks, its a good fit and as often happens with late locks, the square drops on teh tumbler in exactly the right orientation. Dick’s supply of percussion cocks is fine if you want a left hand cock (I did) but not so good if you want a right hand cock – in fact he has hardly any, not sure why, I think he bought them years ago in a box of junk from aWeller and Dufty auction, which is where most of his stuff originated.
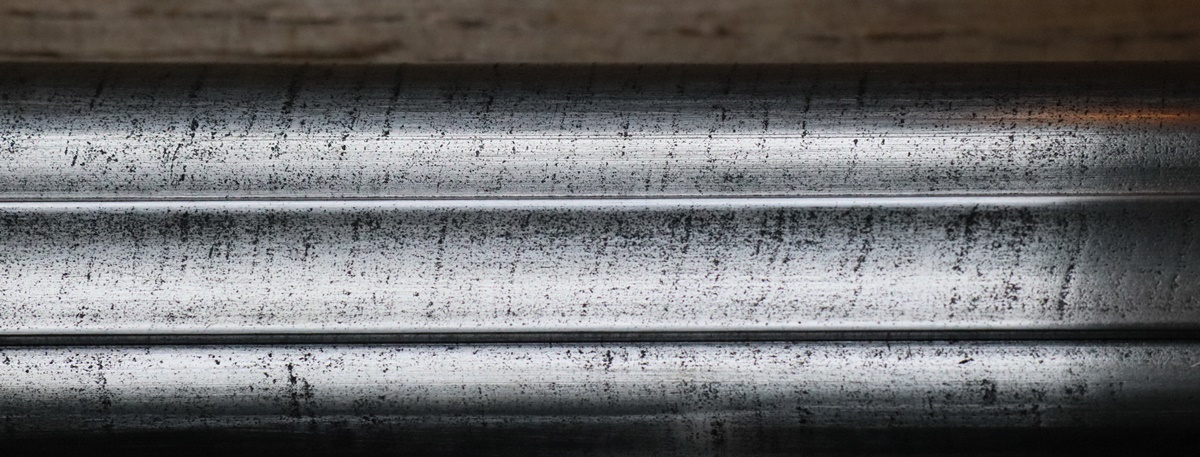 It looks a bit better in the flesh but I’m not going to be able to get all the pits etc out – maybe a bit more though…..
7th October – I derusted the Wilkes barrel to see where we go from here – still not clear on the best course of action – the barrel has a very uniform fine pitting over its surface with no obvious areas of serious corrosion – I’m still puzzling out how it got to be as uniform ! I’m not sure how much metal I’d need to remove to get a smooth surface, or what it would look like if I did a partial strike off. In any event its probably not possible/sensible to strike it off to get rid of the deeper twist related fissures. But I do realise that leaving it as it is is not a viable option, so something has to be done…… And I still need to get one of the nipples out – I don’t like drilling them out as it risks messing up thread. The one I did get out left a reasonable thread in the breechblock that I cleaned out with a 1/4 BSF plug tap but its a bit oversize so I will make up some (titanium?) nipples oversize for it. I need to collect my fine gas torch from Dick’s where I left it, to see if that will shift the second one. I probably need to make/find a better fitting nipple key as I can’t get a really good grip on it to put enough force to turn it – to do that I’ll need to buy some more 10 mm silver steel rod from ebay! I have learned to be patient and try different things before resorting to anything too drastic! There is always the option of recutting the nipple holes to 9/32 BSF (same pitch as 1/4 BSF) but I prefer not to have to do that.

Very uniform pitting over all the surface, with some deeper fissures as part of the twist pattern.
7th October – on Saturday I went on a trip to the Shuttleworth Collection at Old Warden airfield – my old school friend John had been the Director for several years and my nephew wanted to give my brother a day out as he is suffering from Parkinsons, so John kindly flew him down to Old Warden in his vintage Beechcraft Bonanza and we all had a tour round the collection – almost all the aircraft there are kept in flying condition and get an airing from time to time – John was one of the Collection pilots and has flown most of the planes, so was able to give a real insight into the merits and demerits of the various planes. One thing I learnt was why the Spitfire became the dominant fighter plane in WWII in preference to the Hurricane – the Hurricane could never have stood the development that ultimately resulted in the Mk 10 Spitfire which involved fitting an engine of over 2000 bhp in an airframe originally designed for 850 bhp! As John pointed out, you only have to look at the thick aerofoil section of the Hurricane to realise that the drag was always going to restrict it – its more like the (Clarke Y??) sections we used to use on our slow flying model planes when John and I were mad keen aeromodellers in the mid 1950s ( mostly control line planes – John gave me back the last plane I built – a Lucky Lady stunt plane some time ago). Great day out, if you haven’t been to the Shuttleworth Collection – GO!
6th October – I think I’ve put enough coats of Slakum on the Wilkes for the time being – I’ll let it harden off for a few days. I derusted the barrels inside and out in the tank and got all the superficial rust off. There is quite a lot of structure in the exposed surface and I’m not sure how much I would have to take off to get a better finish – I’m not sure it is sensible to take them down to a perfect surface – it would mean removing a fair amount of metal, but I may be able to take it partially down and etch it slightly in copper sulphate before browning – I’ll have to see what looks possible. I had another careful look at the Westley Richards and decided that the locks were a recent replacement from castings – nicely made but in need of some work on the engraving – luckily that’s something I can do. I have been p[
lanning a challenge for the children at school and was looking for some prizes – the school ‘badge’ is a couple of owls so I am engraving them on slices of rod and mounting them in oak blocks as I do with screwheads for the kids when I do engaving demos.
4 th October – I woke up in the night and realised that I’d left a coat of Slakum on the Wilkes stock and it was probably getting past the gel stage, but my concern didn’t overcome my desire to go back to sleep! I had a meeting at 8:30 so rushed into the workshop early to find the Slackum still just about workable, so rubbed it off with kitchen roll and linseed oil – hard work, but it looks good & I made the meeting. I put another coat on today (and I’ve taken it off before bed time!). I made up a couple of screws – as regular visitors to this site will know, its one of my favourite jobs. I made a side nail for the Westley Richards 11 bore to replace the brass one. I reckoned that a 2 B.A. thread would fit as that seemed to be what the brass one was, so I made a blank and cut a thread with a new 2 B.A. die -it didn’t fit the thread, so I closed the die right down and recut the thread but it still didn’t fit, which was odd as I’d tried it with a different brass 2 B.A. screw. Rumaging in my screwcutting box I found an old 2 B.A. die that turned out to cut quite a bit smaller than the first one, so success. I also had to make a small screw to hold the foreend pipe on the Wilkes – those are very short screws with large flat heads filed into a hollow to clear the ramrod – it worked so that is in place now. P.M. I went over to Dick’s to see about the Wilkes barrel pipes that needed resoldering – a tricky job as it means locally heating the barrel up to around 300 C to melt the tin ( tin is the preferred soldering material as it melts at about 100 degrees C lower than lead and is stronger) – Dick had made a couple of pipes out of a bit of a twist barrel, so they were tinned, and the mounting places on the barrel/under-rib were gently tinned keeping the heat to the minimum as one doesn’t want to expand the under rib to make it bulge out – anyway suffice to say that they now appear to be soldered in place and the ramrod fits. I have a gas/oxygen torch with a tiny nozzle that is ideal for localised heating – it was sold for lead welding. We will see if they stay in place after derusting – I’ll derust the barrel inside and outside over the weekend, then take a view as to whether to strike it off or just rebrown as it is. I might be able to get the nipples out after derusting, as the moment I can’t shift them. I filed off the face of one of the Westley Richards cocks at it was a plain but rough surface and engraved it in imitation of the other cock – both were modern castings and the metal isn’t ideal for engraving so I used the GraverMax machine – it’s a bit of a cop out but the metal was so horrible that I couldn’t really get passable curves with hand engraving – even with the GraverMax it was difficult to get flowing curves, but I think its passable.
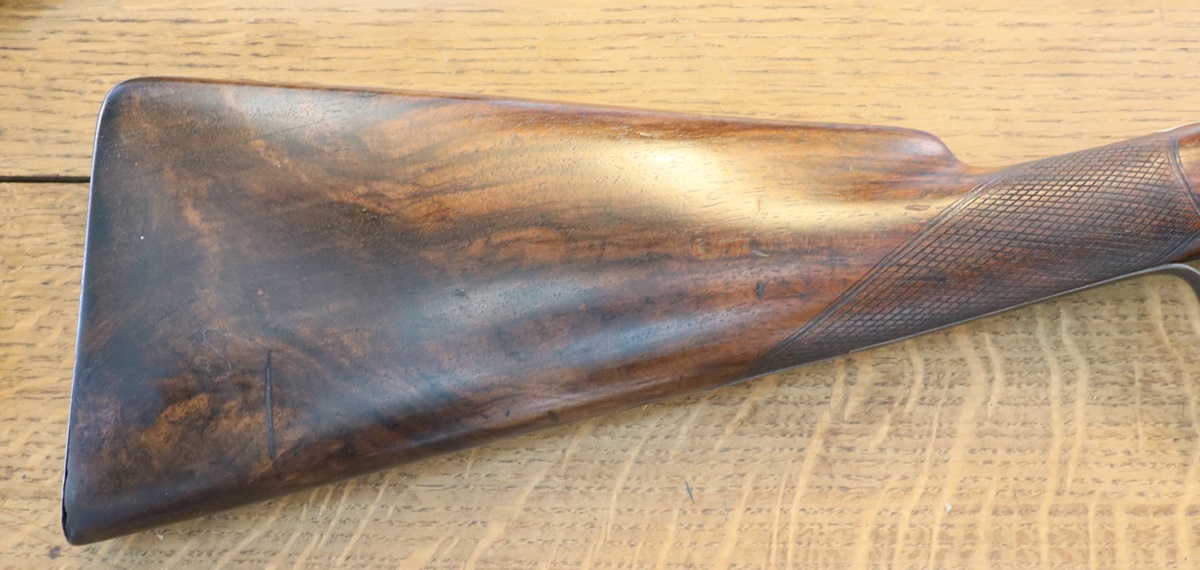
Wilkes stock – Photo shows the grain but not the shine!

Westley Richards cocks – made from reject castings ? I engraved the one on the right -not as conspicuous as the one on the left as that was smeared in the casting process
3rd October – Carried on with the Wilkes 11 bore stock – after removing most of the shellac based finish the wood was looking a bit grey so I wiped it over with a damp tissue with oxalic acid on it to lighten the finish, then when dry put on a couple of coats of sanding sealer with another tissue and filled a couple of pits with instant glue and walnut dust. After rubbing down with 0000 wire wool I’ve started to put on an oil finish – rub on ‘Slacum’ – a mix of boiled linseed oil with colouring from alkonet root, beeswax (4%) and Terbine drier (1%), then leave till it gels and rub off with linseed oil – it will take many coats to get a good finish but each takes only a few minutes. The foreend pipe was missing so I ‘stole’ one from an old stock – its not quite the correct shape but will perform the function and with a bit of filler it will not look out of place. I could have made a new one as an exact fit, but I’m afraid the job doesn’t really merit the expense. See photo below. Looking for a suitable foreend pipe I came across the 11 bore Westley Richards I’d picked up at auction and hadn’t done anything with – it looks like a good shooter so I’ll see what needs doing to it – If you look at the post about it, it is a mystery – I haven’t yet got on to WR to see if they have any history on it. The first and obvious job is to replace the threaded Brass 2 B.A. screw used as a side nail for fixing the locks with something a bit more appropriate – a job for next week. Tomorrow I have a meeting in school again – being a school governor is a very demanding ‘job’ if you take it seriously. Schools are run and managed in a way that seems totally illogical to anyone who has been involved with businesses in the ‘real’ world. How any small organisation can generate so many different policy documents, development plans, termly reports, head’s reports, action plans and newsletters not to mention inumerable charts, tables and graphs is well beyond me. They almost always duplicate something that exists already with slight variations and many repetitions. The nett result is that no-one can see the wood for the trees and there is no time to think – it’s what I believe is known as displacement activity. One of the wonderful concepts introduced by the Department of Education and OFSTED is ‘British Values’. Not only are the children supposed to learn and understand these hypothetical concepts, but be able to recite them if anyone asks ‘What are British Values’. No one has yet given me a satisfactory explanation of what is ‘British’ about them – one is democracy (presumably a bit dented at the moment) and the rest are in part derived from (modern) Western Christianity, which is in turn based on evolved ways of cooperative living with a bit of authoritarianism thrown in. All seem to me to be shared by any number of countries – Scandinavia, western Europe, Australia, Canada etc etc. The only truly British Values I’d be sure about are a propensity to form queues, and to laugh at Monty Pythonesque humour…….but that won’t cut much ice with OFSTED…… Howsoever, I’m told that as a governor I must take it all very seriously, which of course I do, as anyone who knows me would expect!
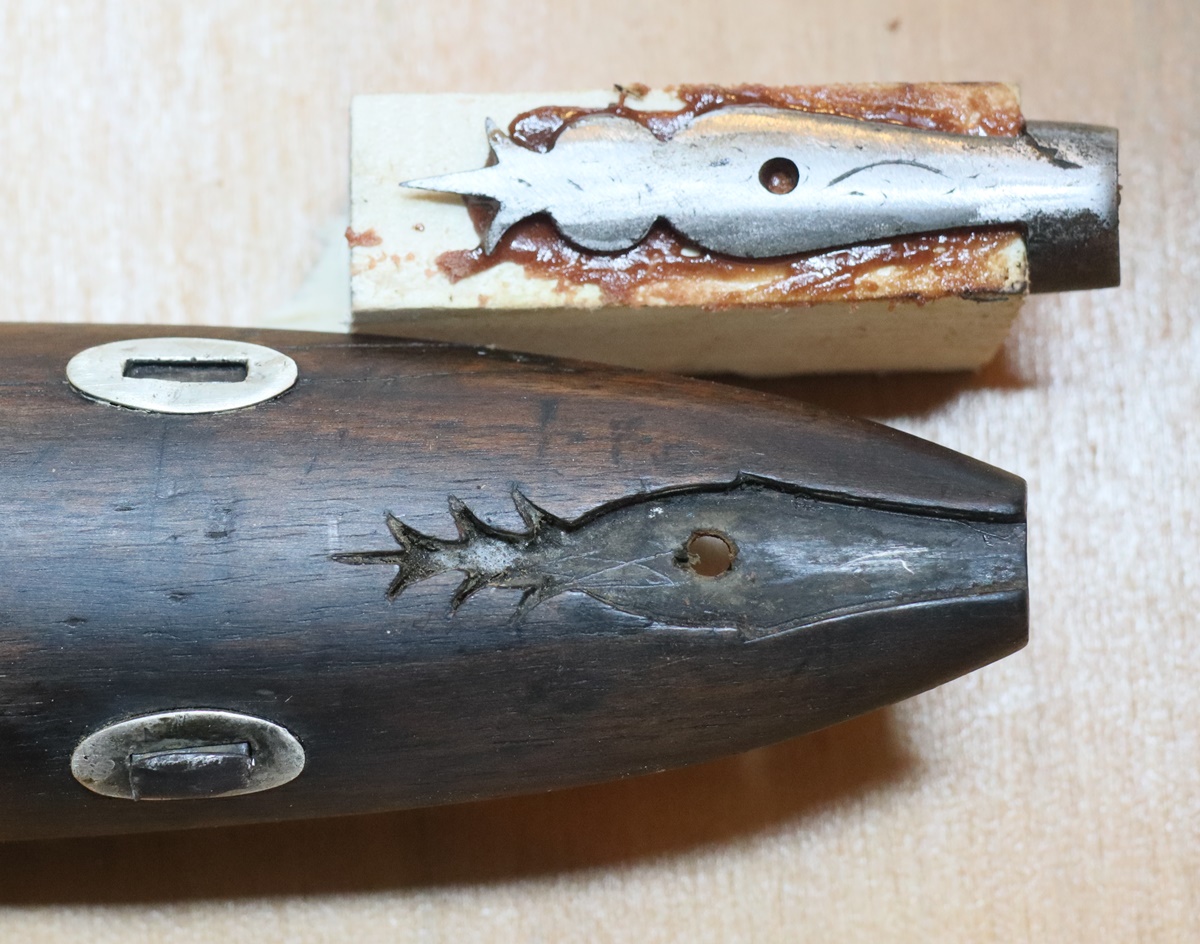
It will cover almost all the cutout – the fixing hole in the stock will need moving and some filler put in a few voids.
2nd October – One of my regular viewers rang me this morning and complained that I had ruined their mornings for too long by ignoring my blog – Apologies – I have been busy with school things and trying to bring a little order to our lives – alas without much success so I have reverted to playing with guns! A friend brought a couple of guns he was thinking of buying to my stand at Sandringham. One was a somewhat tired 11 bore double percussion – sound and once a good gun. He was looking for something to shoot so I suggested he go for the other gun which was in better condition and didn’t need any work, but in the end he bought both – he paid at the low end of my suggested price for the 11 bore which I reckoned left a bit of a margin after I had sorted it. The gun is signed T Wilkes London on the locks – I can’t find a T Wilkes in my books , lots of J Wilkes but earlier than this gun, and a T Wilks of the right date – so none the wiser – could just be the retailer. I forgot to take pictures of it before I started, but it looked sad but not bad! The barrel was, I think, originally quite deeply etched twist as in the French or Rigby tradition, and had been a bit rusted but because the etched twist was an uneven surface it probably looked worse than it will prove to be. One ramrod pipe was missing and the other was soldered on with a great mass of solder over the pipe and barrel. The bores looked possible but not perfect, although there was plenty of metal at the muzzle. The locks were OK – a bit of surface rust but still decent engraving and the actions were fine. The furniture had need pretty well rusted so that there wasn’t much engraving showing, but the fit in the wood was very good – always an important clue. The stock looked a bit worn and had the remains of a fairly shiny black finish, with little of the chequering visible through the thick layer of dirt/oil/varnish. There were a couple of old splits in the foreend and the foreend pipe & finial was missing. Estimating the value when restored as £600 to £800 leaves around £300 – 400 for restoration and a small margin- not a lot, and not enough to get too fancy! My first job was to give the barrel to Dick to sort out the pipes, then I’ll get it back and de-rust it and decide if it needs to be struck down or just wire brushed and browned. In the meantime I had an investigation of the finish on the stock as it was clogging up the chequering and didn’t look right. First test was to go at a discreet bit with meths to see if it was shellac based – it was. That meant I could use my normal method of getting rid of the finish – apply meths to a couple of layers of kitchen roll and wrap them round the stock and cover tightly with kitchen foil, then after half an hour remove and rub with 000 steel wool soaked in meths and wipe the gunge off with more kitchen roll. A whole lot of dirty black muck came off with the shellac and the grain became visible. After soaking the chequering under paper and foil I brushed it with a brass suede brush along the lines and it came up fairly sharp and clean after a few iterations. I decided that I would strip all the furniture from the stock – its not always sensible but in this case all the screws came out fairly easily and the edges and backs of the furniture were not rusted so it all came to bits OK. I took the mainsprings out of the locks and a all the metalwork went into the de-rusting tank in relays, was then dipped in clean water, dried at gentle heat and brushed hard on a fine wire wheel and sprayed with gun oil. Stripping and de-rusting and brushing took about 2 1/2 hours in total – all the parts could go back in without further work, although I might strip the locks right down later. I may, if I feel like playing, recut some of the engraving on the furniture but the surfaces are rusted and for it to be effective I’d need to file the surfaces smooth, and that is probably too much work – I’ll see. Back to the stock, after a number of goes with meths I steamed the surface to lift a few small dents, and cleaned it up with meths again. I could call it a day and apply sanding sealer and then oil, or I might do a bit more before I start to refinish – so far I think I’ve spent about 2 hours on the stock. The whole gun begins to look like it will be nice when done, and I look forward to finishing it. Although I didn’t take photos to start with ( I’d not done restorations for the blog for so long I’d forgotten), I do have some progress ones;-
As luck would have it, it was a shellac based old finish – easily removed!
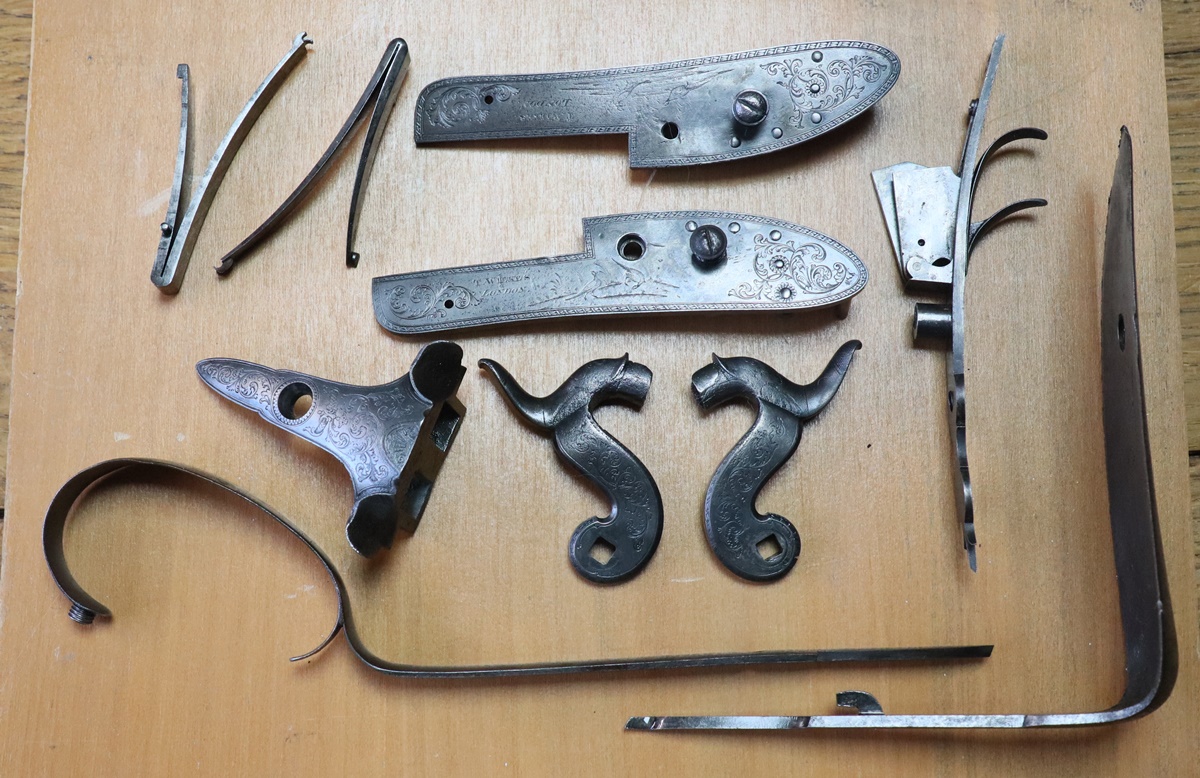
After derusting & brushing:- The lockwork and insides of parts is in good condition – the edges of bits are not rusted at all.
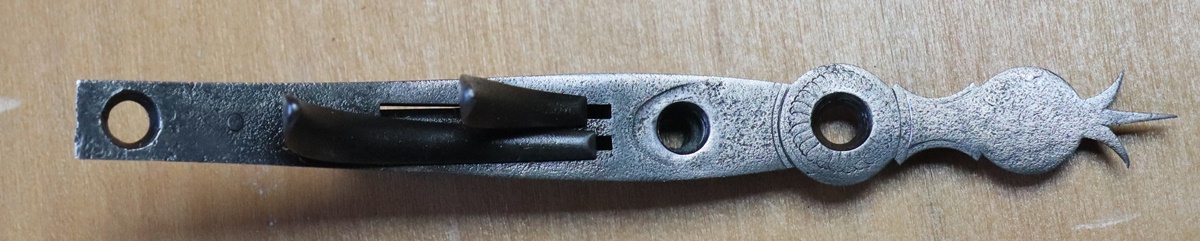
While the lock (hardened) is fairly rust free, the furniture engraving is pretty far gone and would need a lot of filing to get it flat enough to re-engrave – its probably best left, but I’ll see whether I feel like having a go at it later for fun – almost certainly not an economic proposition.
26th September – I went to a School Governor’s meeting yesterday and was told that I had to send in a (short) report on my trip to Norfolk and to Kentwell Hall – there is no such thing as a free holiday! I’ve been struggling with making my cupboard – the doors are a bit of a problem as the outer layer is planked in t&g and that is not ideal for screwing in hinges – in the end I bought a couple of pairs of ‘Parliament Hinges’ which are deep and will screw into the blockboard behind the T&G. I had to buy large fancy ballbearing ones that will support 120 Kg per pair, rather overkill for a 900 x 450 door as they were the only ones Screwfix had and I wanted them today. I’m looking at my pile of gun jobs that I should be doing – a double percussion to restore, a single tubelock needs the lock engraving and an o/u pistol needs sorting – in fact I’ve even forgotten what needs doing to it, I think it needs its cocks refitting and matching….. Plus my own Venables is crying out for the barrels to be resoldered (again).. Ah well, I’ll do a bit when the cupboard is finished. Tomorrow I must take the funny pistol back to Dick as I’ve done a bit of engraving on it, and send back the rat tailed Albanian job.