Jul 172018


12th June.. I have been a bit slack on the blog!  I had a 3 1/2 hour very intense meeting on Monday that left me a bit disinclined to do much except swim up and down, after which I just slumped!    Today I did a bit of sorting out of shot, wads and cards and powder for the trip to Scotland.  As I’m taking 4 muzzle loading guns I though I ought to check which wads I needed for each, which led to sizing all the bores – of course no two guns are the same actual bore, whatever their nominal bore is, anyway I managed to cut it down to 2 sizes of wads, conveniently one size for Tom and one size for my guns.  Tomorrow I must make sure the right guns are on my certificate!  This blog is obviously being found by lots of people as I’m getting a steady stream of photos of guns and pistols to identify.  I live in hope that I’ll discover a priceless antique gun for someone, but at the moment its rather at the opposite end of the spectrum.  I did my STEM club with Dave today, but there was a football match on and we only got two kids, so they got on and built a robot while Dave and I programmed our line following robot to skirt round an obstruction – we got about half way there in 45 minutes!

10th June… I did say that the weather encouraged sitting in the sun rather than working away in the workshop! …..So we went to an Elderflower party today, a friend’s family has been holding one every year for the last 50 odd years to make elderflower wine, which they consume in some quantity. Around 30 people spend a few hours collecting flowers and getting the heads off in order to make 20 gallons of wine (it used to be much more) to last the year. After the work some of us played a game of croquet – it looks like a nice gently, very English, very genteel way to spend an afternoon.  In fact it is about the most vicious game of skill and tactics imaginable – winning is more about scuppering the opposition than getting ahead – in fact getting an early lead isn’t necessarily a great help as I found out to my cost, since if you manage to hit an opponent’s ball you get an extra turn, thus if there are no opponents balls near you, you miss out!  Anyway (son) Giles  beat me ( that’s his inheritance down the drain!).   The number of visitors and visits to the site continues to increase, which is nice – so far in the last 365 days there have been over  100,000 visitors and 670,000 items viewed – obviously a lot of those are regulars who get counted each time they visit – its a shame the software doesn’t analyse visits in more detail, but I think you have to pay if you want more detail, which of course anyone making money out of a site would do.  I sometimes wonder whether there is any way I could ‘monetise’ the site, but actually I’m happy to do it for fun, and I do get some interesting work from time to time, and make new acquaintances and friends, so I’ll carry on for a bit longer!

9th June later…  Shooting at Cambridge Gun Club today – our 1/2 oz of shot competition.  No compromise on the difficulty or range of clays, and the hit rate was a little down on some normal shoots but still good – I did my usual mediocre shooting, but was reassured that several others got the same score!  After lunch I switched to my little 20 bore Beretta hammer gun and  did somewhat better – I am resolved to go and practice properly until I can shoot a bit better.  I have in mind to try an interesting experiment, as I think that one often knows before one pulls the trigger that it is going to miss.  My competition would work as follows – unlimited clays, but fixed number of shots allowed –  score 0 for any clay you don’t shoot at, -1 for any you shoot at and miss, and 2 for each clay you break with the first barrel, or 1 if you break it with the second barrel. I reckon this would concentrate the mind!   So a top score would be 40 and a lowest  score would be -20, if you hit half the clays you score 20 and hitting 7 (1 in 3 shots) scores 1 .   I now need to find someone to try it with.  It could of course be a bit more expensive if you aim to shoot the ‘normal’ number of shots, but it might work with say 20 shots, using a very limited number of traps, say 5 hits at each of 4 traps……..   I took the Manton back to its owner who was well pleased – I forgot his slip, which I found on the peg when I got back – I’m very good at labelling slips and ramrods when I have guns to work on, as they are easy to mix up or mislay, I just forgot to look behind the door!   Pete asked me to tap a hole in a cleaning rod to take the ‘normal’ brushes etc., but that seems to have opened a whole can of worms – The tap I have used is a 9/32 x 26 BSF but that actually cuts too tight – the web suggests 9/32 BSB ( brass thread ( similar to BSC cycle thread & always 26 t.p.i.) but I only have the BSF  in 9/32 and that appears a bit smaller than the brush threads – what I thought was going to be a trivial job becomes a lot more involved – but then these challenges are what makes it interesting………………………

9th June – Back from 2 days in Norfolk at an outdoor activity centre with the year 5 & 6 children from the school I’m a governor at.  Great fun and the kids had a good time and were very  well behaved!  The activity centre was based around an 1898 house designed by Edward Lutyens so I had great fun poking around and trying to work out how the house had been originally before it was altered in several waves – first in WWI as a convalescent home for soldiers, then back to being a private house, then the activity centre, which retained quite a lot of the old furniture etc in the ‘public’ rooms, including about 10 years of Hansard containg every word spoken in Parliament during that time – covered one wall!  I could have spent the whole time reading MP’s speeches from 1975!  Anyway back to real life – in particular our annual recession shoot, in which we shoot clays using 1/2 oz shot load – its not as bad as you might think…. anyway I’d better load up and head out…..

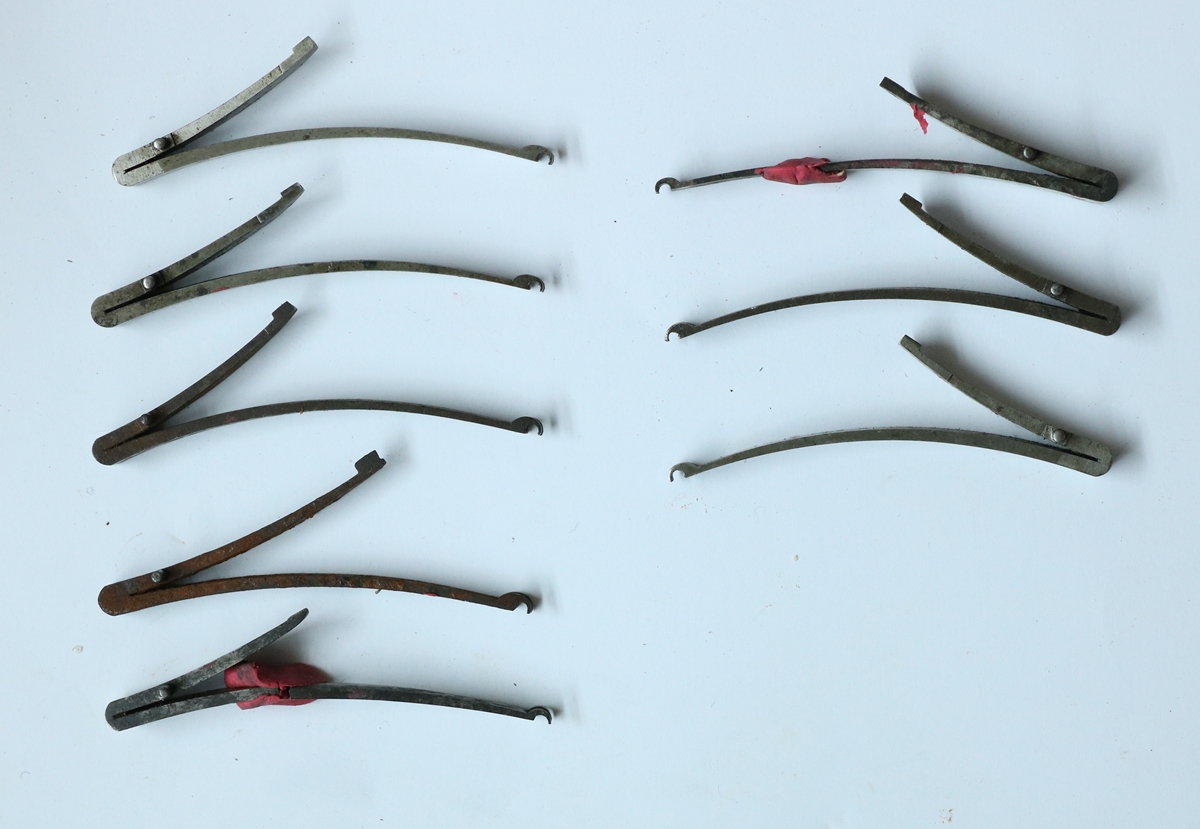
5th June Dick and I spent an hour together getting the locks of the Manton to fit – I had fitted new springs and Dick had re-fixed the ‘rims’ of the lock pockets that were a bit broken away. You may remember that we had found that the locks and barrel were original Manton, but had been grafted into a different and older stock at some point. We had two problems – 1, the springs were slightly bigger in places than the previous ones and so we had to adjust the german silver reinforcing sheet at the top of the mainspring slot, and second that the lock front extensions didn’t fit between the barrel bolsters and the edge of the lock pocket, and were opening an old crack in the woodwork  – presumably the cause of the previous damage around the locks. Unfortunately the rim of the lock pocket under the mainspring was already very thin, so no room to cut more away – I realised that the reason the numbers on the inside of the lock above the mainspring had been half filed away was a relic of previous attempts to solve the problem.  Anyway we filed the bolsters on the barrel down a bit – luckily the breech block was only slightly hard. Anyway judicious filing got it all together, and we filled the crack with a shim of walnut verneer and refinished it.  – Job done and ready to go…..   Now I’m off to Norfolk with the Yr 5 & 6 children to an activity centre… I’ll report back……..

4th June – Didn’t manage much today – just finished off the cartridge loading so I now have 100 Black Powder cartridges for Scotland.  I promised to make another shot belt for a friend, and started on that – I think its going to be a bit smaller than mine, which is a bit heavy when full – for game shooting you don’t need a lot of shot and the less you have to carry across ploughed fields the better!

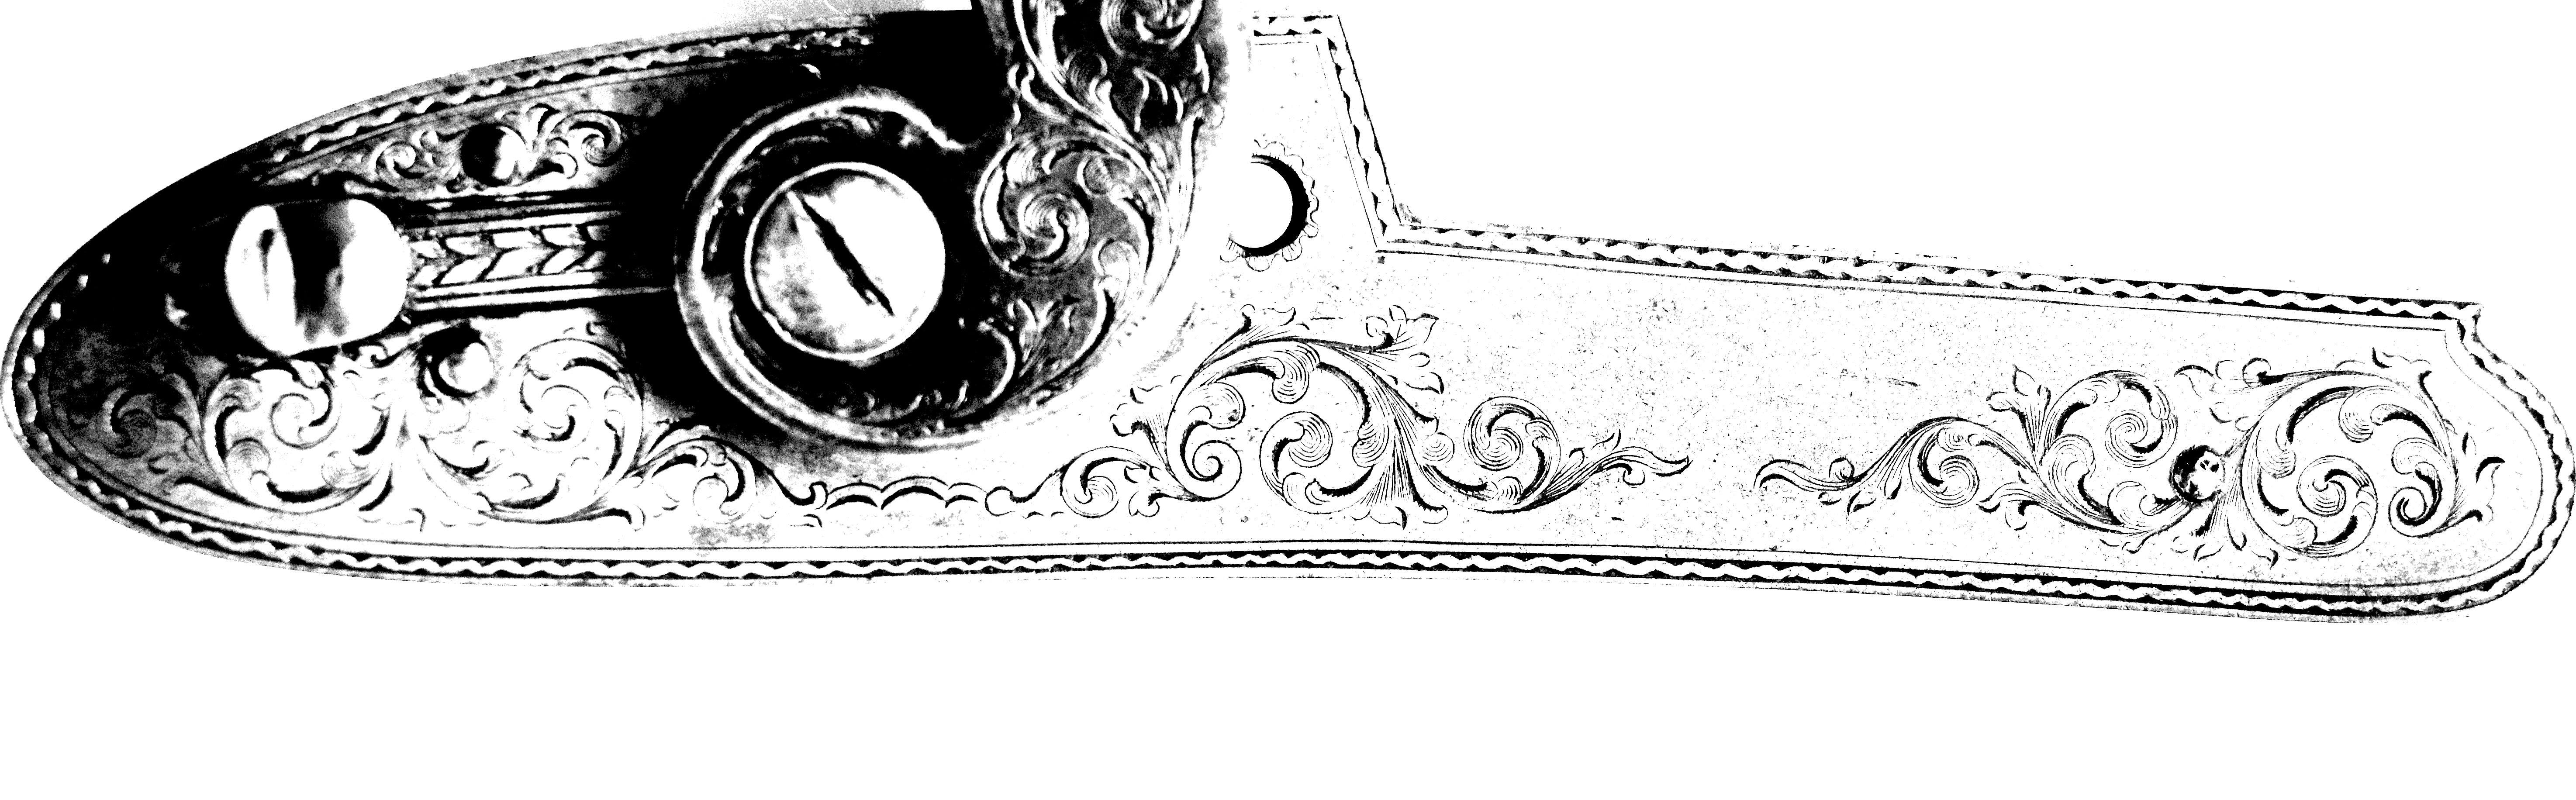
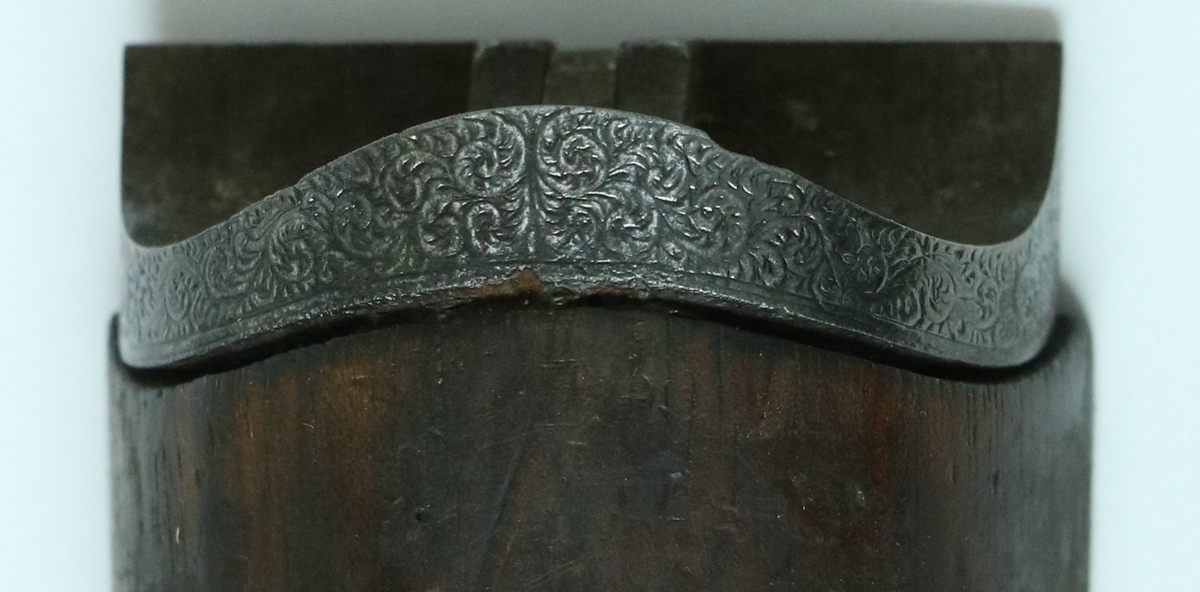
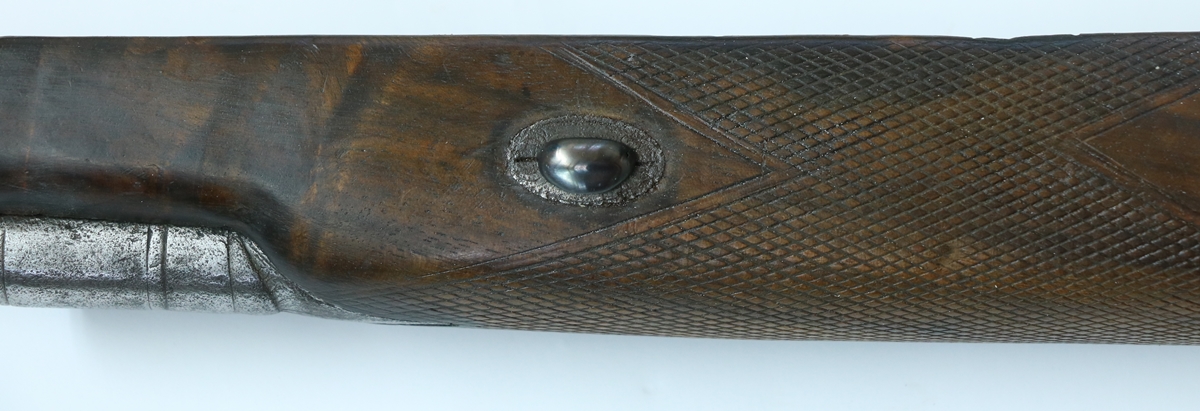
4th June – Excuse the absence yesterday, as I said, sitting in the garden took priority!  Today a meeting all morning in school prevents the garden sitting, and anyway the weather isn’t so appealing!  I have now managed to make 75 cartridges towards my 100 total so nearly there.  The rifle is now getting the oil finish on its stock augmented as it was a bit worn, and I took a photo of the patchbox in situ – I think it looks the part, but these things are always subjective!

It’s in the process of having its oil finish restored – it has the smeared on flood coat waiting to gel and be rubbed off, so looks a bit of a mess!  

2nd June.  I put the patchbox lid in the rifle and it looks good – the toning down of the colour works quite well – I coloured it lightish straw on the AGA hotplate, then rubbed it over with 7000 grit paper, then gave it a rusting with my browning solution – that went rather too well so I rubbed that partly off with 1000 grit and finished with 2500 and 7000 and polished with 0000 steel wool.  It doesn’t sound like a recipe for success but it worked – I did think at one point I’d have to start again, but it came good!  Photo soon!  The annual trip to Leucars to shoot the Scottish National Muzzle Loading Championships is the w/e after next so I thought I’d better start loading the annual bag of black powder 12 bore cartridges – Tom shoots there too using my guns as he doesn’t have a certificate in Scotland.  (He’s in St Andrews so dead handy and my B & B for the w/e) so I need double rations for the hammer gun competition.  I usually take my Bacon patent antique  bolt action double for him, and use my Westley Richards 1874 patent hammer gun by William Powell, of which I am very fond!  Anyway 100 cartridges should do – I got a couple of bags of capped cases at the Northern Shooting Show – its as cheap to buy new capped cases as to buy the caps and use reclaimed cases, even if its not so environmentally friendly – not that shooting clays scores high on those stakes anyway…  I’m getting through the restoration jobs on my list, thanks to help from Dick – I’ve now got the forend iron of the Purdey to engrave, but I’m waiting for pulls of the action body so I can line up the scrolls. After that I’ll have to find some of my own jobs to do!  Things usually quieten down in the summer as I find its rather nice just to sit in the garden and read the paper………………….( weather permitting)…

1 June – I had an email from someone who had come across the post on the Land Cruiser steering lock problem on this site and had a similar problem.  I was able to get out my pile of bits and work out how to remove the broken bit of the lock bar – and send him some pictures.  That post gets quite a few visits – If I can be bothered I can review all the traffic to the site on a daily basis, it also tells me which are the most popular posts, and I can see where all the attempts to crack the site are coming from.  I don’t look very often – I just keep an eye on the number of visitors and visits.   I finished the patchbox lid and I’m just colouring it up – its not too bad considering how difficult the metal turned out to be – I couldn’t get consistent cutting, and the inclusions didn’t help, in the end I started to use the GRS gravermax air driven graver, which I don’t use often, as it ploughs through most things without discriminating and if you are not careful it goes very deep.  I forgot to take a photo before browning so it will have to wait!

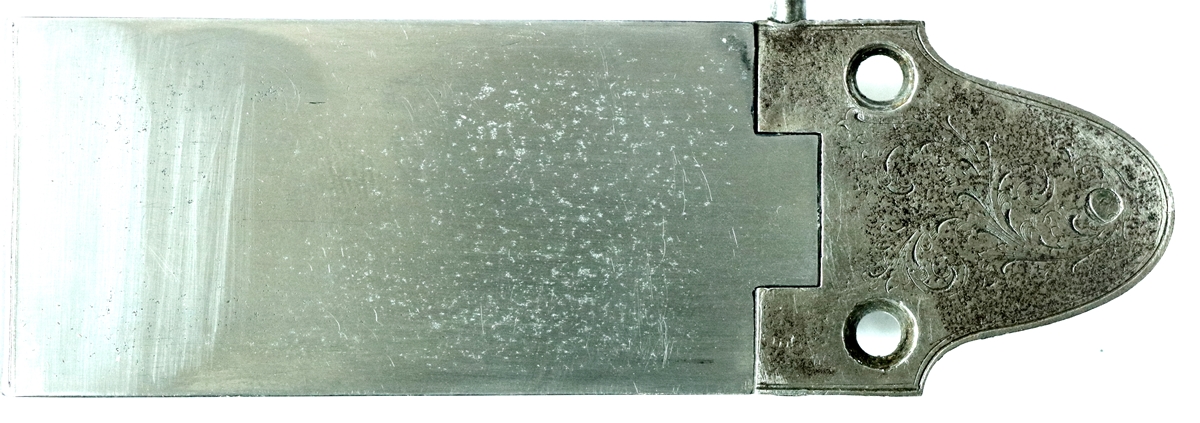
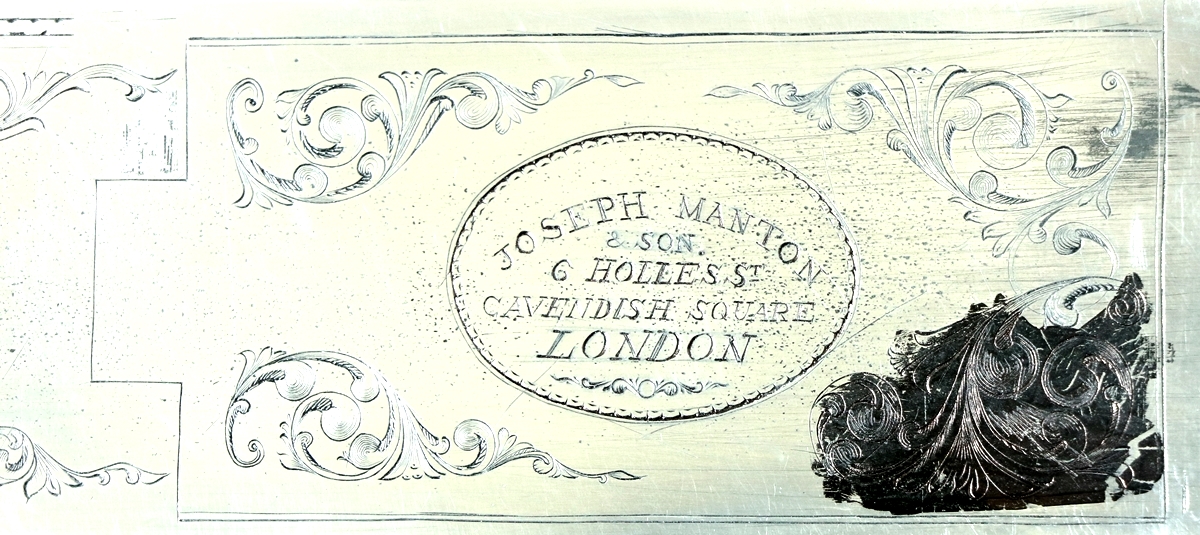
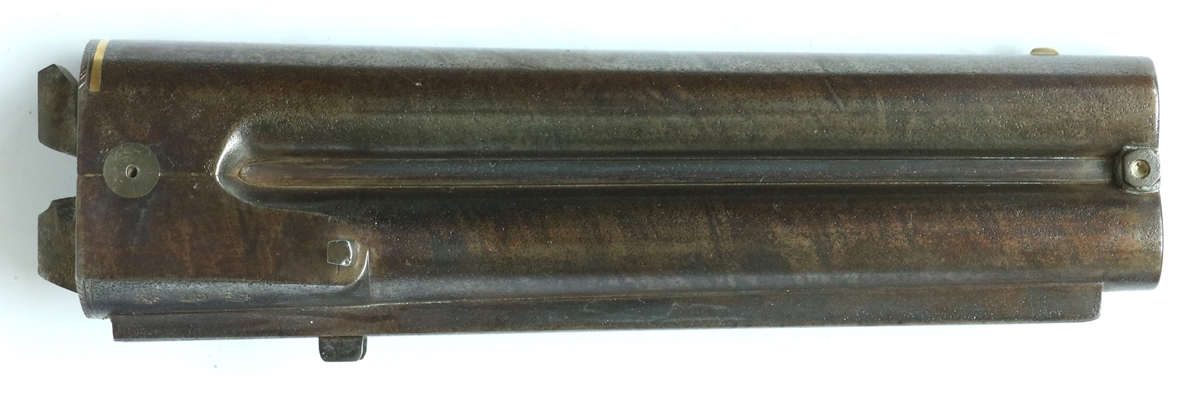
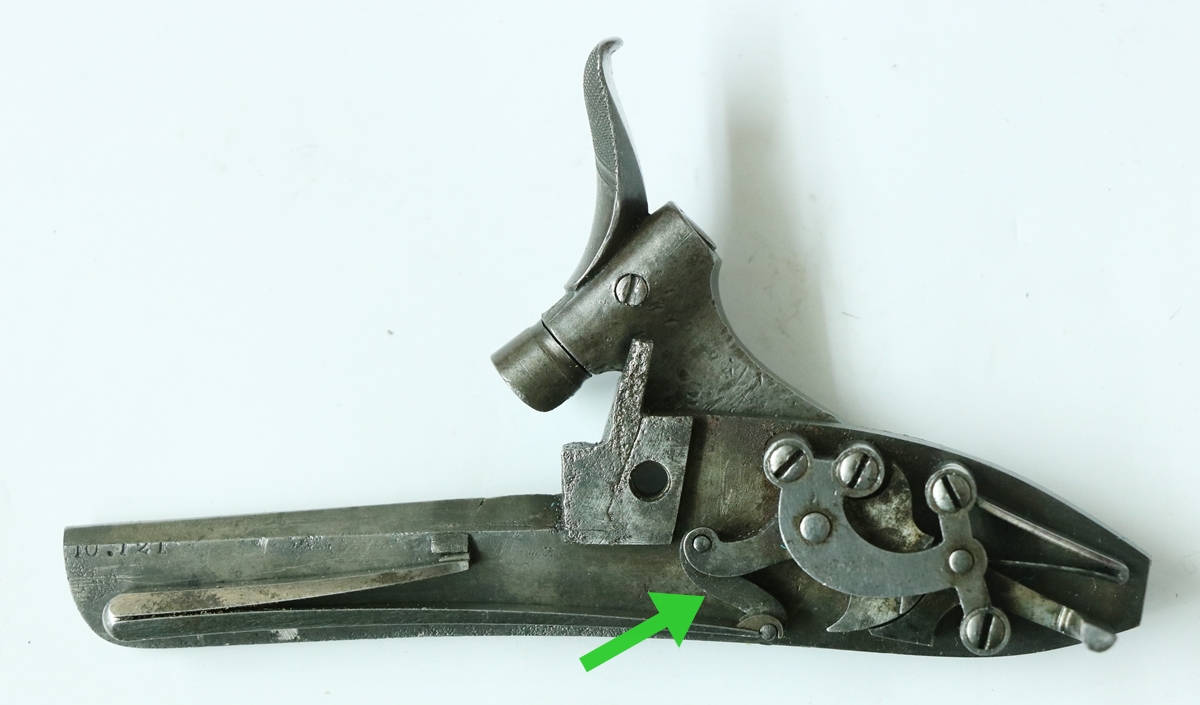
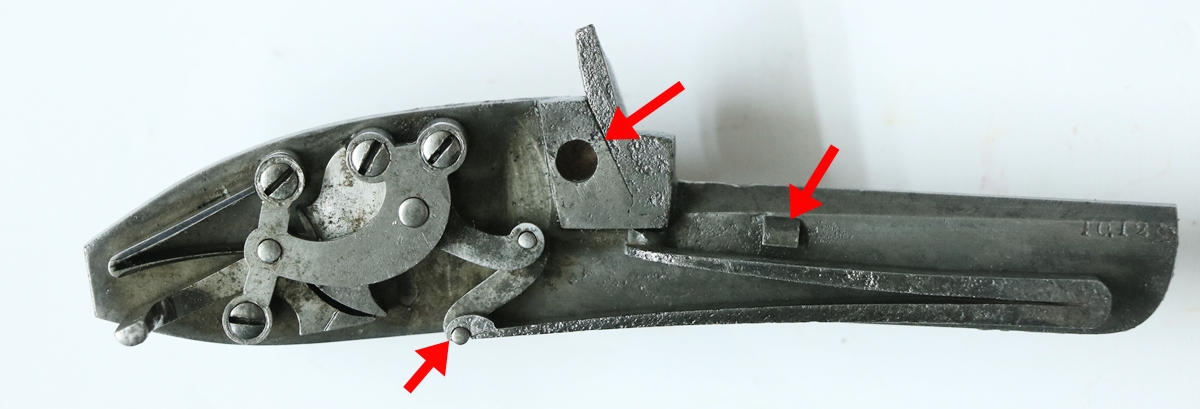
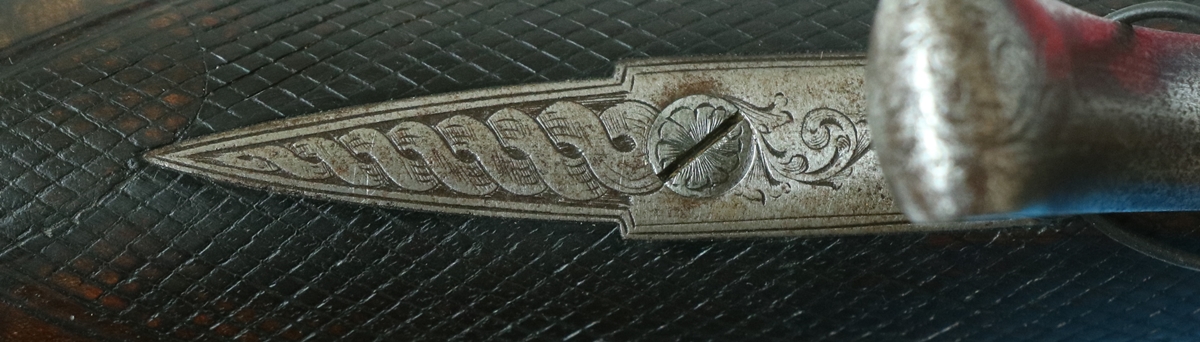
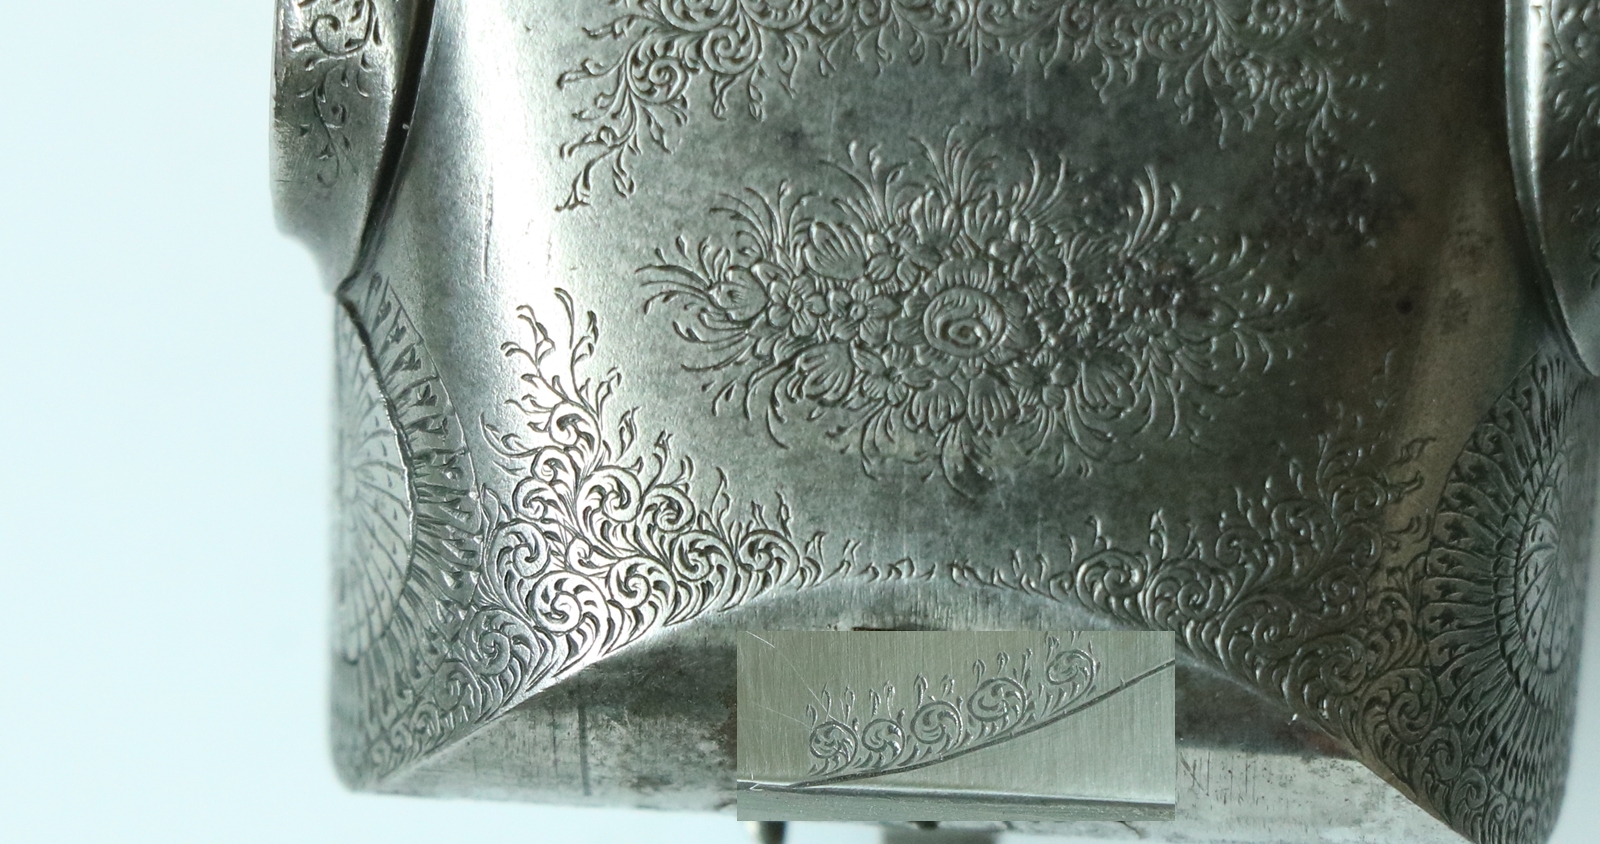
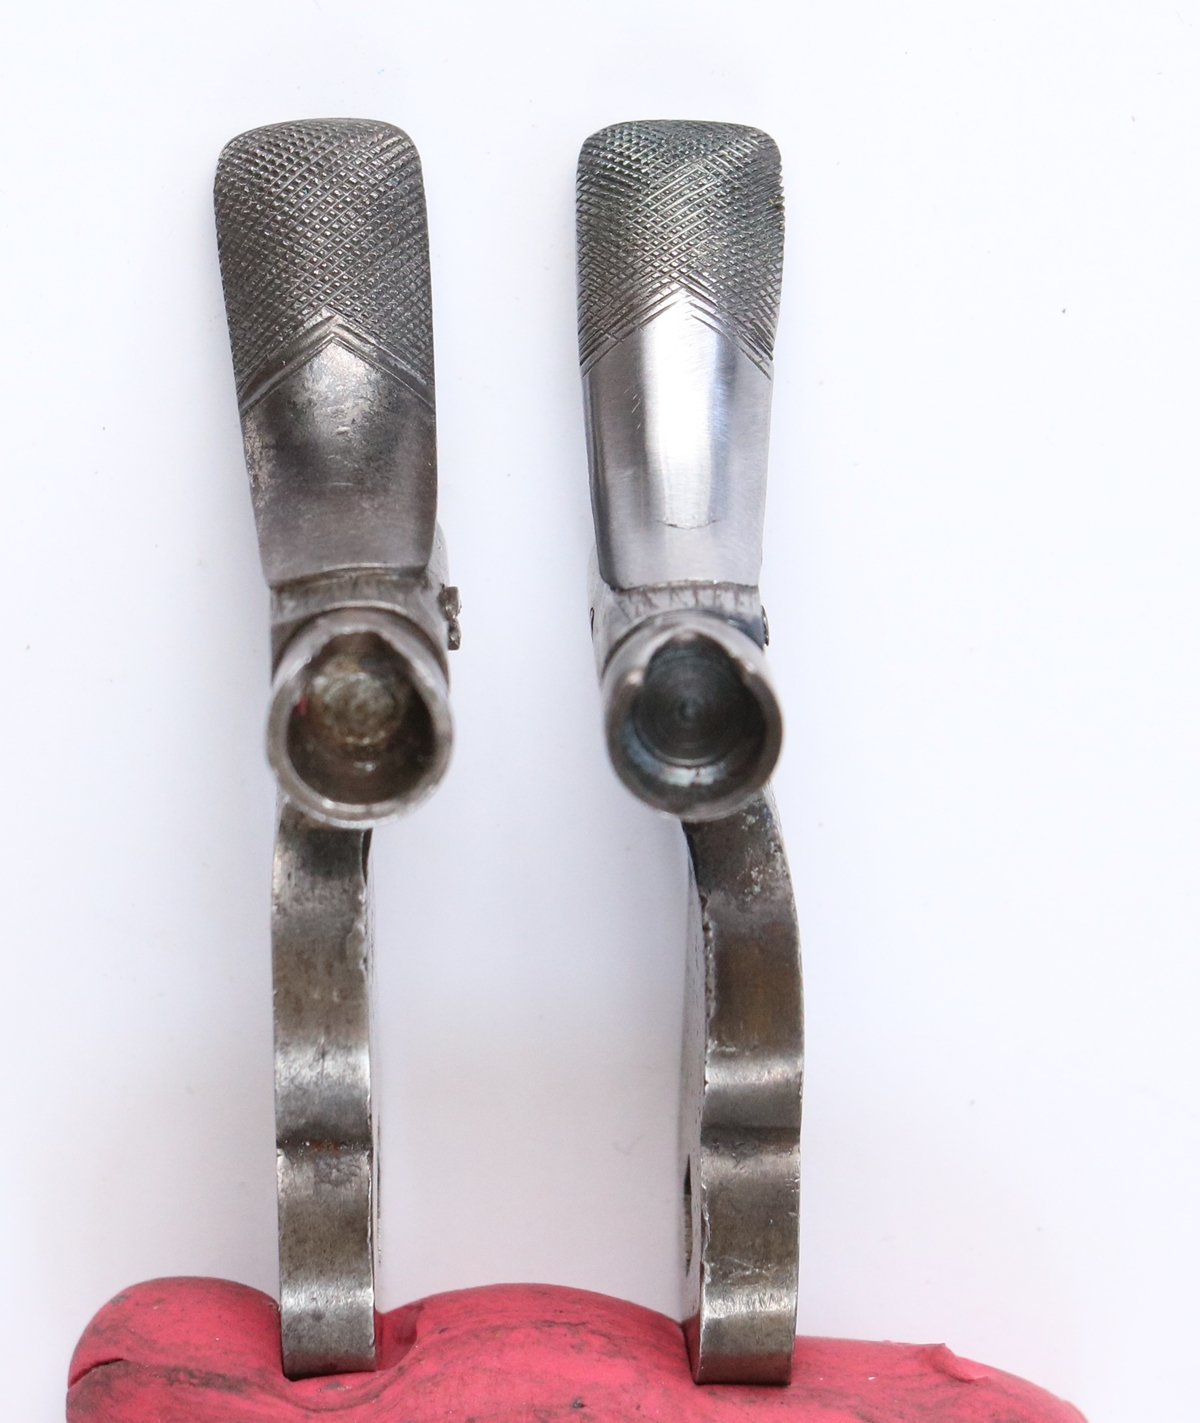
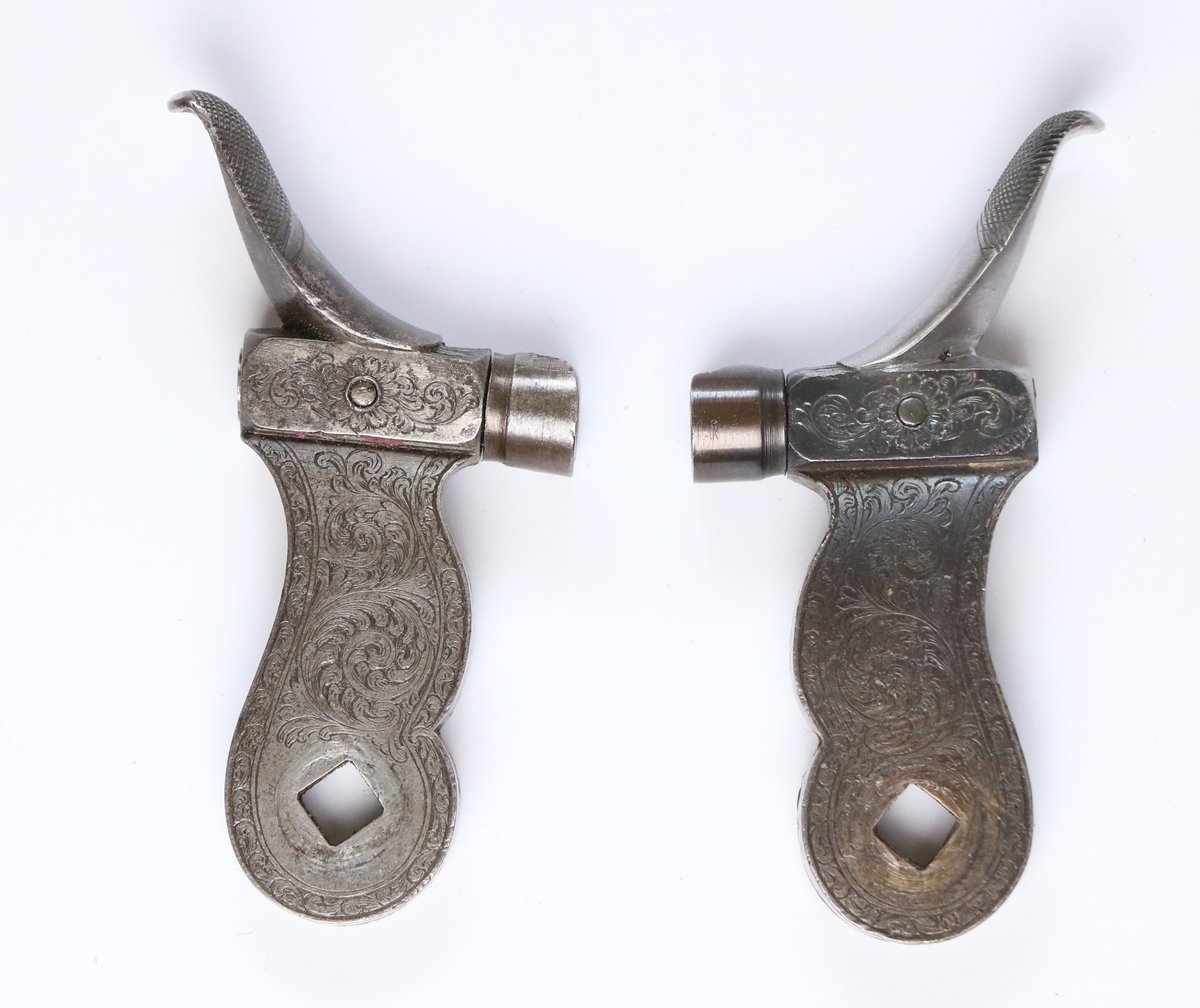
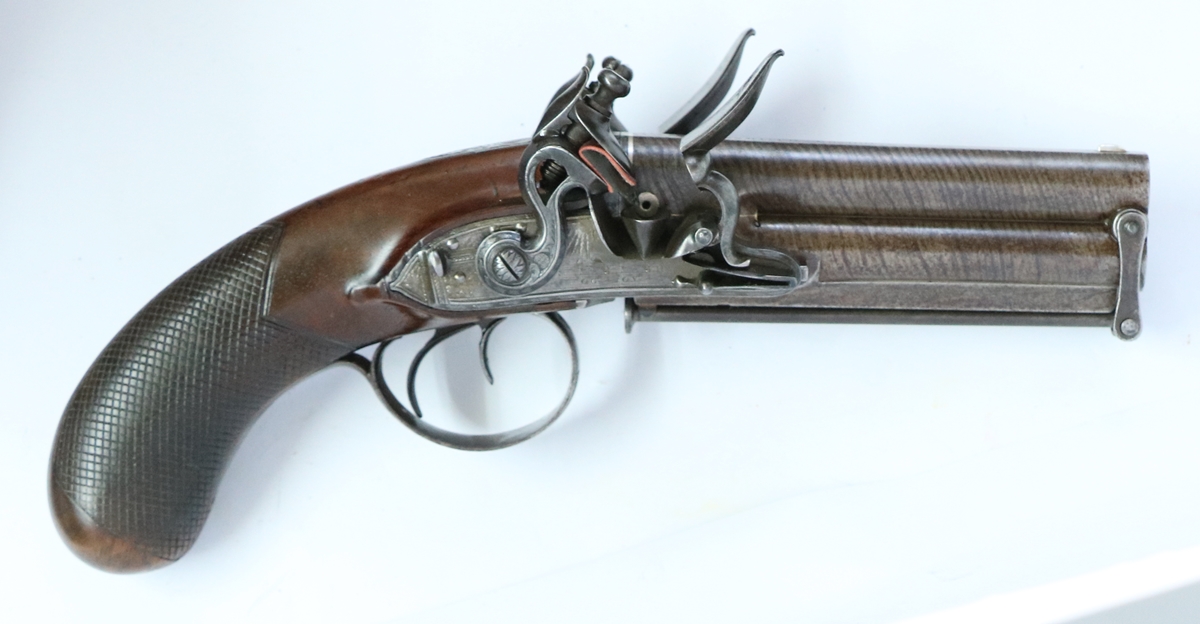
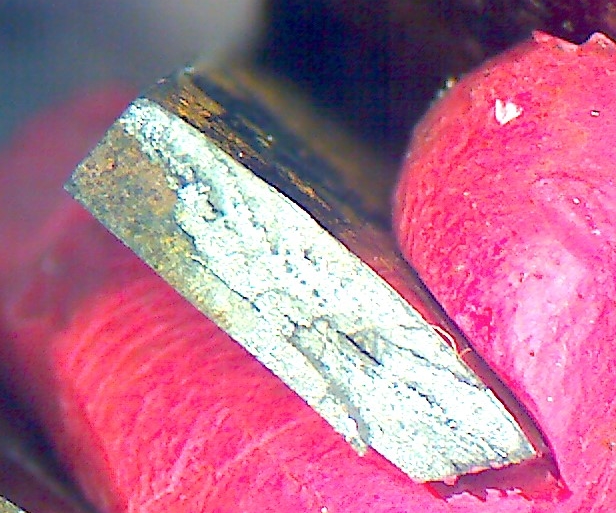
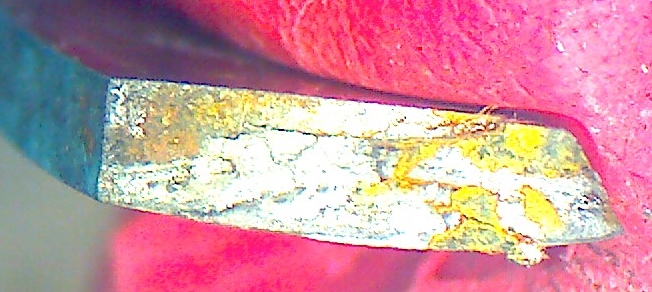
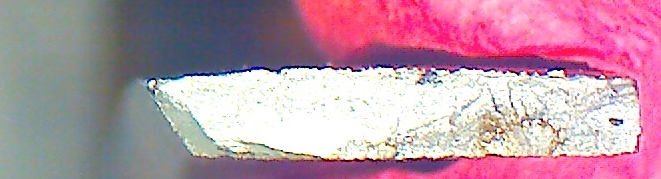
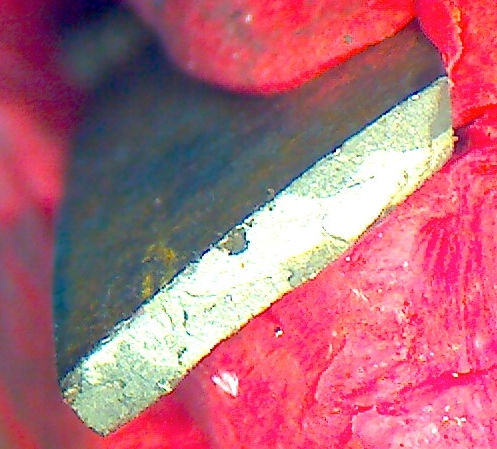
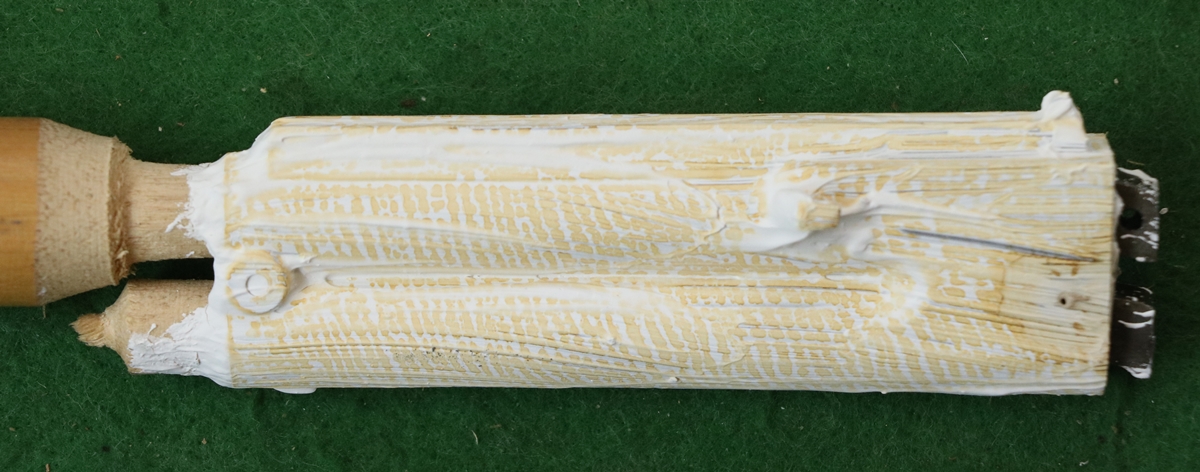
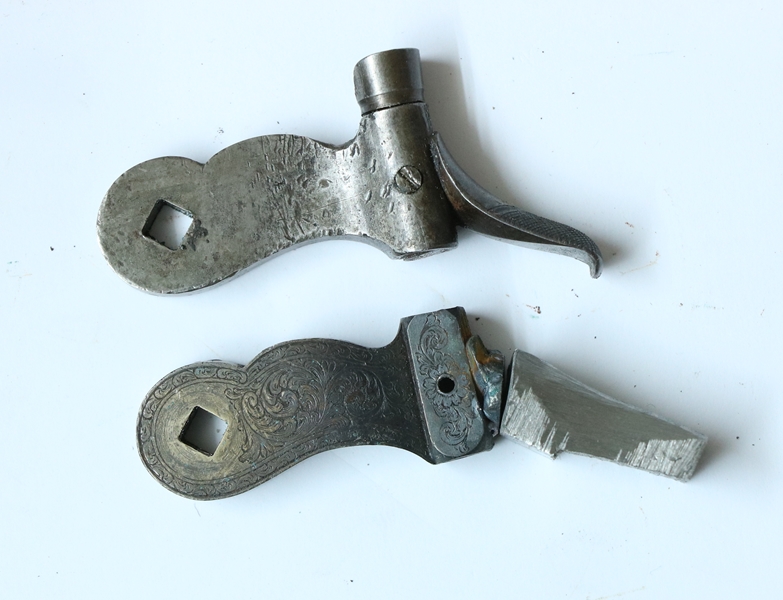
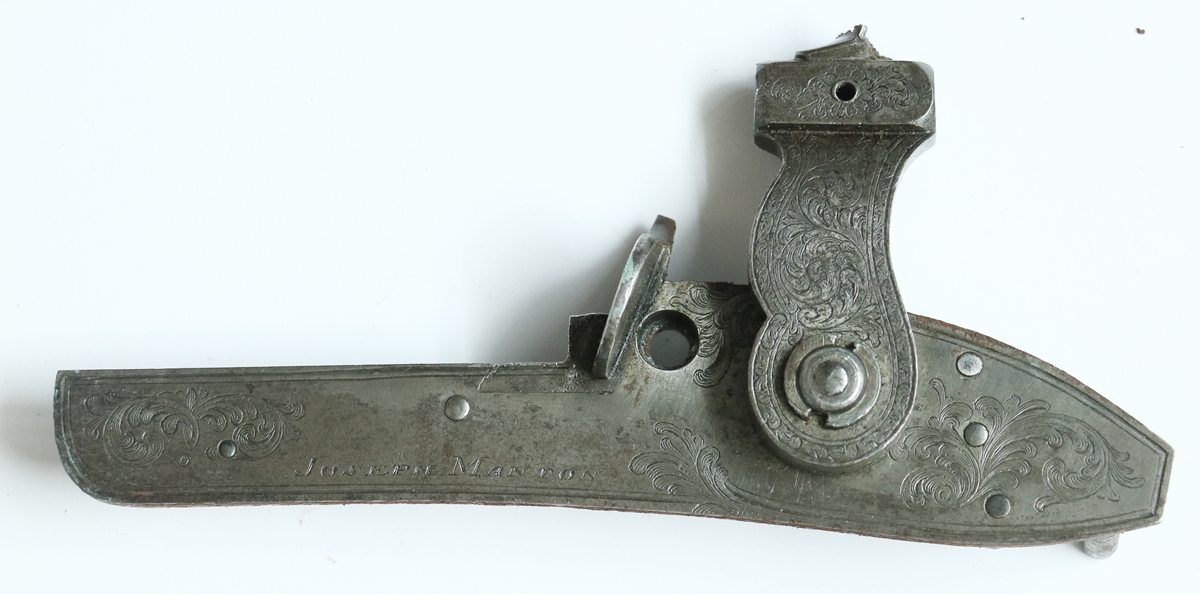
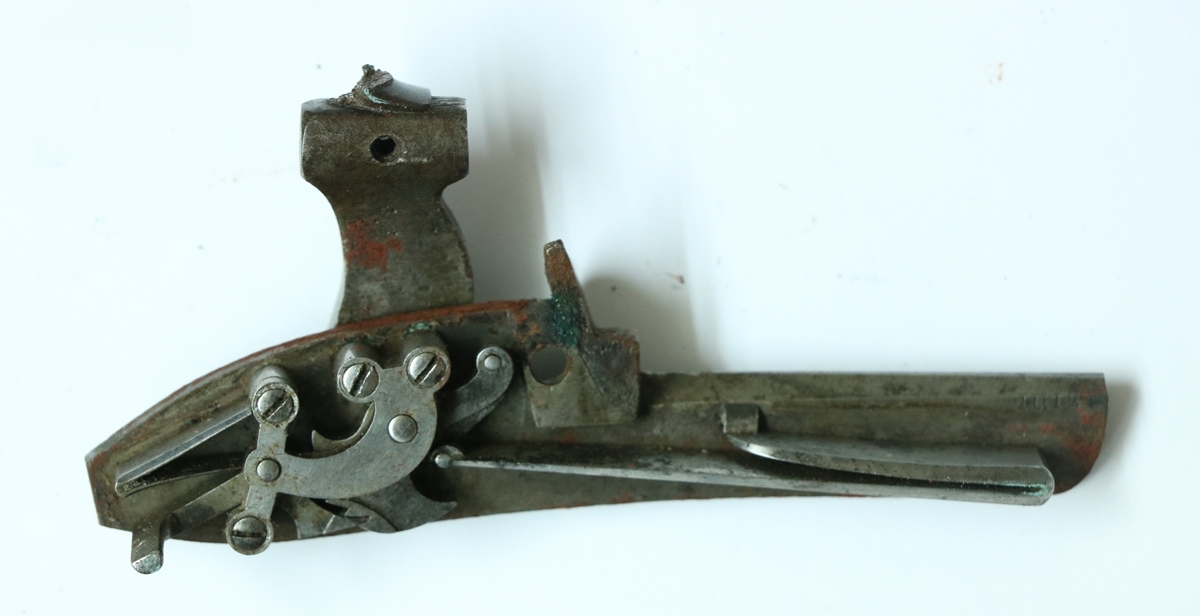
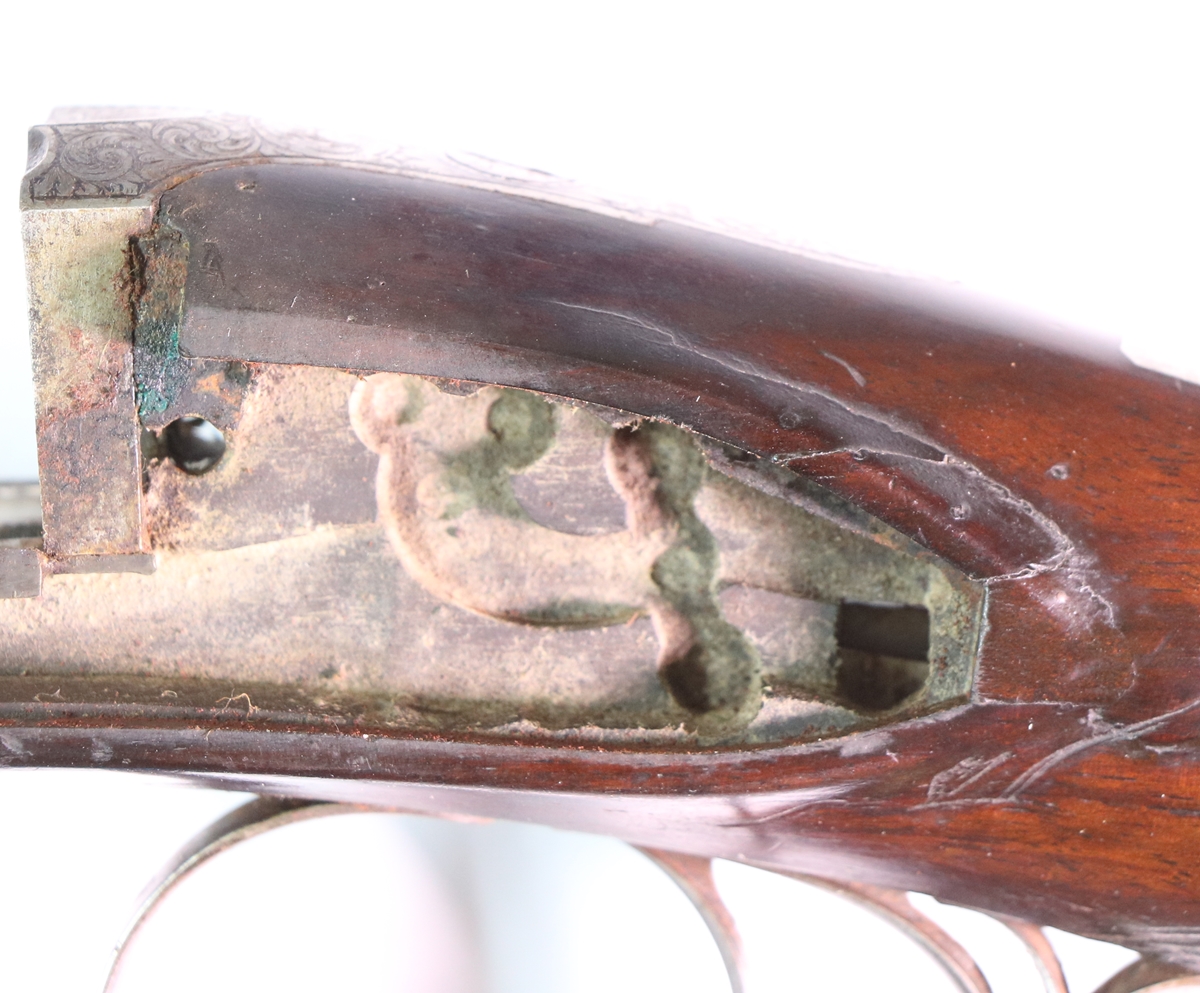
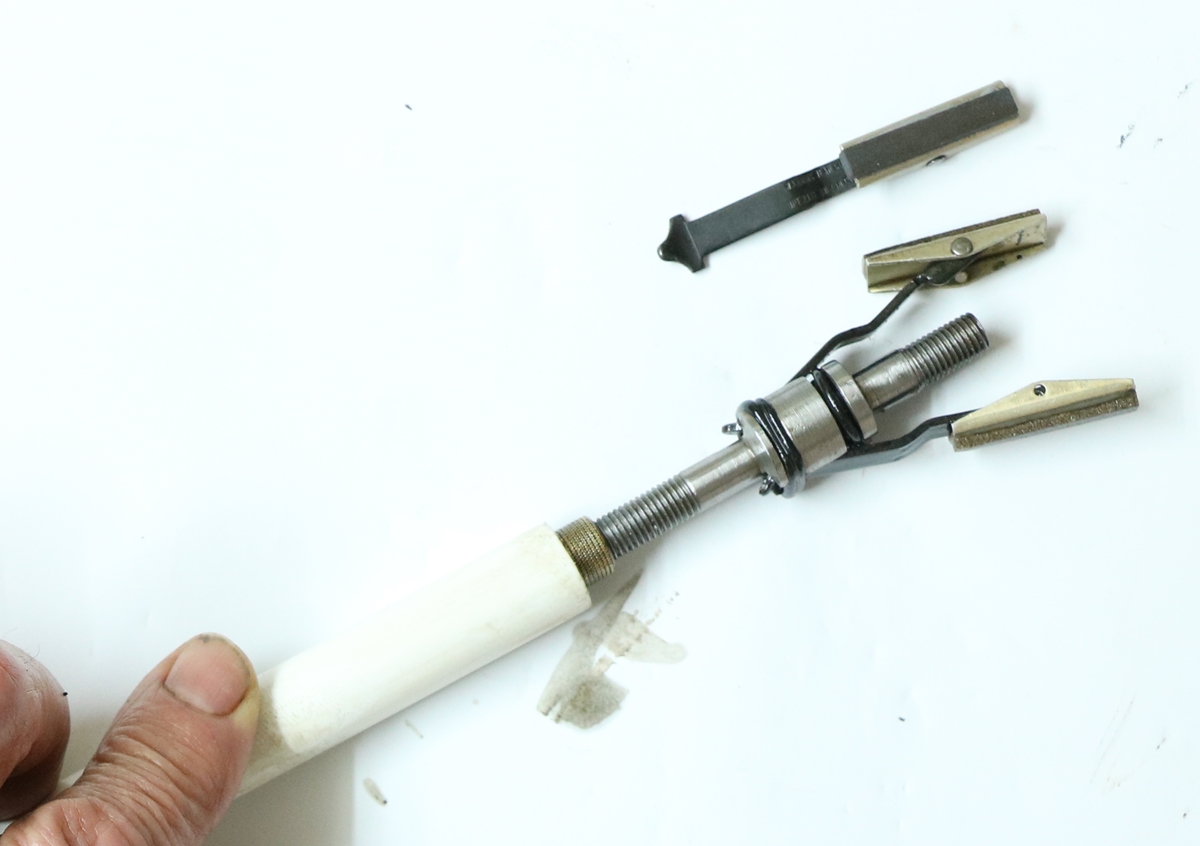
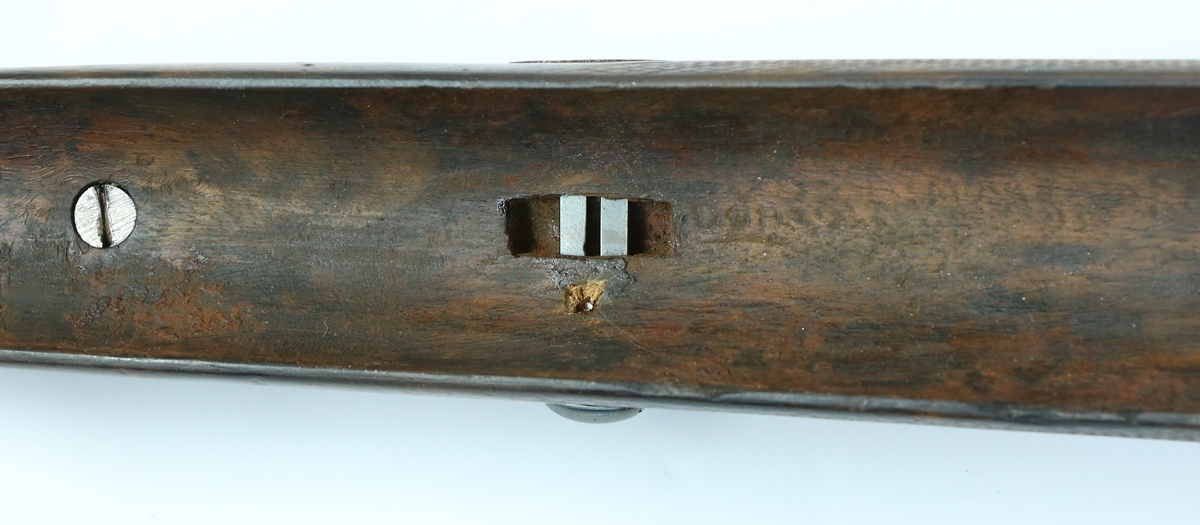
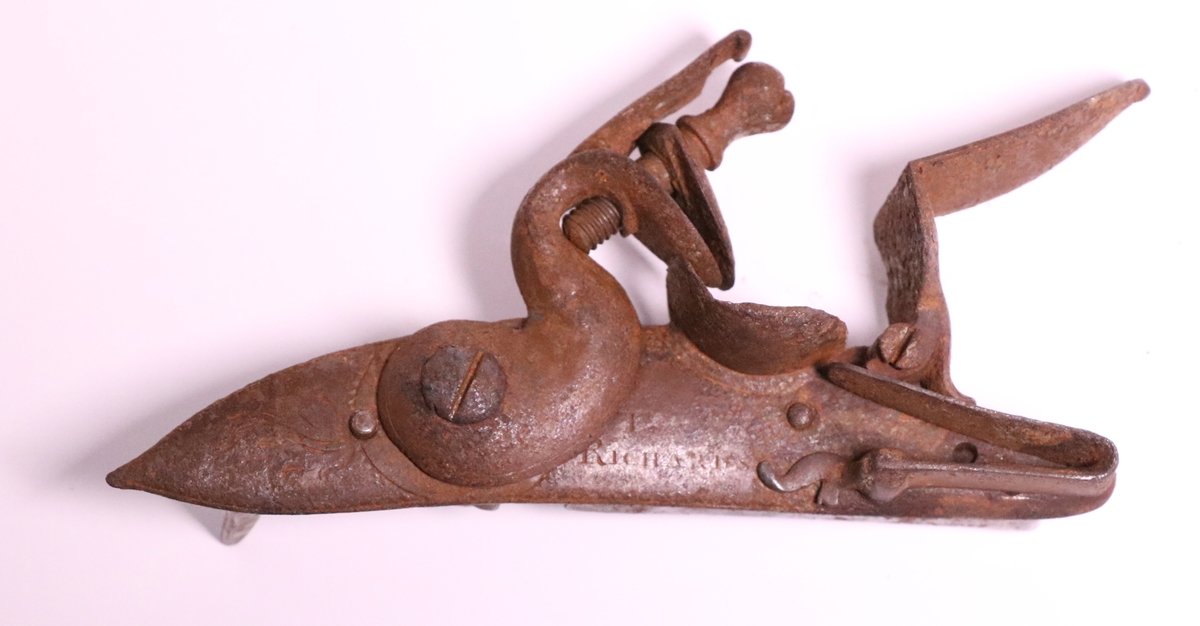
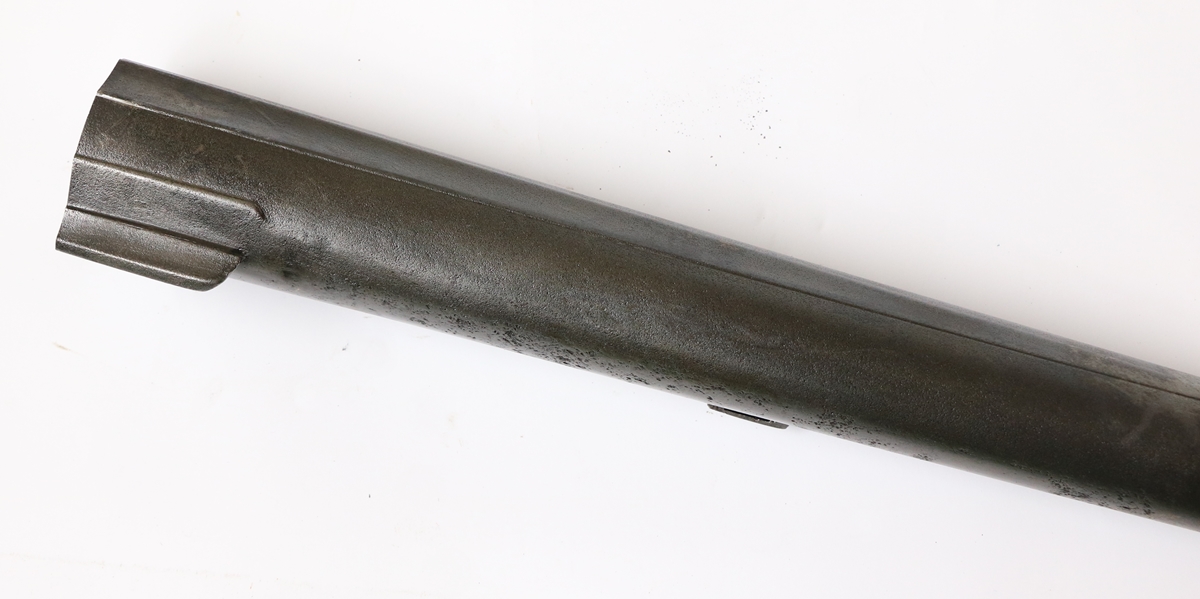
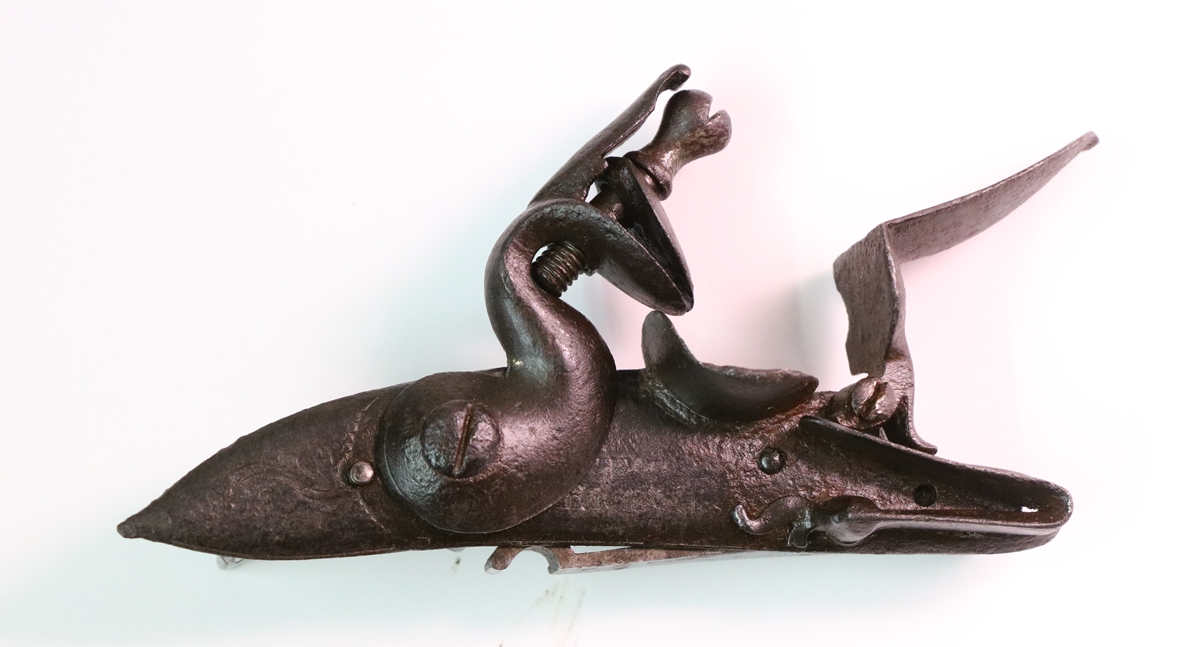
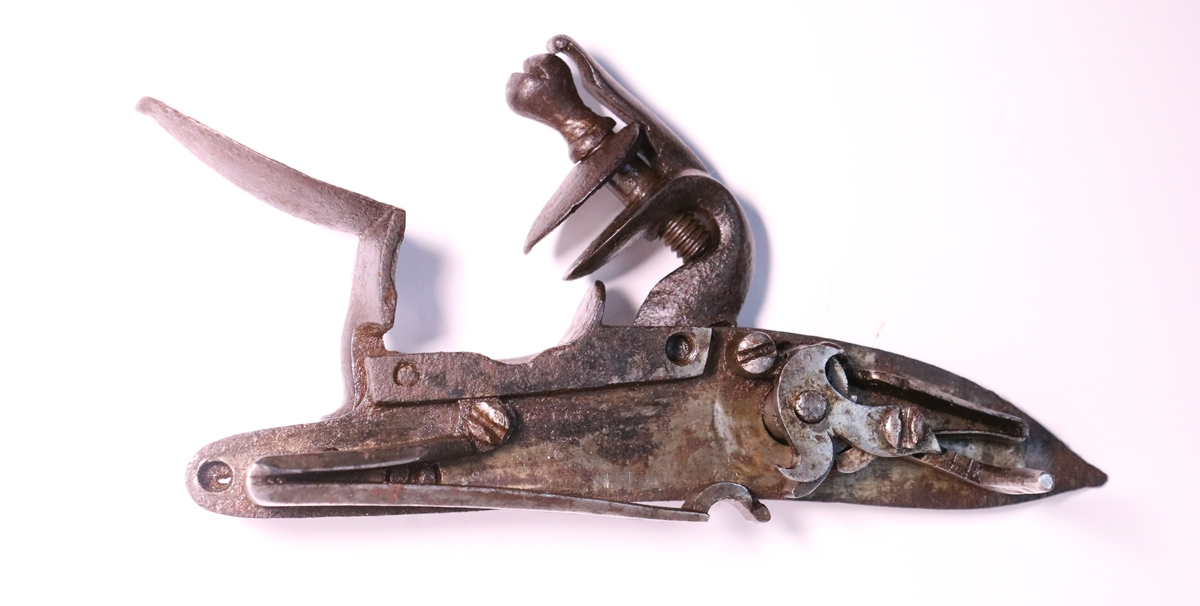
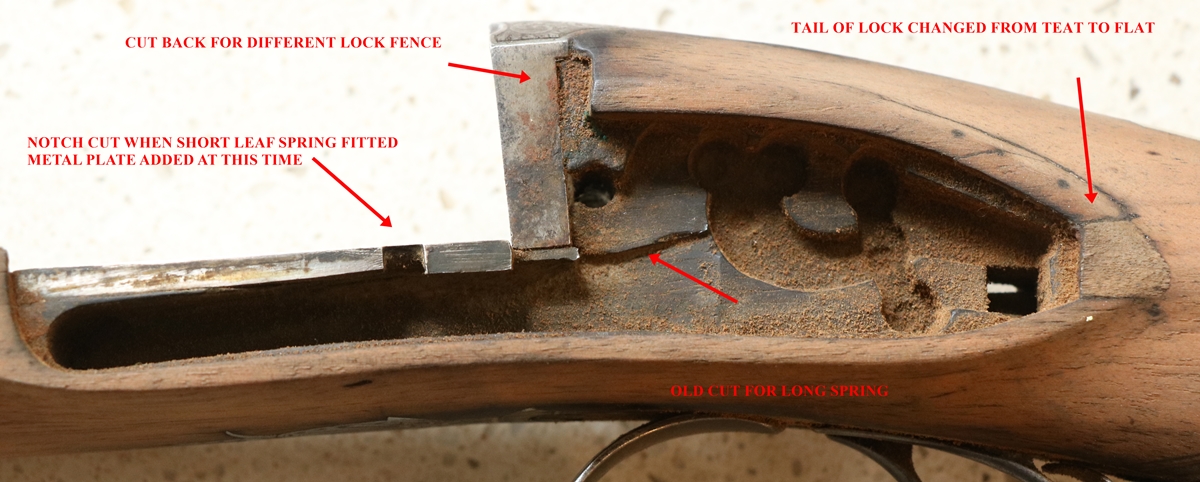
Dick got carried away with the Manton stock!  He needed to sort out one or two problems, including all the cracks around the lock pockets and then decided that he would have to refinish it.  In stripping it he uncovered some intriguing history – while the locks, breech plug and barrel are original Manton as far as we can tell, they have been fitted into a different stock at some point – probably a long time ago.  The evidence for this comes mostly from the photo below.  It looks as if the stock originally had locks with a different shaped tail (almost certainly older) and the cutout for the fence behind the false breech shows that has been changed.  There is a plate (German silver?) screwed in under the breeches, presumably to reinforce that area, and it has a notch cut out for the lug to take the end of the short top arm mainspring that was  fitted to the gun as found. The fixings of the plate are not symmetrical- suggesting it wasn’t done by a gunsmith..  The lock pocket of the stock has the correct cutout for a long top arm spring.  Confirmation comes from the matching number engraved on the tang of the trigger guard – it is not very carefully positioned or executed and doesn’t come near the rest of the engraving in quality – it can’t be original….   The original stock was from a good quality gun, possibly even another Manton and has the original furniture and breech block, Probably percussion as there isn’t a cutout for the cock to hit the top edge of the lock – but it might be for a flintlock with a French cock….. The stock was presumably made for a long top arm mainspring, and the Manton locks will take either – I guess when the swap happened the Manton locks had had long top arm mainsprings, as had the stock, and the locks were modified by the fitting of a small lug on a peg to catch the end of the short top arm.  The stock has been neatly extended and the joint covered with chequering.

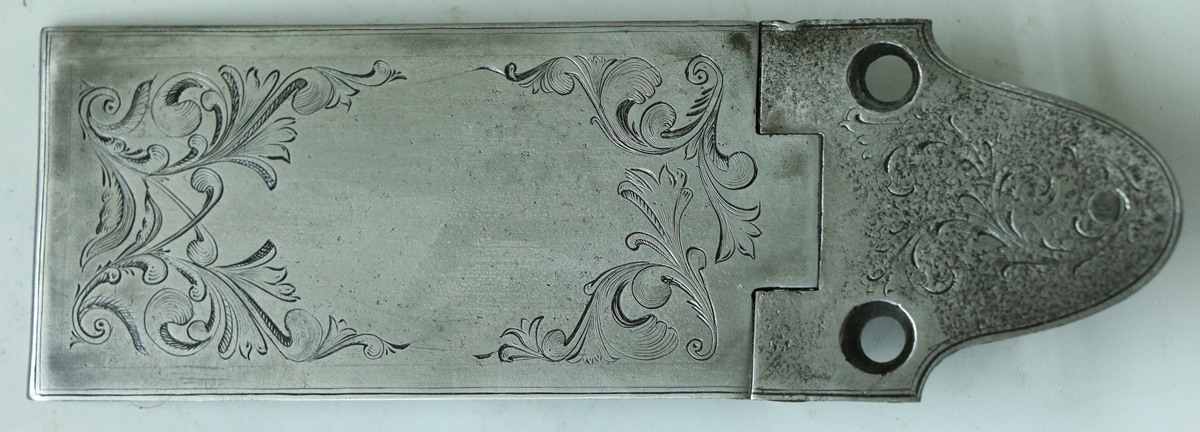
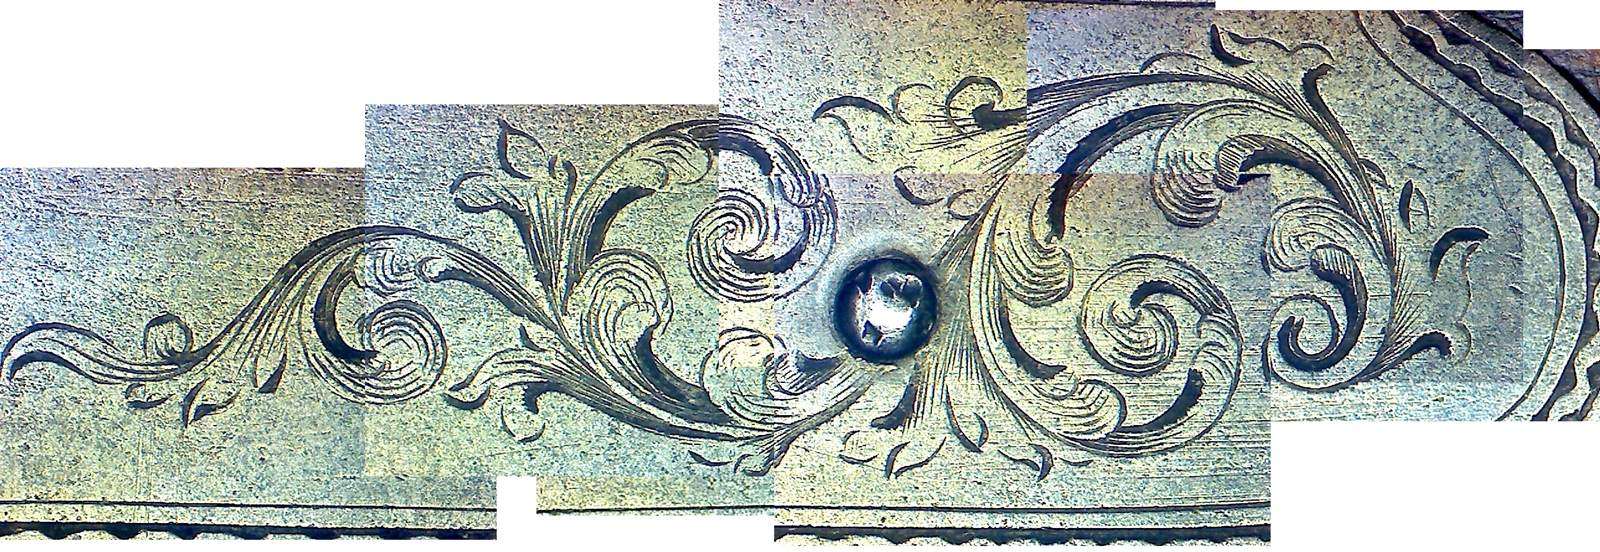
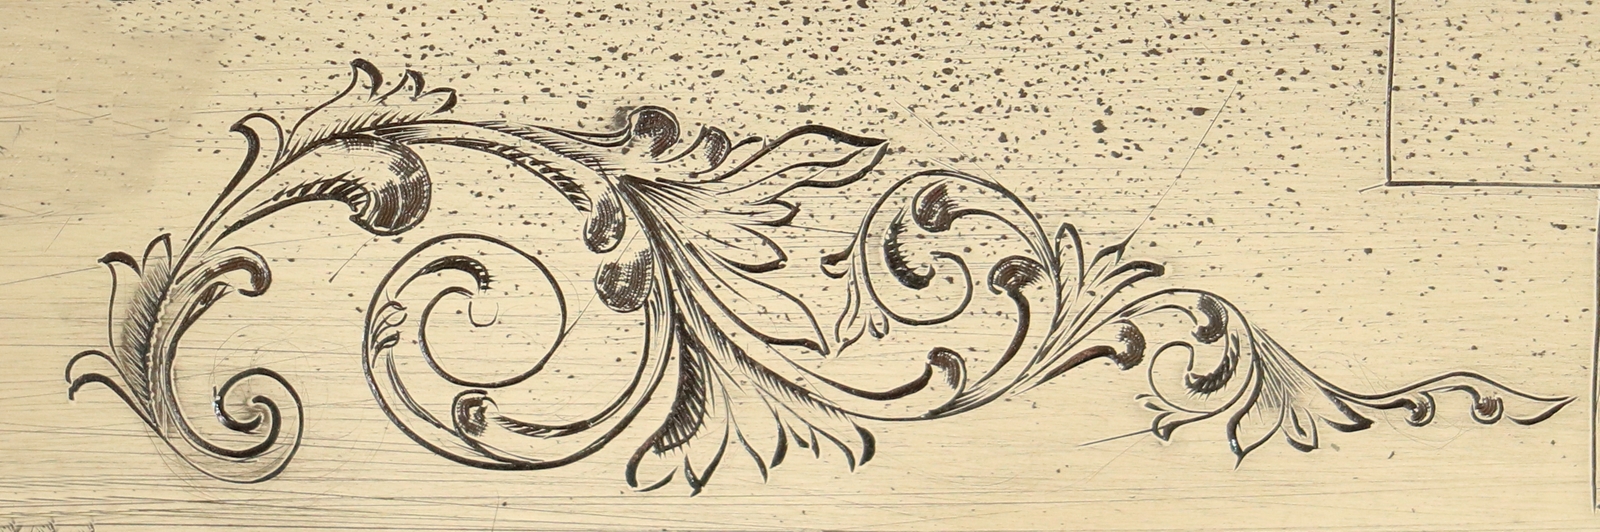
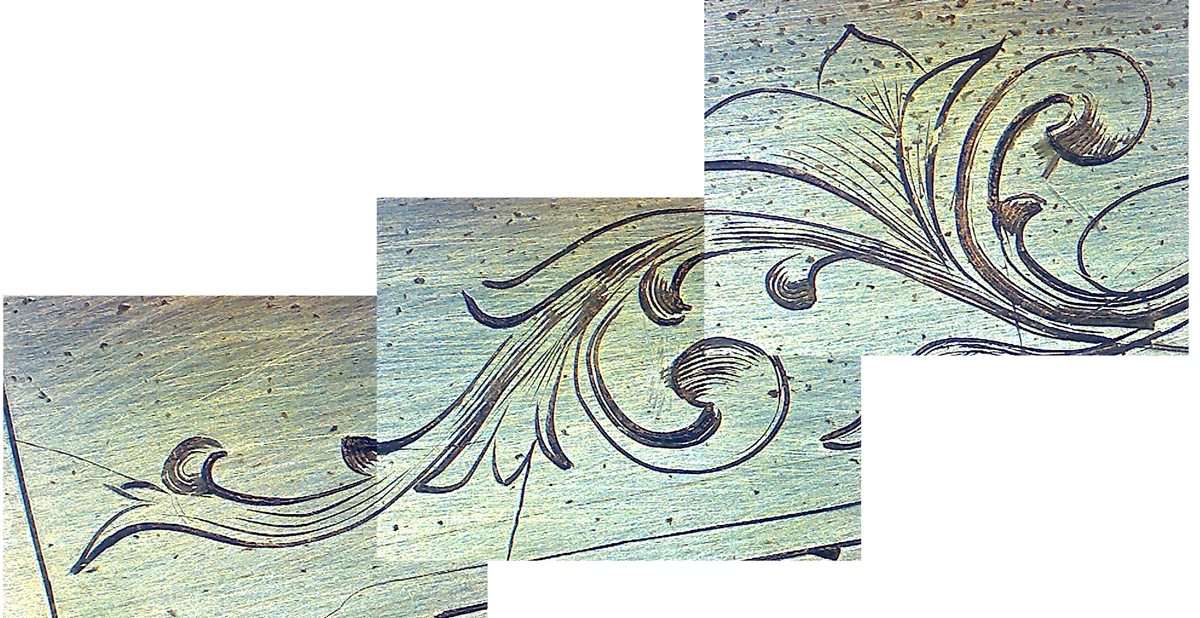
31st May  Out a.m. but this afternoon I decided that it was time to bite the bullet and get on with the patchbox lid – you can walk round a job for just so long and you get nowhere.  Anyway I looked at my designs and decided to go with more or less what I had already tried.  The lid had lots of flecks in the surface that I thought were the orange peel marks from cold rolling, but they seemed more  like little pits of corrosion – anyway it cuts OK in places but seems to have some inclusions that occasionally make it difficult to cut smoothly – anyway I’ve got most of it roughed out ready for the details and shading – I’m going to leave a space in the middle that would fit the oval, but probably not cut it.  I’ll try to get it finished tomorrow with luck.  I need to visit Dick and get tht Manton stock back before the weekend so I can take it back to CGC ant the muzzle loader’s shoot.

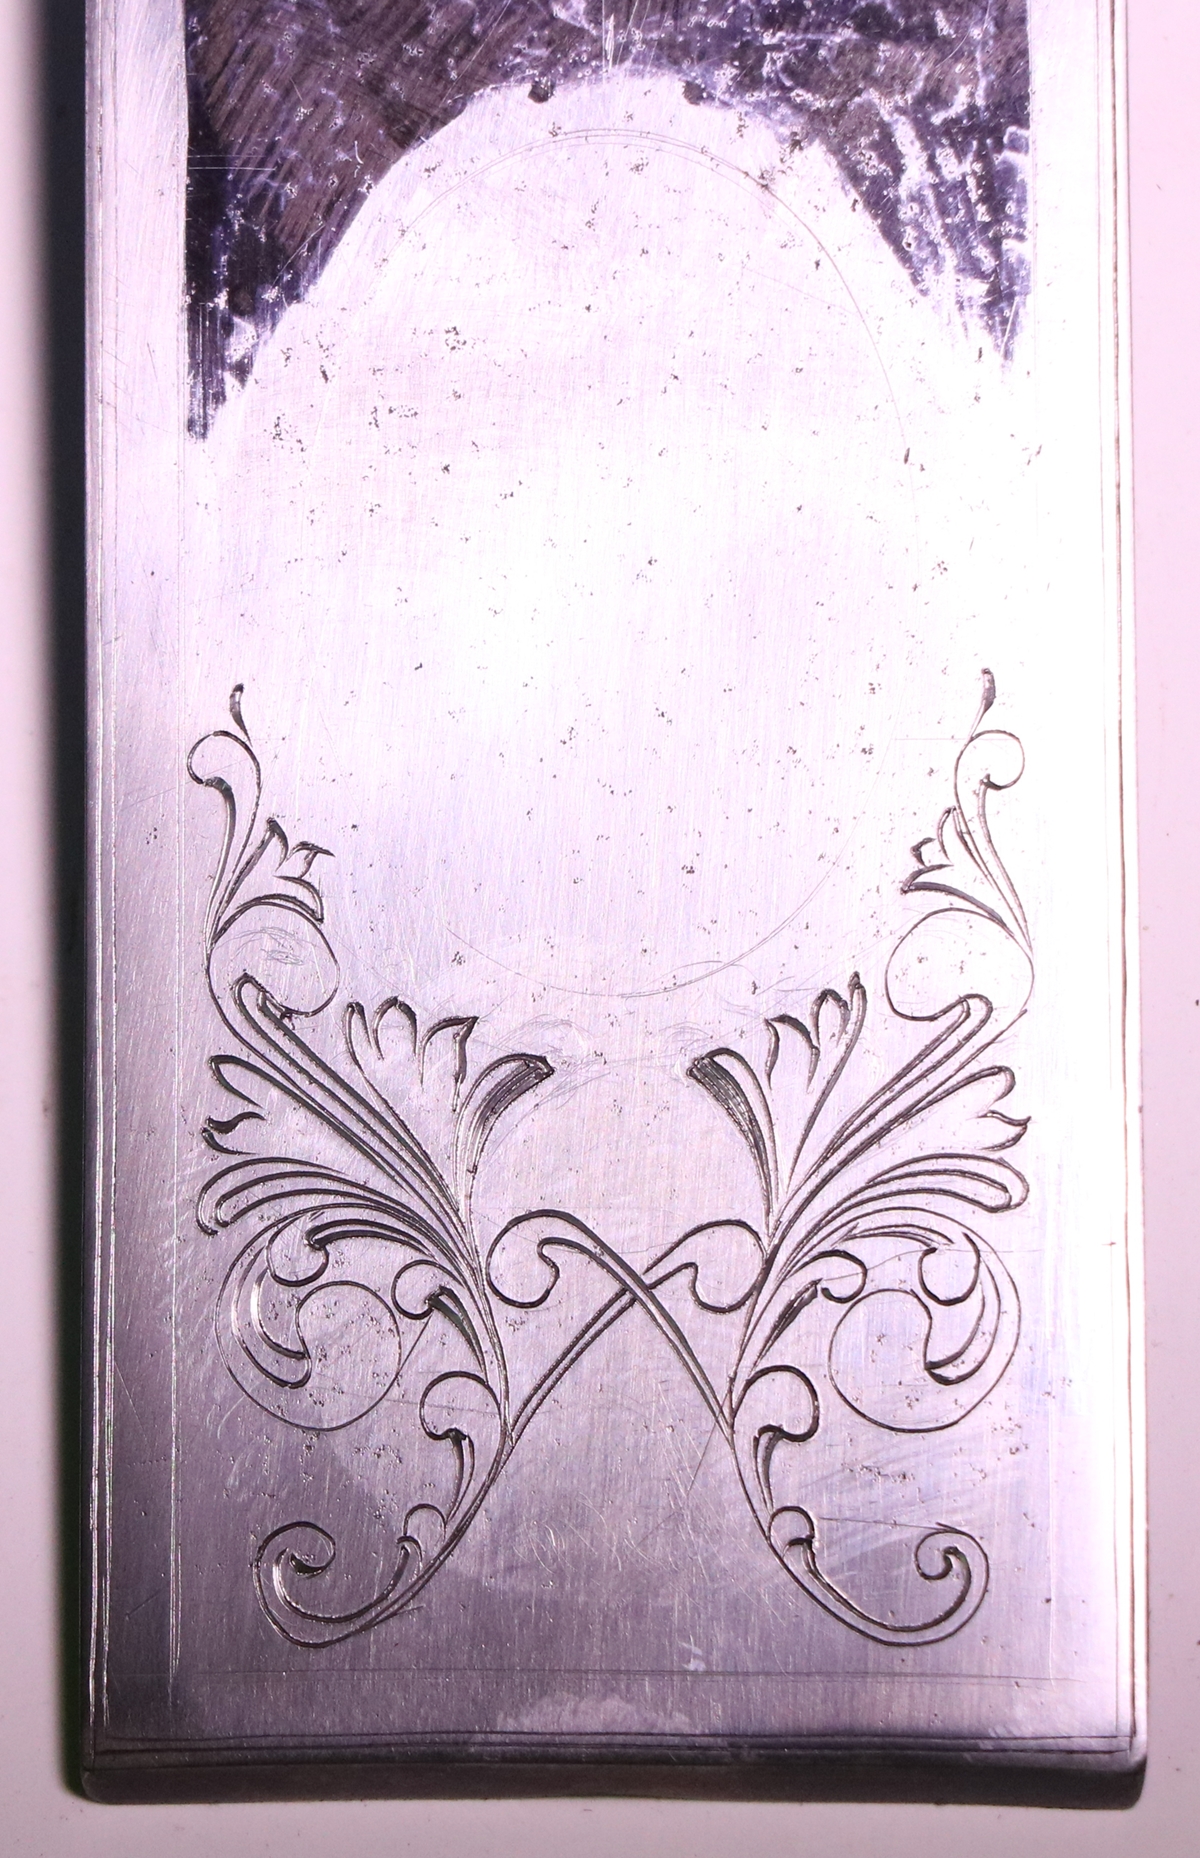
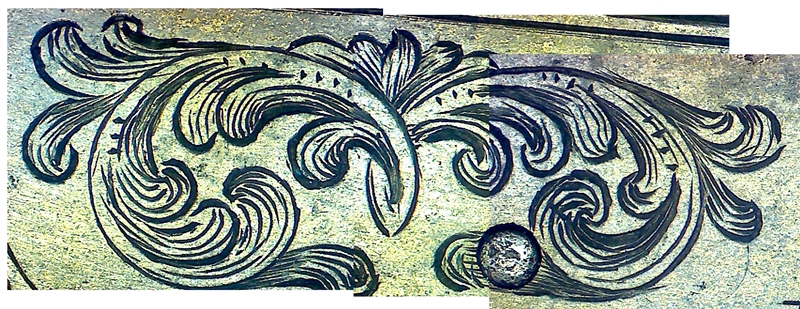
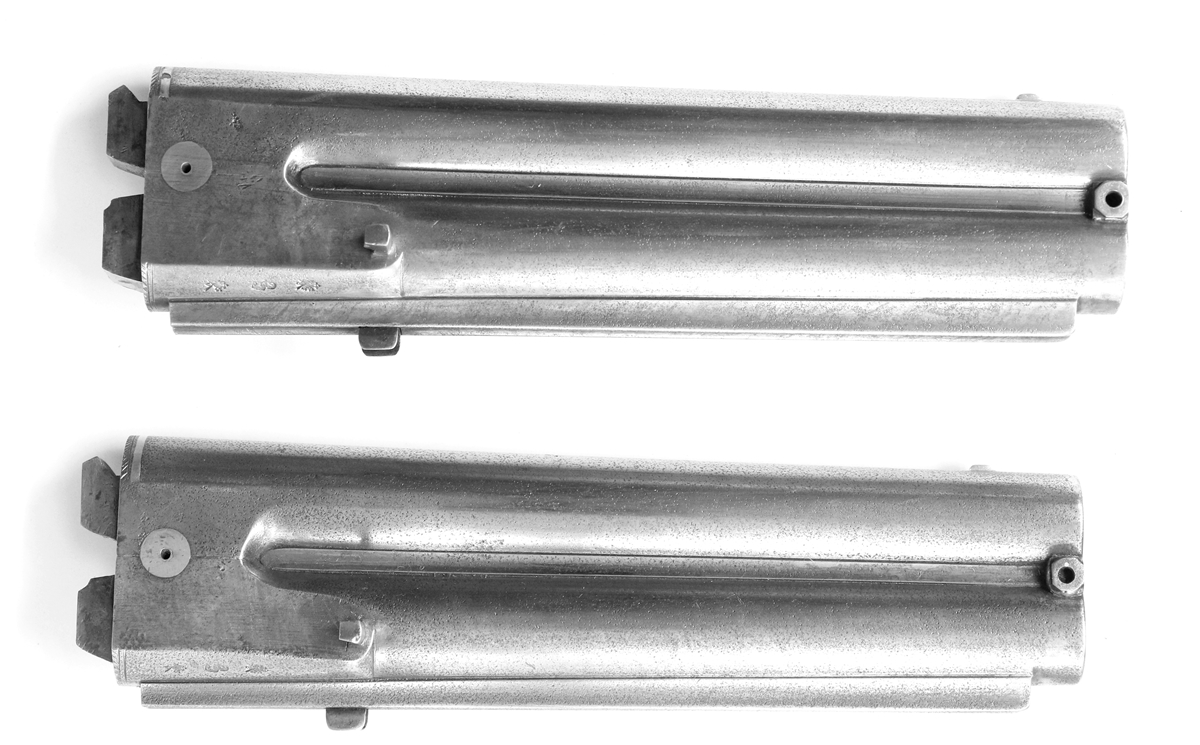
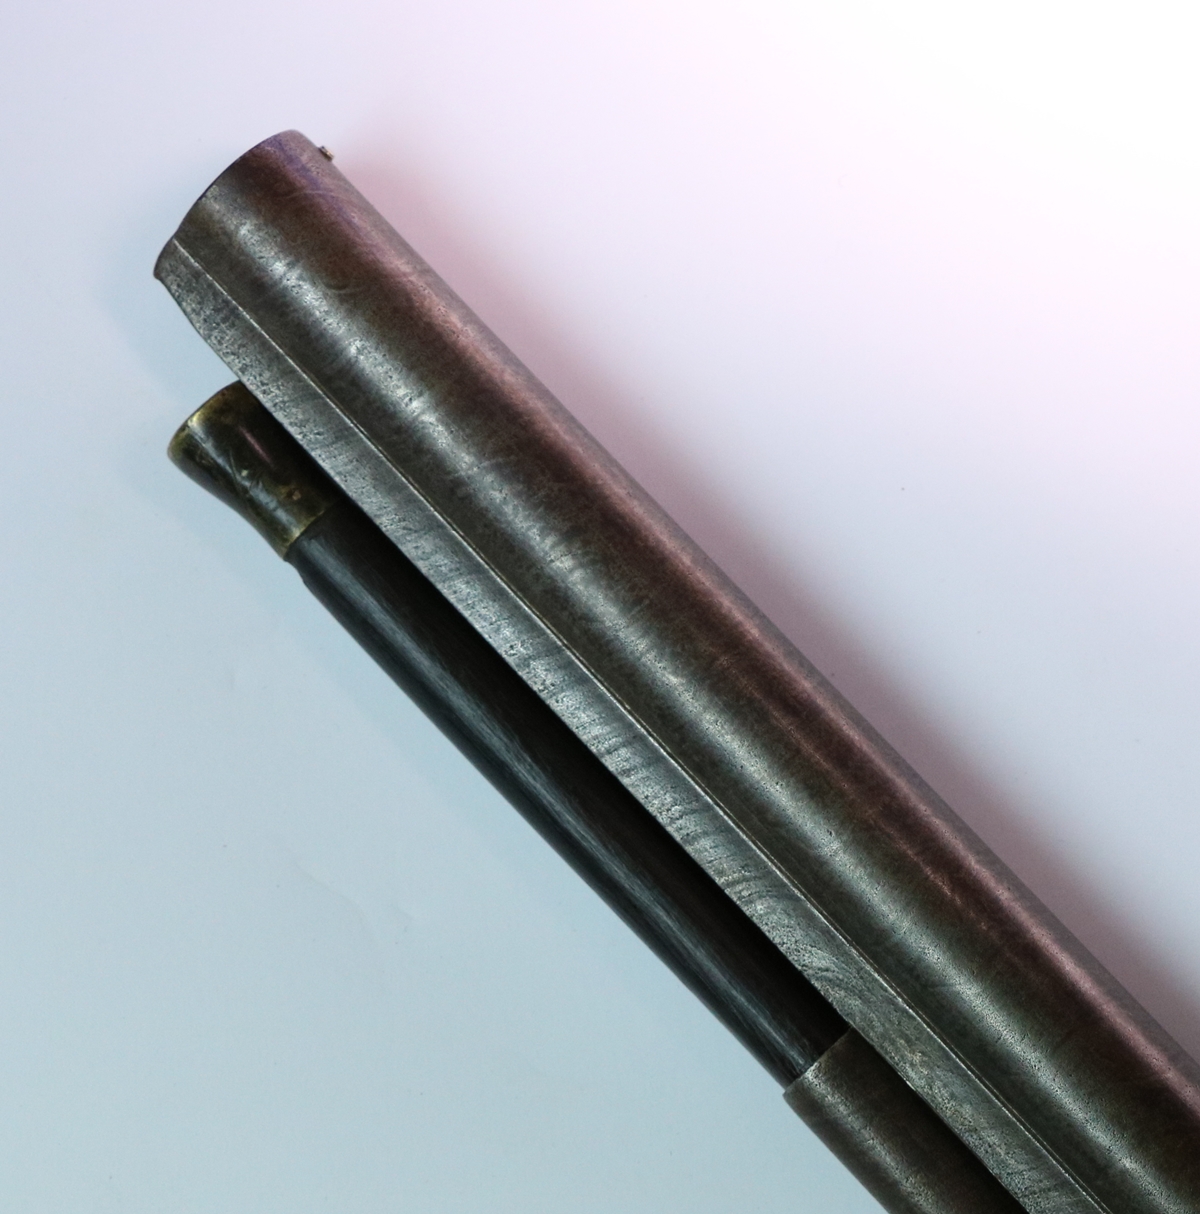
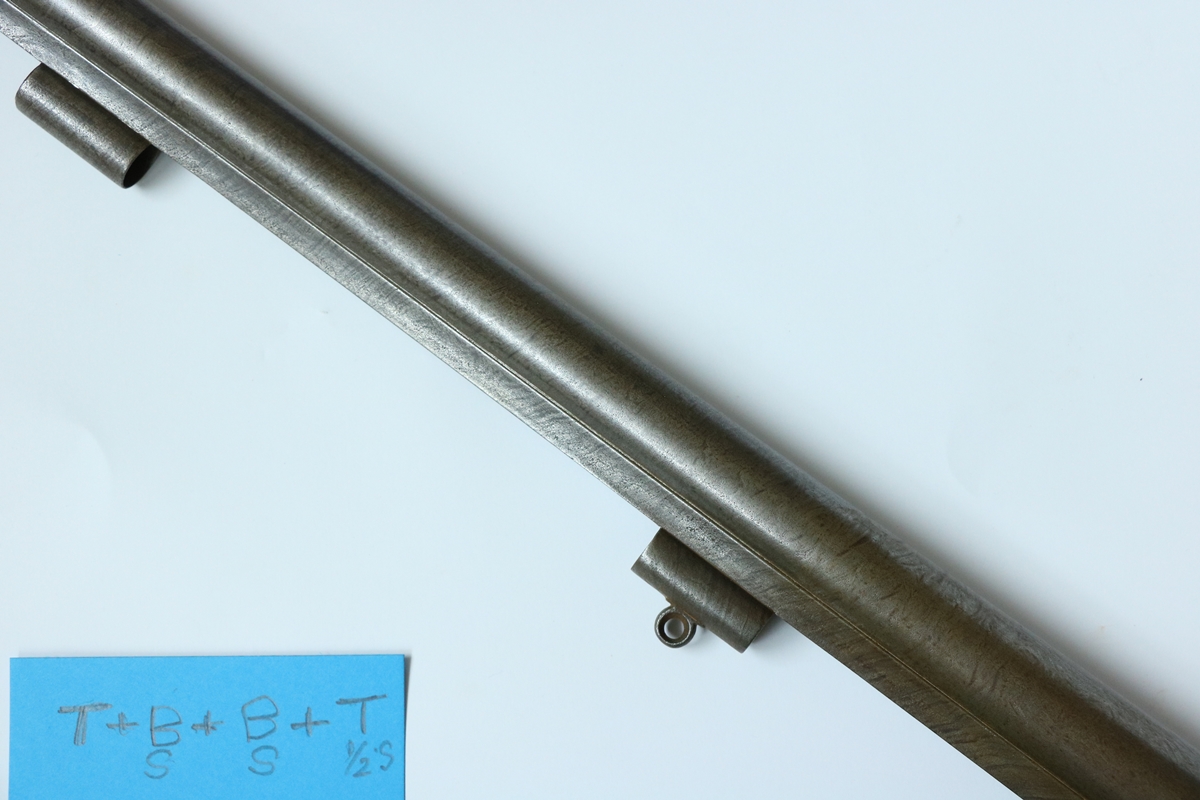
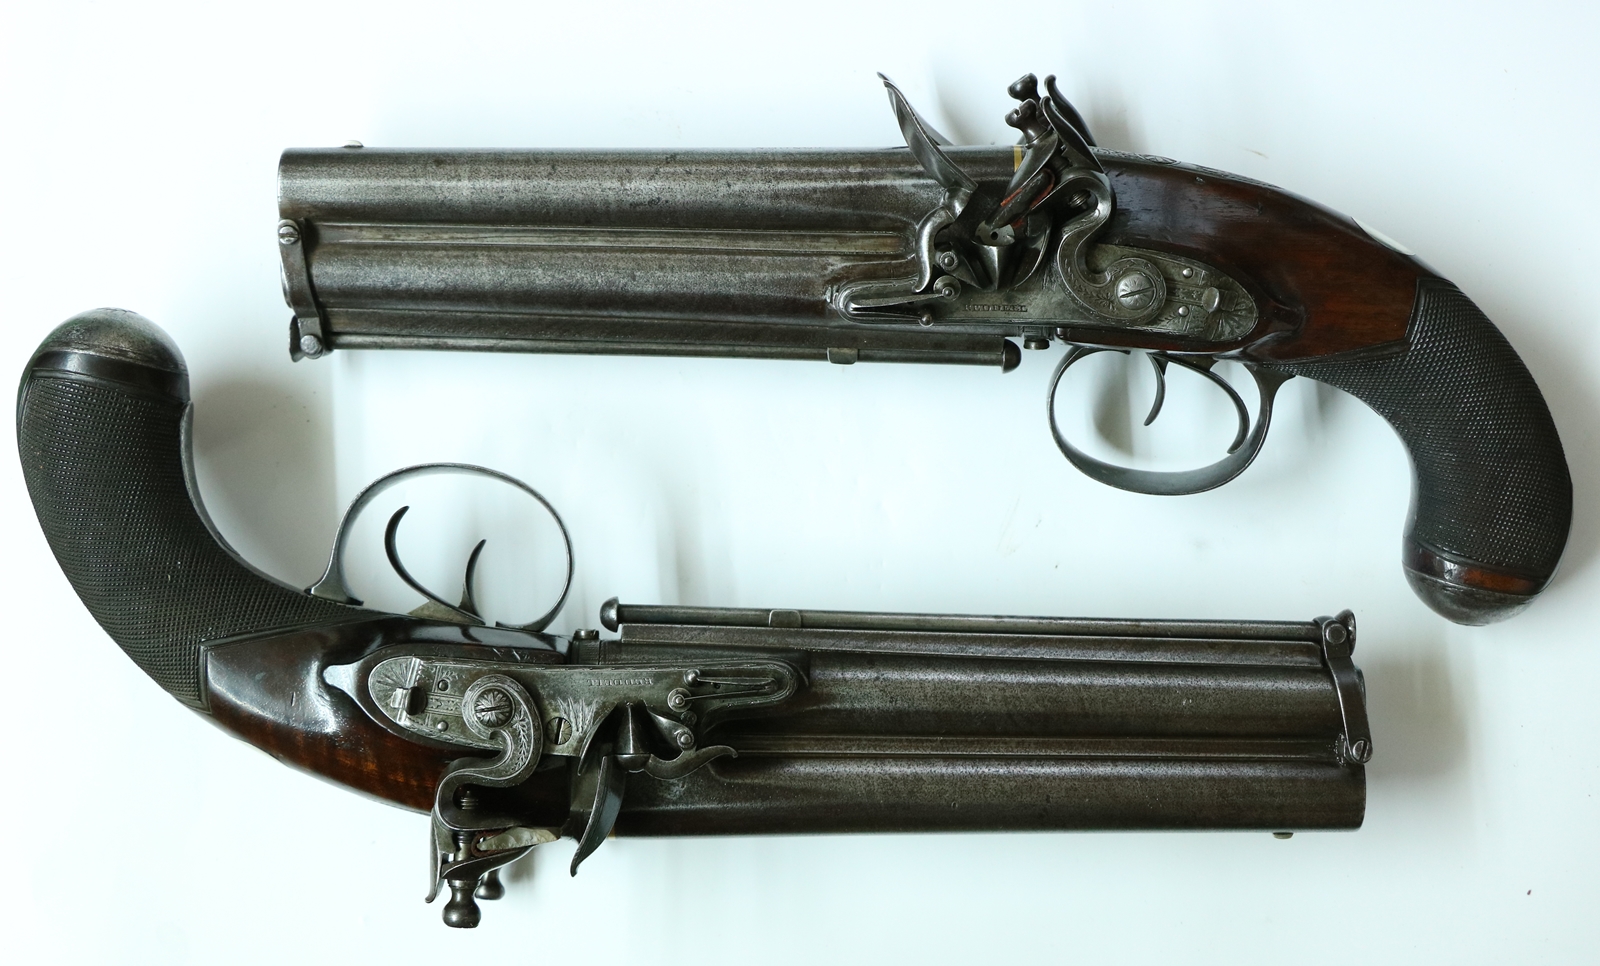
30th May – Still trialing the engraving for the patchbox lid – I needed lots of engraving practice as I’d been a bit lax recently!  I finished trying my original idea for the lid, and for fun engraved the oval ( done very quickly and carelessly!).  I put the lid in my furnace to ‘normalise’ it as I wanted to make sure that it was in the annealed state – an hour or so at 910 C and a very slow cool.  When I looked at the existing top to the patchbox (see below) I realised I’d been copying the lock engraving – the lid is slightly different in feel and some of the cuts are different – possibly a different engraver or in different frame of mind.  In particular the top isn’t symmetrical and is more open, so I am having a bit of a re-think – my efforts are not wasted as most of it is very similar.  I changed my tactics with gravers today – when one got a bit blunt I sharpened it instead of changing it for a fresh one – it seemed to work better, possibly because all my gravers are different lengths and it saved continually changing my hold.  Mostly I can get away with just touching up the heels.   The over and under pistol barrels came good – in contrast to the Manton barrel they only needed about 5 brownings – there isn’t a lot of figure in them, the twist is a bit indistinct – I don’t think its a function of the browning process  – just how the metal is, but they are a very nice chestnut brown – very discrete.  It’s possible I could have brought out the figure more my etching the barrels in copper sulphate solution before browning them, but I can’t see a distinct enough twist to be worth the erosion of the metal.


I think its too fussy – even without the oval &  hasty lettering – I’ll re-think a simpler, more open design…….


The barrels have twist figure, but its not well enough defined  to come through the browning strongly. 

30th May – This blog has now passed 200,000 visitors since I started it!   Amazing.    Started to brown the two o/u pistol barrels, must order some more browning solution!   I’m still trying out my ‘Gumbrell’ style engraving – the trouble is that the more I do, the more I adapt it to my own preferred style!  I have to keep reminding myself to go back to the original and check how it was done!  Anyway I started on a trial layout for the actual engraving on the patchbox lid – I took it to Dick to show him and he thought it would pass muster – see comments below photo;-


I didn’t finish the scroll on the right as its clearly too big for the space.  Not sure what the oval is for, but it fills the space!  I’d probably leave it out on the real thing!  I’m reasonably happy with the scroll on the left  – but doing 4 matching ones will be a challenge!


28th May – The bag of water in the garden continues to grow!   I am still trying to get my head round the Gumbrell engraving on the Rifle – the only way to see how its done is through the microscope, so I took a series of photos using my camera eyepiece and built up a partial mosaic of the ? Gumbrell engraved (?Joe Manton) rifle, the late percussion Joe Manton shotgun and my last attempt at something similar – its pretty instructive! Some bits are  not visible to the naked eye – like the cross shading on the shadows on the rifle ( you’ll need to click on each photo to see them in detail) ;-

This is the ?Gumbrell rifle engraving I’m trying to copy for the patchbox lid….


This is my second attempt – I don’t yet have the correct pitch of shader to put in the parallel lines, mine is too fine -it just looks like a smudge!

This is my first attempt – before I’d done these photos!


This is the Manton engraving – quite different cutting although the overall style is similar – the overall effect id much heavier. 

27th May – What a beautiful day!  We decided to put our old above ground swimming pool up – its just a giant bag of water really – about 30 tons of it so it takes a while to fill!  Its over 10 years old so lets just hope it doesn’t have a leak in the bottom!   I was playing with my microscopes to see which I was going to keep on the bench – the Am Scope does need a 0.75 Bartlow lens to reduce the magnification somewhat so you can see more of what you are doing – as it is, the maximum field of view (on lowest magnification) is 28 mm wide, whereas my Wild it is 52 mm.  You can get one from ebay or from AmScope for around £30 – my Wild uses one – I found a close up lens from an old Canon camera that was  about 0.7 and works very well – I had to make some plastic brackets to hold it as the screw threads are not compatible.   I finally tackled the second Manton lock spring – I’d found one for the left lock that fitted exactly, with a long top arm – the locks will take either a long or short top arm spring – I guess they were modified at some point to take the more modern short top arm spring.  I couldn’t find any springs that fitted exactly, and the nearest I could find was a fairly modern short top arm spring.  Fitting it required the peg hole that locates the spring to be moved a couple of mm.  Positioning the peg hole is critical as it governs the angle that the link on the tumbler takes, and therefore the position of the spring relative to the bottom edge of the lock when the hammer is fully down on the nipple – if the spring peg is too near the hammer, there may not be  clearance for the link to move to full cock, if its too far away the spring and link will try to overlap the edge of the lock, but hit the wood.  Anyway I plucked up courage to mark and drill a 2 mm hole into the lock plate – not quite right through – luck was on my side and it came out perfectly. I was worried that the lockplate would be too hard to drill but it was OK.   So the locks are back to working!  I still don’t understand how the original springs came to be so defective!

The position of the spring peg hole in the lockplate controls the resting angle of the link, – the spring mustn’t be near the edge of the lock plate or it will foul the wood.  This lock now has a spring with a short top arm – at some time I think the locks were modified to take these more modern springs by the addition of the small stop that holds the end of the top arm  – its is just pegged into a hole in the lockplate.

This lock has a long top arm spring as I had one and it fitted exactly – this style of spring would have been fitted to the locks originally.  In this photo the spring is too low and overlaps the bottom of the lock and so would foul the wood, but as soon as the hammer was fitted it comes to rest on the flashguard and stops the tumbler before the spring gets as low as in this photo.   I had to grind down the lump on the top arm as the spring needed to go up to allow the gun to reach full cock but when I took this photo Dick still had the hammer so I didn’t know if it would all work.

I am still playing around with the rifle patch pocket engraving – or at least trying to crack the engraving on the lock so I can make an approximation. I was trying to get a good black and white image  as its is less confusing and I can the see how its done. I’ll have to spend an hour or two with paper and pencil…..

26th May  It’s half term next week so I have the week to myself!  I knocked up a quick headrest mount for the new Am Scope microscope so I could actually use it, and did a bit of playing – it seems to be fine – the zoom is handy and has a bit more magnification than my Wild when flat out, which is really good for checking the sharpness of my gravers – I’m not sure which one I’ll use in the long term, but I’ll keep both on my bench for the moment while I give them side by side tests.  I suspect the new eyepieces will win the day because I can keep my glasses on, which saves a lot of troubletaking them on and off and getting oily fingermarks all over them.  I’m still trying to work out how the Gumbrell engraving was done, and develop the organic shapes – unfortunately I’m a pretty poor artist, and have to do everything the hard way, but I will get there.

The stand is very good – except that used at right angles to the bars it rotates rather easily about the main post.

The head rest support fits into the camera tube mount – it is a ‘quick and dirty’ job to get it working made from a bar of acetal – I should probably make an aluminium one and anodise it as I did last time. 

25th May  In school much of the day – a bit frustrating as we needed to use the smart board for software programming but had to move to the hall which doesn’t have one, but we coped!   I got the Am Scope trinocular microscope today – Its pretty nearly as good as my Wild/Zeiss one and very good value for money – the stand is more versatile and the eyepieces allow the wearing of glasses as the eyes can to be some way back from the lenses – the only trouble is that your head is then ‘waving about in the breeze’ and you really do need a firm headrest like the one I made for the Wild. (see DIY Anodising post and the Engraving Setup post.  The trinocular facility is not as useful as I hoped as it involves switching out the left eye path when you want to use the camera, and the camera is much magnified relative to the eyepiece so you only see a small part of the field of view – I don’t think this is just a function of my camera, but I probably need to make some experiments – the camera I have that fits the new microscope doesn’t appear to have a proper video feed and the frame rate is very slow so  it doesn’t work for ‘action videos’.  But as an engraving microscope it is just fine – a slightly more convenient size than the Wild as its shorter from eyepiece to objective, and handy to be able to keep my spectacles on, and the stand is very good with a double arm slider – and its zoom rather than switched magnifications.  I haven’t fitted a light to it yet – the camera ring light I use on the Wild is too small to fit the ‘nose’ of the new microscope. I expect an expert would find the optical quality inferior, but for engraving I challenge anyone to find much difference – and all for £422.38  including carriage from the UK so no VAT or duty to pay – whats not to like ( AmScope x7 – x45 trinocular zoom microscope with dual arm stand) ? – & I can swap the eyepieces with the Wild and wear spectacles for that now…..  I’ve now got the Purdey foreend to engrave with fine scrolls and the patchbox cover to engrave with Gumbrell large scroll.  The Purdey engraving is not particularly fine and once I get the details sorted in my mind it will be no problem, – however the Gumbrell engraving ( see below -click on the photo for much better view)  is a  whole other ballgame – he was about the best engraver in Britain as the time and his work is technically challenging, whereas the Purdey is, relatively speaking, just hacked out!  So I’m spending a lot of time looking at the Gumbrell lock and trying out different bits of the pattern – its all leaves and plant scrolls with subtle interplay of light and shade – the cuts range from deep to very fine tapered cuts, all with perfect sweeping curves.  I am having to revisit tool sharpening to get fine enough cuts without throwing up burrs . I have been lamenting for some time that I haven’t had much engraving to do – now I am revelling in a real challenge – I did a bit of ‘Sea Monster Gumbrell engraving once but never really cracked it, so now is my chance to raise my game!  I’ll post photos when I get a bit further along the learning curve- assuming I do, but at the moment its a bit primitive- just as well I annealed a couple of test plates!

24th May  GDPR comes into force today, whatever that means!  I have to sort out the Parish Council website as I host it for some obscure reason – actually I’m told that GDPR is being misinterpreted by many organisations as it really only applies to marketing – the rest is to do with Subject Access Requests.  I bet you are none the wiser- me neither!   The good news is that the Manton Barrel is put to bed – it eventually got a decent brown – i deliberately didn’t strike it down to smooth bare metal as I didn’t want to take too much off the barrels and anyway I didn’t want it to look all shiny and stripy as if just rebrowned – it now looks very comfortable and mature, like the rest of the gun!   Dick is working on the stock, and then I just have to pop in the replacement spring in the right lock – it means drilling another hole for the spring peg as its annoyingly about 2 mm away from the existing hole – I went through all Dick’s boxes of locks and springs but there was a distinct shortage of right hand springs, and all the ones that he had were worse than the one I’d picked out already.  I will try to get away with a blind hole for the peg – I can’t see it needs to go right through the lock plate, but if it doesn’t work as a blind hole I can always drill it through.  I’ll have to plug the existing hole, but that is not a problem – contemporary repairs often moved the peg hole.  I got a percussion rifle today to rebrown and engrave the replacement patchbox lid.  It was suggested by previous owners that it was by Joseph Manton but from his late period and was un-named and un-numbered.  It is certainly of a high quality,  it is late, so it is possible it comes from a ‘fire sale’ of stock.  In favour of the Manton theory is the quality (although by then he didn’t have all his own quality workmen), the tail of the trigger guard that I’m told is characteristically Joe Manton, and the engraving which matches that on a number of his guns post 1820 ish, presumably by Peter Gumbrill who later worked for Purdey after he set up on his own.  Gumbrill stopped working about 1850. The barrels were proofed in Birmingham. I love these mysteries – you keep hoping for the definitive clue…..


Superb Peter Gumbrell (?) engraving ( click photo for better view, then <- )

favourite Joseph Manton trigger guard tang.

Lock in perfect -as new- condition with ‘fly’ or detent as was normal on a rifle to stop the sear slipping into the half cock notch if you merely squeezed the trigger ( as you are supposed to with a rifle) – Shotguns rely on a more vigourous trigger pull to avoid this problem.

24th May  – I didn’t get anything at Bonhams, the cheap 14 bore gun went for one bid more than my bid but I didn’t really want it.  The cased pistols both went well above my bids – one for twice what I bid and the other telephone bid I took up to my spending money limit but the next bid got it – you never know how far the other bidder is prepared to go!  Anyway my general observation that pistols, particularly small non military pistols are hot property held true!  The Joe Manton flint/percussion gun made 15000 GBP, which after the premium and tax takes it to almost 19K!  Still it was a very unusual piece, and if I had that sort of money I’d want it in my collection.   I did a bit of engraving on one of a pair of little pistols that had been extensively repaired – good to get the tools out, although the metal was horrible – bits of old hard metal, bits of new soft metal and bits of filed up weld metal – in the end that job got through about 20 gravers!  I actually have one very fine graver from GRS that really stood up to it for a lot longer than most of the others, so I must try to get a couple more.  Oddly it doesn’t shine so much against my normal HSS ones for softer metals.  Still browning the Manton barrel – about 10 rustings down and still the steel is more or less untouched!  How many more will it take?    I got a percussion rifle to sort out this morning – a very nice clean and elegant un-named gun.  I have to re-brown the barrel and also engrave the (replacement) patch box cover.  AT the moment the cover appears to be cold drawn steel that has been partially hardened – it will need annealing before I can engrave it.

22nd May  – Off to Bonham’s viewing today, which involved enduring a moderate amount of rail chaos – all manner of excuses were posted on the boards – I think they have a random excuse generator in their system – I saw’train in the wrong place, no driver, signal failure, breakdown’ – I didn’t see ‘engineering works’ for which be thankful….   Anyway Bonhams was its usual friendly place – part of the attraction is the social aspect!  I met up with a friend who had flown over from the US to to look at a gun and we had a good chat – we’ll meet up again in November on a muzzle loading shoot.  There were a number of fairly OK percussion guns at reasonable estimates, but I have enough- no more room in my cabinets for long guns!  Nothing spectacular, although I left a few bids at around the bottom estimates just in case – I might set up internet bidding, although I did fix one telephone bid – you can’t book a telephone bid on any lot that has a lower estimate of less than £500.   There was one gun that I fancied – a Joe Manton ‘switchable’ flintlock and percussion gun – and  I wouldn’t have minded the cased set by Smith of a gun and a rifle – fitted with nipples for Imperial caps, which Smith favoured – all well more than my pocket money these days.  The pair of Barbar silver mounted pistols at 12000 to 15000 look quite similar to mine, only unfortunately quite a bit nicer!   The Manton barrel continues its browning – its becoming clear that the sections of twist the barrels are made of – they are coils  about 9 or 10 inches long –  don’t all match, either along the length or from side to side – I’m not sure if this is an artifact of the stage of the browning, or more probably of the construction  If its built-in then I’ll go for a a fairly dark browning to hide the differences.  All will be revealed…  I have been practising my Purdey engraving – when you look in detail at the fine scrolls they are fairly simple cuts and not especially finely executed. but very clever in achieving the visual effect – looking at them with x25 magnification allows you to see exactly how the engraver made each cut, so that you can truly copy it – its one of those situations where the outcome is more than the sum of the parts so  fairly crude cuts will work as long as the balance of light and dark and the overall impression are right.  Anyway a bit more practice is called for….  Over to Dick’s tomorrow to pick up a mainspring for the other Manton lock and collect the little pistols that need the engraving touched up…..

I haven’t cracked it yet – I need a lot of practise with paper & pencil first to get it right

21st May – got yesterday’s date wrong – my watch has skipped a day!  The Manton barrel is going quite well after its aborted browning – I am convinced that the twist on the two barrels is slightly different – we will see when it is finished.  I tried out ‘normalising’/annealing a couple of test plates – at least one is EN8 – I sealed them in a stainless/titanium envelope made from sheet from Brownells, and one was also coated with anti scale paint – I wanted to see if I could anneal without generating scale.  I used my little furnace ( see post) and cooked them at 910 degrees C for an hour, then let them cool very slowly by feeding in a little power from the auxilliary supply until they got below 400 C.  The bare one didn’t scale, and the paint is still on the other one so I guess that is clean too.  I just tried engraving a straight line across one plate and cuts much better than before, so I’ll anneal all my plates from now on.   I talked to a knife maker at the Northern Shooting Show who wanted to do engraving on the scales of his knives , and, since he has a real need, I suggested that he could justify buying a suitable microscope at the start.  I always have a bit of trouble with my separate camera when doing demonstrations of engraving as it gets knocked and doesn’t give a very clear picture – anyway I thought I’d buy a cheap(ish) trinocular microscope to see if the cheap microscopes were any good, and so that I didn’t have to disassemble and cart my good one to shows, and had a camera that showed what I was actually doing – I might even be able to shoot videos, which would be good.  I managed to find a new AmScope x7.5 – x45 trinocular microscope on ebay from the UK substantially reduced  price so I bought it!  Tomorrow I’m off to London to view the Bonhams auction – not sure if I’ll buy anything – probably not but its nice to look and I can see various friends!

20th May – bit of a disaster with the browning of the Manton barrel – I wasn’t having much luck in the cellar with Blackleys slow brown so I gave it a coat of mine and shifted it up to the kitchen next to the AGA and left it for a few hours.  Nice deep reddish brown colour BUT a patch were I hadn’t put on any of my brown looked very pale and with sharp edges  AND in a few places the rusting had got too vigorous and had raised some rough patches that I couldn’t remove with 0000 wire wool or a brush – it needed 3000 grade paper to get them down and that left patches – SO back to square one – chuck it in the derusting tank and then work on it with 1000 grit, 2500 grit and 000 and 0000 wire wool – so now we are back to the start – no damage done.  It has never happened to me before, and I don’t know why it went wrong this time as the rusting hadn’t been too vigorous -maybe my solution is really too strong – I’ll dilute it some more – when steamed it tends to give a very black colour.   While waiting for the derusting etc I started to tackle the outboard motor that was overheating last year.  I had done the bottom end and water pump last autumn, so I decided that there must be a block somewhere in the cooling galleries of the engine – I stripped the engine and took the head off – there was some salt and crud in the passages but not enough to stop the flow – anyway I’ve cleaned it all out and will get new gaskets from the friendly chap in the Isle of Man – would be good to go sailing next w/e if this weather holds – I need a new number plate for the trailer – I have a spare outboard if the Yamaha isn’t finished.  I’ve started to do a bit of practice for the Purdey foreend engraving  – I picked up an old practice plate that had been heated on one corner and realised that the corner was much softer to engrave compared to the rest.  The material is bright cold rolled mild steel ( probably EN1 or EN3) but the cold rolling process toughens it up considerably so its much harder to engrave than soft gun parts.  I have more or less run out of test plates, so I’ll order some more EN1 in 30 x 6 mm and then anneal it in my furnace before flattening the surface and getting a good working finish for practice plates.  Metals4U gives you 10 free cuts and then 50p per cut, so a 3 m length can be cut into 150mm plates for £4.50 which is not bad, which adds up to about £2.50 per test plate.  I might get them surface ground again, but I’ll try for a finer finish than last time as I had to do a lot of work on the surface before I could use them.

19th May – More school today – a visit to see how the school is doing with its maths progress.  The children in the top class had made  cards and presents for Dave and I for doing robotics with them – really touching!   I went shooting this morning – it was meant to be a ‘have a go’ session that we run for the Cambridge Gun club for corporate groups, but the group had cancelled and they had forgotten to tell us, so we got a free mornings shooting as a compensation.  I took my flintlock and am sad to report that I couldn’t hit anything with it – well, actually one clay!  It was firing a bit slow but that isn’t an adequate excuse…   I swapped to my percussion for the last few  shots and was back in my usual somewhat erratic form – bother, I was hoping I had got somewhere with the flint – I did better last time.   I’m still browning the Joseph Manton barrel – its being very slow but I think its getting there.  One lock still needs a mainspring but I think I’ll go and have a poke through Dicks box again to see if I can get one that fits without having to drill a new hole for the peg.  I picked up a handful of mainsprings with a short top arm – as from modern locks – and they are all more or less identical – just about 1.5 mm too long between peg and claw.   Apart from cleaning the two guns, all I had time for was sharpening the 15 gravers that I bought back blunt or chipped from the NSS.   There is another Anglian Muzzle Loading shoot on Sunday but I don’t think I can face using the flintlock as its just too depressing!  I’ve got to ship some engraving bits to Australia, but unfortunately they have to be picked up and its not easy finding a day when I am in.

18th May – A morning in school invigilating the dreaded SATs exams!   Dick has finished the Manton hammer and made a new nosepiece, he didn’t have the rest of the gun and didn’t know which way up the nosepiece opening should be, so they need unscrewing and changing.  He has, as usual, made a fantastic job of copying the good hammer – I just need to engrave a couple of lines to frame the chequering on the spur and it will be a perfect match when its coloured down.  The barrel is coming along well after about 4 or 5 brownings – I guess it will take 10 or so.  Now I need to replace the mainsprings with the ones I found in Dicks junk box – he says he found another box of springs if I want another poke around – and to think I used to make them….  Dick will do a bit of work on the wood round the lock pockets,  I cleaned up a couple of pistol barrels that need rebrowning – I hope I got a reasonable finish – I refuse to strike them down to the bottom of the pits as that will seriously remove metal.    I talked at the NSS to a gunsmith who wanted a Purdey replacement foreend iron engraved – I have never done any Purdey style engraving, or indeed any modern style engraving but I said I would have a go!  Probably regret it!  I had a look at some Purdey foreend that Dick has, and looked on a couple of auction websites so I have a fair idea what to do…   I’m off to Cambridge Gun Club tomorrow as we (Anglia Muzzle Loaders) are putting on a ‘have a go’ event for CGC and I am needed on account of not many people have flintlocks and are familiar enough with them to let them loose on the public.  For the first time I actually checked my flints and replaced them BEFORE starting to shoot – this is probably a big mistake and I probably ensured that they won’t spark well!

You have to admit, that is a pretty good copy!

A couple of barrels to rebrown so that they don’t look rebrowned!

An old Purdey forend – most are not quite so closely worked – I will see what I can do!

17th May – Back in harness, so to speak.  I have finished preparing the Manton barrel (and unscrewed the foresight) and put on the first browning which went quite slowly but looks very promising now I’ve rubbed it off with 0000 wire wool – I will probably make a warm box as the cellar really takes too long – I can do pistol barrels on top of the AGA  in a tub but long gun barrels need some better method than hanging them in the cellar.   I am now preparing the barrels of a pair of over and under flintlock pistols – they are slightly pitted (as are almost all antique barrels even when the rest of the gun is immaculate) and needed a gently rebrowning, but it would not be appropriate to strike them off to get rid of all the pits – I have run them through the derusting tank to convert all the red rust in the pits to black and wire brushed them – I then work on them with 400 grit paper on any bad bits but mostly with 600, followed by 1000, then 3000 and 000 wire wool. It’s fiddly because there are ribs between the barrels and a rib underneath and each has two right angled edges to be cleaned out.  I run them under my fine wire wheel (0.03 wire) to brush the grit and dust off between grades of paper.  The engraving on the barrels looks fine and isn’t even filled with rust, so just a very quick going over to clean it out before browning.   I spoke too soon about filling my shooting calendar for next season – I got another lovely invitation today that I can’t miss.  The only problem is that its on Penny’s birthday and I’ve already ducked out of a party and a May Ball for the Scottish shoot – I am expecting the divorce papers any minute………………………………………………….

16th May – Bit of a surge in visitors to the blog – I gave out about 50 cards at the NSS so I guess some new people are looking – Welcome if this is your first visit – hope you enjoy the site.

16th May – Busy trying to sort out my ‘clean’ workshop, which is anything but.  I’ve now got a bit more swinging room around the microscope, although the support for the microscope will still get in the way, but it only blocks an angle of about 10 degrees so not too bad.  I had invitations to another two muzzle loading game shoots next season, which just about fills my shooting calendar!  I think I now have 7 lined up – they are getting more and more popular as people get a bit jaded by the big bag breech loader shoots – It’s going to grow significantly as a sport – we are already seeing a steady increase in the numbers shooting clays with muzzle loaders.  At the moment its difficult for newcomers to get into the muzzle loading game shoots as only a few people are organising them and they always get filled up quickly with  the ‘regulars’.  It can’t be a very attractive commercial proposition for the shoot, as the bag is much smaller than for  ‘normal’ shoot, and hence the gross take is a lot less –  having said that, the shoots I go on all seem to be very popular with the keepers. I am going to see how well I do with a flintlock next season, as its getting a bit common using a percussion gun – nasty new fangled things!  Checking my calendar, I’ve had to duck out of a birthday party and a May Ball to go up to Scotland to shoot the National ML championships with my son Tom, but it is great fun, even if I don’t hit much – Tom and I are about equal as he only shoots once a year and I am a lousy shot anyway.  Last year I missed the Samdringham Game fair, which I love, but this year I should make it.  I probably won’t be at the Fenland Country fair – its my least favourite as its only 10 miles from home so none of the fun of camping there!  I popped over to see Dick and look at the hammer of the Manton he has been filing up – Jason did a splendid job of welding – much better than my welding – so that is almost done – I just need to brown the barrel now.

16th May – Back from Harrogate…  The Northern Shooting Show was pretty hectic viewed from behind my engraving bench – not sure of much that went on outside a radius of about 15 ft!  Lots of interest in what I do, particularly in engraving and re-engraving antiques, and I am sure a lot of work will come my way as a result. I came totally exhauseted after talking all day for both days!  People seemed to like the assurance that I understand the importance of not over restoring guns, so I am becoming ‘The Ethical Restorer’!  Quite a good strapline…    I did get to wander round on a short lunch break – its an amazing show, I’m not sure in our urbanised south of England you could put on a big show that had Shooting in the title, we just tag guns onto ‘Country Fairs’!    Several of the enquiries that I had related to restoring the engraving on barrels, and I have a couple to do already, so while I have my microscope etc all packed up from the show I have decided to re-organise my engraving bench so that there is room to swing a barrel – this means extending the bench and cutting away the bottom part of a set of shelves, so that is today’s job – I do have a couple of pistol barrels and a double shotgun barrel to re-brown, plus a few other bits and pieces, but I do want to get the bench sorted so I can get all the boxes off the floor and have room to move!

10 May – A website regular emailed me to say that he did his browning on the back of his AGA so I thought it might be worth a try.  I’ve been browning the little pistol barrel hanging over a jug of water in the bottom of a steel barrel about 2 ft high in the cellar so I just took it up to the kithen and perched it on top of the cover of the AGA hotplate and wrapped a piece of silvered bubblewrap round it – that really turbocharged the browning and finished it in one go – beautiful!  Thanks Chris.  I can probably get each rusting done in a couple of hours like that – now I need to sort out how to do the same for a long gun barrel.  The little pistol is now together and looks superb – I wish it was mine.   I’ve now loaded up my truck with all the stuff for the Northern Shooting Show – I’d forgotten what a long drive it was until I did a reccy on Google maps – about 4 hours.  I’ll have to get there in time to build my setup and display – it takes a while to get the microscope set up with the turntable as the field of view needs to be aligned with the centre of the turntable an perpendicular to it or I keep loosing the object as I rotate it, which of course I have to do all the time as you can only cut in a very limited range of directions.  The NSS opens at 8 every morning so its an early start, although I only have to travel from where we camp on the shooting line to the show hall.  I haven’t been able to get a map of where on the site the MLAGB stand is going to be, or how much space we will have  so I’ll have to play it by ear.   I’m still not quite sure what to take in the way of guns – I’ve been asked to take some pistols for the main display and I’ll take a couple for my own display of restored things, and my restored Lancaster oval bore as that is my best bit of restoration so far.

Here is the little pistol – I can’t claim any credit for restoration – it is entirely original!

9th May – Sorting out labels for the NSS – I’m still browning the little barrel and it still has some way to go, I’ve lost count of how many brownings its had but judging by the number of wads of used 0000 steel wool lying about on the bench it must be around 8 so far – I’m still using Blackley’s slow brown as I don’t want to make the finish any blacker at this stage by using my solution with copper in it.  I nipped over to Dicks to have a look at the Manton hammer – it is looking good, a little bit more work needed.  As I expected Dick has had to file through the weld I put on the front of the spur in order to match the existing one, so he will take it to Jason for a bit of delicate welding – probably a bit fiddly for me to do.  He found a chequering file to cut the spur surface, so that will match the existing one, I’ll have to do a bit of engraving around the chequering but it should be good.  I must get on with the Manton barrel smoothing with 600 grit paper, then 1000 then 3000 ready for browning.

8th May – Spent most of the day sorting stuff to take up to the Northern Shooting show on Friday  – as well as all my engraving stuff, microscope, power hone, lights etc I had to sharpen about a dozen gravers and find my microscope camera etc.  I have 2 tables & trestles plus mounted photos and bits for a display of restoration to sort out, plus a notice or two about restoration as I haven’t got any.  Clare emailed me this evening to bring some pistols for the main MLAGB display – so that is another thing to sort out  – I seem to have mislaid my Colt Navy that I usually take – probably gave it to Tom – it was a bit ropey… I did wonder about getting some section 7 pistols for my collection – it stops rather abruptly after the Adams and associated  percussion revolvers – apart from a couple of little rim fire .32 Smith and Wessons which are as common as dirt.  I carried on browning the little pistol – still some way off, but I’ll keep at it.  I did a bit of cleaning up of the Manton barrel – that will brown nicely when I get round to it.  Dick says he has nearly finished filing up the hammer spur and reckons it won’t need any more welding, which would be good. I’ll probably go and see it tomorrow – he is quite excited because he has just got another dog so I”ll be shown that too – another black lab bitch that was rejected as a gundog!

7th May – went to Dick’s to show him the Manton and hand over the filing of the hammer spur to him – he has a better eye for shape than I do and is better at filing – he did a proper apprenticeship while I am just a bodger!  He was as amazed as I was at the nature of the surfaces of the break in the Manton springs  – I can’t believe they were the original springs.  There is a bit of a mystery there – if you scroll down a bit and look at the two photos of the lock you will see that the top arm of the mainspring rests on a little ledge on the inside of the lock plate, and on the outside there is the end of a pin where the ledge is fixed through the lockplate – this seems to me to be a bit unusual as the top arm usually rests under the thick piece of the lock that rests against the barrel – i.e. its normally quite a bit longer.  It looks like the lock may have been modified with the ledge added to take a replacement spring – The springs with the short top arm are now associated with ejector springs.  Anyway at DIck’s we sorted through his collection of mainsprings – he has lots of ex Purdy ejector springs and various assorted springs including a number of mainsprings recovered from old percussion guns.  We managed to sort out half a dozen possible springs – they are almost an exact fit, except that all bar one has the peg that locates  in the lock just about 1.5 mm to far towards the muzzle to fit directly – I did contemplate filing off the pin and welding on a built-up peg, but I’m not sure if that would be strong enough, so I’ll probably do what an old gunsmith would have done and drill a new hole and plug the old one – I might just try a blind hole.  I’ll then have to block the old hole, either welding it or, more authentic, riveting in a bit of steel rod. Anyway its good to know I won’t have to make springs from scratch…   Browning of the little pistol barrel is being slow – Dick complained that the last pistol he browned took him 15 rustings, so I shouldn’t get depressed as I’ve only done 4 so far.

Obviously the ones with red clay are the originals –  the right hand lock on the right.   The peg on the RH  original lock is further from the ‘elbow’ than it is on the LH lock

This is the best fit spring  for the LH lock – it may be a bit short, causing it to hang down below the lockplate, but I can’t be sure as Dick has the hammers and they form the stop.  This spring is more traditional and rests on the main bolster, not the pegged in ledge arrowed.  Most locks had the bolster extending further forward?  The photo also shows the line where the flashguard is joined into the plate rather than being integral. 

6th May –  I got my microscope camera rigged up today and took a few photos of the broken springs – it works very well but needs to be in place of one eyepiece so you can’t use the microscope while the camera is in place.  Anyway you can certainly see why the springs fell apart – its just difficult to see how they ever held together!  I tackled the job of welding the replacement spur on the hammer of the Manton.  I could not see how to get a weld across the whole face of the joint, and the lump I welded on is somewhat oversize so I tacked it in place – it took a couple of goes to get it aligned right. Now it needs shaping, and if that gets near to taking away the weld I’ll just go in a bit deeper with the weld – I’ll just have to make sure that there is always enough weld left somewhere to hold it all together.  I’m browning the little barrel but its being a bit recalcitrant – I had to hang it in a bucket over a jug of hot water to get it to rust today.  I get the urge to try my browning solution on it, but I’ll keep going with Blackley’s for a bit.  I’ve been in correspondence with a friend from the AML who is browning a barrel and not getting a great deal of joy after half a dozen rustings – he has now added some dilute copper sulphate to his bottle of Blackley’s Slow brown to emulate my used printed circuit etching solution – signs it might help.    I’m off to the Northern Shooting Show on Friday so I have lots of things to sort out.  I will be doing engraving demonstrations and  giving engraved screwheads to small children as usual, but I thought I might make a change and do a static display of restoration equipment, parts and tools and a job in progress ( I have lots!).  I’ll take my power hone for sharpening this year as I get through the gravers at a rate of knots – I made another 4 this afternoon – I usually sell a few at Harrogate.  I bought a very cheap belt sander and some silicon carbide belts which is ideal for preliminary shaping of the points, and other shaping jobs as it doesn’t heat things as much as a grinding wheel.  I mean to get a coarser diamond hone disk but the 80 grit ones are very expensive, and anyway I need a new 260 grit wheel at some point.  All these tools cost a lot.  I am doing a quite few restorations for friends and via the blog but I have to work out costings each time and don’t always get it right so I thought I’d try to make a price list – at least with a range of prices for each job so people could judge whether it was economically viable to do a particular piece of work on their gun.


The delamination emerging top right in each of these two photos is visible along the top of the spring surface as a crack.

Above are the two parts of  one mainspring – all sorts of faults are visible, including a slightly rusted surface from an old crack and  several delaminations.    I really find it difficult to believe a spring can be that bad!  I’ve seen a fair number of breaks in mainsprings before and always look at the surfaces under the microscope but usually they are clean uniform surfaces – sometimes with a rather large grain size. These look as if they are original, so its difficult to see what happened to them – unless it was the effect of a damp atmosphere.

This spring has flaws too, not quite as obvious in the photos, but both broke – the red is modelling clay.

I hope that the metal I’ve welded on is large enough to make the spur- its quite difficult to judge – we shall see!


5th May  – Had a bit of a problem today – I was derusting a pair of percussion locks for a job and after 10 minutes in the derusting the mainsprings both broke!  I knew that some very high strength modern steels suffered from hydrogen embrittlement if subjected to a very long  derusting electrolysis, but I’d never had any problems with mainsprings in dozens of derusting so I was a bit concerned to say the least.  When I looked at the spring breaks under the microscope at x25 the answer was obvious – both had longitudinal cracks and delamination and  corrosion around around the area of the break  – the gun had been stored in a damp place and it looked as if that had somehow badly affected the spring – maybe it was held together by rust, and derusting it just let it fall apart.  I wondered if the mainsprings might have been replaced with very inferior ones at some time as some of the faults looked as if they were the result of poor manufacture.   I can usually weld mainsprings using piano wire as filler but in this case it would be pointless as there is too much amiss in the surrounding metal.  The springs would have fallen apart as soon as the gun was used so its just as well to sort it now.  I’ll try to get some castings from Kevin, or failing that I’ll make a couple of springs myself – its a bit of a pain to make the hooks for the link, but it can be done!  I started on browning the little o/u pistol barrel – first coating it in a slurry of chalk and water that I left for about 16 hours and got this effect;-

You can see a fine twist appearing, I then cleaned the chalk off and gave it a rusting with Blackley’s slow brown, but so far it hasn’t really got rusting going – I suspect that the cellar is actually pretty dry today, although its usuallly quite damp and things rust easily.


5th May – Busy afternoon at school.  I cleaned up the little over and under flintlock barrels ready for browning and they are now sitting in the workshop coated in chalk to  remove all traces of oil – it also starts off the etching process – I can already see a beautiful twist coming out.  I started on the hammer of the Manton caplock – I ground off the ragged break and welded over the joint area to give a sound base for welding on the extra metal that is to be shaped into a new spur for the hammer.  I’ll leave the metal well oversize so I don’t have to get the alignment perfect – I’ll tack the piece on and then undercut the rest of the joint so that the weld penetrates towards the middle of the break, otherwise its not going to be strong enough.  I’m running out of Argon so I’ll shortly have to make an expedition to get a refil – last year I changed from a rental to a half sized bottle on a refill contract – the big bottle lasted 4 years but this one must have leaked as its only been in use for a year.  The owner of the Manton wants us to do the complete ‘breathing’ so I’ll start with the derusting over the weekend.

I hope the piece of metal I cut from a little set-square is big enough!


3rd May – Pleasant day shooting at Eriswell – I did manage to hit a few with the flintlock!  emphasis on few…   At long last I got to fire at a pattern plate – the Manton flintlock was a fairly even pattern at 20 m and covered 30 inches fairly evenly but was a fraction low.  My 20 bore Beretta has choke on both barrels and threw a very good pattern of about 20 – 24 inches centered on the target – not too tight, so I feel more confident that when I actually manage to point it at the clay, it will break it!  A friend asked me to fix a Joseph Manton he had just purchased – the spur of the cock had been broken off.  I bought it home and checked it out against ‘The Mantons’.  It is a caplock of around 1827 to 1829  made my Joseph Manton & Son a year or so after Joseph had been declared bankrupt for the first time in 1826.  He had been forced to sell his premises and had managed to get an advance of £750 and set up in business again at Mary Le Bone Park House – New Road – London for a couple of years before moving to Holles Street in 1829 or thereabouts  – a truly irrepressible man.  He was not able to keep his full staff and had to outsource some work, but overall this gun is of decent quality.  My friend’s example appears to be genuine and original and ‘ticks the boxes’, but is in need  of a little tender love and care to restore it to its full potential (& value – anything by Joseph or John Manton is sought after).   It has the classic caplock hammers with detachable face, and short, square nipples – it is interesting because the flash guards are morticed into the (flat) lock plates – see arrow on photo – I assume this was original.  The serial number is 10121  and the barrel was bored by Thomas Evans (TE) and has faint proof marks.  The barrel address is Mary Le Bone Park House New Road London.  Apart from the broken spur and missing insert it just needs tidying – there is a bit of split wood round the lock pockets because the edges of the locks are quite badly rusted and the expansion has cracked the wood in a few places – the barrels need a bit of attention – derusting (as do the locks) and very gently rebrowning.  At the moment I’ll just sort out the hammer spur and any engraving that needs replacing on the repaired parts – the owner will probably want to do the rest…..

You can see some of the rust that covers much or the lock edges. 

Interesting that the flash shield is morticed in to a flat lockplate  rather than made as part of it as in most guns.

Quite a rare Joseph Manton with this address – he was only there for a couple of years.


2nd May – The 8 bore is back together – the browning worked well for the muzzle half of the barrel but there was not much pattern in the breech area – that section of the barrel was quite clearly much more homogeneous  – it can’t have been made using twisted iron and steel or it would have more figure – I guess it was mostly steel.  Anyway it now looks pretty good – I might try a photo later.  I had a visit from a collector dealer who brought a cute pair of percussion pocket pistols to be ‘breathed on’  One has the bottom tang poorly repaired, and  a bit of the butt to be fixed, and the other has a chipped flare to the cock mouth.   We took them to Dick to do the breathing, along with a pair of Joseph Lang 12 bores that need a bit of TLC but nothing major.   I got the little O/U flint pistol back from Dick to be rebrowned.  I’m off tomorrow to Eriswell to shoot the John Manton double 14 bore flint gun, and perhaps a few shots with the 20 bore hammer Beretta if I need a break from the effort involved in loading the flintlock   I had a careful look at the Manton with my visitor, and he wondered if the stock had been swapped – it is possible as there is a slight misfit in the area of the false breech that I had to sort out when I got it – I’m pretty sure the locks, barrel and breech block belong to the proper Manton as they are all correctly numbered, but from the on it could be a bitza – I am not particularly concerned as I didn’t pay anything like the price of an original Manton.


Much improved, and not looking as if it has just been rebrowned – which is the aim.

1 May – another bit of browning T+Bs+Bs+Ts – its getting darker but the pattern is being obscured over some of the barrel – there never has been any significant pattern in the thick material of the breech, which was obviouly not just a continuation of a  simple twist – I tried just steaming the breech end and now I have just put browning on the bit that doesn’t show very much twist at the breech – I used my browning for that as it was a bit light for the last foot or so.

1st May – Another month gone!   I’ve done a couple of brownings of the 8 bore barrel so far with quite encouraging results – I keep a note of what I do so that I can compare results, a T for a browning with my solution, a B with Blackleys and a lower case s when I steam a browning after rubbing it down with 0000 grade steel wool. At the present rate I think 6 brownings might be enough – I can fit in about 3 a day if I’m here most of the time.  I do them in the cellar, which is quite damp  but not particularly warm,  13.7 C at the moment – fine for red wine!

This is the result of T+Bs in my simple code system – the twist is beginning to show nicely – the steaming brings it out more – it doesn’t take much – just pass the barrel back and forth over the spout of a kettle a few times ( beware burning yourself, you need long wooden handles in the breech and muzzle)  – somewhat easier on the AGA compared to an electric kettle.

This is the first browning with old printed circuit etchant – the blue seems to be due to the copper in the acidified ferric sulphate solution

29th April – I ordered some sets of honing stones from Zoro UK – I got 3 sets (different grades) of 3 stones (most hones work in threes not two like mine) that are 100 x 9 mm and one set that is 51 x 7 mm  – and all for the price (about £21) of one pair of Brownells 19 mm stones with the postage.   We shall see if I can devise a suitable holder.  In the mean time I am pressing ahead with the rebrowning of the 8 bore.  I turned up a couple of bits of wood as bungs in the muzzle and breech, sealed with shellac, and scrubbed the barrel with detergent and water and then painted it with a slurry of chalk and water to lift any remaining oil.  I’ll probably give it a coat of my browning solution first as it contains copper and probably etches the surface better than Blackleys – then I’ll change to Blackleys, although I don’t have much in stock and I have the little pistols to do.  I seem to have lost the last bottle I bought – things disappear!   I’ll make up more of my solution when I can find a good bottle, I have a jar of strong used printed circuit etching solution that has been used, diluted at least 10:1 it works fine, and is probably OK at 20:1.


28th April – I carried on honing the 8 bore barrel – I spent a long time with the 150 grit stones – at first the muck that flushed out was mostly rust colour, but it gradually changed to  a greyish brown as I wore down the rust patches and got rid of most of the worst roughness.  The barrel got a lot smoother but you could still see a number of imperfections that were obviously left over from the  original boring – a few marks along the barrel and some ripples.  I stopped the 150 grit when it looked reasonably clean and switched to the 400, which did a reasonable job of refining the surface and flushed grey, but the stones wore out very quickly and unevenly and I had to unrivet them and swap them end for end.  I did get a reasonable finish so I swapped to the 500 grit stones which did get a better finish although they wore down quite quickly.  I stopped at that point – the almost shiny surface actually showed up the irregularities  more, but the finish was smooth and you can see that there is very little in the way of pitting – the barrel is obviously well able to stand the sort of loads it would originally have been used with – maybe up to 4 to 6 drams and 2 1/2 oz of  large shot. I rate the honing a partial success –  I realised afterwards  that the finer hone stones were cutting with the back corner, presumably the arm was interfering with the floating part – so that it was polishing into the depressions instead of taking off the high spots – it does mean that all the rust has gone and the barrel is smooth and nothing is lost as I can always go over it with a longer & or flatter stone.  But I will have to think about a new holder, especially if I want to do smaller bores than 8 bore!  So now I have to brown them a nice dark colour. When I’ve done that I’ll do the pair of O/U pistols and the little O/U ( all flintlocks).

Here is a photo of a nice Irish Duelling Pistol circa 1780 by Hutchinson of Dublin – it was on my FAC for a while and I have shot it.  This was one of my first restorations – the cock was broken and had been brazed, and needed the wood sorted and the barrel browned.  I had a pair of almost identical pistols by Edwards of Dublin so I got a new cock cast from one of the Edwards cocks – my guess is that the engraving on the Hutchinson and Edwards were done by the same Dublin engraver because the cock matches the lock tail engraving perfectly.  For historical accuracy I still have the braze repaired cock for the pistol.   I’m very fond of this pistol as it represents the peak of elegance of the duelling pistol – no half stocked pistol can ever look this elegant, and percussion pistols don’t do much for me!  You don’t need to pay a fortune for big name duelling pistols to get a thing of beauty, although even this one will be worth a lot more now than the £700 I paid for it!

27th April   Had a great hour this afternoon teaching a group of 10/11 year olds about programming robots – I just wish the boys would show as much interest and concentration as the girls!   I fear that when the male culture that has successfully kept women at bay for hundreds of years  finally crumbles, men are going to have to up their game to stay in contention!  I finally got my kit of honing stones from Brownells yesterday – all their stuff is shipped from the US and only ordered once a week, so  the normal delivery is around 2 weeks.  I hadn’t ordered a holder for them because I wanted it to work on an 8 bore and the holder said it was good up to 12 bore.   Looking at their photo I figured I could make one – I had a long fibreglass cleaning rod with a hex shank to fit a drill and a 9/32 BSF hole in the other end so I copied the general shape of theirs, turning a boss with 9/32 BSF male ends and milling grooves for the stone arms – I wasn’t sure how they applied tension to the stones, but I found that I could make an adjustable system using O rings ( I have a box with an assortment left over from various jobs) – one to hold the tails in and several in a groove to pack out the stones to the required pressure.  I slipped a piece of plastic tube ( 15mm water pipe) over the fibreglass to protect the barrel and am using WD40 as a lubricant.  And it works just fine- somewhat to my surprise – although its going to be a long job even with the 150 grit stones – at the moment it seems that most of what comes out is rust, but the bore is showing signs of getting better – we shall see after another hour or so with the battery drill.  I was going to mount the barrel in the lathe and run the rod straight up and down  but the fixtures for holding the barrel in the lathe would take too long to make, and this is easier, plus I have the speed control in my hand on the drill.

26th April – Driving much of the day – first to Norfolk to lunch with a keen collector, then over to Holts to take a couple of 12 bores to put in the sale.  I hadn’t really looked at them before, but when they were properly looked at it was clear that both were very loose in the action –  rattling when shaken, and the Jefferies had been reproofed in 1993 but the barrels were down to 13 thou in places.  Not yet at the stage of being dangerous to shoot, but not very encouraging – we left them for Holts to see how to sell them.  I always enjoy having a poke round their premises – this time all the ‘Grown ups’ were off round the country on a valuation week drumming up new business, but the remaining crew were as friendly as ever and we had a look at some pretty unusual things – they had a Nock 7 barreled gun for the next sale at £15K  and a very unusual breech loading  7 barreled .22 rifle designed to fire all 7 barrels simultaneously – thought to be for ‘mopping up’ operations after discharging a punt gun, although the reloading must have taken a while.  There was a nice Westley Richards 1874 patent with the classic crab knuckle joint like my William Powell – in a bit better condition than mine, but in next time for more than I paid for mine – unfortunately black powder only or I would have been tempted to swap it.  I’m still thinking of what I need to cull from my collection – I have relatively few flintlocks so I shall keep most of them, but there are  a number of percussion guns and pistols that could go to make room for more flintlocks……..  The popular things at the moment are little pistols in good condition – prices seem to be on the increase, as are prices of shootable sporting guns.  There is very little market for junk unless it will restore into something  good.

25th April – Sorting out my little robots for my class on Friday – quite a challenge to find something that will give them an understanding of how robots are programmed in the space of an hour! – still I do like a challenge.  Tomorrow I’m off to deepest Norfolk with Dick to see a collector friend who has an amazing collection of flintlocks and an insatiable appetite for more – I keep trying to think of something I could take to sell him, but its my percussion guns that I want to shift!   After lunch it will be a dash to Holts to deposit a couple of 12 bore guns that came from a friend’s gun cabinet when he died – a sidelock ejector by Jeffreies and a Webley and Scott 700 series non ejector – I have no use for them, although the Jefferies is decent bog standard side by side if one wants one – it will probably make around £700.  I  quite like my little 20 bore if I want to shoot a nitro S/S – 24 grams is a decent load as its a light gun, and I occasionally hit things with it when I get used to the weight – I’m a bit liable to wave it around in the air when I pick it up after shooting a heavier gun, and its chokes are tight so its easy to miss (anyway that is my excuse!).

24th April  – Miraculously nothing to take me away from playing today – went to see Dick and look at progress on the little O/U pocket pistol he is cleaning and tidying, and saw a little Tranter .38 rimfire revolver he had cleaned up for a client –  because its rimfire it is classed as an obsolete  calibre and is therefore section 58 and doesn’t need to be on a FAC – rather a pretty little thing – wouldn’t mind one of those for my Tranter/Adams collection!   I tackled the Richards lock that Dick and I had been working on – he had the cock  and the tip of the sear welded, but Jason, our speciality welder didn’t want to weld up the broken bridle – he doesn’t know guns and I guess he didn’t know what liberties he could take, so it was left to muggins to fix it.  Bits of old guns are always a gamble to weld as they may contain a lot of carbon and may fizz like a firework, but this bridle wasn’t too bad – the bit that broke was a narrow bridge between the mounting boss and the main plate, but fortunately there was room for the bridge to be thickened up a bit – so it worked!    I’ve been cleaning up a lovely pair of Over and Under flintlock overcoat pistols – they really don’t need much done to them – I’m still debating whether to rebrown the barrels – I think I probably will if I can do it in a discrete way.  The barrels have LONDON engraved on them, and it appeared almost completely worn down – but actually the cuts were just filled with a hard rust/oil mixture and were perfect underneath.  Its not possible to get the crud out of the letters with a brush as its too hard, so I use a graver, being careful to follow each original cut and cut the very minimum of metal.  Not so much recutting as clearing out – it does leave some shiny metal showing so its best if it is rebrowned or failing that, gone over with blacking using a very fine watercolour artists brush.(0000 size).

A couple of my clients have brought to my attention that putting details of significant restorations of their guns on the site might prejudice their chances of selling them, which I can well understand.  Part of the problem is that Google searches will find even a single mention of a gunmakers name anywhere  on this site, and if a would be purchaser is searching for details of a maker he is likely to see it in unrestored condition and may be put off purchase.  Google images has lots of images from this site too.   For me its a bit of a problem as I do the restorations  partly to have things to put on the blog, and don’t really feel the need to charge much for my time as a consequence.   I usually ask if its OK to put things on the web, and I will now generally avoid mentioning the maker’s name  so that it wouldn’t come up in searches – which will avoid most of the problem.  I am reluctant to charge full economic prices for jobs that I can’t post on the web, but I suppose that is one possibility.  I hope buyers realise that just because they haven’t seen a blow by blow account of a restoration on the web it doesn’t mean that the gun is not in fact heavily restored – they are probably better off knowing!


Welded bridle of Richards lock


The ‘N’ is cleaned out – you can see the crud out of the ‘O’


These are the original cuts minus the crud – the graver takes almost no metal off

These are a beautiful pair of London made pistols in very good condition  Rebrowed they could look stunning  – I’ll probably do it! 

Its a question of getting it exactly right – I’m very fussy about the colour of browning!


23rd April – In Cambridge today sorting out around 100 laundry boxes of old data from Geophysical research cruises between 1957 and 1980 – records from deep water echo sounders, seismic receivers, magnetometers, gravimeters and heat flow – mostly on old paper records from various forms of chart recorder or mechanical raster recorders using electro marked paper.  A lot were early digital records recorded on punched paper tape – some may remember the click clack of the teletype as it spewed out 5 or 7 hole punched paper tape!    The echo sounder records were from Mufax recorders that were designed  for printing out weather maps and used wet paper that turned dark when an electric current was passed through it – a process that depended upon iodine.  The recorder had a beautiful helical electrode that revolved behind the paper and gave a linear sweep against a fixed electrode.   The boxes full of these records had all been infused with iodine and were a uniform dark brown colour.  We kept about 1/4 of the stuff for our archive, and ditched most of the rest.  Some is on hold pending other institutions wanting it.   It all took me back to my days in Cambridge University as I had designed many of the instruments we used at sea, and been on many of the cruises.  I think/hope the rest of the week is more or less free so I can get some gun work sorted out – I’ll go to Dick’s tomorrow as he is fixing up a beautiful over and under flintlock that had a slightly bent frizzen.  I will need to come up with something to do at the Northern Shooting Show to amuse the punters – I thougth I might display a set of parts/castings  for making a double barreled flintlock fowler as I have a complete set I bought some time ago, including a very nice piece of wood for a stock.  I also have most of the modern parts for the ‘Mortimer’ duelling pistols – although not the cocks.

22nd April – The lovely weather doesn’t make for good gun fettling!  On the basis that we usually get one week of decent weather early in the year and pay for it all through a miserable summer, I’ve been outside as much as possible fixing things in the garden, or. I have to confess, just sitting in the sun!   A few things needed sorting with the Lego Mindstorms for school – two units ‘disappeared’ from the school, so we are short of equipment now and I’m trying to get old stuff working with little success – I’ll probably have to buy another set, which is a blow as I’m no longer VAT registered.   I still haven’t had a whisper about the Brownells order so the 8 bore is stalled until the hones get here – I tried running a fibre pad up and down the bore and it seems to be in reasonable condition ( for an old gun) but I do want to hone it.  I could use the lead plug method – you turn up a tapered arbor and cast a lead slug in the bore with the arbor through it – the idea is that by tightening the lead on the arbor and forcing the taper into it, you can gradually expand the arbor as the lead wears down during the lapping with a suitable abrasive. Anyway that can wait til I se what turns up from Brownells – I will have to make a holder for the hones as the bore is bigger than the kit is designed for (12 bore).  I also have a copule of over and under flintlocks to ‘breath on’ when I feel in the mood for some sensitive cleaning and light restoration……….

18th April.  Didn’t get a chance to do anything to the 8 bore barrel – I’m waiting for a barrel honing set from Brownells, but as everything has to come from the US it takes a bit of time and I don’t want to get too far with the outside of the barrel before I’ve attacked the inside.  I spent hours building and testing some Mindstorms robots for a class that Dave and I are helping with tomorrow  – trying to find things that children of 8/9/10 who have very little idea about computers can do (apart from play) with programming robots in just one hour is  difficult.  But we’ll get something to work.

18th April.  I finished the barrel bolt for the 8 bore – it was filed out of a bit of 1/2 x 1/8 spring steel with the boss on the end built up with  TIG welding.  I find with a bit of care you can build quite elaborate extensions with TIG if you melt the rod on the place you want it, rather than getting a melt pool before applying the filler rod as you are supposed to – one of my favourite tricks is building the hook on the front end of a lock plate.  It’s a careful balance between getting unwelded junctions  or having it all melt into a pool – it is a situation where my home made foot control is essential. I did resort to using the miller to reduce the thickness a bit but it was too difficult to hold properly.  I deliberately left the head of the bolt quite chunky as I’ve seen too many barrel bolts with bits nibbled off them where they were not substantial enough to stand whatever was done to them to get the bolt out.   I usually mill the bolts out of a bit of 6mm steel, but thought this would be easier – it wasn’t! 10 minutes on the hotplate of the AGA got it to a nice blue colour, a little bending made sure it held the barrel tight, pop a piece of sharpened 0.8mm wire in to hold the bolt in place, a little hard wax in the hole where the original pin was excavated and its all fine.  I have now started to refinish the barrel with 240 grit, 400 grit and 600 grit paper and then I’ll run my fibre wheel over it and it will be ready for browning – I’m now covered in a fine black dust from head to foot!   I took the back door lining off the Land Cruiser to see if I could fix up a way of opening the door from the inside.  It turned out to be neater than I expected – I was able to fix a short length of steel as an extension on the back of the door handle  and cut an inconspicuous hole in the door lining in the edge of a pocket depression to reach it – job done!  I was so eager to put it all back and try it that I forgot to photograph it.   I had to go into Cambridge to rescue Penny as she had driven into a curb and written off the tyre of her car – unfortunately it is a modern car without a spare and the foam sealant they give you doesn’t work for  damage to the walls of tyres. For some reason the tyres of the Mazda 6 are not a stock item so we have to wait until Saturday before someone can come to fix it.  Given the number of potholes around after the winter there must be a many motorists cursing the absence of a spare wheel.  I’m quite glad the Land Cruiser still has one, although its slung underneath and very difficult to access.

I  can never tell what shade of ‘white’ the background to my photos is going to be – I think this was taken with sunlight streaming in.


17th April.  Took a little under and over pistol to Dick’s so he can straighten the frizzen – having looked at a couple it seems that the weakness with under and over flintlocks is that they are quite heavy and if dropped may well land on the frizzen steel and bend it.  They are, I suspect, also prone to breaking the cock at the same time.  I’ve got a couple at the moment to clean up – they are in nice condition so don’t need any dramatic restoration.

16th April – Got on with the barrel bolt for the 8 bore – I don’t have a slitting saw, so making the slot down the middle is a pain  – I cut a first slot with a fretsaw and am opening it up with needle files but its anything but straight – still its not a part of the gun that gets examined often!   My ‘new’ Land Cruiser has a ‘barn door’ rear door, unlike the old one that had  lift up and drop down flaps, so its not so good as a camper van – what is even more annoying is that in a cost saving mode Toyota have left off the inside handle that lets you open the rear door from inside.  But ….  a hasty google and there was a set of photos of exactly how to fit a DIY handle – from the US of course, where that sort of make and mend is much more common that in the UK, where most of the population seem to have lost the ability to do anything original, if they ever had it!  Anyway another thing for the to do list, along with stripping my Yamaha 4 h.p. outboard and digging the salt from the cooling channels – lets hope some enterprising person has made  a You Tube video of how to.  And I offered to make Viking a shot belt out of my left-over leather… and I have 3 meetings in school this week…   I can remember when I used to wonder what I’d do when I retired………..

15th April –  Shot my Manton flintlock at the AML shoot for 30 clays – I had a couple of misfires from worn flints, and it took me a while to work out how to load.  Received wisdom is to place a pin in the touchhole and close the frizzen while loading, but I can’t do that because the frizzens have tabs that cover the touchholes when closed to prevent the main charge from filling the pan.  I started out leaving the pans open, but that blows too much powder out of the touchhole as you force down teh wad, so I got misfires even when the priming in the pan went off – anyway closing the pan while reloading – as it was meant to be- fixed the problem and I had almost no misfires after that.  My score wasn’t particularly impressive as I didn’t really get my eye in except for one crosser that was fast enough for me not to have time to think, but not too fast for me to get onto which I hit all three times I shot it.   I used my little 1955 Berretta 20 Bore hammer gun in the afternoon and managed to break a few – it has very tight chokes on both barrels, as did many guns of that generation so you have to be spot on in targetting.  It was good to get out and shoot after a long break from it!  I took teh 8 bore and it was admired as a working tool – I’ll finish it and take it to the Northern Shooting Show where I will be doing my engraving demonstration as I might be able to sell it.   Holts are sponsoring a clay shoot with us  at the Cambridge Gun Club on 22nd July, which promises to be good fun – they are doing a free valuation for one gun for each entrant, and there will be a shield and prizes – which of course I will not be in the running for, unless there is a booby prize!

14th April – Anglian Muzzle Loaders shoot tomorrow – I’ll keep to my resolution of shooting flintlocks – now I have a good single (‘Twigg’) and a good double (Manton) and a good supply of Swiss No 2 powder and OB priming powder I should be set for some serious practice!  I will of course miss most clays as I always do, but I was inspired by Bev who on the last  AML shoot hit 26 out of 30 clays with his flintlock and beat all the percussions, proving to me at least that shooting flint is not, of itself, an excuse for missing!   I did start to make a new barrel bolt for the 8 bore – I want to get it finished as I want to sell it to clear some space – but cutting the lawn took priority, and then I went to a discussion on what makes a human different from a robot at Homerton so that put paid to any gun work, leaving just enough time to sort out things for shooting tomorrow.  One downside of shooting muzzle loaders is the kit you need – shot and powder flasks (different for percussion and flint), priming, wads, cards, caps, flints, loading rods, unloading rods, brushes, prickers……..   If you take both percussion and flint plus a breech loader for a bit of light relief in the afternoon you need a pantechnicon and several hours to sort it all out.  The only saving grace with my current set of shooting guns ( double and single flint and percussion) is that all four are 14 bore and take the same wads and cards!

13th April – I came to re-assemble the 8 bore and found that I’d somehow lost the barrel bolt – another thing to make!  I had a very pleasant visit from a friend/blog reader/client who bought me three pistols to ‘breath on’.  We had a long discussion about non-restoration, and our feeling that less is more when it comes to good quality pieces.  It’s a tricky area, and obviously each gun or pistol needs very careful analysis to decide what needs to be done, what might be done and what shouldn’t be done.  The client’s views are clearly important, but most sensible owners want an assessment of  the likely impact of any work on the aesthetics and value, and I try to give an honest answer based on my knowledge, but in the end its only my opinion.   Certainly some people are keen for their guns to look as they did when first made, but its rare to find a gun that can be returned to that standard, and it seldom if ever increases the value of the gun to a serious collector, although some buyers ( I refrain from calling them collectors!) want that sort of artificial perfection.    On the list of ‘needs to be done’ I’d obviously include missing or broken parts or missing bits of the stock and major cracks that would affect the strength.  On the probably to be done list I’d include taking apart and lightly cleaning and getting rid of any big dents and dings in the woodwork (unless the rest of the finish is near perfect, in which case proceed with caution or leave well alone), and fixing any lesser splits.  On the might be done we probably move on to the thorny subject of the barrel – to rebrown or not to rebrown, and to recut or not to recut the barrel engraving. Depending on how much work needed to be done on the stock, complete stock refinishing might be necessary, but that is a pretty drastic option for a valuable gun in good condition .  The usual state of an antique gun or pistol is that the barrel finish is much more obviously worn and rusted than the lock and furniture because it is of necessity  soft iron while the rest is hardened.  If the finish on the barrel looks incongruous there will be an argument for lightly refinishing the barrel and rebrowning  it – BUT only if you can do so discreetly, that means NO GINGER browning, beloved of many unknown restorers.  If you decide that rebrowning is going to enhance the look of the gun AND you can do it in a way that doesn’t shout ‘rebrowned’ it is probably worth doing unless the gun is  rare or expensive, in which case leave well alone.  If rebrowning is on the books there may be a case for recutting the engraving on the barrel if it is worn to the point of being difficult to make out individual letters – BUT again the object is just to refresh very lightly so it doesn’t look as if its been done.  In practice, as you will see eleswhere on this website, apparent wear and illegibility of barrel engraving is often the result of the letters being filled with rust with a hard skin on top, in which case with luck recutting will only need to consist of using gravers to (extremely carefully) dig out the mess without cutting much new metal away. Recutting engraving when you are not going to rebrown afterwards is particularly tricky and is only rarely justified.  Having said all that, it all  depends on the value and initial condition, and ordinary guns in mediocre condition don’t have a lot of value, so its easier to enhance their value by careful restoration, particularly if they then appeal to people looking for guns to shoot.  Anyway looking at the pistols that I got today, one had a few bits in the needy category and  all three were in the maybe/probably category in respect of their barrels, but with the caveat that they must not look as if they have been restored!  A tall order, and I’ll have to be in the right mood to tackle them!

12th April – My client opted for the Richard’s lock to be properly fixed and cleaned, so first job was to put it in the derusting tank in its entirety for a couple of hours.  The result looks much worse because the deep hard rust is now friable red or black rust ( it seems to depend on the nature of the original rust – see later) . One feature of derusting is that its almost always easy to remove screws afterwards, and in this case it was easy to strip the lock so that all the parts could be given a thorough brushing with the .03 wire wheel, which removes all the loose stuff and leaves a nice uniform patina.   Stripping and cleaning the parts  revealed a couple of interesting things; The bridle was cracked and in two bits, although it was more or less doing its job, and there was a brazing line on the back of the cock where the shoulder stop had been altered, presumably during the working life of the pistol, thereby confirming that the cock had been a replacement, and explaining the two different positions it could take on the tumbler.  In fact looking carefully at the stop shoulder shows it hardly works as a stop because the replacement cock differs a bit in shape from the original.   Anyway putting it all together with a scrap of flint shows it all works and sparks.  Its now gone off to Dick to get the bridle welded and the cock hole sorted while I get on with the 8 bore.

Straight from derusting (dried on the AGA).  The previously hard rust will now brush off.

Arrow shows where a piece was brazed in to modify the replacement cock – presumably during pistol’s working life.  The bridle is broken just below the arrowhead but it doesn’t show  until  it is taken off.

Cleaned and waiting for the welding. The flint is a bit  blunt, but I don’t have any good small ones.

Having got the Richards lock on its way I returned to the 8 bore.  In preparation for trying to lap the barrel I decided to derust it inside and out.  My previous derusting of barrels had been done in a 2 inch pipe, which wasn’t really very convenient and not big enough for the 8 bore barrel.  One of my favourite distractions is making tools and aids to restoration, so this morning I quickly made up a derusting tank 40 inches long and big enough to hold a single or double barrel.  I had a length of 50x 200 PVC ducting left over from the extractor fan duct at Giles’s flat, and a nice strip of worktop from the cottage washbasin fitting, plus a load of leftover black sealant and white adhesive – saw, squirt, glue and a tank appeared.  It holds about 4 litres of Caustic Soda solution and I fitted a piece of 1/2 inch angle as an electrode in a bottom corner with a steel tab for electrical  connection welded on (don’t allow copper in the solution on the electrode side) and found my length of 1/4 inch bar with grommets as an internal electrode and Robert is your avuncular……      It took about six hours to derust the barrel in a number of different orientations and inside the bore – my tank is set up in the cellar so I don’t have any problems with it getting in the way while its working.   I took the barrel out and wiped it and intense black oxide wiped off, so I left the barrel to dry and then went over it very carefully and firmly with the .03 wire wheel, which left an intense even  black graphite like finish that didn’t wipe or rub off.  You can see the twist pattern in the structure of the metal but its all an even black colour  – I’ve never had that result from derusting barrels before and I’m not sure why it happened this time.  The black must be pure ferric oxide, but it doesn’t usually bond so well to the surface, it didn’t in the Richards lock for instance, which cleaned up to a grey finish.   I am almost tempted to leave the barrel graphite black, its so even!  I suspect that it ended up like this because it had a very heavy layer of browning, possibly as a protection from water – wildfowling must he very hard on guns…..

Tank in use in the cellar – bubbles are hydrogen reducing the rust from ferrous to ferric oxide

Fine black finish – I’m not sure how durable it would be.  I’ll probably strike up the barrel and brown it after lapping it.


11 April – I received a nice old T Richards flintlock lock from a blog regular this morning to sort out – the mainspring was slipping off the end of the tumbler well before the cock had reached its stop and come to rest in the pan.   Thomas Richards was a Birmingham gunmaker (c 1749 to 1784) and the pistol this lock came from was probably made around 1760 – it has a rounded profile, a pointed tail, not link on the mainspring or roller on the frizzen or its spring and has traces of engraving in the appropriate style for that date.   The cock looked original, as did all the parts, and they were all lightly rusted to an more or less equal extent, with no evidence of significant repairs.  Looking at the lock the cock seemed to be rotated about 20 degrees from its correct position in relation to the tumbler, yet the tumbler and cock seemed OK.  Taking off the cock revealed the answer – sort of!  Or another puzzle, depending on how you look at it.  One position of the cock on the tumbler shaft is right and works well,  the other is wrong.  I’m not sure why this was done, and I wouldn’t want to use the pistol many times as the bearing surfaces are not great, but for an antique it is fine, and preserves the puzzle for future generations to mull over!  The ‘works’ need a good derusting as the sear is a bit stiff, and the engraving would show up a bit more with attention.

As received the mainspring falls off the end of the tumbler before the cock hits its stop on the lockplate.

Here is the answer, sort of, two sets of notches on the cock, so a choice of positions, one is right, one wrong- but why?

11 April –  Disaster struck!   My old Welcome Post on this blog got so big that my system wouldn’t allow me to edit it as there wasn’t enough memory available on my server!!  I had been meaning to prune it a bit but left it too late, so I’ve had to leave the old one and start a new Post.  The old one is still there, now called April 2018 Post.    I am now back from a short break in Cornwall fixing up our holiday cottage (see tinminerscottage.co.uk & on airbandb ) – I don’t advertise my absences on this blog for obvious reasons!

Now I’ve just got to work out how to sort out the too big post – the housekeeping involved in running this blog is not inconsiderable, so I’m always grateful for the encouraging messages I get from regular viewers – I now have quite a few friends out there!   To finish off the last post, the ‘missing’ basin was eventually scheduled for delivery by Parcelforce an hour after we left the cottage – great timing – I phoned them and miraculously got through within 5 minutes ( a record ?)  and told them not to bother!  I hope they don’t just dump it outside.  Anyway now to catch up with all the things that are waiting for me……..

 Posted by at 8:34 am

 Leave a Reply

You may use these HTML tags and attributes: <a href="" title=""> <abbr title=""> <acronym title=""> <b> <blockquote cite=""> <cite> <code> <del datetime=""> <em> <i> <q cite=""> <s> <strike> <strong>

(required)

(required)

This site uses Akismet to reduce spam. Learn how your comment data is processed.