I’ve stuck some bits from my blog when I stripped the gun and got it going properly; see the end of the first bit….
This is a most unusual gun that I inherited from my father’s collection – I have no idea where he got it from, I have never seen another gun even vaguely like it, except perhaps a Jones Patent enclosed lock gun that is undoubtably of later date, and although I have shown it to many collectors and experts I haven’t met anyone who has a clue about it – and that includes Holt’s valuer and old gun guru Robert, who must have had most things through his hands at some time or another. So any information or comments would be valued!
Stock shape and barrel are early features – may be a case of re-use?
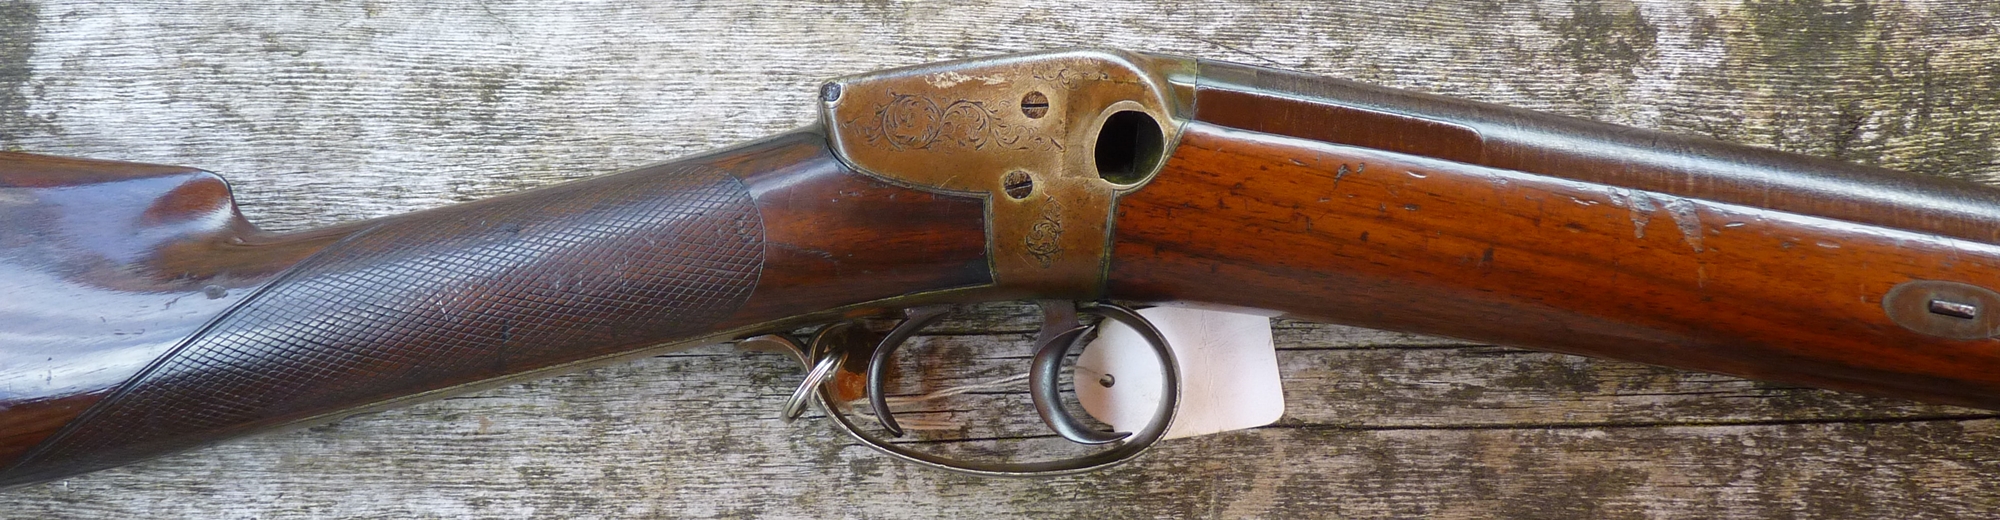
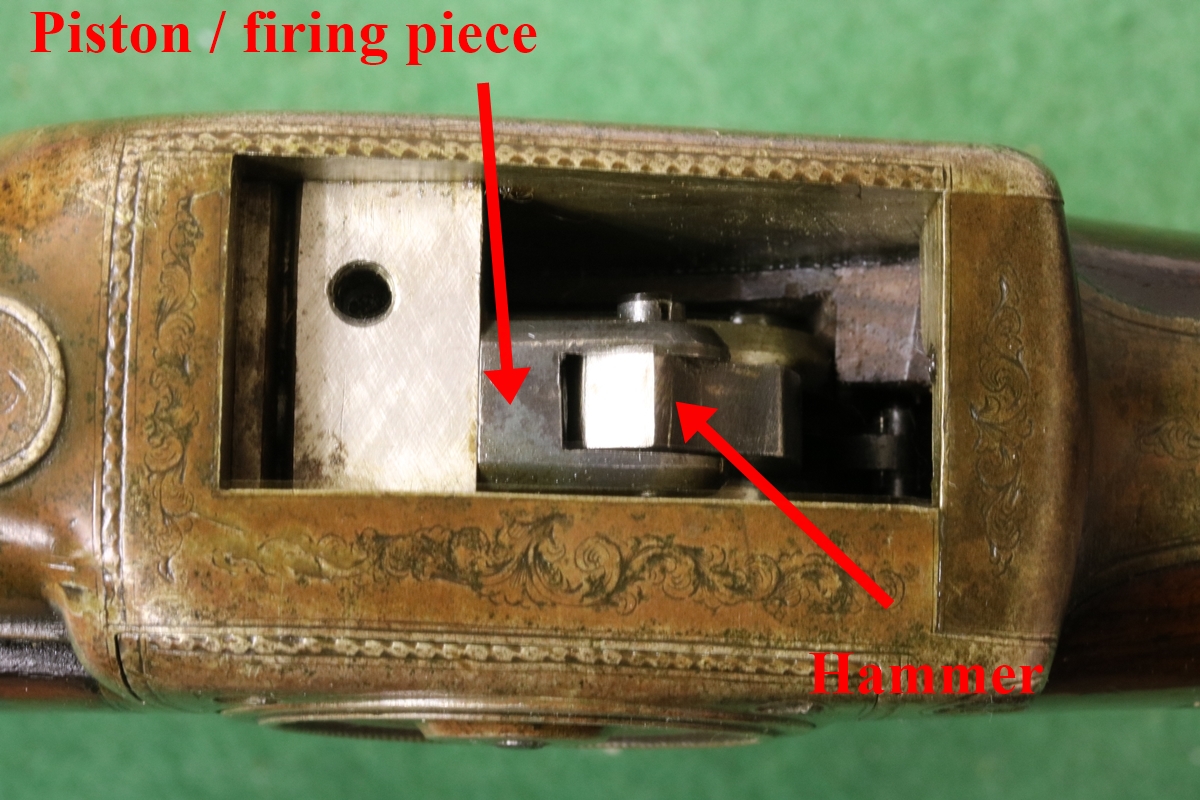
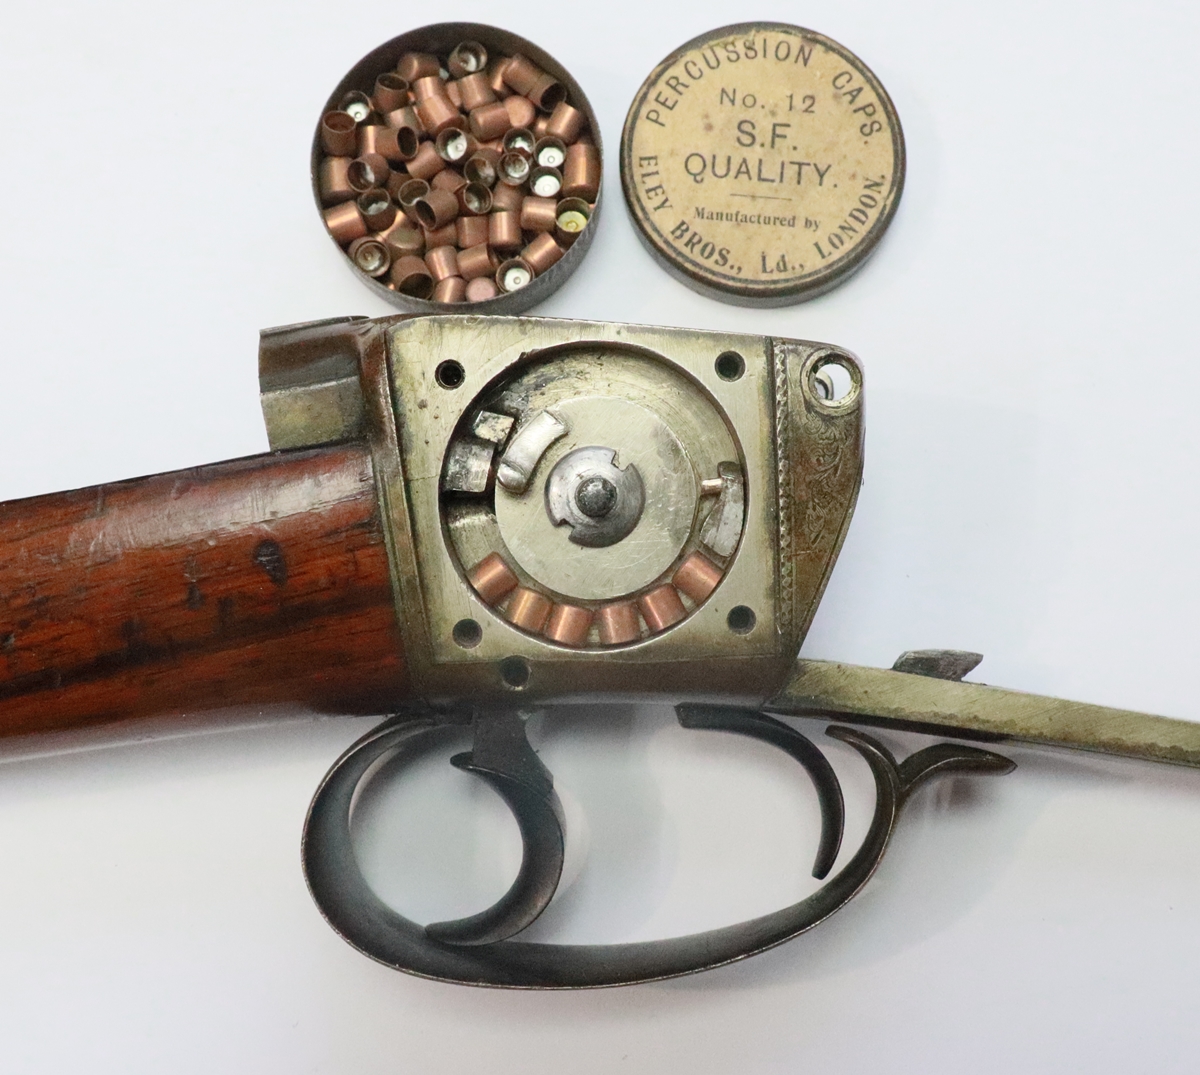
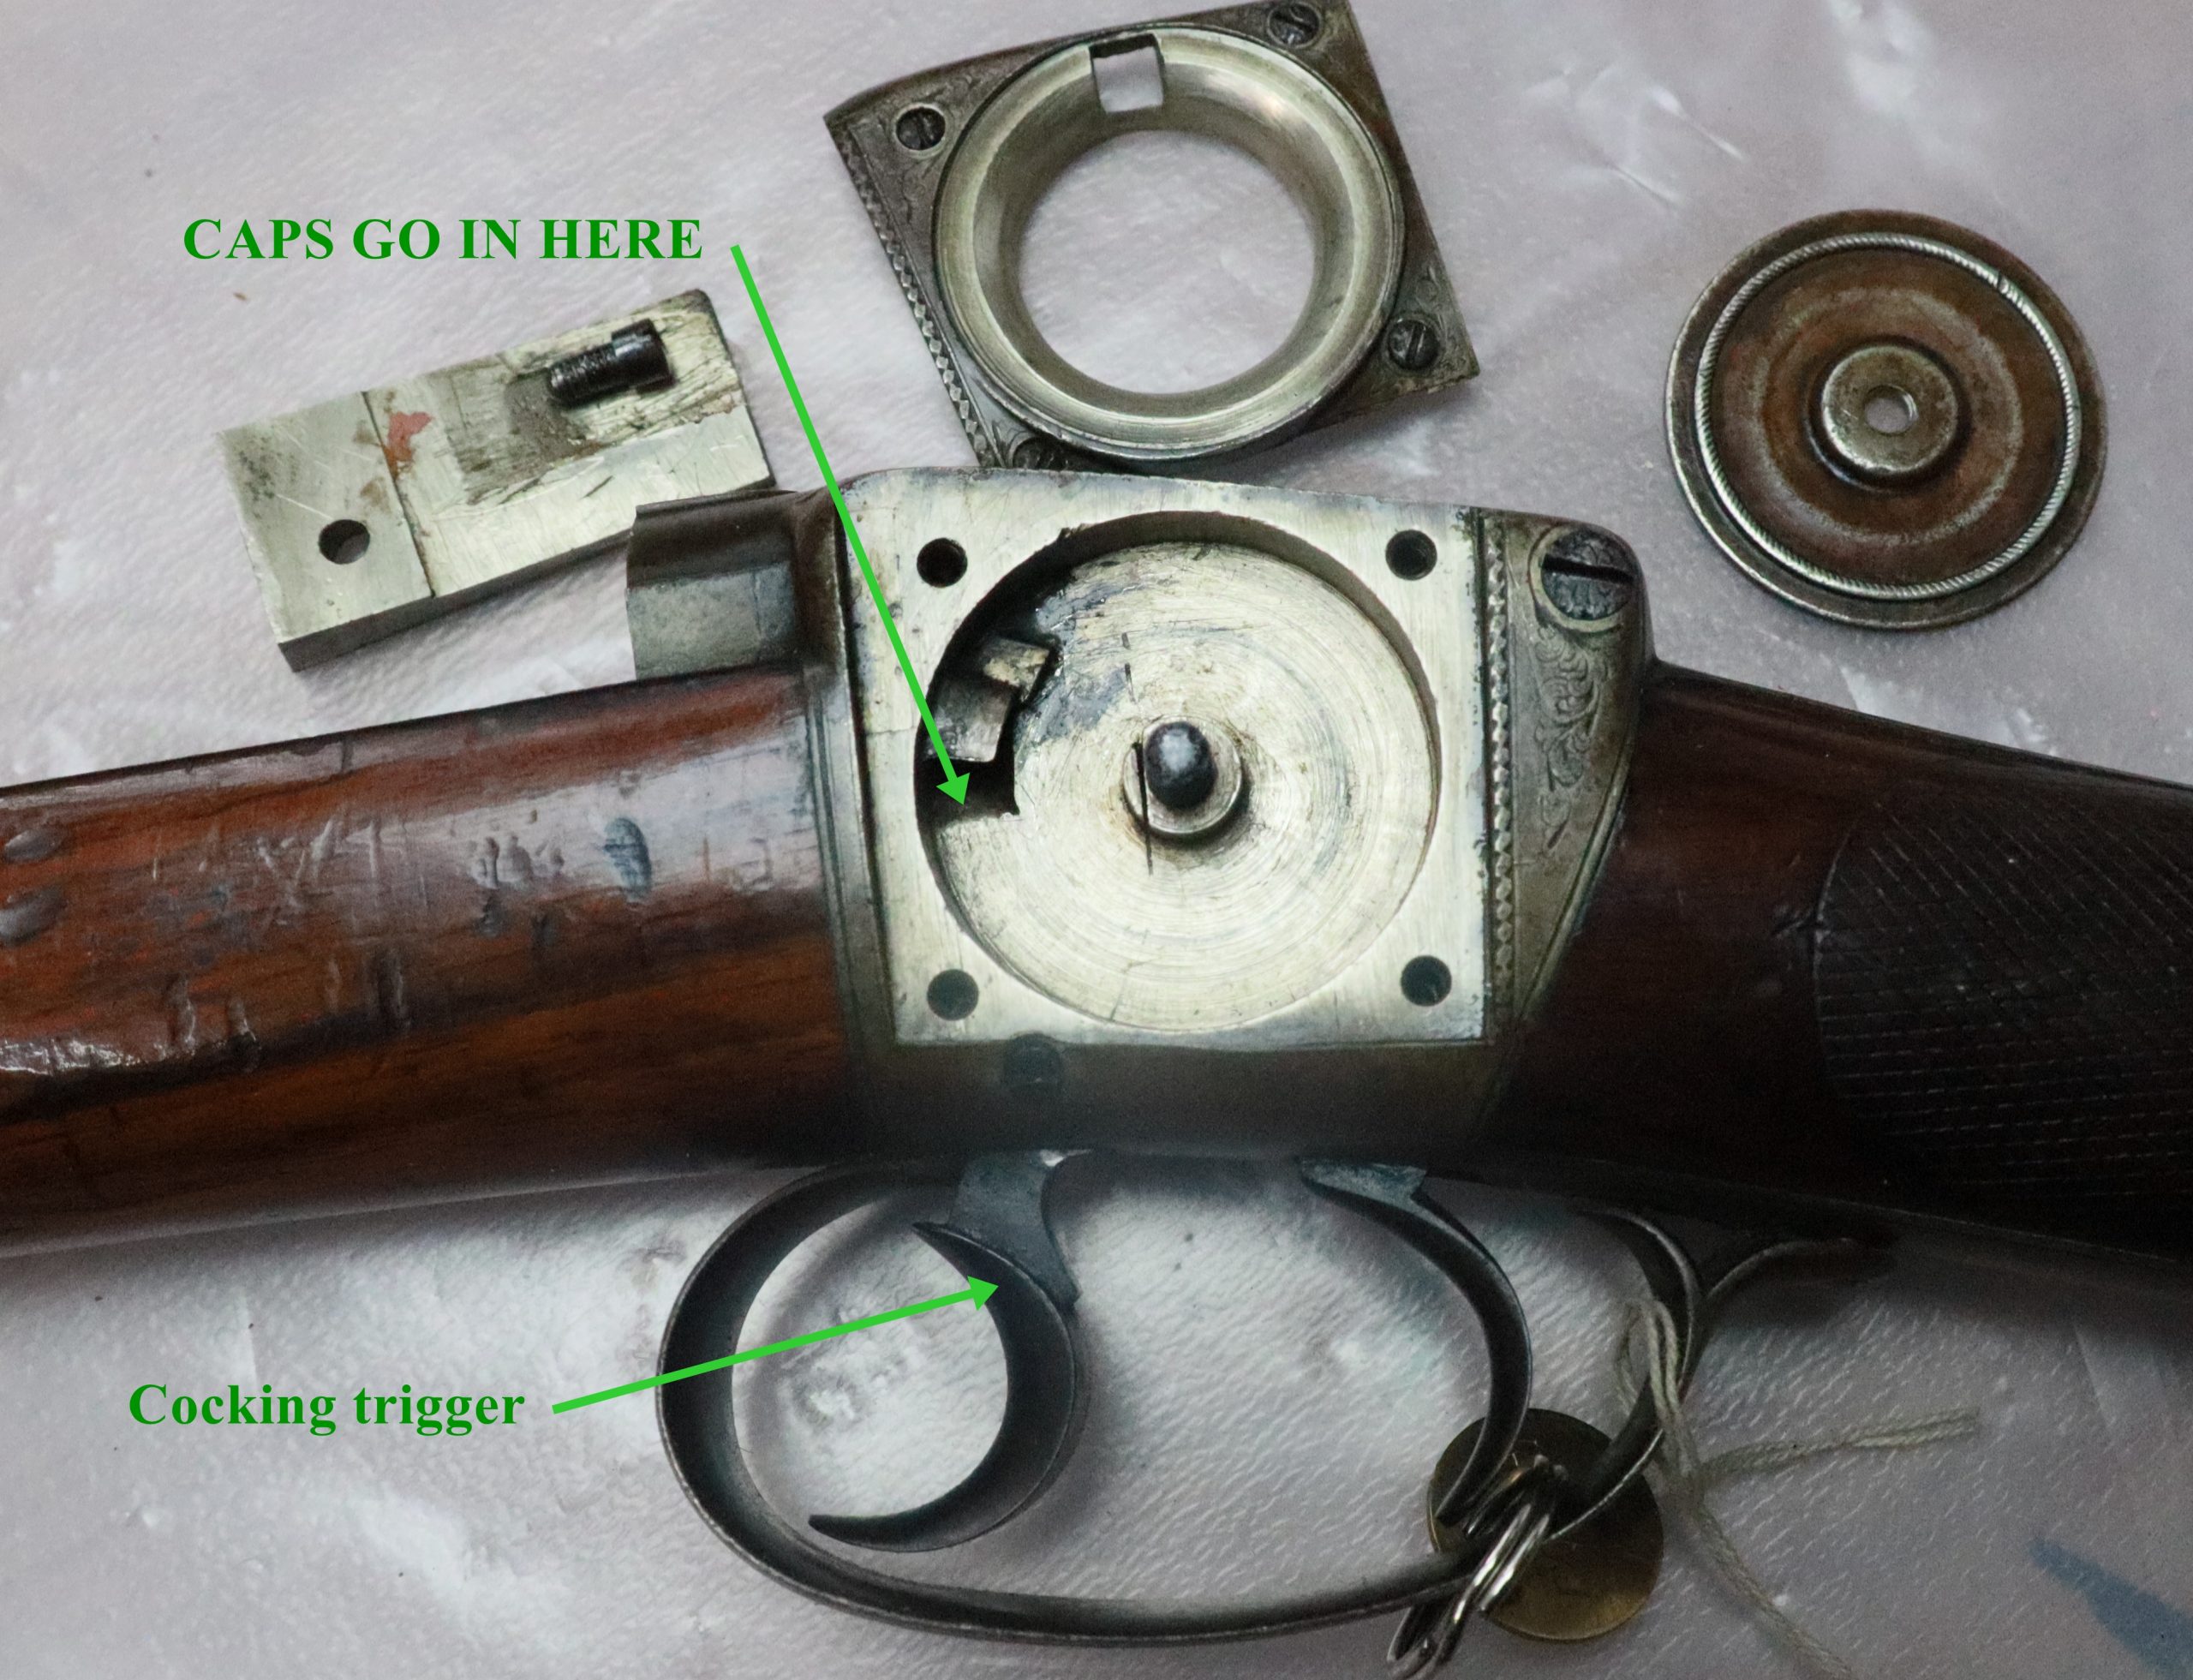
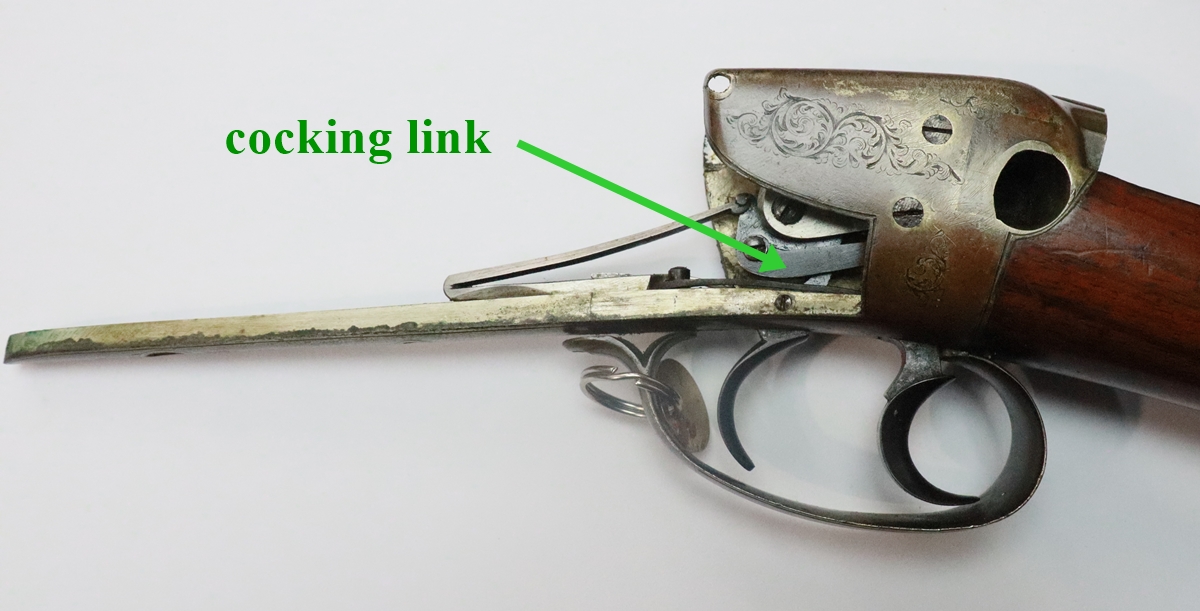
What we have is a single barreled percussion gun of about 16 bore with a fully enclosed firing mechanism and a spring operated cap magazine on the left side. The nipple is in line with the bore and is struck by a piston actuated from the tumbler. The gun is cocked by a large trigger in front of the normal trigger – it can be ‘let down by holding the front trigger back and pulling the proper trigger. The cap magazine is accessed by unscrewing a circular cover of German silver. Spent caps are ejected through the hole in the right side of the boxlock.
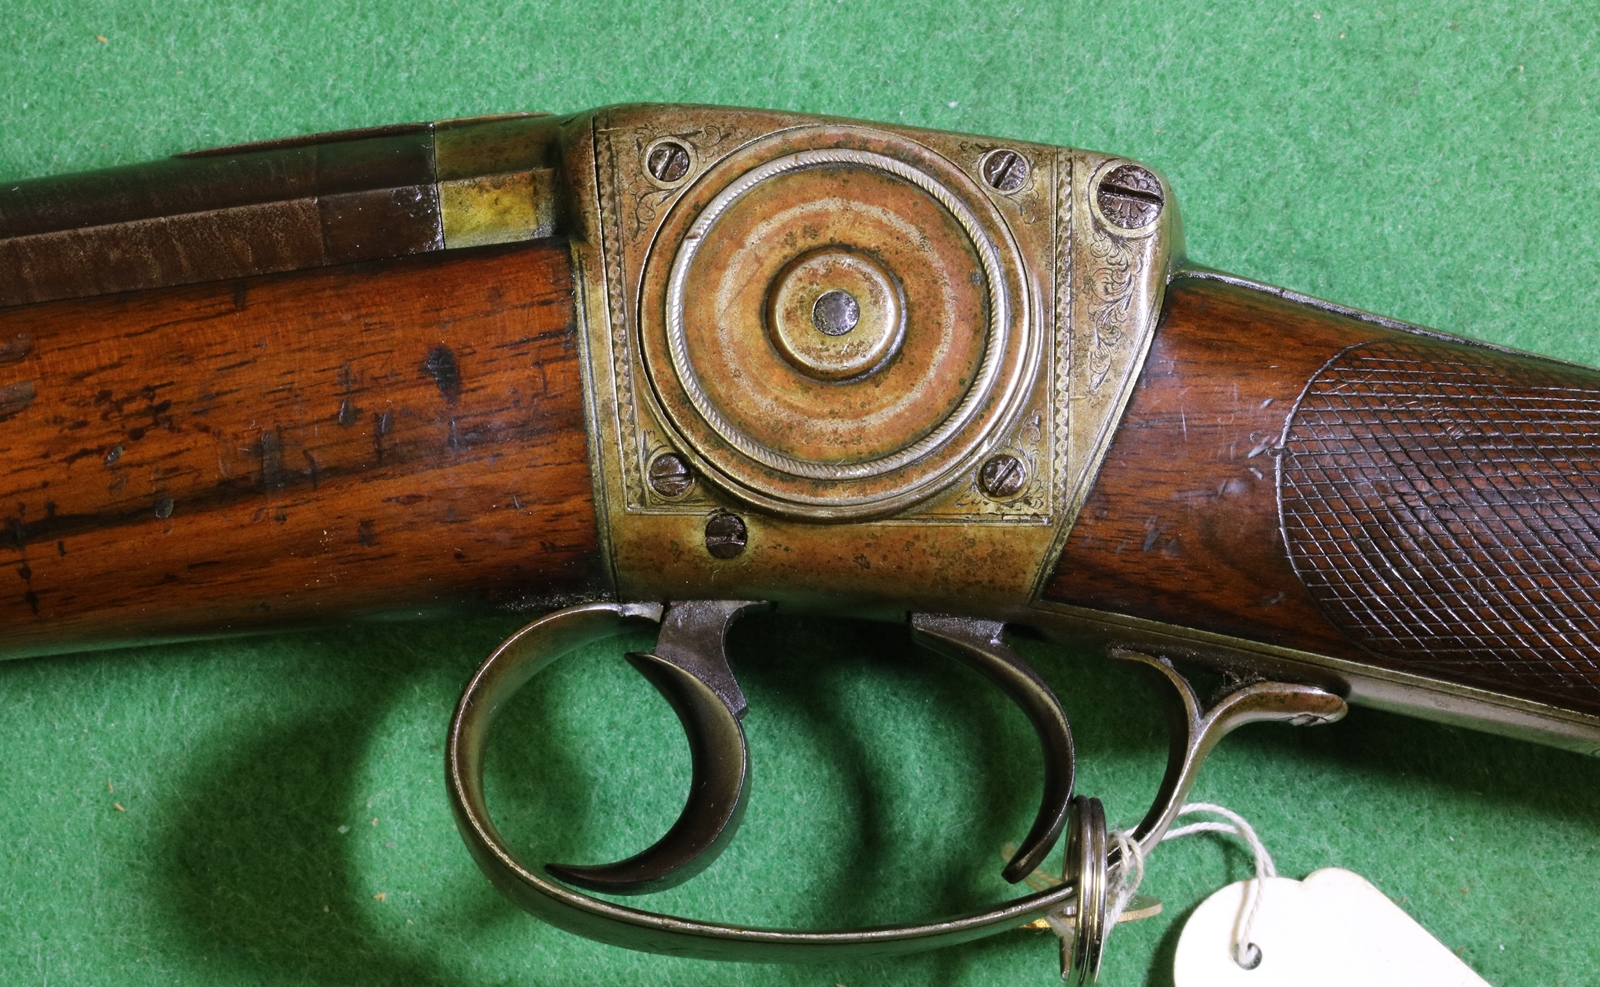
Circular cover unscrews to insert caps to circular sprung magazine.
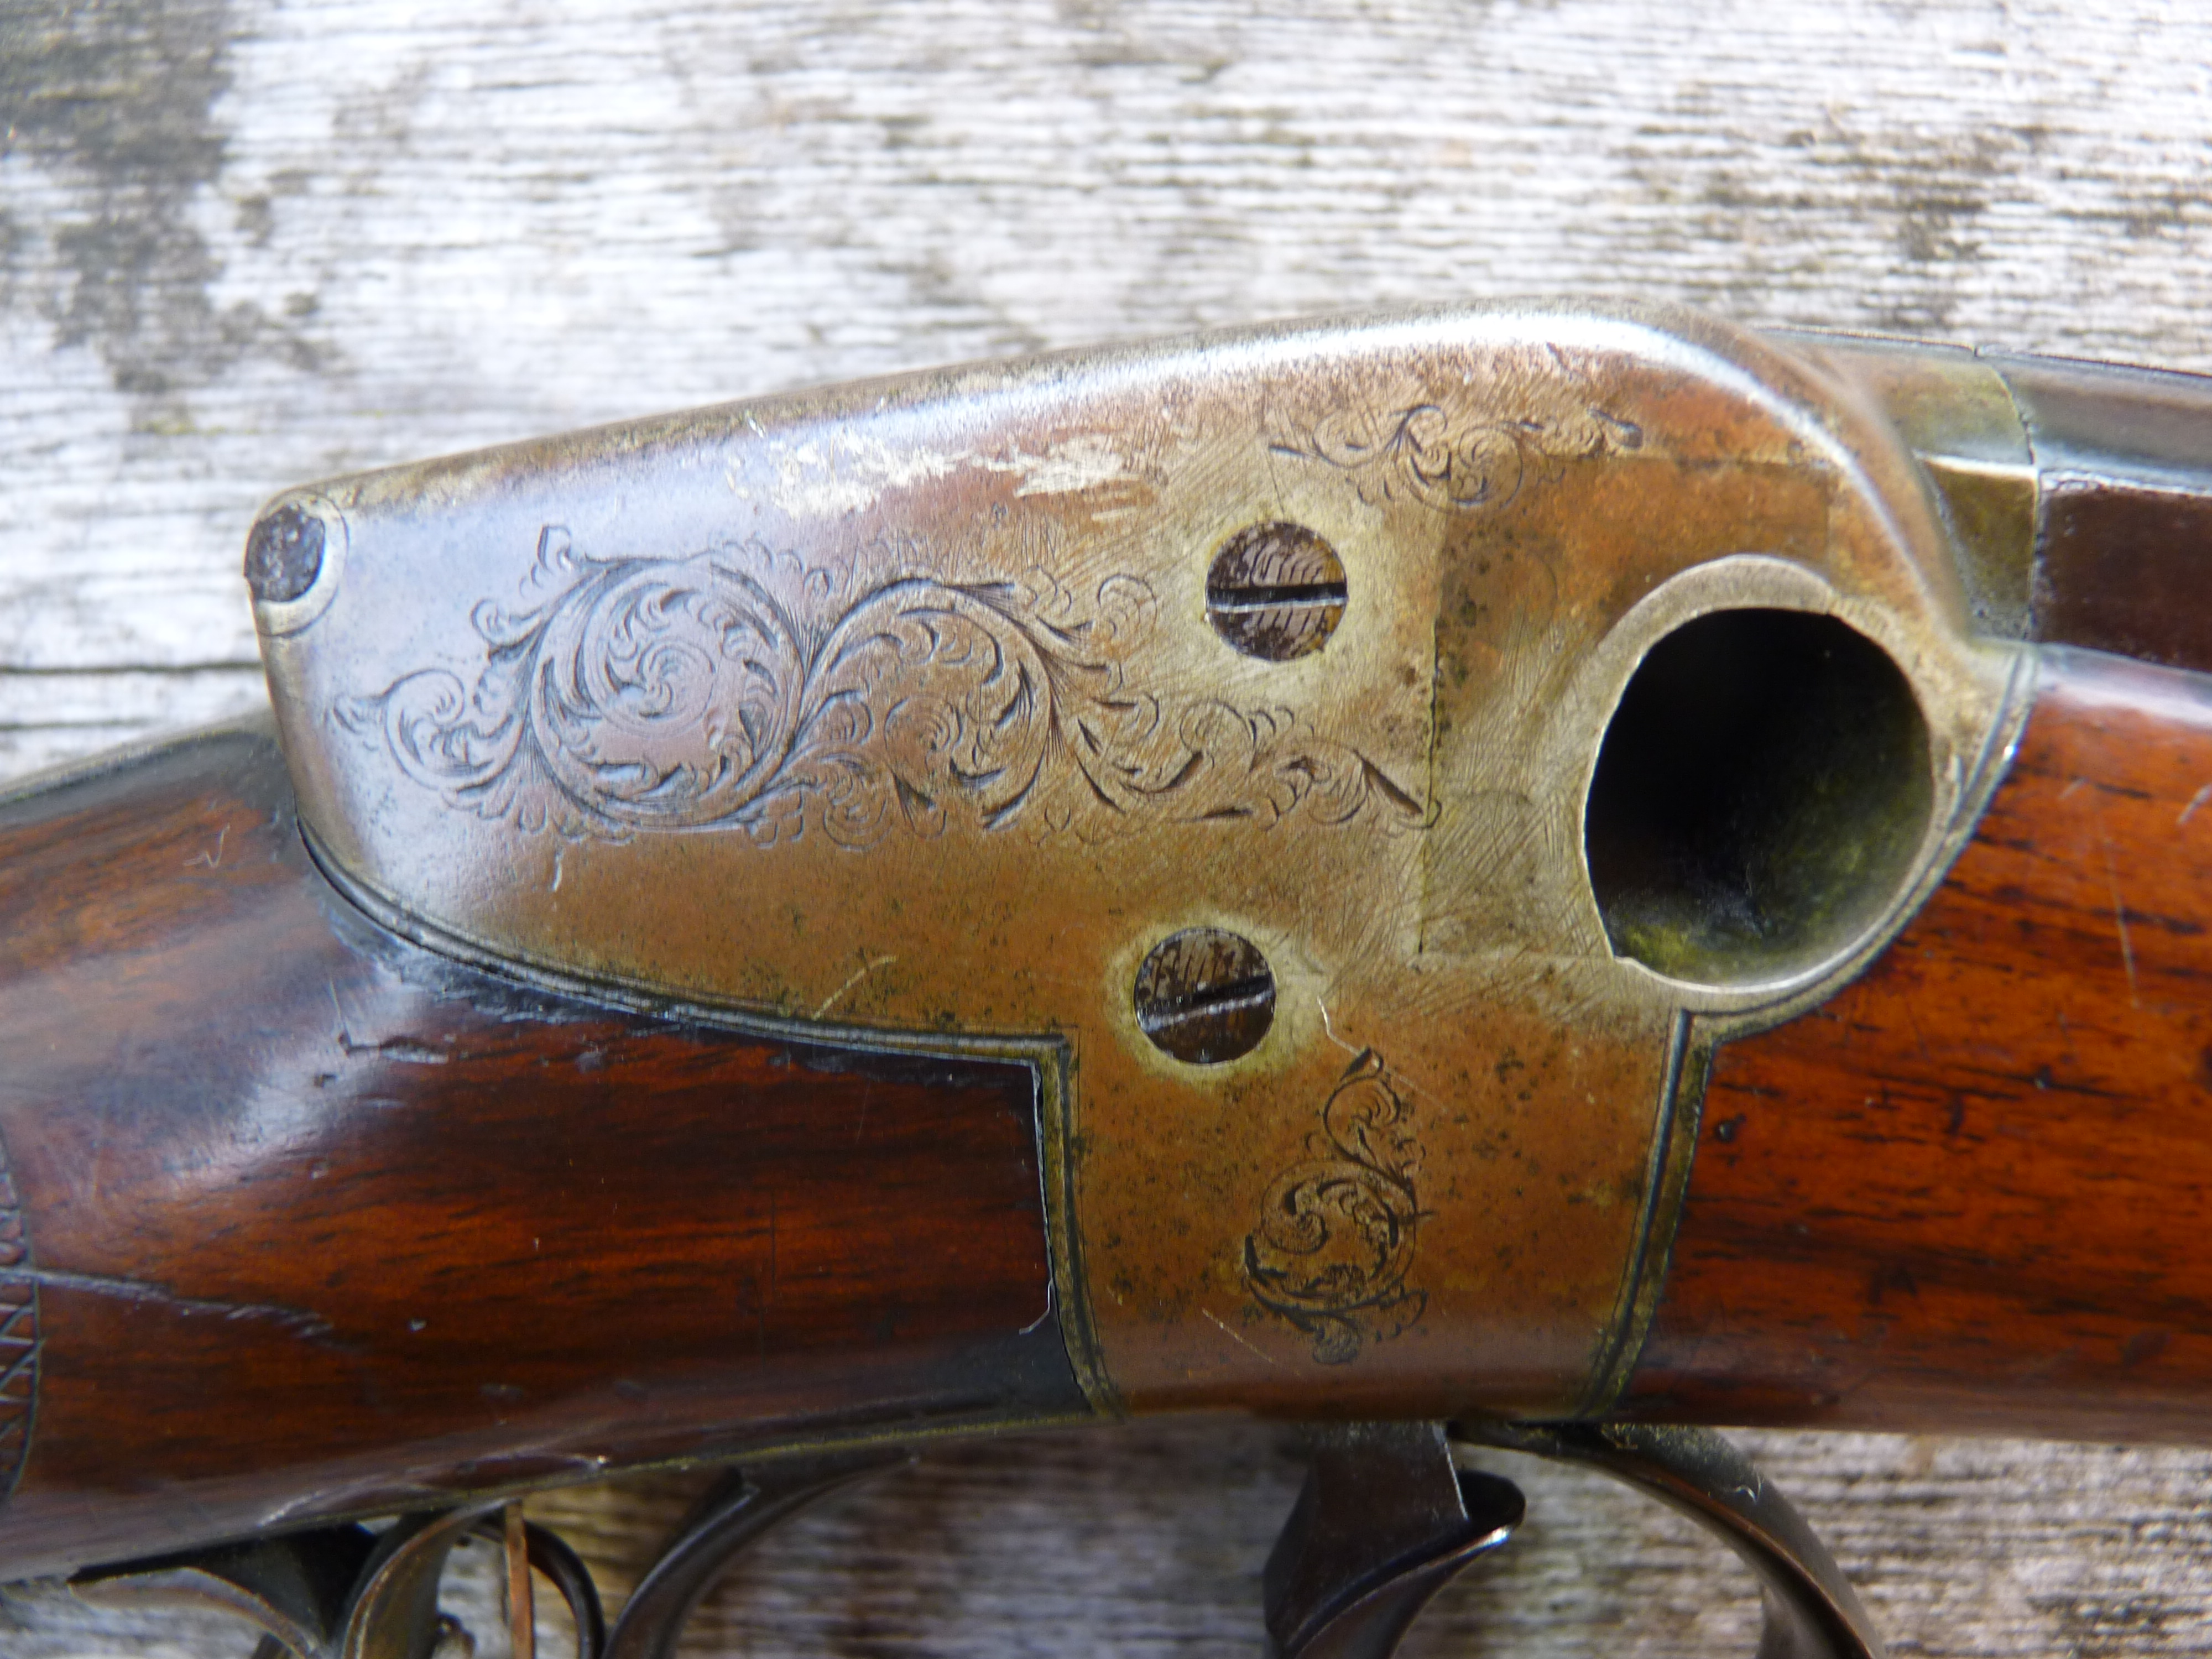
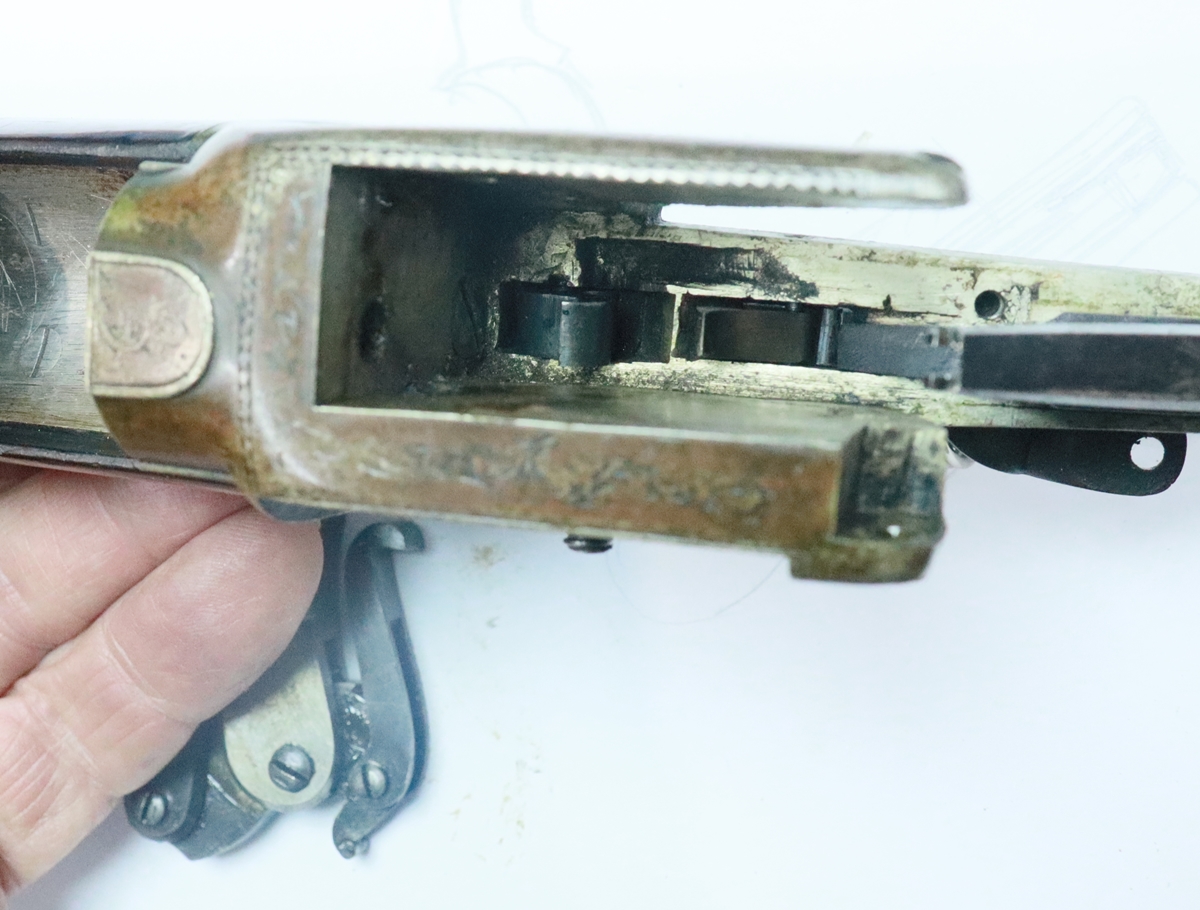
Spent caps are supposed to be ejected from this hole
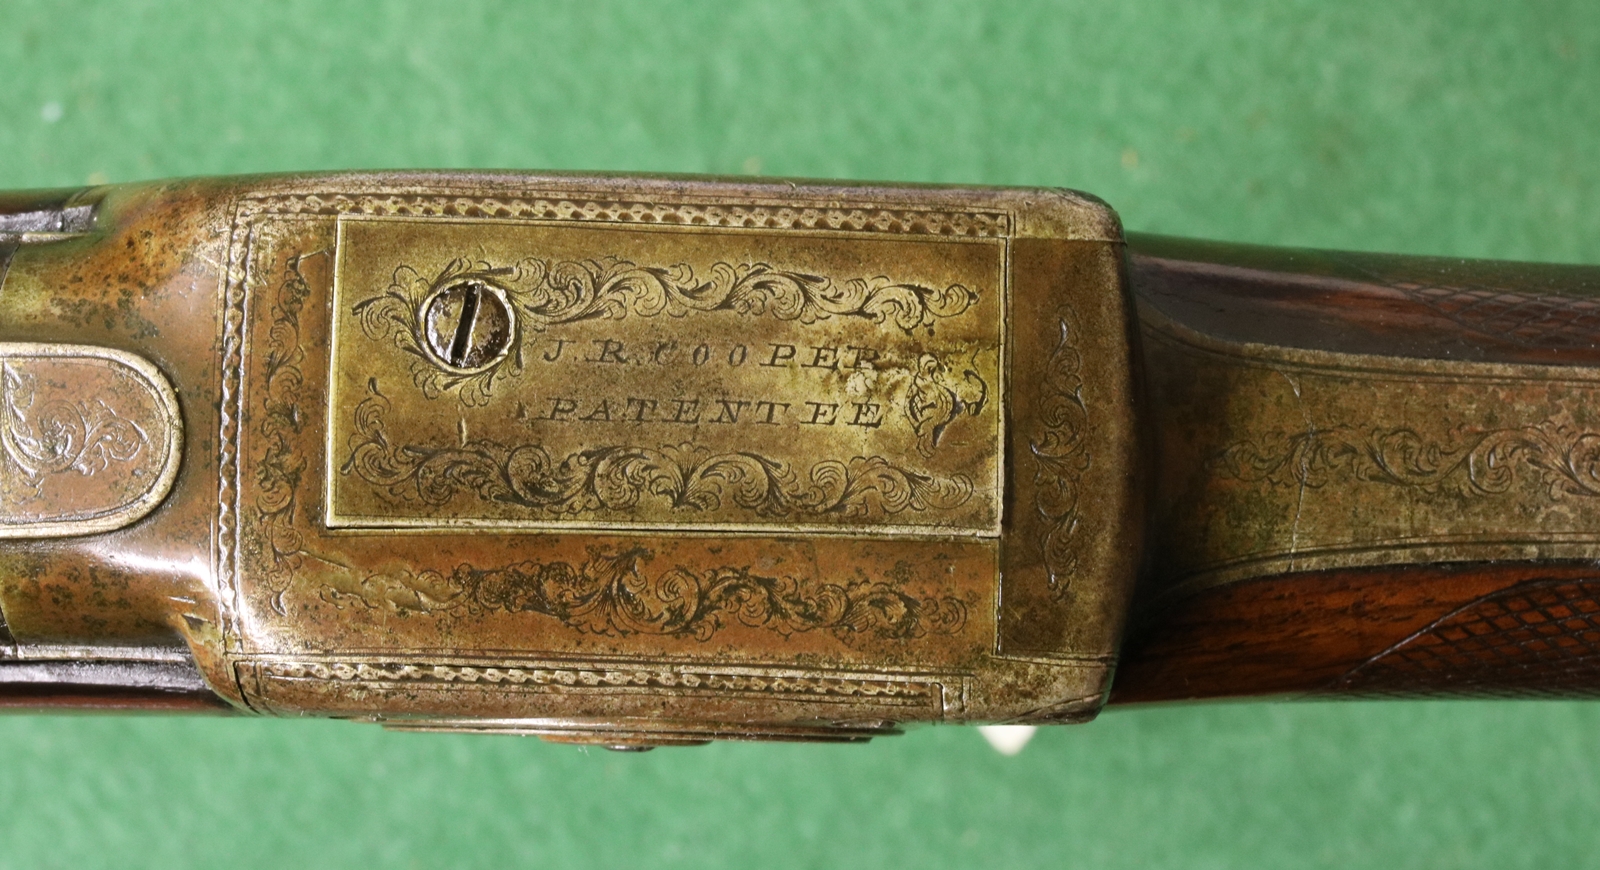
General observations are; The gun is finished externally with good quality engraving on all parts, with a strong patina and signs of wear. It is obviously original and genuine and well made ( but see below). The barrel and stock are rather old in style – the stock has a very long cylindrical section in the hand very reminiscent of the ‘stair rail’ or broomstick of the 18th century, and the barrel has a sun burst, also an early feature. It is devoid of any markings except for the top cover plate of the lock mechanism that is engraved ‘J.R.Cooper Patentee’. J R Cooper was a prolific patenter of gun related ideas, and is best known for his patents on pepperbox pistols, but has many other patents to his name this ‘patent, however doesn’t appear amongst them as far as I can discover, and in any event doesn’t give a patent number, which it would normally have done. On stylistic grounds one has to put the gun very early in the percussion era, or more probably assume that it was a re-used stock and re-breeched barrel.
You can see a fair level of wear and patina on the gun – clear signs of use!
There is one strange feature to this gun, even stranger then the gun itself – the top cover plate is quite thick and fits perfectly, but the tumbler that links to the firing piston comes very close to the top, and the top has a groove cut in it that is necessary to clear the tumbler as it fires – however, the groove is roughly hacked out of an otherwise well made and finished part. Since the gun couldn’t fire without the groove, and the groove couldn’t have been made by any self respecting gunsmith, it represents areal conundrum!

I have tried at various times to see if I could get the mechanism to function in respect of the loading of the caps, but its difficult as that spring mechanism that should load the caps is broken. However it is still difficult to see what caused the caps to move into position in front of the piston and stay there waiting to be propelled orwards onto the nipple, and why they should have jumped from there across the cap to the nipple.
So the questions are;
- Is it unique?
- When was it made?
- Could it ever have worked?
- Why is the top cover hacked to clear the tumbler?
Idea on a postcard to…….. as they used to say on the BBC – but at least comments….
Here is the latest – I have stripped the gun and got most of it working – I just have to see if the caps fall off the nipple before a new cap is placed by the piston ; here is the relevant blog frm 2023
6th November – Had a bit of a problem with my super Bambu 1X 3D printer as the filament broke in a couple of places inside the tubes and extruder and I had to partially strip it to clear the bits – its a beautifully engineered device but everything is so small that its very fiddly – the screws look a bit like the tops of pins! I don’t know what had happened to the filament, it seemed to be rather brittle when I tried to bend it so I’ll be careful when I next use that colour – trouble is its my standard colour for cappers and card dispensers – pine green. Well, I wasn’t happy to leave the J R Cooper without knowing whether the cap system would work completely including voiding the caps after they had fired, or rather when the gun is moved to half cock – I didn’t hold out much hope of finding the right sized caps of the correct construction so I decided that I’d have to modify existing overlength caps. That suits my favourite activity of toolmaking! I made a jig to hold the caps at the right depth so I could just file off the excess length – I drilled a series of 3.4 mm holes in an 8 mm steel plate and opened up the top 4.6 mm to 4.8 mm diameter. I can drop the caps in the holes firing side down and gently file off the skirt that protrudes above the plate, blow out the swarf, push a short tapered brass rod into the mouth of each cap to make sure its round and any burr is opened out, the GENTLY push the caps out with a matchstick through the 3.4mm hole. I am of course very conscious of the nature of the caps, and wear safety glasses and work very carefully and gently making sure that I am never directly in the firing line if any cap were to fire. Anyway it works and I now have around a dozen caps that seem to be the right dimensions so tomorrow I will repeat the multiple firing experiment – just the caps, every time I look closely at the ?brass, tin, zinc ? alloy and its cracks I doubt the gun would stand being fired. I do like to shoot most of the guns I work on if sensible and legal, but not at the expense of damaging them! Even if they are not shootable I do like them to be fully functional up to that point.
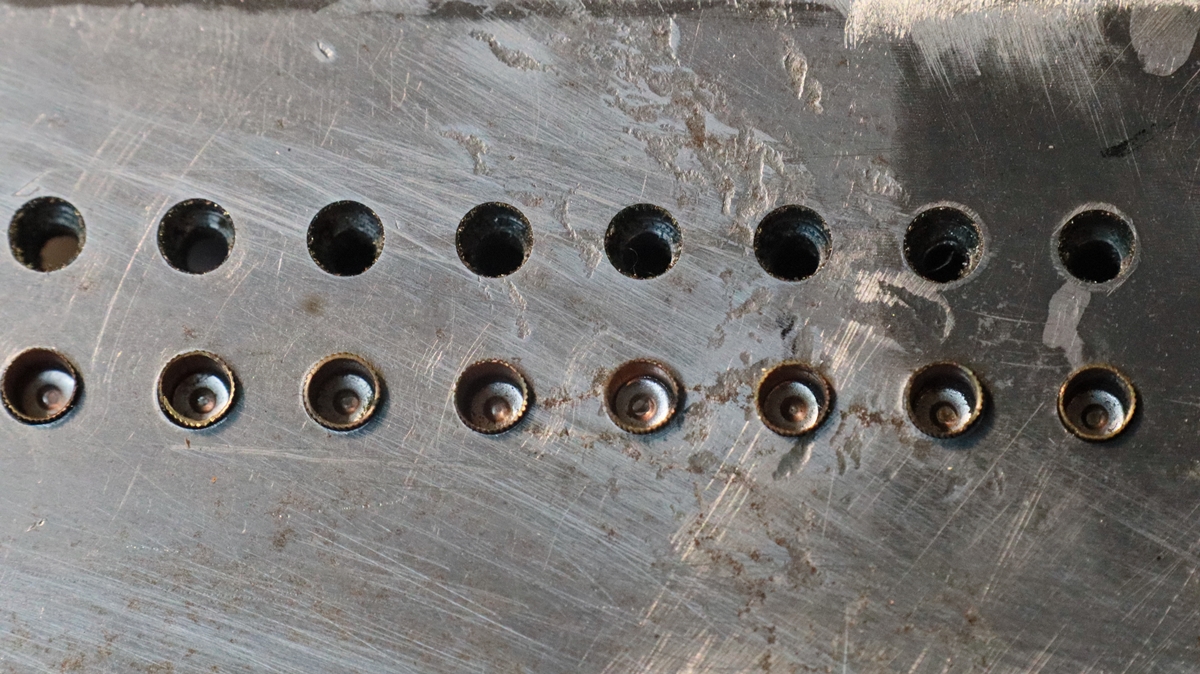 Cap filing Jig – The top row of holes were slightly too large, the lower row are just right.
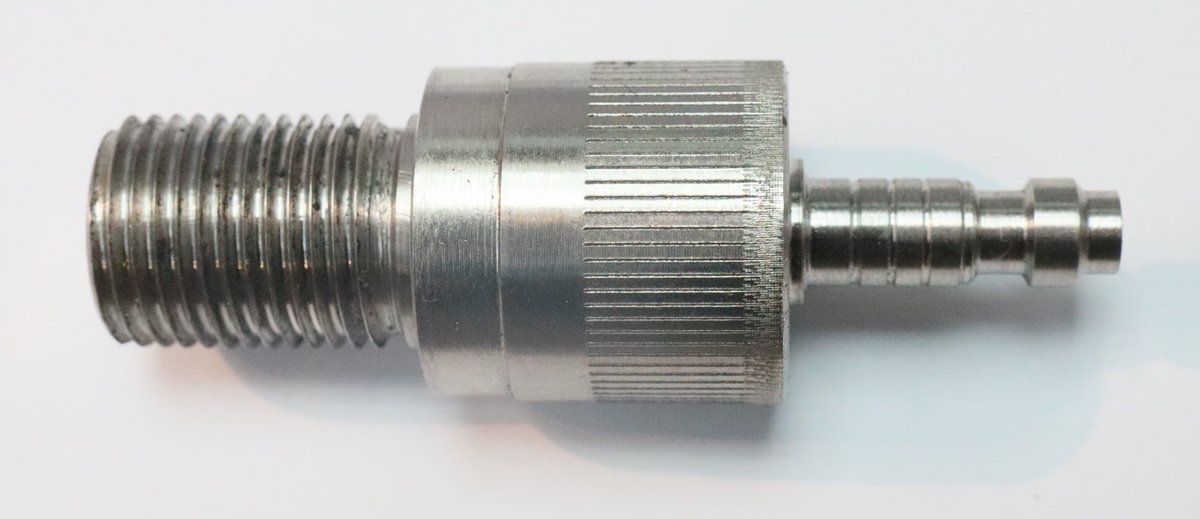
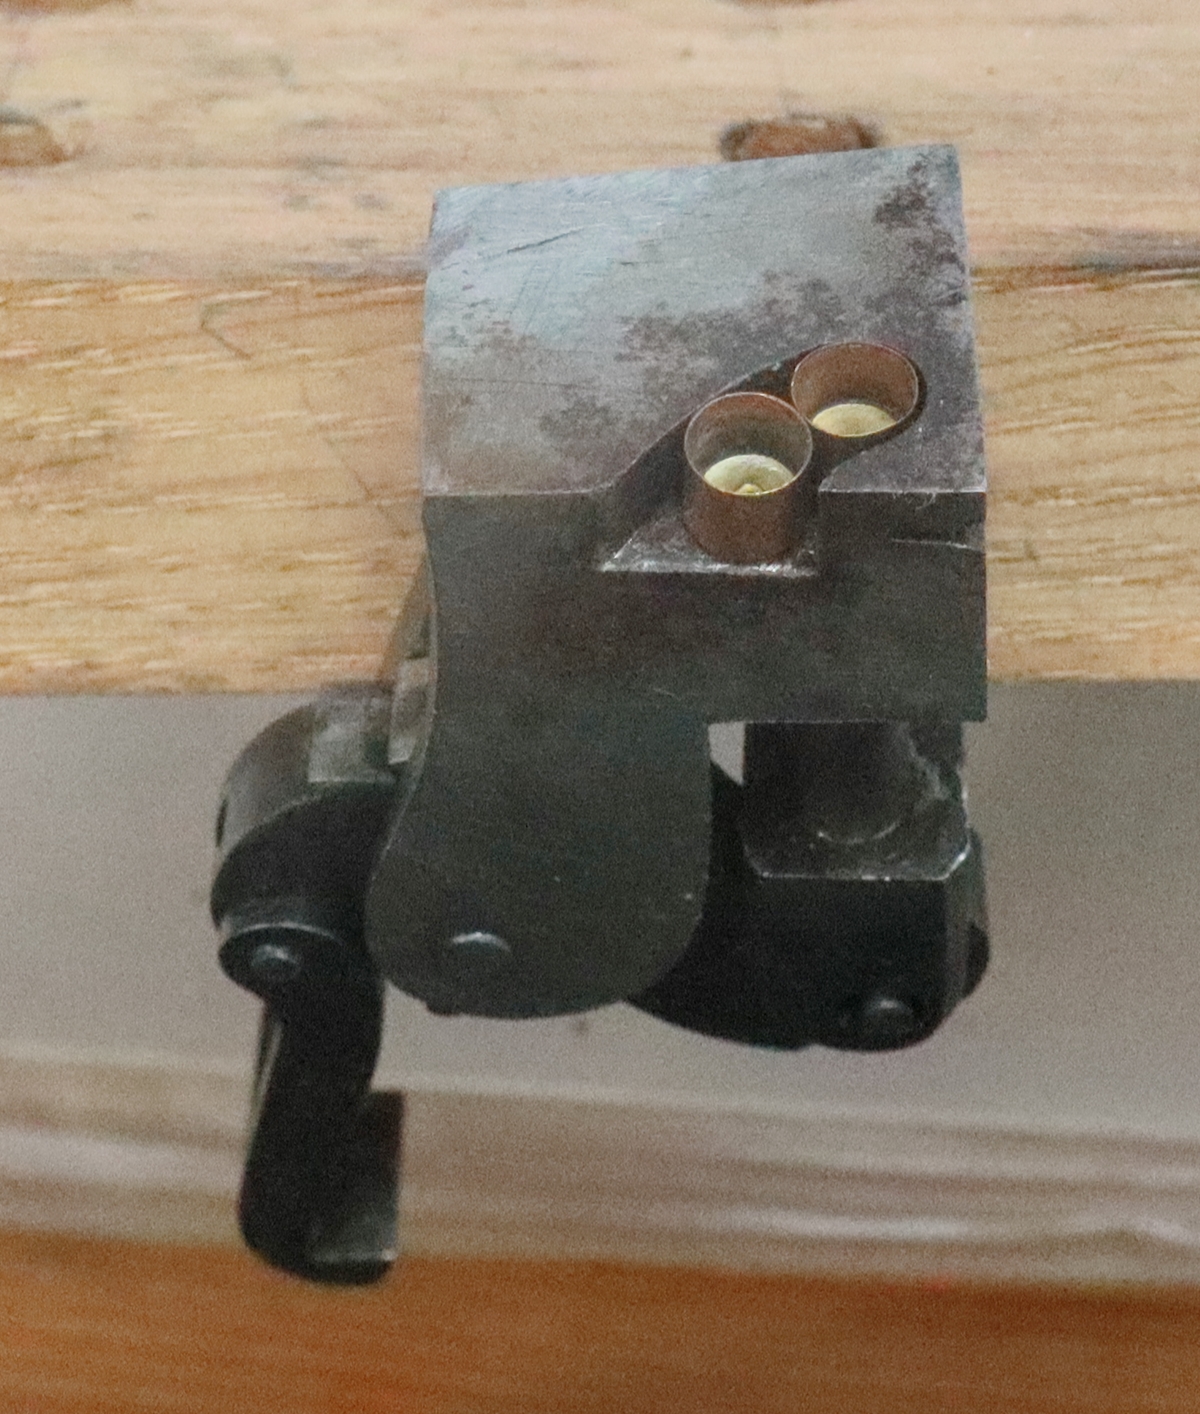
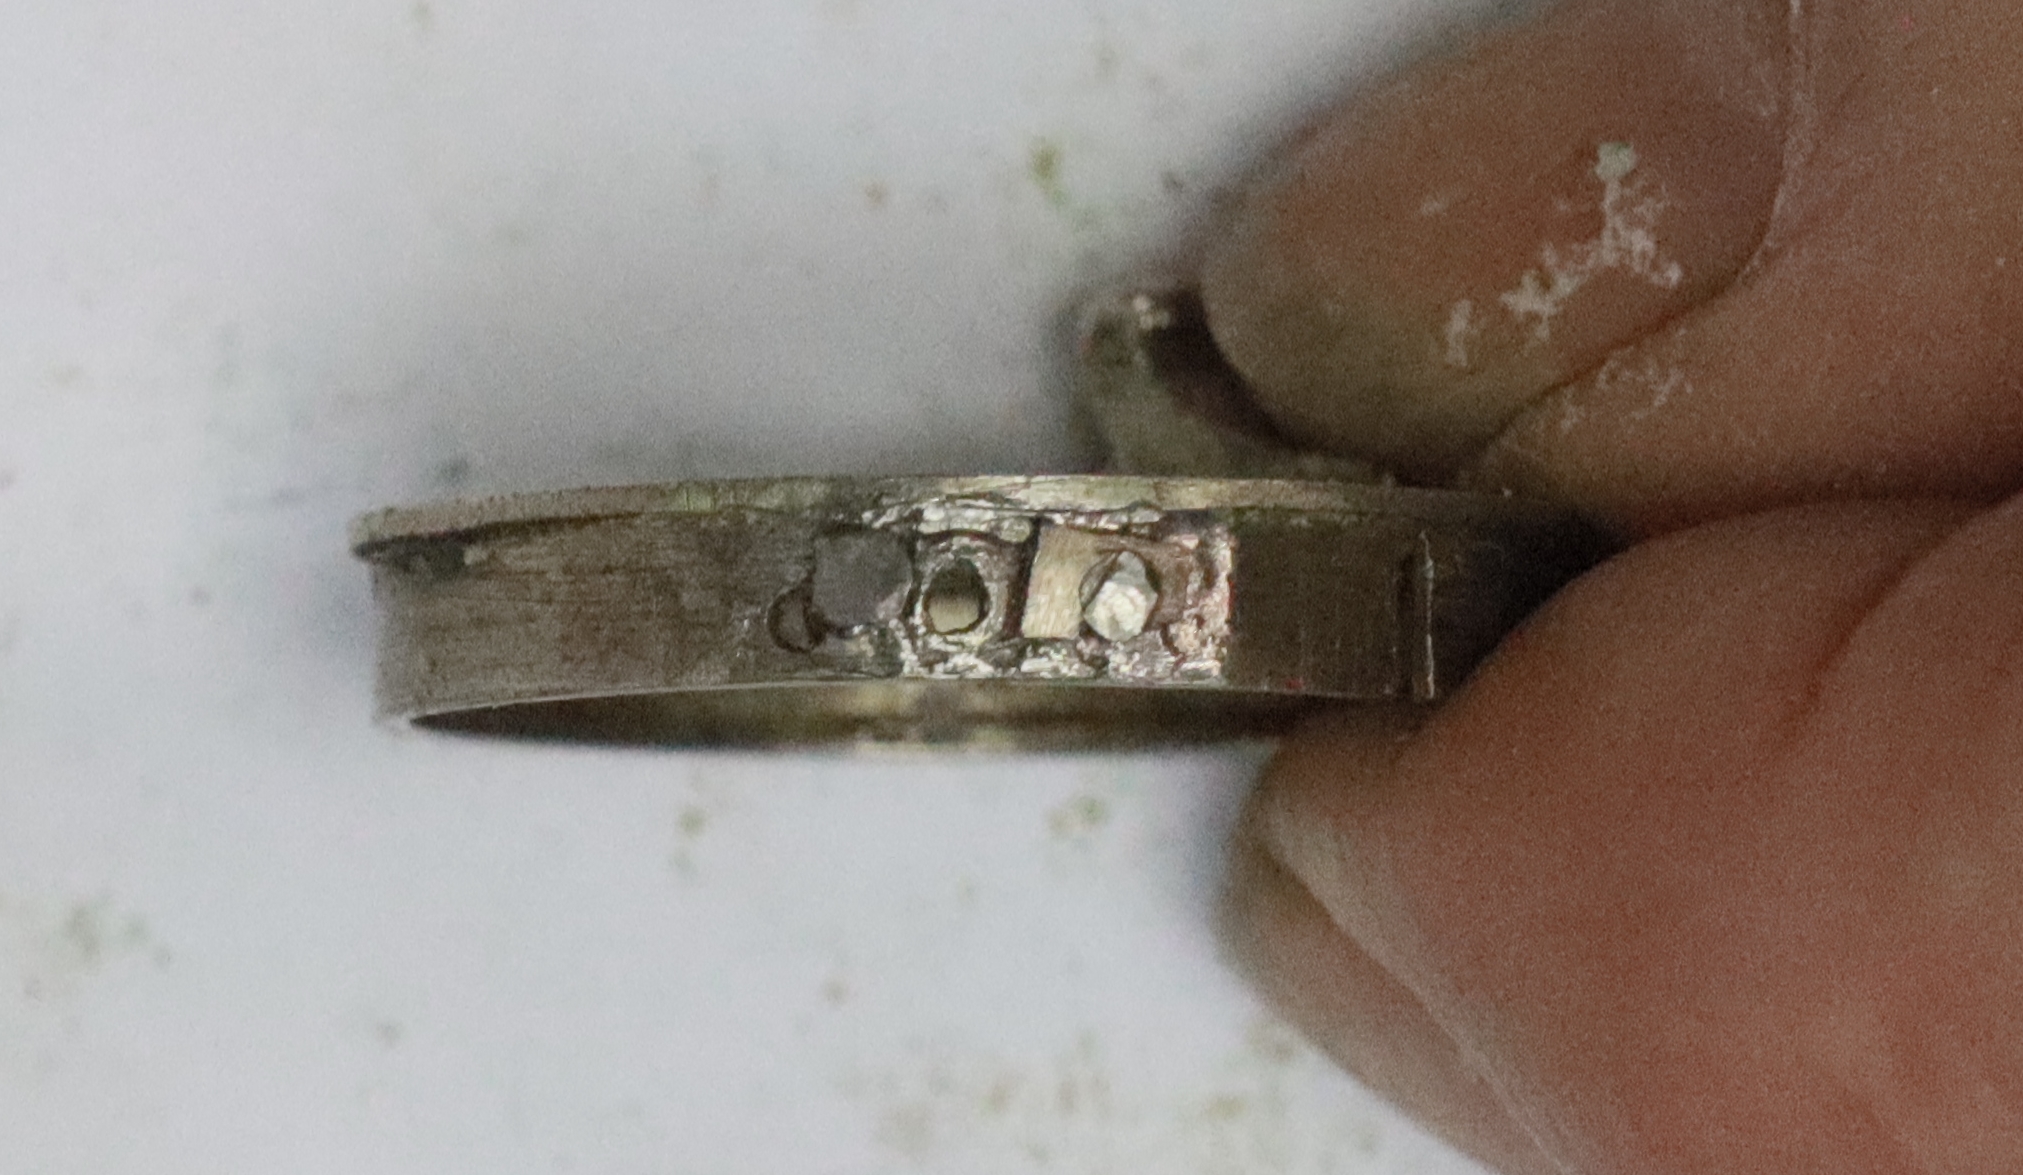
5th November – Gunpowder, treason and plot etc. I set about cutting a new thread yesterday, and managed to have another saga of cock-ups – I caught the lathe tool on the boss of the thread and slightly off-centered it – after I’d turned it down to finished size too. It wasn’t bad enough to spoil the job luckily, just slightly annoying ! Then I broke off a 2.5mm drill – but again luckily I got the bit out. Anyway after a bit of messing about with the tipped tool that had a bit of movement in the tip, I got a good thread and was able to finish the job. I was able to test the reservoir of the Blissett up to a couple of hundred p.s.i. and it seemed OK, but not surprisingly the old sealing valve didn’t seal at all , and as it is horn and I couldn’t get it off I decided it was best left as it is – then it’s no danger to anyone from trying to fire it as it won’t hold air! I did a bit more playing with the J.R.Cooper – I found that the length of the caps was pretty critical for the magazine as it is, anything over about 4.65 mm tall jams the drum and won’t load – I managed to find about 8 caps that were below this limit – it would be possible to file more of them down I guess, but at least I have enough to test out the feed. Loading the caps through the hole in the cover is a bit tricky but OK, although you have to hold back the clock spring while you do it so its a fiddly two handed job. The caps feed all the way round and arrive in the steel tumbler block. If the lock is on half cock or fired they are pushed against the side of the piston, then when the lock is cocked using the front trigger the caps all shuffle up one , and one sits in front of the piston. Pull the trigger and it shoots forward – if the barrel is off it just projects forward fairly briskly, if the barrel is fitted it presumably lands on the nipple and fires – I haven’t tried that yet, but I have shot a few caps out of the lock so I know it does feed. I made a repair to the break in the top tang – as it is made of some unknown alloy I soft soldered a piece of brass into a recess I’d filed in both parts. It was just as well I didn’t try hard soldering as the metal swelled o one side of the joint and I had to file it down and recut the engraving and recolour the metal with brass/bronze browning from Blackleys – not a perfect repair by any means, but I thought it ought to be made as strong as reasonably possible in case it is ever fired. I don’t intend to fire it because of the many other cracks in the mystery alloy, but I may fire off a few caps to test the mechanism. I realised the serious design flaw in Coopers design – Once you load the caps through the slot in the cover there is no way of seeing how many are in the magazine, or of getting them out without unscrewing the left side of the breech – 4 small screws – except by firing them, although if you take the barrel off you can ‘fire’ them through the hole on the false breech into the barrel groove (see photo below) and recover them. You can go from the lock being fired to half cock by partially pulling the cocking trigger, and half cock is safe in that the piston is sticking out into the place where the ‘ready to fire’ cap would be – thus there is no cap in play. Going into full cock withdraws the piston , thus allowing the next cap to take up position in front of the piston ready to be fired. The main problem is that there is no visible indication of the state of the gun – whether there are any caps in the magazine or not or what the state of the lock is – fired, half cock or full cock. It is thus inherently unsafe, which may have been the reason it never got beyond a prototype, for that is what I believe this gun is. The only indication on the gun is ‘J R Cooper Patentee’ – no patent number nor the word ‘patent’ – so perhaps the ‘Patentee’ was a bit of a con – after all he was a patentee of a number of patents, just not one relating to any of the features of this gun! He did however take out a patent in 1838 for a single barreled gun with an enclosed lock, but that didn’t have a cap magazine, and did have a form of cock extending through the right side of the action body – so this might just have been a follow-on experiment. I tried ‘firing’ caps without the barrel in place and the magazine works well – cock the gun using the cocking trigger, fire it and a cap is projected, cock it again and fire again and a second cap is projected…. I just tried the same with the barrel in place ( its Nov 5th) and a nipple in the barrel – but without loading the barrel, and the first ‘shot’ goes off fine but the cap doesn’t come off the nipple, so the second cap hits the first one and partially over-rides it but doesn’t fire (see photo) . I tried tapping the butt on the ground gently but couldn’t get the cap to drop off the nipple, although when I lifted it with tweezers it came off easily. It is quite probable that Cooper would originally have used caps formed from a cruciform of copper rather than a drawn cup, in which case the caps would have opened out on the nipple and would more easily fall off as they tend to do with our modern caps – the other old caps I have were mostly brittle copper bent from cruciform blanks, whereas the only ones I could find that were of the correct dimensions were ductile solid drawn copper. Assuming that suitable caps existed, I think the gun would have worked as intended. I am certain that the safety issues relating to the cap magazine and the lack of any means of seeing the state of the firing mechanism and the difficulty of clearing the magazine would outweigh the convenience of not having to cap the gun for each shot = after all you still have to do all the muzzle loading stuff with powder, wads and shot anew for each sho, not to mention having to take the lock apart to clean it each time it is used or it will corrode horribly. Next problem – find short, wide cruciform caps! But basically that just about wraps up two jobs!
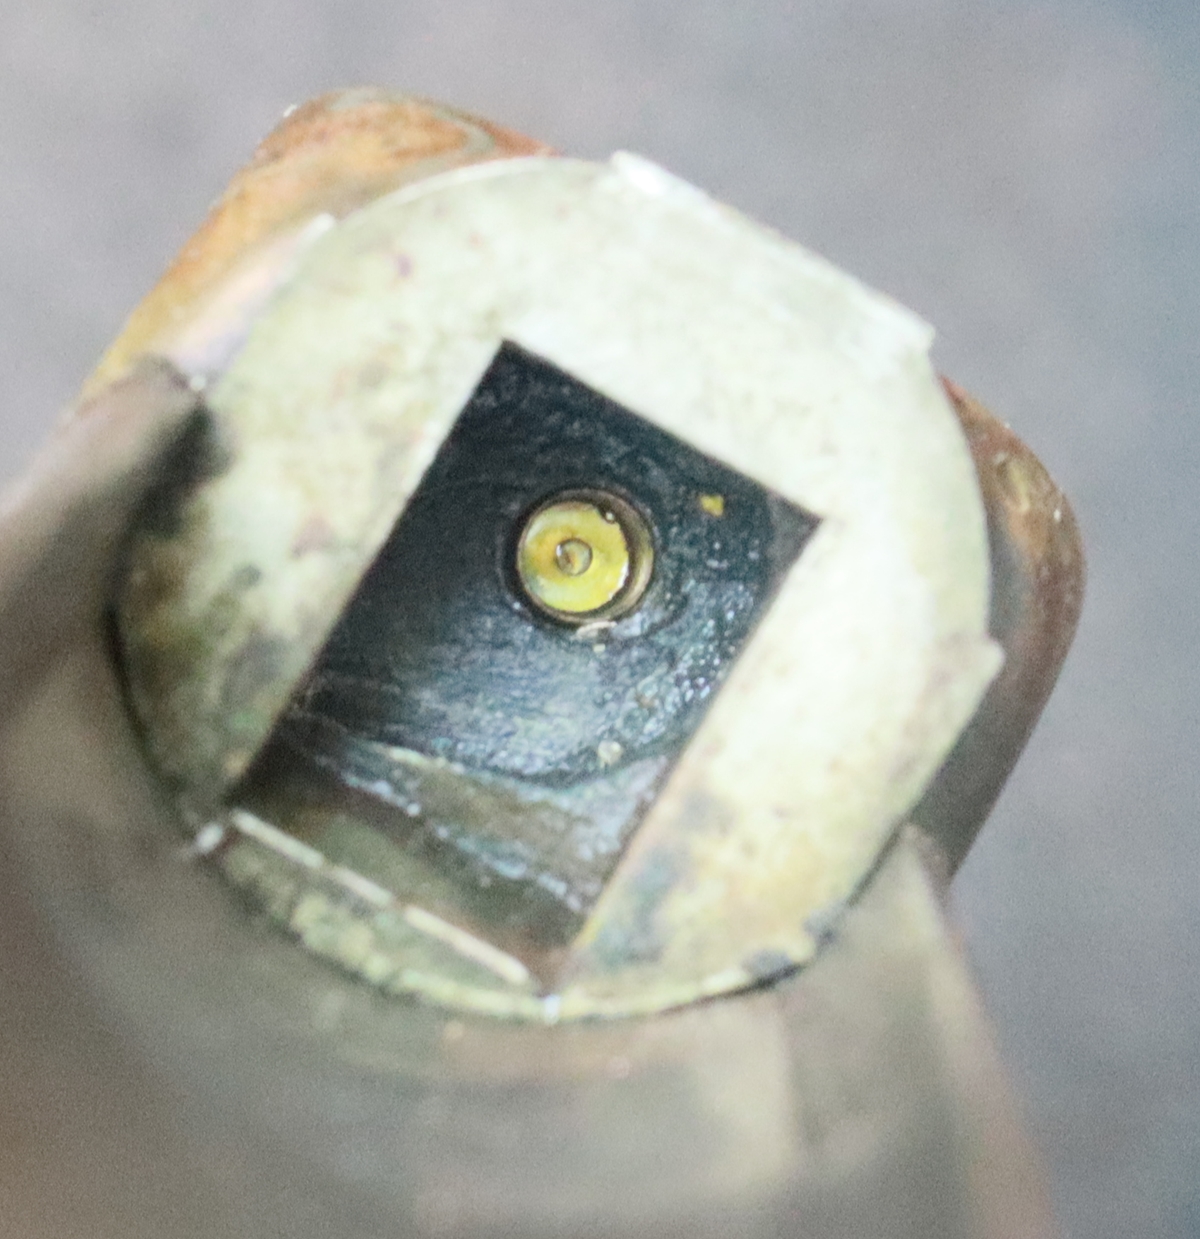 Looking down the barrel groove the cap is visible through the nipple hole in the false breech
 The collision problem with drawn caps – the first fired one didn’t fall off the nipple
despite being a loose fit, and even if the butt is tapped.
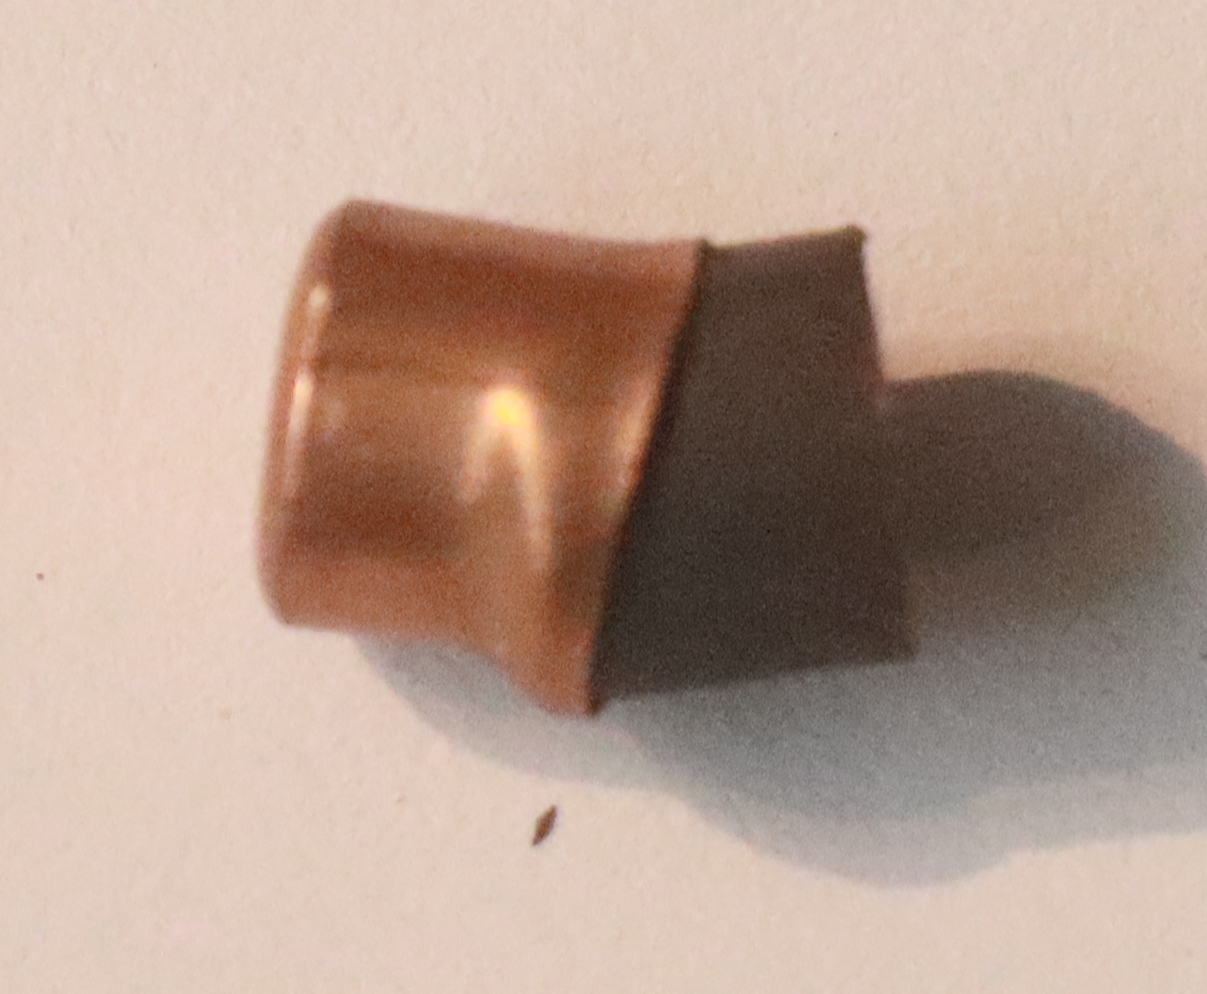
3rd November – More work on the I R Cooper cap reservoir and feed. After going through all my boxes of old caps I found a box of caps that seem to be formed by drawing as cups, unlike the more normal caps that are made as a disk in the middle of a cross of thin sheet copper that is then bent up into the tube, so that when the cap fires the arms of the cross can spread and the cap fall off. They look very like cartridge primers but without an anvil, but the tin says percussion caps! Anyway the tin had two sizes of caps in it, so when I’de sorted it out I had perhaps 40 caps of what appears to be the right size. I could now try to sort out the feed mechanism and get the clock spring working, which involved a bit of adjustment with clearances etc. Along the way I saw why the ‘pawl’ is fitted on the peg rather than being fixed to the spring drum – it actually follows the caps into the path in the steel firing block and will, I think, push the last cap into the way of the piston. Fingers crossed it might all work – at least as well as it did originally. I’ve tried various parts of the feed process, but haven’t yet put it all together, let alone fired off caps – but I am beginning to think that the system might work after all! I got distracted by another job – I needed to cut an 17.5 mm x 16 t.p.i thread in stainless steel on the lathe – now I haven’t done a lot of thread cutting on my lathe so its always a bit of a struggle to get it set up – it has a set of change-wheels (gears) and an internal gearbox so there are a very large range of possible metric and imperial thread pitches that it will cut and a set of tables on the front telling you the settings – unfortunately I overlooked the ‘Z’ gear and cut a beautiful thread that was 48/44 times too coarse! As that was my sole chunk of stainless ( working mostly on old guns I don’t normally stock stainless) I’ll have to cut the thread on the other end and use the bad thread end for the small pipe fitting. It was a very slow job cutting the thread, so I guess I wasted half a day on that stupid mistake and will spend most of the weekend when I’m not doing domestic chores remaking the thread – unfortunately it started from 35mm diaameter bar so there is a lot of messing about getting it down to the required diameter as my coolant pump is not working, so I have to take quite small cuts. and I think I chipped another lathe tool insert!
 The clock spring is not yet fitted so there is no tension on the feed – if you tension it without the cover all the caps jump out!
I’m not sure that the cap box label is for these caps.
 Far Rt cap is sitting on the piston ready to be fired, note they are just about flush with the top of the block – ? enough clearance???
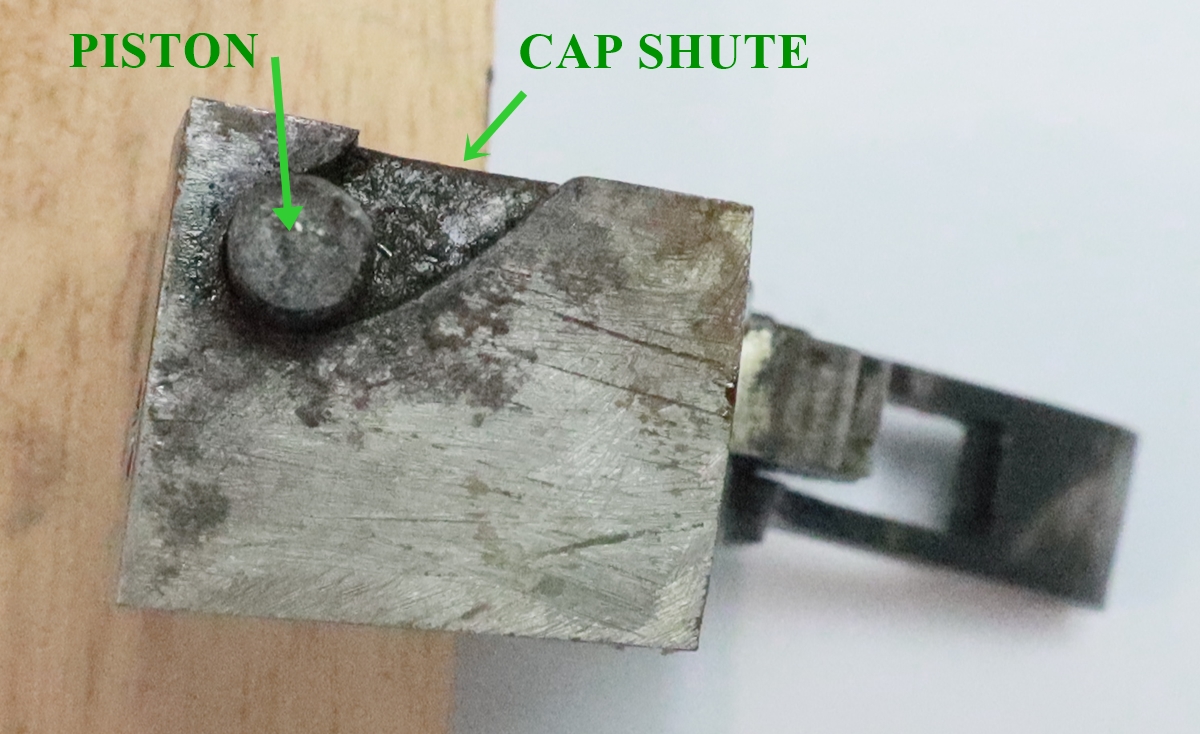
Piston is between half and full cock positions. In half cock it exactly blocks the cap position
2nd November – Shooting clays today – the weather forecast was pretty dire, so CGC was very quiet – I think only our group shooting clays and a few people on the rifle range, but that meant that the 4 undercover stands were all available and we had a very enjoyable day – I shot the Spanish d/b 12 that was left with me – in very good condition, but I found the left hand trigger a bit light, and then it double fired on me, so I ended up shooting left barrel first, which avoids the problem – but makes pairs tricky as you have to move from the back trigger to the front. I did a bit more on the J R Cooper last night – I had a good look at the break in the top strap and thougth it had a bit of greenish crystaline material, so I washed it and scrubbed it with a small brush and it looked suspiciously yellow – a quick once over with a magnet of all the body of the action proved that it was all non ferrous – The outside has a patinated finish that doesn’t give much of a clue, and the raw metal isn’t yellow enough to be a normal grade of brass, or bronze. I guess it is a form of Nickel Siver – of at least some alloy of copper, zinc and nickel, or perhaps some tin? Presumably that enabled the main action body to be a casting, although I can’t see any unworked cast surfaces. The only part that is steel, apart from the moving parts and the pins, is the block that forms the firing mechanism – tumbler housing/ piston bore/ final cap guide. Anyway that explains the cracks, and leaves the problem of how to repair the break. It is possible to TIG weld brass and alloys but difficult as the zinc has very low melting point and vapourises, so I’ll avoid that. I’m not even sure I want to silver solder it as I don’t know what the properties of the material are – especially the melting point – so I’ll probably file off a step in the back of the parts and soft solder a brass plate in. Returning to the cap loading problem, I soldered on the new pin and filed it down so that the hob will rotate with the outer cover in place, now it all looks as if its a working system I have to find out if it does actually work – I played with some caps that just fitted in the scroll but they won’t go through the slot into the steel part where the piston operates – there is room for the cap waiting to be pushed forward on to the nipple and fired, plus one other . The size of the caps is constrained by this part of the system – the diameter has to be such that the piston only picks up the intended cap and doesn’t get caught on the second in line although there is a bit of a chamfer on the piston on the side facing the 2nd cap so the cap can be a shade smaller in diameter than the piston (?) but not much less than 5mm – minimum 4.9 anyway. The front to back depth of this area constrains the length of the cap to about 4.8 mm. I have a number of boxes of old Joyce and Eley caps – some of which are empty and some are unopened, so I ought to be able to find something that fits! Well so far I’ve managed to find just one old cap that is just about perfect, at least I think it is, only with just a single cap its difficult to try the feed properly – I think the cap is a Joyce F4 No 18 – I need to find a table of the sizes of the old caps. The normal modern 1075s and N0 11s are too small in diameter and length – the piston tries to pick up two caps and will I think jam. Having got the caps that will feed onto the nipple, will they stay in the magazine while its being loaded without rotating? Watch this space……………………………………
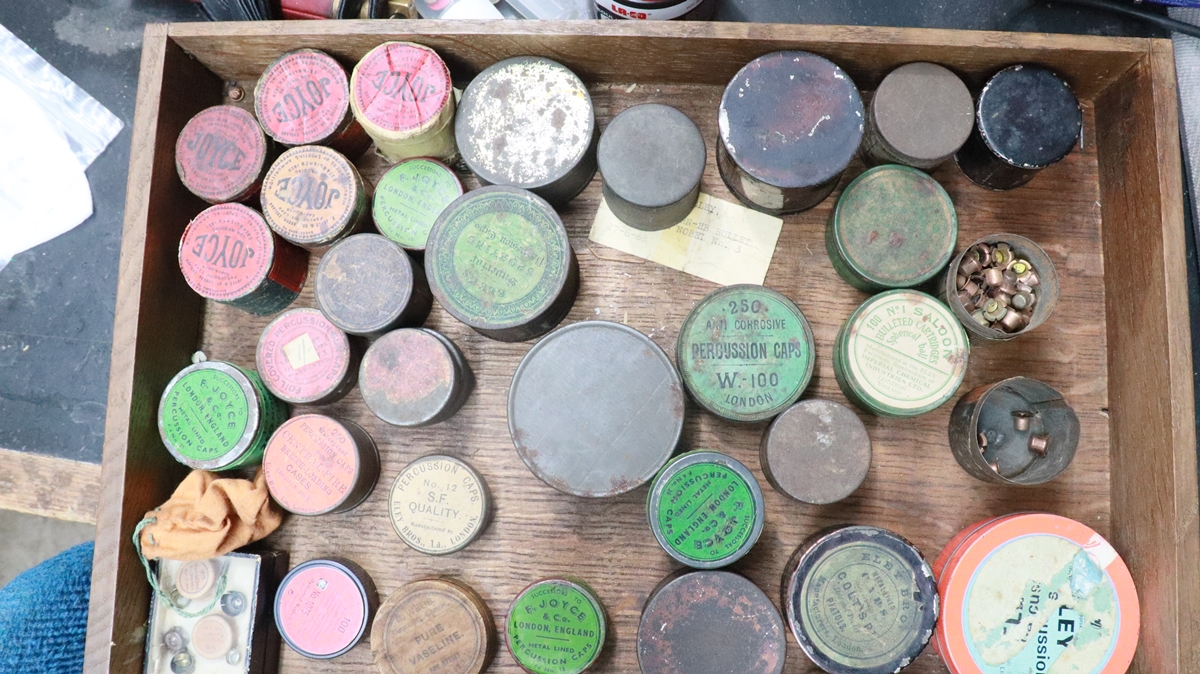 My collection of caps – some of the boxes are empty, most have some caps and a few are still unopened.
1st November – another month gone – soon be fireworks! I carried on working on the J R Cooper – the cap feed was damaged – the inner drum that houses the clock spring should have a peg on the outside that has a ‘pawl’ put on it that pushes on the train of caps – I can’t quite see why the pawl has to be loosely fitted on a peg rather than fixed to the drum. The tiny peg, with its flange that fits against the drum was broken off – it appeared to have been riveted onto the wall of the drum, but from the look of it there had been a previous attempt to rivet it and also an attempt to silver solder it on, so that was obviously a weak point. Anyway the existing peg didn’t have enough left of its flange to be usable so I filed one up in brass. I was thinking of silver soldering it to the German silver drum but I am not confident that I can handle such tiny bits without overheating them and melting the parts themselves, which would be a disaster, so I’m going to soft solder them on with tin. I nearly got that job done, but had to go off and get dinner! The tang of the top strap had cracked right off so I’ll need to chamfer the joint on the back and put a dab or two of TIG weld on the joint – I don’t want the weld to be visible on the front – I’m not too bothered about the strength of the joint. Anyway I had to go out and get a refill of Argon for the TIG weld and a cylinder of oxygen for my Maxy Gas torch – I used all my oxygen when I had Covid in 2020! I’m off shooting tomorrow if we can find a moment between showers – I was hoping it would be a flintlock day but that is only possible in settled weather so looks like it will be percussion if there are gaps in the weather, or I might take an old D/B 12 non ejector that I am sheltering for a friend just to see if I can shoot with a random gun. I’ve been idly looking through the pile of old gun mags that I inherited from my father – one UK mag from 1993 is just full of full page ads for pistols – at least a couple of dozen dealers advertising a range of semi automatic (now called self loaders!) and revolvers in every calibre imaginable – I don’t know how many were destroyed in the 1997 ban, but judging by the ads there must have been tens or hundreds of thousands in circulation. I’ll try to get the soldering done – I have a small hot air device for soldering surface mount circuit chips that is supposed to blow air at up to 450C – I shall see if it will do the job as I would prefer not to use a flame, and I don’t think a soldering iron will quite do – we shall see. Here are some photos – cracks seem to be endemic on this gun – the top strap is cracked in several places, and the clock spring housing below had two or three cracks visible – one reason for being very careful with the soldering!
 Remains of the original peg joints on the spring drum, what we in the trade call a ‘mess’
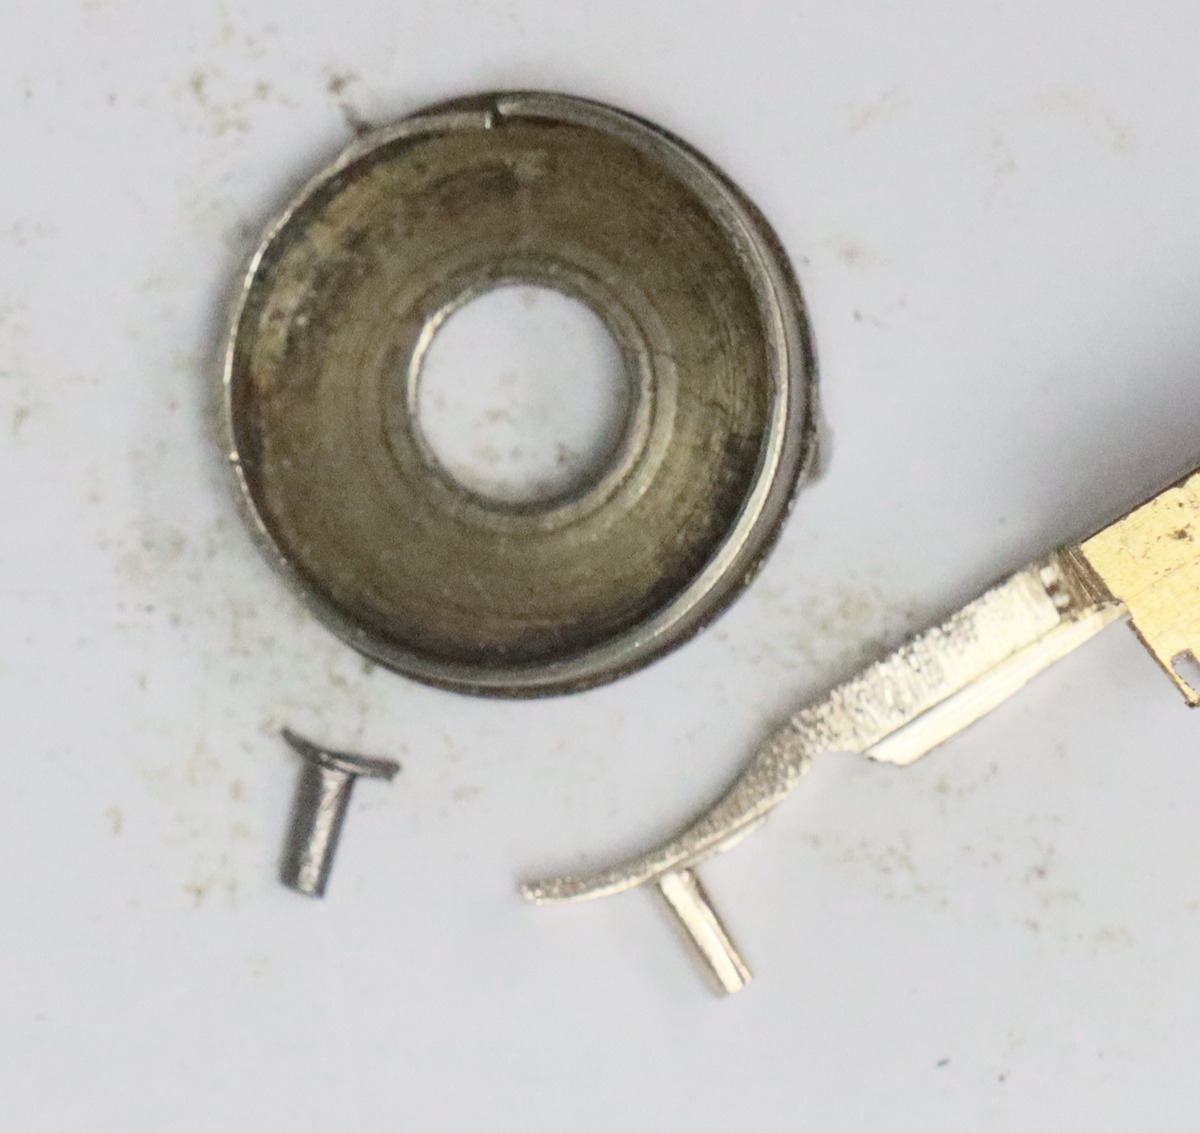 replacement peg in the making – keep things attached to a decent ‘handle’ as long as possible!
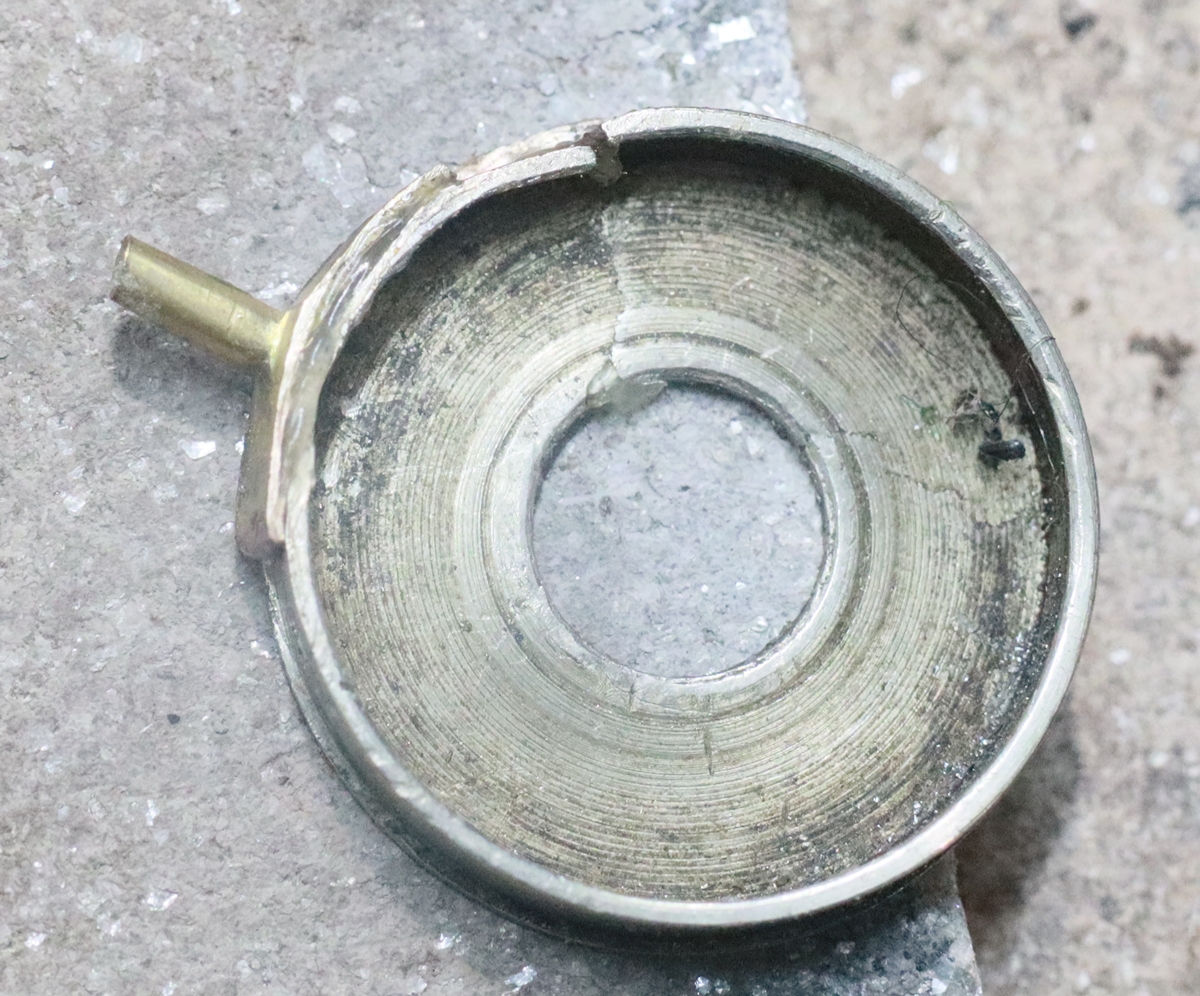 Ready to solder – held on by flux at the moment – will probably need something better although capilliary action might work.
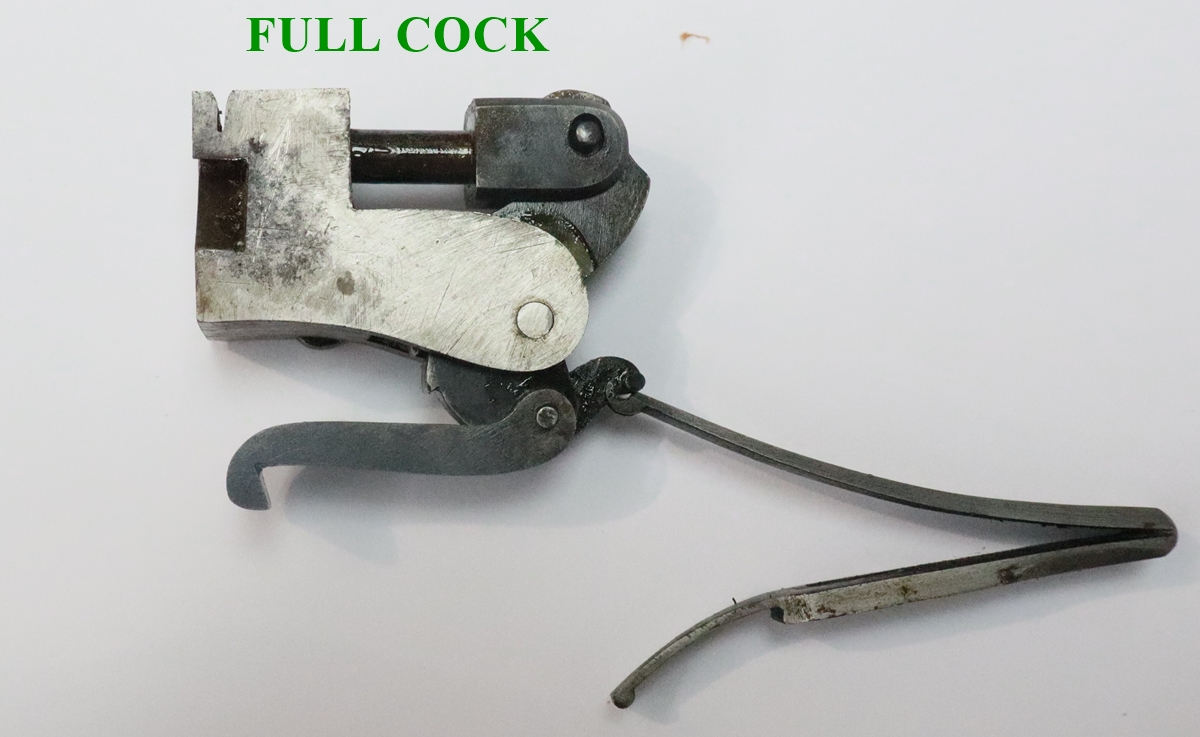
31st October – Not content with the number of jobs I have on the go I started another! Its been bugging me since I took the J R Cooper to the shoot to ask for info – I just had the feeling that I had to find out if it would ever have worked, and just how it was put together I so out came my collection of gunmaker’s screwdrivers ( much thinner blades than normal screwdrivers – mostly ground down by me ). The way its put together is not like any other gun I’ve taken apart, and it was a bit of a mystery how one got into it. The top plate comes off easily enough and reveals the top of the tumbler and the link and piston that does the firing, and the top of the block that the piston slides in. The barrel comes out as per normal, except that it has a quite small and tapered nipple sticking straight out of the back of the breech block. the Left side ide plate with the drum that holds the cap magazine comes off, but that just leaves an inner side integral with the ‘trigger plate’ and right side After that it wasn’t obvious where to begin. The trigger plate is screwed through to the top tang and the top tang is screwed to the trigger plate – removing both screws releases the top tang and also the stock – leaving the trigger plate with the spring attached together with the integral side plates and the lock mechanism. A bit of work with a Mole Wrench and a wrap of leather as a spring compressor removed the spring. Two screws from the right side plate now release the block containing the tumbler and piston and piston guide plus the channel through which the caps have to travel to present themselves in front of the piston. Its now possible to temove the tumbler pivot and get the tumbler out with the link for the spring and the bridle to engage with the cocking trigger – now almost there. One problem remains, and I haven’t yet sorted it – The trigger guard is fixed by screwing into the lock plate ahead of the cocking trigger but won’t rotate because the front, cocking trigger gets in the way, but the front trigger wont go through the hole in the trigger plate as it seems not to be large enough – impass! I’m sure that is all a bit difficult to follow – I’ve taken loads of photos but I’m not sure they will really help that much – I’ll put some below. Anyway I think I can see that it might work – it does look as if there is a bit of corrosion around the piston area so I guess it has been used, and the engraving looks quite worn – in fact I wonder if the mechanism within is actually a MK 2 or MK ? version as the external wear is not quite compatible with the internal state. Anyway the result of my stripping it is that I can see how the caps must have been fed to the piston, and can see that it needs the original, larger old caps – of which I have plenty. The nipple is really tiny, smaller than a modern 1075 or No 11 nipple, but then I guess the cap doesn’t have to stick on the nipple as its just thrown on by the piston in the process of firing and then has to fall off on its own account. The larger caps fit well in the magazine too. The magazine needs working on, the clock spring that drives the caps has come unattached and will need refixing, and the spur on the inner rotating drum has come off so there is nothing to drive the caps round. I’ll have to sort that out. The other problem is that the tail of the top tang was cracked and has now come off, so will need a dab of weld – only I have run out of Argon. Enough excitement for one day!
Here are some photos – for a general view etc see my original post – look in recent posts…
 The clock spring and hub have been removed here. The side visible is an integral part of the trigger plate
 Gun is pointing right! the other pictures are pointing left – confusing eh?
 Top view of the one part trigger plate/side plates with tumbler block removed
 This block with tumbler comes out from between the side pieces of the trigger plate – this is a view from the front
There is evidence that its been fired during its life – so it must have worked! A total pig to clean though!
30th October – I did get the bell engraved, and I didn’t loose any more tips although I did have to sharpen my graver a few times. That took me most of the morning a
J R Cooper patents;
I’m following up on Cooper’s patents, the British library lists teh following patents by James Rock Cooper between 1838 and 1869;
- “COOPER, JOSEPH ROCK”, GB7610, 10/04/1838, “Fire arms.”
- “COOPER, JOSEPH ROCK”, GB 8347, 21/01/1840, “Fire arms, and balls to be used therewith.”
- “COOPER, JOSEPH ROCK”, GB12781, 20/09/1849, ”Fire arms.”
- “COOPER, JOSEPH ROCK”, GB131, 19/01/1853, ”Firearms.”
- “COOPER, JOSEPH ROCK”, GB225, 30/01/1854, “Preparing or constructing and dressing rolls for rolling gun barrels, tubes, and bars.”
- “COOPER, JOSEPH ROCK”, GB2718, 03/12/1855, ”Breech loading firearms.”
- “COOPER, JOSEPH ROCK”, GB300, 02/02/1859, ”Breech loading firearms.”
- “COOPER, JOSEPH ROCK”, GB328, 07/02/1860, “Breech loading firearms and ordnance.”
- “COOPER, JOSEPH ROCK”, GB3067, 13/12/1860, “Breech loading firearms.”
- “COOPER, JOSEPH ROCK”, GB908, 13/04/1861, “An improvement in or addition to certain kinds of breech loading firearms and ordnance.”
- “COOPER , JOSEPH ROCK”, GB1755, 14/07/1863, ”Sights for rifles and other firearms.”
- “COOPER, JOSEPH ROCK”, GB1816, 21/07/1861, “Breech loading firearms.,,
- “COOPER, JOSEPH ROCK”, GB1308, 11/05/1865, “Improvements in breech loading firearms, and in cartridges for breech loading firearms.”
- “COOPER, JOSEPH ROCK”, GB1562, 08/06/1865, ”Central breech loading firearms.”
- “COOPER, JOSEPH ROCK”, GB2958, 17/11/1865, ”Breech loading firearms.”
- “COOPER, JOSEPH ROCK”, GB3383, 22/12/1866, ”Breech loading firearms.”
- “COOPER, JOSEPH ROCK”, GB537, 27/02/1867, ”Breech loading firearms.”
- “COOPER, JOSEPH ROCK”, GB 1590, 29/05/1867, ”Cartridges for breech loading firearms. (Partly communicated by Charles Francois Galand.)”
- “COOPER, JOSEPH ROCK”, GB1881, 27/06/1867, “Breech loading firearms.”
- “COOPER, JOSEPH ROCK”, GB2587, 12/09/1867, “Breech loading firearms.”
- “COOPER, JOSEPH ROCK”, GB2672, 21/09/1867, ”Firearms.”
- “COOPER, JOSEPH ROCK”, GB655, 27/02/1868, “An improvement or improvements in breech loading firearms.”
- “COOPER, JOSEPH ROCK”, GB793, 15/03/1869, “Breech loading firearms.
Here are .pdf’s of some of them, courtesy of the British Library;-
7610 of 1838 enclosed lock, gilded nipples and safety catch GB183807610A
0131 of 1853 Breechloading percussion gun GB185300131A