You can see my YouTube video on sharpening at;-
Being able to sharpen your gravers is key to engraving because it is next to impossible to engrave on steel unless your tools are both the correct shape and sharp. You need to sharpen gravers frequently because they wear quite quickly when cutting steel, and its very easy to break off the point, especially when you are beginning. So learning to sharpen your tools is a necessary first step to engraving, even if you buy a ready sharpened tool. An experienced engraver will probably be able to sharpen his gravers freehand, but that comes with years of experience, even so, many chose to use a jig. Beginners and journeymen certainly need to use a jig in order to ensure consistency and minimise the amount taken off the tool surface with each sharpening. For convenience I have a carousel of gravers, mostly sharpened the same, so that I can change gravers quickly to continue working, and then have a sharpening session when I’ve exhausted my supply.
to read more click….
The vast bulk of engraving along the lines shown in this blog, which corresponds to the type of engraving used on guns from about 1730 through to about 1870 was cut with 90 degree square gravers, and it is this pattern that I am concentrating on here. The only other gravers that I see occasionally used on old guns are very narrow ‘knife’ or fine ‘slapstick/Ongulet’ gravers for cutting serifs on quality lettering, very occasional ‘flats’ used for the strokes of letters and even more rarely ‘liners’ for putting multiple shading lines on work. These odd gravers are less easily jigged for sharpening and I’ll concentrate on the square gravers first as that is the type the beginner should be using.
Different engravers favour different sharpening angles for square gravers but the angles chosen here are the most common and the ones I always use. The main face is cut at 45 degrees on the diagonal and the heels are cut at 15 degrees with the graver ‘flat’ – it will become clear what that means later. These angles can be varied according to personal preferences, but the values 45/15 used here are a good starting point for most work. The technical post on engraving describes in more detail the mechanics of the cutting, but basically the tool slides on the heels and pushes up the cut metal on the slope of the main face – the steeper the main face the more cutting resistance it generates, but the stronger the tip is. The steeper the heels the steeper the angle the graver is held at and the more indirect the push. In order to allow the graver to turn in curves the heels must be kept short or they will rub on the outside of the curve – a heel length of 1/4 mm (10 thou) is good, but 1/2 mm (20 thou) is easier for a beginner to manage with. To reduce the amount of metal to be removed with each sharpening and thus speed it up, and to improve visibility when 1/8 square tools are used the top and side surfaces of the graver are ground off at the business end.
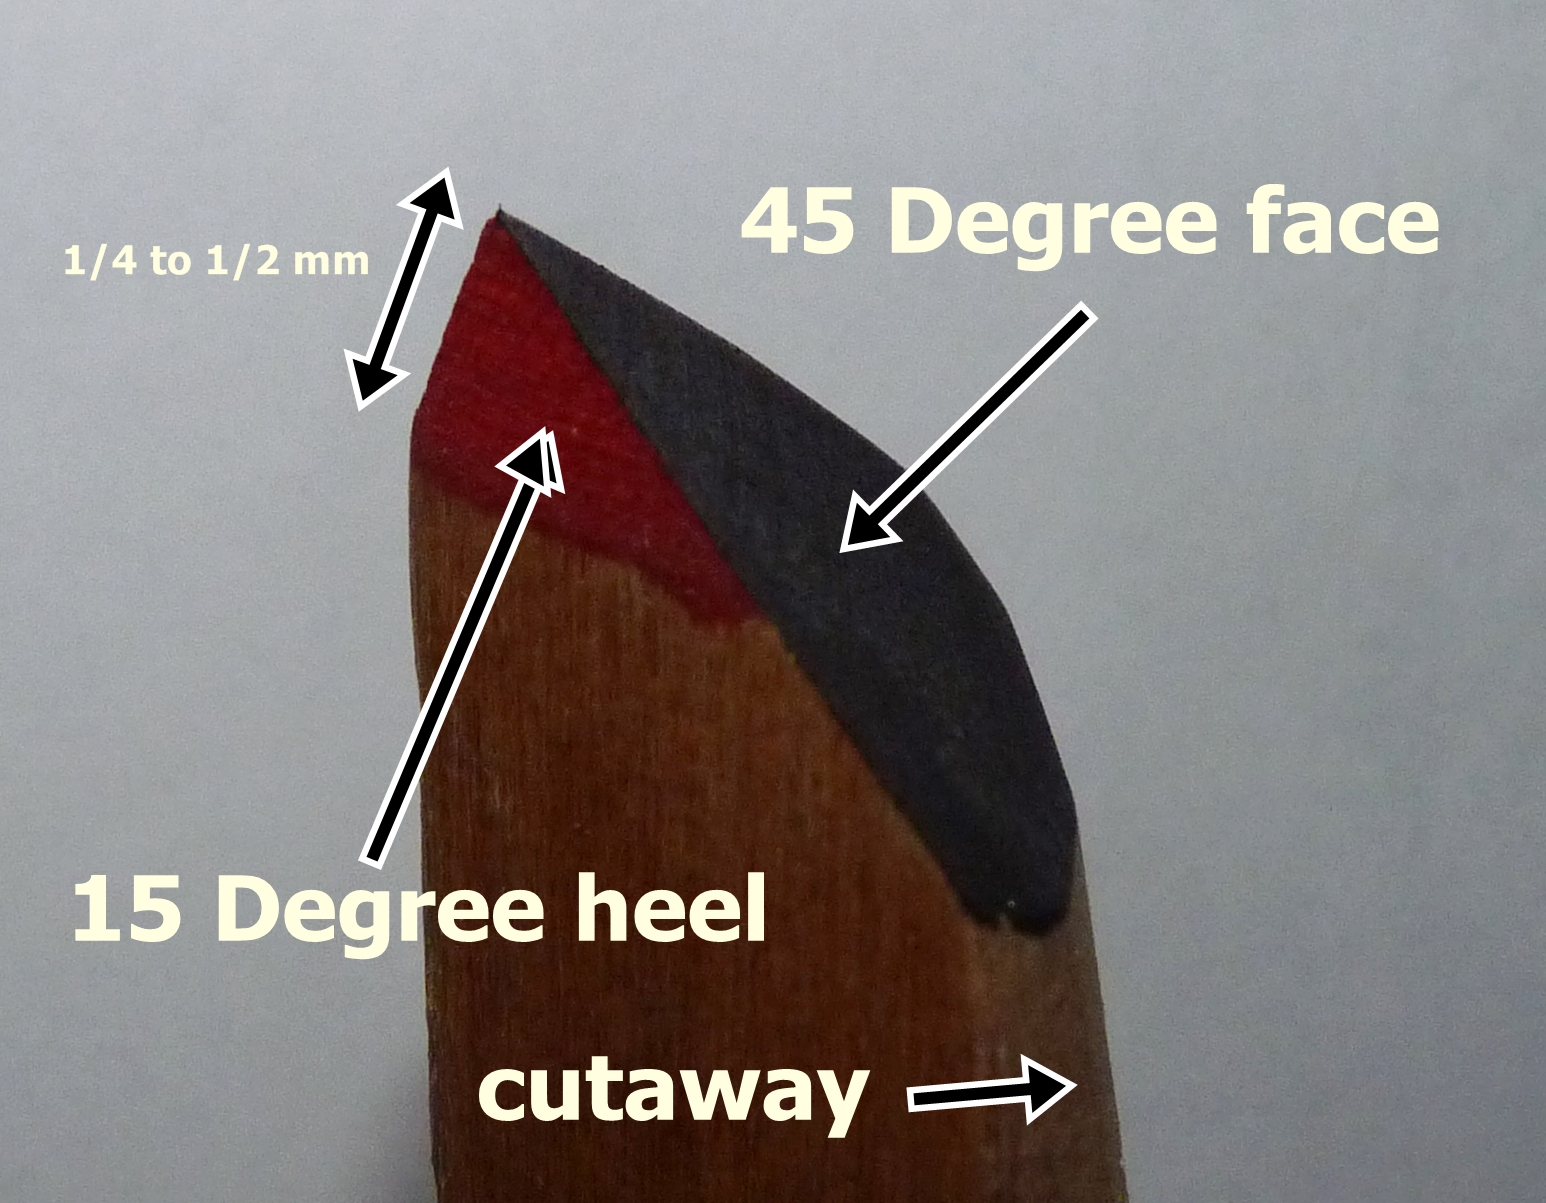
Gravers made of wood like this one are not often used for gun engraving, but it shows the angles!
Given how often gravers must be sharpened its essential to minimise the time it takes, and to align the tool in exactly the same way every time it is sharpened to minimise the metal removed – gravers have a limited life as they get shorter with every sharpening, and there is only a limited range of tool length that is usable. This means that accurate, easy to use jigs are essential for efficient sharpening!
The faces of gravers are quite small compared to blades usually sharpened on stones, and so will wear grooves in any natural stone – the only satisfactory ‘stone’ for the main face is therefore a continuous diamond surface – for speed I use two grits – a medium grit (260 grit) for roughing if I break a bit off the tip, and a fine (1200 grit) for the final surface. The heels are minute in area and a fine diamond takes off too much material in no time at all – I use an Arkansas stone, the hardest natural stone, for heels but I have an old extra extra fine diamond stone that I use if there is no existing heel just to ‘break the point’ to avoid scratching the Arkansas stone. Even so I need to flatten the Arkansas stone from time to time with the 1200 grit diamond.
You can either sharpen the main face of your gravers freehand (for experts) or using a jig on a normal rectangular diamond , or you can purchase a powered honing machine and one or more diamond honing disks with a suitable jig. For the heels the choice is really a jig and an Arkansas stone or a ceramic disk for a power hone used with diamond paste or solution – anything else removes metal too fast. The power hone is expensive although you can improvise with a drill press, and the diamond disks are much more expensive ( £80 each) than the rectangular s’stones’ – the ceramic disk is around £180 plus the diamond solution!
I have not been able to find any really good sharpening jigs on the market – there was a very cheap little jig that didn’t really work because it was so cheaply made, and another that was so fiddly to adjust each time that it drove me mad, so I have always made my own. I normally sharpen the main face of my gravers on a hone with a 1200 grit diamond and I’ve fitted a 45 degree ramp on an arm so that I can hold the tool in a diagonal groove with one finger as I sharpen it – this is very quick. I still sharpen the heels on the Arkansas stone with a small wheeled jig I made just for heels. I don’t bother to take my powered hone to demonstrations as its big and heavy and needs power, so I still need a 45 degree wheeled jig to use on a regular 6 inch 1200 grit diamond. To save time I wanted the same jig to work for the heels and main face, and I wanted the angle setting, which is done by measuring the length of the graver protruding through the jig, to be accurate and reproducible. I use a small perspex length measuring jig to set the length and hence the angle. I have now come up with a design for a wheeled jig with a slot for heels and a separate slot for the main face in which the geometry is such that the length protruding is the same for the face and heels.
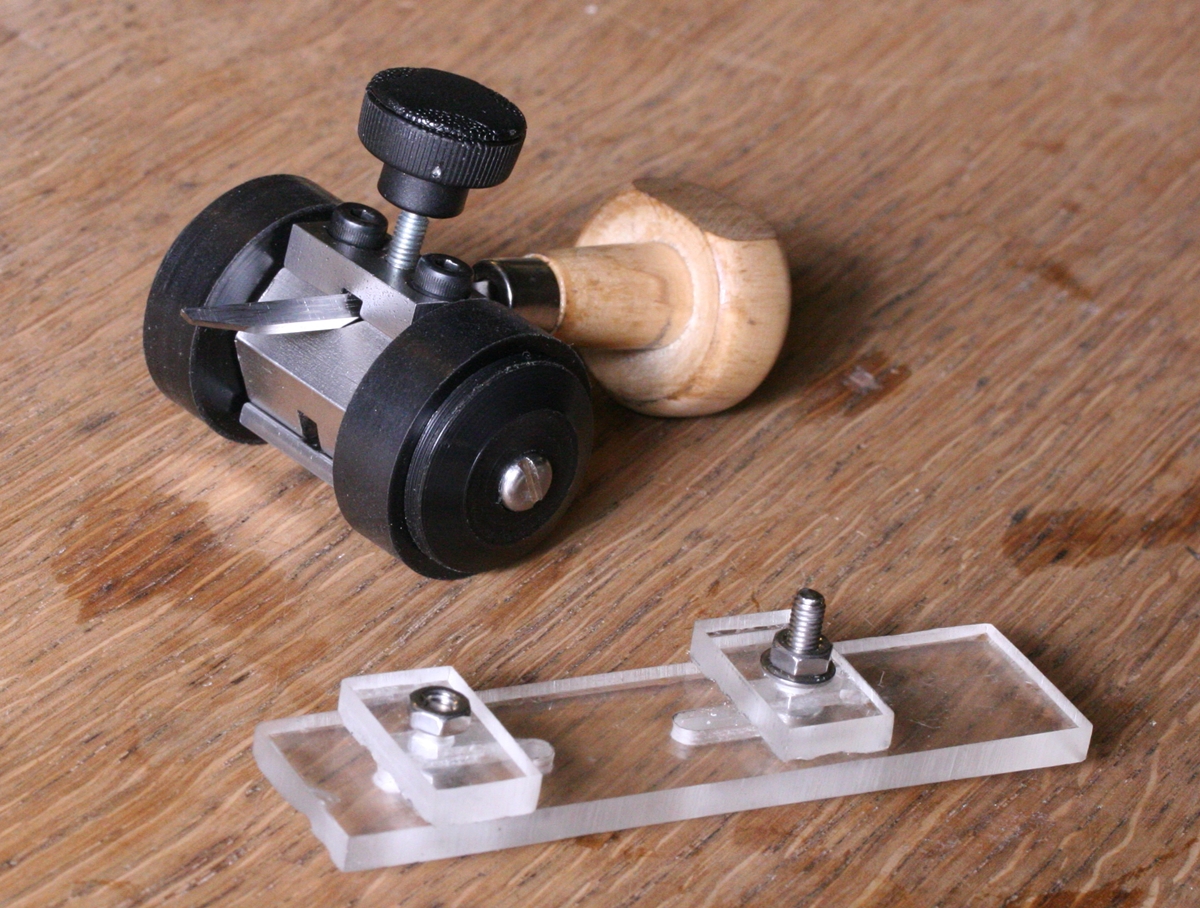
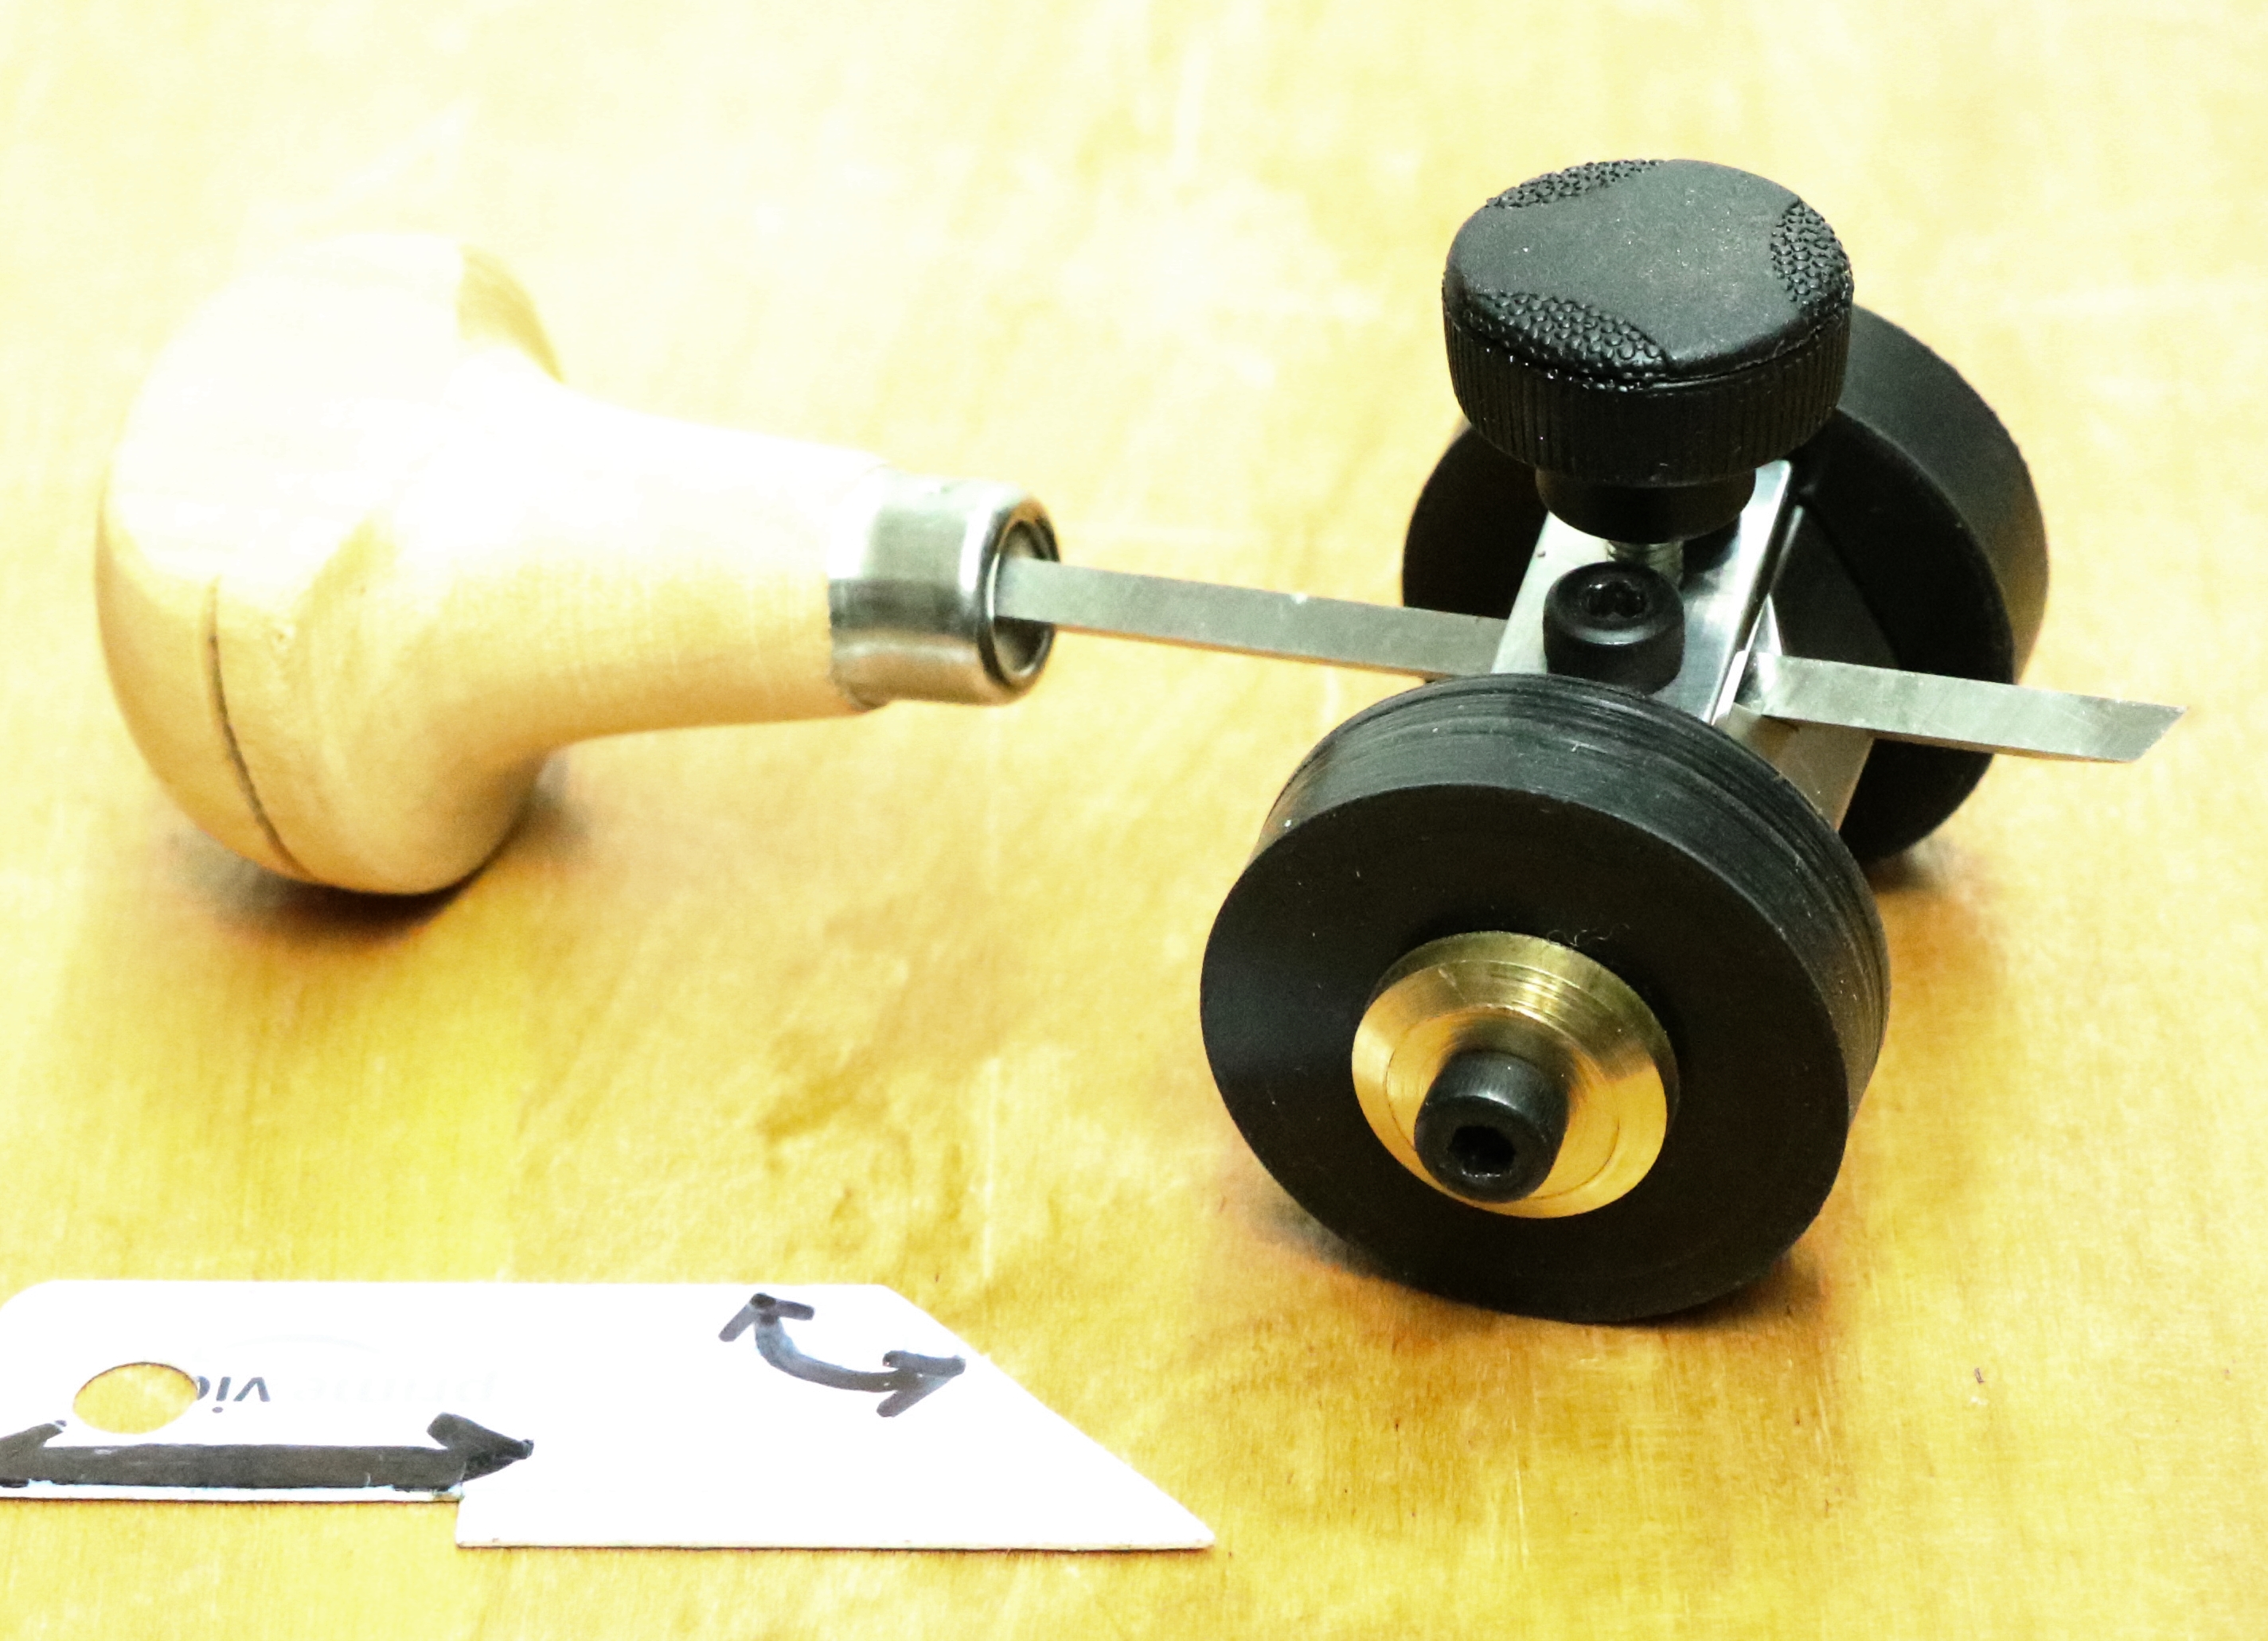
Graver sharpening jig – The top hole is for the main face and the lower hole for the heels – the plastic gauge sets the angle by setting the length of the graver protruding from the jig face. There is a small piston inside the body of the jig that allows the top screw to clamp the graver in teh bottom slot for heel sharpening without adjusting the jig in any way. Once set the jig is entirely repeatable and very quick to use.
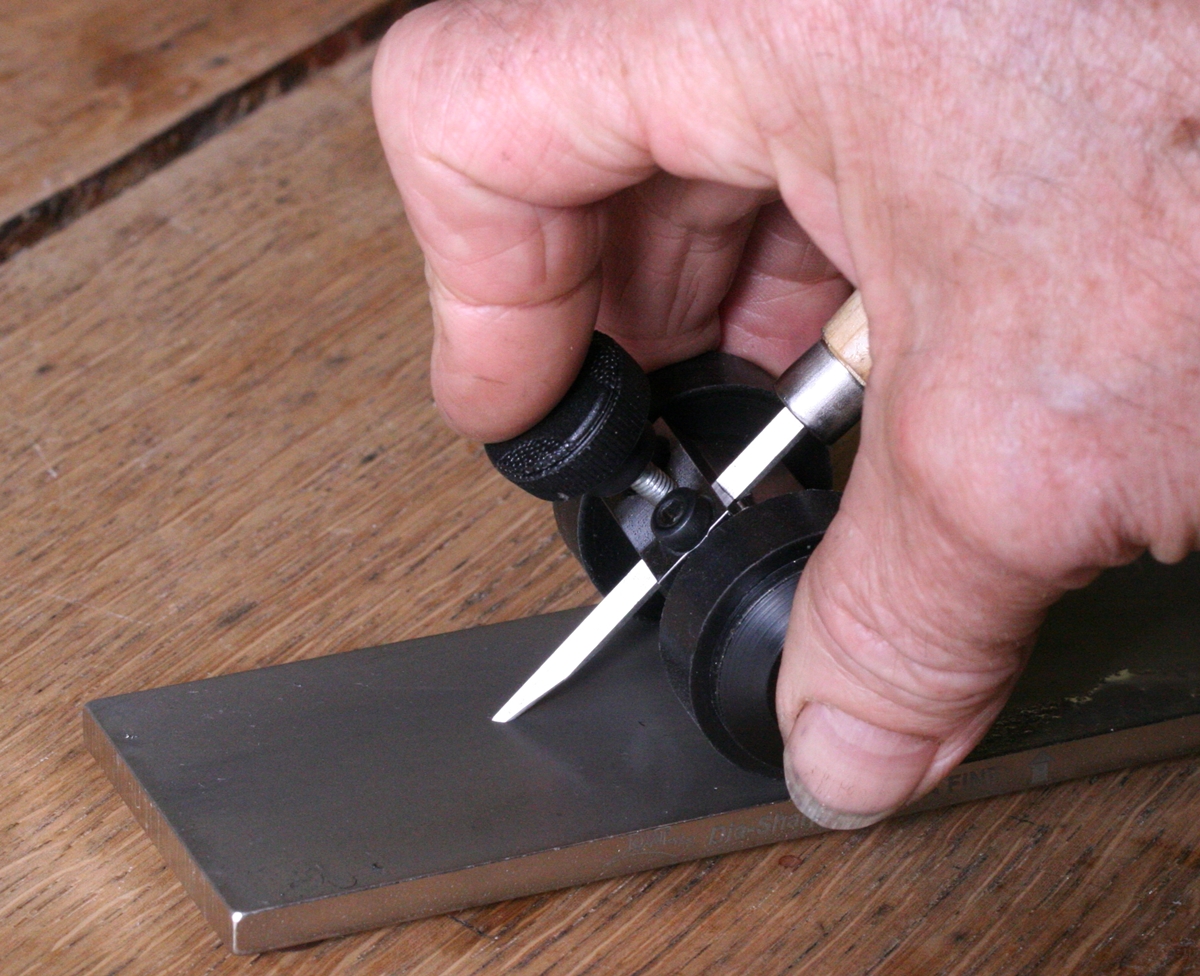
Graver sharpening jig – the jig allows an even light pressure to be maintained on the cutting face.

The heels are sharpened in the lower slot with the graver at 15 degrees tilt but flat in the other plane.
Using this jig the procedure using the power hone is as follows:
- The tools to be sharpened are inspected under high magnification ( x 25 or as much as you can manage) and any chipped tools are graded for the amount of metal needed to form a new point.
- Any tools needing reshaping or chips ground away are honed on t face on a 260 grit diamond until the shape is right.
- All tools are sharpened on the 1200 grit diamond – experience will tell you how long to sharpen for.
- The tools are visually inspected to make sure they are fully ground to a good point.- any that have now got no heels are noted.
- The two bottom 90 degree surfaces are wiped flat on the Arkansas stone to get rid of the burr.#
- A tool is jigged and if it has no heel is wiped in the jig lightly on a fine diamond to break the sharp point.
- The tool is then sharpened on the Arkansas stone and then swapped to the other heel angle and 6 and 7 repeated.
- Finally the main face is wiped on a piece of diamond impregnated leather or a scrap of oily 2000 grit paper to get rid of the burrs thrown up when the heels are sharpened, and the graver visually inspected to make sure the point is good and the heels are a reasonable length and are both the same. I have a small plastic graticule marked in 0.5 mm that is useful for occasional checks.
- When sharp the graver point should catch when run up your thumbnail under its own weight – if it doesn’t its probably not right!
If using hand sharpening then the 260 grit and the 1200 grit would be used without taking the graver out of the jig. When sharpening the heels you can push the jig back and forth or from side to side or some of each, but be careful to do the same on each heel – I count to 10 while doing each heel, not necessarily in time with the movement of the jig. In time you will get good at balancing the two heels!
This may sound like a lot of work – and it is, but it pays to be meticulous in your sharpening or you are likely to end up spoiling your work! My system of saving tools up for one big session and doing a ‘production line’ process works well for me because I’m using a microscope and wear spectacles when not looking through the microscope so it breaks the swing to go back and forth to the microscope. I guess if using an optical visor or eyeglass it might be easier to sharpen tools as they get blunt.
A couple of points to note – try to distribute the sharpening across your stones to even out the wear – gravers are very small things by sharpening standards, also I have used DMT diamond stones for a number of years and I started off using water as lubricant – I have had a couple of ‘stones’ that have started to rust under the nickel plating which renders them useless – I now use WD40 or thin oil – I think that the oil slurry makes sharpening less effort and maybe gives a finer finish.
What is ‘blunt’ – when should I stop using a graver and sharpen it? That depends on what you are trying to cut – the progression for a normal tool steel or HSS graver is that initially the tool will cut very fine lines but doesn’t feel quite ‘right’, after a cut or two it begins to feel smoother, but will still cut very fine cuts if it was properly sharpened, but as you cut more with it, the tip of the tool will round off and you won’t be able to cut such fine lines, but it will still cut well – gradually it will round off more and tend to cut deeper and at some point won’t give the cuts you want and you’ll find you have to be careful to get the graver cutting at the start of the line. At or before this point you should have discarded that tool!
Broken points are more serious cause of problems for beginners – all engravers in any material experience the occasional broken tip, but of course its much more likely to occur in a material like steel. As mentioned in the post on ‘Gun Engraving -technical’ below, tip breakages occur at the end of a cut, either because you pulled the tip at the wrong angle, or engraved into a previous cut and hit the far side. You need to develop a sixth sense for possible tip breakages because the next cut you try to make after a tip beakage will almost certainly result in a gouge across your precious work.


Hi Tim, John Baker from Australia. I bought your wheeled graver jig and 3 or four gravers from you about a year ago. I have only just got around to using some gravers to cut some small brass stock for a clock I am working on. I understand the directions from your video and can get a wonderful honed surface on the diamond part of the graver. I use the graver just like a wood turner would use a skew chisel. I am a wood turner, just as an aside. What I am having trouble with is the need to further take more metal off using the 15 degree slot. Why do this? You also refer to this area as the heel of the graver. I thought it was the front, where metal is being removed. Is this method providing some form of relief for the swarm?
Besides all that, hope you are well and virus free. Kindest regards, John.
Hi John, I too do a bit of wood turning but I wouldn’t make the comparison of a skew to a graver, although I guess they both effectively ‘ride’ on a part of the tool to control the cut.
With the graver the two heels (15 degree to the axis of the graver) are the controlling surface and ride the metal, the main face (45 degrees) does the cutting and the swarf rides up it to leave a V shaped groove in the metal Removing more metal gives a deeper V. If you need something other than a V groove then you need a different graver, or you are getting into the realms of metal carving or chasing.
Glad you started to use the gravers. Thanks for your interest.
Tim
Can you share the template sharpening with my my Whatsapp +6285649941218
Not sure what you are asking!