A Beginners’ Guide to
Collecting and Restoration
Part 2: Electrolytic Derusting.
By Tim Owen
First Published in the Autumn 2014 edition of Black Powder, the magazine of the Muzzle Loading Association of Great Britain.
WARNING – Possible Hydrogen Embrittlement of springs- see note at the end of the article
I’ve always regarded electrolytic de-rusting, or un-rusting as it might more accurately be called, as being as near to magic as any aspect of gun restoration gets, so it always surprises me that it is not more widely used. Rust unfortunately affects almost every old gun sooner or later since iron and steel have very little resistance to oxidation; rust forms on the surface of iron in the presence of oxygen and moisture, when the iron is converted to form an oxide and associated hydrates. The free availability of oxygen in the air allows the iron to form its most oxygen rich oxide – ferric oxide – which is what we know as rust, forming a hard brown layer that bonds firmly to the underlying iron and eventually leaves a rough and pitted surface beneath the rust. There is another oxide of iron that combines less oxygen into its structure – ferrous oxide – that has different physical properties; it is black and forms a fine powder which does not bond strongly to itself or the underlying iron. The power of electrolytic de-rusting is in creating a situation where the adhering rust, the ferric form of the oxide, is converted to the black, non adhering ferrous form by a process known as reduction, in which some of its oxygen is removed. One way to bring about the necessary reduction of the rust is by exposing the rust to active hydrogen, which has a strong affinity for oxygen and will ‘steal’ some of the oxygen from the oxide to form water and leave the oxide reduced to the ferrous form.
Having dealt (in a simplified form) with the basic theory behind the reduction process, how do we do it in practice? You might remember vaguely from school science that we can generate hydrogen by passing an electric current through water, splitting some of the water into its constituent parts – hydrogen and oxygen – hydrogen is generated at the electrode connected to the negative terminal and oxygen at the positive terminal. By connecting our rusted part to the negative terminal we can provide the hydrogen needed for the reduction process. The amount of hydrogen and oxygen produced depending only on the current flowing. Pure water doesn’t conduct electricity so we need to add something suitable to it to make it conduct, i.e. to form an electrolyte – adding any acid or alkali would form an electrolyte, but acids attack iron, so an alkali is used. Two readily available substances are particularly suitable;- Caustic Soda, available as drain cleaner granules, and Washing Soda available as granules under that name. Both will attack oil and grease to some extent by ‘saponification’– turning it into a form of soap. However, if you want to rely on the process to remove oil and grease along with the electrolysyis, you will find that Caustic Soda is much more effective, although it requires more care in use as it is more aggressive in its action on the skin (see safety box). The concentration of either electrolyte is not critical for the electrolysis – one or two heaped teaspoons per mug of water is fine, but always add the soda granules to the water as heat is generated. If you prefer to use Washing Soda but don’t have any to hand, just take Bicarbonate of Soda (the culinary sort) and heat for half an hour in the oven at 120oC and you will convert the sodium bicarbonate to a somewhat smaller quantity of washing soda by driving off some carbon dioxide.
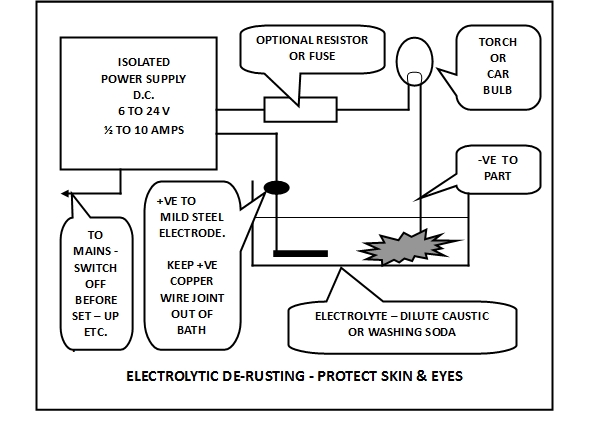
The electrolysis requires a D.C. power supply with a voltage somewhere in the range 6 volts to 24 volts that will sustain a current of between1/4 and 10 Amps depending on the size of the pieces to be de-rusted, and the length of time you are prepared to wait while it happens. Obviously electrical safety is paramount, and the D.C. must be very effectively isolated from any Mains voltage by using a suitable power supply, transformer or battery charger. The power supply from an old laptop or similar may be suitable – often providing 24 volts at 1 Amp or more (check that the output is D.C – the label will give the output specification and polarity), or a 12 Volt car battery charger (beware that sensing circuits in most modern chargers may inhibit the output until a battery is sensed so you may have to connect a battery across the charger to get it to work, in which case it is safest to charge the battery and then use it to power the electrolysis while it is disconnected from the charger – see safety information . Once your supply is chosen, you will need to provide some resistance to limit the current in the event that you accidentally touch the positive and negative electrodes together, to prevent damage to the supply or overheating of the wiring. The best way to do this is to find a light bulb from a car or torch of the same voltage as the supply and with a power rating so that if the bulb is connected and the electrodes are short-circuited the bulb will light fully and the supply won’t be overloaded. Wire it in series with one or other leads to the electrolytic bath. Light bulbs have the property that their resistance is much higher when they are hot, i.e. lit, than when they are cold, by a factor of about 10. This means that the bulb will prevent overload in the event of a short circuit but won’t waste much power when the electrolytic cell is functioning properly at lower current (see electrical box for calculations). If you plan to electrolyse a wide range of part sizes and have a high current rating supply you might also want to put a normal wire wound resistor in the circuit for additional control and protection.
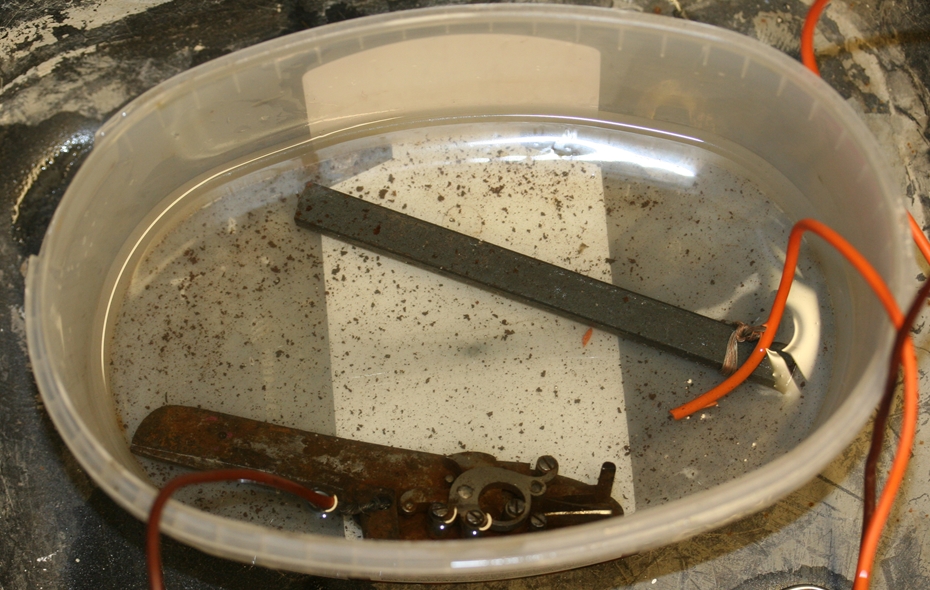
To set up the process you need the electrolyte and D.C. supply and bulb as above, and a suitable plastic container large enough to hold the item to be de-rusted with space for the positive electrode to be a couple of centimetres away from the item. The positive electrode needs to be a piece of mild steel of any convenient shape and size which can be put in the electrolytic bath with a bit of the mild steel protruding from the bath or you can use a bit of mild steel wire to complete the circuit. DO NOT let your positive copper connecting wire be submerged in the bath during electrolysis or you may plate copper onto the item you want to de-rust – but it is OK to use copper to connect to the item to be de-rusted. DO NOT use stainless steel or any other metal anywhere in the bath (see safety box) – gold is OK and silver should be but I haven’t tried it yet. When the bath is set up, connect the electrical supply to the mains and switch on. You should see the de-rusting item begin to get covered in tiny bubbles (of hydrogen if you got the connections the right way round!) – and also the positive electrode (with oxygen bubbles). Hydrogen can be explosive in critical concentrations, and the gas can carry up tiny bubbles of caustic soda, so the whole process is best carried out in a very well ventilated space such as a garage or shed.
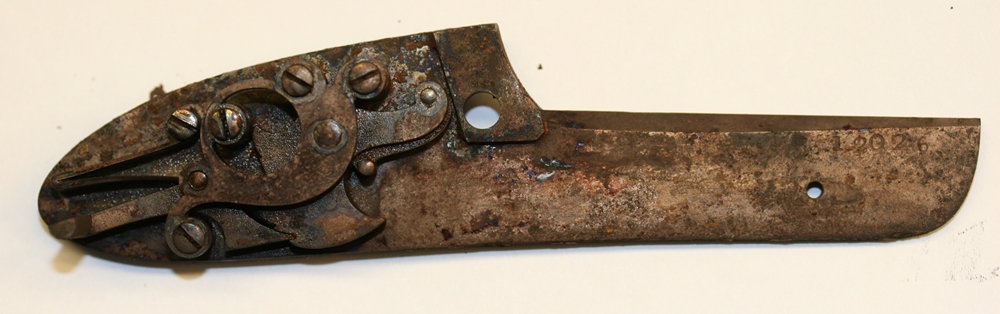
How fast does it work? The rate of working depends on the current, and on the amount of rust and on the total area of the item, and to a lesser extent on how much oil and grease needs to be attacked before the rust is exposed. As a guide, a percussion gun lock with slight to moderate rust in places might take of the order of 6 – 12 Amp hours to de-rust (i.e. 12 to 24 hours at ½ amp, 6 to 12 hours at 1 amp or 3 to 6 hours at 2 amps). High currents and large voltages may heat the electrolyte, so avoid high power inputs to small containers, and for safety always limit power to less than 240 Watts (say 10Amps at 24 Volts).
Can it damage gun parts? As long as you have got the electrodes connected the correct way round, the process will not attack or damage any actual iron or steel surfaces on the de-rust item. Polished surfaces appear to stay polished, even if left with the current flowing for days on end (but it is not advised!). So the process is intrinsically safe as far as the parts are concerned. As long as you stick to mild steel electrodes you won’t plate alien metals onto your gun parts. However, don’t leave parts in the electrolyte for long after you have switched off the current or they may rust again.
Connecting the electrodes the wrong way round will leave a pitted surface on your parts in minutes. Handy for a bit of ageing, but not something you often want!
Will it work on barrels? I have used it on the bores of barrels and on the outsides using either a section of plastic gutter with ends as a horizontal bath, or a section of 50mm pipe a vertical bath, with a length of mild steel rod on which I had placed a number of small ‘O’ rings or elastic bands to stop it shorting onto the barrel. Barrels need quite a long de-rusting because the surface area is large, but it will make the bore much easier to clean out. Of course, the browning on gun barrels is just a form of rusting so that de-rusting will remove it, leaving a matt grey finish. Incidentally pouring boiling water over barrels during browning affects the colour by reducing some of the brown ferric oxide to black ferrous oxide. If you re-brown a barrel that you have just electrolytically de-rusted without thoroughly re-polishing it you are likely to end up with a black brown, which may incidentally be more historically accurate than a modern gingerish browning colour.
How much cleaning do I need to do before de-rusting? Probably none if you are using Caustic Soda as the electrolyte. The electrolyte plus the hydrogen formation will shift any oil and grease pretty quickly and electrolysis will eventually leave a rust free surface.
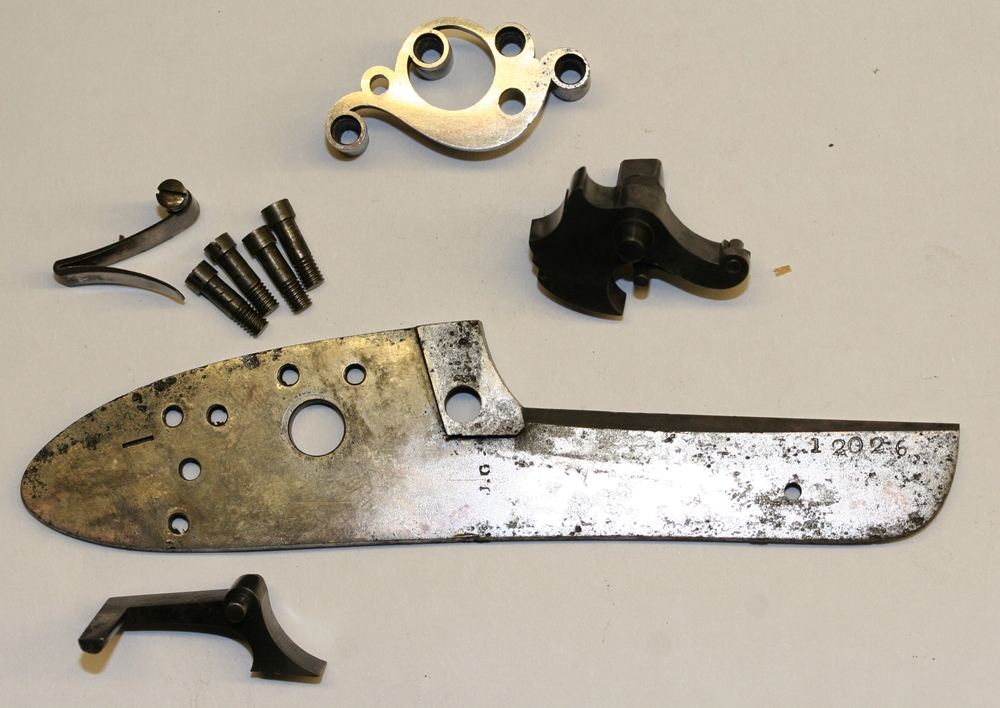
How well does it get into crevices? If left for a reasonable time, the process will degrease and de-rust all the surfaces of a lock if you turn it over once or twice so no one side is always against the bottom of the container. It also appears to de-rust into narrow crevices like the exposed ends of screw threads, rendering them easier to undo, but that is really only my impression. I have found that here is no need to strip or clean locks before de-rusting – in fact I tend to dump most things into the electrolytic bath before examining them, then stripping them and de-rusting again if necessary, but see warning about patina below.
What shouldn’t I use it on? Don’t use it on parts that have components of other metals beside iron or non-stainless steel without a careful trial – gold and silver don’t seem to come to any harm, but if they are held in by rust the fixings may suffer. Remember that electrolytic reduction potentially removes all oxide layers from the surface of the parts. This will include browning and blueing, mill scale formed when parts are let down or hardened, colour case hardening and the grey surface on investment castings as well as the natural patina that forms on gun parts with age. If you want to retain any of these finishes don’t use the process or at least mask surfaces very carefully. In particular, think very carefully before removing the patina, as it needs skill to get back a convincing aged surface, and you could be reducing the value of the gun.
What after-treatment is necessary? Most of the black powdery ferrous oxide should wash off with water when you take the object out of the electrolytic bath, but a brush with a toothbrush or fine brass or very fine steel wheel will remove any bits in crevices. The surfaces are left de-rusted and with no natural oxide protection, so you need to stop them rusting again by whatever steps are appropriate for your future treatment.
How can I dispose of used chemicals? Caustic Soda requires the most care in handling, but pouring it down the sink drain is after all only using it for its intended purpose so no harm should be done. Washing soda can similarly be disposed of but both should be flushed with plenty of water. Don’t dispose of electrolyte that has had stainless steel used in it by flushing as it is likely to be highly toxic – do not make it in the first place!
As I’ve tried to show, electrolytic de-rusting is a very convenient and benign process that doesn’t appear to damage parts, even if you forget about them and leave it running for days. It is fairly simple and doesn’t require any difficult to acquire equipment or chemicals and is very forgiving – I even managed to de-rust small parts using just a 5 Volt D.C power supply giving 250 mA. (1/4 Amp) –an old mobile phone charger- without any additional resistance or bulb in the circuit – it took over 24 hours, but lots of other processes in gun restoration take time! Using a very small supply like this that is intrinsically safe, and ‘cooked’ bicarbonate of soda as your electrolyte in the plastic tray from supermarket food will let you try out electrolytic de-rusting with very little investment!
I’ve even seen it claimed that electrolytic de-rusting can convert any ferrous oxide next to the metal that is in the process of forming rust back into iron on the surface of the metal, but I think that may be going just too far in claiming magic properties for the process – I am happy to rest my case on simple de-rusting!
Electrolytic Derusting – Hydrogen Embrittlement
I thank Geoff Smith for pointing out the dangers of Hydrogen Embrittlement, which I had overlooked in my article. This is a problem that occurs in high strength steels when the surface is exposed to nascent (active) hydrogen – the active part of the derusting process. Hydrogen atoms, being very small, diffuse into the steel and later can form defects that cause the component to fail when subjected to high tensile loads. This process appears not to be fully understood. The problem only occurs in high strength steels, which in terms of old guns limits it to springs in a hardened state, so that barrels, locks, screws, pins and furniture are not susceptible. It is therefore safe to use electrolytic derusting on all parts except springs, and even those should be OK with short process times – less than half an hour with a cool electrolyte to slow down the diffusion. I have never had any problems with springs, even for long derusting so I don’t know if they count as high strength steels, but better to be on the safe side.
Fortunately there is an easy way of ensuring your springs are not embrittled for any reasonable derust time – just put them in the oven as soon as you finish derusting, and bake for 4 to 12 hours (depending on derust time) at 190 to 200oC, – the hydrogen will diffuse out, and the temperature is not high enough to alter the temper – Aga owners may gloat at this point, but please don’t blame me for any ensuing domestic strife.
Incidentally I found after I had written the article that it was possible to buy 30 Volt 2 Amp power supplies on ebay with meters and voltage and current controls that would be ideal for gun derusting for as little as £30.
Safety Information
When handling Caustic Soda wear latex gloves and eye protection. Washing Soda is less aggressive but still avoid skin contact.
When using Caustic or Washing Soda keep concentrations as recommended and ALWAYS add the soda to the full volume of water slowly.
DO NOT use stainless steel anywhere in the electrolysis process as the chromium in the steel can create very toxic chemicals – for safety avoid all metals except iron and plain steel.
Keep a jug of water handy, with a little vinegar added to rinse off hands and parts after immersion.
Use power supplies with outputs isolated from the mains – i.e.laptop supplies or get professional help, and always unplug them before making or breaking connections. Ensure that you have a bulb or resistor in the circuit to limit the current in the event of a short circuit.
Always run the electrolytic process in a well ventilated area to avoid build-up of hydrogen and oxygen.
If using a car battery as your power supply include a 10 Amp fuse in the circuit for protection in the event of a short circuit. A car battery can do a surprising amount of damage if short-circuited.
If you are going to run the electrolysis from a car battery, connect the system to the battery and get it working, and then connect the charger to the battery if required.
Be aware that charging the battery will cause a build-up of hydrogen in the cells that can explode if anything produces sparks. Wear eye protection and old clothes if using a car battery.
Electrical Details
Amps = Volts / Ohms ( I = V/R) or Ohms = Volts / Amps (R = V/A)
Watts = Volts x Amps (P = V/A) or Amps = Watts/Volts (A = P/V)
(‘/‘ means divided by. Power in Watts, Current in Amps, Resistance in Ohms)
The electrolytic cell needs at least 3 to 5 Volts to work properly, and generates a voltage drop of about 3 Volts at low currents, rising at high currents as the electrolyte acts as a resistor and dissipates power as heat.
A current of between ¼ and 10 Amps D.C. maximum is suitable depending upon size of item.
A voltage of 6 to 24 Volts can be used with a suitable resistance or bulb in series.
A 12 Volt bulb of 55 Watts (car headlamp – type H3) will allow a maximum current of about 4 .6 Amps ( = W/V = 55/12) to flow with a 12 Volt supply if the electrolytic cell is shorted, and will represent a resistance of 0.38 Ohms ( = A/V = 4.6/12) when hot (brightly lit). At low currents the resistance will fall to around 1/10 of that, possibly as low as .03 Ohms. A bulb therefore acts as a convenient automatic regulator for the current. Very low output (less than 2 Watts) power supplies may not need a bulb or resistor..
Hi Tim,
Very interesting article on using electrolysis for rust removal. I have a small set up which I use with some of my metal detector finds and it works well.
I am also an antique firearms collector, specialising in weapons used during the Australian bushranging period (1850 – 1880). I have just acquired a very rare .44 cal. Colt Dragoon, 3rd Model percussion revolver. For its age it is in very good condition. However, around the nipple recesses it has rust accumulations which I think ruin the look of this beauty. I am reluctant to soak the whole cylinder in some sort of solution to remove the rust as I am concerned this might damage the patina on the cyliner.
Do you think electrolysis of the cylinder might be the answer?
Thanks in advance for any suggestions you can make’
Best wishes,
Brian Tate
Hi Brian,
Thanks for the interest – I’m going to duck out of a straight answer as I haven’t seen the patina – sometimes it doesn’t change the appearance very much – for instance if you look at the Parr restoration I don’t think I can see any real loss and I didn’t need to do anything to restore a comfortably original look. On the other hand a Sea Service pistol I am about to tackle looks very bare where I did a bit of test derusting on the breech block and I’ll have to refinish it ( it was a bit of a mess so I’m not distraught).
I might paint the cylinder with some resist applied thickly and carefully and try an experimental derust with just the nipple end immersed if that looked feasible. Shellac in methylated spirit/ethanol is my favourite resist – it sticks very well to clean surfaces and is removable with the same solvent – button polish or French polish is the same stuff ( I haven’t tried it in an alkaline solution – I use it for browning resist, so try it out on a test piece – it may be better to use washing soda rather than caustic soda). You should be able to cover all the finish you want to keep.
Sometimes rust is best removed physically using the back of a modelling knife blade – it might at least reduce its impact.
I’m sorry there isn’t one simple answer! Hope this helps nevertheless.
regards
Tim
You are wise to be cautious with such a rare piece – it is easy to spoil things.