December 21st 2020 – The new kitchen is more or less finished and about to be occupied, just in time for Christmas……..
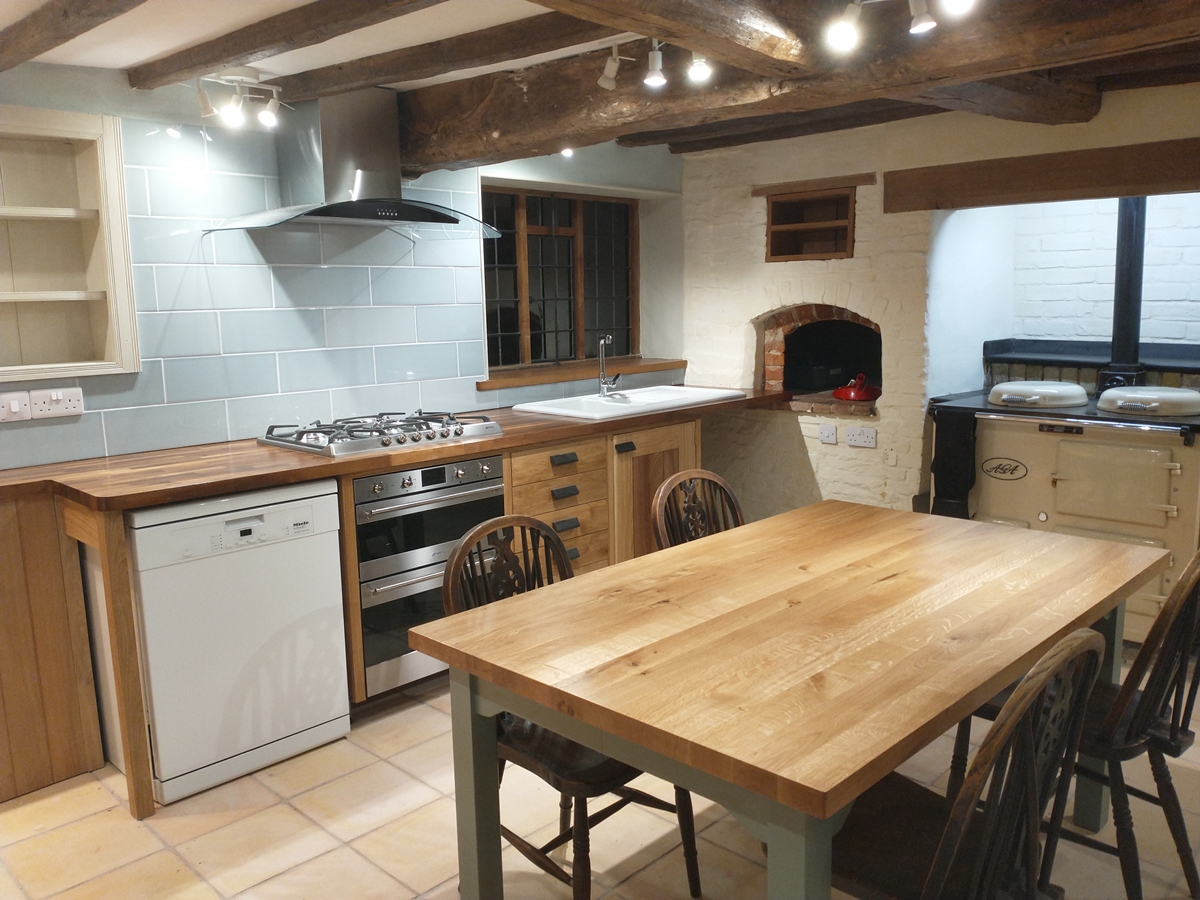
This is probably the last time it will be so uncluttered!
At the beginning of the year I planned to redo our old kitchen – I had done a bit of work on it over the years, replacing the old coal fired range with an oil fired AGA and putting down another layer of vinyl floor over the deteriorating black and red tiles laid on a few dabs of lime mortar directly on to the earth and then coated in self levelling compound about 30 years ago before we bought Cables Farm. I had also patched a large hole in the old lath and plaster ceiling that fell down when Penny slammed the back door,covering everything in a thick layer of gritty dust. Oh and the main sink unit was looking very tired when we moved in 26 years ago and was looking even tireder now, despite my best efforts at trompe d’oile! I got Covid in early March, a week before the lockdown, which laid me out for about 5 weeks and took another 3 months before I was fit enough to do anything useful. I was just about fit for our sailing trip to the Hebrides in late July, and on return I figured that I had better resume ‘normal’ activities – time to start on the kitchen… A bit of planning and I figured I’d make units out of oak with wooden worktops, and of course the ceiling would have to be entirely re- plastered at the very least as quite a lot of it looked as if it would follow the example of the fallen chunk (which I had rather neatly patched!) Obviously the damp and uneven floor would have to be tackled – old buildings don’t work well with any form of concrete slab as they need to breath to prevent the moisture in the ground being diverted to the walls, so a bit of research was called for into breathable floors, obviously incorporating a decent level of insulation. Having got a few basic ideas I started gently on building the unit to hold the sink and a built in oven and gas hob ( I’ve always longed for a gas hob as electric hobs seem too uncontrollable). Having ‘got my hand in’ I decided it was time to get serious, so I recruited Matthew, my son from a previous incarnation, who had been a joiner and worked around buildings for many years. We started on September 7th – Here is the story….
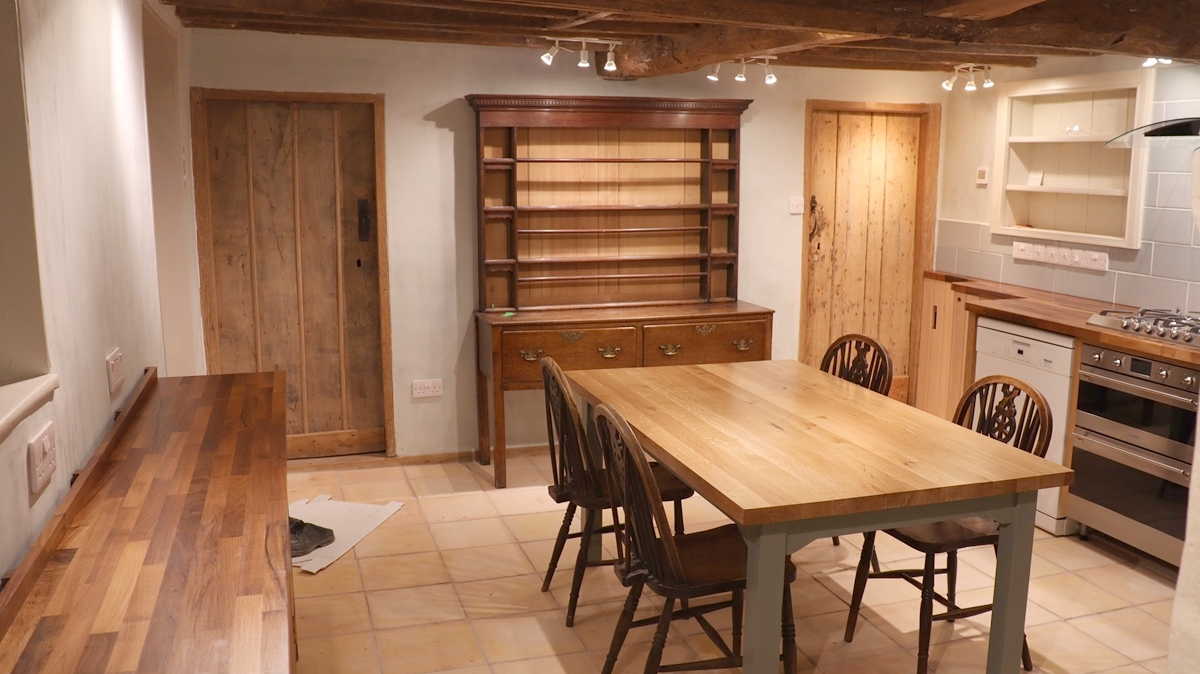
About the design: The basic arrangement of the kitchen is more or less defined by the position of the Aga and the door to the larder and the window on the North wall, so any major rearrangement would be very difficult to imagine – plus it more or less worked, so there was only limited room for change – in the end amounting to moving the water softener from one end of the working area to the other. The ceiling was very low – uncomfortably so both physically and aesthetically so, but without taking the AGA out and lowering it ( a massive job) I reckoned that the best we could do was to lower the floor by about 30 mm. We had always speculated on whether the ceiling beams would be good enough to expose – its a ‘normal’ conundrum in old houses like this – but without having a good look at a number of joists its impossible to guess. We initally thought that it they might not be good enough, and expected to leave them covered – see below but it became clear that they had originally been exposed. We had a vinyl that represented pale square floor tiles and we rather liked the look of it, plus pale yellow tiles and bricks are made using a local clay – Burwell whites. We should probably have got floor tiles from the Burwell Brick company, but when I looked at them some time ago they were too small and too rustic for a kitchen floor so we went with the Norfolk Pamments tiles. There is quite a lot in the room that won’t change with the work – the two leaded windows and the door to the utility room ( elm boards – hand sawn and 19th century or earlier) and the larder door ( pine boards with an old apotopical ‘witch’ mark inscribed by compass – maybe 18th century?) and bread oven (Victorian) that give the room its ‘period charm(!) but we didn’t want to add to the old-worldiness by putting in faux old features, so the furniture and fittings we added were designed to be comfortable to live with and not too ‘kitcheny’ since its a room we spend a lot of time in. Kitchens inevitably get cluttered but we have a decent utility room and a large larder so the intention is to keep things clear, particularly above the level of the worktops. I’m happy that we pretty much achieved our goals – there isn’t much I’d change if I did it again, possibly a smaller, less dominant gas hob, but otherwise I’m very happy with the outcome, and the apparent and real improvement in headroom is welcome.
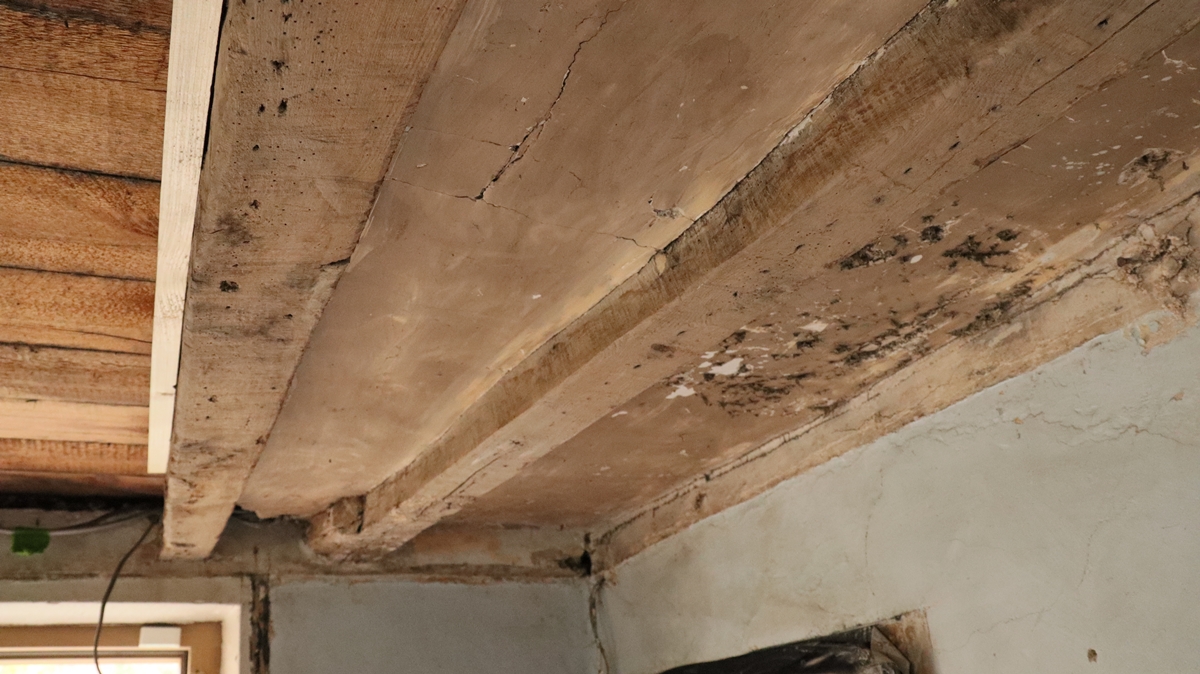
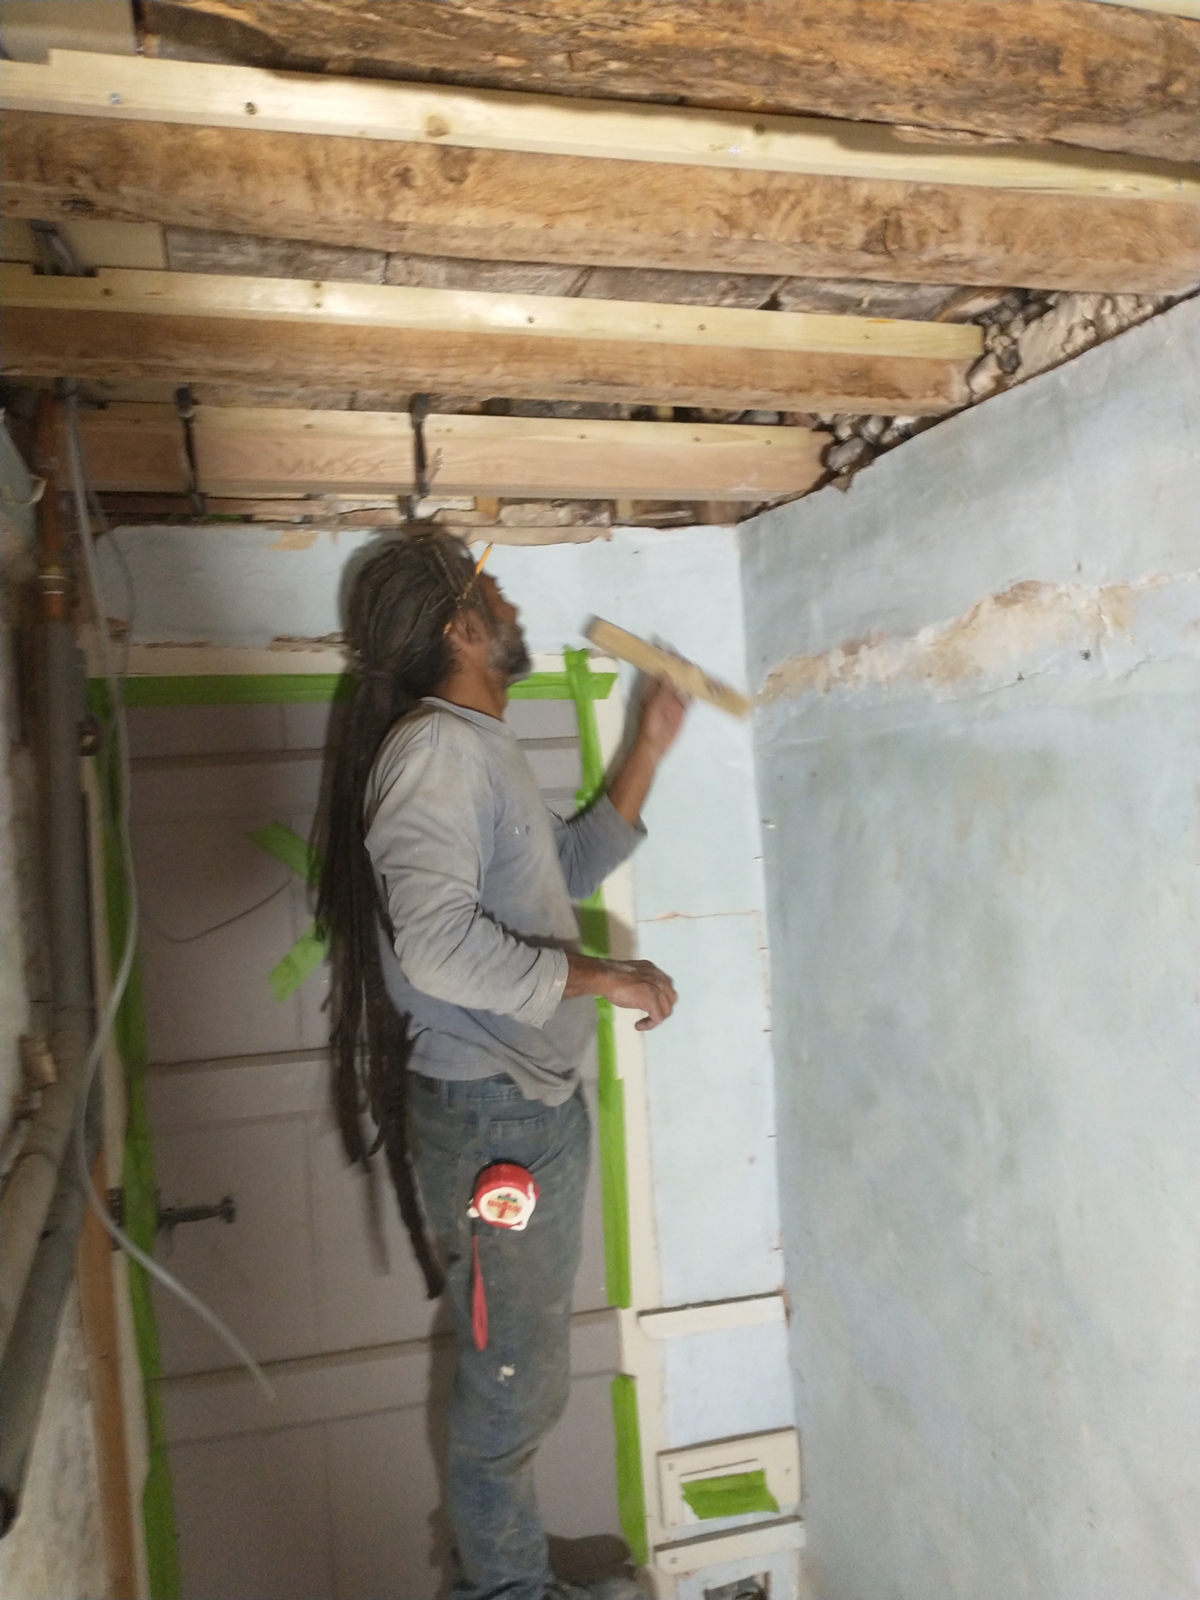
Ceiling : First job after clearing everything out was to take the plaster off the old split lathes so I could replaster. The original ceiling was quite low and the lathes were nailed onto the floor joists above, with the main cross beams exposed below ceiling level. We got all the plaster off, and took out a few laths so we could clean the backs and see what was there. In one corner we exposed a couple of older panels of lath and plaster fixed directly under the floor above and plastered and painted brown. From what we could see, the joists looked in pretty good condition, some being squared and chamfered (so must once have been exposed) and some pretty wavy and rustic. After some discussion we opted to remove all the laths, clean off the joists and attach 1 1/2 inch battens alongside the tops of them and fix short laths to the battens and plaster between the beams, so as to maximise the ceiling height and create an interesting feature. Fixing the laths under the batten edges was accomplished using an electric stapler, although it was still a very slow job re-using the old split laths, cutting them to fit between the joists and stapling each end a couple of times – a job I left to Matthew while I got on with fixing in the wiring for new lighting and getting rid of the old wiring. I then plastered the strips between the joists using lime putty plaster – one coat of ‘coarse stuff’ – sharp sand and lime putty with some chalk and goat hair mixed in – laid on so it extruded between the laths and the extruded bits bent over and held the plaster in place, the hair giving the wet plaster enough strength to stay in place (mostly!) The second coat used plastering sand, lime putty and chalk with no hair and was laid on to form as level a surface as possible. A very thin skim coat of chalk and lime putty was used to level up the second coat plaster when it had almost dried. For the most part the finish worked although in places the surface cracked and needed a further skim to hide the cracks. The plastered ceiling was given 3 or 4 coats of white limewash – water and lime putty to the consistence of milk (it covers a multitude of sins!). Matthew then waxed the joists as they looked a bit dusty. I was a bit skeptical about making them too shiny but they turned out perfect.


Two original ceiling panels from a previous ceiling on the undersides of the original floorboards – before 1850???
Matthew fixing reused split laths
 Quite challenging plastering without getting plaster all over the beams! They look to me to be around 250 to 300 years old.
The Floor: Having more or less finished the ceiling and the falling mess/plaster/limewash it was time to tackle the floor – there are a couple of firms specialising in flooring for old houses that use lime instead of cement based concrete – its called limecrete and isn’t as strong as concrete but is adequate for floor slabs laid on a firm foundation. Two firms specialise in the materials, Mike Wye and Tyn Mawr. We used Mike Wye although they are both similar. The basic floor insulation is provided by foamed glass (Geocel) supplied broken into chunks about 30 mm mesh and tamped down with a whacker plate to a depth of 150 to 200 mm, followed by a limecrete screed of 80 mm , followed by the tiles. We wanted to drop the final floor level by 30mm from its original level so we ended up digging out the old floor to a depth of around 350 mm – generating 4 trailer loads of spoil – kindly taken away by our farmer neighbour after being shovelled and barrowed out by Matthew – probably more than 10 tonnes judging by how much sand went into the limecrete! Having dug out the floor to something approaching a level – all very compacted earth – we laid a patch of wine bottles in the centre as supplementary insulation, blinded them with sand, laid down plastic conduit for cable runs and put down a permeable membrane to receive the Geocel foam glass. We had very little joy with the hired whacker plate as the Geocel won’t bond and just kept moving around – in the end we put a another membrane on top and ran the plate over that, which did improve things a bit. We had been intending to put electric heating wires onto the Geocel layer, but this was clearly not practical, so we laid the first limecrete screed of about 75 to 80 mm thick, levelled from a laser datum. We left that for a couple of weeks to dry, then laid out the in-screed 105 metres of electrical heating wire fixed into plastic strips precariously bonded to the very friable limecrete surface with fix-all. The heating was calculated to give around 140 watts per sq m. We laid 2 inch battens on edge on the first screed as a guide for leveling the second screed – which was therefore laid to about 50mm and finished pretty level – probably to within +/- 2 mm over the floor. This took an age to dry – 2 to 3 weeks while we got on with leveling the walls and decorating , fixing services and a long list of odd jobs, including Matthew laying a French drain along the outside North wall. I ordered the clay pamments in February from Norfolk Pamments Ltd – hand made by a small mother and daughter business in Norfolk in a very pale white/yellow clay 12 x 12 inches by about 24 mm thick. They are somewhat uneven in size and some are a bit convex underneath as we discovered later. In order to keep the floor permeable we had to avoid cement (OPC) in fixing the tiles (modern tile adhesive is impermeable and so not suitable) and so we used a lime/kiln dried sand mix with a bit of lime putty for workability. Our main problem was that the dry floor and the very permeable pamments sucked the water out of the mortar almost instantly, making adjusting the position of tiles very difficult after a few seconds. We soaked the floor and wetted the pamments but only towards the end did we hose down the pamments repeatedly before bringing them into the kitchen. Once dried I carefully walked on all the tiles, and discovered about 10 where the tile was so convex that it sat on a mortar pad in the centre and rocked – these were taken up and less bent tiles relaid. We decided that, once dry, we could afford to use a modern grout, even if it wasn’t permeable as it only accounted for a small area. During drying the tiles went through a nice range of colours, pink, deep yellow and back to pale yellow/white. Suffice to say that when finished the floor looks fantastic! Before grouting, and again afterwards I sealed the tiles with a natural, breathable seal – Natural Finish Stone Sealer from Eco Protec. Since we started using the kitchen I’ve noticed how much warmer the floor is because of the Geocel insulation – I tested the underfloor heating, and it raises the temperature measured in the slab at a rate of about 1 degree an hour, with the surface temperature rising with a bit of a delay, and the slab seems to loose heat quite slowly – the heat input to the approx. 12 sq meters covered by the heater is only 1.6 KWatts so I think it will work perfectly as a storage heater charging overnight on cheap electricity – although given the additional insulation in the floor, the AGA does a pretty good job of keeping the room warm.
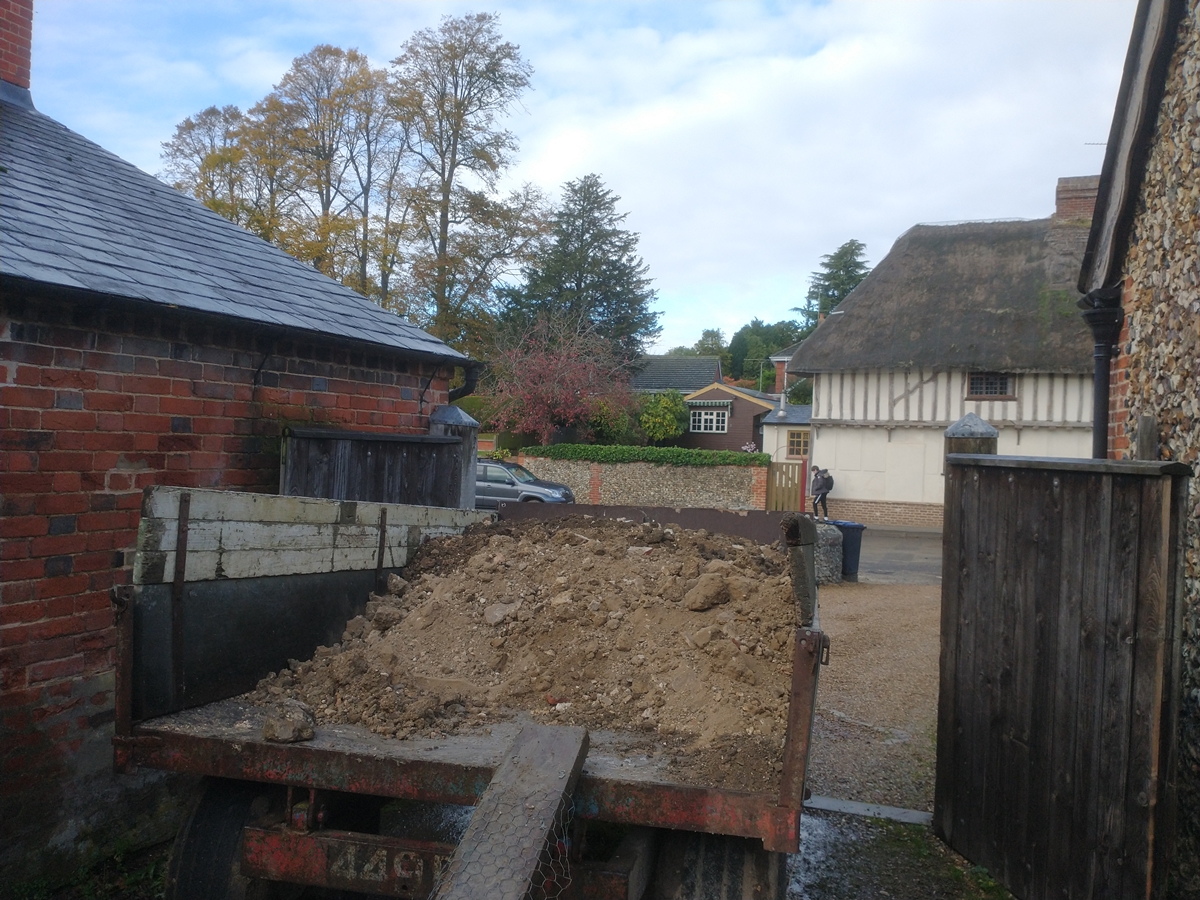 Part of the 10 tons of earth removed from the floor.

Wine bottles for extra insulation !

First screed laid.
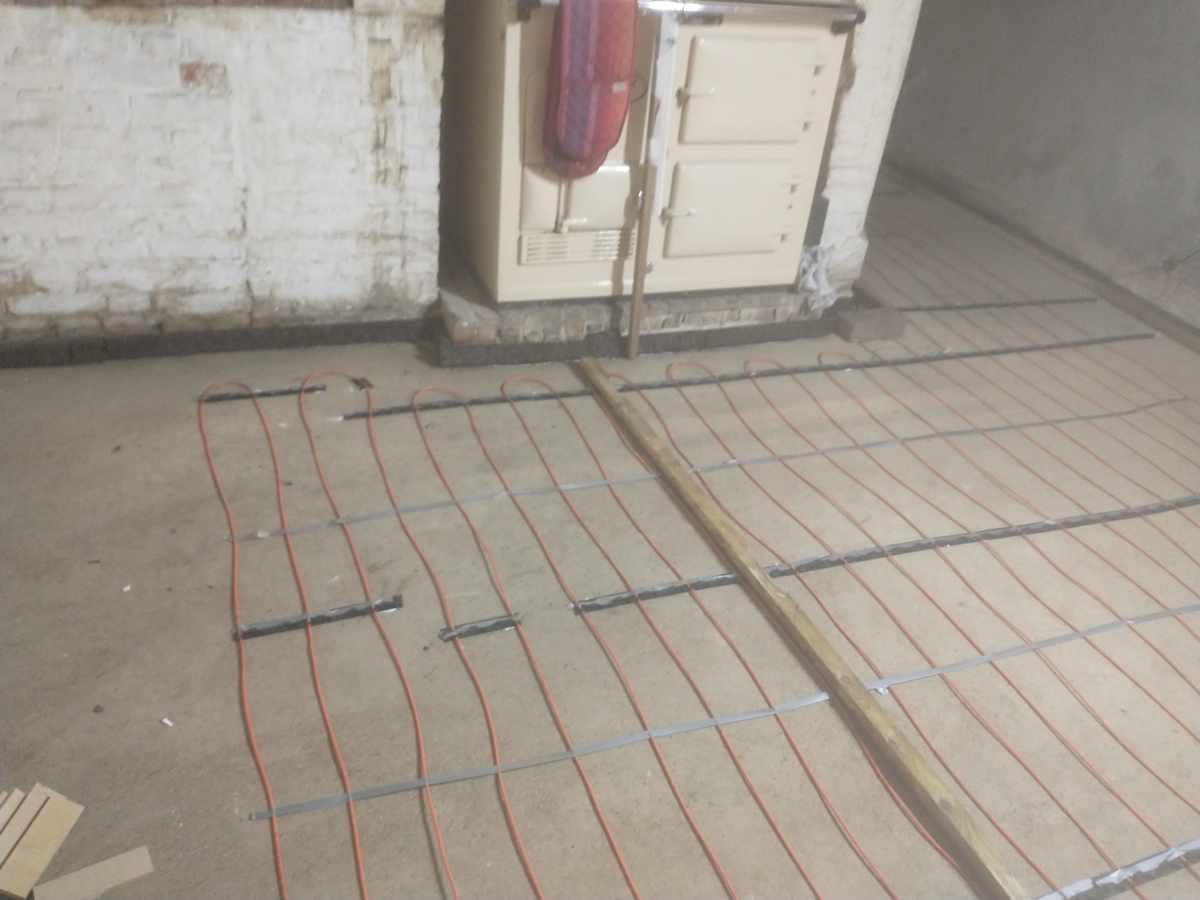
Underfloor heating cable plus battens for levelling next screed
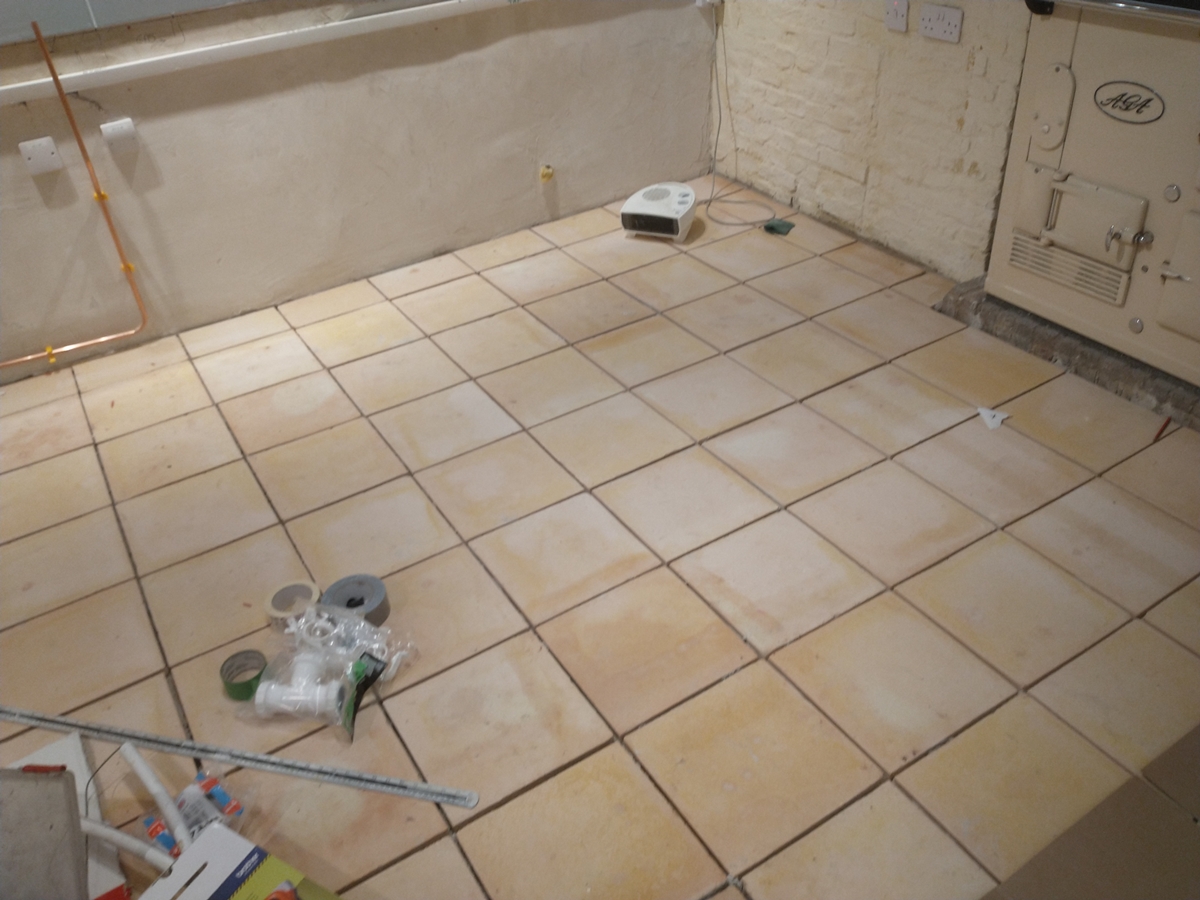
 Penny says the Norfolk Pamments look just like the vinyl that used to be on the floor!
The Walls: The walls were not straight or flat and had texture on them where a previous finish had been partially removed – however I had put a number of coats of limewash on years ago and it had made a very hard and stable layer that was almost impossible to remove. The wall I wanted to tile had to be straight and level so that was leveled up using a modern lime based plaster called R50 that turned out to stick to almost any surface and was easy to use to level the tiled area and also repair some dodgy bits of wall that had been hidden behind the sink unit and were wet and crumbling. I had to replaster some areas of exposed lath using lime plaster, and on the ‘textured’ plaster walls I used a very thin skim of fine filler to hide the texture – not more than about 1/2 to 1 mm maximum. The walls were then given half a dozen coats of limewash that I tinted using acrylic artist’s paint (cobalt blue, yellow ocre and phalos green) – its vital to mix the pigments thoroughly in tap water before adding to the limewash as the alkali in the lime prevents the pigment from disersing as it reacts with the paint medium, causing specs of pigment to come out in the brush strokes. As a guide I generally mix pigments in quantities of 5 to 10 grams to add to 4 litres of limewash, its always possible to add more (dissolved) pigment but if you are not careful you will end up adding more limewash and have enough to paint the Forth Bridge. Limewash is a vastly under-rated finish and costs almost nothing – a £10, 25 Kg tub of lime putty will make at least 100 litres of limewash! At one point Matthew put on rather a lot of lime in his limewash (my fault) and so the final finish is a bit streaky, which I rather like so I haven’t tried to rectify it. I spent a long time messing around to get the right white for the bits of woodwork – window cills and wooden corner strips, and eventually settled on Farrow and Ball Shaded White, although I think maybe a bit more black in it would be better!

The problem with the walls was mostly due to previous patching with gypsum plaster or strong cement – both WRONG!
The Services;- The lighting in the kitchen was horrible – basically a striplight in the centre of the room – so something had to be done – choosing light fittings for such a low ceiling is difficult as you need a good spread of light in the working areas. After a bit of thought and hours looking at unsuitable fittings, I came across some fittings in IKEA that had 3 G10 spotlight bulbs in each fitting that could be controlled by the IKEA remote system. I have to admit that the price of the TROSS fittings (£7 each) was an added attraction and the sample I bought was so well made that I ended up buying 9 fittings and putting them around the kitchen – using 5 W LED bulbs that is 145 Watts of LED light! The plan, so far not fully implemented, is to use a combination of static 120 degree bulbs and 30 degree remote controlled bulbs so that the lighting can be adjusted by remotes but the wiring is kept very simple – all the lights are on one circuit. The power circuits were half on one consumer unit and half on a very old original one, so they were rationalised onto the newer one and circuits added for underfloor heating.
The plumbing was similarly chaotic, and the new plan involved moving the water softener (essential as we have a heatstore cylinder) so that was redone for the softener and sink – I enjoy a bit of plumbing!
The extractor fan was challenging as there was barely enough height to meet the regulation height above the work surface – in the end the hole through the wall is touching the floorboards above – just fits! I went for a cheap Electriq extractor from Appliance Direct as all the possible models were exactly the same dimensions and noise levels, so I guessed they all had the same components inside, even fairly expensive ones. The first one arrived with the glass broken, and they didn’t want the rest back so I now have a set of spares!
The gas hob necessitated a couple of propane cylinders and a changeover switch outside and a 15 mm copper pipe through the floor screed. I have yet to get it finally connected and build a box outside for it.
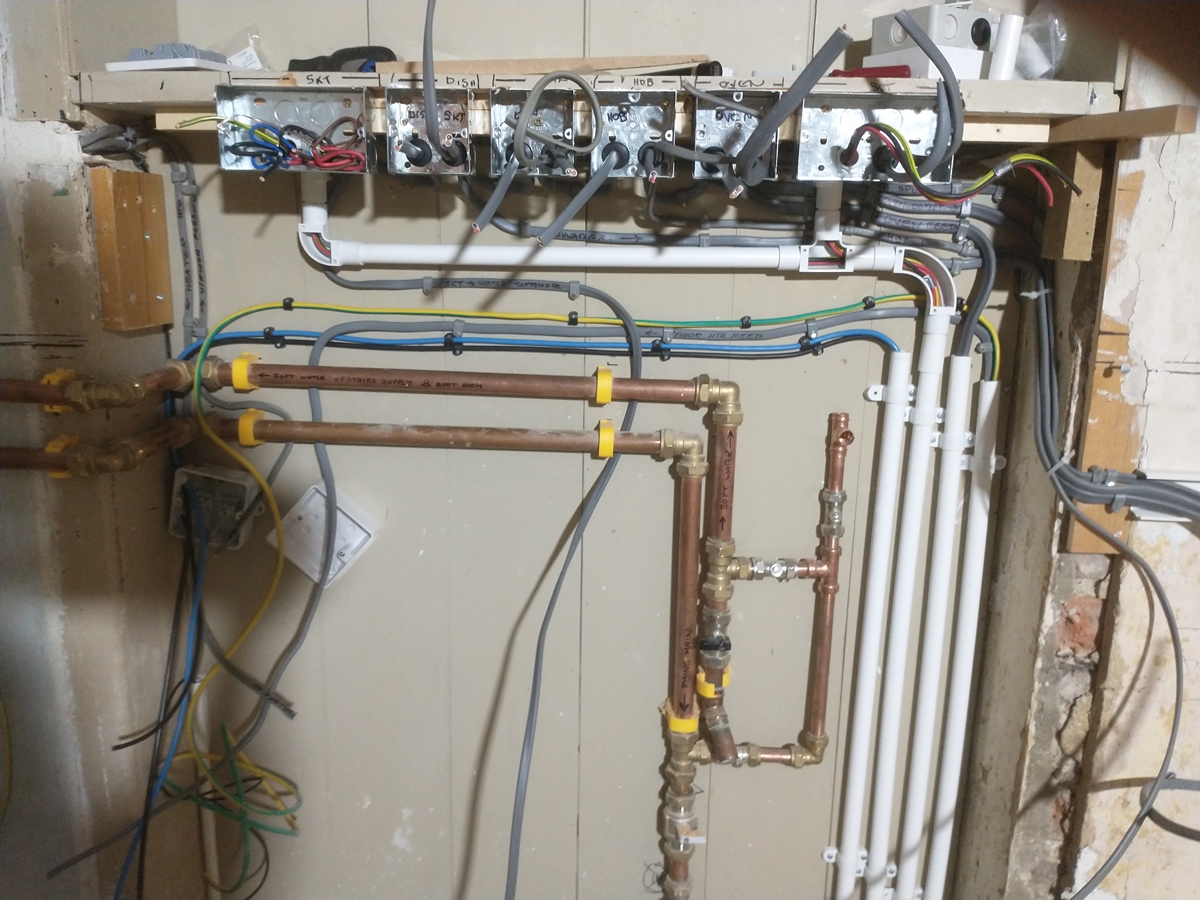
And it all worked!
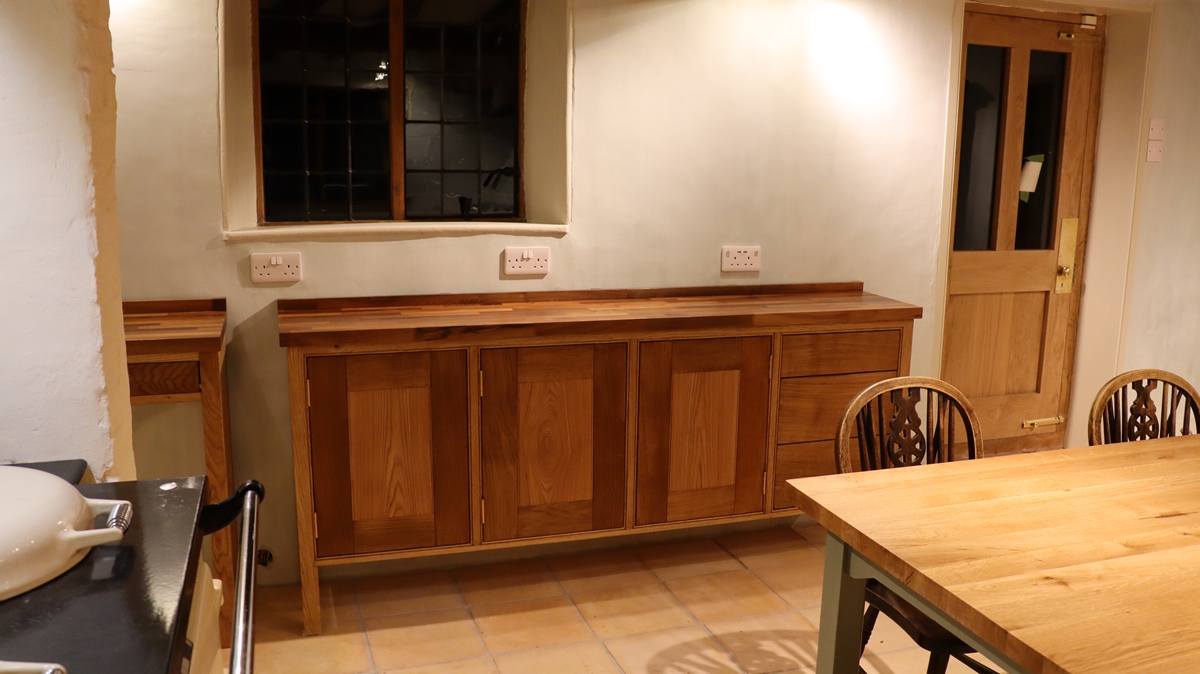
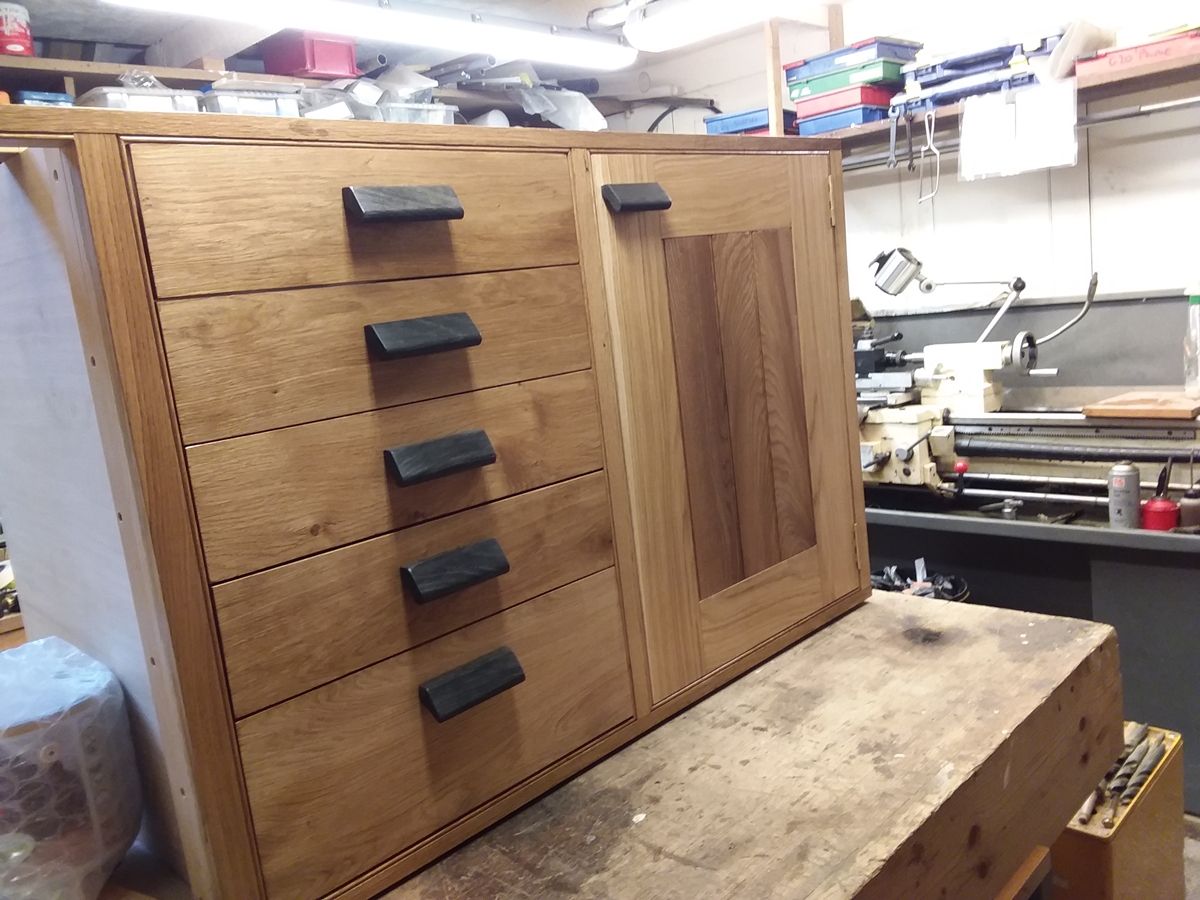
The furniture;- I wanted to avoid kitchen units made of MDF in some monotonous tone, so decided that it would be nice to make them out of oak, with slightly darker tops of black walnut ( which we had used in Giles’s kitchen). I had a store of various old oak salvaged from goodness knows what bits of furniture, and my friend Richard, a local carpenter/joiner had a large stock of very good quality 18 mm ply in large offcuts left over from job. So my basic design involved a carcass of 18 mm ply – massively heavy – with oak framing and oak doors and drawer fronts. I had to buy a couple of 200 x 50 x 3.4m kiln dried oak boards for the framing and legs (£217 – but I’ve got half of one left over) but the rest is all reused wood. When I came to make the door under the sink I planed up what I thought was a nice bit of oak for the door panel, only to discover that it was elm, with a beautiful figure. ( it had been a draining board in a darkroom in the Geodesy and Geophysics Department at the University – I had acquired it when the building it was in was demolished in the 1960s) . I made the handles out of bog oak, a typical fenland wood from trees that have laid for thousands of years in fenland bogs – I had a few bits I had bought at a sale of timber 20 years ago. Later on I got Matthew to build a more or less matching sideboard for the other side of the room, similarly out of reused wood and we wanted to put elm panels in all 3 doors – since Dutch Elm Disease killed all the trees its very difficult to get elm and I got laughed at by several timber merchants for asking. I eventually sourced a beautiful old plank of elm on Ebay for £85 that made 3 panels with perfect grain patterns – its lighter than the surrounding oak frames but looks fantastic. All the timber for the drawer carcasses came from an enormous hoard of cherry shelving recovered from the refurbishement of Homerton College library, which also made some of the panelling under the worktop. The window cill of 1 1/2 inch oak came from some table tops salvaged from an Oxford college some 35 years ago, and the back Matthew put in the top of the antique dresser came from the back of an old cupboard from the Zoology Department – all of which has run down my stock of salvaged timber to a sadly low level. My old second hand radial arm saw and planer thicknesser earned their keep on this job as always!


The Bottom Line:- Penny and I didn’t have a firm budget for the job as the priority was to make something that we were happy with – we’re not extravagant by nature so it is a fairly safe technique! The overall cost of the materials, wood, appliances and sundries was a smidgen over £10K although I am prepared to accept that I might have missed off a few expenses I can’t trace. The biggest area of expense was the flooring materials, pamments (£2433.00), grout and tile sealant and heating cable, in total about 45% of the direct cost. The solid wood worktops and table top accounted for around 15%, as did the appliances. The remaining 25% covered ceiling materials, plumbing and electrics and lighting and everything else, including loads of small Screwfix bills for bits and pieces. The materials for the furniture apart from the worktops was almost all reused from old oak furniture I had salvaged over the last 30 years and 18 mm ply offcuts my friend Richard gave us and cut to size and biscuit jointed for us – total spent on (new) wood was less than £300. The whole job, minus the building of the sink unit that I did before Matthew started on the project, took the two of us 15 weeks from start to finish, We each had a couple of days off – Matthew worked a 5 day week, I worked 5 or 6 days a week if there was stuff I needed to do to prepare for the next week. Given the Covid situation Matthew and I tried to work separately, at least at opposite ends of the room with a through air current between us, or with one of us working inside while the other worked outside. It’s difficult to pinpoint where the most time was spent, but the floor took a long time to dry at each stage so it spread over a large part of the project. Not surprisingly the ceiling was also a long job. If you assume that Matthew and I together would have charged around £300 a day if we were being paid ( pretty much the standard trade rate for a similar two man team round here) then the labour would have cost around £25K, making it a £40K minimum kitchen revamp at commercial rates!
Hi Tim: a brilliant job and all done while recuperating from covid too. Judith and I are truly amazed. Now if you are feeling up to another challenge, we might have a kitchen in Yorkshire that would benefit from your careful attentions! We wish you both a wonderful 2021. Phil & Judith.
Looks magnificent. Well done the team. Would you like to come and start on Green Lea? We will start preparing the extra insulation now! Best for 2021 Judith and Phil
It is brilliant. What a lovely job you and Matthew have done. Penny is, I am sure, thrilled with it.
Happy New Year – Jennifer and Graham
Looks good after a lot of hard work Tim. Well done to complete before Christmas which I hope treats you and the family well and all the best for the coming year. From New Zealand, Merry Christmas, Rod.
Thanks Rod,
Good to hear from the far side of the world. Hope you have a good new year and miss some of our little problems!
Tim
Beautiful kitchen. Definitely the right decision on the ceiling. Looks great! Enjoy!
Thanks John,
I’m pretty pleased with the ceiling – can’t stop looking up while I’m sitting down!
Thanks for your interest.
Happy New Year.
Tim
Congratulations Tim and Matthew. A lot of hard work, but well worth it. The kitchen looks fabulous.
I bet Penny is very pleased with it and the fact that it is finally finished!
Thanks Bev, It was Penny’s Christmas present! She is pretty pleased. Finished (gas hob finally tested and working) at 4 p.m. on Christmas Eve. Happy New Year.
Tim